

Trying to set up a WordPress project inquiry form for your business?
With the project inquiry form template in Gravity Forms, you can easily set up a form for your agency, freelance website, or any other type of business.
Creating a dedicated project request form brings structure to the process and has benefits for both you and your customers:
- Business/agencies – it saves you time, better qualifies leads, creates a more consistent intake process, and helps you collect important data that you need.
- Customers – it gives them a clearer way to communicate their needs and can lead to faster responses and more accurate quotes. It also sets expectations early on so that the customer can figure out if your agency is a good fit or not.
While the default use case for this Gravity Forms template is WordPress agency projects, you could easily adapt it to other use cases, including non-agency projects.
Below, we’ll explain some of the key features of the template and show you step-by-step how you can set it up on your own website.
We’ll also cover some optional enhancements that are unique to Gravity Forms, such as using Gravity Flow to build custom workflow automations to streamline the entire project inquiry process.
Key features of the project inquiry form template
While the project inquiry form template is fully customizable, it already includes most of the essential features that businesses need:
- Essential project data fields – the field makes use of smart drop-downs and checkboxes to collect important project details in a structured way, while still providing open-ended options for customers to describe their projects.
- Full control over all form fields – you can fully customize the template, including adding, editing, or deleting fields as needed.
- Multi-page support – if your form feels a little long, you can easily break it up into multiple pages to create a more user friendly experience for your clients.
- Conditional logic support – you can also use conditional logic to optimize your form. For example, only displaying certain fields if a customer indicates that those fields apply to their project.
- File upload support – you can let customers upload files to the form, including controlling the number of files that are allowed and the allowed file extensions.
- Email notifications – you can automatically send an email to clients after they submit their project inquiry with more details about the process. You can also send emails to yourself and/or members of your team to notify yourself of the new project inquiry.
- Works with other Gravity Forms integrations – you can enhance your form with other integrations, which gives you a lot of flexibility. For example, adding customers to your CRM, integrating with project management software, receiving Slack notifications, saving files to the cloud, creating automation workflows, and much more.
You can see a live preview of the project inquiry form template here.
How to create a WordPress project inquiry form
Now, let’s get into the step-by-step guide on how to set up a WordPress project inquiry form using Gravity Forms.
We’ll cover the required steps, along with some optional enhancements that you can make to customize the form to your own unique use case.
1. Install Gravity Forms and any necessary add-ons
To get started, you’ll need to install and activate the core Gravity Forms plugin, if you haven’t done so already.
If you don’t have a license yet, you can purchase your Gravity Forms license here.
The core plugin is all that you need to use the basic project inquiry form template. However, there are some optional scenarios in which you might want to install one or more add-ons to add more functionality to your form.
For example, if you want to automatically sync contacts to your CRM when they submit a project inquiry, you need a CRM add-on.
If you do want to install some add-ons, you can do so by going to Forms → Add-Ons in your WordPress dashboard.
Feel free to skip installing add-ons for now – you can always come back and install some add-ons after we cover some example use cases in the tutorial.
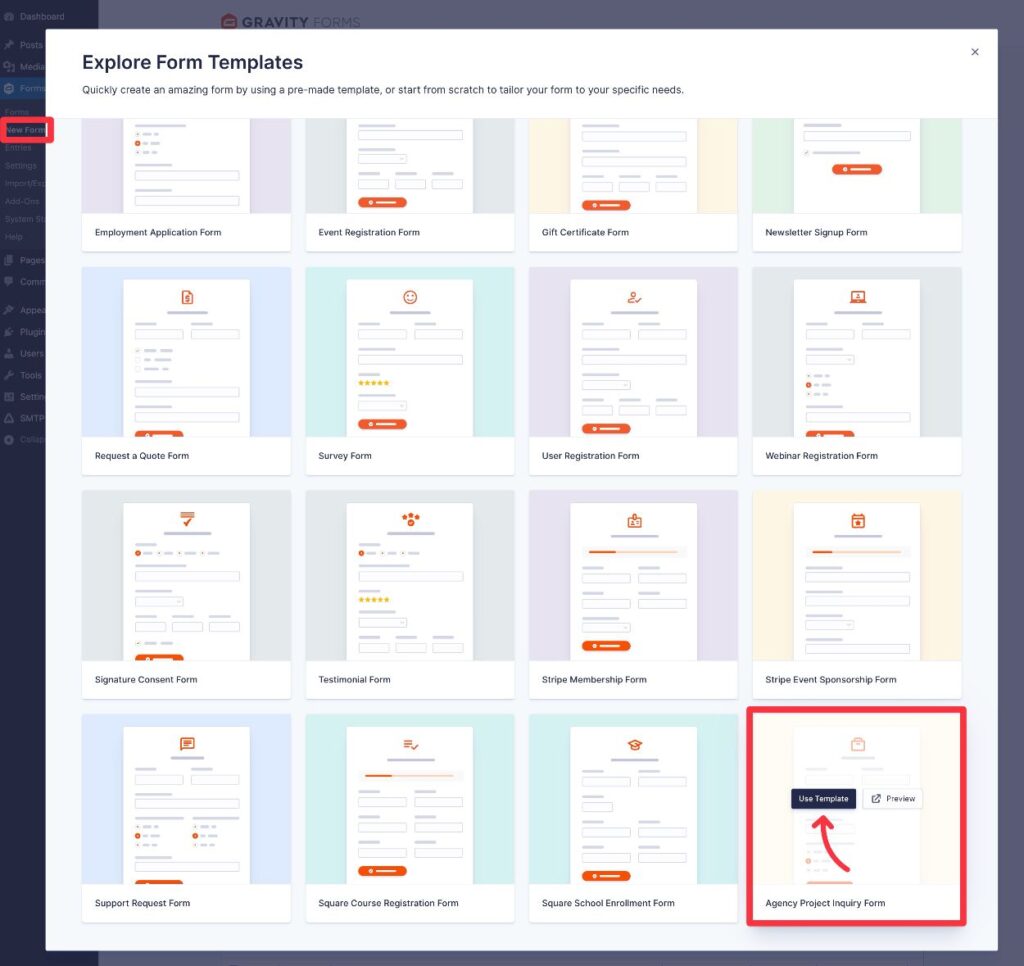
2. Create a new form with the project inquiry form template
Once you’ve installed Gravity Forms, you can jump straight into creating your form using the project inquiry form template:
- Go to Forms → New Form in your WordPress dashboard.
- Find the Agency Project Inquiry Form template in the list of available templates.
- Hover over the template and click the Use Template button.
- On the next screen, give your form a name and an optional description. Then, click Use Template again.
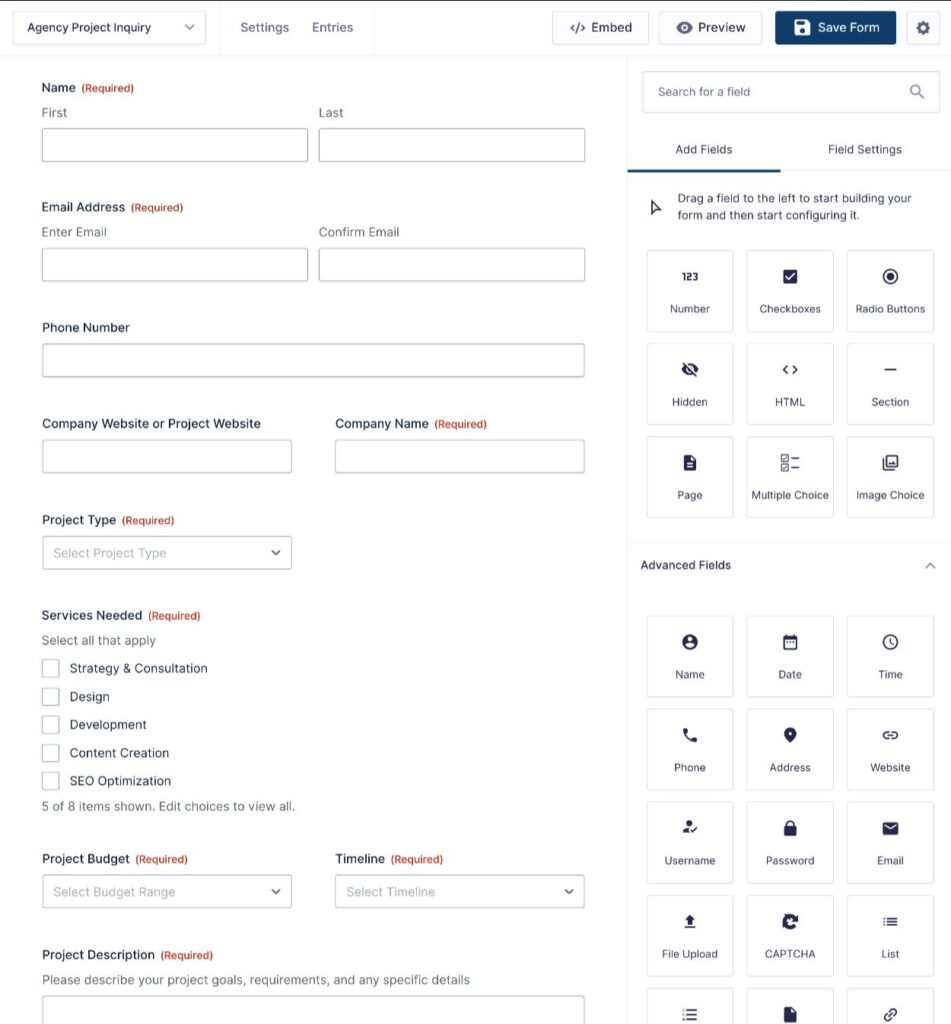
3. Customize your project inquiry form as needed
Now, you’ll be in the Gravity Forms drag-and-drop form builder interface.
Here, you’re free to fully customize the template as much as needed, including the following:
- Editing all of the default fields that are included in the template.
- Adding new fields to collect additional information about clients’ projects.
- Deleting any of the included fields that don’t apply to your use case.
You’ll want to pay special attention to the fields for Project Type, Services Needed, Project Budget, and so on, as you’ll typically need to adjust these to the particulars for your agency. However, we recommend considering all of the fields.
By default, the template uses a single-page approach. However, if you make the form longer, you might want to consider breaking it into multiple pages.
You can do this by adding the Page field where you want each page break to be.
You can also add conditional logic to show/hide certain fields depending on how a client answered previous questions. This can be another great way to keep your form as short as possible, while still collecting all the information that you need.
Once you’re happy with your form itself, make sure to click the Save Form button in the top-right corner.
4. Set up email notifications and confirmation messages
Now, it’s time to get into some of the backend settings of your project inquiry form, starting with two core Gravity Forms features:
- Notifications – this lets you send one or more emails triggered by someone submitting the form. You can send emails to yourself, your team members, the person who submitted the form, and/or anyone else.
- Confirmations – this lets you show a message to a person after they submit your form, or redirect them to a certain page.
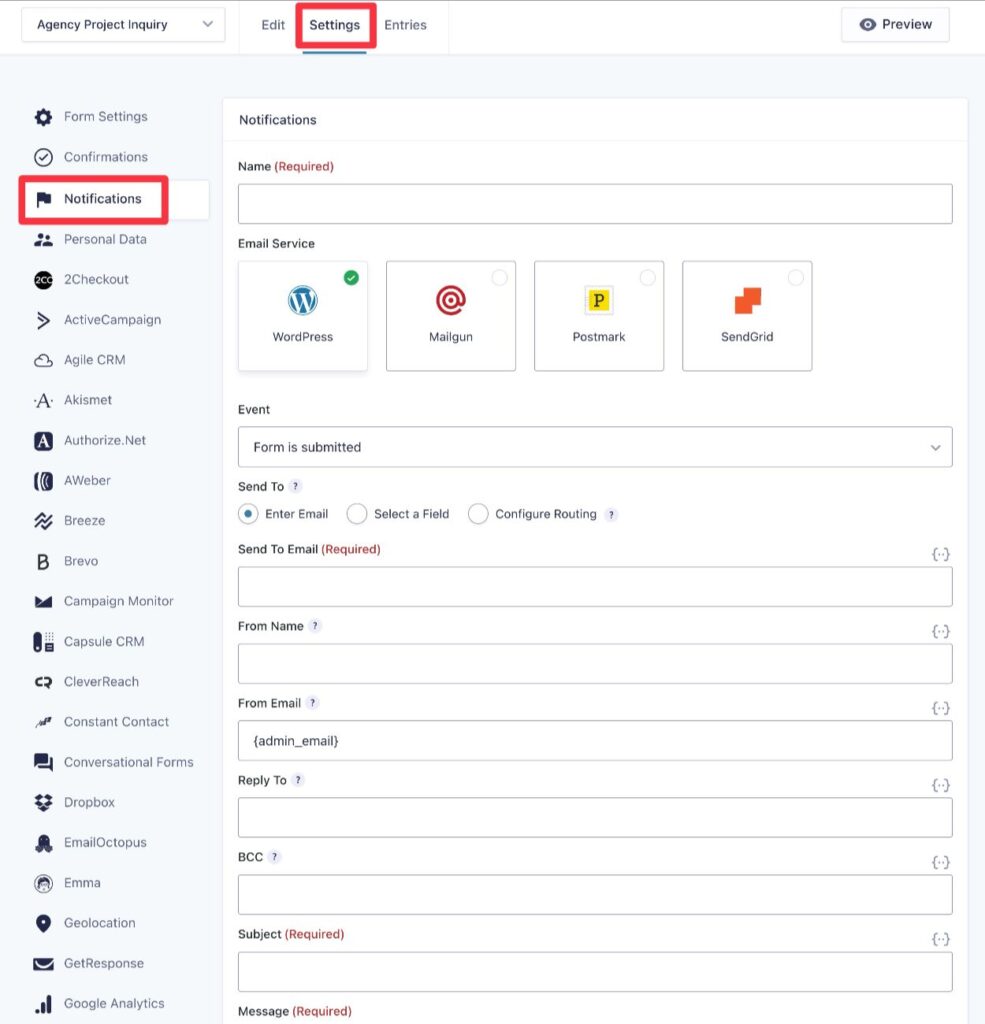
Notifications
To create an email notification, go to Settings → Notifications in the form editor.
A couple of notes here:
- You can create as many email notifications as you want, each of which can be sent to different people, have different settings, etc.
- You can use conditional logic to only send a notification if certain conditions are met. For example, you could send an email to different email addresses depending on how a person filled out the form.
To make sure emails make it to users’ inboxes, you can use the SMTP integrations for Gravity Forms or an all-purpose SMTP plugin like Gravity SMTP. Check out our ultimate Gravity SMTP guide to learn more.
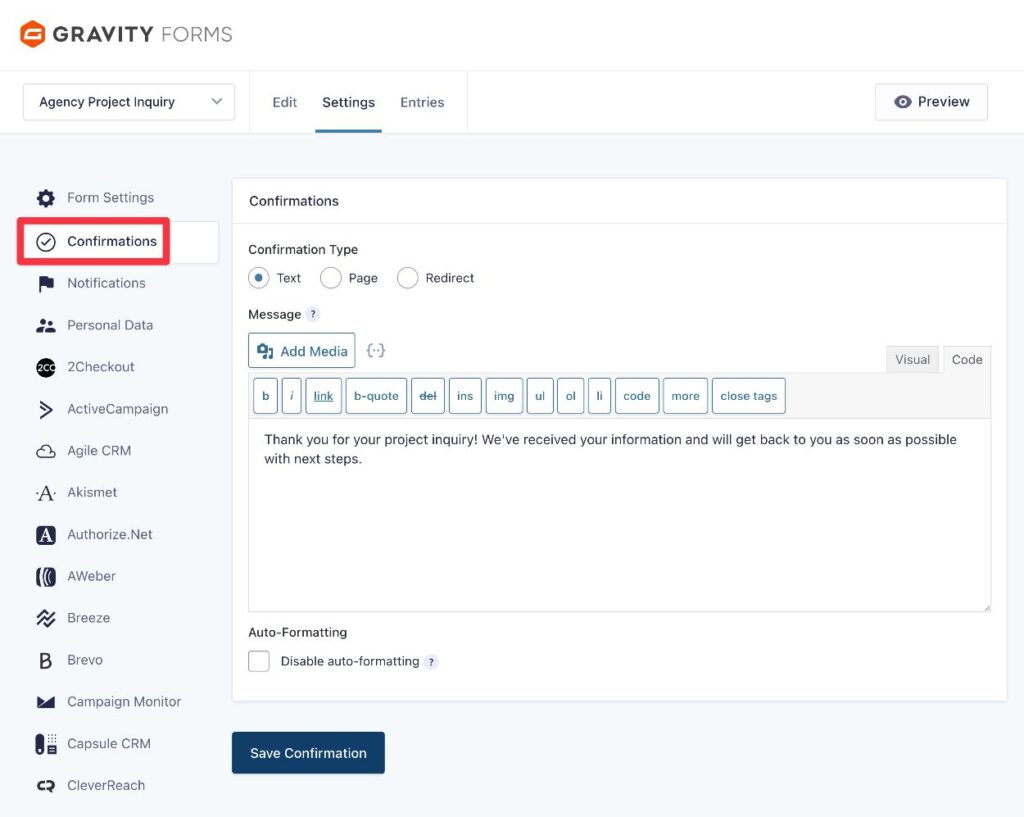
Confirmations
To create a confirmation, go to Settings → Confirmations in the form editor.
When creating a confirmation, you can choose between different types. As with email notifications, you can also create multiple confirmations and use conditional logic to control when to show each confirmation.
Typically, you’ll want to use your confirmation messages to:
- Thank the potential client for their submission.
- Share next steps for how you’ll respond to their project inquiry.
- Give a rough timeline of how long the process takes, so clients know when to expect a response.
5. Integrate your project inquiry form with other services (CRM, project management, and more)
Another advantage of using Gravity Forms for your project inquiry form is that you can take advantage of the many official and community add-ons that are available for Gravity Forms.
You can use these add-ons to integrate your form with additional services that your business might be using, such as your customer relationship manager (CRM), project management software, etc.
In this section, we’ll go over a few examples to give you some ideas of what you can do. However, these are by no means the complete list of what you can accomplish.
Additionally, all of these integrations are 100% optional. It really just depends on your specific use case and goals for your form.
Add contacts to your CRM
One of the most common integrations for a project request form is automatically adding contacts to a CRM after they submit an inquiry. This can help you with sales, marketing, and customer service.
Gravity Forms offers direct integrations with many popular CRMs, including the following:
You can also integrate with other CRMs using the Gravity Forms Zapier Add-On, which lets you use Zapier as an intermediary service between your forms and any one of the CRMs that Zapier supports. Or, there are also a number of community add-ons that offer additional direct CRM integrations.
While the specifics will depend on the integration, you can generally set up the following types of functionality:
- Automatically create a new contact or update an existing contact whenever someone submits your project inquiry form.
- Map fields from your form to fields in your CRM, including support for custom fields.
- Add tags to a contact.
- Assign owners, add tasks, etc. (depending on what your CRM supports).
- Use conditional logic rules to adjust behavior based on how a person fills out the form. For example, adding a different tag or assigning a different contact owner.
Save files to cloud storage
The Gravity Forms project inquiry form template includes a file upload field that lets potential clients upload files as part of their request. These files will be saved on your WordPress site’s server and accessible via the WordPress dashboard.
However, you also might have situations in which you want to save a potential client’s files to your cloud storage service.
Gravity Forms offers its own Dropbox Add-On that lets you automatically upload files to your own Dropbox account. You can also integrate with additional storage services using the Gravity Forms Zapier Add-On or third-party community add-ons.
Create tasks/projects in your project management software
Another useful integration is setting up a task in your project management software. For example, you might want to create a task to manage responding to the project inquiry and providing a quote.
Gravity Forms offers its own add-on for Trello, and you can find third-party community add-ons for other project management platforms. You can also use the Gravity Forms Zapier Add-On to connect to other platforms through Zapier, or the Gravity Forms Webhooks Add-On to connect to tools that support incoming webhooks (such as Airtable or Notion).
Set up new project notifications via other channels
The core Gravity Forms plugin lets you send email notifications when someone submits a project inquiry.
However, you might want to receive notifications via other channels, which could be especially important for time-sensitive projects.
Gravity Forms offers its own add-ons for some other notification channels:
- Slack Add-On – receive a Slack message whenever there’s a new project inquiry.
- Twilio Add-On – receive an SMS/text message whenever there’s a new project inquiry.
You can also use the Zapier Add-On or Webhooks Add-On to receive alerts via other channels.
6. Create business process workflow automations with Gravity Flow (optional)
If you want to go even further with automating your project inquiry form, you can also consider setting up complete business process workflow automations using the Gravity Flow plugin, which comes from the same team behind Gravity Forms.
Gravity Flow lets you build automation workflows with 40+ different action steps, including things like approvals, rejections, assignments, payments, and more.
Here’s one example of what you could do, though this is just scratching the surface:
- When someone submits a project inquiry, assign a task to yourself (or a member of your team) to provide a quote.
- Once the quote is provided, send the inquiry back to the client for approval of the amount.
- Once the client approves the amount, collect full/partial payment from the client as part of the workflow.
- Once the payment is processed, create a task in your project management software to get started on the project.
Basically, if you want to go beyond just accepting project inquiries and get into actually automating all the business process workflows associated with new client inquiries, Gravity Flow is a great option to consider.
7. Embed your project inquiry form
Once you’re finished setting up your form, the last step in the process is to embed the form on the frontend of your site so that potential clients can start using it.
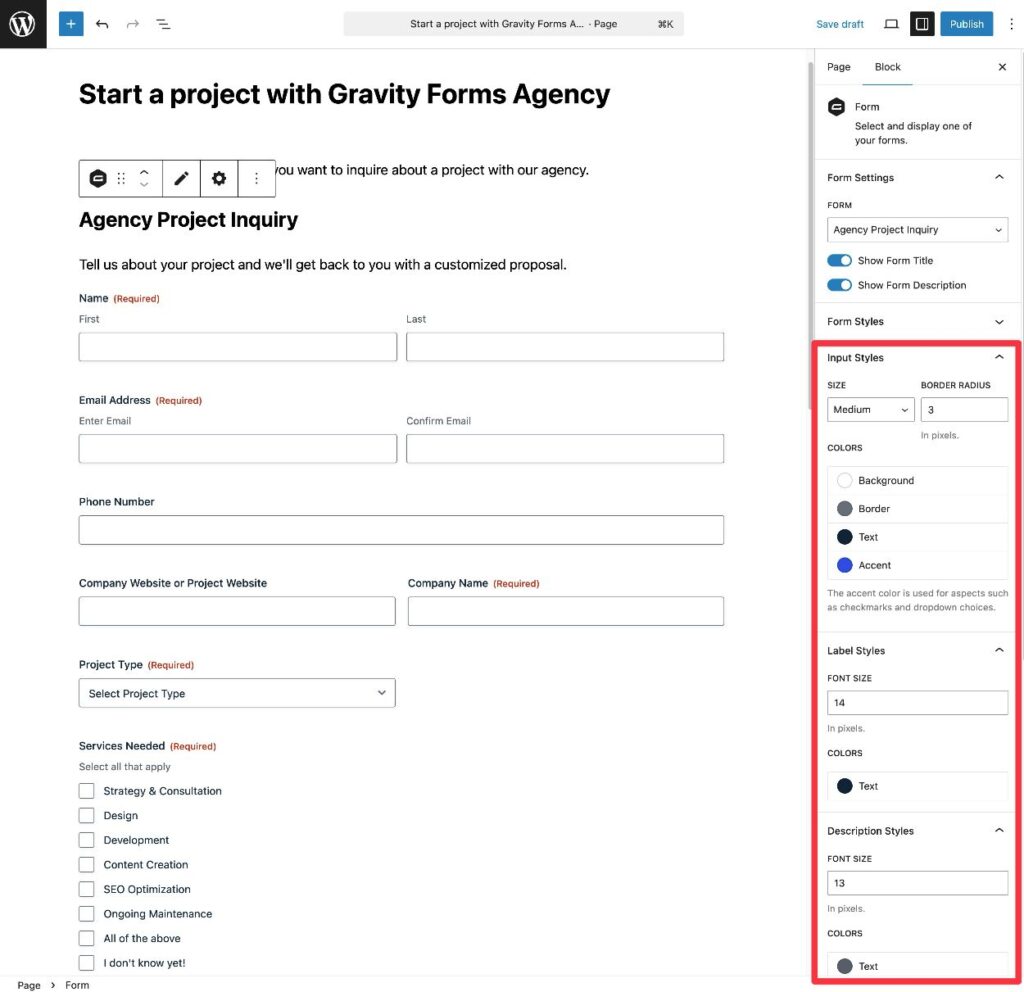
You can embed your form anywhere on your site using the Gravity Forms block, shortcode, or PHP function.
If you use the Form block, you’ll also be able to style your form directly from the editor, without needing to use any custom CSS.
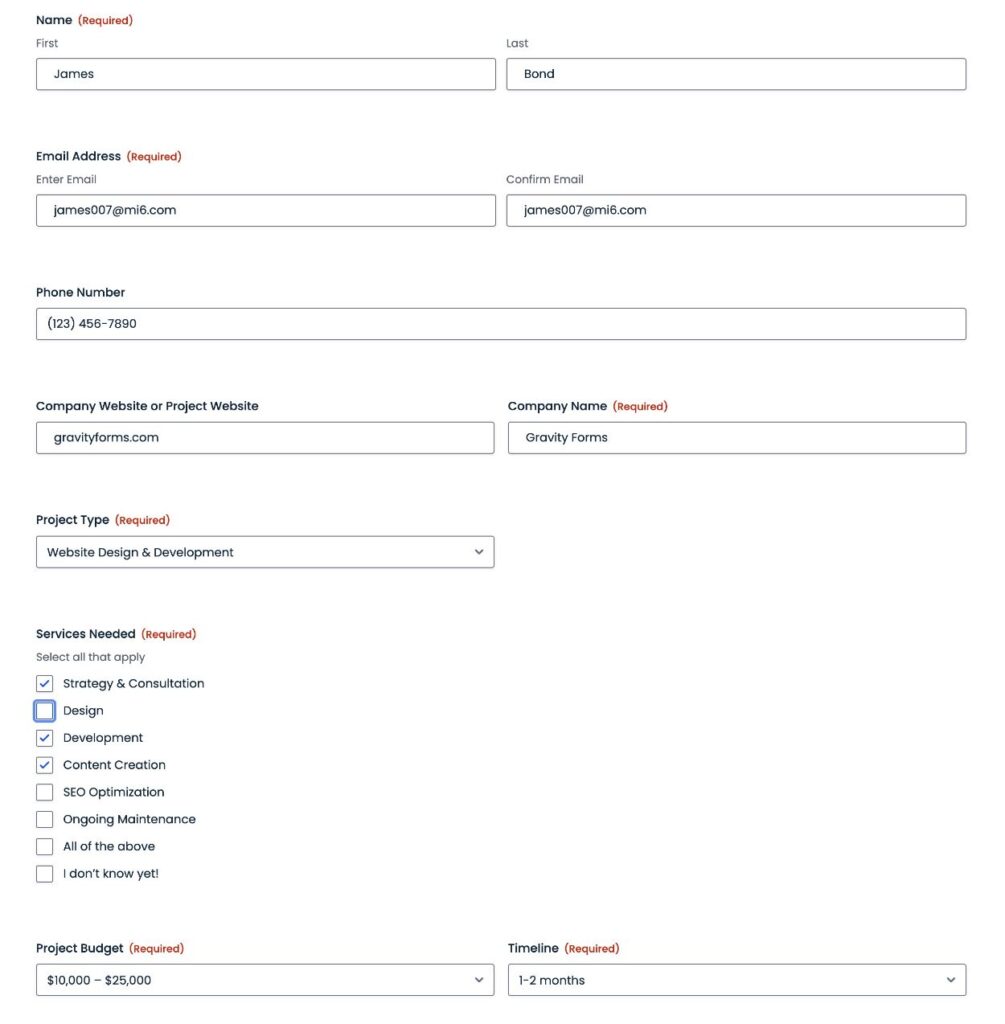
After embedding the form, we recommend testing it to make sure everything is working as you want it to.
8. View and monitor new project inquiries as they come
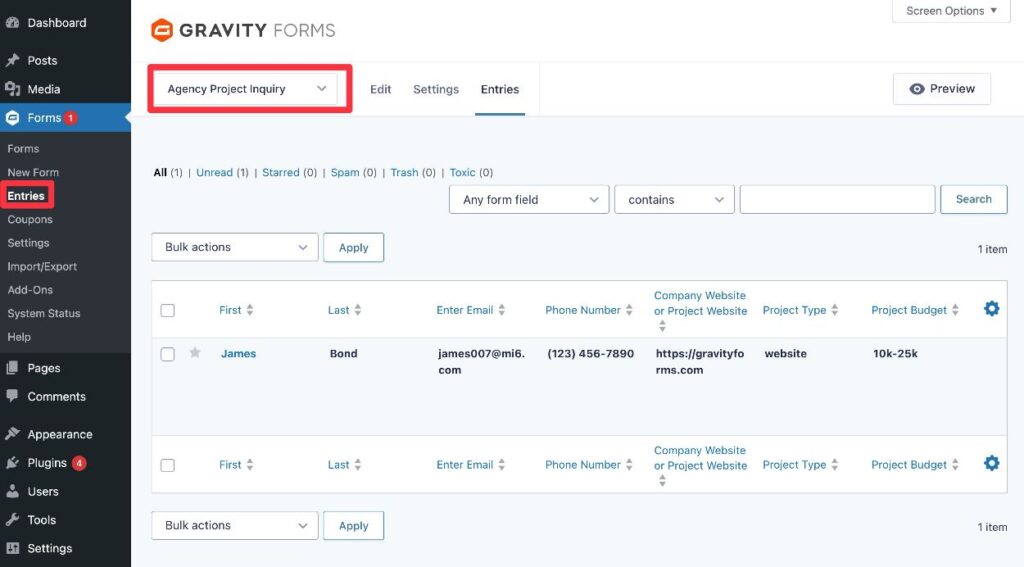
Once you start receiving project inquiries, you’ll be able to view them just like any other form submission:
- Go to Forms → Entries in your WordPress dashboard.
- Select your project inquiry form from the drop-down.
- View a list of project inquiries.
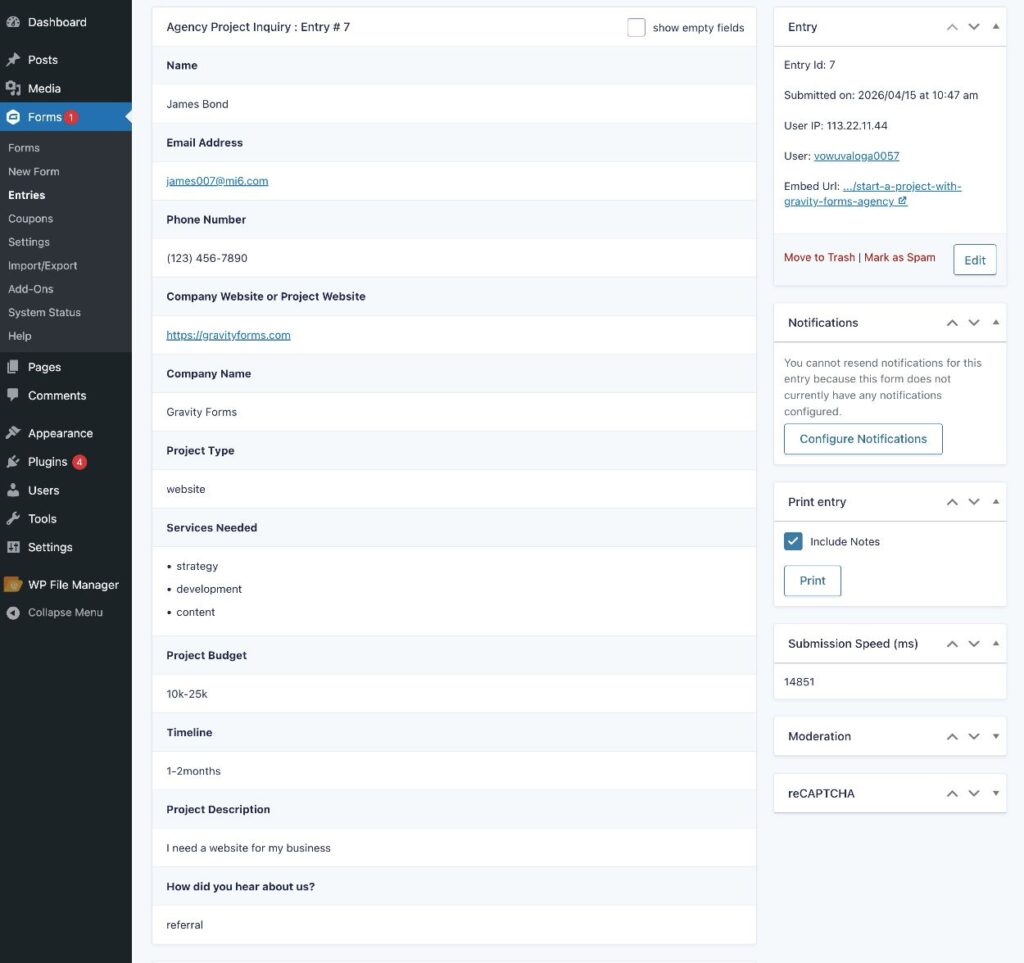
You can click on a specific project inquiry to view more details about it, including any files that the client uploaded.
Create your WordPress project inquiry form today
If you’re looking to create a WordPress project inquiry form for your agency, freelance business, or any other use case, Gravity Forms can help you get the job done.
To start, Gravity Forms offers a pre-built project inquiry form template that you can use to quickly get up and running.
If you want to extend the template, you can also take advantage of Gravity Forms’s many official and community add-ons to enhance your form in all kinds of useful ways.
These can include adding contacts to your CRM, sending various real-time notifications, adding tasks to your project management software, and more. If you want to go even more in-depth with automating the project inquiry process, you can also use the Gravity Flow plugin to build entire business process workflows triggered whenever someone submits a project inquiry.
If you’re already holding a Gravity Forms license, try the template today.
If you’re not holding a license yet, you can purchase your Gravity Forms license here.
Or, if you’d like to try the template before making your purchase, you can create a free demo site that includes the core Gravity Forms plugin and all of the official add-ons.


