
If you are looking to integrate your web forms with Agile CRM, we have a treat for you: this month’s featured extension, the official Gravity Forms Agile CRM Add-On. It enables you to easily connect your website with your favorite customer relationship management software so you can collect and use your customer data with ease.
To help facilitate that, in this post, we will give you a detailed rundown of the Agile CRM extension. You’ll learn why Agile is a great choice for a CRM, the benefits of combining it with Gravity Forms, and a step-by-step tutorial how to connect the two.
What Does Agile CRM Offer?
First of all, if you are not yet an Agile CRM customer, let’s talk about why it’s a great addition to your WordPress website. Here is a list of features that make it stand out in the field of customer relationship management:
- All in one place — Agile CRM combines sales, marketing, and customer service in a single platform. There is no need to connect different apps, you get everything in one place.
- Great sales features — Single-page contact management, one-click calling, appointment scheduling, and project management are just a few of the options you can use to ramp up your sales.
- Marketing options — Configure your marketing workflows with an easy drag-and-drop interface, build landing pages, and run email, social, or mobile marketing campaigns all from the same software.
- Customer service functionality — Provide a helpdesk and knowledge base, collect feedback, automatically answer common questions, and more.
- Many integrations — Agile CRM integrates with many common social platforms, support software, email platforms, phone gateways, e-commerce solutions, and and and! In addition, you can upgrade to integrate with 50 more paid apps for a set monthly price.
- Fair pricing — Speaking of price, you can get Agile CRM for as little as $8.99/month (at time of writing) and there is even a free plan that is enough to use it with your favorite web form plugin.
The Benefits of Using Agile CRM With Gravity Forms
So, why use Agile CRM together with Gravity Forms? There are many great reasons.
For one, you can send new form data directly to the Agile dashboard. Automatically create contacts or update existing ones by easily mapping form field data to your Agile account. You can also automatically create tasks for what to do with those new contacts and automate workflows for contact information coming in.
In addition, with the help of custom fields, you can collect customized data from your clients and send it to Agile CRM, helping you to collect and manage the specific data you need. If that isn’t enough, you can also manage, track, and segment contacts in Agile and even beforehand with Gravity Forms conditional logic. It allows you to divide email subscribers into lists at sign-up and qualify leads beforehand.
Finally, you can also easily ensure GDPR compliance of your email list with Gravity Forms’ Consent field. It allows you to make your sign-up forms GDPR-compliant quickly and easily.
Interested? The Agile CRM Add-On is available with a Pro license, Elite license, and Nonprofit license.
How to Connect Gravity Forms With Agile CRM
Alright, now let’s talk about how to connect your web forms with Agile CRM.
1. Create an Agile Account
Naturally, one of the first things you’ll need is an Agile CRM account. Without one, what are we even talking about here?
So, if you don’t have one yet, let’s start off with that. Simply go to the Agile CRM homepage, and click on Get Started in the upper right corner.
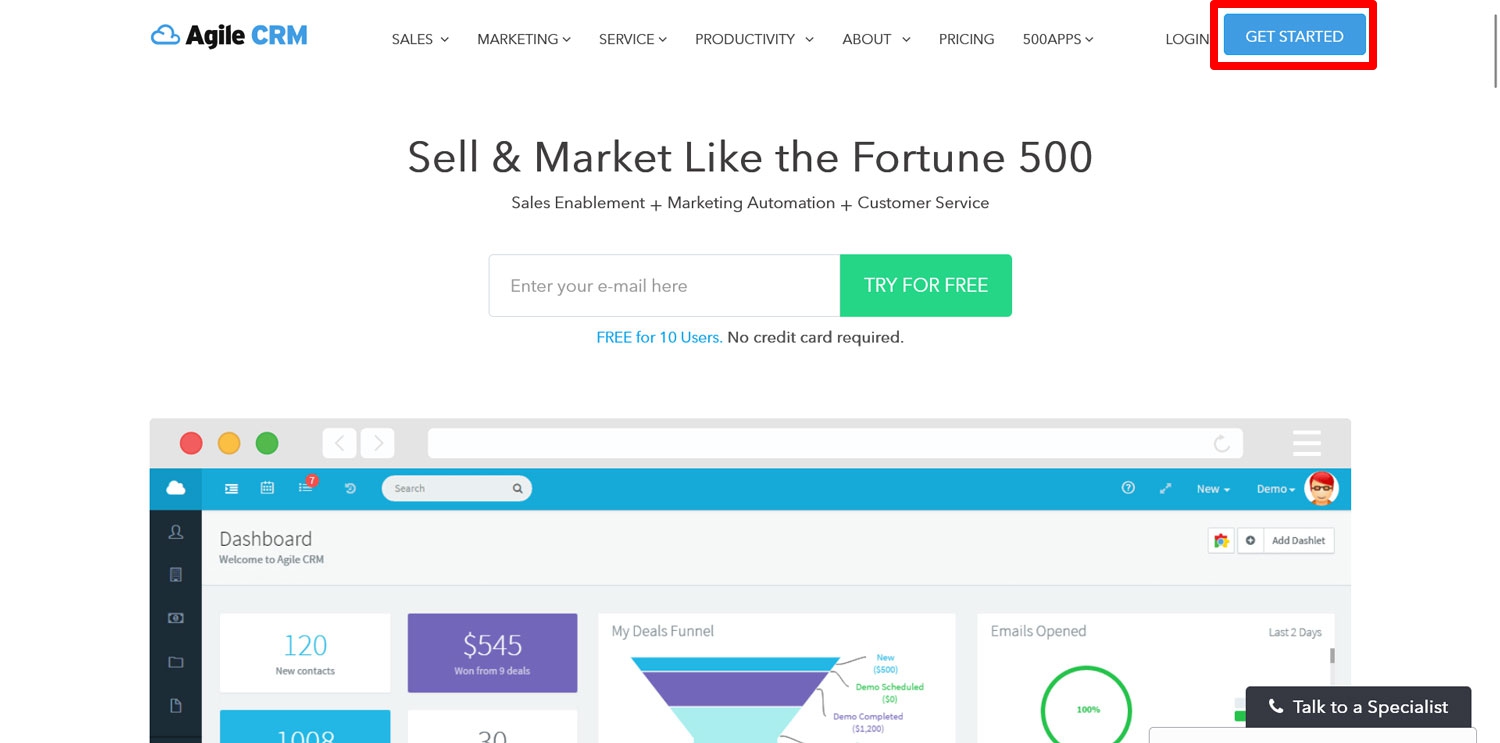
Doing so will open up a sign-up form.
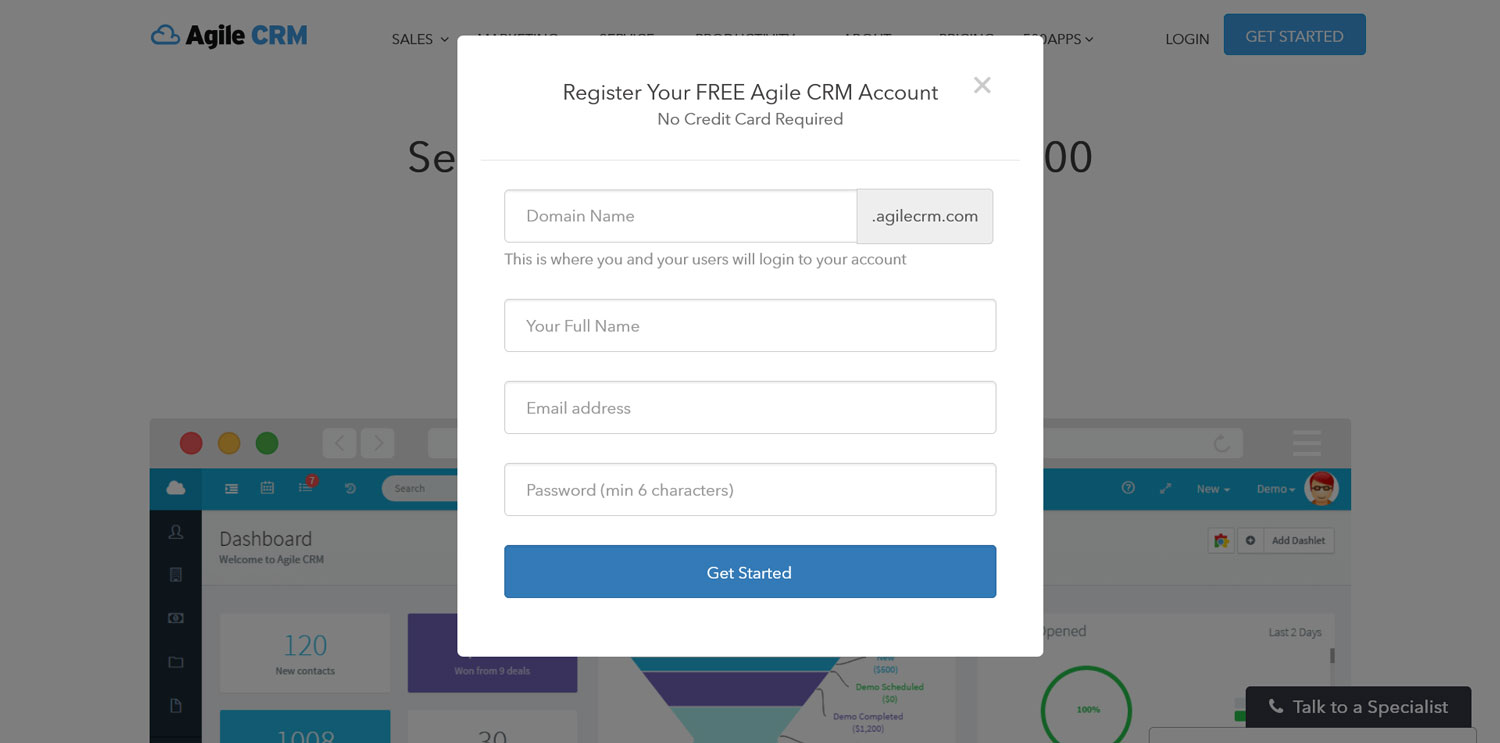
Enter all the requested information (note, you need a business email address), including the customized URL for your account (you will need this information soon, just FYI), and click Get Started.
Next up, select a plan (free is fine for the moment), the number of users on your plan, information about your role and company, and a phone number.
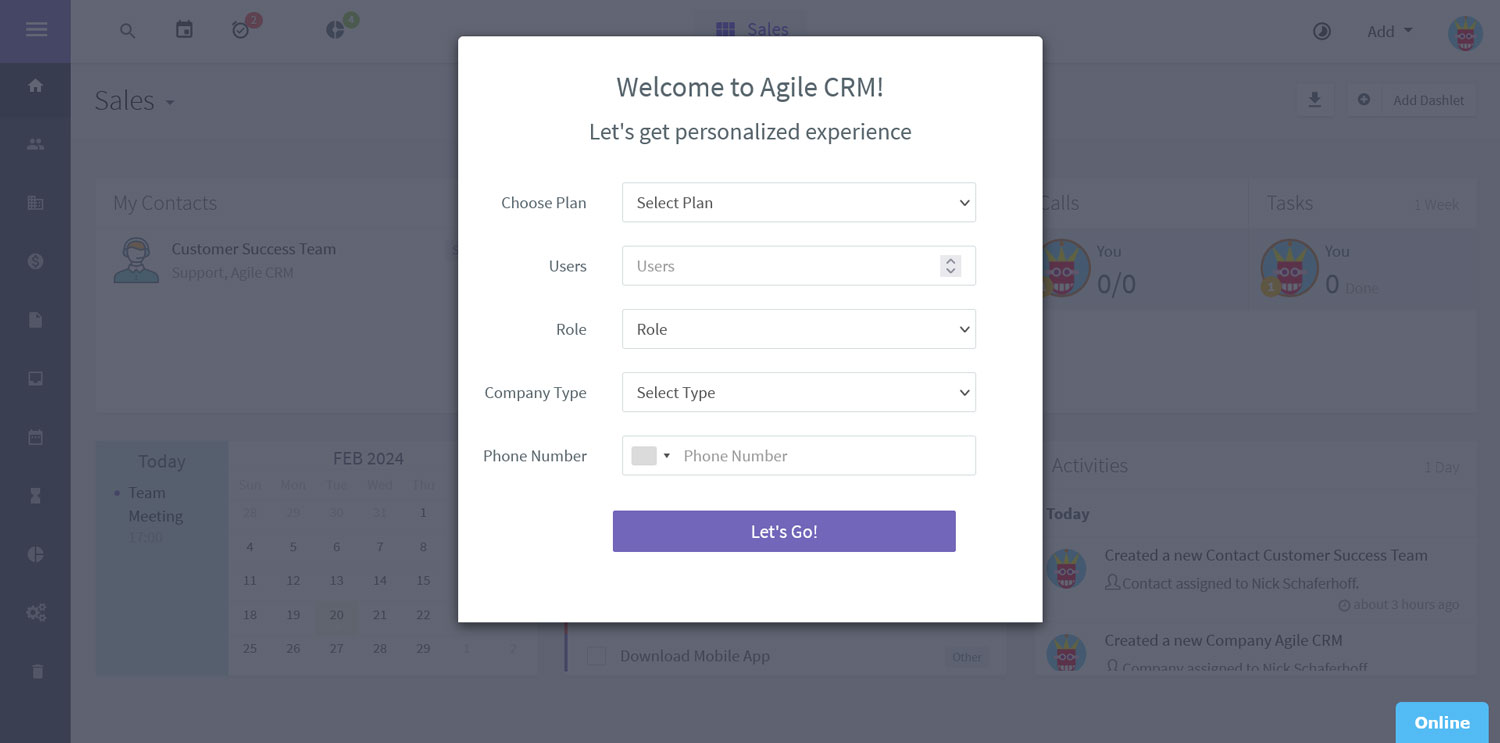
Save when you are done and you will land on the dashboard, from which you can take the next steps.
2. Find Your Agile CRM API Key
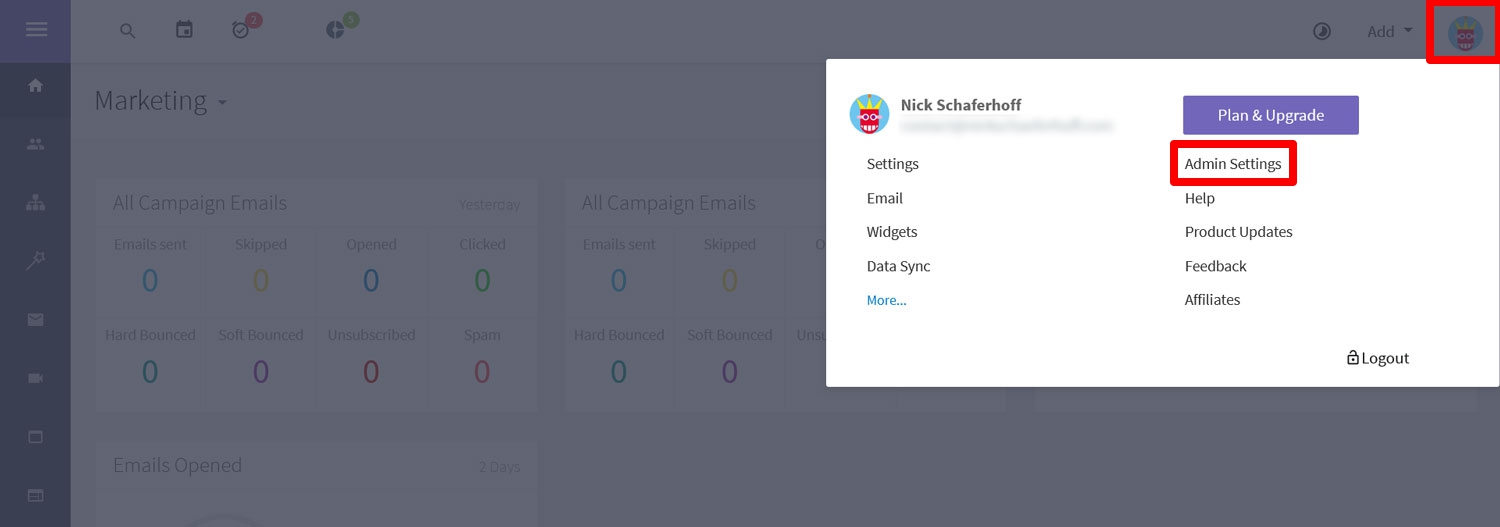
In order to use Agile CRM together with Gravity Forms, will need an Agile API key. It is already created for you, you just need to find it. To do so, click on your name/icon in the Agile dashboard’s upper right corner and select Admin Settings.
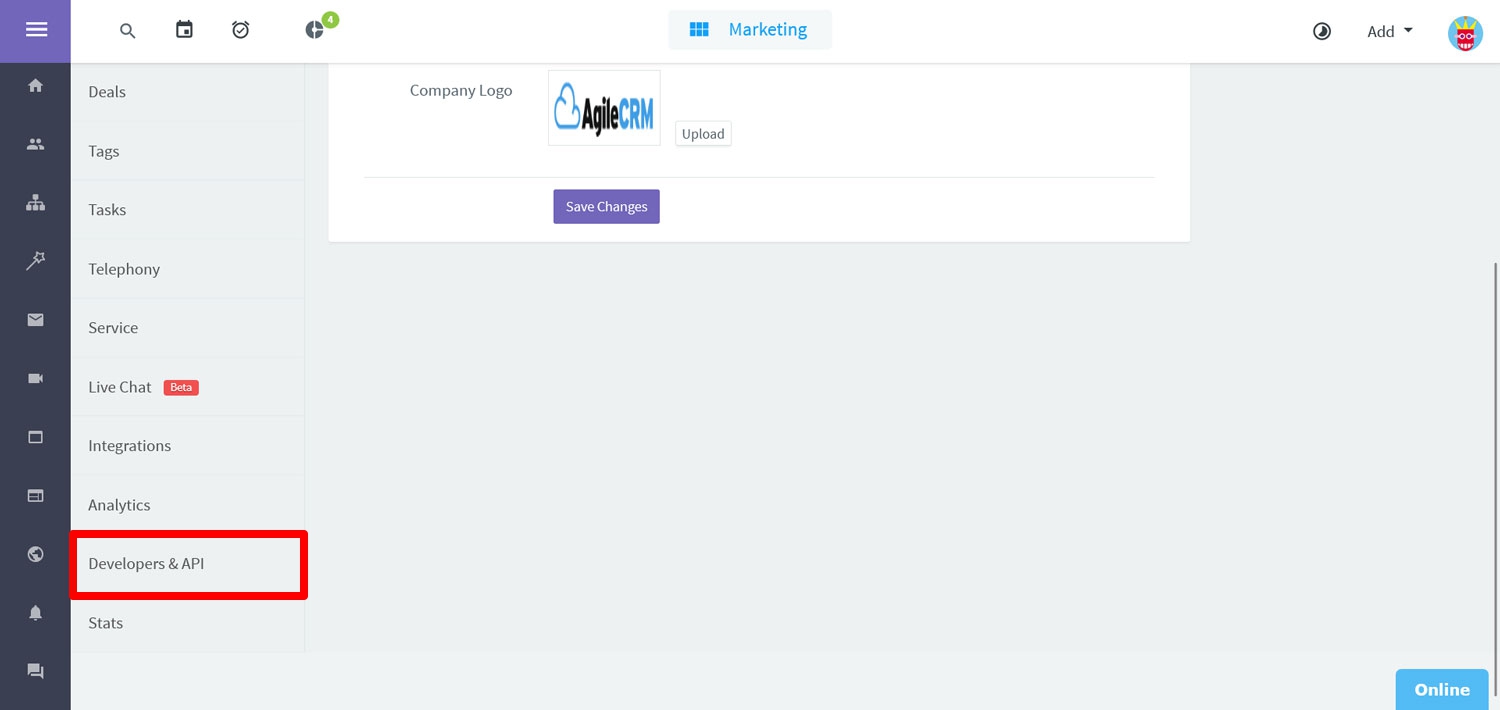
In the menu that follows, choose Developers & API in the left-hand menu.
In the next screen, you can see your REST API key and JavaScript API key displayed on the page.
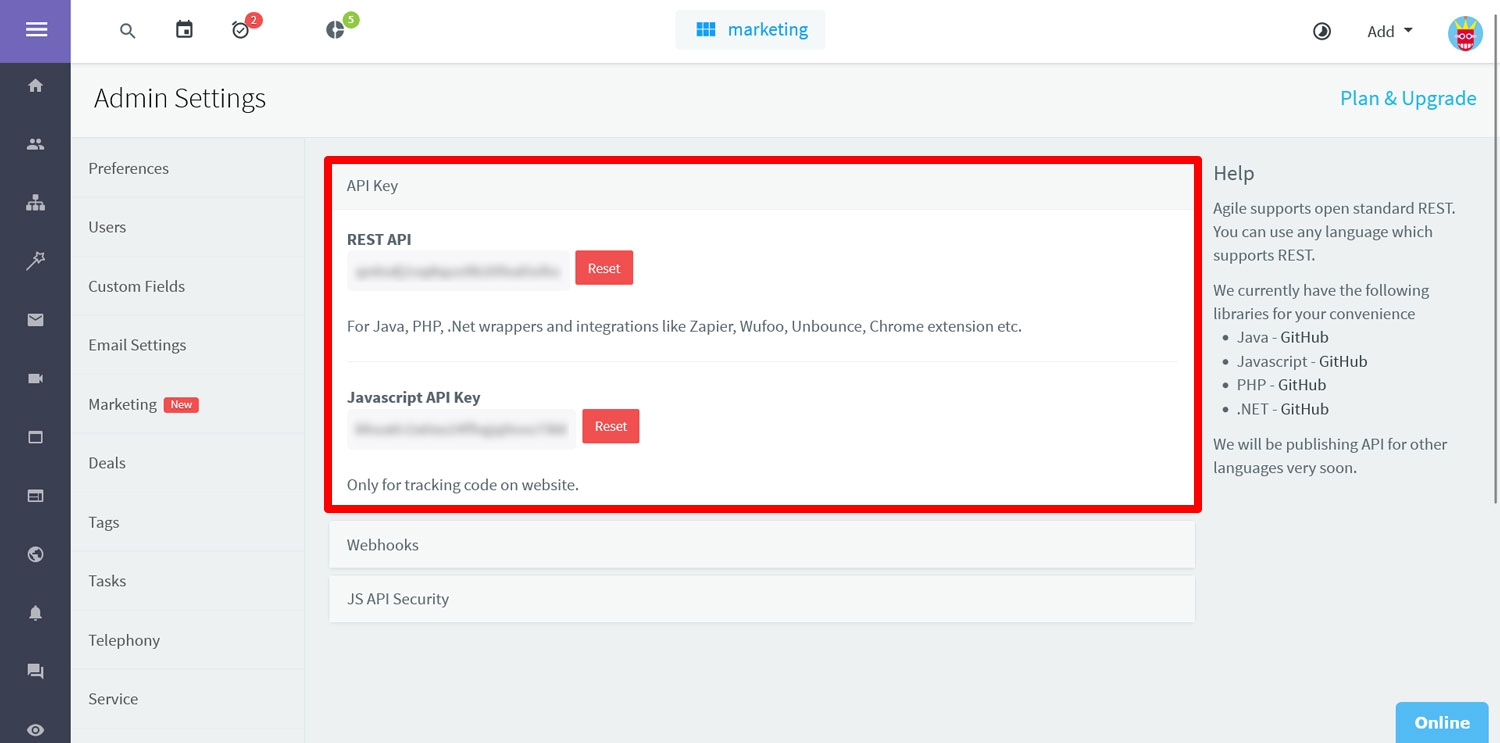
Leave this open in a browser tab, you will need it soon.
3. Install and Set Up the Gravity Forms Agile CRM Add-On
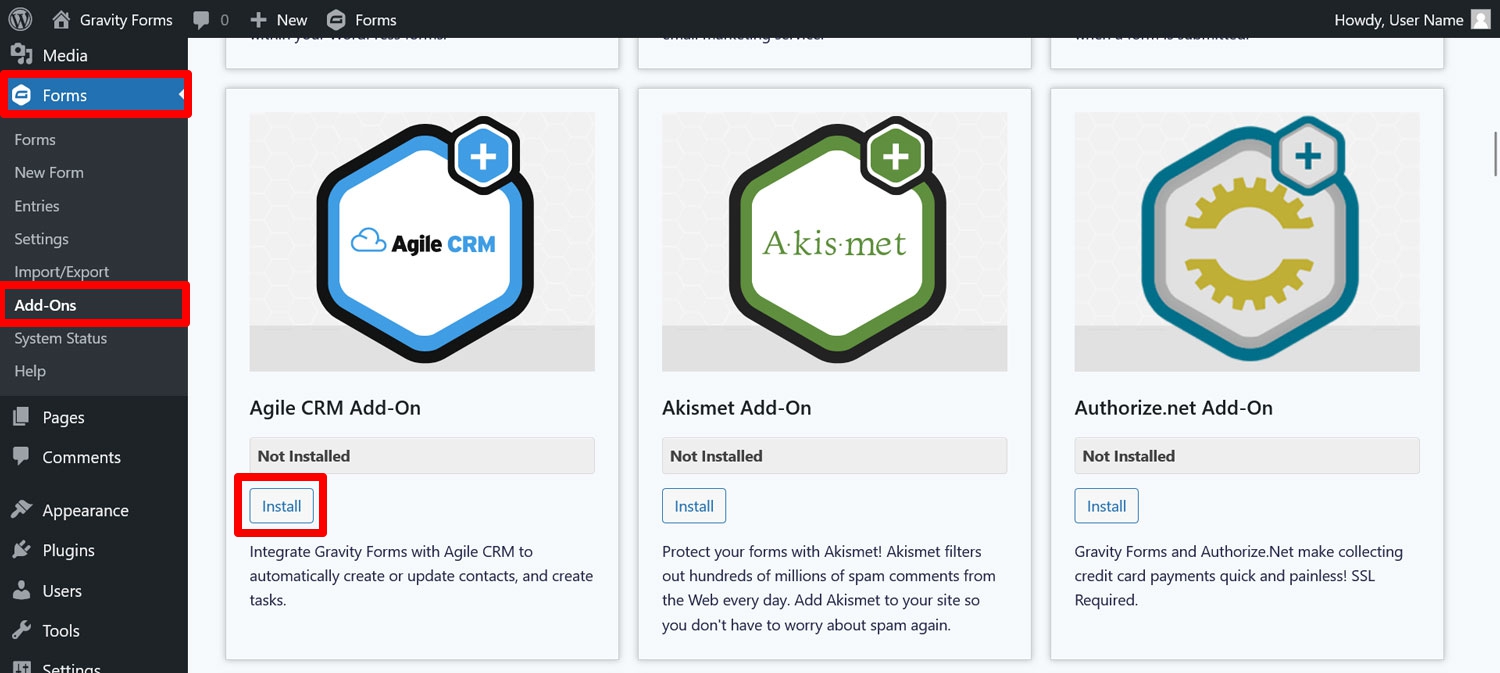
From here on out, we are continuing on your own website. The first stop here is Forms → Add-Ons. Scroll down until you see the Agile CRM Add-On and click on Install.
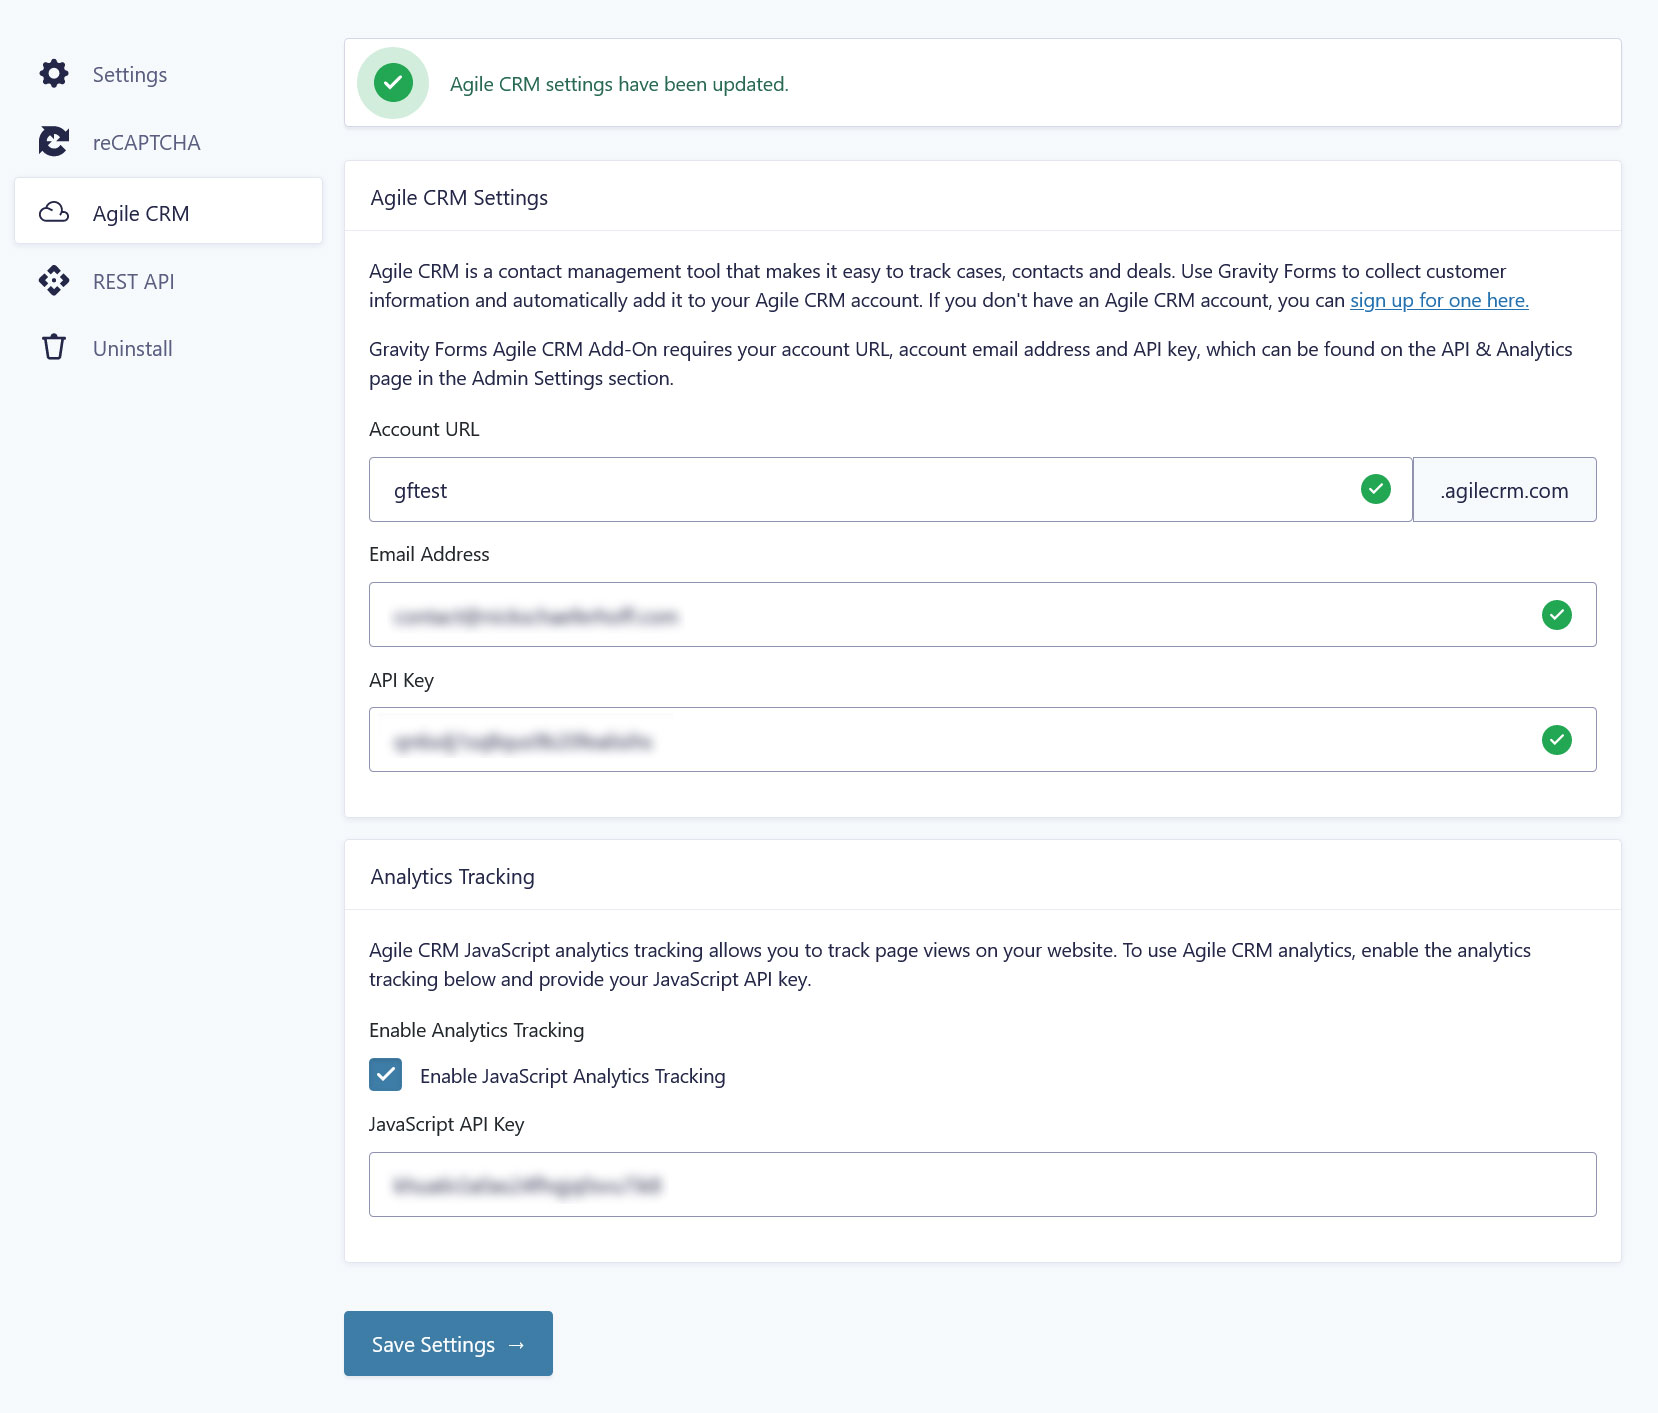
Once downloaded to your site, make sure to also activate it. After that, go to Forms → Settings and then the Agile CRM tab.

As you can see, it asks for four pieces of information in order to connect to your Agile account:
- Your account URL (that you created earlier, input just the part before .agilecrm.com)
- The email address you used for the account
- An API key
- Optional: the JavaScript API key, if you want to use Agile CRM’s web analytics
Luckily, we know where to get all of those. So, go back to your Agile dashboard and copy over all of this information (the analytics part is up to you).
Once you are done, click on Save Settings at the bottom. Your connection to Agile CRM should now be established.
4. Create a Form
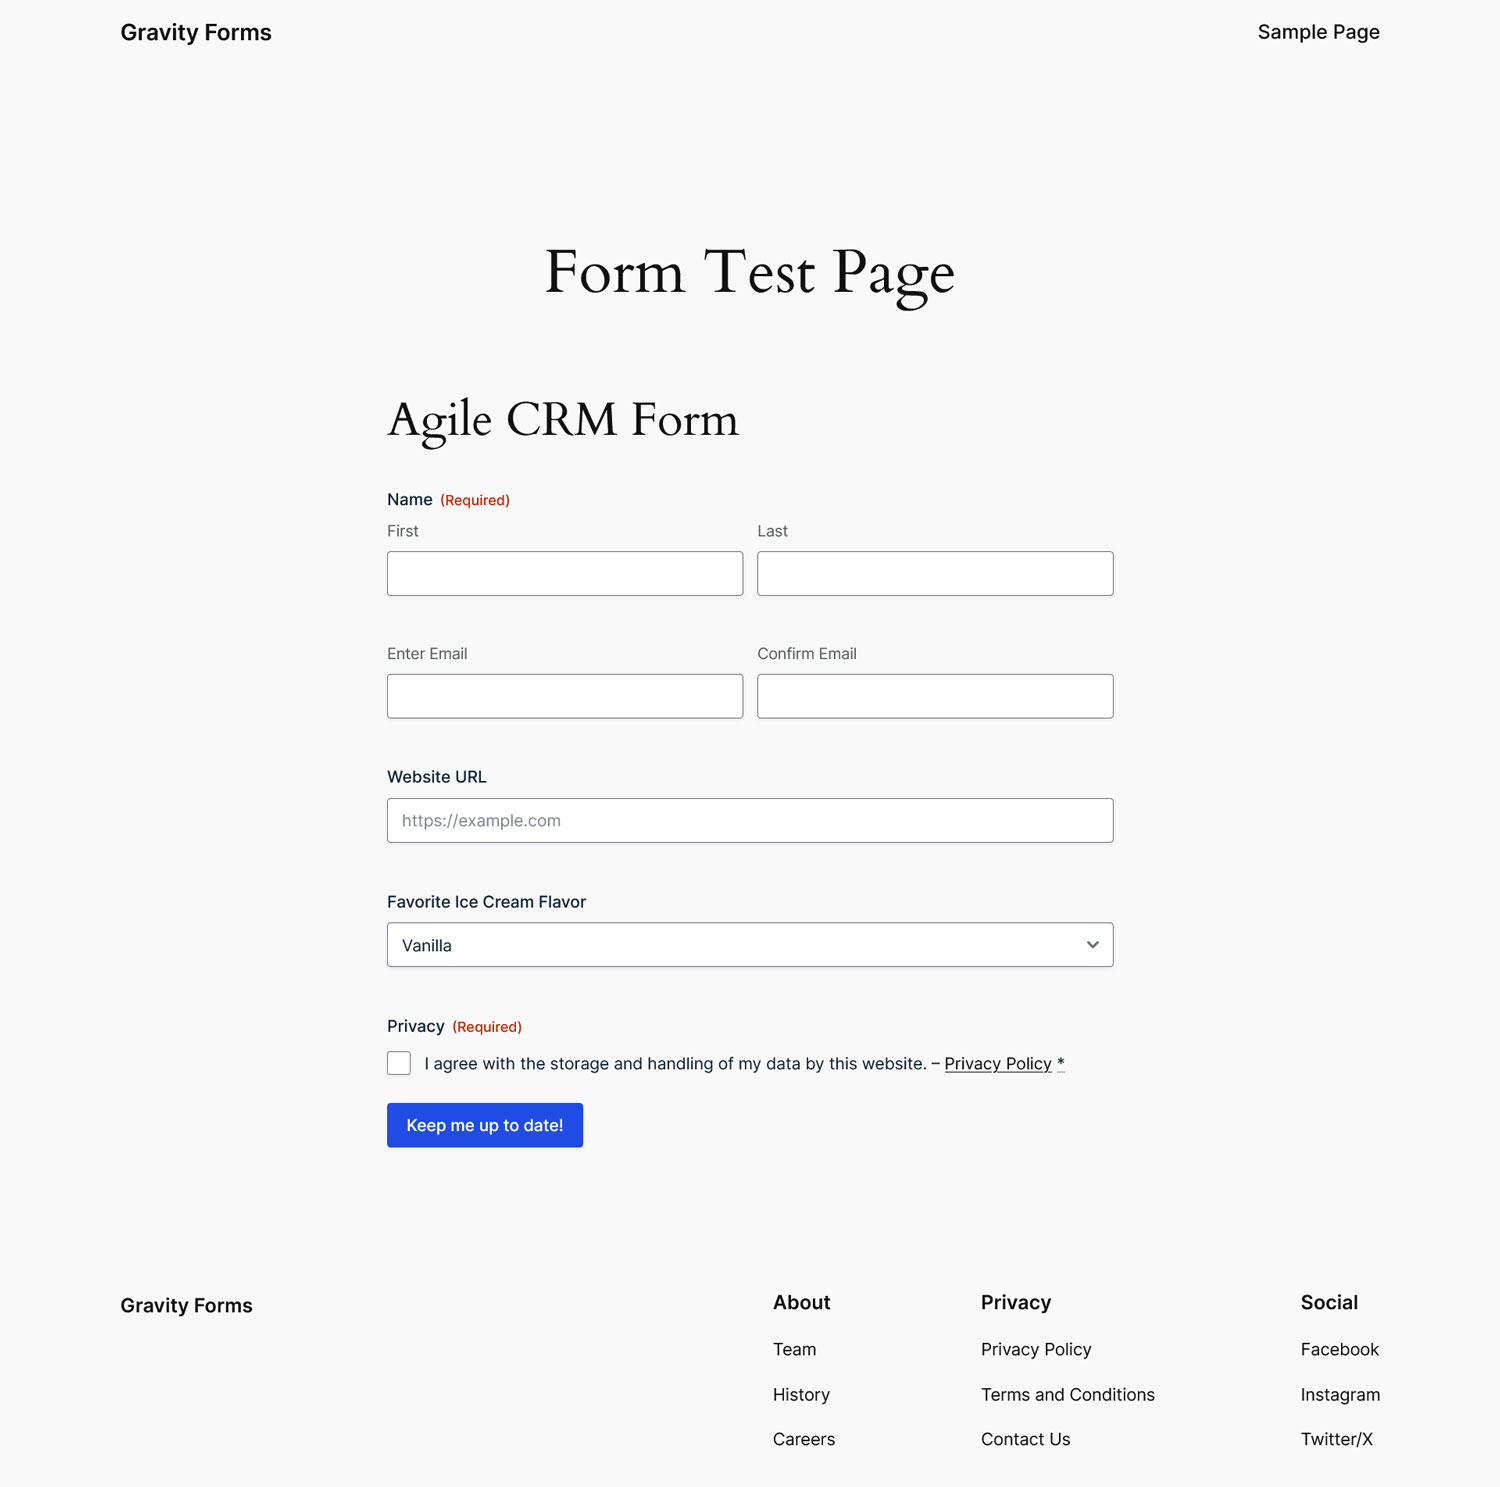
Next up, we want to create a form to use together with Agile CRM. In this case, we are planning to collect email addresses and contact information to use in our Agile CRM email campaigns. For that, we need a sign-up form that allows us to gather this information.
If you already have one of those, you can skip to the next step. If you don’t, go to Forms → New Form.
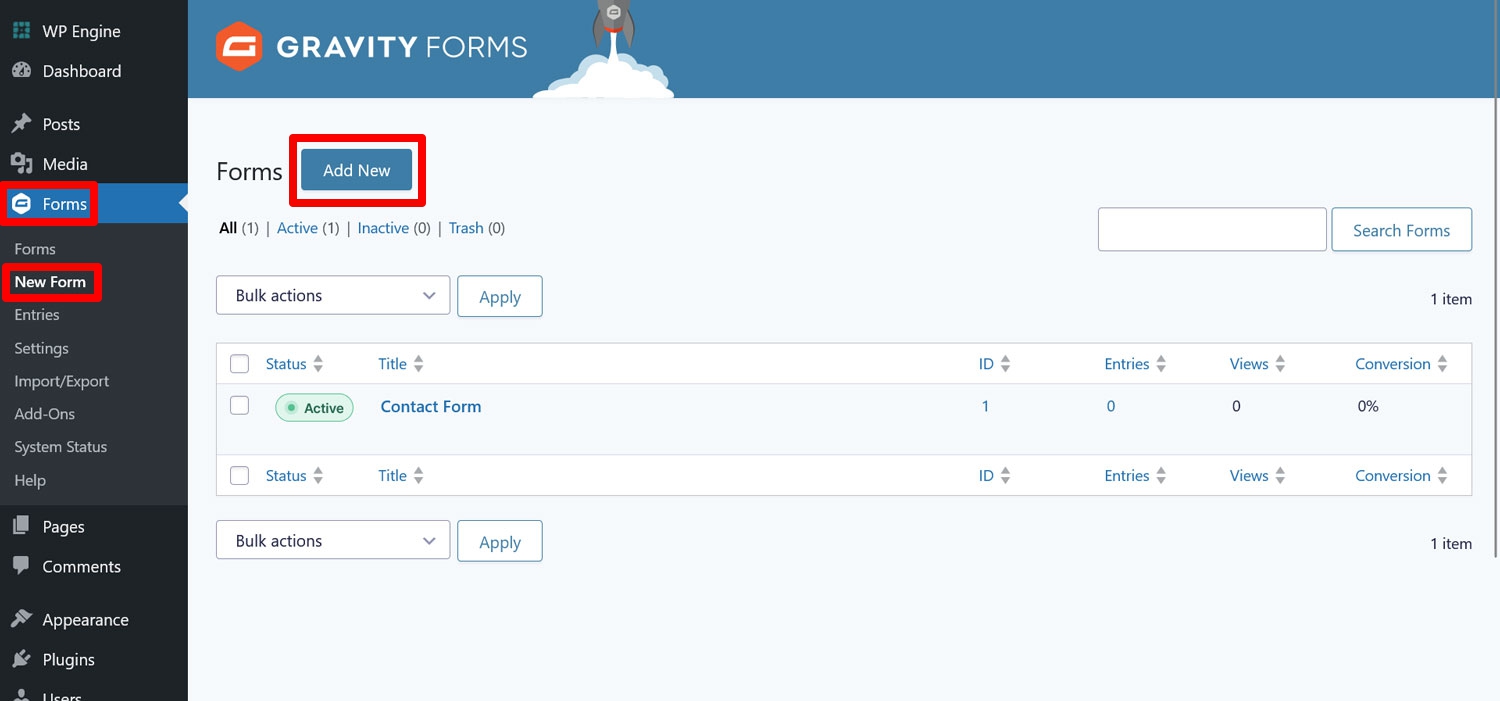
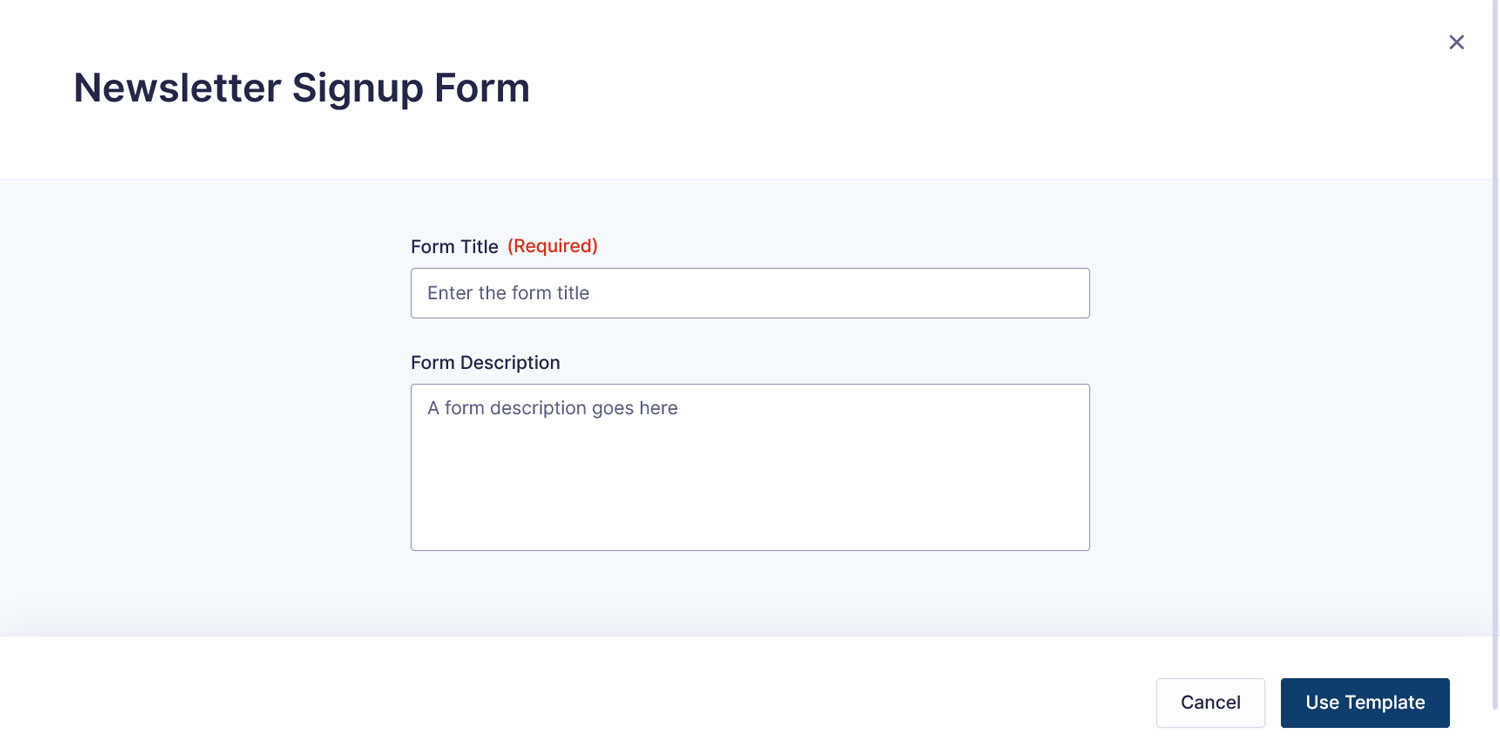
You can either build a form from the ground up or speed up the process with a pre-built template. We are doing the latter by hovering over the Newsletter Signup Form and clicking Use Template.
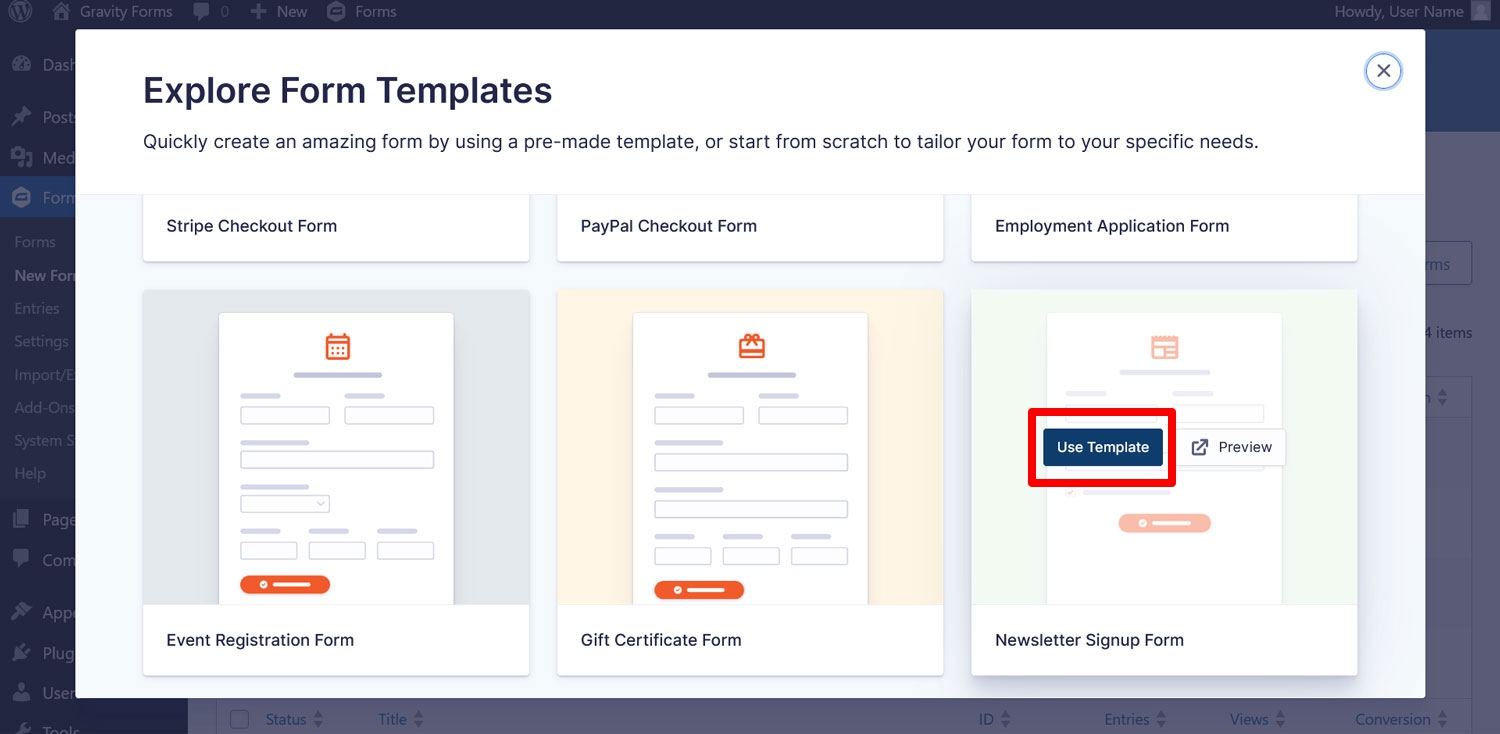
In the next screen, name your form and leave an optional description as a reminder of its purpose. Then, click Use Template again to land on the form editor.
Here, make any adjustments as needed, including deleting the tool tip at the top (like you needed to be told to connect your form to an email provider, eh?). Drag-and-drop in any fields you need or configure existing fields in the sidebar.
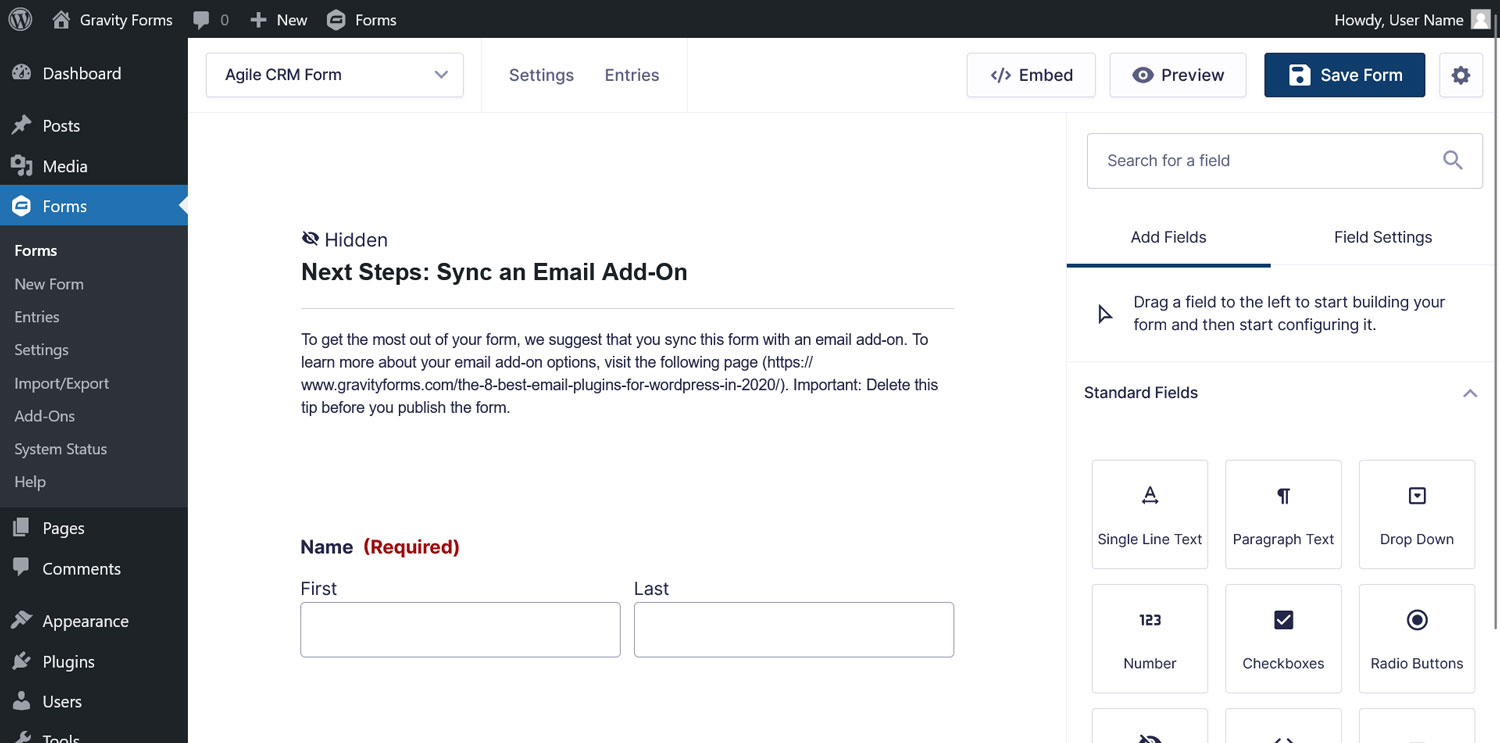
Once you are satisfied, click Save Form. Now it’s time to move on to the next step.
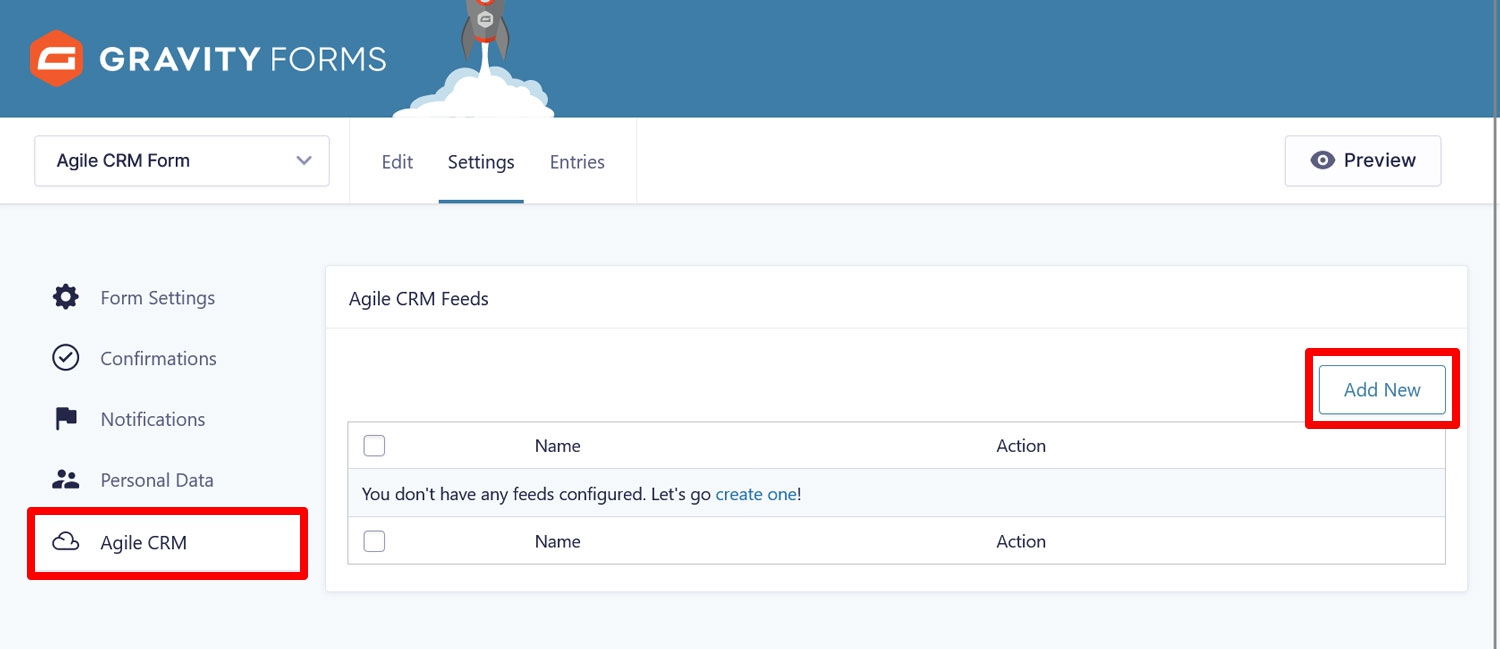
5. Create an Agile CRM Feed
In Gravity Forms, a “feed” determines what happens with form data after it has been submitted, such as sending it to another app. So, if you want to forward your information to Agile CRM, you will need to create a feed first.
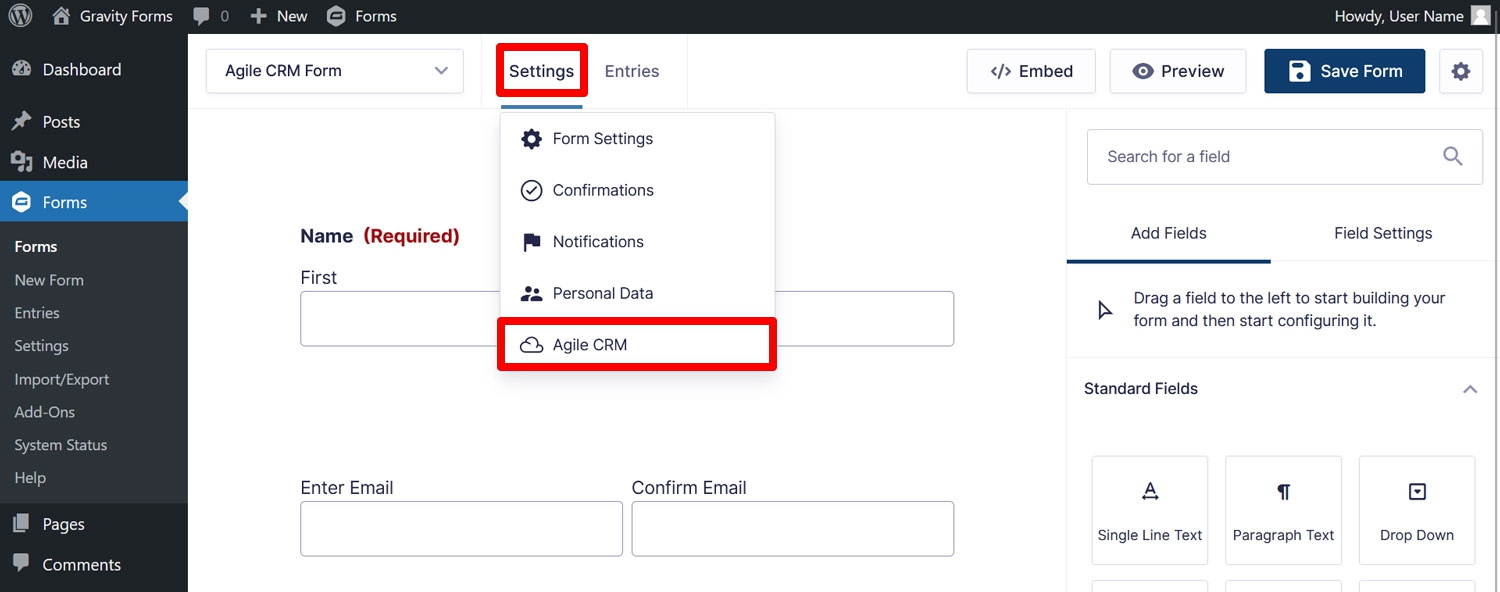
This happens in the settings of the form you want to use for this purpose. If you are still in the form editor, you can get there by hovering over the Settings menu item at the top and choosing Agile CRM.
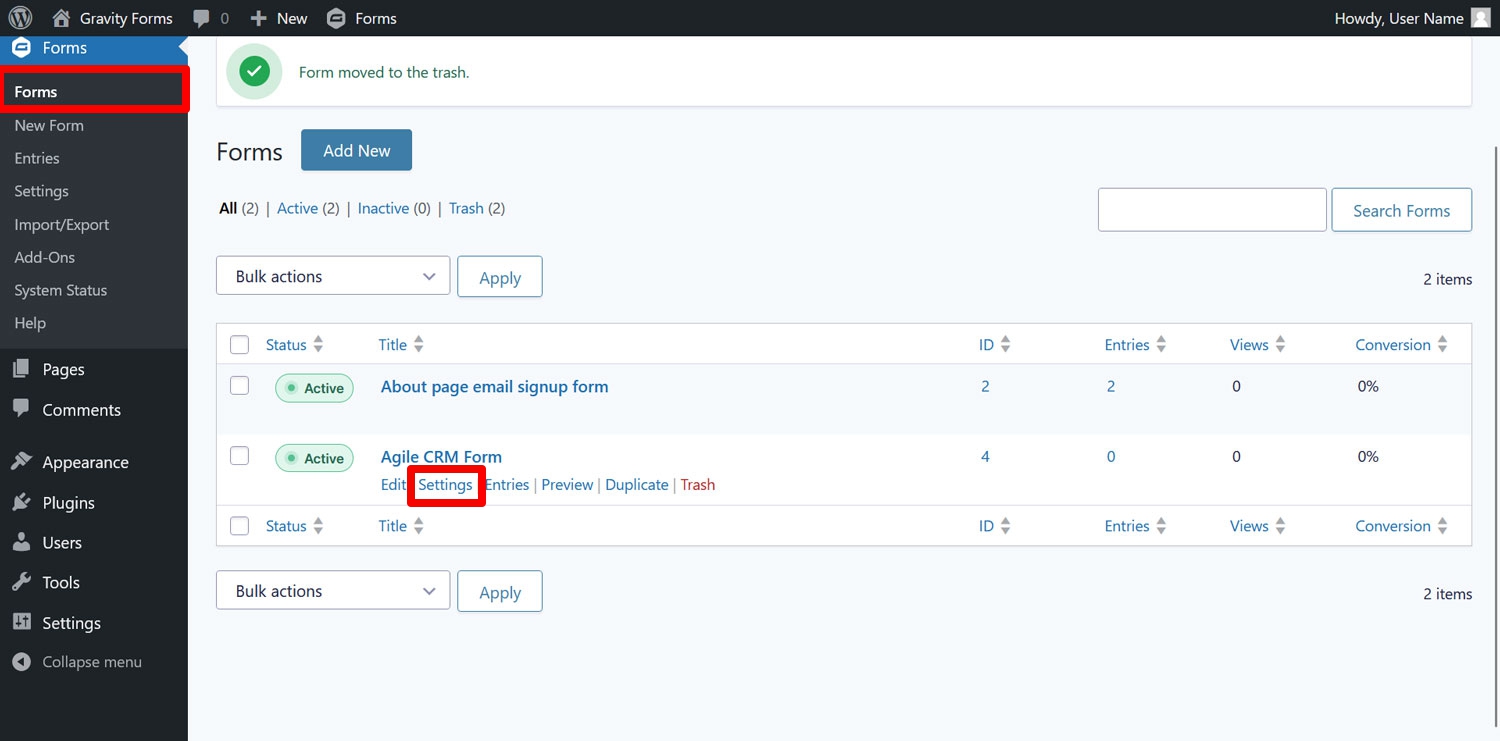
Alternatively, it’s possible to get to the same place via the Forms menu. Hover over the name of the form you want to connect to your CRM solution and click Settings.
After that, click on Agile CRM in the left vertical menu. Once there, use the Add New button to create a new feed.
Doing so gets you to this screen:
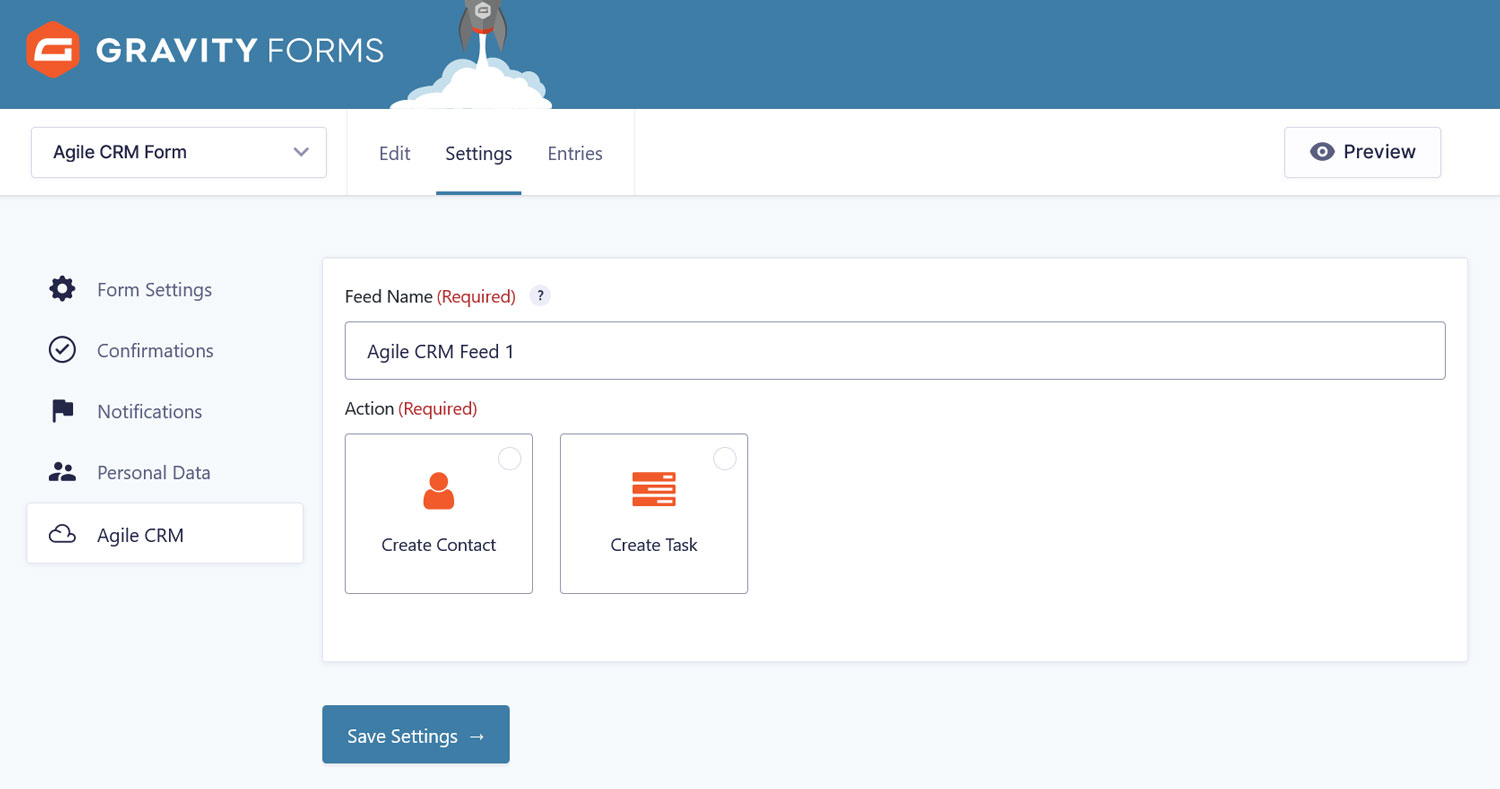
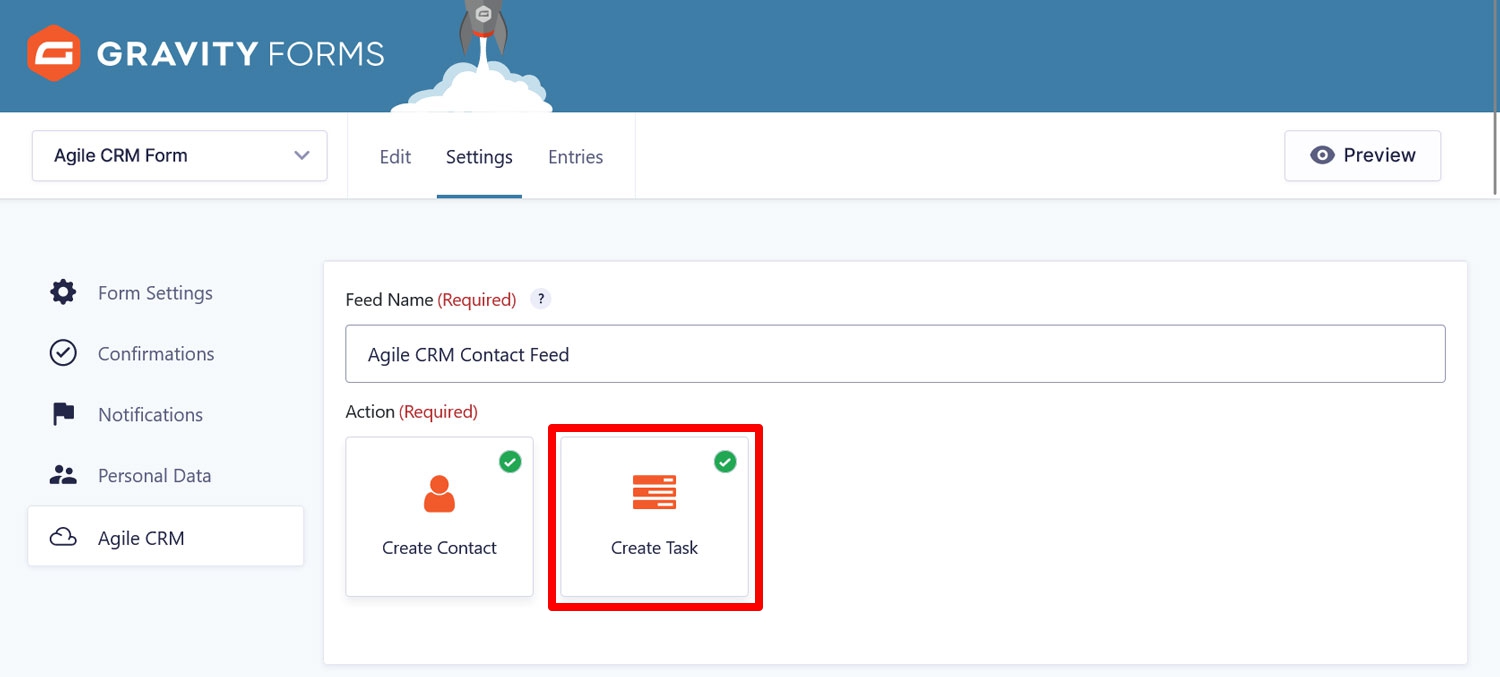
The first thing you need to do is give the feed a name at the top that describes its purpose. After that, it’s necessary to choose the action that it will perform. You have three choices for that: create a contact, create a task, or do both at the same time.
For now, we are going with the option to create a contact since that’s what we want to use our sign-up form for. Clicking it opens additional settings.
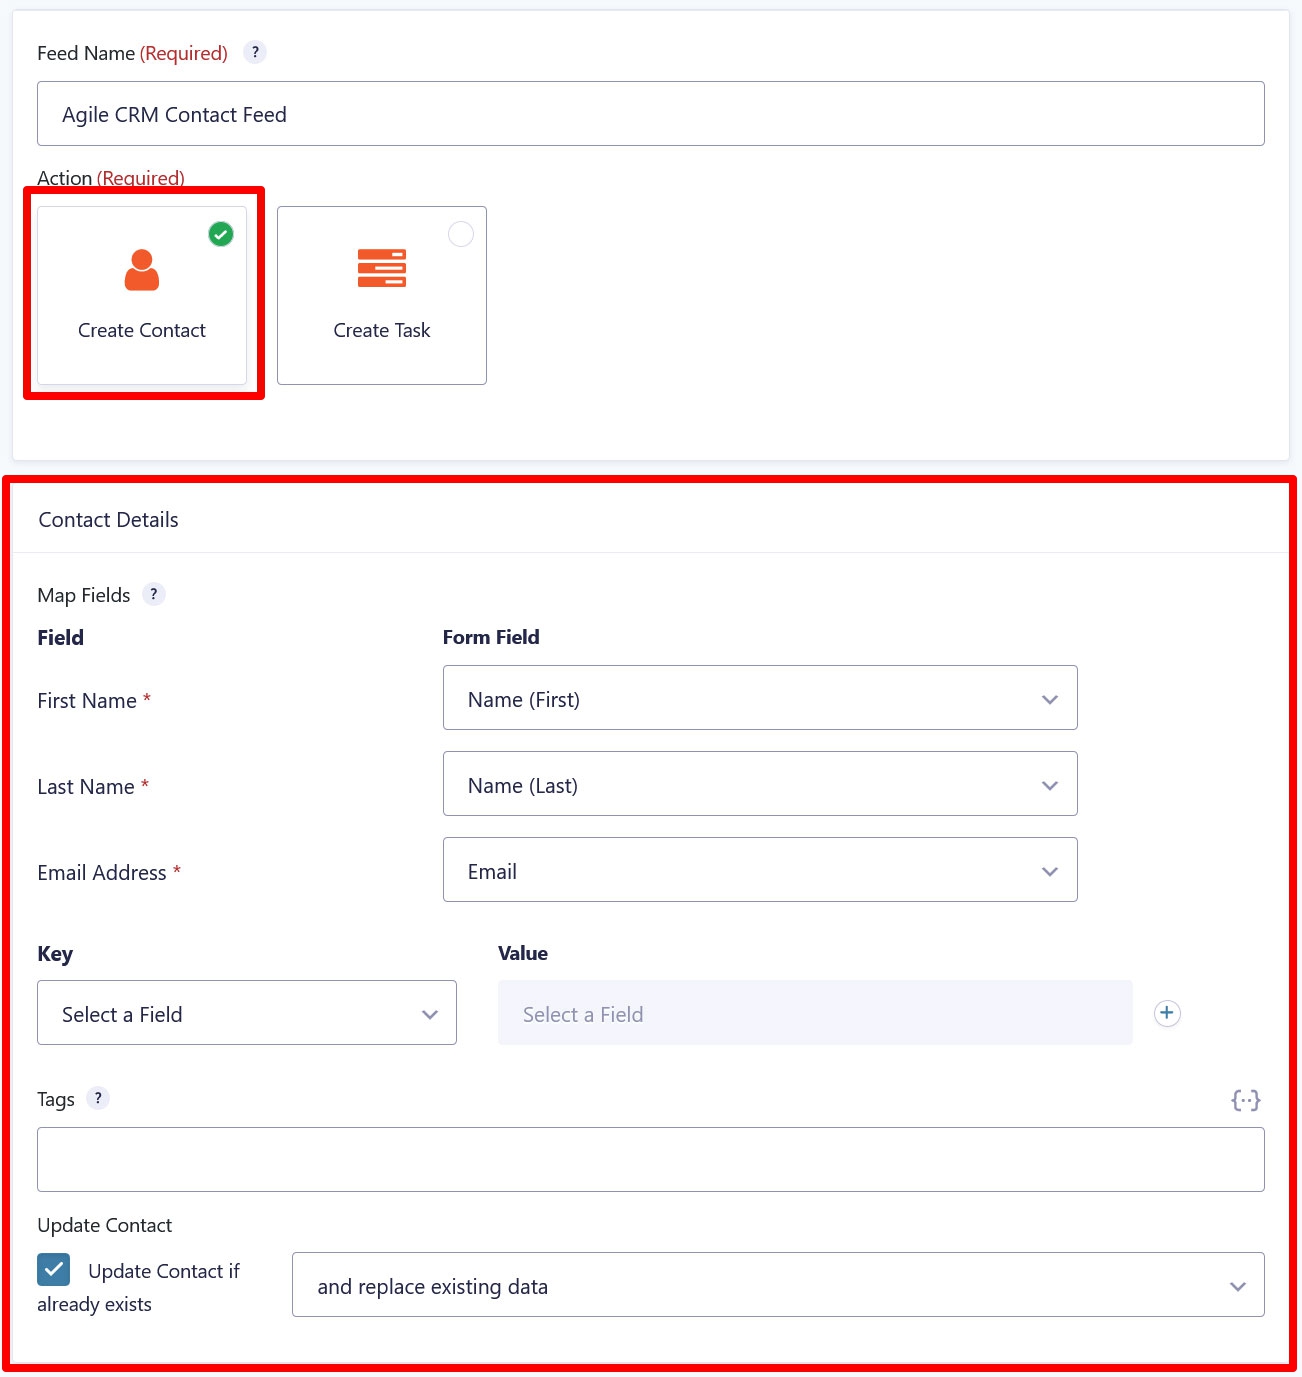
The main task here is to map the information you receive on your form to its equivalents in Agile CRM. If, like in this example, you are only asking for a first and last name as well as an email address, this should happen automatically.
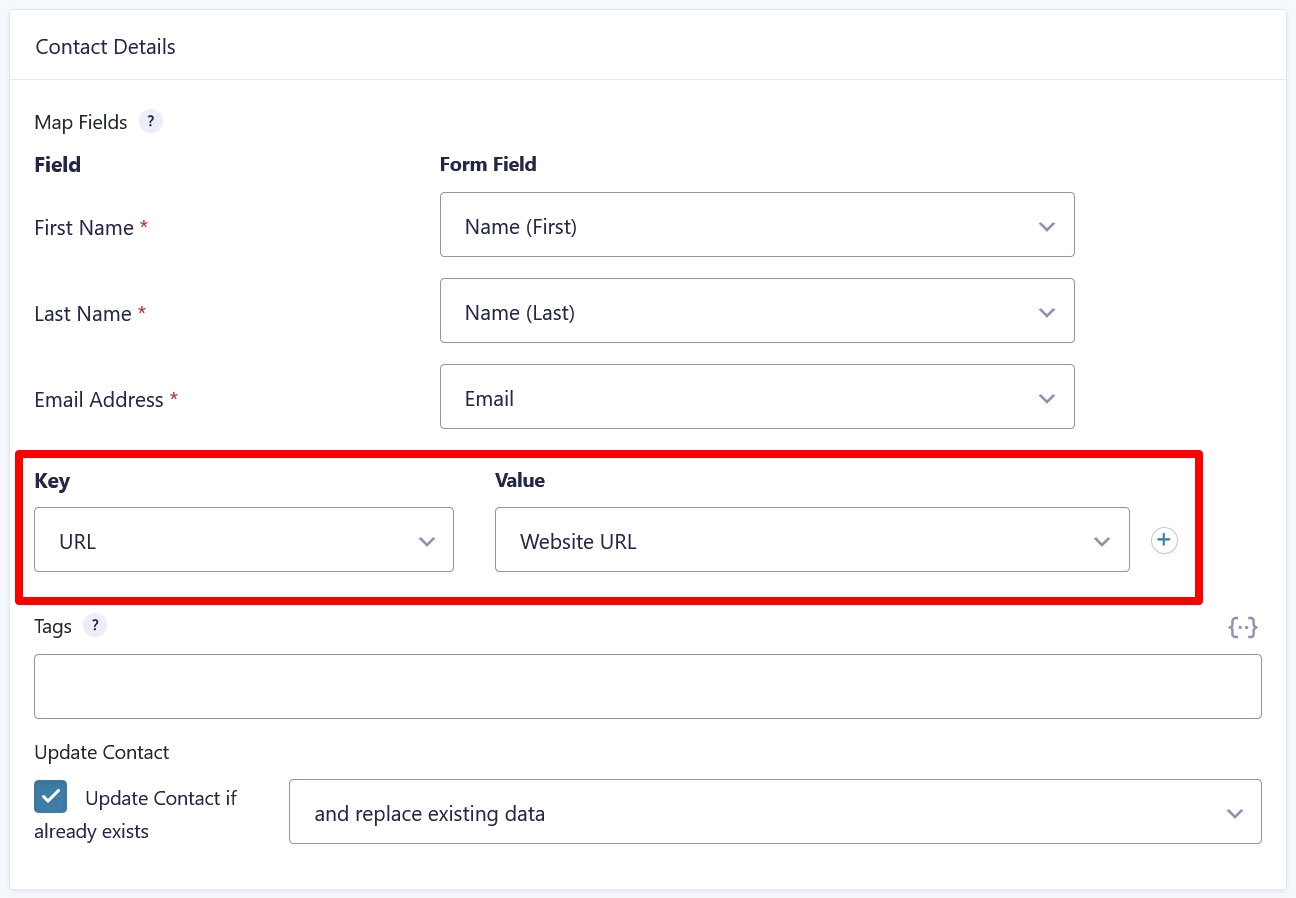
Don’t worry about the Key and Value fields for options for now, we will talk about that soon. Under Tags, you can add additional information that will be saved in inside Agile CRM to further segment, filter, or search contacts. Finally, Update Contact allows you to decide what happens if a contact already exists, whether their information should be replaced or appended.
Once you are happy with your choices, click Save Settings at the bottom.
6. Additional Information/Custom Fields
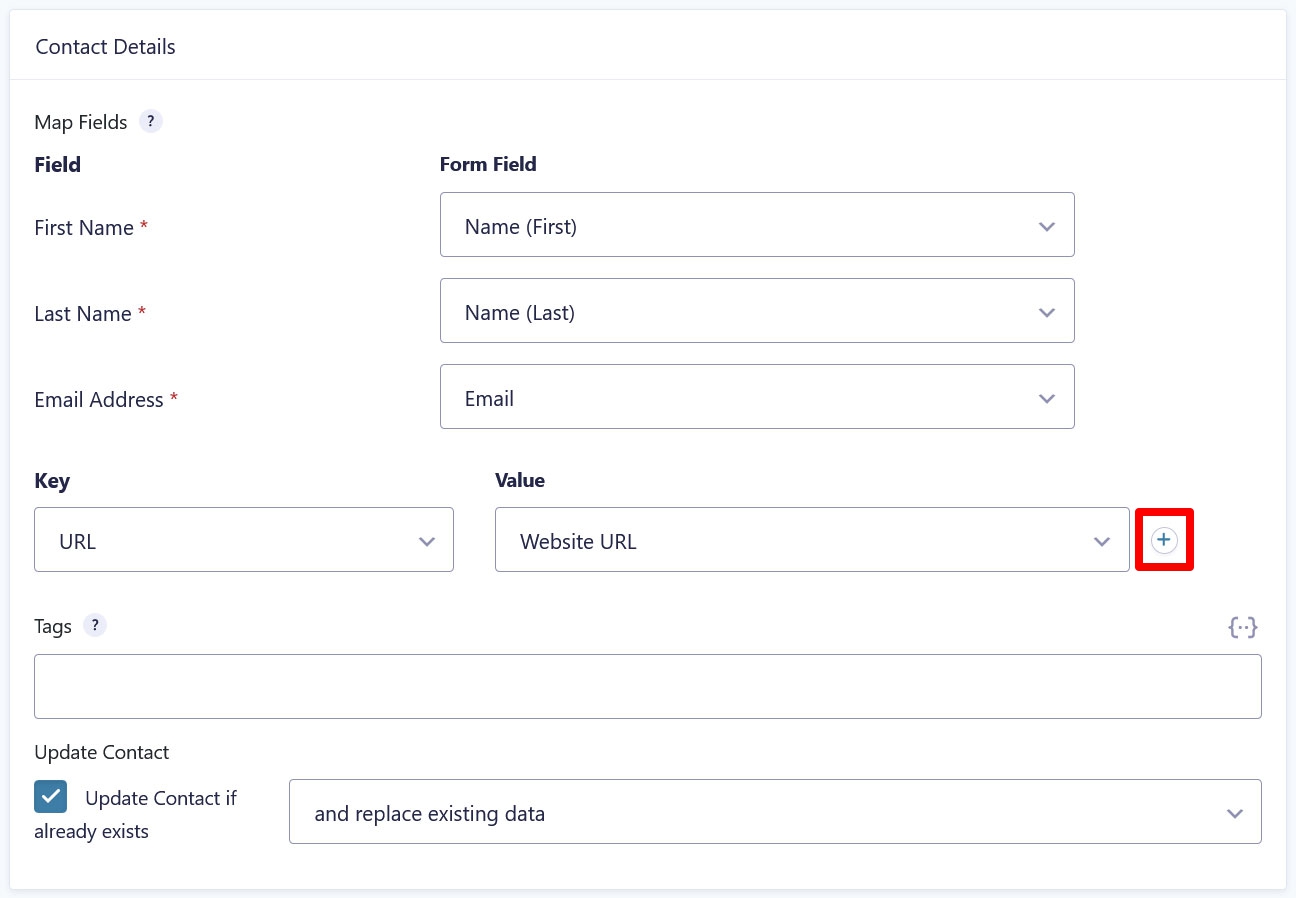
Notice that we have sidestepped an option in the last section, namely the Key/Value fields. You can use these to collect additional information about your contacts.
The Key field contains a bunch of other information that Agile CRM accepts. When you click it, you can see that that’s everything from a job title and company over work email to physical address, website URL, and social accounts.
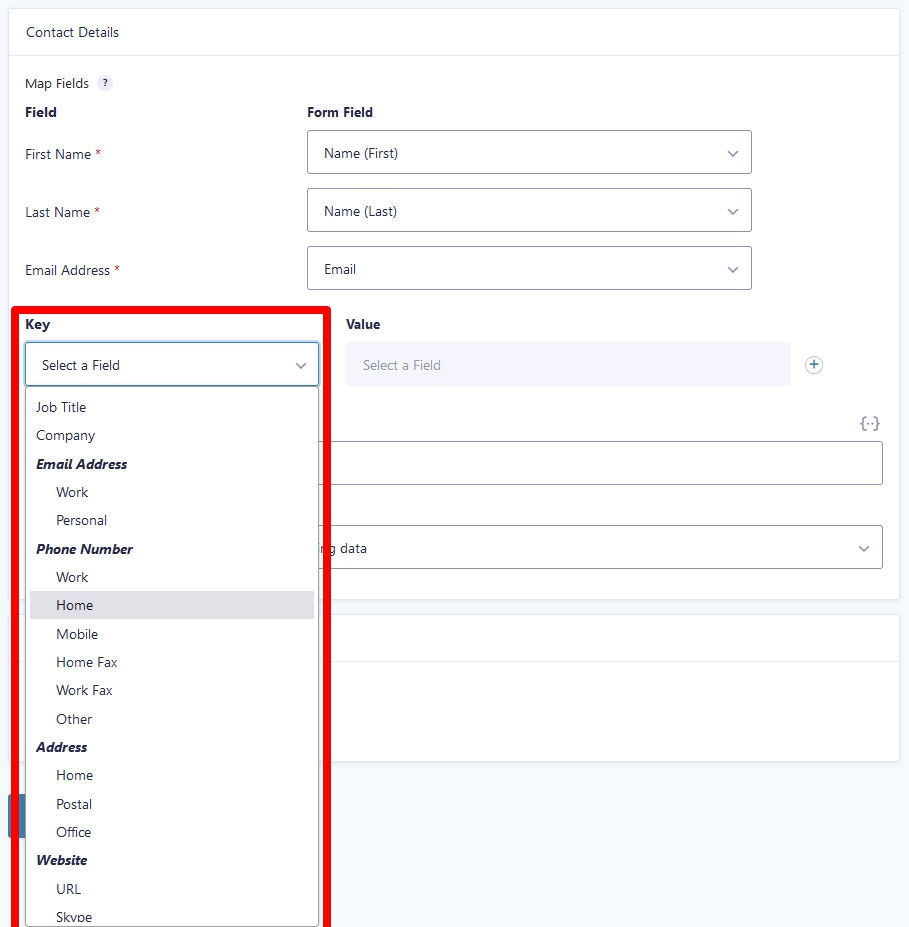
You can select any of these to map them to fields on your form. However, in order to do so, you also need to have the respective fields present on your contact form. So, if you want to collect any of this information, now is the time to go back to the form editor and add them. Afterwards, be sure to map keys and values together correctly.
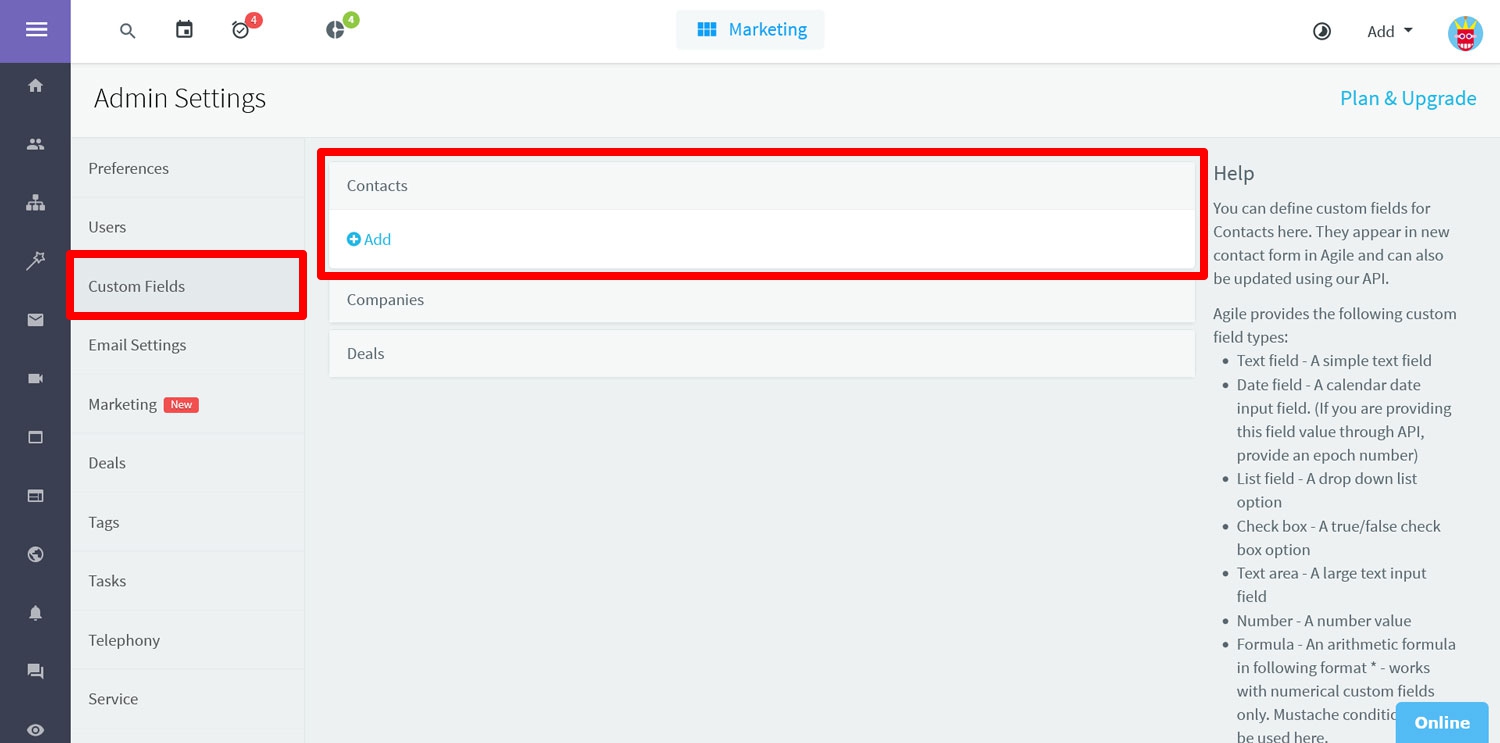
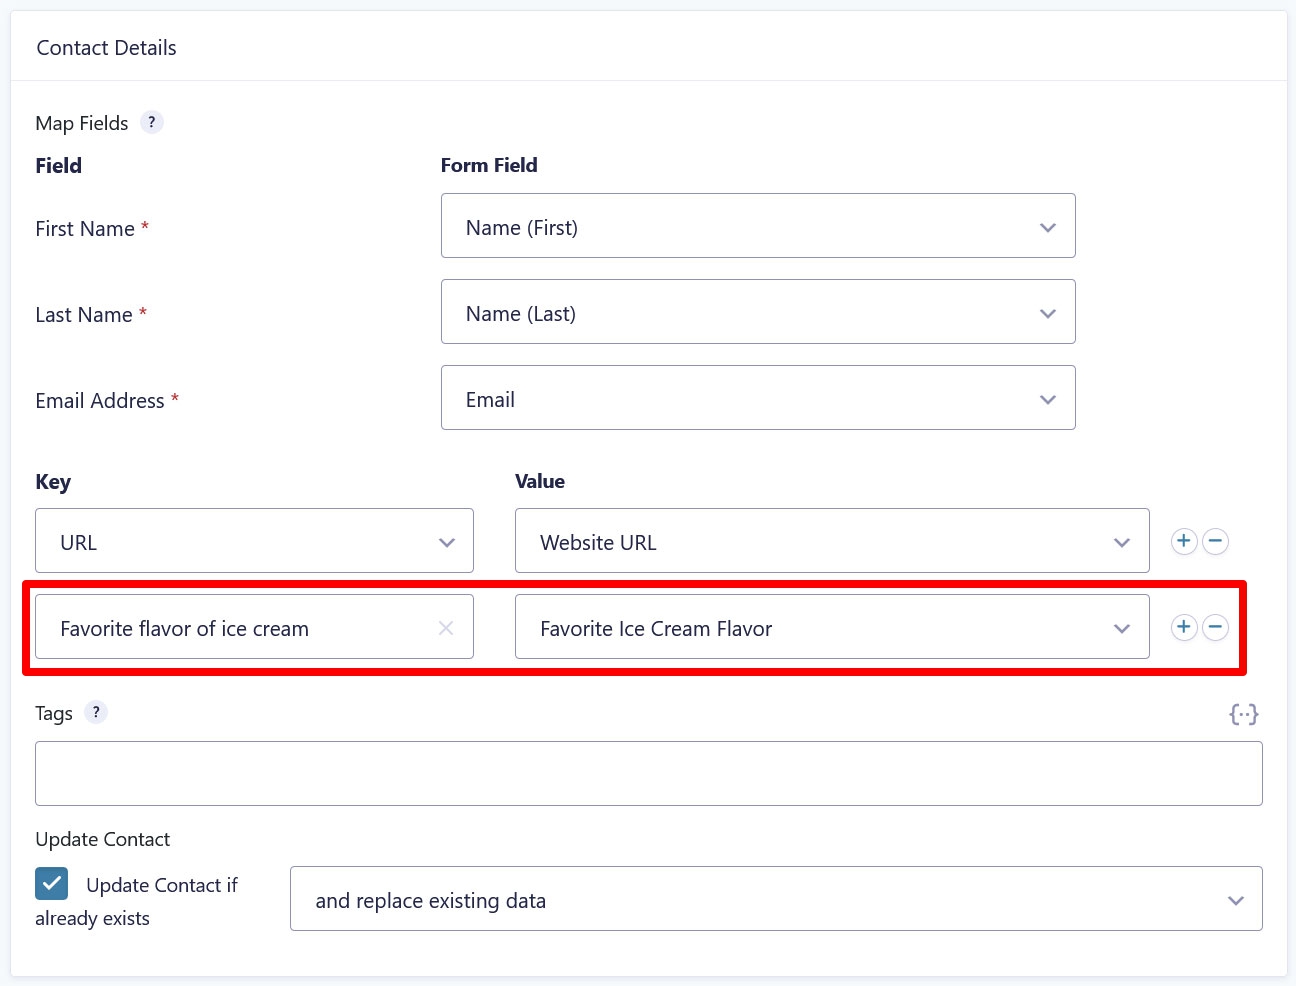
At the same time, you can also collect completely individualized information thanks to Gravity Forms’ custom fields. For that, you first need to set up their equivalents in Agile CRM, otherwise you won’t be able to accept this information into your account. You do that, again, in Agile CRM under Admin Settings (click your profile image, remember?) and then Custom Fields → Contacts → Add.
You will need a label, the type of field, and a description. Under Type, you have a lot of options, from a text field to a checkbox and list to a URL.
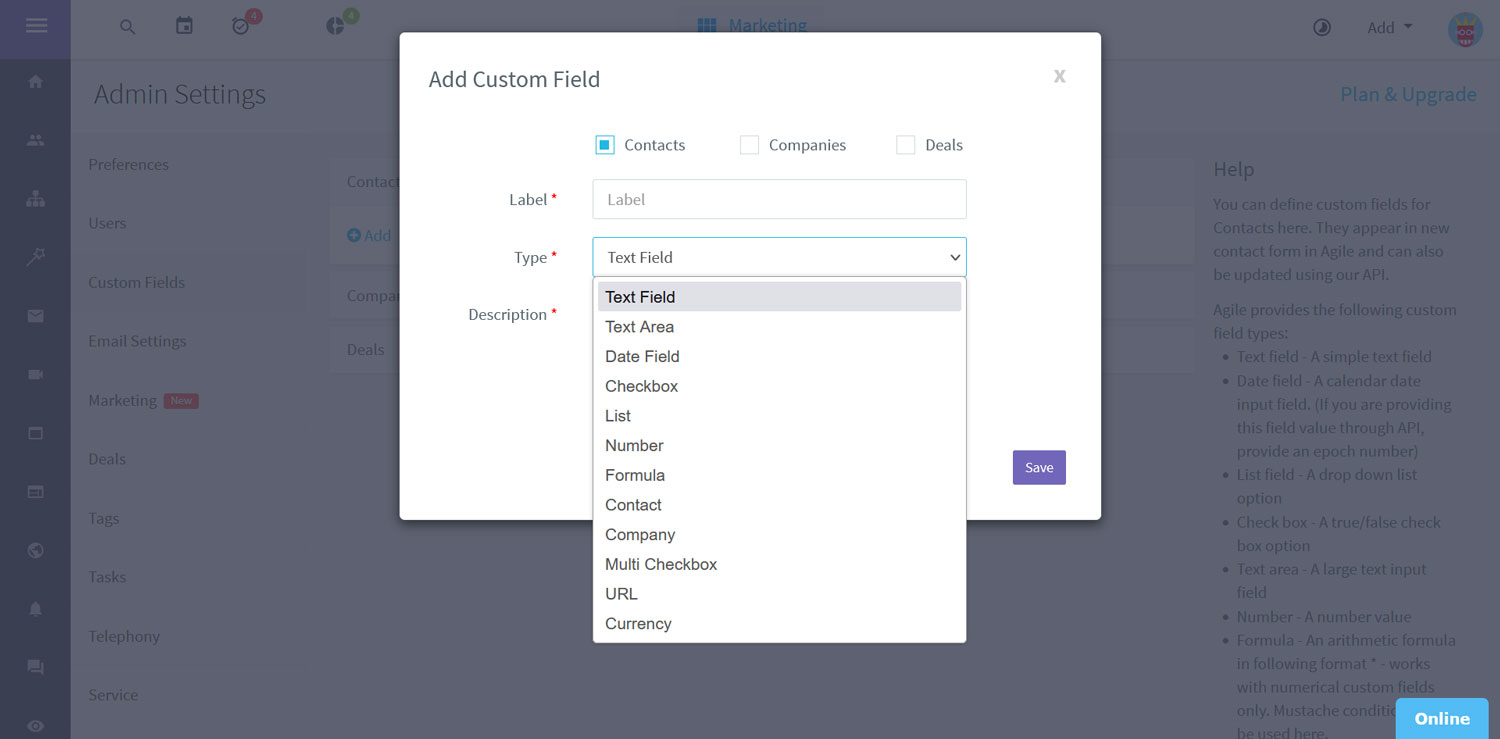
A lot of this also corresponds to the types of custom fields you can set up in Gravity Forms.
To make this work, ensure that your choices on both ends align. That means, if you create a drop-down list custom field in your web form in order to capture data, you also need to create a list-type custom field in Agile CRM and include the possible values.

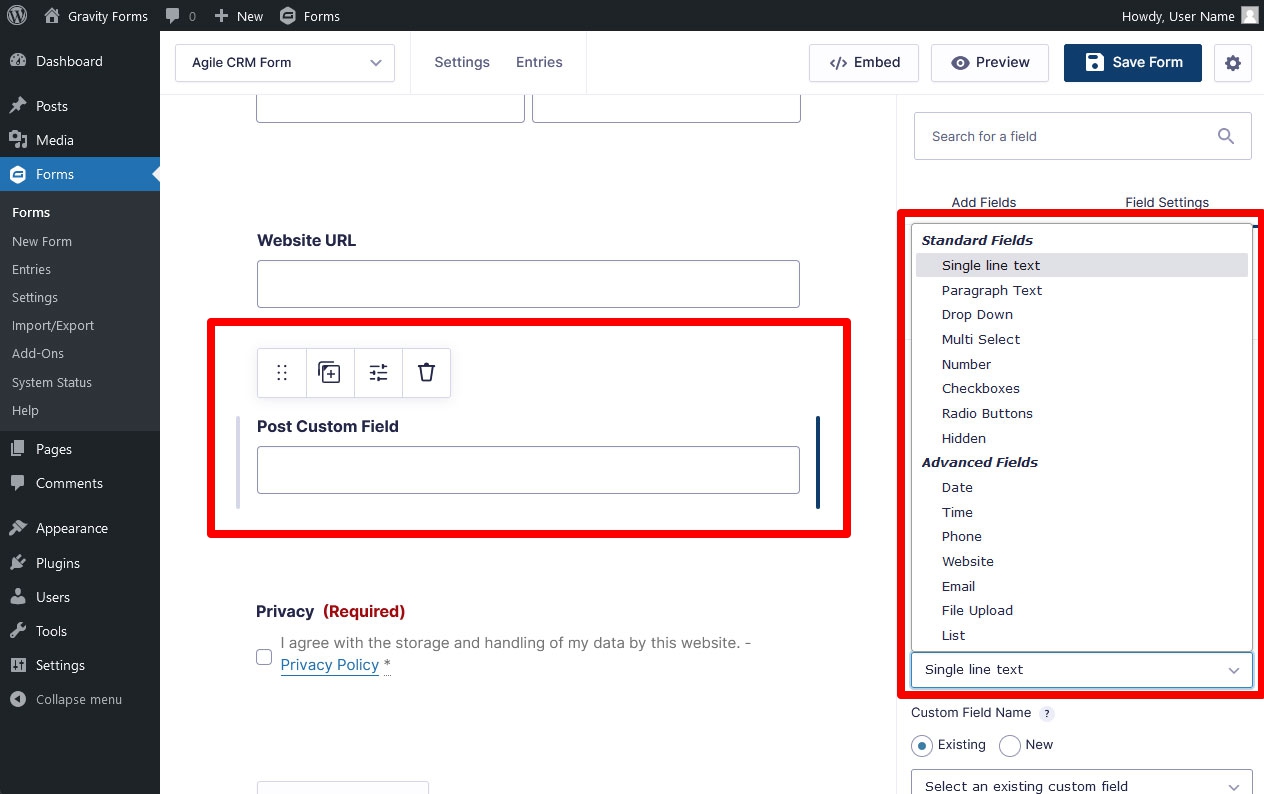
If you do that, you can then start gathering this information. For that, add a new key/value pair in the Agile CRM feed by clicking the plus symbol.
Under Key, use the drop-down menu to pick Add a Custom Field and then copy over the name of the label you gave your custom field in Agile CRM. Then, map it to the respective form field under Value.
7. Creating Tasks
As we have mentioned earlier, another option you have in the Agile CRM feed is to create tasks. That means, when a contact signs up through your web form, you can automatically trigger a task to be created inside Agile CRM for what to do next. All you have to do for that is choose Create Task under Action in the Agile CRM feed.
When you do, it opens up a new panel where you can configure the details.
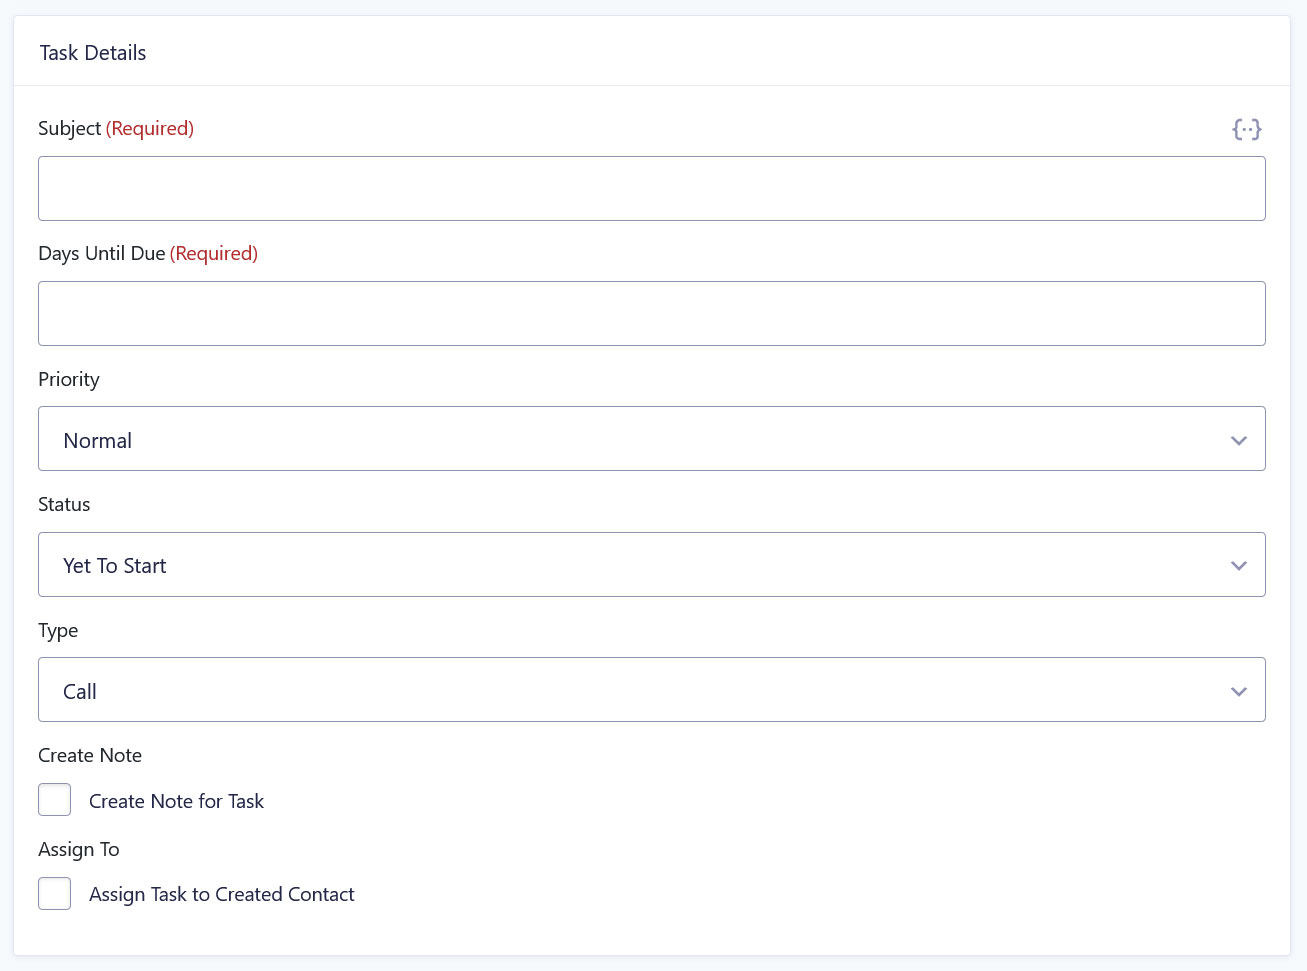
You have the following options:
- Subject — This is mandatory to make clear the name of the task.
- Days Until Due — Also mandatory, input a number here.
- Priority — Set it to high, normal, or low.
- Status — You can choose from “Yet to Start”, “In Progress”, and “Completed”.
- Type — What this task entails, it can be a call, email, meeting, milestone, etc.
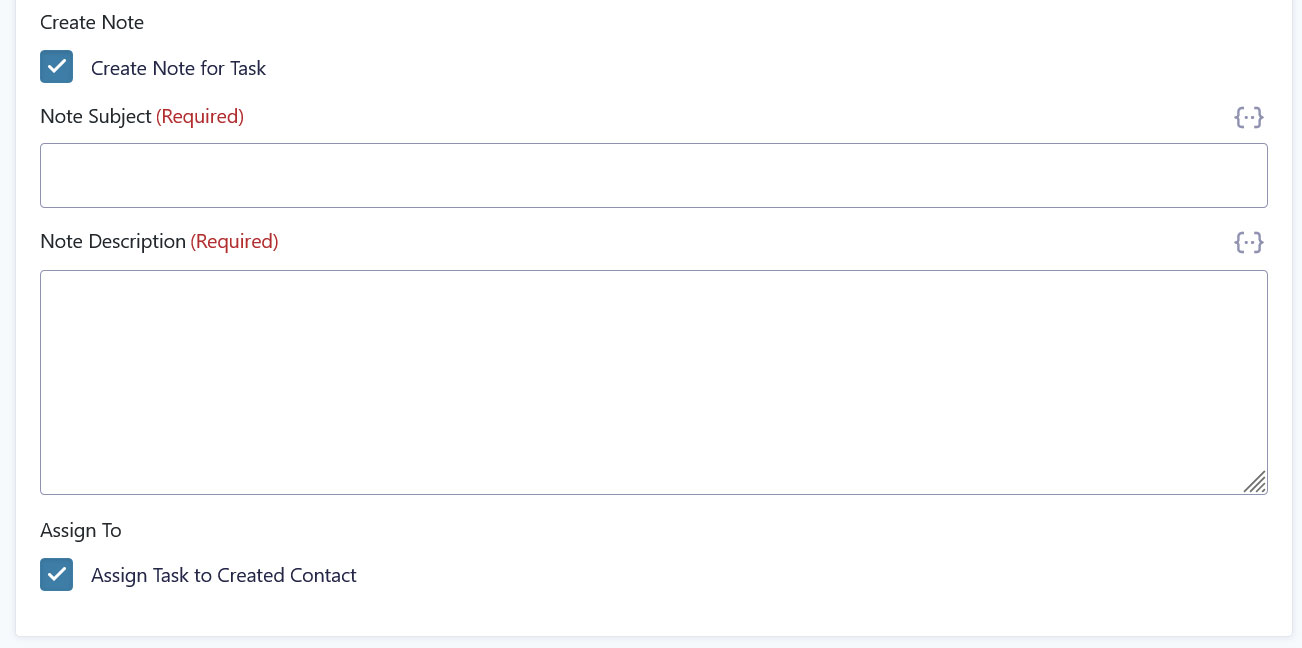
If you tick the box that says Create Note for Task, you may also create a message that goes along with this task for further information. Simply fill in the subject and description. Finally, you can choose to assign the task to the created contact inside Agile CRM by ticking the box at the end.
Once satisfied, be sure to save at the bottom.
8. Optionally: Use Conditional Logic
Another option that exists for working with Agile CRM in Gravity Forms is using conditional logic. You find an option for this at the end of the feed menu, which opens up additional settings when you check the checkbox.
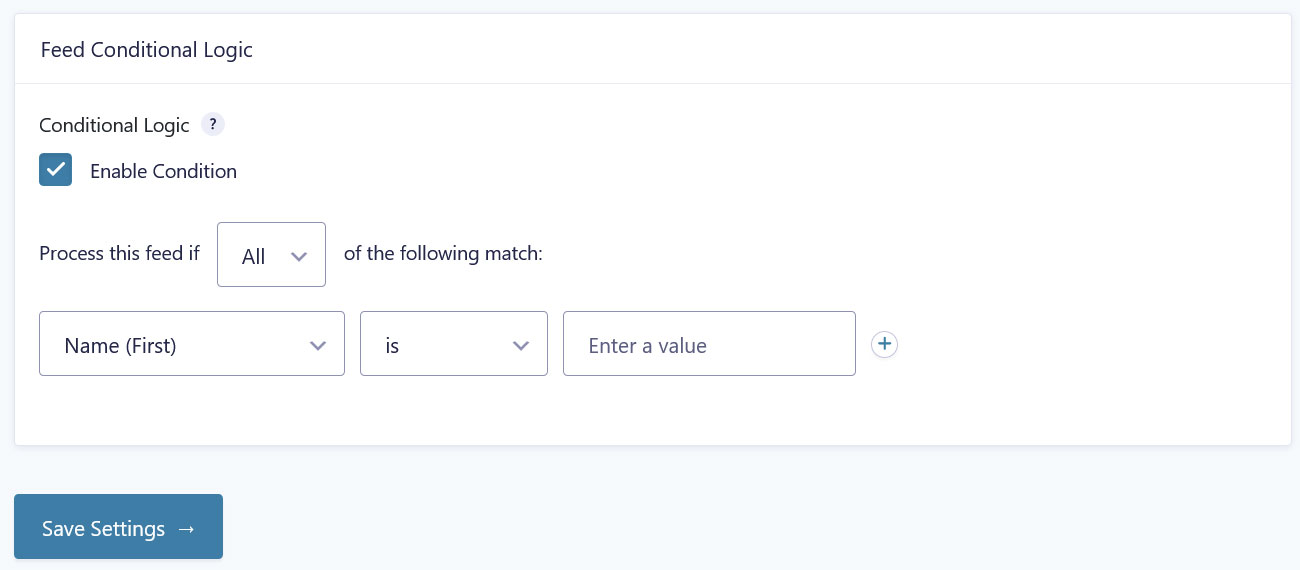
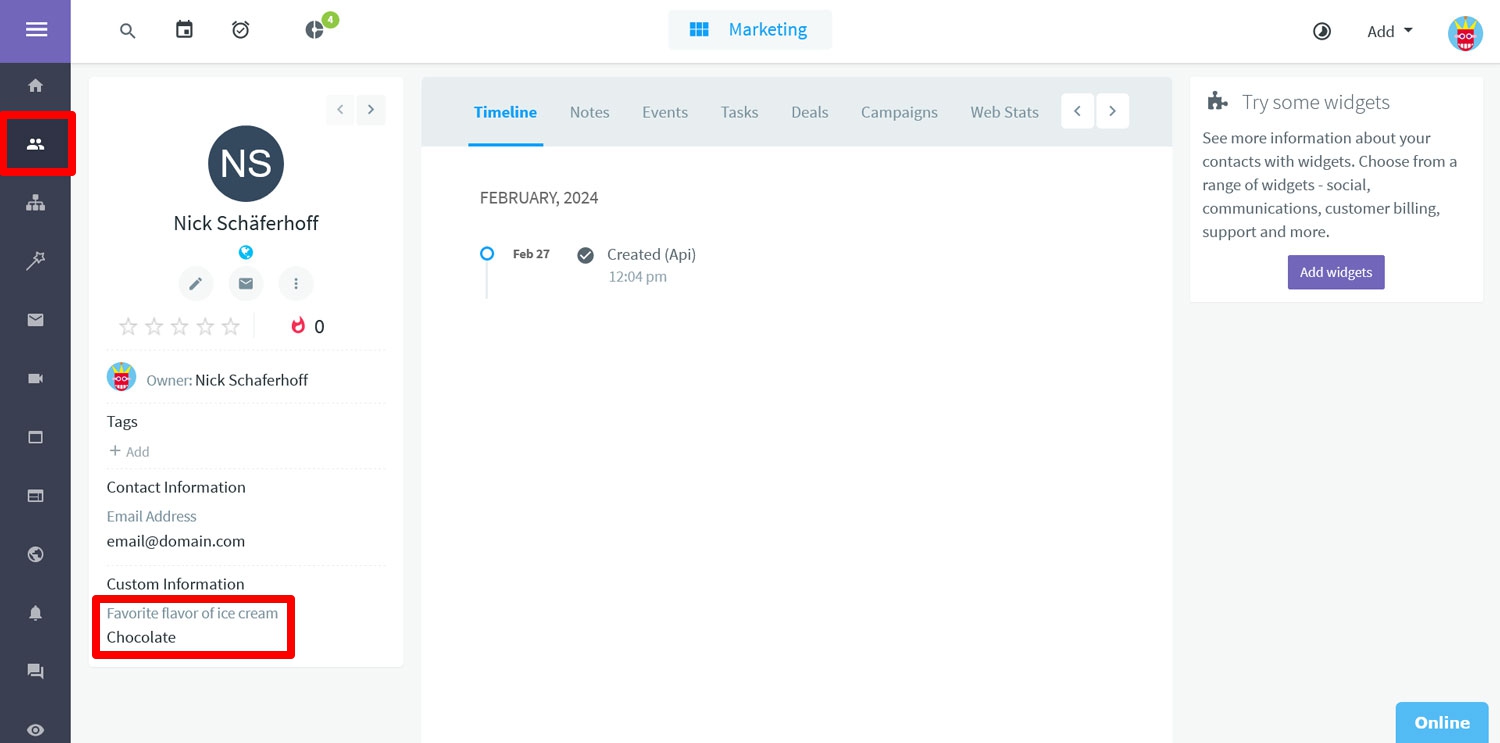
Here, you can set additional conditions for when this feed should be processed, meaning the form data sent on to Agile CRM. For example, if, like us, you have set up a custom field for stating the contact’s favorite ice cream flavor, you can set a condition that their contact information should only go to Agile CRM, if they choose vanilla or chocolate (not that we discriminate against strawberry).
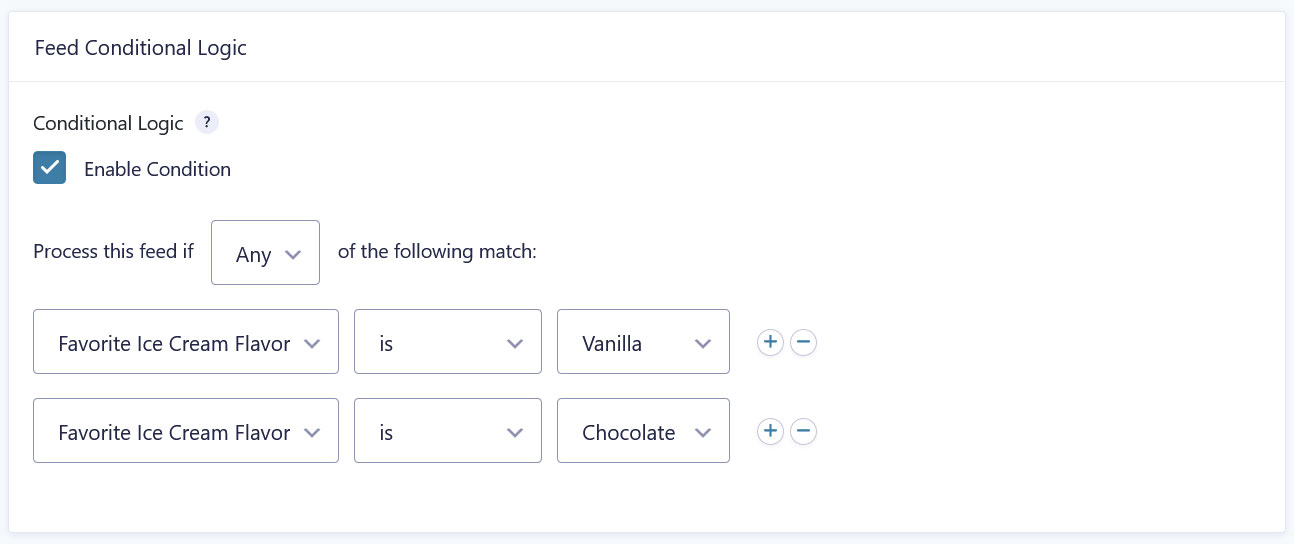
This allows you to segment contacts beforehand so that only promising leads make it to your customer relationship management tool. You can also use it to create separate form feeds in order to futher divide customer information. For more information on this, visit the Gravity Forms Documentation.
9. Embed and Test Form
Finally, once all of the above has been configured, it’s time to test your form. The first step for that is embedding it in a page or post. You can do so using the Gravity Forms block or shortcode. Once present, you can either publish or preview the page to give your new form a test run.
Fill it with relevant information and submit it. Then, go back to Agile CRM and first check the Contacts menu. If everything went alright, your test contact should appear there with all its information.
If you have custom fields set up, pay special attention to whether that information was sent along as well.
In addition, should you have created a task in your Agile CRM feed, click the little alarm clock icon at the top left of the screen. This will get you to the Tasks menu, where your new job should appear as configured.

If everything is as it should be, well done! You successfully connected your web forms with your customer relationship management platform using the Gravity Forms Agile CRM Add-On. If you want to look into ways to further customizing your form experiences, read up on how to customize confirmations and notifications.
Final Thoughts: Gravity Forms and Agile CRM
Agile CRM is a great addition to Gravity Forms. You can use it to manage all contacts captured through the forms on your website and run your marketing campaigns with it.
As we have seen above, connecting the two is also a cinch, thanks to the dedicated Agile CRM Add-On. Simply install it, connect it to your Agile CRM account, create a feed, and you are good to go. From now on you can capture leads fully automatically.
Just one more time, in order to take advantage of it, you need the Pro license, Elite license, or Nonprofit license. Get them now to put your marketing on autopilot.


