
Gravity Forms shortcodes are a useful feature that let you embed your forms on your site and customize how they work.
While you can use the Gravity Forms shortcode as a simple tool to embed your form, shortcode also gives you more flexibility for setting up your site, such as displaying or hiding certain form content, adjusting form behavior, pre-filling form fields, adding conditional logic, and even chaining multiple forms together.
In this complete guide to the Gravity Forms shortcodes, you’re going to learn everything that you need to know to use and get value from the shortcodes in Gravity Forms.
We’ll start with an introduction to the basics, such as what shortcodes are, how they work, and how to find a shortcode for your form.
Then, we’ll get into more advanced use cases for shortcodes, such as using shortcode parameters to adjust form behavior, chaining together two separate forms using shortcodes, adding conditional logic to confirmations and notifications, and more.
Let’s dig!
What Are Shortcodes in WordPress?
In a nutshell, WordPress shortcodes are small bits of code that let you more easily perform actions on your site, such as embedding content from a plugin. In terms of Gravity Forms, that “action” is typically embedding a form in your content.
The basic format for a shortcode looks something like below, with the shortcode name placed inside brackets:
[shortcode]
To adjust shortcode behavior, you can add modifiers called parameters. These are additional content inside the shortcode, typically followed by an equal sign that indicates the parameter to use.
For example, to embed a form from Gravity Forms, you’ll add an extra id parameter that specifies the actual form to embed:
[gravityform id="7"]
Why Use Shortcodes?
Shortcodes offer a way to add content from plugins to different areas of your site.
For Gravity Forms, one of the biggest advantages of the shortcode is its versatility.
You can use the Gravity Forms embed shortcode to add forms pretty much anywhere on your site. Beyond adding forms to the native WordPress editor or widgets, this can be especially useful if you want to add forms to other plugins.
For example, the shortcode lets you create a popup form by adding the shortcode inside a popup plugin’s settings – check out our guide to WordPress popup forms to learn more.
Similarly, the shortcode would let you add forms inside any drag-and-drop builder plugin such as Elementor, Beaver Builder, Divi, and so on.
Beyond this versatility, the Gravity Forms shortcode also unlocks some more advanced use cases that other embed methods don’t offer.
For example, you can chain two forms together using shortcodes.
Basically, understanding how the Gravity Forms shortcodes work will help you get the most value from Gravity Forms.
You might not need to use shortcodes depending on your use case, but understanding them will at least help you know their potential.
How to Embed Gravity Forms Using Shortcodes
To kick-start our tutorial, let’s go over how to embed a form using the shortcode. Then, in the next section, we’ll cover using shortcode parameters to modify the form embed.
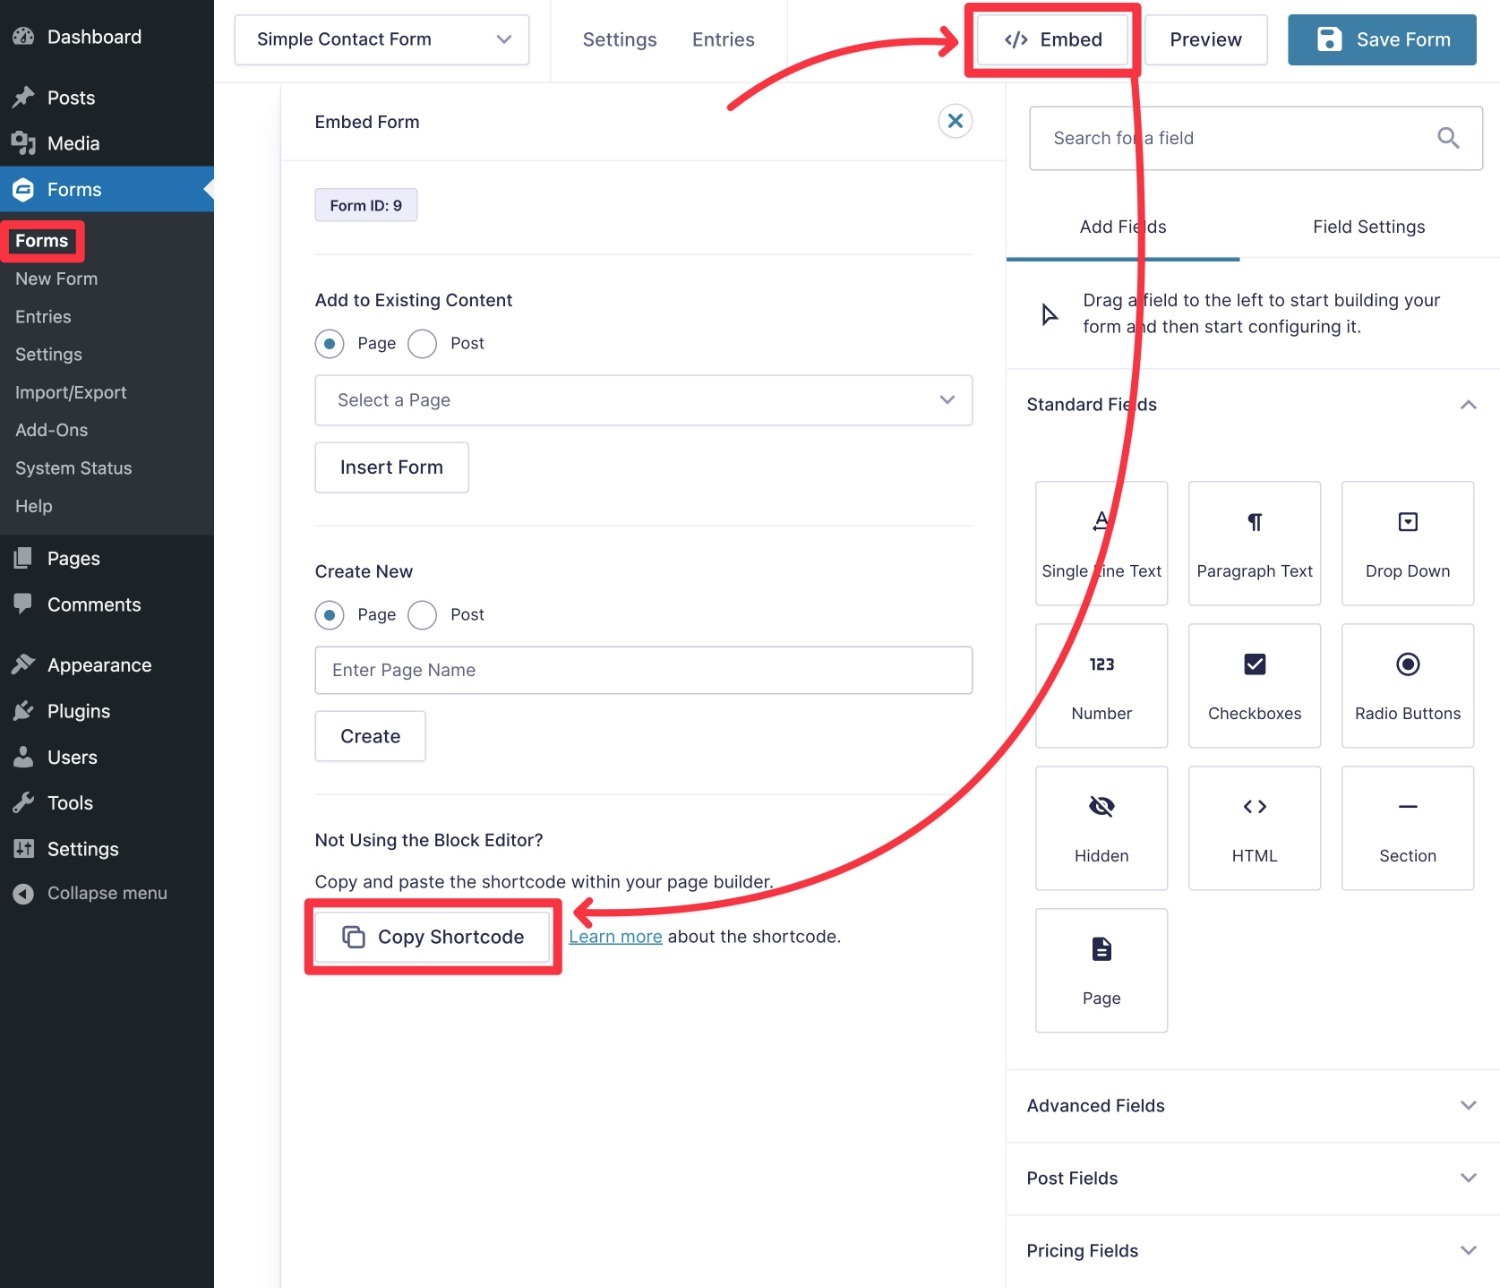
1. Find the Shortcode for the Form
Here’s the easiest way to find the embed shortcode for any form that you’ve created with Gravity Forms:
- Open the form editor for the form that you want to embed. Go to the Forms area in your dashboard and select Edit under the form that you want to embed.
- Click the </> Embed button in the top-right corner of the form editor.
- Click the Copy Shortcode button to copy the shortcode to your clipboard.
2. Add the Shortcode to the Editor
Now, open the editor for the page where you want to embed the form.
This could be the WordPress block editor, the classic TinyMCE editor, a popup plugin, a page builder plugin, and so on.
For this example, we’ll use the native WordPress block editor, though.
First, add a Shortcode block. Then, paste the Gravity Forms shortcode into the field like so:
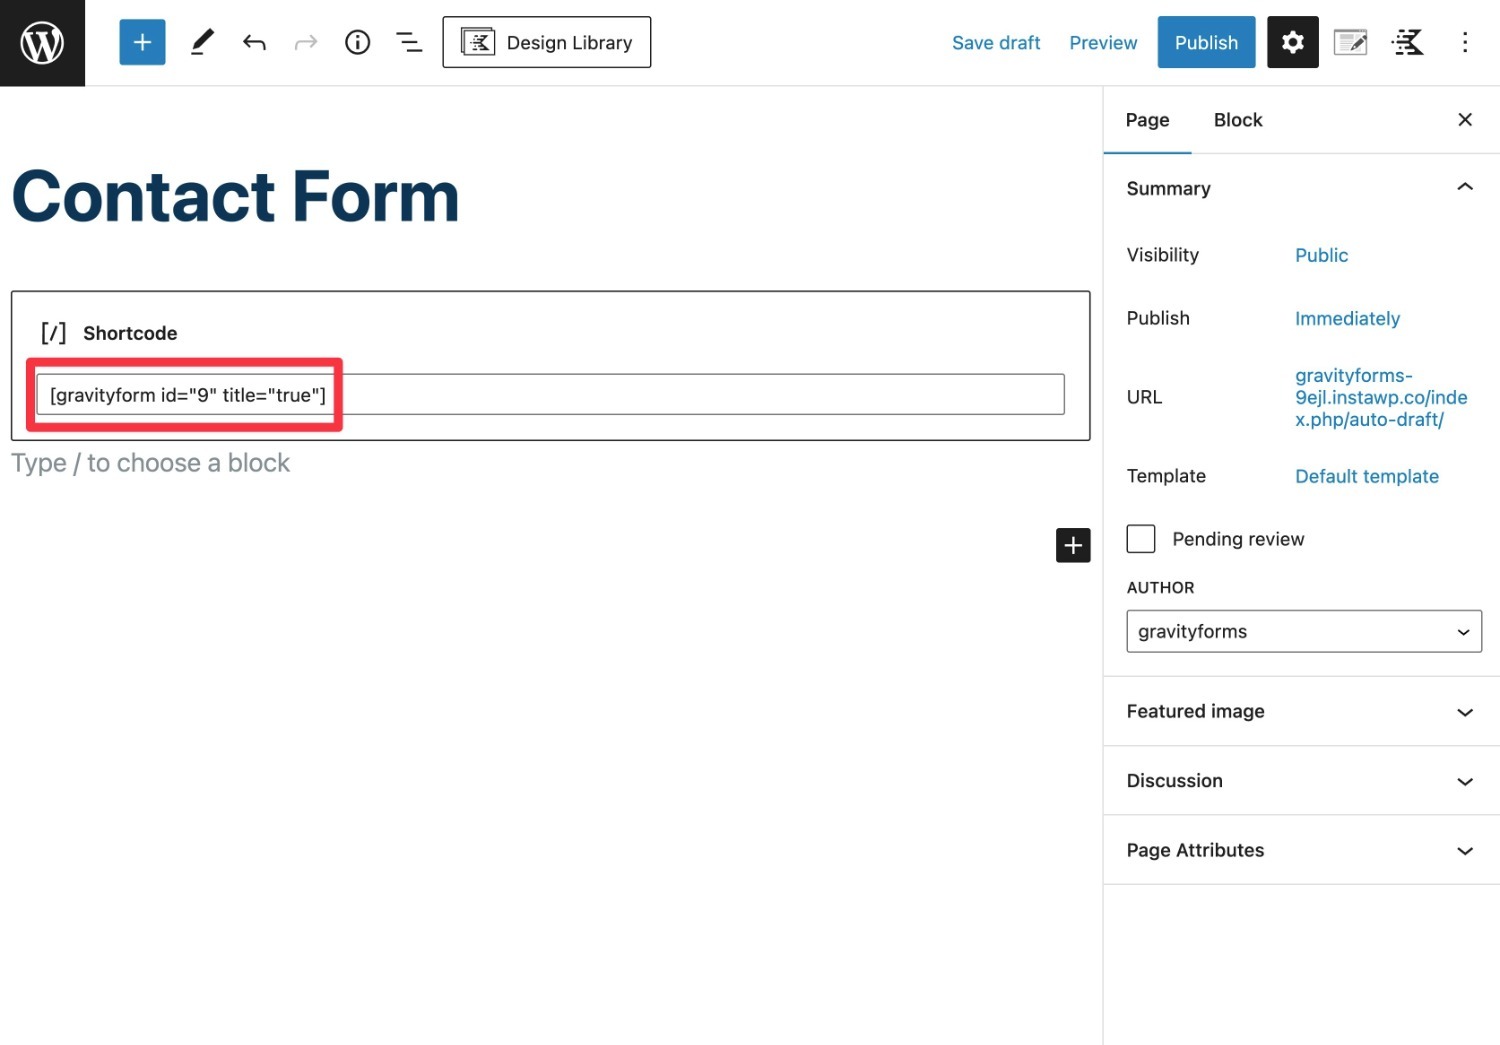
And that’s it! When you update the page, you should see your form.
In the next section, we’ll talk about some ways to modify how the embed functions. But first, it’s worth pointing out that there are other ways that you can embed forms.
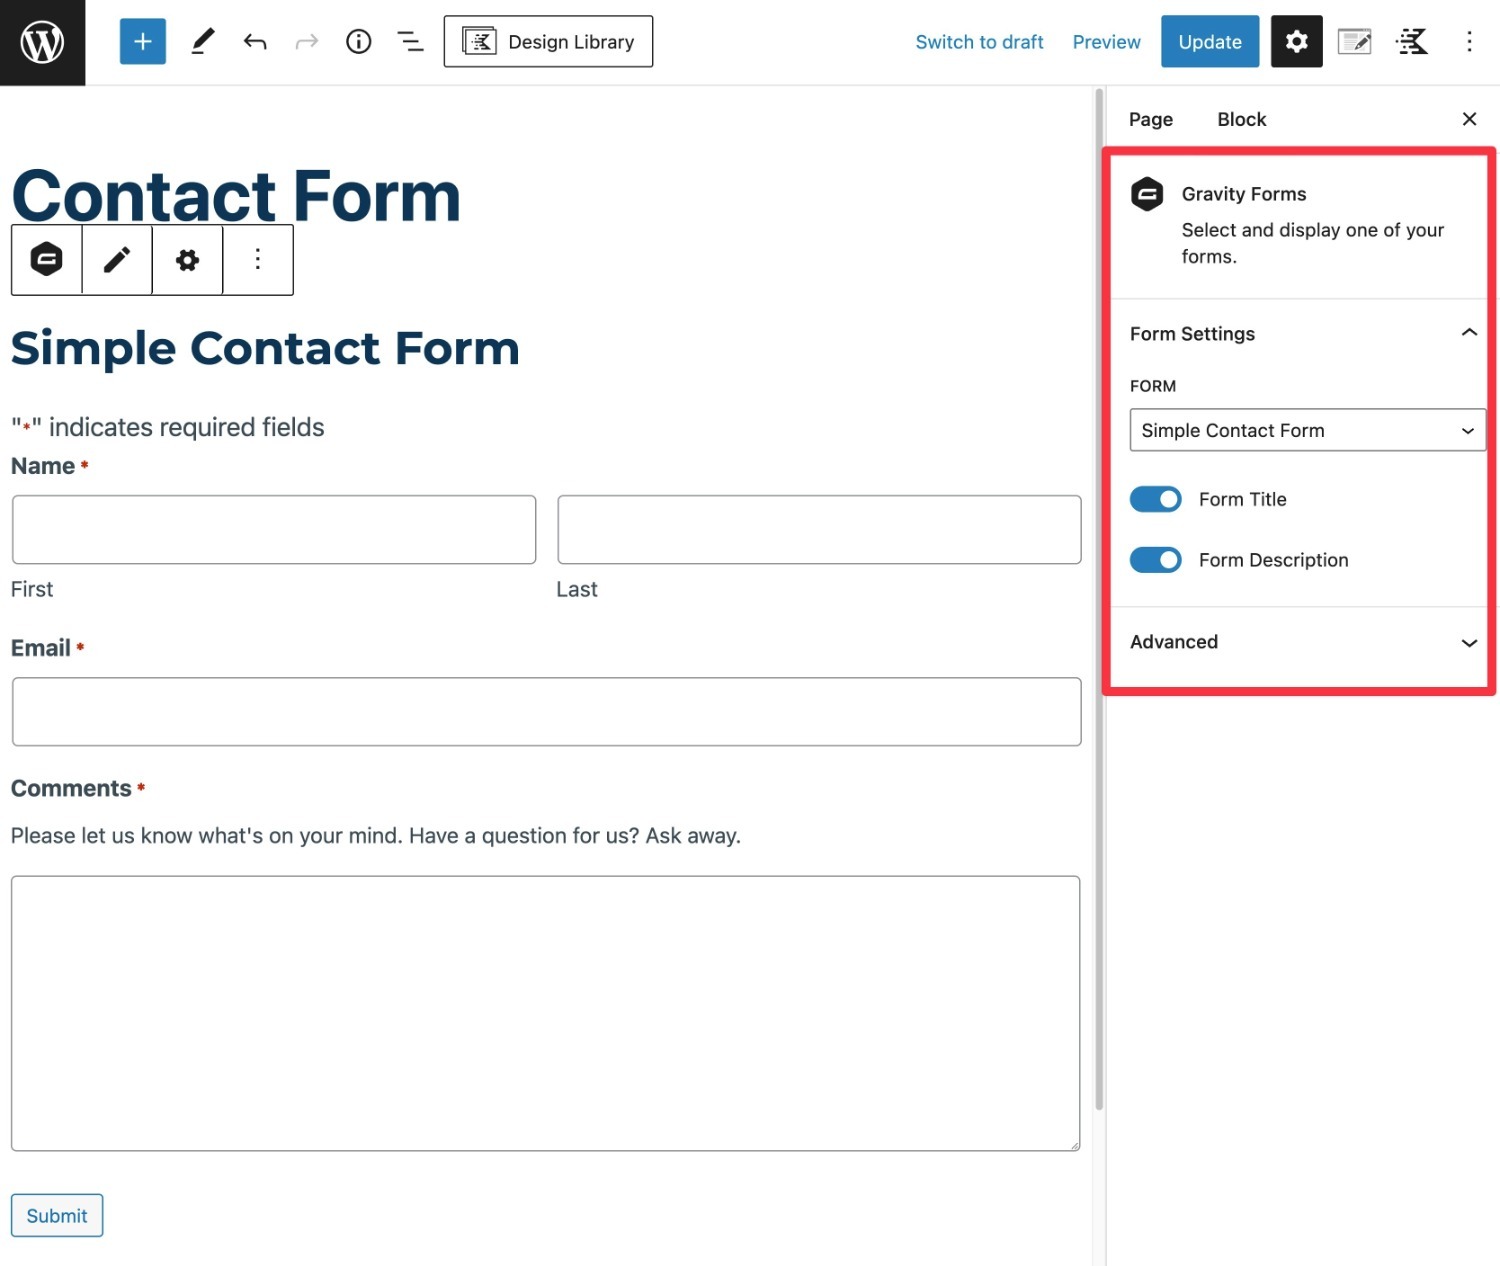
You Can Also Embed Forms Using Blocks…
It’s important to note that you don’t need to use the Gravity Forms shortcode to embed basic forms in the block editor.
If you’re using the native WordPress block editor (AKA Gutenberg), Gravity Forms includes a dedicated block that you can use to embed forms.
This block also includes basic settings for most of the basic shortcode parameters, such as hiding the title and/or description.
…Or You Can Embed Forms Using Code
For more advanced users, you can also embed forms using the dedicated gravity_form() function – there’s no need to rely on WordPress’s do_shortcode() function.
To learn how this works, check out our guide on how to embed forms using code.
How to Modify Your Form Using Gravity Forms Shortcode Parameters
The Gravity Forms embed shortcode comes with six different parameters that you can use to modify its behavior.
Here are the six embed shortcode parameters that you can use:
id– this specifies the specific form to embed, based on its ID. This is the only parameter that’s required. The other parameters are all optional.title– whether or not to show the form’s title. It can be true (display the title) or false (no title).description– whether or not to show the form’s description. It can be true or false.ajax– whether or not to use Ajax submit. It can be true (use Ajax submit) or false (require a page reload after the user submits the form).tabindex– this is a number that lets you specify the starting tabindex of the form. You don’t need to use this most of the time, but it can help adjust keyboard shortcut behavior when you have multiple forms on a page. Learn more.field_values– this lets you pre-populate certain fields in your form with preset values. This is the most versatile shortcode parameter, so we’ll explain it in more detail below.
Gravity Forms Shortcode Parameters
Let’s look at a few examples of applying the basic Gravity Forms shortcode parameters so that you can understand how they affect your form embed.
Here’s what our form looks like on the backend:
Now, let’s go through what it would look like with different shortcode parameters.
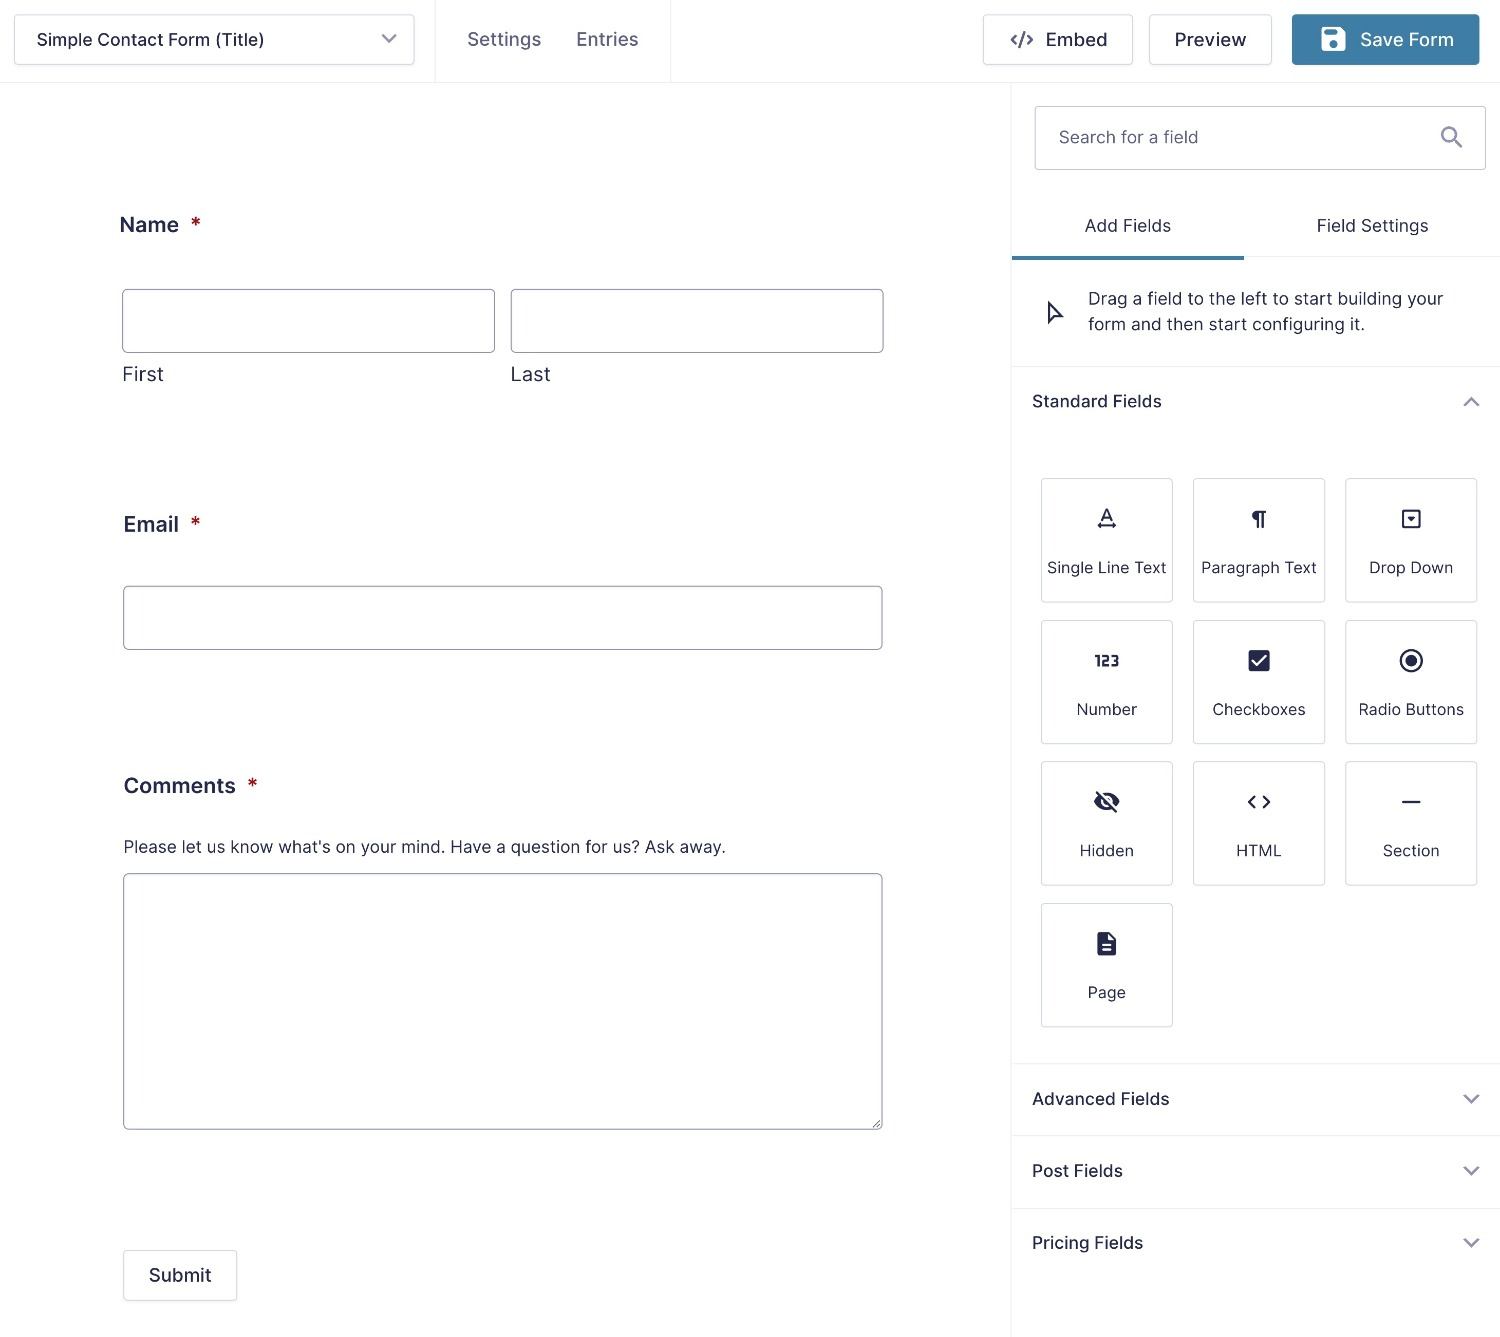
Basic Embed Shortcode
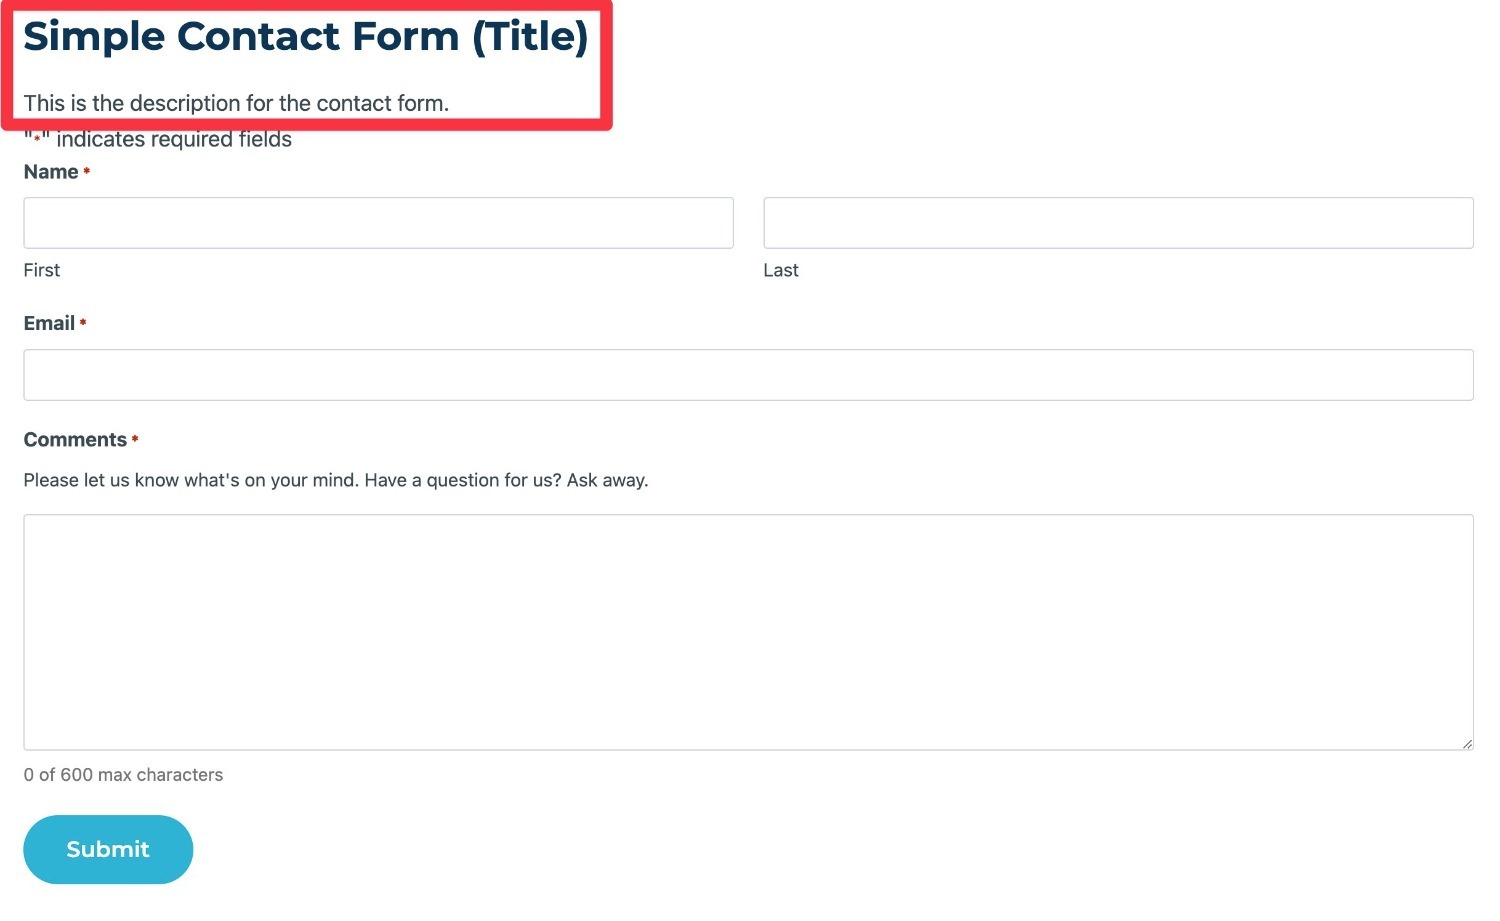
When you use the basic Gravity Forms embed shortcode, the default behavior is to include both the form title and description.
So, if you use just the shortcode like this:
[gravityform id="9"]
Then the frontend form will include both the title and description like this:
Hiding the Form Title
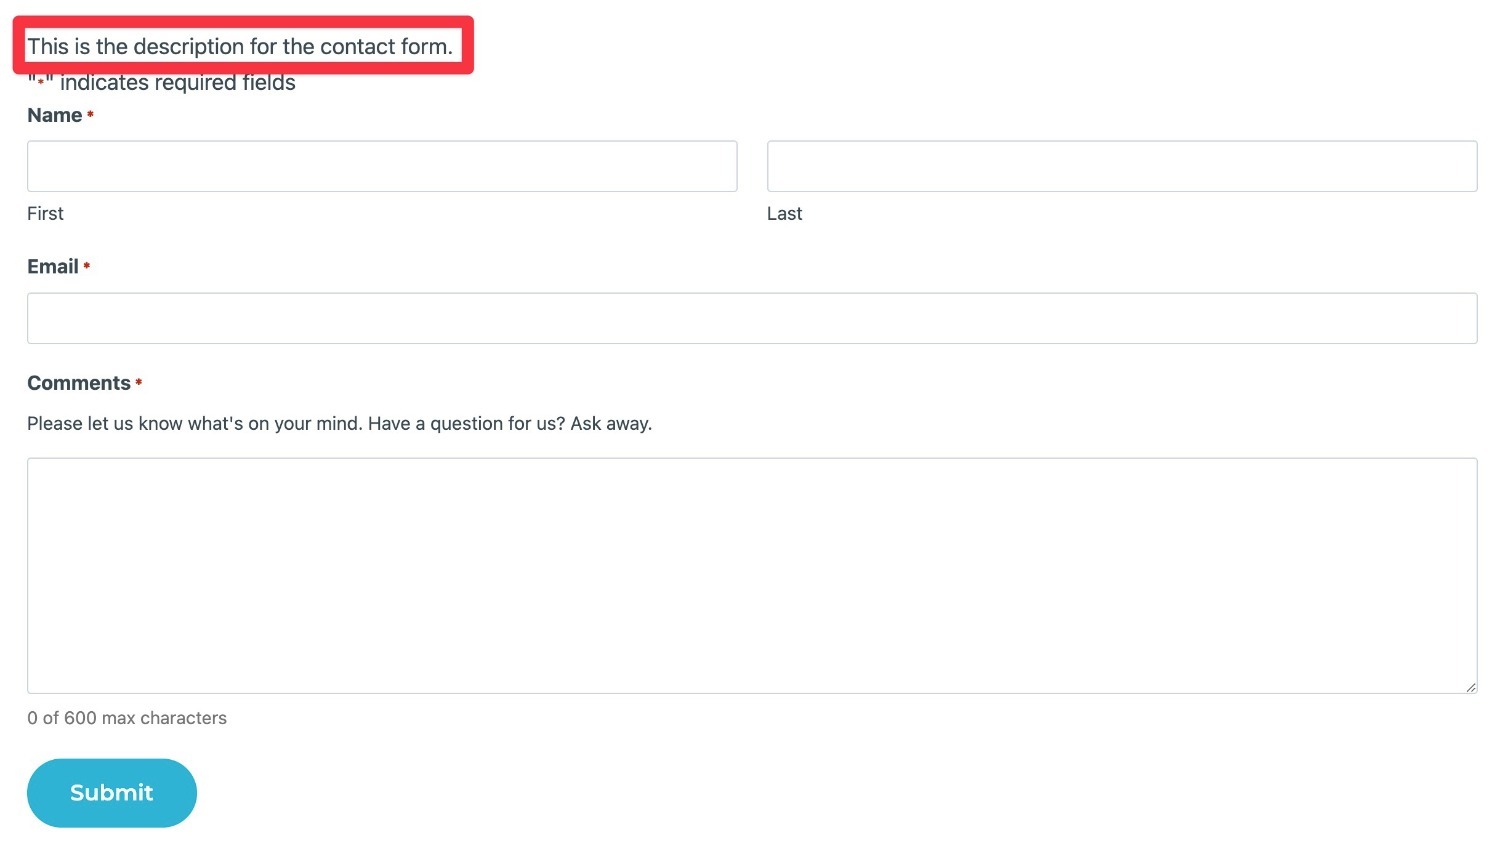
If you want to hide the form title, you can add the title parameter and set it equal to false:
[gravityform id="9" title="false"]
Now, the frontend form will still include the description but not the title:
Hiding the Form Description
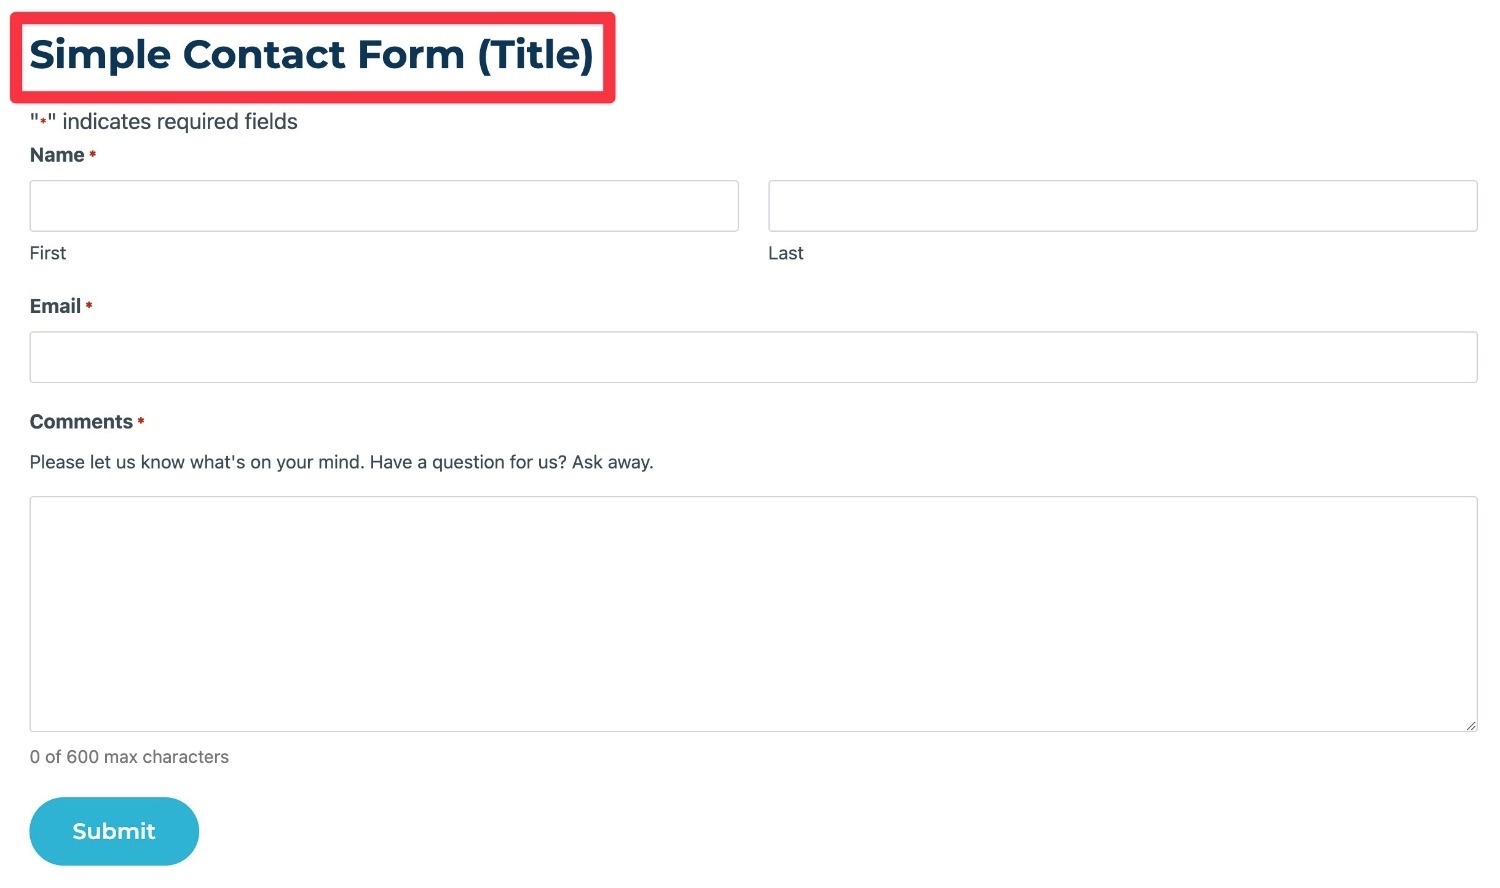
If you want to hide the form description, you can add the description parameter and set it equal to false:
[gravityform id="9" description="false"]
Now, the frontend form will still include the title but not the description:
Hiding the Form Title AND Description
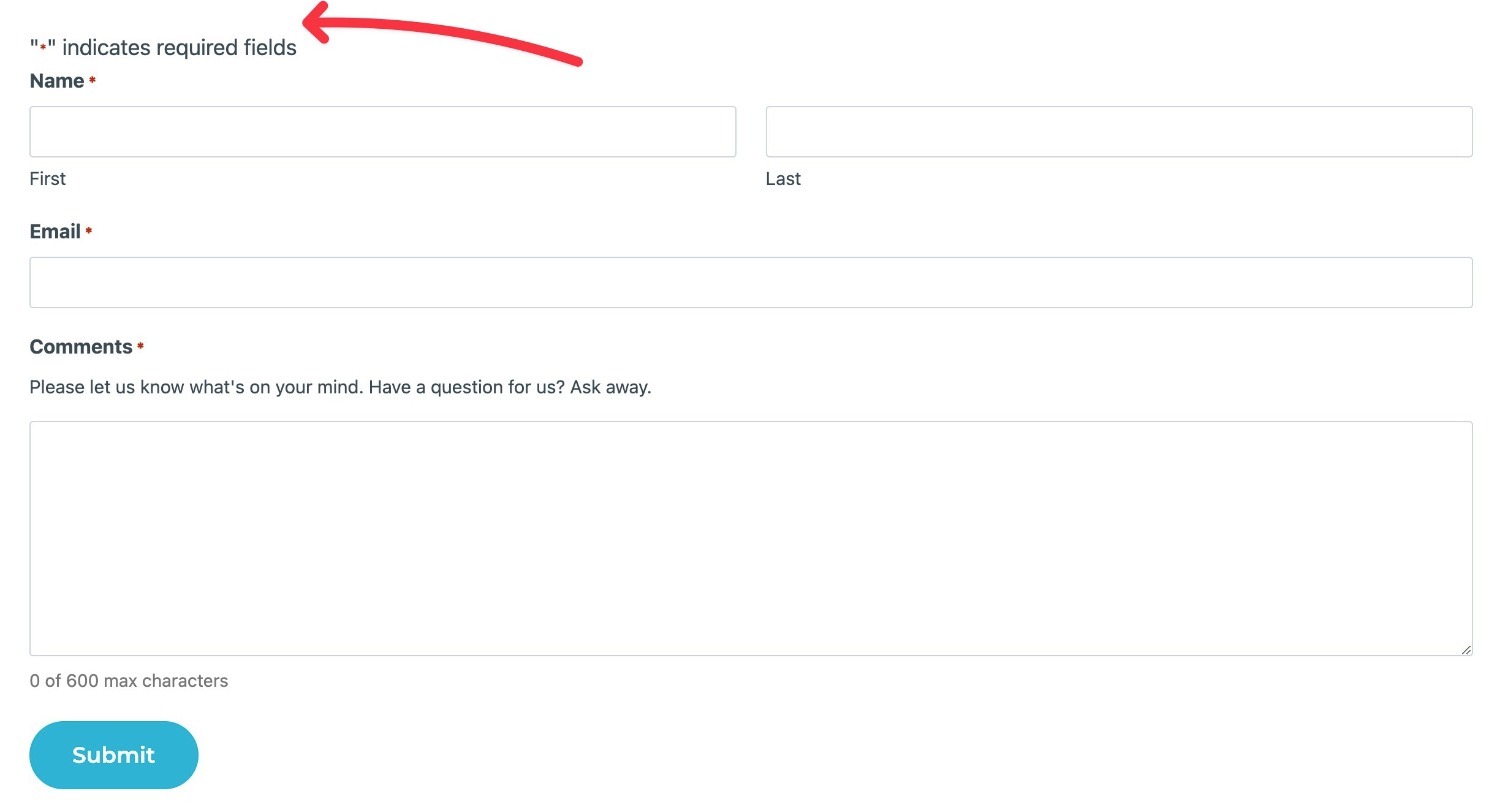
To hide both the title and description, all you need to do is include both parameters in your shortcode like this:
[gravityform id="9" title="false" description="false"]
Now, the embed will only include the form itself, without any title or description:
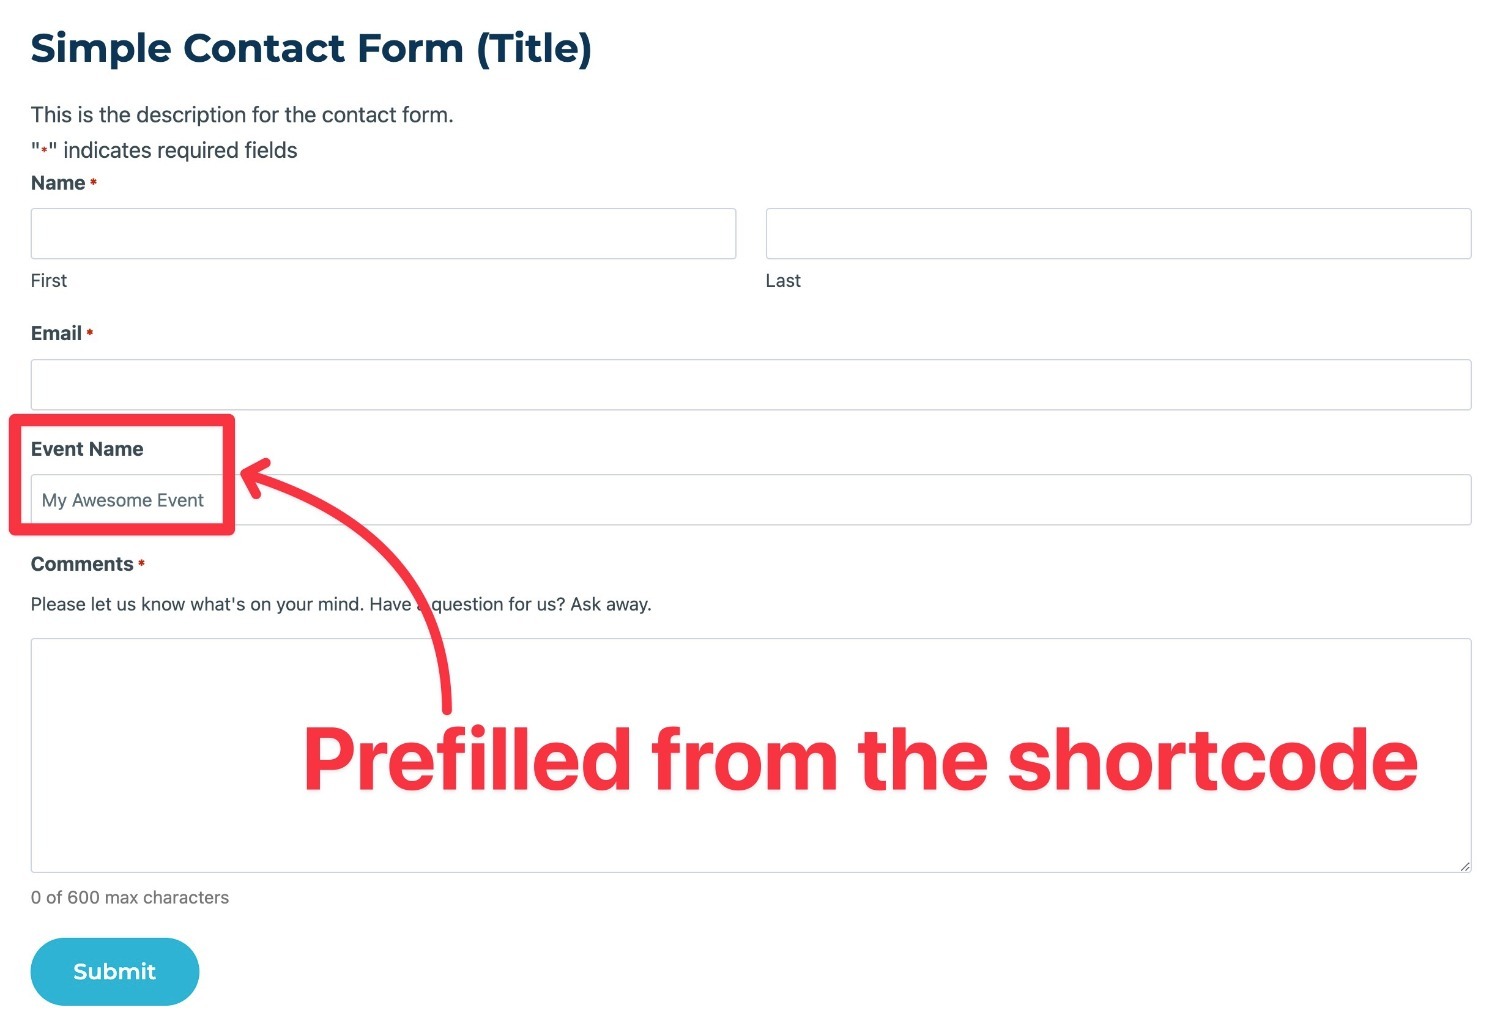
How to Pre-Fill Form Data Using the field_values Parameter
Whereas the other shortcode parameters make simple adjustments, the field_values parameter offers much more advanced functionality.
Essentially, this parameter lets you pre-fill one or more fields in your form (or pre-select the value from multiple options).
There are two parts to using the field_values parameter:
- The field that you want to add information to.
- The information that you want to add.
To use this parameter, you’ll first need to enable dynamic population in the field settings of the field that you want to populate. When you enable it, you’ll be able to specify a parameter name, which you need for the shortcode.
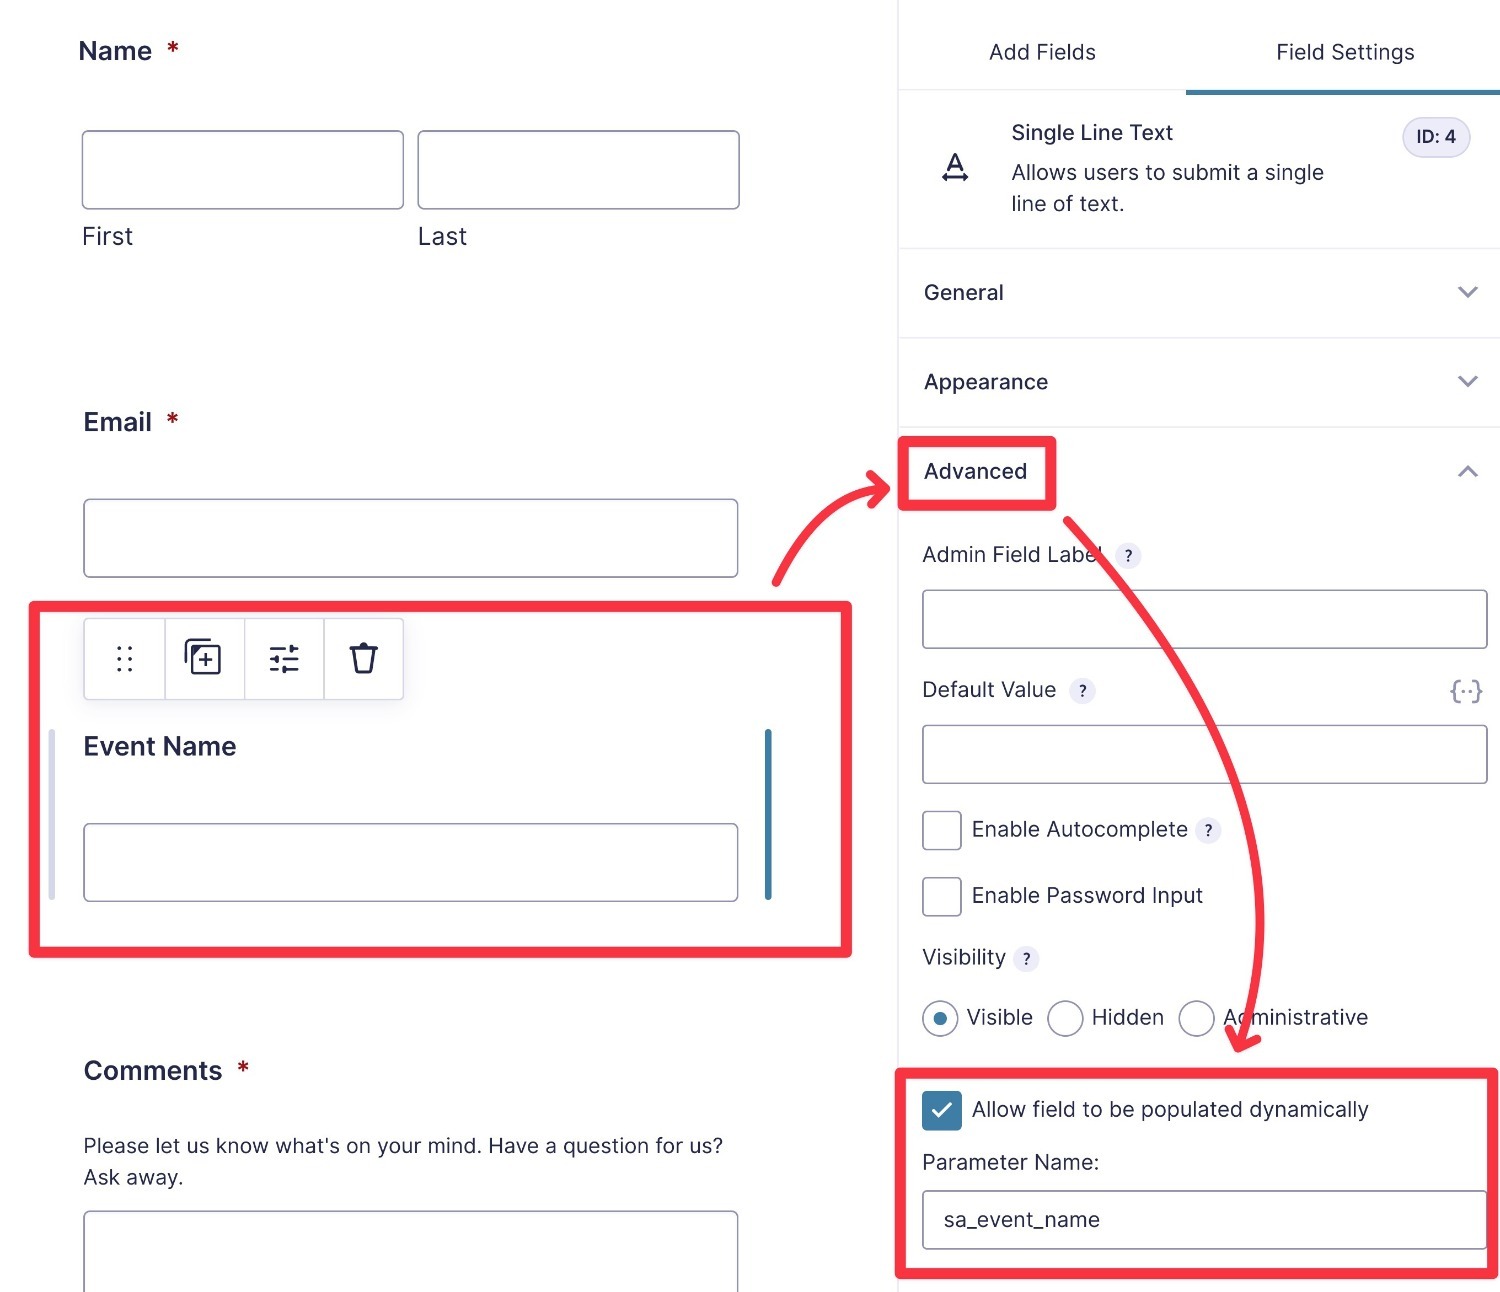
Then, you can set up the shortcode like so:
[gravityform id="1" field_values="parameter_name=value"]
For example, to pre-fill a field with a parameter of sa_event_name with the content “My Awesome Event”, you would set up the shortcode like so:
[gravityform id="1" field_values="sa_event_name=My Awesome Event"]
If you want to populate multiple fields, you can connect them using ampersands like so:
[gravityform id="1" field_values="parameter_name1=value1¶meter_name2=value2¶meter_name3=value3"]
If you want to learn more, check out this documentation on dynamic population.
How to Chain Gravity Forms Together Using Shortcodes
A more advanced use case for the Gravity Forms shortcode is chaining two separate forms together without needing to send users to a separate URL.
By “chaining two forms together”, we mean that a user submits the first form and then is immediately presented with the second form after submitting the first form.
Using what you learned about pre-filling form data in the previous section, you can also pre-fill some information in the second form based on data that the user submitted in the first form.
For example, if the user already submitted their email address as part of the first form, you could pre-fill that information in the second form.
Here’s a look at the basic process – keep reading for the full tutorial:
- Create the two forms that you want to chain together.
- Add the shortcode for the second form to the confirmation message of the first form. If you want to pre-fill form data in the second form, you can include that as part of the shortcode using merge tags.
- Embed the first form on a page.
1. Create the Two Forms That You Want to Chain Together
To get started, create the two forms that you want to chain together.
You can create them just like you would any other form – there’s no need to do anything different (yet!).
2. Add Shortcode for Second Form to First Form’s Confirmation Message
Next, you’ll want to find the embed shortcode for the second form. That is, the form that will appear after the user submits the first form.
Once you have that shortcode in a safe place, open the form settings for the first form and edit the default confirmation message in the Confirmation tab.
Make sure to choose Text as the Confirmation Type. Then, add the shortcode for the second form to the confirmation message editor for the first form:
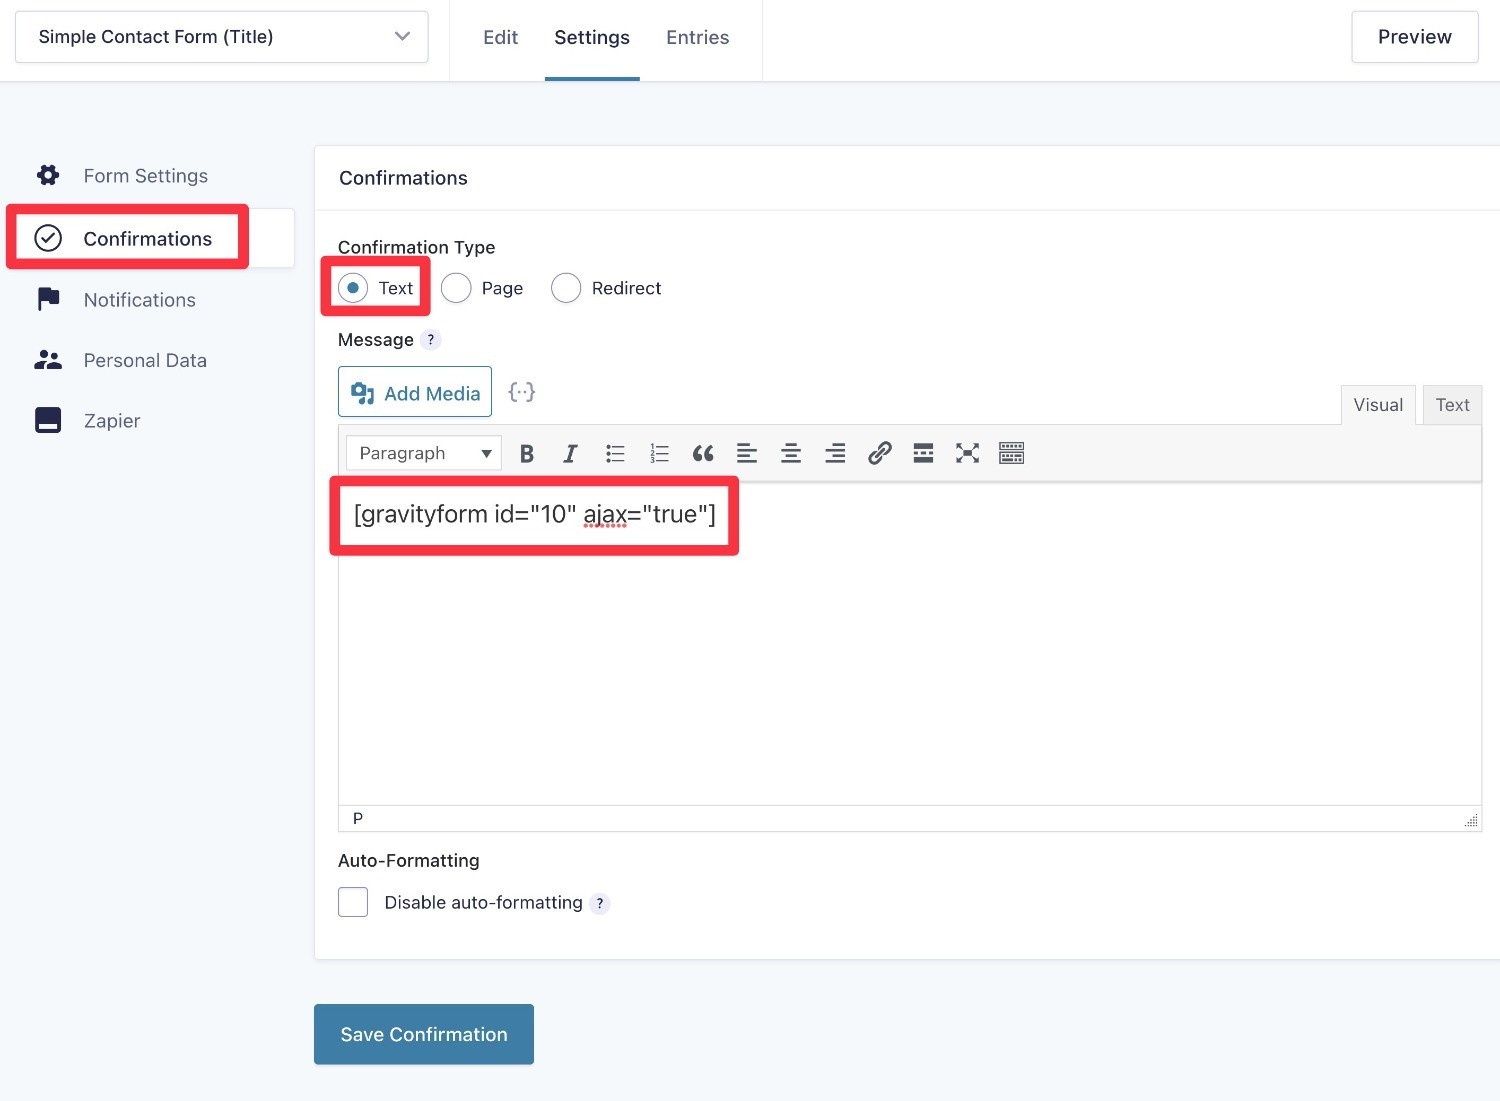
When doing this, make sure to set the ajax parameter equal to true inside the shortcode for the second form.
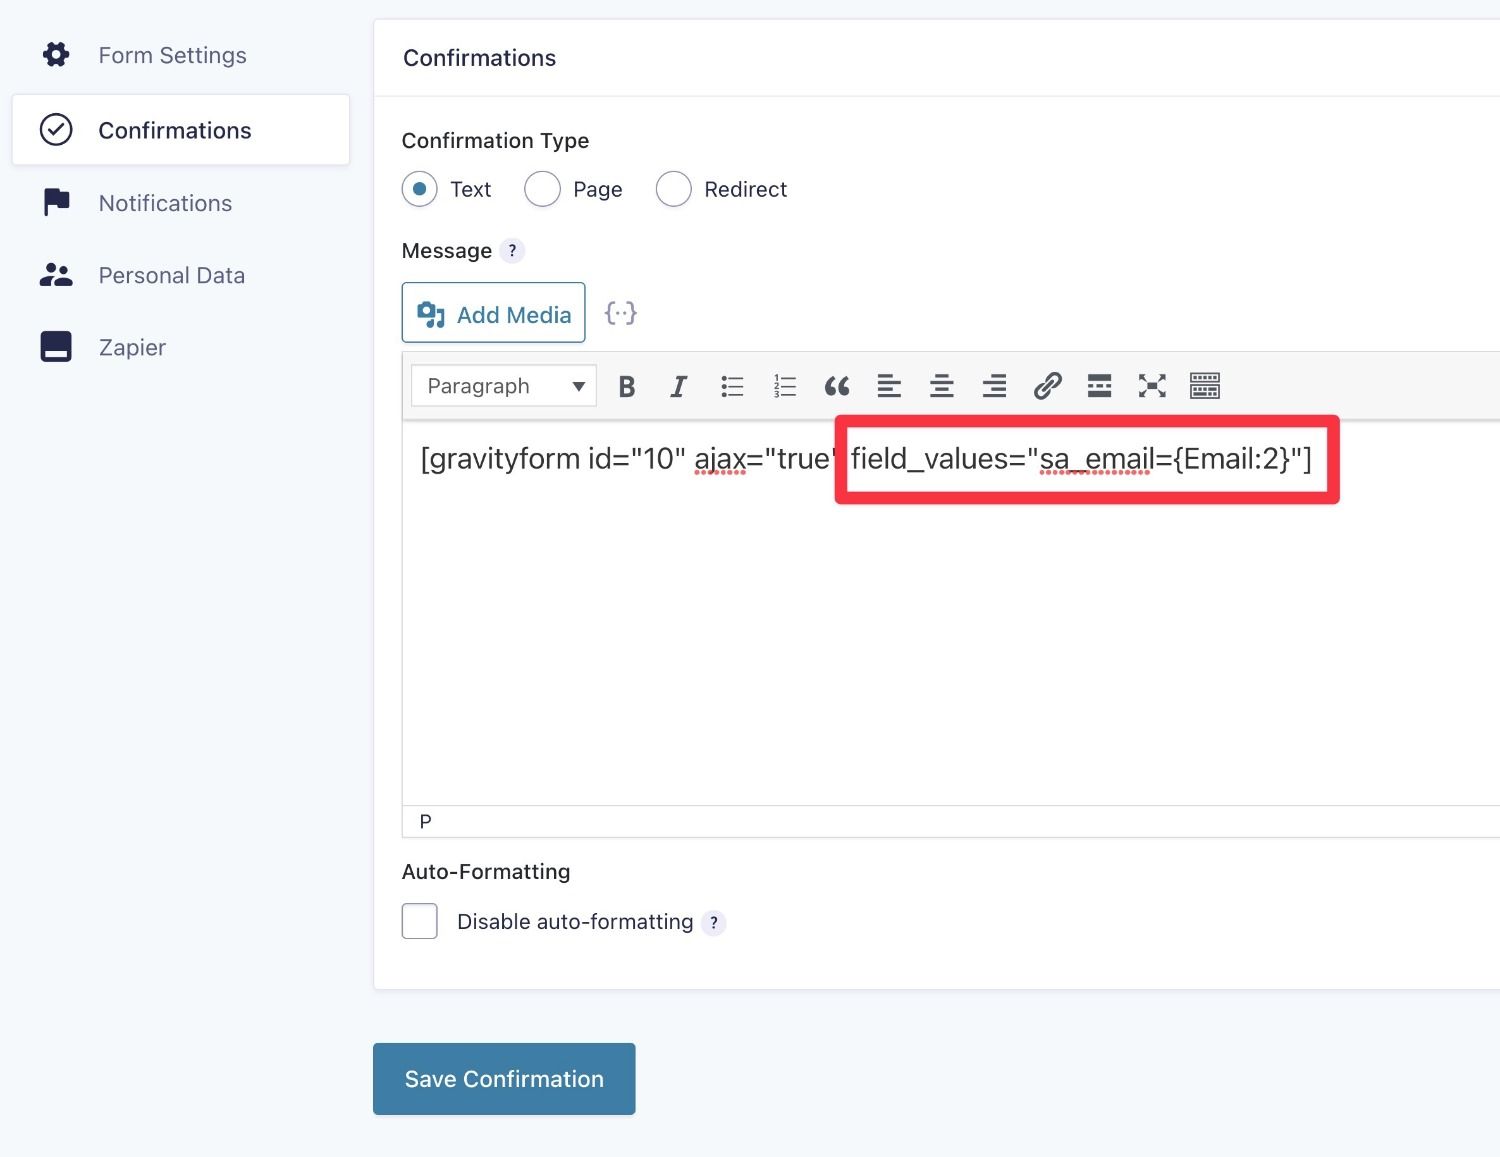
3. Set Up Dynamic Field Population (Optional)
If you want to pass information between the two forms, you can do that using the field_values parameter for the Gravity Forms shortcode, along with the merge tags available in the confirmation message.
This step isn’t required, but it can be helpful for creating a better user experience for people when they’re filling out the second form.
For example, if you already asked for a user’s email address on the first form, you could pre-fill that information in the second form to avoid making the user duplicate their efforts.
To do this, you would set the field’s value equal to the merge tag for the email address field on the first form:
4. Embed the First Form
To finish things out, you need to embed the first form on the frontend of your site, which you can do with either the shortcode or the block (or even the PHP function).
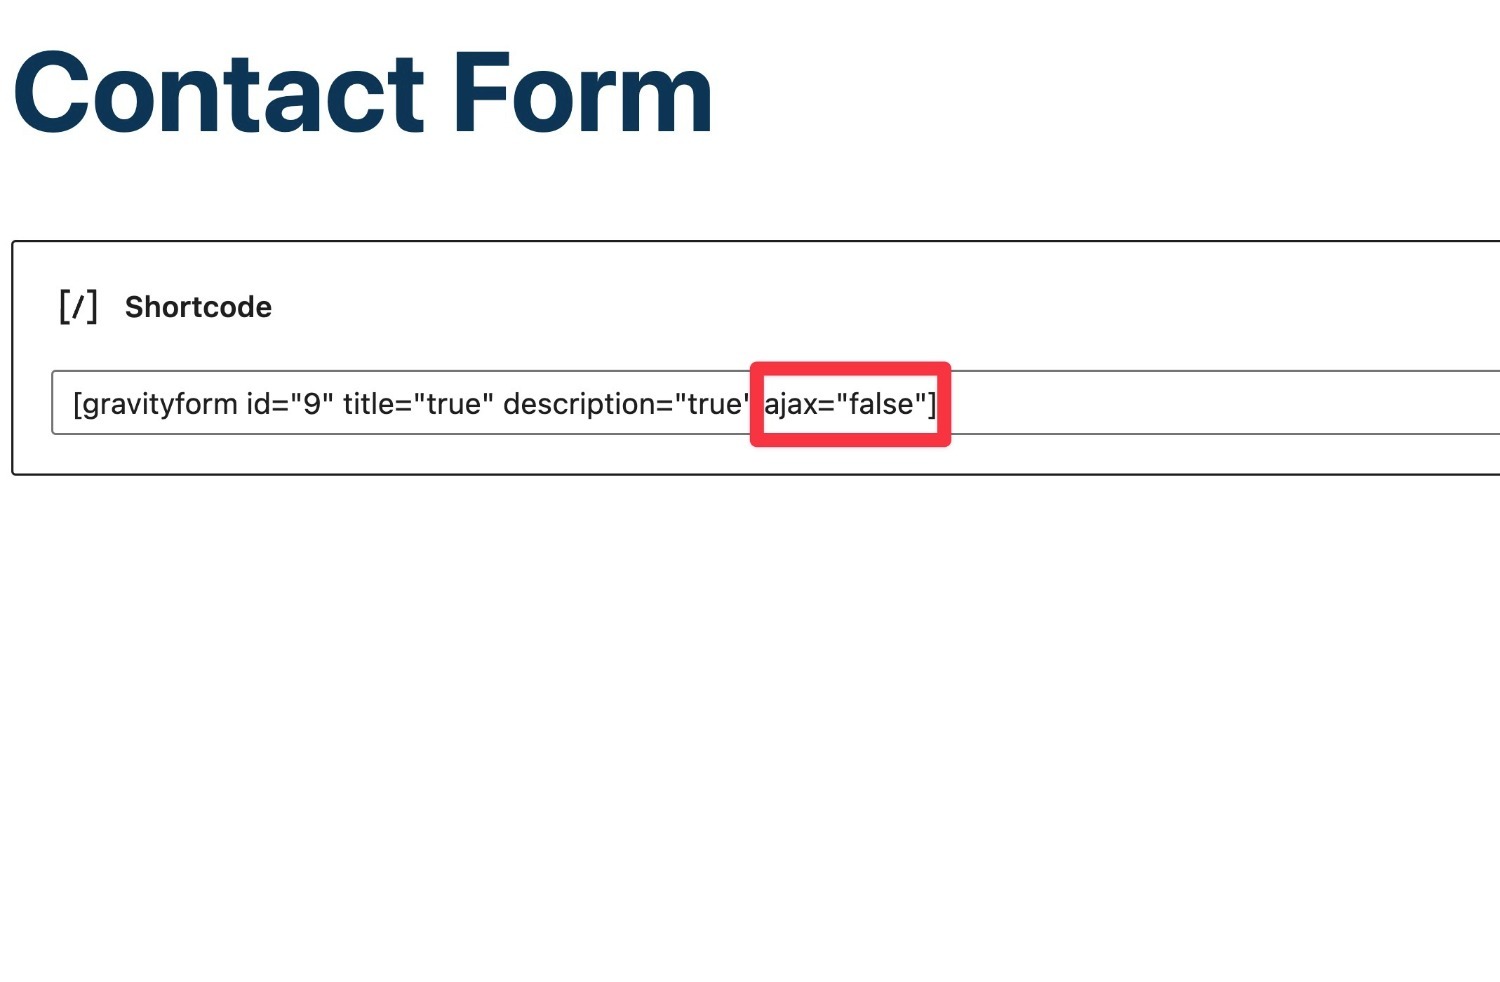
There’s one important thing about the embed, though. When you embed the first form on the frontend, you must make sure to set the ajax option to false (turned off).
If you set ajax to true when embedding the first form, the first form will reload after the user submits the second form, which is confusing behavior.
Here’s an example of what it might look like to embed the form using a shortcode:
[gravityform id="9" title="true" description="true" ajax="false"]
And that’s it!
When visitors go to this page, they’ll see the first form.
After they submit the first form, the second form will automatically load
Use Conditional Logic to Only Show the Second Form In Some Situations
A more advanced use case is to only show the second form if the user answered the first form in a certain way.
To achieve this, you can use Gravity Form’s built-in conditional logic feature.
Essentially, you would do everything the same as what you saw above. But the one tweak is that you would create a new confirmation message.
When doing so, you would use the Conditional Logic feature to control when to use this confirmation.
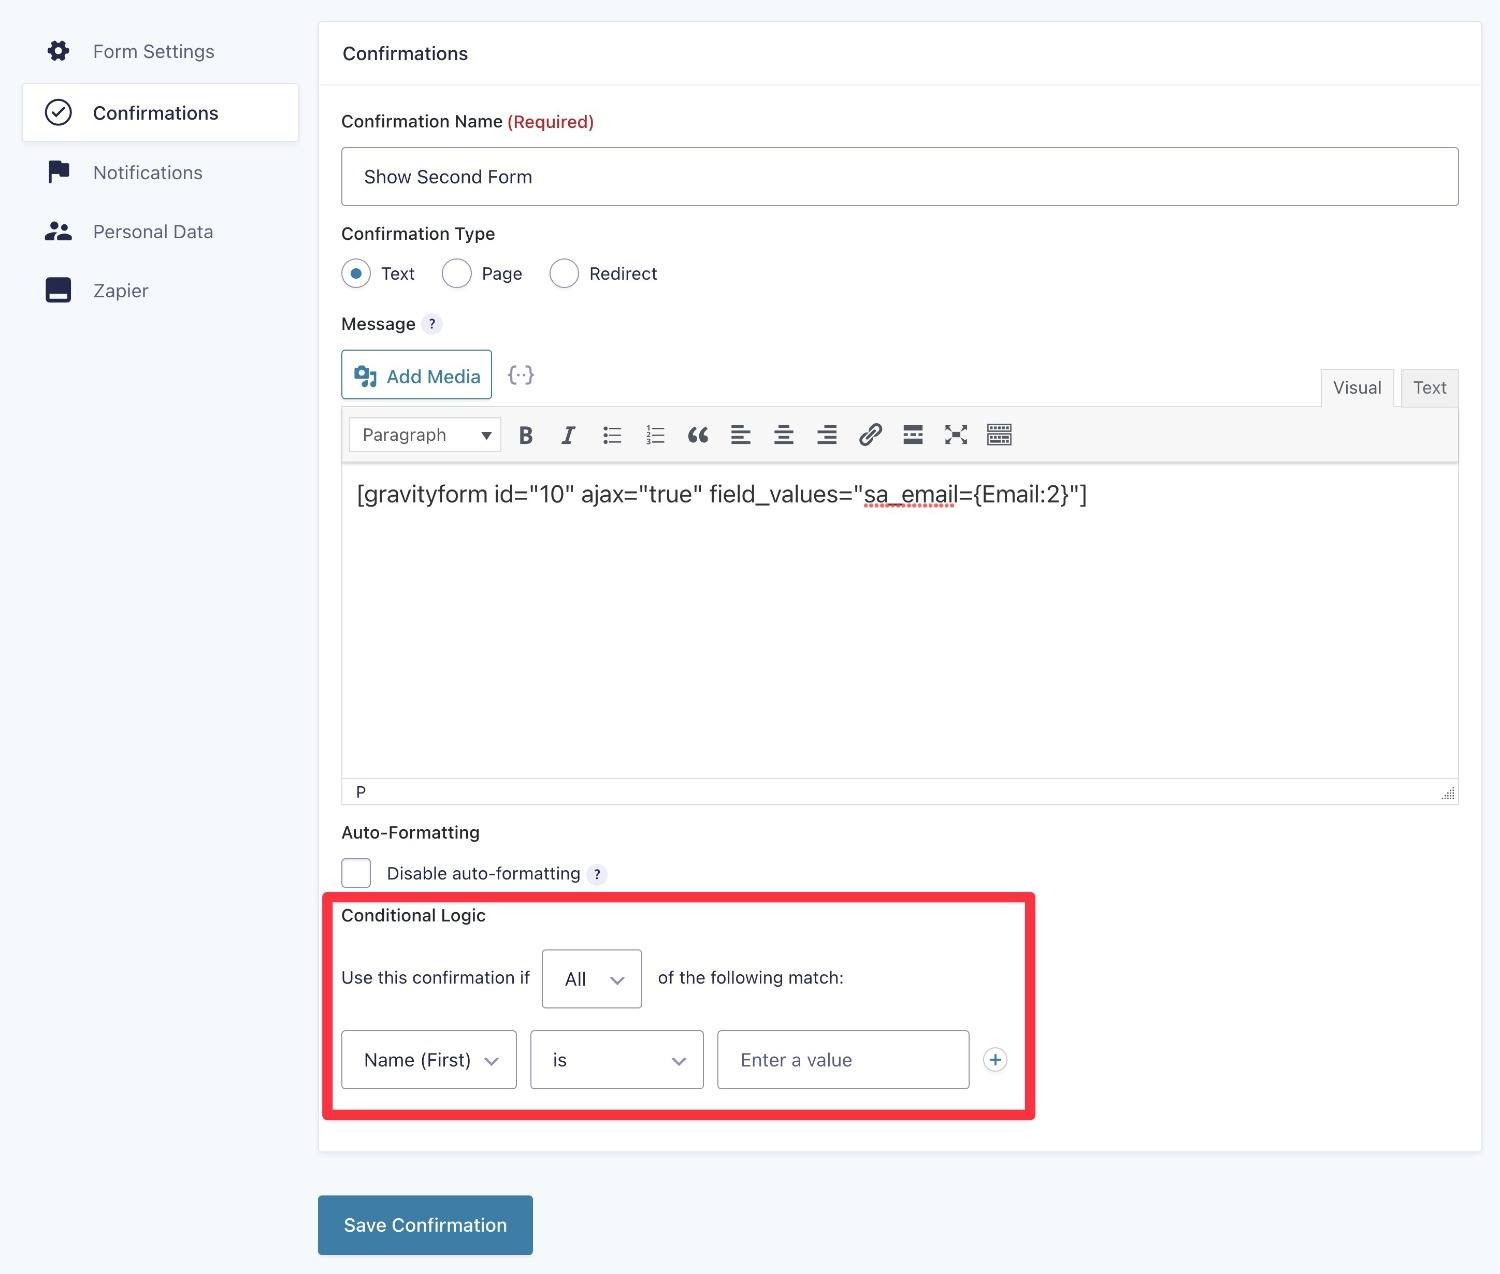
With this setup, the second form will only display when it meets the conditional logic rules that you set here.
How to Use the Gravity Forms Conditional Shortcode
So far, we’ve focused on the Gravity Forms embed shortcode.
However, you can also use a Gravity Forms shortcode to apply conditional logic to your forms, such as in notifications (sent to admins or users) and confirmation messages.
For example, you can show content if a certain checkbox was checked, if a certain field is not empty, if a certain field contains specific content, and so on.
This can be useful for making small tweaks to your notifications and confirmation messages.
However, for larger changes, it’s worth noting that you might want to set up completely different notifications or confirmation messages and use the built-in conditional logic settings.
Basically:
- Gravity Forms conditional shortcode – use this for making small changes where you don’t want to bother with creating a separate notification or confirmation feed.
- Separate feeds with conditional logic – use this if you want to display completely different content/formatting.
Gravity Forms Conditional Logic Shortcode Parameters
The base conditional logic shortcode is [gravityforms].
You can then modify its behavior using four parameters, which allow you to define the conditional logic rules:
action– this must be set to conditional to use conditional logic.merge_tag– this is the form merge tag that you’re applying conditional logic to – i.e. the field value that you want to target.condition– this is the condition that you want to apply. More on this below.value– this is the value that the condition must equal in order for the content to be displayed.
In terms of the condition, you can use the following:
- is
- isnot
- greater_than
- less_than
- contains
- starts_with
- ends_with
Here’s an example:
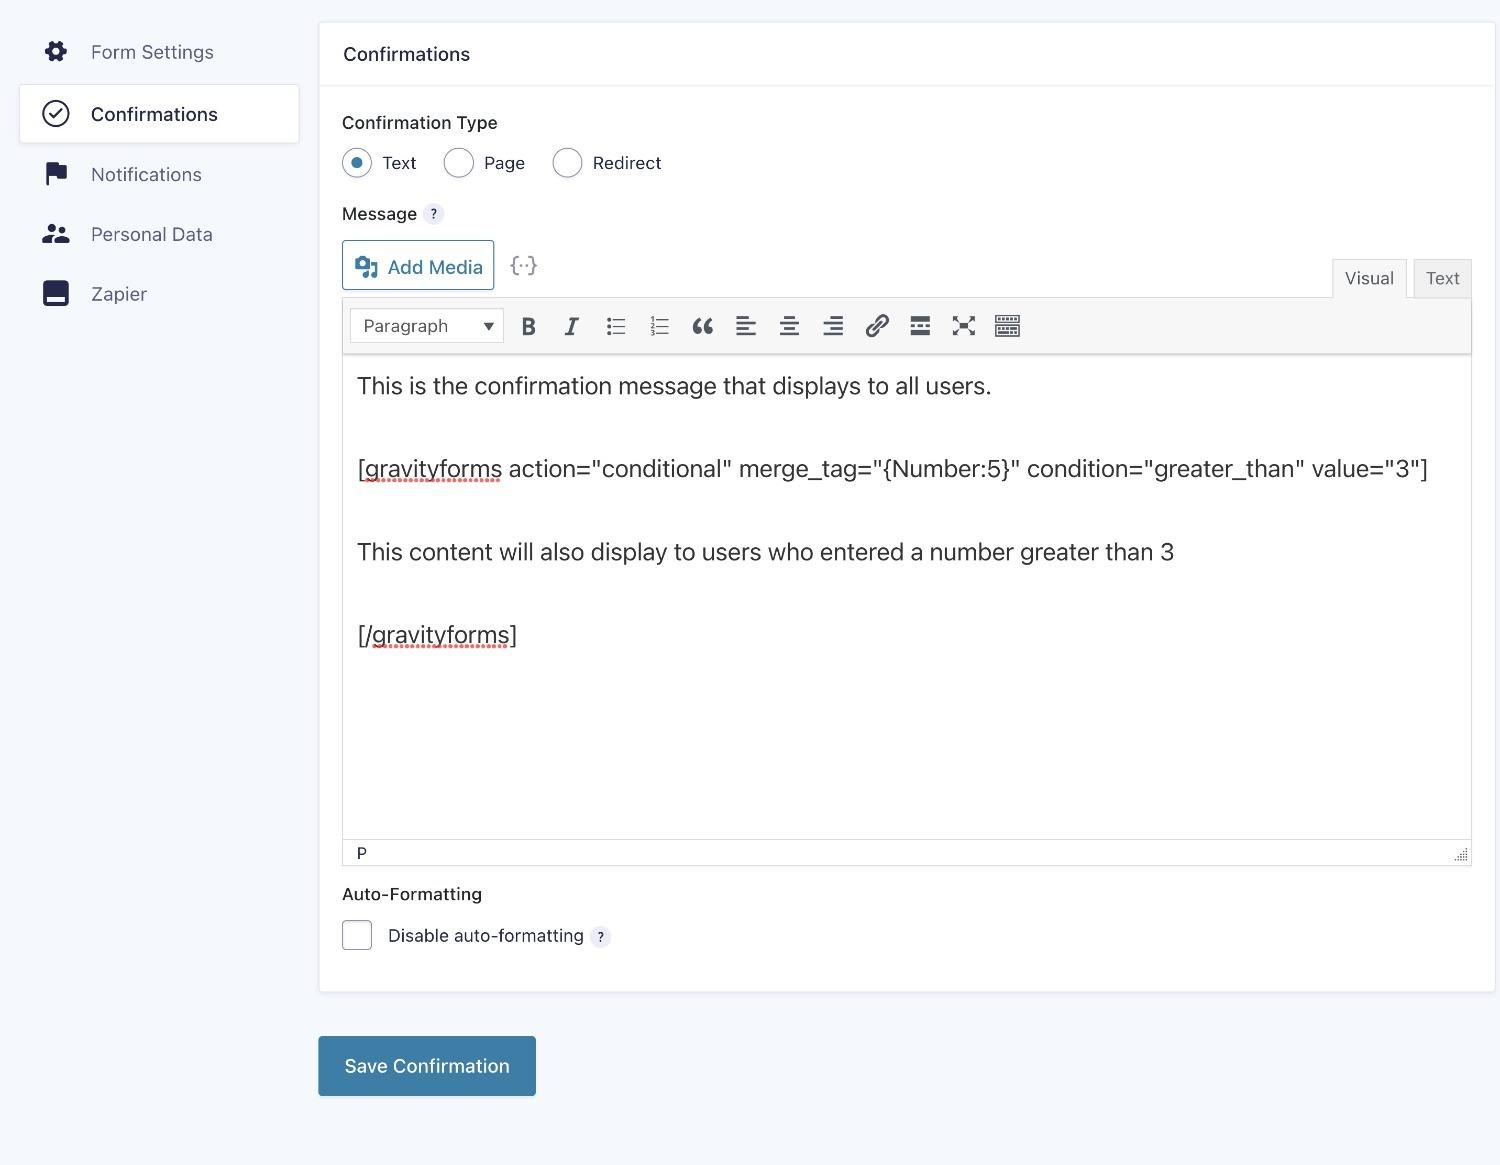
[[gravityforms action="conditional" merge_tag="{Number:1}" condition="greater_than" value="3"]

Content you would like to conditionally display.

[/gravityforms]
How to Add the Gravity Forms Conditional Logic Shortcode
You’ll mainly use the conditional logic shortcode in your email notifications and confirmation messages, which you can access from your form settings.
If you’re using other add-ons, you might also use the conditional logic shortcode in feeds for those add-ons. For example, you could include it in Slack notifications that you send if you’re using the Slack Add-On.
To use the Gravity Forms shortcode, you wrap the content that you want to conditionally display inside of the shortcode. Then, the shortcode defines the conditions for when to display that content.
Let’s go back to the example from above:
[gravityforms action="conditional" merge_tag="{Number:1}" condition="greater_than" value="3"]

Content you would like to conditionally display.

[/gravityforms]
This shortcode would display the content “Content you would like to conditionally display.”, but only when the value of the field (specified by its merge tag) is greater than three.
Here’s an example of what something similar might look like in the actual confirmation settings:
Gravity Forms Shortcode Not Working? Here’s How to Fix
If you’re having issues with the Gravity Forms shortcode not working, there are a few things that you’ll want to check.
First, make sure that you have the right form ID number. If you accidentally enter a form ID that doesn’t exist, Gravity Forms will show a message that it can’t locate your form.

If the form ID is correct, the next thing to check is your quotation marks. If you’re manually typing in the shortcode parameters, it’s easy to make a typo here:
- Forgetting to add the opening or closing quotation mark.
- Mixing apostrophes (‘) and quotation marks (“). You can use single or double quotes, but you need to be consistent in your choice.
- Including a quotation mark as part of a parameter. For example, trying to populate a field with content that includes a quotation mark. You can do this, but you might need to switch to using single quotes (or vice versa) if it’s causing problems.
You’ll also want to check the parameter itself to make sure that you don’t have any typos there, either.
Add Even More Shortcodes With Gravity Forms Add-Ons
Everything that you saw above applies to the core Gravity Forms plugin.
However, it’s important to note that you might get access to additional shortcodes or shortcode parameters via official or third-party Gravity Forms Add-Ons.
For example, if you’re using Gravity Flow to extend your forms with custom workflows, Gravity Flow includes its own shortcode, along with a number of shortcodes to modify it.
Learning how these add-on shortcodes work can help you get even more value from Gravity Forms.
The easiest way to discover this information is to consult the documentation from the add-on developer.
Get Started With the Gravity Forms Shortcodes
The Gravity Forms shortcodes open up a lot of flexibility for embedding your content and/or applying conditional logic.
While there are other ways to embed forms, such as using the dedicated block, some of the advantages of the Gravity Forms embed shortcode are as follows:
- You can use it to embed content anywhere on your site, which isn’t the case with blocks. For example, you can use the shortcode to embed forms in page builder plugins, popup plugins, and so on (not to mention the classic TinyMCE editor and classic widgets).
- You can unlock some more advanced use cases, such as chaining two forms together and even passing data between those forms.
Now that you know how the shortcode works, you can start using it in new and interesting ways.
If you aren’t already a Gravity Forms user, purchase your license today to access the shortcode, along with all of the other helpful features in Gravity Forms.

If you want to keep up-to-date with what’s happening on the blog sign up for the Gravity Forms newsletter!
"*" indicates required fields