
Searching for the best way to create a popup form in WordPress?
Displaying your form in a popup can reduce the friction needed for a user to fill out a form, which can improve the user experience and boost your conversion rates. Instead of needing to load another page to access the form, users can do everything from the page that they’re on.
However, if you want to get the most from this setup, you need a tool that still gives you the flexibility to customize the form to your specific use case.
In this step-by-step tutorial, you’ll learn how to create any type of popup form on WordPress using Gravity Forms and the free Popup Maker plugin.
For this example, we’re going to create a contact form that displays in a popup.
However, the cool thing about this method is that it’s super flexible and you can easily adapt this tutorial to create other types of forms including the following:
- Email opt-in form in popup (e.g. add subscribers to Mailchimp)
- Lead gen form in popup
- User registration form in popup
- Event/webinar registration form in popup
- Quote form in popup
- WordPress or WooCommerce login form in popup
- …anything!
Here’s an example of what it might look like to show a popup contact form when a user clicks the Contact Us button – but you’re free to customize the form fields, popup design, popup triggers, and everything else:

Let’s dig in!
Key takeaways
- Combine the power of Gravity Forms (form creation) with Popup Maker (popup triggers and display) to build custom popup forms for lead generation, contact, email opt-ins, and more.
- Create a variety of popup forms including contact forms, quote request forms, user registration, login, WooCommerce, webinar signups, and more – no extra plugins needed.
- Popup Maker allows click-based or timed triggers and advanced targeting rules, giving you control over when and where your popup forms appear for optimized user interactions.
- Simply copy and paste your Gravity Forms shortcode into the popup content editor, with optional parameters to hide form titles or descriptions for a cleaner design.
- Leverage Gravity Forms’ ecosystem of add-ons to connect your popup forms to CRMs, email marketing tools, Slack, and automation platforms for streamlined workflows.
What You Need to Create a Popup Form in WordPress
To follow this tutorial and create your popup form, you’ll need two plugins:
- Gravity Forms – this lets you create any type of form.
- Popup Maker – this lets you create a popup that includes your form.
The advantage of using two plugins instead of looking for an all-in-one solution is that you get a lot more flexibility, since each plugin excels at its use case.
Gravity Forms
Gravity Forms is a full-featured form plugin that can help you create all kinds of forms, from simple contact forms to email opt-in forms, quote forms, registration forms, login forms, and more.
You can also access tons of integrations and automations to make your forms more effective.
For example, when someone submits the form in your popup, you could automatically save their details to your CRM, send yourself a notification on Slack, create a task in your project management software, and more.
Popup Maker
Gravity Forms handles everything you need when it comes to creating simple or advanced forms. But there’s one thing it doesn’t do – popups!
To fix that, you’ll add the freemium Popup Maker plugin to the mix.
Popup Maker lets you create all kinds of different popups and display them anywhere on your site using various targeting and trigger rules.
You can display your popups automatically or you can display them on click, which can be a really useful feature for popup forms. For example, you could create a “Contact Me” button that opens your contact form in the popup (which is the example we’re using for this post).
On the other hand, you’ll probably want to use automatic triggers for email opt-in forms. For example, you could trigger the form after a user has scrolled down the page or been on your site for a certain amount of time.
How to Create a Popup Form in WordPress With Gravity Forms and Popup Maker
Now that you know the tools that are involved, let’s get into how to actually set up your WordPress popup form.
For this tutorial, the only thing we’ll assume is that you’ve already installed Gravity Forms and Popup Maker on your site.
Optionally, you can also install some of the other Gravity Forms Add-Ons to add extra functionality to your form, but you don’t need to install any add-ons to follow this tutorial.
1. Create Your Form and Set Up Form Fields
To get started, you’ll want to use Gravity Forms to create the form that you’re going to embed in your popup:
- Go to Forms → New in your WordPress dashboard.
- Give your form a name – e.g. “Contact Form in Popup”.
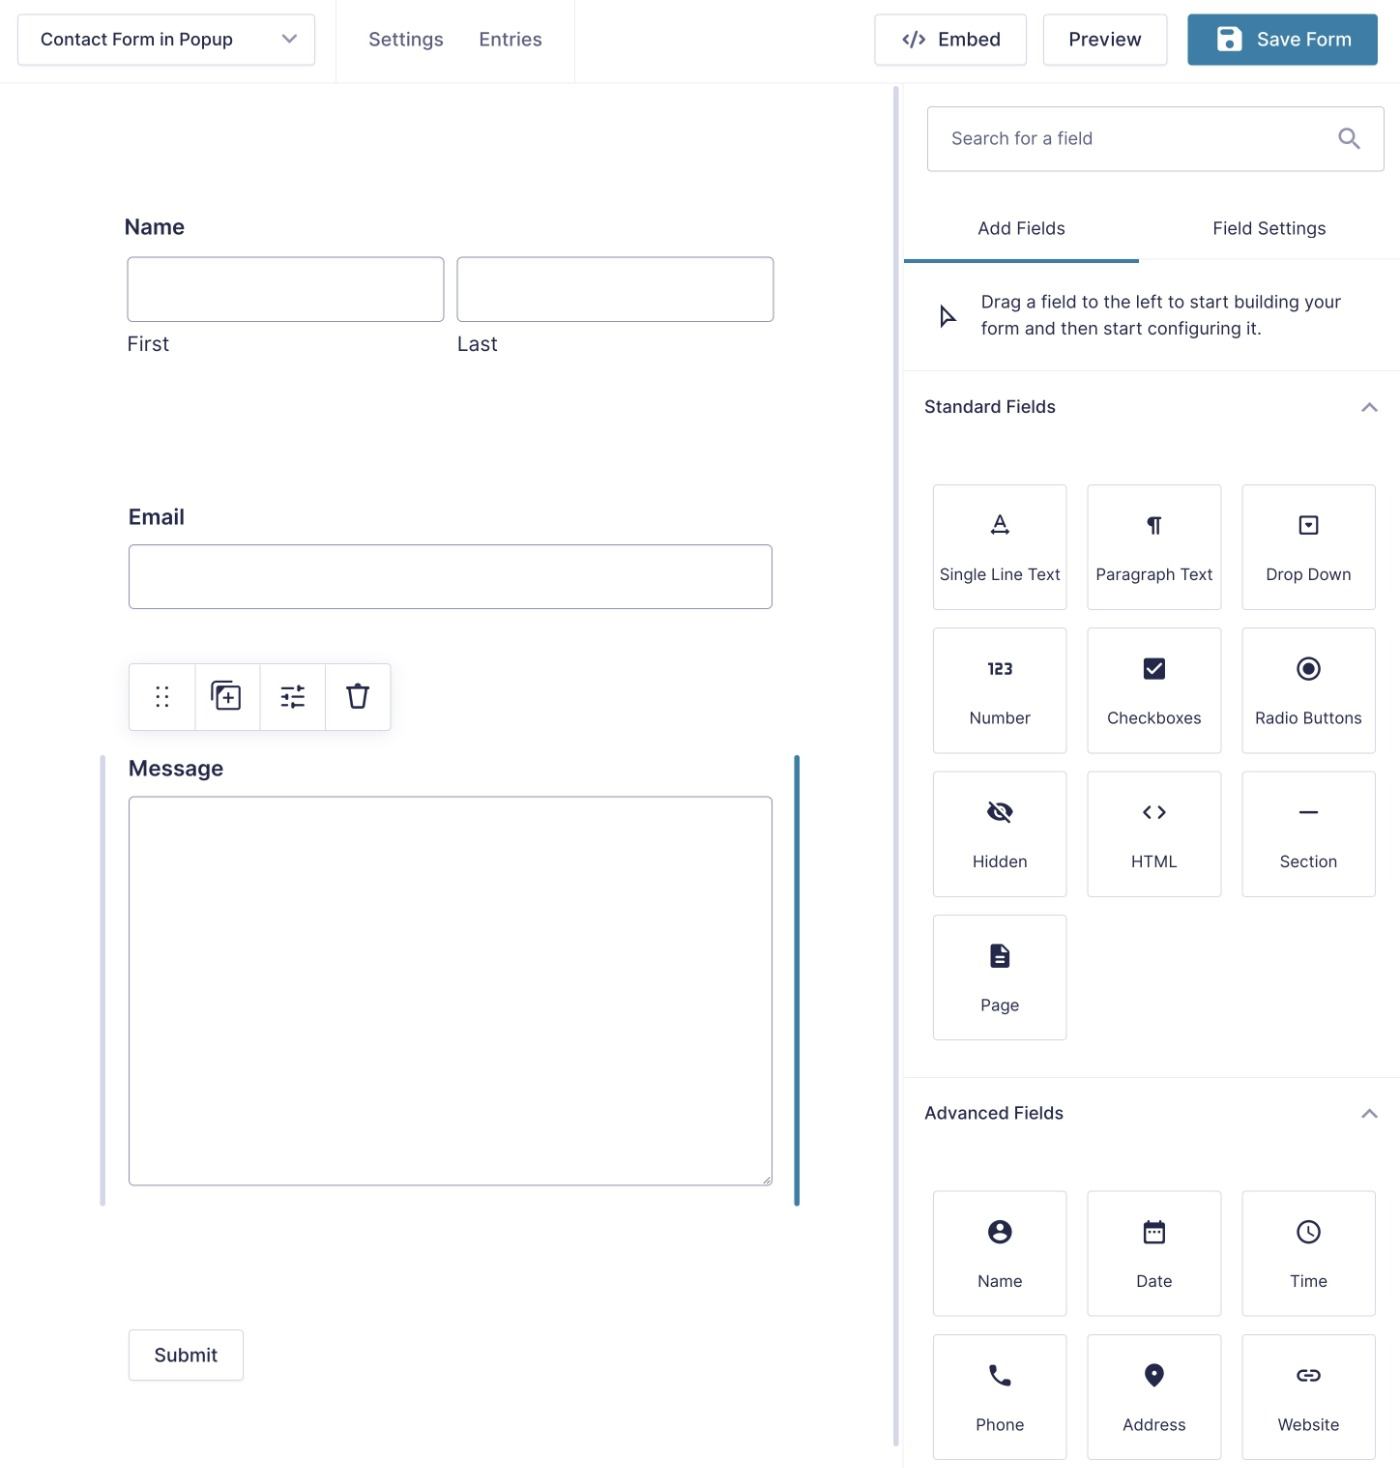
- Use the drag-and-drop interface to set up the form fields for your form.
Here’s an example of what a simple contact form might look like:
Alternatively, you can also import one of the pre-made Gravity Forms templates – you can browse the templates here.
2. Set Up Backend Settings, Automations, and Integrations As Needed
Once you’re happy with the form fields for your form, you’ll want to open the form’s settings to configure its backend behavior and integrations.
For example, if you were creating an email opt-in form, this is where you could connect your form to your email marketing service so that it automatically adds people to your email lists.
It’s also where you can set up more general behavior, such as showing a confirmation message or sending email notifications after someone submits the form.
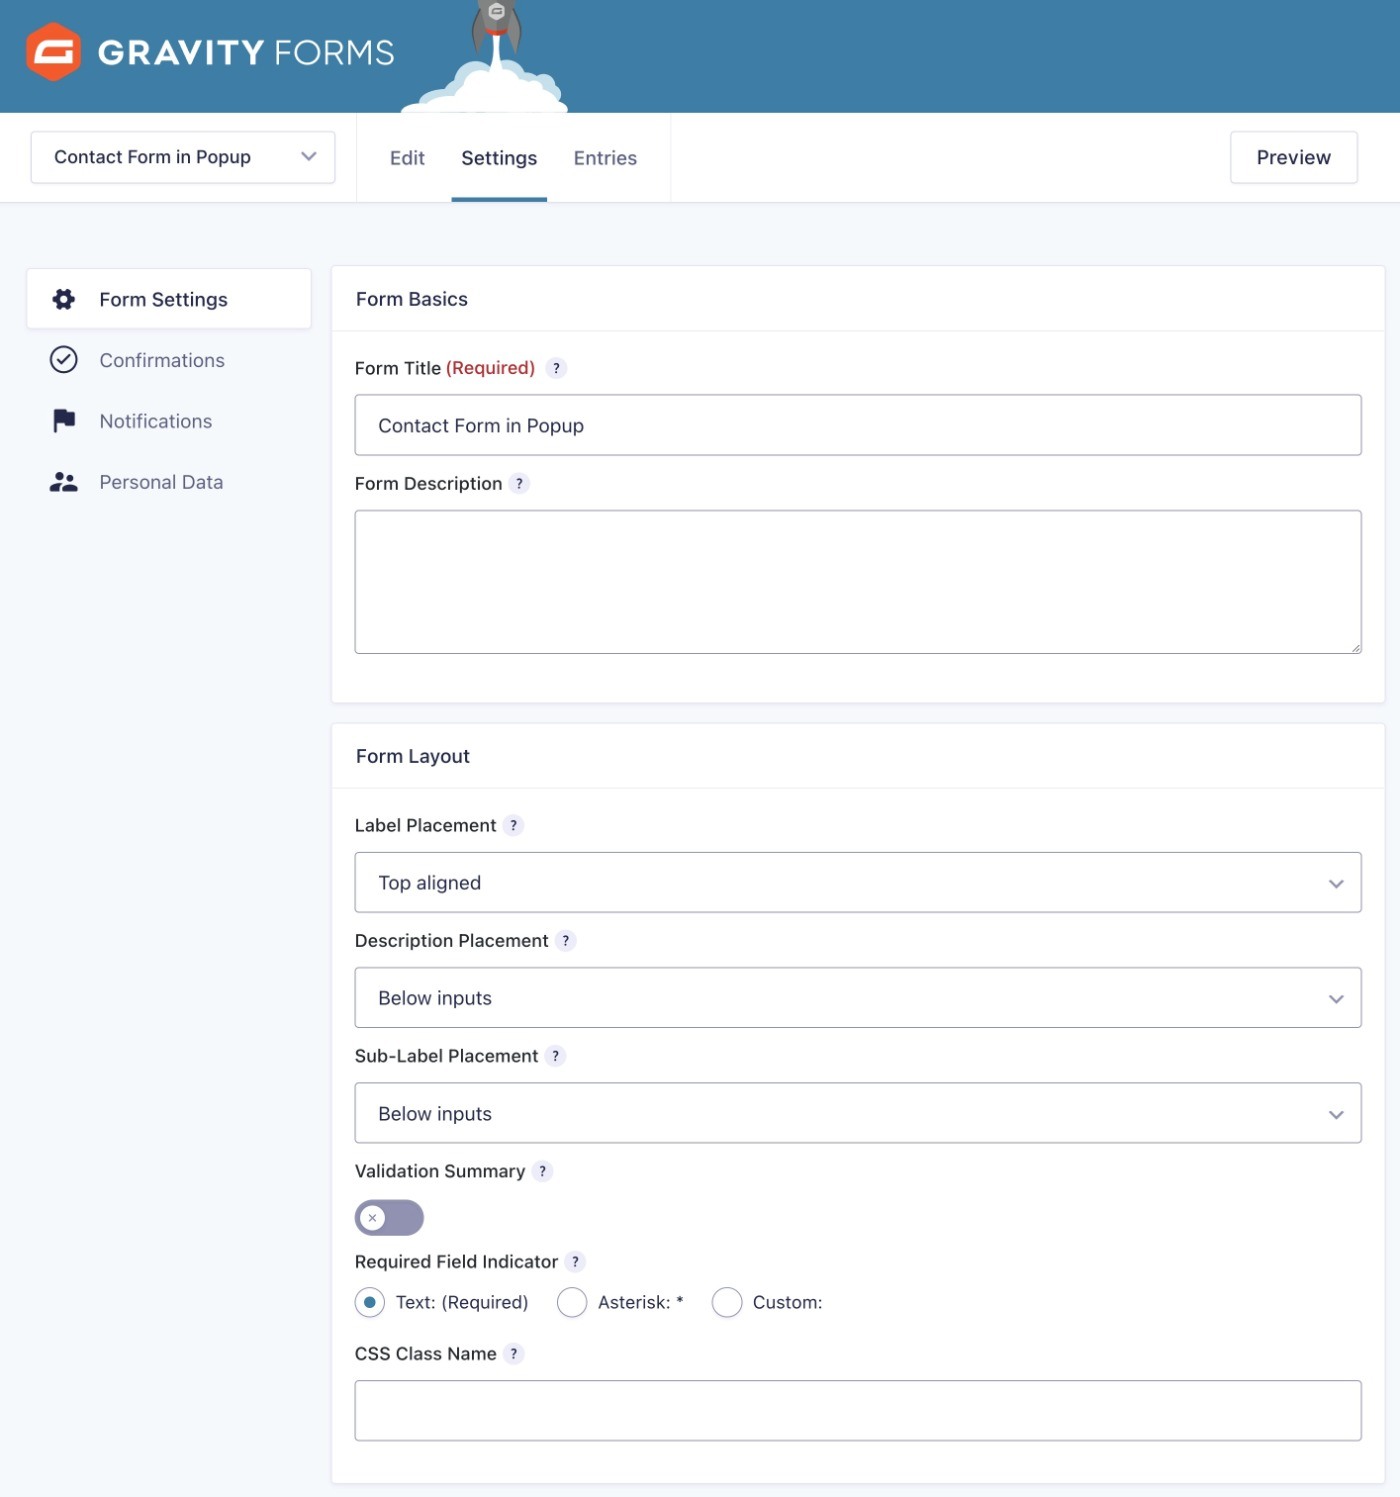
To open the settings area, click on Settings → Form Settings at the top of the form editor interface.
By default, you’ll see four tabs:
- Form Settings
- Confirmations
- Notifications
- Personal Data
If you want to add more options here, you can install some of the many Gravity Forms Add-Ons. You’ll find dozens of official Gravity Forms add-ons, as well as tons of third-party add-ons from other developers.
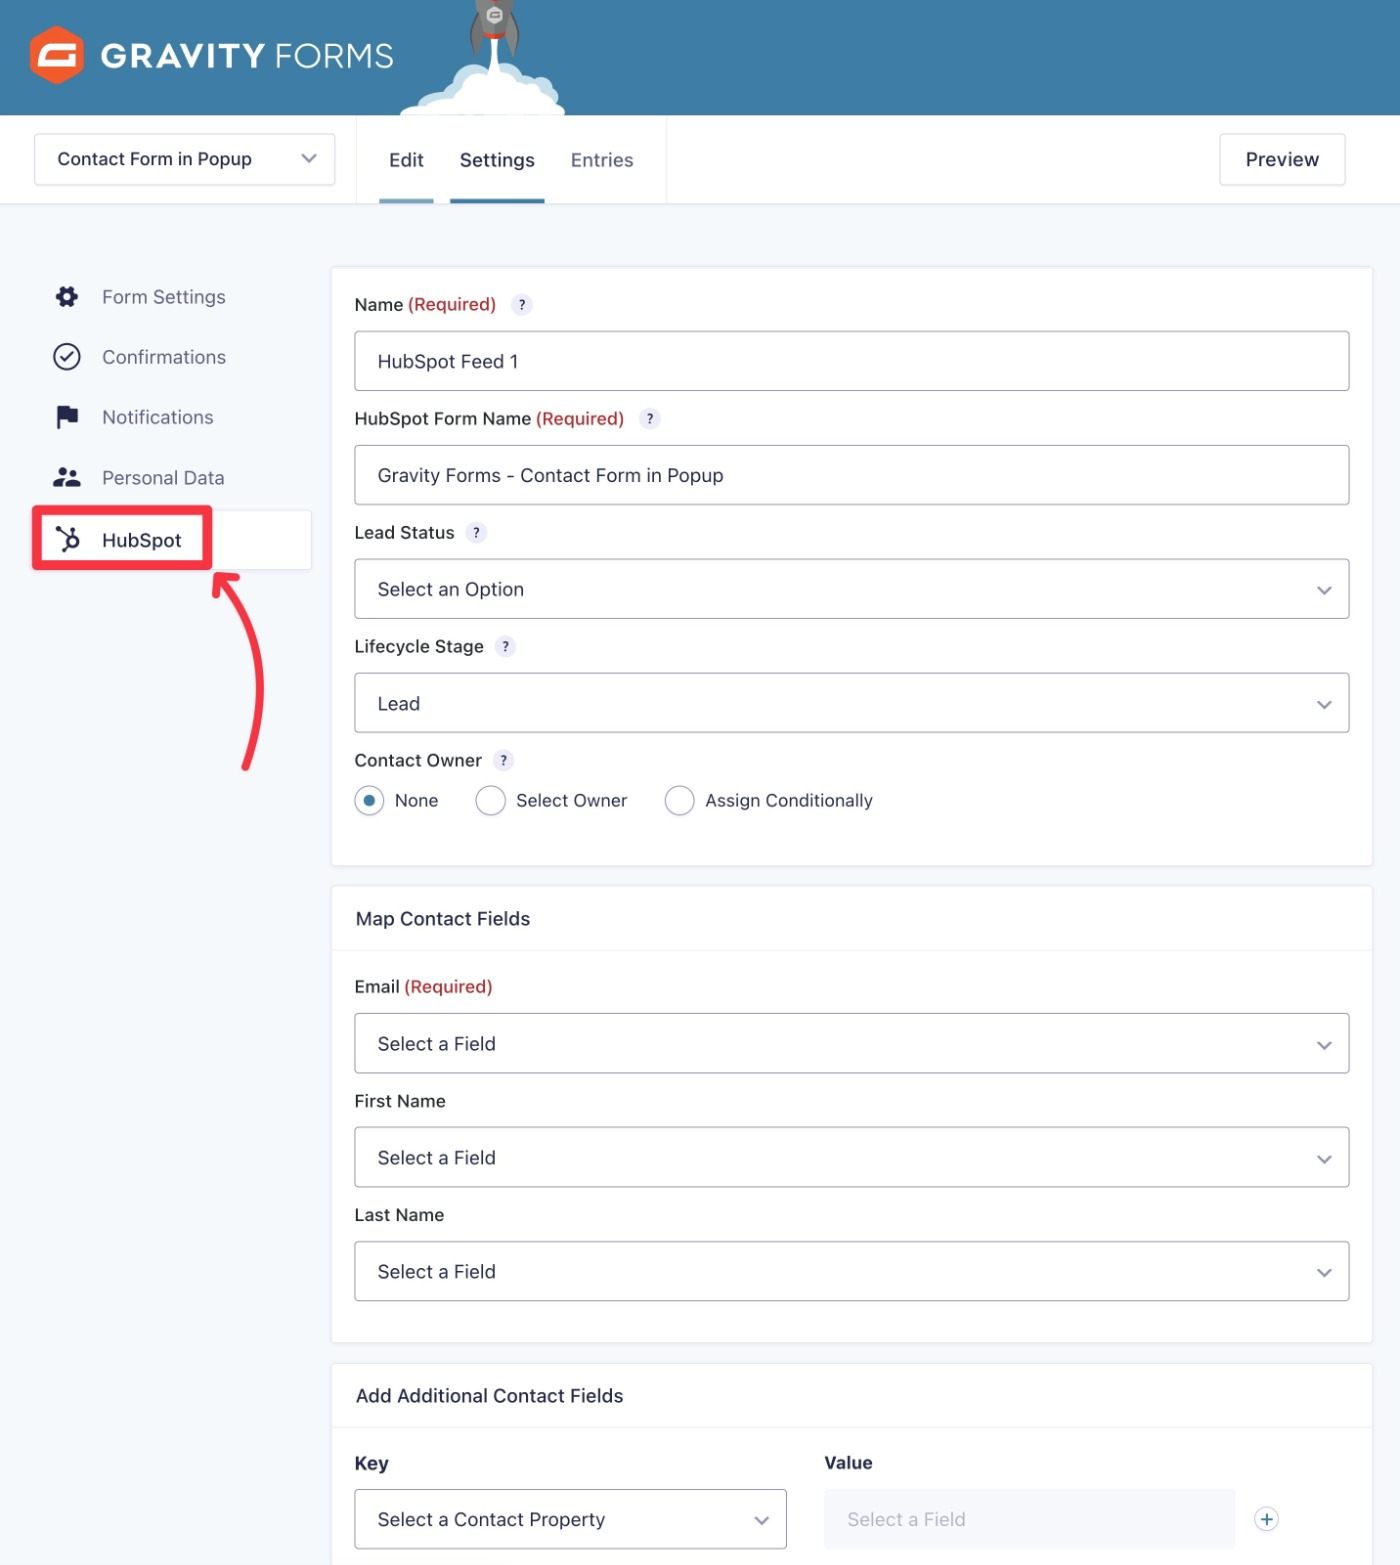
For example, if you’re using HubSpot as your CRM and you want to automatically add the details of people who contact you to your CRM, you could install the official HubSpot Add-On.
You would then get a new HubSpot area in your form settings to configure the integration, such as mapping fields in your popup form to fields in your HubSpot CRM.
Feel free to browse all of the add-ons and install as many as you need. Again, having access to all of these features is one of the biggest advantages of using Gravity Forms for popup forms.
3. Create Your Popup and Configure Behavior
Next, you’ll want to create the popup that will house your form using Popup Maker.
Here’s how to get started:
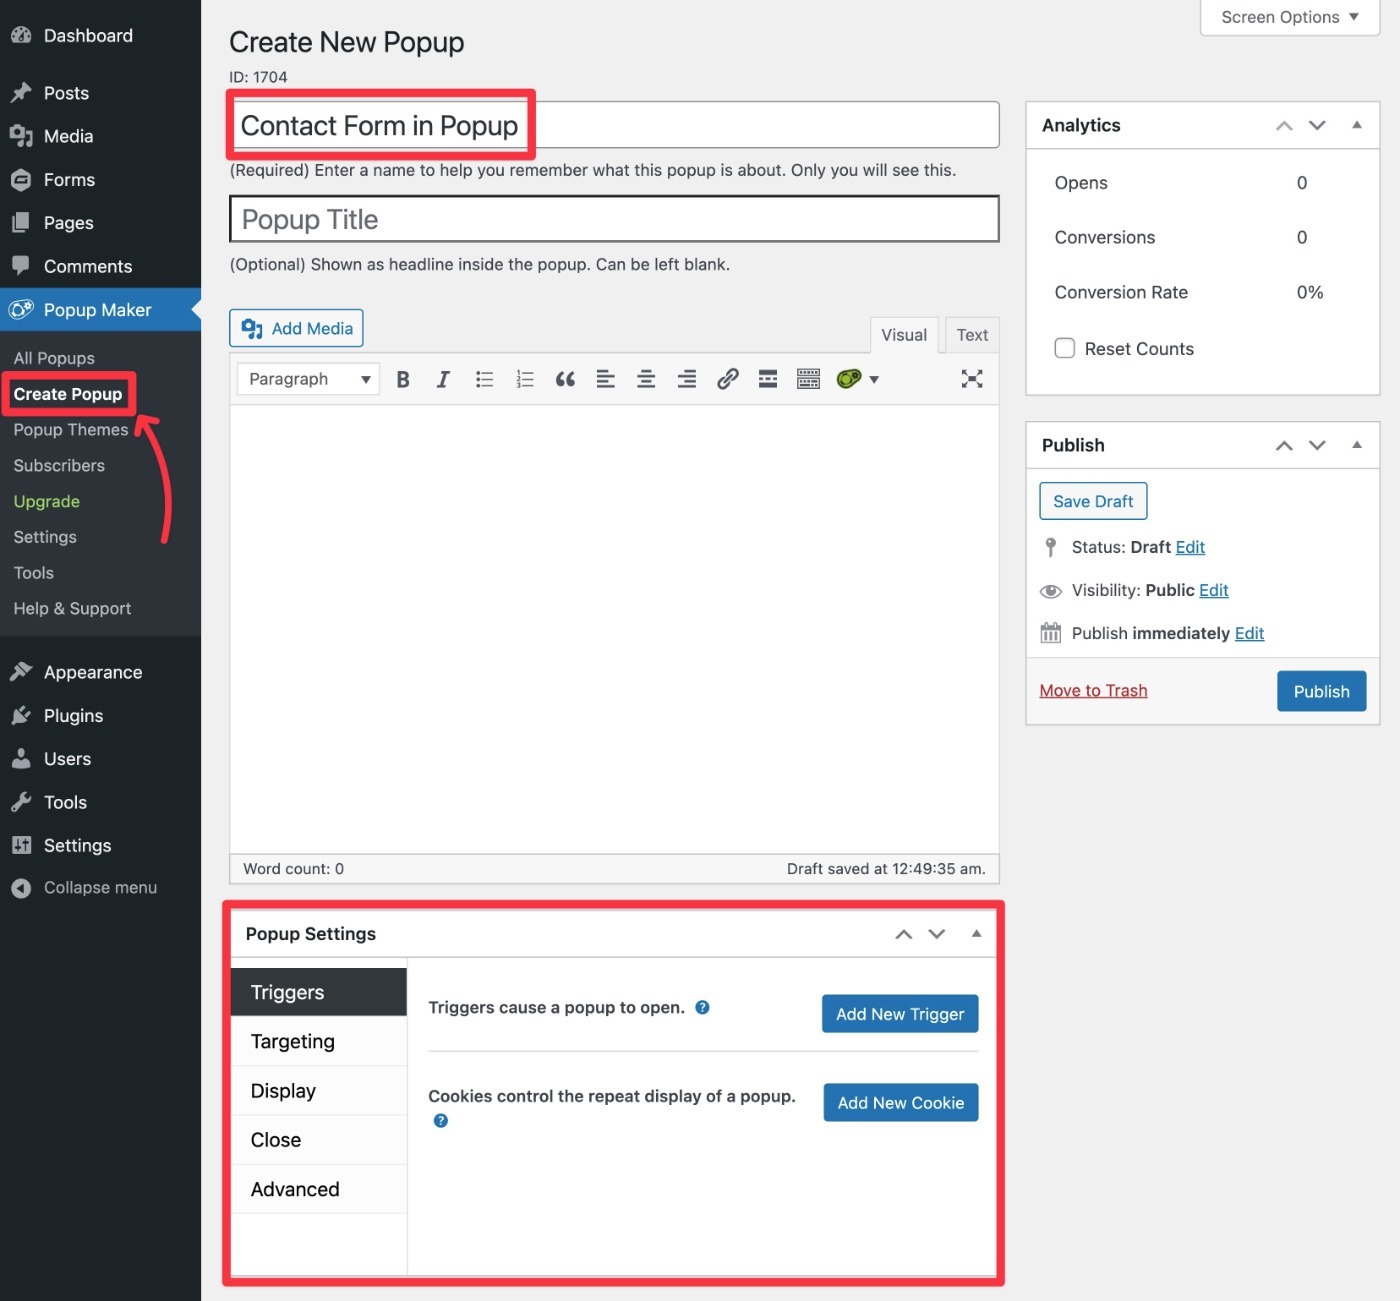
- Go to Popup Maker → Create Popup to create a new popup.
- Give your popup an internal name to help you remember it.
- Use the Popup Settings to configure your popup’s settings, including triggers, targeting, and design.
Don’t worry about embedding your form yet – we’ll cover that next.
The Popup Settings box is the most important part of configuring your popup, so let’s look at it in more detail.
Form Popup Trigger
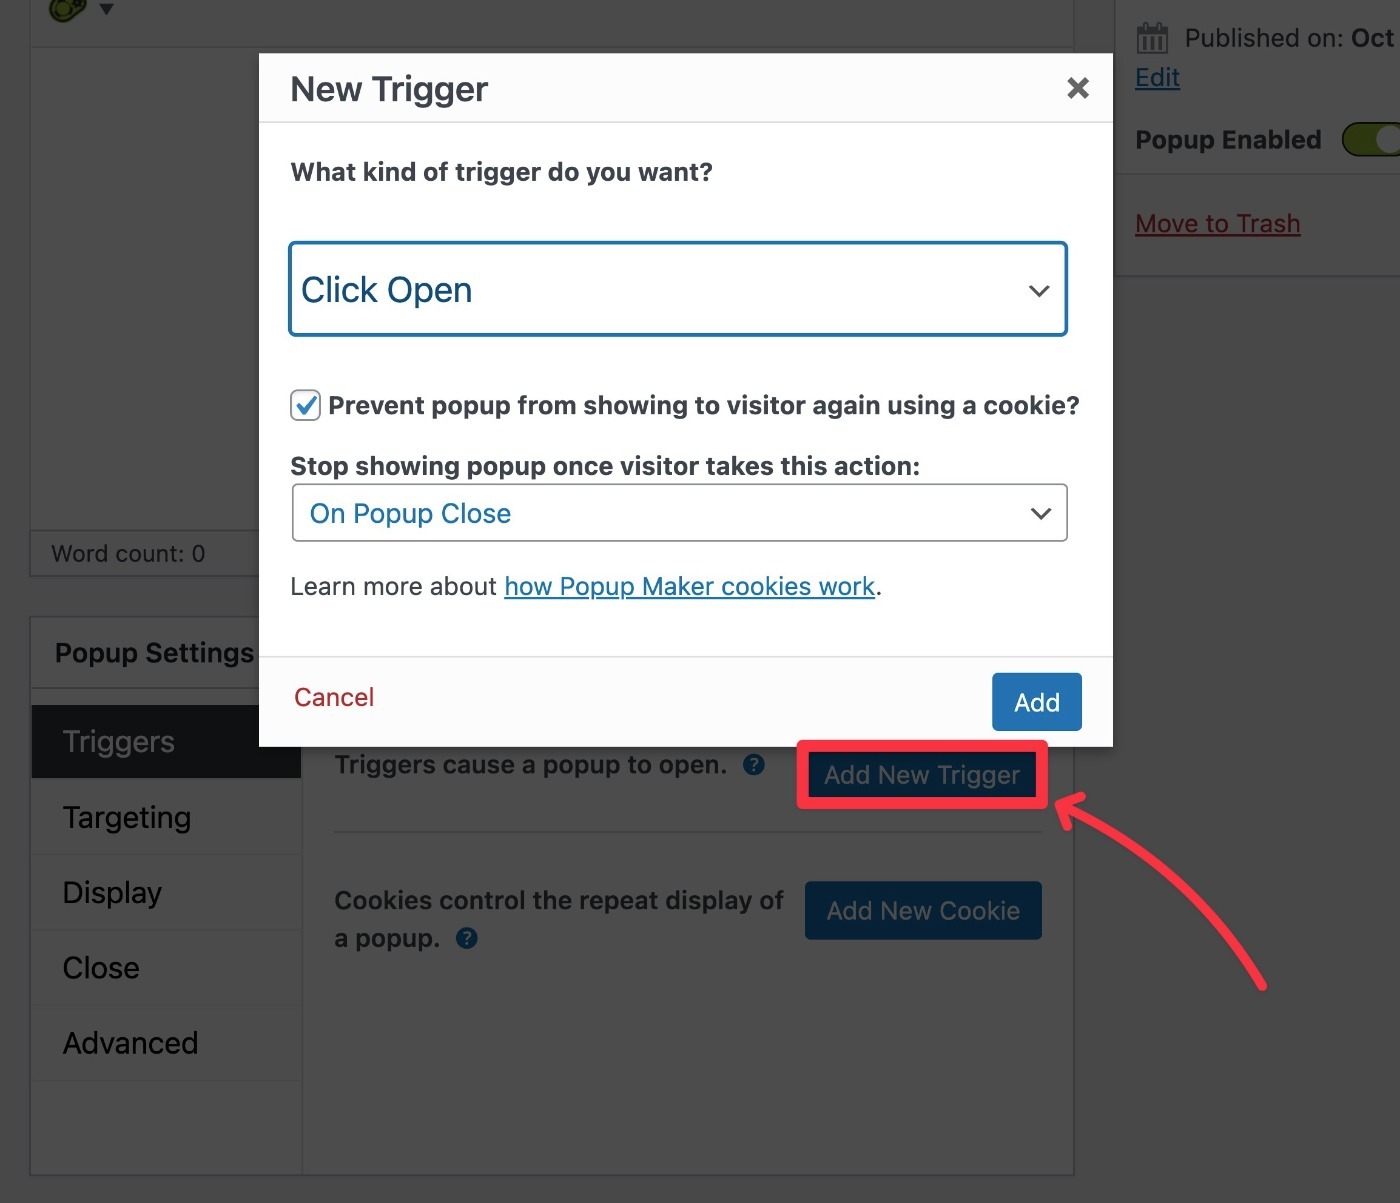
The Triggers tab lets you control when to launch your popup. You have two main options with the free version:
- Click Open – the user needs to click something to launch the popup – e.g. a “Contact Me” button.
- Time Delay / Auto Open – the popup will automatically launch based on certain conditions.
To add one, click the Add New Trigger button:
For a click trigger, you would then get some additional options to control the element to launch the popup. The easiest way to set things up is to just add the Popup Maker class to the button that you want to launch the popup:
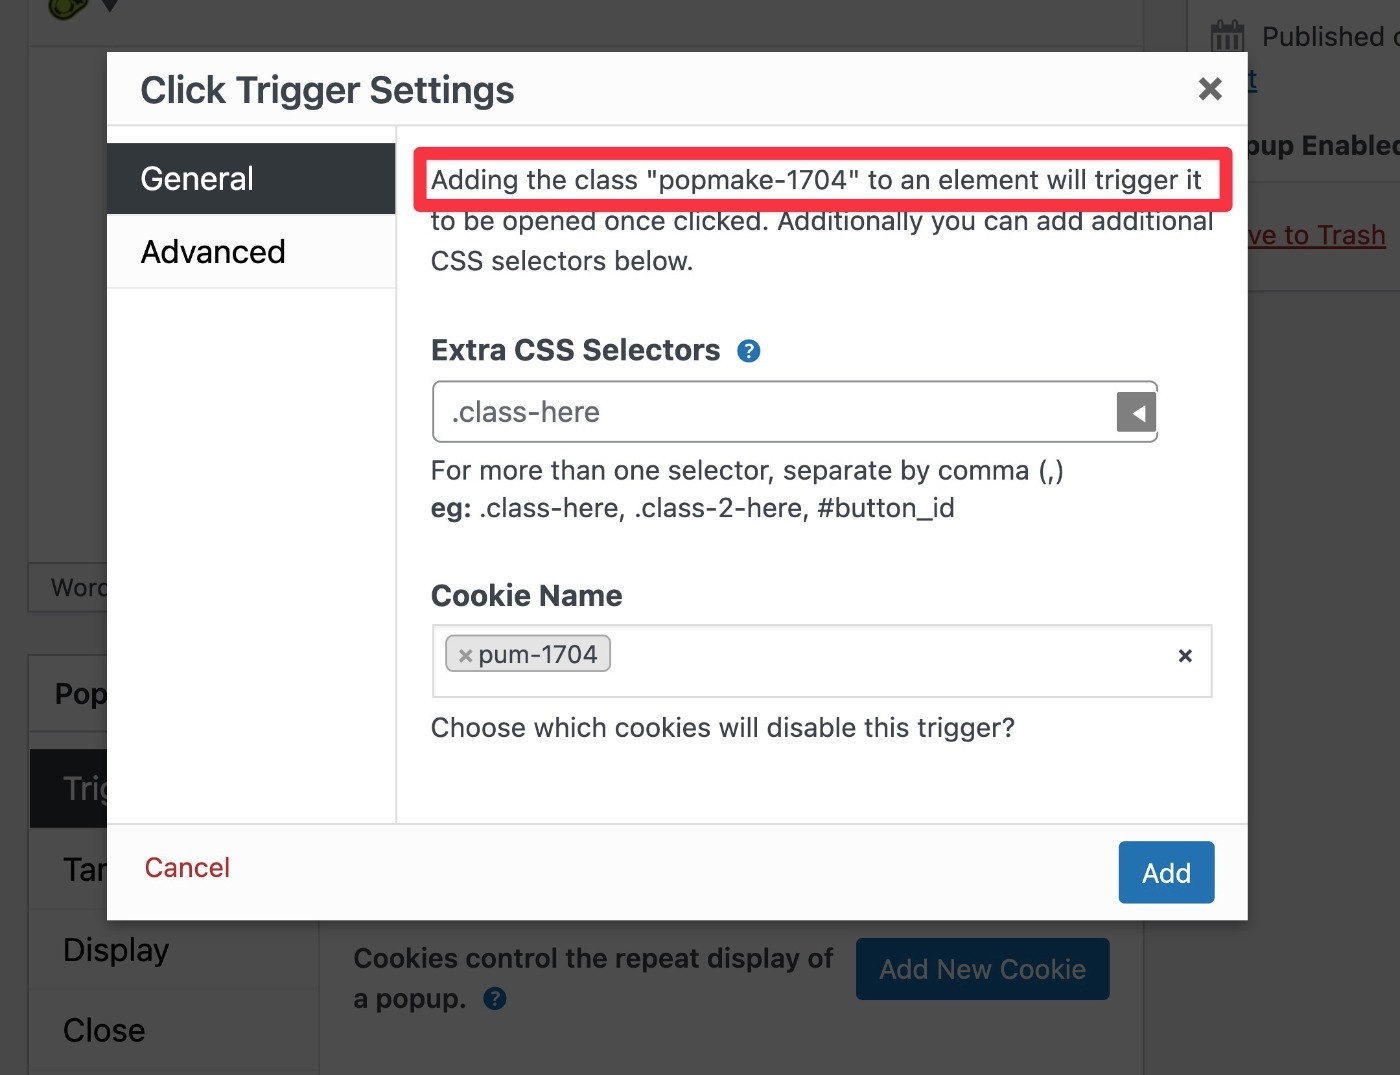
If you’re not sure how to do that, check out the Popup Maker documentation here.
Alternatively, if you use a Time Delay / Auto Open option, you would be able to choose the time delay. The premium version of Popup Maker adds other options such as scroll depth.
Form Popup Targeting
Next, you can set up the Targeting options. If you use a click open trigger, these aren’t really important because the popup will only open when people click the button. But if you’re using an automatic open trigger, these are really useful for controlling when the popup is eligible to display.
For example, you could only display it on certain pages. Or, you could hide it for certain devices.
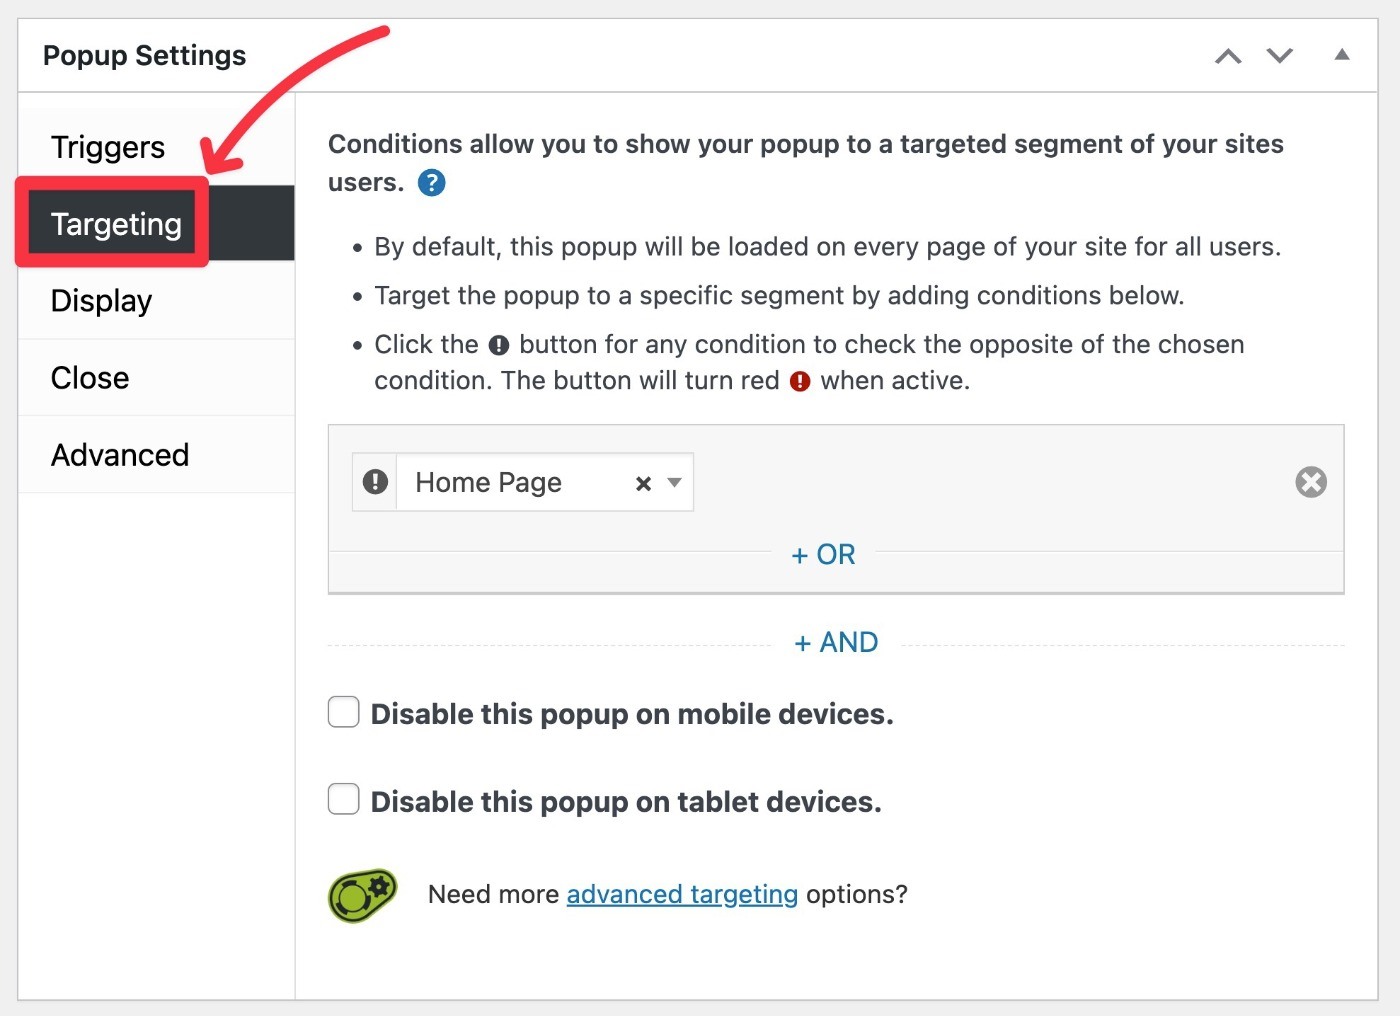
The premium version of Popup Maker adds much more detailed targeting rules, such as targeting certain users, referring URLs, and more.
Form Popup Display
Next, the Display tab lets you control the size and design of your popup. For example, whether to display it as a lightbox popup or a slide-in.
For most types of popup forms, we recommend choosing the Center Popup preset so that there’s room to display all of your form’s fields.
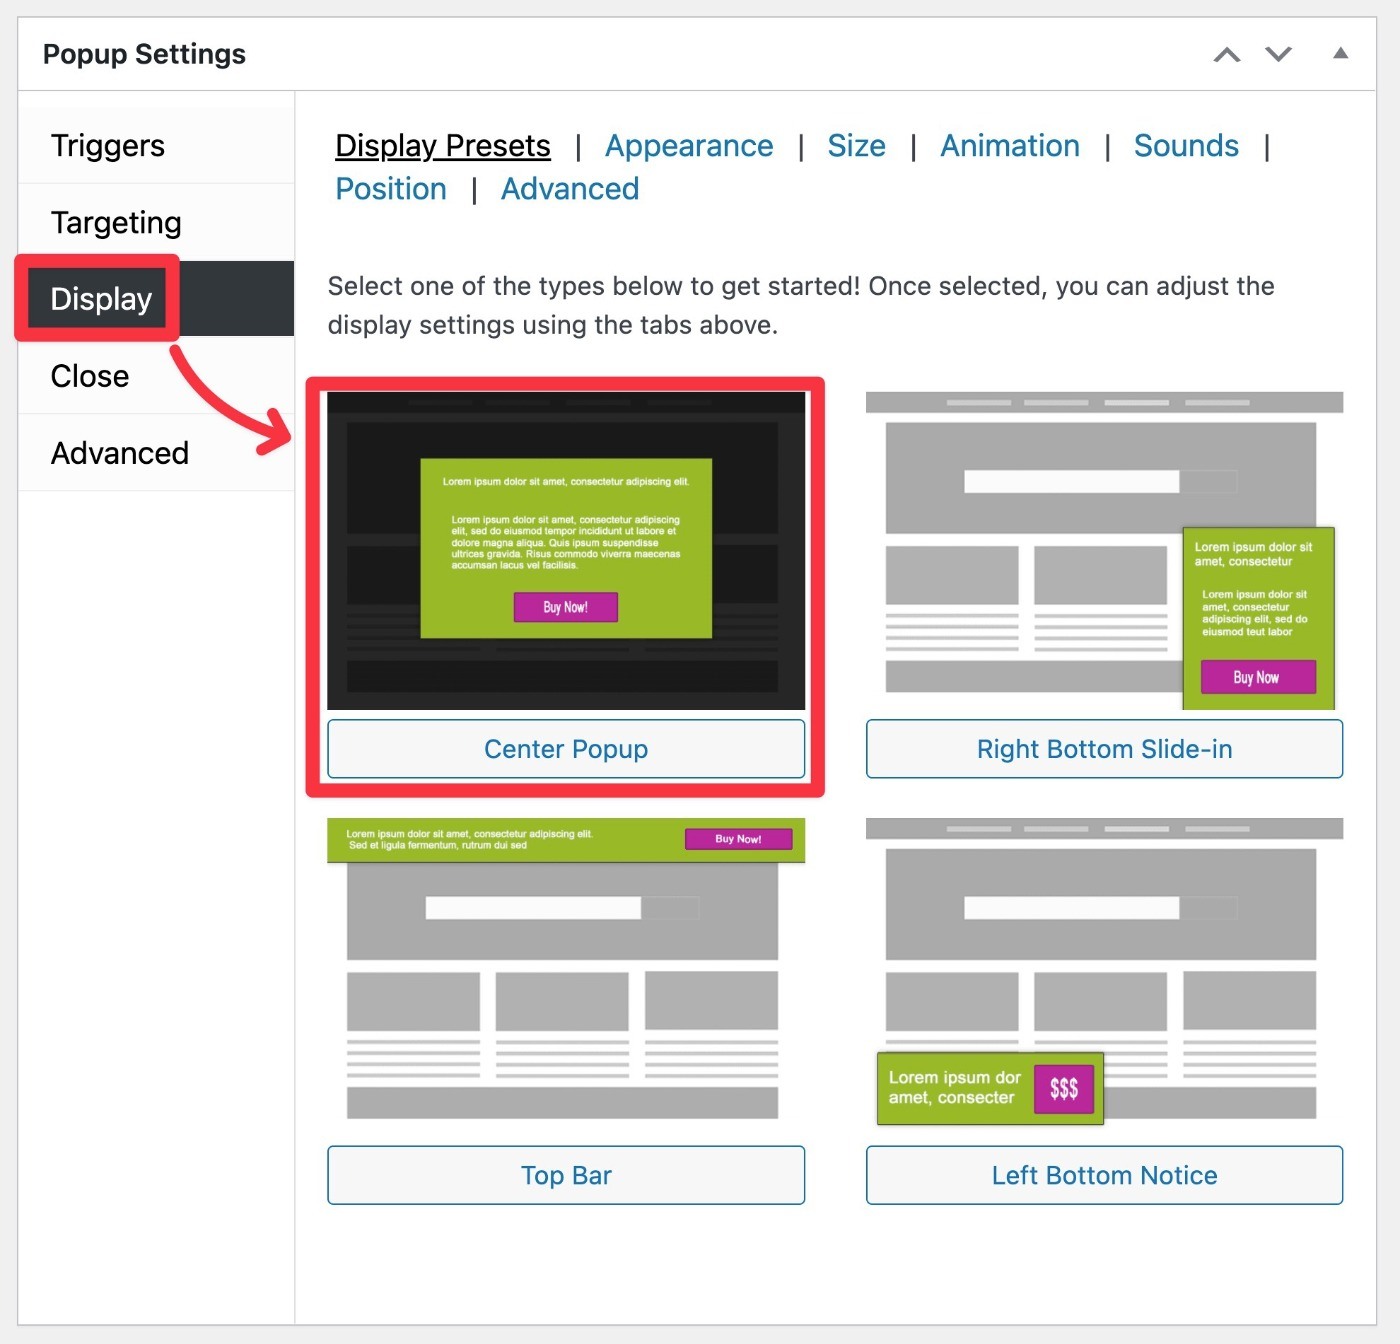
You can then explore the rest of the settings to control the design in more detail, as well as the rest of the popup settings.
4. Embed Form in Popup
Once you’re happy with the basic settings of your popup, the last step is to embed your form.
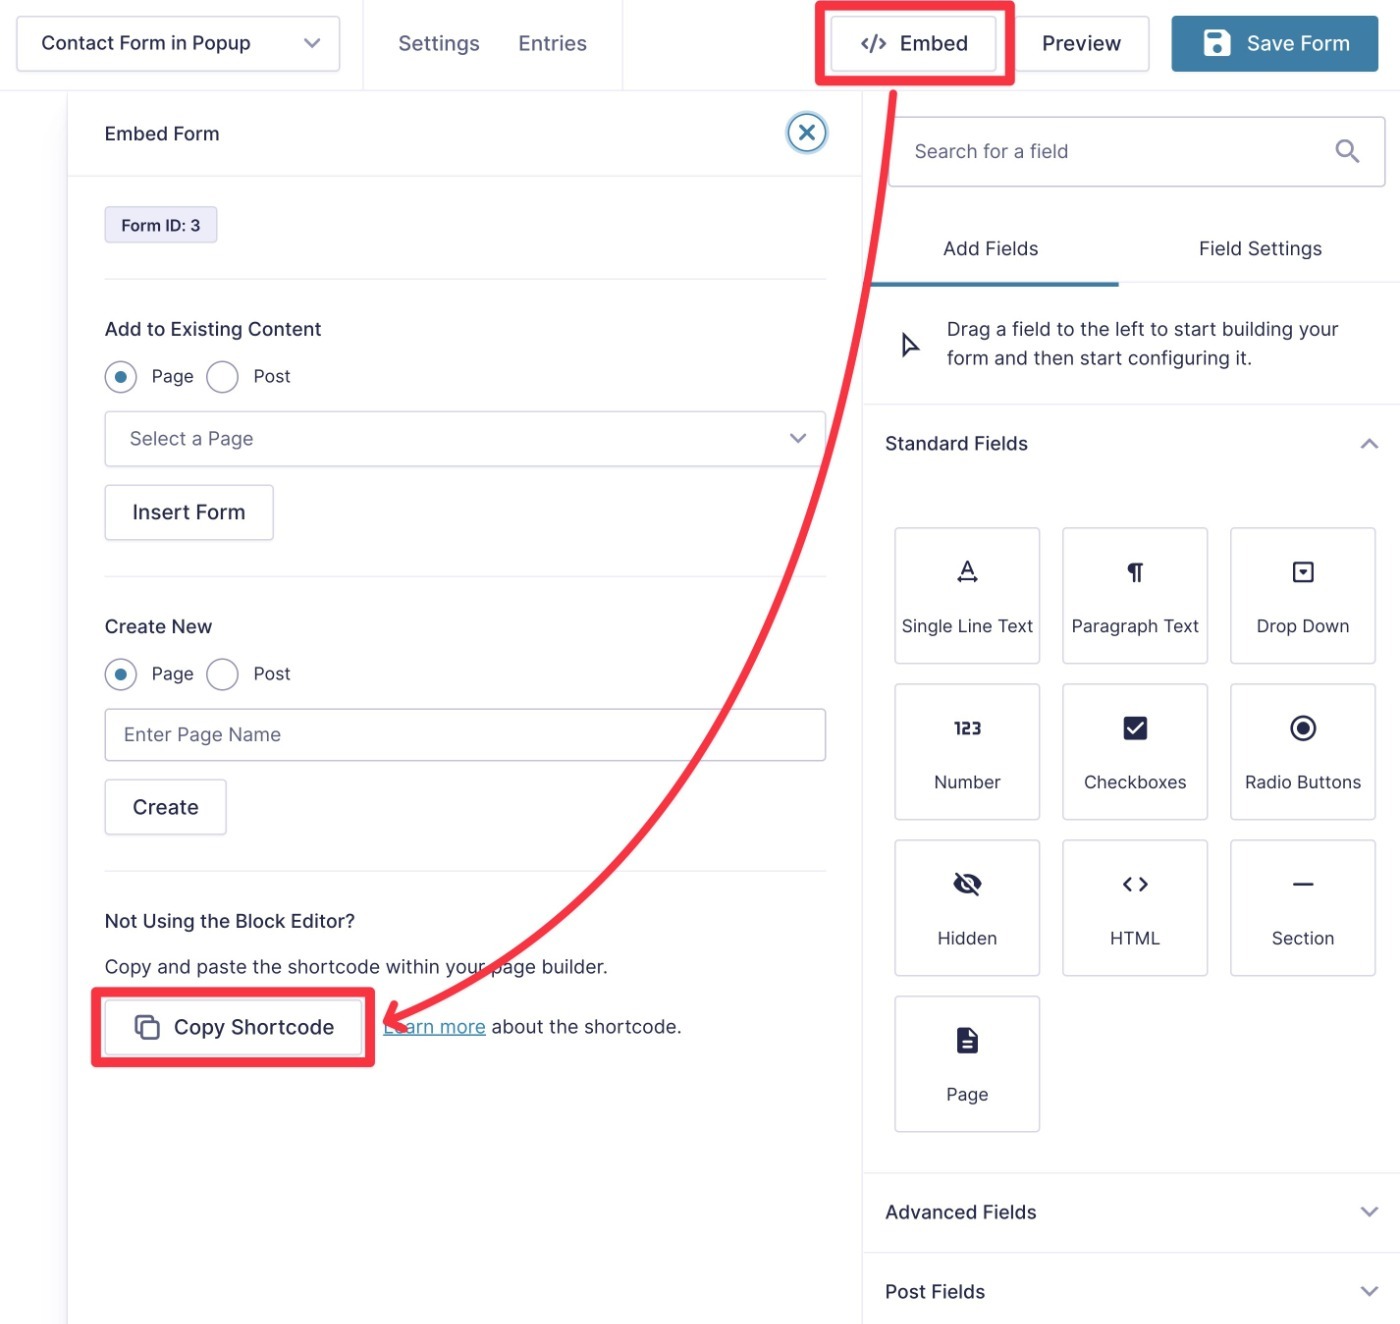
To do this, you can use the Gravity Forms shortcode. You can access the form shortcode from the form builder interface:
- Go to Forms → Forms.
- Hover over your popup form and click Edit to launch the form editor.
- Click the Embed option in the top-right corner of the interface.
- Click the Copy Shortcode button.
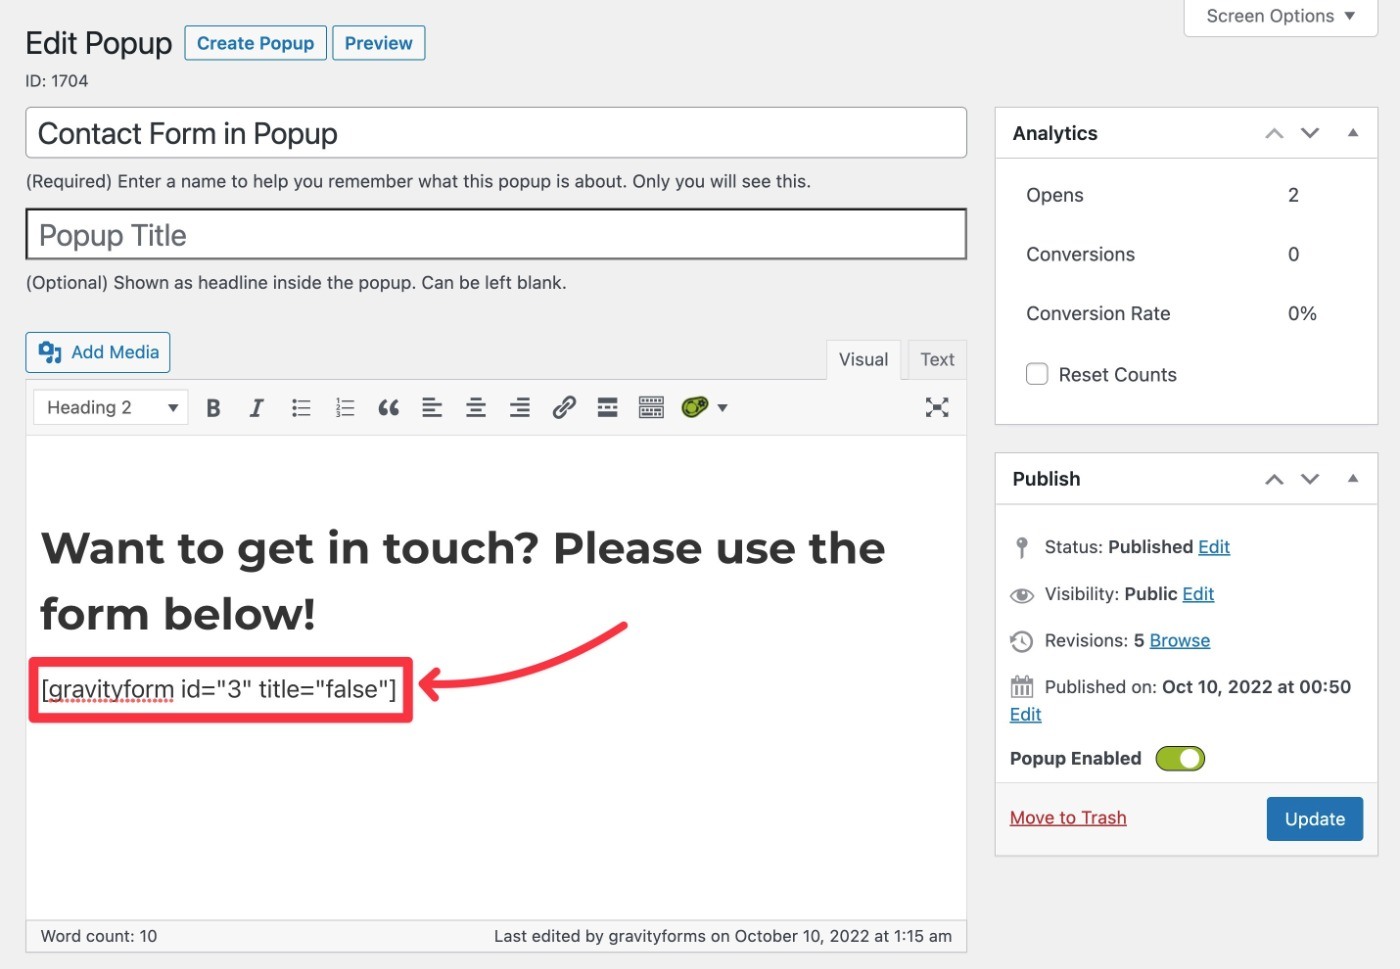
Now, go back to your popup’s settings and paste the shortcode into the content editor.
By default, Gravity Forms will display your form’s title along with the form. You can turn this off by setting the title equal to false.
You can also add your own content around the form if needed.
Make sure to save your settings when you’re done.
5. Start Using Your Popup
Now, your WordPress popup form should be active according to the targeting and triggering rules that you set.
Again, here’s an example of how it works on our test site using a click trigger:
If you want to create additional forms, you can repeat the same steps. Just make sure to use different targeting and trigger rules for each popup form.
Create Your WordPress Popup Form Today
That wraps up our guide on how to create a popup form in WordPress.
If you’re ready to get started, purchase Gravity Forms today and you’ll be up and running in no time.
If you want to test out this tutorial before making your purchase, you can also spin up a free and fully functional Gravity Forms demo site. You can then install Popup Maker on your demo site and follow this guide to see how it works.

If you want to keep up-to-date with what’s happening on the blog sign up for the Gravity Forms newsletter!
"*" indicates required fields