

When someone completes a form on your site it’s essential to make sure that the information makes it to the right member of your team. This is doubly important when it’s a form that requires a response, like a contact form or a job application. With the Gravity Forms Slack Add-On makes it easy to keep your team informed.
Slack is a powerful internal communications tool used by over 100,000 companies and nonprofits to help their teams collaborate more effectively. When combined with the Gravity Forms WordPress form plugin, Slack can help your team process information received through various forms in a timely manner.
Slack Core Features

Slack offers chatroom-style communication for remote teams. You can create channels for different topics or teams and assign specific members to each channel. There are also some advanced features to help you better communicate with your team:
- Message Scheduling – Easily schedule messages to go out to your team at a specific time of day.
- Team Files – Upload relevant files directly to Slack or connect Slack to your Google Drive to make important data readily available.
- App Integrations – Slack offers integrations with a variety of tools including Google Drive, Google Calendar, and Trello.
- Slack Huddles – A virtual meeting tool that lets you invite members of your team to join an audio or video call.
- Slack Connect – A suite of tools that lets you connect with people outside of your Workspace. You can do this either through DMs or by creating a new channel with people from multiple workspaces. Note that this feature is only available on paid plans.
And you can do even more with the Slack Add-On for Gravity Forms!
How the Gravity Forms Slack Add-On Can Benefit Your Business

The Gravity Forms Slack Add-On makes it possible to send automated notifications to your company’s Slack workspace when someone completes a form on your website. You can set three notification parameters for each form:
- Where to Send the Messages – Notifications can be sent to a specific channel, team, or individual. You can use this feature to make sure that information always reaches the right department. For example, if you have a job application form on your site you might set it up to notify your HR team or hiring manager.
- What Included in the Messages – You can use a combination of static text and merge tags to specify what’s included with each notification. This can help you make sure that team members receive the most actionable information right away.
- Attach Files – You can make sure any files attached to the form are included in the notification. This is particularly useful when dealing with customer service messages because team members can immediately view any relevant screenshots and photos.
The Slack Add-On for Gravity Forms also supports conditional logic, allowing you to further specify when your team will receive notifications. For example, if you’re connecting Slack to a contact form, you might set it up to notify your customer service team if a ‘Help’ checkbox has been checked.
How to Use the Gravity Forms Slack Add-On
Let’s now take a look at how to get started with the Slack Add-On. This tutorial presumes that you already have Gravity Forms installed and activated on your WordPress website.
If you don’t yet have Gravity Forms set up, head on over to the Pricing page to make a purchase, then download the plugin and install it on your site.
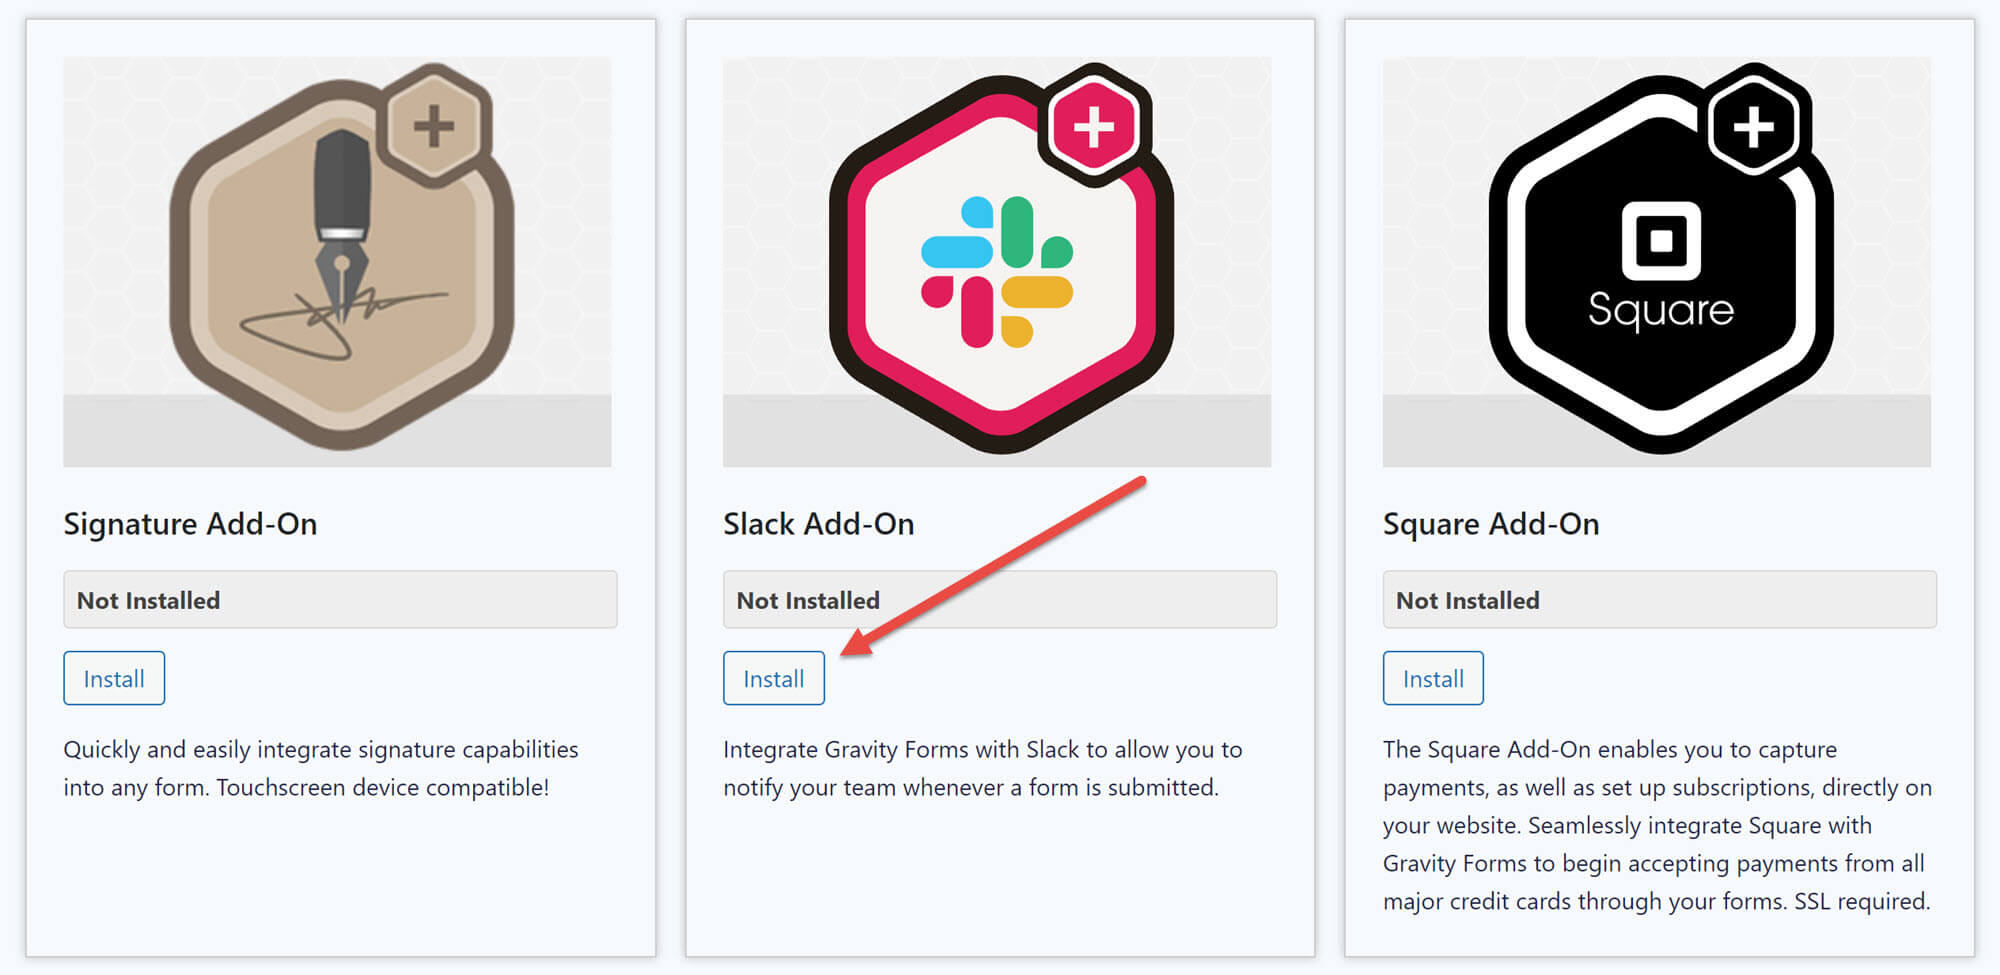
1. Install the Slack Add-On
Open your WordPress dashboard and select Forms > Add-Ons. Scroll down until you see the Slack Add-On, then click Install > Activate.
2. Connect Slack to Gravity Forms
Next, head to Forms > Settings and choose Slack from the options listed. On this page, click Connect to Slack.

You’ll then be redirected to a page asking you to give the Gravity Forms Slack Add-On permission to access various parts of your Slack Workspace.
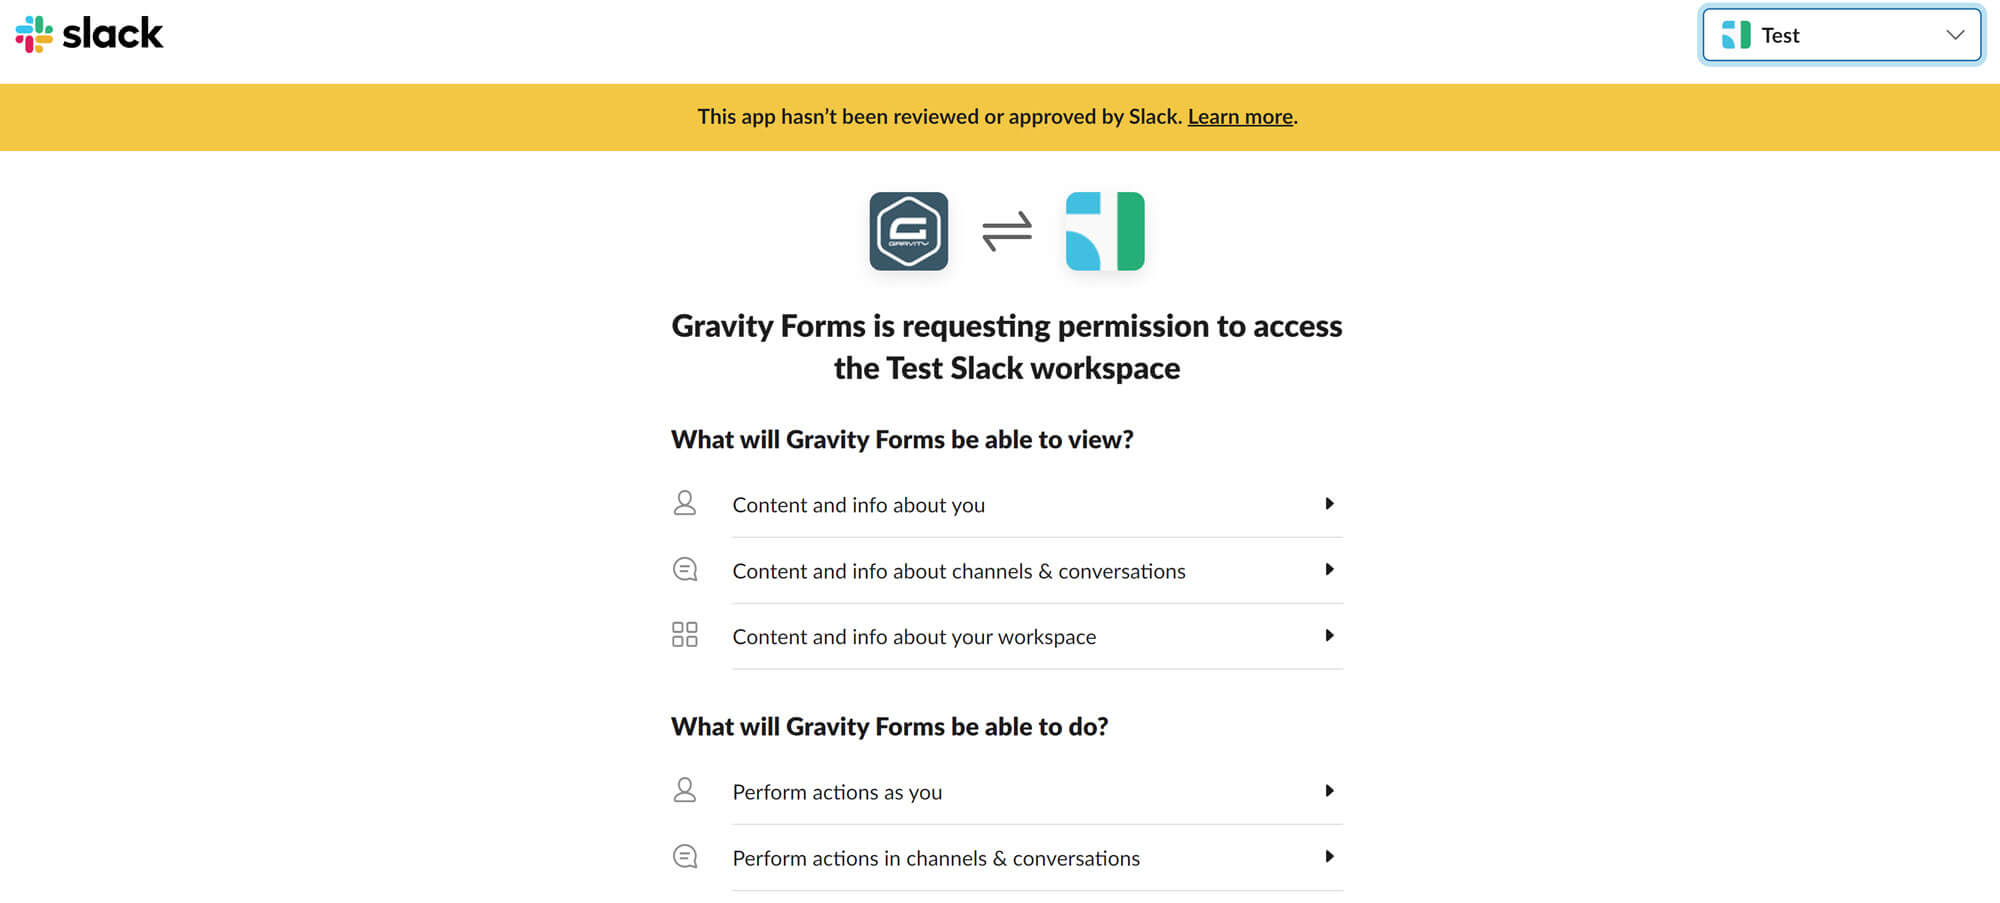
If you have more than one workspace you can choose which one you want to connect to Gravity Forms using the dropdown menu in the top right corner. Otherwise, scroll to the bottom of the page and click Allow. You will then be redirected back to the Settings area of Gravity Forms within your WordPress dashboard.
3. Create a Form
Next, head to Forms > Add New and enter a name and description for your form. Note, you don’t have to create a new form, the Slack Add-On will integrate with any new or existing form.
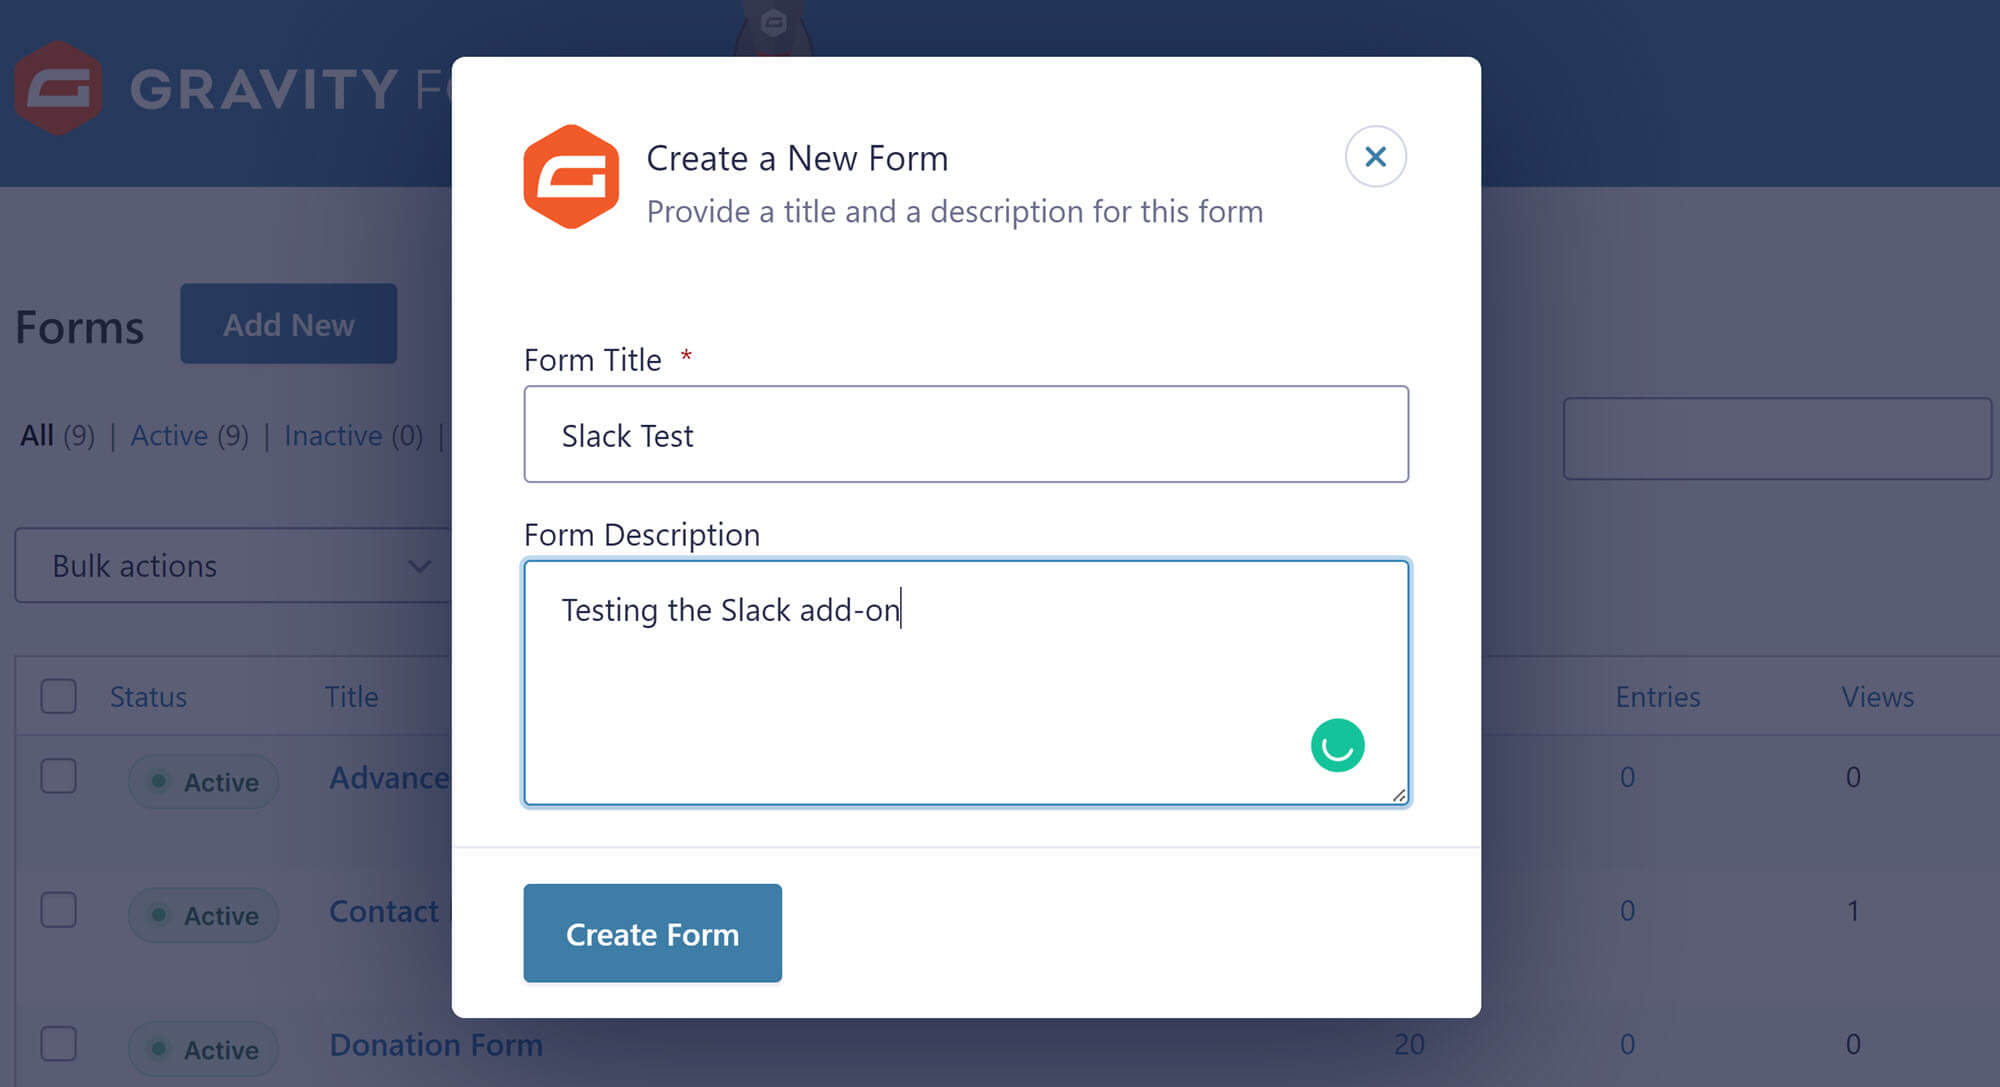
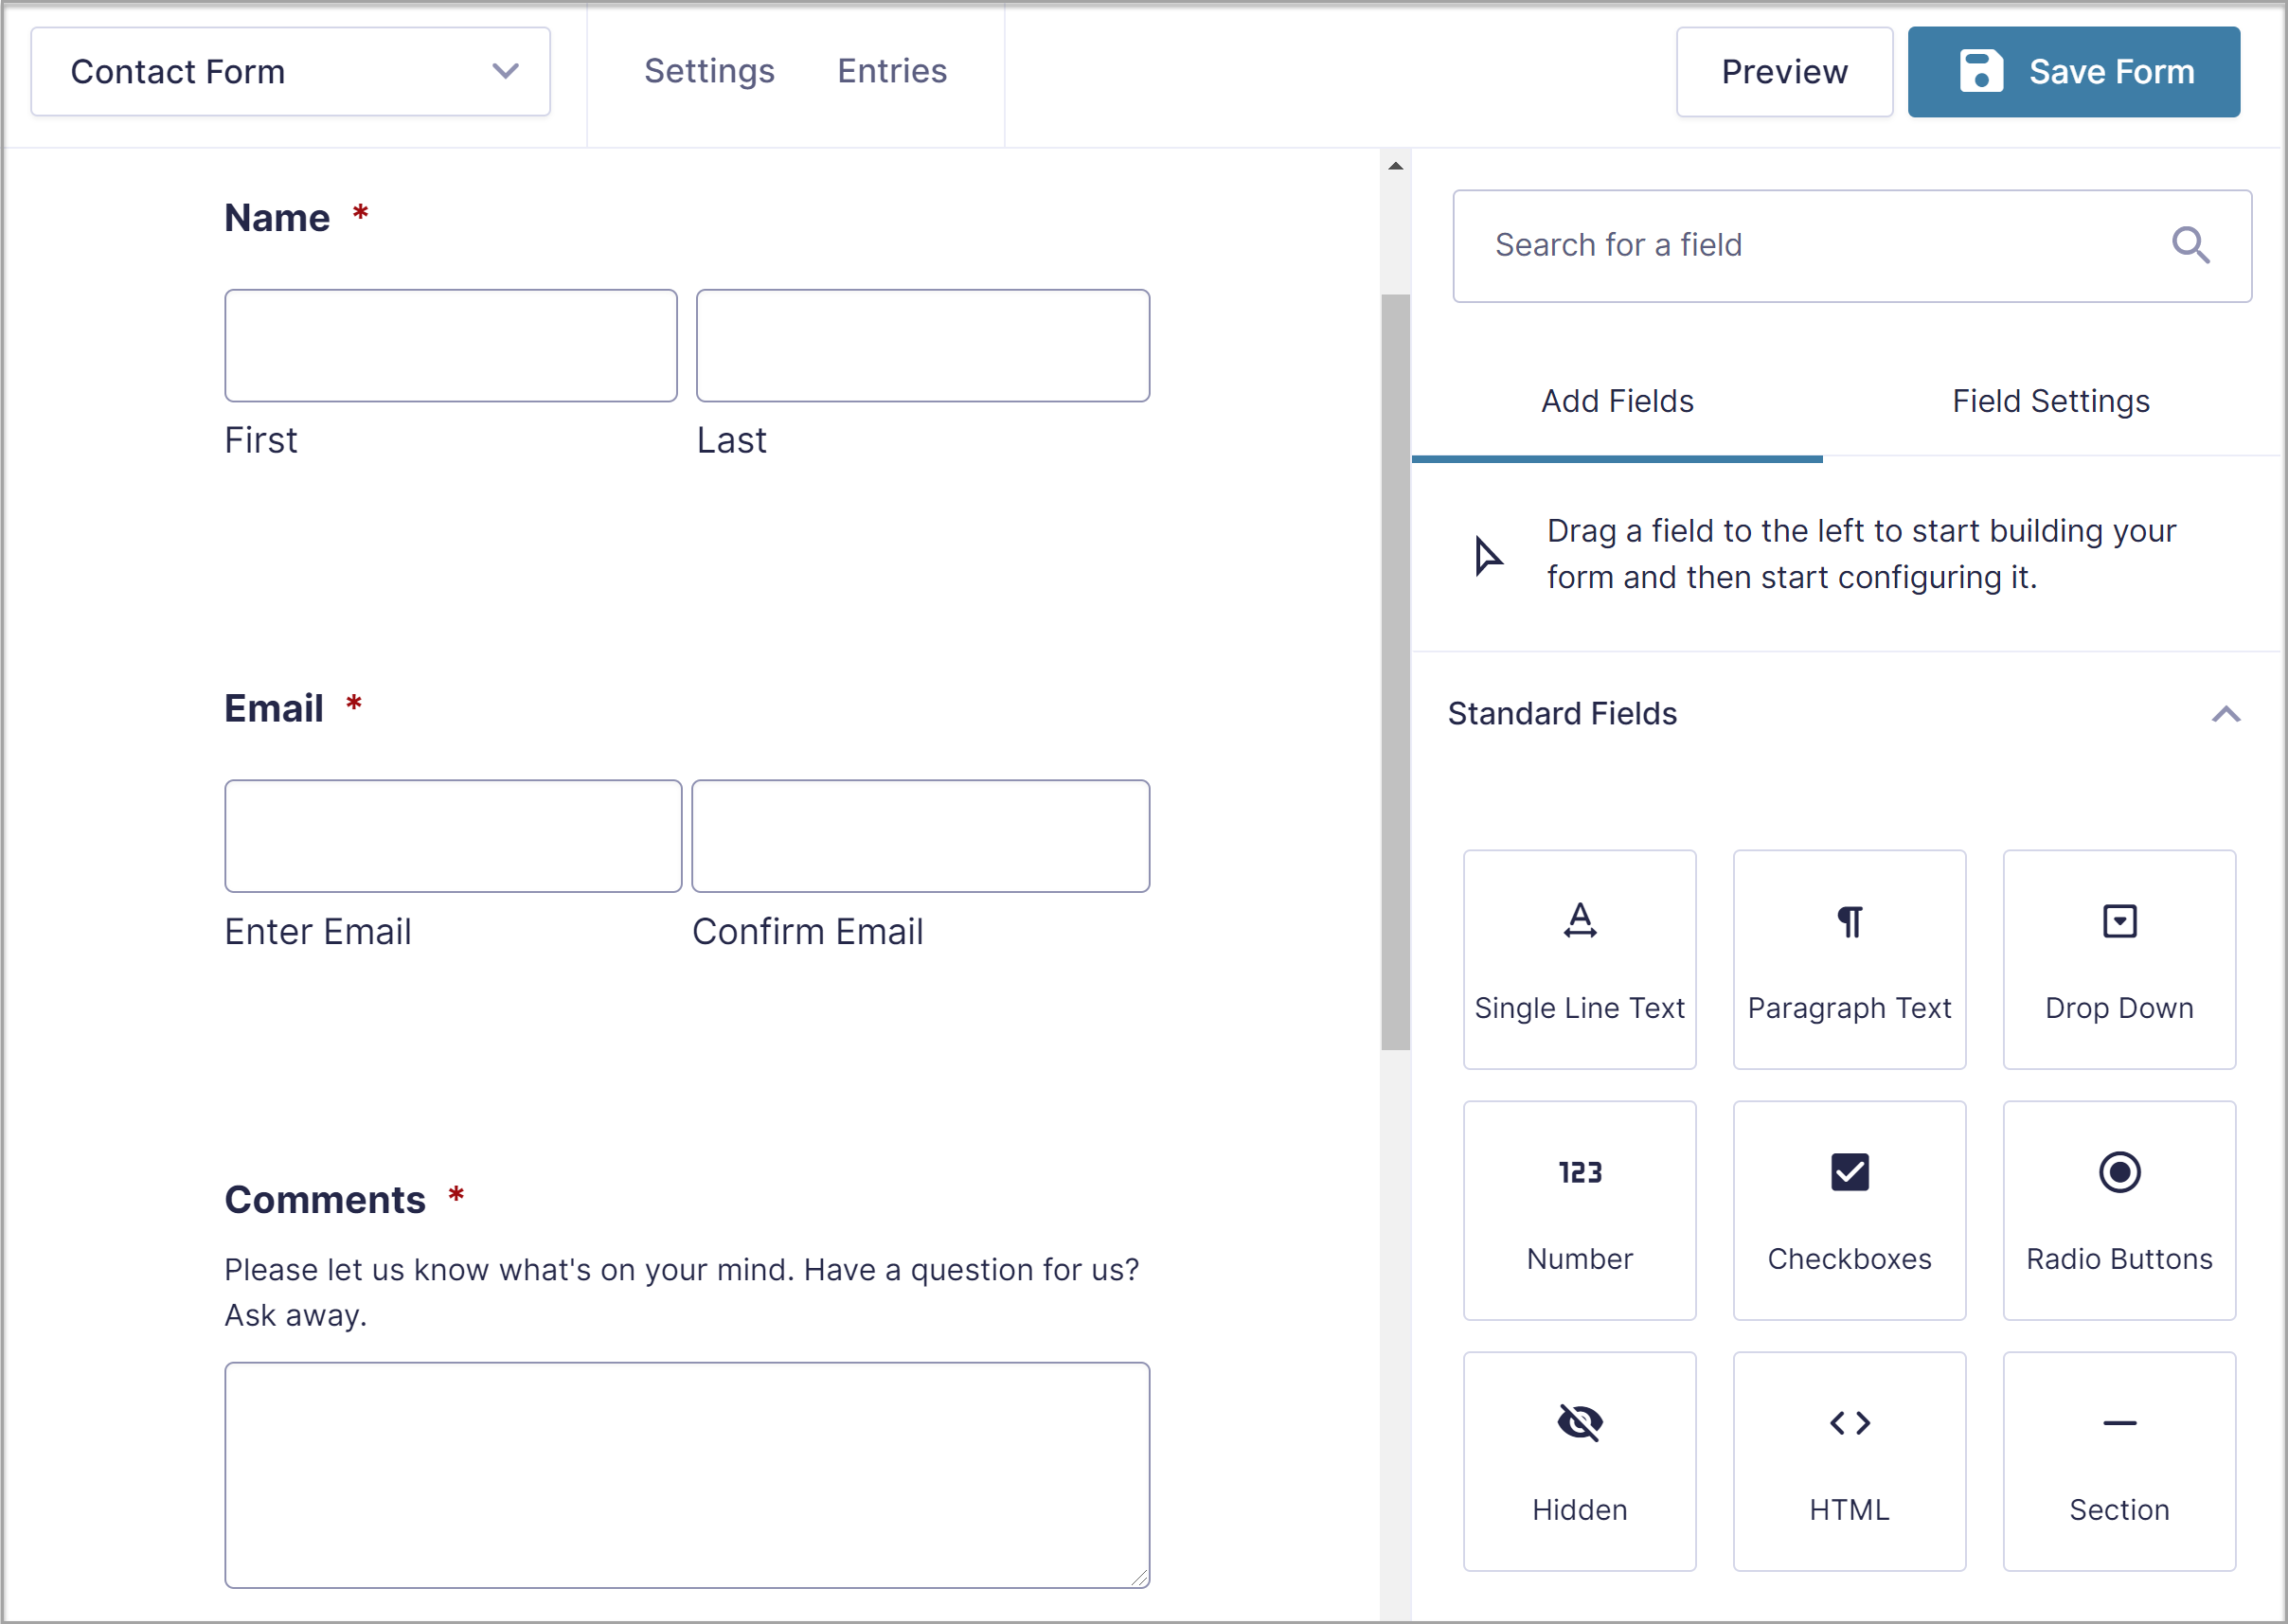
Once you’ve entered a title (and description if you want one), click Create Form. This will open the form editor, where you can drag and drop information fields, checkboxes, and other form elements directly onto your form.
For example, if you’re creating a contact form, you might use the Name and Email fields, as well as a Paragraph Text field for user messages.
If you need more guidance on creating forms, check out our article, How to Create a Form in WordPress. Equally, you can select from any of our fully customizable form templates to give you a helping hand getting started with a new form.
4. Create a Slack Feed
When you’re happy with the contents of your form, open the Settings dropdown menu in the form editor and click on Slack.
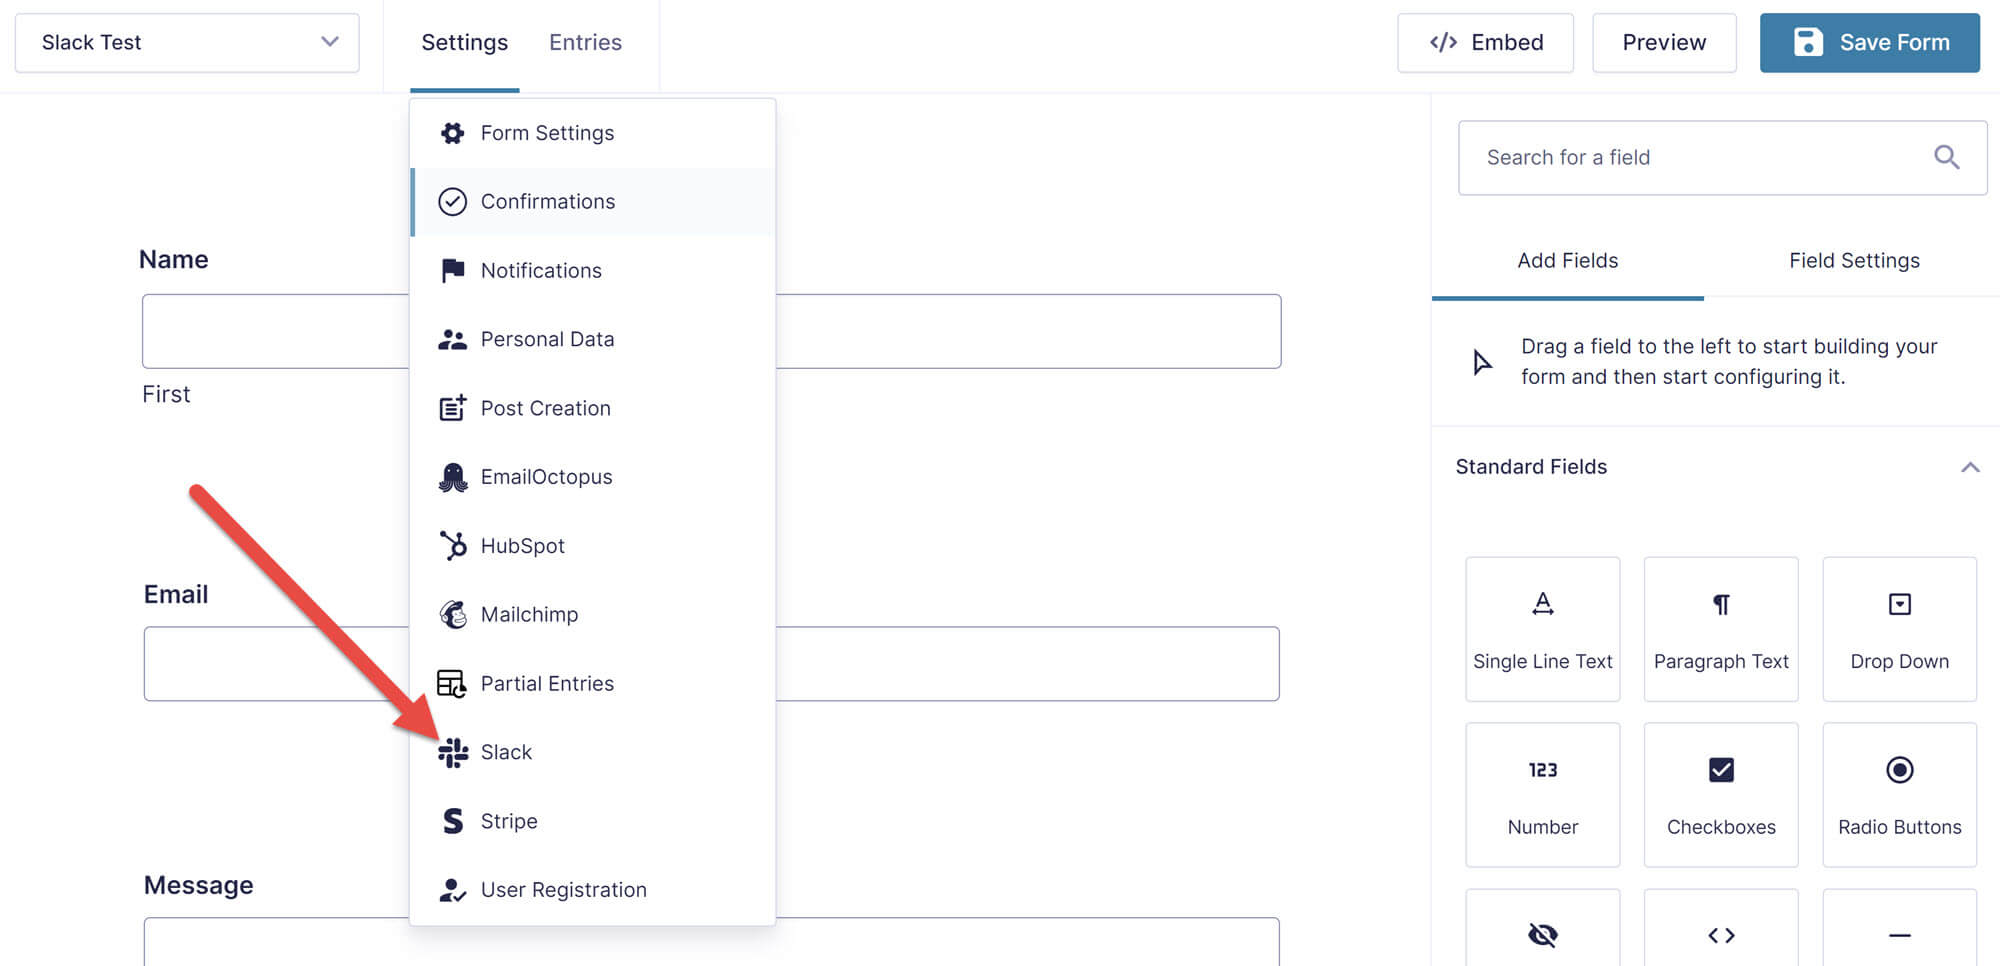
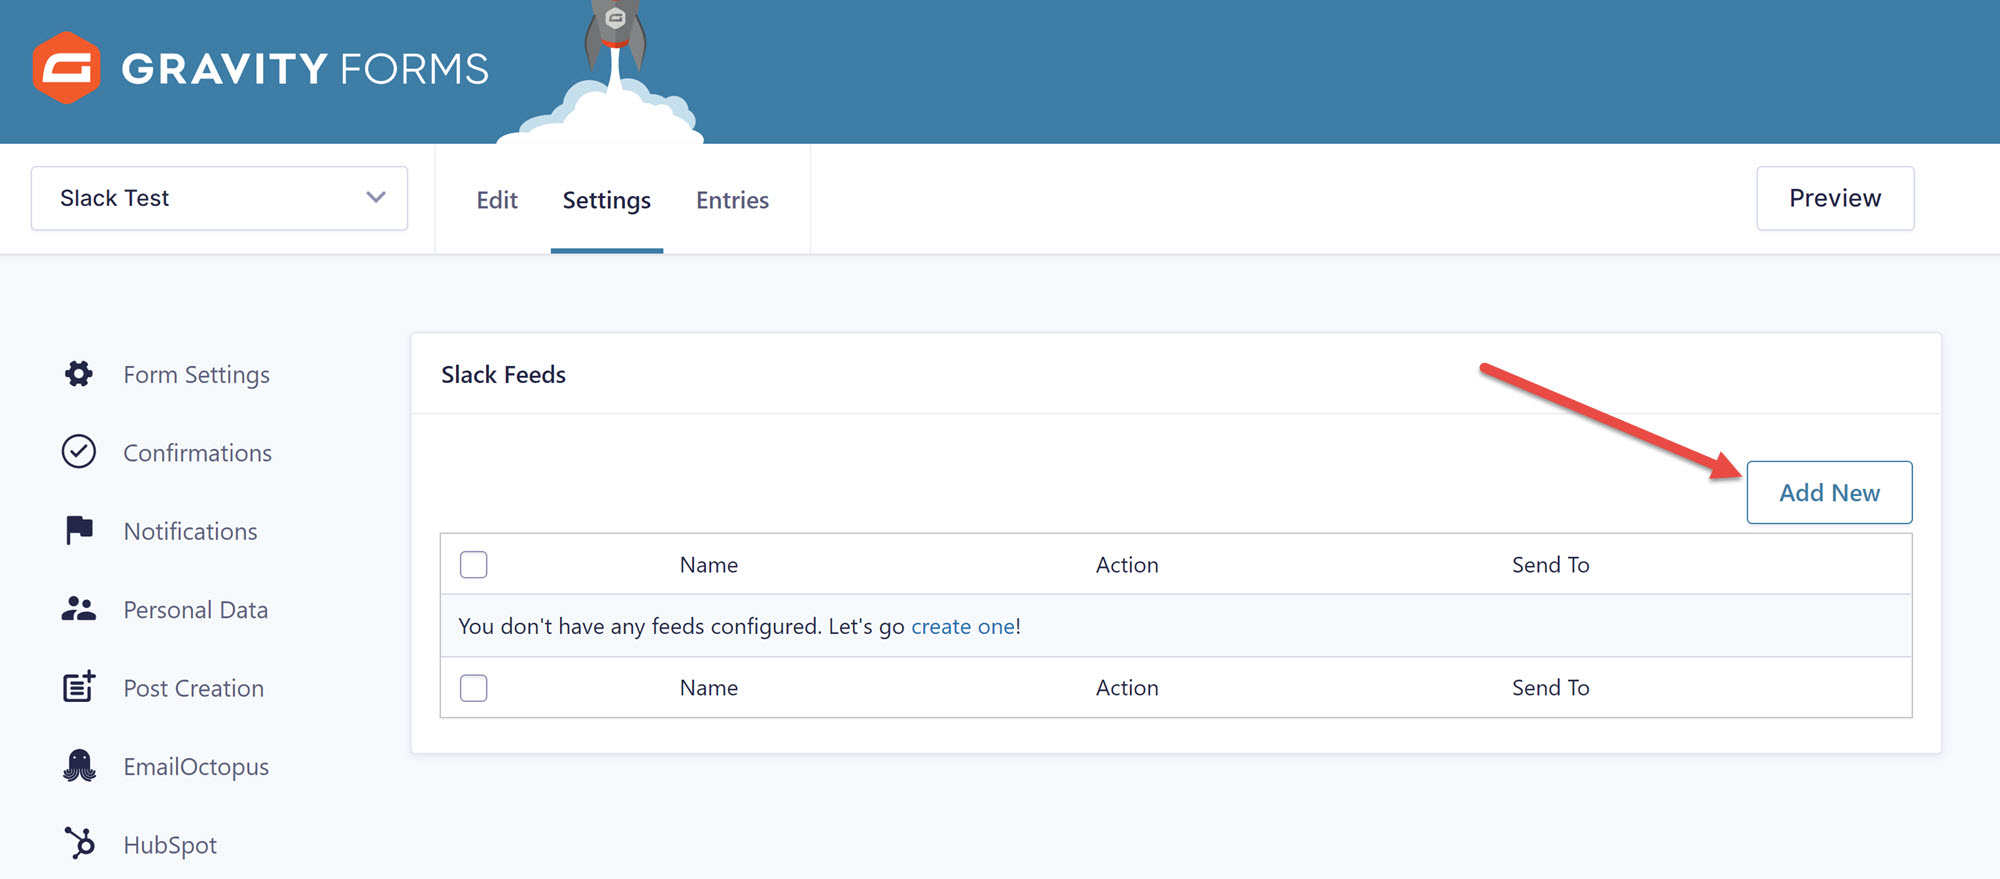
This will take you to a page where you can view all of the feeds connected to Slack. Feeds are automated instructions that send form information to a specific place, like a channel or team in your Slack workspace.
Click Add New to create a new feed.
On the next page, you’ll be asked to give your feed a name and select an action (currently, the only action the Slack Add-On can perform is sending a message). You can then choose where you would like the feed to send the form entries – a public group, private channel, or direct messages to an individual.
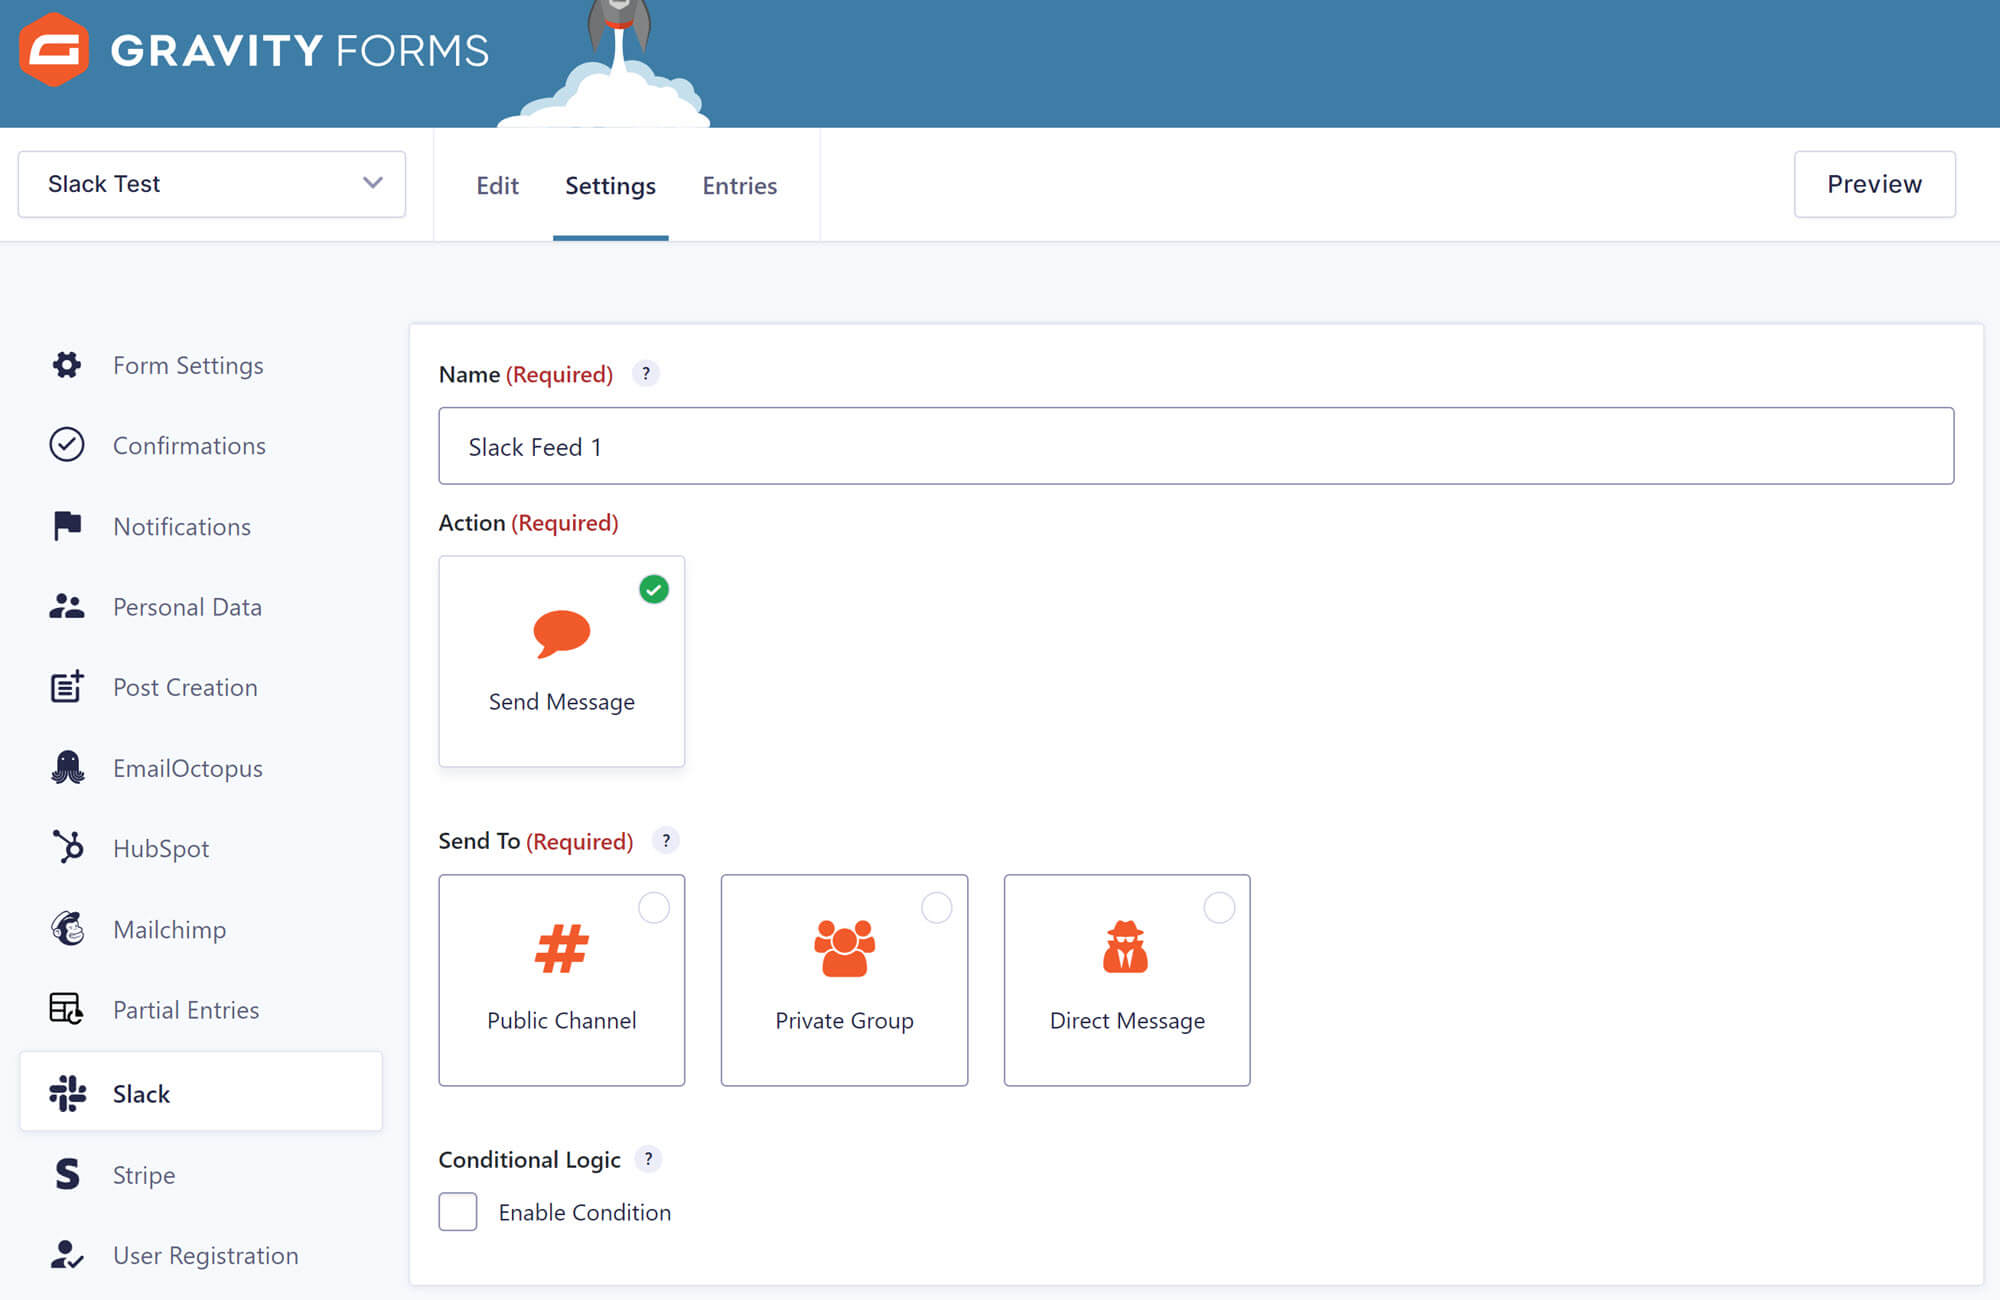
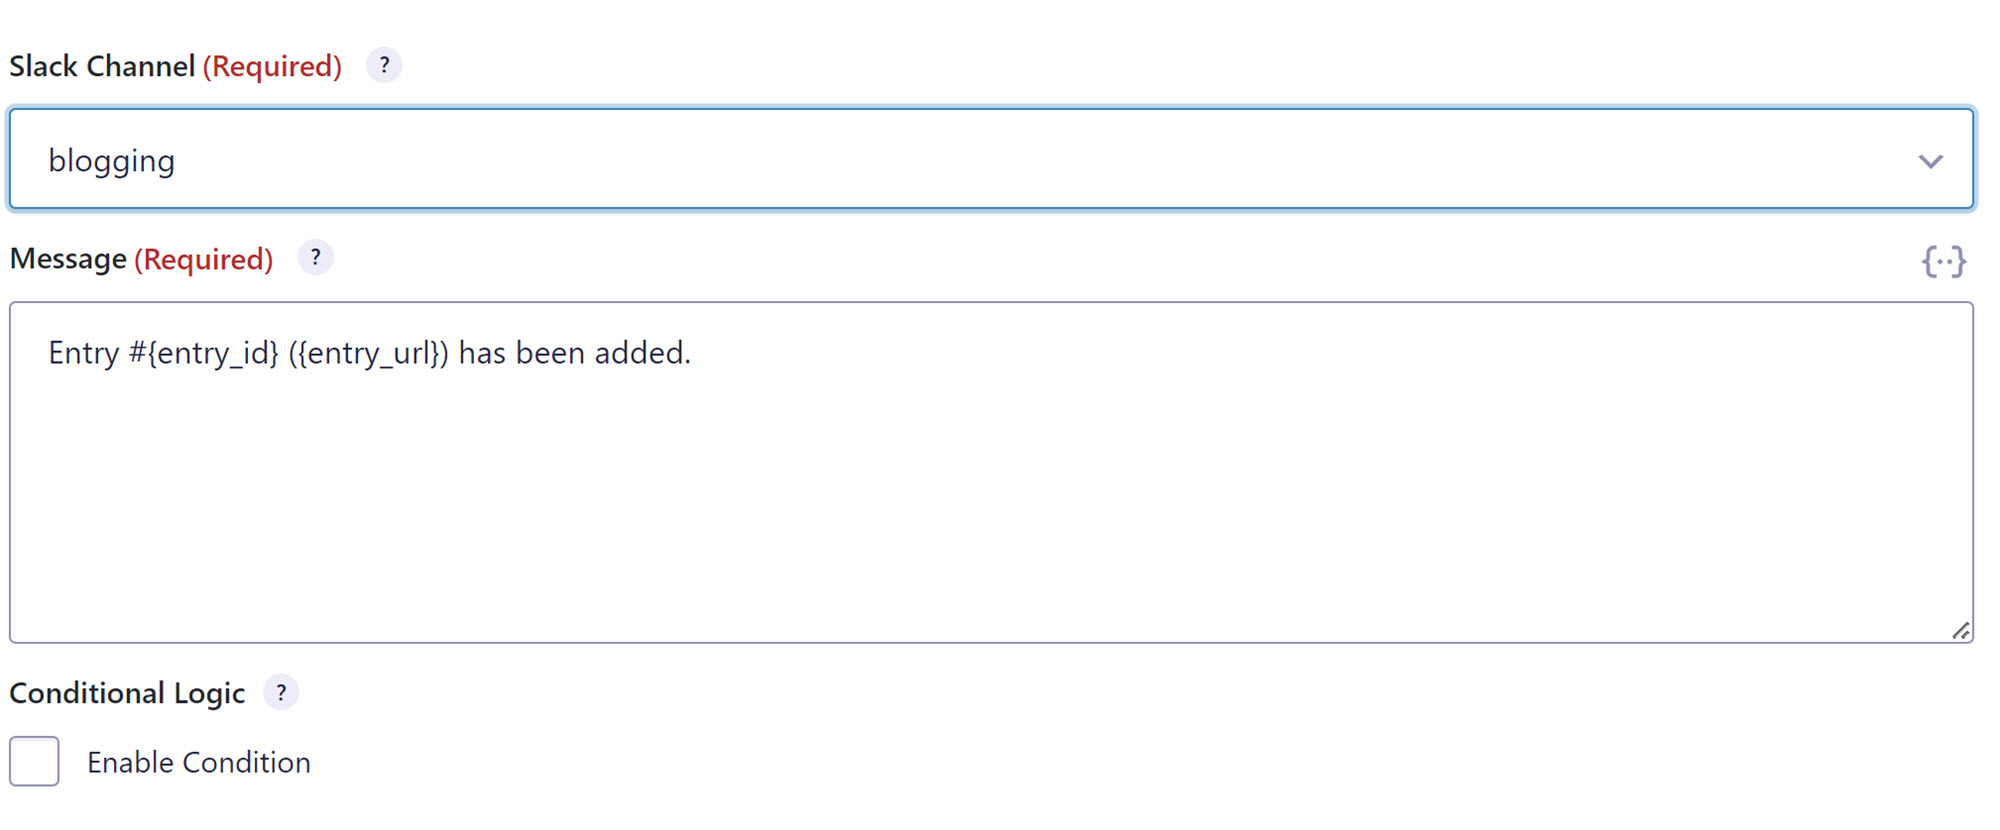
After choosing a Send To option, you’ll see a dropdown menu listing all of the relevant options. For example, if you chose Public Channel, you’ll get a list of all the public channels in your Slack workspace.
You’ll also see a box where you can customize the notification message that the channel or user receives. Shortcodes can be used in this area.
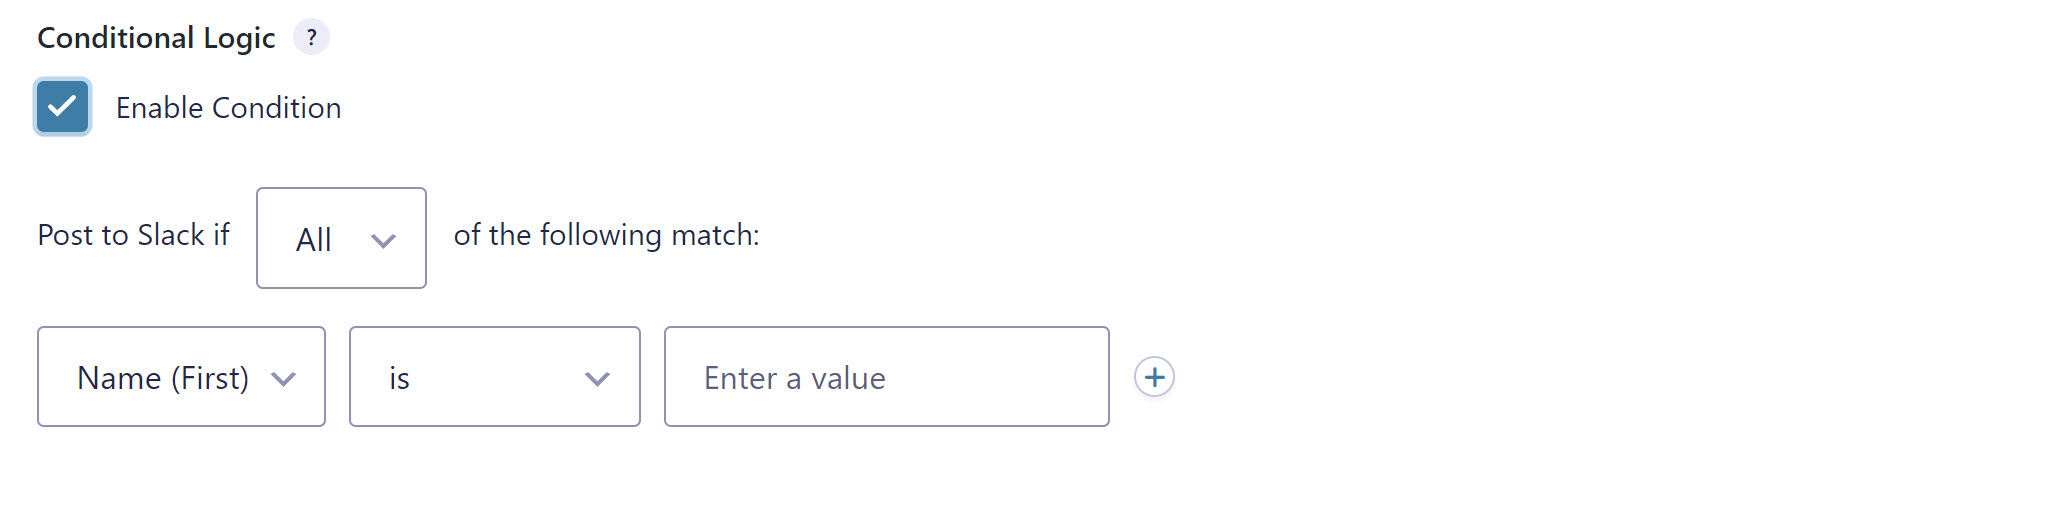
5. Optional: Enable Conditional Logic
To make your Slack feed even more efficient, click Enable Condition. This opens two dropdown menus: a fields menu, a menu that sets the type of condition (such as contains or is), and a blank area where you can enter the word or phrase you want the add-on to look for.
Here you can set conditions for when you want a notification sent to Slack. For example, you could opt to only send a notification of a new lead if the form submitted contained a telephone number. This ensures that your team is passed valuable and qualified leads.
Check out our documentation on conditional logic to learn more about how this works.
6. Embed the Form
Now that your form is connected to Slack, you’re ready to publish it! To do this, click the </> Embed button in the top right corner. This will open the Embed Form flyout menu.
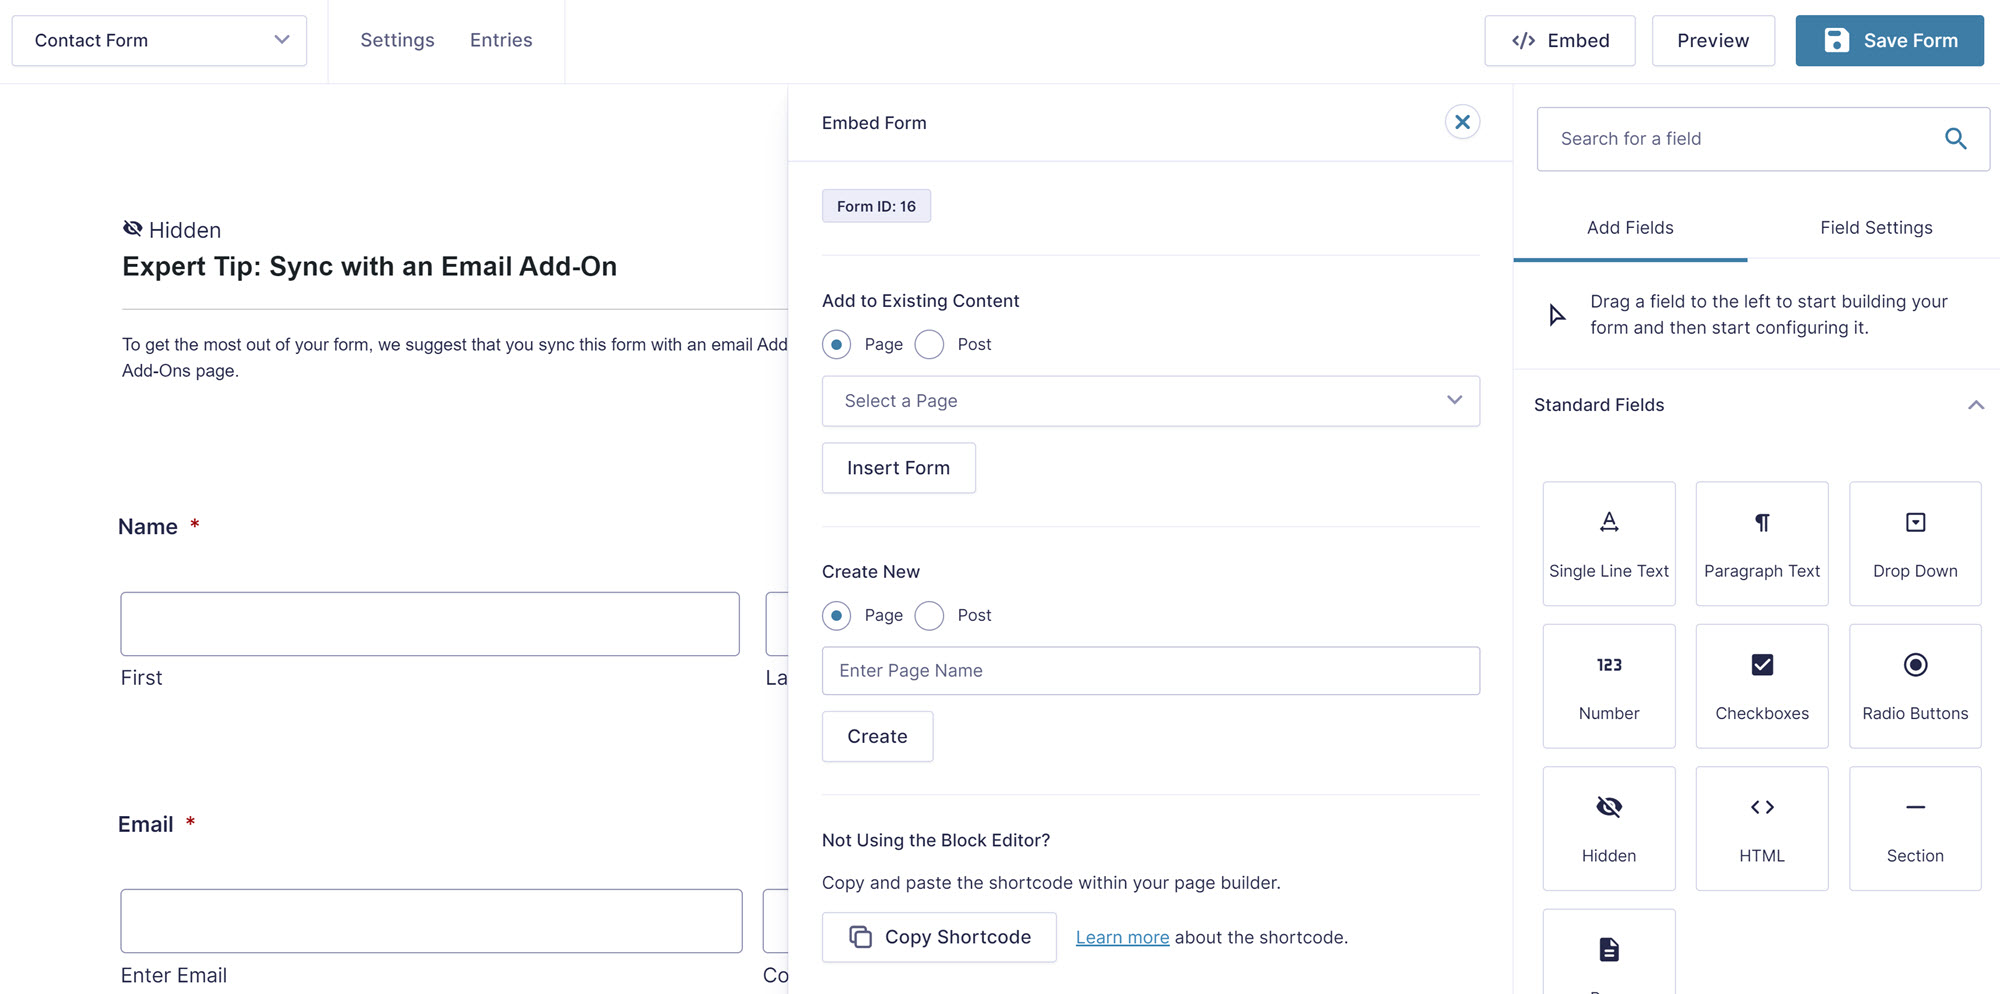
To add your form to an existing page, under Add to Existing Content choose either Post or Page. Then select the appropriate post/page in the dropdown menu and click Insert Form. You can also choose to create a new page for your form or to generate a shortcode that can be added to existing content.
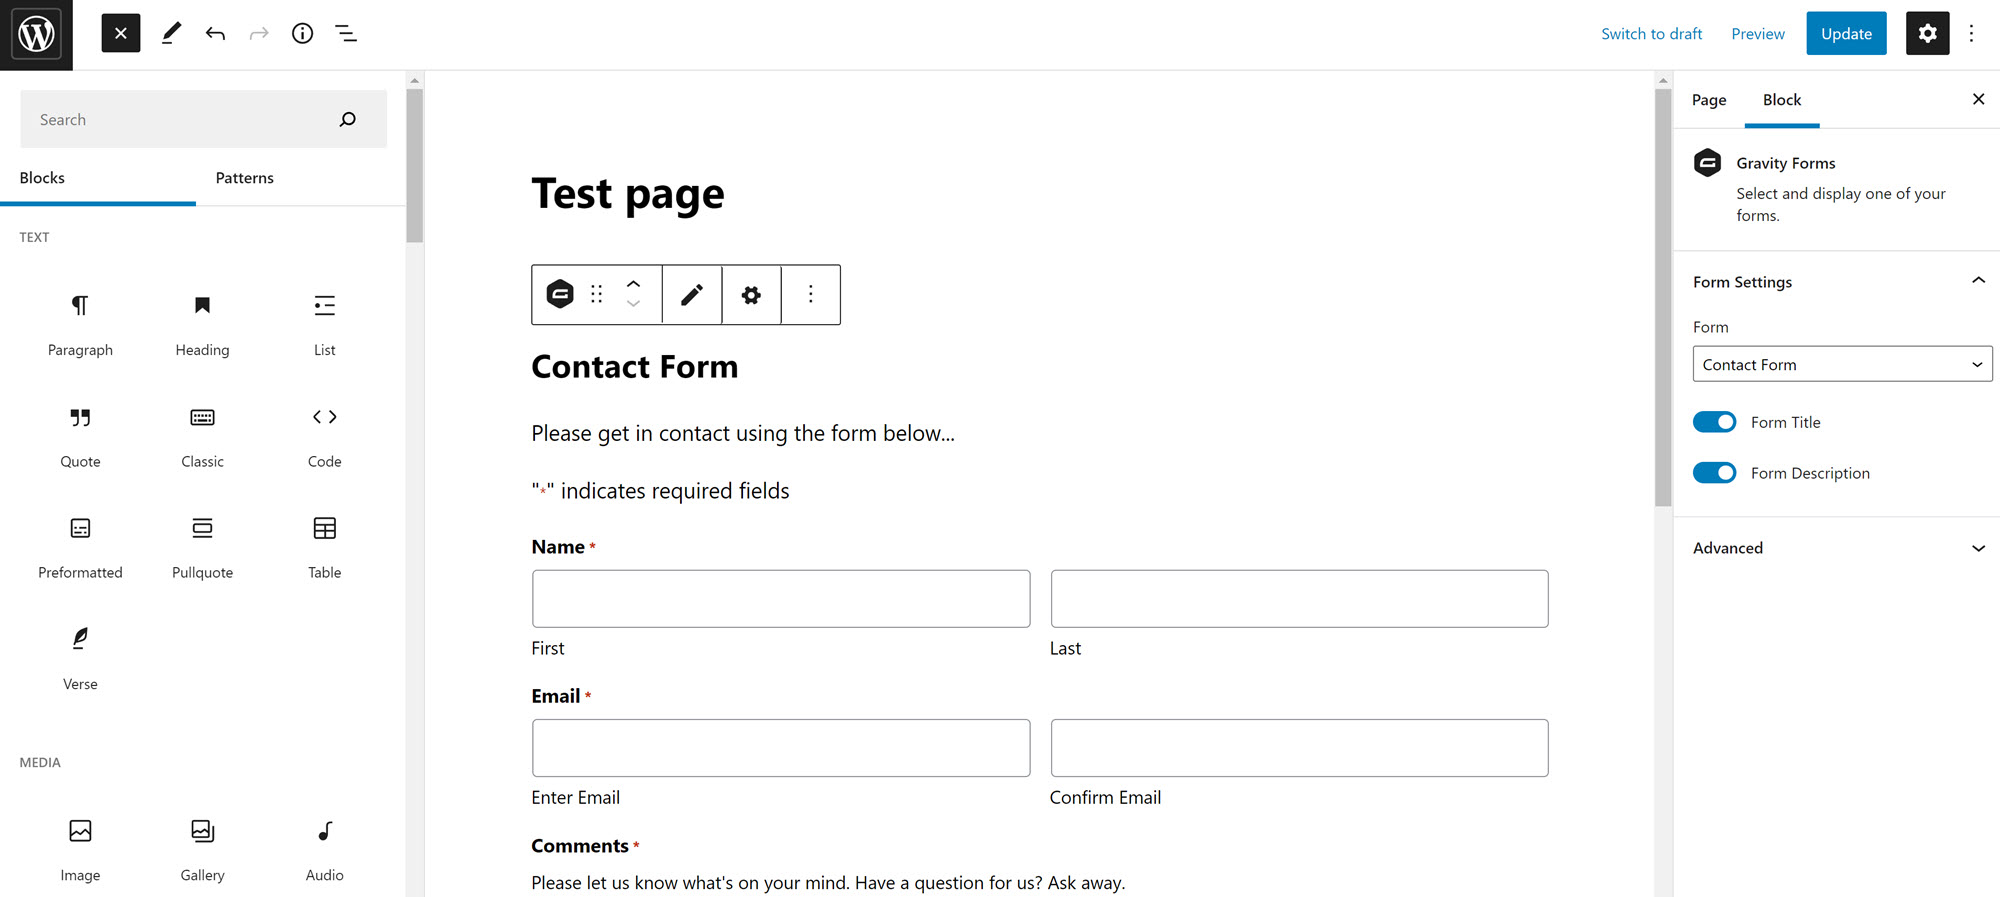
If you’re adding a form to an existing page, Gravity Forms will open that page with the Gravity Forms block highlighted.
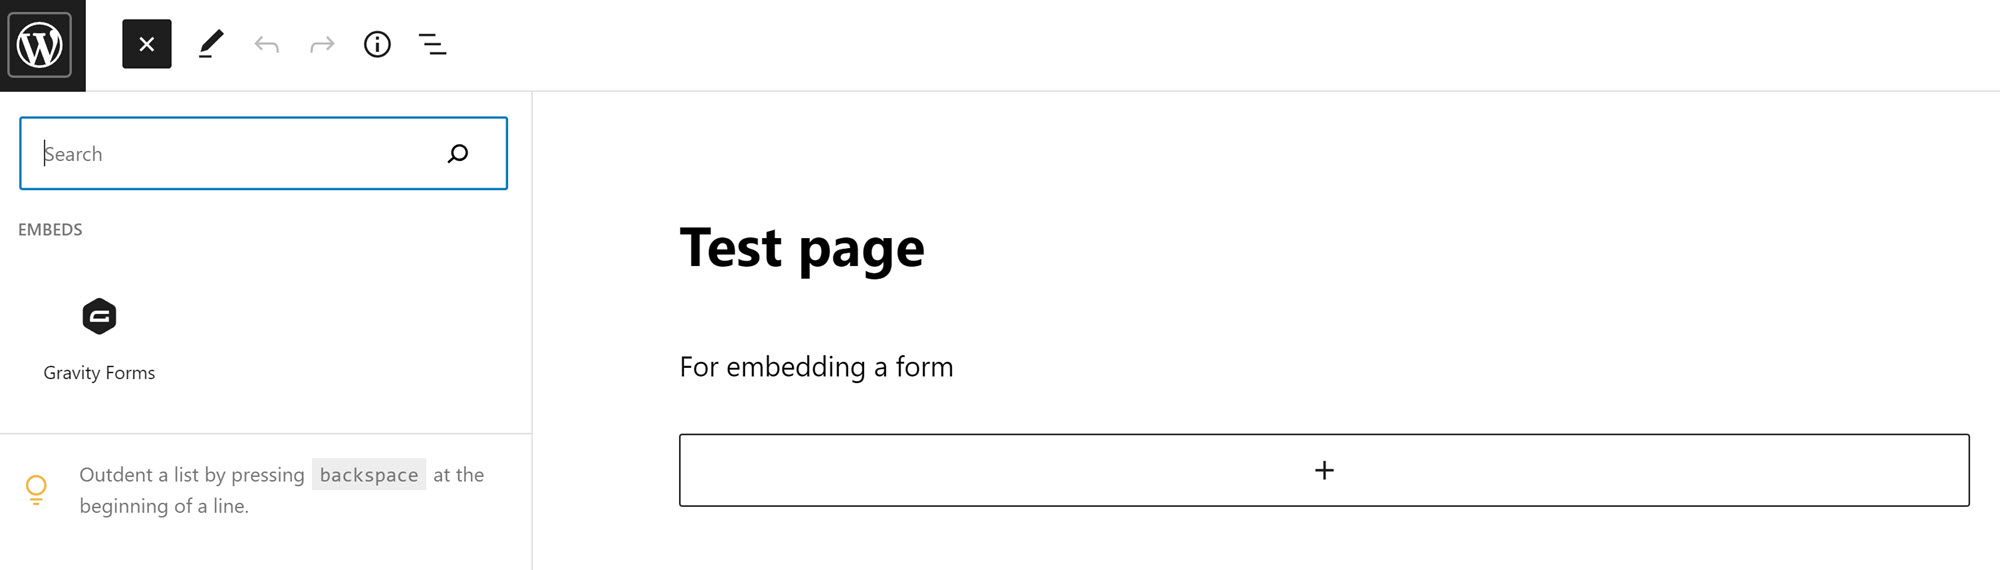
Simply drag the Gravity Forms block onto your page in the appropriate position, and voila, your form is ready to be published!
Ready to Connect Your WordPress Forms to Slack?
The Gravity Forms Slack Add-On makes it easy to direct form information to appropriate team members, enabling them to take action on it in a timely manner. For more information on how to use this add-on, check out our Slack Add-on Documentation.
Don’t have Gravity Forms yet?
Don’t have Gravity Forms set up on your site yet? Don’t worry! You can test out Gravity Forms, including the Slack Add-On (and all of our other add-ons), for free with our personalized demo.
Already know you want this premium WordPress forms plugin? You can buy Gravity Forms today!

If you want to keep up-to-date with what’s happening on the blog sign up for the Gravity Forms newsletter!
"*" indicates required fields


