ActiveCampaign is a popular add-on for Gravity Forms and with good reason. ActiveCampaign is a powerful marketing platform that offers not only email marketing tools but also a CRM platform to keep track of all your sales pipelines.
This month, our ‘Featured Add-On’ series takes a closer look at ActiveCampaign and how it can benefit your business. We’ll also discuss the key features of our ActiveCampaign Add-On, and show you how to integrate it with your WordPress forms. Let’s dive in…
ActiveCampaign: An Introduction
ActiveCampaign provides all the email marketing, marketing automation, and CRM tools you need to support and grow your business. An impressive platform, use ActiveCampaign to easily store, manage, and connect with those all-essential leads and customer contacts from one central location.
Here are some of ActiveCampaign’s main features…
- Powerful CRM — keep track of lead and customer journeys, manage customer data, monitor interactions, and much more.
- Set up marketing automation — set up welcome automations as well as automations that are triggered based on a user’s actions or interests.
- Workflow templates — ActiveCampaign has tons of premade automated workflow templates that you can use as a starting point to set up your campaigns.
Gravity Forms ActiveCampaign Add-On: Features
The Gravity Forms ActiveCampaign Add-On seamlessly integrates Gravity Forms with your ActiveCampaign account, enabling you to send form data to the email lists or sales pipelines of your choice.
Top features include…
Easy Integration
As soon as you install the ActiveCampaign Add-On, you’ll be able to instantly sync your forms with your email list. Automatically add new subscribers to a specific list when a user submits a form.
Use Custom Fields
You can use custom fields to capture even more information about your subscribers. Simply specify which form field data should be captured and the add-on will ensure that you’re collecting and sending all the necessary details to ActiveCampaign. This makes it easy to better target your campaigns and increase your conversion rate.
Connect Instantly
As soon as you set up the ActiveCampaign Add-On, you can select to send users the last broadcast campaign or add them to a specific automated campaign. This makes it easy to start building a relationship as soon as a user fills out your form.
Opt-In Conditional Logic
As with other Gravity Forms Add-Ons, it’s possible to use conditional logic with the ActiveCampaign Add-On. You can easily set conditions that determine which form entries are sent to ActiveCampaign, ensuring you only collect valuable and qualified leads.
GDPR Compliance
When running a website, you need to make sure it’s compliant with different privacy laws and regulations such as GDPR. With Gravity Forms, you can easily add a Consent field, link to your privacy policy, and enable conditional logic, making GDPR compliance a prerequisite of form submission.
Get Started With ActiveCampaign And Gravity Forms
So far, we’ve covered what ActiveCampaign has to offer as well as the features that are available with the Gravity Forms ActiveCampaign Add-On. Let’s now take a look at how you can set up the add-on and start syncing your form entries with your ActiveCampaign email list.
For this tutorial, you’ll need Gravity Forms installed on your site – the ActiveCampaign Add-On is available with all Gravity Forms licenses.
1. Install ActiveCampaign Add-On
First, we have to install the ActiveCampaign Add-On. Start by logging into your WordPress dashboard and clicking on Forms > Add-Ons. Look for ActiveCampaign and click on Install > Activate. This will activate the add-on so you can use it on your website.
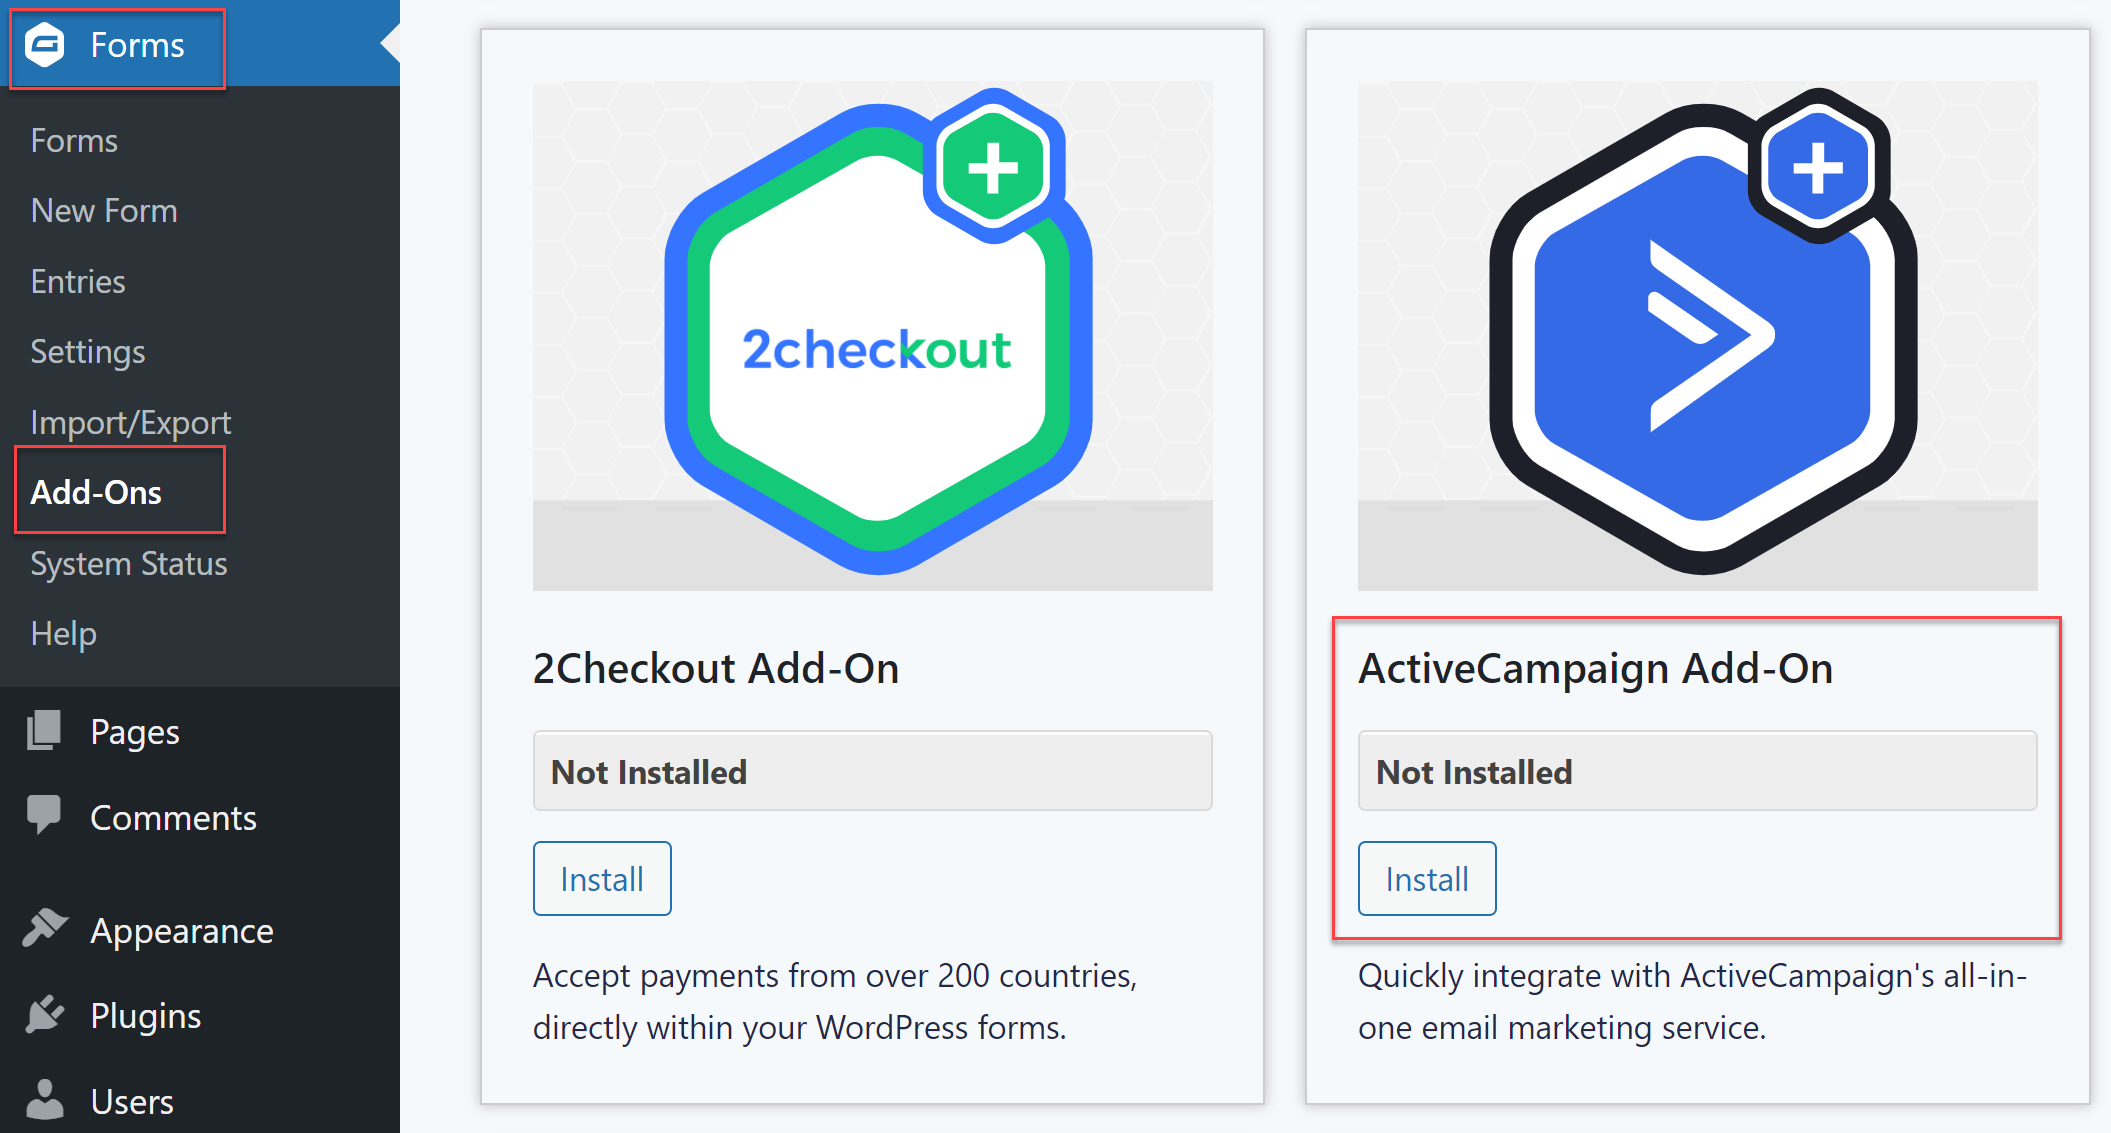
Once installed, you will need to connect your Gravity Forms and ActiveCampaign accounts. Navigate to Forms > Settings > ActiveCampaign and enter your API URL and API Key, which can be found in the API tab on your ActiveCampaign account Settings page.
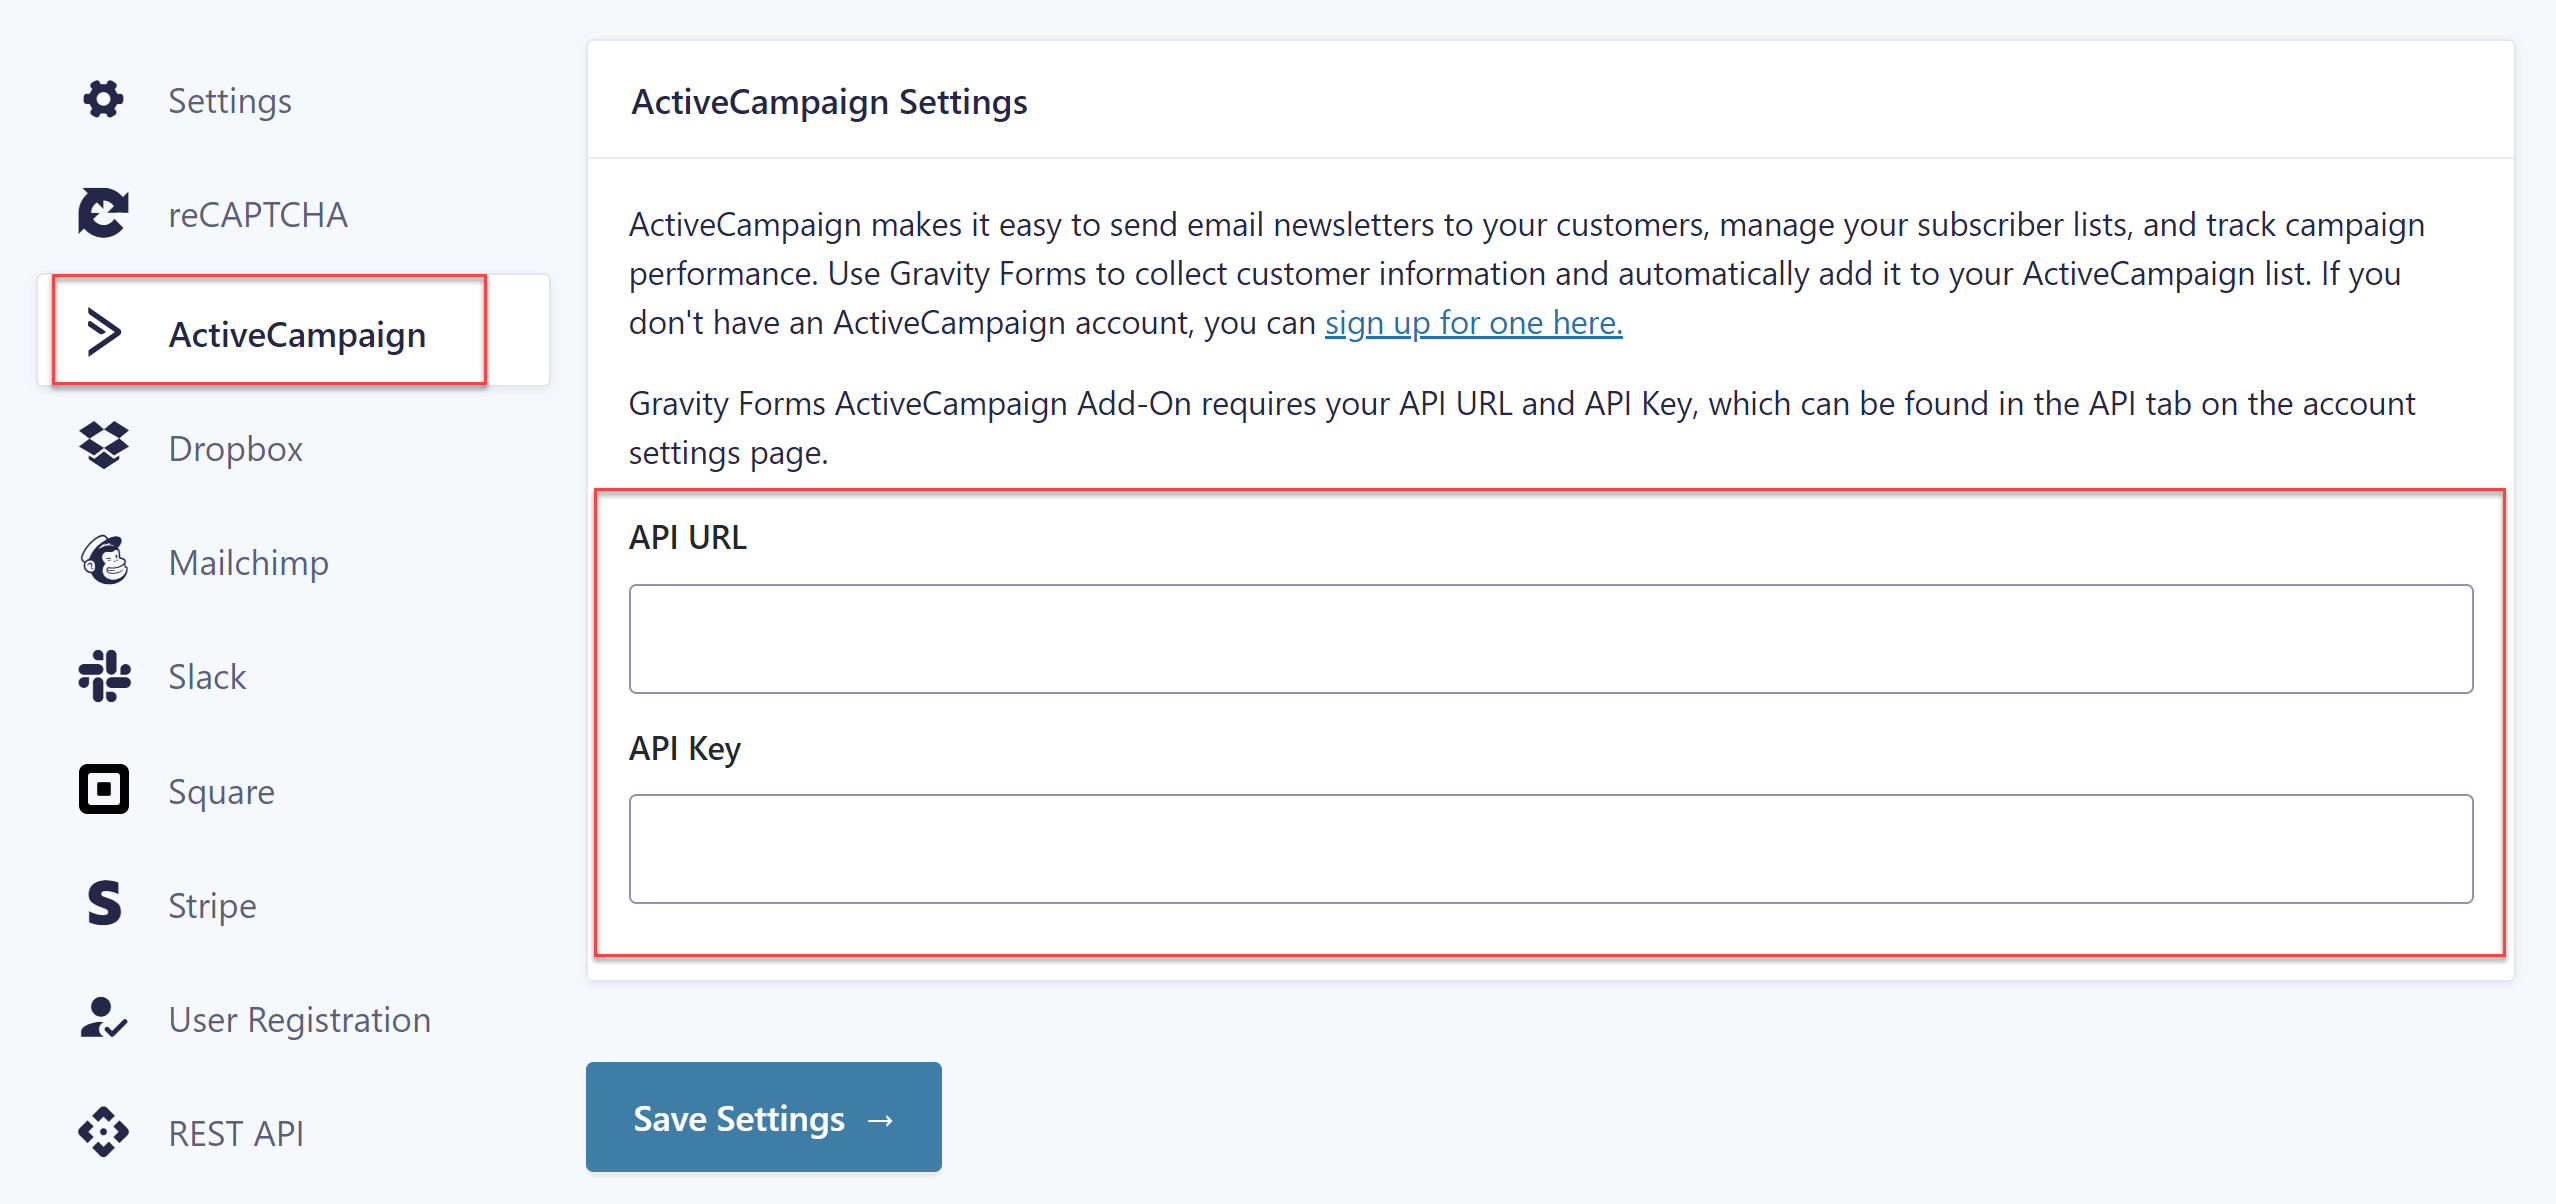
Click Save Settings to save your changes – you should then see two green checkmarks that indicate the add-on was set up correctly.
For more information on how to install and connect the ActiveCampaign Add-On, check out this ActiveCampaign Set Up article in the Gravity Forms documentation.
2. Create Your ActiveCampaign Form
Once the add-on is active, you need to create the ActiveCampaign form that you’ll use to collect leads or customer information. You can create a form from scratch or you can save time with one of our pre-built form templates.
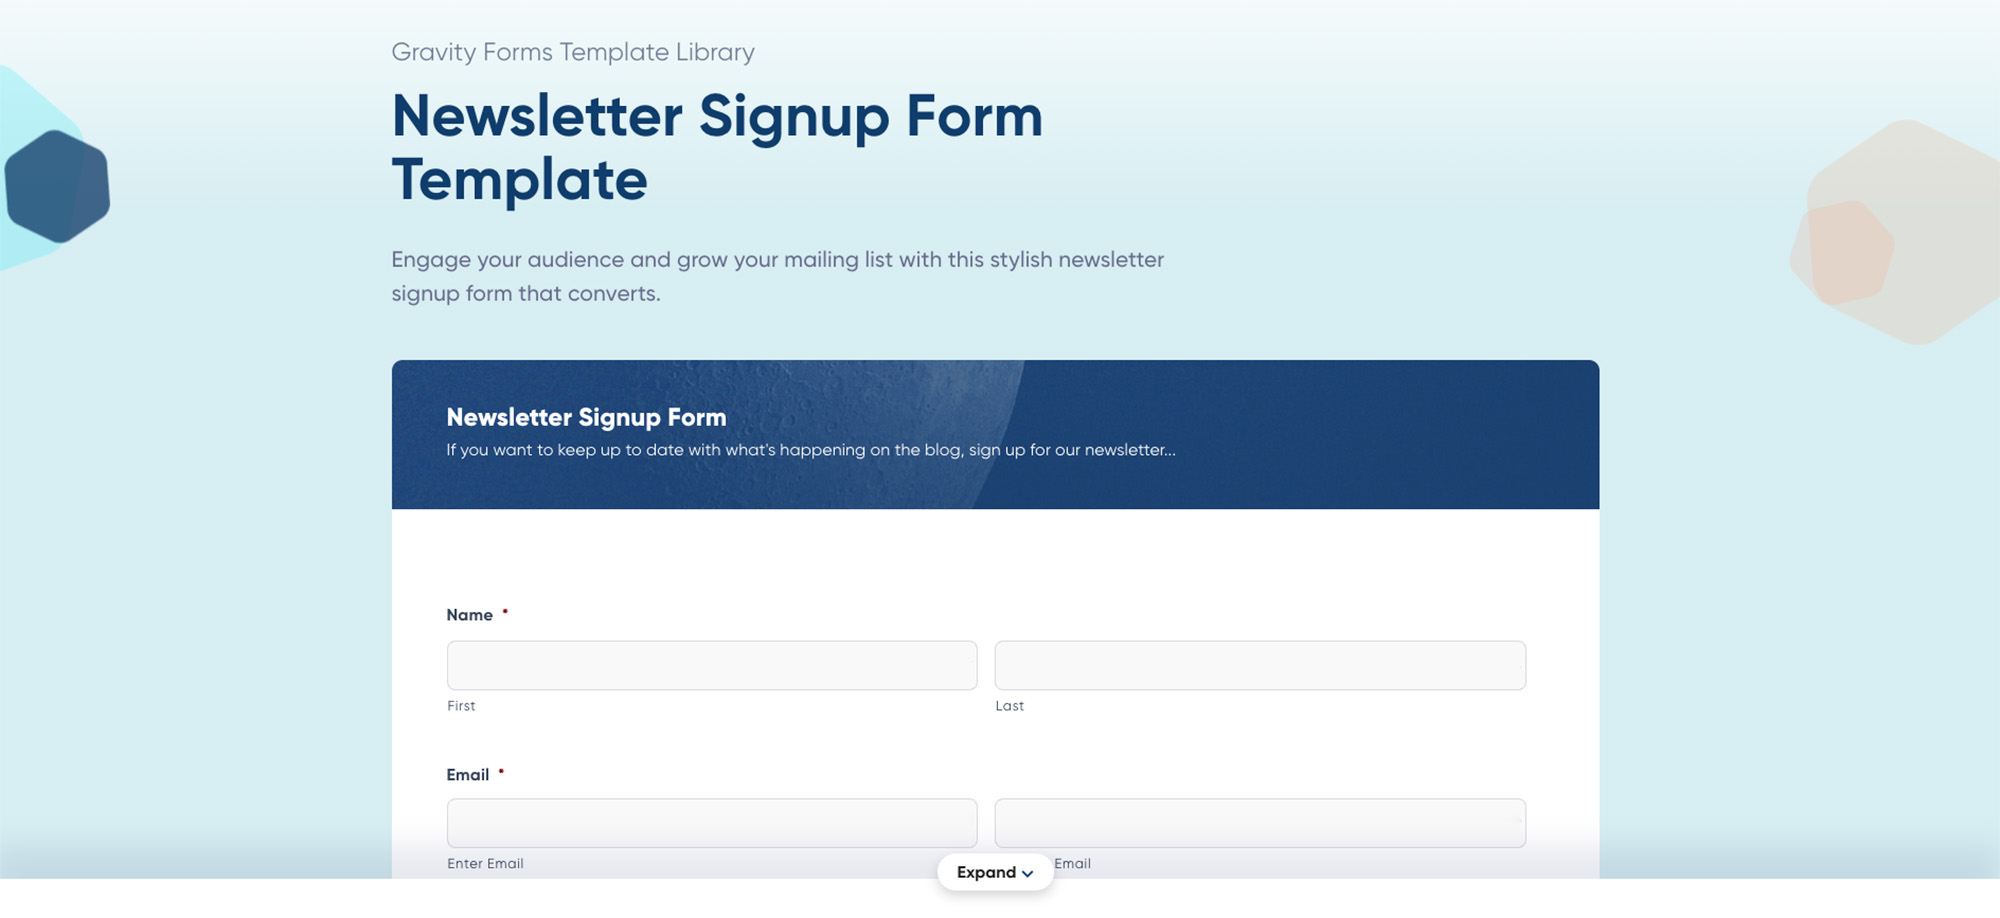
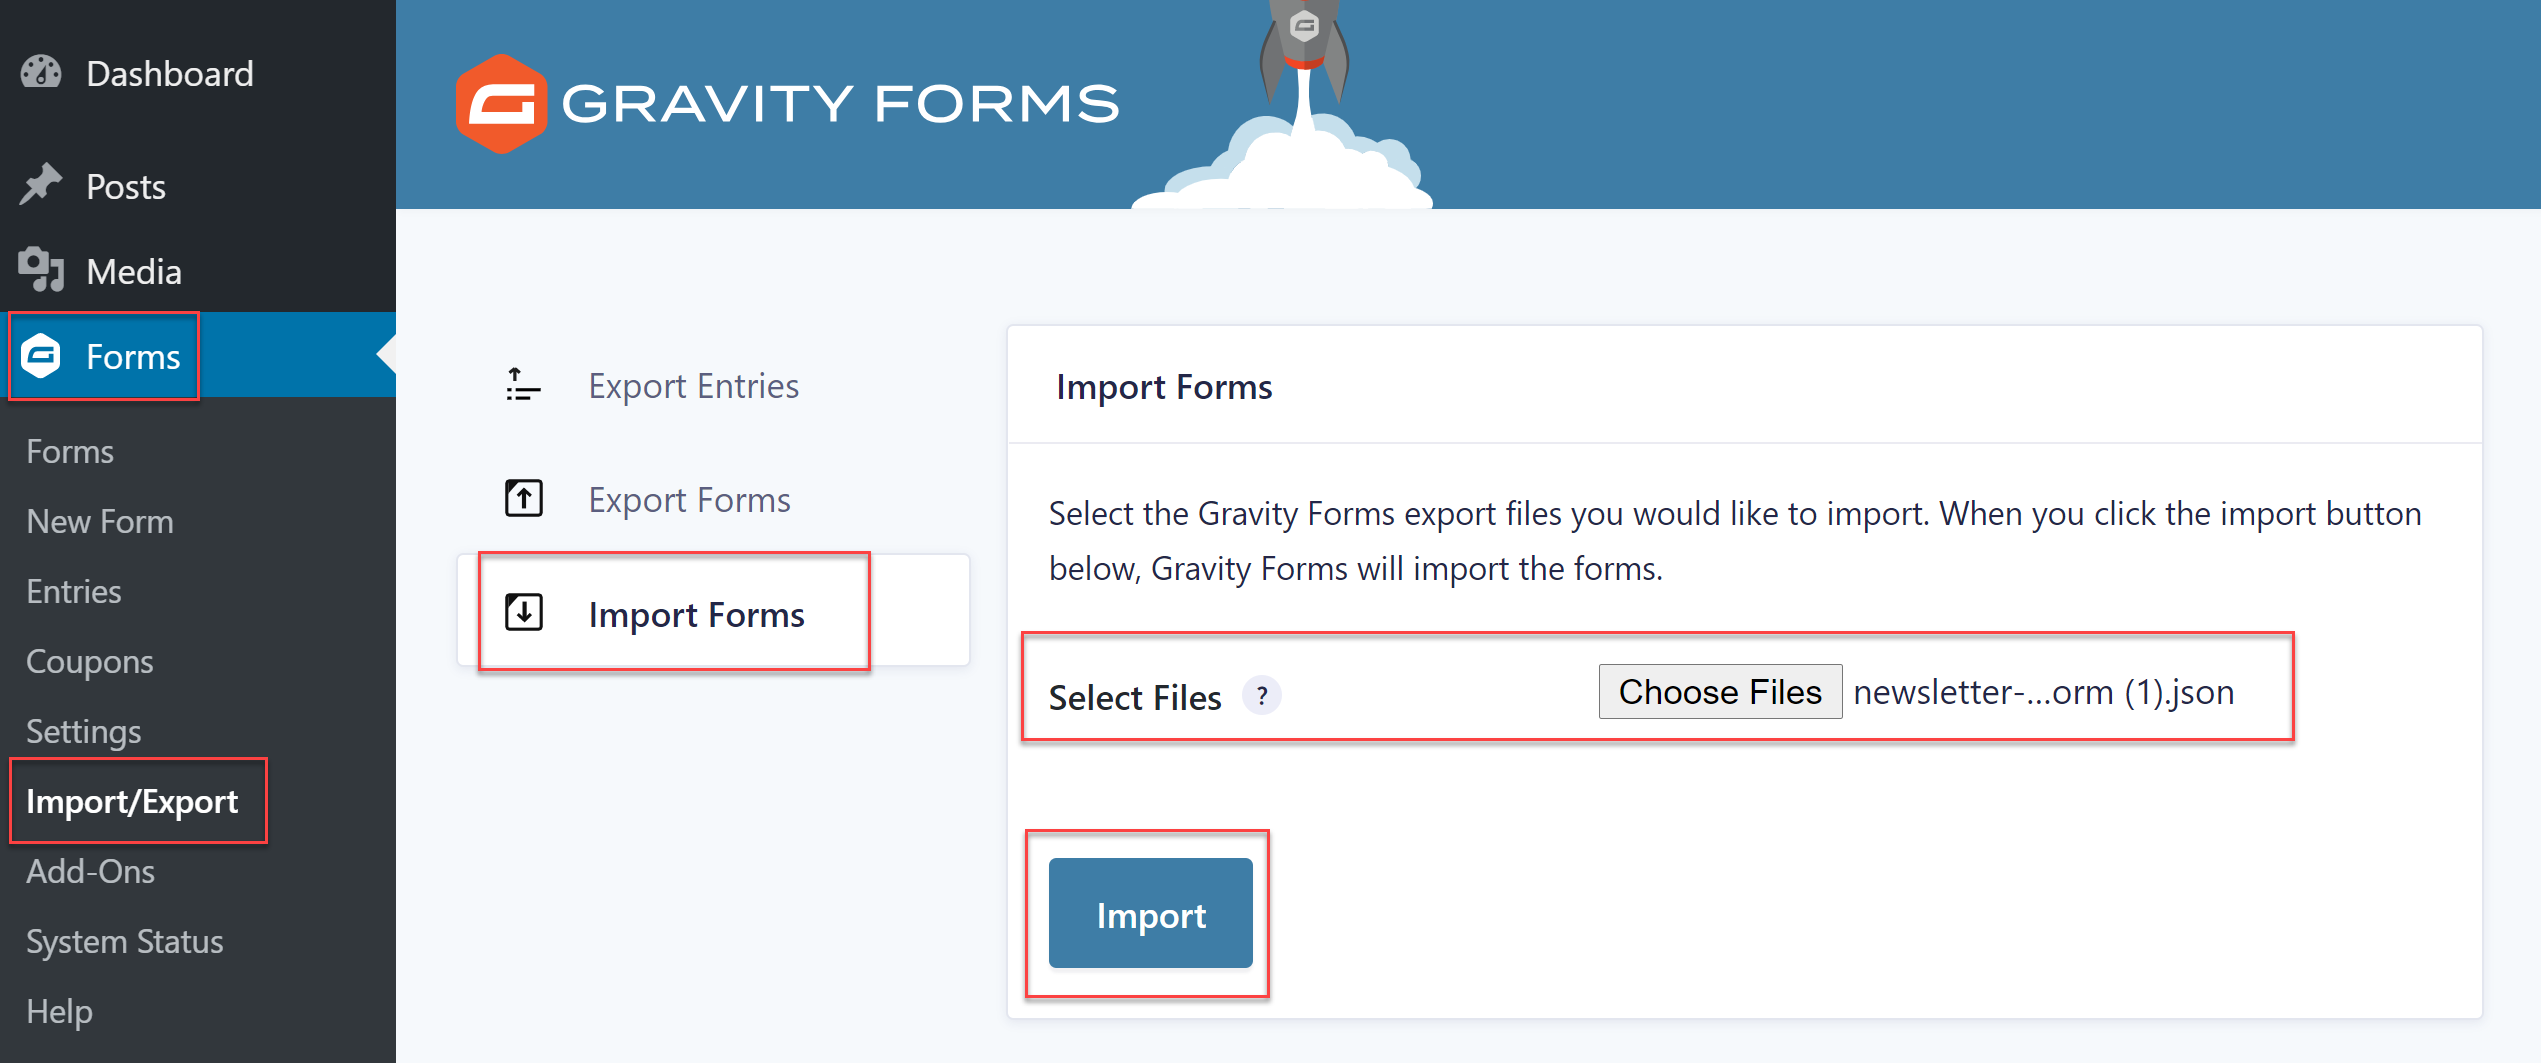
Our form template library has numerous form templates to choose from, one of which is a newsletter signup form. Simply download the form in its .json format then go to your WordPress dashboard and navigate to Forms > Import/Export. Click on the Import tab and choose the downloaded form template. Press Import.
After the form has been imported, you can customize it within the form editor, adding new fields or editing existing ones to ensure it’s relevant for your business and lead generation needs.
3. Sync Your Form With ActiveCampaign
The ActiveCampaign Add-On is active on your site and your lead generation form is ready to go. The only thing left to do is to create an ActiveCampaign form feed. By setting up the feed, new form submission data will automatically be sent to the list you specify in your ActiveCampaign account.
To create this feed, open your lead generation form and select Settings > ActiveCampaign. Then click Add New to create a new ActiveCampaign form feed. Give the feed a name and select the appropriate email list from your ActiveCampaign account.
You’ll then have the option to map your form fields to ActiveCampaign and control which information will be synced to your ActiveCampaign list.
You can also map any custom fields if you want to add more information about your subscribers. This is useful if you want to segment users based on interests, the page they signed up for, and more.
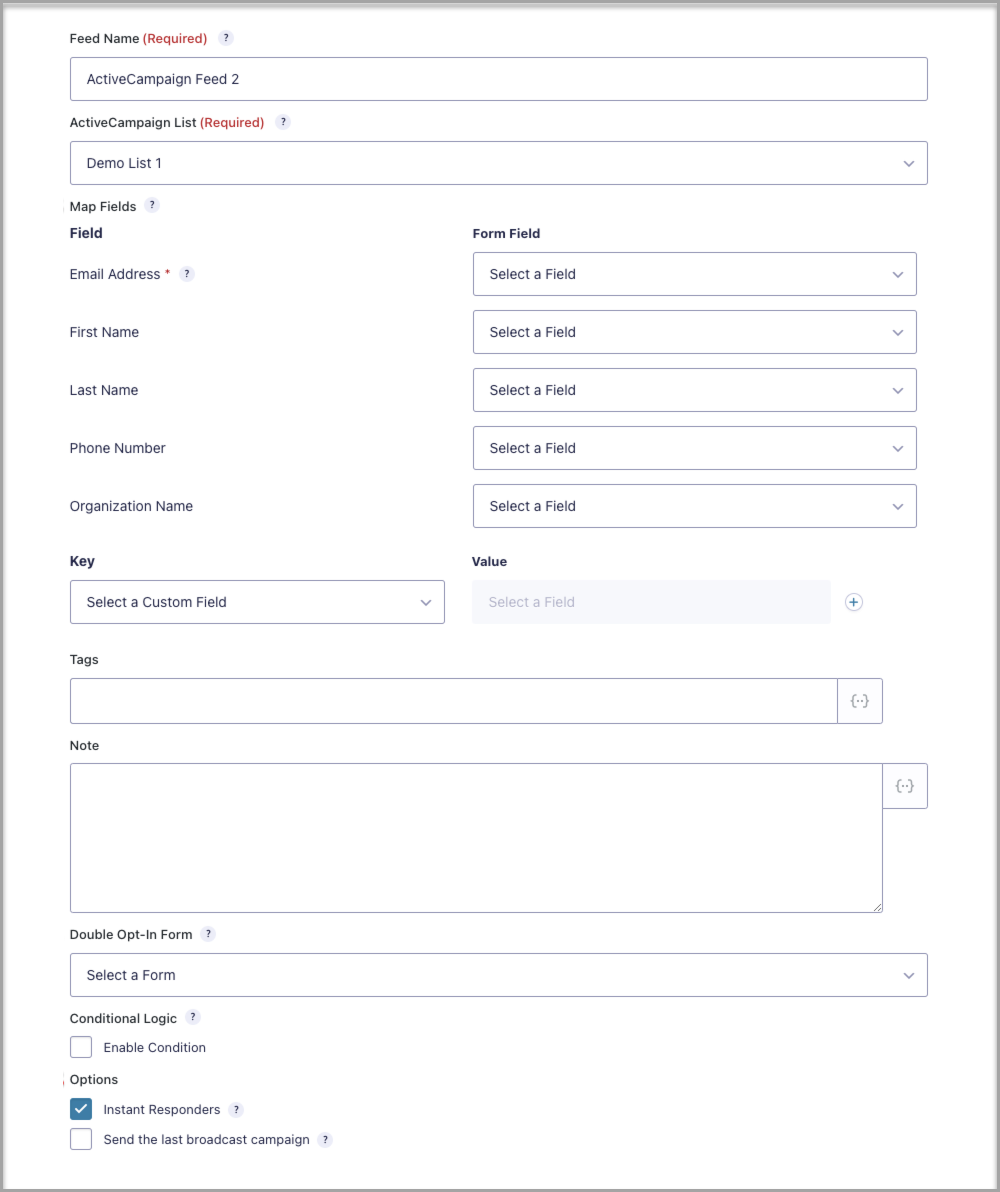
A few other options include adding a note about each subscriber, assigning tags, and enabling a double opt-in form. The double opt-in ensures that you’re adding only users that are truly interested in hearing from you. It’s a little more work on their part to get on your list but subscribers who take the time to confirm their subscription are typically more engaged.
You can also configure conditional logic to make sure the form submissions only get synced when certain conditions are met.
Lastly, you have the option to automatically add new leads to an Instant Responder campaign that you’ve set up for the selected ActiveCampaign list or send your new subscriber the last broadcast campaign you published.
When you’re done configuring the feed, click on Update settings to ensure your changes are saved. Your form is now connected to ActiveCampaign and ready to be published.
For more information on how to set up an ActiveCampaign form feed, check out the Gravity Forms documentation.
Don’t Have Gravity Forms Yet?
If you don’t have Gravity Forms or the ActiveCampaign Add-On, don’t worry. You can still test out everything in this article for free inside your own personalized Gravity Forms demo and see why Gravity Forms is the top choice for WordPress sites worldwide.
Already in love? Purchase our premium WordPress form plugin today!
Newsletter
If you want to keep up-to-date with what’s happening on the blog sign up for the Gravity Forms newsletter!
"*" indicates required fields