
If you’re interested in creating WordPress payment forms, this post is going to cover everything that you need to know to get the job done with Gravity Forms.
We’re going to start with some high-level information about payments in Gravity Forms, including why you might want to use Gravity Forms for payments, the different types of payment forms that you can create, and the six different payment processors that Gravity Forms offers official add-ons for.
Then, we’ll get into a detailed, step-by-step tutorial to help you create your first payment form, from start to finish. If you’d rather just jump straight to the tutorial, you can click this link.
There’s a lot of ground to cover, so let’s jump in…
Why Use Gravity Forms for Payments
When it comes to WordPress payment plugins, there are lots of different options out there.
So – what are some of the main reasons to rely on Gravity Forms instead of the alternatives? Let’s go through them…
Choose From Six Different Payment Processors (Plus More)
Gravity Forms offers official add-ons for six different payment processors, which lets you choose the one that works best for you:
- Stripe
- PayPal
- Square
- Mollie
- 2Checkout (Verifone)
Gravity Forms also supports a lot of the connected gateways that these processors support. For example, through Stripe, you can also offer Apple Pay, Google Pay, ACH payments, and many other options. Or, with PayPal, you can enable Venmo payments as an option.
You can also offer multiple payment options within the same form and let customers choose their preferred method.
Have Full Control Over Your Payment Form
When you use Gravity Forms, you’ll have full control and ownership over your form. While one of the secure third-party payment processors from above will handle actually processing a user’s card/payment details, all the rest of your form and its data will “live” on your own server.
You’re also free to fully customize your form as much as needed, including adding/editing form fields, changing the styling, connecting with other services, and lots more.
Save Money With No Added Transaction Fees
Unlike some other payment solutions, Gravity Forms doesn’t charge any extra transaction fee based on your usage. You pay one flat fee for your Gravity Forms license and that allows you to accept unlimited payments via unlimited payment forms.
Of course, your chosen payment processor will charge its own fee*, which is unavoidable if you want to accept online payments. You just won’t have to worry about any added transaction fees on top of that.
*Most payment processors charge around 3% for credit card payments in the USA, but the exact rate will depend on which processor you choose.
Integrate With Other Tools/Services That You’re Using
When you use Gravity Forms, you can integrate your payment forms with other tools and services that you’re using, as well as other features in your WordPress site.
Here are a few examples of how you could integrate your payment forms with third-party services:
- Subscribe a person to your email newsletter.
- Apply a tag to a person in your CRM (and/or add their information to the CRM in the first place).
- Create a task in your project management software (e.g. Trello). This can be super handy if you’re selling services. You can automatically create a task for yourself to perform that service once the person has paid.
And here are a few examples of how you can integrate your forms with other WordPress features:
- Register someone for your site and assign them a specific user role. You can use this to create a paid registration system for your membership site, online course, private community, and so on.
- Create a new piece of content on your site, e.g. a custom post type. For example, you could create a paid job board. Companies who are looking to hire people could pay to post their jobs on your site. After a successful payment, you could automatically create a new job listing on your site based on the information that they provided.
Build Full Business Process Automations With Gravity Flow
If you want to go beyond one-step integrations with other services, you can also use the Gravity Flow plugin to build multi-step workflows with unlimited steps. Gravity Flow comes from the same team behind Gravity Forms.
You can build in multi-step notifications, approvals, payments, and more.
For example, you could have people submit a quote form for final approval. Once you approve the quote, you can seamlessly route it back to the customer for payment.
Be Confident With a Reliable, Established Solution
When it comes to something as important as payments, reliability is essential. Having issues with your payment forms isn’t just a little annoyance – it means lost money and frustrated customers.
Gravity Forms has been around since 2009, so you can be confident that your payment solution is in it for the long haul.
You also get direct one-on-one support from the Gravity Forms team if you ever need any help.
The Different Types of Payment Forms That You Can Create
One of the nice things about using Gravity Forms for payments is that it can work for a ton of different use cases.
You can use it for very simple payments/donations, but it can also handle lightweight eCommerce applications.
Here’s a quick rundown of some of the different types of payment forms that you can create with Gravity Forms, though this is by no means a complete list…
- eCommerce forms – you could use a form to sell one or more physical or digital products, including adding product options so that people can customize their orders.
- Donation forms – you could let people donate on a one-time or recurring basis. These can be great for digital fundraising.
- Service payment forms – if you have standardized service offerings, you could let people pay you directly via a fixed form.
- Invoice/quote generator forms – for non-standardized service offerings, you could create a form that lets people calculate a quote and pay right there. With Gravity Flow, you could even have people send their quotes to you for manual approval before they make the actual payments.
- Registration payment forms – you could charge people to register for your membership website, online course, or any other type of community website.
- Paid content submission forms – you could charge people to submit content to your site. For example, if you have a job board, you could charge companies to submit a job to the board.
Exploring the Different Gravity Forms Payments Add-Ons
Currently, Gravity Forms offers official add-ons for six different payment processors:
- Stripe
- PayPal
- Square
- Mollie
- Verifone (formerly 2Checkout)
In addition to these six payment processors, you can also find tons of third-party community add-ons for other processors, including a number of local payment processors. However, we’re going to focus exclusively on the six official add-ons in this post.
So – which one should you use?
Below, we’ll briefly summarize each option, including some of the pros and cons of the different payment processors.
For a more detailed look, we also have an entire post comparing and contrasting the different payment add-ons.
Stripe – Pro License
Stripe is one of the most well-known payment processors and a great starting point if you’re not sure where to begin.
It makes it easy to accept credit and debit card payments, along with a number of other payment options including Apple Pay, Google Pay, ACH payments, and more (full list here). The Gravity Forms Stripe Add-On also supports Stripe Link, which is Stripe’s accelerated checkout feature.
Beyond that, the add-on also gives you a lot of flexibility for setting up your payments:
- One-time or recurring payments – for recurring payments, you can fully customize the billing period (e.g. every month or every year).
- Free trials and one-time signup fees – for subscriptions, you can offer a free trial period before beginning billing and/or charge a one-time signup fee that’s added to the first payment.
- Authorize and capture – you can authorize a person’s card upon form submission but wait to actually capture the payment until a later time.
- Subscription and refund management from WordPress dashboard – you can cancel a person’s subscription and/or refund their payment right from your WordPress dashboard.
There’s also an official Gravity Forms Stripe App that’s available in the Stripe App Marketplace, which lets you see payment form information inside your Stripe dashboard.
For more details, we have a whole guide to Gravity Forms and Stripe.
Square – Pro License
While Square primarily got its start with its phone-powered card reader for in-person payments, it’s long since evolved into a full-service payment processor that works great for online payments.
While you can use Square exclusively for online payments, it can be an especially good option if you’re already interested in Square’s in-person payment tools and want to use the same processor for your website.
Here are some of the specific features that you can access with the Gravity Forms Square integration:
- One-time or recurring payments – for recurring payments, you can customize the billing period and also set a maximum number of cycles (great for payment plans). We have a whole guide to Square subscription payments on WordPress.
- Authorize and capture
- In-dashboard refunds – you can refund a person’s payment right from your WordPress dashboard.
Gravity Forms also has a special deal with Square where all new Square customers can get free processing on up to $3,000 in credit card transactions made within the first 180 days. You just need to sign up with this link.
PayPal – Pro License
PayPal is probably the best-known payment processor, even more popular than Stripe when it comes to casual users.
One of the most unique things about PayPal is that it lets users pay using their existing PayPal accounts, rather than needing to enter credit card details on your site. If you think that your users would prefer using that approach, that might be a reason to at least offer PayPal as one option on your site.
In addition to letting people use their PayPal accounts, you can still let them enter their credit/debit card details directly, as well as offering other payment options like Venmo (owned by PayPal) and PayPal Pay Later.
Here are some of the other payment features that you can access with the Gravity Forms PayPal Add-On:
- One-time or recurring payments – for recurring payments, you can customize the billing period. You can also set a maximum number of billing cycles, which lets you set up things like payment plans (e.g. three payments of $199).
- Free/paid trials and one-time signup fees – for subscriptions, you can offer free or paid trial periods and also apply a one-time setup fee to the first payment.
- Authorize and capture
- In-dashboard refunds
Mollie – Pro License
Mollie is a payment processor that’s especially popular in Europe, though it’s able to process payments from people in other areas, too.
In addition to offering competitive rates for European card payments (1.80% + €0.25 for Visa or Mastercard payments from European Economic Area consumer cards*), Mollie lets you also offer other payment methods, including PayPal.
*Stripe and Square also offer lower rates for EU credit cards.
Here are some of the key details about the Gravity Forms Mollie integration:
- One-time payments only – while Mollie itself does support recurring payments, the Gravity Forms integration currently only works for one-time payments. If recurring payments are important to you, you can vote on that feature on our product roadmap.
- Support for other payment methods – in addition to card payments, you can also enable other payment methods, including iDEAL, Bancontact, Sofort, and PayPal.
2Checkout – Elite License
2Checkout (acquired by Verifone) is another popular payment processor that you can access with the Gravity Forms Elite license.
You can accept one-time or recurring payments via any of the 45+ payment methods that 2Checkout supports.
How to Create a WordPress Payment Form With Gravity Forms
Now that you know all about the options that Gravity Forms gives you for WordPress payments, let’s get into the actual step-by-step guide on how you can create your first WordPress payment form and start accepting payments from your customers.
For this example, we’ll use Stripe as the payment processor. Again, if you’re not sure where to begin after the overviews above, starting with Stripe is never a bad option.
However, the same basic principles will apply to any of the other payment gateways that Gravity Forms supports.
For this guide, the only thing that we’ll assume is that you already have a WordPress site and you’ve installed the core Gravity Forms plugin on that site.
If you don’t have a Gravity Forms license yet, you’ll need to purchase at least the Pro license to follow this guide. This is the license that you need to access most of the payment add-ons, including the Stripe Payments add-on.
We also recommend registering for a free Stripe account before starting the guide, if you don’t already have one.
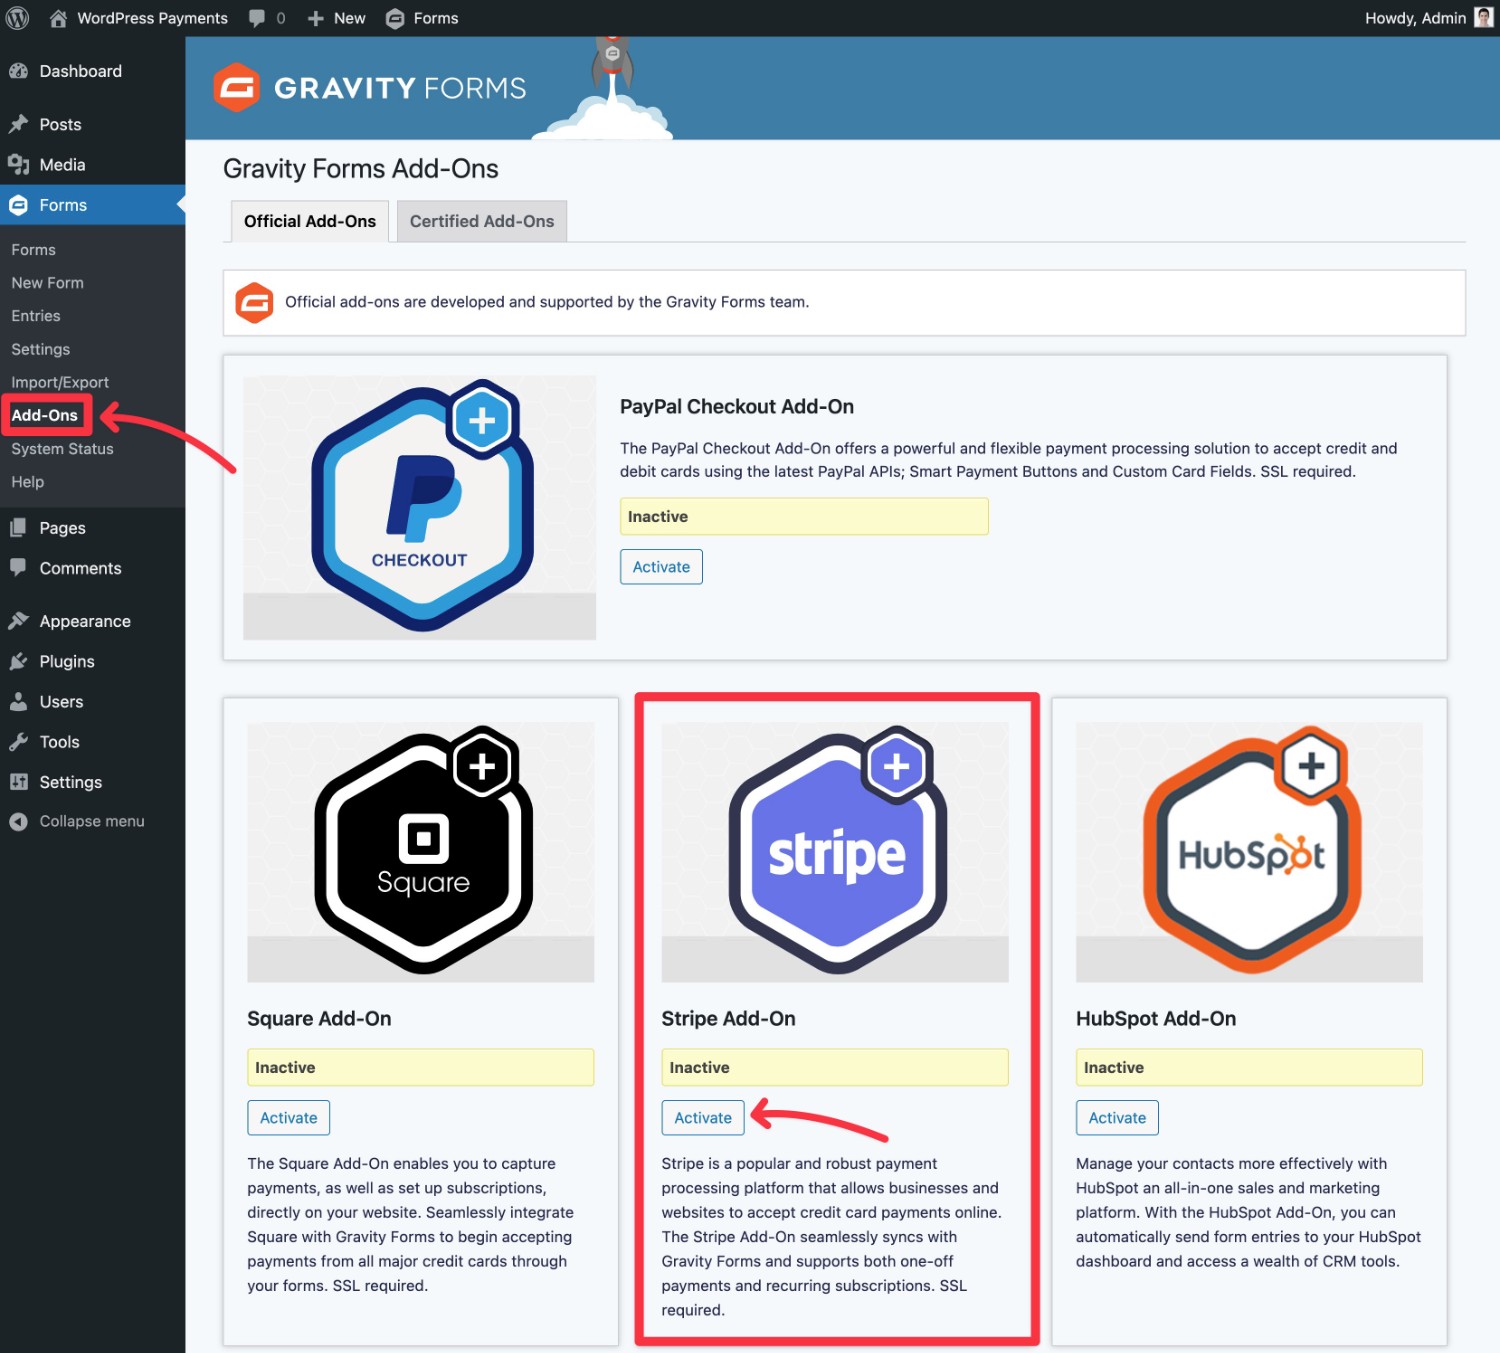
1. Install the Add-On for Your Payment Processor
To get started, you’ll need to install the add-on for your chosen payment processor, which is Stripe in this tutorial:
- Open your WordPress dashboard.
- Go to Forms → Add-ons.
- Find the Stripe Add-On in the list.
- Click the Install button.
- Once the installation finishes, activate the add-on.
2. Connect Gravity Forms to Your Payment Processor
Once you’ve activated the payment add-on, you’ll need to connect Gravity Forms to Stripe (or whichever payment processor you’ve chosen to use).
Here’s how to begin:
- Go to Forms → Settings in your WordPress dashboard.
- Select the Stripe tab in the settings area.
- Choose your payment mode. We recommend using Test mode when you’re setting up your form, as it lets you safely test your form without processing real payments. When you’re ready to go live, all you need to do is switch to Live mode, which we’ll cover later in the tutorial.
- Click the Connect with Stripe button.
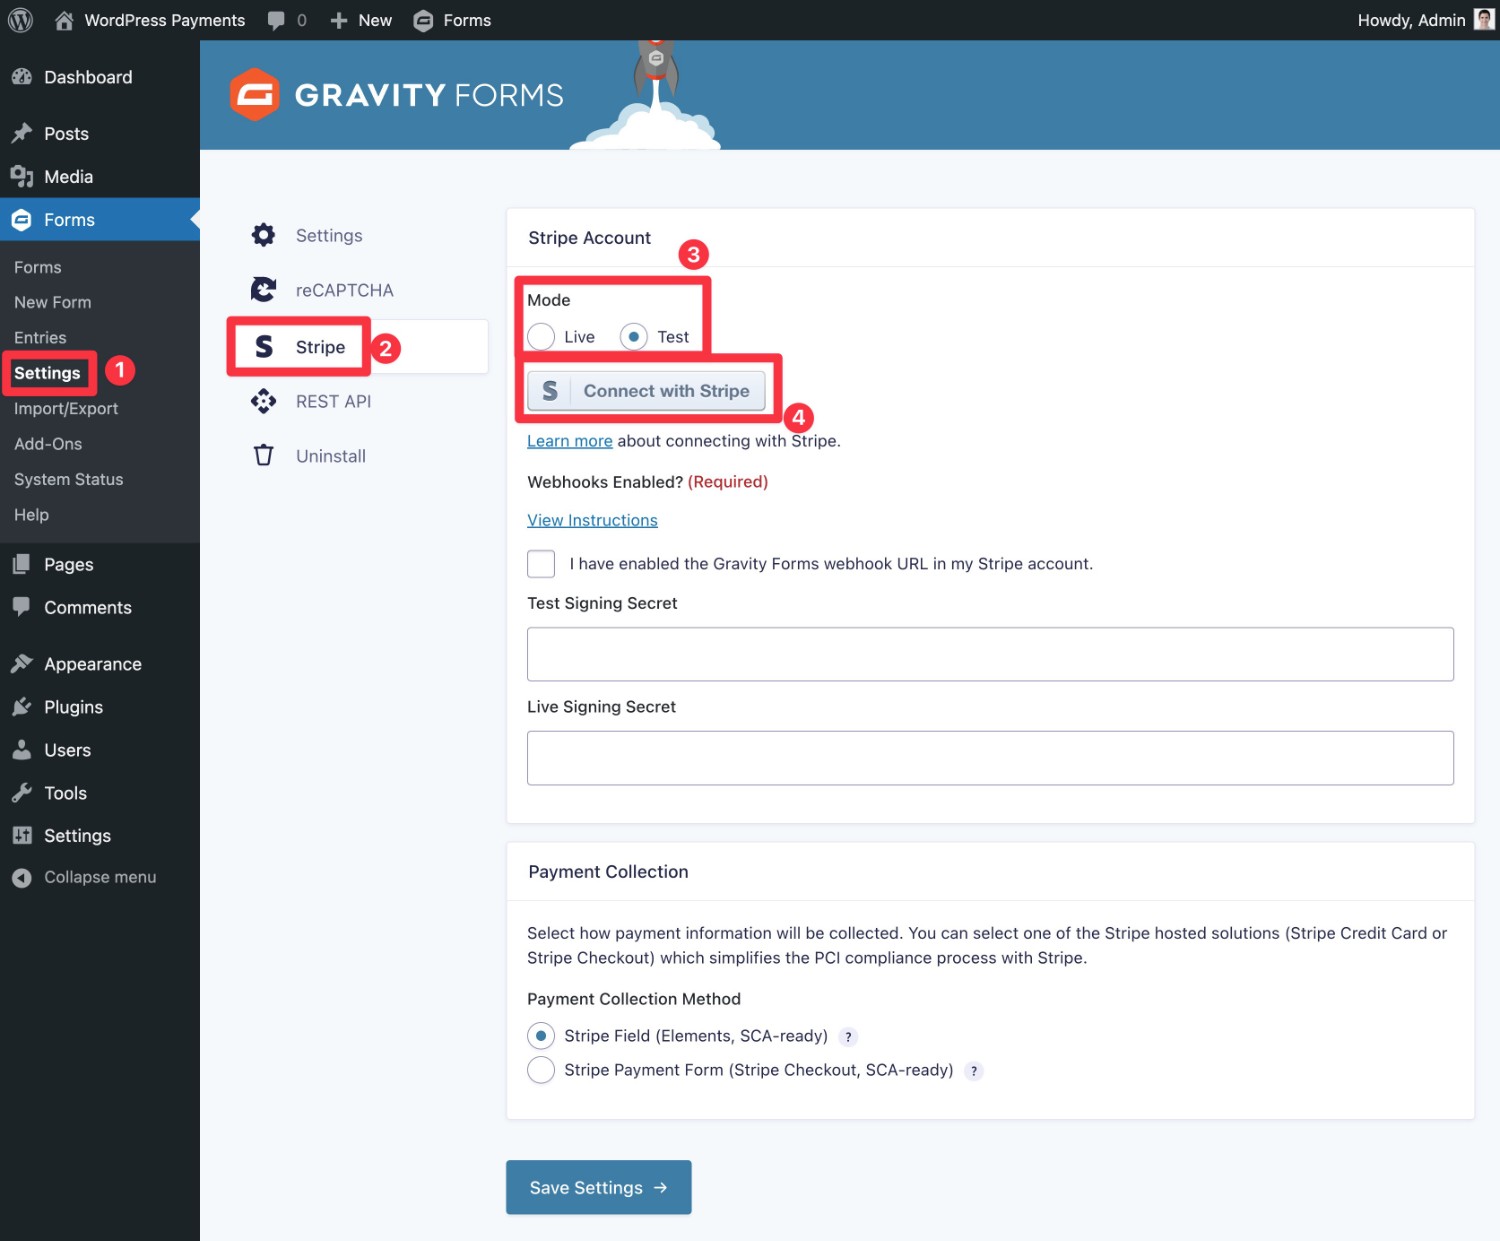
Clicking the Connect with Stripe button should take you to Stripe’s website, where you can log in to your Stripe account.

Once you choose your Stripe account and click Connect, you should be redirected back to your WordPress dashboard. In the settings area, you should see something like “Connected to Stripe as [accountname]”.
To finish setting up the connection, you’ll need to do two things:
- Add your Gravity Forms webhook URL to the Stripe dashboard.
- Once you’ve added that, you’ll need to add your Stripe Test Signing Secret to the Gravity Forms settings area.
To find your Gravity Forms webhook URL, click the View Instructions link under Webhooks Enabled?
This will open a popup box that contains the URL.

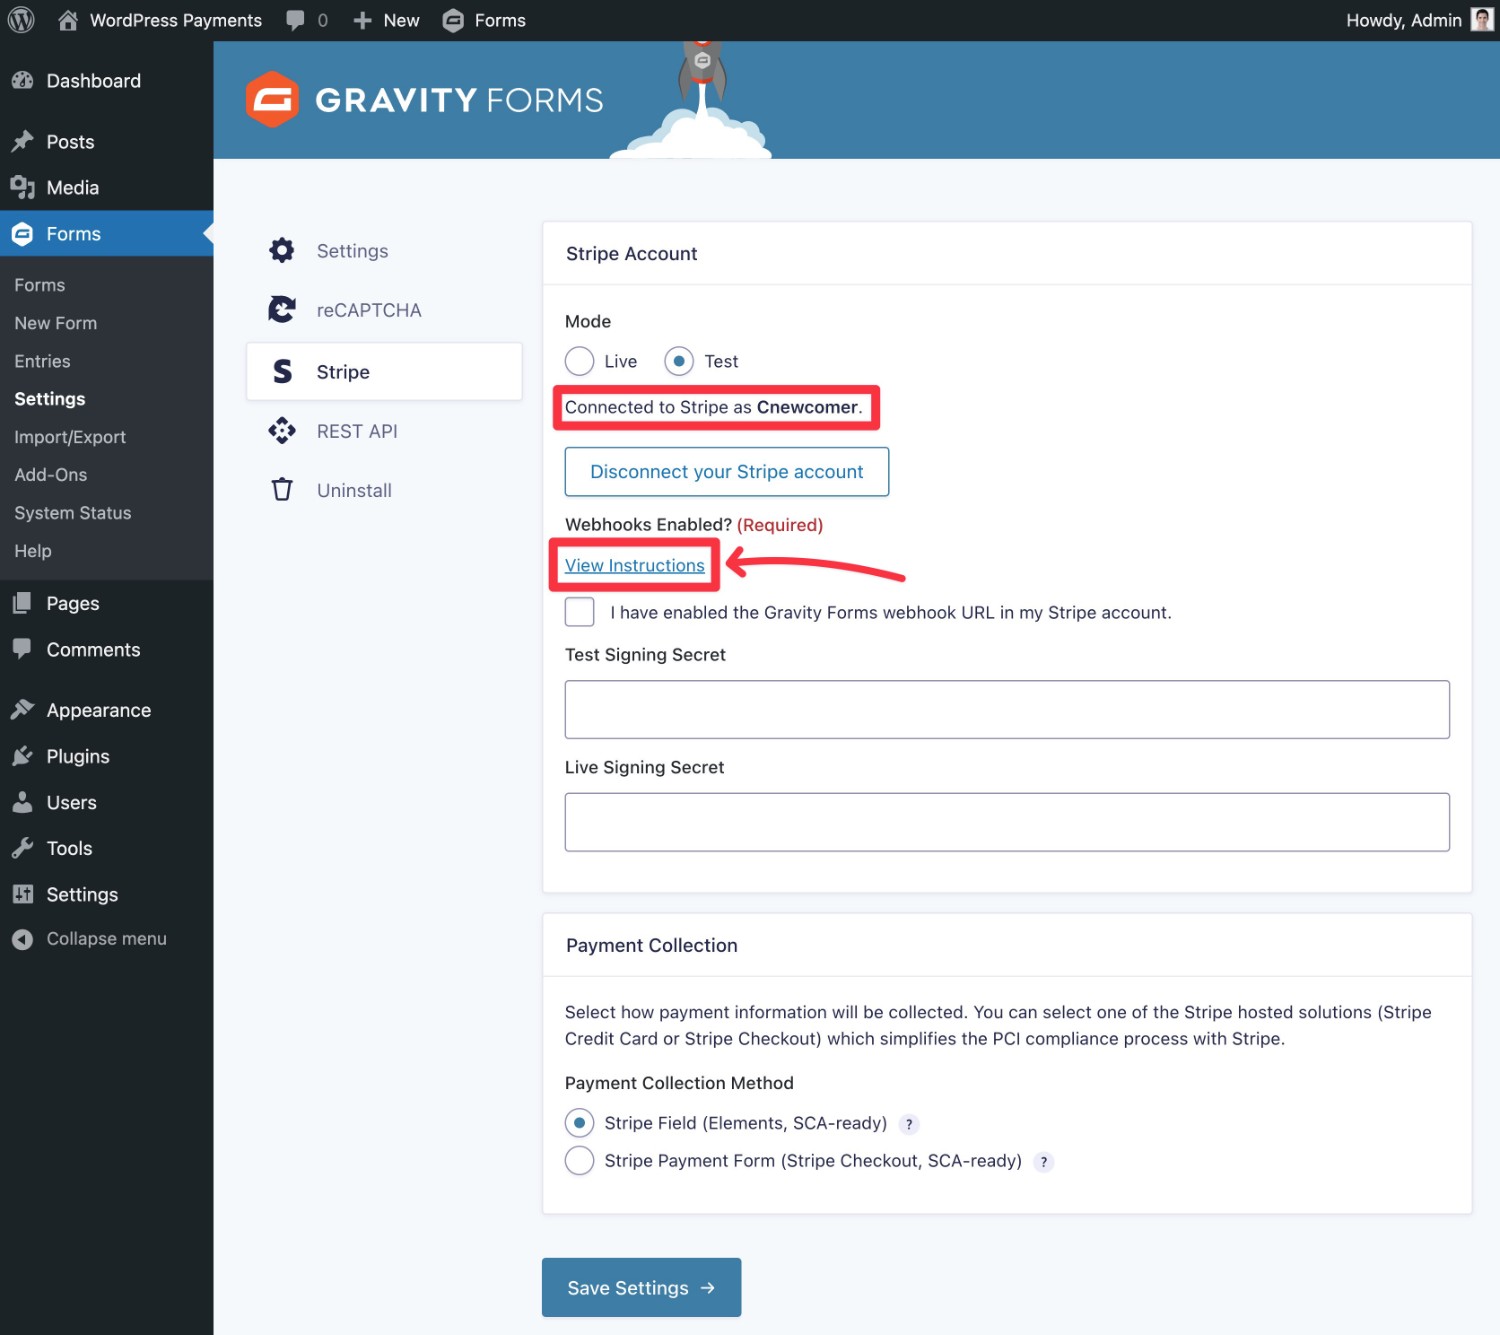
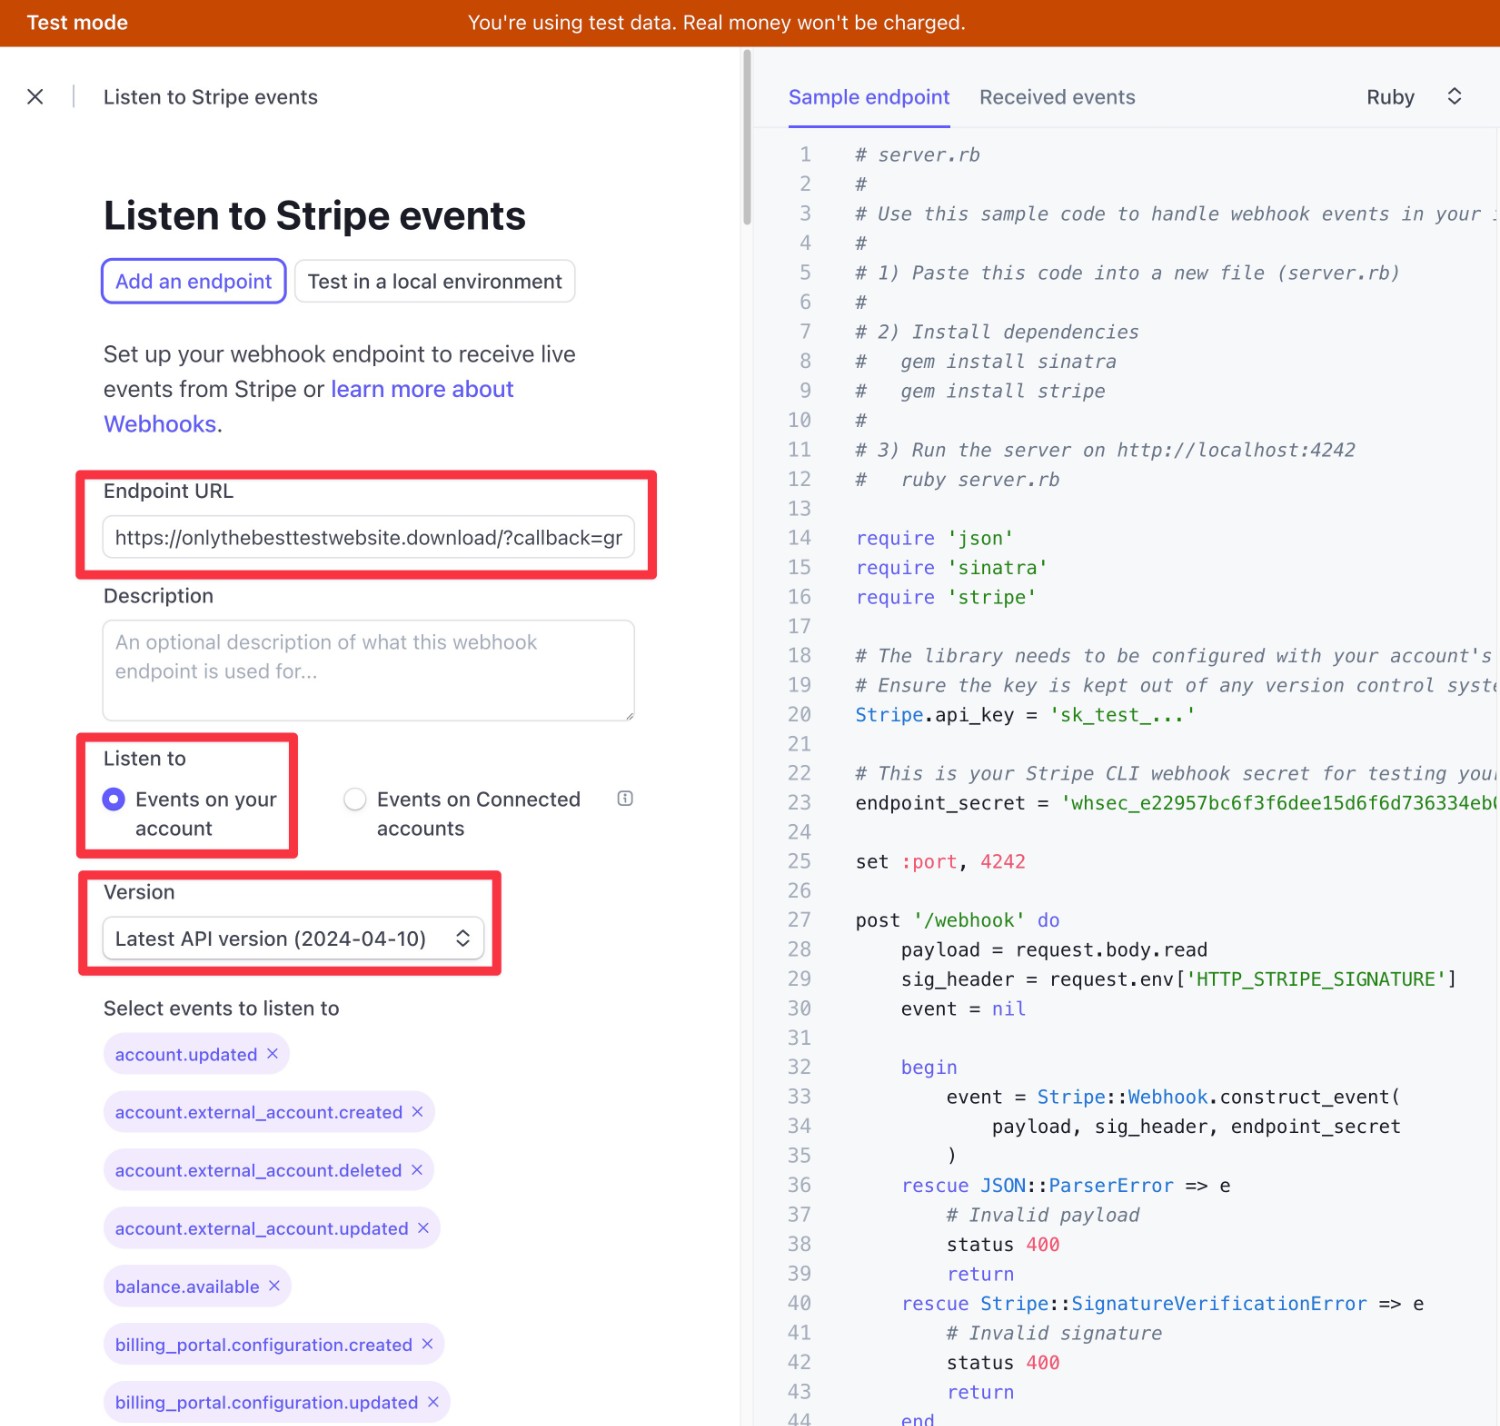
Here’s how to add this URL to Stripe:
- Click this link to open the Stripe Webhooks area for Test mode.
- Click the Add an endpoint button.
Here’s how to configure the endpoint:
- Paste the URL from Gravity Forms into the Endpoint URL box.
- Select Events on your account under Listen to.
- Select Latest API version in the Version drop-down.
- Click the + Select events button under Select events to listen to.
- This will open a new interface. Click the Select all events checkbox to select all of the events.
- Once you’ve selected all the events, click Add events at the bottom. This should take you back to the previous interface.
- Click the Add endpoint button at the bottom to finalize your endpoint.
On the next screen, click the Reveal button under Signing secret to display your Test Signing Secret key.
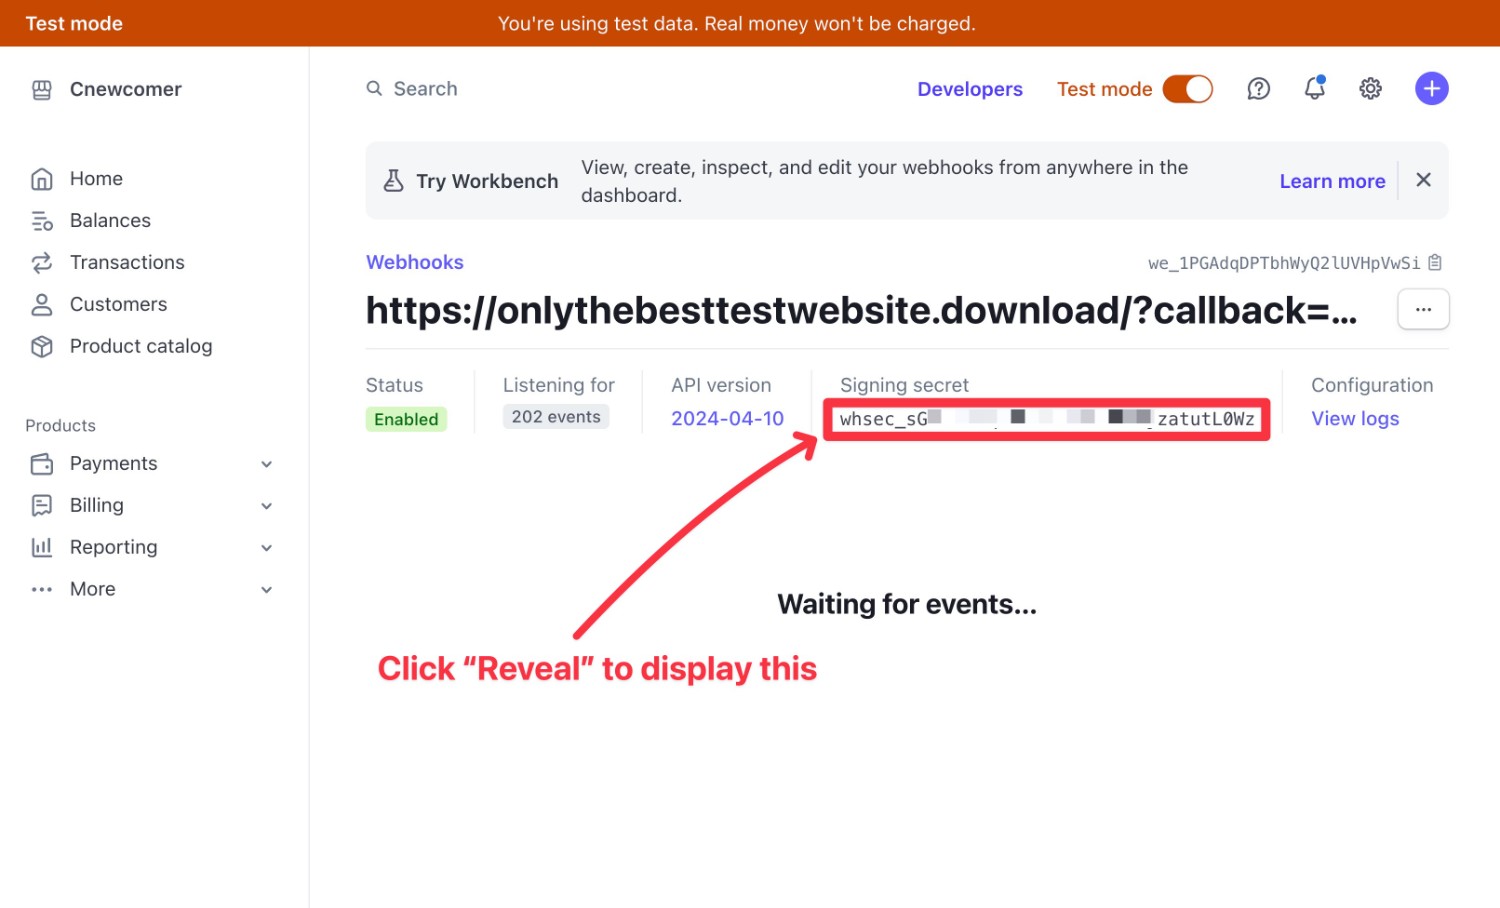
Here’s what to do:
- Copy the value of this key.
- Go back to your WordPress dashboard.
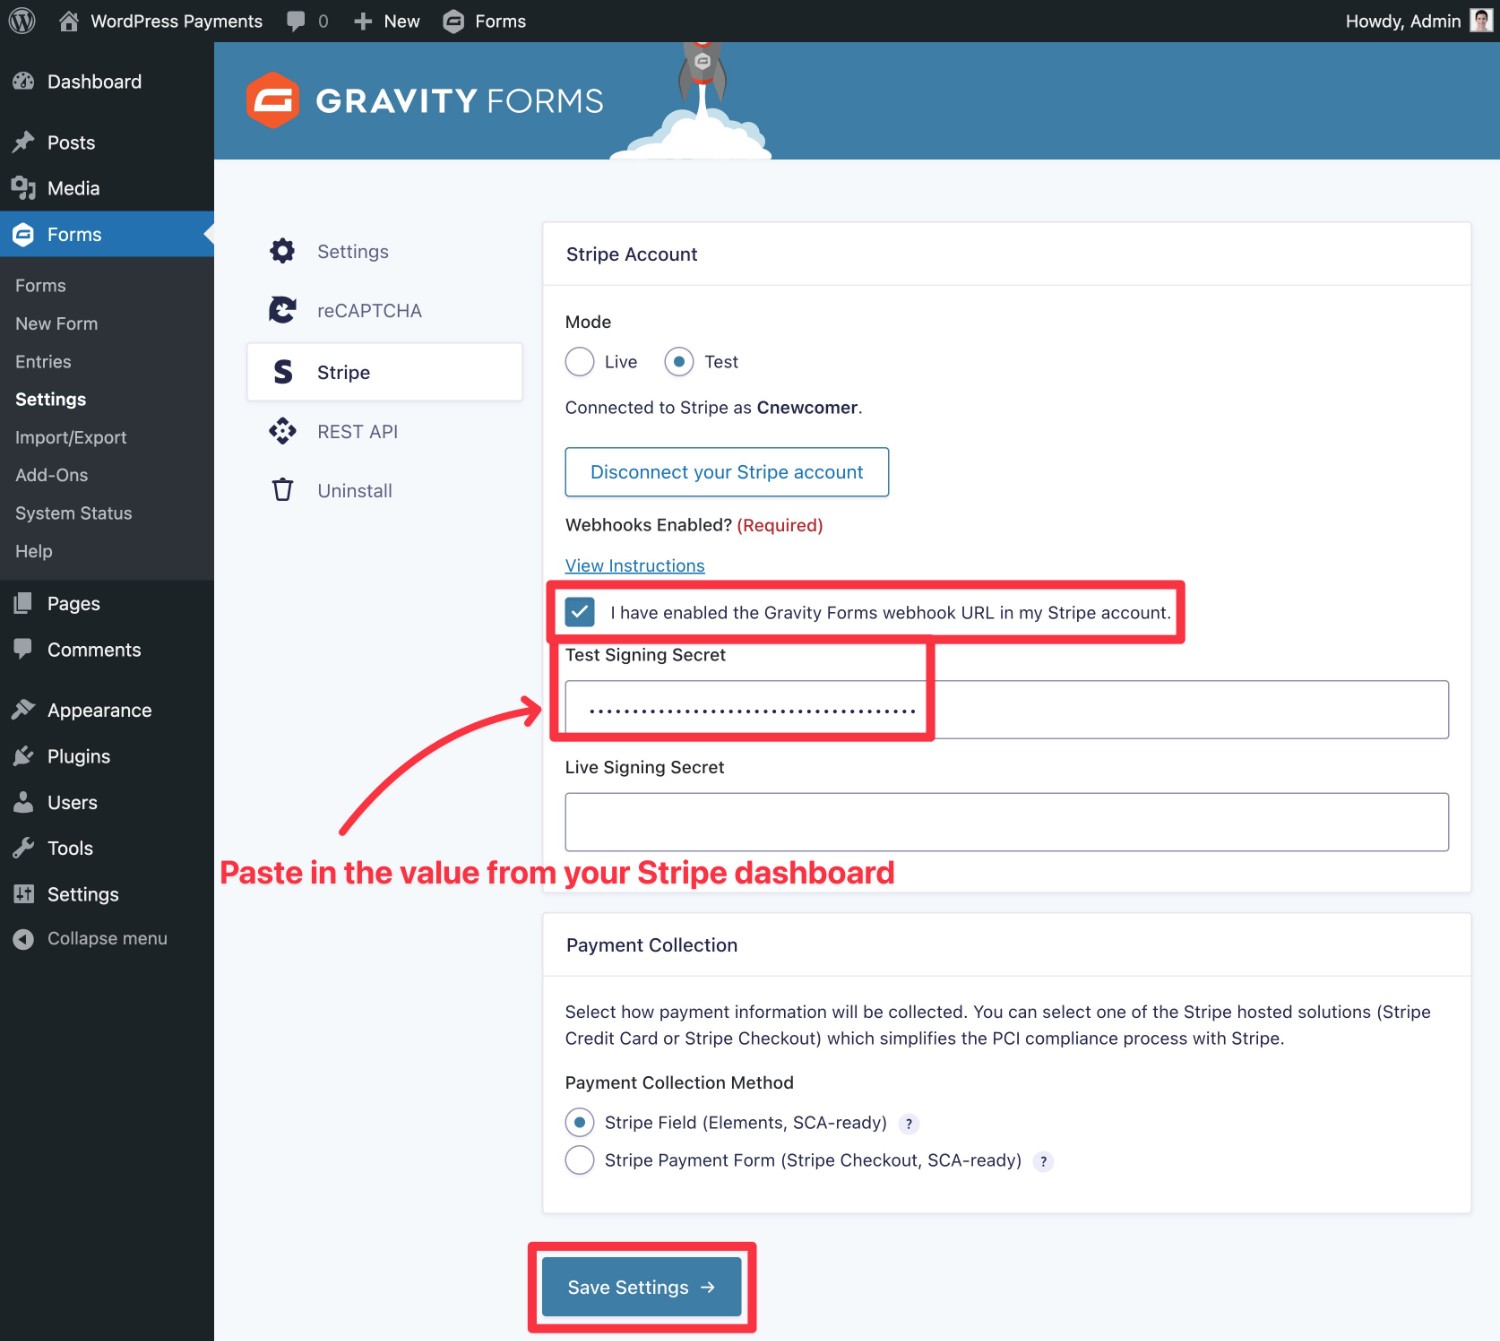
- Paste it into the Test Signing Secret box.
- Check the I Have enabled the Gravity Forms webhook URL box.
- Click the Save Settings button at the bottom.
3. Create Your Payment Form
Now that you’ve connected your website to Stripe, you’re ready to actually create your first payment form.
To begin, go to Forms → New Form, which should open the Gravity Forms template library.
To save time, we recommend using the premade Stripe Checkout Form. You’ll still be able to fully customize it, but it already includes all of the essential fields that you need for a payment form.
However, you’re also free to start from a blank form, if you prefer that approach.

Once you’re in the form editor interface, you’re free to fully customize your payment form as needed.
There are three main “elements” of a payment form:
- Basic information fields – you can collect details about the customer, such as their name, billing address, email address, phone number, etc. Depending on your form, you also might want to collect additional information, such as how they found your site.
- Product/pricing fields – you’ll use these to control the amount of the payment. You’ll want to add at least one Product field, along with at least the Total field. You can also add fields for options, shipping, and so on. The pricing field documentation covers all of these in more detail.
- Stripe field – this is where the user will actually enter their payment information – e.g. their credit card numbers. Typically, you’ll add this at the bottom of the form.
The Stripe Checkout Form template already includes all of these fields. However, you’re free to add, remove, or edit fields as needed.
For example, you could add another Product field if you want to give people more pricing options or remove one of the two included Product fields if you want to give people fewer pricing options.
If you edit a Product field, you’ll be able to choose from different input types, such as drop-downs, radio buttons, or user-defined prices.
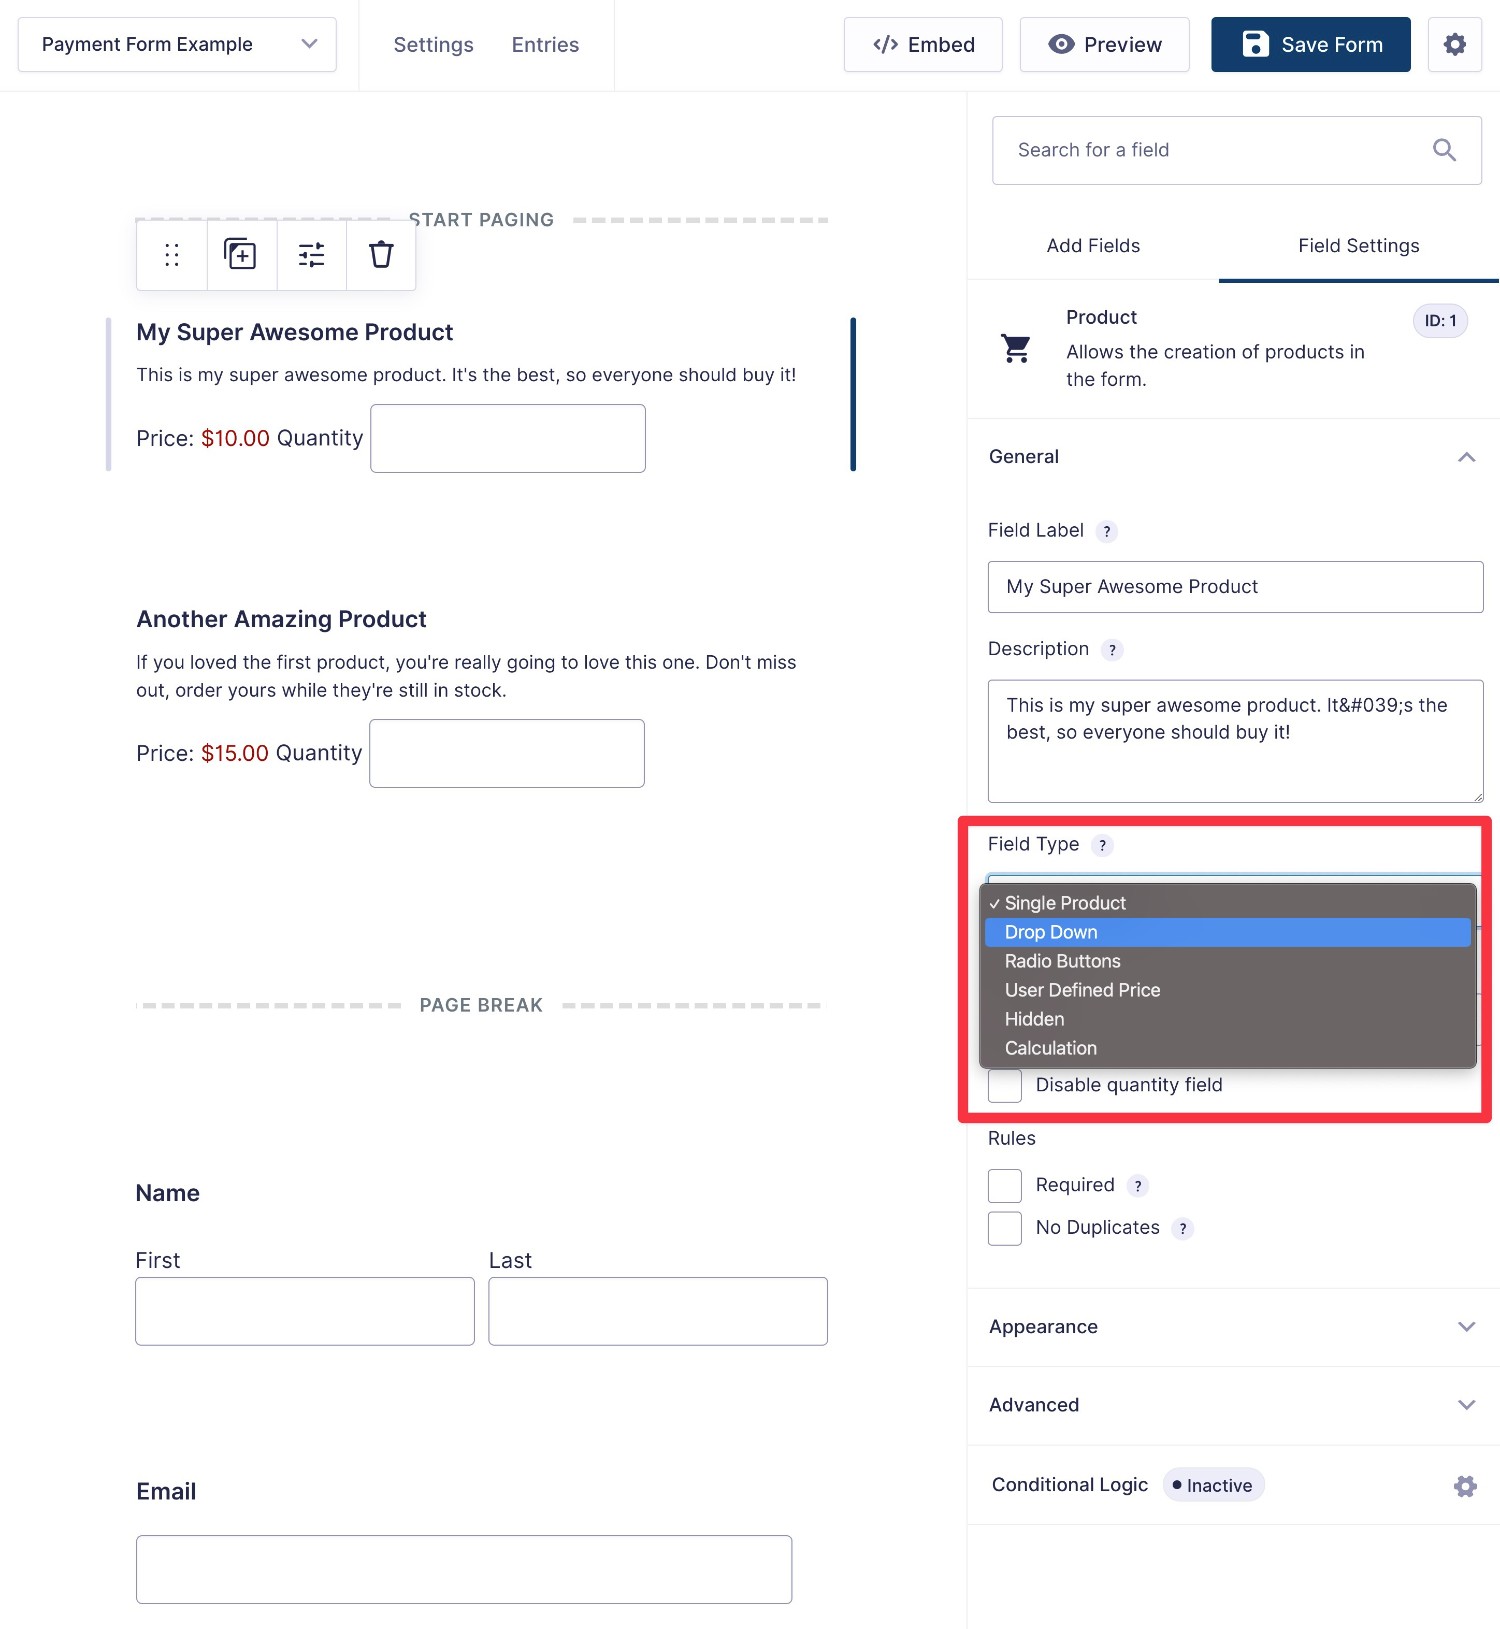
You can also hide a Product field if you don’t want people to interact with it or use your Product field as part of a mathematical calculation. Our guide to Gravity Forms calculations covers how those work.
Once you’ve set up the basic information and pricing fields, you can tweak the Stripe field as needed.
Note – you won’t see a live preview of your Stripe field until you create a Stripe feed, which we’ll cover in the next step. However, you can still adjust the field’s settings even before you create the feed.
The most important choice in the Stripe field’s settings is whether or not you want to enable additional payment methods. This refers to methods like Apple Pay, Google Pay, ACH payments, and so on.
If you enable this, you can configure the exact payment methods that will appear from your Stripe dashboard.
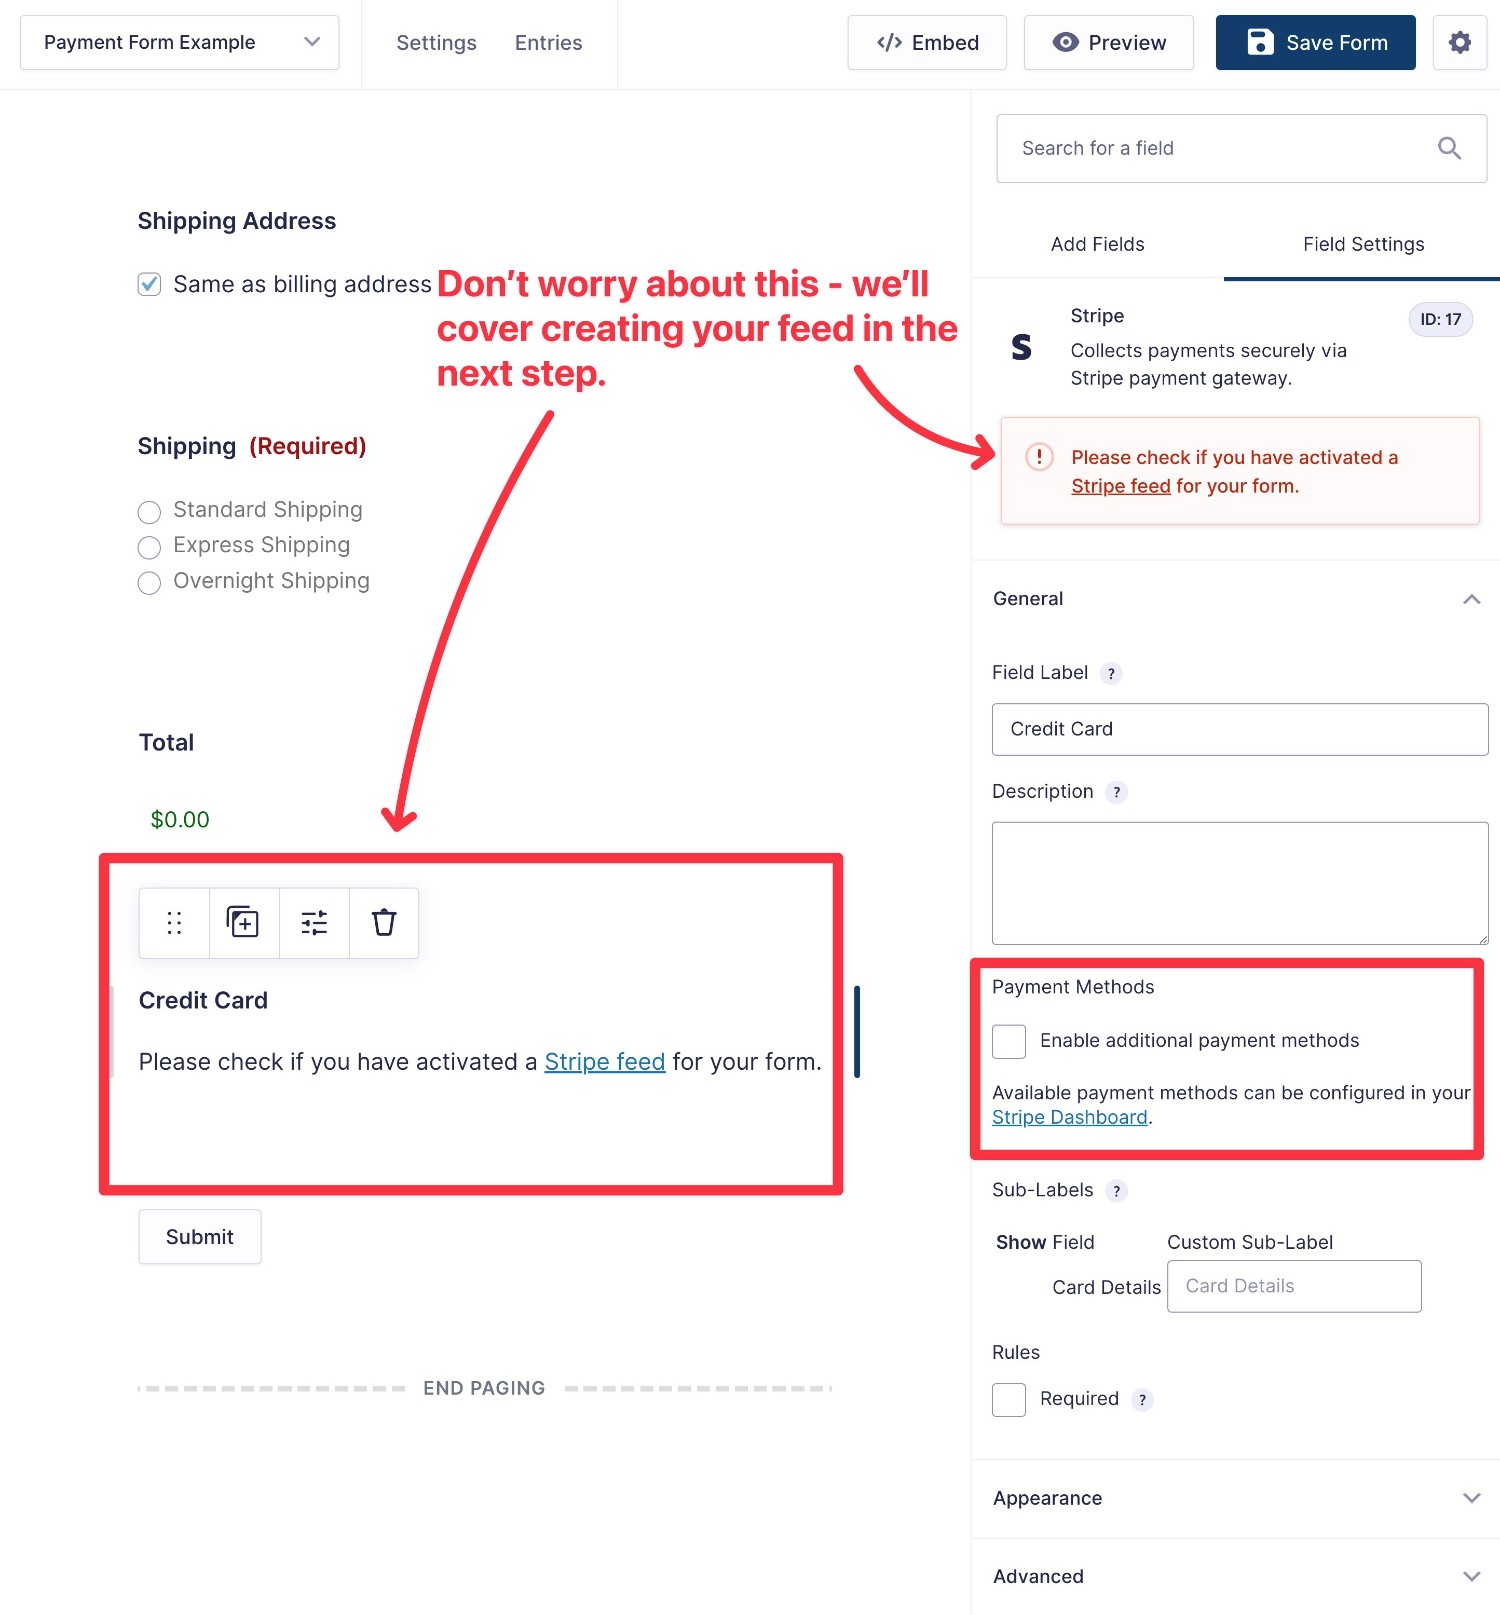
Once you’re happy with your form, make sure to click the Save Form button.
4. Create Your Payment Feed
Your payment feed lets you control how to actually process payments. For example, whether you want Stripe to charge the form’s “Total” amount as a one-time payment or set up an automatic schedule.
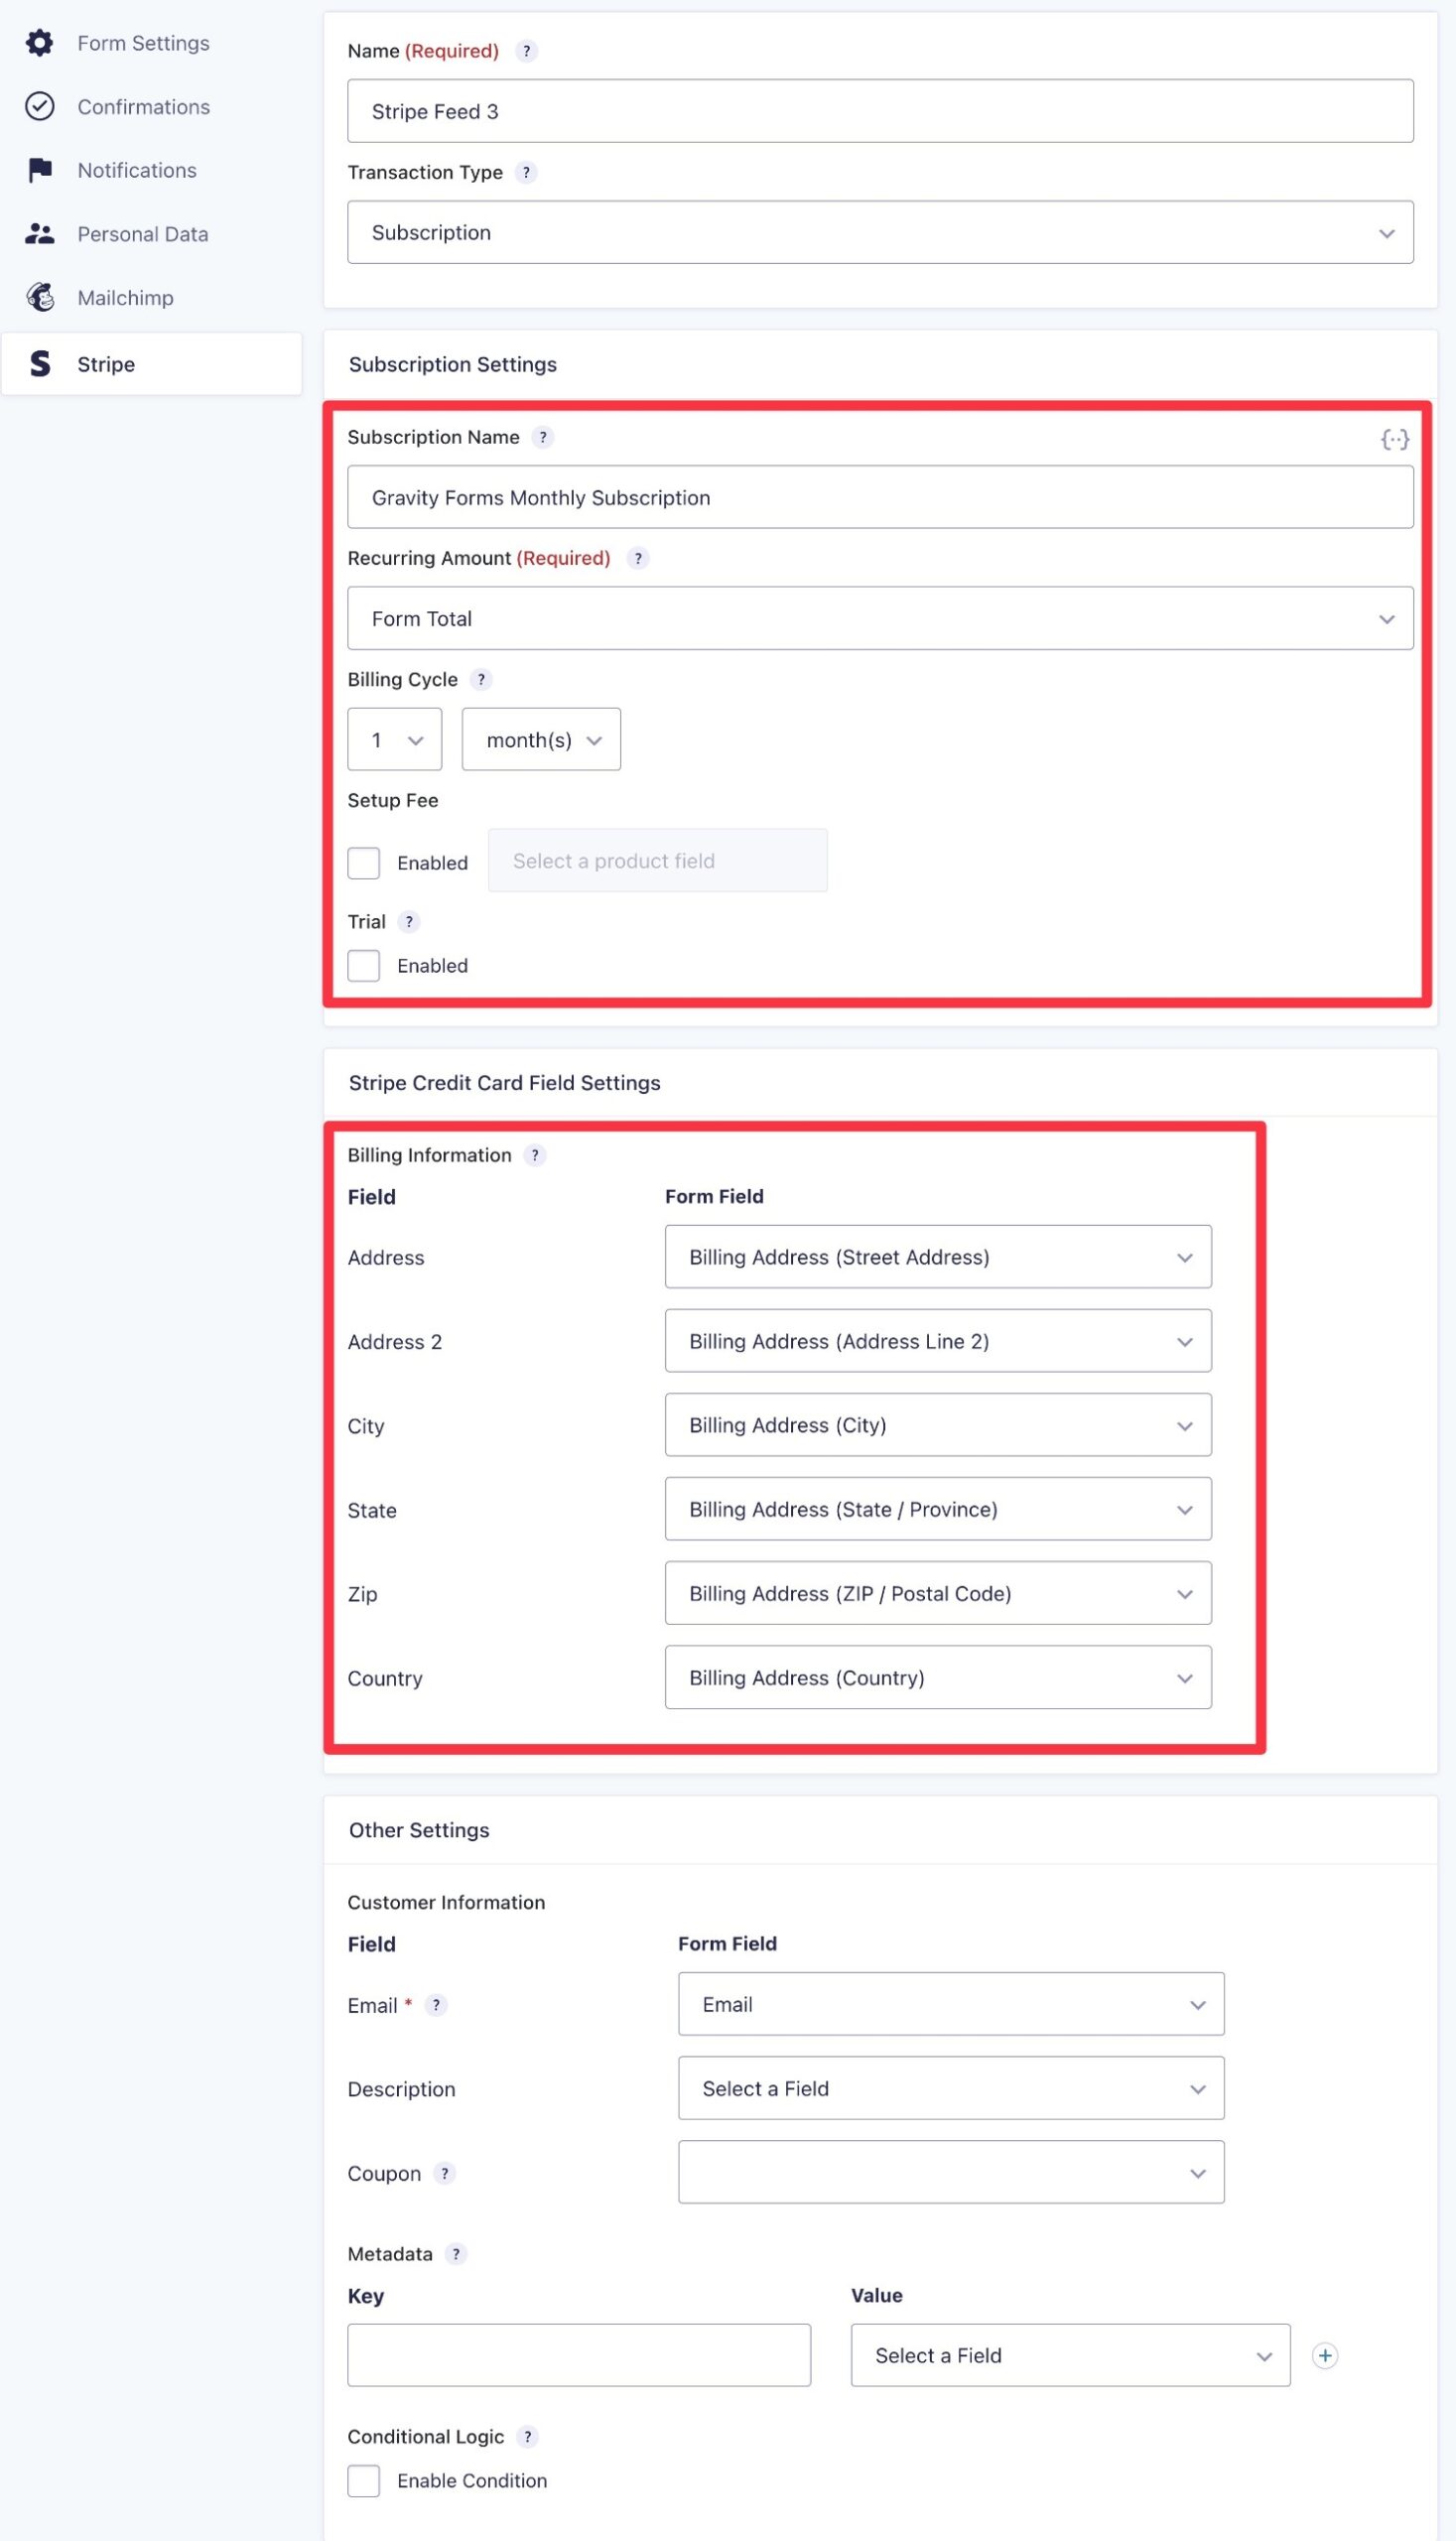
The feed also lets you map information from your form to your payment processor. For example, you can pass the billing details from your form to Stripe.
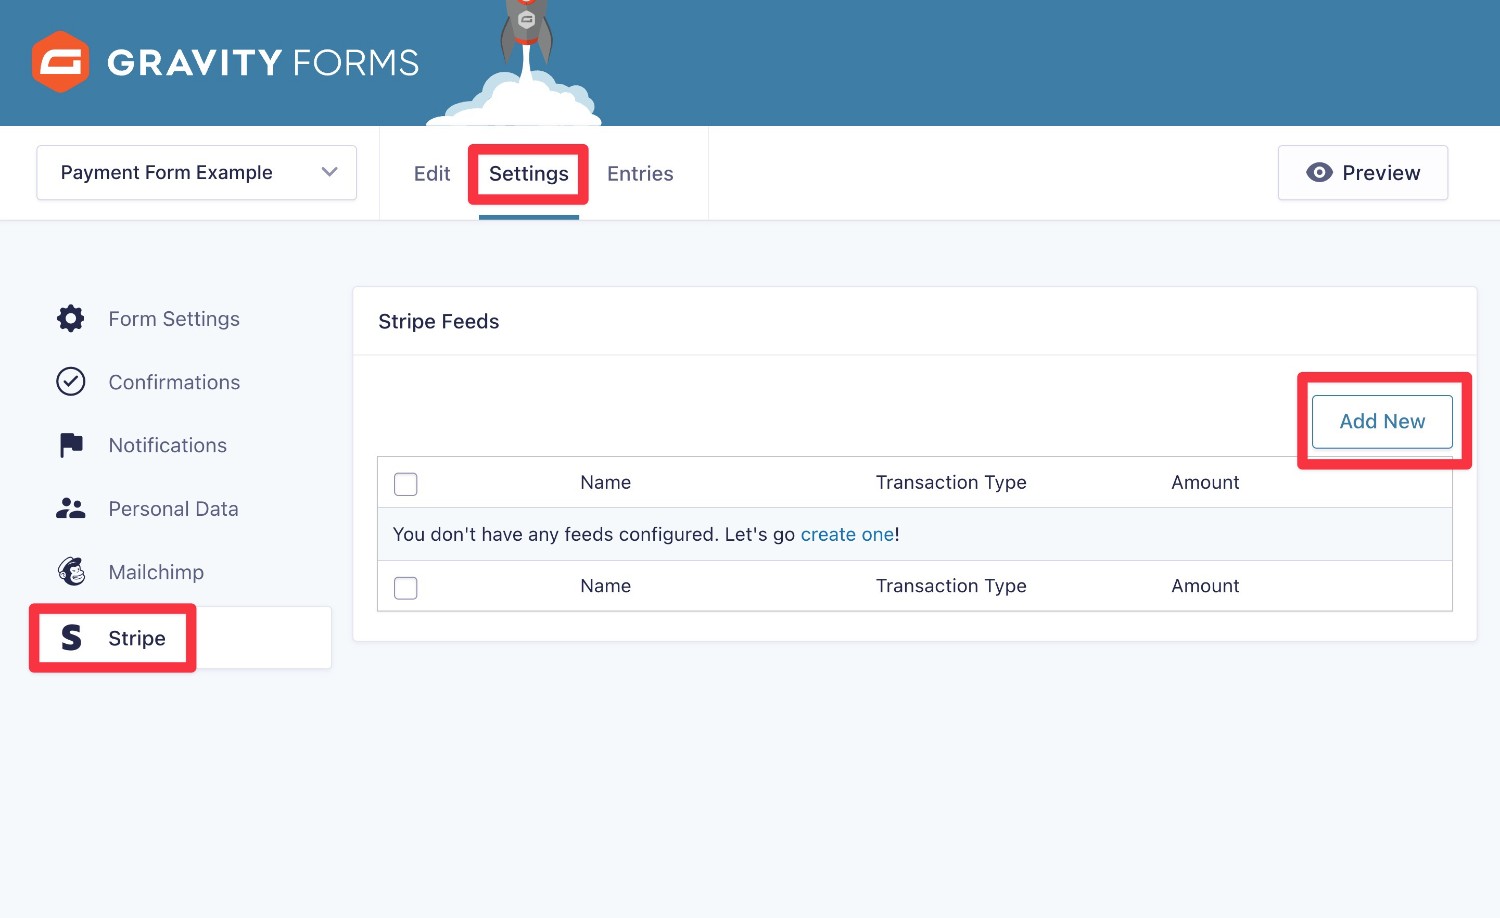
Setting Up Your Feed
To create your first Stripe feed, go to Settings → Stripe in the form editor. Then, click the Add New button.
First, choose the Transaction Type:
- Products and Services – use this for one-time payments.
- Subscription – use this to set up automatic recurring subscriptions.
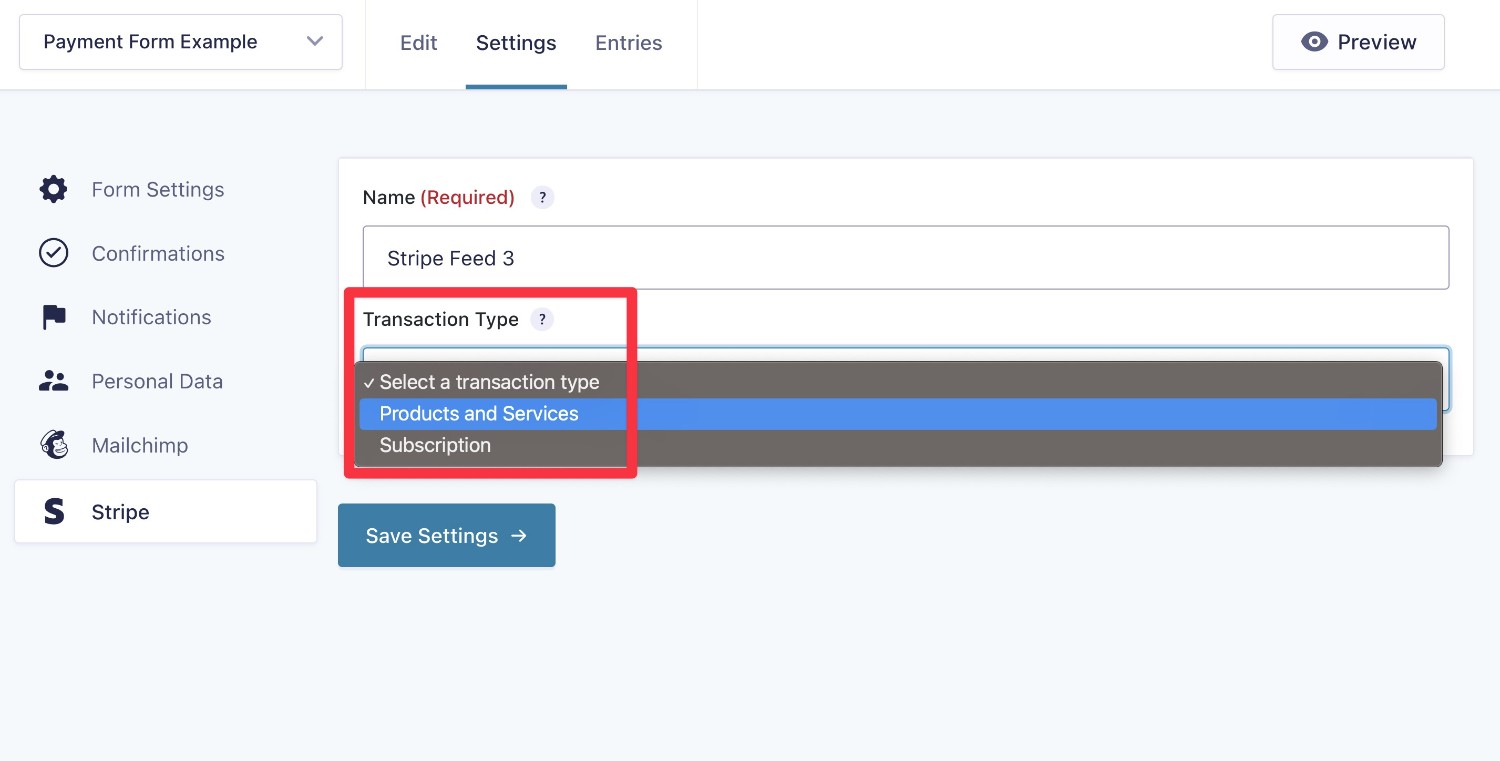
Based on your choice, you’ll see additional settings below to configure the feed.
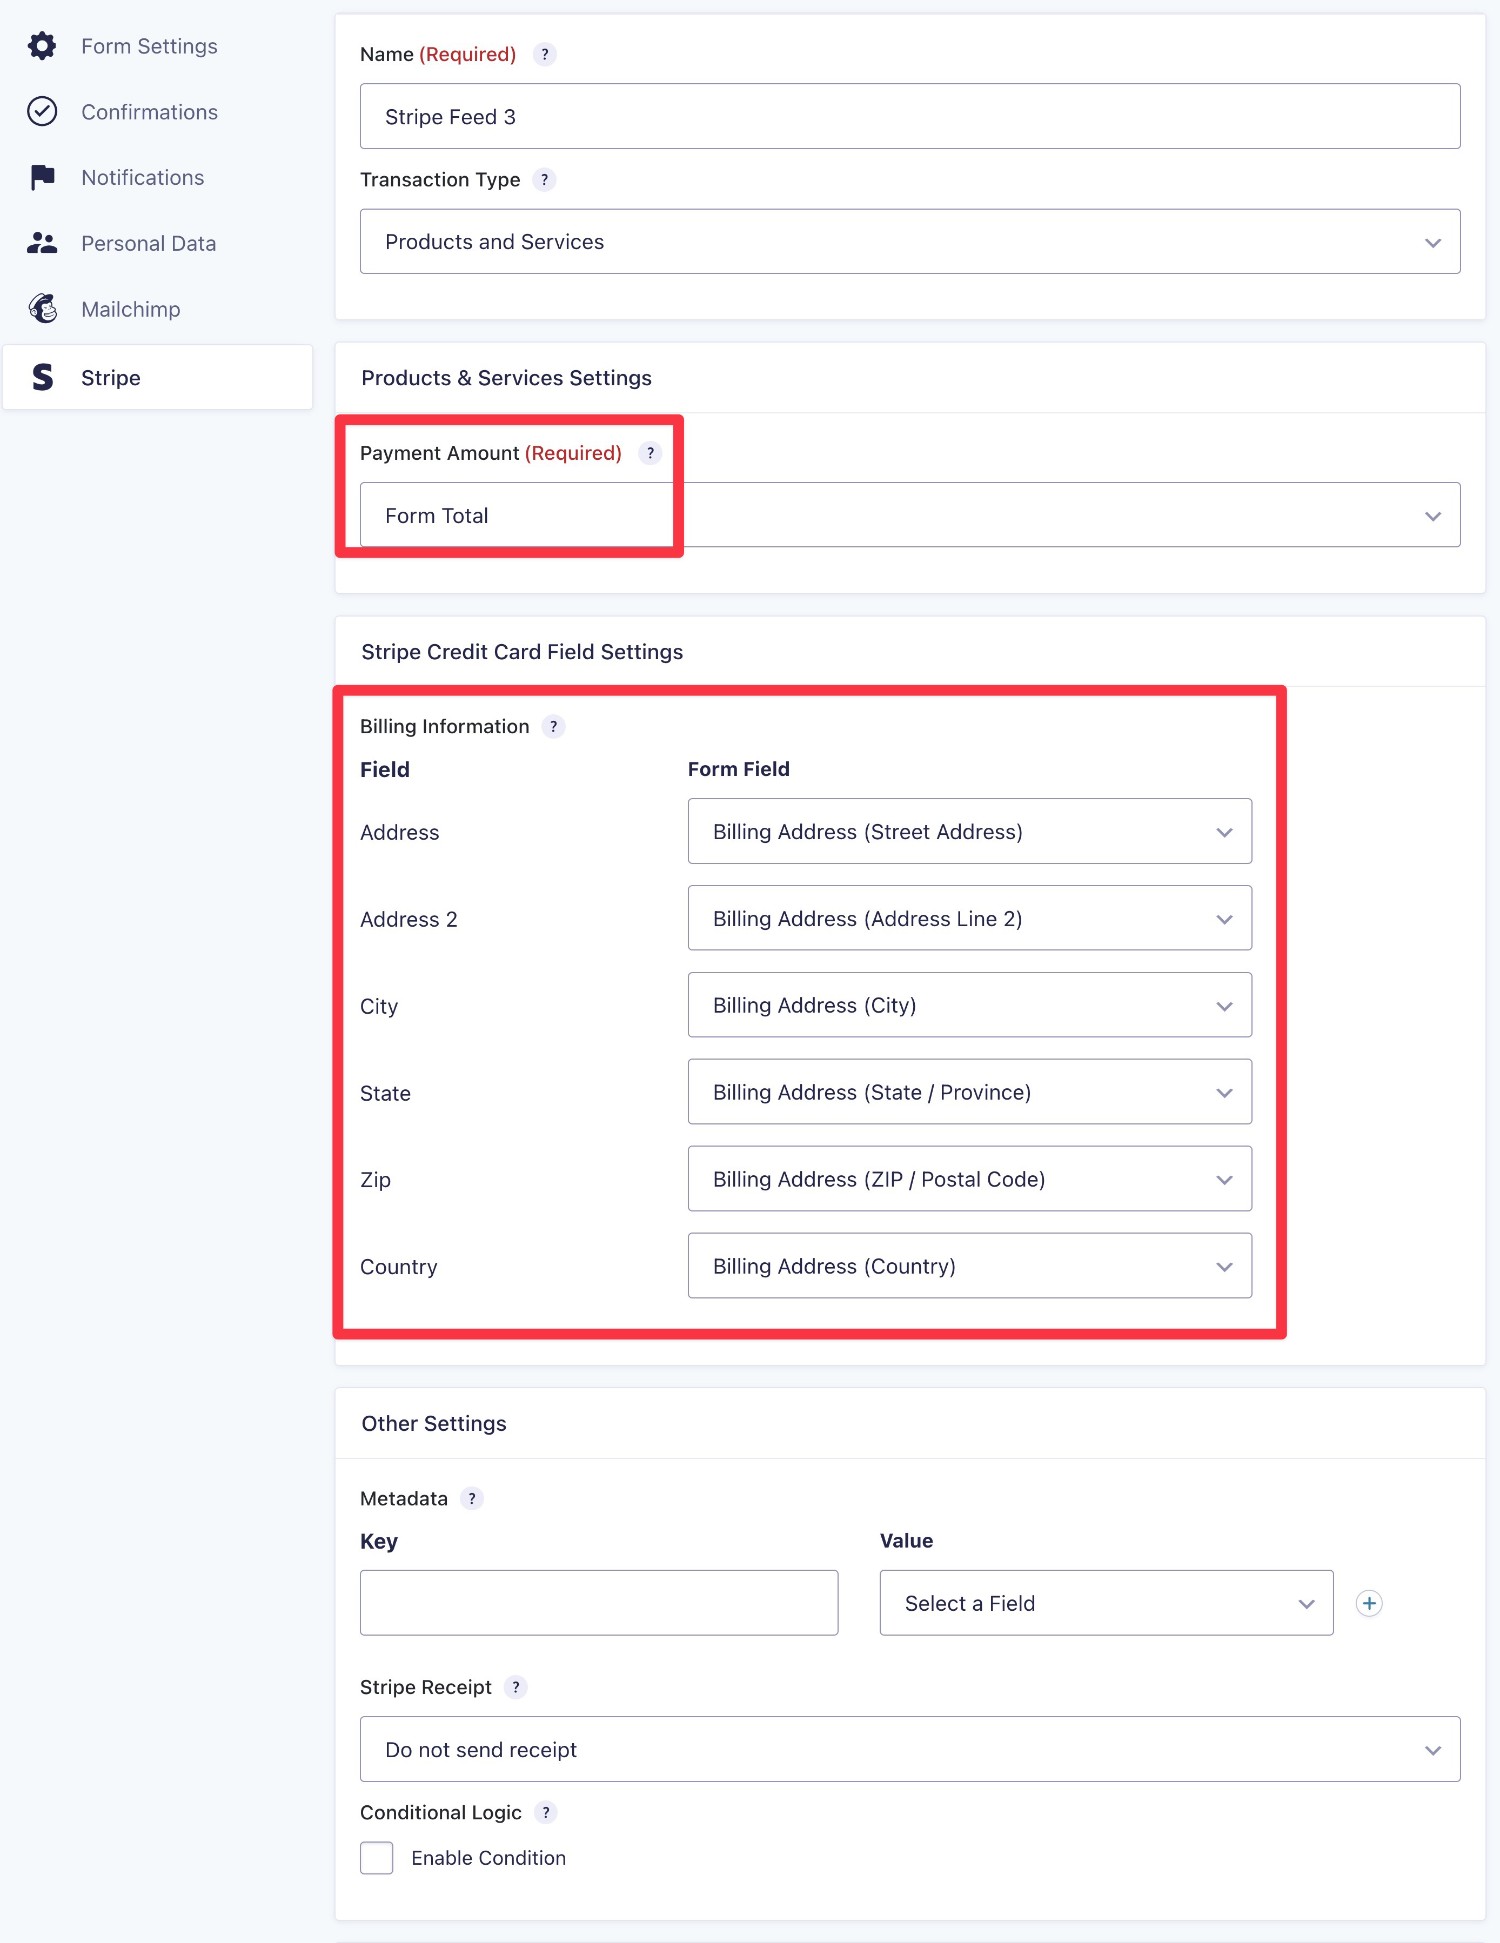
For Products and Services, you can choose which form field to use as the Payment Amount, which is what people will be charged. Typically, you’ll set this as the Form Total, but you can choose another field if needed.
Below that, you can map data from your form to Stripe, along with setting up some other basic settings.
The options are similar for a Subscription. The main difference is that you’ll get additional options for the Subscription Settings, such as the billing cycle, whether to charge a one-time setup fee, and whether to offer any type of trial period.
Once you’ve configured your feed, make sure to click Save Settings at the bottom.
Using Multiple Payment Feeds With Conditional Logic
For some use cases, you might want to process a user’s payment in different ways depending on how they filled out the form.
For example, you might want to give people the choice to choose between a one-time payment or some type of recurring payment. Here are some examples of when you might do this:
- Donations – you could give donors the option of making a one-time donation or setting up an automatic monthly donation.
- Payment plans – you could let people choose between making a one-time $200 payment or making three monthly payments of $80. Note – the Gravity Forms Stripe Add-On doesn’t let you set up these types of payment plans, but you can with another add-on such as Square or PayPal.
If you’re looking to implement these types of payment options, you can create multiple payment feeds, each with the relevant configuration.
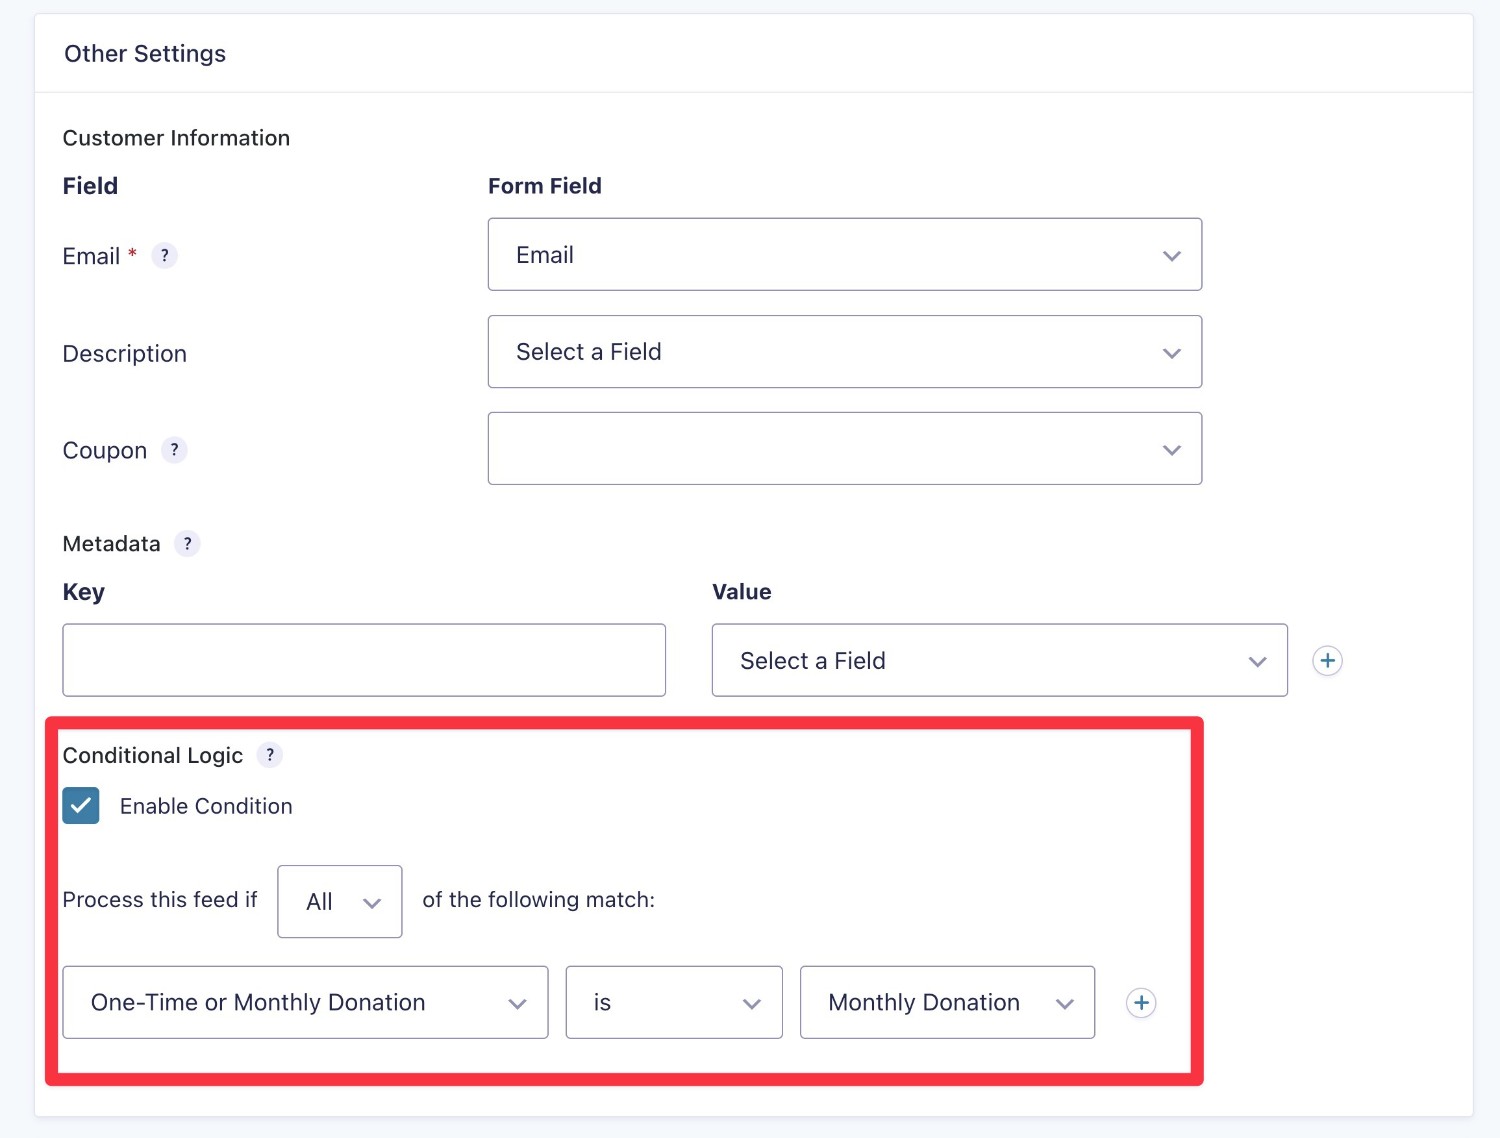
Then, you can use the conditional logic option in the feed’s settings to only execute each feed in a specific situation.
For example, you could add a radio button field to your form that has options for “One-time donation” and “Automatic monthly donation”. You would then set up the conditional logic to only execute the payment feed that applies to the option the person selected in that radio button field.
5. Set Up Payment-Related Emails and Confirmations
Next, you’ll want to set up your form’s confirmation and notifications:
- Confirmation – you can show a message after they submit the form or redirect them to a custom thank you page.
- Notification – you can send emails to the person who made a payment, yourself, and/or other members of your team.
For a payment form, you’ll get some special notification email triggers, such as automatically sending an email if you refund a payment.
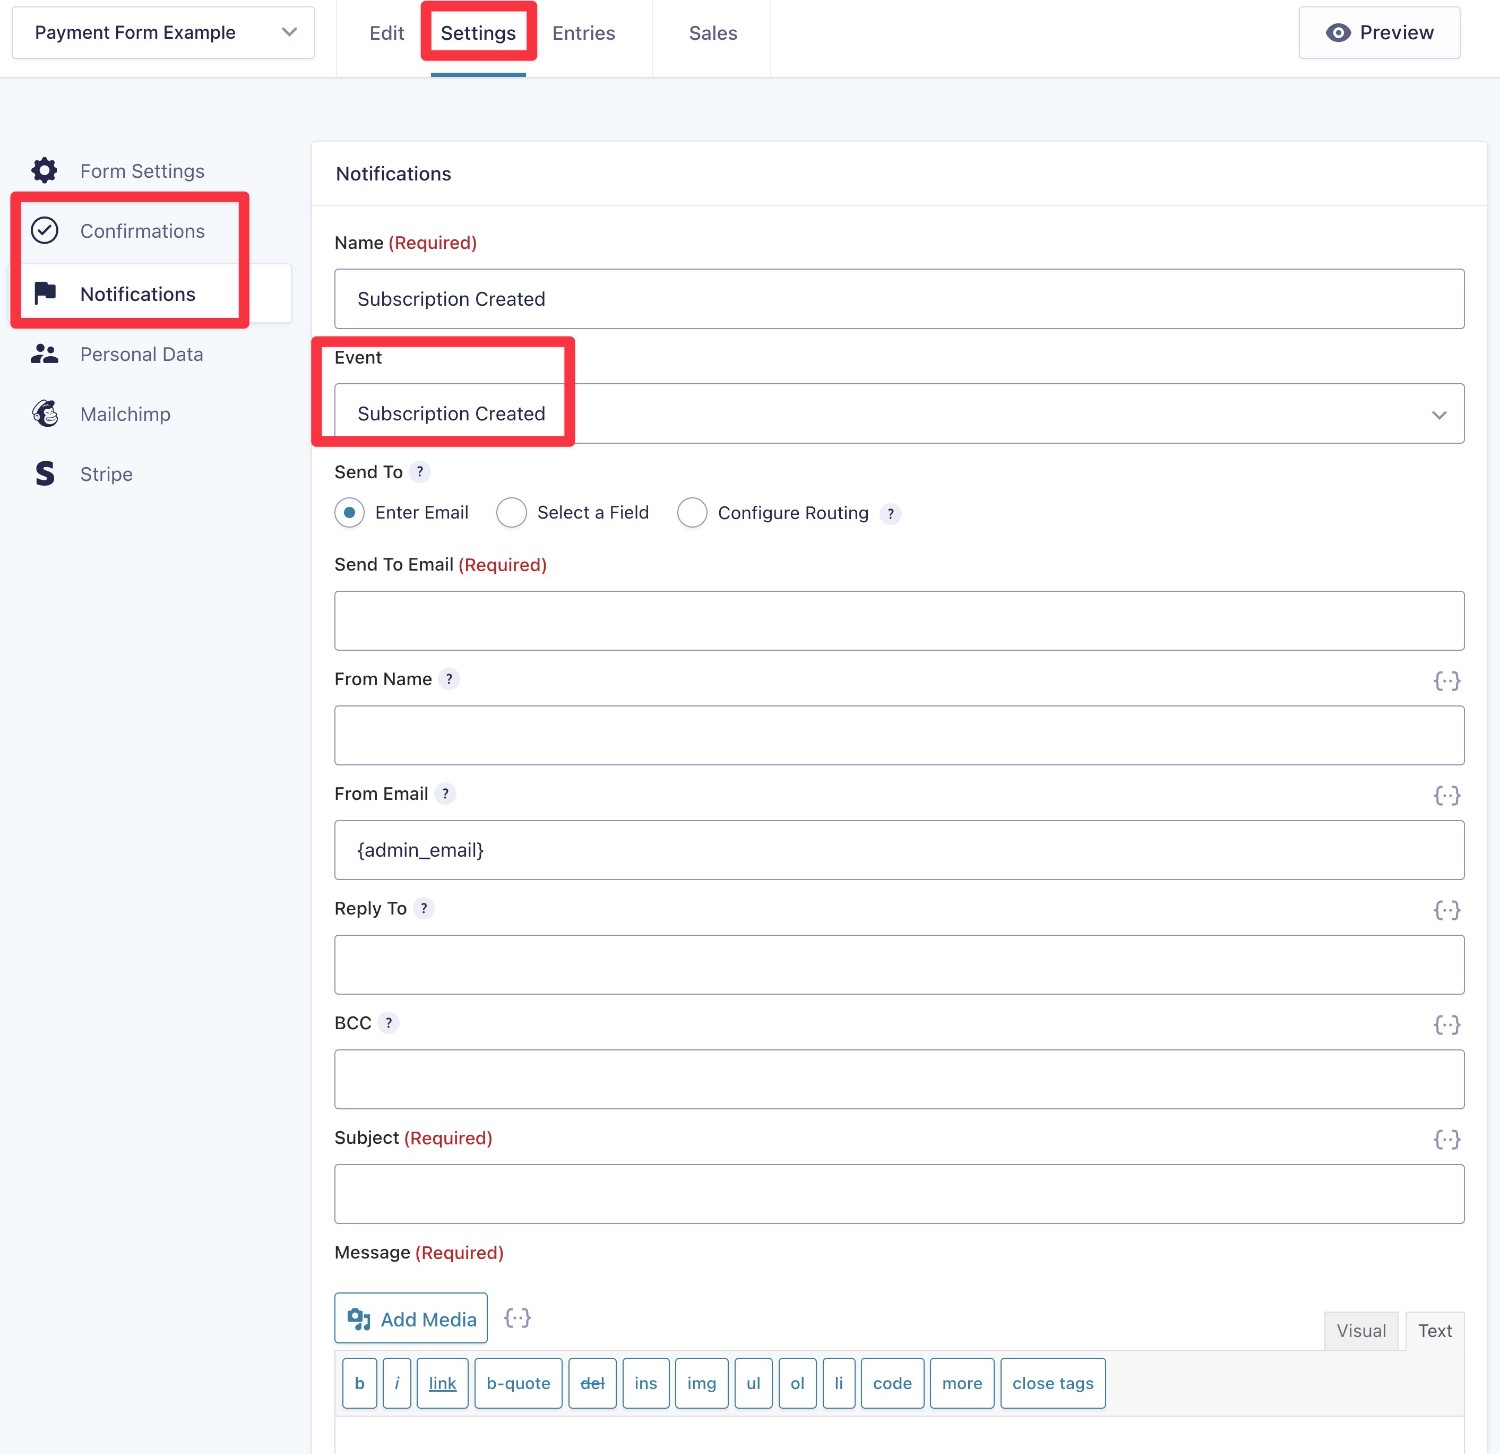
You can set up confirmations and notifications from the form settings area.
6. Set Up Other Integrations As Needed (Optional)
As we mentioned earlier, another notable advantage of using Gravity Forms for WordPress payments is that you can easily integrate your payment forms with a lot of other tools and WordPress features.
For example, subscribing people to your newsletter or registering a WordPress user account for them after a successful payment.
If you want to set up any of those types of integrations, now is a good time to do it.
In general, you’ll first want to install and activate the add-on for the integration that you want to set up. For third-party integrations, you might need to perform some additional steps to set up the connection, such as adding an API key to the add-on’s settings.
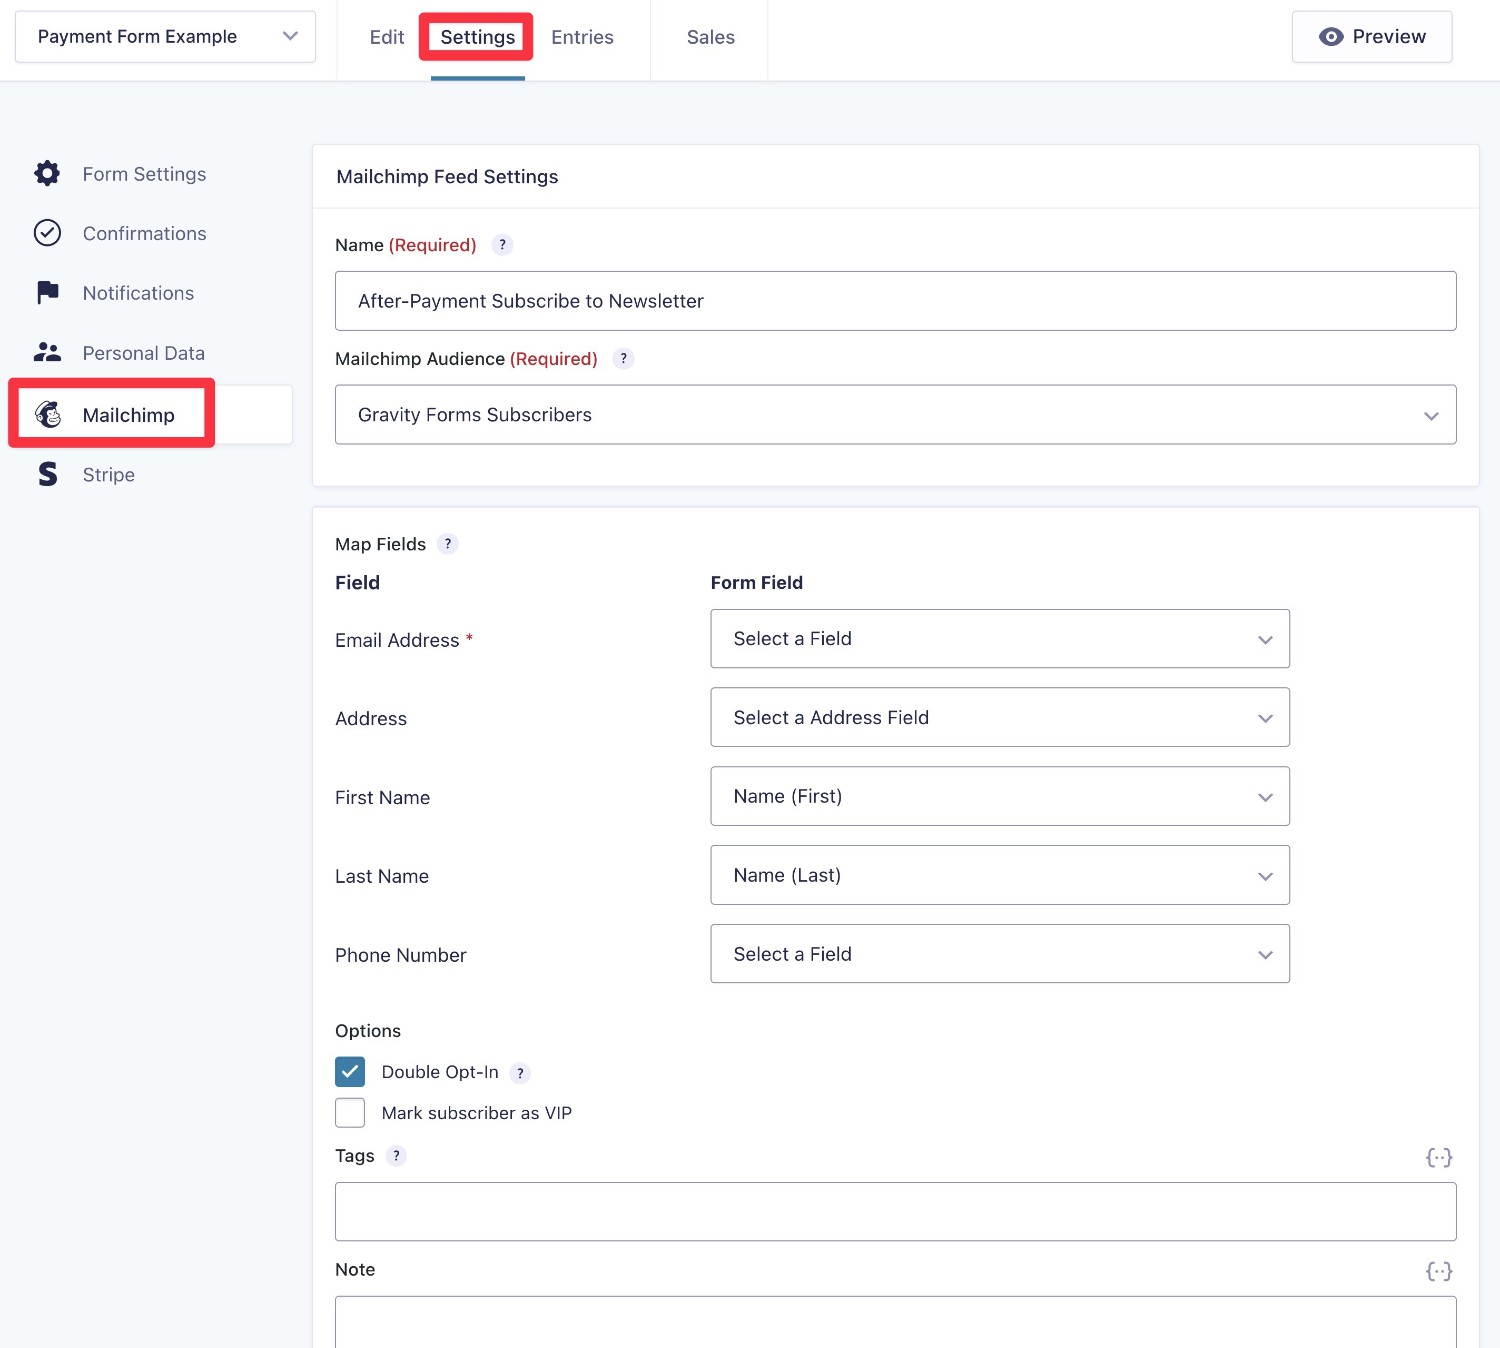
Then, you’ll usually create a feed for that integration in your payment form’s settings.
For example, if you want to subscribe people to your Mailchimp newsletter after they make a payment, you would create a Mailchimp feed.
If you can’t find an add-on for the service that you want to connect to, Gravity Forms also supports both Zapier and webhooks. Or, there are lots of third-party community add-ons that might offer the integration that you need.
If you want to build multi-step automation workflows, you can install the Gravity Flow plugin, which comes from the same team behind Gravity Forms. It lets you include unlimited steps in your workflows, including adding time delays or approval delays as needed.
Here’s an example of a multi-step workflow that you could build with Gravity Flow:
- After the initial payment, send an email to the site admin asking for approval.
- The site admin can approve or reject the submission.
- If approved, register a WordPress account for the person.
- After the account is registered, generate a PDF invoice and send it to the person’s email address.
7. Embed and Test Your Payment Form
At this point, you’re now ready to embed your payment form on your site and start processing some test payments (and eventually real payments).
To embed your form, you can add the Form block to the page where you want it to appear (or, you can also use the shortcode or PHP function if you prefer those methods).

If you’re using the Orbital form theme, you can also style your payment form right from the block settings. Our full guide to form styling covers exactly how to do that.
Once you’ve embedded your form and published/updated the page, you should see the payment form on the frontend of your site.
To make sure that it’s working as you intend it to, we recommend submitting some test payments using Stripe’s testing card numbers. For example, you can use the following credit card information to submit a test payment:
- Card number: 4242424242424242
- CVC: Any three digits – e.g. 123
- Expiration date: Any future date
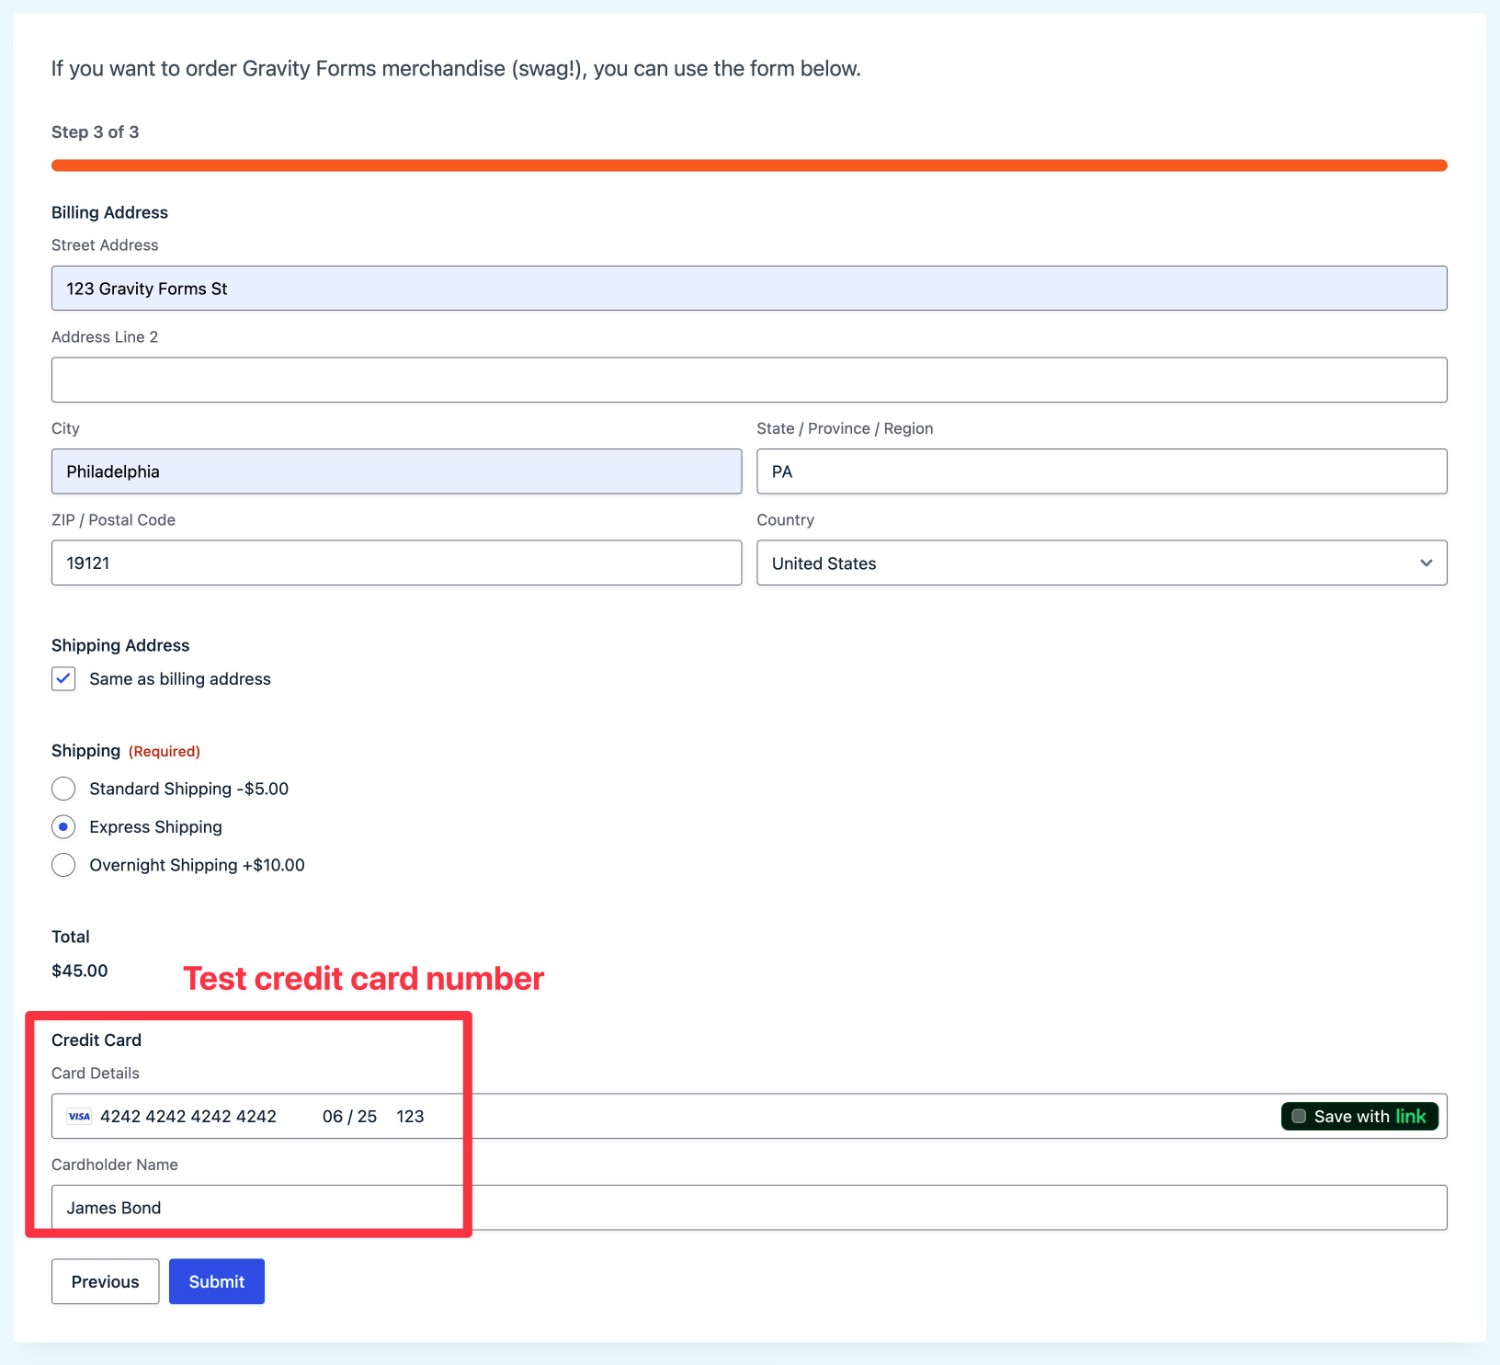
If your form is configured properly, you should see the payment appear in both your WordPress dashboard and your Stripe test dashboard. We’ll cover more about viewing payments in a second.
8. Enable Live Payments (If You Started In Test Mode)
Once you’ve tested your form and verified that it’s working, you’re ready to flip the switch and start accepting live payments from your customers:
- Go to Forms → Settings in your WordPress dashboard.
- Select the Stripe tab in the settings area.
- Change the Payment Mode from Test to Live.
- Click the Connect with Stripe button.
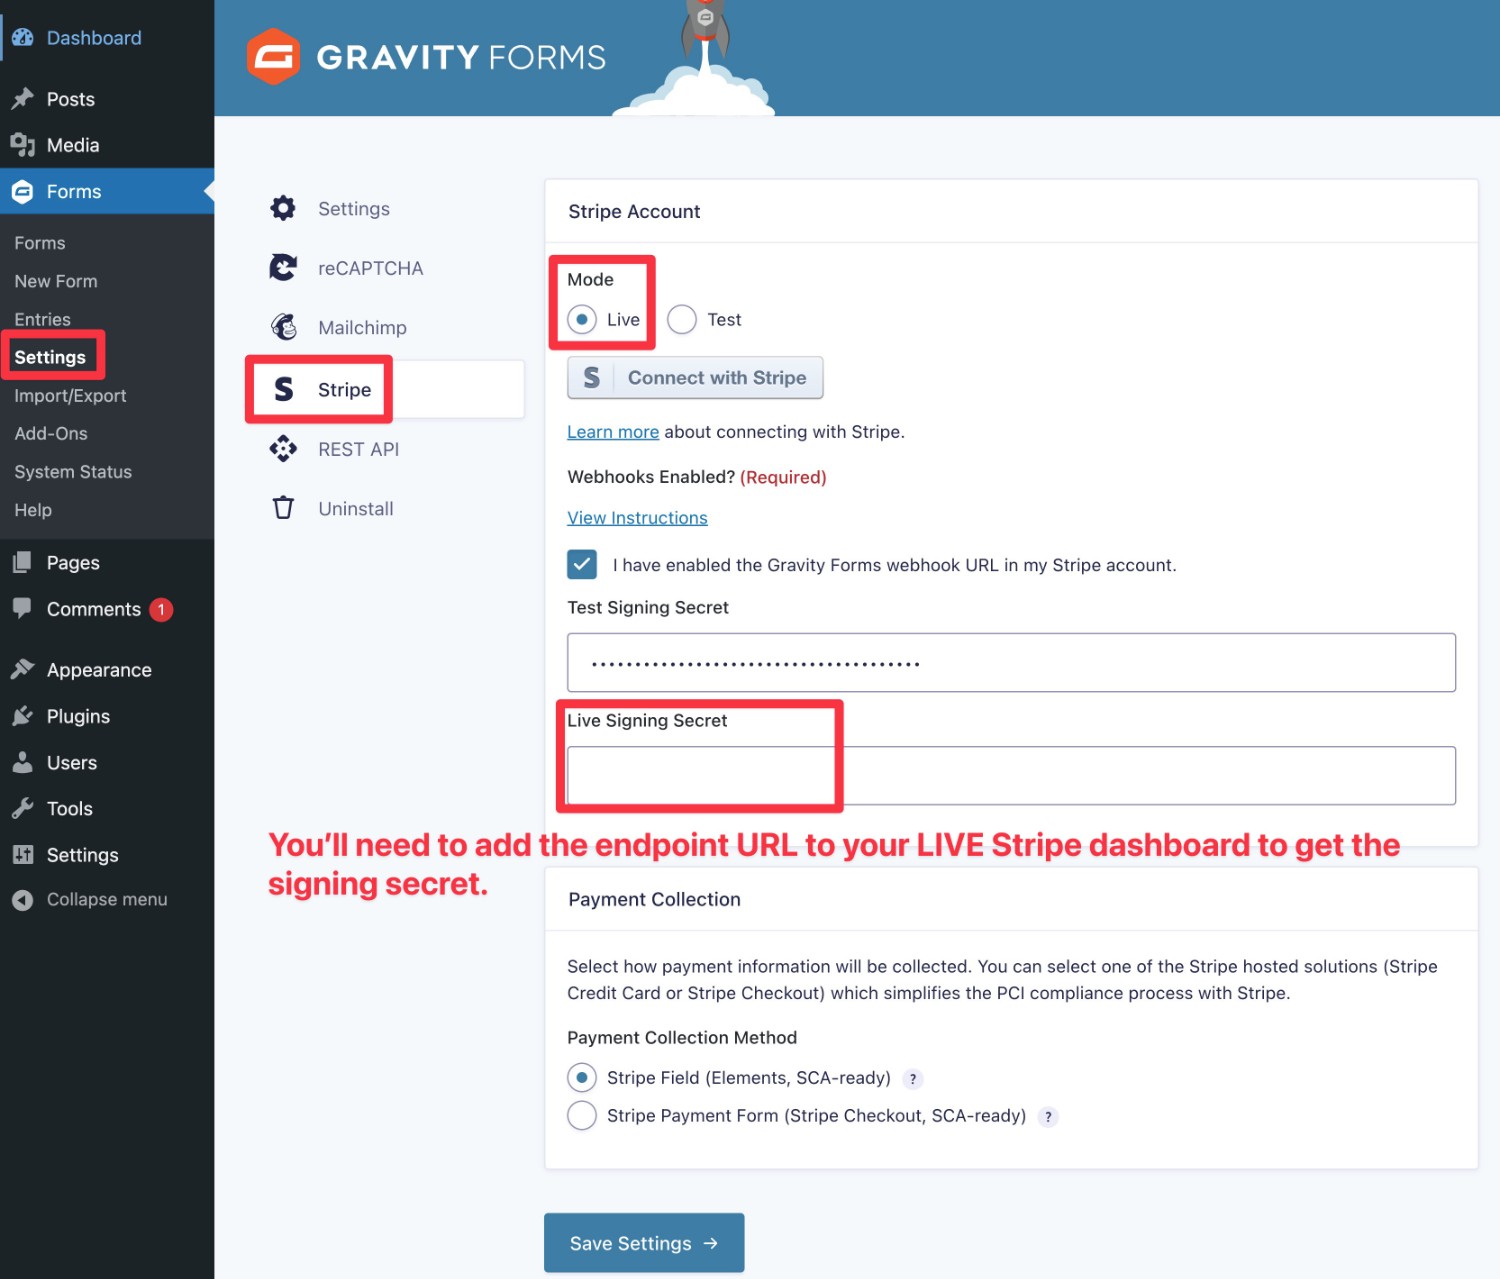
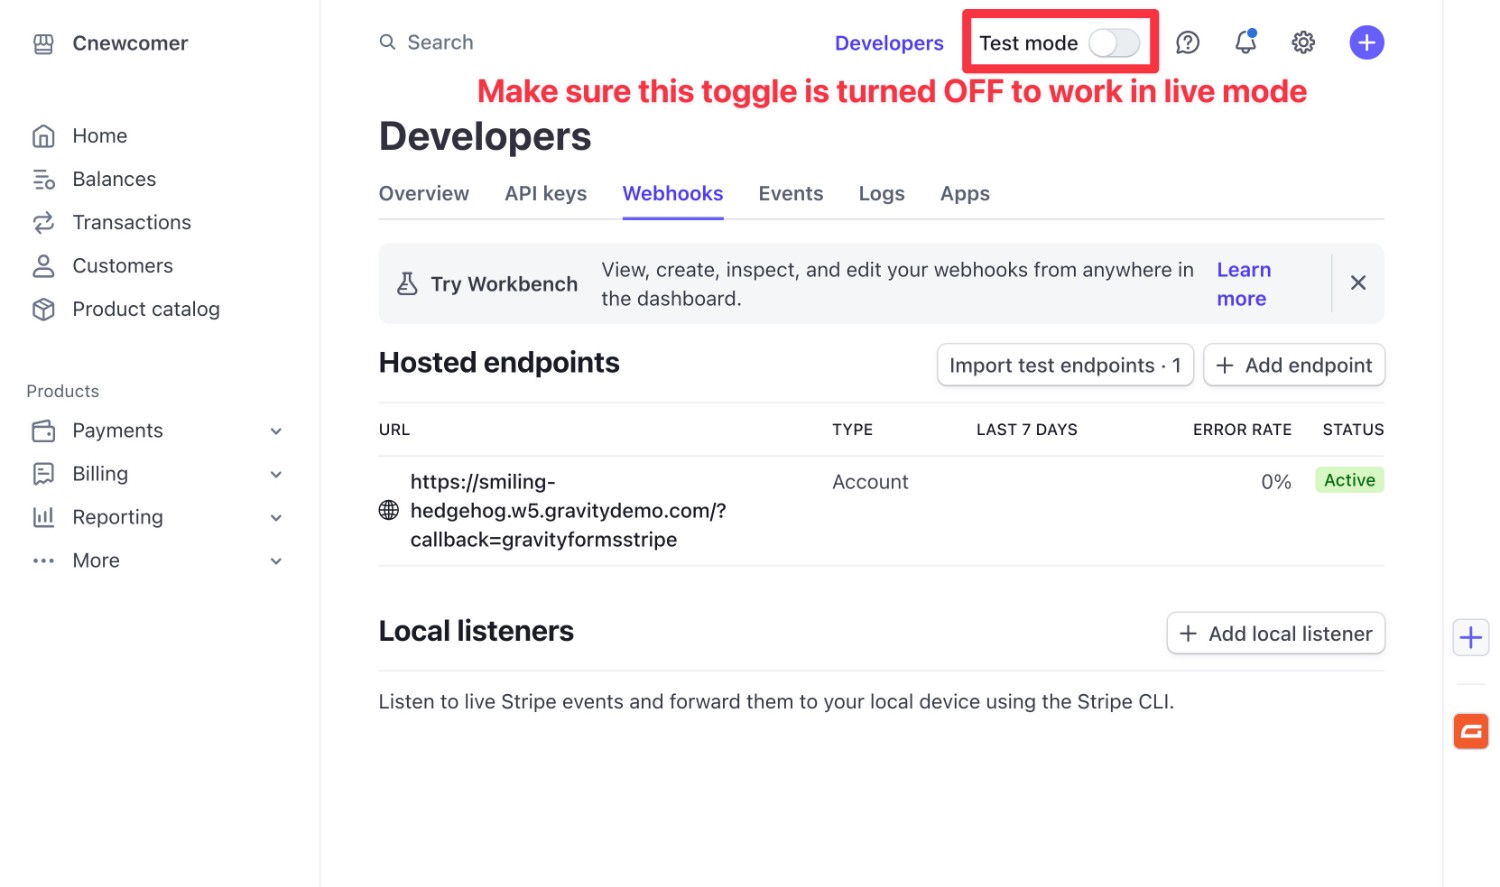
You’ll now need to repeat the same tasks from Step #2 above. However, instead of adding the endpoint URL to your Stripe Test dashboard, you’ll want to make sure that you’re doing everything in your live dashboard.
You can verify that you’re working in the live dashboard by looking at the toggle in the top right corner of your Stripe dashboard.
You can go back to Step #2 to see those instructions in more detail, but here’s a quick recap of what you’ll want to do:
- Add the Gravity Forms endpoint URL to Stripe and give it the required permissions.
- Copy the signing secret key that Stripe gives you for that endpoint.
- Paste that signing secret key into the Gravity Forms settings.
9. View and Manage Your Payments
Now, your payment form is officially live and processing real payments from customers.
When people make payments, you’ll be able to view them in both your WordPress dashboard and the Stripe dashboard.
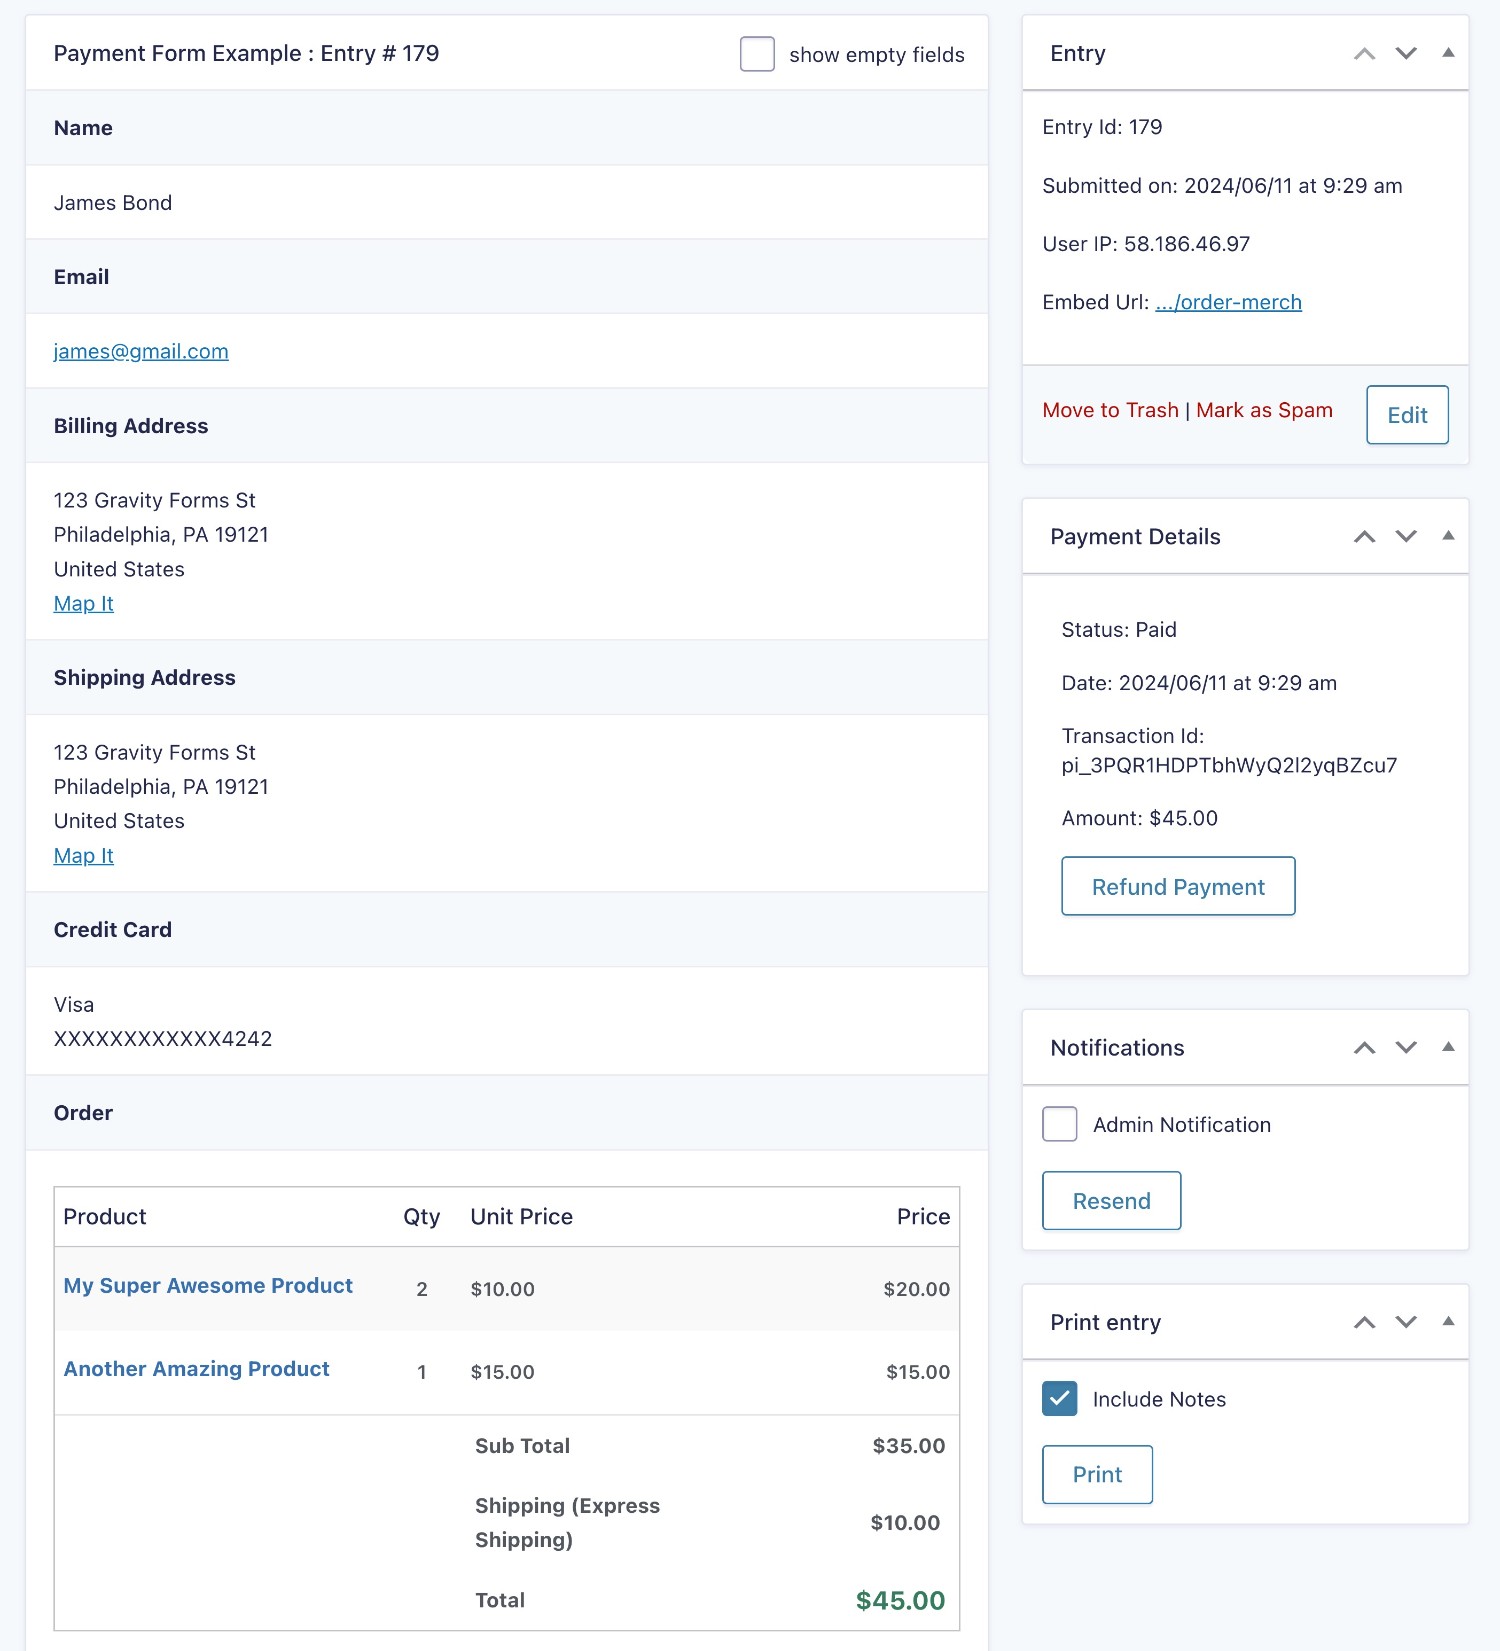
In WordPress, you can view individual payments by following these instructions:
- Go to Forms → Entries.
- Select your payment form from the drop-down.
- Click View underneath the specific payment that you want to see.
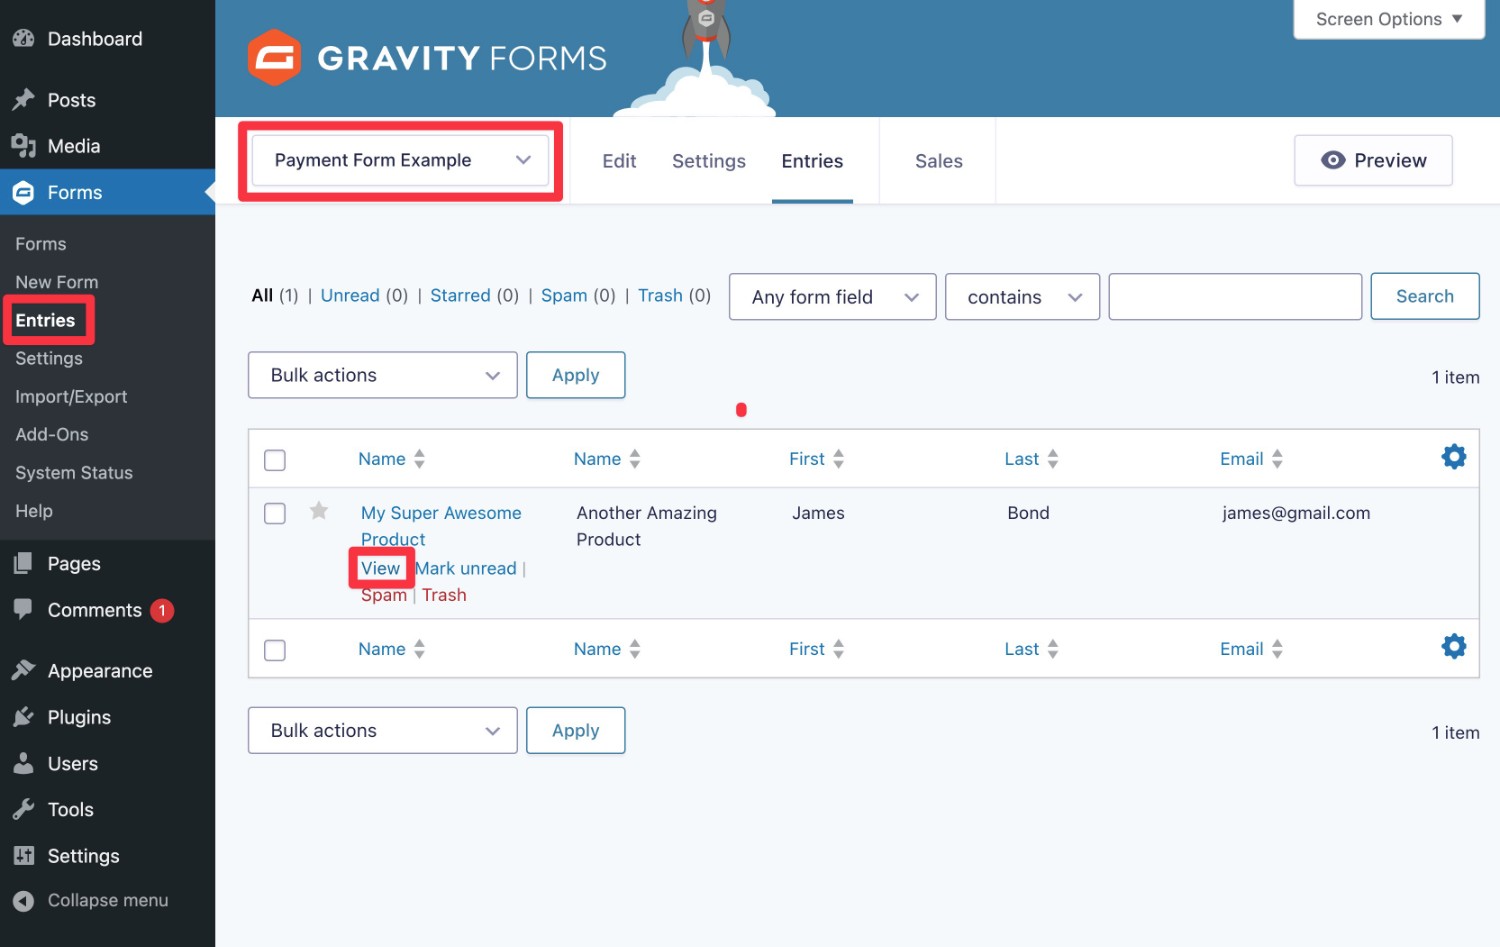
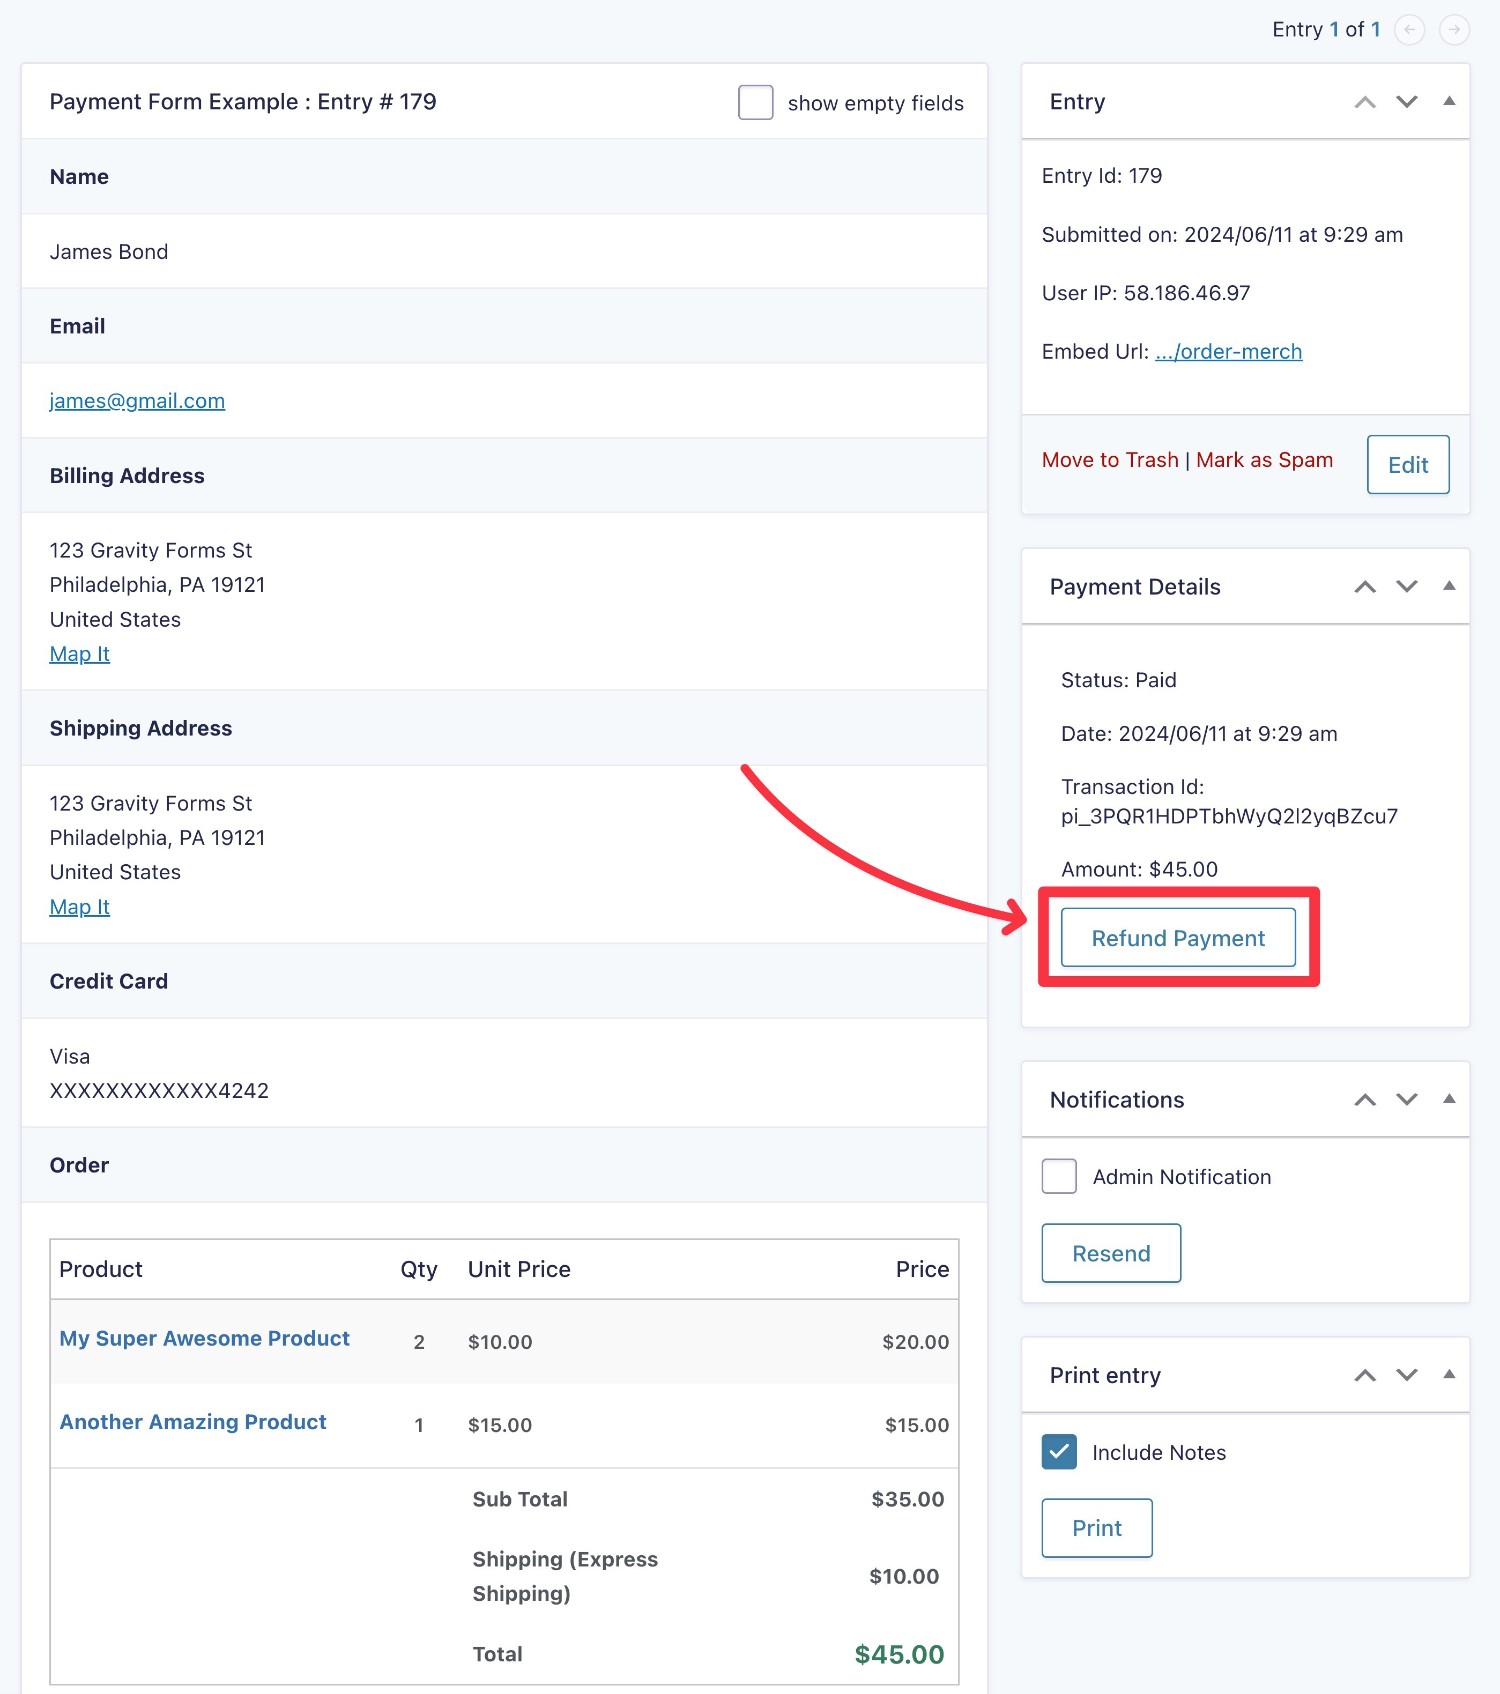
Inside the entry detail page, you can view details and also perform relevant actions, such as refunding a payment, canceling a subscription, capturing a payment for which you’re using “Authorize and Capture,” and so on.
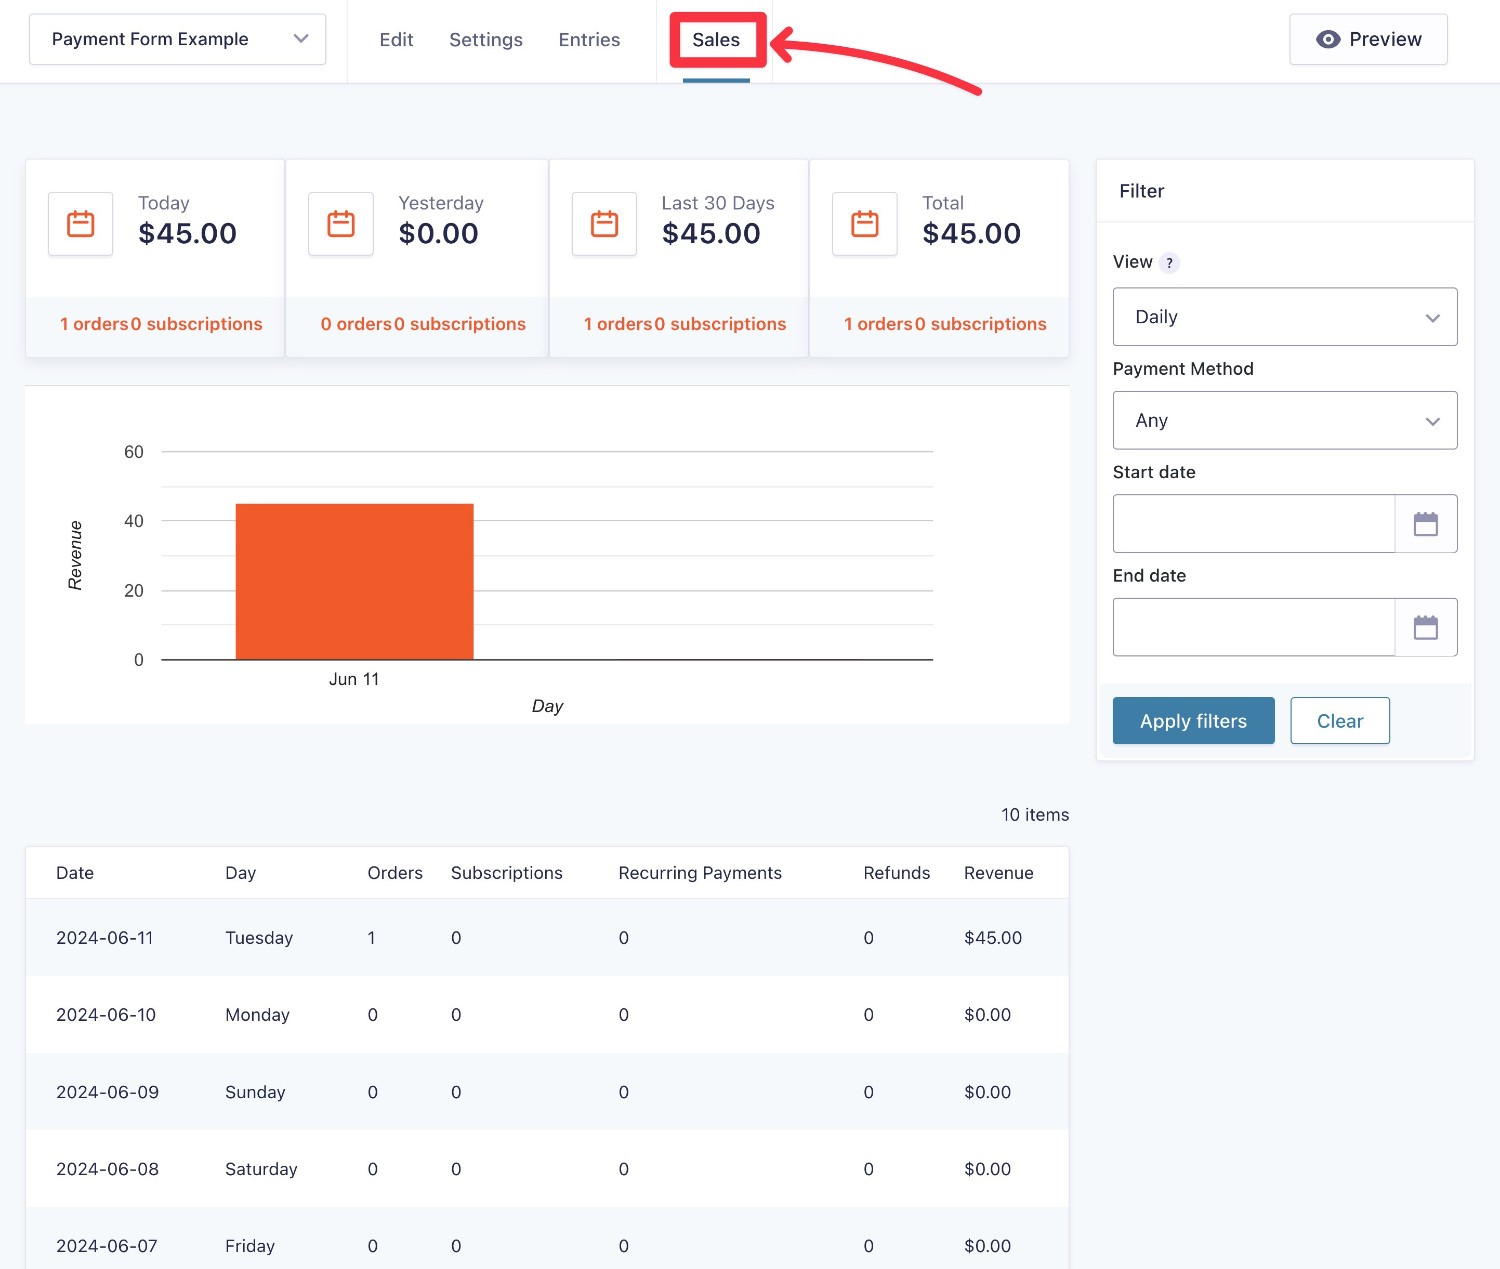
You also get a special Sales dashboard that lets you see data for all of the payments that you’ve received via that form.
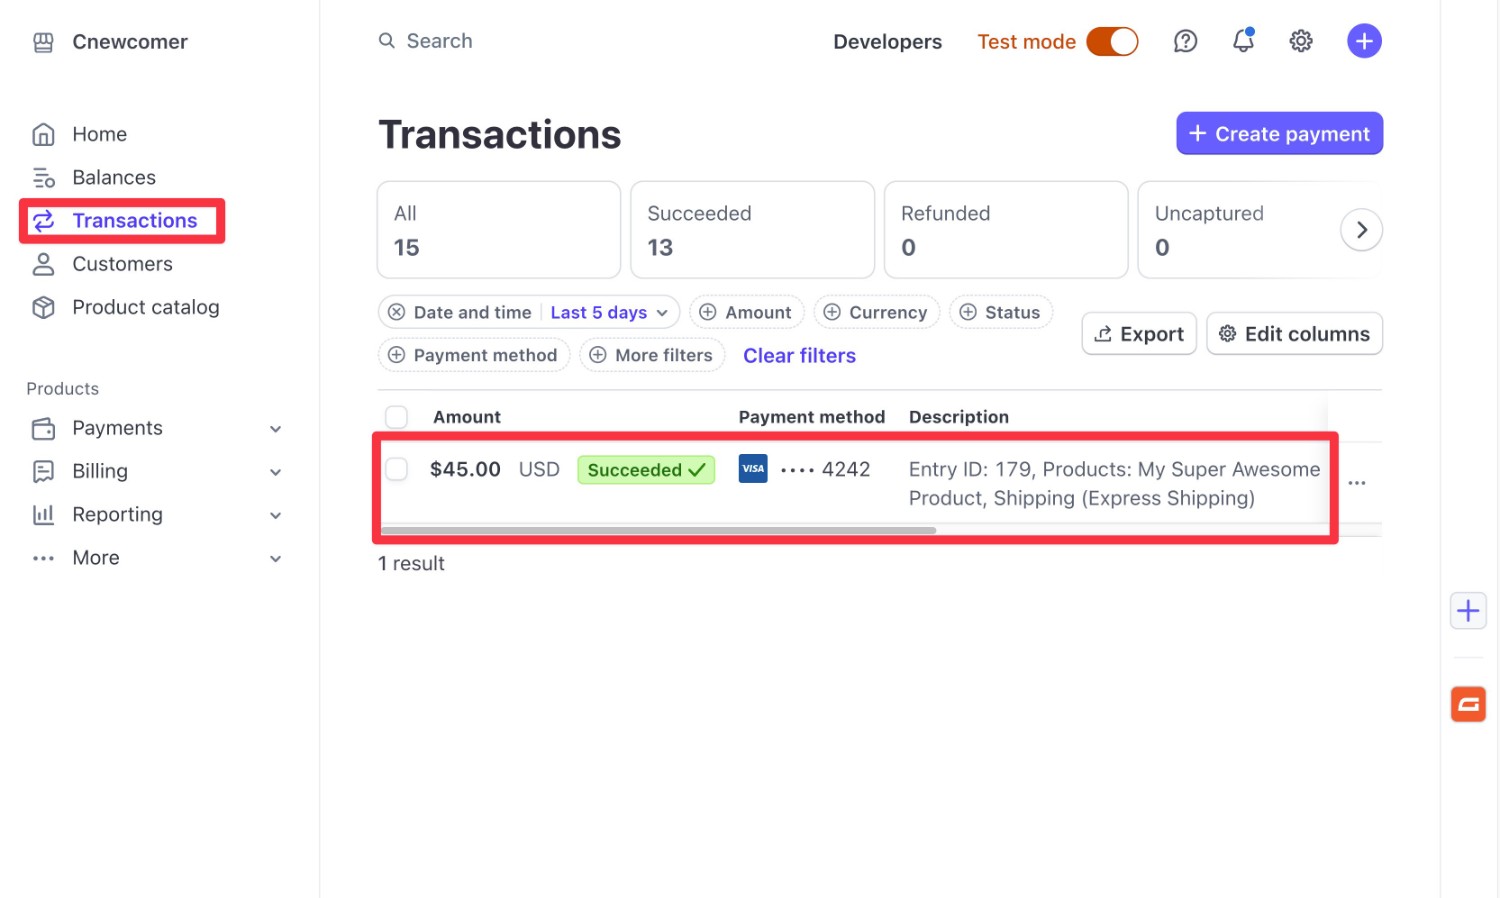
In Stripe, you can view individual payments by clicking the Transactions tab in the sidebar.
You can also use the official Gravity Forms Stripe App to more tightly connect these two dashboards. When you set up the Gravity Forms Stripe App, you’ll be able to access a few new features:
- You can see form entry data inside the Stripe dashboard.
- You can add notes in both WordPress and Stripe, with support for two-way syncing.
Get Started With WordPress Payments Today
That wraps up our complete guide to using Gravity Forms for WordPress payments.
With Gravity Forms, you can access a flexible payment solution that’s fully within your control, with no extra transaction fees added on top of your payment processor.
You can also integrate your payment forms with the other tools that your business relies on, and even build multi-step workflows to automate entire payment workflows.
For many payment use cases, all you need is the Gravity Forms Pro license. However, you might need the Elite license if you want to use 2Checkout (or access some other non-payment add-ons).
If you’re ready to get started, purchase your Gravity Forms license today.

If you want to keep up-to-date with what’s happening on the blog sign up for the Gravity Forms newsletter!
"*" indicates required fields