Using Stripe to process payments with Gravity Forms? With the new Gravity Forms Stripe app, you can now create an even deeper integration between Gravity Forms and Stripe that lets you view form entry data and notes right from your Stripe Dashboard.
What’s more, you can also add notes straight from Stripe, and those notes will sync to your WordPress dashboard (and vice versa).
In this blog post, you’re going to learn everything that you need to know to get started with the Gravity Forms Stripe app. We’ll start with a more detailed introduction to what the app does and then we’ll get into a complete, step-by-step tutorial – with screenshots!
Let’s dig in…
What Is the Gravity Forms Stripe App? How Does It Help?
In May 2022, Stripe launched its own official app marketplace, named, unsurprisingly, the Stripe App Marketplace.
With the Stripe App Marketplace, you can now install third-party apps directly in your Stripe account. In WordPress terms, you can think of these apps as “plugins” for the Stripe dashboard.
More specifically, these apps let you add new features and integrations directly to your Stripe dashboard. The main goal of the Stripe App Marketplace is to give you tools to improve your business workflows with Stripe.
Because so many Gravity Forms users use Stripe and the Gravity Forms Stripe Add-On to process online payments, we worked with Stripe to create an official Gravity Forms Stripe app to let you more closely integrate the Stripe dashboard with your Gravity Forms form entries/payments.
This official app adds two main features to help improve your workflows with Gravity Forms and Stripe.
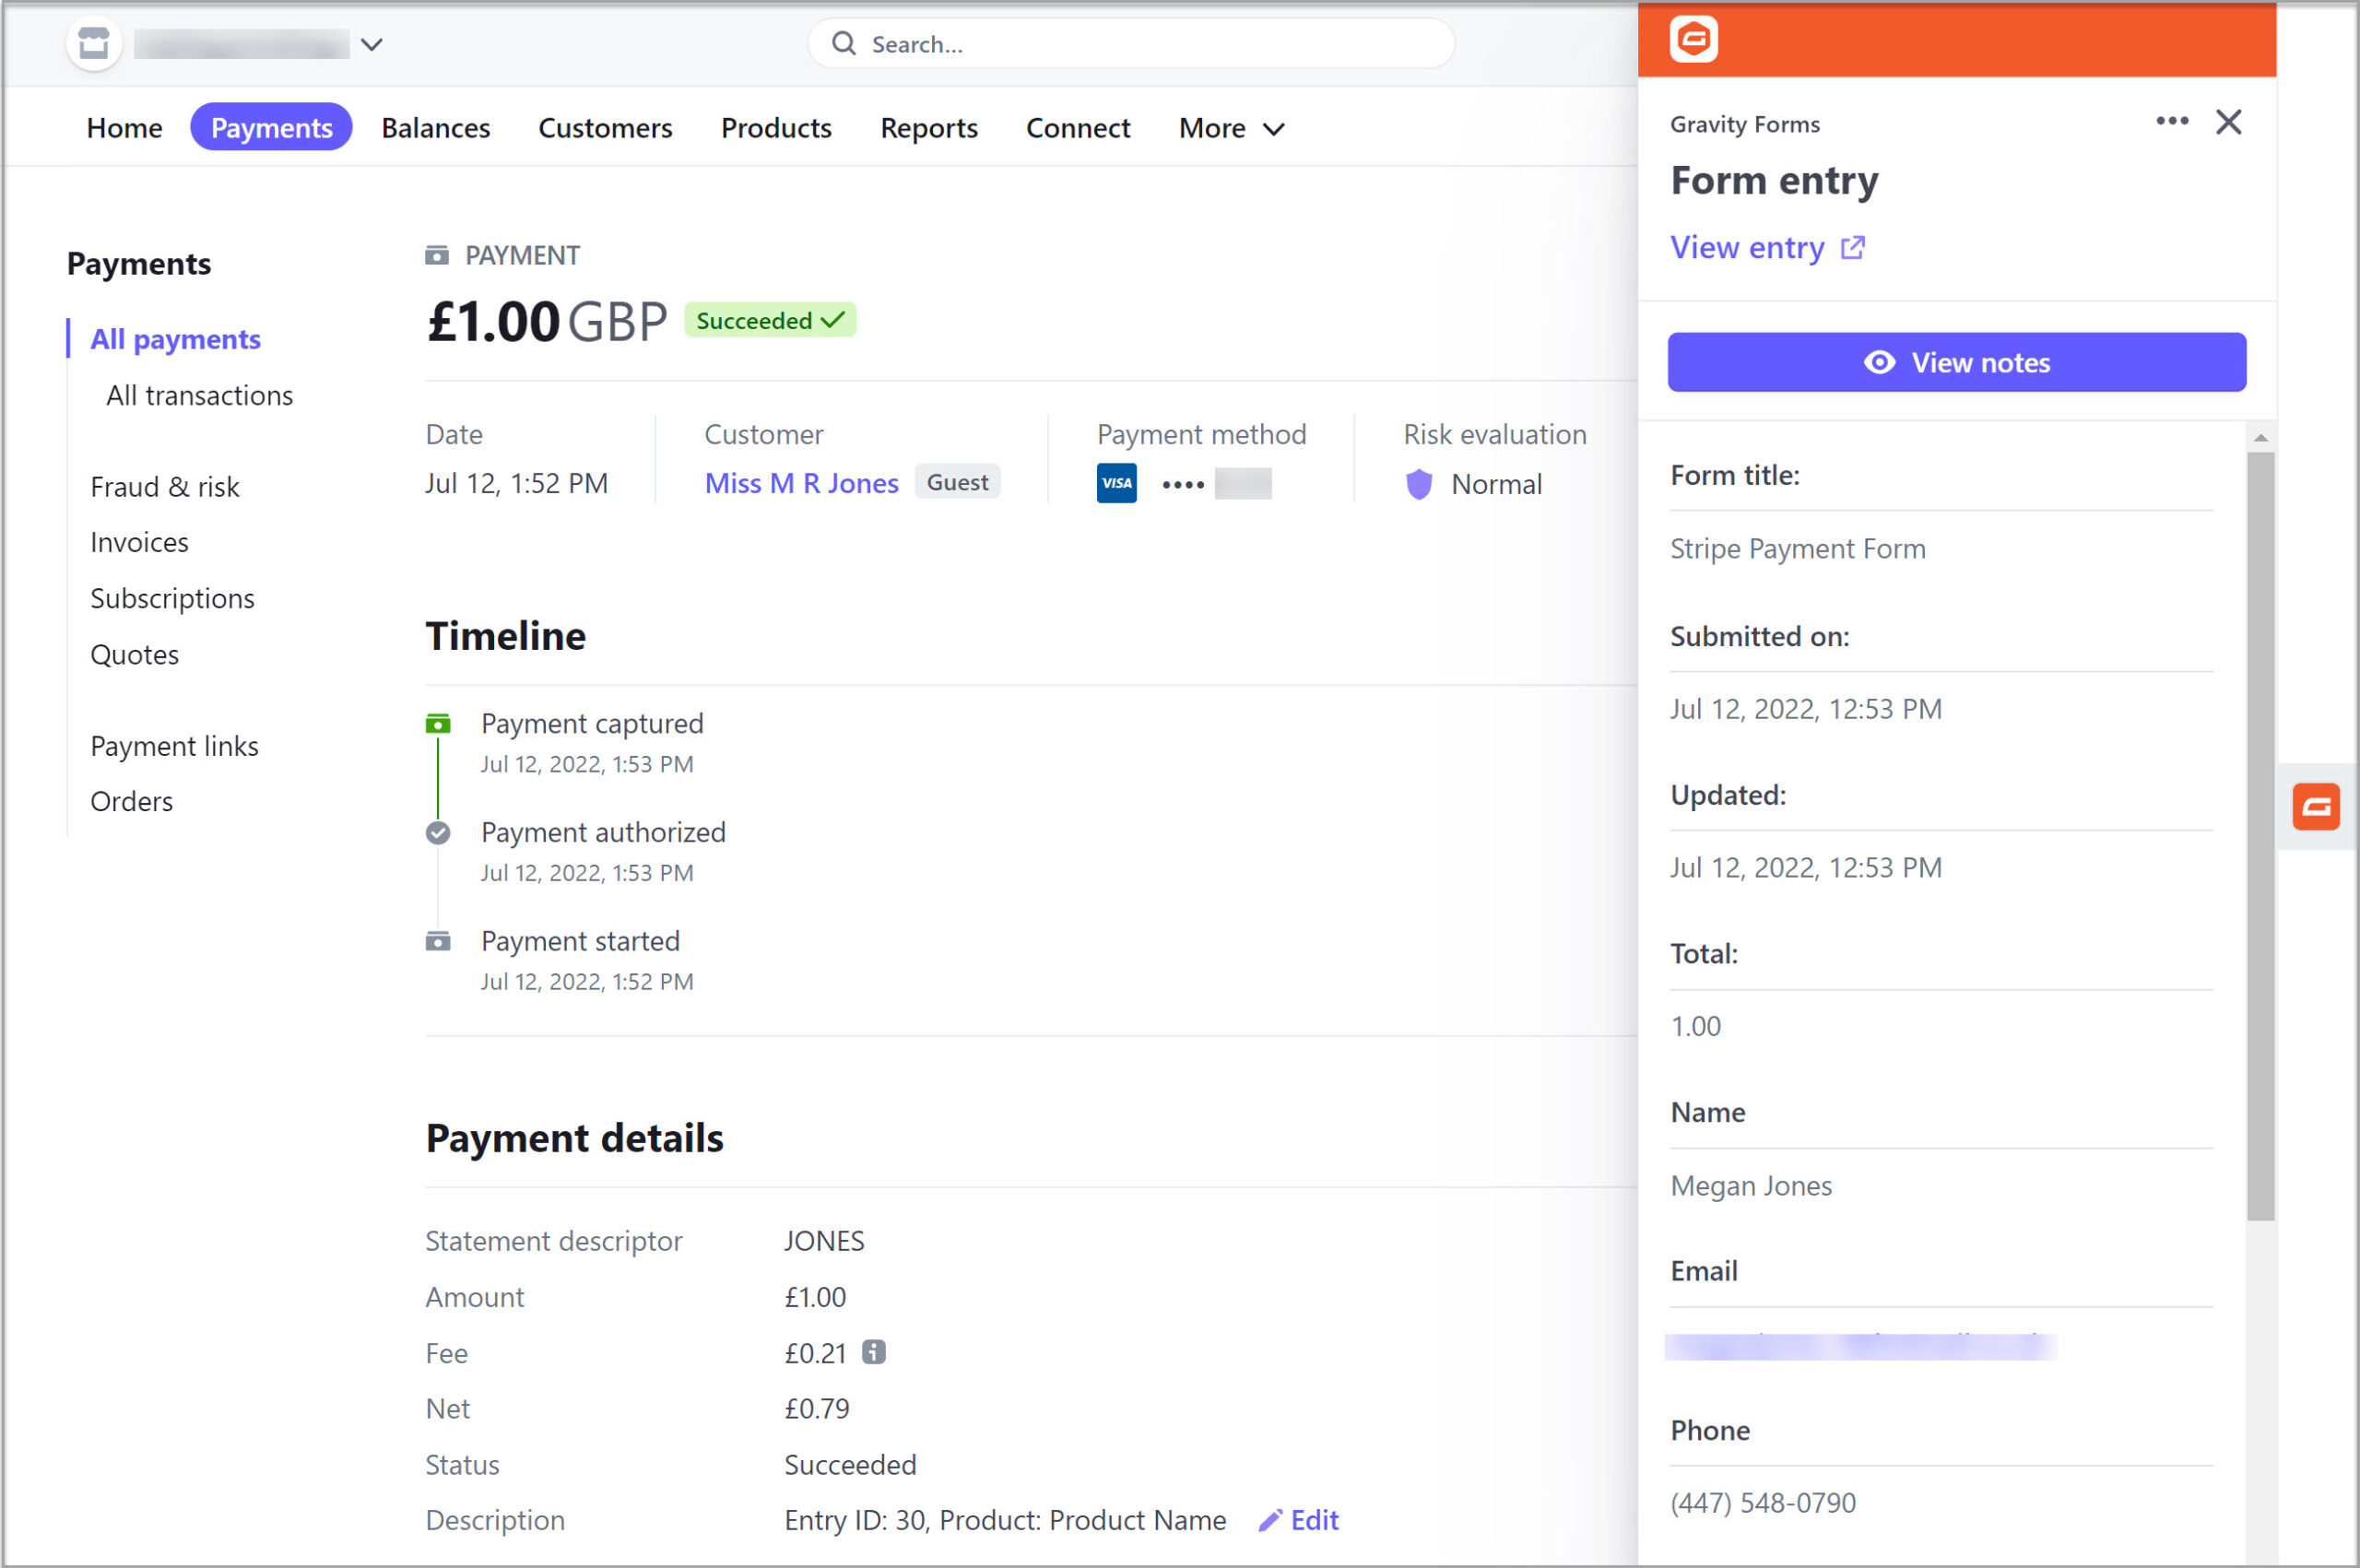
First, you’ll now be able to open a slide-out that lets you view form entry data directly from the Stripe dashboard. For more context, you also get a link that lets you open that entry directly in WordPress:
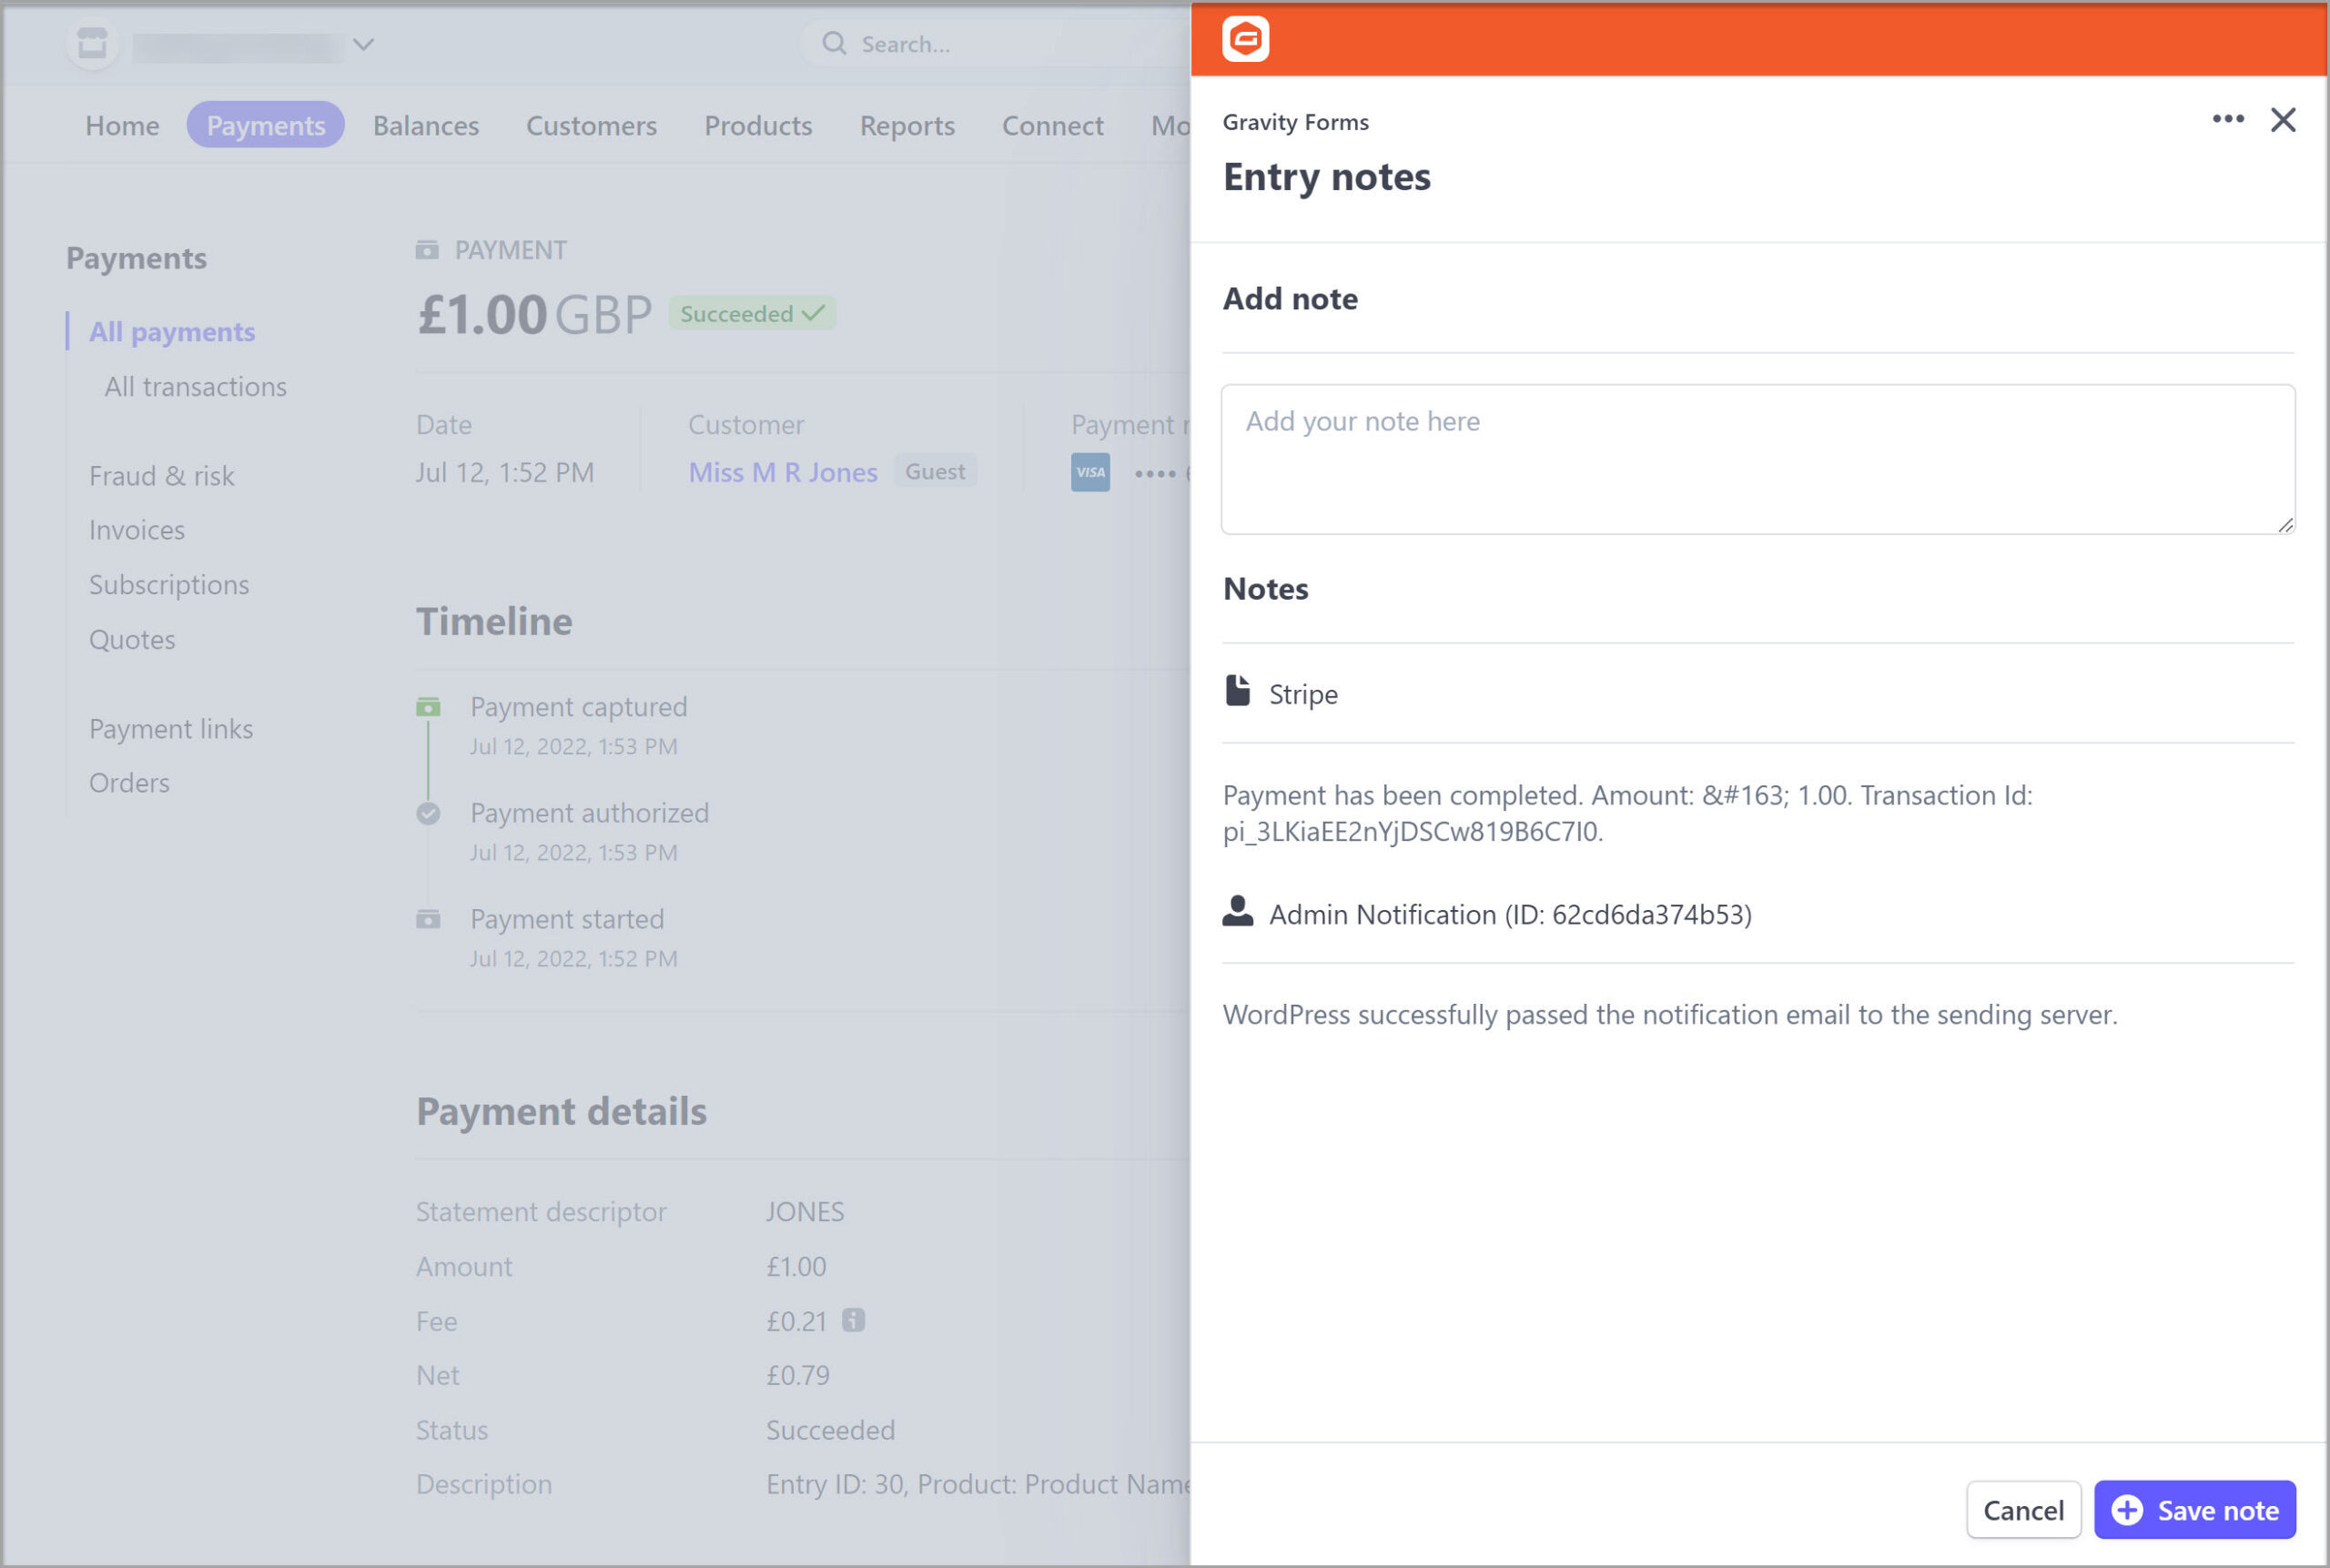
Second, you can now add notes to entries from your Stripe dashboard, which includes two-way syncing:
- If you add a note from the Stripe dashboard, that note will also be visible in WordPress.
- If you add a note in WordPress, that note will also be visible in the Stripe dashboard.
By viewing and syncing information in both your WordPress dashboard and your Stripe dashboard, you’ll be able to access data more quickly, see more context about your payments, and just generally work more efficiently with Stripe and Gravity Forms.
How Much Does the Gravity Forms Stripe App Cost?
The Gravity Forms Stripe app is available at no extra cost to Gravity Forms users.
However, to benefit from the app, you’ll need to be using the Gravity Forms Stripe Add-On, which is available on both the Gravity Forms Pro and Elite licenses.
If you’ve already purchased one of those licenses and set up a payment form with the Gravity Forms Stripe Add-On, you will find the Gravity Forms Stripe app available to install within the Stripe App Marketplace.
How to Set Up the Gravity Forms Stripe App
Now that you know what the Gravity Forms Stripe app is, let’s get into how you can set it up for your Stripe-powered Gravity Forms payment forms.
For this tutorial, the only thing that we’ll assume is that you’ve already used Gravity Forms to set up an active Stripe payment form.
Don’t have a payment form yet? No worries! Just head over to the Stripe Add-On documentation to learn all about how to get up and running with a Stripe payment form. Then, come back here once your form is ready.
1. Install the Gravity Forms App in Your Stripe Account
To get started, you’ll want to install the Gravity Forms Stripe app in your Stripe account dashboard.
Unlike other Gravity Forms Add-Ons, the Gravity Forms Stripe app is not listed in your Gravity Forms account area and you don’t install it on your WordPress website.
Instead, you’ll install the app via your Stripe dashboard. To begin, click this link to open the Gravity Forms listing in the Stripe App Marketplace.
Then, click the Install app button on that page:
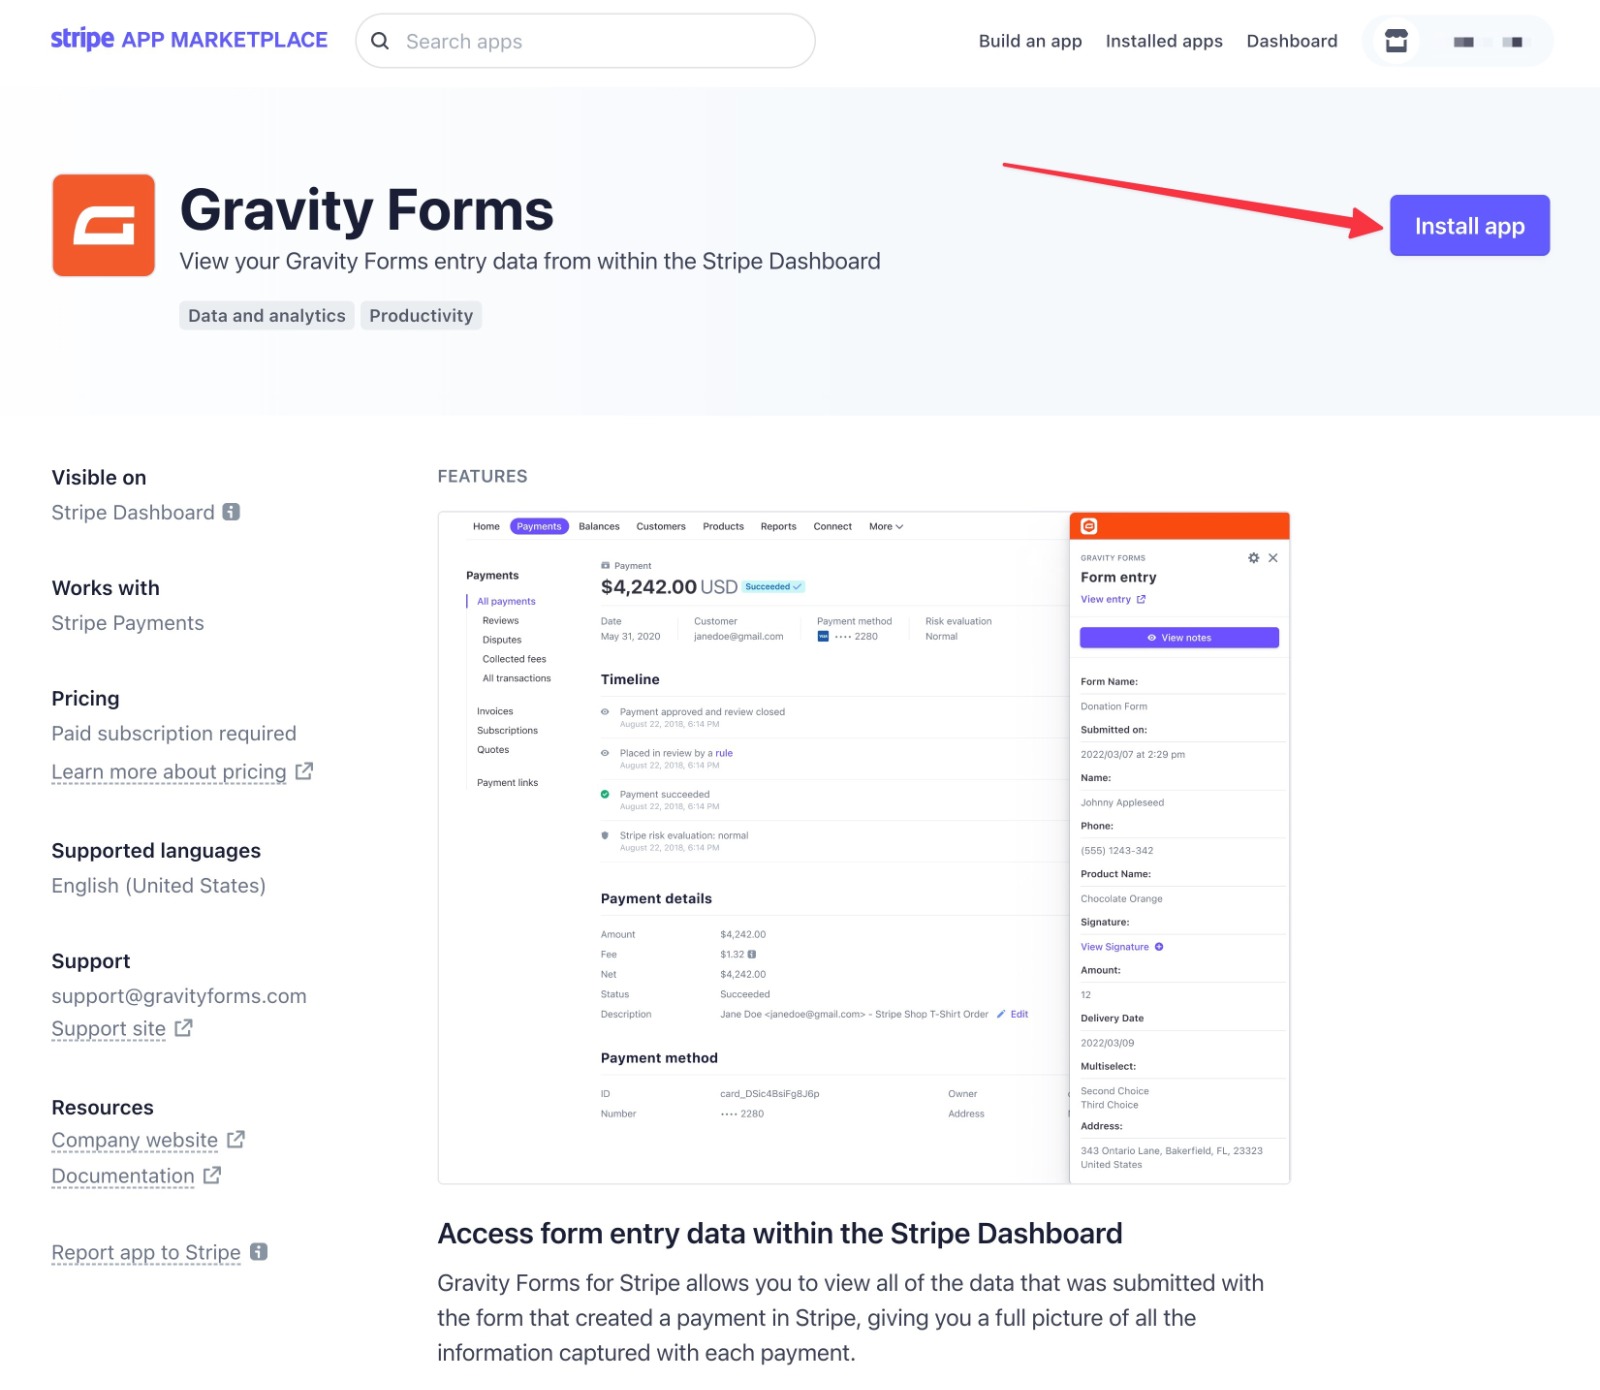
If the Install app button is grayed out, make sure that you’re signed in to your Stripe account and that you’ve activated your Stripe account.
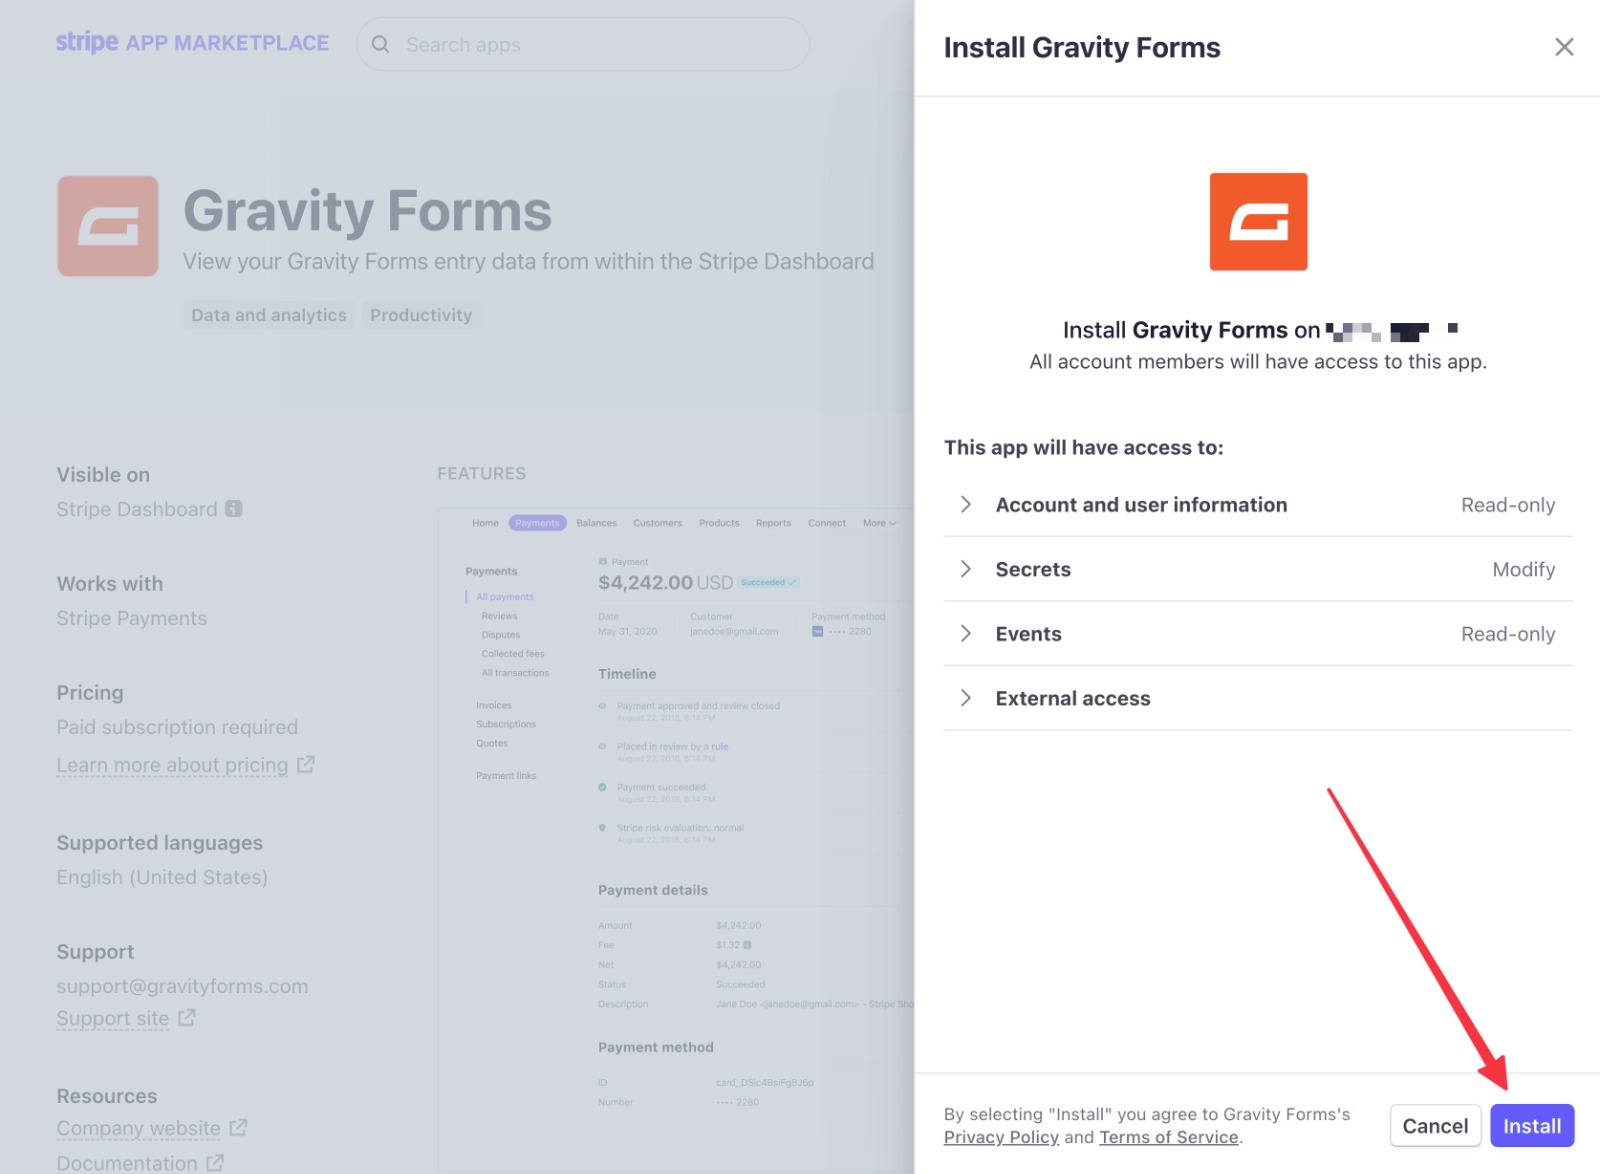
Clicking the button will open a slide-out with some additional information. Click the Install button in the bottom-right corner to continue installing the app:
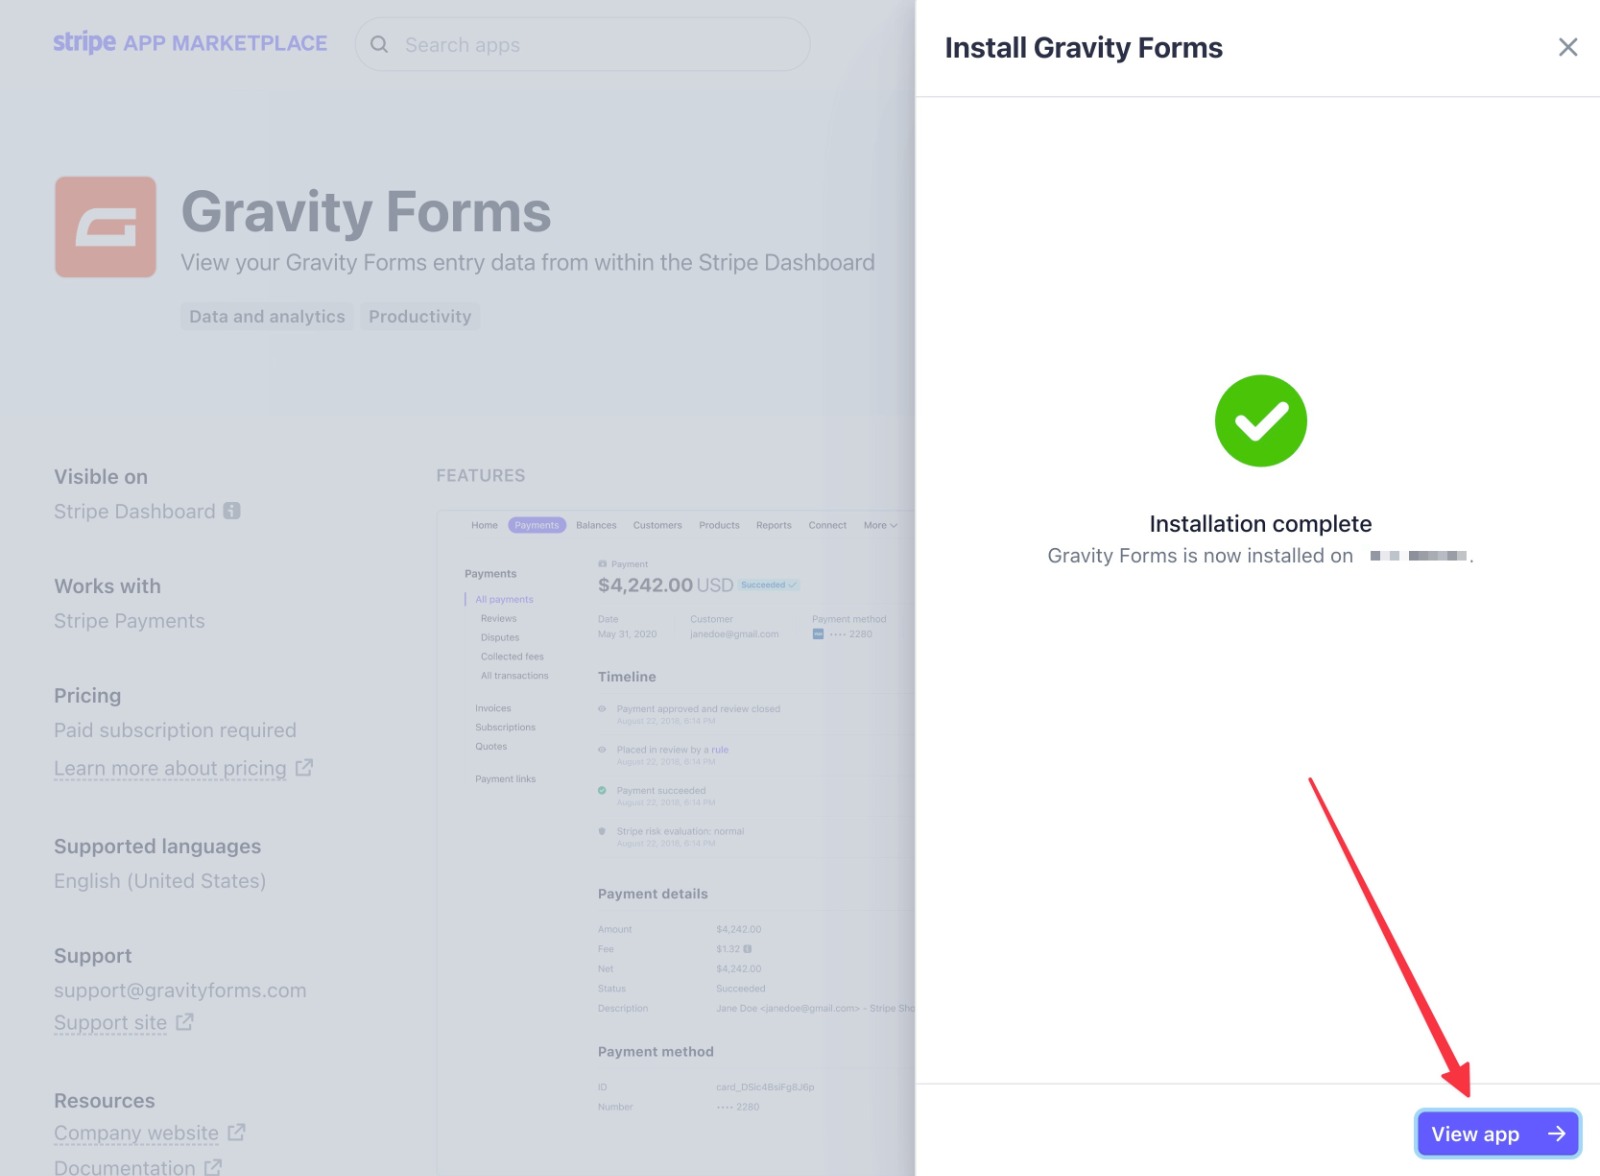
After a short wait, you should see a success message telling you that the installation was successful.
You can also click the View App button to see the app in your dashboard. However, you need to perform a couple of other tasks before the app will start working. They’ll only take a few minutes, though, so you’ll be up and running in no time.
2. Create Your Gravity Forms API Key
In order to connect the WordPress site with your Gravity Forms payment forms to the Stripe app, you need to create a Gravity Forms API key and add it to the app’s settings in your Stripe dashboard.
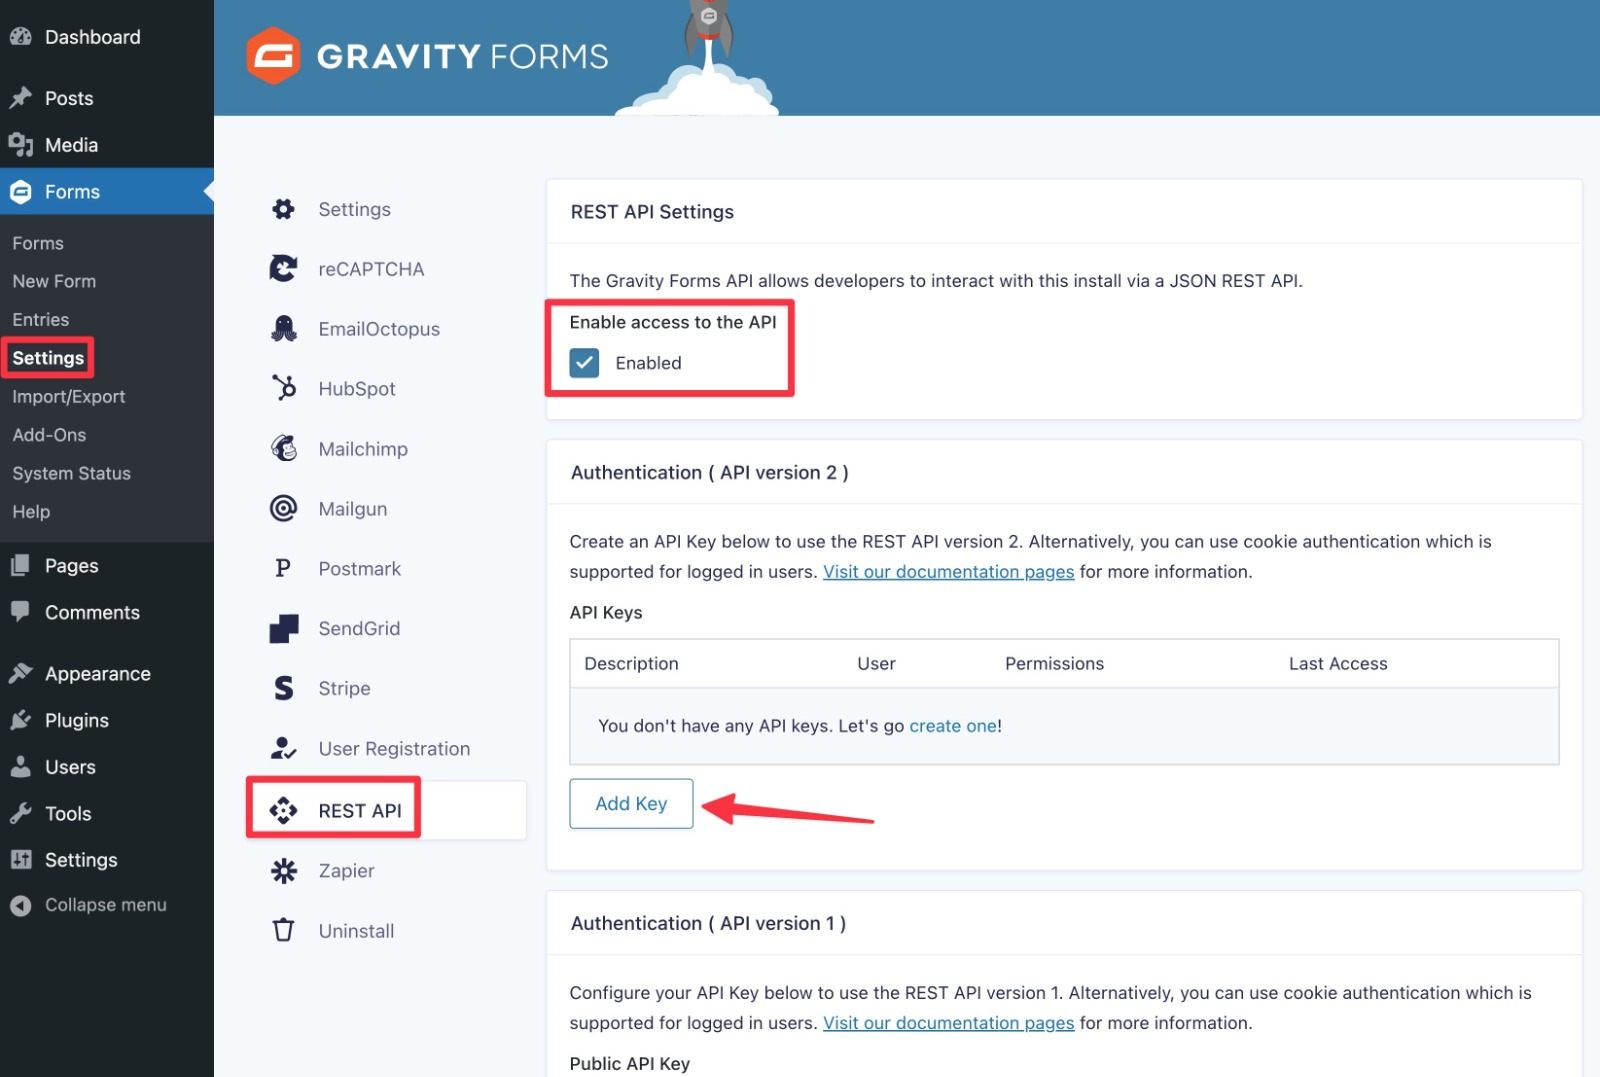
To do this, go to Forms → Settings → REST API in your WordPress dashboard. If you haven’t done so already, you’ll first need to enable access to the API by checking the box. Then, click the Add Key button under Authentication ( API version 2 ):
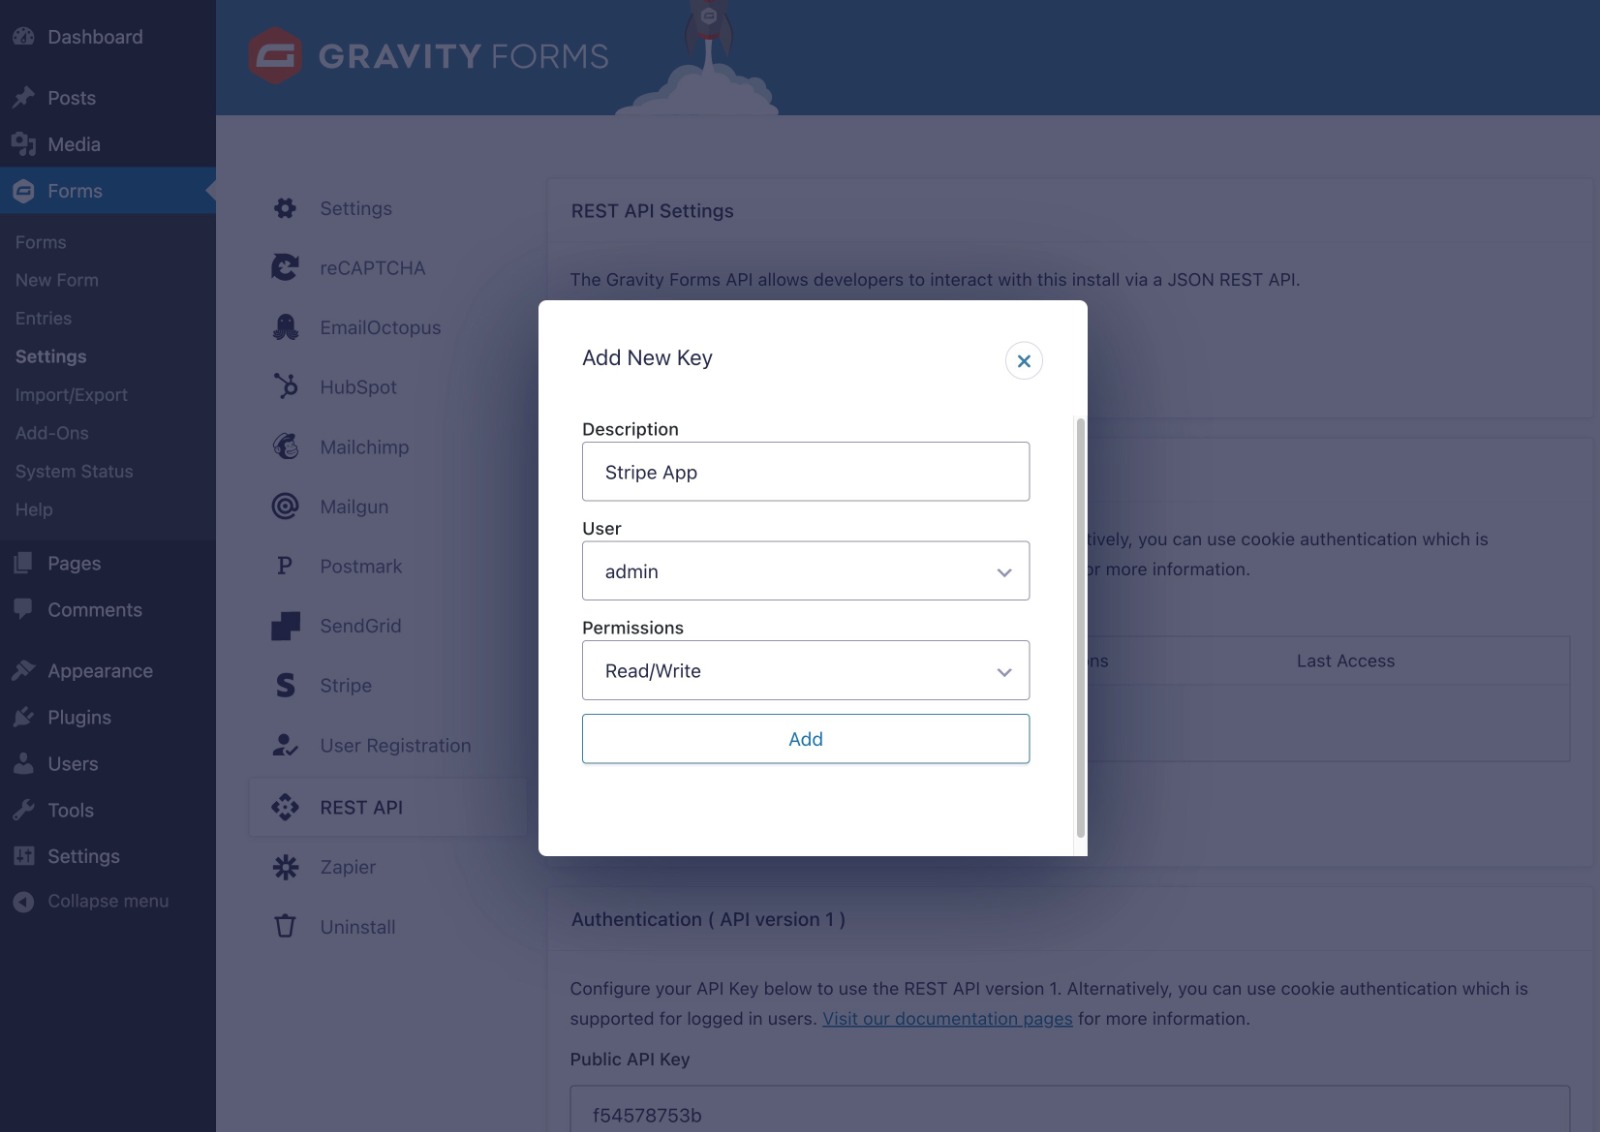
This should open a popup. Here’s how to configure it:
- Description – Give your key a name to help you remember it – e.g. “Stripe App”.
- User – Select your WordPress username.
- Permissions – Read/Write
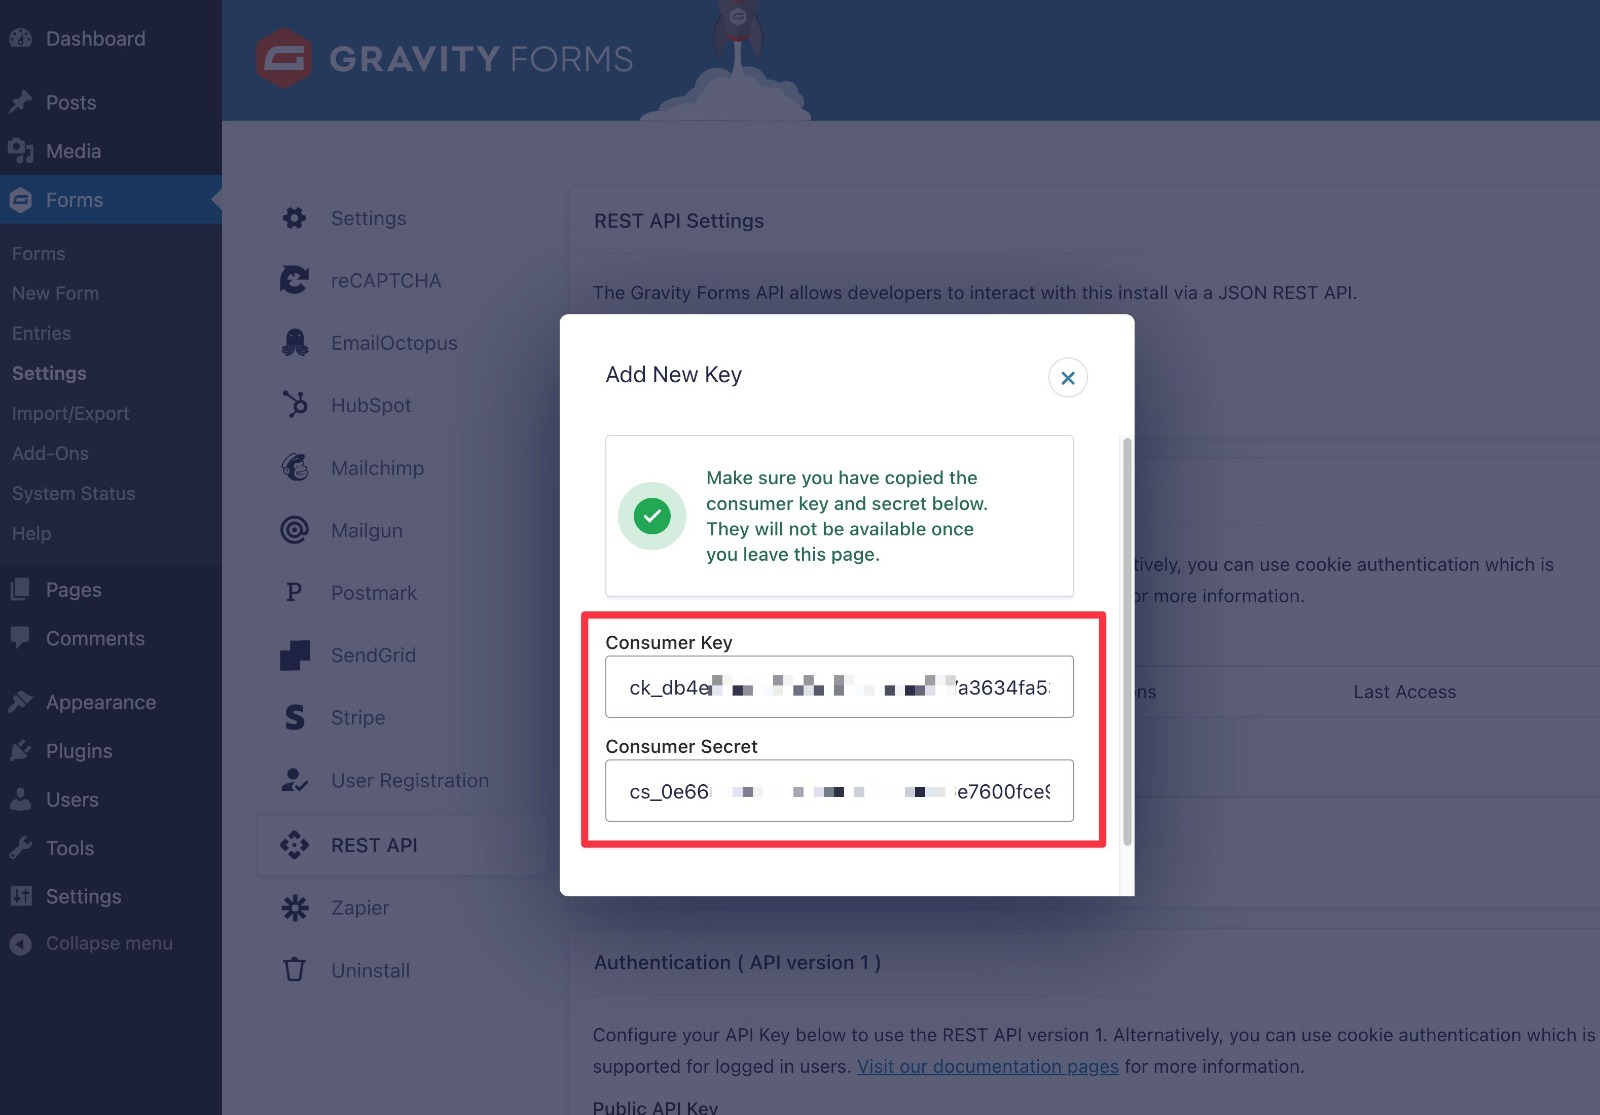
Then, click Add to create your API key:
On the next screen, Gravity Forms will show you two pieces of information:
- Consumer Key
- Consumer Secret
You’ll need both of these in the next step.
Therefore, you’ll want to copy both of these to a safe location because Gravity Forms will not show you them again once you close the popup.
Don’t worry, though. If you accidentally lose track of them, you can just create a new API key by repeating the steps.
When you’re finished, make sure to click the Update button at the bottom of the settings area to save your settings.
3. Add Gravity Forms API Key to Stripe App
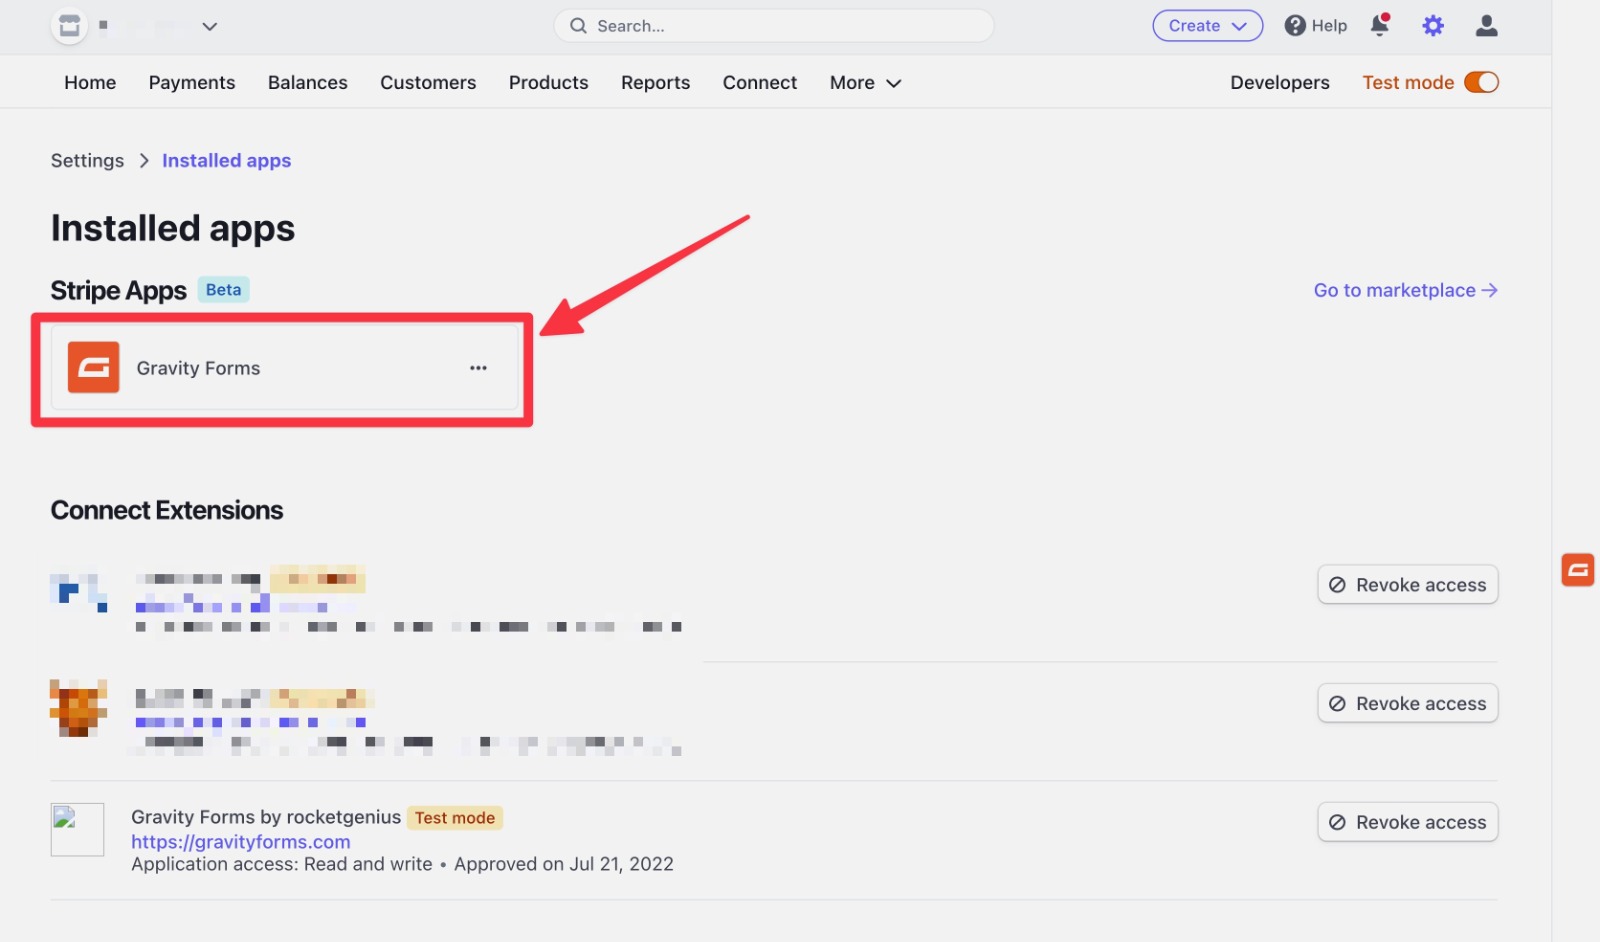
Now, open the Gravity Forms Stripe app settings in your Stripe dashboard.
To open the settings, you should be able to click this link to go straight there. Alternatively, you can click the settings gear icon in the top-right corner of your Stripe dashboard and then select Installed apps:
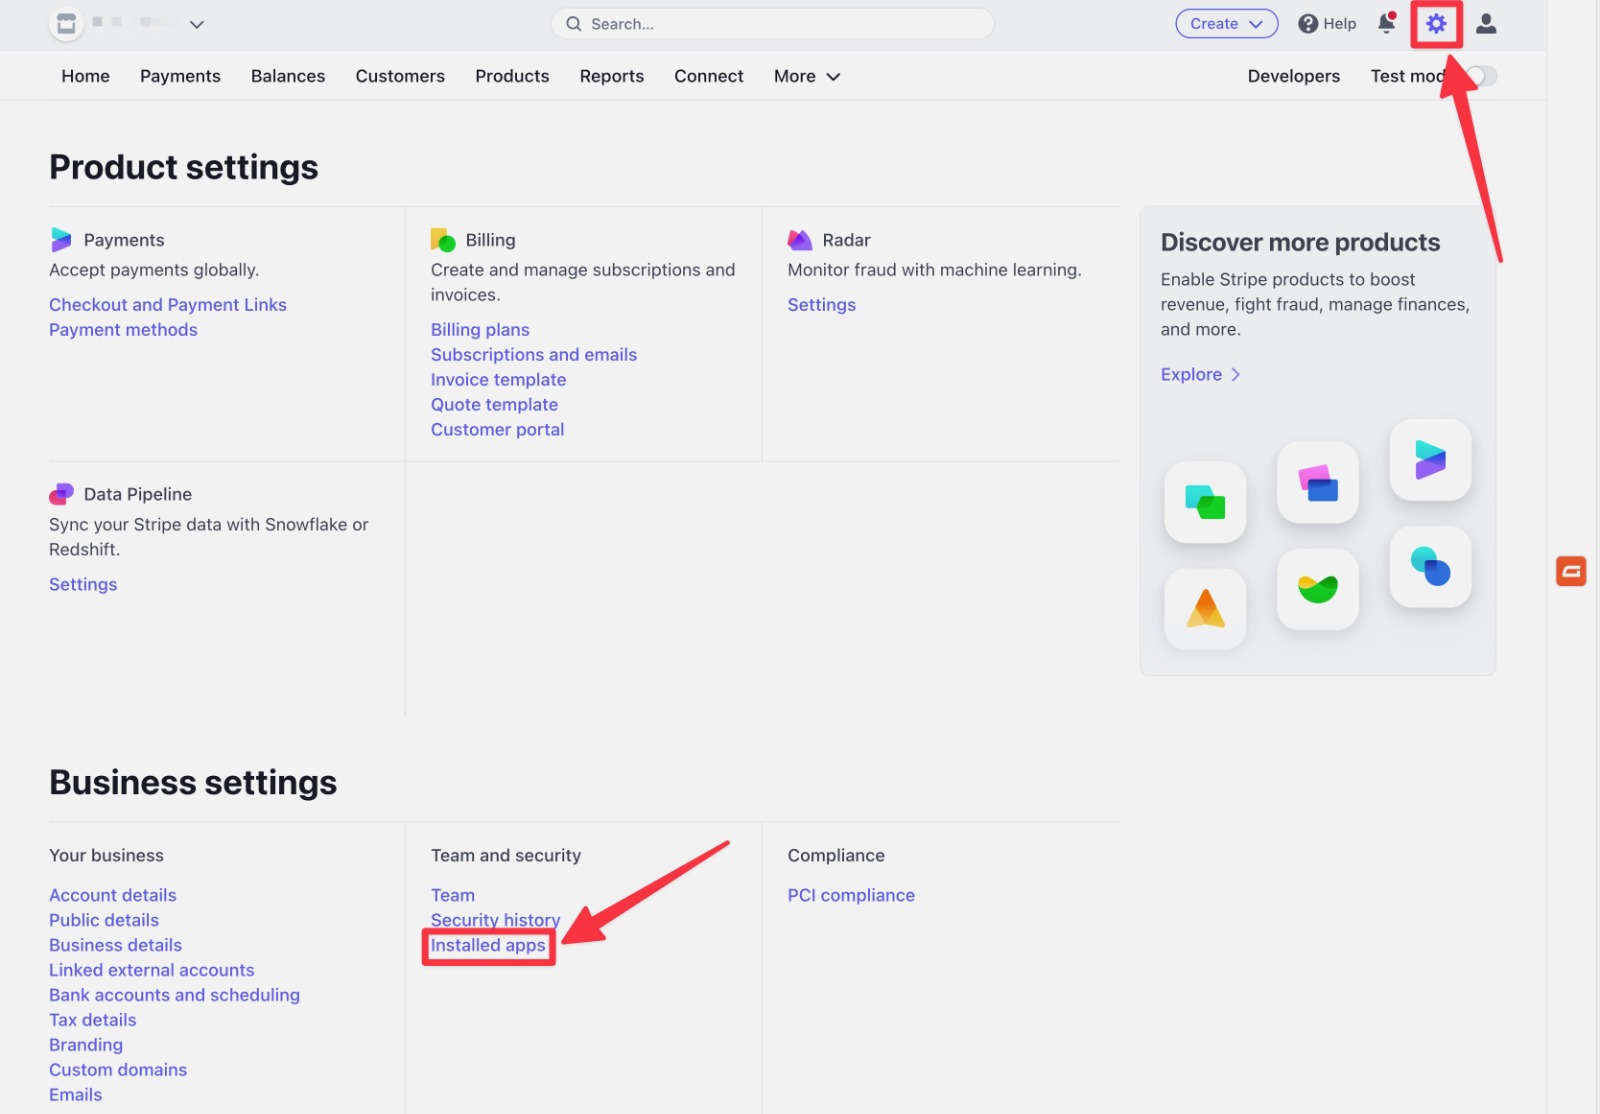
From there, select the Gravity Forms app to open its settings:
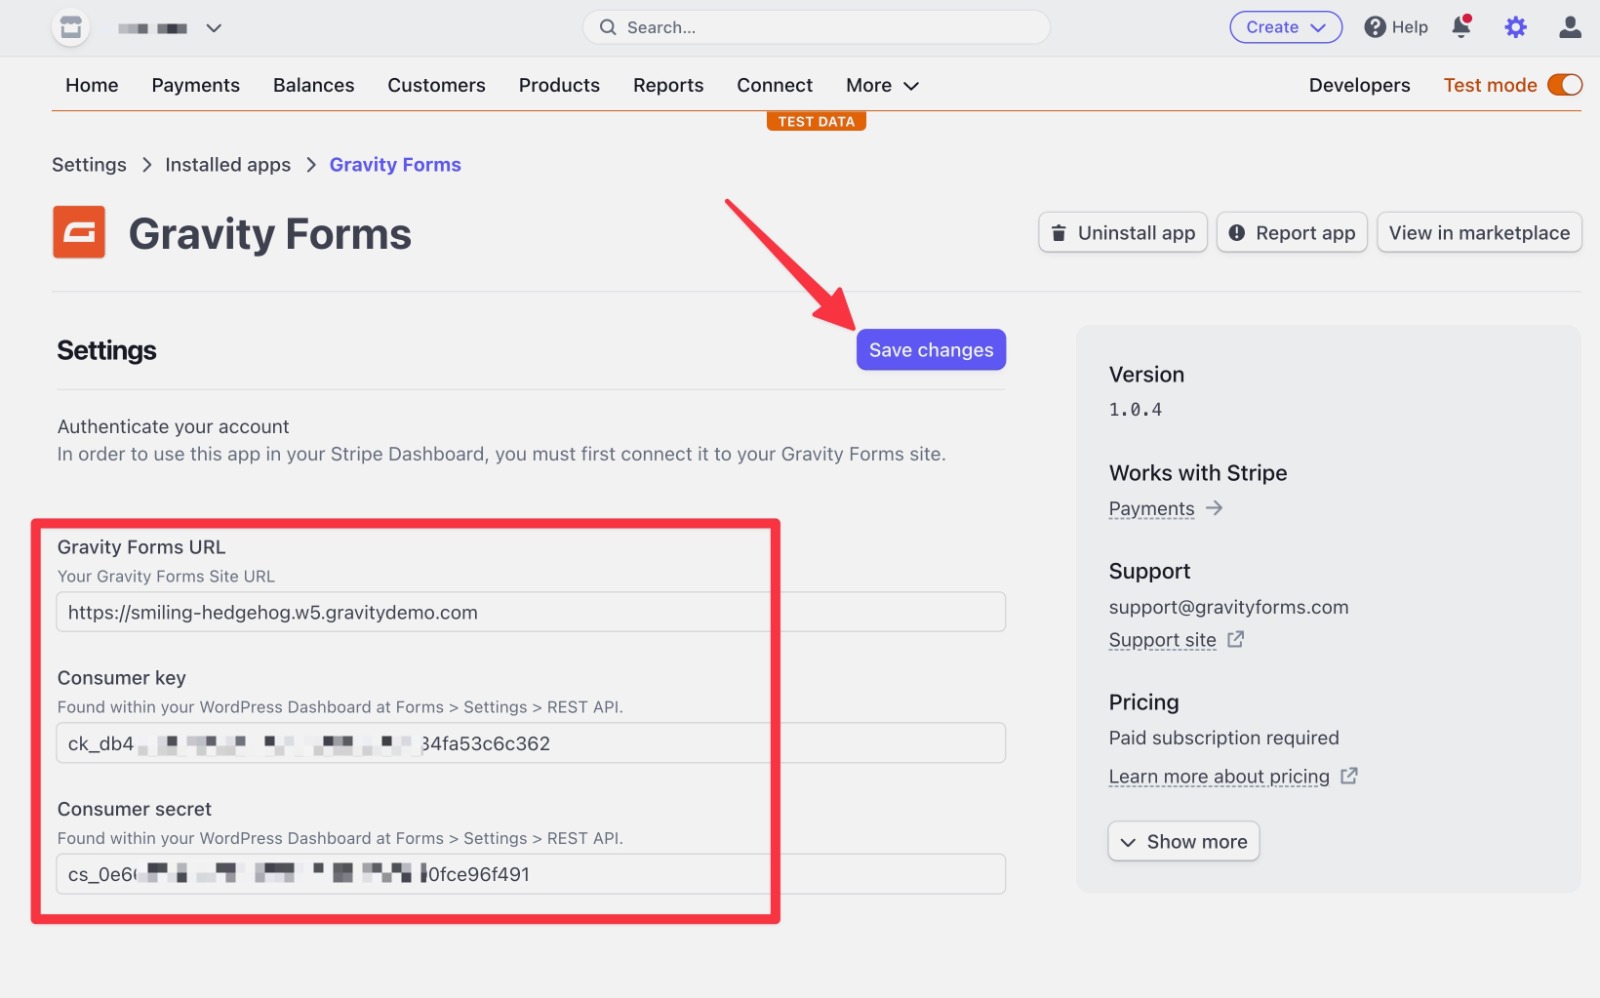
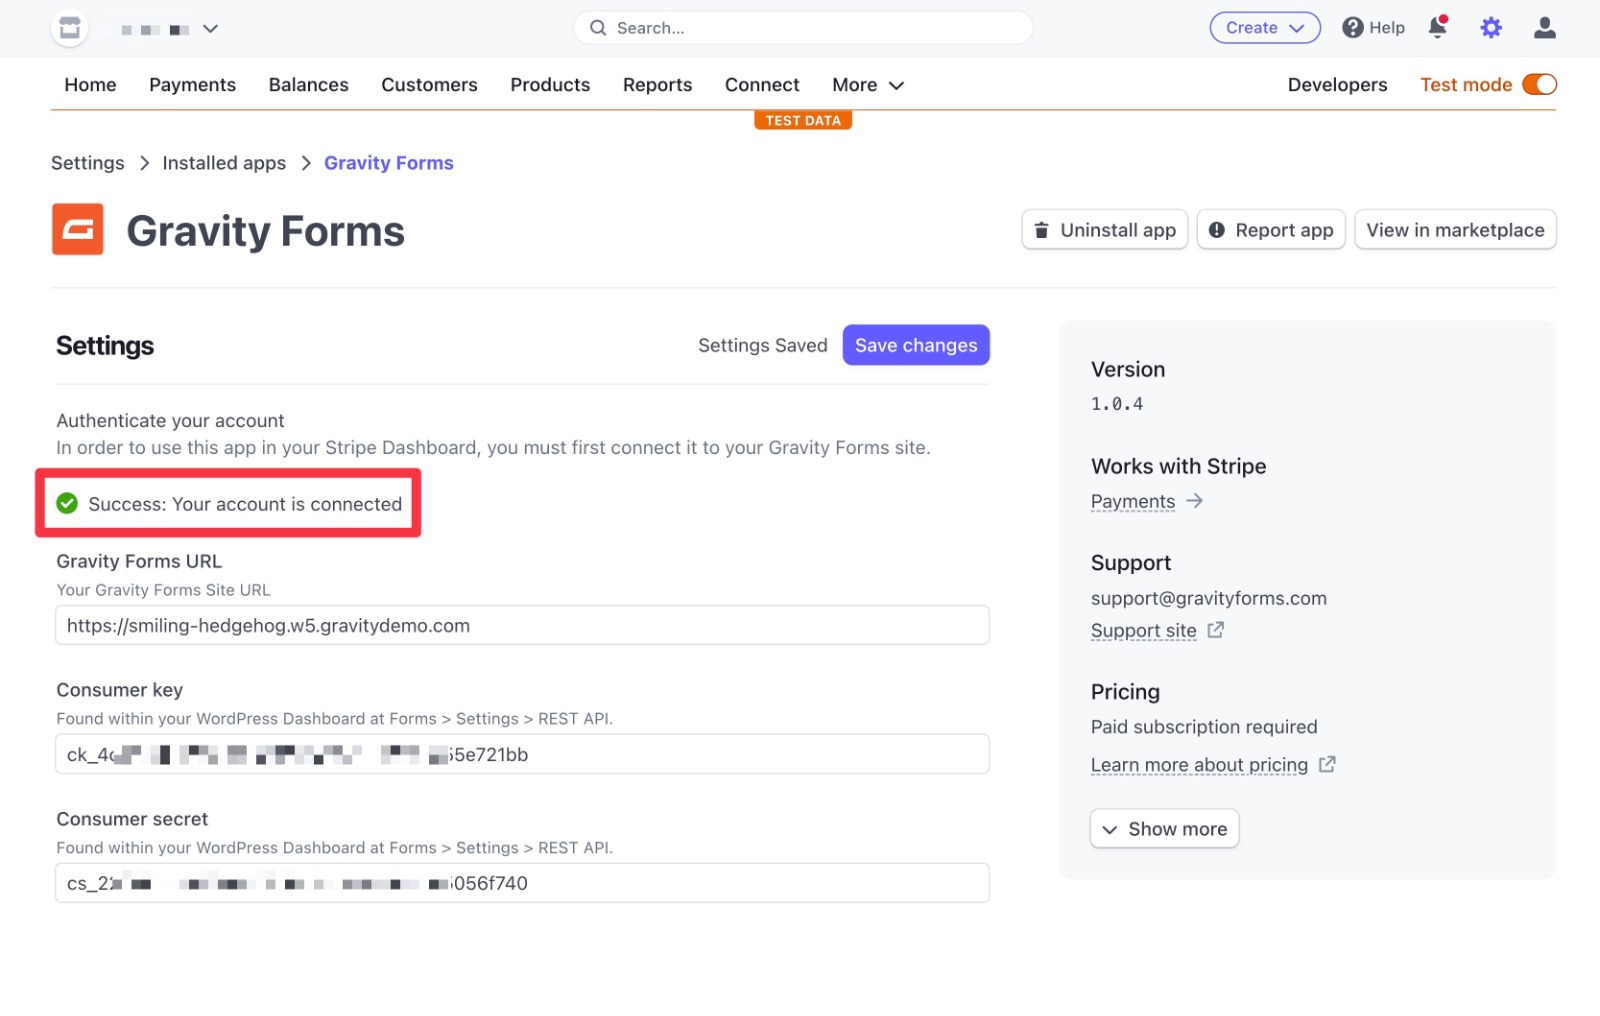
In the Gravity Forms Stripe app settings, you’ll need to add the following information:
- Gravity Forms URL – the full URL of the WordPress site with your payment form.
- Consumer Key – from the previous step.
- Consumer Secret – from the previous step.
Then, click Save changes:
On the next screen, you should see a message saying Success: Your account is connected:
If you see an error message instead, here are a few troubleshooting steps:
- Make sure you entered the proper URL of your site including the https part.
- Check that you copy and pasted the full API keys and didn’t accidentally include a space at the beginning or end.
- Make sure you didn’t accidentally swap the consumer key and consumer secret.
- Make sure you saved the changes in the Gravity Forms settings area after enabling the API.
4. Start Using the Gravity Forms Stripe App
At this point, you’re ready to go!
To open the Gravity Forms app in Stripe, look for the Gravity Forms logo as a slide-out when you’re browsing the Payments interface in your Stripe dashboard:
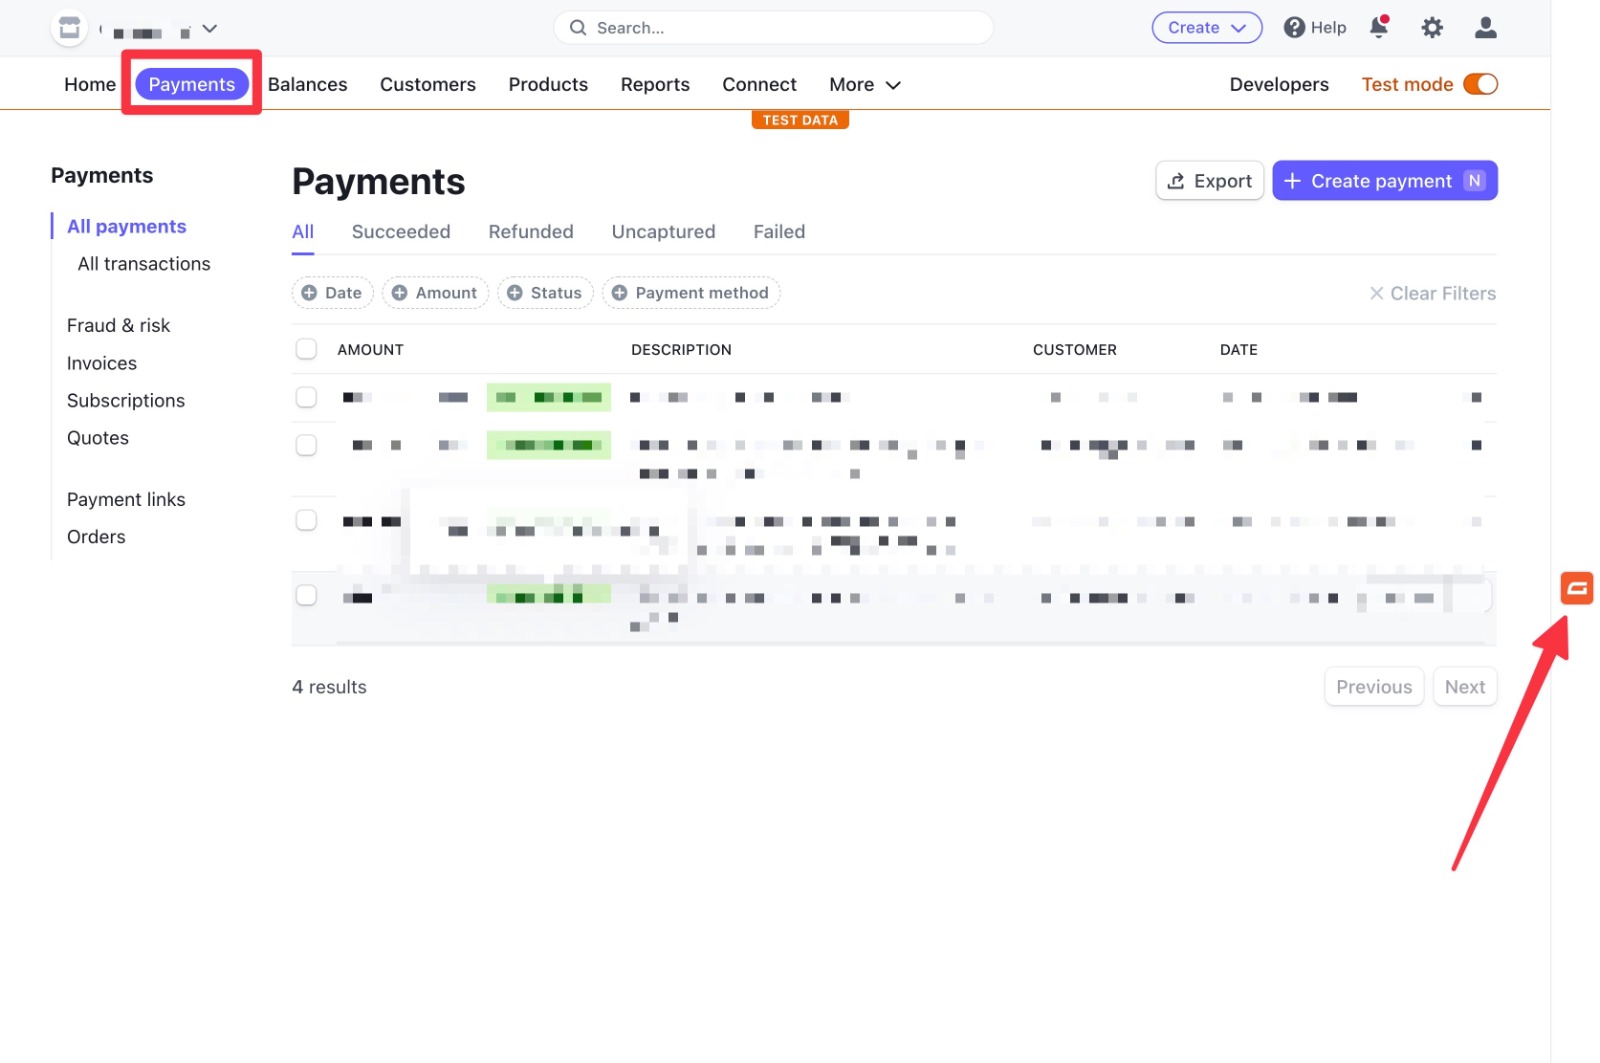
When you’re browsing an individual payment, you can click that slide-out to open the full panel where you can view form entry details and/or add internal notes that sync with your WordPress dashboard.
Here’s what it looks like to view a form entry. In addition to seeing the entry details in Stripe, you can also click the View entry link to open that entry in your WordPress dashboard:
To view or add entry notes, you can click the View notes button. Here’s what that looks like:
Again, any notes that you add in Stripe will show up in WordPress. Similarly, any notes that you add in WordPress will also show up in Stripe.
For further details on getting started with the Stripe App, check out the Gravity Forms Documentation.
Try the Gravity Forms Stripe App Today
If you’re using the Gravity Forms Stripe Add-On to accept payments via your forms, the Gravity Forms Stripe app gives you some convenient new tools for managing entries and streamlining your workflows.
Best of all, you can access the Gravity Forms Stripe app at no extra cost – the only requirement is that you’re using the existing Gravity Forms Stripe Add-On, which is available with a Pro or Elite license.
If you’re ready to try it out, install the app today and you’ll be up and running in just a few minutes.
If you’re not yet a Gravity Forms customer, purchase your Pro or Elite license today to access the Gravity Forms Stripe Add-On. Or, you can spin up a fully functioning demo site for free, which will let you connect to Stripe, create a payment form, and check out everything Gravity Forms has to offer.

If you want to keep up-to-date with what’s happening on the blog sign up for the Gravity Forms newsletter!
"*" indicates required fields