Searching for a way to accept monthly donation payments on your WordPress website?
While one-time donations can also be a great source of fundraising, recurring revenue is important for nonprofits because it gives you a more dependable income stream.
While you’ll always have some donors churn from month to month, you can still have a pretty good idea of exactly how much will be coming in each month – that helps you plan your efforts and ensure you always have the money you need to keep doing your charitable work.
And guess what – setting up recurring donations for your charity might be easier than you think.
In this post, you’ll learn how to set up your own recurring donation form using Gravity Forms and a pre-built donation form template.
You don’t need any special technical knowledge to set up this functionality – all you need to do is choose the form template, customize it to your needs, connect your preferred payment gateway, and you’re ready to go.
You can offer multiple donation amounts/tiers in the form and also give donors the ability to enter their own custom amounts.
Let’s dig in!
Why Use Gravity Forms to Create a Monthly Donation Form?
Before we get into the step-by-step tutorial, here’s a quick rundown on why Gravity Forms makes a great option for creating a monthly donation form for your nonprofit (as well as other key forms that nonprofits need):
- Non-technical – even if your nonprofit doesn’t have a dedicated development team, you can still set everything up because Gravity Forms doesn’t require any coding.
- Pre-made donation form template – while you can set up your monthly donation form from scratch if you want to, Gravity Forms also offers a dedicated donation form template to help you get up and running quickly.
- Support for multiple payment gateways – you can use the payment provider that works best for your nonprofit, with support for Stripe, Square, PayPal, Mollie, Authorize.net, and more. Many of these providers even offer special discounted processing rates for nonprofits.
- Drag-and-drop form builder – in addition to the payment functionality, you can use the easy drag-and-drop form builder to collect as much information from your donors as you need.
- Safe and secure – Gravity Forms is renowned throughout the WordPress sphere for its focus on reliability and robust security.
- WCAG 2.1 AA compliant (for accessible forms) – Gravity Forms takes accessibility seriously and makes it easy to create accessible forms.
For more information on using Gravity Forms, check out this indepth review.
If you’re ready to get started, here’s how to create your first WordPress monthly donation form!
How to Set Up a Monthly Donation Form Using Gravity Forms
Here’s a high-level look at what it takes to create your donation form – keep reading the tutorial and we’ll take you through each step in detail:
- Install the required plugins on your WordPress site.
- Set up your payment processor.
- Create a new donation form using the donation form template.
- Customize your monthly donation form as needed.
- Set up your payment processing feed.
- Set up other integrations (100% optional, but can be helpful for many nonprofits).
- Embed your monthly donation form.
Let’s go through it!
1. Install the Required Plugins
To get started, you’ll want to make sure that you’ve installed and activated all of the plugins that you’ll need.
To follow this guide, you’ll need to install a minimum of two plugins:
- The core Gravity Forms plugin.
- A payment processor add-on for Gravity Forms – these are available with the Gravity Forms Nonprofit license.
For this tutorial, we’re going to use Square to process the donation payments, along with the official Gravity Forms Square Add-On.
However, you’re free to use a different payment gateway such as Stripe or PayPal if they’re a better fit for your organization. The steps in the rest of this tutorial are mostly the same even if you’re using a different gateway.
Once you’ve installed Gravity Forms and the Square Add-On, you’re ready to continue.
Not sure how to install a Gravity Forms add-on? Check out this article.
2. Connect Your Payment Processor
Next, you’ll want to connect to your payment processor.
For Square, you’ll first want to register for a free Square account if you haven’t done so already. If you want to use a test mode before launching your form, you also might want to register for a Square Developer account.
Go to Forms → Settings → Square in your WordPress dashboard. Choose your mode – Live to process actual payments or Sandbox to test things – and click the Connect with Square button.
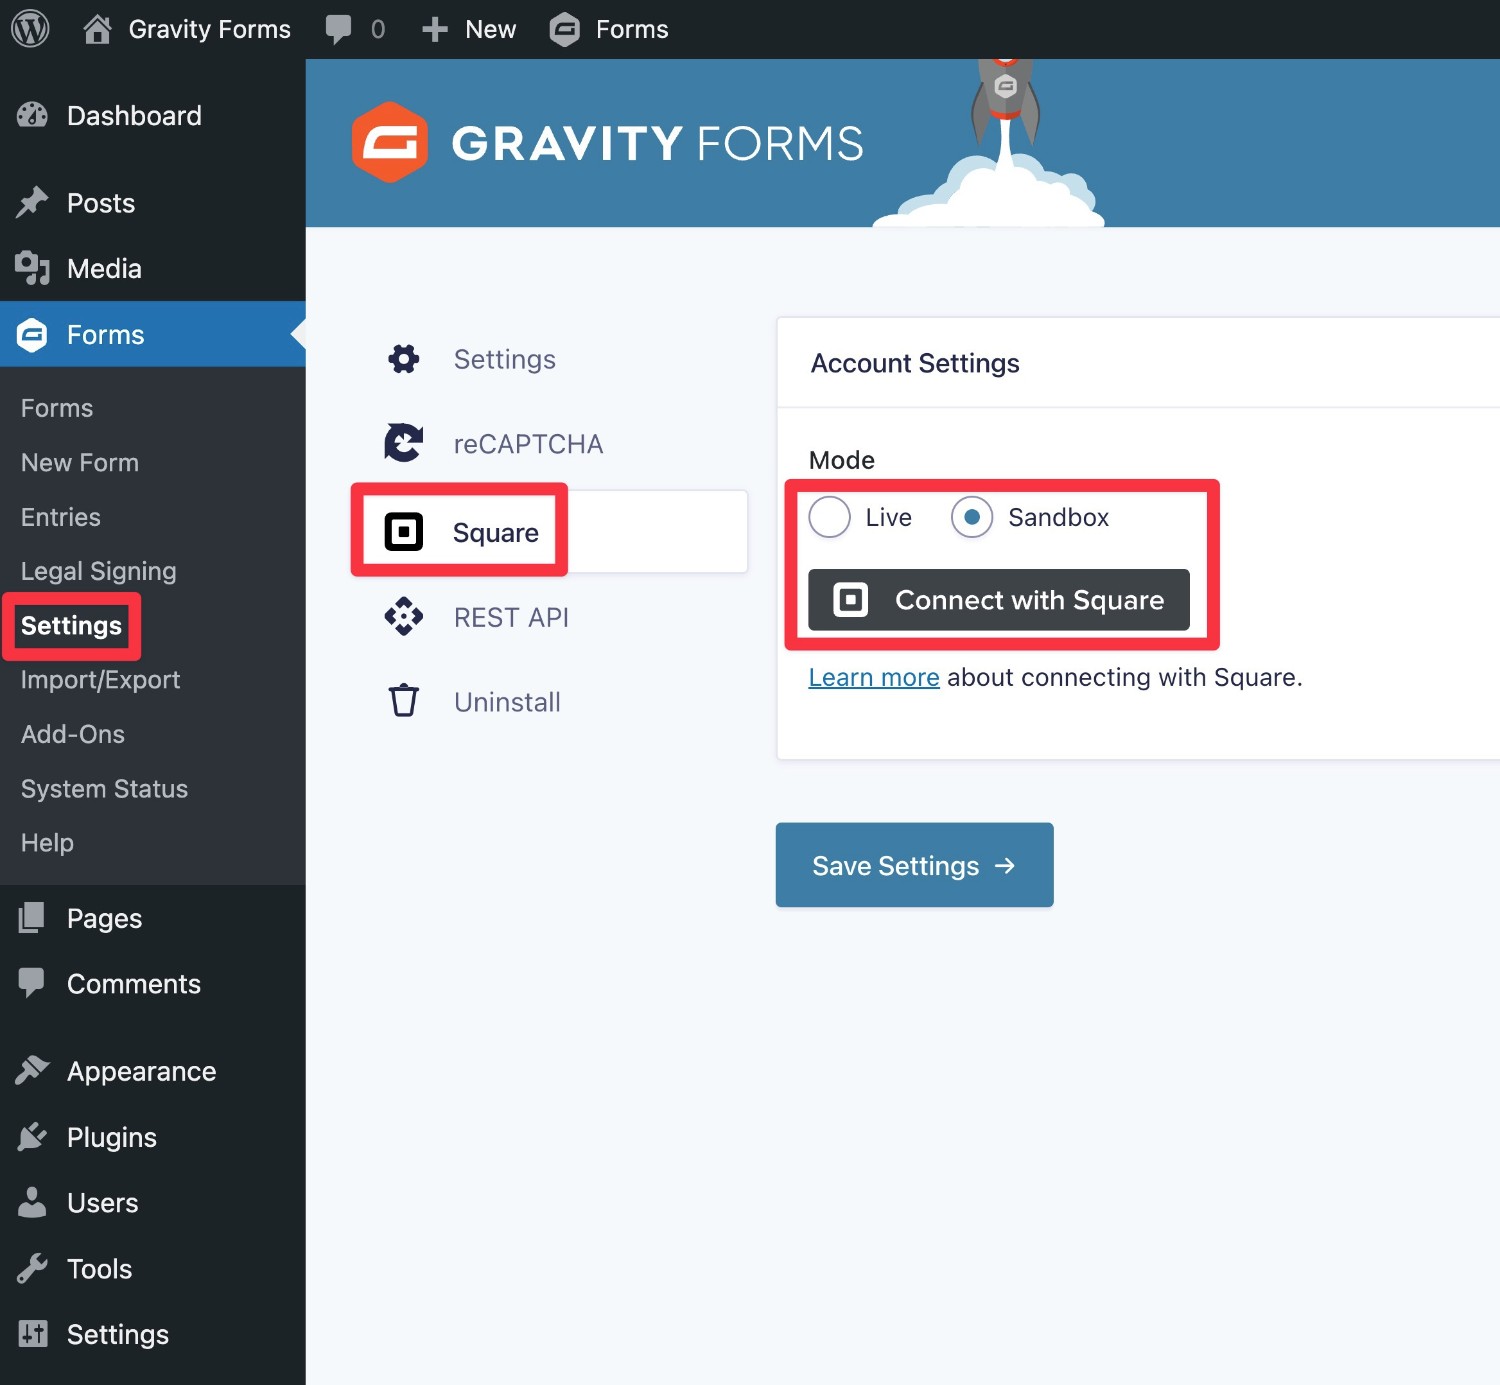
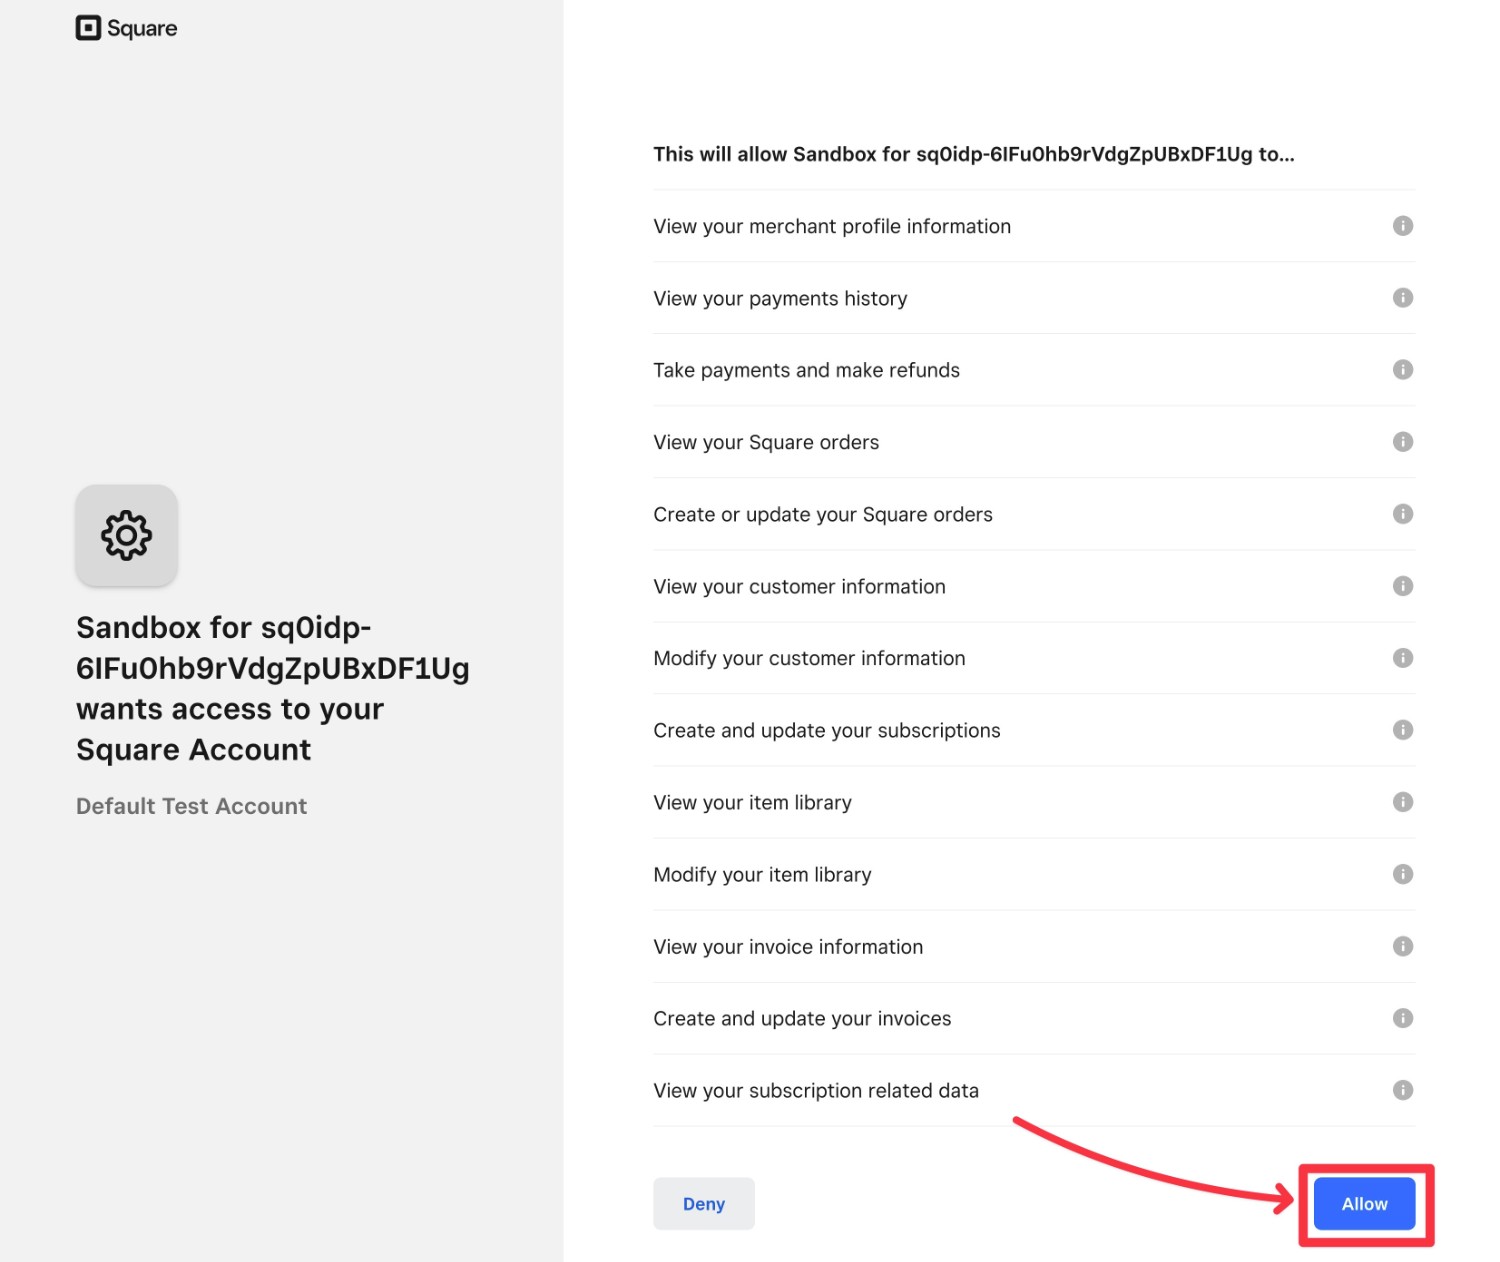
Then click Allow to connect your WordPress site to Square.
For more detailed instructions, you can read the full Square Add-On setup documentation.
If you want to use a different payment processor, you can check out these articles to learn how to set them up:
3. Create a New Form Using the Donation Form Template
To help you get up and running more quickly, you can use the premade donation form template as the base for your form.
Don’t worry, though – you’ll still be able to fully customize it to meet your organization’s needs. The template just saves you some time in setting things up.
To get started, go to Forms → Add New.
This will open the template library – click on the Donation Form template to continue.
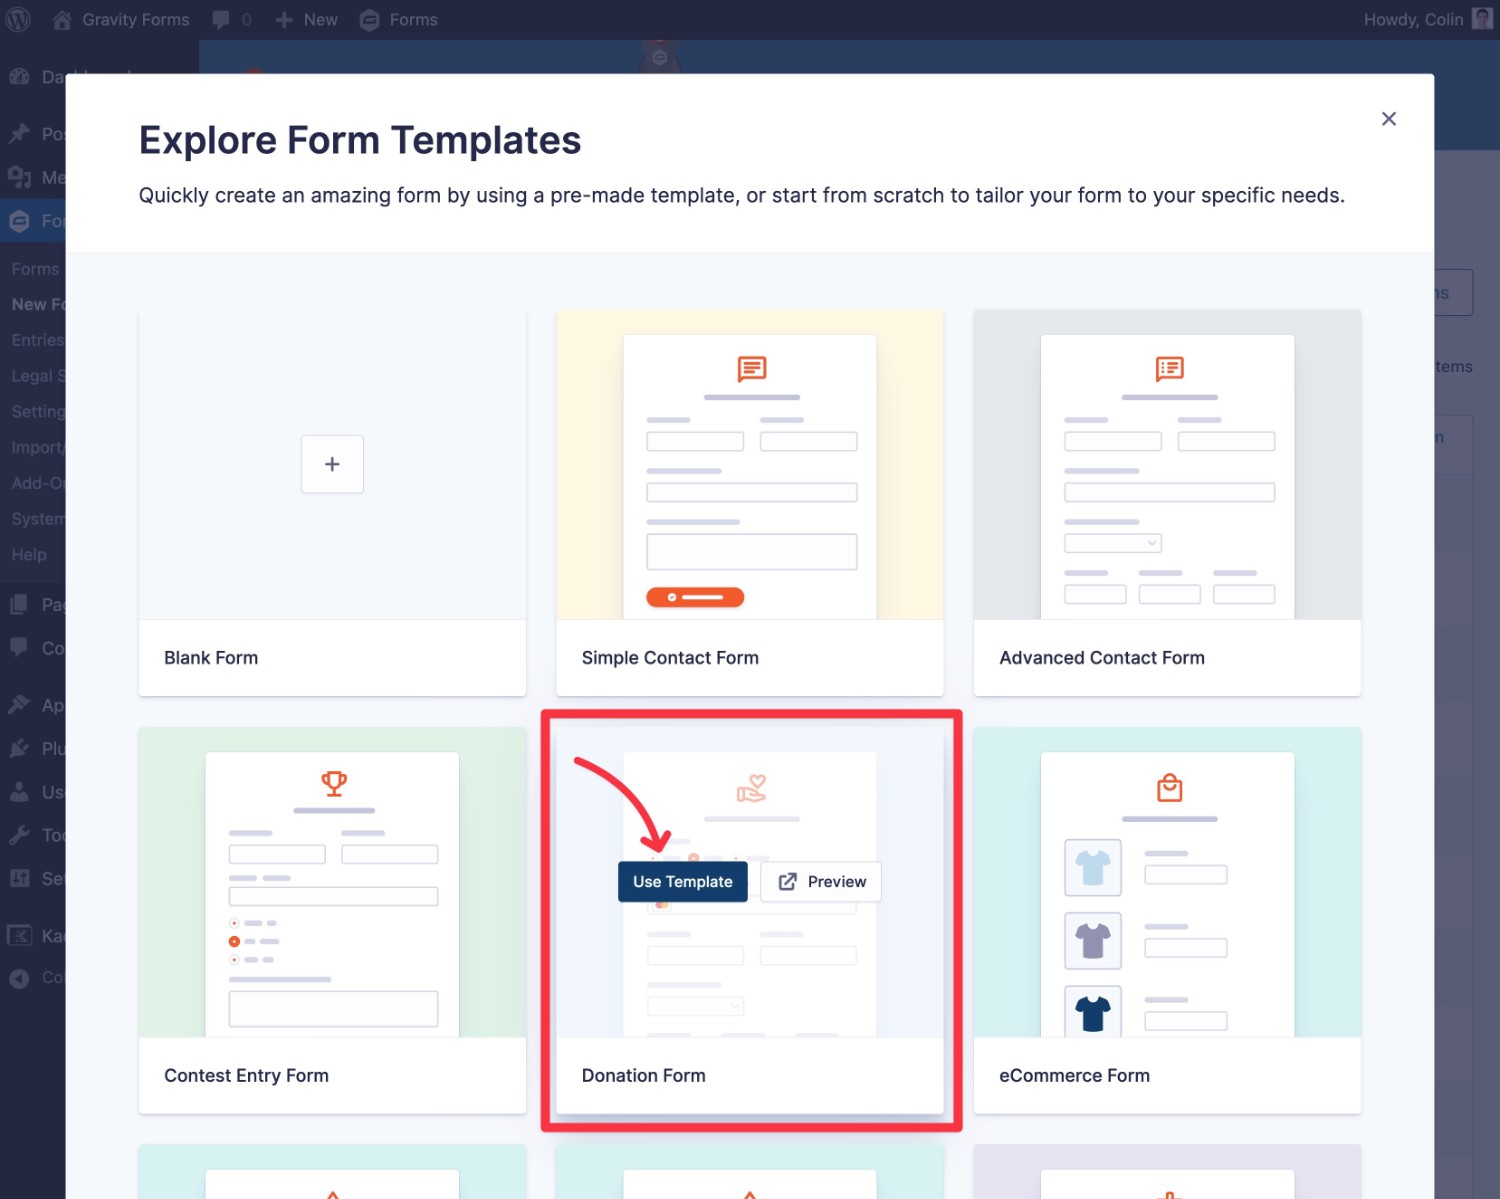
Then, give your form a name to help you remember it and click Use Template.
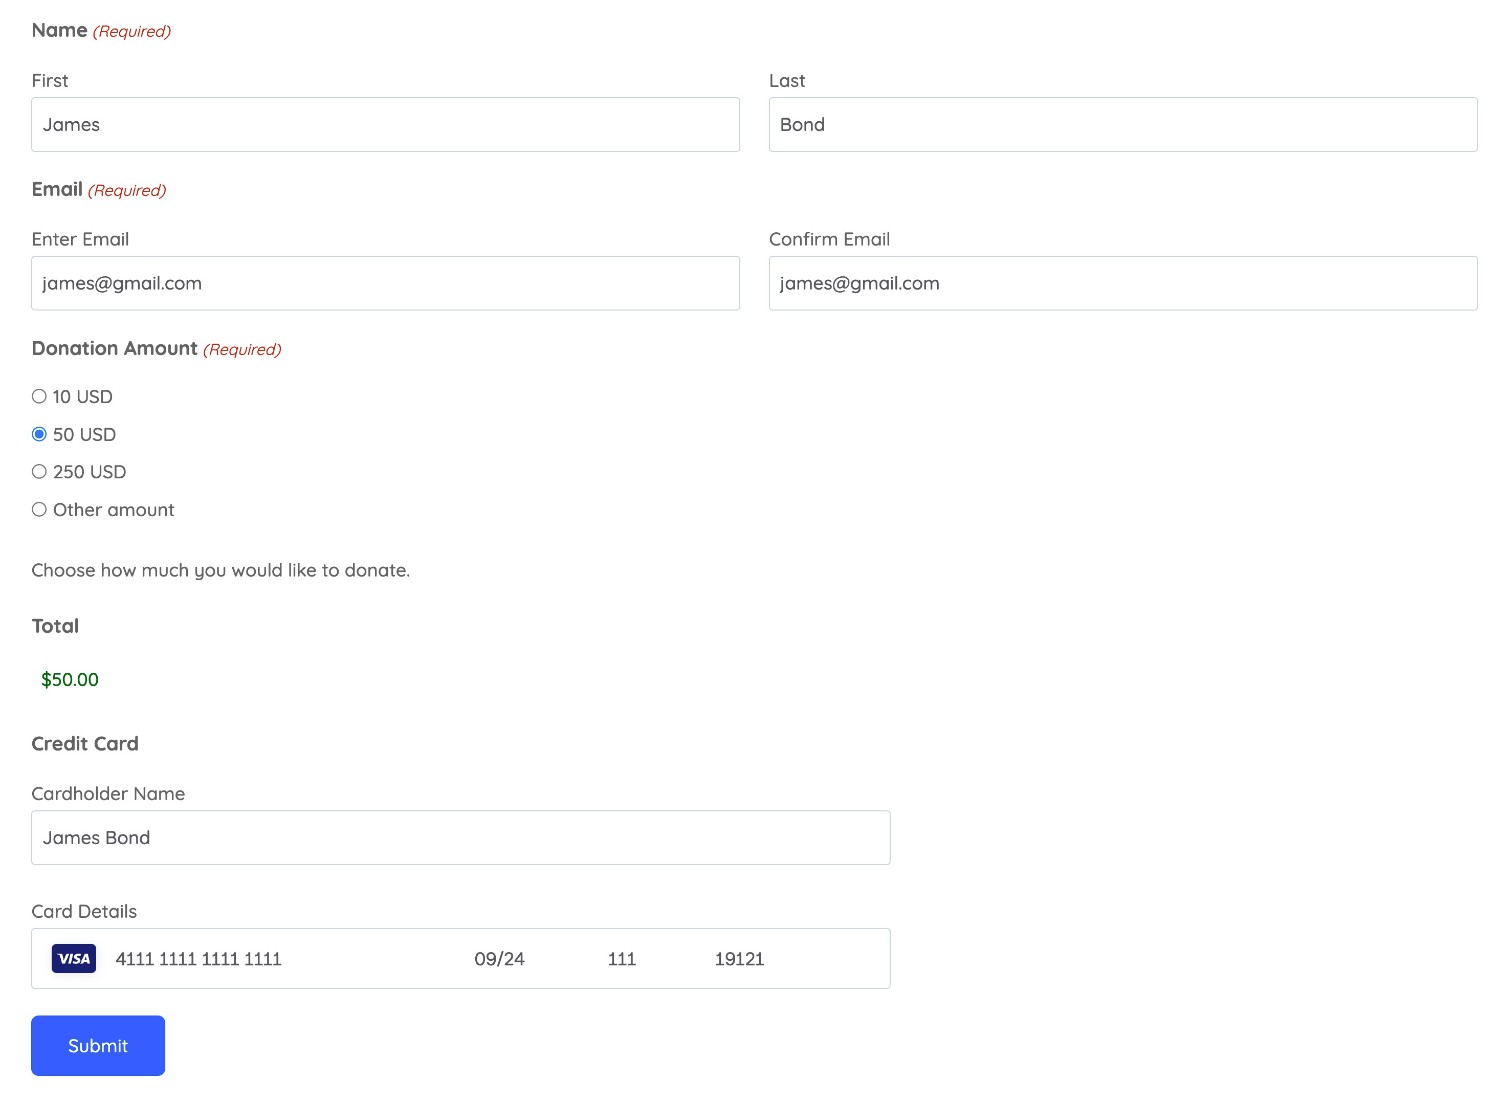
4. Customize the Donation Form As Needed
In the Gravity Forms editor and you’ll see the default fields from the donation form template.
By default, the form offers three preset donation amounts, along with an “Other amount” option that lets donors enter a custom donation amount.
To edit these amounts or remove certain amounts, you can edit the choices in the Donation Amount field:
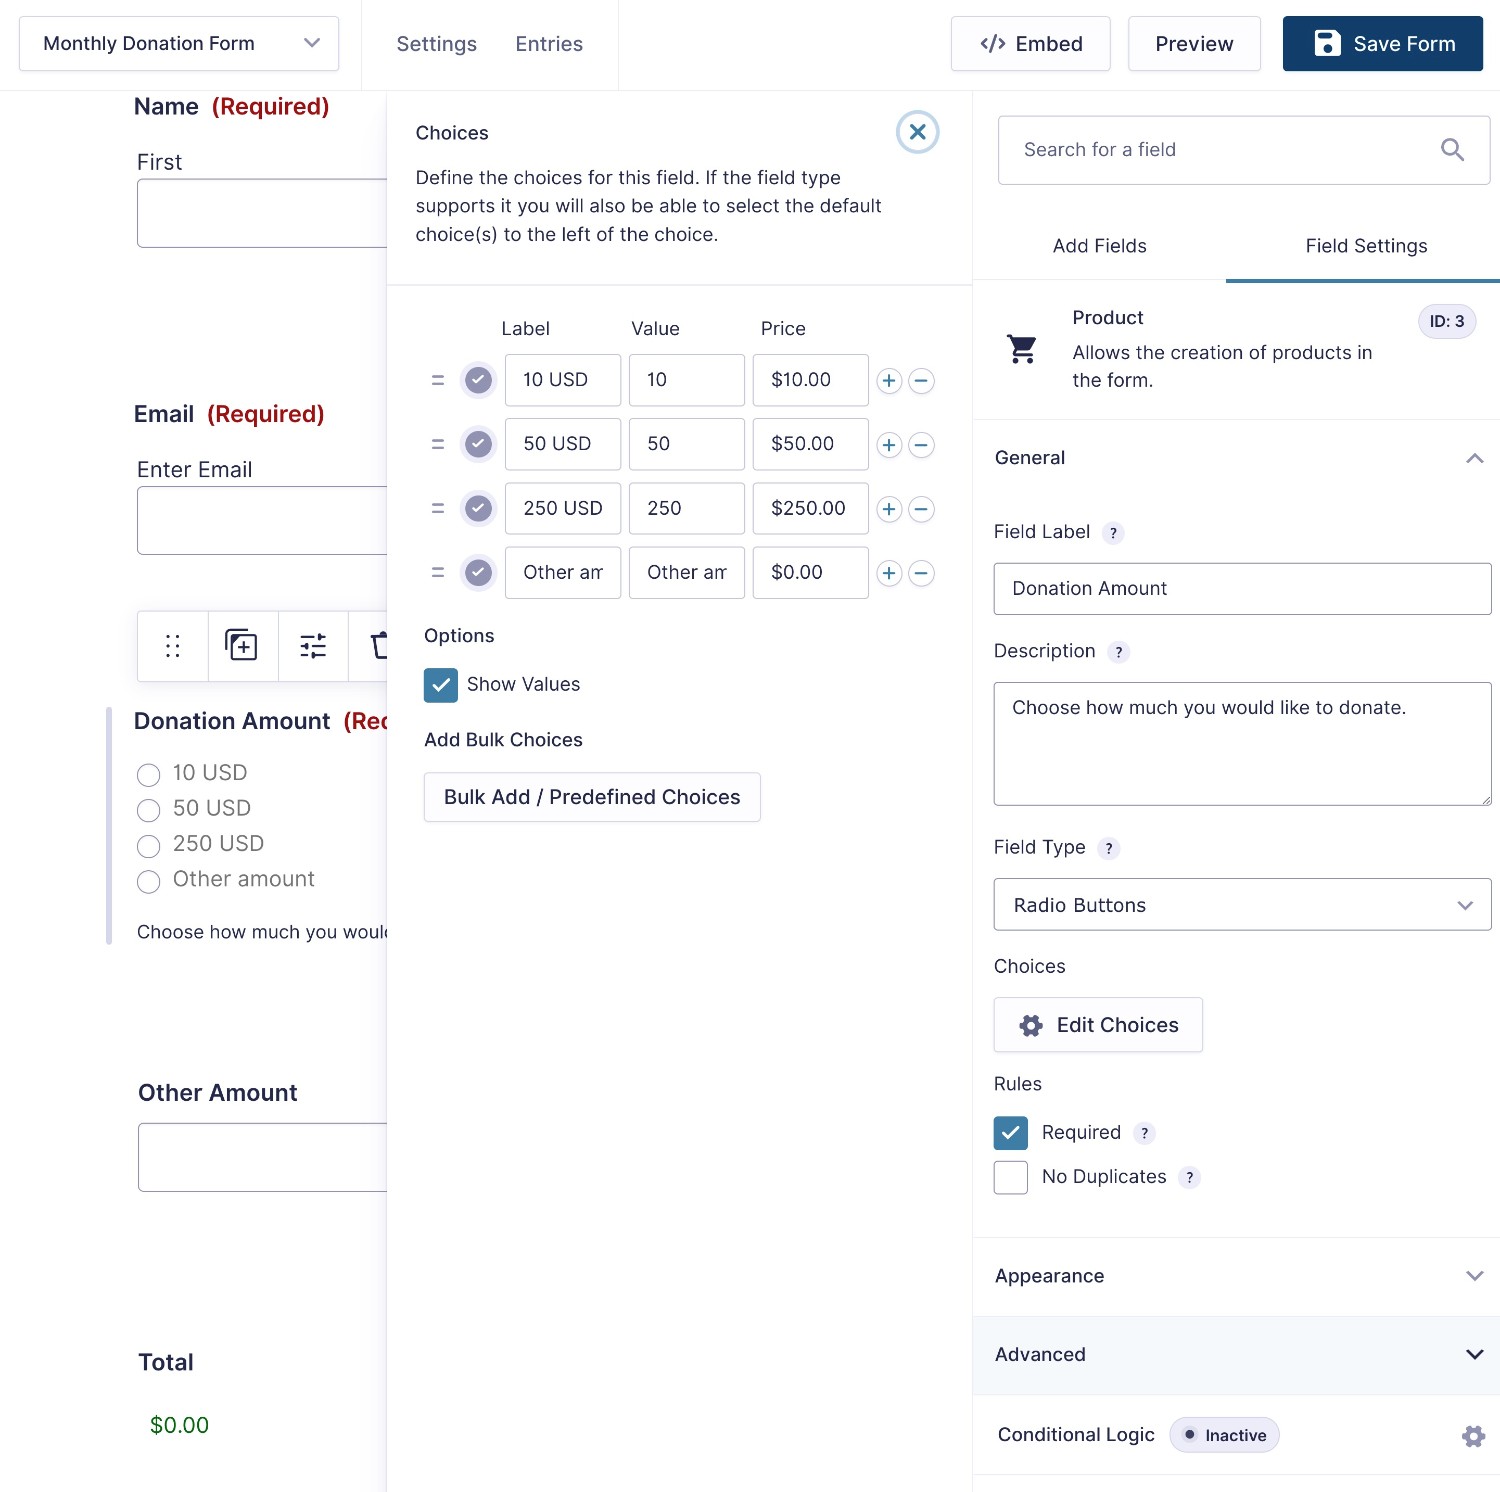
You can also add new fields or edit the other fields as needed. For example, you might want to collect additional information from your donors.
Once you’re happy with the donation amounts and other form fields, you need to add a credit card field to the bottom of your form.
For Square, you can do this by opening the Pricing Fields section and adding the Square field.
5. Set Up Your Square Payment Processing Feed
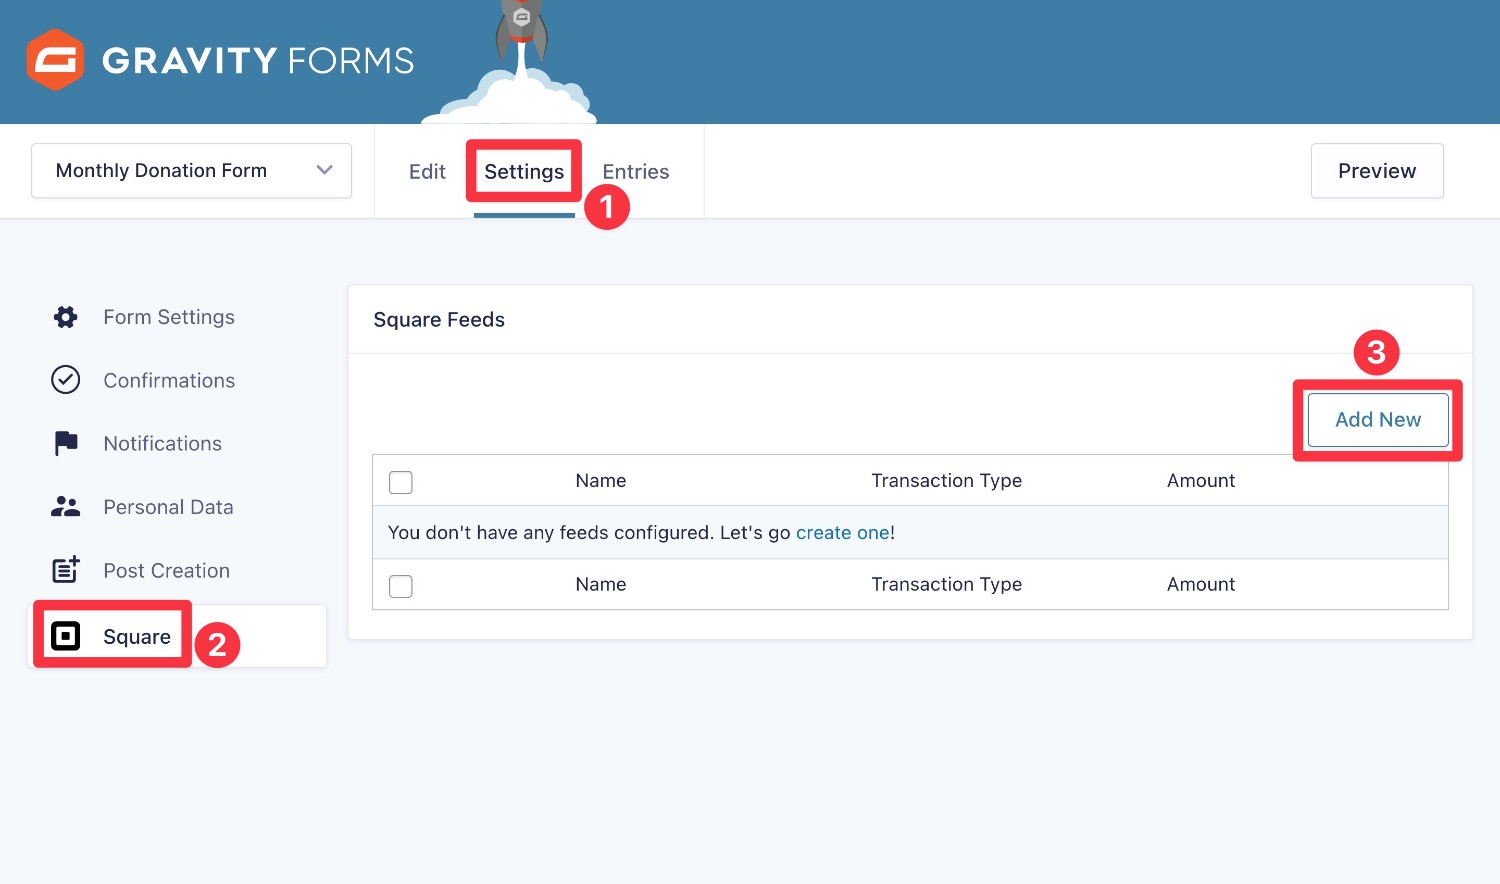
Once you’re happy with how your monthly donation form looks, click the Save Form button.
Then, go to Settings → Square → Add New in the form interface to configure how Square will process your donation payments.
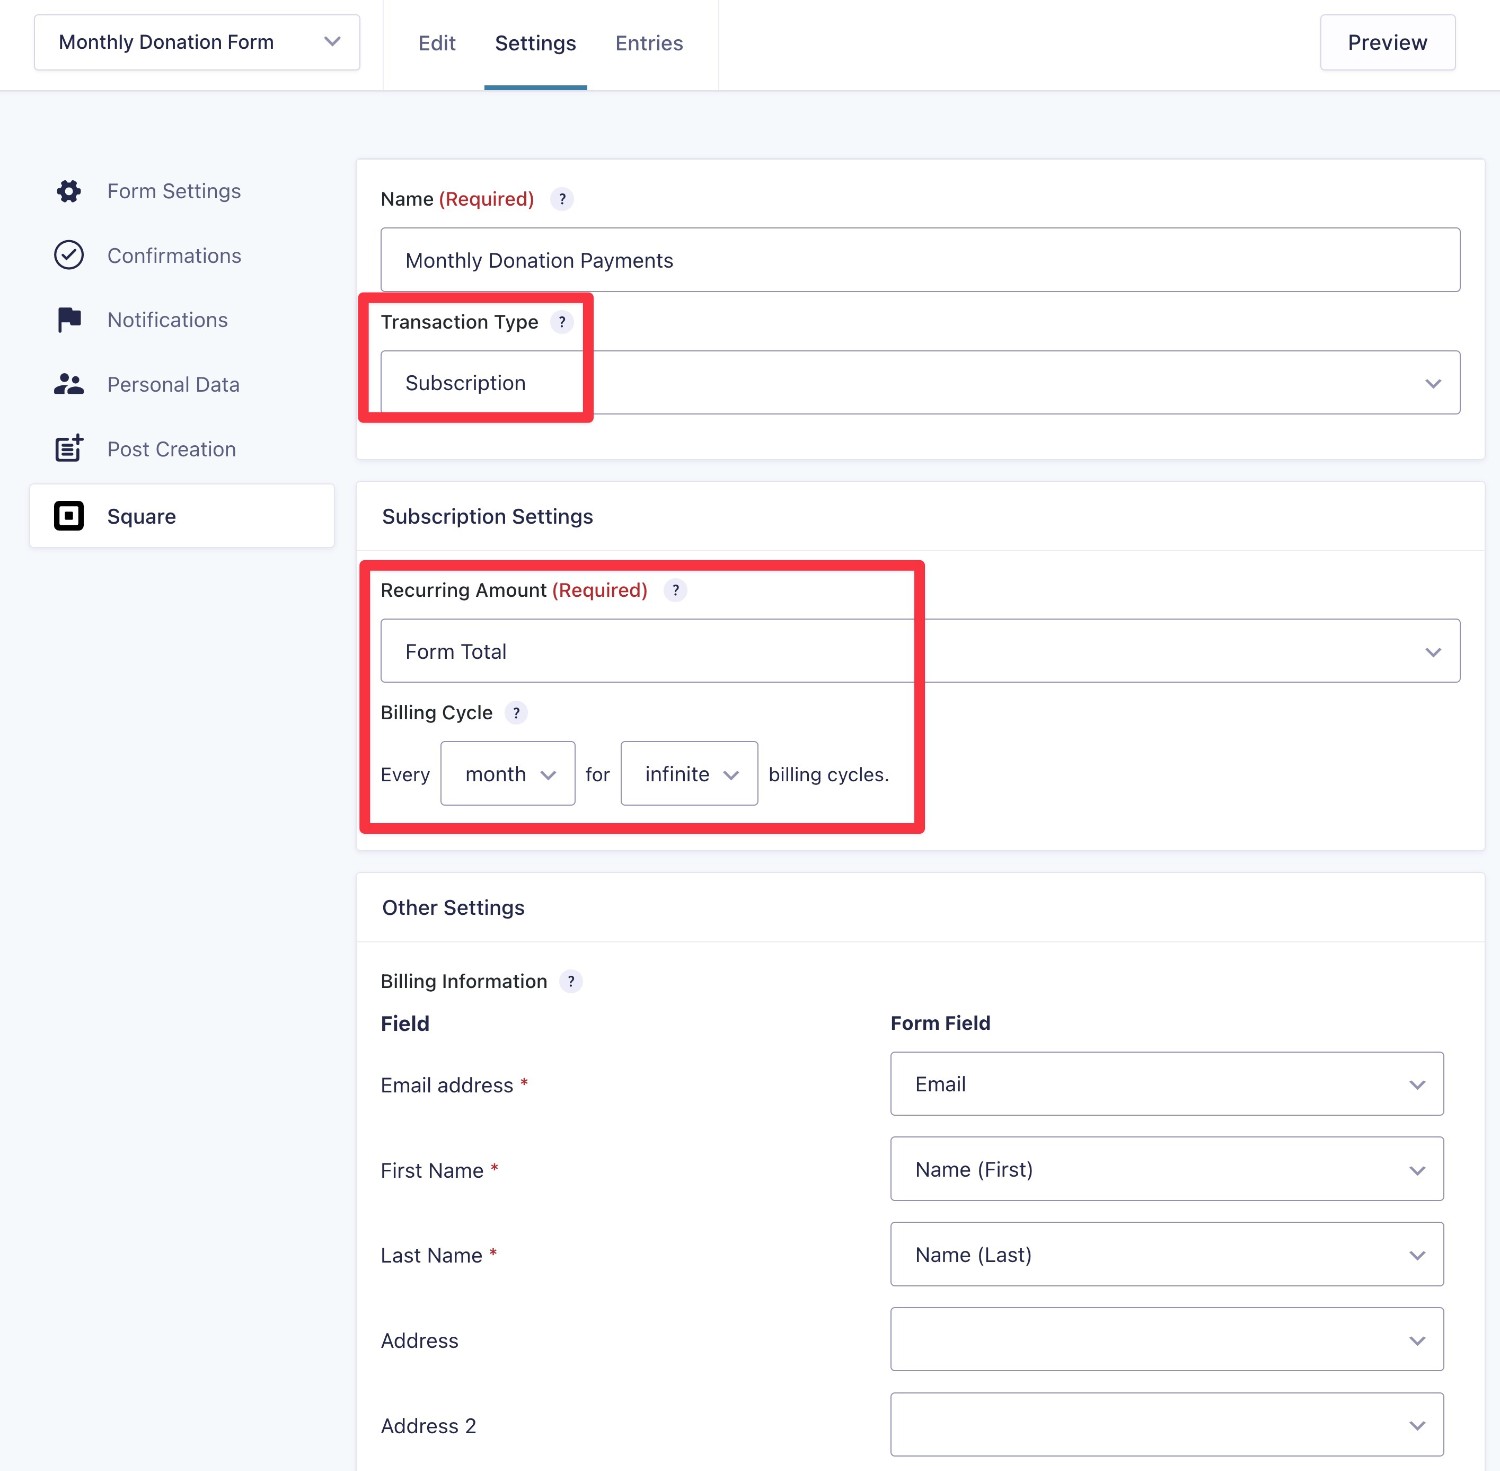
Under Transaction Type, select Subscriptions. This is what lets you configure the payment to be a recurring monthly donation, rather than a one-time donation.
Choosing Subscriptions will expand some additional options:
- Recurring Amount – set this equal to the “Form Total” field.
- Billing Cycle – set this to “Every month for infinite billing cycles”. This will have the donation continue each month until the donor cancels it.
In the Other Settings, you can map form fields to billing information:
- Email address – Email field.
- First Name – Name (First) field.
- Last Name – Name (Last) field.
Then, click Save Settings at the bottom.
6. Set Up Other Integrations As Needed (Optional)
One of the great things about using Gravity Forms for your nonprofit donation forms is that it lets you also set up integrations with other key services that your organization is using.
Here are some examples of what you might want to do in addition to processing the donation payment:
- Subscribe donors to your email list to stay in touch with them.
- Add donors’ contact information to your CRM.
- Create a task in your project management software to thank donors/get in touch with them.
To set up these other types of integrations, you can install other Gravity Forms Add-Ons as needed.
For example, if you install the Mailchimp Add-On, you can automatically add donors to your Mailchimp email lists (or give donors a checkbox that lets them opt-in if they want to receive updates).
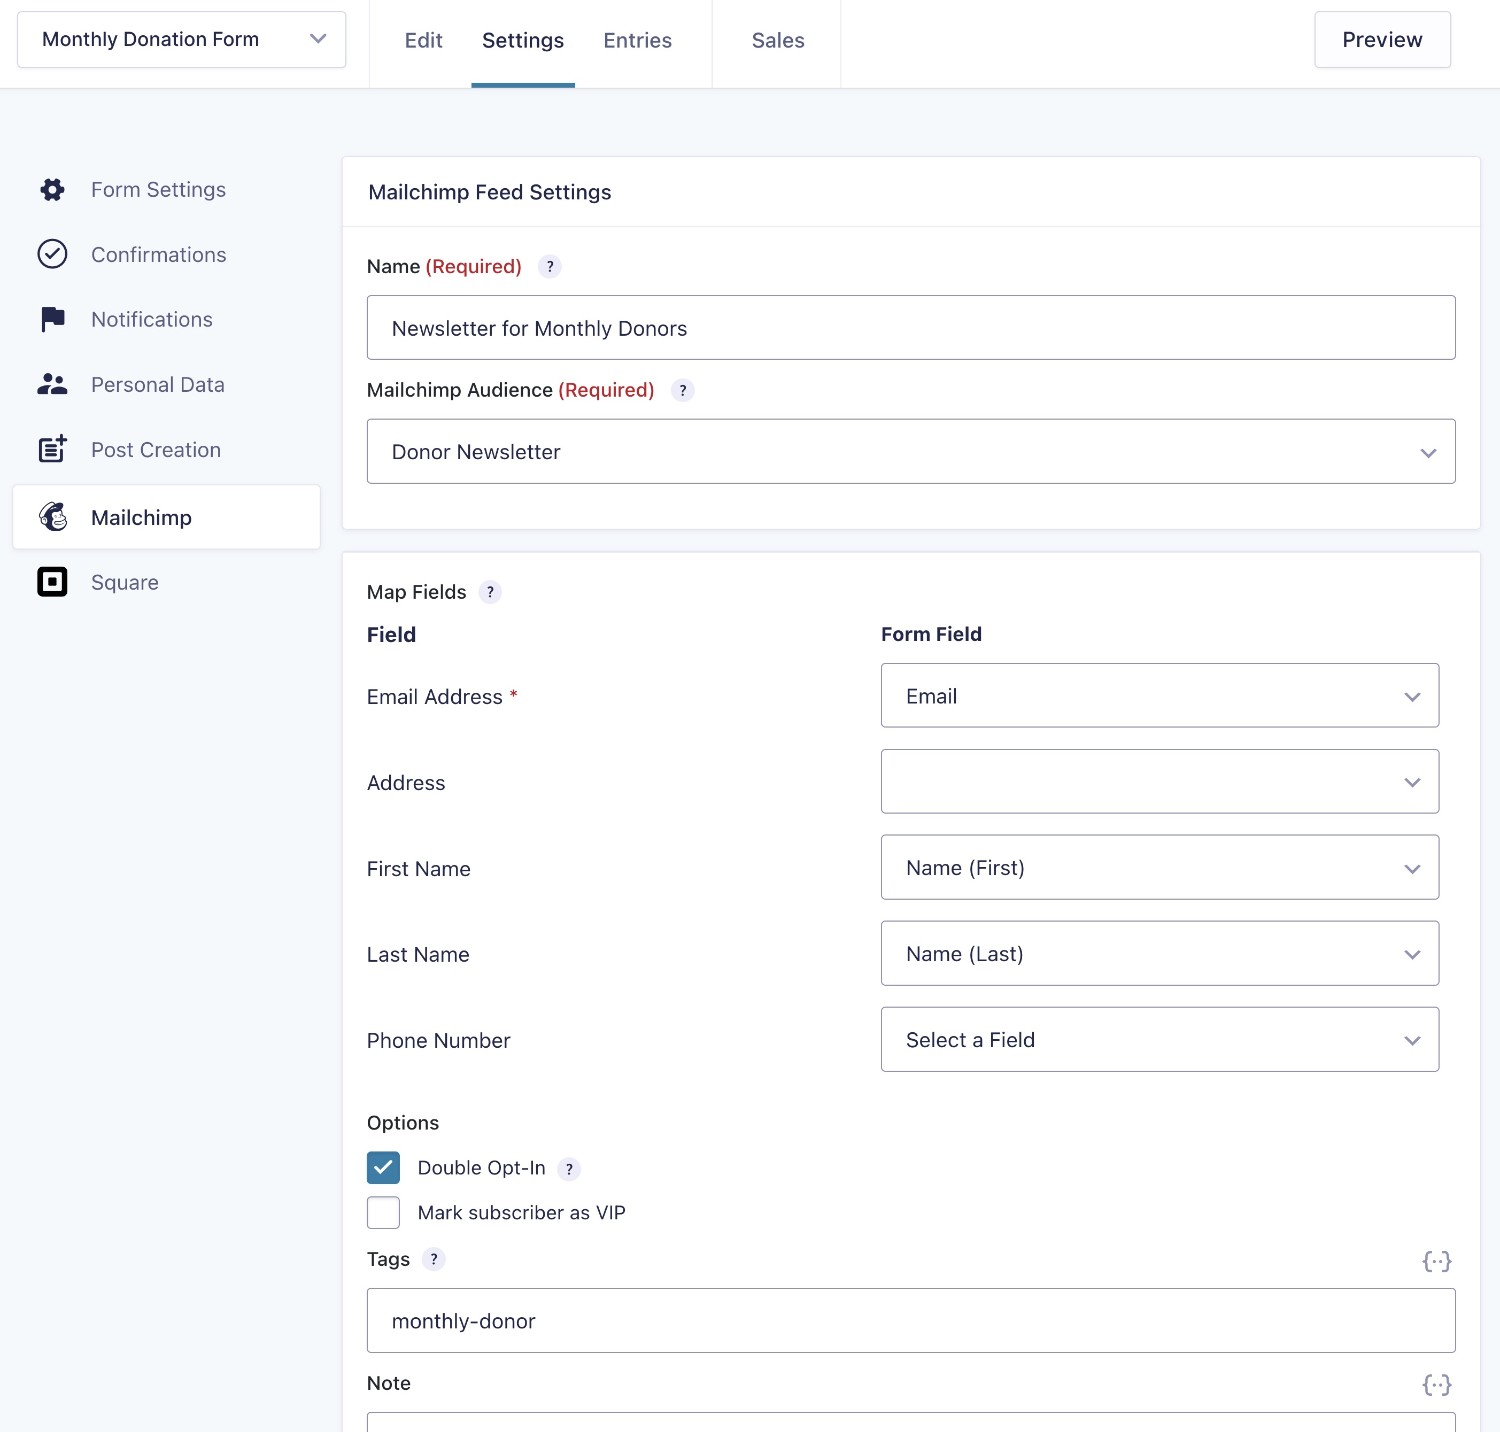
This is 100% optional, though. If all you want to do is collect recurring monthly donations without other integrations, you can skip ahead to the next step.
7. Embed Your Monthly Donation Form
At this point, your monthly donation form is ready to start processing payments.
To share it with donors, you can embed it in a post or page using the Gravity Forms block or shortcode.
Once you’ve added the donation form, you’ll want to test it to make sure that everything is working. If you’re using the Square sandbox mode, you can send some test donations using one of the dummy credit cards.
If you are using sandbox mode, it’s important to switch to live payments mode when you’re ready to start accepting real donations.
How to Manage Recurring Donations
Once you start accepting recurring donations via your site, you’ll be able to manage them from both your WordPress dashboard and your payment processor’s dashboard.
For example, you can view all your form entries in your WordPress dashboard and if you want to cancel a donor’s subscription, with Square you can do that from the Entries dashboard.
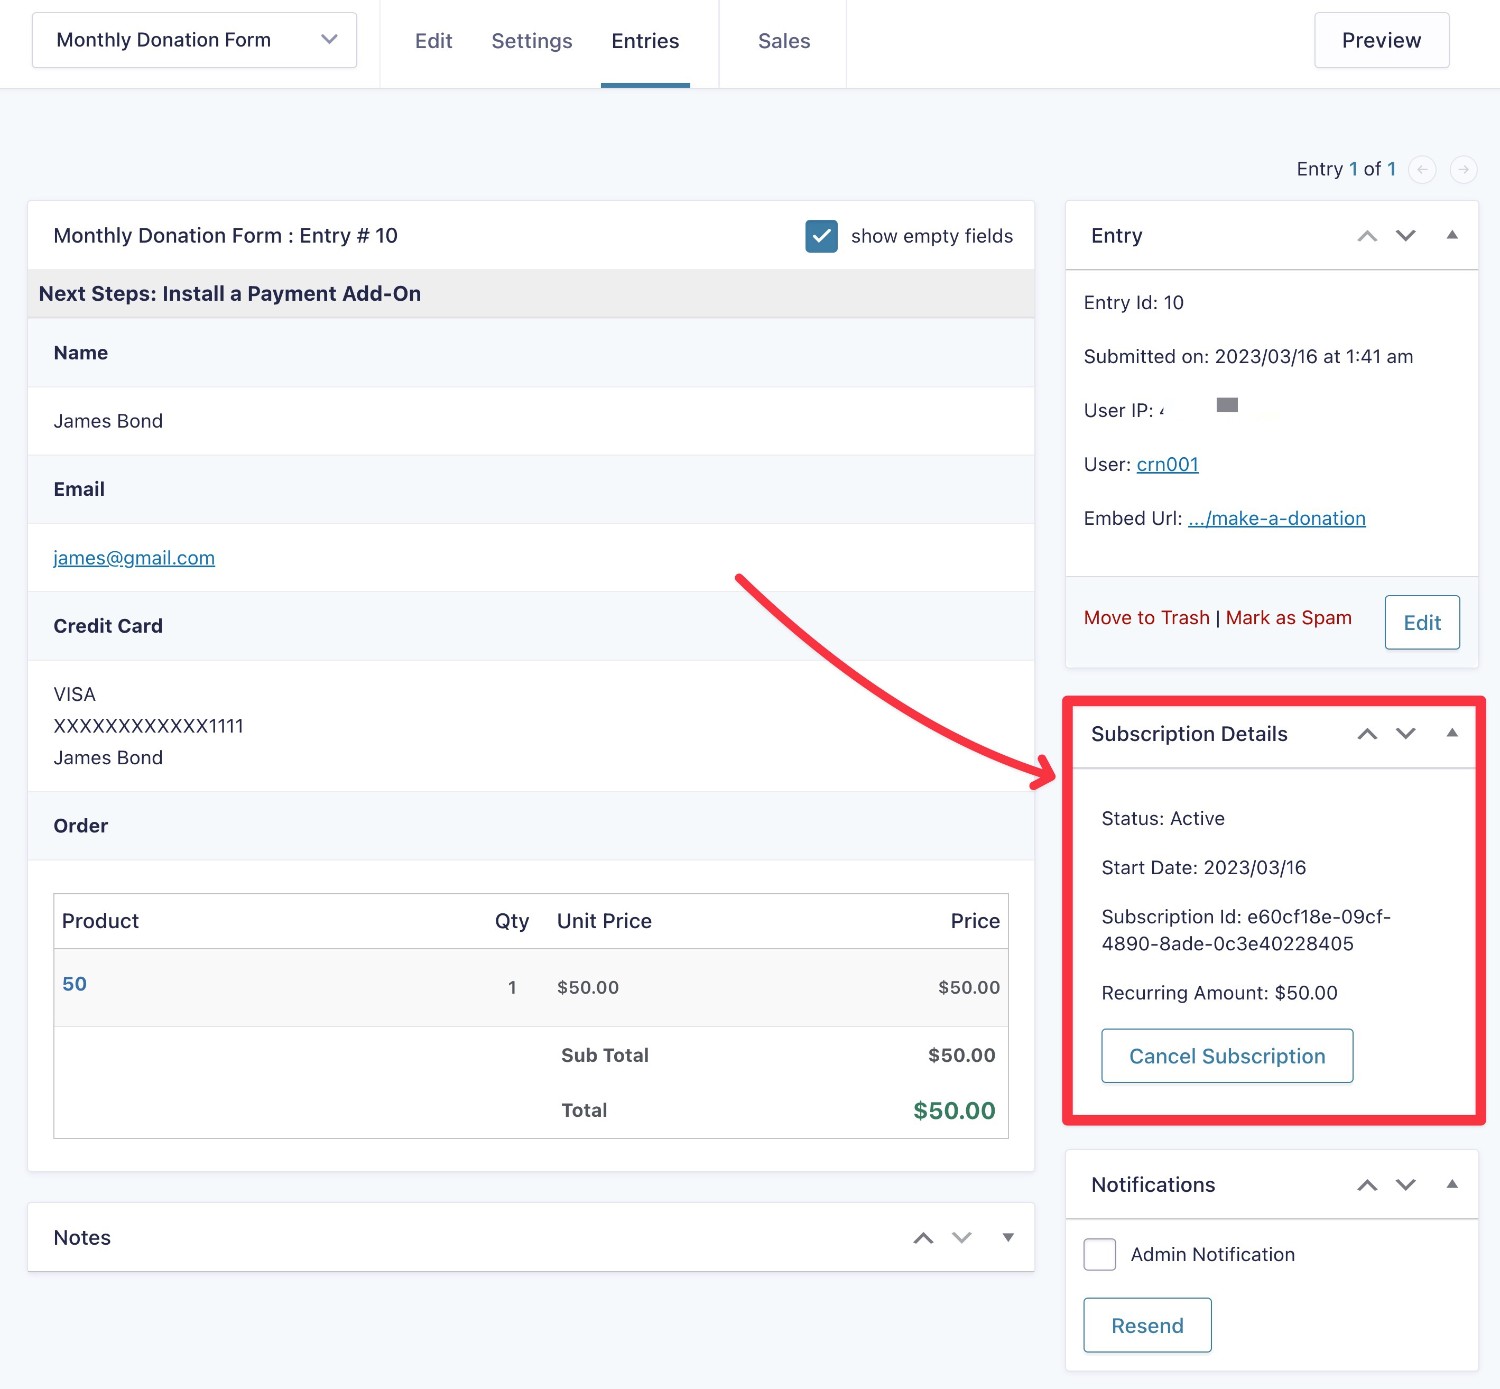
For more information on managing subscriptions, check out this article – Managing Square Subscriptions.
Optional: Build Automated Donation Workflows for Your Nonprofit With Gravity Flow
If you want to create more advanced business process automations for your nonprofits, you also might want to consider further extending your donation form with Gravity Flow.
Gravity Flow is owned by the same team behind Gravity Forms and helps you create custom workflows triggered by a new monthly donation.
Overall, it can be a great option to streamline your organization’s administrative processes for donations, including requiring admin approval for certain tasks, generating PDFs, and lots more.
If you want to learn more, you can go to the Gravity Flow website or read our guide to building workflows with Gravity Flow.
Apply for a Gravity Forms Nonprofit License Today
That wraps up our guide on how to create a monthly donation form using Gravity Forms and the premade donation form template. While we focused on using Square to process donation payments, you’re free to use the other payment gateways that Gravity Forms supports, such as Stripe, PayPal, and others.
With the Gravity Forms Nonprofit License, as well as accept donations, you can generate leads, run surveys and quizzes, register donors to your webiste, and much more.
Top features of the license include:
- Price: The Nonprofit License will cost your organization just $129 (renewable annually).
- All Built-in Features – Create stylish custom forms that appeal directly to your target audience using any of Gravity Forms’ built-in features such as conditional logic, multi-page forms, and file uploads.
- All Current Add-Ons – Integrate with marketing, payment, and automation solutions, or install our feature enhancement add-ons, including User Registration, Survey, Quiz, Signature, and more, supporting all your nonprofit’s data capture needs.
- Licensing for Three Sites: The Nonprofit License supports licensing for three websites. Create unlimited forms and collect unlimited form entries across three sites.
- Support Scope: The Nonprofit License includes standard support. We always try to respond to all support queries within 48 hours.
- No Multisite – It is important to note that multisite functionality is not included with the Nonprofit License.
The Gravity Forms Nonprofit License is available to registered nonprofit organizations via an application process.
To learn more and apply, head on over to the Nonprofit License page.
Want to test the Gravity Forms donation template before making a purchase? Spin up a free, fully functioning demo site today!
Square Promotion – Free Processing
Gravity Forms and Square have teamed up to offer an exclusive promotion for new Square customers — enjoy free processing fees for up to 180 days!
Here’s how it works:
- Free Payment Processing – Get $5,000 in credit card transactions processed for free within your first 180 days. After that, standard Square fees apply.
- $20 Off Square Hardware – Receive a $20 discount on Square hardware once you sign up.
To take advantage of this promotion, simply sign up for a Square account using this link and start processing payments with no extra fees.

If you want to keep up-to-date with what’s happening on the blog sign up for the Gravity Forms newsletter!
"*" indicates required fields