

If you are a nonprofit organization then connecting and engaging with your audience is a must. A key aspect of this process is using the right forms on your website – forms that relate to your visitors’ needs and that crucially reflect your organization’s goals.
By displaying stylish, fully-functioning forms on your website, your visitors can easily contact you directly, donate money, and much more. This will ultimately improve site conversions and enable your organization to achieve its objectives.
In this article, we look at three different forms your nonprofit website might need. These include…
- A contact form for general inquiries
- A volunteer application form
- A donation form
We look at each form in turn and discuss why you need them and how to build them with Gravity Forms. We also share some top tips to help make each form successful. Let’s get started…
Building a Contact Form

Displaying an engaging contact form on your nonprofit website for general inquiries is a great way to start a discourse with your audience. A modern user-friendly contact form that is not only attractive but also quick and easy for your visitors to fill in will ensure that your organization is openly available to your visitors, helping you to forge and maintain strong relationships.
Using Gravity Forms, you can create a custom contact form for your organization in minutes. Let’s take a look at how to do that…
Step 1: Create a New Form
Open your WordPress dashboard and select Forms > New Form.
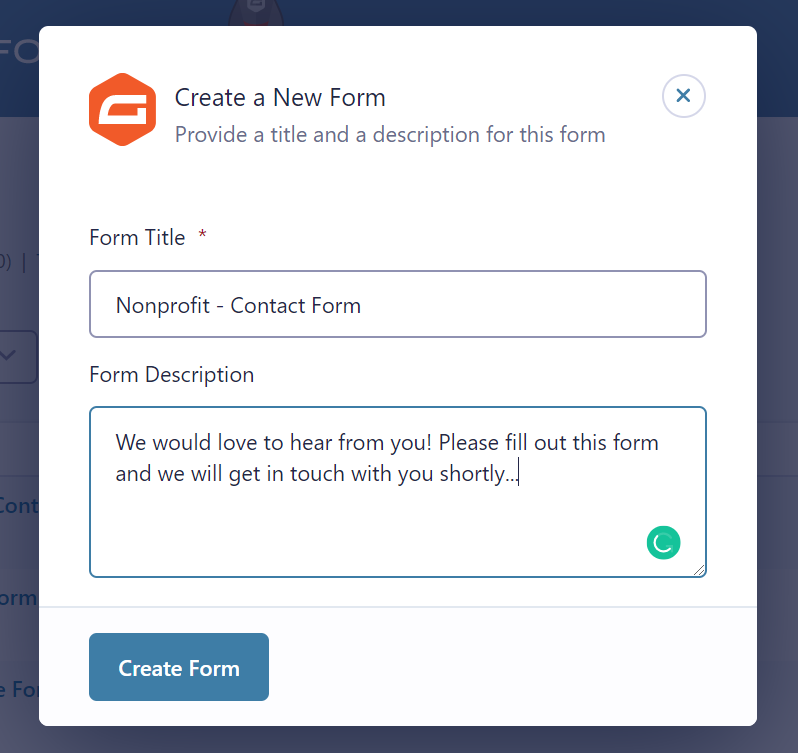
Give your form a name and a description if you wish. Then click on Create Form.
Step 2: Select Form Fields
Your new form will now open within the Gravity Forms drag-and-drop form editor. On the right-hand side of the form editor you will find 30+ ready-to-go form fields that you can use to create your form.
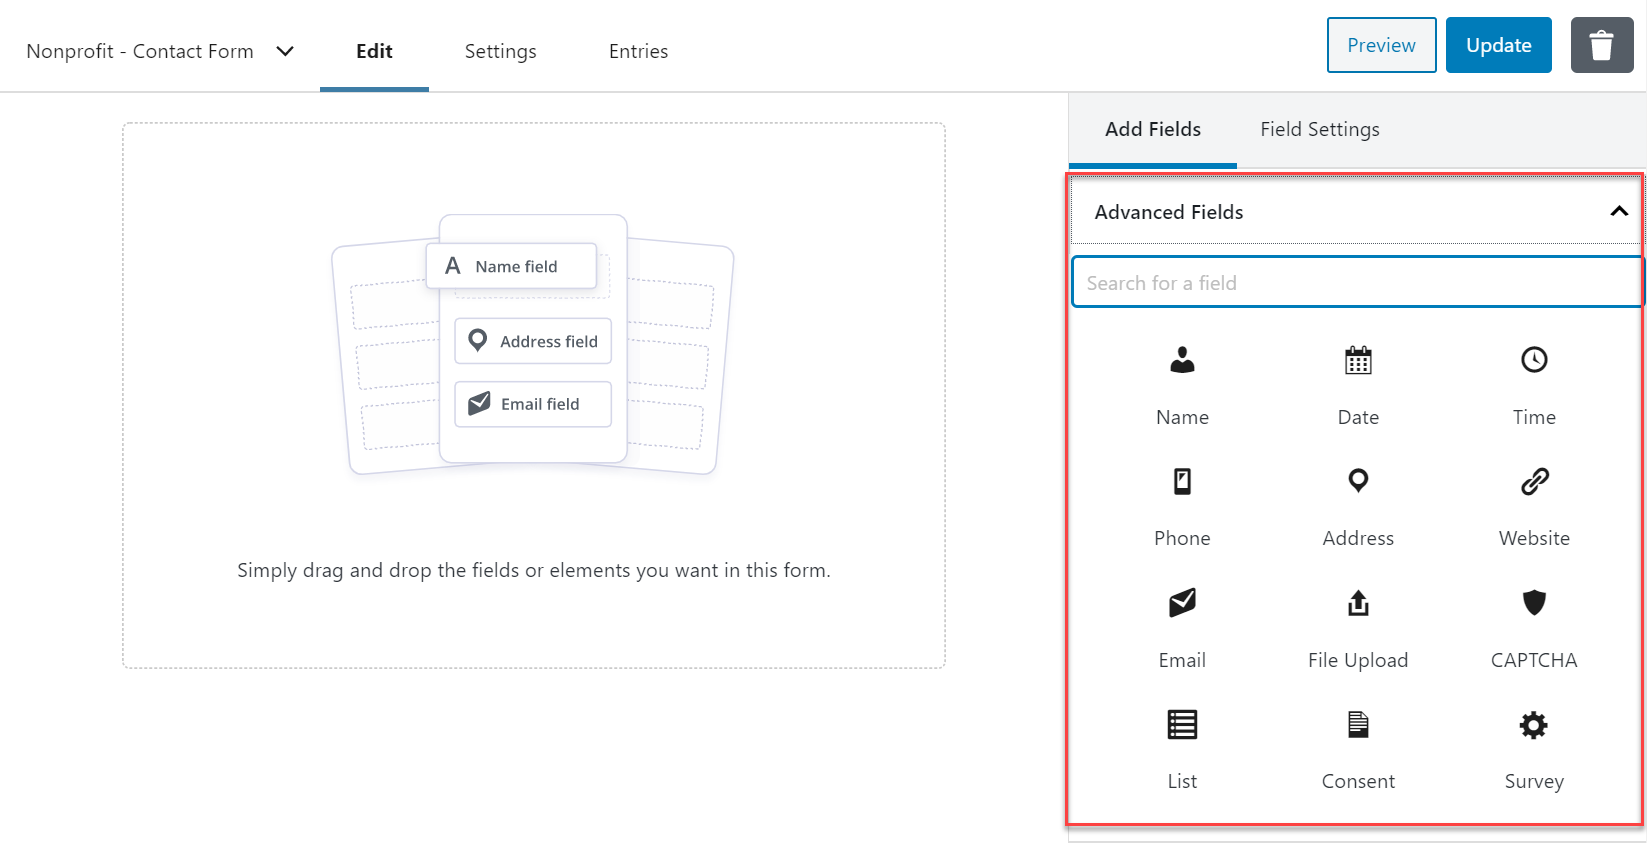
Under Advanced Fields, select the personal information fields that you would like to add to the contact form, and drag and drop them into the editor.
Top Tip: You want your contact form to be short and to the point, making the form easy for visitors to fill in and submit. Therefore, bear in mind ‘less is more’ – just select the fields that you consider essential.
From the list of Advanced Fields, we would recommend Name and Email.
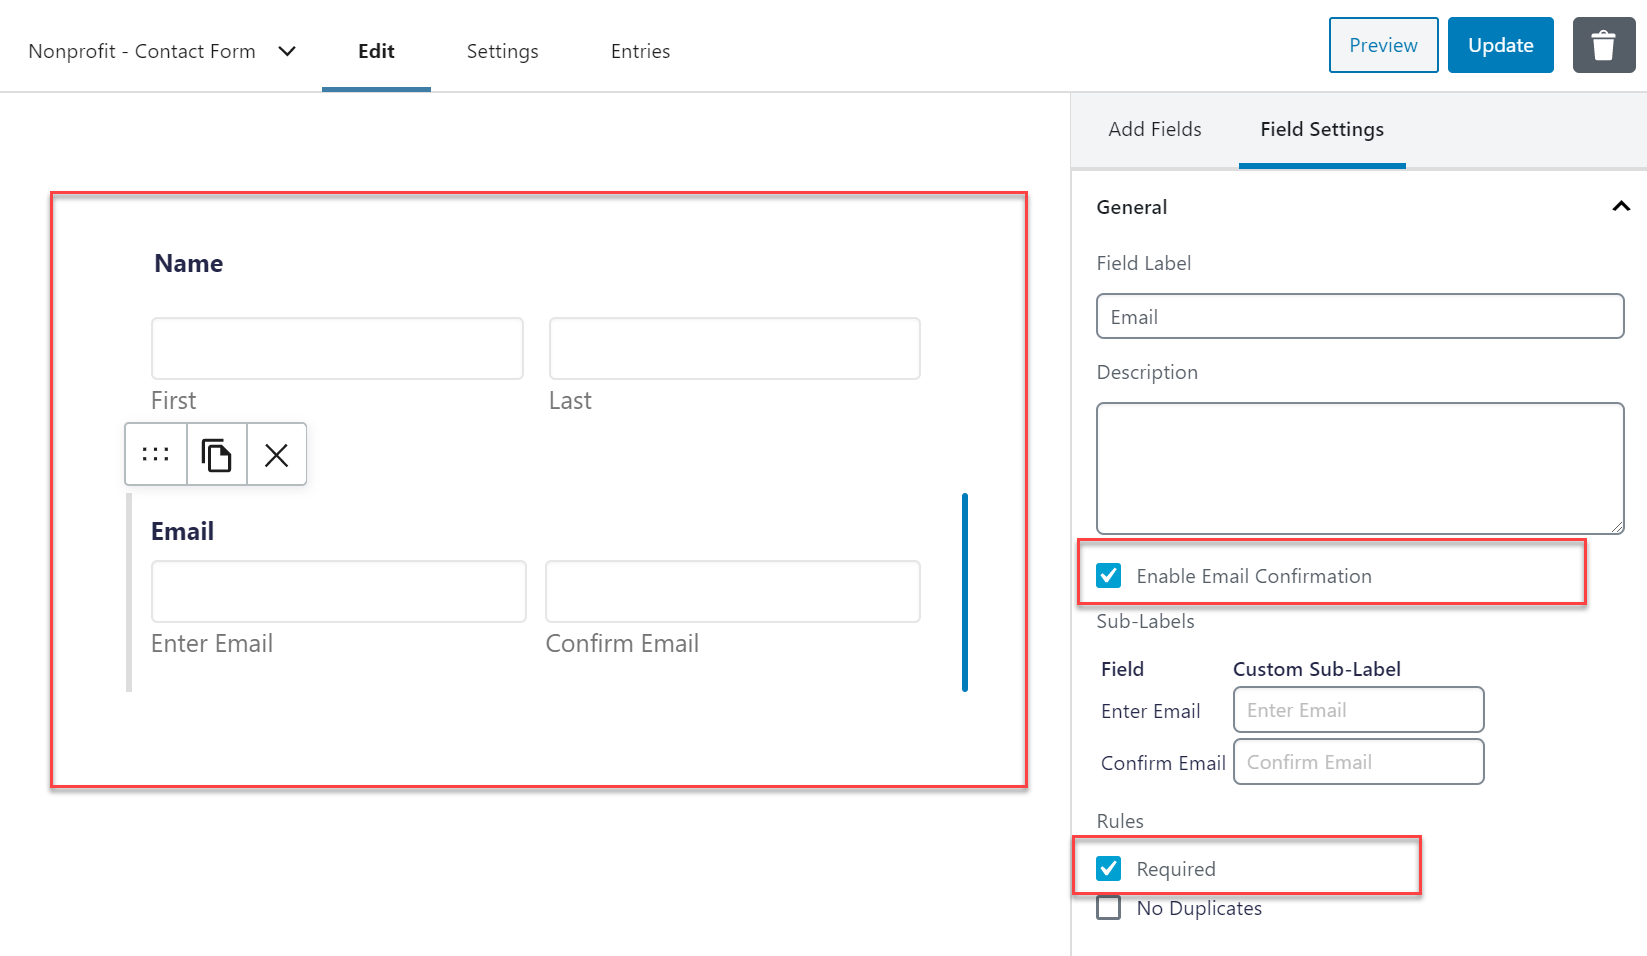
Top Tip: Click on the Email field to configure the field settings. Here, we recommend that you select Enable Email Confirmation as well as making this field Required. Combined, these settings prevent people from submitting the form unless they have inputted their email address twice. This ensures that you receive correct email addresses, so you can to respond to all inquiries received.
Next you need to add a ‘comments’ section. To do so, under Standard Fields, select the Paragraph Text field. Then in the Field Settings, rename the field to Comments and Questions (or whatever works best for your website) and add a description.

Lastly, we would recommend that you add a CAPTCHA field, which you will find under Advanced Fields, to protect your website from spam and bot abuse.
Top Tip: Gravity Forms supports Google reCAPTCHA v2. To use this functionality you will need to sign up for a free account and then integrate it with your Gravity Forms site installation. For more information on this process check out the Docs.

Once you are happy with your form, click on the Update button in the top right-hand side of the form editor to save your form.
Step 3: Edit the Confirmation Message
When a visitor submits a form, a confirmation message will automatically be displayed on their screen.
By default Gravity Forms displays the confirmation message ‘Thanks for contacting us! We will be in touch with you shortly.”
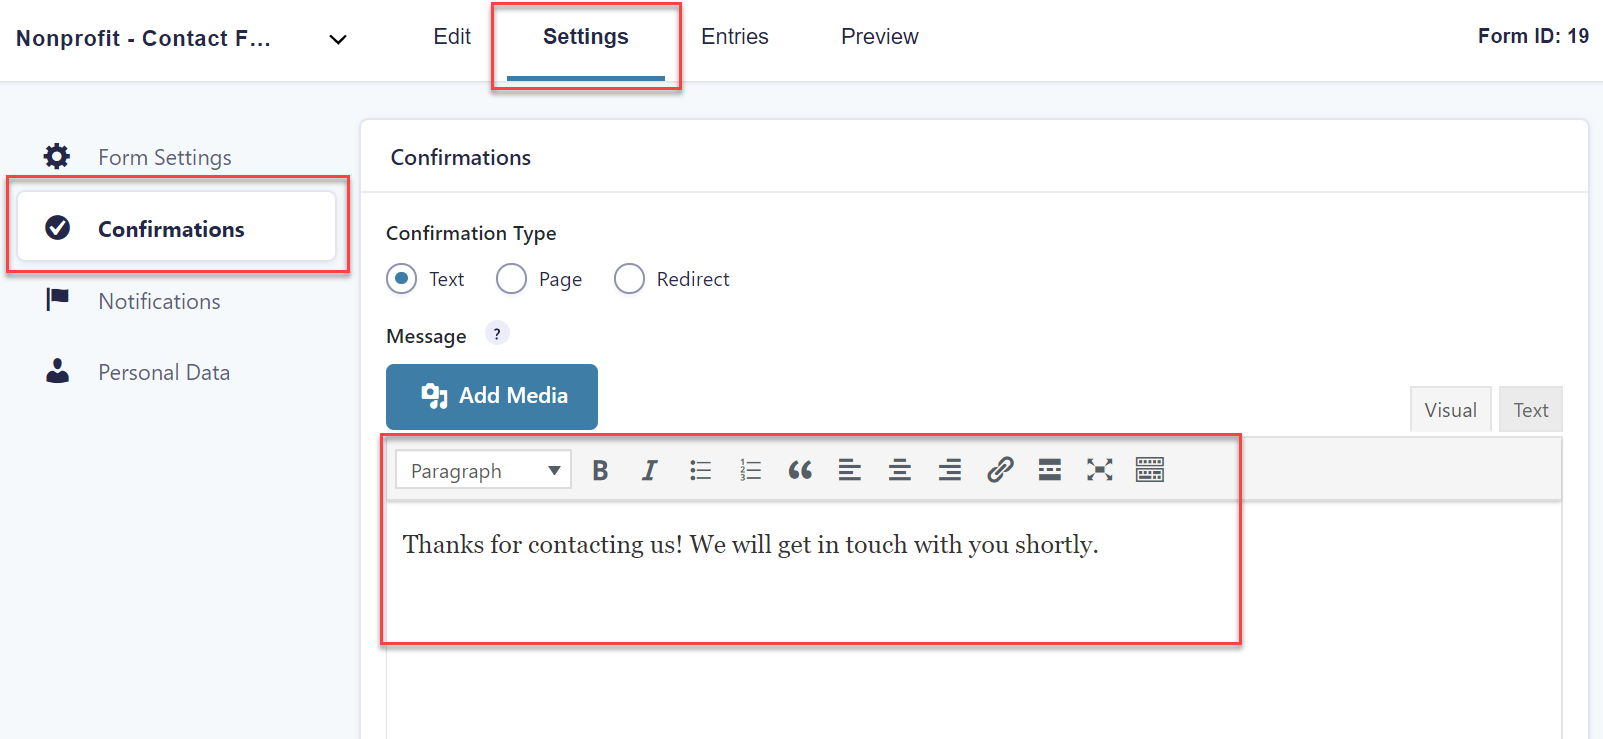
If you want to edit this message, click on the Settings tab within the form editor and then select Confirmations. Once you have re-written the message, hit Save Confirmation at the bottom of the page.
Step 4: Sync the Form with Add-Ons
Gravity Forms integrates with numerous add-ons to help enhance your forms and streamline your data processes. Here are a few options that may benefit your organization…
- Email Add-Ons – Syncing your form with a powerful email marketing solution will help you stay connected with your subscribers in the future. Select from any of the official Gravity Forms email add-ons, including MailChimp, Campaign Monitor, Constant Contact, and many more.
- CRM Add-Ons – Track and organize your newly captured contacts with a CRM add-on. Check out this guide to the Best CRM WordPress Plugins.
- Notification Add-Ons – By default Gravity Forms includes notification email options with every form. However, to customize these to further suit your needs, you might want to set up custom notification emails – Sendgrid, Postmark, and Hubspot add-ons are all good options for this.
Step 5: Embed the Form
Once your contact form is complete, all that is left to do is to embed it into a page on your website.
To do so, within your WordPress dashboard, open the appropriate page, click into the Gutenberg editor and add a block where you want the form displayed. Then type Gravity into the Search for a Block function.

Select ‘Contact Form’ from the drop-down form options, then Preview the form on the front end of your website. If you are happy with your form, go ahead and Publish the page.
Top Tip: Don’t forget to test the form yourself to check that it is working!
Creating a Donation Form

The majority of nonprofit websites display a donation form somewhere on their website. A stylish form that is quick and easy to access will see an increase in submissions – which ultimately means an increase in donations.
So let’s find out how to create a donation form using Gravity Forms…
Step 1: Integrate a Payment Add-On
To take payments via your donation form, you will need to install one of Gravity Forms’ many payment processor add-ons. Here are just a few that you can select from…
- Stripe
- PayPal (Standard and Pro)
- Square
- 2Checkout
- Authorize.net
Before you start creating the donation form, install the payment processor of your choice on your WordPress website and integrate it with Gravity Forms. (Check out our extensive documentation for more information on how to integrate specific payment add-ons).
Step 2: Create Your Form
As with all forms, your donation form will vary depending on your organization’s needs. However, most donation forms will follow a similar layout to the one we have shared above.
To create something similar, drop the key personal information fields into your form editor – to keep it simple, we recommend just Name and Email.
Top Tip: We recommend a double email opt-in – select Enable Email Confirmation.

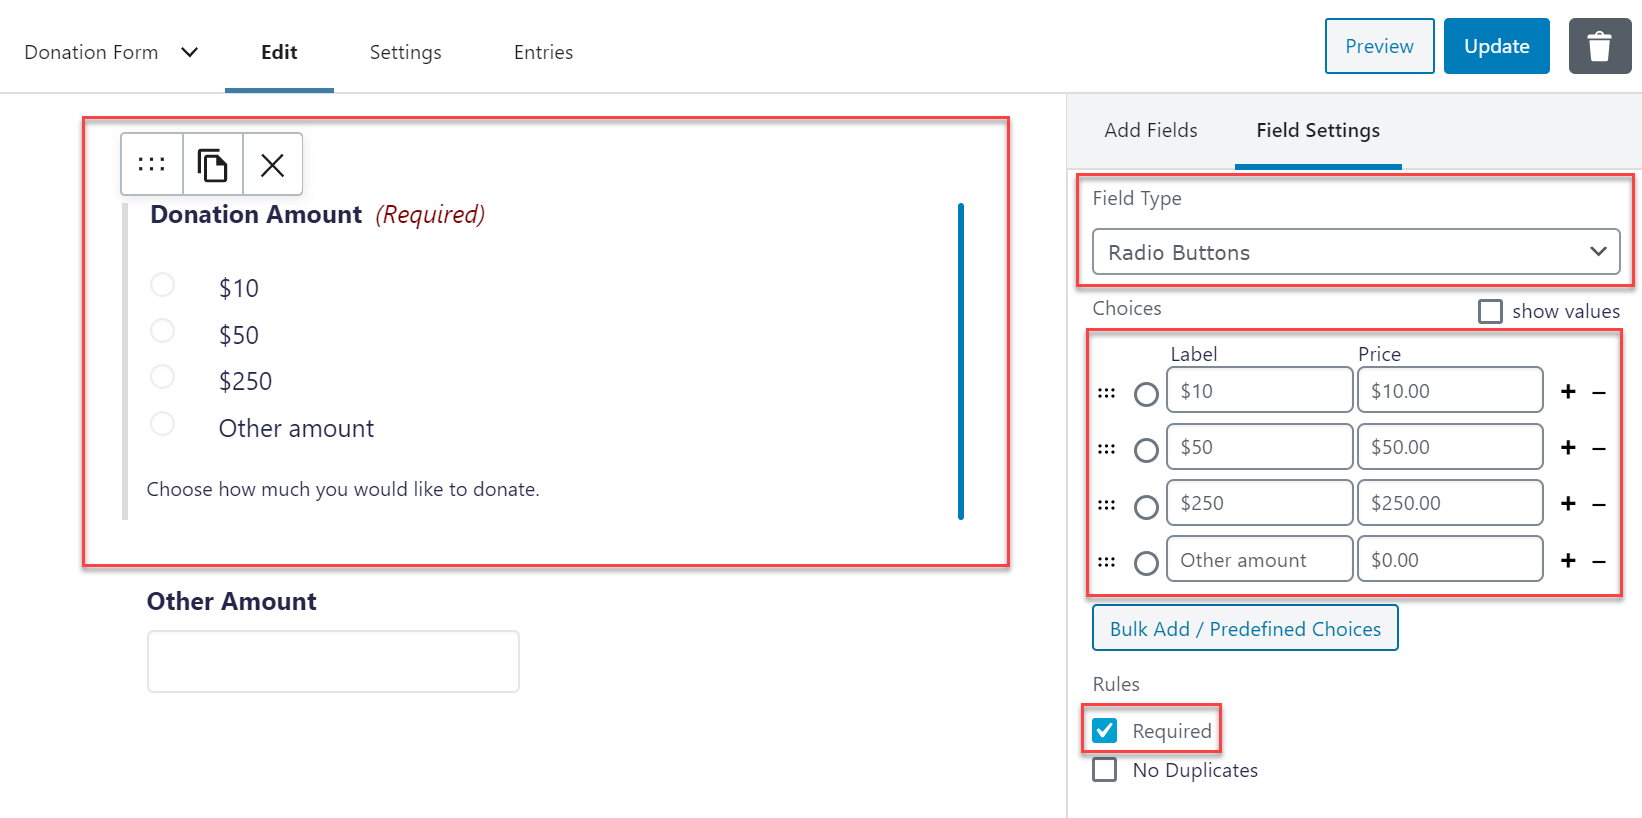
Next, under Pricing Fields, select the Product field. For this form, we wanted to give users the option of choosing from set donation amounts or entering a different amount that they would like to donate.

To do this, under the Product Field Settings, scroll down to Field Type and select Radio Buttons. Add in the donation amounts you would like users to choose from, and then add an extra option for ‘Other Amount’.
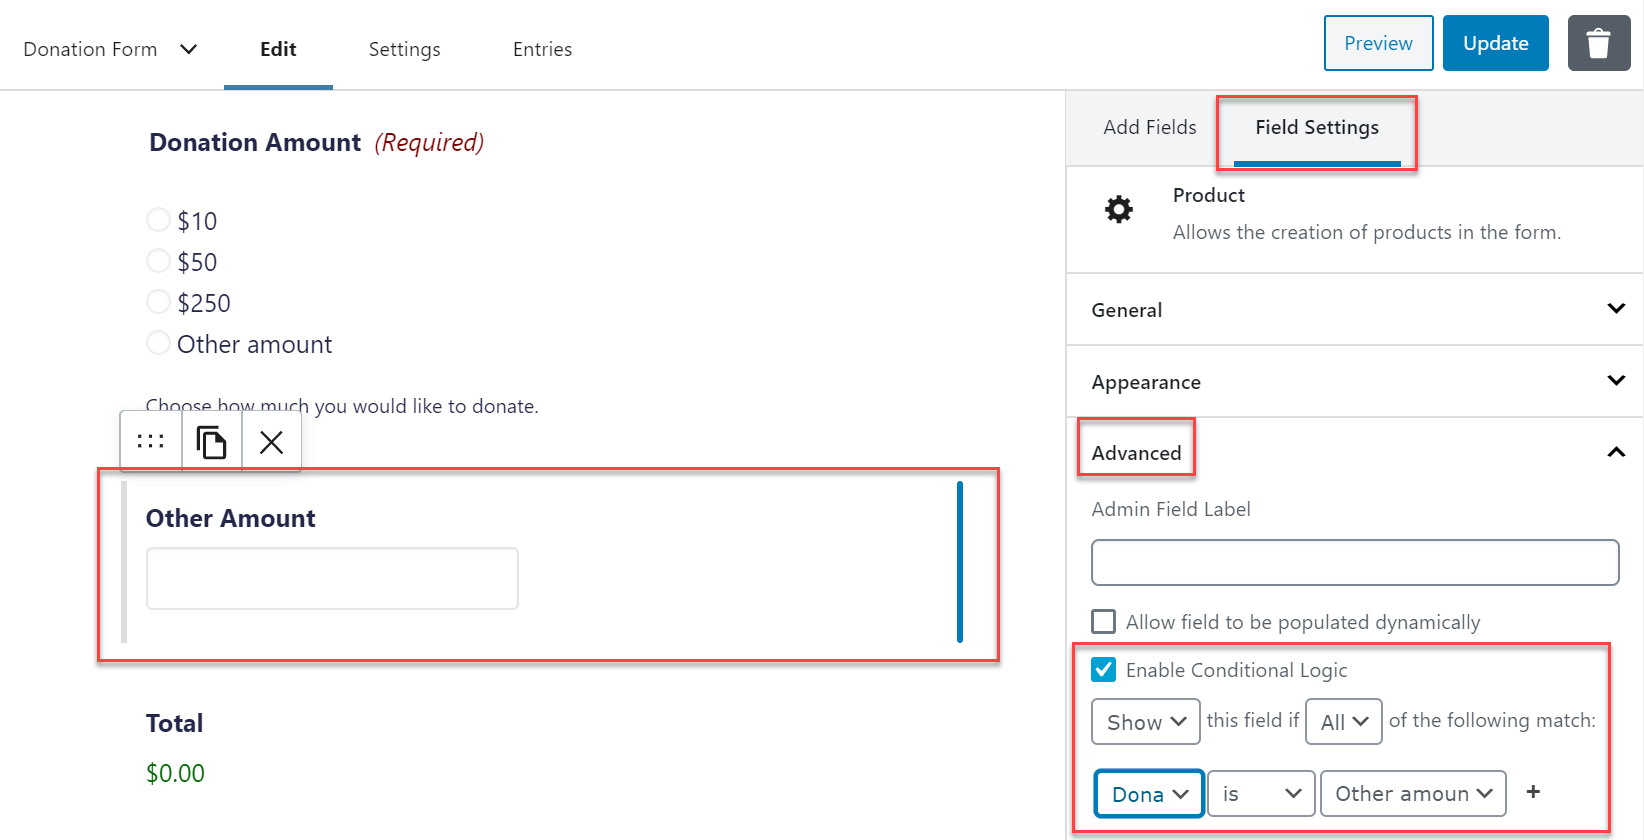
Now, drag and drop another Product field and place it underneath the existing product field that you have just customized – this should also be named ‘Other Amount’. You will need to add conditional logic to this field, to allow people to enter their chosen donation amount if they select the radio button ‘other amount’.
To do so, within Field Settings > Advanced select Enable Conditional Logic. Then choose – Show this field if All of the following match: Donation Amount is Other Amount.
Lastly, you just need to add the fields Total and Credit Card. Now save your form and Preview it to check it is working.
Step 3: Create a Feed for Your Payment Form
To connect your form with your payment processor you will need to create a feed for your form. This is a quick and easy process that has been written about extensively within the Gravity Forms documentation, with clear step-by-step instructions for each payment add-on.

Once your feed is created, edit the form Confirmations and Notifications if necessary, and then embed the form on your site.
Creating a Volunteer Application Form
Nonprofit volunteer application forms will differ greatly depending on the type of organization you are, and the sort of volunteer projects that you may offer. However, providing a user-friendly form that quickly captures people’s data is a great starting point for any nonprofit website.
Here we have created a basic application form, which incorporates fields and questions that you may find useful. However, this form example is just a starting point – it can of course be further customized and extended to ensure you gather all the information you need from your volunteers. Let’s have a look…
Step 1: Personal Information Form Fields
A volunteer form may need to collect a fair amount of personal information. Under Advanced Fields you will find the bulk of what you may need:
- Name
- Address
- Phone Number
Top Tip: If you need to collect copious amounts of information from your volunteers, you may want to create a multi-page form. As mentioned previously, too many form fields can put people off completing a form – multi-page forms can help your form appear shorter and more manageable to your users.
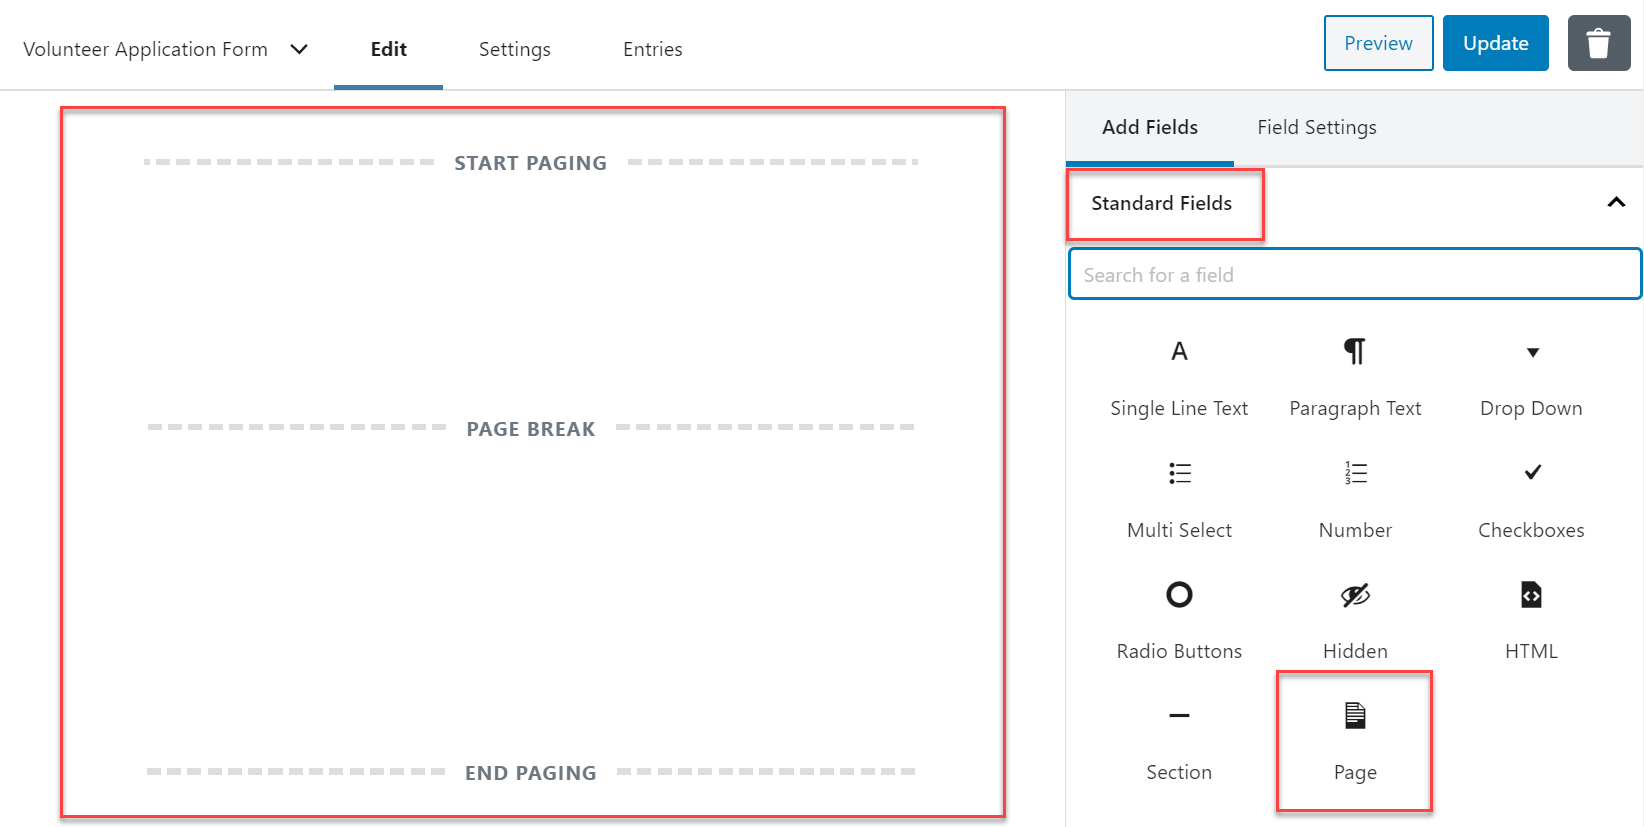
To enable a multi-page form, simply select the form field Page. Add it at the top of your form and anywhere else you’d like to start a new page. Within the Field Settings you can also select to display a Progress Bar, so your users know how much of the form is left to complete.
Step 2: Use Conditional Logic
More often than not, nonprofits have more than one volunteering project or position available. By using conditional logic, you can identify which opening the user is interested in, and then ask them targeted questions related to that event or position.
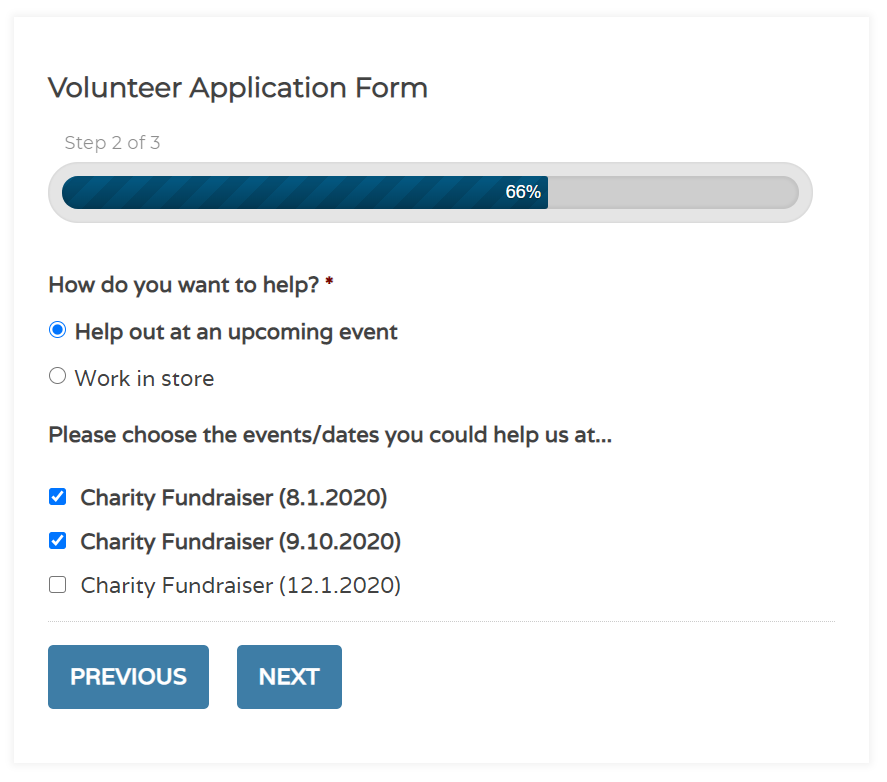
For example, in this form we have selected the Radio Buttons Field and renamed it ‘How do you want to help?’ We have then provided a couple of volunteering options for users to choose from – ‘Events’ and ‘Store Work’.

For the next field we have selected Checkboxes and renamed it ‘Please choose the events/dates you could help us at’. By using conditional logic, this field will show if someone clicks on ‘Events’ from the field above.

To set up conditional logic, under Checkboxes > Field Settings > Advanced, select Enable Conditional Logic. Then choose – Show this field if All of the following match: How do you want to help? is Help out at an upcoming event.
We have then created another field related to ‘Store Times’ and used conditional logic so it will be displayed if users select the ‘Store Work’ option. Here it is in action…

As you can see, by using conditional logic, you can segment the questions asked, depending on the volunteering options users have selected.
Step 3: Add a Consent Field
As you will be collecting user information through this form, it is crucial that you include a Consent field. Using this field, you can either display or link to your privacy policy, which users will need to agree to before submitting the form.

Top Tip: Make sure you remember to make this a Required field.
Step 4: Configure the Form Settings and Embed Your Form
Once your form is completed, Save and Preview it to check it is working correctly. Then configure the form settings – Confirmations and Notifications – and go ahead and embed the form on your website.
Import Our Form Templates
Don’t want to make any of these forms from scratch? Download the templates below and then simply import them to your website…
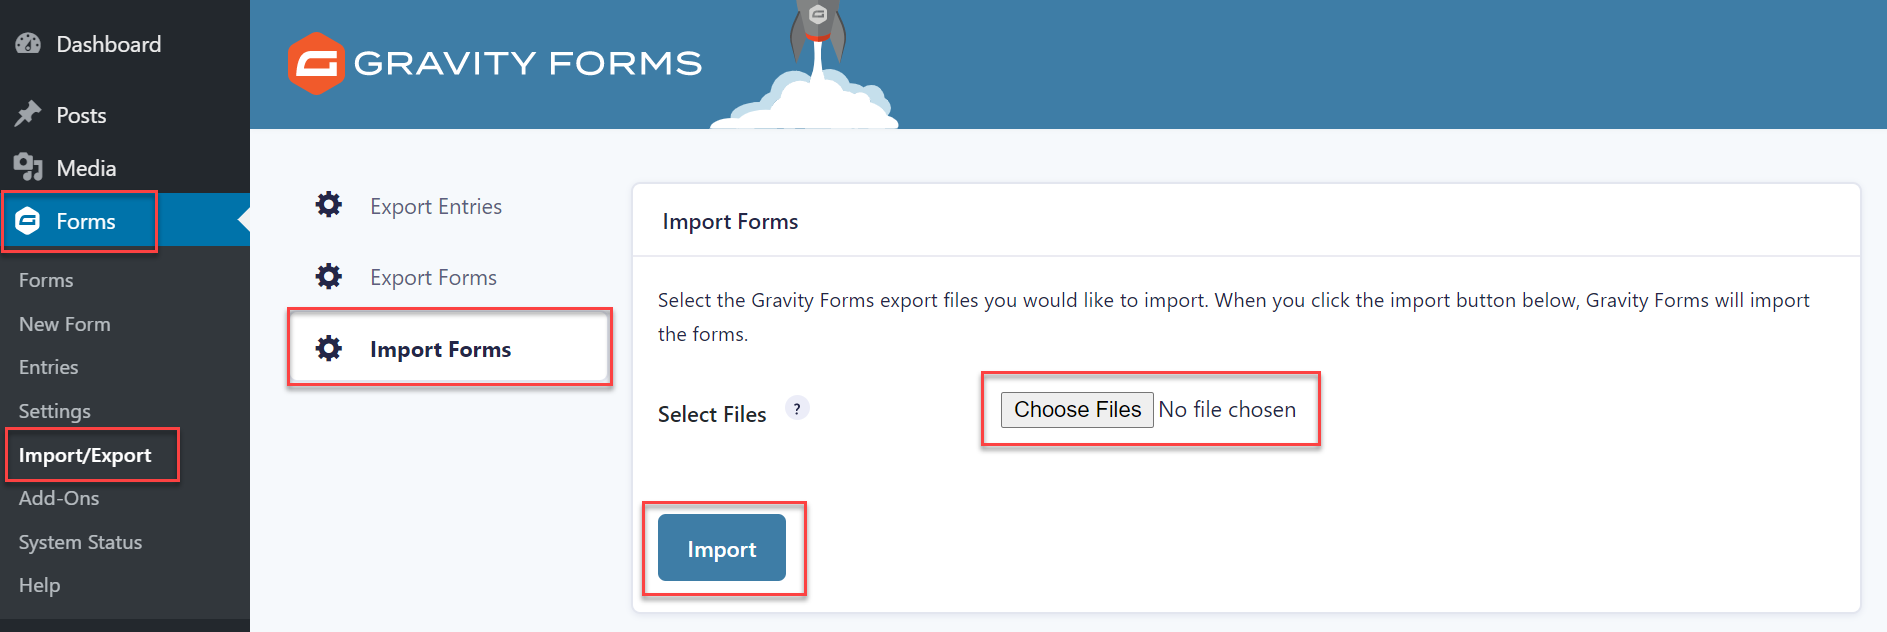
All forms can be easily customized within the form editor to suit your exact needs.
(Note: These templates will need to be extracted from the zip file before you can upload them to your site).
Nonprofit Website Privacy Policy Promotion
Does your nonprofit website have an adequate privacy policy? Gravity Forms have teamed up with Termageddon, an auto-updating privacy policy generator service, to offer all nonprofits 10% off their first order.
Termageddon will not only generate your privacy policy but also keep it auto-updated as privacy laws alter – a must-have for any nonprofit website.


