

Want to accept Square subscription payments on WordPress but not sure how to get started?
With the official Gravity Forms Square Add-On, you can easily create flexible subscription payment forms powered by Square.
In this post, we’ll start with a quick introduction to why Gravity Forms works well with Square and some of the different use cases for Square subscription forms.
Then, we’ll get into the full step-by-step tutorial that shows you how to set up a WordPress Square subscription form that’s tailored to your unique use case.
Let’s dig in!
Example Use Cases for Gravity Forms Square Subscription Payments
With Gravity Forms and Square, you can accept subscriptions for both physical and digital products, which opens up a lot of different use cases.
To give you an idea of what you can build, here are a few example use cases for Gravity Forms Square subscription payments (though this is by no means a complete list).
- Subscription products – if you sell physical or digital subscription products, setting up automatic recurring subscriptions ensures that you get paid each billing period.
- Membership sites – you can charge users to register for your site and assign them a certain user role. You can also change this user role if a user cancels their subscription.
- Service retainer – you can have your clients set up an automatic recurring subscription to make sure you get paid on time.
- Installment plans – you can break large one-time payments into multi-payment installment plans with a fixed end date. E.g. three payments of $199.
- Donations – you can let people make ongoing recurring donations on any schedule.
Benefits of Using Square for Your Gravity Forms Subscriptions
While Gravity Forms supports other payment gateways that work with subscriptions, Square can make a great choice for your subscription forms for a few different reasons:
- Reliable payment processing – Square is one of the most popular and well-established payment processors, so you can be confident that your subscriptions will go off without a hitch.
- Accepts all major credit cards — Square offers the same rate for Visa, Mastercard, and American Express payments.
- User-friendly dashboard – the Square dashboard makes it easy to view and manage your subscriptions. You can also view subscriptions in your WordPress dashboard.
- Security — Square follows all necessary industry security requirements to ensure all your data, and that of your customers, is safe and secure.
- Extensive support — you can get both phone and email support as well as take advantage of their support center with plenty of articles and video tutorials to help you get started with their platform.
Key Features of Gravity Forms Square Add-On
Here are some of the specific reasons why Gravity Forms makes a great option for WordPress Square subscription forms:
- Subscription amount customization – you can charge the subscription on the full value of a customer’s order or only part of the order.
- Billing period control – you can charge your subscription per day, per week, per month, or per year.
- Billing cycle limits – you can have your subscriptions run infinitely until canceled or automatically stop them after a certain number of billing periods. The latter would let you set up installment plans, such as “four monthly payments of $199”.
- Conditional logic – you can use conditional logic to only enroll users in the subscription if they meet certain conditions. For example, if you’re accepting donations, you could add a checkbox that users can check to “make it a monthly donation” and only start the subscription if they check that box.
- Manage subscriptions from WordPress – you can cancel and/or refund a subscription directly from your WordPress dashboard and also view other relevant subscription details.
- Authorize and capture – you can authorize the subscription payment upon form submission but wait to actually process the payment until a later time.
- Support for other Gravity Forms Add-Ons – you can integrate subscriptions with other Gravity Forms features and add-ons, such as registering an account for a user after they subscribe.
- Change user role when subscription canceled – you can automatically adjust a user’s role if their subscription is canceled, which works great for membership sites.
How to Accept Subscription Payments With Gravity Forms and Square
Now that you understand how Gravity Forms and Square can help you level up your WordPress subscription payments, let’s get into the actual step-by-step tutorial on how to set up your first Gravity Forms Square subscription form.
For this tutorial, the only things we’ll assume are that you already have a working WordPress site with the core Gravity Forms plugin installed.
To follow this guide, you’ll also need at least the Gravity Forms Pro license. You need this license in order to access the Square Add-On. You can also access the Square Add-On on the Elite and Nonprofit licenses.
If you’re not already using at least the Pro license, you can purchase a new Gravity Forms Pro license here or upgrade your existing Basic license and only pay the prorated difference.
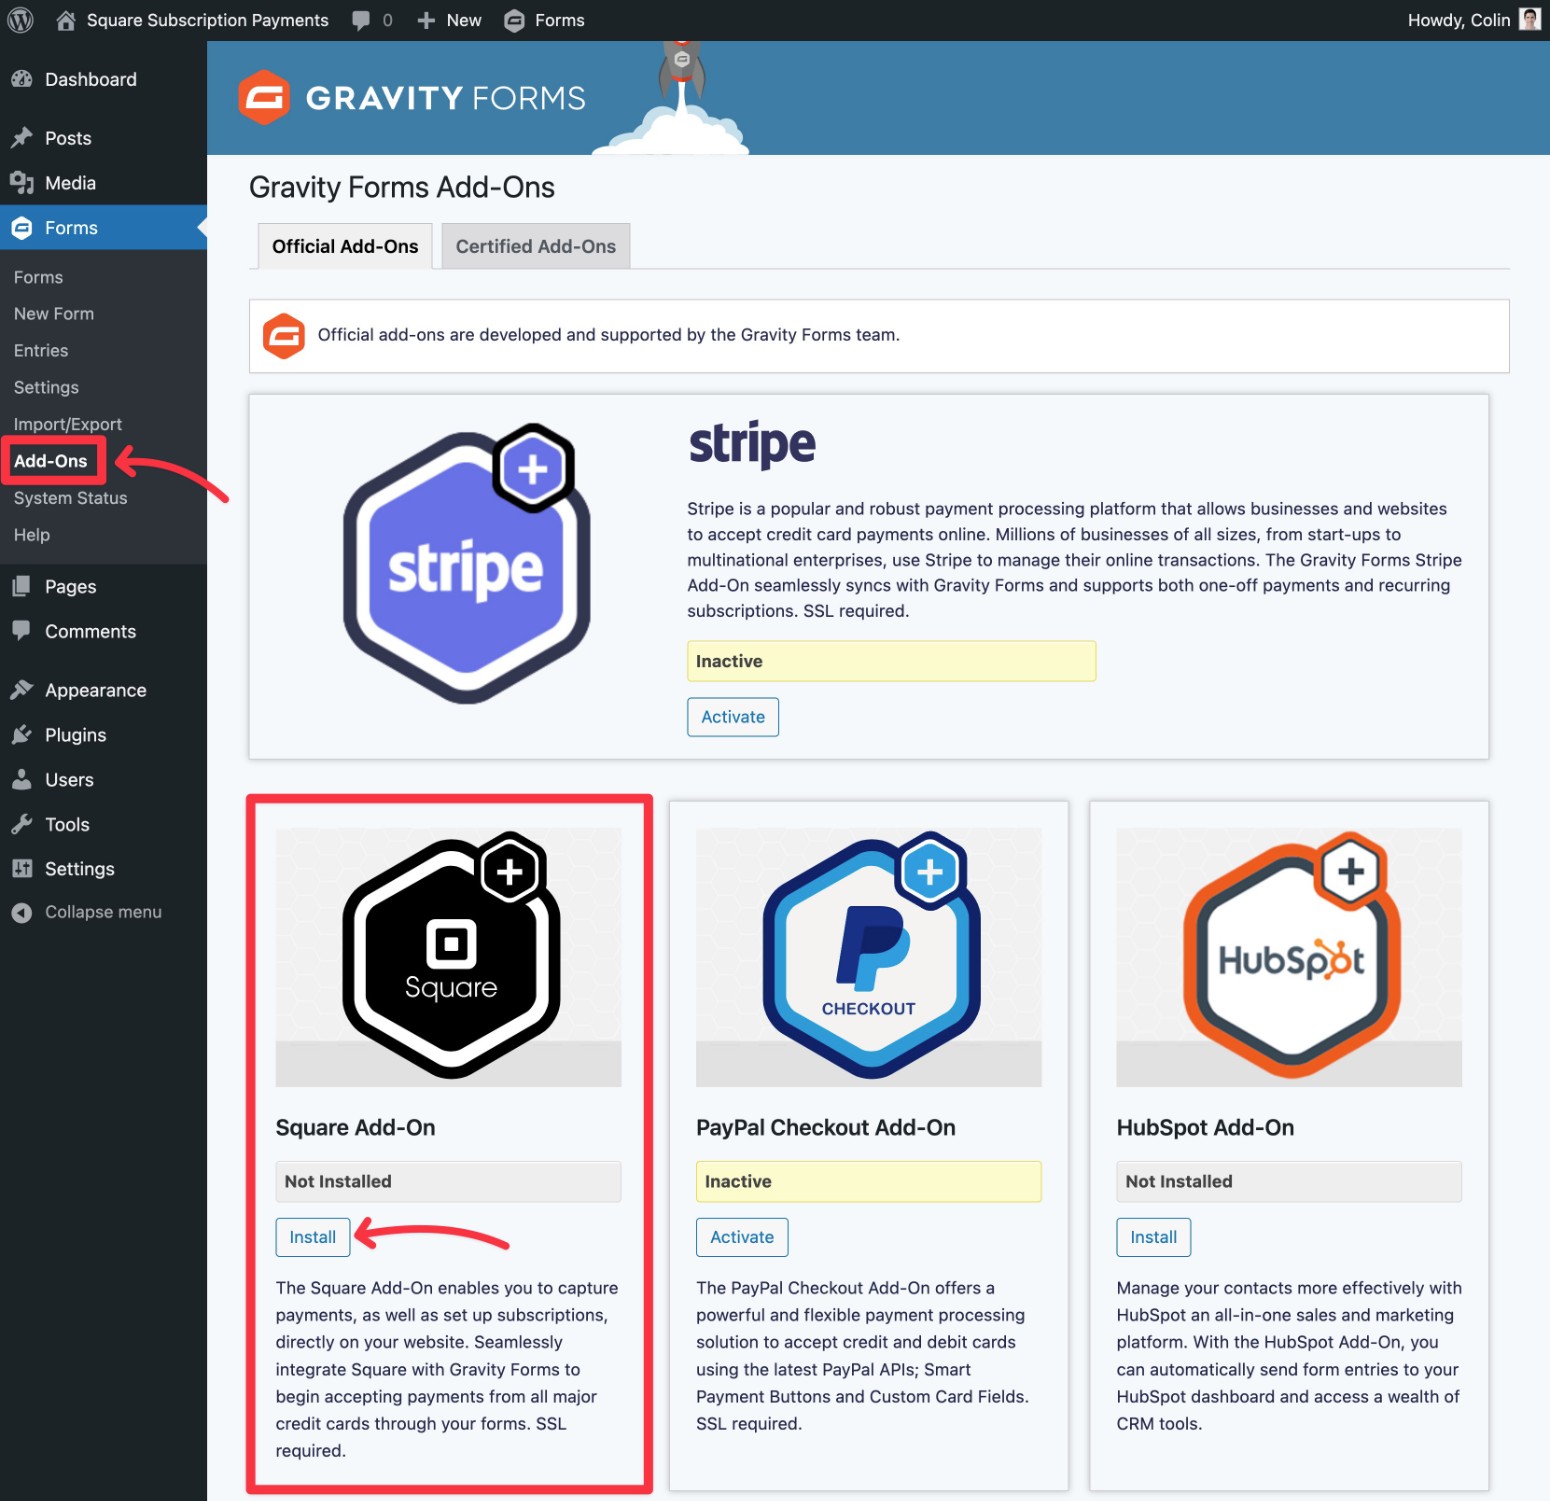
1. Install the Gravity Forms Square Add-On
Before you create your subscription form, you’ll first want to install and activate the official Gravity Forms Square Add-On:
- Open your WordPress dashboard.
- Go to Forms → Add-Ons.
- Find the Square Add-On in the list – it should be near the top.
- Click Install and then activate the plugin after the installation finishes.
2. Connect Your WordPress Site to Square
Once you’ve installed and activated the add-on, the next step is to connect your WordPress site to your Square account via the add-on’s settings area.
If you don’t already have a Square account, you’ll first want to register for a free Square account.
Then, here’s how to connect your Square account to your WordPress site
- Go to Forms → Settings → Square to access the Square settings area.
- Choose Sandbox mode for now – this lets you test things while you’re setting everything up. Once you’re happy with your forms, you’ll need to come back and change it to Live mode to accept actual payments. We’ll cover this later on.
- Click the Connect with Square button.
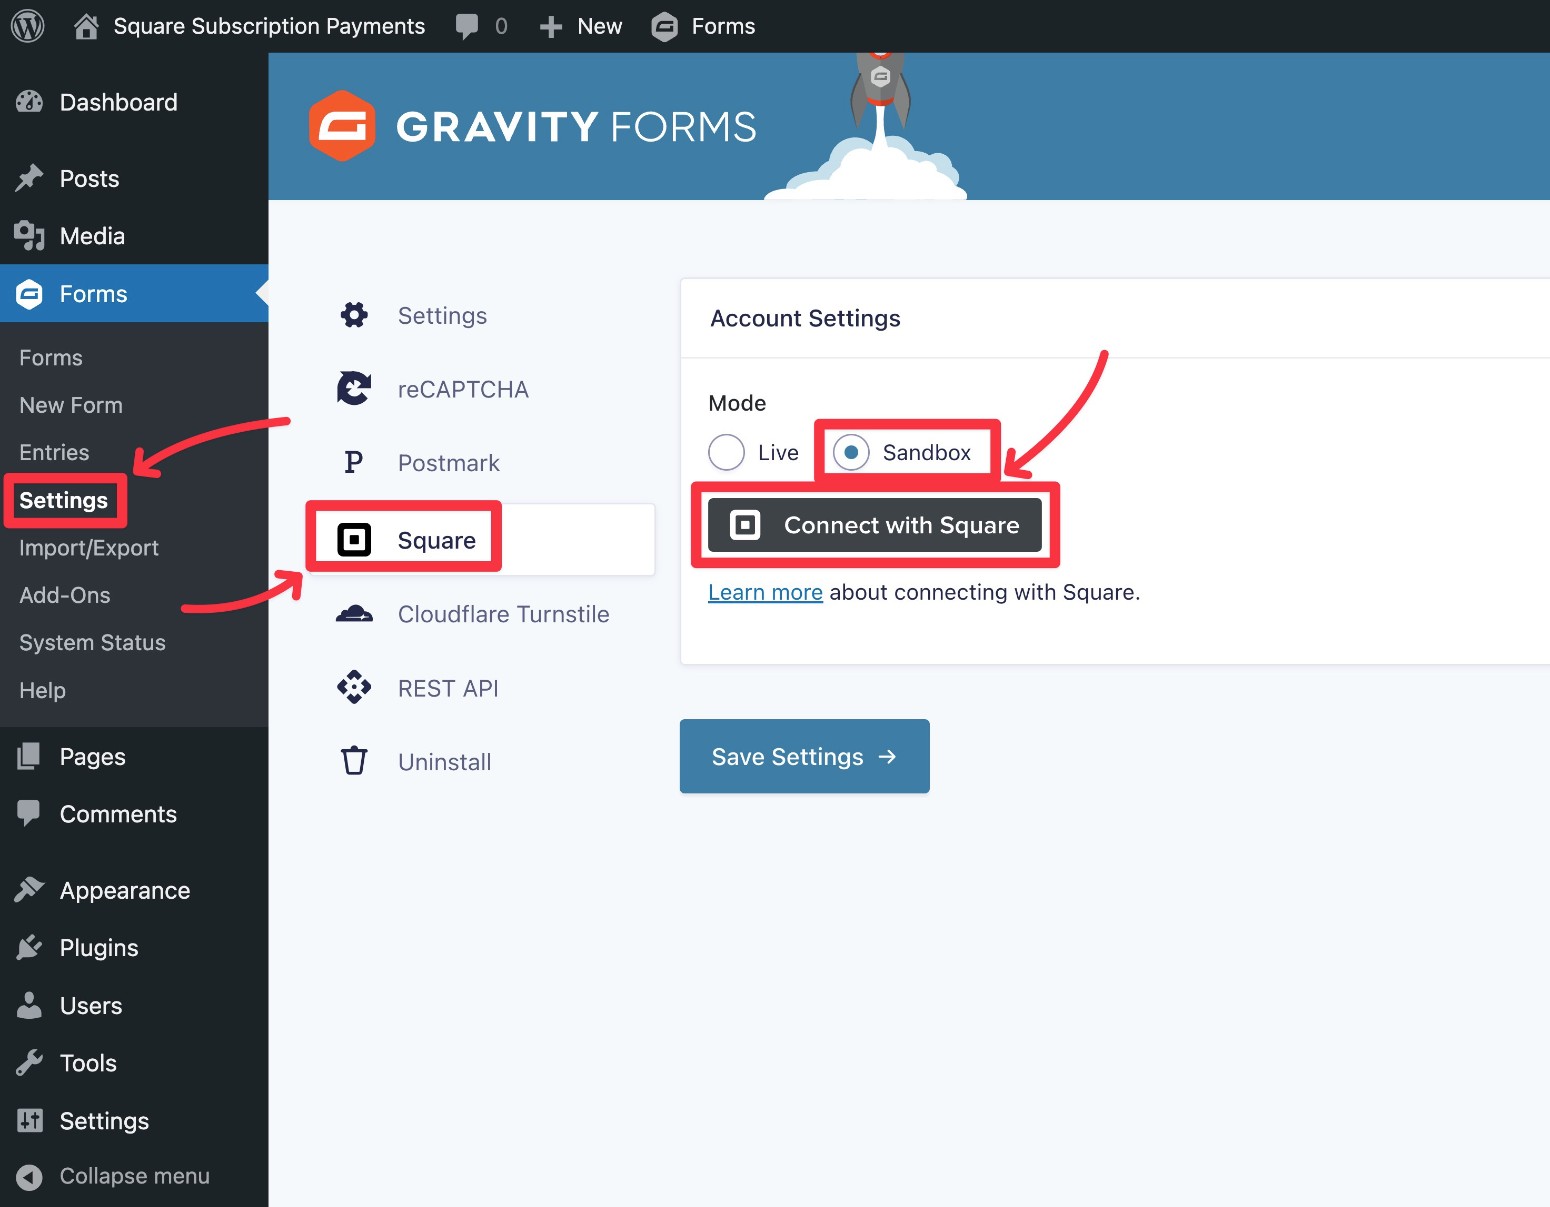
This should open the Square website briefly and then redirect you back to your Gravity Forms dashboard after the connection is complete.
Make sure to click the Save Settings button.
However, if you’re using Sandbox mode, you might see an error message like this:
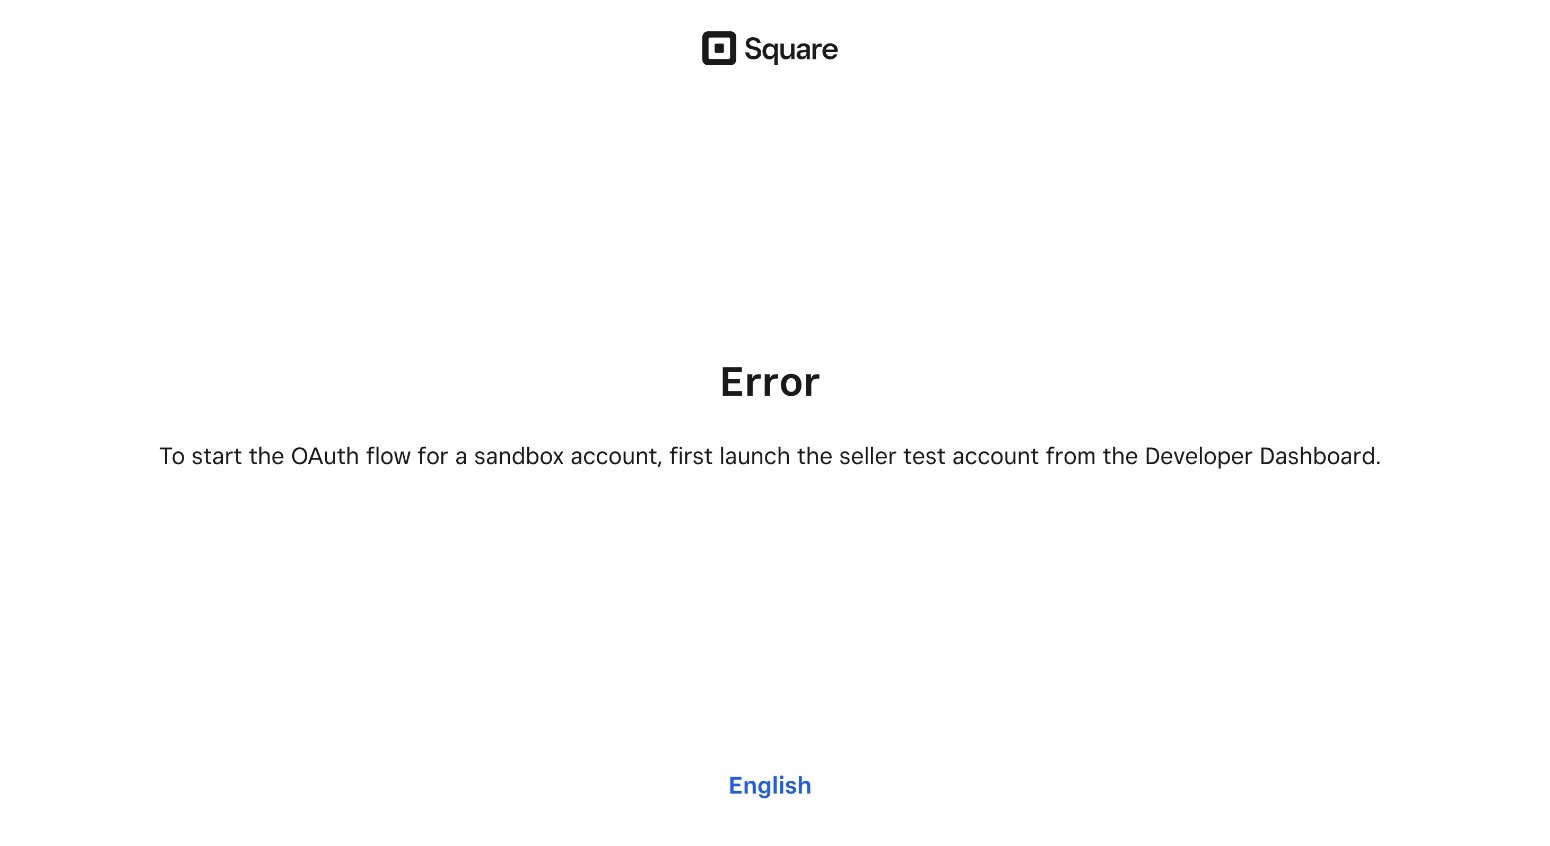
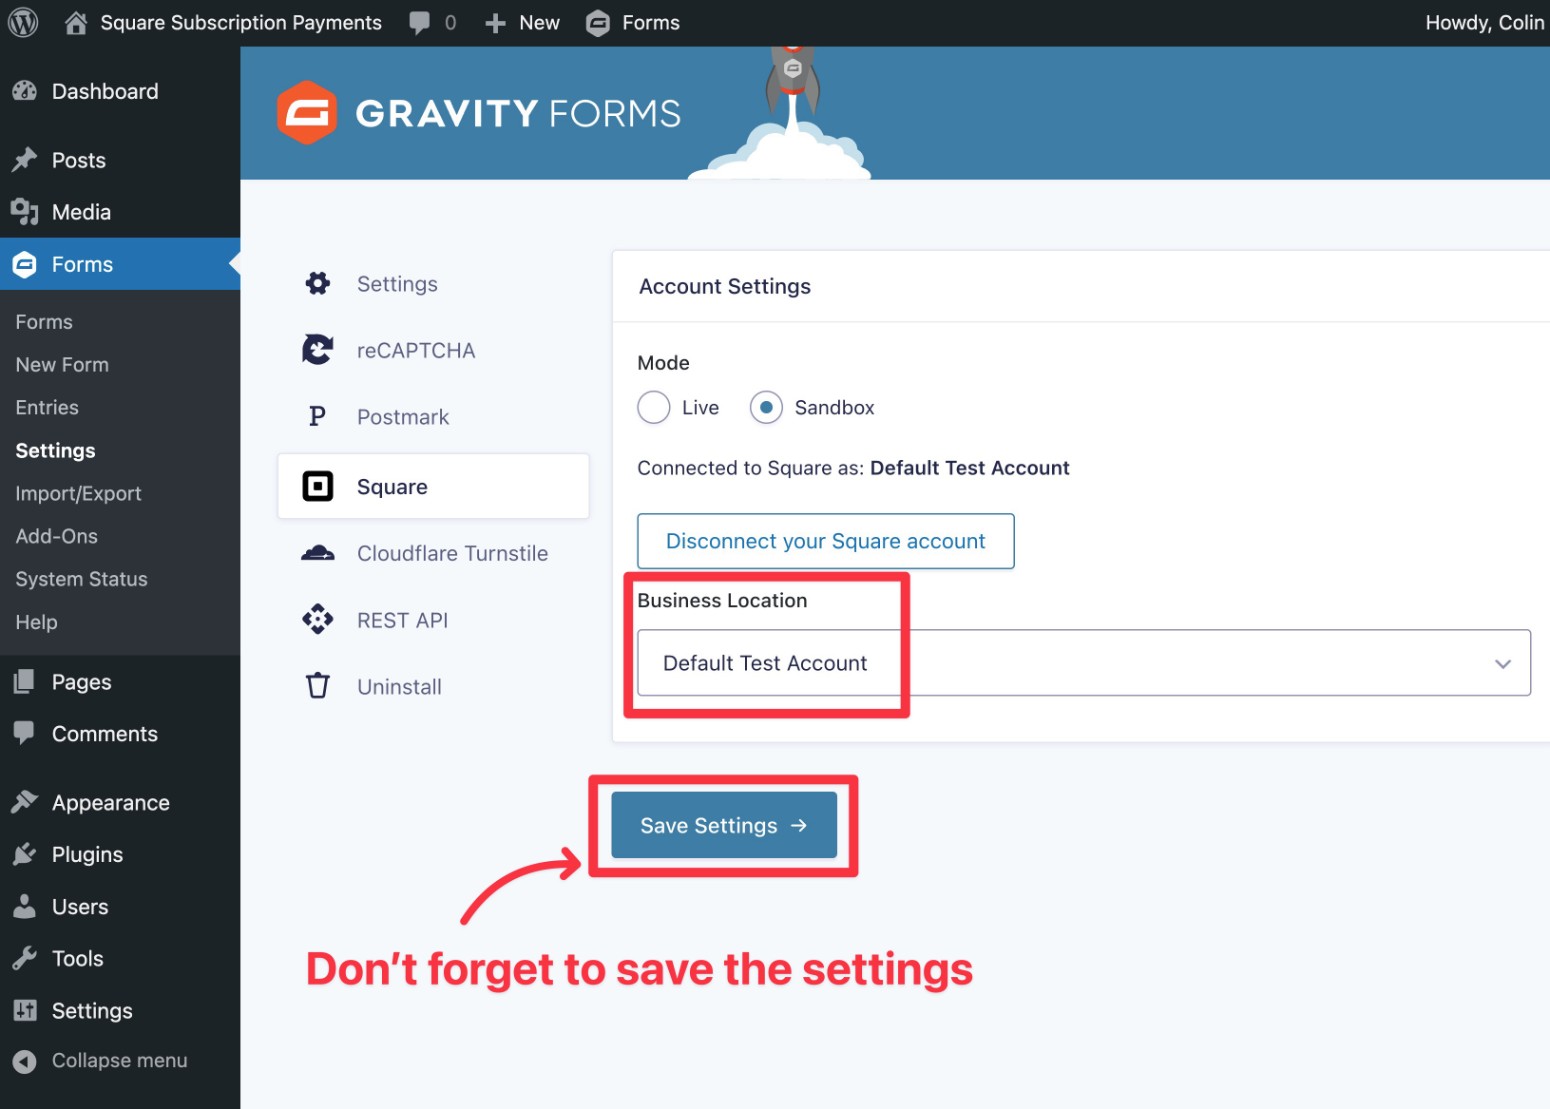
If that happens, click this link to open the Square Developer dashboard in a new tab. Then, click the Open button next to Default Test Account.
Leave the tab with the Sandbox test account open. Then, go back to your WordPress site and repeat the same steps above to click the Connect with Square button.
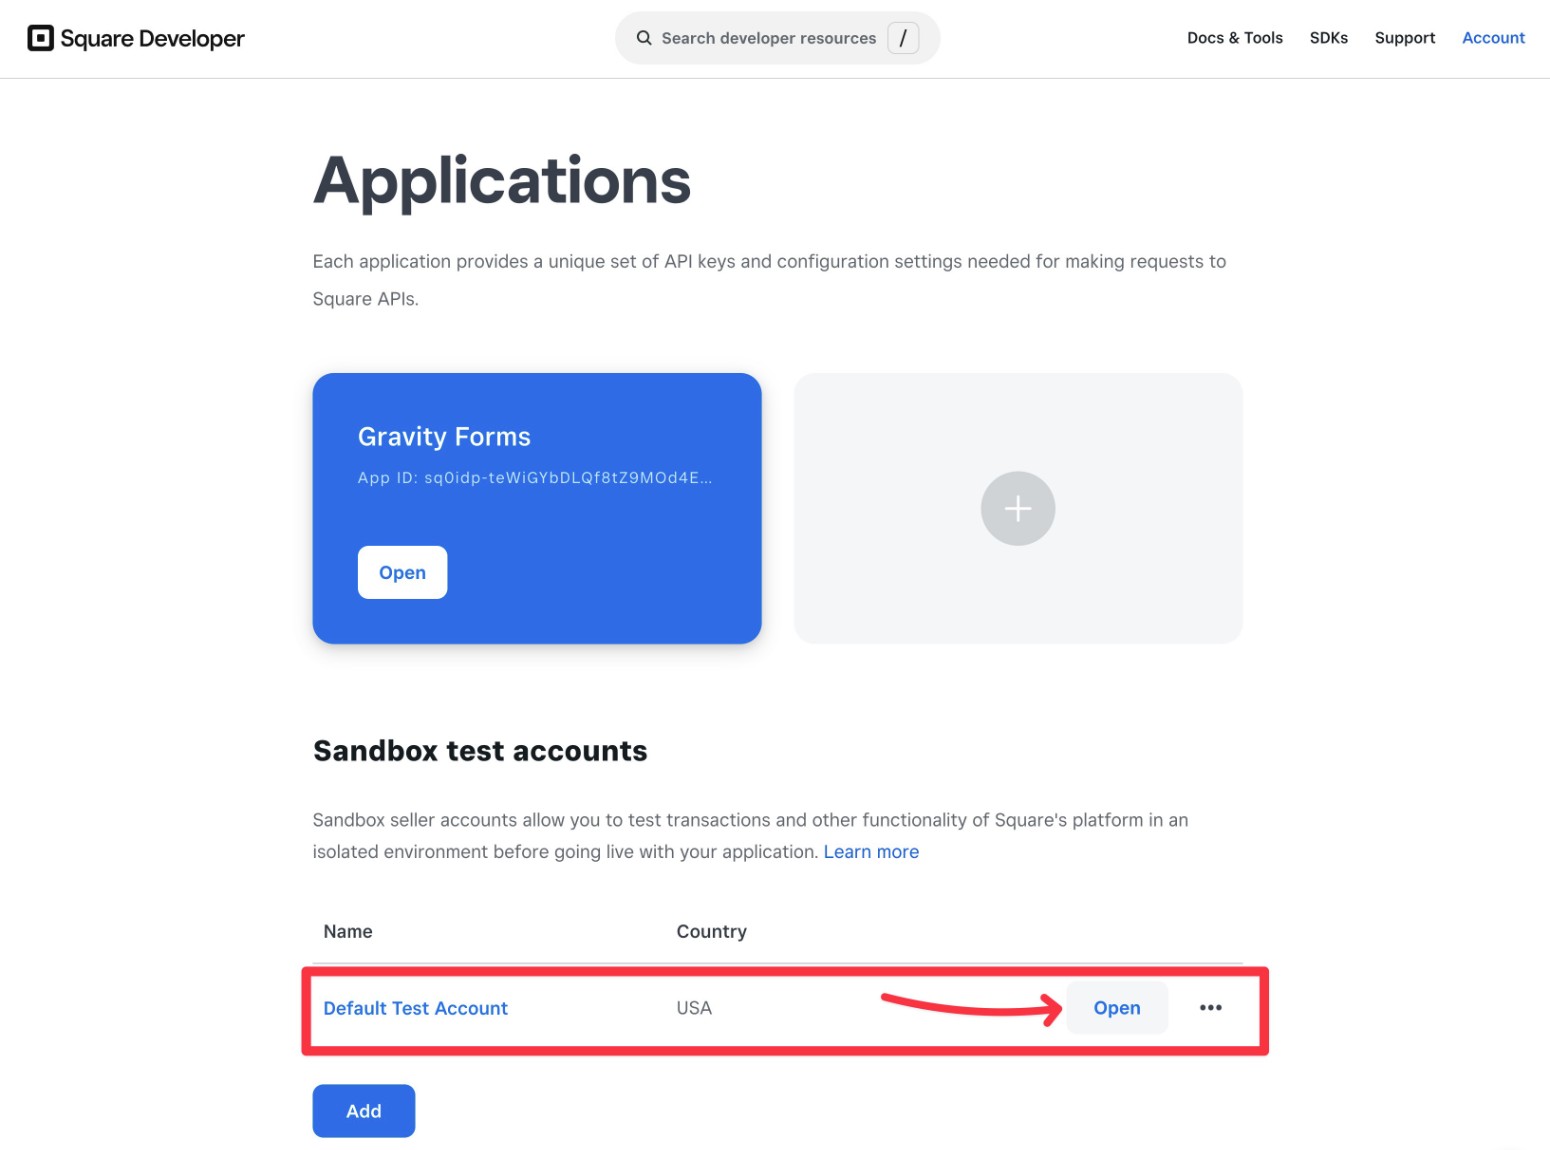
Once you do it like this, you should be taken back to your WordPress dashboard. You should also see the Default Test Account as the Business Location.
Make sure to click Save Settings to save the configuration.
3. Create Your Square Subscription Payment Form
Now that you’ve set up the Square Add-On, you’re ready to create your actual subscription payment form.
Create a New Form
Go to Forms → New Form.
To save time, you can use the premade eCommerce Form template, which is what we’ll do for this tutorial.
Or, you can always choose the Blank Form option to set up your form from scratch.

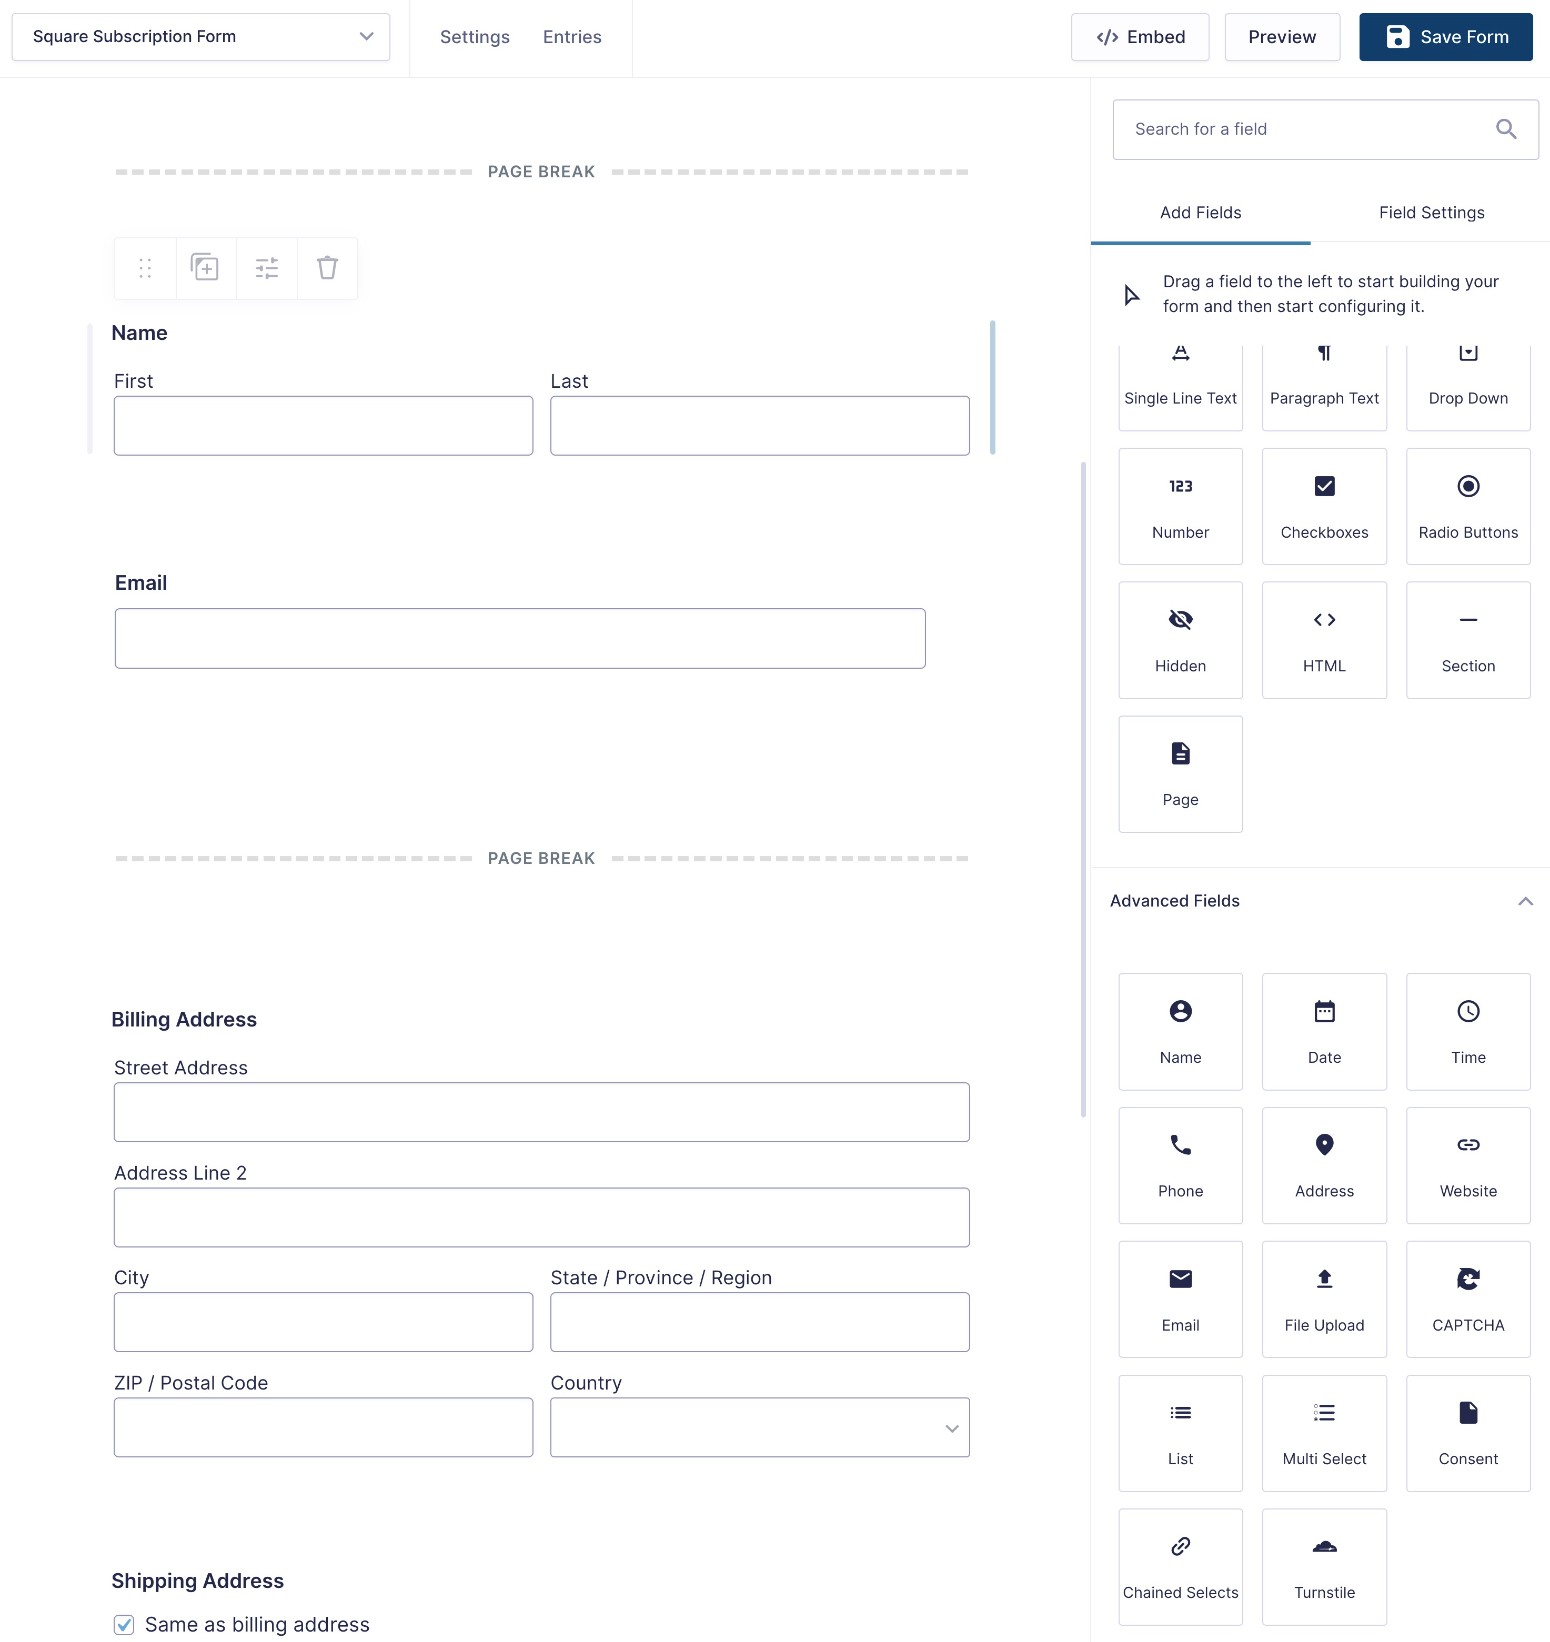
Edit Form Fields
If you use the eCommerce Form template, it will already include fields to collect people’s names and billing addresses.
However, if you want to collect additional information beyond that, you’re free to add as many fields as needed.
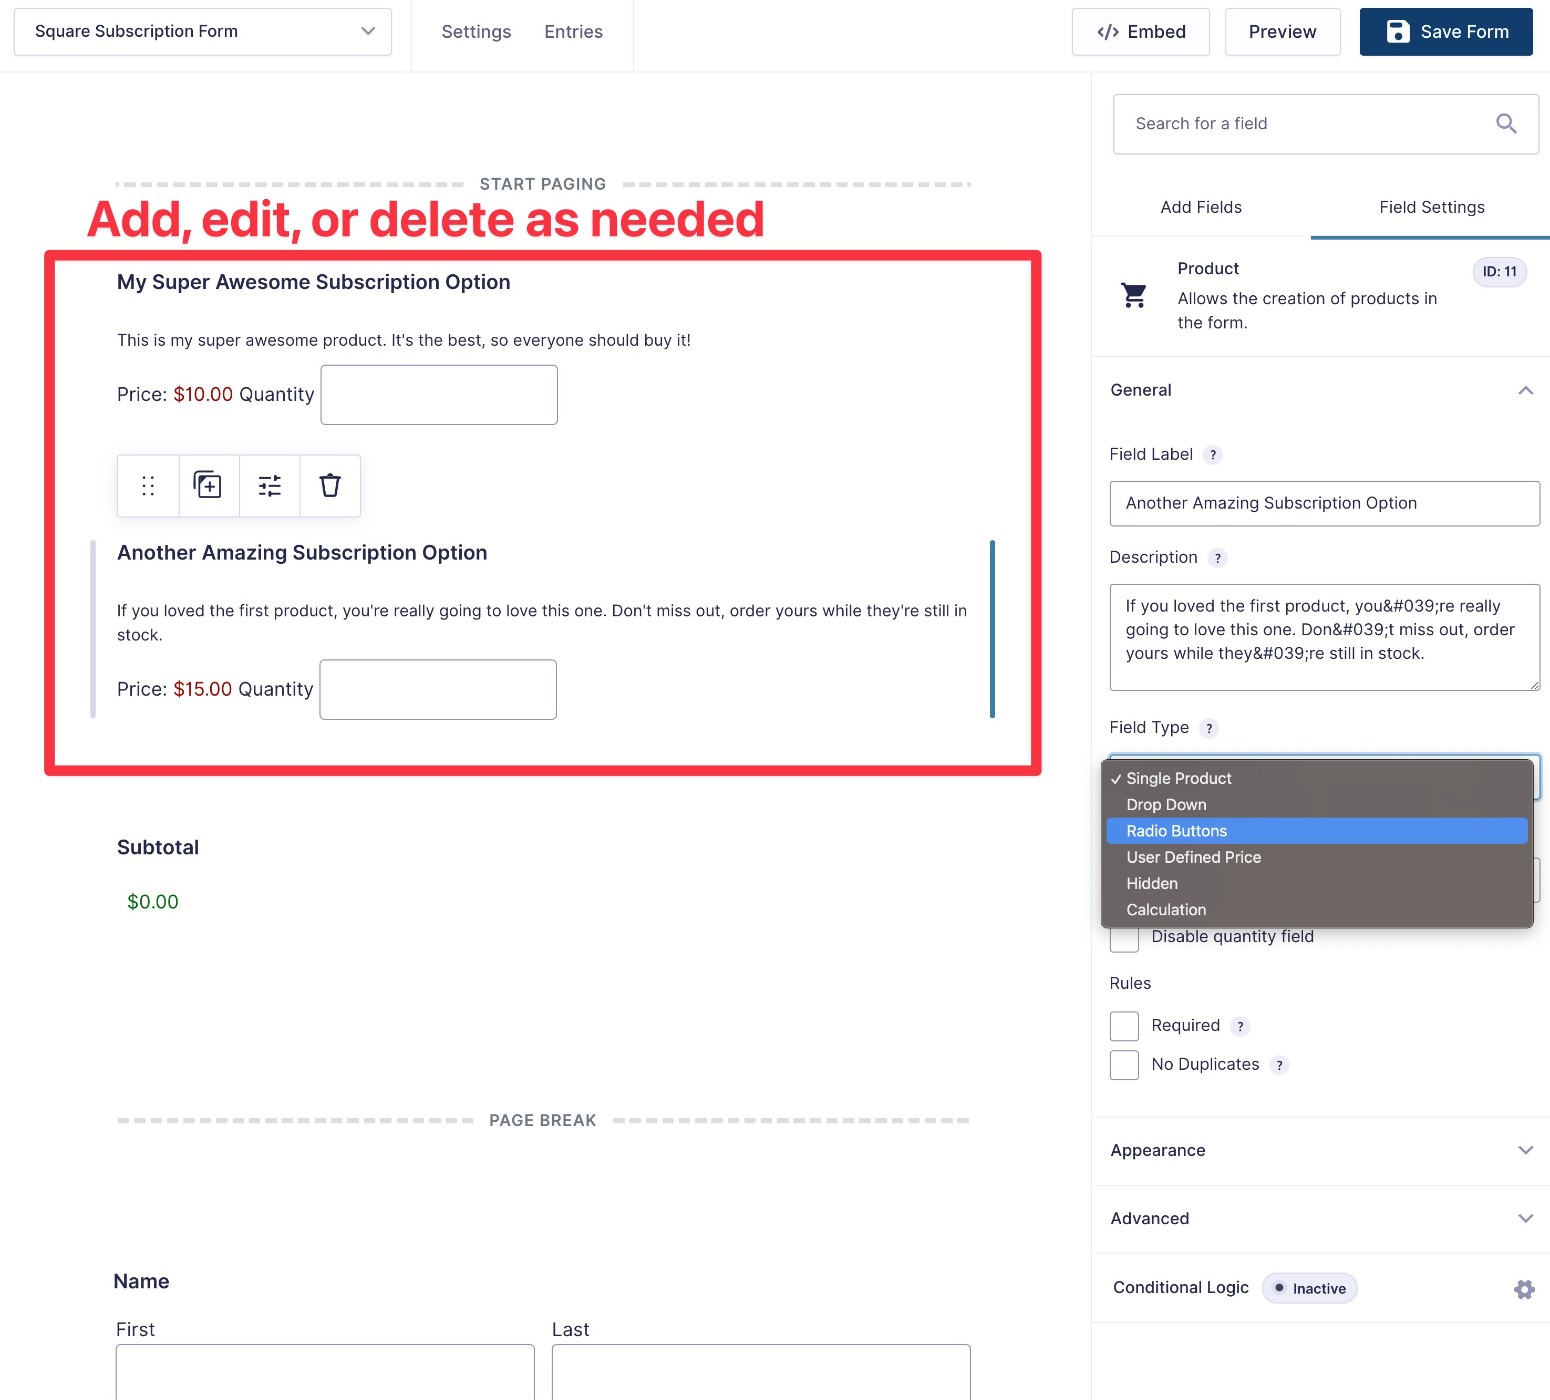
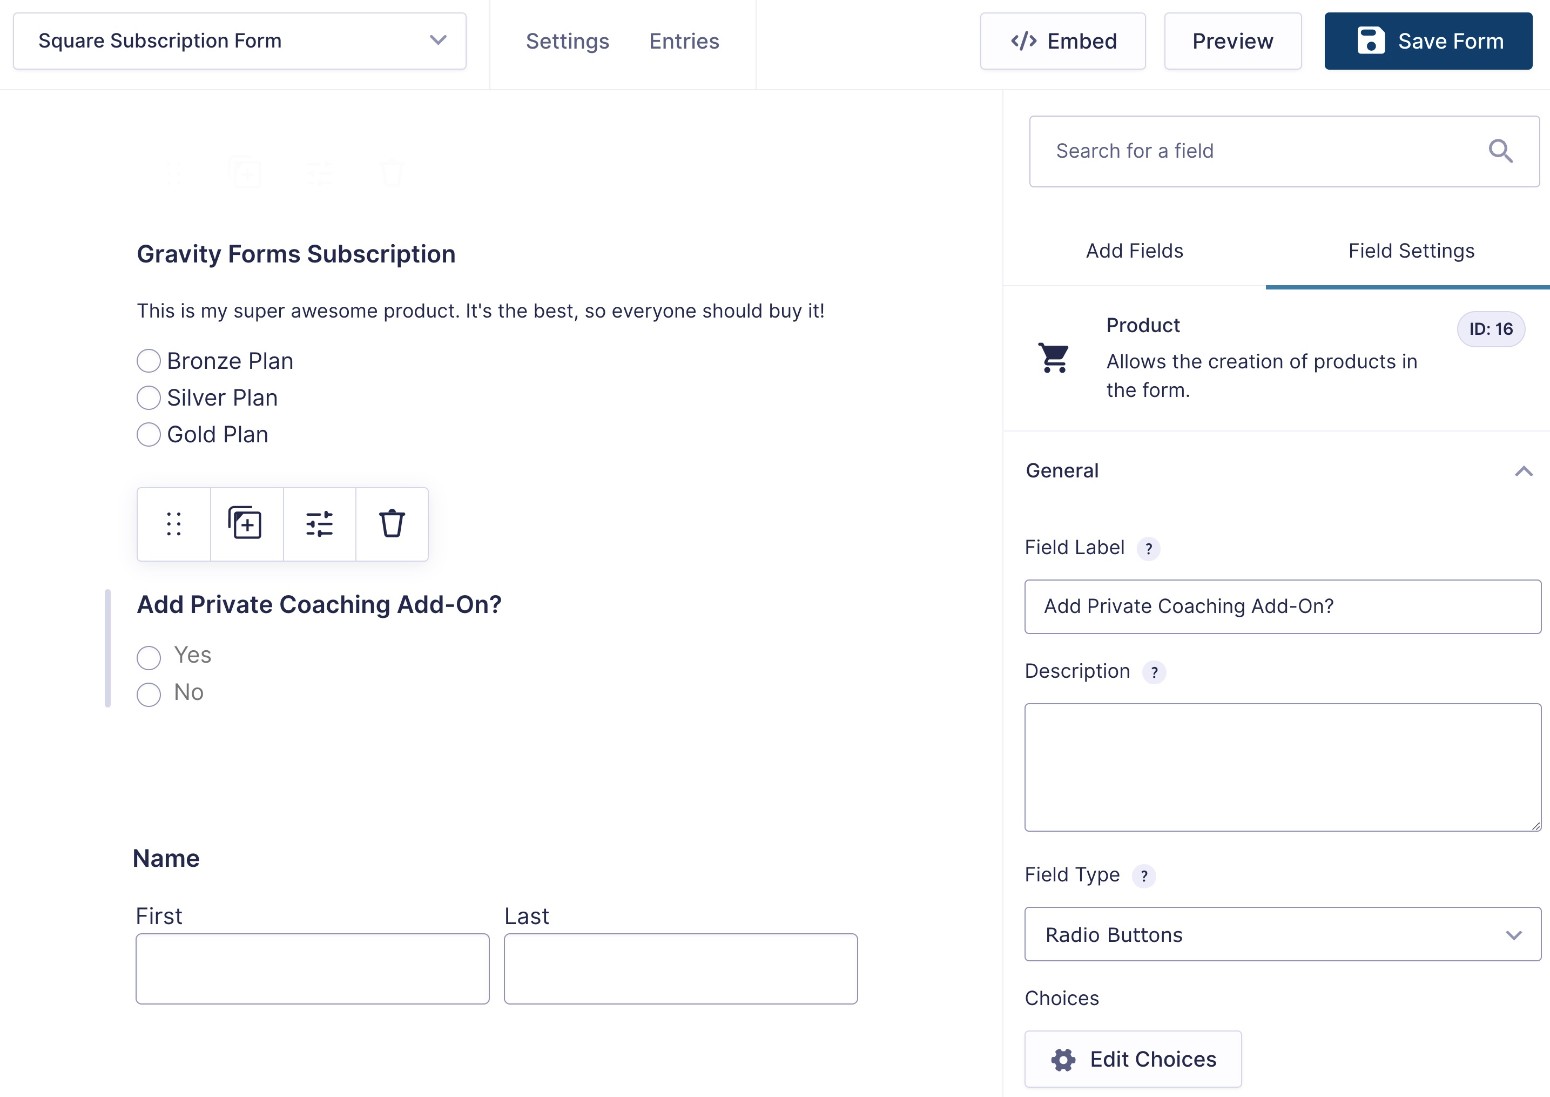
Edit Product Fields
To control the price of your subscriptions, you’ll use Product fields.
The eCommerce Form template already comes with two Product fields. You’re free to edit those according to your preferences.
You can add more Product fields or delete one of the existing Product fields as needed. You can also add multiple subscription options within a single Product field by adjusting the Field Type drop-down in the Product field settings.
Beyond the Product fields, the template also includes a Shipping field. If you’re shipping physical products as part of the subscription, you can customize this according to your needs. Otherwise, you’re free to delete it.
Make sure to also use the Subtotal and/or Total fields to calculate the full price of your subscription, if you have multiple products and/or shipping options.
Here’s an example of us editing the Product fields to add a core subscription with three different tiers, as well as an optional coaching add-on that costs an extra $50 per month.
Related information:
- Product field documentation
- Shipping field documentation
- Total field documentation
- Product Option field documentation
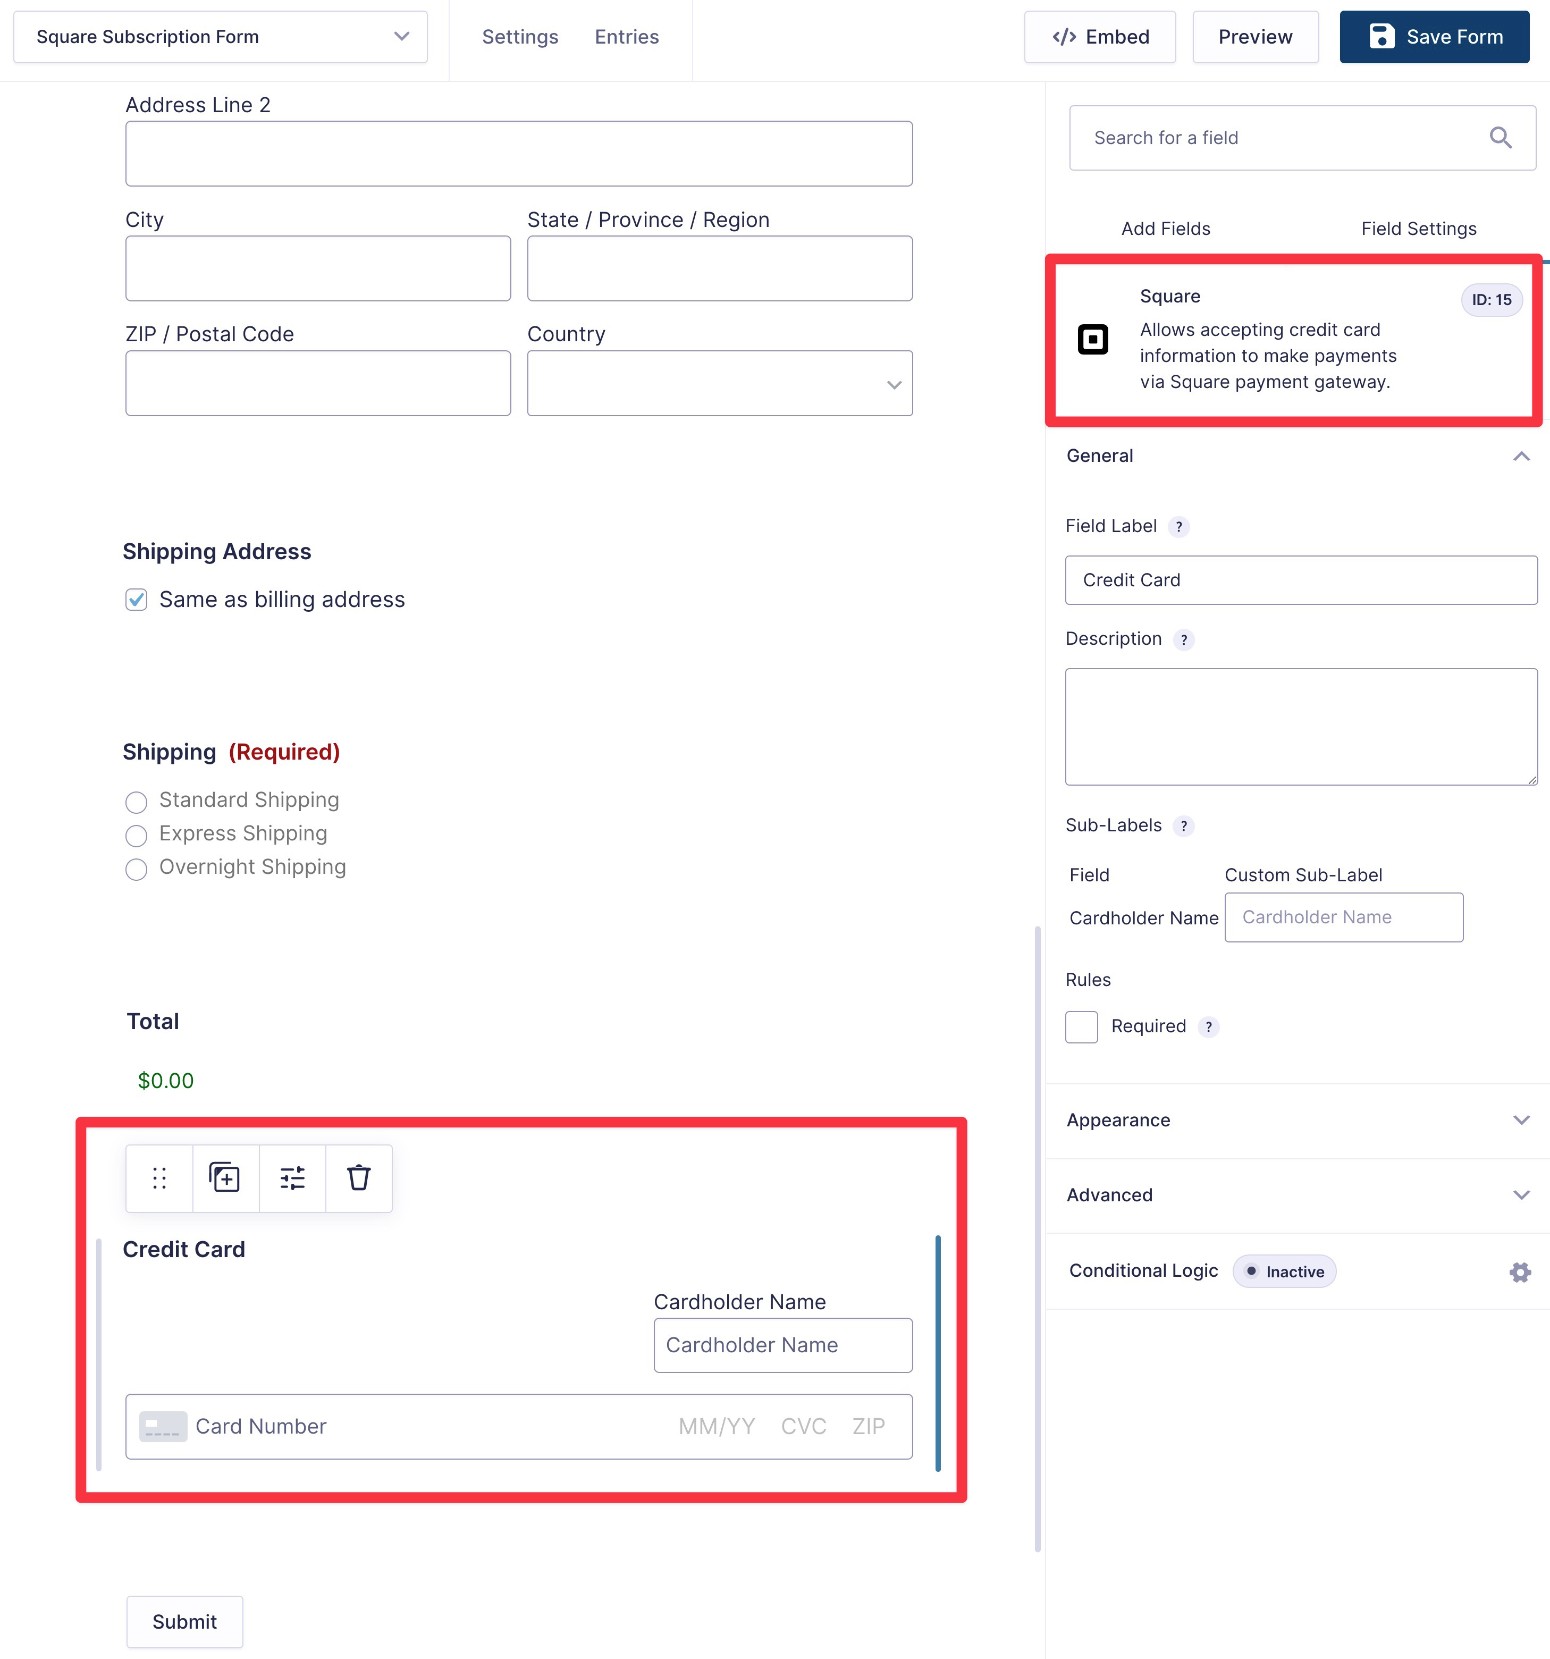
Add Square Checkout Field
Once you’ve configured the other fields in your form, you can finish the form field setup by adding the Square field to your form where you want users to enter their credit/debit card information.
4. Set Up a New Square Feed
Now, you’re ready to set up a Square feed to control how to process subscription payments.
Go to Settings → Square → Add New within the form builder interface.
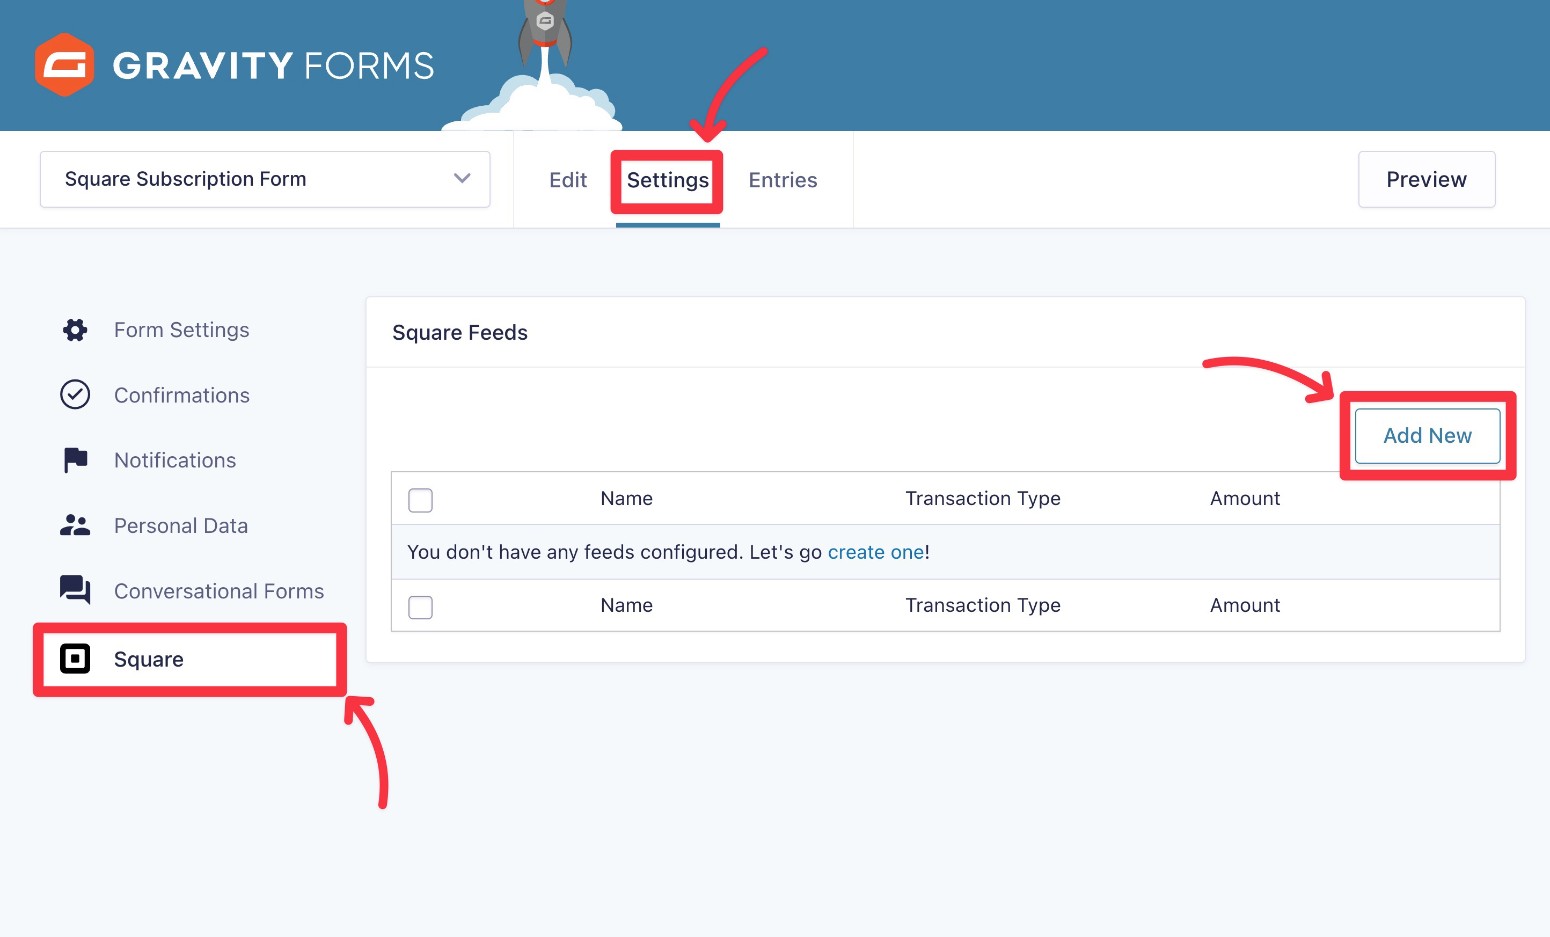
Set the feed’s Transaction Type equal to Subscription.
Then, use the Subscription Settings box to configure your subscription:
- Recurring Amount – you can set this to a single Product field or to the form total. Usually, you’ll want to choose the form total.
- Billing Cycle – choose how often to bill – e.g. every month. You can also choose the number of billing cycles. To have the subscription recur until you or the user cancels it, set it equal to infinite.
Below that, you’ll also want to map the address fields from your form to the billing information from Square.

You also have the option to set up conditional logic. For example, you could only set up the subscription if the user checks a box to enroll in recurring billing.
5. Set Up Other Integrations (Optional)
This step is totally optional…
However, one of the great things about using Gravity Forms for Square subscription payments is that you can also set up other integrations using the other Gravity Forms Add-Ons.
Here are just a few examples of what you might want to do:
- Give subscribers the option to join an email newsletter that you manage with Mailchimp, ActiveCampaign, Campaign Monitor, and similar tools. Check out the best email plugins here.
- Add customers to your CRM, such as HubSpot, Zoho CRM, and others.
- Create a new task in your project management software, such as adding a new Trello card for each subscription.
- Connect to any one of the thousands of apps on Zapier using the Zapier Add-On.
Check out all the Gravity Forms Add-Ons to learn different ways that you can enhance your Square subscriptions form.
6. Embed Your Form (and Test It)
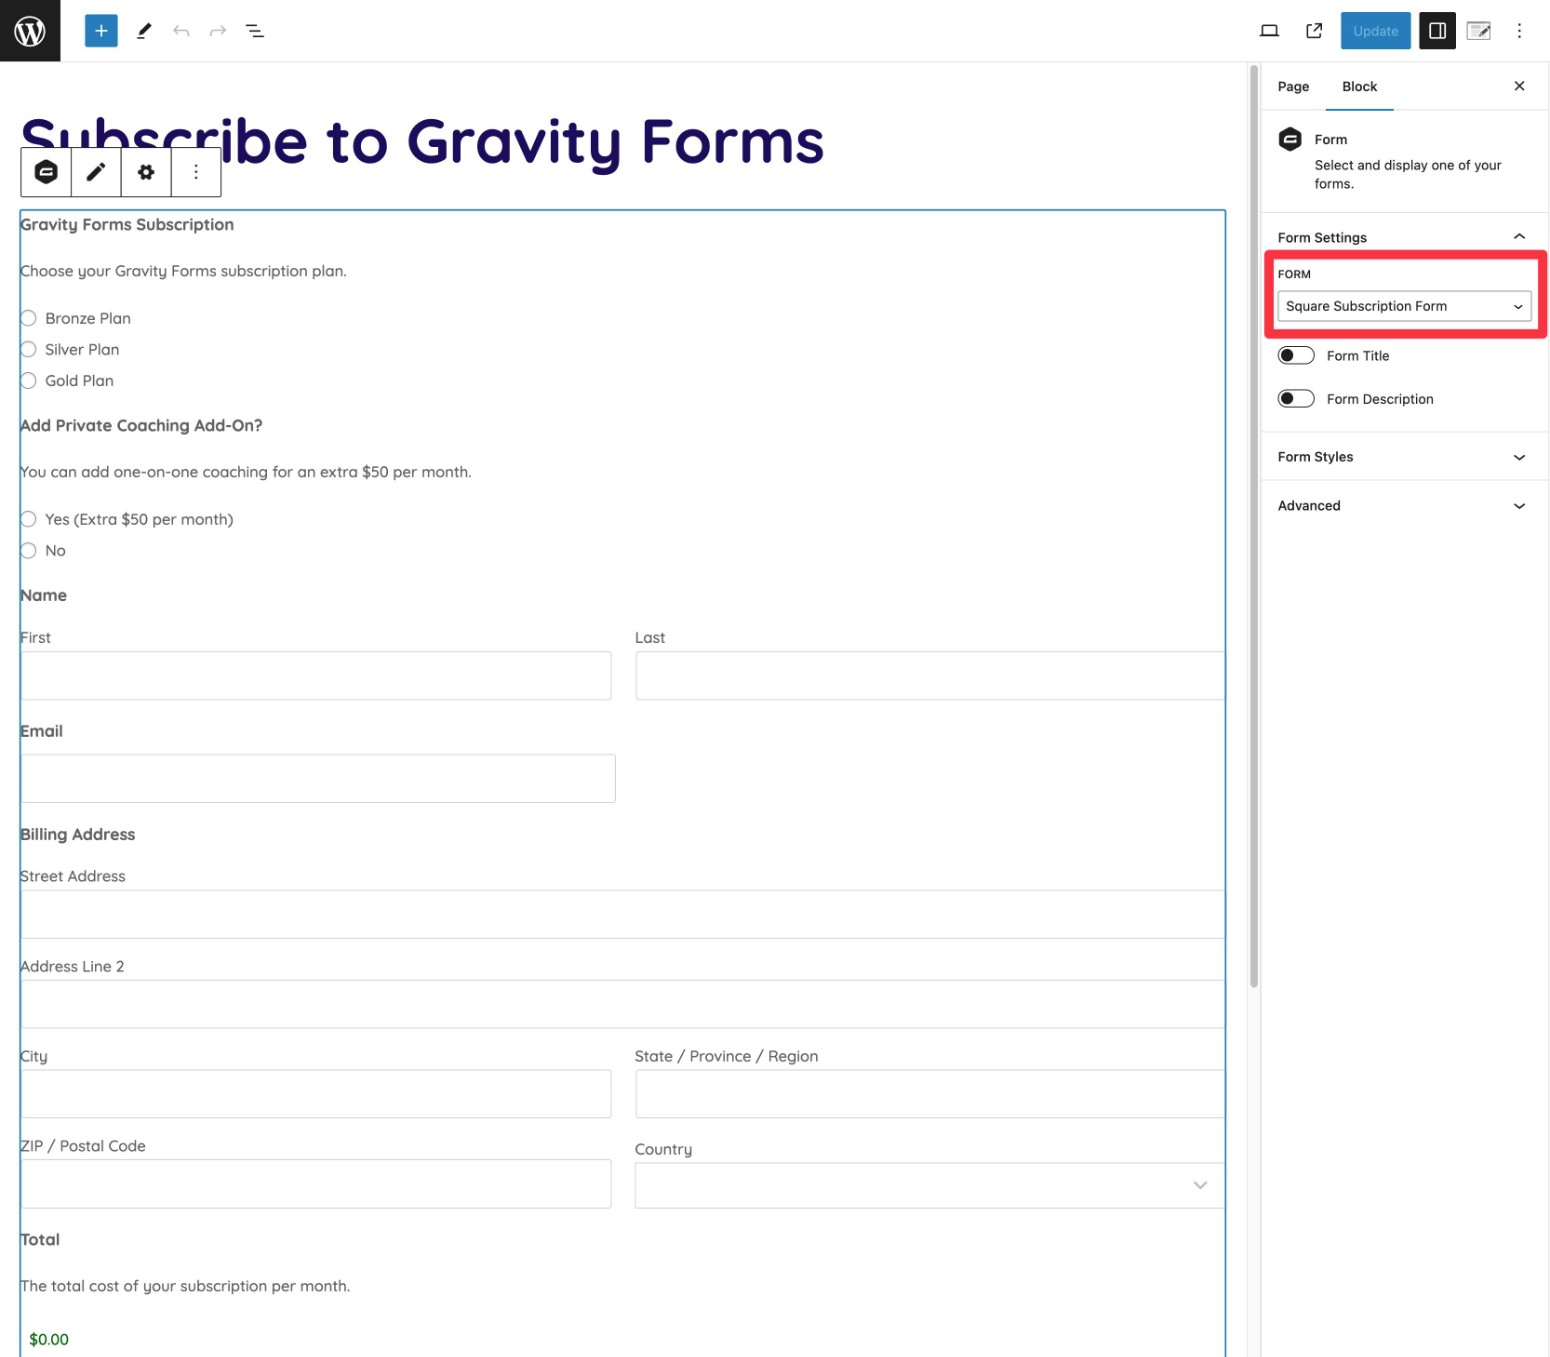
Once you’ve set up your Square feed, you can embed your subscription form anywhere on your site using the Gravity Forms block or shortcode.
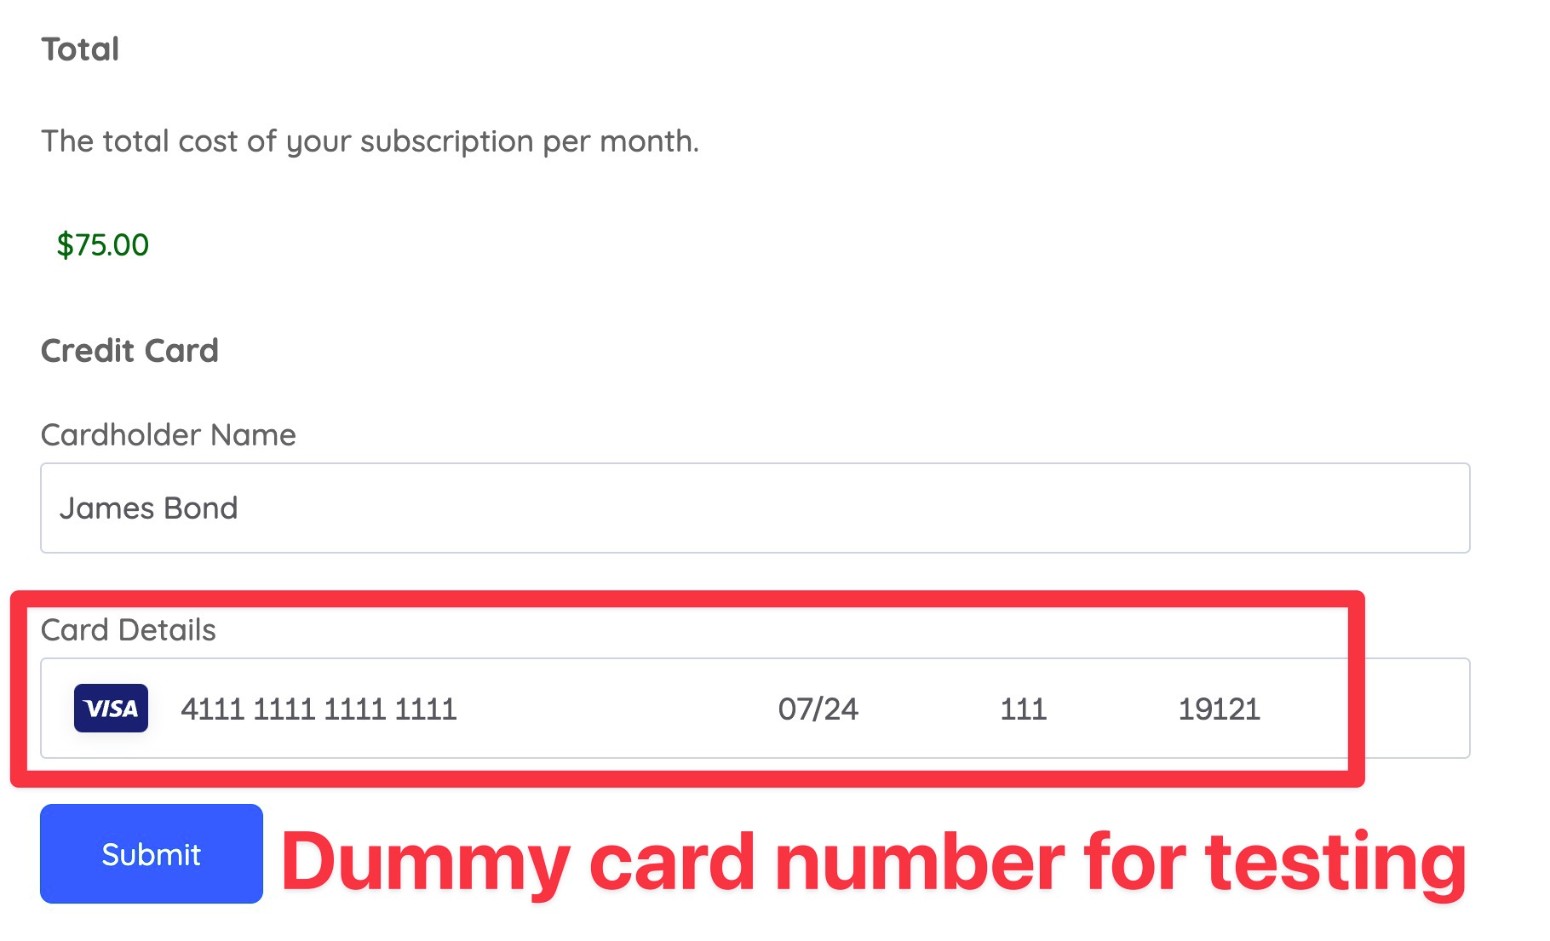
Once you’ve embedded your form, you can perform some test subscriptions to make sure that everything is working.
Because your form is set to sandbox mode, these will not process real payments. Instead, you can use one of the Square sandbox credit card numbers.
Here’s an example of what it looks like to use the dummy card data:
How to View and Manage Subscriptions
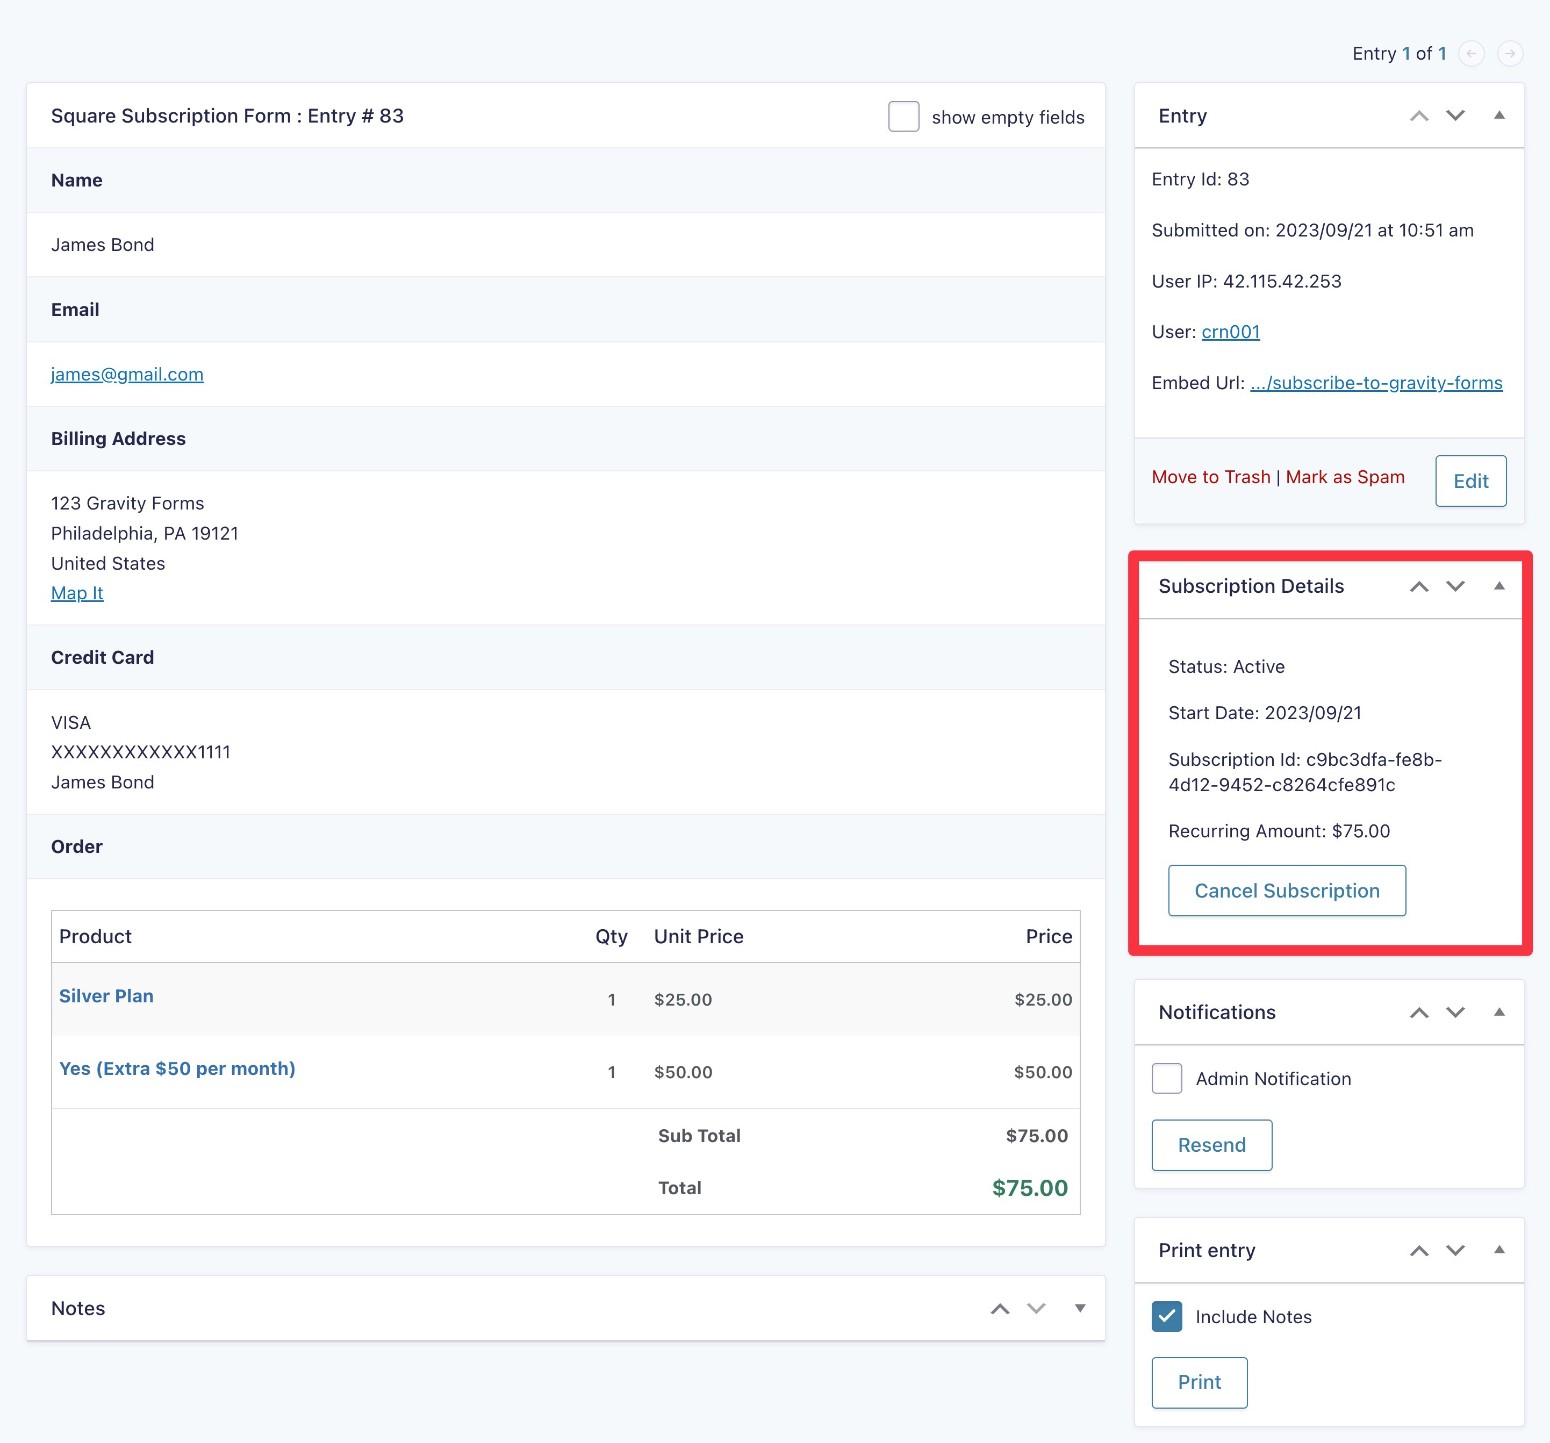
If it worked properly, you should see the payment show up in that form’s Entries dashboard.
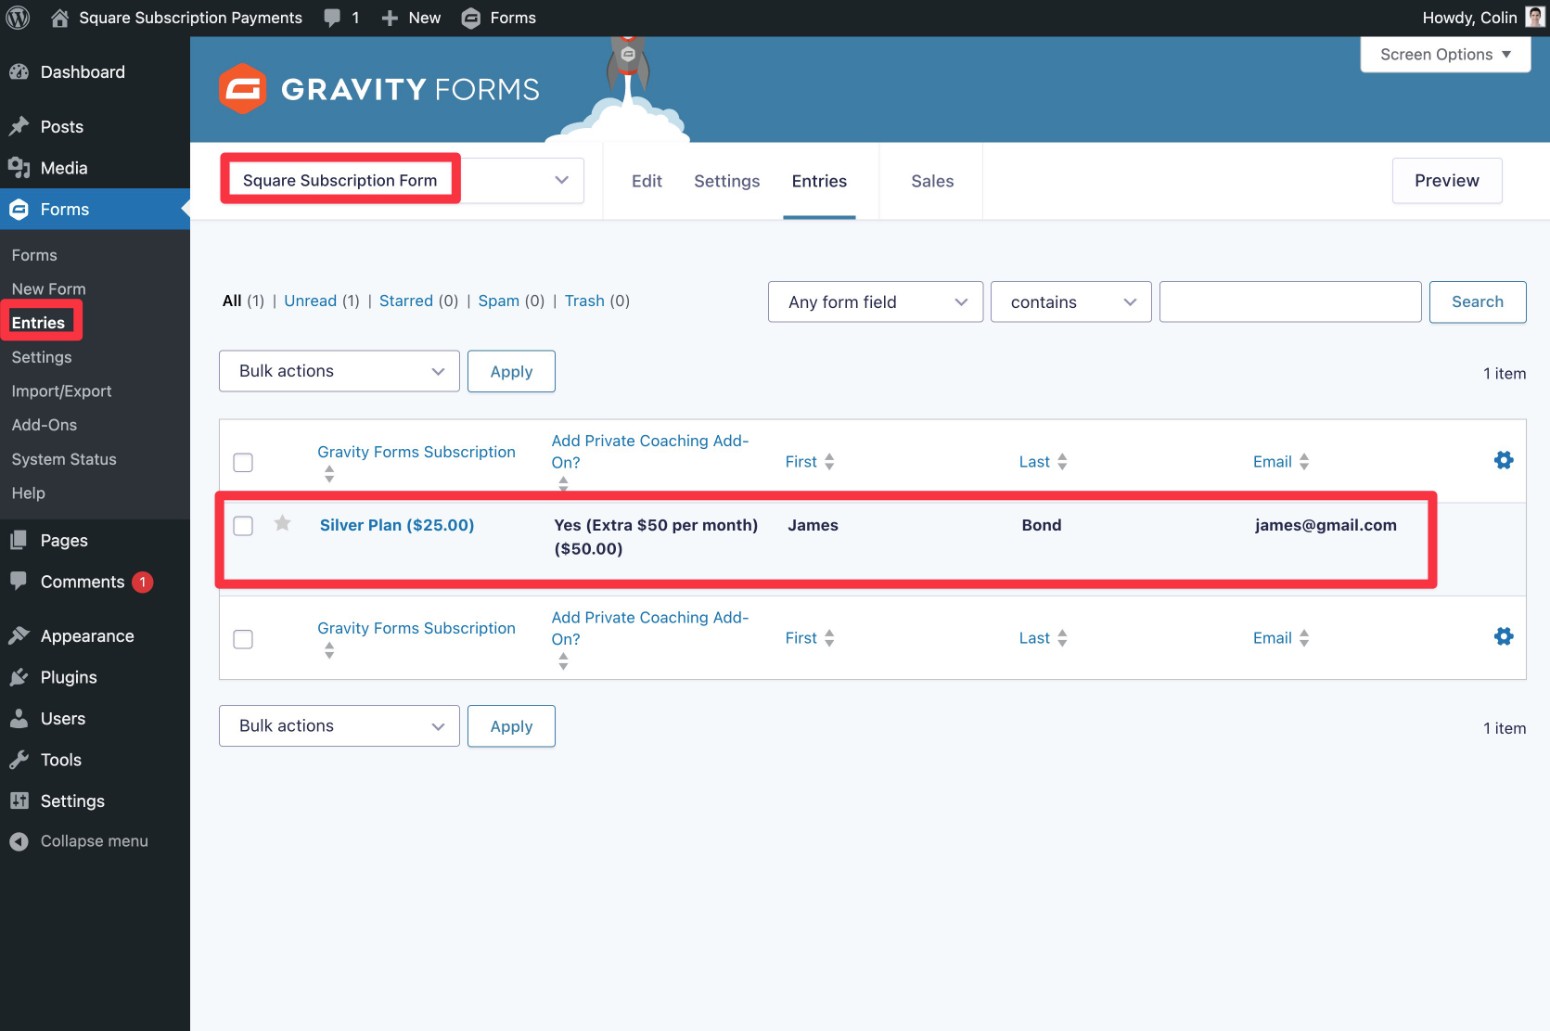
If you view the entry, you’ll see more details about the subscription. You can also cancel the subscription directly from your WordPress dashboard.
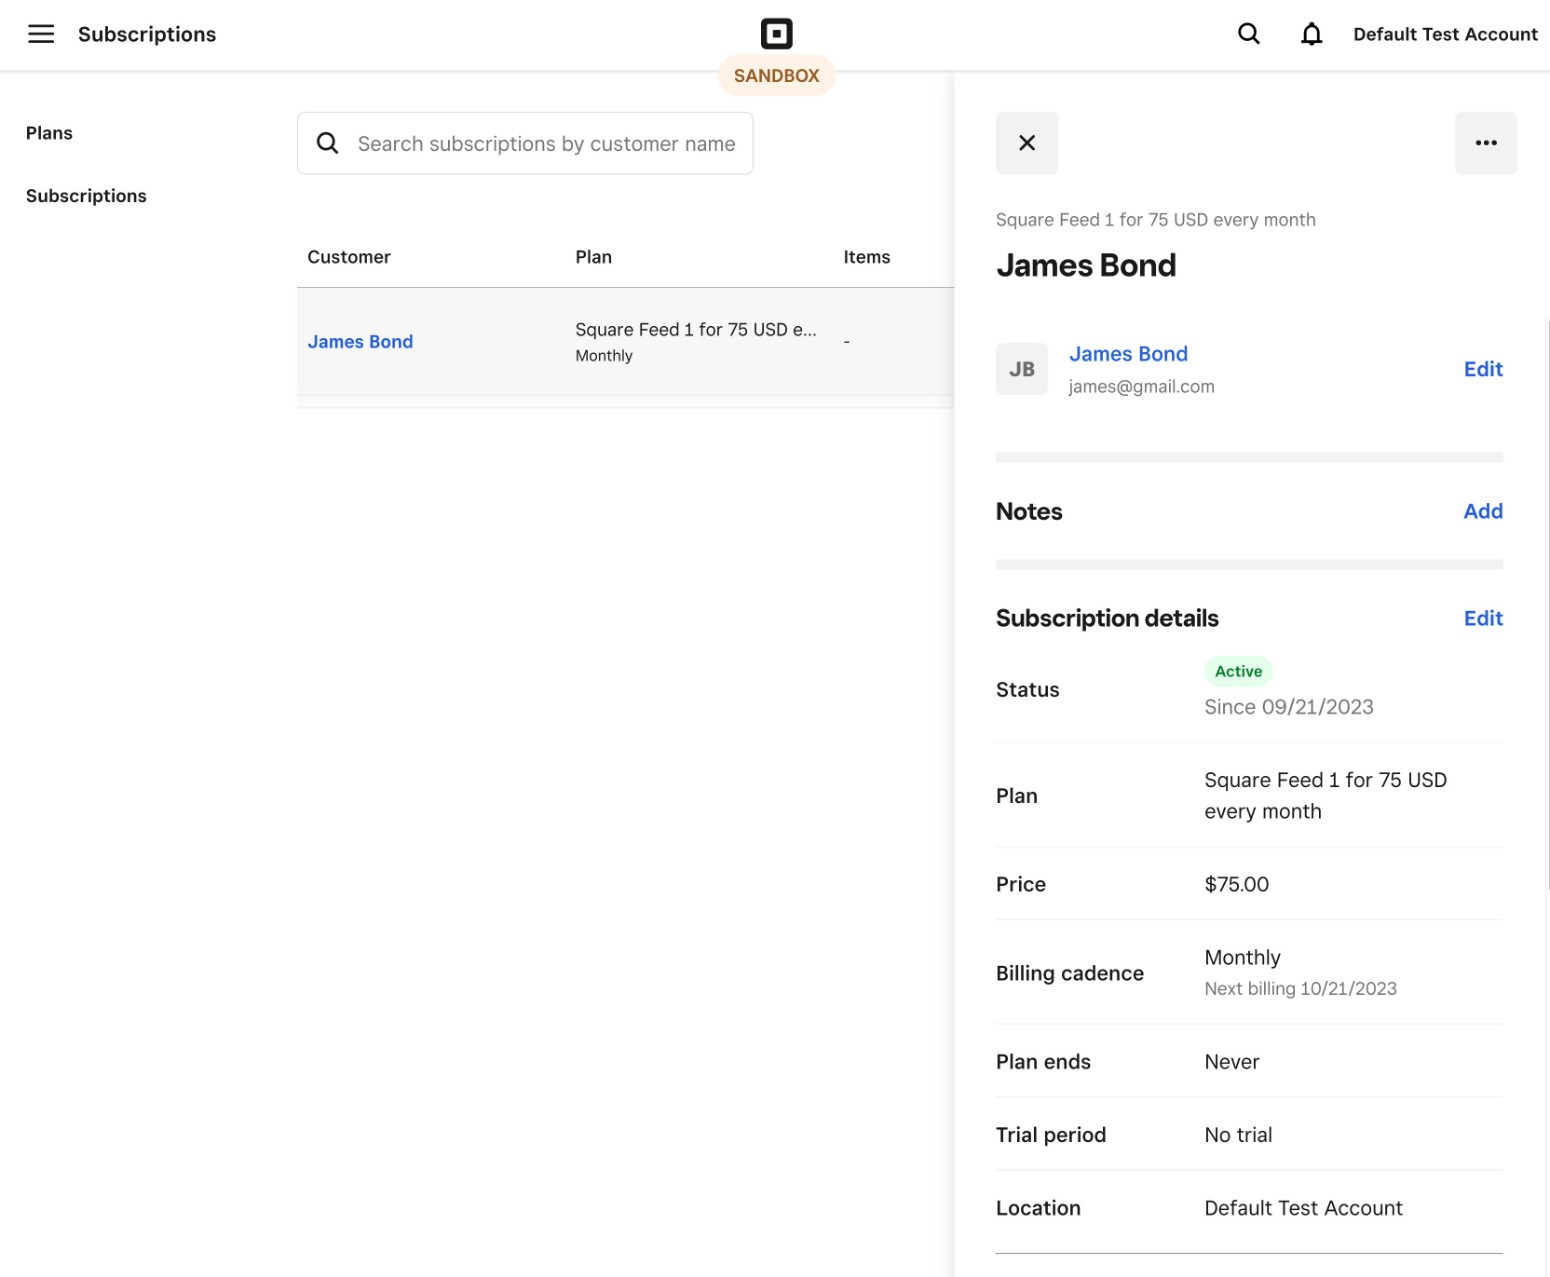
You should also see the subscription in your Square Developer sandbox dashboard.
7. Enable Live Mode to Start Processing Real Payments
Once you’ve tested your form in Sandbox mode and verified that your subscriptions are behaving as intended, the last step is to enable Live mode for your form.
This will tell Square to start processing real payments when someone fills out the form.
Here’s how to do this:
- Go to Forms → Settings → Square in your WordPress dashboard.
- Change the mode from Sandbox to Live.
- Click the Connect with Square button to authorize your live sandbox account – the setup process is exactly the same as setting up a Sandbox account.
- Make sure to click Save Settings after you’re redirected back to your WordPress dashboard.
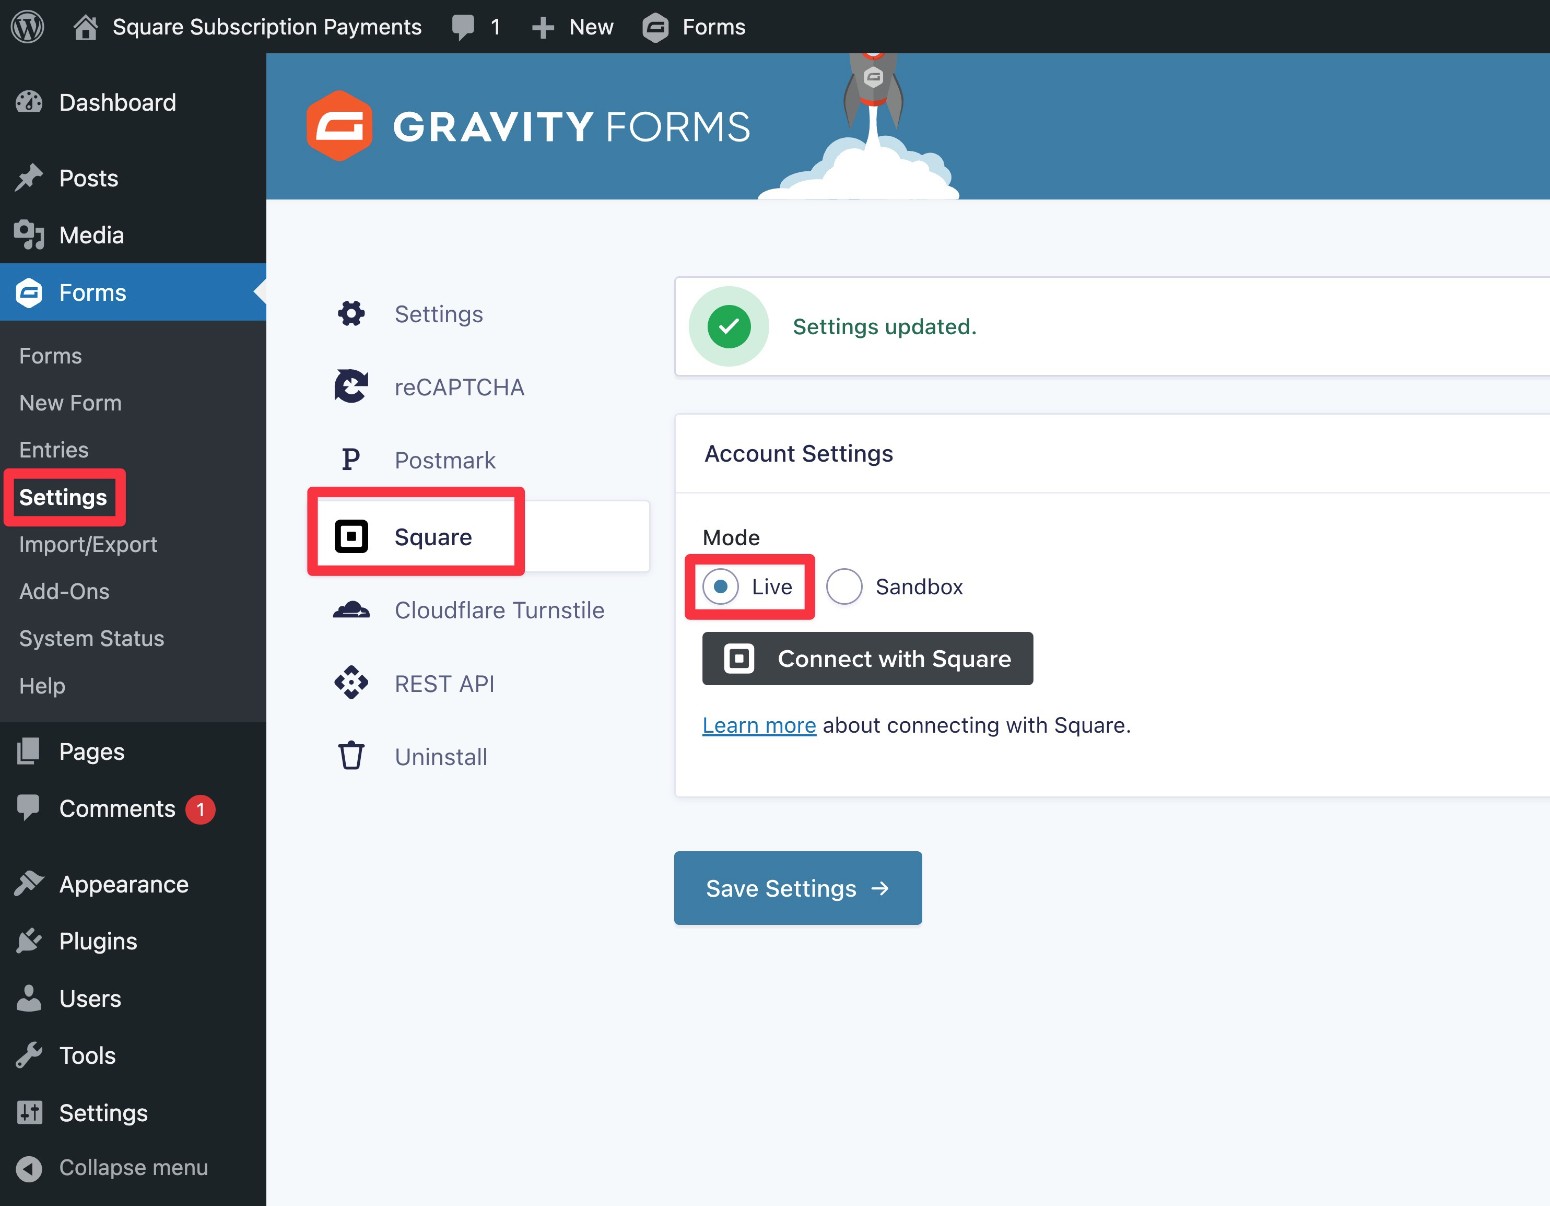
Now, your existing Square subscription form will start processing payments for real – there’s no need to edit the form itself.
Get Started With WordPress Square Subscriptions Today
That wraps up our guide on how to start accepting Square subscription payments using Gravity Forms.
With subscription payments, you can use Gravity Forms to help you build recurring revenue streams. And with the Square integration, you get access to the reliability and ease of use that Square offers.
If you’re already using the Gravity Forms Pro license or above, you can follow this guide to start accepting Square subscriptions today.
If you’re not yet, you can purchase a new Pro license here or upgrade your existing Basic license and only pay the prorated difference.
Square Promotion – Free Processing
Gravity Forms and Square have teamed up to offer an exclusive promotion for new Square customers — enjoy free processing fees for up to 180 days!
Here’s how it works:
- Free Payment Processing – Get $5,000 in credit card transactions processed for free within your first 180 days. After that, standard Square fees apply.
- $20 Off Square Hardware – Receive a $20 discount on Square hardware once you sign up.
To take advantage of this promotion, simply sign up for a Square account using this link and start processing payments with no extra fees.
Newsletter
If you want to keep up-to-date with what’s happening on the blog sign up for the Gravity Forms newsletter!
"*" indicates required fields


