 Subscription payments are a great way to create a predictable revenue stream for your business. They ensure you get paid on time every month and you always know how much you’ll make based on the number of people paying for the subscription.
In this post, we’ll explain why you should use subscription forms on your site, why Gravity Forms is the right tool for the job, and we’ll walk you through the process of creating a new subscription form for your WordPress website.
Why Use Subscription Forms?
There are several reasons why you should consider using subscription forms on your site. The most important reason, as we’ve mentioned above, is to create a recurring and predictable revenue stream in your business.
A few examples of when a subscription model makes sense include:
- Monthly client retainers for ongoing services such as content writing, social media management, or website maintenance.
- Membership sites that offer classes, workshops, and training materials that update every month or a membership site that offers graphic and web templates.
- eCommerce subscription boxes that deliver the same product each month to the customer.
- An app or another SaaS that offers advanced features.
- Exclusive content such as a paid newsletter or paid blog posts.
- Recurring non-profit donations.
As you can see, there are plenty of businesses that would make a great fit for a subscription revenue model. And the best part is that you don’t need a complicated payment system or a platform to set it up.
Create Subscription Forms With Gravity Forms
Gravity Forms makes it easy to take one-time payments on your website. But you can also use our form builder to create subscription forms.
Here’s why Gravity Forms is an excellent choice to handle your subscription forms…
Payment Add-Ons
 A key reason to use Gravity Forms is the numerous payment processors that it integrates with, giving you extensive choice over how you accept payments. One of those payment Add-Ons is Square, available with the Gravity Forms Pro and Elite licenses.
Notable features include:
- Ease of use – Square has an extremely quick and easy registration process, and equally the process of integrating it with Gravity Forms consists of just a few clicks. Once set up, Square automatically captures payments, securely handles customer data, seamlessly transfers payments, and much more, all with minimal input from yourself.
- Accepts all major credit cards – Square helps millions of sellers globally, accepting all major credit cards with the same rates across the board for Visa, Mastercard, and American Express.
- The ability to take subscription payments – you can use the Square Add-On to set up recurring monthly payments. Subscriptions can also be cancelled directly within your WordPress dashboard.
For more information on the Gravity Forms Square Add-On, check out this Square article on the blog.
Marketing Add-Ons
Aside from payment Add-Ons, Gravity Forms also has numerous marketing Add-Ons that make it a breeze to add your customers to your email list or a CRM. For example, our Mailchimp Add-On will seamlessly sync users who fill out a subscription form on your site with your Mailchimp list.
 Notable features include:
- Capture custom fields — the add-on makes it easy to capture any field in your form as a Mailchimp custom field.
- Opt-In control and double opt-in — control which users opt into your mailing list with a few simple clicks. You can also send double opt-in messages to ensure only highly interested users get added to your list.
- GDPR compliance — you can easily use the conditional logic feature of Gravity Forms to make your subscription forms GDPR compliant.
Have a read of this Mailchimp article for more information about this popular marketing Add-On.
Built-In Features
Aside from the above, Gravity Forms has a number of built-in features to help you create high-converting forms of all kinds on your site:
- Conditional logic — makes it easy to show and hide form fields based on information and fields that were previously filled out, tailoring your forms to your customers exact needs.
- Multi-page forms — you can split your forms into multiple pages to make them appear shorter and thus increase conversions.
- Limit & Schedule forms — create an open and closed enrolment period for your subscriptions to make it more exclusive and increase the demand.
For more information on using Gravity Forms to create beautiful forms that convert, check out this article – There’s Never Been an Easier Way to Create Forms.
How To Create A Subscription Form With Gravity Forms And Square Add-On
So now you know how Gravity Forms can help you create effective subscription forms. Let’s next walk you through the steps of using Gravity Forms and the Square Add-On to create your very own subscription form.
You’ll need to have Gravity Forms installed on your site for this to work so if you don’t have our plugin yet, go ahead and purchase the appropriate license. Note that you’ll need a Pro or Elite license if you want to enable the Square Add-On. With that out of the way, let’s go through the process step-by-step.
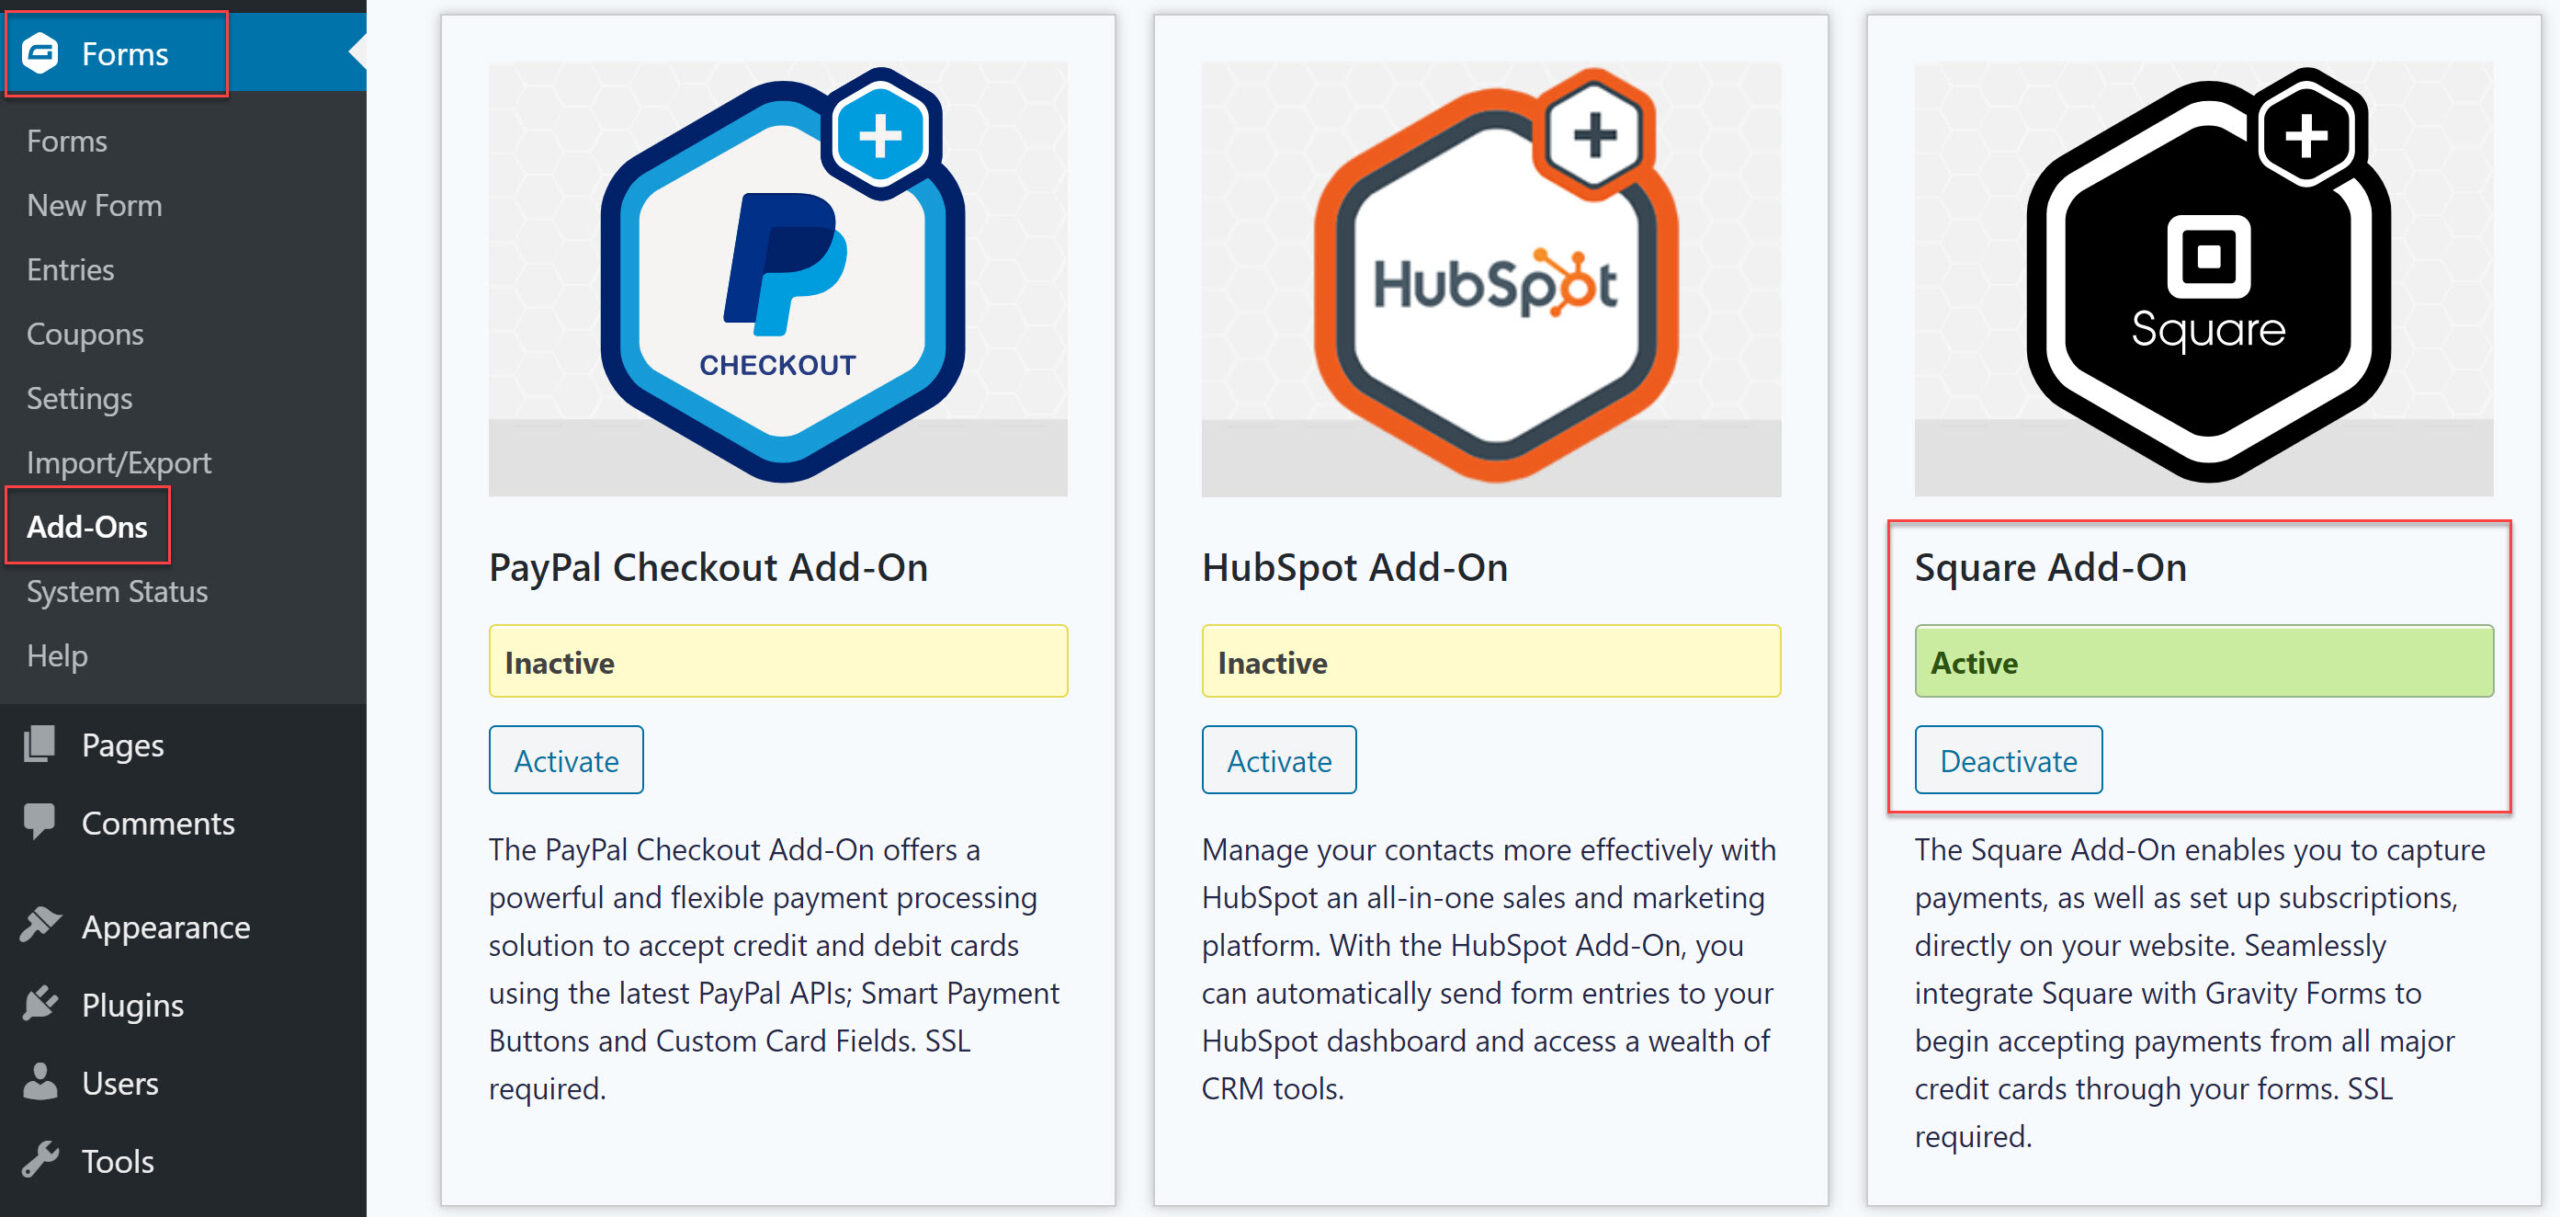
Step 1: Install the Gravity Forms Square Add-On
To install the Gravity Forms Square Add-On, go to your WordPress dashboard and select Forms > Add-Ons. Scroll down the page to the Square Add-On and click on Install > Activate.
 Note that you’re going to need a valid SSL certificate on your site if you want to accept payments with Square. This is because credit card information is confidential and sensitive data. An SSL certificate ensures that data is encrypted so hackers can’t intercept it and steal it.
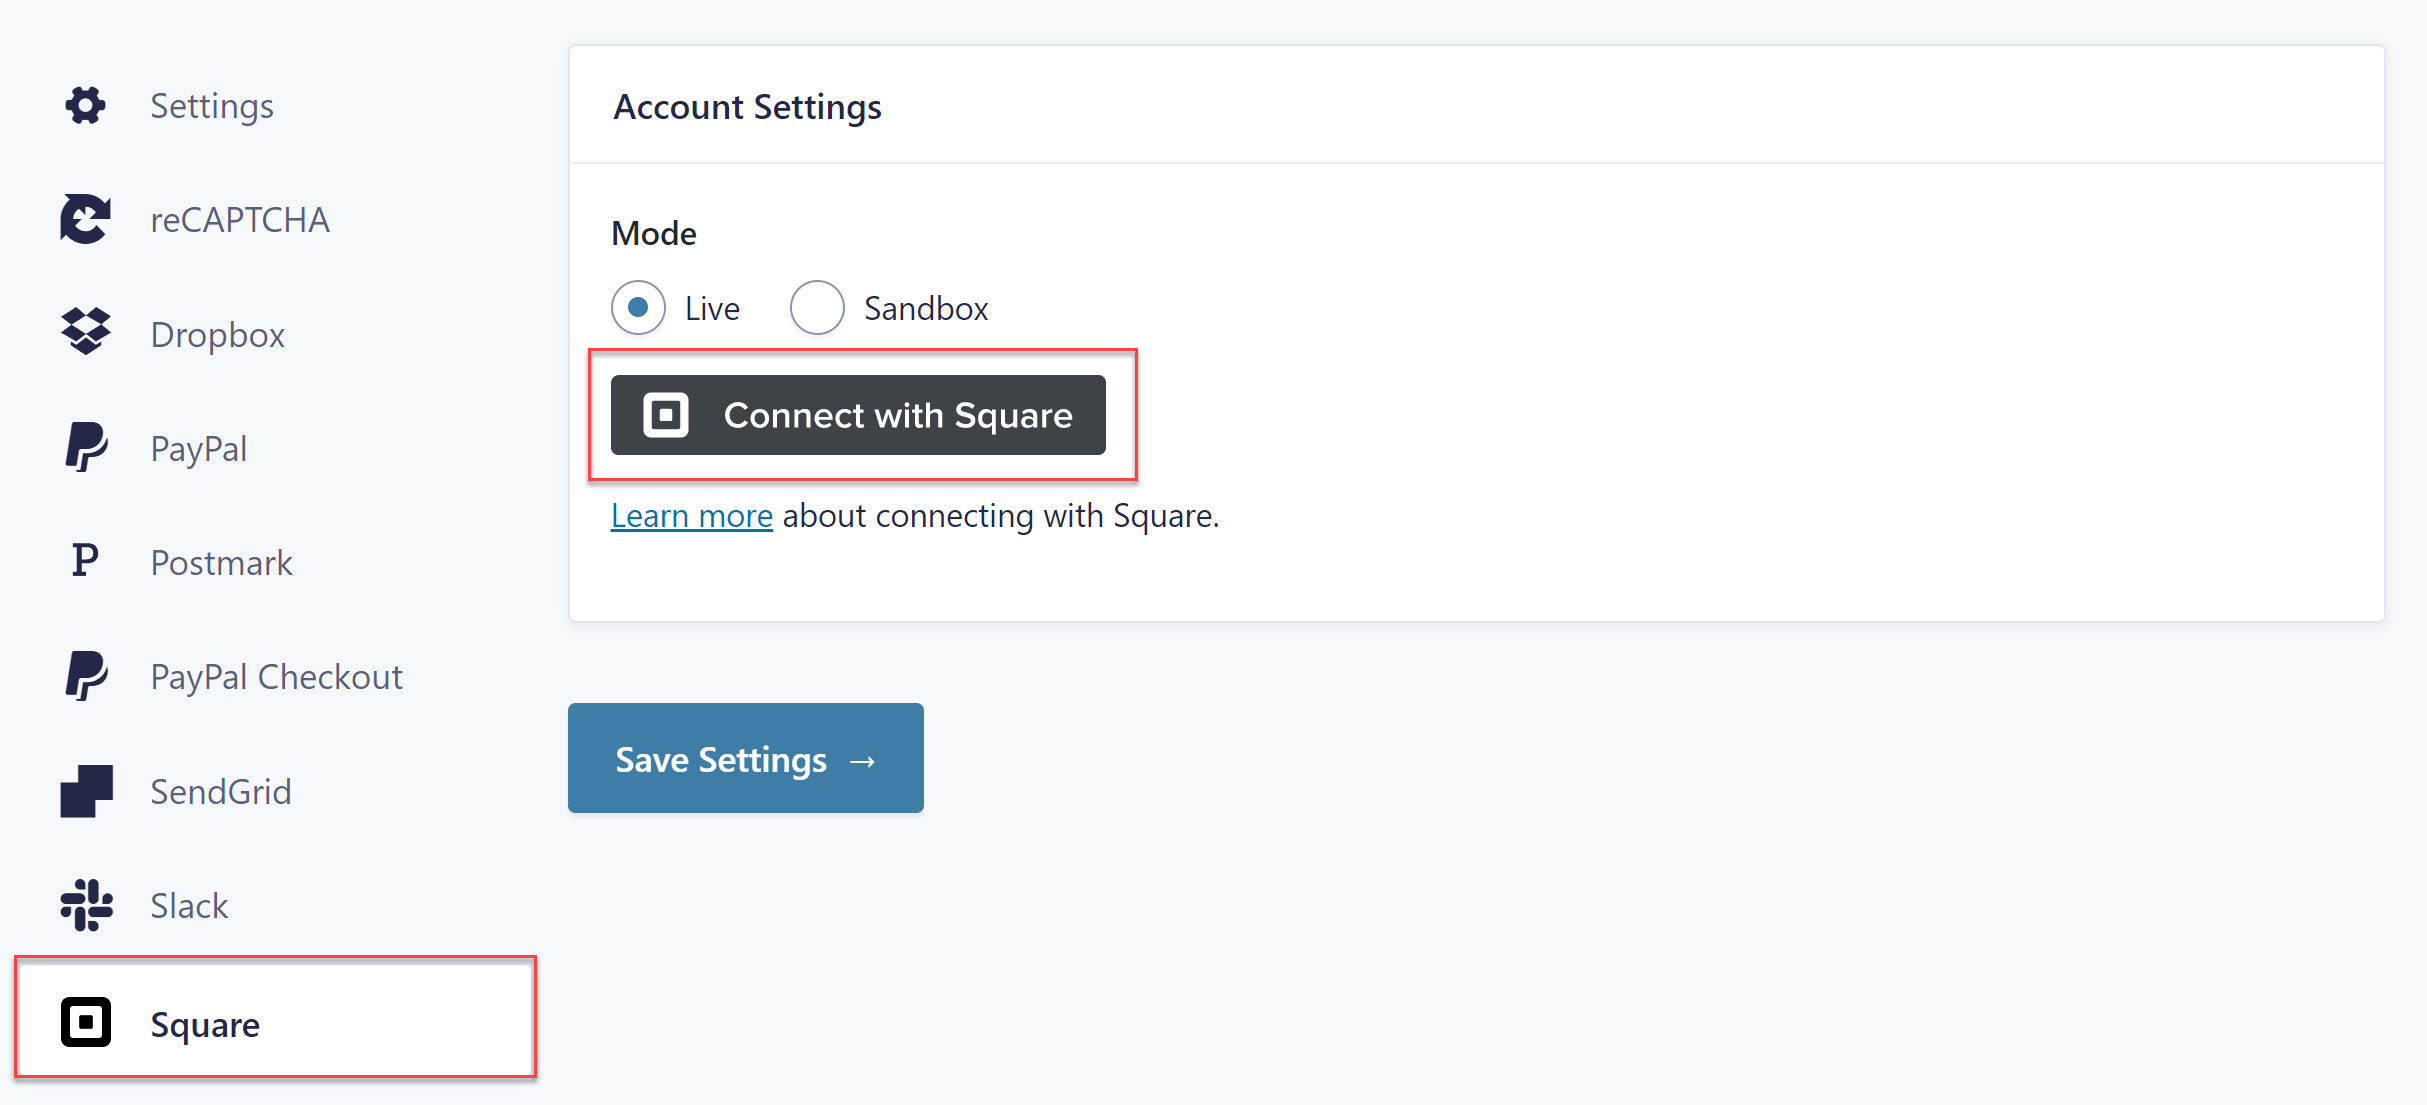
Step 2: Integrate Gravity Forms with Square
After you have activated the Square Add-On, you’ll need to integrate your Square account with your Gravity Forms installation.
If you don’t have a Square account, you’ll need to create one first. Once you’ve created your Square account, go back to your WordPress dashboard and click on Forms > Settings > Square. Click on the Connect with Square button and follow the prompts to authenticate your website with Square.
 When done, you’ll be brought back to your WordPress dashboard and see that your account has been connected. You’ll also see your business location. Note that you can select the correct location if you have multiple business locations listed within Square.
Step 3: Set Up Your Subscription Form
Now that Gravity Forms and Square are connected, it’s time to set up your subscription form. You can also select an existing form if you want to add the ability to take payments to it.
To take subscription payments via your form using Square your form needs to include the following fields:
- Name field
- Email field
- Address field (optional)
- Product field
- Square field, which provides Credit Card input and Cardholder name
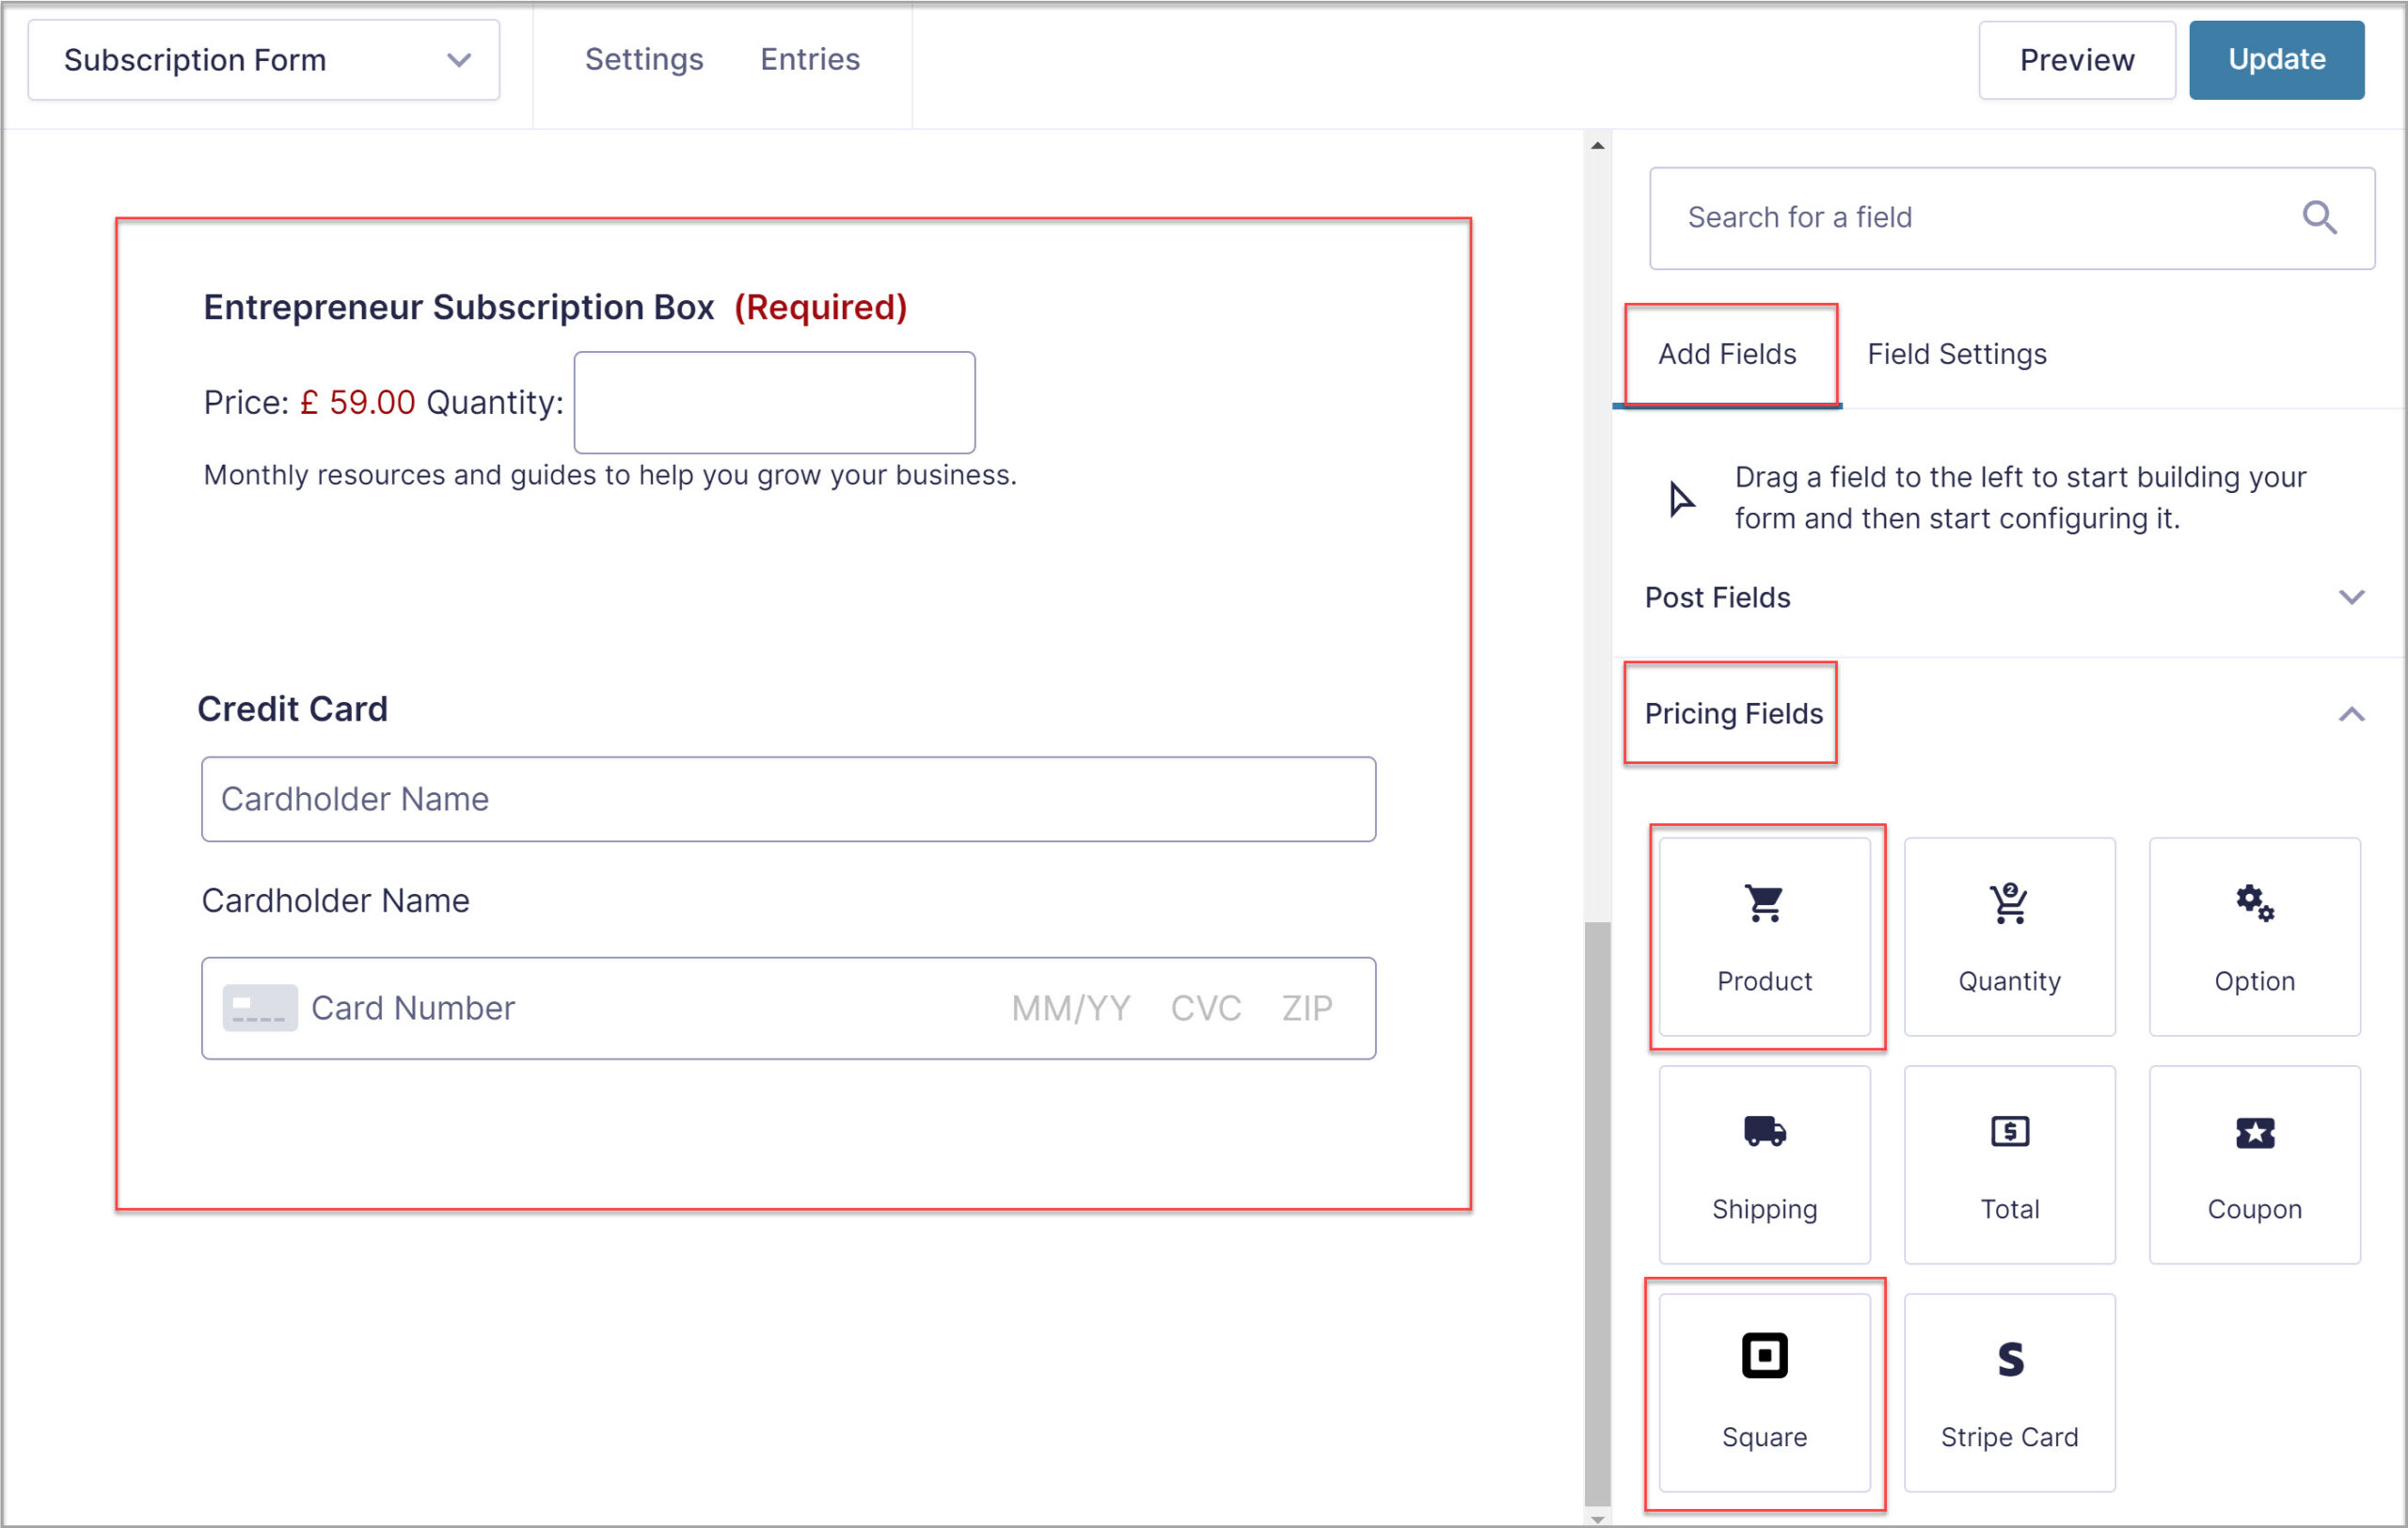 Configure these fields to your liking and then click on the Update button to save the changes.
Step 4: Create a Square Feed
The last step is to create a Square Feed. Start by going to Form Settings > Square > Add New. Enter a name for your field and then select Transaction Type > Subscriptions from the drop-down menu.
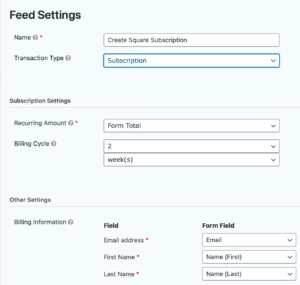
After you’ve selected the transaction type, you’ll need to configure the rest of the Square feed settings. This includes configuring the payment amount and making sure that the feed is pulling the correct address fields from the form fields.
Optionally, you can configure conditional logic settings if you have any special requirements for your form.
Don’t forget to customize the confirmation and notification settings to ensure your customers get confirmation that their subscription has been processed successfully as well as to notify anyone who needs to keep track of new subscription payments.
Finally, add the form to the appropriate page on your website so you can start collecting subscription payments.
For more in-depth information on how to set up a payment form with Square, check out the Gravity Forms documentation.
Square Promotion – Free Processing for up to 180 Days
 Gravity Forms and Square are offering a great promotion for all new Square customers – free processing fees for up to 180 days.
As part of the ‘Free Processing Promotion’ with Square, all new Square customers will receive free processing on up to $2,000 in credit card transactions for the first 180 days. (Afterwards, you will pay the standard Square fees for all transactions).
To take advantage of this promotion, simply sign up for a Square account using this link.
Don’t Have Gravity Forms Yet?
If you don’t have Gravity Forms or the Square Add-On, don’t worry. You can still test out everything in this article for free inside your own personalized Gravity Forms demo and see why Gravity Forms is the top choice for WordPress sites worldwide.
Already in love? Purchase our premium WordPress form plugin today!
Newsletter
If you want to keep up-to-date with what’s happening on the blog sign up for the Gravity Forms newsletter!
"*" indicates required fields