If you want to start using Gravity Forms and Stripe, this post is for you.
Stripe is one of the most popular payment processors in the world. It’s reliable, easy to use, and comes with tons of advanced features and payment options, including support for additional methods like Apple Pay, Google Pay, bank transfers, and more.
With Gravity Forms, you can easily start using Stripe to accept one-time or recurring payments on your WordPress site.
In our ultimate guide to using Stripe with Gravity Forms, you’ll learn everything that you need to know, including the basics as well as more advanced topics such as using conditional logic, setting up payment-specific notification emails, and more.
Let’s begin, starting with an overview of key features and use cases and then getting into the full tutorial.
Key takeaways
- Easily collect one-time or recurring payments, sell products/services, or accept donations directly from your WordPress site using the official Gravity Forms Stripe Add-On.
- Supports credit cards, Apple Pay, Google Pay, ACH debit, and more – plus features like setup fees, free trials, and conditional subscription logic.
- Cancel subscriptions, issue refunds, or view payment and sales reports – all from your WordPress dashboard or via the official Stripe App integration.
- Use multiple Stripe feeds, conditional logic, and product fields to tailor form behavior based on user input, such as switching between one-time and recurring donations.
- Combine Stripe payments with other Gravity Forms add-ons to add users to your CRM, trigger automations via Zapier, send PDF receipts, or initiate project management tasks.
Example Use Cases for Gravity Forms and Stripe
Because of how flexible Gravity Forms and Stripe are, you can use them for all different types of payment scenarios:
- eCommerce stores – you can create a lightweight eCommerce store to sell physical and/or digital products.
- Subscriptions – you can set up automatic recurring subscriptions for products, services, and more.
- Membership sites – you can charge users one-time fees or recurring subscriptions to register for your membership website.
- Donations (one-time or recurring) – you can create a donation form to accept one-time and/or recurring donations. This makes it great for digital fundraising and other forms that nonprofits need.
- Service payments – you can accept payments for services that you’ve rendered in person or online.
This is by no means the complete list – you also might come up with your own use cases for Gravity Forms and Stripe.
Key Features and Benefits of the Gravity Forms Stripe Add-On
Here are some of the key features that you can access with the Gravity Forms Stripe Add-On:
- One-time or recurring payments – you can accept one-time payments or automatic recurring payments on a custom schedule.
- Supports a wide array of payment methods – beyond credit and debit cards, the add-on supports other Stripe-powered payment methods including Apple Pay, Google Pay, ACH debit, and more.
- Setup fees and free trials – for subscriptions, you can also add one-time setup fees and/or free trial periods.
- Stop subscriptions after a certain number of billing periods – while the Stripe API doesn’t allow you to halt subscriptions after a certain number of billing periods, Gravity Forms offers its own filters and actions to help you automatically cancel subscriptions based on certain conditions.
- Supports Stripe Link – you can also use Stripe Link, which is Stripe’s own accelerated checkout feature.
- View payment details in WordPress – you can view important payment details right from WordPress.
- View sales reports in WordPress – you can also view aggregate sales reports to see total revenue and subscription data for your form.
- Authorize and capture – you can authorize a user’s card on form submission but wait to process the actual payment until a later time.
- Manage subscriptions and refunds from WordPress – you can cancel a user’s subscription and/or process a refund without needing to leave your WordPress dashboard.
- Let users manage subscriptions from the frontend – if you allow user registration on your site, you can let registered users manage their own subscriptions from a frontend dashboard powered by Stripe Customer Portal.
- Official Gravity Forms Stripe app – you can install the official app from the Stripe App Marketplace to view and sync form entry data in your Stripe dashboard.
Beyond the specific features in the Gravity Forms Stripe Add-On, you can also still leverage “regular” Gravity Forms features in some really helpful ways:
- Integrate with other Gravity Forms Add-Ons, such as charging users to register on your site, adding paying customers to your CRM with a certain tag, creating a task in your project management software, and lots more.
- Use conditional logic to execute payments in different ways based on how a user fills out a form (or skip payments entirely).
- Perform calculations to control how much to charge users.
- Send Stripe-specific notifications including letting users and admins know when a payment has been processed, canceled, refunded, and so on.
How to Use Gravity Forms and Stripe for Payment Forms
Now that you know all about Gravity Forms and Stripe in a vacuum, let’s make things more actionable and we’ll show you step-by-step how to set up your first payment form using Gravity Forms and Stripe and then view/manage your payments.
For this guide, the only things we’ll assume are that you have a working WordPress site and you’ve already installed the core Gravity Forms plugin.
To use Stripe with Gravity Forms, you will need a Gravity Forms Pro or Elite license. If you don’t already have that, you can…
- Purchase a new license here.
- Upgrade your existing Basic license and only pay the prorated difference.
The Stripe Add-On is also available with a Gravity Forms Nonprofit license, which all registered nonprofits can apply for.
We also recommend signing up for your free Stripe account if you haven’t done so already.
Once you have that in place, keep reading to learn how to configure everything…
1. Install the Gravity Forms Stripe Add-On
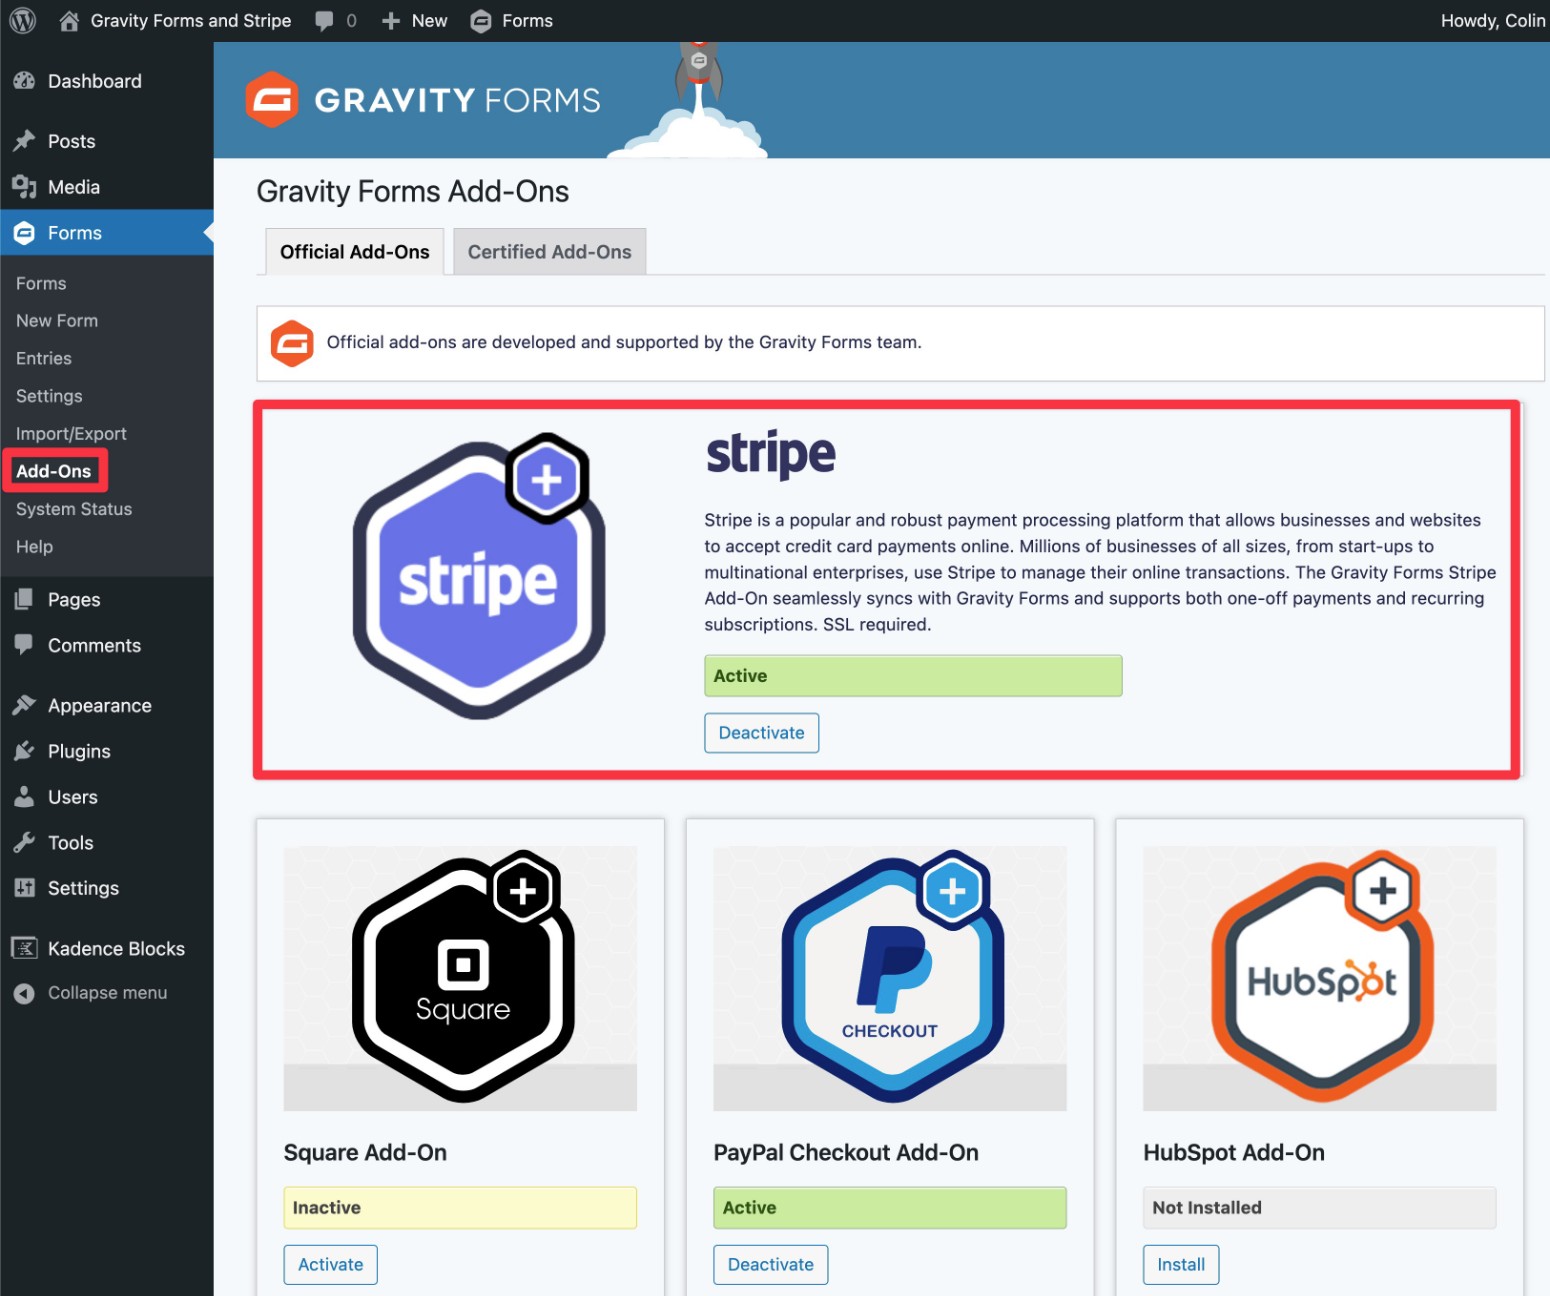
To get started, you’ll want to install and activate the official Gravity Forms Stripe Add-On:
- Open your WordPress dashboard.
- Go to Forms → Add-Ons.
- Find the Stripe Add-On in the list.
- Click Install.
- Once the installation finishes, make sure to activate the add-on.
2. Connect Your Site to Stripe
Once you’ve installed the Stripe Add-On, the next step is to connect your WordPress site to your Stripe account.
If you haven’t already created your free Stripe account, you’ll want to click here to do that now.
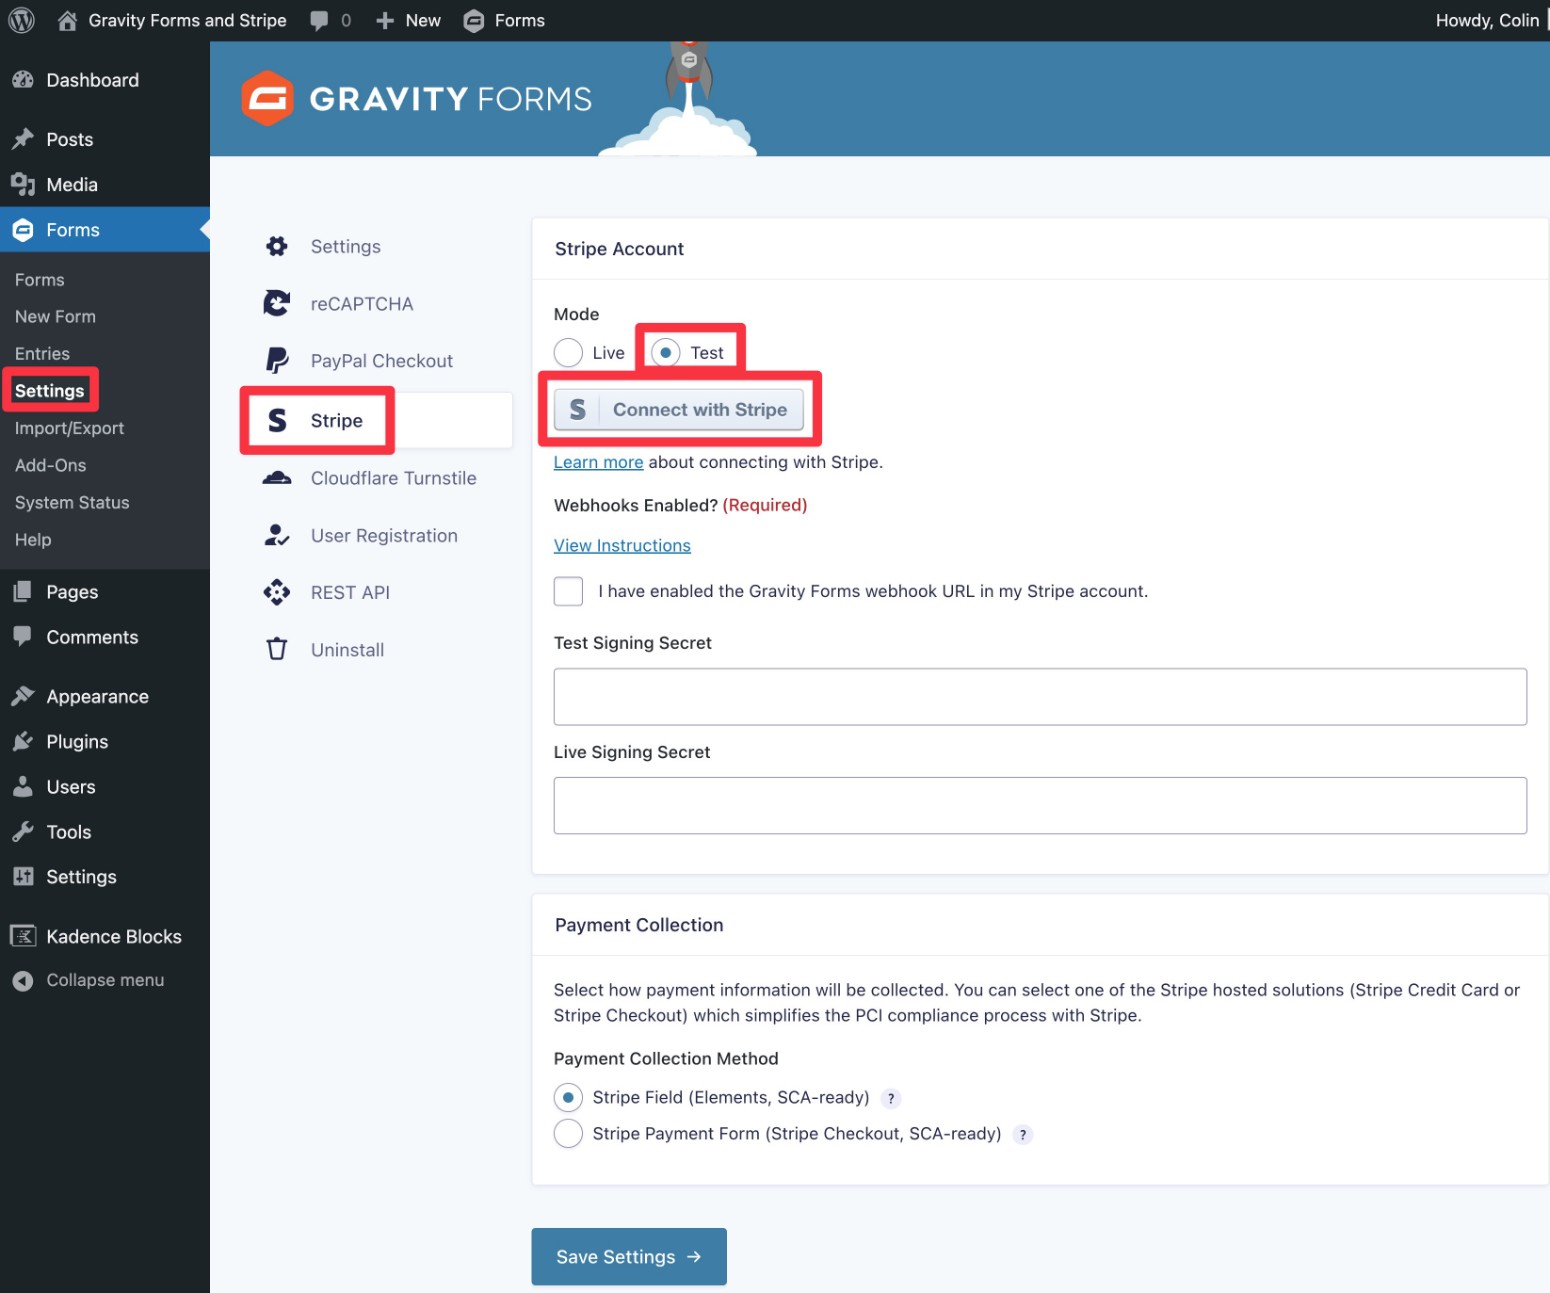
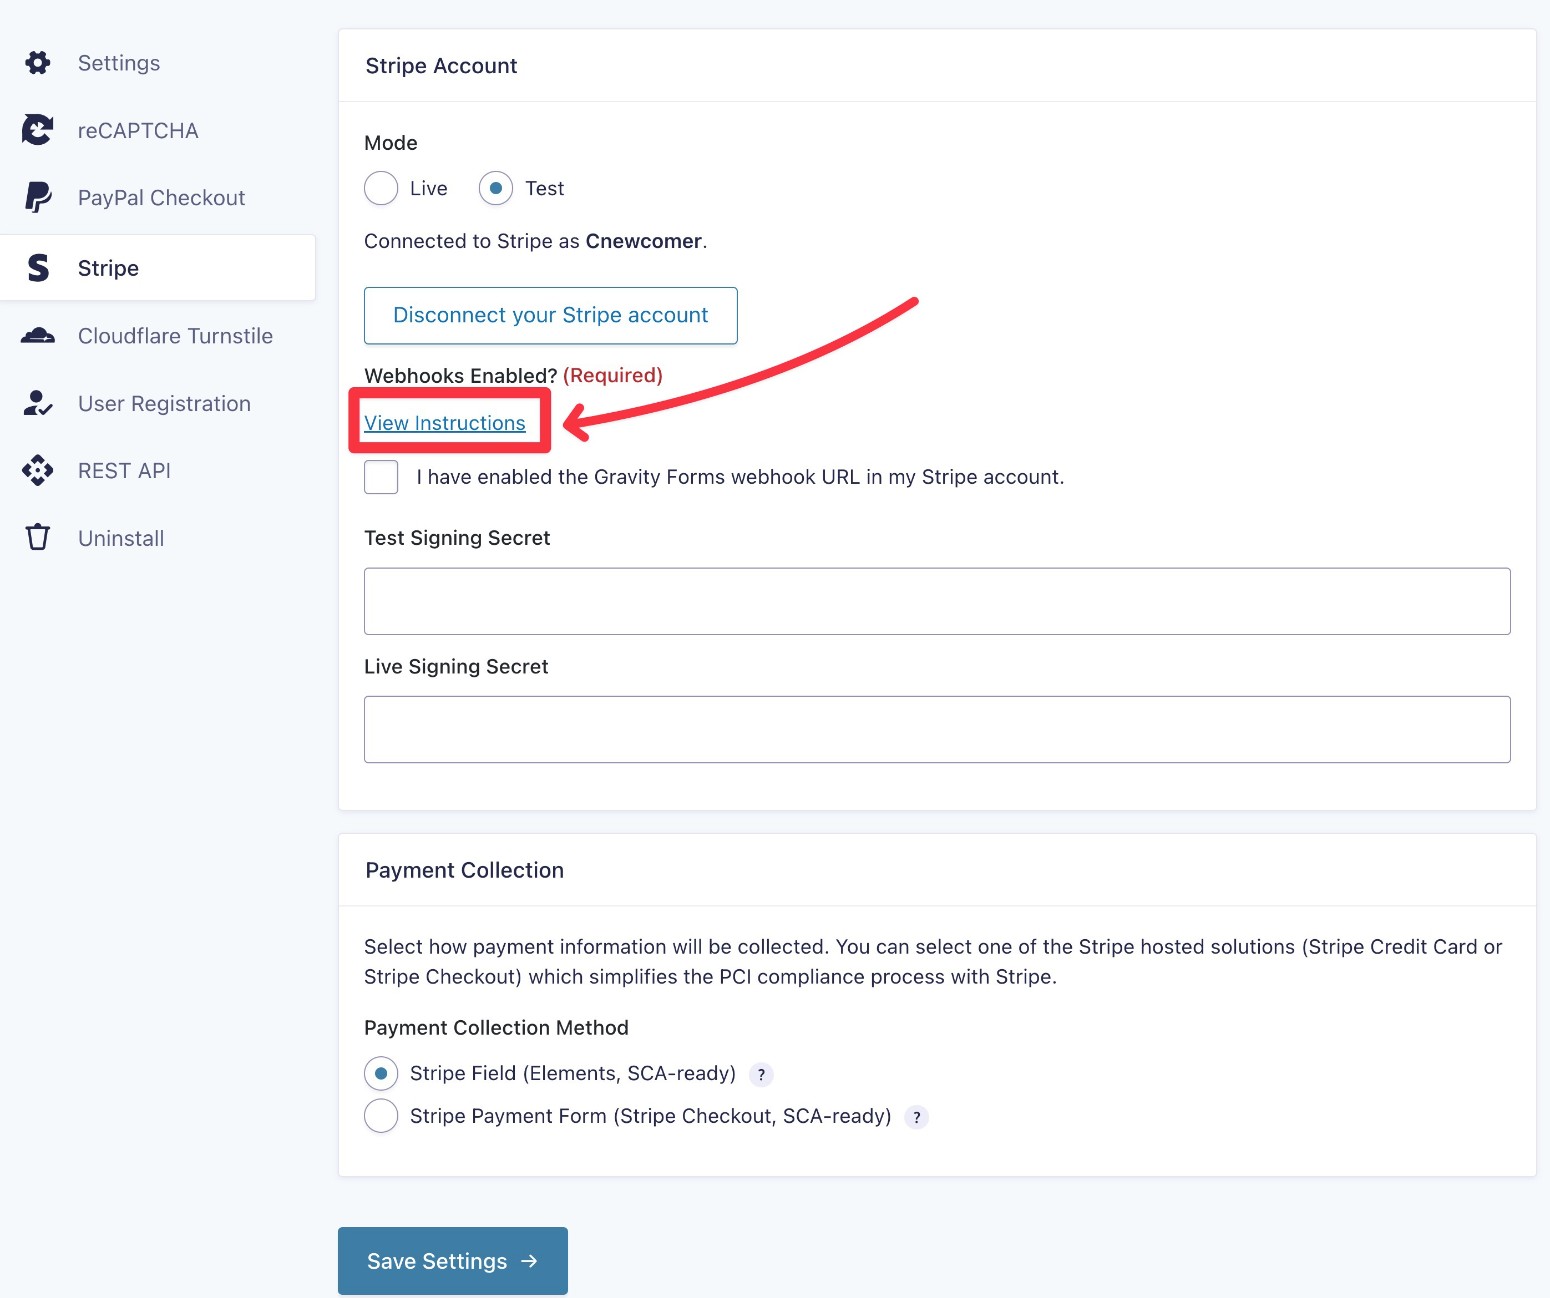
Then, go to Forms → Settings → Stripe in your WordPress dashboard.
First, choose the Mode. We recommend choosing Test to start because it lets you test things using dummy payments. Later on, you can switch to Live when you want to accept real payments.
Then, click the Connect with Stripe button.
This will redirect you to Stripe’s website. Choose your Stripe account (if you have multiple) and click Connect.
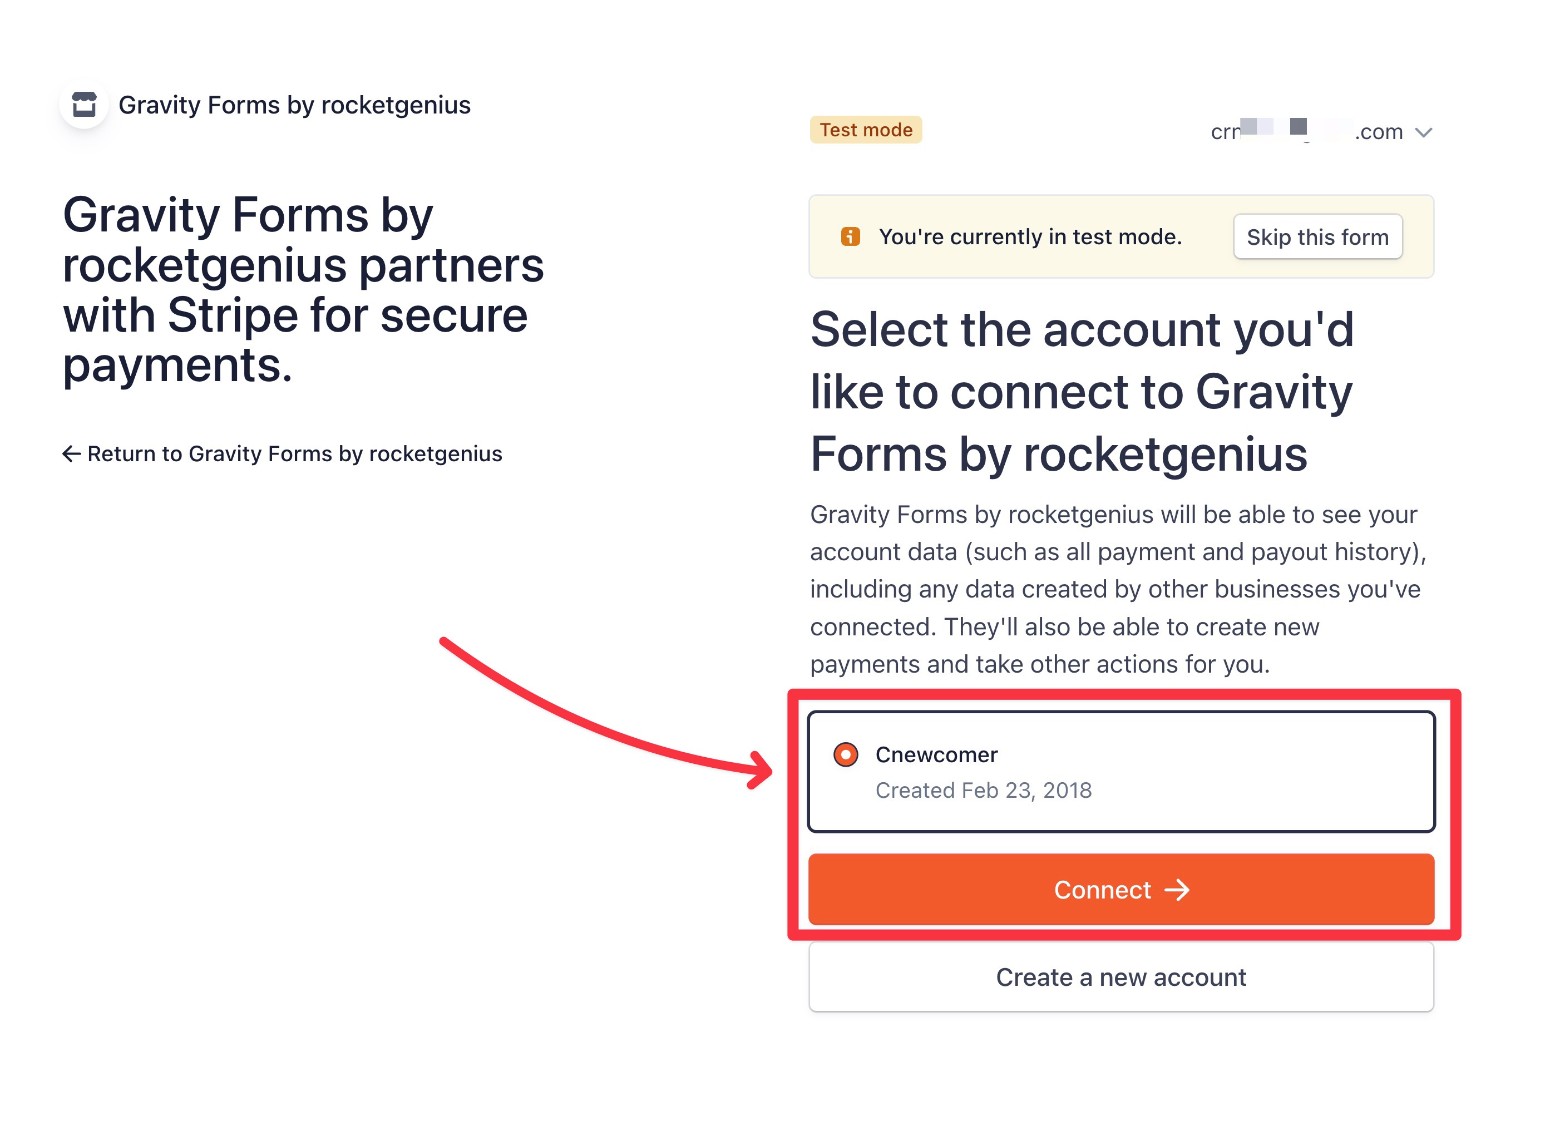
This will take you back to your WordPress dashboard.
Next, you need to add the Gravity Forms webhook URL to your Stripe account.
For detailed instructions, click the View Instructions link under Webhooks Enabled?
Here are the instructions – pay special attention to the URL for your site:
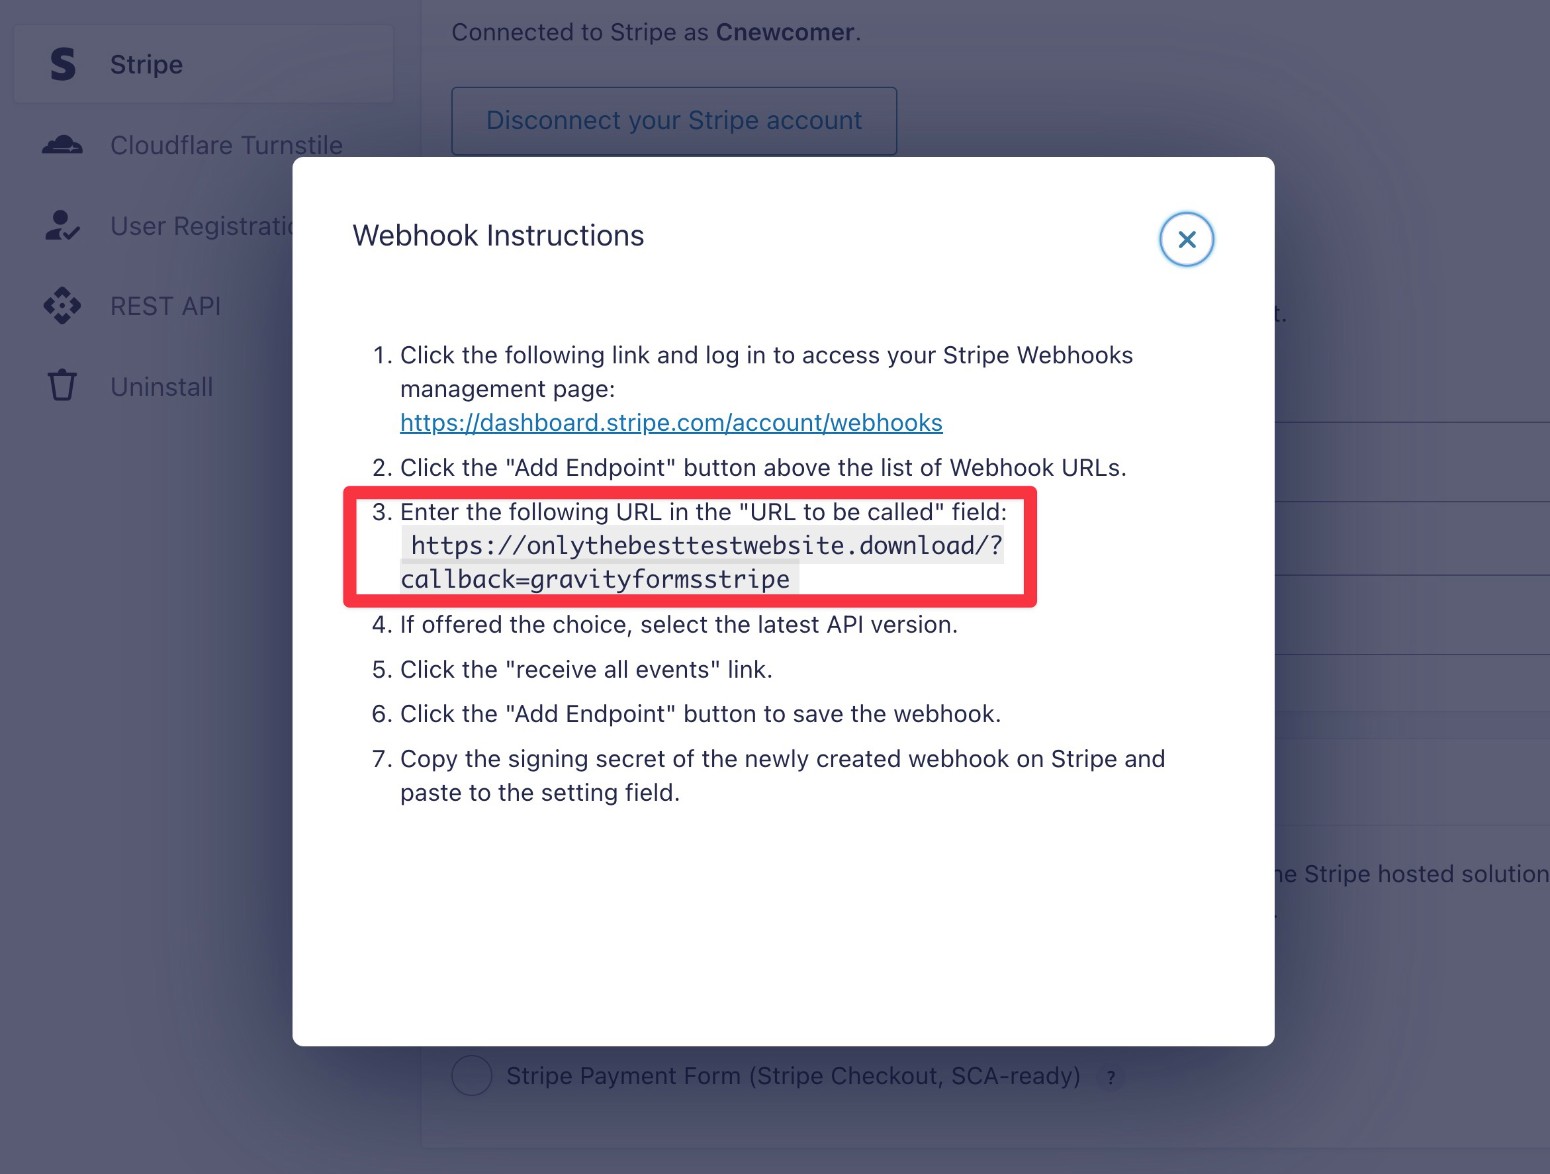
Here’s the link to the webhooks area in Stripe. When adding the webhook URL, make sure that you select Test mode in the Stripe dashboard (if you’re setting up test mode in Gravity Forms).

Here’s what it looks like to set up the endpoint:

Once you add the endpoint, click the link to Reveal the Signing secret.

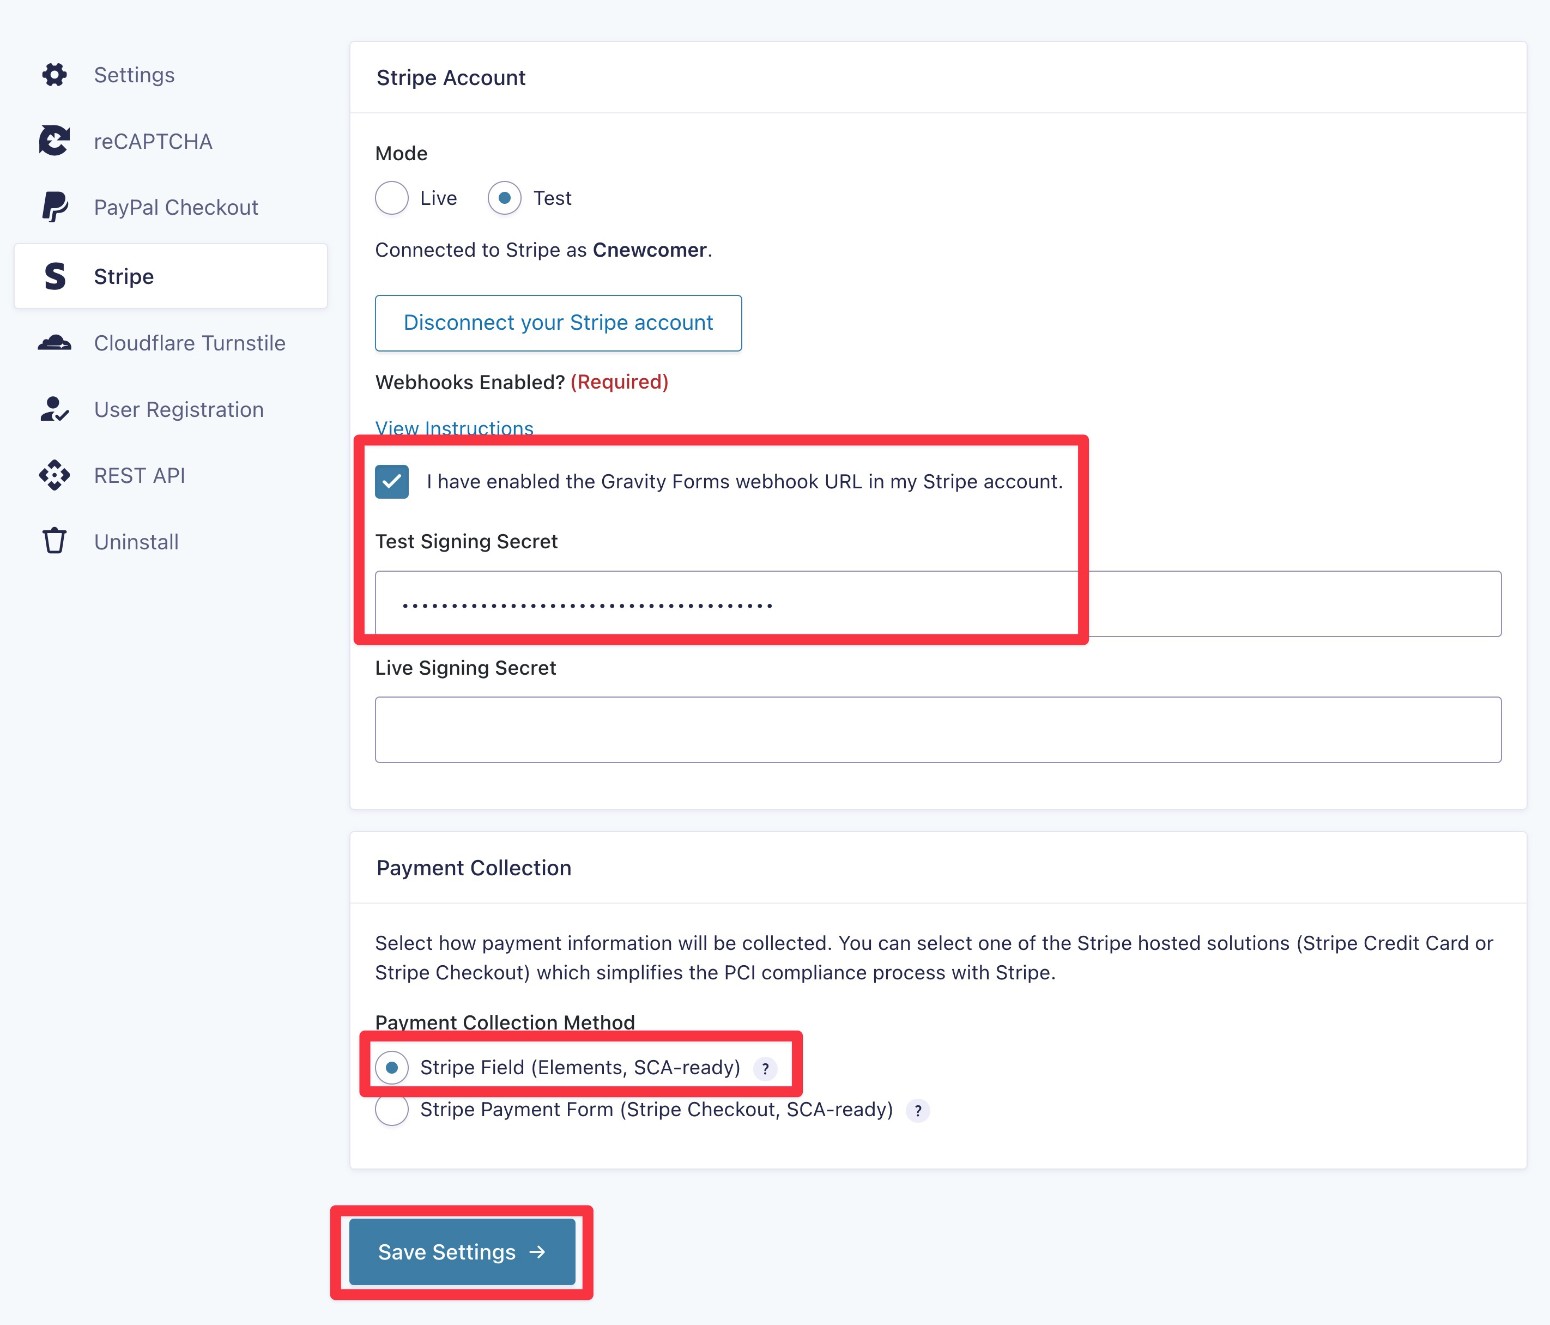
Then, go back to your WordPress dashboard:
- Check the box for I have enabled….
- Paste your test signing secret into the relevant box.
- Choose your Payment Collection Method. We recommend the default Stripe Field for most use cases, but you can use the Stripe Payment Form if preferred.
- Click Save Settings.
3. Create Your Payment Form
Now that you’ve connected your WordPress site to Stripe, you’re ready to create your first Stripe payment form.
To get started, go to Forms → New Form in your WordPress dashboard.
You can then choose one of the premade form templates or start from a blank form.
For this guide, we’ll use the Stripe Checkout Form template because it includes all the essential fields that you’ll need. Even if you choose this template, you’ll still be able to customize everything.

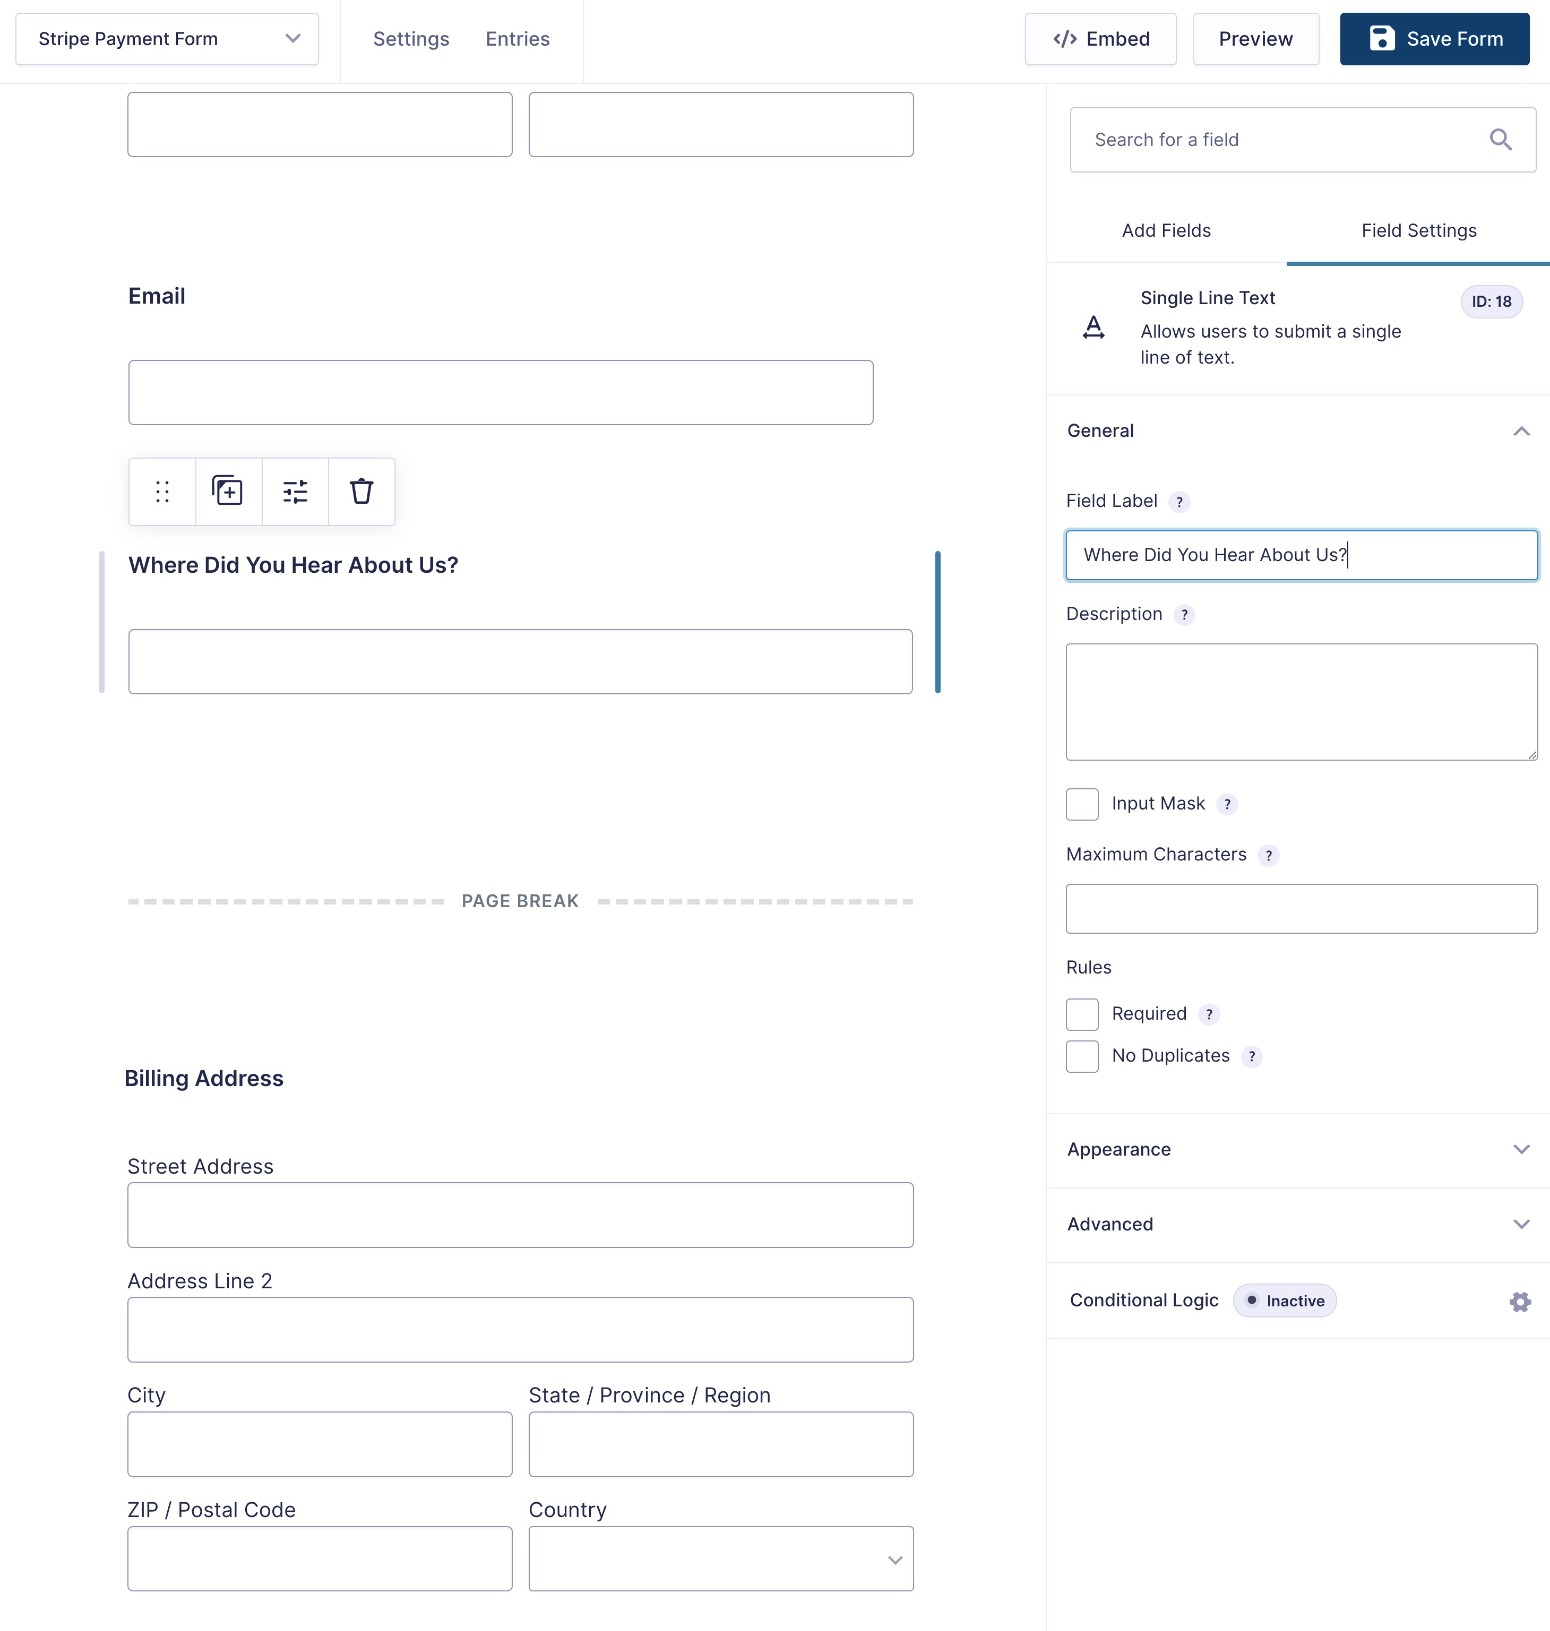
Add/Edit Basic Data Fields
To start, you’ll want to add any basic data fields for information that you want to collect from people who submit your form, such as their addresses.
Add/Edit Product Fields
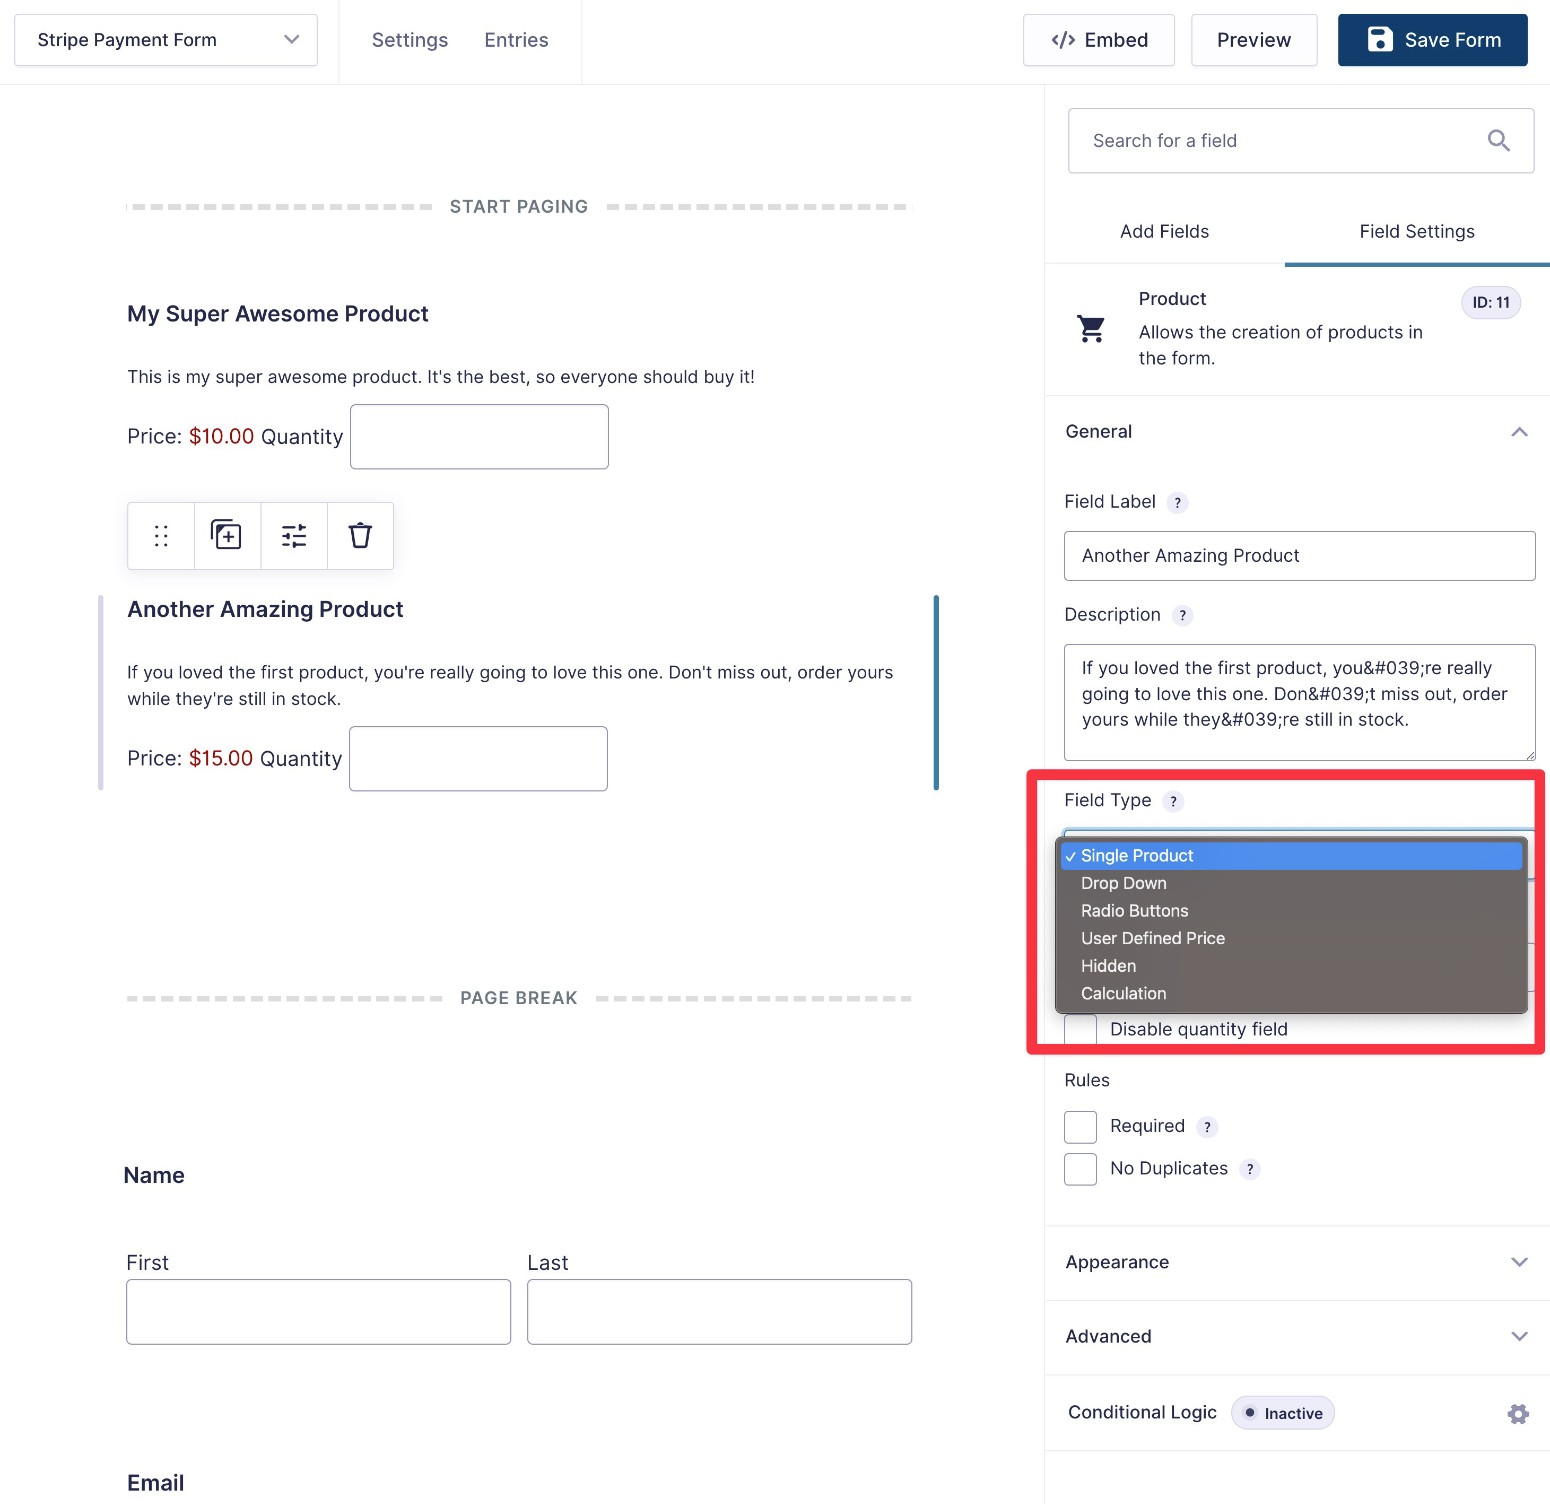
Next, you can use Product fields to collect the data that you need to come up with the total payment amount.
How you set these up will depend on what type of payment form you’re creating.
For an eCommerce form, you might want to let users choose different options and quantities. You also might want to add a Shipping field if you need to ship a physical product.
However, if your form has a fixed payment amount that’s the same for every user, you can also just set the Product field to Hidden. You can then manually enter the price.
Whether you have public or hidden product fields, you can show the full price that a user will pay using the Total field.
Related information:
- Product field documentation
- Shipping field documentation
- Total field documentation
- Product Option field documentation
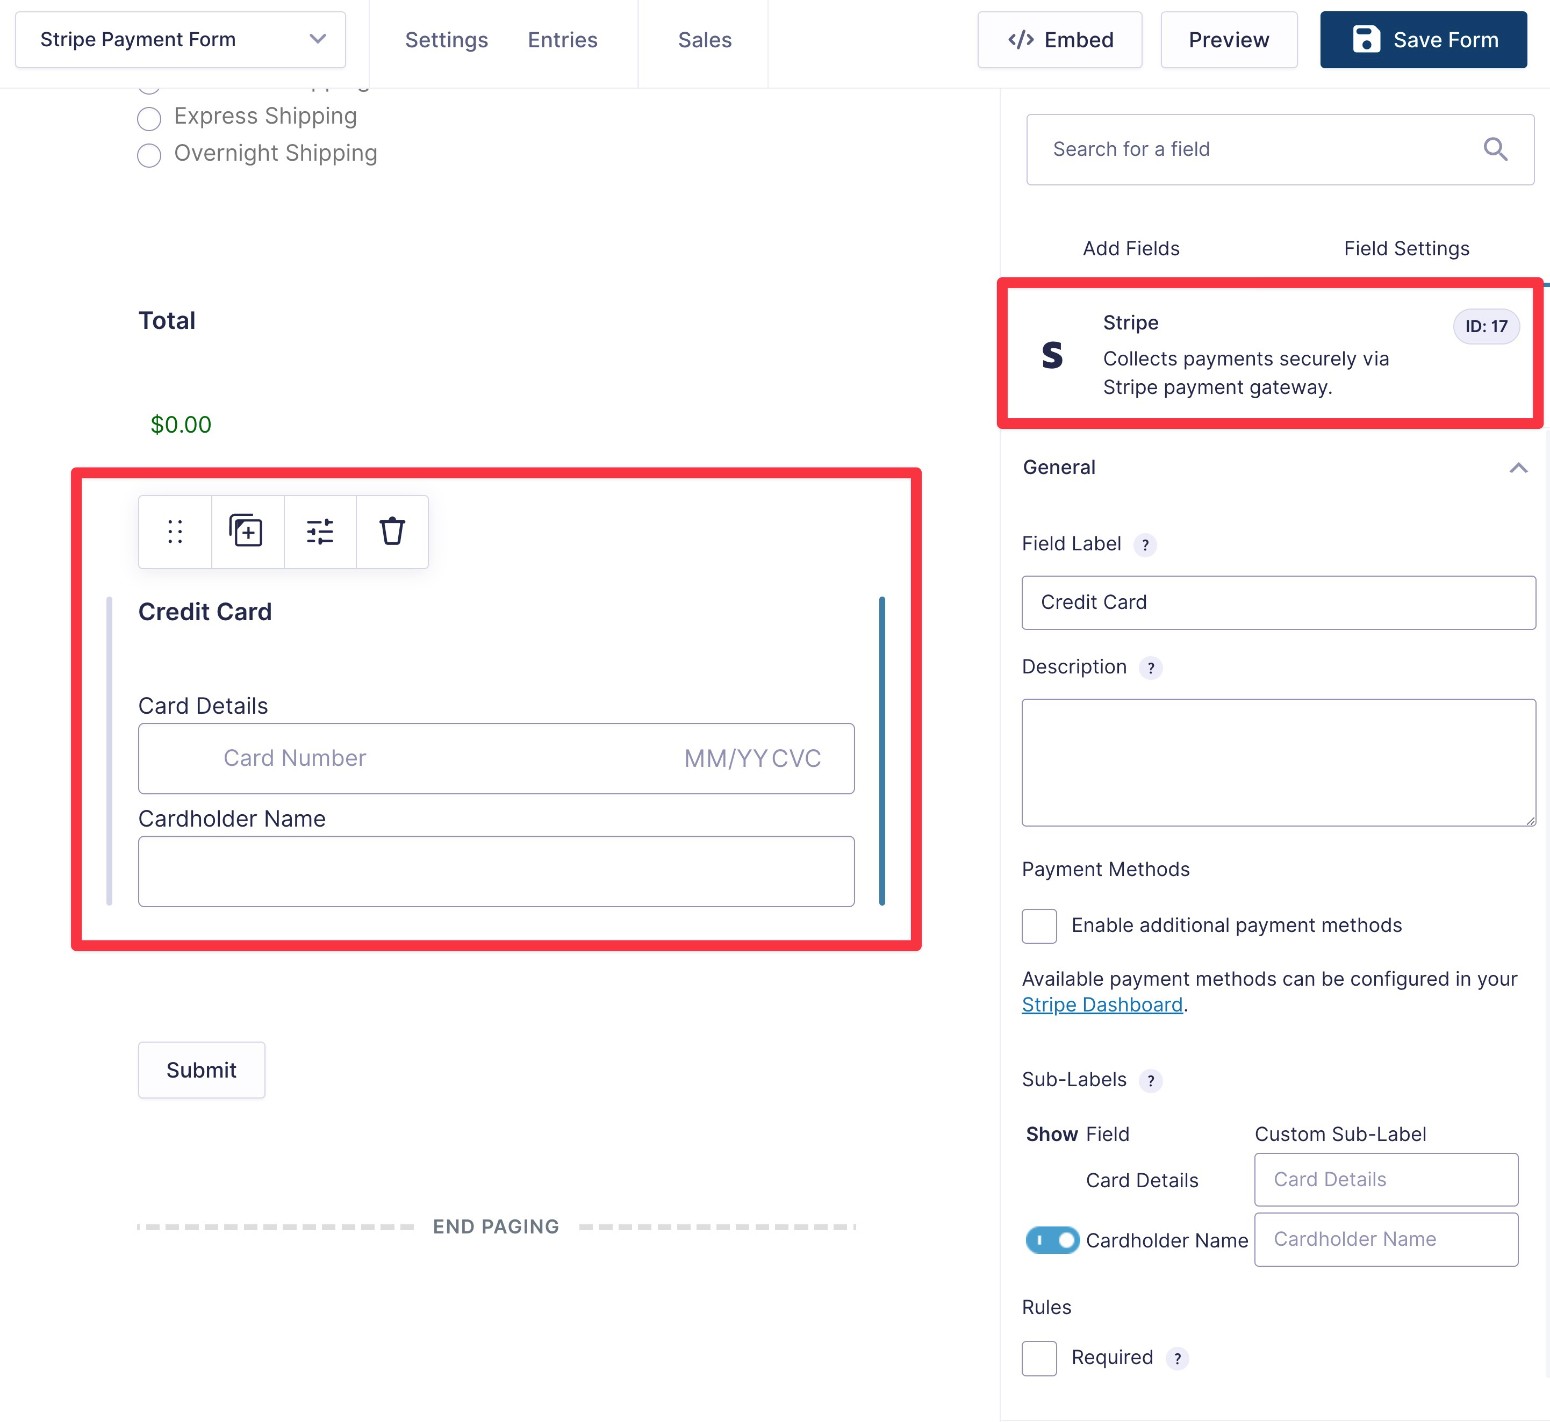
Add the Stripe Field
Finally, you’ll want to add the Stripe field to your form – this is where users will enter their actual credit card details (or choose one of the other payment methods, such as Apple Pay).
Typically, you’ll want to place it at the bottom of your form.
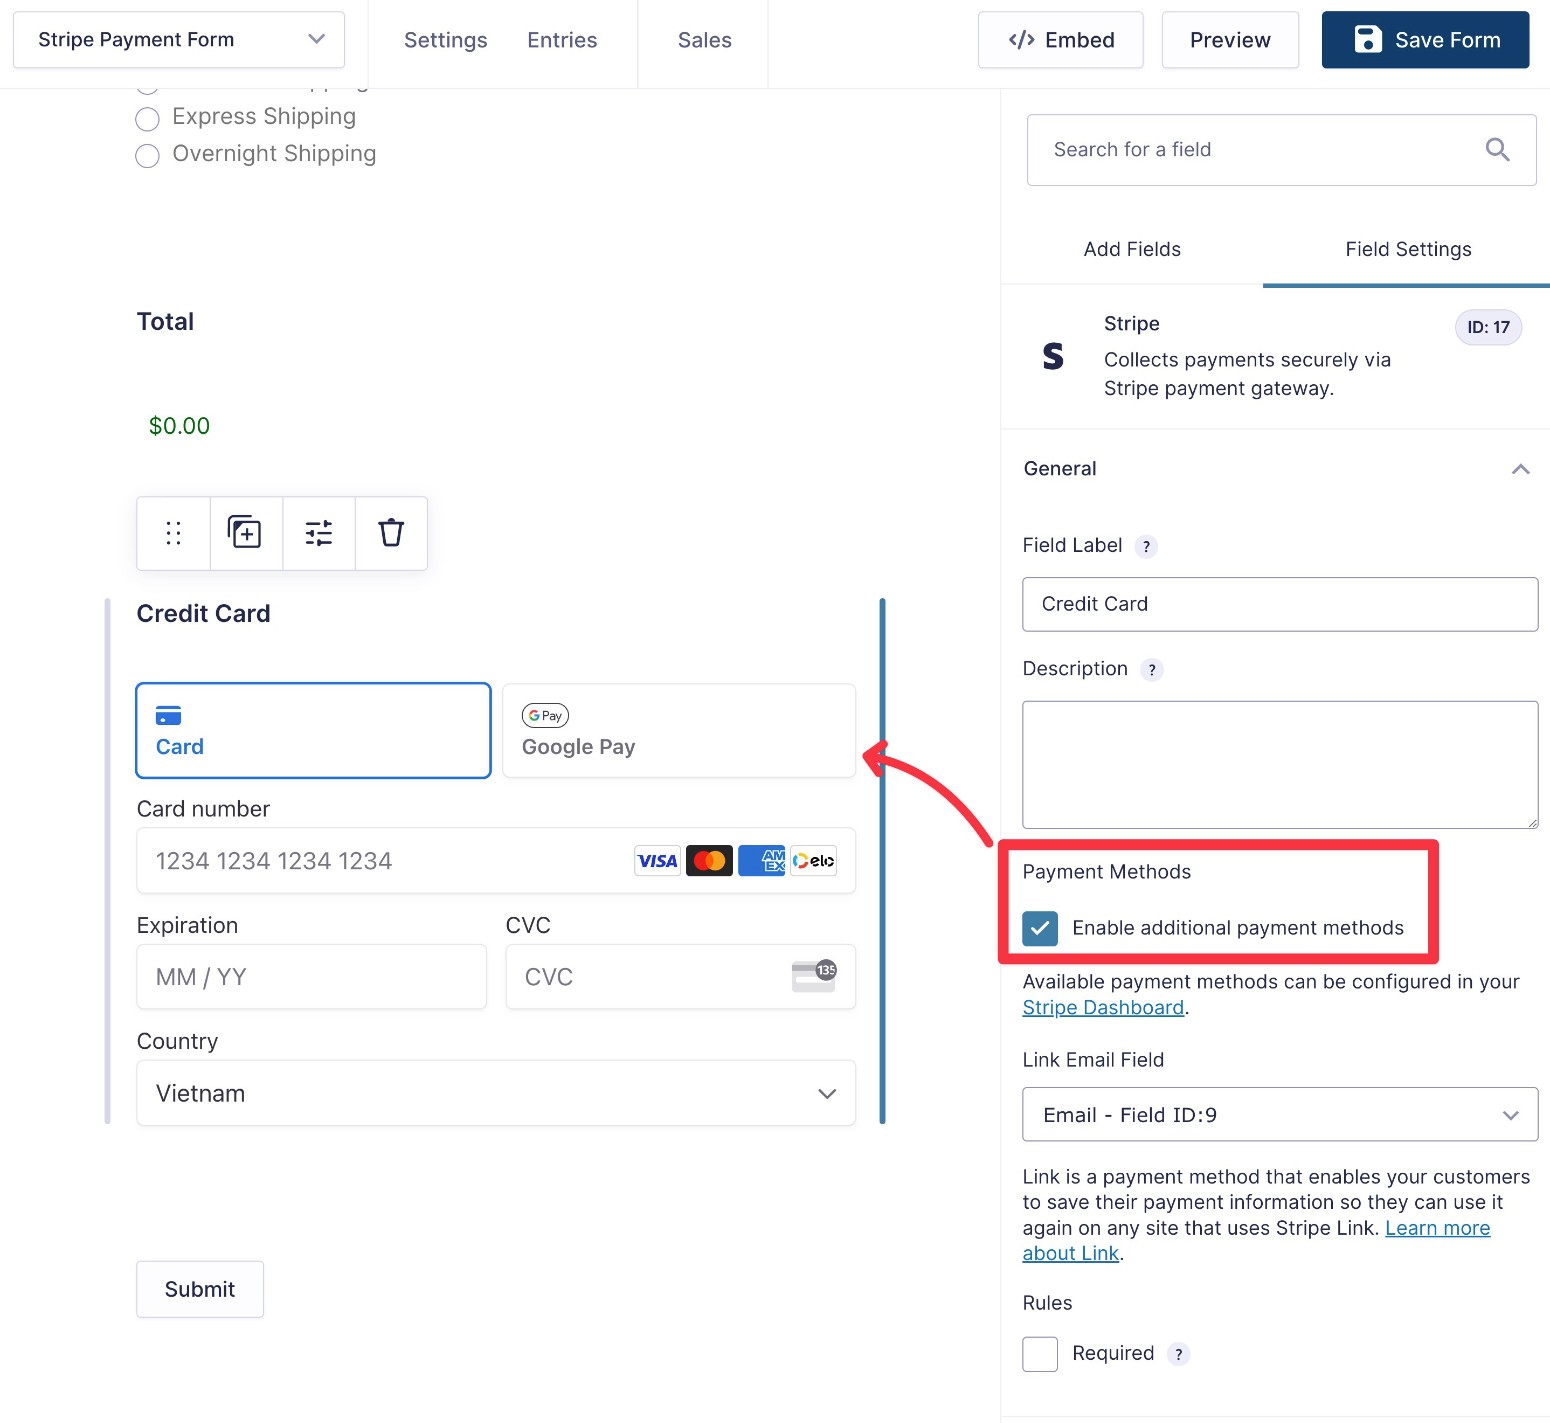
Once you’ve added the field, you can open its settings to configure some important settings, including whether to enable additional payments like Apple Pay.
Note – you might not see a live preview of the field until you create your Stripe feed, which is the next step.
Only credit cards:
Additional payment methods:
When you’re finished, make sure to click the Save Form button.
Enable Additional Payment Methods in the Stripe Dashboard
Some additional payment methods, like Apple Pay and Google Pay, are enabled by default, but for other methods you will need to take the extra step of turning them on within your Stripe dashboard.
To do so, head on over to your Stripe dashboard and select Settings > Payment Methods.
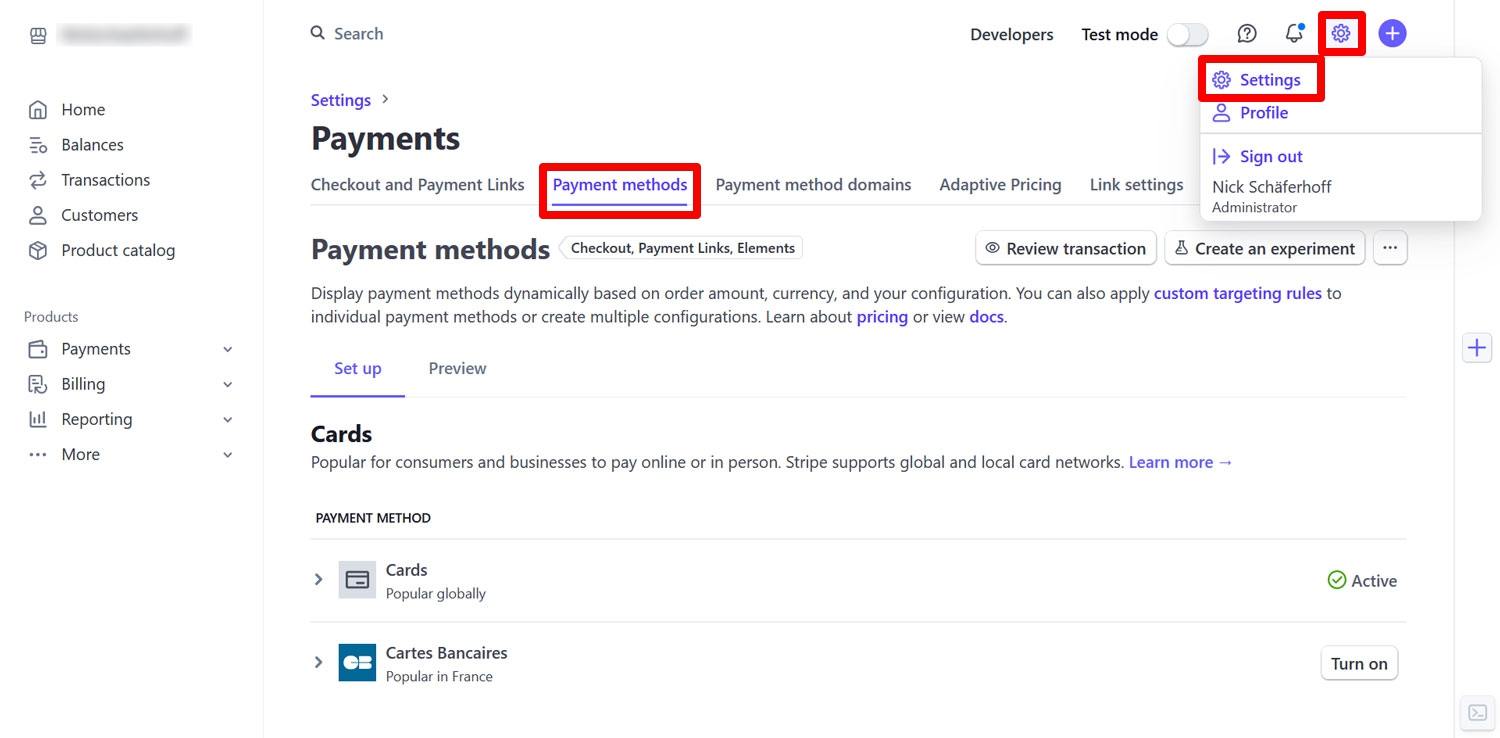
You need to be editing the Gravity Forms configuration, so if you are not, pick it from the drop-down menu.
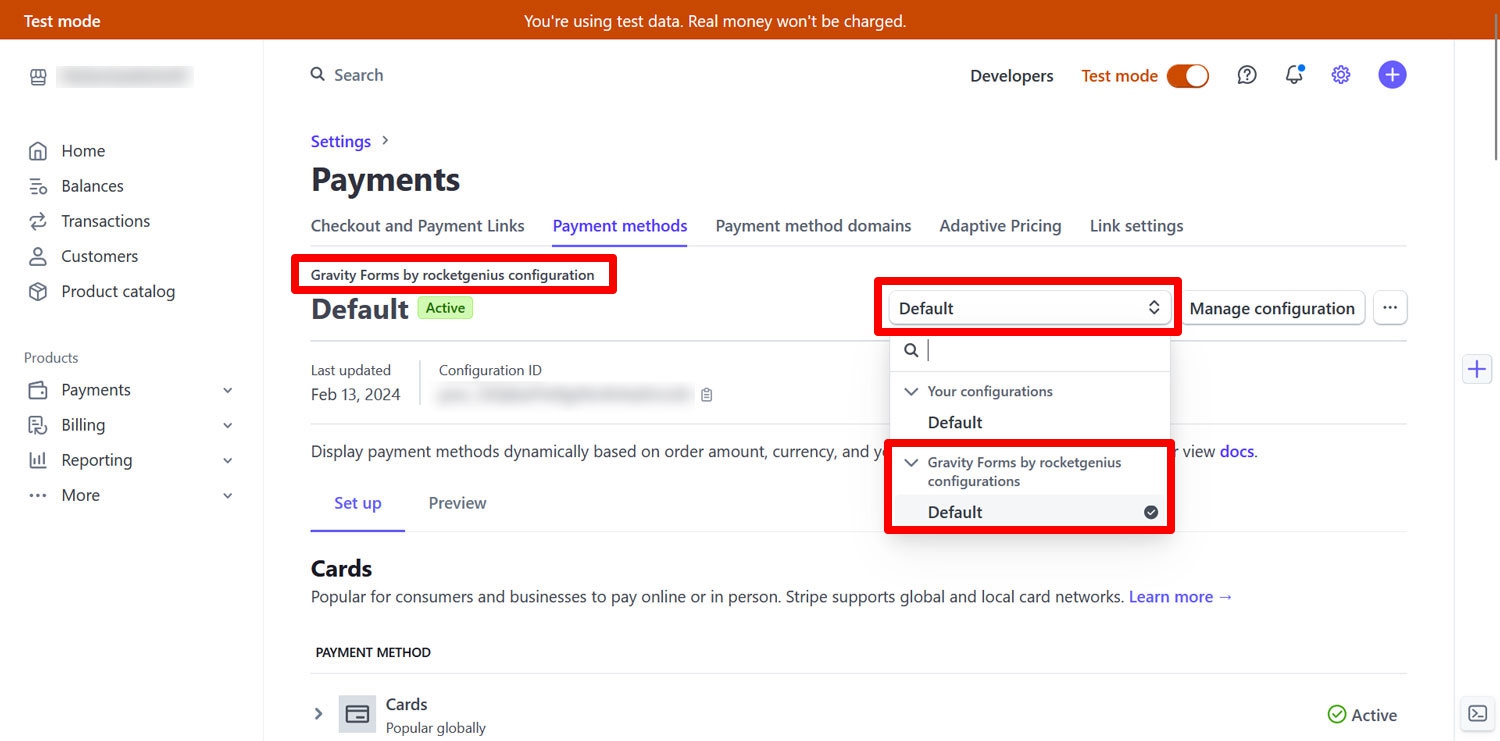
Then scroll down the list of payment methods and enable the ones you will use.

4. Create a Gravity Forms Stripe Feed
In Gravity Forms, a “feed” lets you configure something to happen when a user submits your form.
For Gravity Forms and Stripe, your form’s feed will control how to process the information from your form in Stripe. For example, whether to have Stripe collect a one-time payment or set up a recurring subscription.
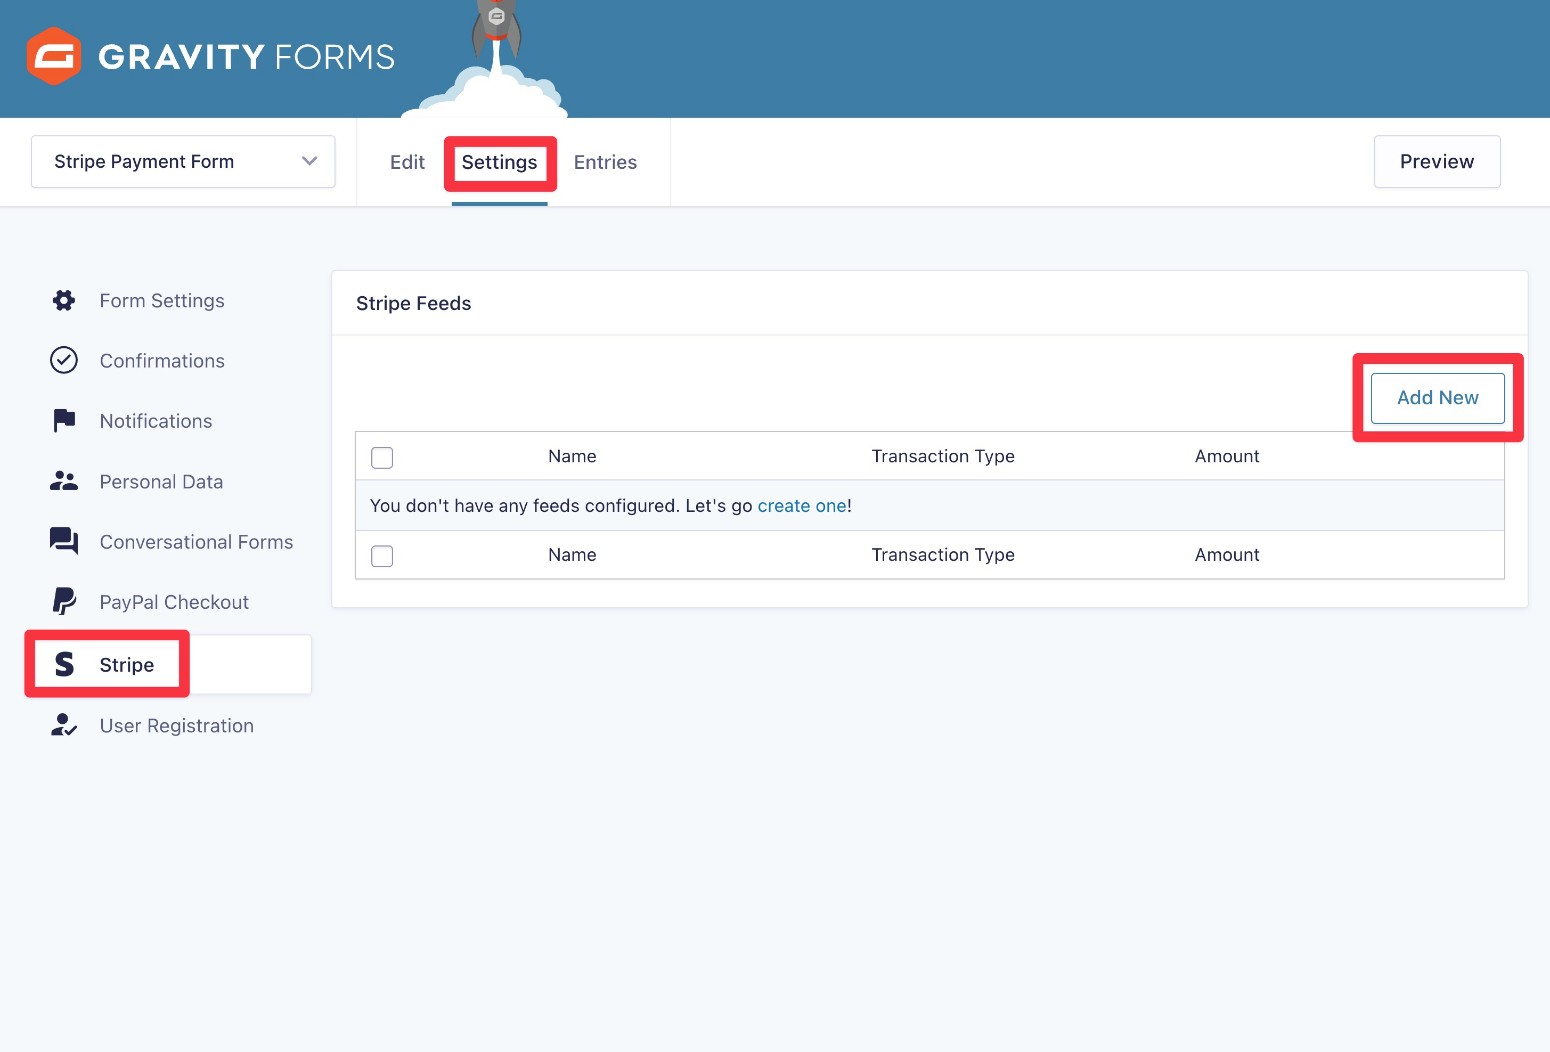
Set Up Your Basic Feed Details
To create your first Stripe feed, go to Settings → Stripe in the form editor. Then, click Add New.
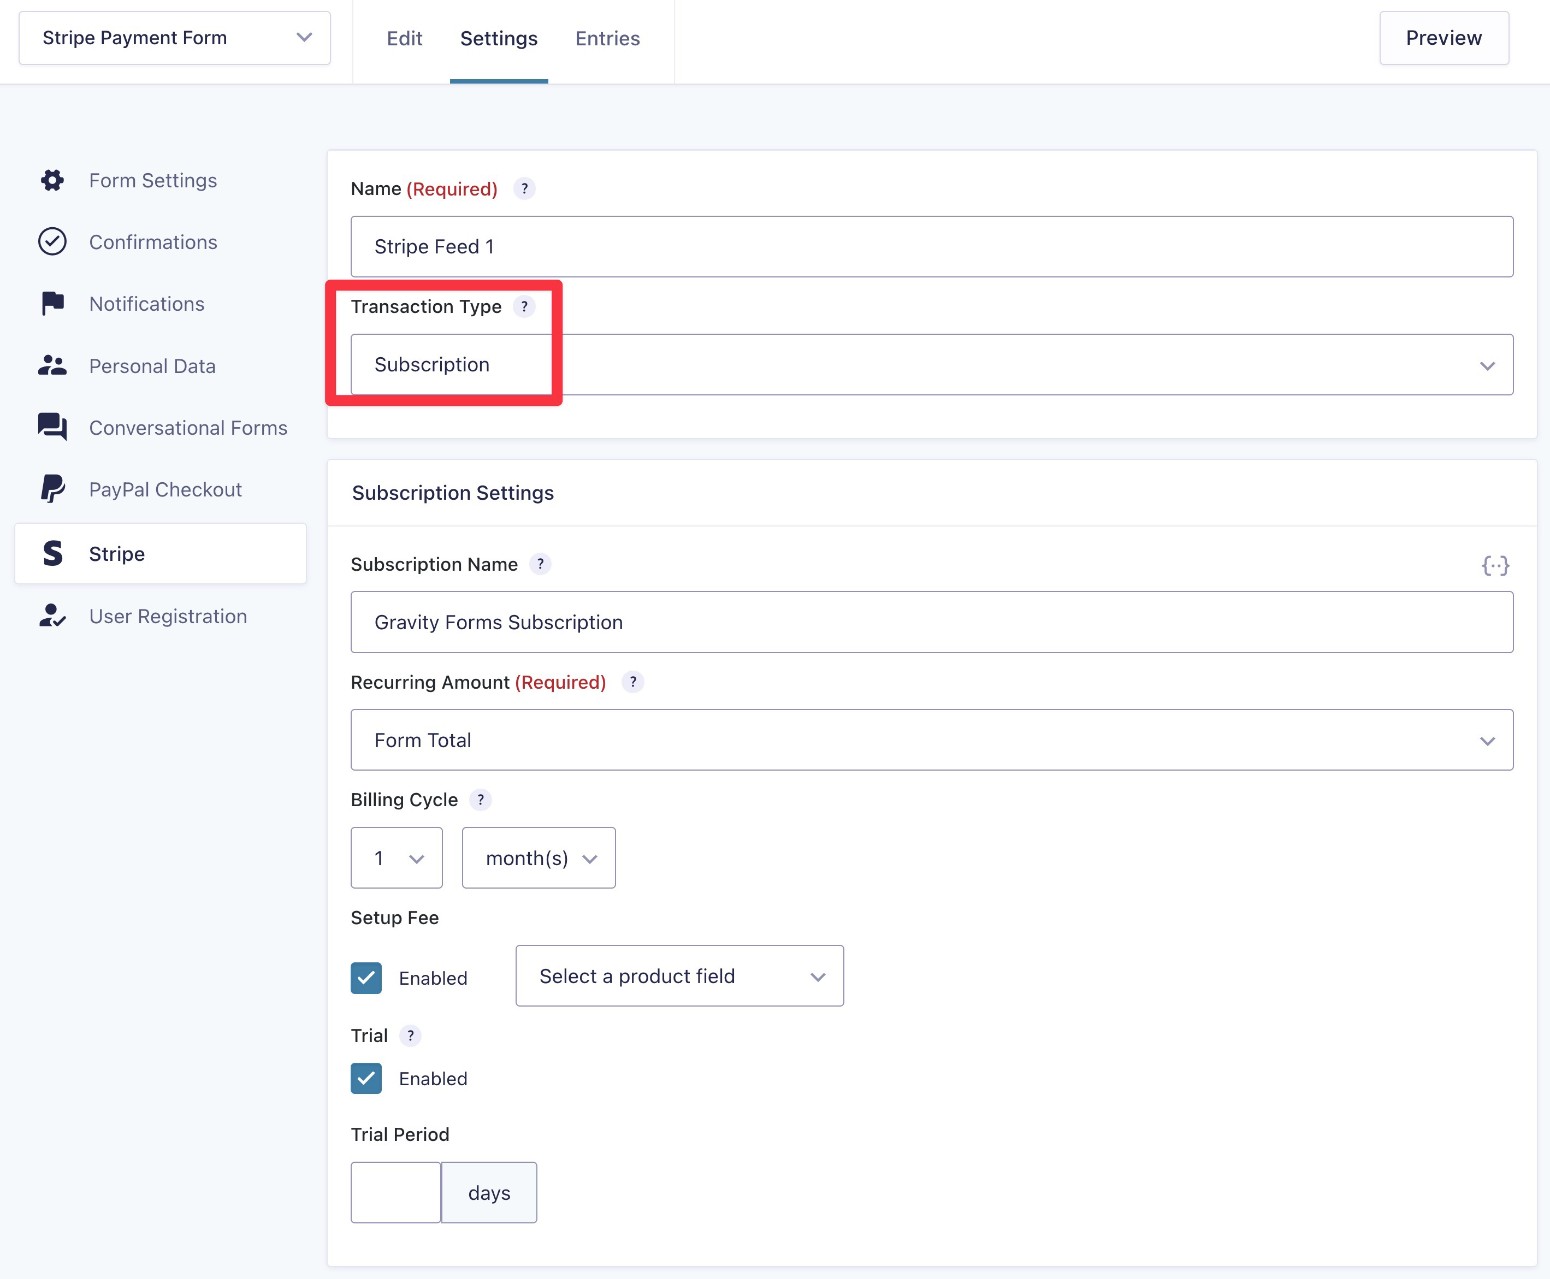
First, you’ll want to choose between setting up a one-time payment or an automatic recurring payment:
- Products and Services – this is a one-time payment.
- Subscription – if you choose this option, you’ll see additional settings to configure the billing cycle (e.g. every month). You can also set up one-time setup fees or offer free trial periods.
Here’s what it looks like if you choose a subscription transaction:
Below that, you’ll need to map the billing fields from your form to the associated data in Stripe.
You can also sync additional information in the Other Settings box.
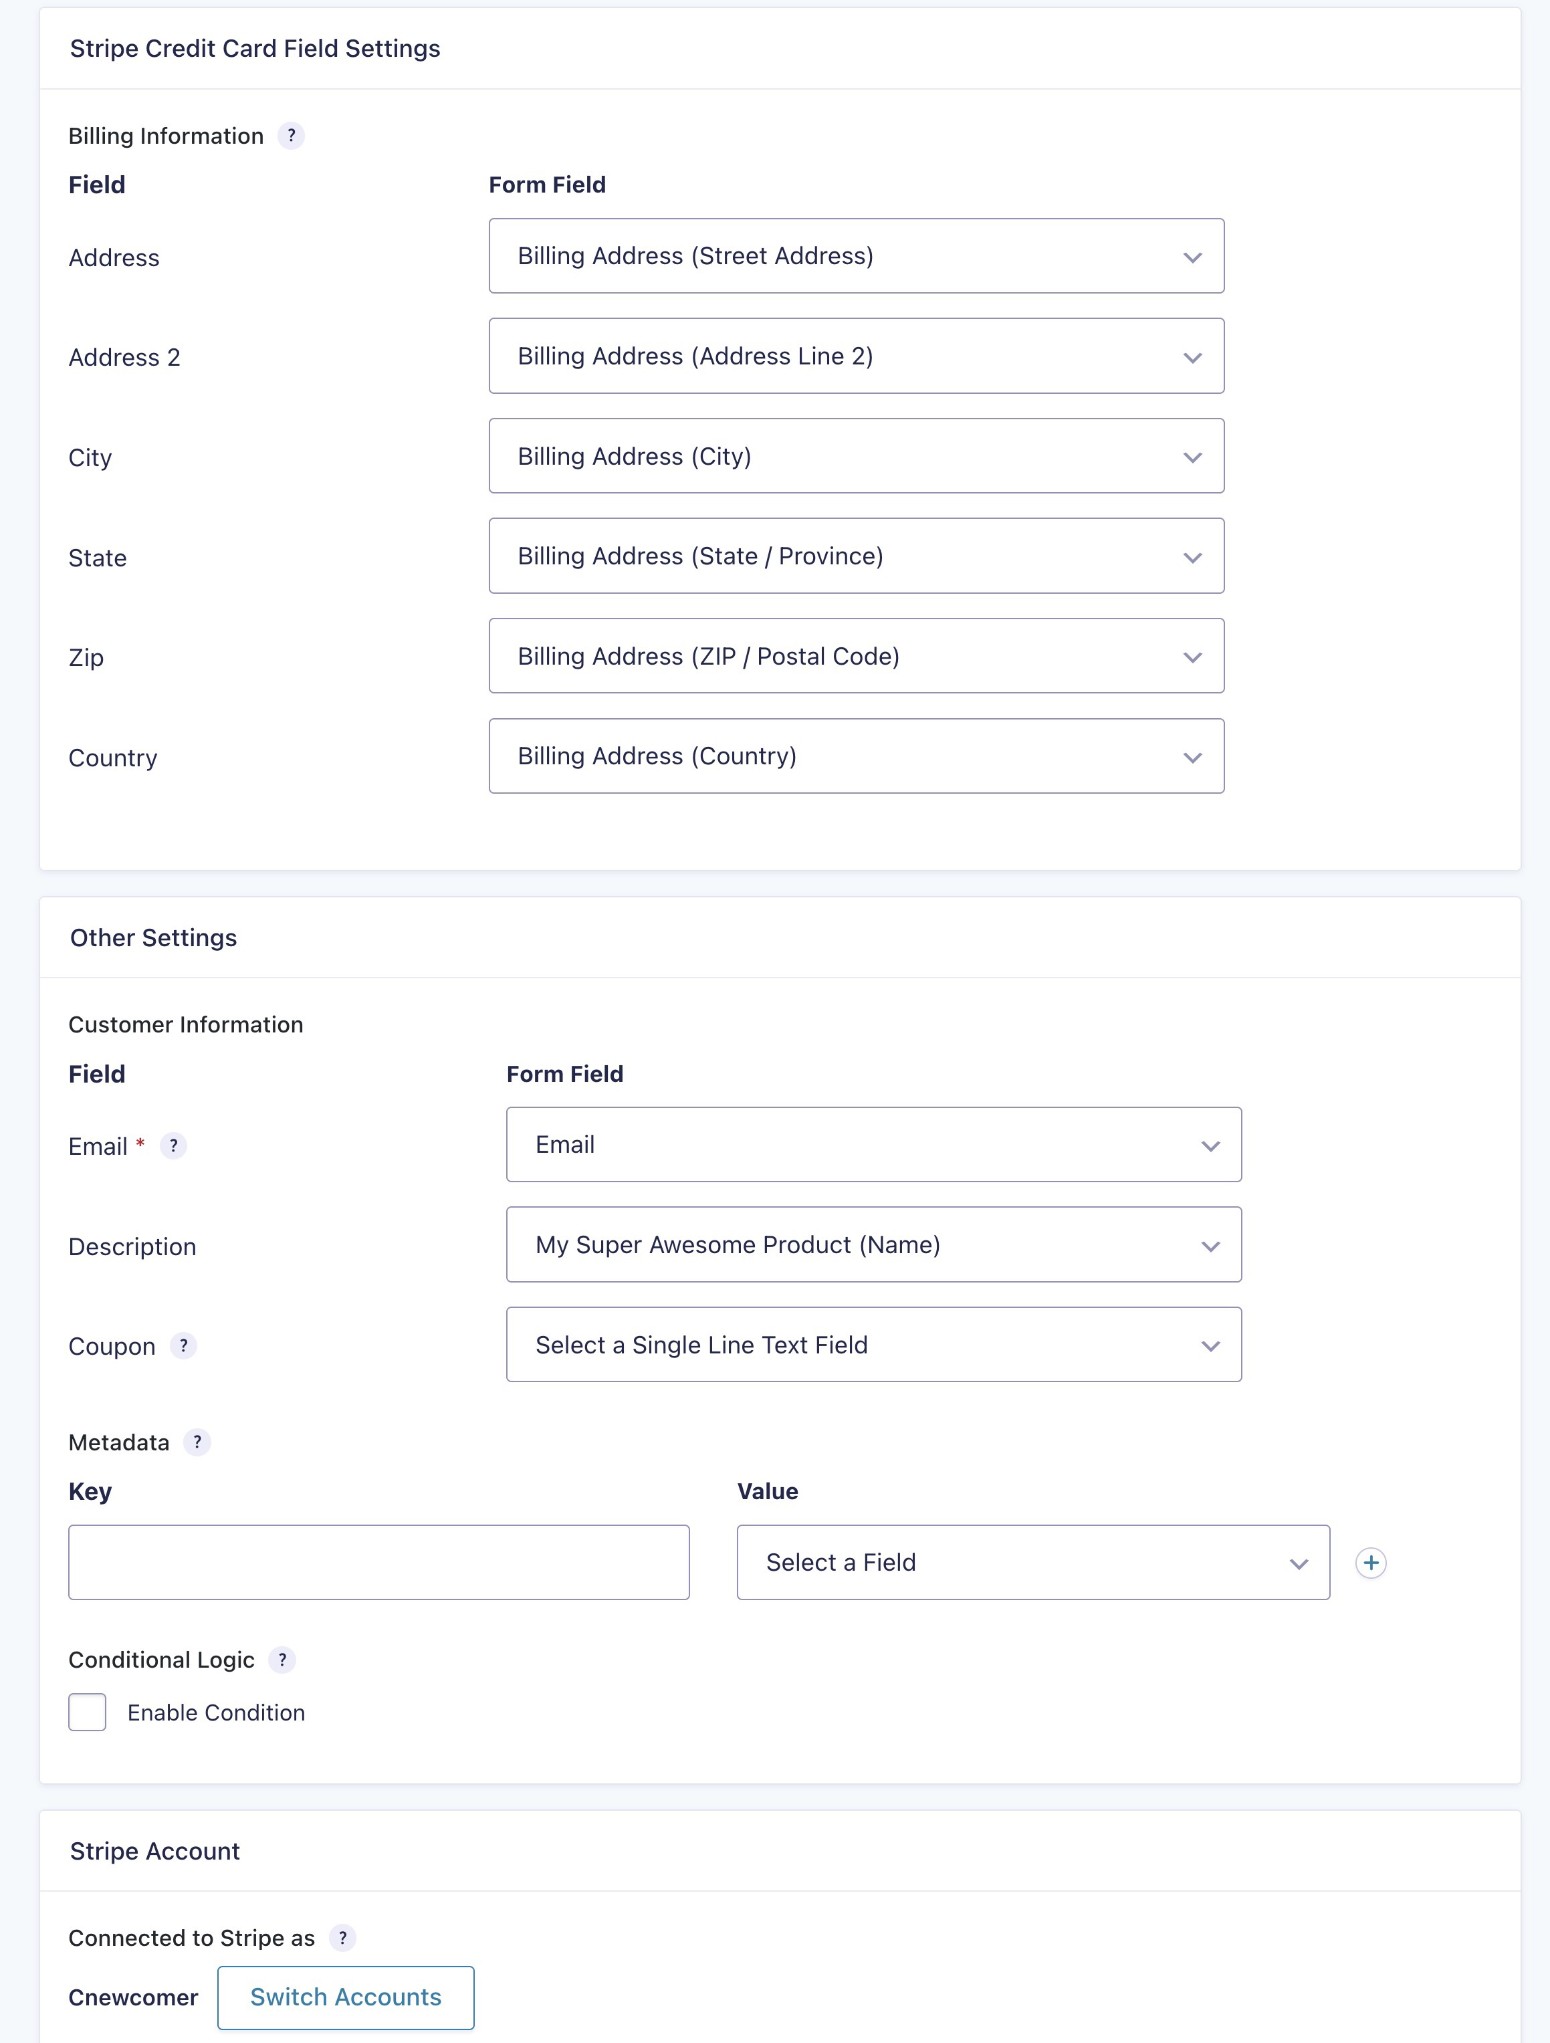
Once you’ve made your choices, make sure to save the settings.
Use Multiple Feeds and Conditional Logic to Adjust Payment Behavior
So far, we’ve assumed that you want to process payments in the same way for every single person who submits your form.
However, you might have situations where you want to handle things differently depending on how someone fills out a form.
For example, you might have a donation form that has a “Make it a recurring donation” checkbox. If someone does not check the box, the form should process a one-time payment. But if someone does check the box, the form should set up an automatic recurring payment.
To handle this, you can create multiple Stripe feeds and then use Gravity Forms’s conditional logic functionality to choose which feed to use for each submission.
Here are some examples of what you can do with this:
- Give users an option to turn a one-time payment into a recurring payment. This can work great for donations, as we discussed above.
- Offer different billing durations for subscriptions. For example, you could let users choose between paying monthly or paying annually.
To start, you would first want to add a radio button or drop-down field to your form that lets users choose their preferred payment option.
For something where you don’t need to change the price, you can use regular fields (e.g. a donation form where the user has already chosen the donation amount and is just choosing between one-time or recurring payments).
If you do need to change the price (e.g. monthly vs annual billing), you can add these options using the Product field.
Then, create Stripe feeds for each payment option.
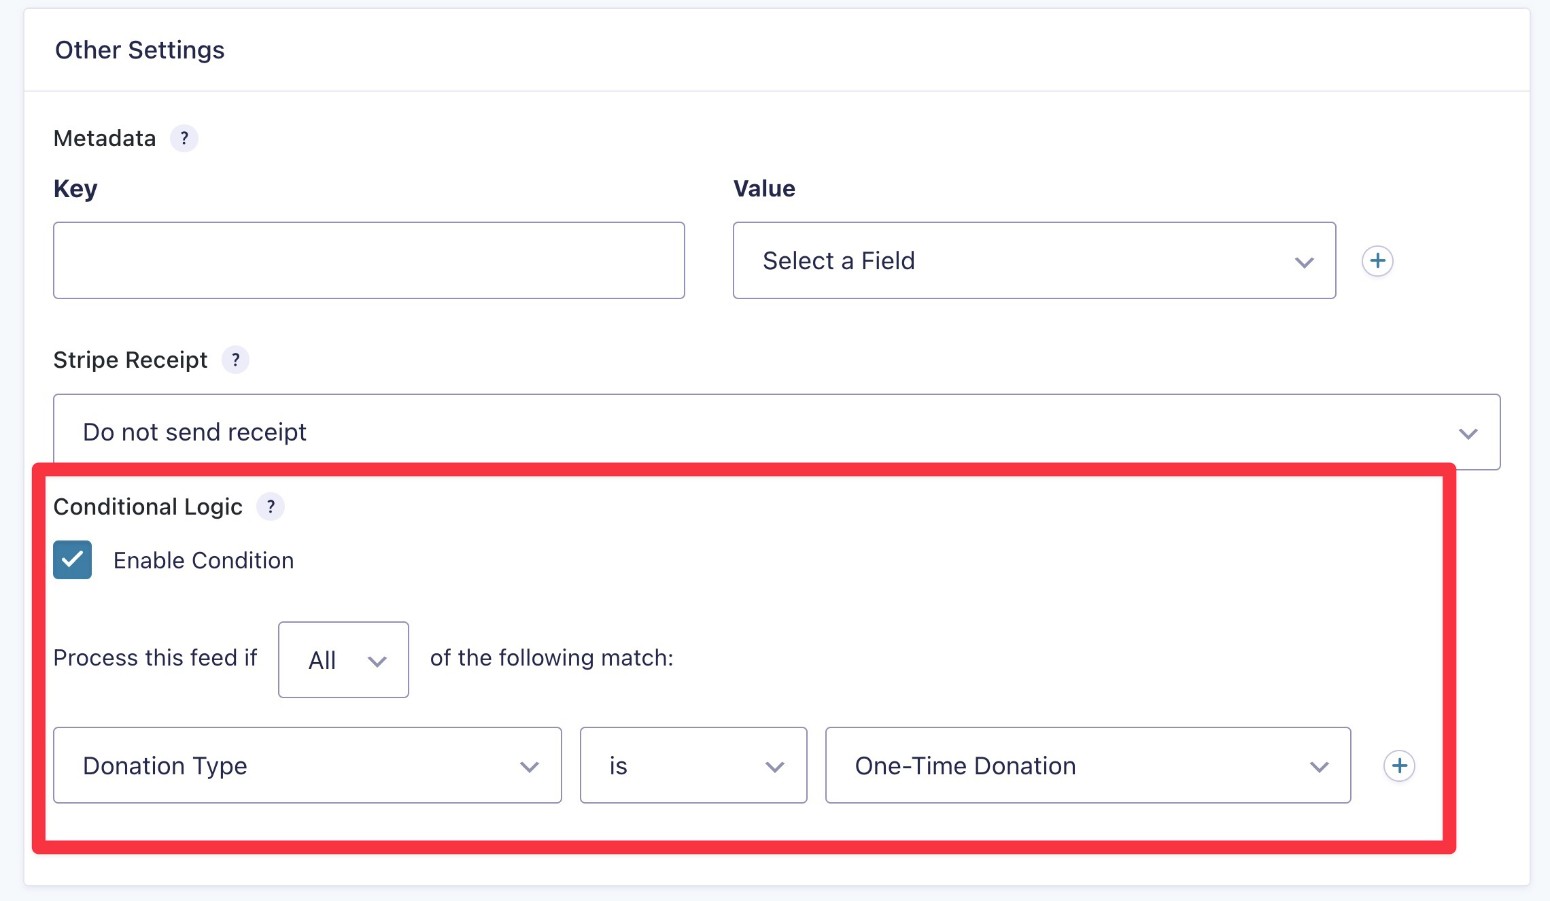
To control when to execute each feed, you can use the conditional logic option at the bottom of the feed settings.
For example, you could set the one-time payment feed to execute if a user has chosen the one-time donation option:
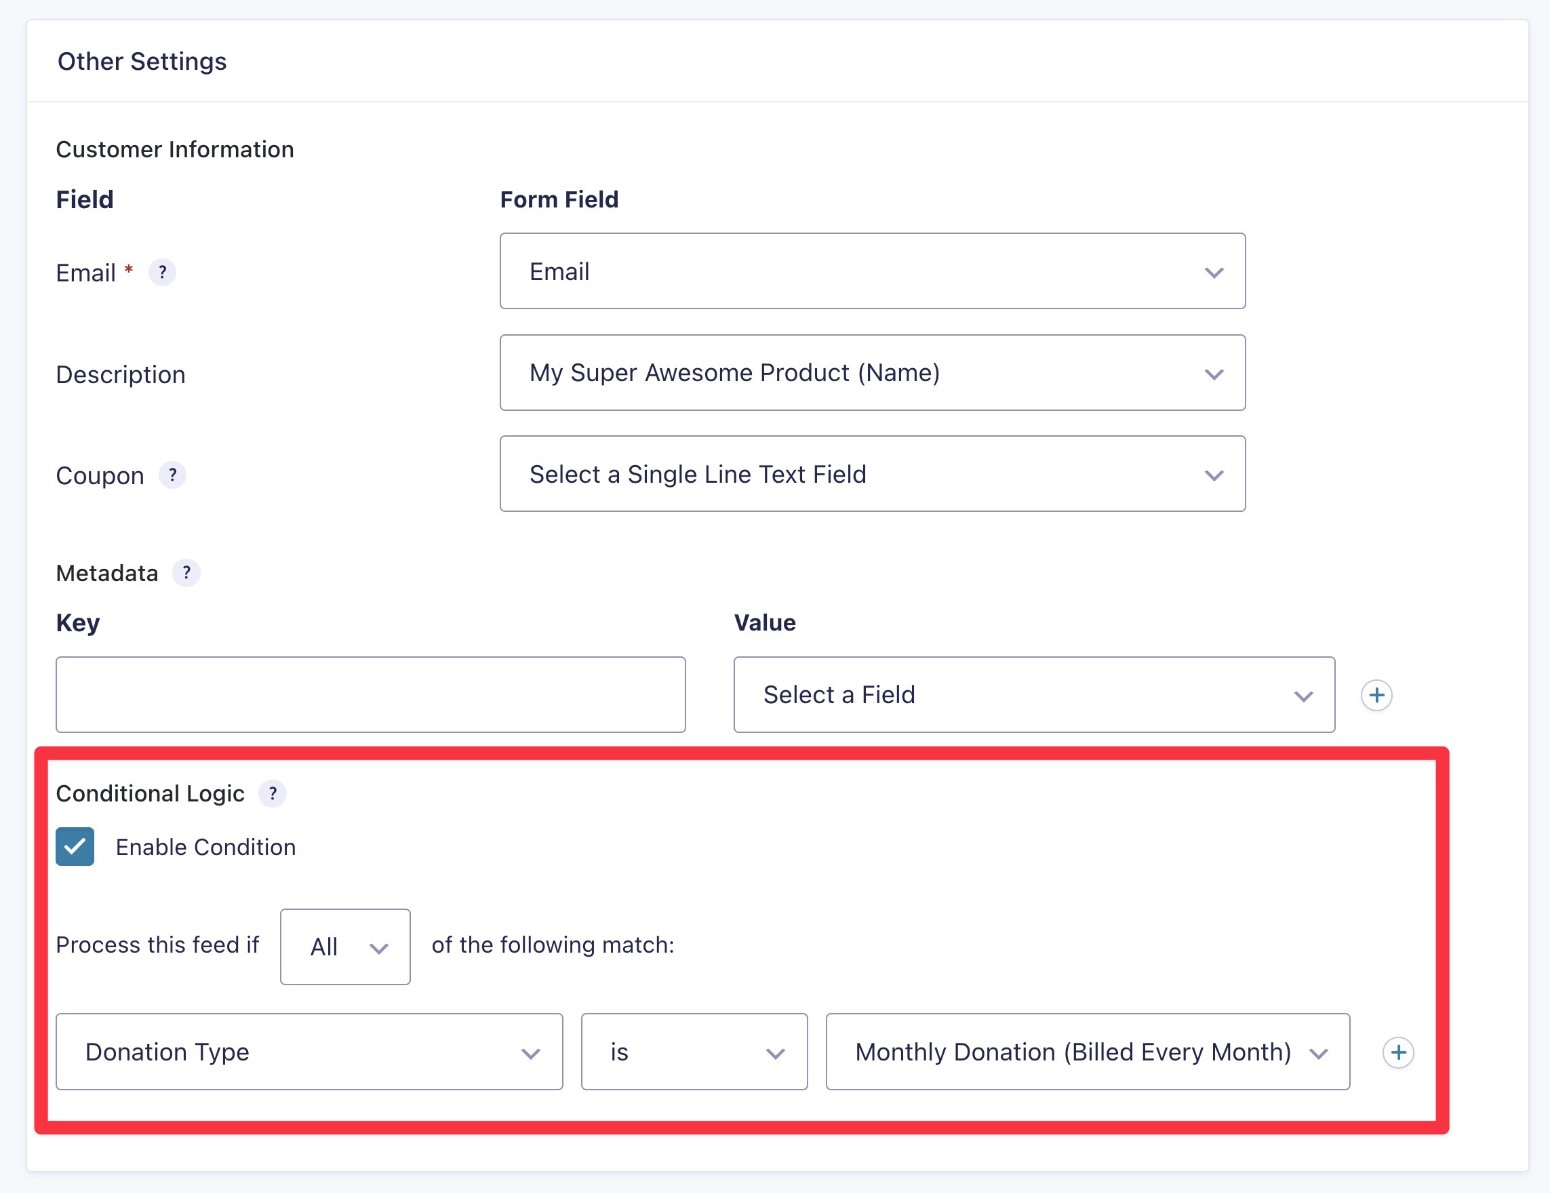
Then, you could set the subscription feed to execute if the user has chosen the monthly donation option:
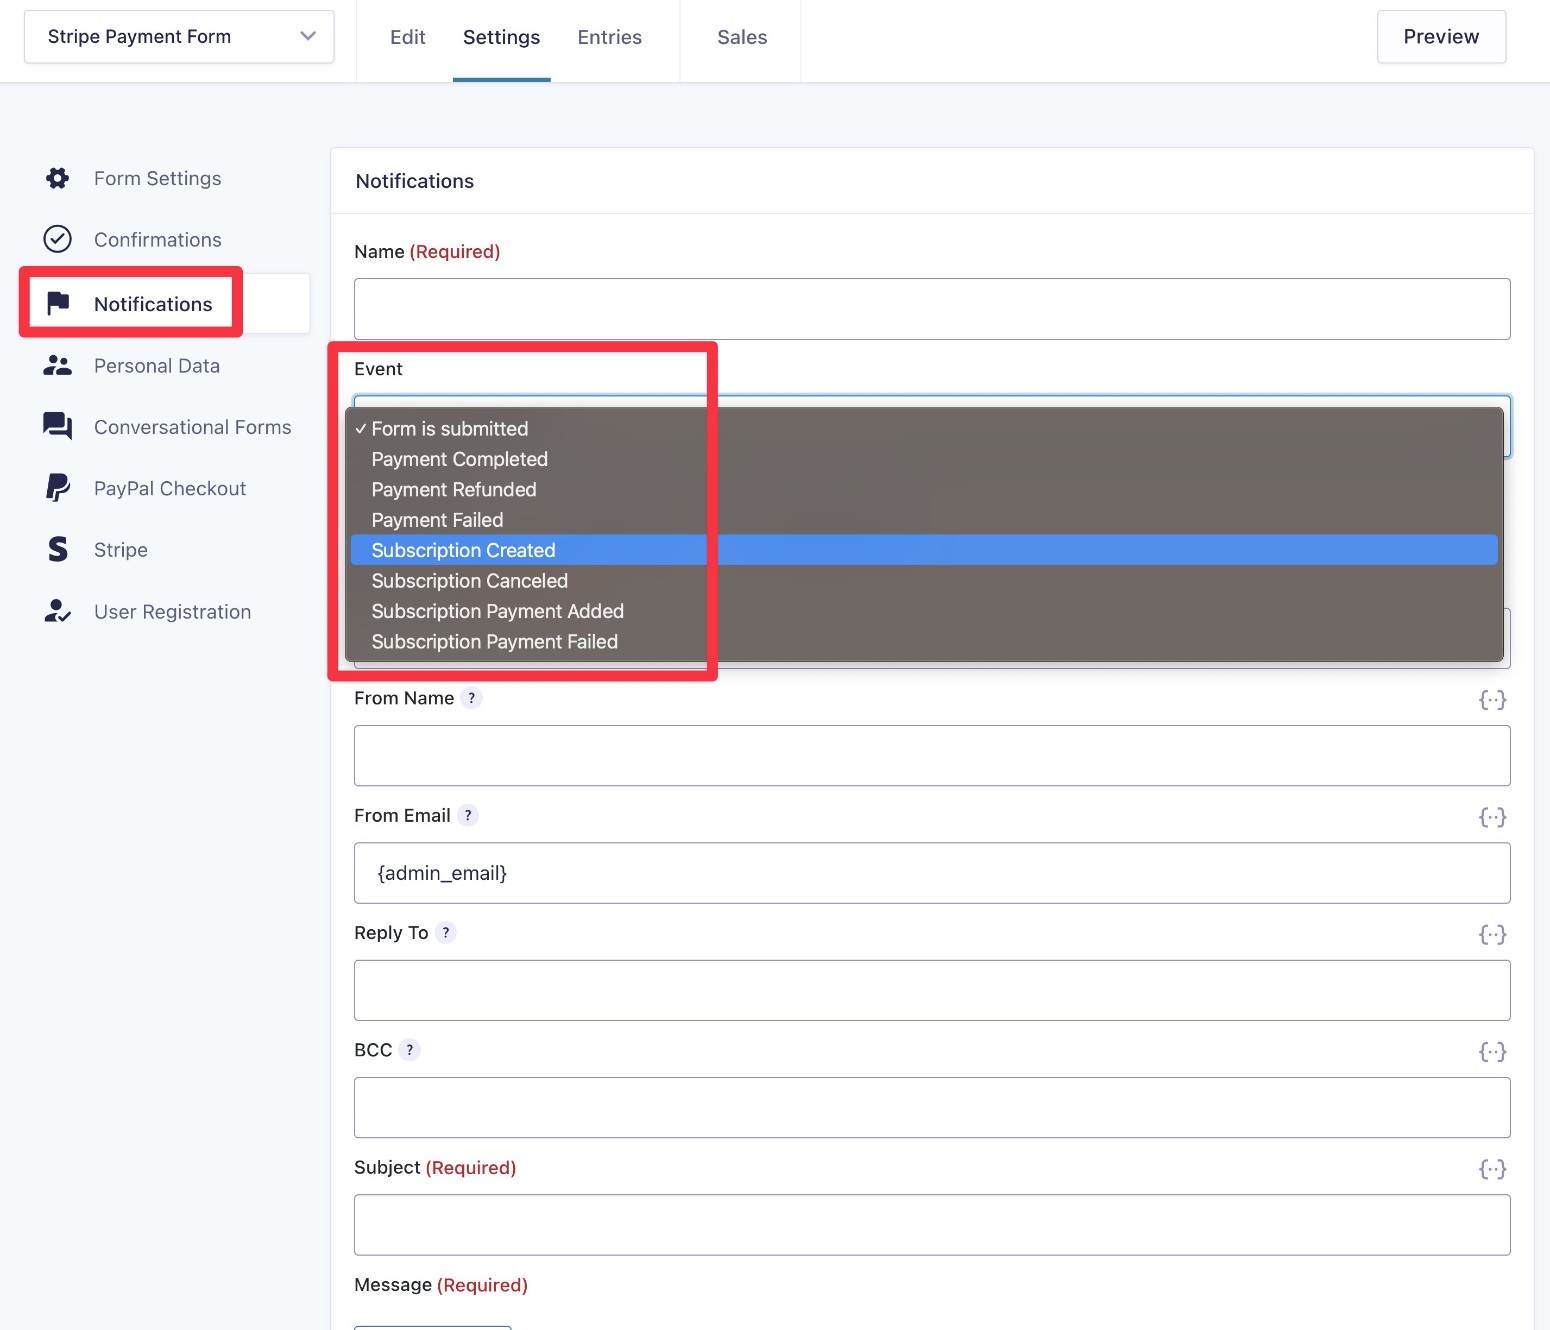
5. Set Up Payment-Related Notification Emails
To help you streamline your admin workflows and also create a better experience for your visitors, the Gravity Forms Stripe Add-On lets you set up form notifications that are triggered based on the payment status in Stripe.
6. Set Up Other Integrations (Optional)
Another nice thing about using Gravity Forms for WordPress Stripe payments is that you’re also free to make use of all the other Gravity Forms add-ons in your Stripe payment form.
Here are some examples of what you might want to set up:
- Add people to your email newsletter after they make a payment.
- Create a task in your project management software after a successful payment.
- Add users to your customer relationship manager (CRM) after they make a payment.
- Connect to apps via Zapier and trigger an action whenever someone makes a payment.
- Generate a PDF receipt that you send to customers or keep for your records.
- Track conversions in Google Analytics.
- Register users for your site after they make a successful payment.
- Build multi-step business process workflows using Gravity Flow.
To get an idea of the types of integrations that you can set up, browse all of the Gravity Forms Add-Ons.
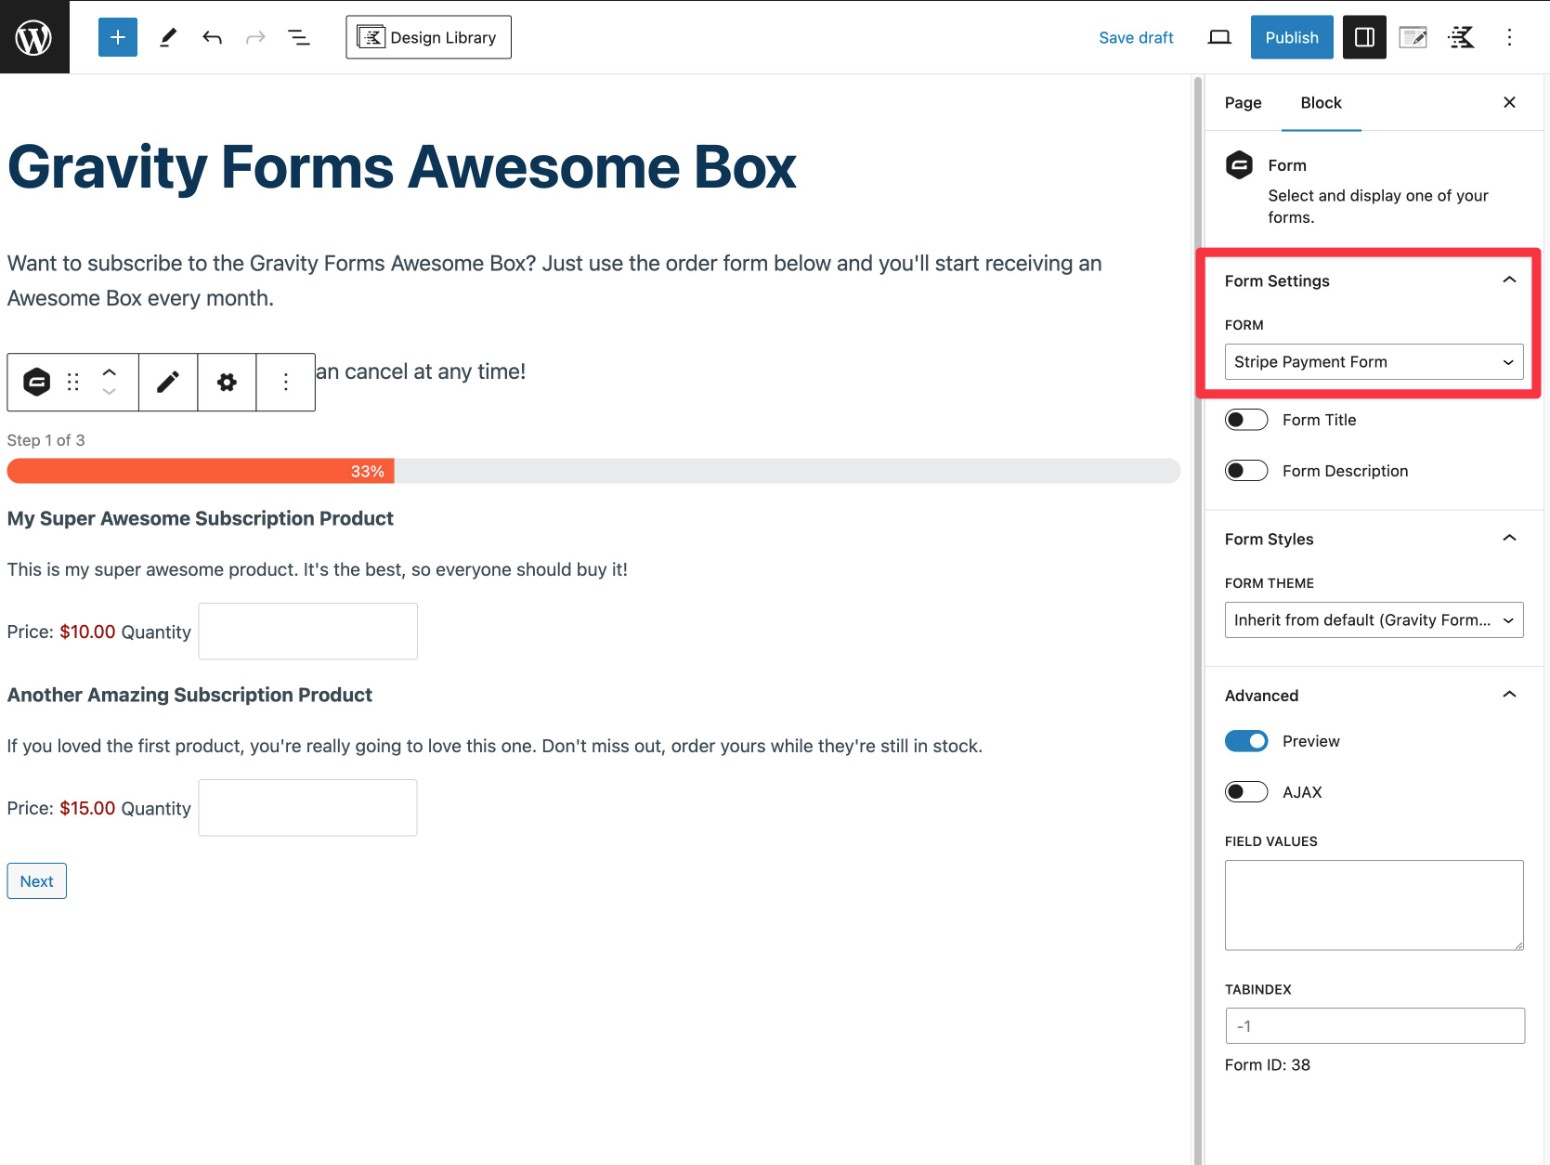
7. Embed and Test Your Form
Once you’re happy with how you’ve configured your Stripe payment form, you can embed it anywhere on your site using the Gravity Forms block or shortcode.
If you set up the Stripe add-on in Sandbox mode, you can also test your form with some dummy payments using one of the Stripe testing payment methods.
Even though these are dummy payments, you’ll still be able to see them in your WordPress dashboard and in the Stripe Test Mode dashboard. More on viewing payments later in this guide.
8. Enable Live Payments
Once you’ve tested your form and verified that everything is working as you expect it to, you can update your form to have it start processing live payments:
- Go to Forms → Settings → Stripe in your WordPress dashboard.
- Change the Mode from Test to Live.
- Click the Connect with Stripe button to connect your live Stripe account.
- Add the Gravity Forms webhook URL to your live Stripe account (you can follow the same steps from before – just make sure to disable the Test mode toggle in your Stripe dashboard).
- Add the live signing secret to the settings box.
- Click Save Settings.

9. View/Manage Payments from WordPress and/or Stripe
Once you start getting some payments, you’ll be able to view and manage them from both your WordPress dashboard and your Stripe dashboard.
In this last step, we’ll cover some of the most common things you might want to do.
How to Set Up the Official Gravity Forms Stripe App
To help make it easier to manage your payments, Gravity Forms offers an official Stripe app that’s available via the Stripe App Marketplace.
If you set up this app, you’ll be able to view and sync form entry data from inside your Stripe dashboard (in addition to being able to work from your WordPress dashboard).

To learn more about it and how to set it up, check out our full getting started guide for the Gravity Forms Stripe app.
How to View Payment Details
Whether or not you set up the Gravity Forms Stripe app, you’ll be able to view payment details from both your WordPress dashboard and the Stripe dashboard.
The official app just gives you more form-specific information in the Stripe dashboard.
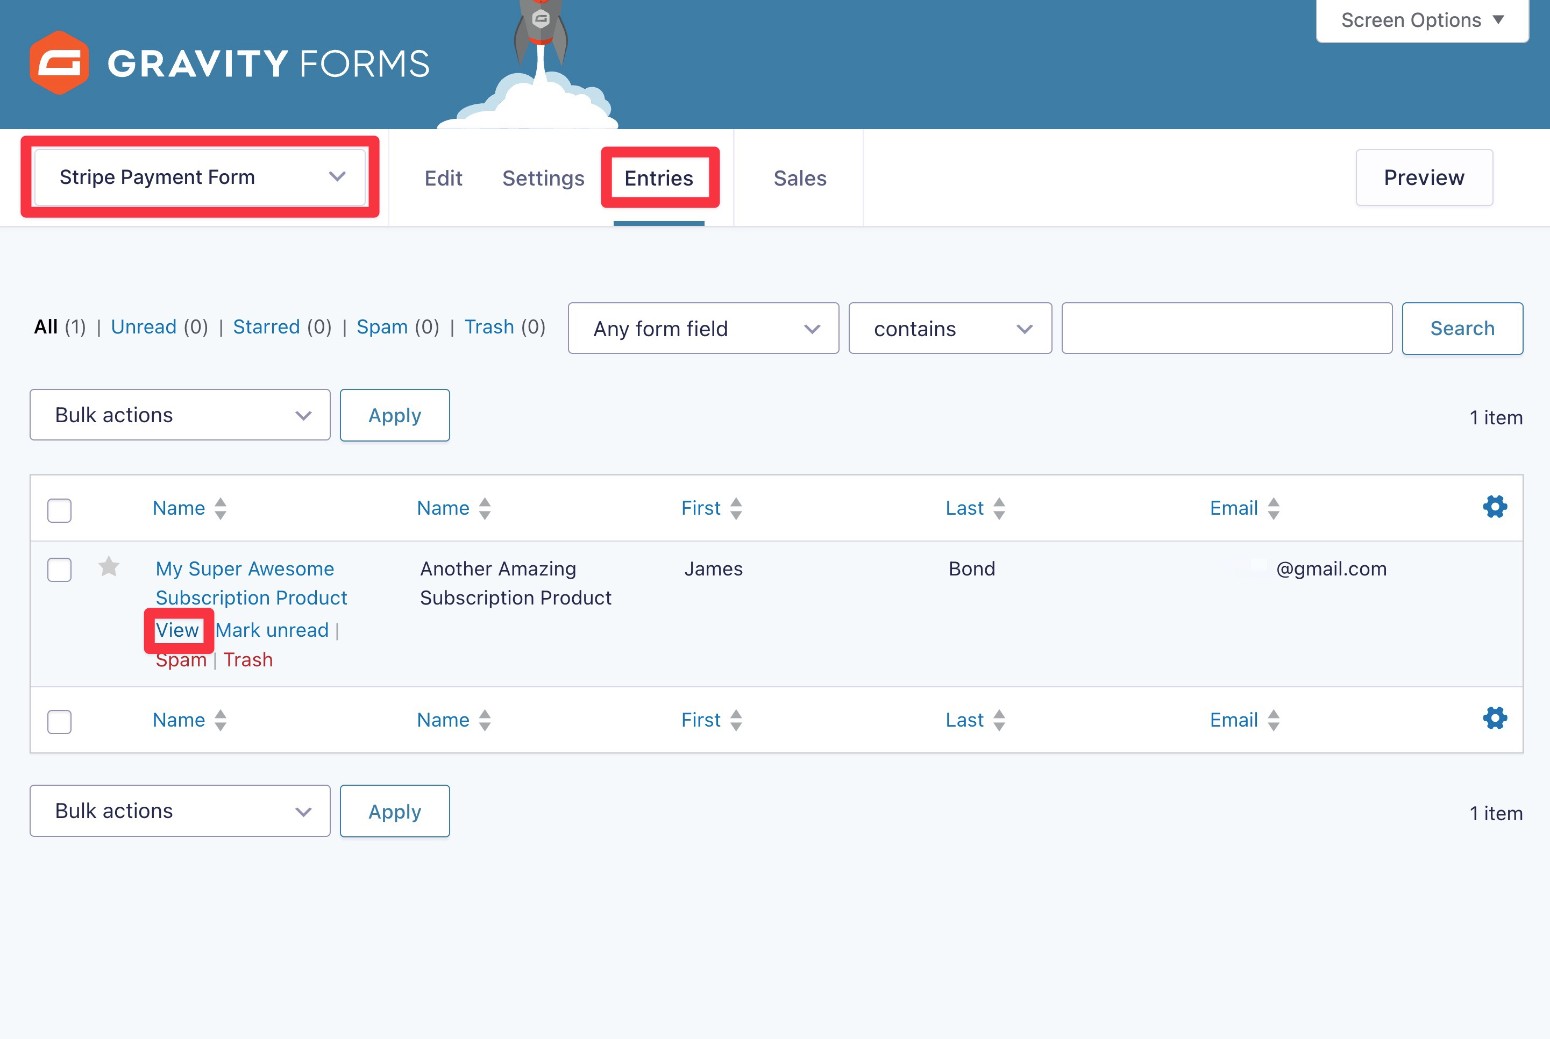
To view payment details in WordPress, you can open the entry detail page for the user’s form submission:
- Go to Forms → Entries.
- Select your Stripe payment form from the drop-down.
- Find the entry for the payment that you want to view.
- Select the View option.
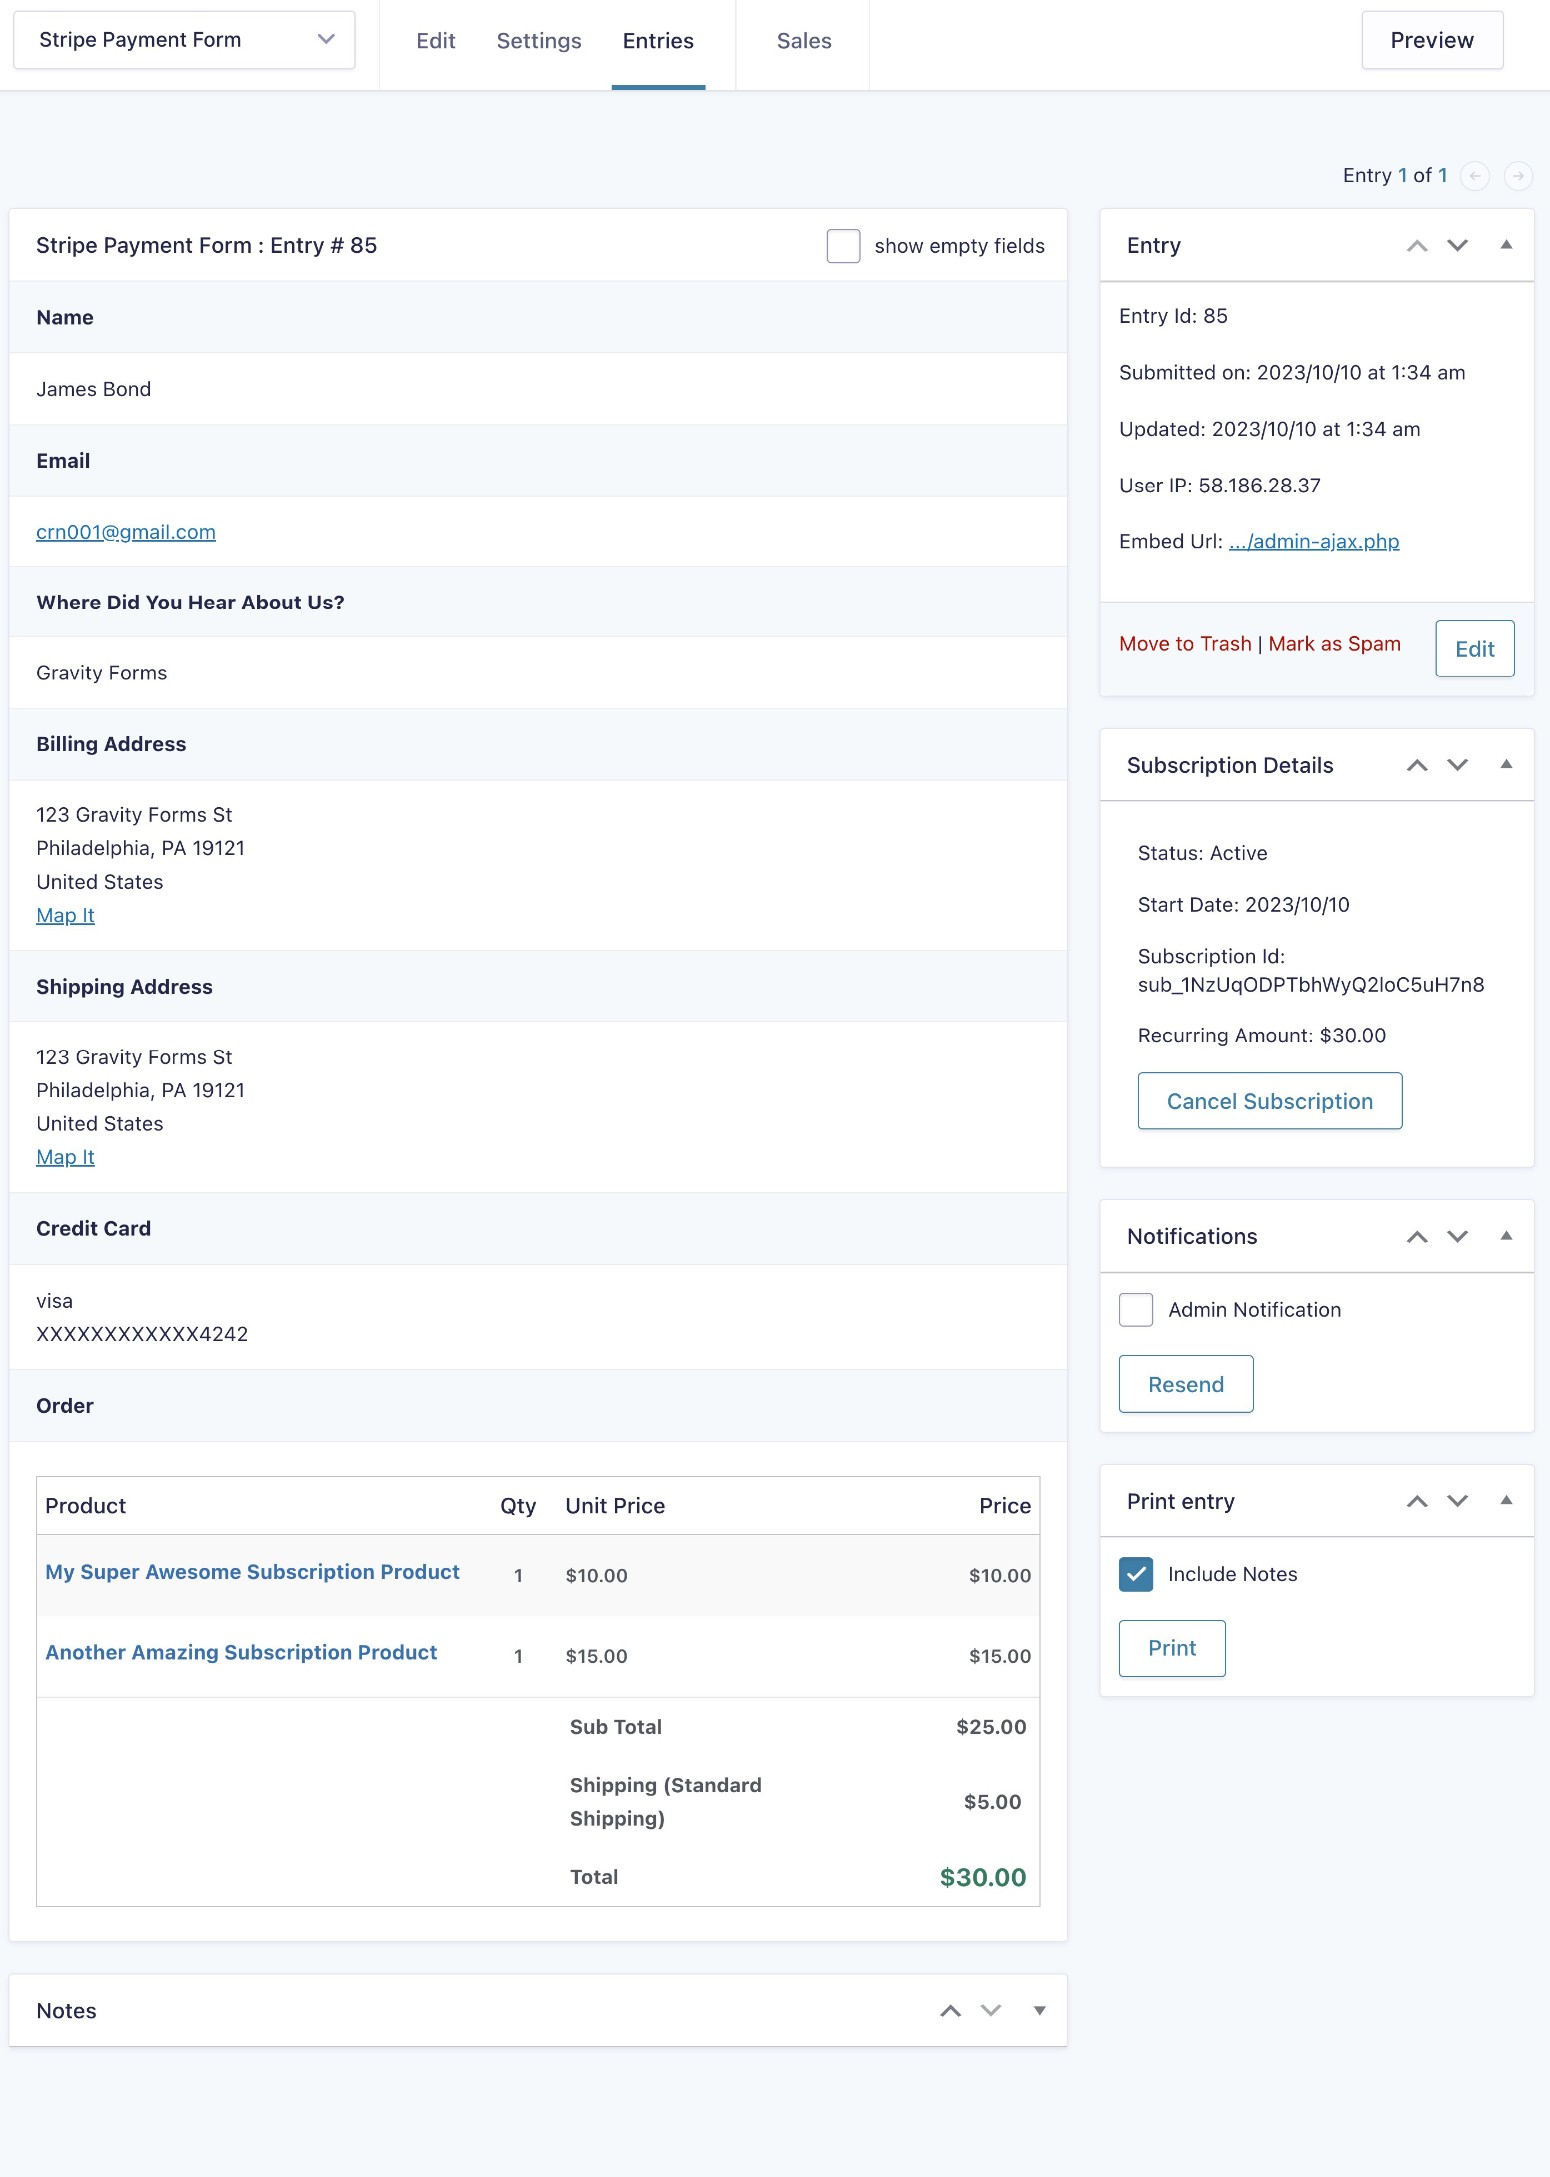
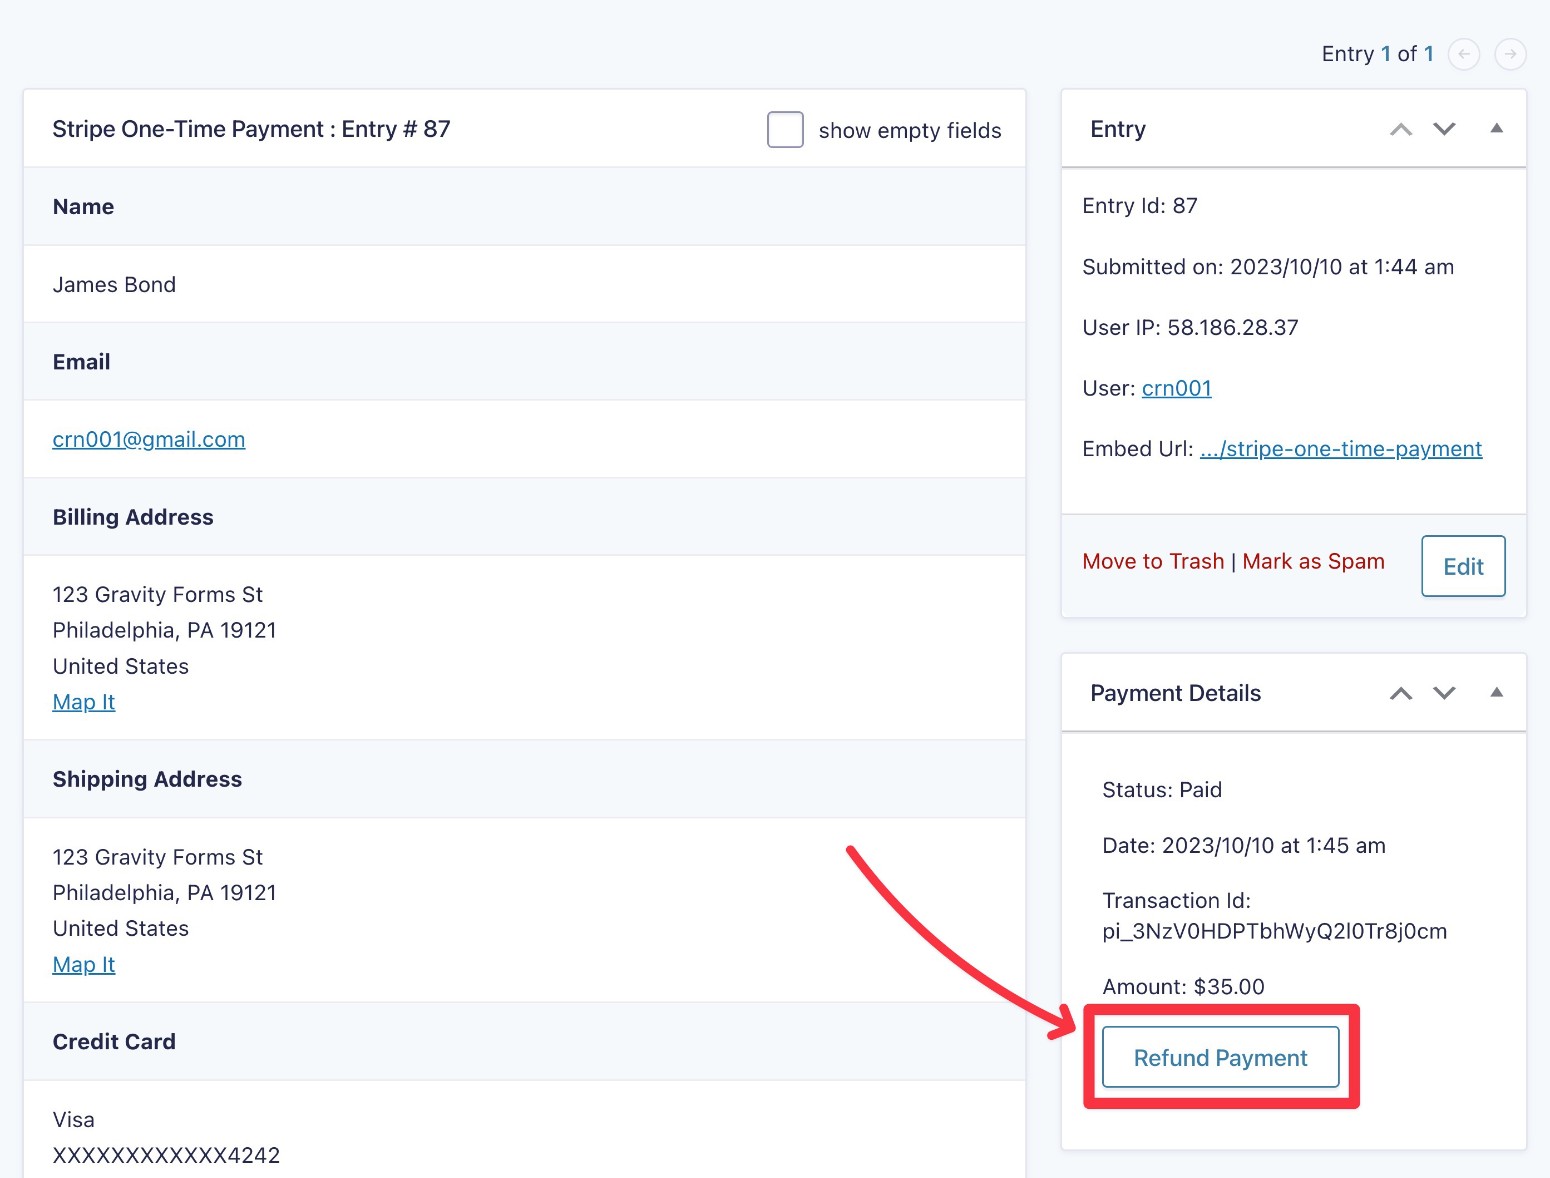
You’ll then see details for both how the user submitted the form and the payment status in Stripe (in the Payment Details box).
You can also see payment details in Stripe:

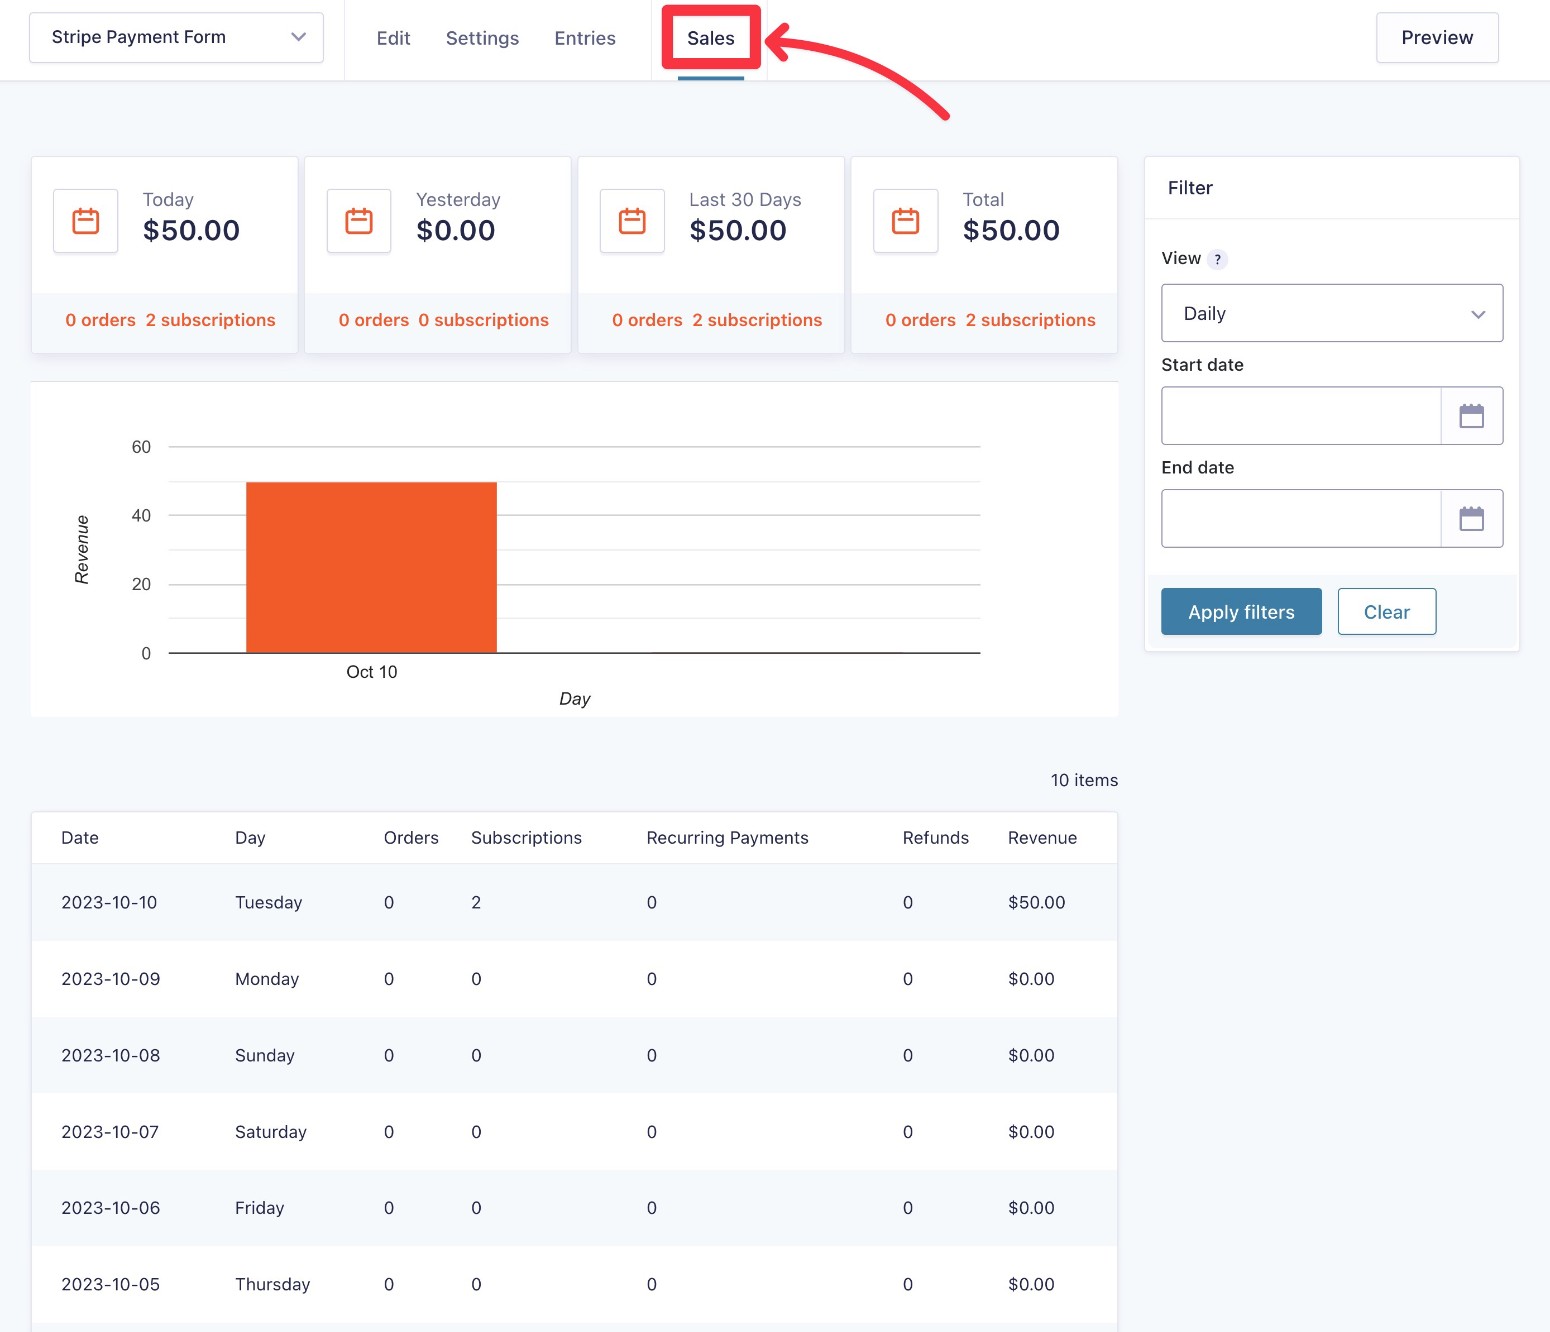
How to View Sales Reports
To help you understand how your form is performing, you can access special sales reports from the Sales tab in the form interface.
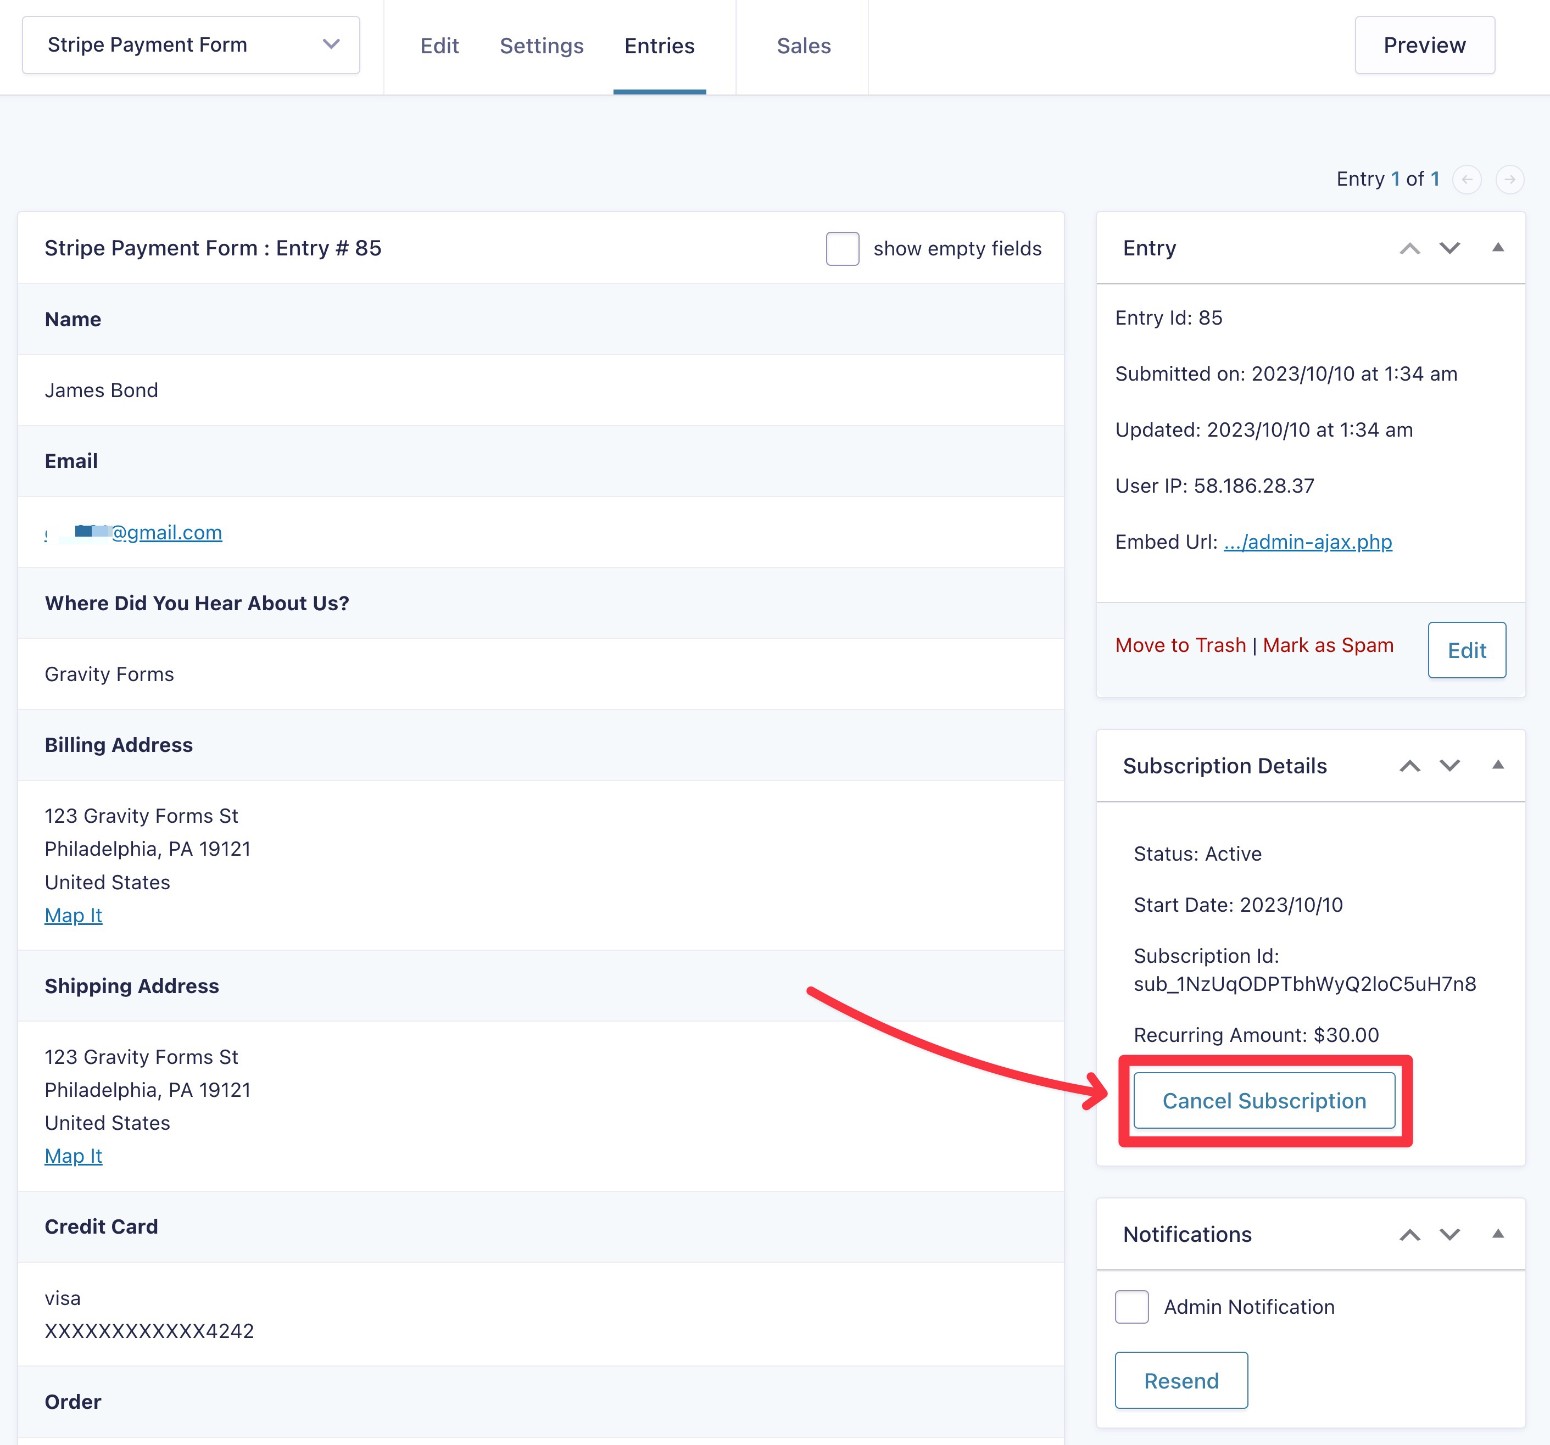
How to Cancel a Stripe Subscription
You can cancel an existing Stripe subscription from both your WordPress dashboard and the Stripe dashboard.
If you’re being paid by registered users, you can also use a shortcode to create a frontend option that lets users cancel their own subscriptions.
To cancel a subscription in WordPress, open the entry detail page (instructions above) and click the Cancel Subscription button in the Subscription Details box.
If you set up a subscription canceled email notification, the user will automatically receive an email confirming the cancelation.
Here are instructions from Stripe on how to cancel a subscription from the Stripe dashboard.
If you want to create a frontend portal to let users manage their subscriptions, you can use the Stripe Customer Portal shortcode action.
How to Refund a Stripe Payment
In addition to managing subscriptions, you can also refund a user’s one-time payment from both your WordPress dashboard and the Stripe dashboard.
To refund a payment from WordPress, open the form entry detail page. Then, click the Refund Payment button in the Payment Details box.
If you want to manage refunds from Stripe’s dashboard, you can find the instructions here.
Get Started With Gravity Forms and Stripe Today
That wraps up our complete guide to using Gravity Forms and Stripe to accept one-time or recurring payments on your WordPress site.
With this functionality, you can unlock a huge number of use cases, including selling physical or digital products, selling services, charging for user registration, accepting donations, and lots, lots more.
Plus, you can still use all of the other functionality in Gravity Forms, such as using conditional logic to process payments in different ways, adding people to your CRM after they pay, and lots, lots more. We know that we used “lots, lots more” twice, but it’s true!
If you’re ready to get started, purchase a Gravity Forms Pro or Elite license today to access the official Stripe Add-On, plus a bunch of other helpful add-ons.

If you want to keep up-to-date with what’s happening on the blog sign up for the Gravity Forms newsletter!
"*" indicates required fields