Want to get started with digital fundraising but not sure where to begin?
Whether you’re fundraising for a nonprofit, a church, a club, or any other entity that needs some extra money, WordPress makes a great platform for raising money.
But if you want your fundraising efforts to be as successful and efficient as possible, you’ll need the right WordPress plugin so that you can create donation forms, connect with donors, and just generally implement your fundraising efforts in the most efficient way possible.
In this post, you’re going to learn everything that you need to know about digital fundraising on WordPress, including the following:
- Why digital fundraising is important, and how it can help your organization raise more money.
- How the Gravity Forms plugin can help you more effectively fundraise on WordPress.
- A step-by-step tutorial on how to start online fundraising using WordPress and Gravity Forms.
Let’s jump in!
Why Does Digital Fundraising Matter?
Whether you’re part of a sports team trying to raise money for jerseys, you’re running a large nonprofit, or anything in between, raising money is an essential part of making your group’s goals a reality.
Depending on what type of organization you’re running, you might already have implemented some in-person fundraising strategies, such as running in-person events, bake sales, or other similar fundraising opportunities.
While those are all great ways to fundraise for your organization, adding digital fundraising options can help you make your efforts more successful for a few different reasons:
- More convenient for donors – many donors prefer donating online with their credit or debit cards rather than cash. According to Nonprofits Source, 54% of worldwide donors prefer giving online with their credit/debit cards. Another 9% prefer using PayPal, which adds up to ~63% who would prefer online donation methods.
- Donors can be anywhere – adding a digital fundraising strategy lets people donate from anywhere. This can help you connect with people living in other areas or people who just aren’t able to attend your in-person fundraising events.
- Option for automatic recurring donations – with digital fundraising, you can give donors the option to set up automatic recurring donations. This can help you build a more dependable revenue stream for your organization and eliminates the need to rely solely on “new” fundraising pledges.
Most importantly, digital fundraising can help your organization flat-out raise more money. For example, churches that accept tithing online increased overall donations by 32% versus churches that don’t.
Using digital fundraising to accept recurring donations can also lead to much higher long-term fundraising amounts. For example, while the average one-time online gift is $128, the average monthly donation is $52, which equates to over $600 per year.
While it might seem intimidating to set up a digital fundraising strategy (especially if your organization lacks a dedicated technical team), choosing the right tool will let you start accepting online donations without needing any special technical knowledge.
Why Gravity Forms Works Great for Digital Fundraising
While WordPress makes it easy to create an online presence for your organization, the core WordPress software lacks the capability to help you accept online donations and engage in digital fundraising.
To fix that, you can add the Gravity Forms plugin to WordPress.
Gravity Forms is a versatile form plugin that can help you collect information from your donors, accept one-time and/or recurring donations (including preset amounts and/or custom amounts), and integrate with other important tools that your organization might be using.
Here are some specific reasons why Gravity Forms makes a great digital fundraising solution for any type of organization:
- Non-technical + drag-and-drop builder – you can build your fundraising forms using a drag-and-drop builder – no code needed! So no matter what your situation is, you can feel confident that you’ll be able to get your digital fundraising efforts up and running, even if you don’t have a technical team.
- Flexible payment options – you can offer unlimited preset donation amounts, along with letting donors customize their amounts. You can also accept one-time and recurring donations, including both via the same form.
- Support for unlimited forms – you can create unlimited fundraising forms at no extra cost, which lets you create separate forms for different fundraising efforts. You can also use Gravity Forms for the other forms that your organization might need, such as contact forms, surveys, newsletter signups, and more.
- Connect with other tools – you can connect your donation forms to email marketing services, CRMs, project management software, and more. This helps you streamline your fundraising efforts and work more efficiently.
- Build multi-step workflows – if you want to automate your fundraising efforts even further, you can add Gravity Flow to build automated multi-step workflows based on your fundraising forms.
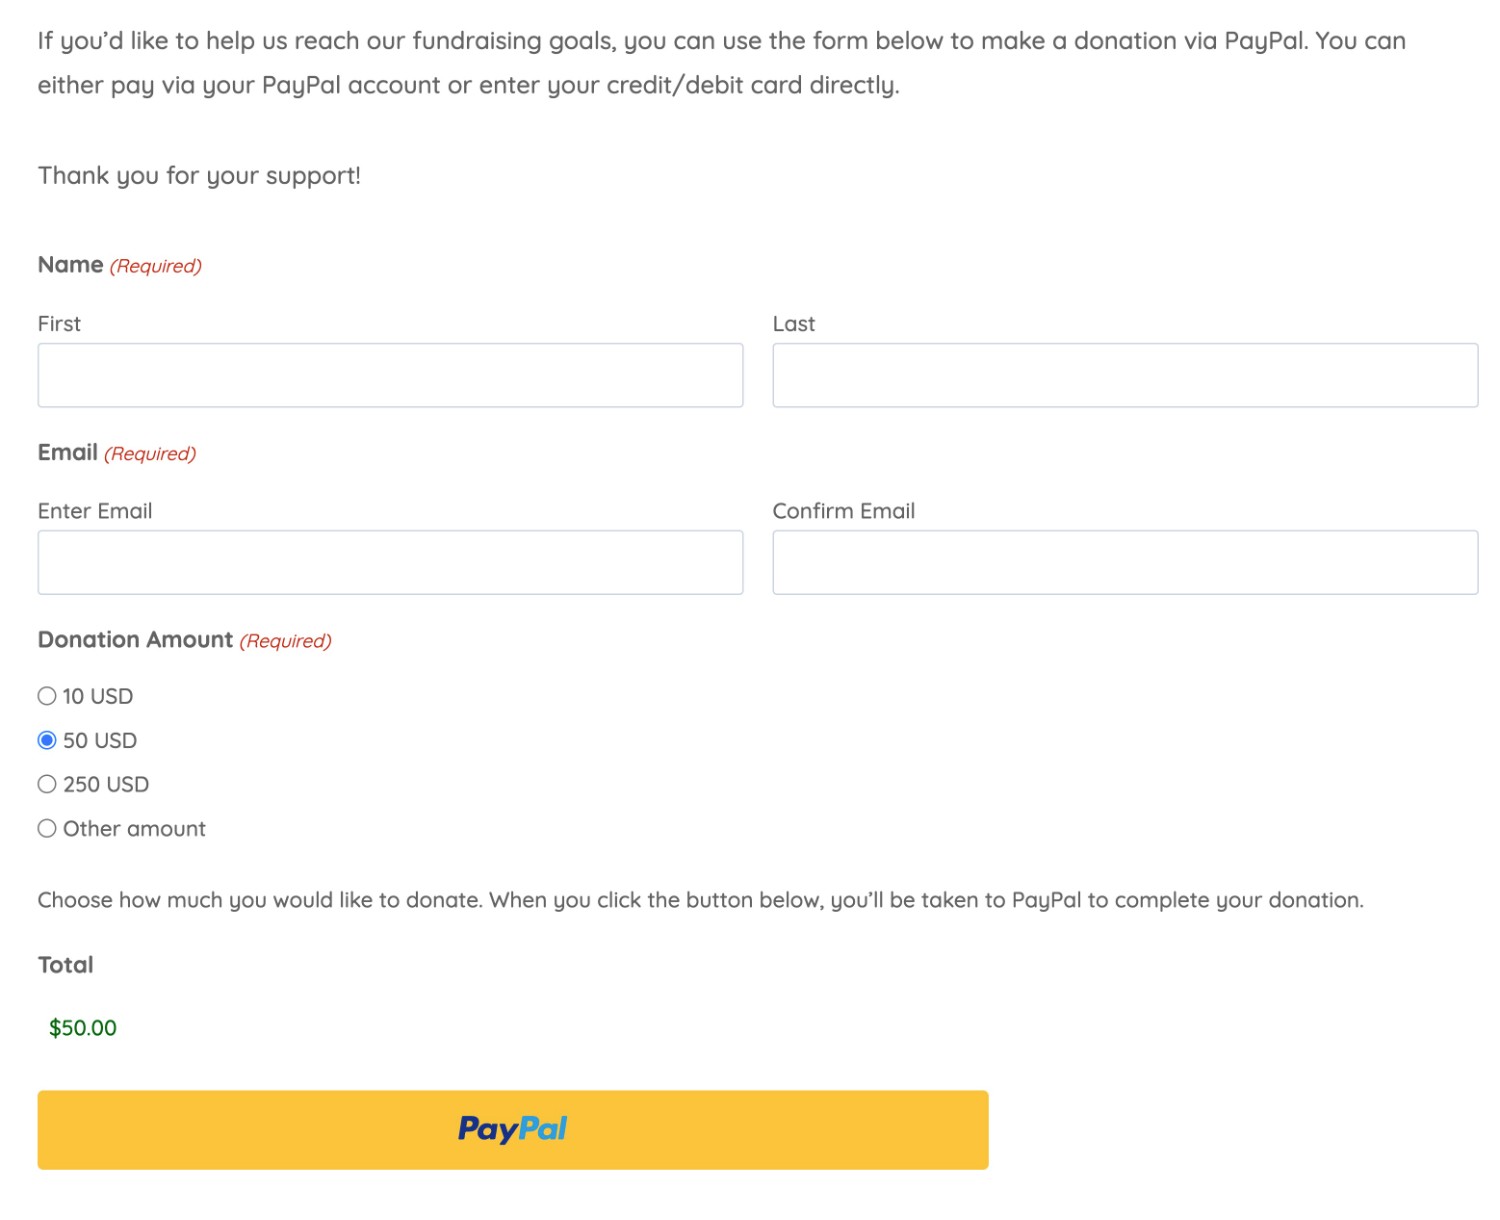
Gravity Forms also includes a pre-built donation form template that you can use to quickly get started – here’s an example of what it might look like:
How to Accept Online Fundraising Donations On Your WordPress Site
Now that you know how Gravity Forms can help you implement your own digital fundraising strategy, let’s get into an actual step-by-step guide for how you can get started.
To begin, we’ll assume that you’ve already installed the Gravity Forms plugin on your WordPress site.
If you don’t have a Gravity Forms license yet (or a WordPress site), you can still follow along with this tutorial by creating a 100% free, fully functional Gravity Forms demo site.
Once you see how Gravity Forms can help you implement your digital fundraising efforts, you can purchase a Gravity Forms license and install it on your website.
Let’s get started!
1. Create Your Form Using the Donation Template
Once you’ve installed Gravity Forms, you can go to Forms → Add New to create your first fundraising form.
To save you some time, Gravity Forms offers a number of pre-built form templates, including a donation form template.
Even if you choose the donation form template, you’ll still be able to customize everything about your form. Or, if you’d rather just start from a blank canvas, you can choose the Blank option.
With that being said, we’re going to use the donation form template as the example in our tutorial.

2. Customize the Form Fields As Needed
While the donation form template makes a great starting point for any digital fundraising strategy, you’ll most likely want to customize it a bit to match it to your organization’s needs.
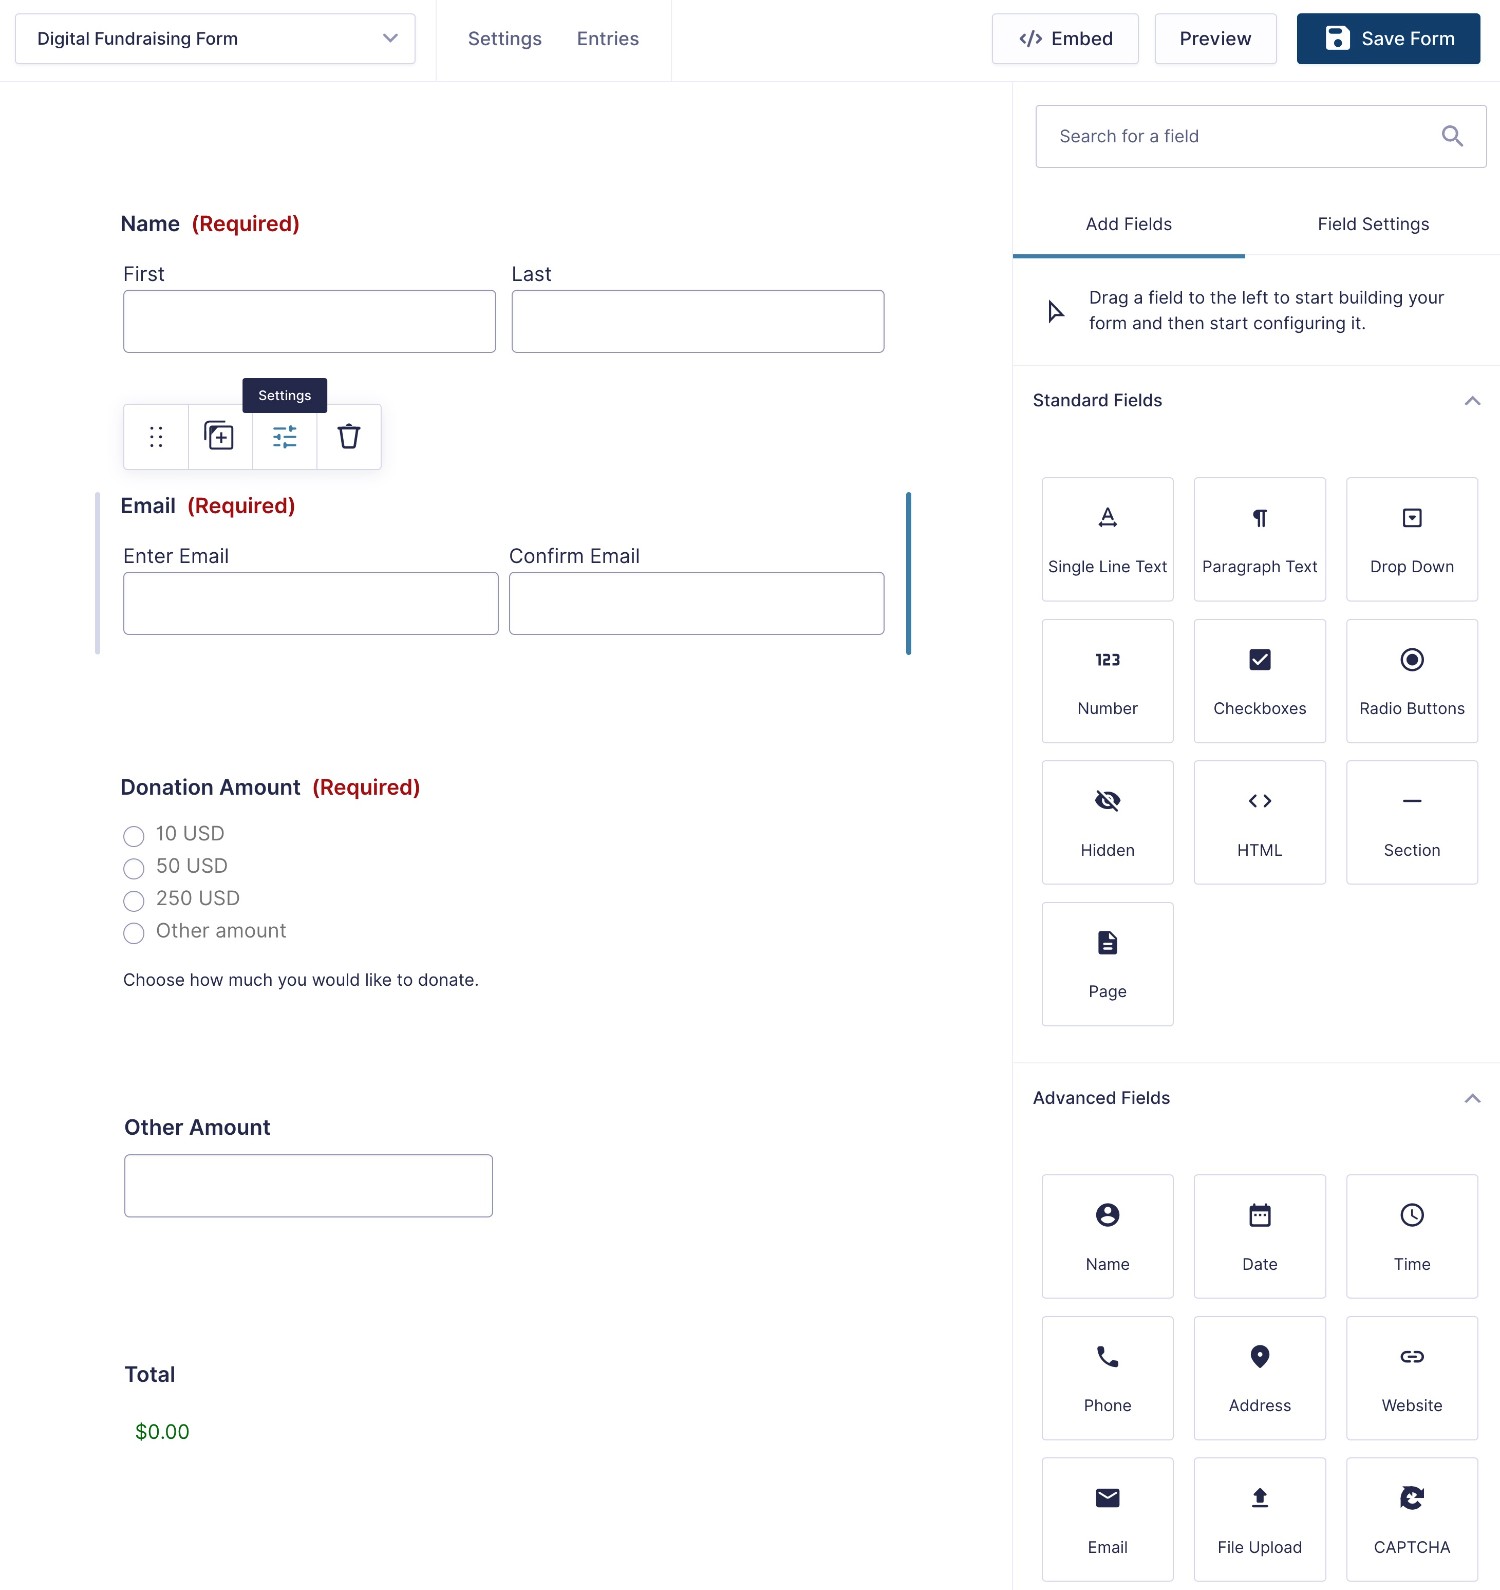
To help you do that, Gravity Forms offers a beginner-friendly drag-and-drop editor. Here are some of the things that you might want to do:
- Add new fields to your form – you can drag different field types over from the list on the right. You can even drag a field beside another field to automatically create a multi-column layout.
- Edit existing fields in your form – you can click on the field in the live preview and select the edit icon. You’ll then get a bunch of settings in the sidebar to customize all aspects of that field.
- Delete existing fields – if there are fields that you don’t want to include, you can select them in the live preview and click the delete icon.
How to Customize Donation Amounts and Options
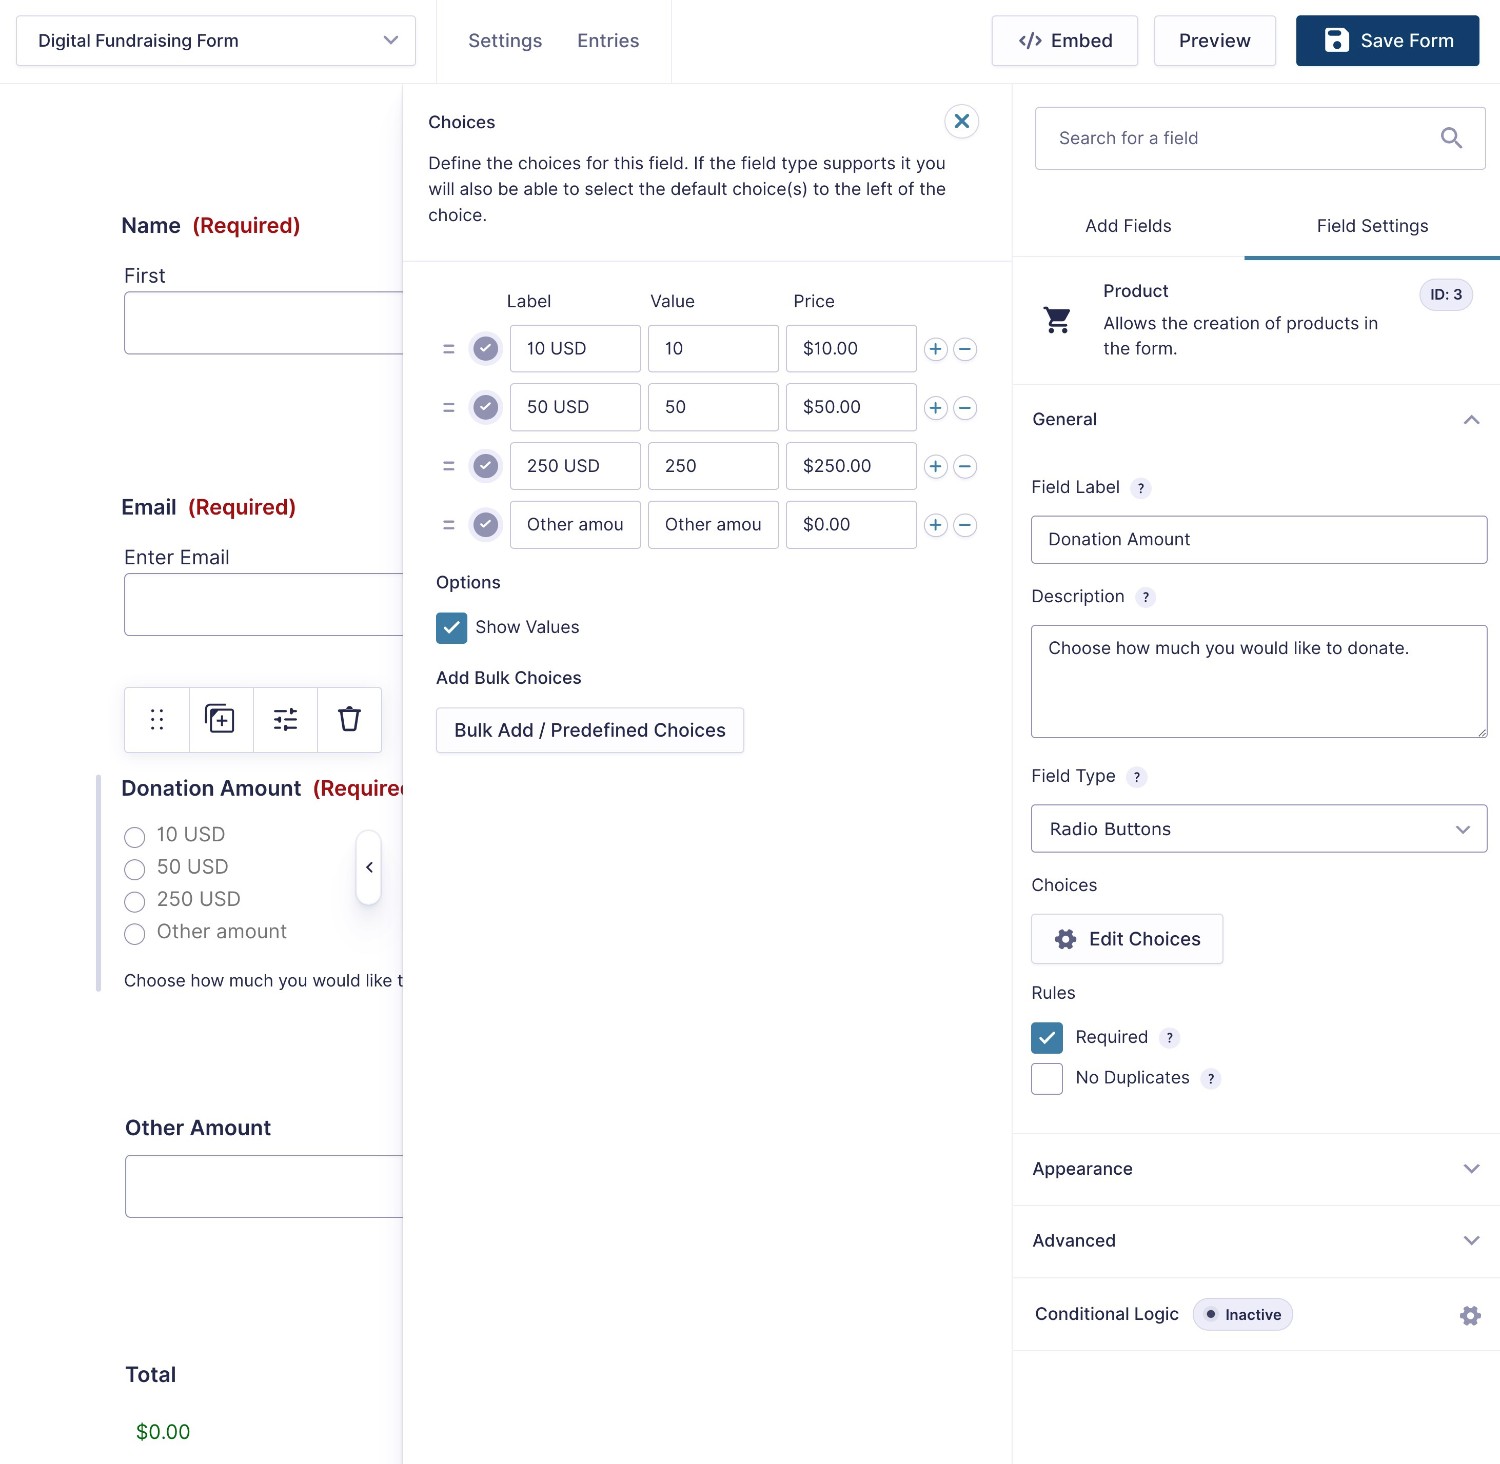
In addition to setting up form fields to collect information from your donors, you’ll also want to use the product fields to configure the donation amounts and details.
For example, you can offer preset donation amounts, as well as an option for donors to enter a custom donation amount.
You can also add an option to let people set up automatic recurring donations, which can be a great way to create a dependable source of income for your organization.
If you used the donation form template, Gravity Forms will already have added some relevant product fields to your form. If not, you can manually add product fields as needed.
3. Set Up Your Payment Processor and Donation Options
Once you’re happy with the fields in your form, the next step is to set up a payment processor.
This payment processor is what allows you to collect money/donations directly from your digital fundraising form.
There are a few different steps in this process, so let’s break them down…
Install the Payment Processor Add-On
To start, you’ll want to choose which payment provider to use and install the Gravity Forms Add-On for that payment provider.
Gravity Forms has official add-ons for six popular payment providers:
- Stripe
- PayPal Checkout
- Square
- Mollie
- Authorize.net
- 2Checkout
If you’re not sure which one to use, you can check out our breakdown of all the Gravity Forms payments add-ons.
For this tutorial, we’re going to use PayPal. However, you’re free to choose a different payment processor and the basic steps will be the same either way.
For PayPal, you would want to install the Gravity Forms PayPal Checkout Add-On – here’s a full explainer on how to install Gravity Forms Add-Ons.
Connect to the Payment Processor
Once you’ve installed the PayPal Checkout Add-On, you need to connect your site to PayPal:
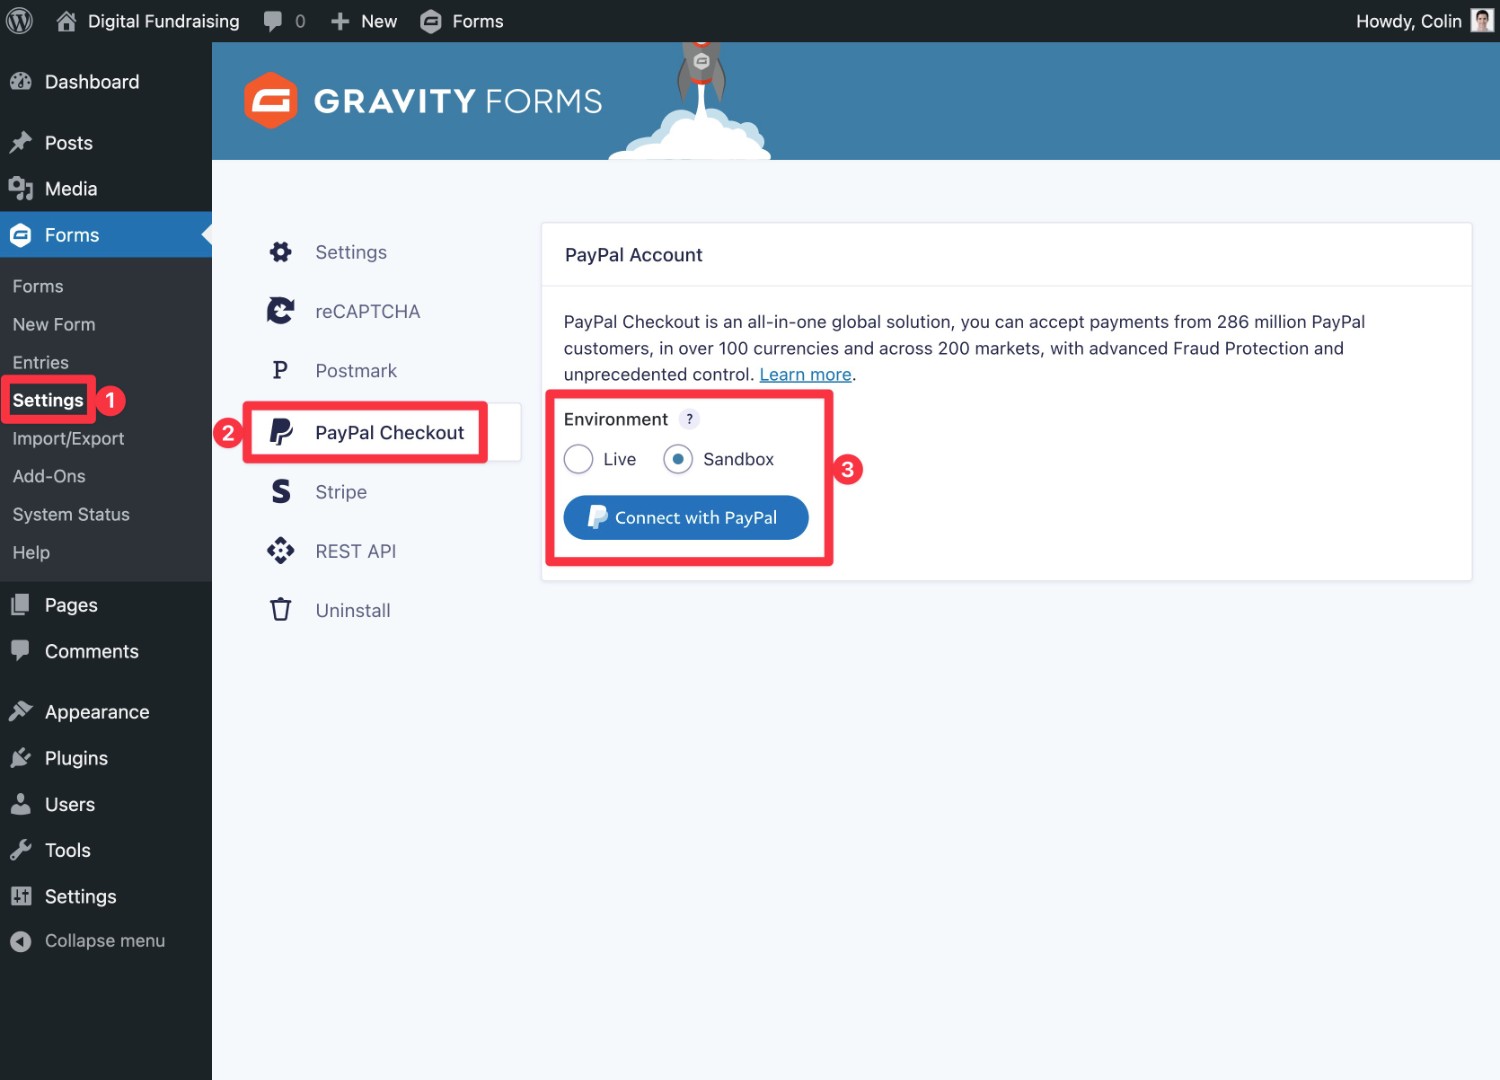
- Open your WordPress dashboard in a new tab.
- Go to Forms → Settings → PayPal Checkout.
- Choose your Environment – we recommend starting with the Sandbox environment to test things. Just make sure to switch to Live when you’re ready to start fundraising for real. If you use a Sandbox environment, you’ll need to create a separate PayPal account for the Sandbox.
- Click the Connect with PayPal button and follow the instructions to connect your site to PayPal. Here’s the full help article explaining this step.
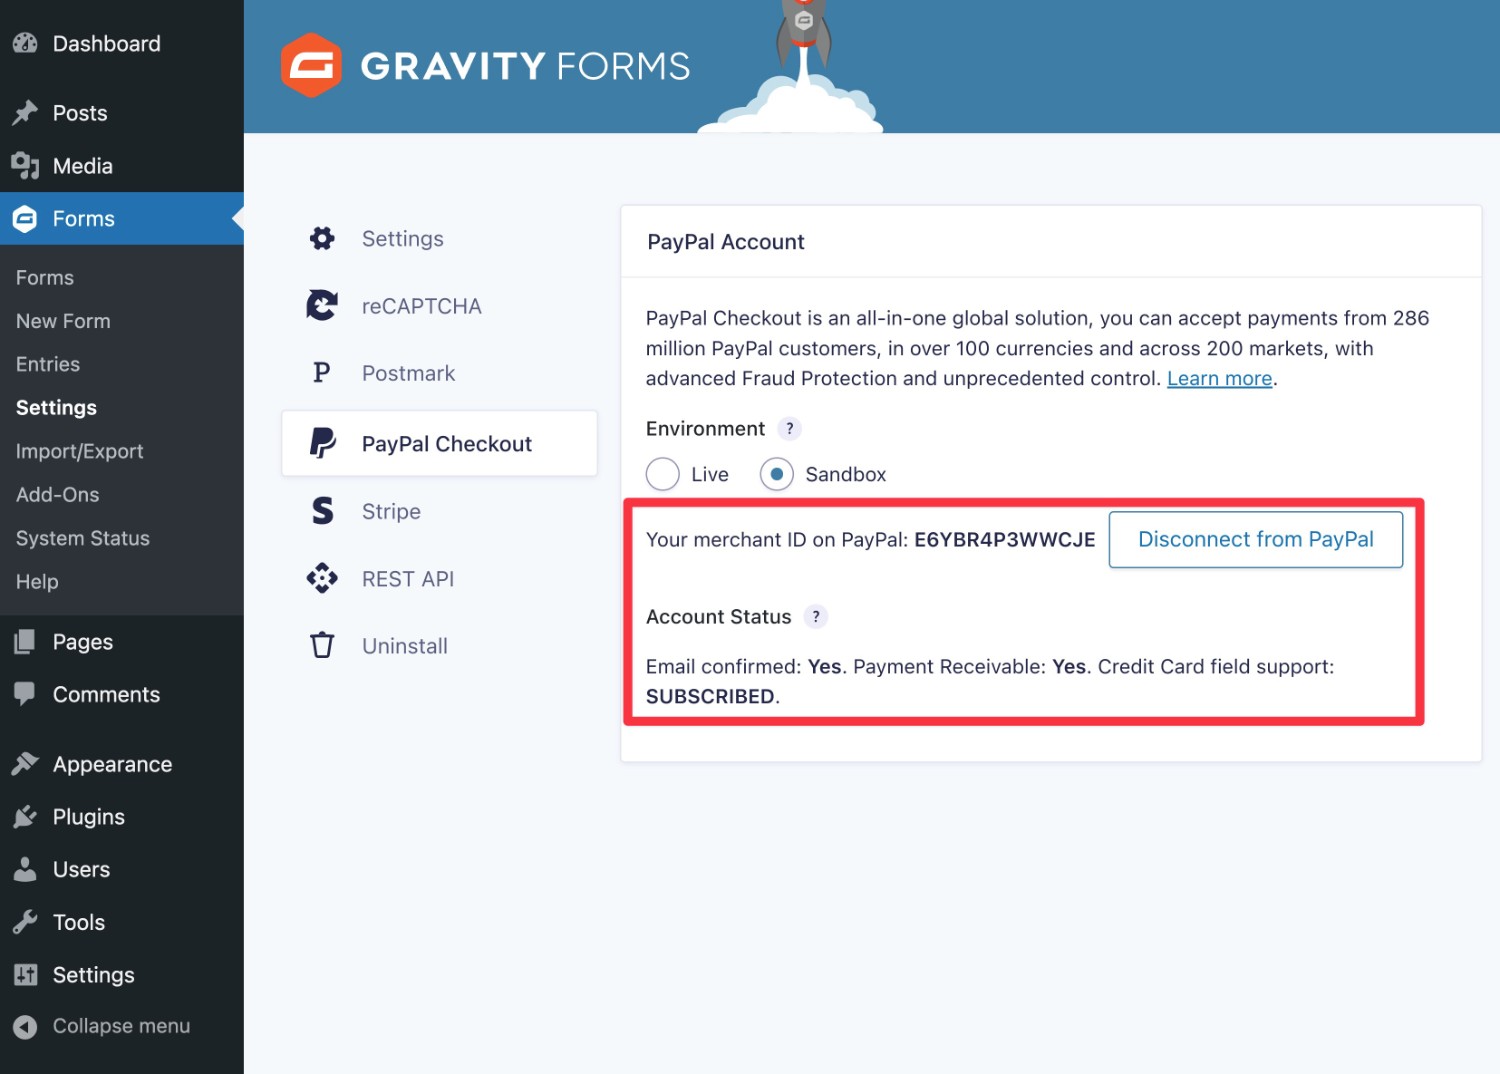
Once you connect PayPal, you should see the status change in the Gravity Forms settings.
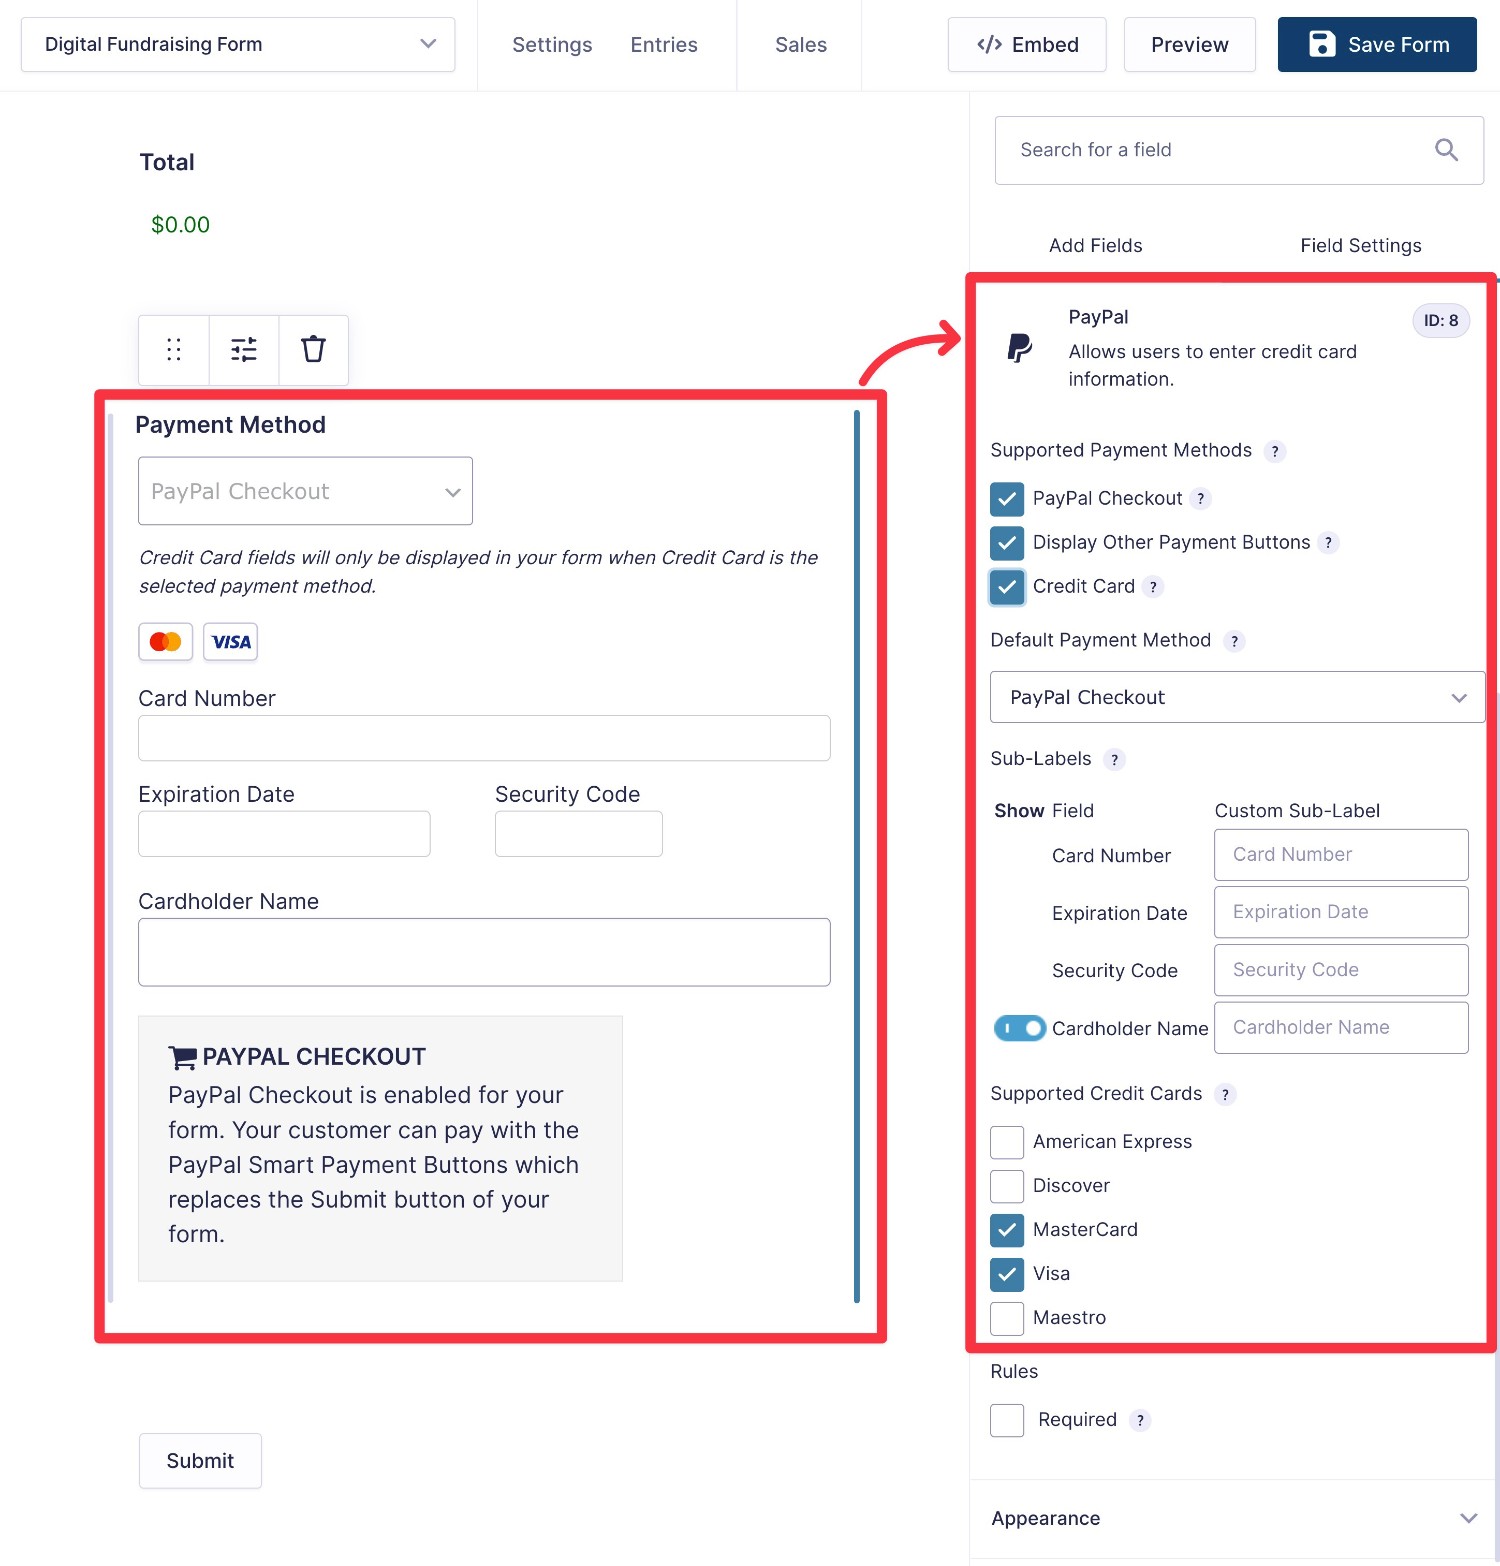
Add PayPal/Credit Card Field to Your Form
Next, go back to the form editor for your WordPress digital fundraising form and add the PayPal Checkout field to the bottom of the form.
In the field’s settings, you can choose whether or not to allow separate credit card payments in addition to the PayPal payments interface.
Create a Feed for Your Payment Processor
To finish things out, you want to create a “feed” for your payment processor. This feed is what allows you to control how to process a person’s payment.
For example, whether the payment is a one-time contribution or an automatic recurring contribution.
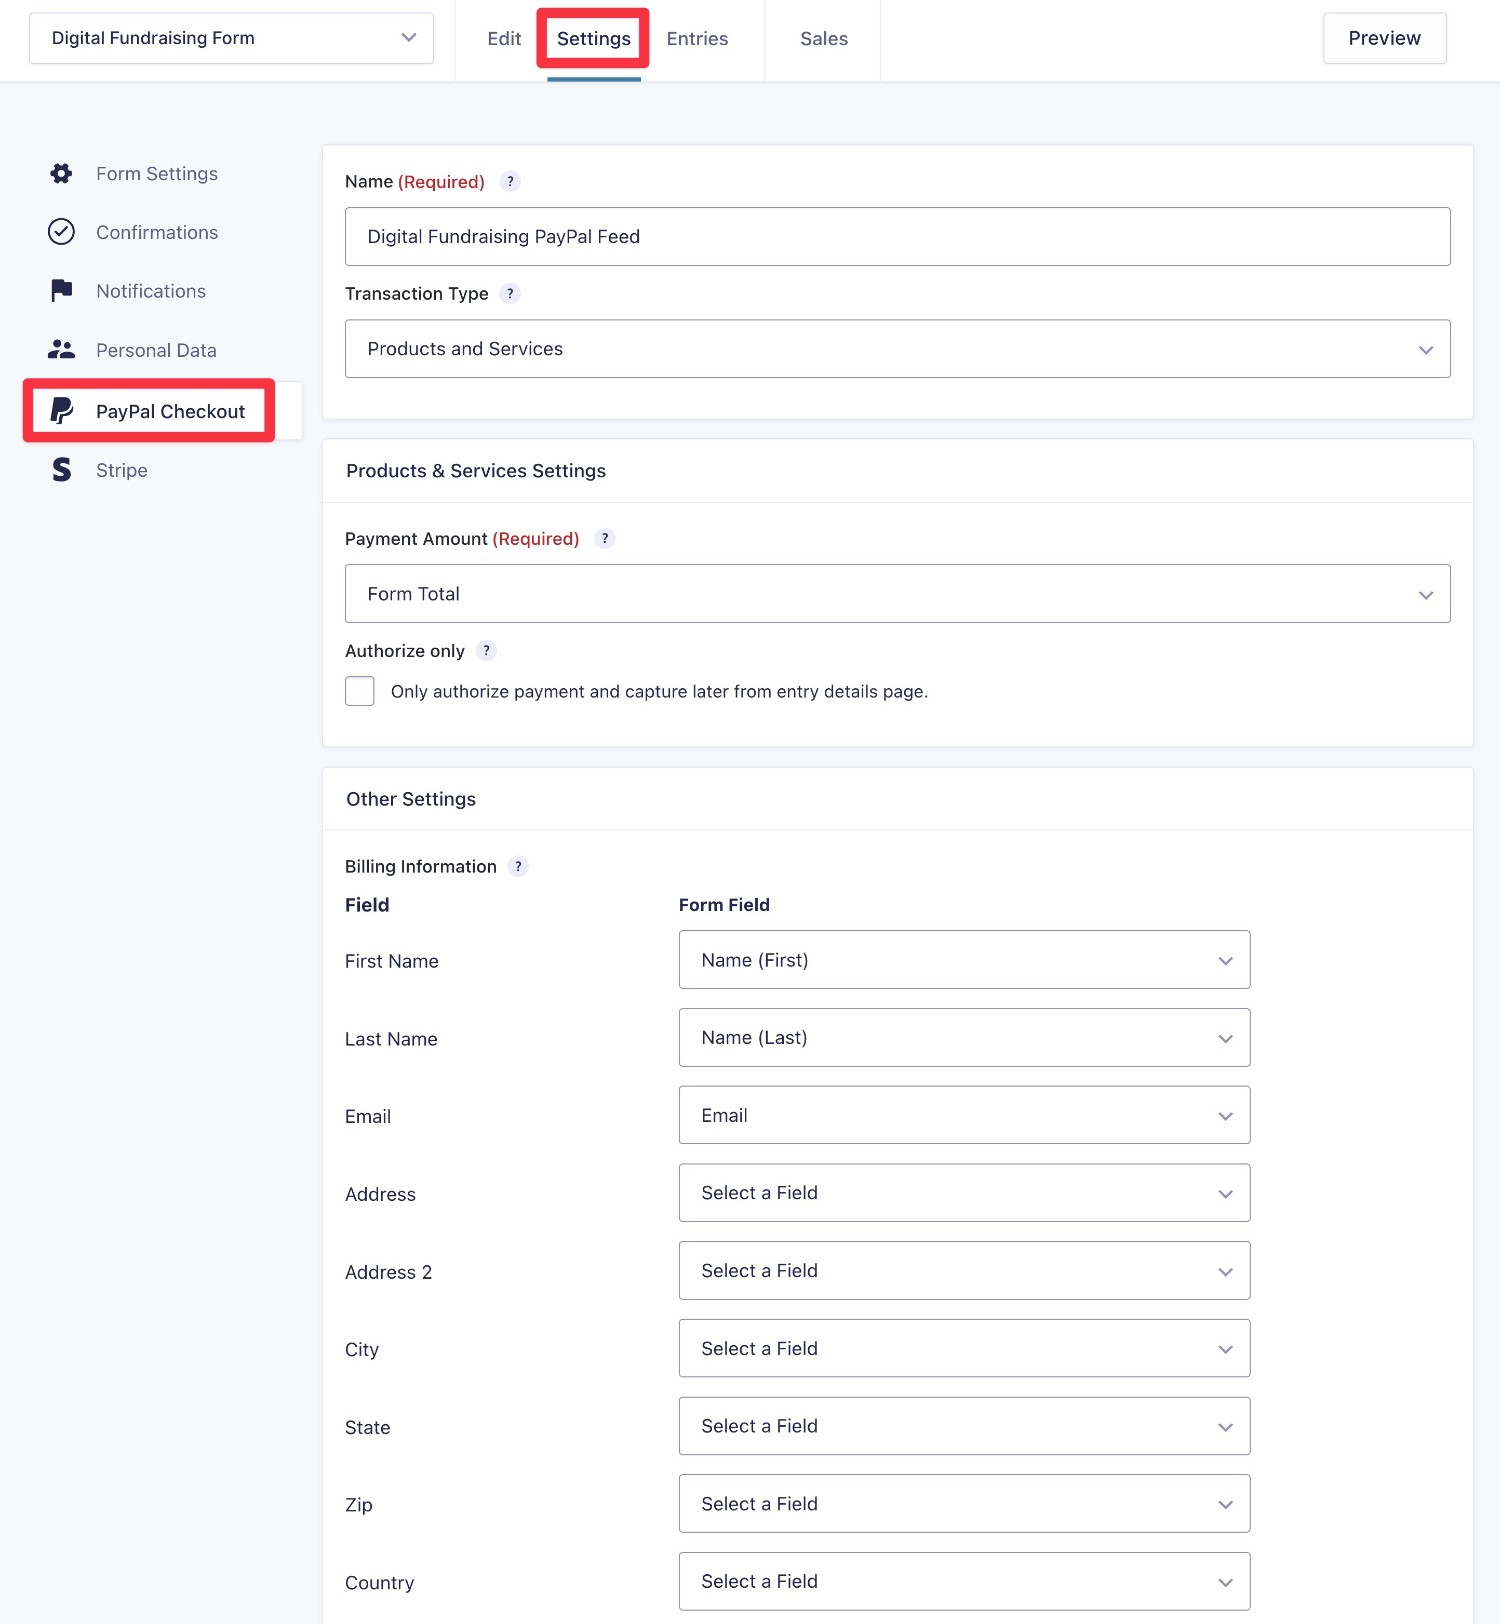
Here’s how to create your feed:
- Go to Settings → PayPal Checkout in the form editor interface.
- Edit the default PayPal Checkout feed or create a new one.
- Configure the feed settings to control how to process payments. For recurring donations, you can change the Transaction Type from Products and Services to Subscription.
For more detailed instructions, check out this help article.
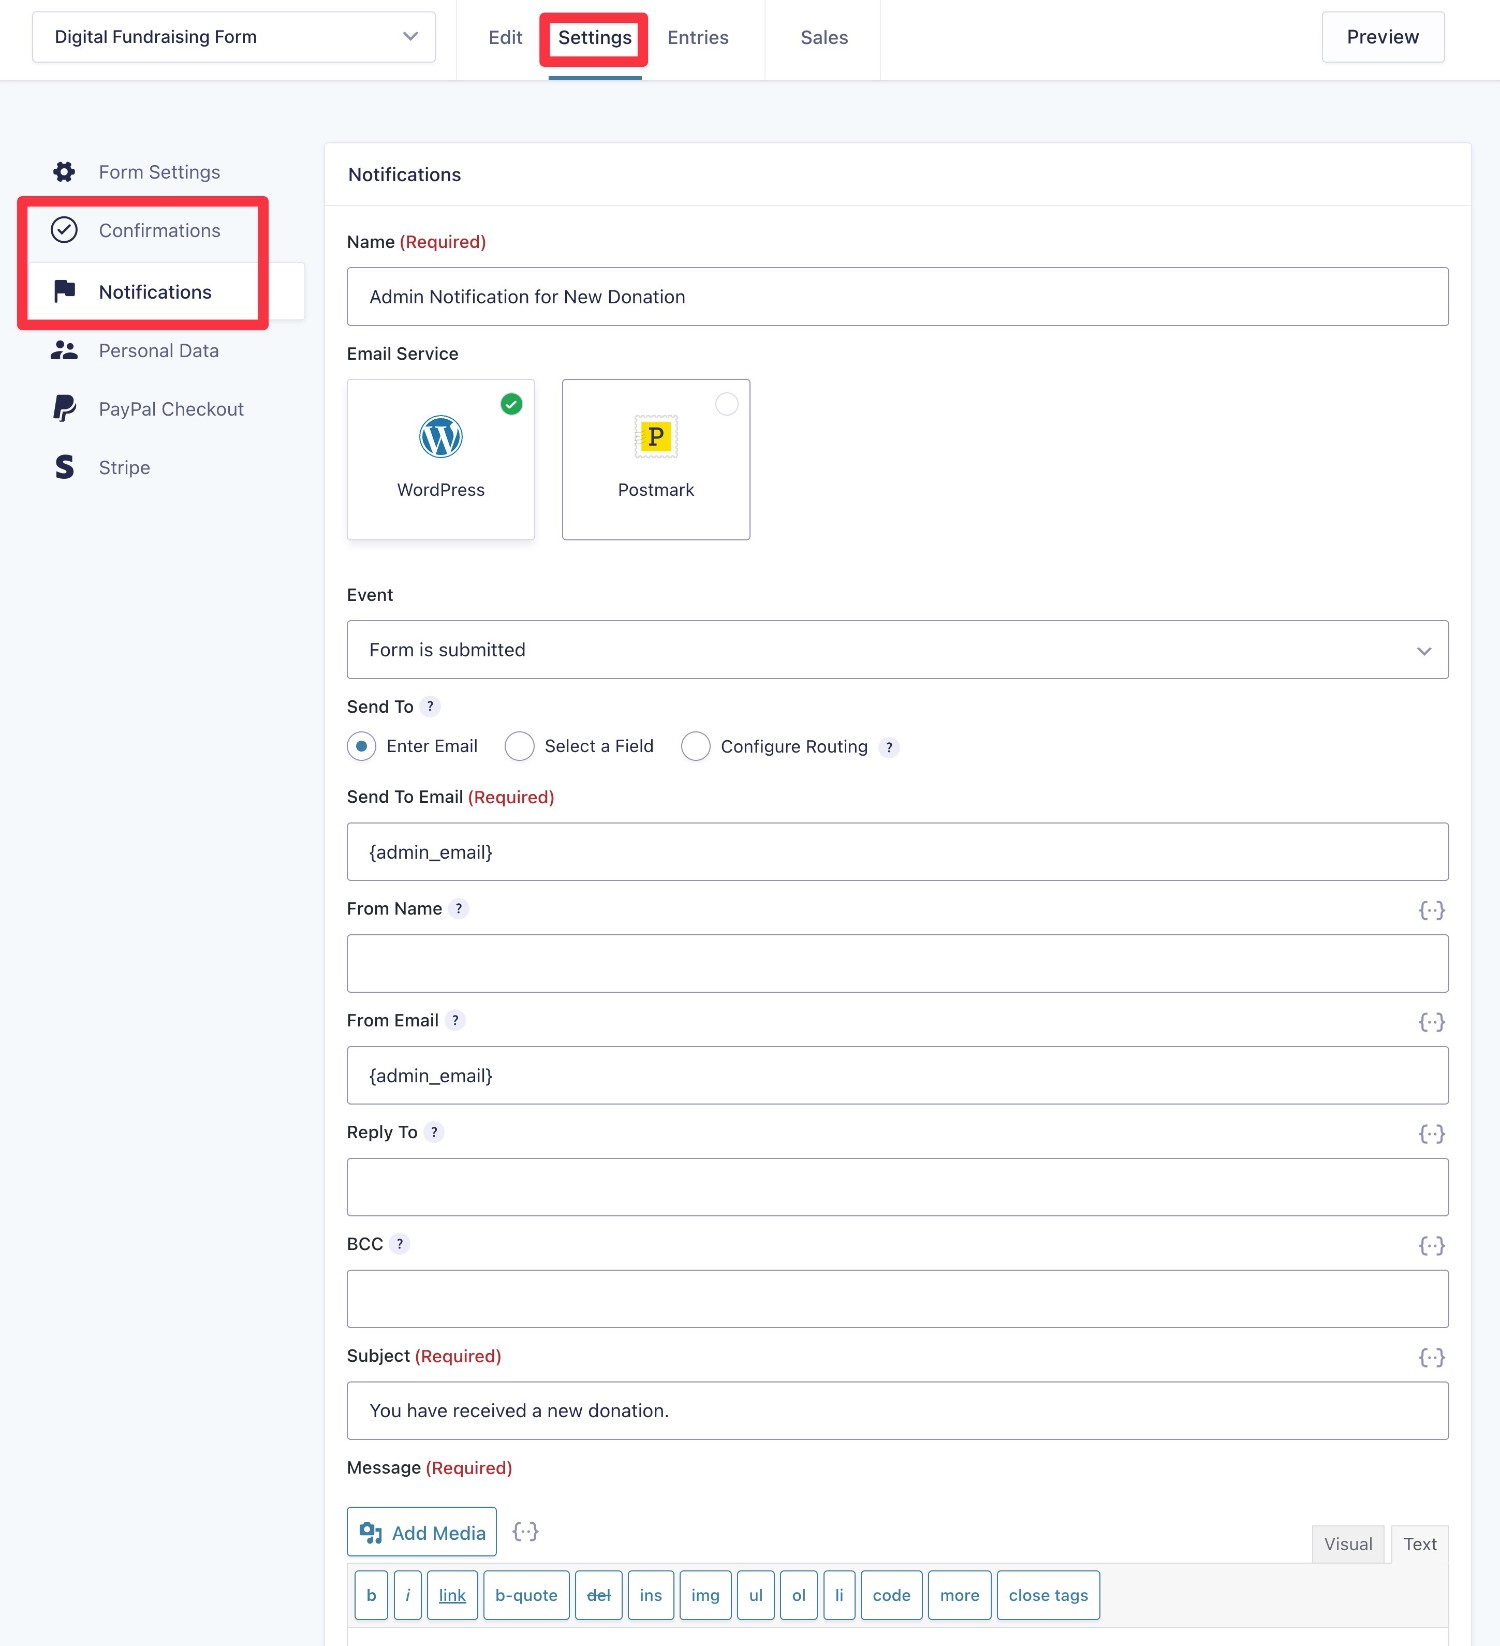
4. Set Up Email Notifications and Confirmation Messages
Once you’re happy with the form fields in your donation form, you can move on to customizing two other areas:
- Confirmations – this is a message that displays on your website immediately after someone submits a form.
- Notifications – these are emails that you can send after someone submits a form. You can set up multiple emails to different users. For example, one email to the donor and another email to yourself (or your staff).
You can set these up from the Confirmations and Notifications tabs in the form settings:
5. Integrate Other Services As Needed (Optional)
In addition to having a digital fundraising form, your organization also might rely on other tools to power your fundraising efforts.
For example, you might use an email marketing service to create a newsletter for donors or you might use project management/to-do list software to keep up with tasks related to donations.
To help you simplify your organization’s fundraising workflows, Gravity Forms also gives you the option to integrate your digital fundraising forms with a variety of other tools including the following:
- Email marketing services.
- Customer relationship managers (CRMs).
- Project management software.
For many of these services, Gravity Forms offers dedicated add-ons to help you connect directly. You can browse them all here.
If you can’t find a dedicated add-on for your service, Gravity Forms also offers an official Zapier Add-On. This lets you connect your digital fundraising forms to any of the thousands of apps that are available on Zapier.
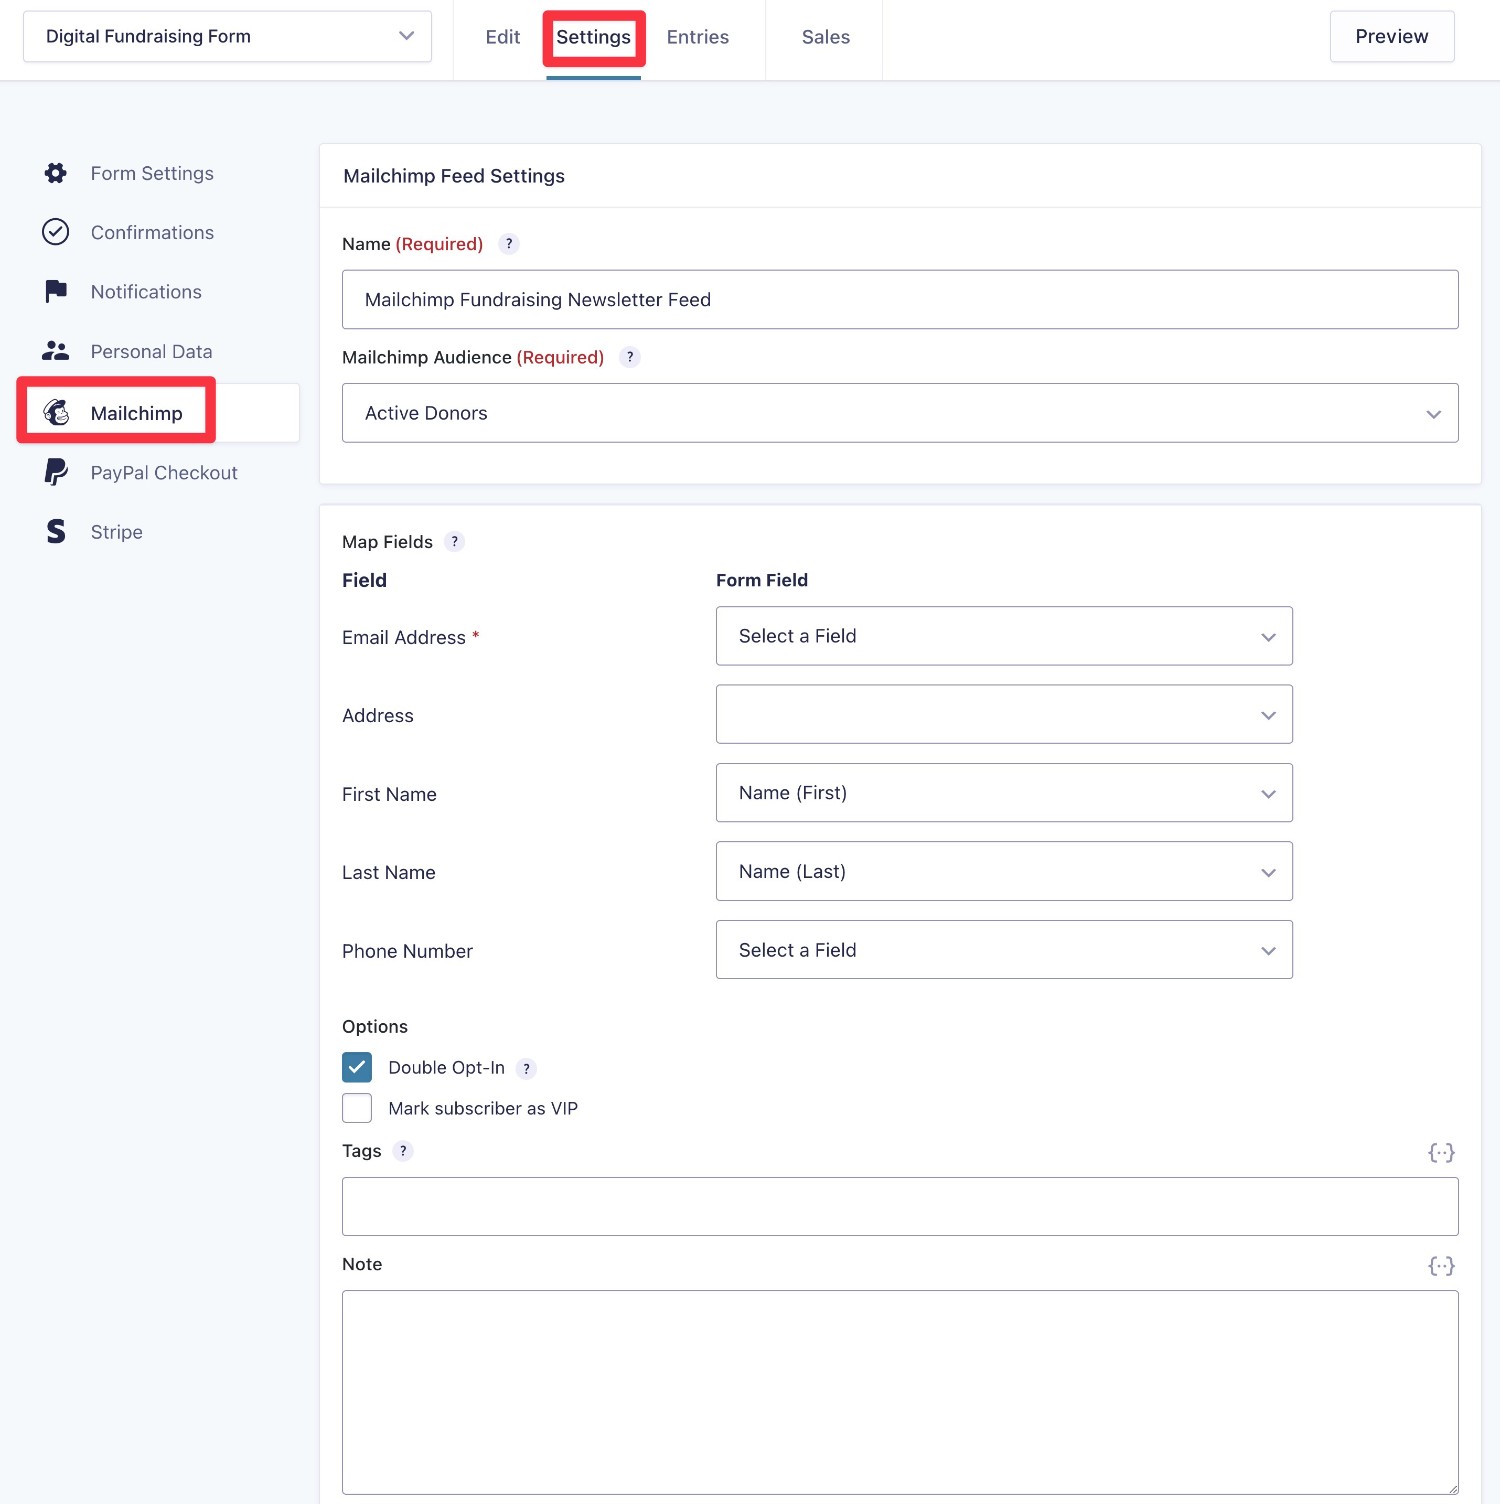
How you set things up will depend on exactly which add-on you’re using. But typically, the process works something like this:
- Install the add-on.
- Go to Forms → Settings → [Service Name] to connect your site to the service.
- Create a new “feed” for that service from the settings area of your form (much like we showed you how to create a feed for PayPal in the payments section).
For example, if you install the Mailchimp Add-On, you can automatically add new donors to an email list in Mailchimp.
6. Embed Your WordPress Digital Fundraising Form
Once you’re happy with your WordPress digital fundraising form, the last step is to embed your form on your site so that people can start contributing to your cause.
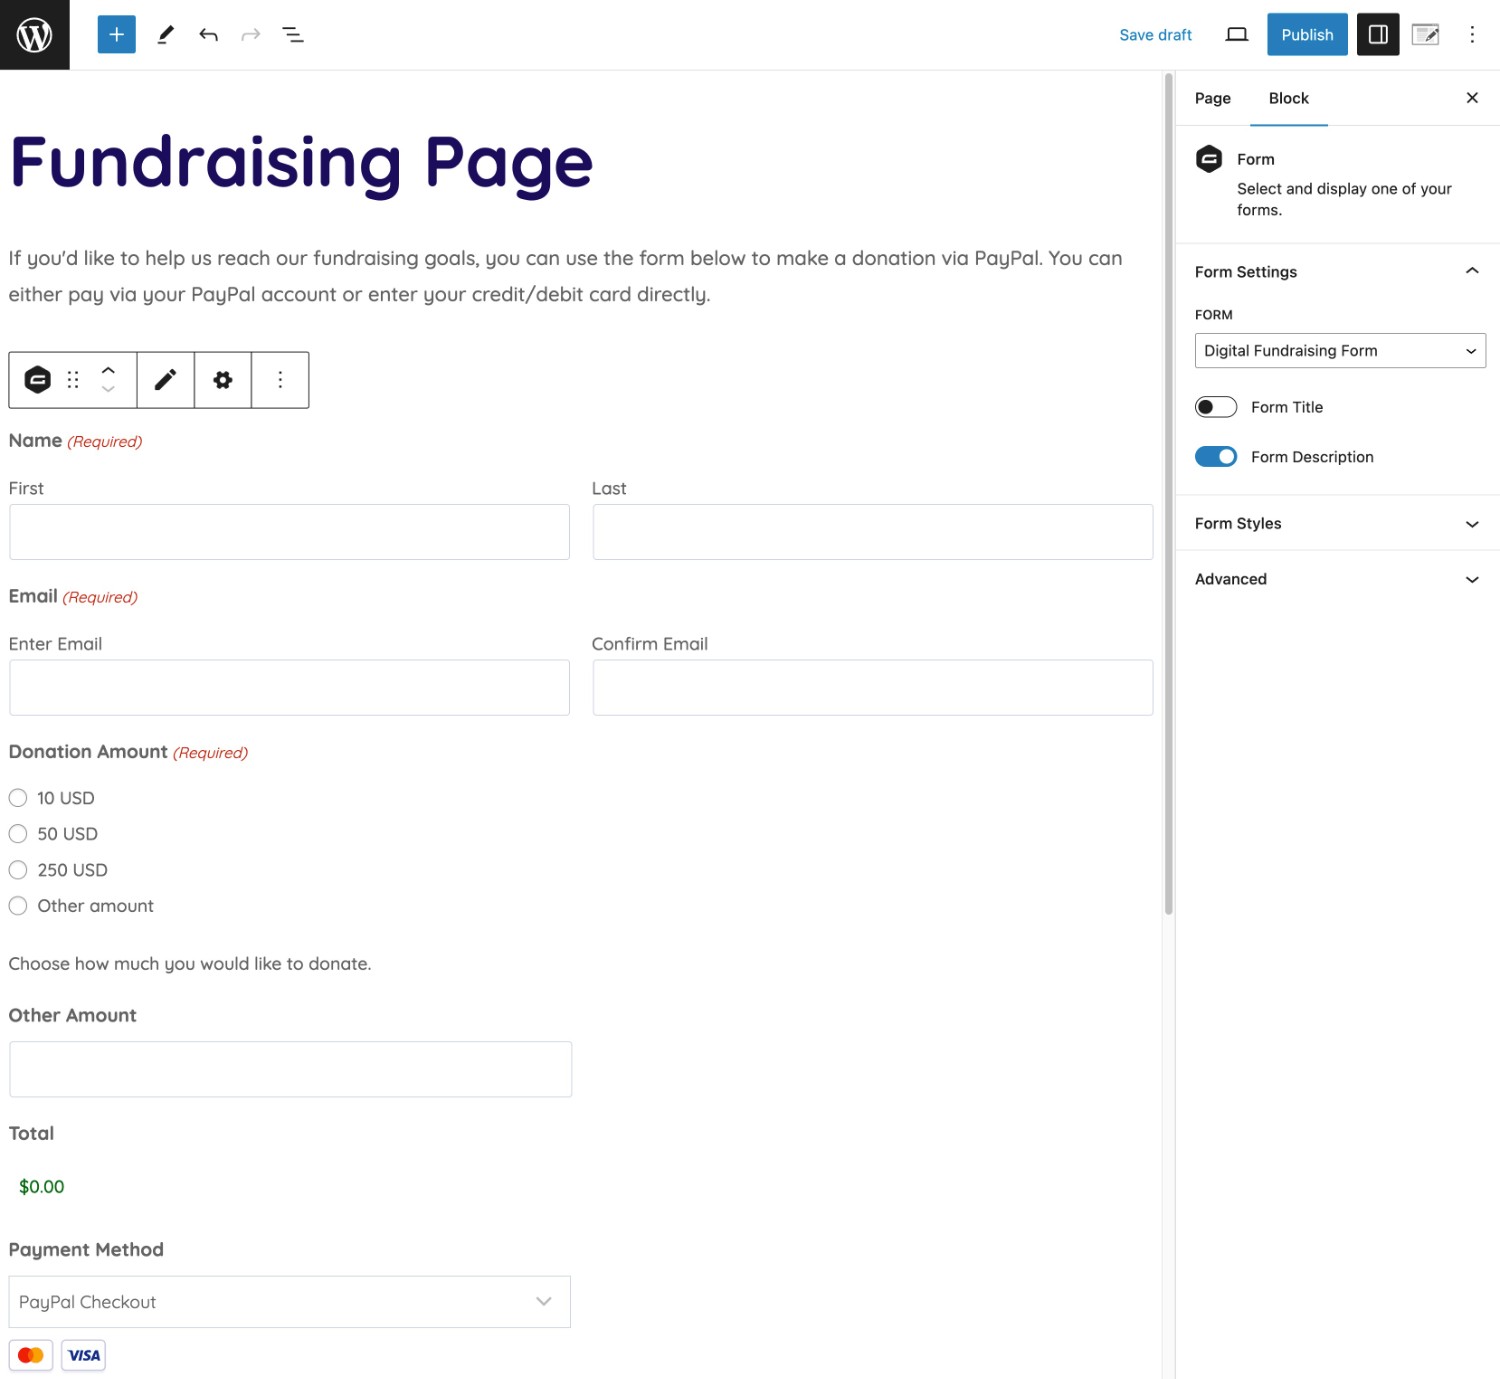
To do this, you can use the Gravity Forms block or the Gravity Forms shortcode. We’ll use the block for this example:
- Within the form editor select Embed in the top right corner.
- Select the page or post that you want to add the form to and click Insert.
- On your chosen page or post, you will find the Gravity Forms block highlighted under Embeds. Drag and drop the block, positioning it within the existing content where you deem appropriate.
- If you want to edit the appearance of your form, under Form Styles, select the Orbital theme. This theme will allow you to tweak the color scheme of your form, alter the size of inputs, modify button styles, and much more!
- Once you’re happy with the appearance of your form, publish/update the page.
You’re also free to include other content around the form. For example, you might want to explain what you’re fundraising for and how the money will be used.
And that’s it!
People can now start contributing to your cause using the form.
7. Set Up Custom Process Workflows (Optional)
Once you start accepting fundraising payments via your form, you might notice that you have repetitive workflows built around those fundraising efforts.
For example, you might have to perform certain administrative tasks, you might want to send another delayed email to people who donate (after the initial form notification email), and so on.
If you want to save time, you can set up custom multi-step process workflows based on your WordPress digital fundraising forms using Gravity Flow, another premium plugin from the Gravity Forms team.
Here are some of the actions that you can perform as part of your multi-step workflows:
- Send an email, including building delays into the email sequences to create an email drip campaign.
- Generate a PDF document – e.g. a PDF donation receipt.
- Require approval from someone on your team.
- Integrate with third-party tools – e.g. creating a task in your project management software at each step in the process.
If you want to learn more, check out some Gravity Flow case studies and our guide to building custom workflows.
Fundraising for a Nonprofit? Use the Gravity Forms Nonprofit License
While you can use Gravity Forms to fundraise for any type of cause, registered nonprofits can also take advantage of the Gravity Forms Nonprofit license, which gives you access to all Gravity Forms features and current add-ons for one low price – $129.
First off, getting access to all of these add-ons lets you unlock the full power of Gravity Forms for WordPress digital fundraising.
But beyond that, it also means that you can use Gravity Forms for all of the other forms that your nonprofit might need, such as:
- Contact forms
- Newsletter opt-in forms
- Volunteer application forms
- Job application forms
- Surveys
- Polls
- Etc.
Head on over to our Nonprofit License page to apply today!
Get Started With WordPress Digital Fundraising Today
If you want to make your fundraising efforts more successful, setting up a digital fundraising strategy is a great choice.
No matter what you’re trying to raise money for, WordPress makes a great foundation for digital fundraising.
When you add Gravity Forms to the mix, you can easily create the donation forms that you need to accept one-time and/or recurring donations – no code needed.
If you’re ready to get started, you can purchase at least the Gravity Forms Pro license to access all the most important payment add-ons.
Or, if you’re fundraising for a registered nonprofit, you can apply for the Gravity Forms Nonprofit license.
And if you’d like to test these features before you make your purchase, you can spin up a 100% free, fully functioning Gravity Forms demo site to try all of the add-ons.

If you want to keep up-to-date with what’s happening on the blog sign up for the Gravity Forms newsletter!
"*" indicates required fields