

Want to create a survey form with Gravity Forms?
The Gravity Forms Survey Add-On gives you tools to create simple or advanced surveys and analyze the results right from your WordPress dashboard.
However, the Survey Add-On is part of the Elite license, which might not be an option for your budget right now.
Don’t worry, though – the core version of Gravity Forms is still powerful enough to create useful surveys even if you’re on the Basic or Pro license.
And that’s the topic of this post – how to create effective survey forms with Gravity Forms without using the Survey Add-On.
We’ll start with a general introduction to using Gravity Forms for surveys and then get into a full step-by-step tutorial and tips to create effective surveys using just the core Gravity Forms plugin.
How to Use Surveys to Improve Your Business
Surveys can help you grow your business in a lot of different ways.
They can help you discover what you’re doing well, what you’re doing poorly, and where you should focus your efforts going forward.
You can ask these questions both externally – i.e. surveying your customers – and internally – i.e. surveying your employees.
Here are some examples of the types of surveys that you might want to implement:
- Customer satisfaction
- Customer demographics (learn who your customers are)
- Product features (discover which features your users value the most)
- Employee satisfaction
- Customer pain points (learn what issues your customers deal with, either in general or with your product)
Beyond crafting your own surveys, there are also lots of standardized surveys that you can use to learn more about your business. Here are some examples:
- Net Promoter Score (NPS)
- Customer Satisfaction Score (CSAT)
- Customer Effort Score (CES)
How Gravity Forms Helps You Implement Effective WordPress Surveys
First off, if you want to collect helpful information in a way that you can easily analyze, you need to use the right field type.
To help you do that, Gravity Forms gives you a bunch of different field types that you can use to collect information from your visitors, including:
- Single line text
- Paragraph text
- Checkboxes
- Radio buttons
- Single select drop-downs
- Multi-select
- Numbers
With that being said, one of the biggest benefits of Gravity Forms is all the other stuff it lets you do beyond the survey form fields themselves. Here are some examples:
- Conditional logic – display different questions based on how a user answered previous questions in your survey.
- Multi-page forms – for lengthy surveys, you can divide them into multiple pages.
- Email marketing/CRM integrations – automatically save survey participants’ contact details to your email marketing service or CRM.
- Form restrictions – restrict access to the form so that only logged-in users can submit your survey, or add other restrictions such as start/end times, number of responses, and more.
- Spam protection – protect your surveys from spam submissions to avoid polluting your data.
- Flexible notifications – send email notifications to the survey taker or anyone else, including using merge tags to dynamically insert information.
How to Create a Survey Form With Core Gravity Forms Functionality
Now that you have some background context, let’s get into the step-by-step guide on how to create a survey form using Gravity Forms without the Survey Add-On.
Create a New Form or Import a Template
To get started, create a new form to house your survey.
Navigate to Forms → New Form to create a blank form. Give your form a name and optional description, then click Create Form to open the form editor.
Set Up Your Survey Questions Using Core Fields
Now, you can configure your survey questions using the different field types that Gravity Forms offers.
The exact field types that you use will depend on the type of information that you want to collect, but typically you’ll rely on these field types:
- Radio Buttons – use this to let respondents select a single option from a list.
- Drop Down – use this as another way to let respondents select a single option from a list.
- Checkboxes – use this to let respondents select multiple options from a list.
- Single Line Text – use this for short free-form text answers.
- Paragraph Text – use this for long free-form text answers.
- Number – use this to collect quantitative data.
Here’s an example of how you might use the Number, Radio Buttons, Checkboxes, and Paragraph Text fields to collect information in a survey:
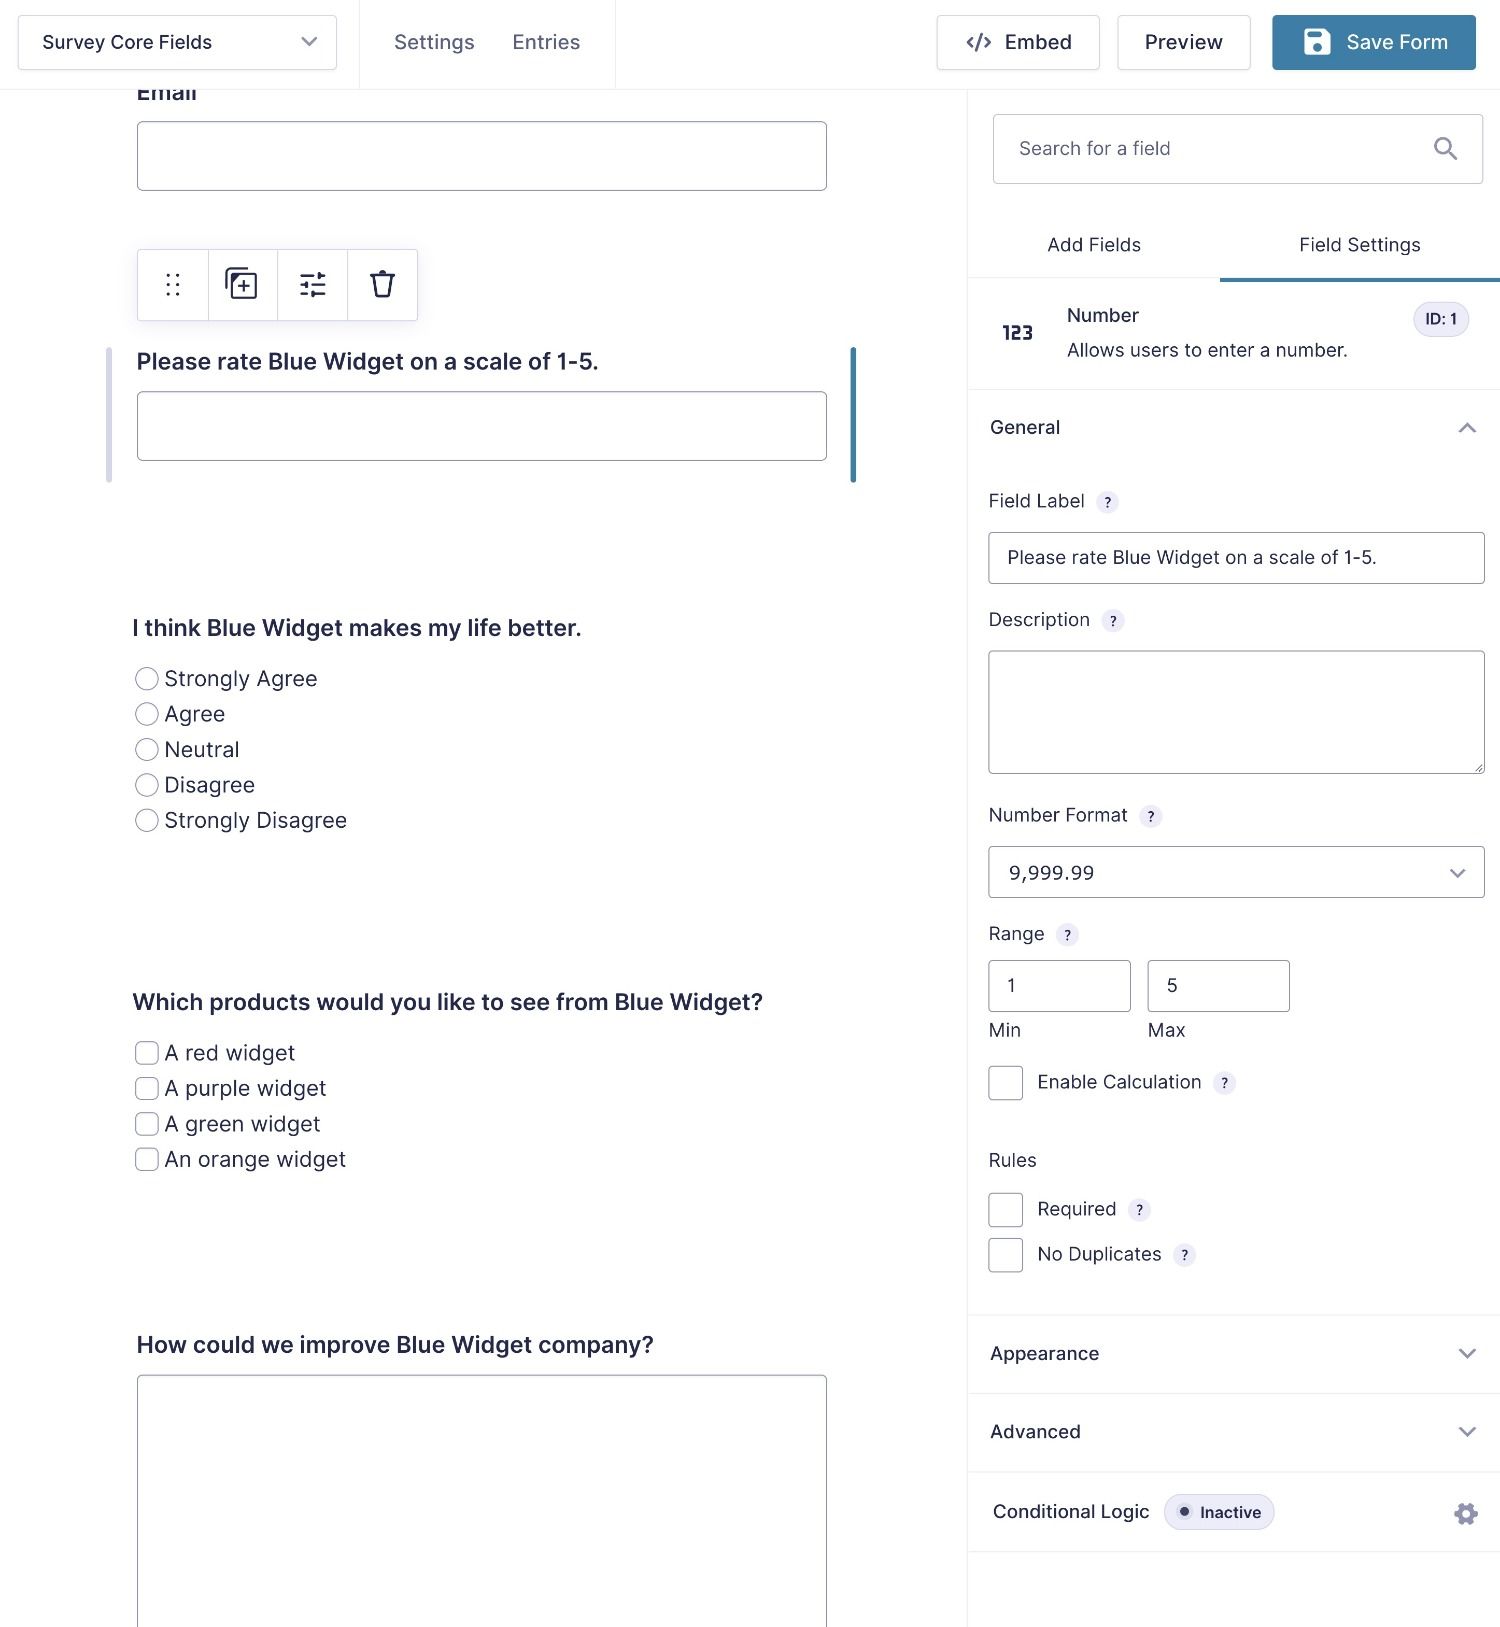
While you don’t get access to the dedicated Rating and Likert fields that the Gravity Forms Survey Add-On offers, you could approximate these fields using the Radio Buttons field type (the Number field can also work for ratings).
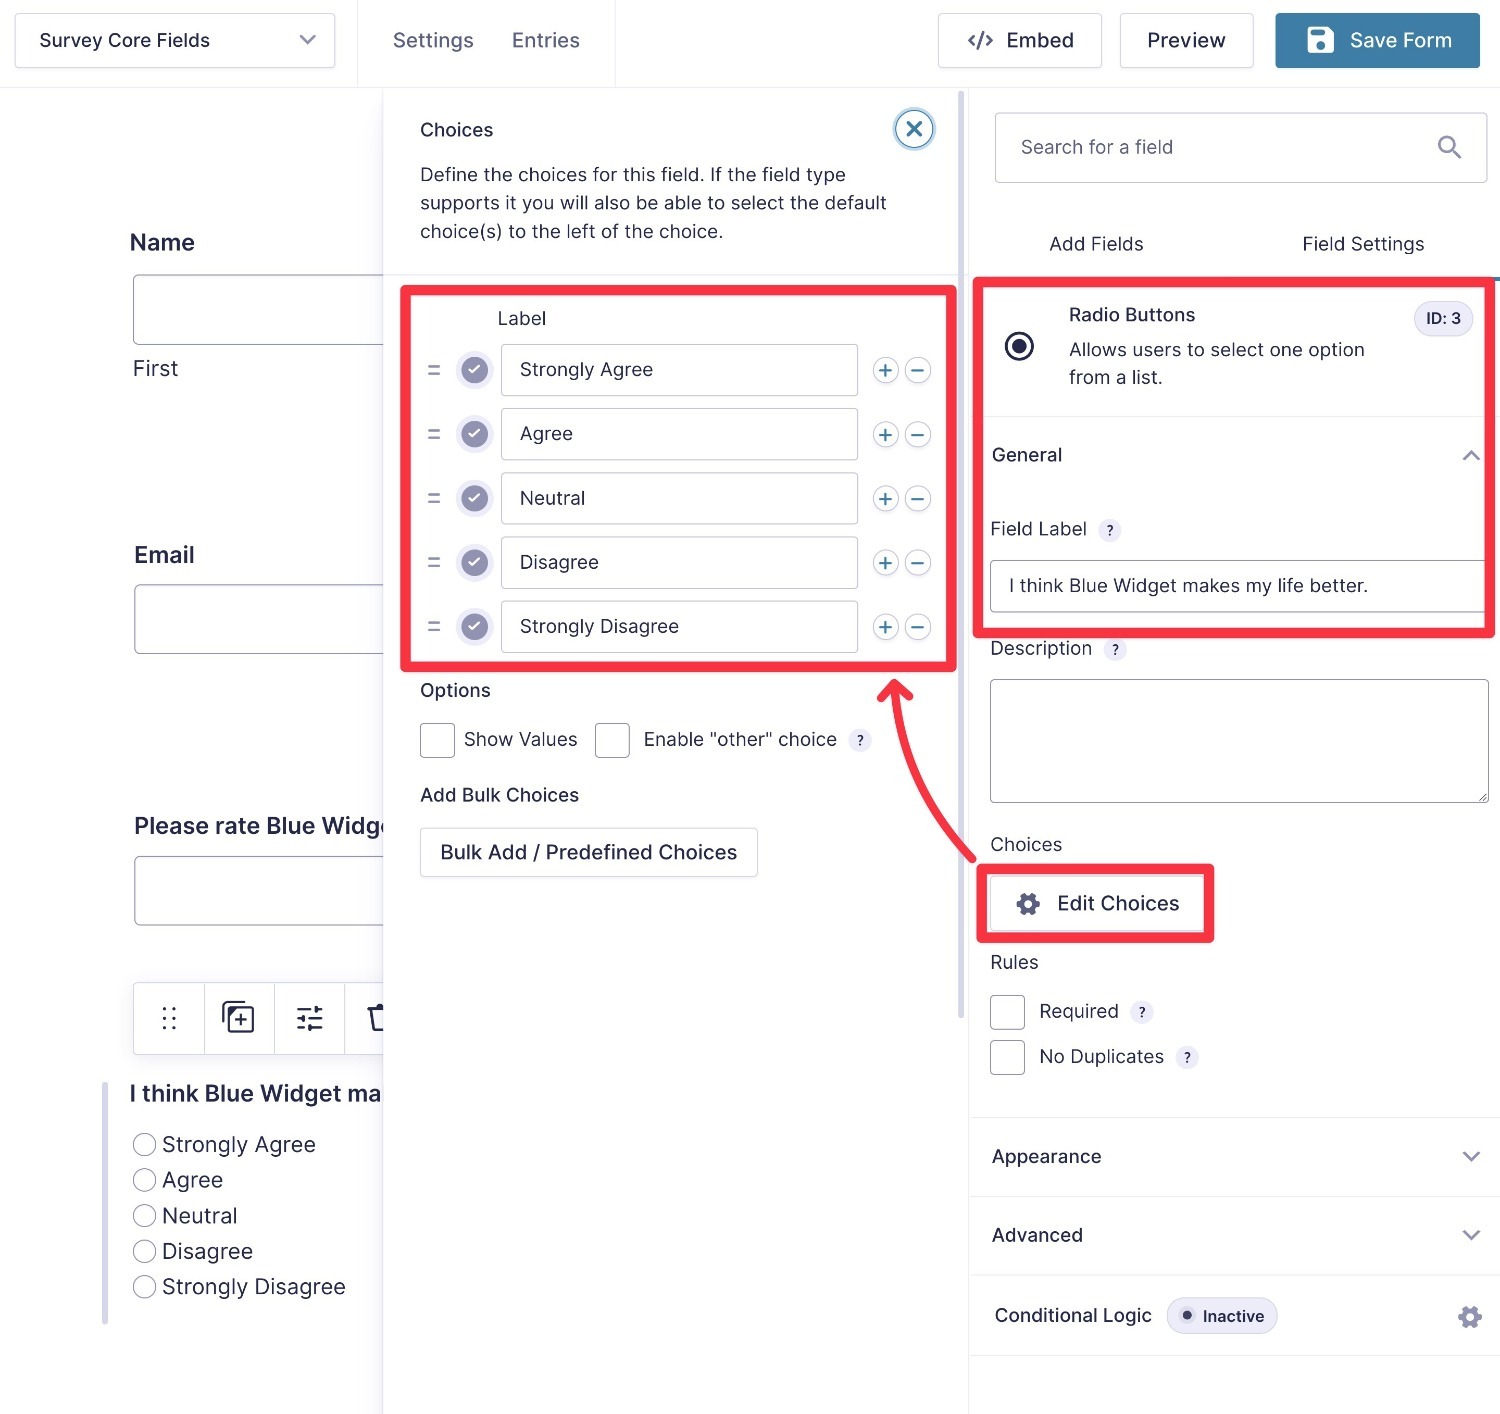
For example, here’s a manual implementation of the Likert scale using just Radio Buttons:
You’ll also probably want to use some other fields to collect basic information from respondents, such as the Name field, the Email field, and so on.
Beyond the fields themselves, you also might want to set up conditional logic to adjust your survey based on how people respond to earlier questions.
Configure Form Settings and Set Up Integrations If Needed
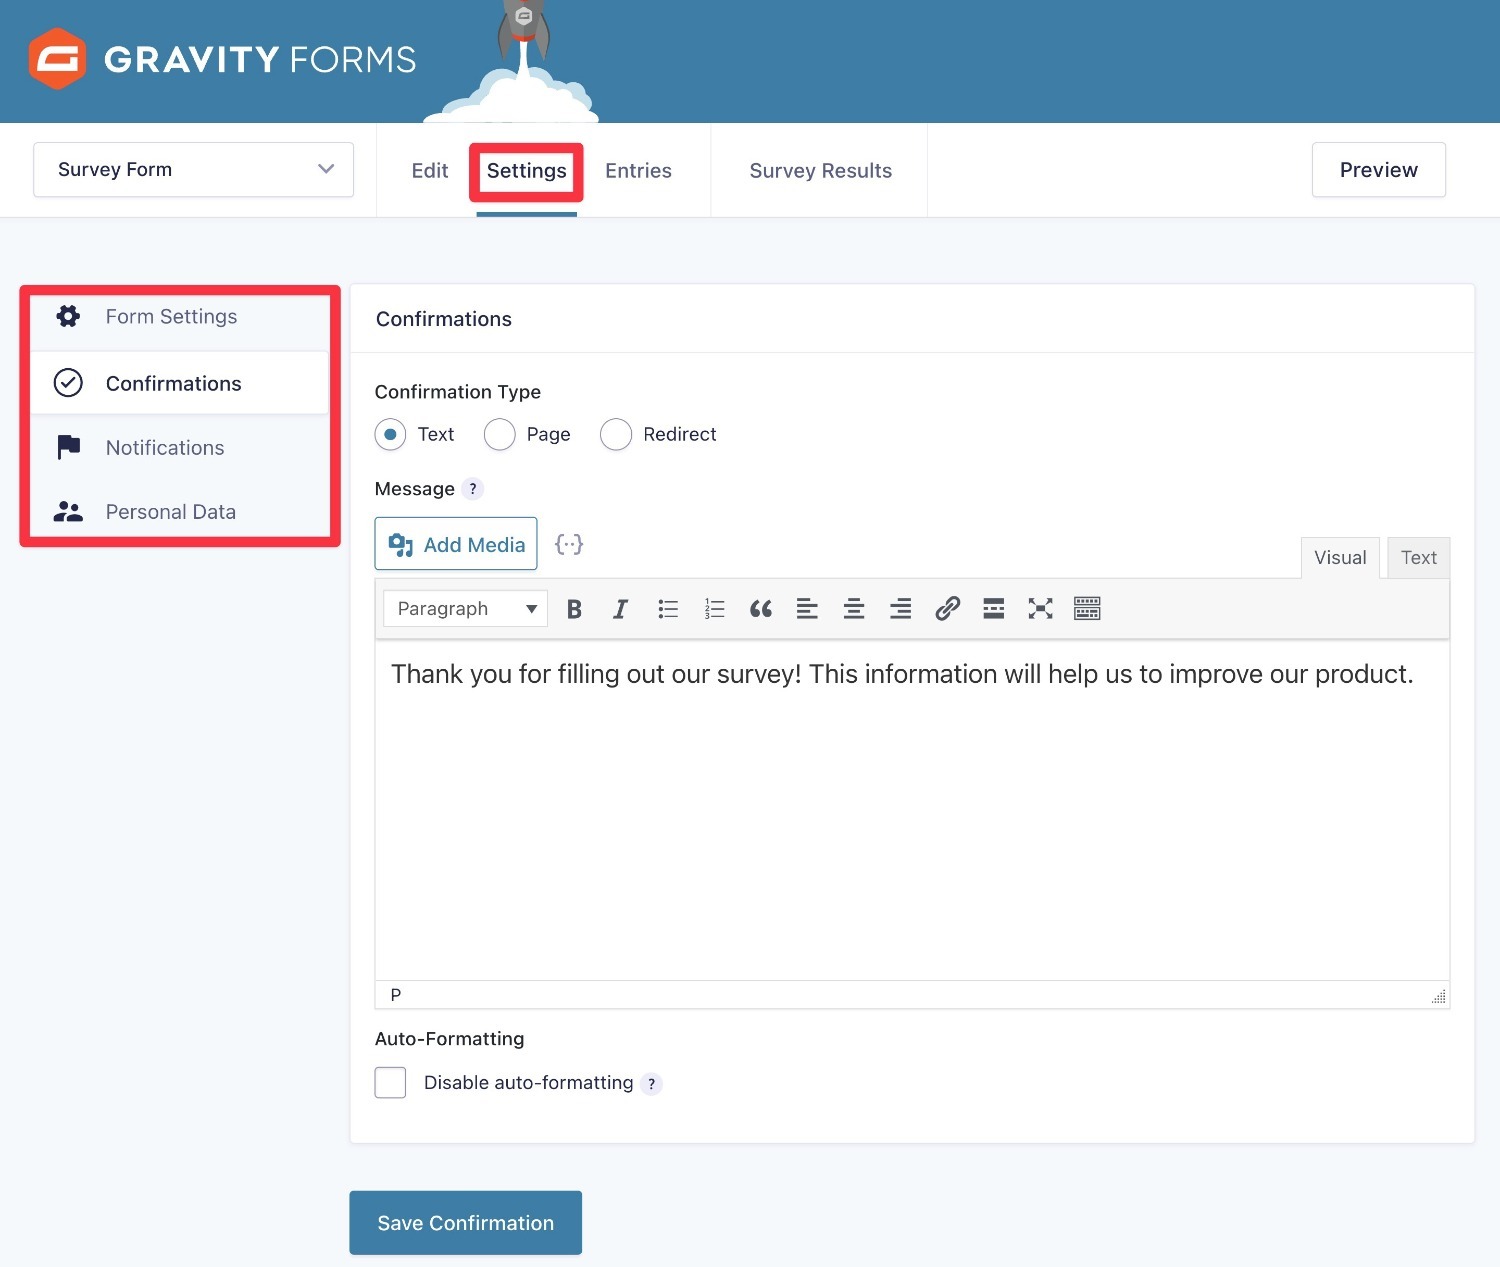
Once you’ve set up the survey fields, you can open your Settings area to configure other settings such as confirmation messages, notifications, and so on.
For example, you’ll probably want to adjust the confirmation message to tailor it to your survey.
Embed Your Survey
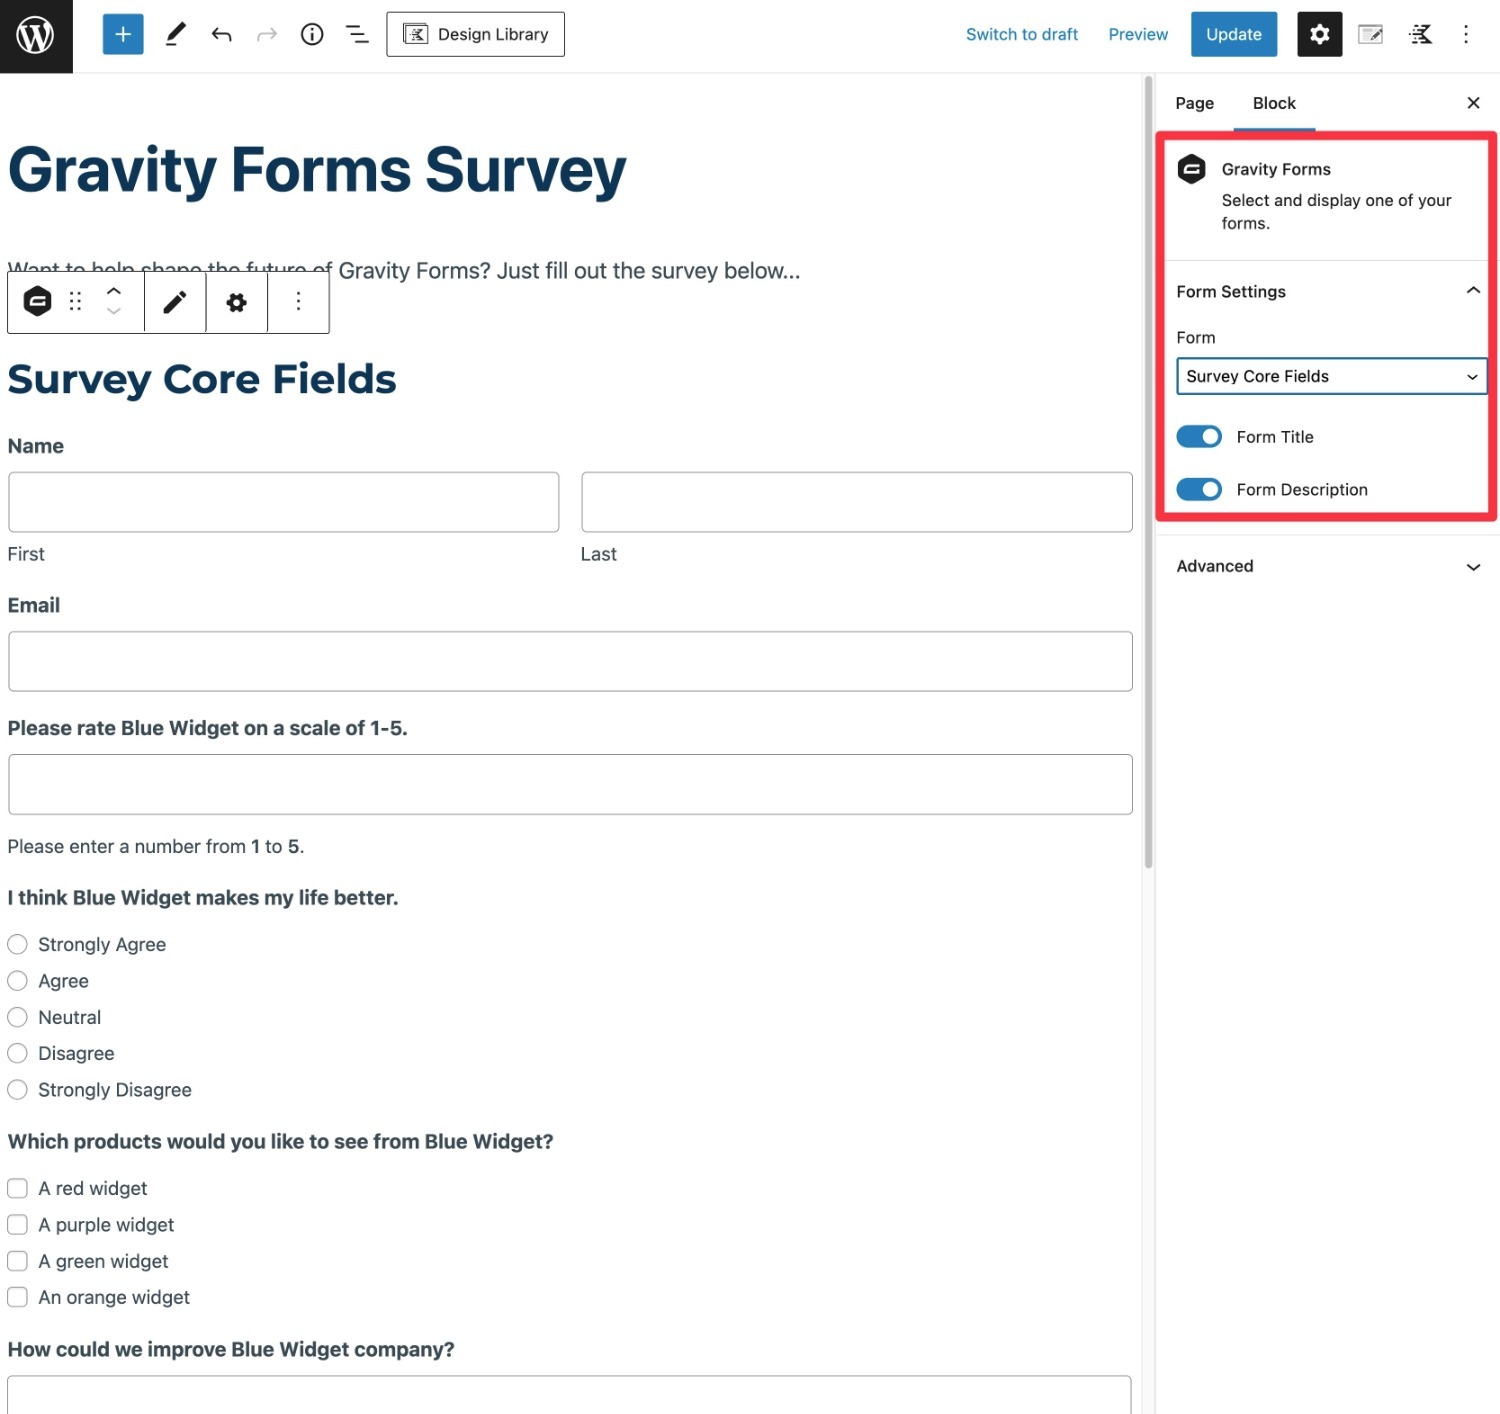
Once you’re happy with your survey form’s settings you can embed it on your site using the Gravity Forms block or shortcode.
If you don’t want your survey to be public, you have a couple of options:
- Restrict the form to logged-in users – you can do this from the Form Settings tab using the Require user to be logged in setting in the Restrictions box.
- Restrict the page in which you embed your form – WordPress includes a built-in feature to do this via the Visibility settings. You can either password protect it or restrict it to users with the read_private_pages capability (this is Administrators and Editors by default, but you can add this capability to other user roles with a plugin like User Role Editor). Alternatively, if you’re using a WordPress membership plugin, you could use your membership plugin’s functionality.
Analyze Survey Responses (or Export for Advanced Analysis)
While the core Gravity Forms plugin lets you view individual survey responses from your WordPress dashboard, it doesn’t let you aggregate those responses to analyze data in bulk.
This is one of the reasons you still might want the official Survey Add-On, as it does add tools for bulk survey analysis from inside your WordPress dashboard. More on that in a second.
However, you can still analyze survey responses in different ways without the Survey Add-On.
For example, here are a few different survey responses in the Gravity Forms dashboard:
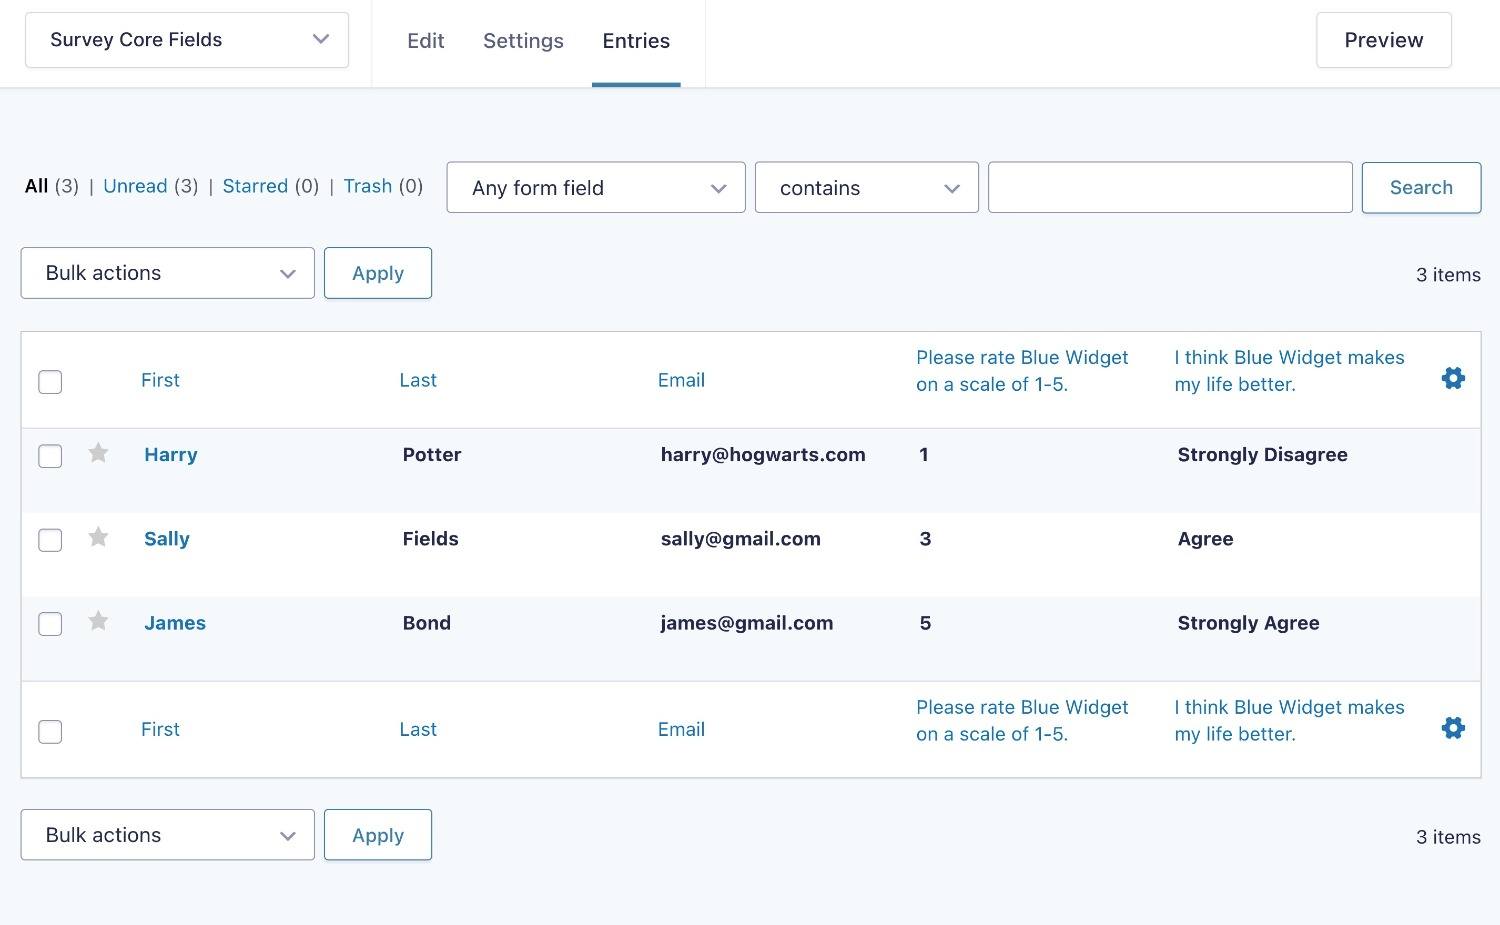
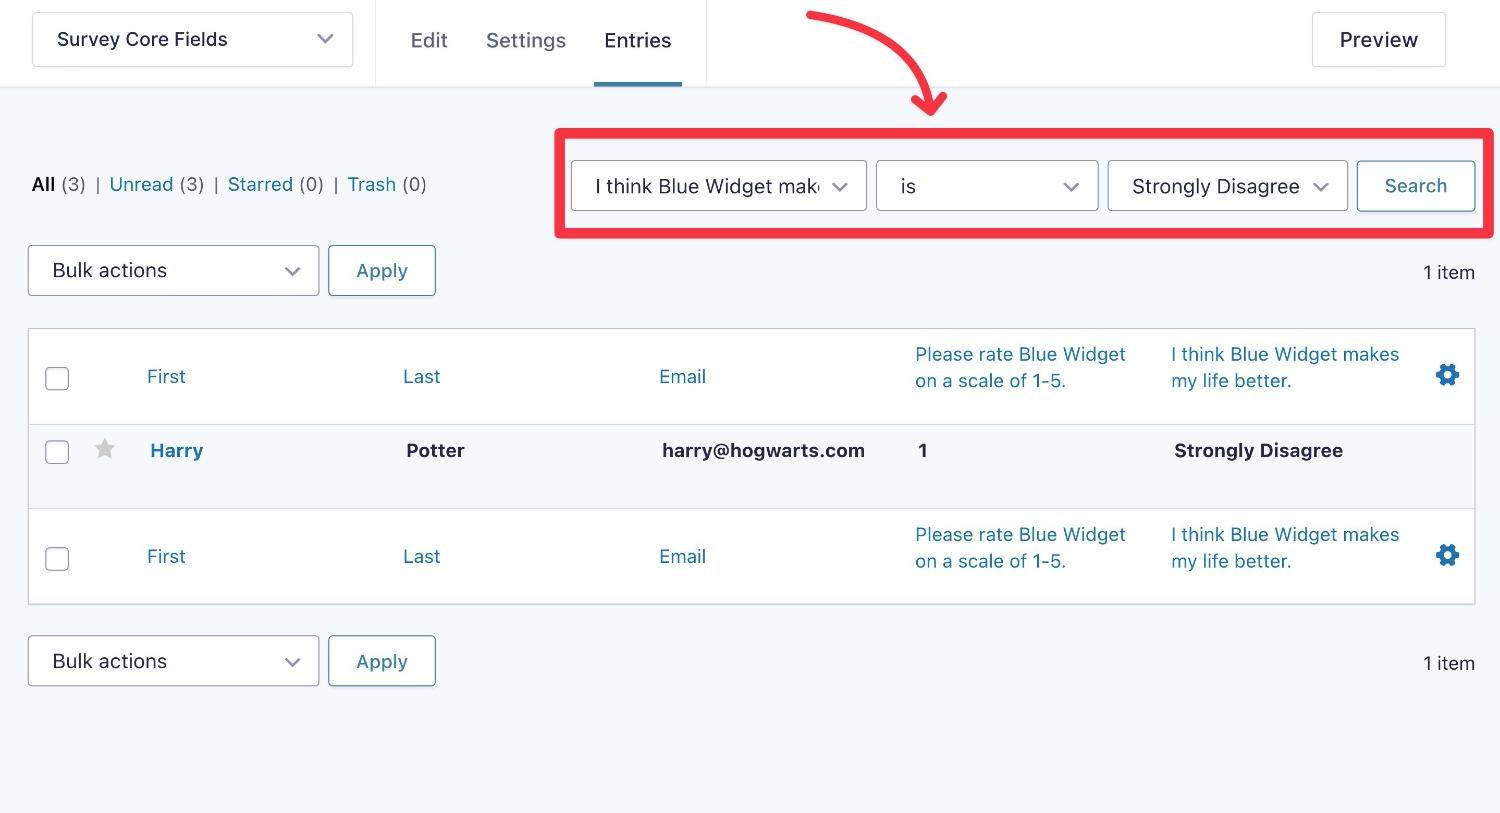
If you just want to view individual responses, you could rely on the built-in filters to find survey responses that meet certain criteria. For example, all the respondents who answered “Strongly Disagree”:
On the other hand, if you want to aggregate responses (such as calculating the average rating from all respondents), you might want to export the entries to a CSV.
This would let you use Google Sheets or Excel to analyze the data in aggregate.
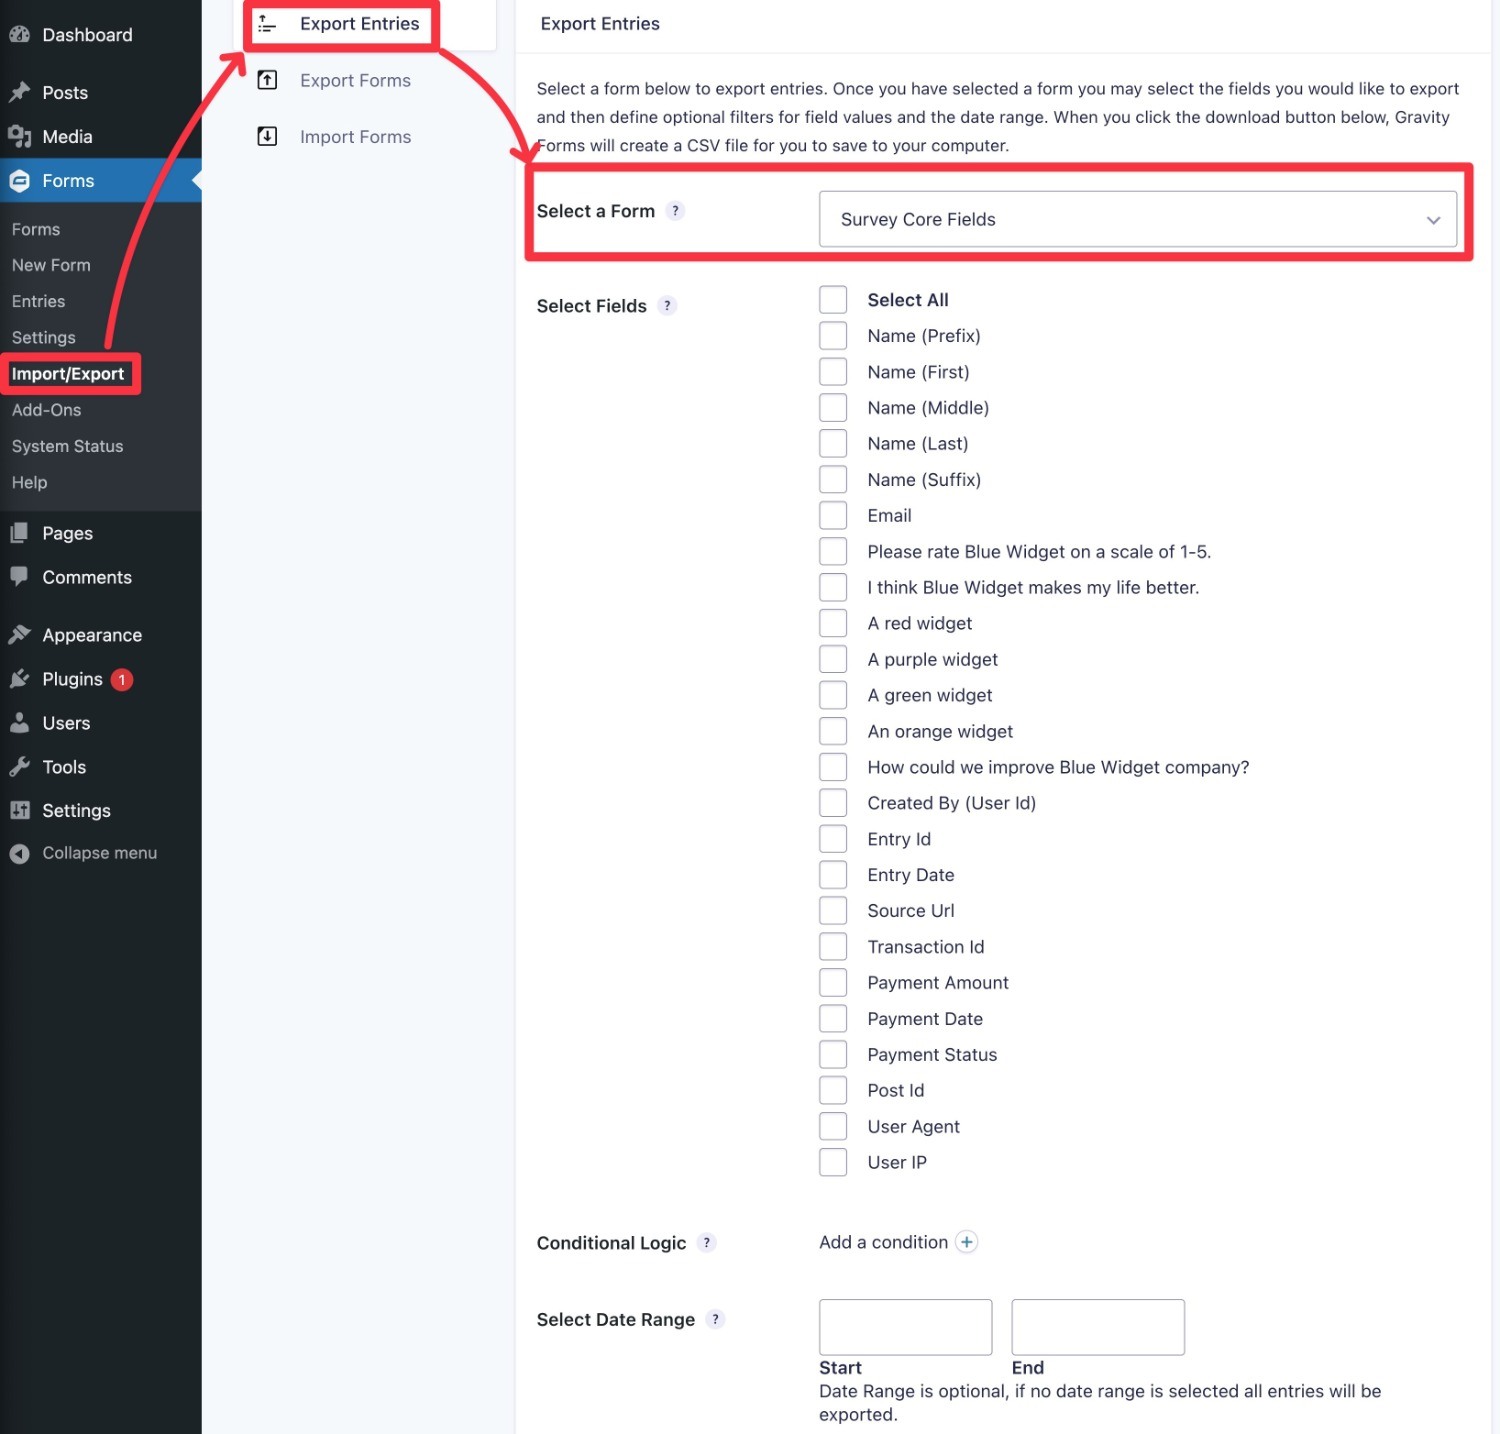
To do that, you can go to Forms → Import/Export → Export Entries. Then, select your form and choose which fields to export.
You can also use conditional logic to filter out certain entries or set date range restrictions:
Then, you could upload that CSV to Google Sheets, where you could start creating the charts, manipulating the data, and so on.
Alternatively, if you have the Gravity Forms Pro license, you could use the official Zapier Add-On to automatically send survey responses to Google Sheets.
You will need some knowledge of Excel/Sheets to use it for analysis, but it gives you a cost-effective way to analyze your data in bulk.
Or, if you’d rather not mess around with Excel/Sheets, you can also consider upgrading to the Gravity Forms Elite license to access the official Survey Add-On. Speaking of that…
Why You Still Might Want the Gravity Forms Survey Add-On
Up until now, we’ve been focused on how to create a survey form using core Gravity Forms features.
However, there are two big reasons why you still might want to consider purchasing the Elite license to access the official Survey Add-On.
Here are some advantages to creating surveys with the Survey Add-On…
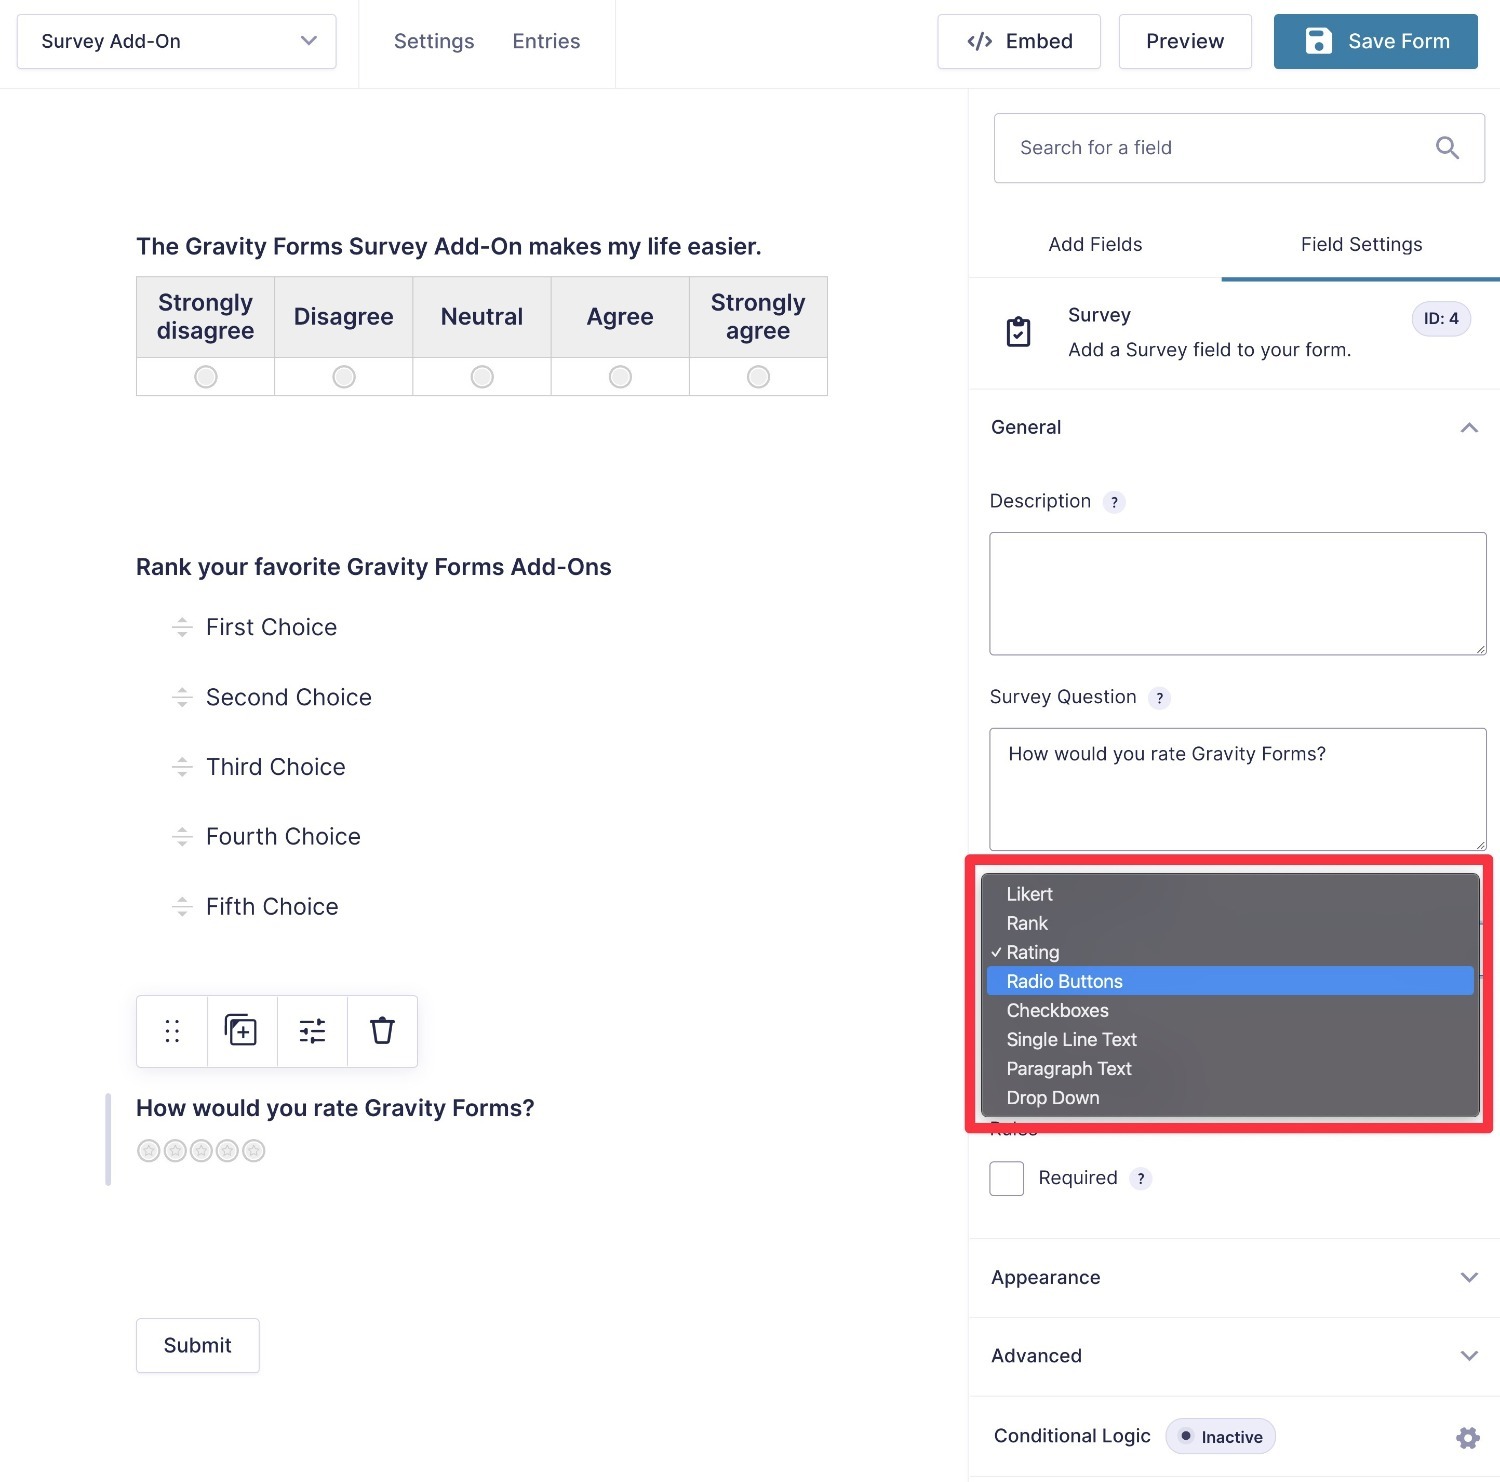
More Advanced Survey Field Types (Likert + More)
While you can already set up some pretty useful surveys using just the core Gravity Forms fields, the Gravity Forms Survey Add-On gives you a special Survey field that lets you choose from a variety of field types:
- Likert Scale – users can choose an answer from a scale of multiple options.
- Rank – users can drag and drop items to arrange them in their preferred order.
- Rating – users can select a star rating.
- Radio Buttons
- Checkboxes
- Single Line Text
- Paragraph Text
- Drop Down
While the last five survey field types also exist as regular Gravity Forms fields, the advantage of using the dedicated Survey Field type ties with the next point…
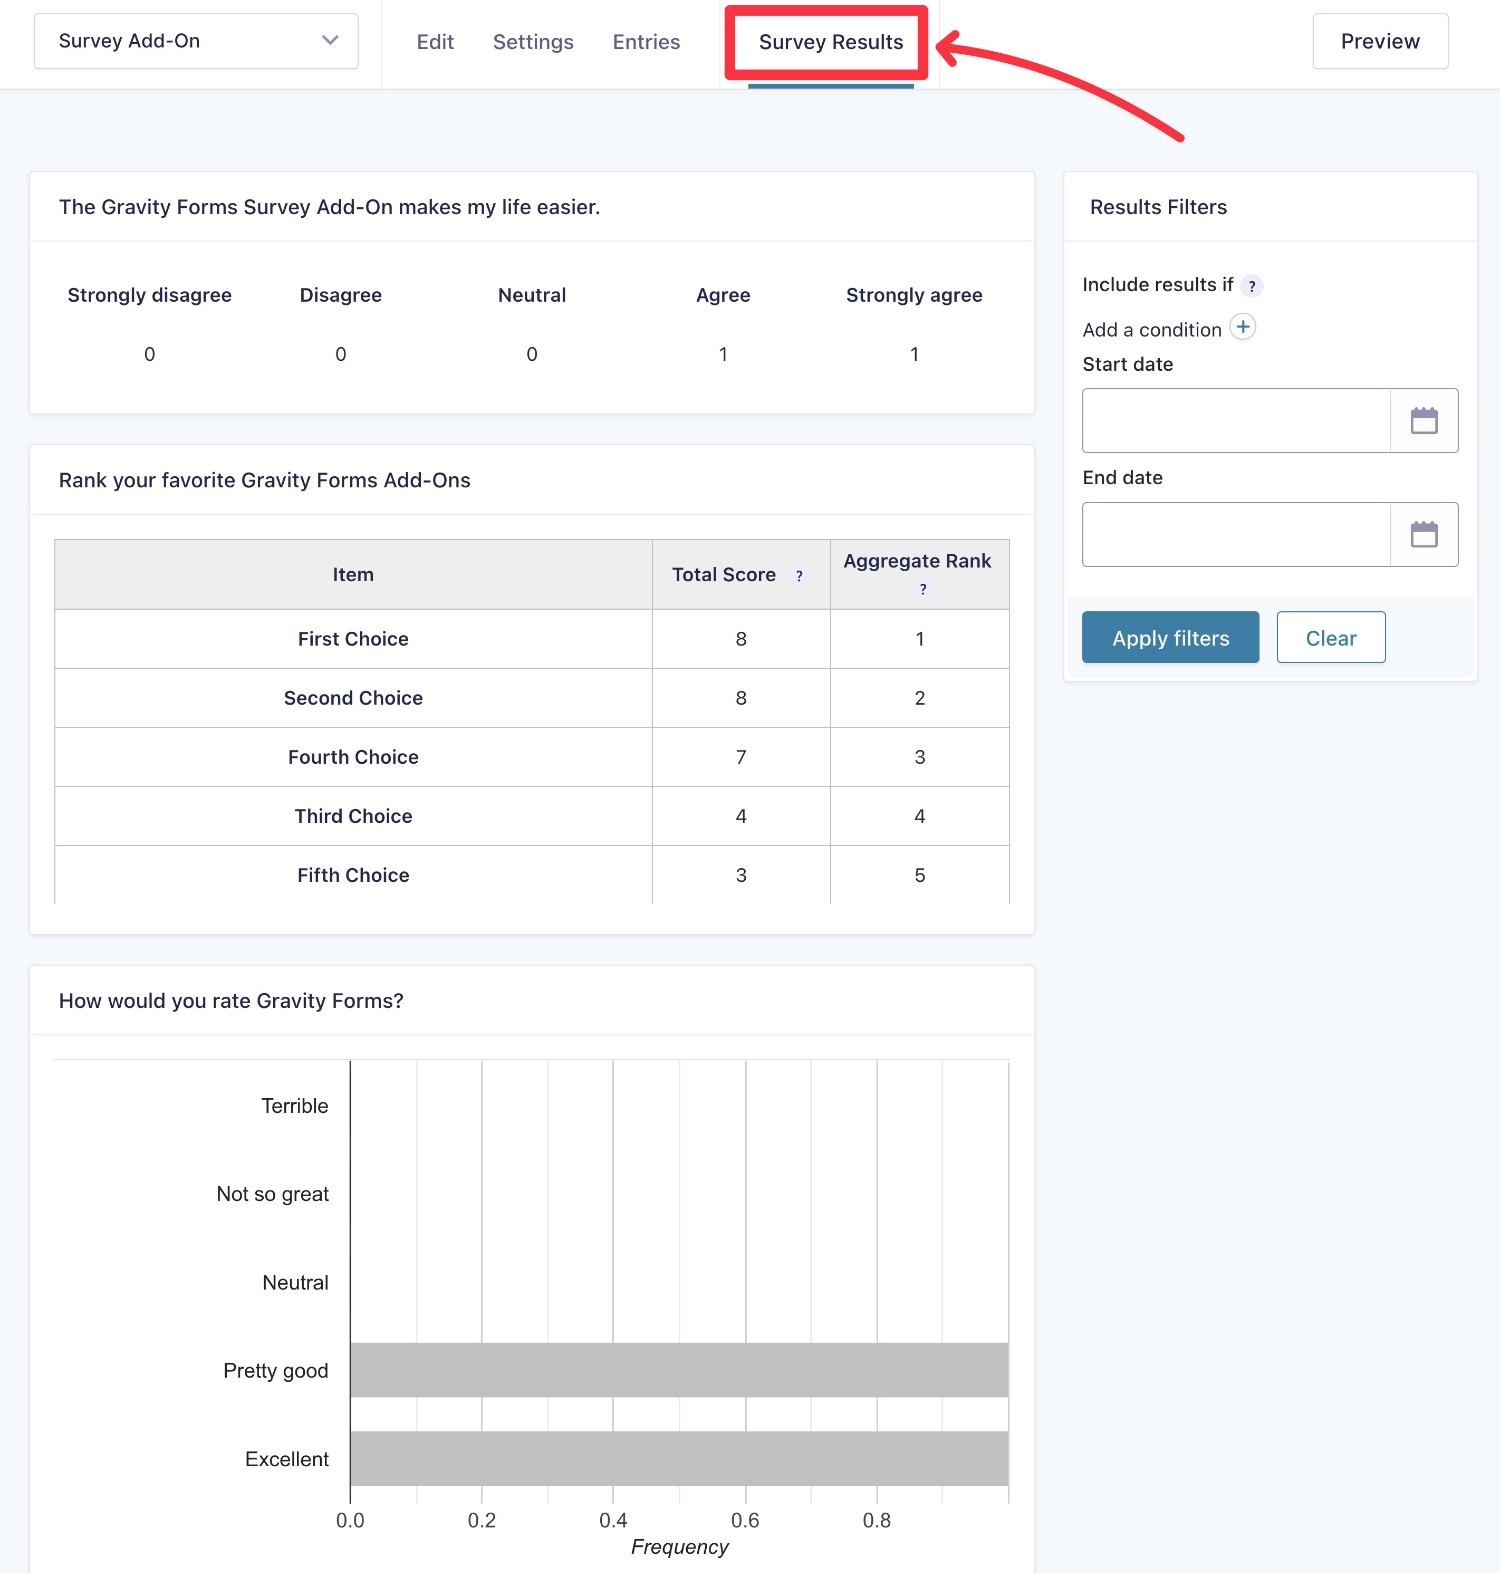
Tools to Analyze Aggregate Survey Responses
To help you analyze survey responses, the Gravity Forms Survey Add-On gives you a dedicated in-dashboard area to view survey results.
You can view aggregate results for your survey and also dig into responses to specific questions.
You can also use filters to slice and dice the survey data as needed.
While you can accomplish something similar with the Survey Add-On by exporting the data to Sheets or Excel, the Survey add-on is a lot more convenient and doesn’t require any special knowledge (i.e. knowing how to manipulate data in Excel)
Create Your First Survey Form Today
Whether you’re using the Basic license or the Elite license, Gravity Forms gives you all the functionality that you need to start gathering insights using survey forms.
For simple surveys, all you need is the core Gravity Forms plugin on the Basic license. You can use the built-in field types to collect data and analyze individual responses in your dashboard or export responses to analyze them in bulk using Excel or Sheets.
If you want dedicated survey field types and in-dashboard analysis, you can purchase the Gravity Forms Elite license to get access to the official Survey Add-On, as well as the other 45+ official add-ons.
Not sure if you need those extra features? Spin up a free, fully functional Gravity Forms demo site to play around with the core version, the Survey Add-On, and all the other official Gravity Forms add-ons.

If you want to keep up-to-date with what’s happening on the blog sign up for the Gravity Forms newsletter!
"*" indicates required fields


