 Are you interested in turning your website into a fully-fledged membership site? With Gravity Forms and Gravity Wiz (and the help of a few extra free plugins), you can do just that, creating tiered membership plans, restricting content, registering and managing new members, and accepting online payments.
In this article, we will walk you through how to turn your WordPress website into a fully functional membership site. We’ll guide you through each step and give you a ton of pro tips to take each step to the next level along the way. And while this article is focused on creating paid memberships on your WordPress site, you can skip the payment collection step if you would like to offer free memberships.
Ready to get started?…
Gravity Forms and Gravity Wiz: An Introduction
Gravity Forms is the #1 form builder for WordPress websites, providing a professional and secure service that has proven to be reliable time and time again. Integrating with a wide assortment of global payment processors, you can confidently accept one-off registration fees or recurring monthly membership subscriptions through your site with Gravity Forms.
With its intuitive drag-and-drop form builder, Gravity Forms is an extremely user-friendly tool that will enable you to easily create stylish forms that engage your target audience and boost conversions. Equally, Gravity Forms’ highly extensible framework and its huge ecosystem of third-party add-ons make it the best fit for any advanced custom project.
Gravity Wiz, a Gravity Forms Certified Developer, provides a powerful suite of tools (Gravity Perks) designed to enhance Gravity Forms and create flexible solutions for complex problems. Using Gravity Wiz in conjunction with Gravity Forms, you can quickly create an impressive paid membership site to suit your exact requirements, which can then grow with your business.
How to Create a Membership Site
Over the course of this tutorial, we will cover how to set up a paid membership site with Gravity Forms in just 5 easy steps. These include…
- Create Tiered Membership Levels
- Create a Registration Form
- Set Up Online Payments
- Register Users on Your WordPress Website
- Create Members-Only Restricted Content
Importantly, we will also share a variety of extra resources, enabling you to easily extend your membership site’s functionality and take your website beyond just the basics.
Let’s dig in…
Step 1: Create Membership Levels
Before you can accept memberships, you’ll want to define user roles in WordPress for each membership level. We’ll use these terms interchangeably throughout this tutorial. Even if your site is going to have a single membership level, we still recommend completing this step.
We will use the Members plugin to create our membership roles. This free plugin allows you to set up custom user roles and restrict content based on the membership level of the user.
To create a role, go to Members > Add New Role in your WordPress Admin. Here we’ve created a few sample roles: Bronze Member, Silver Member, Gold Member…
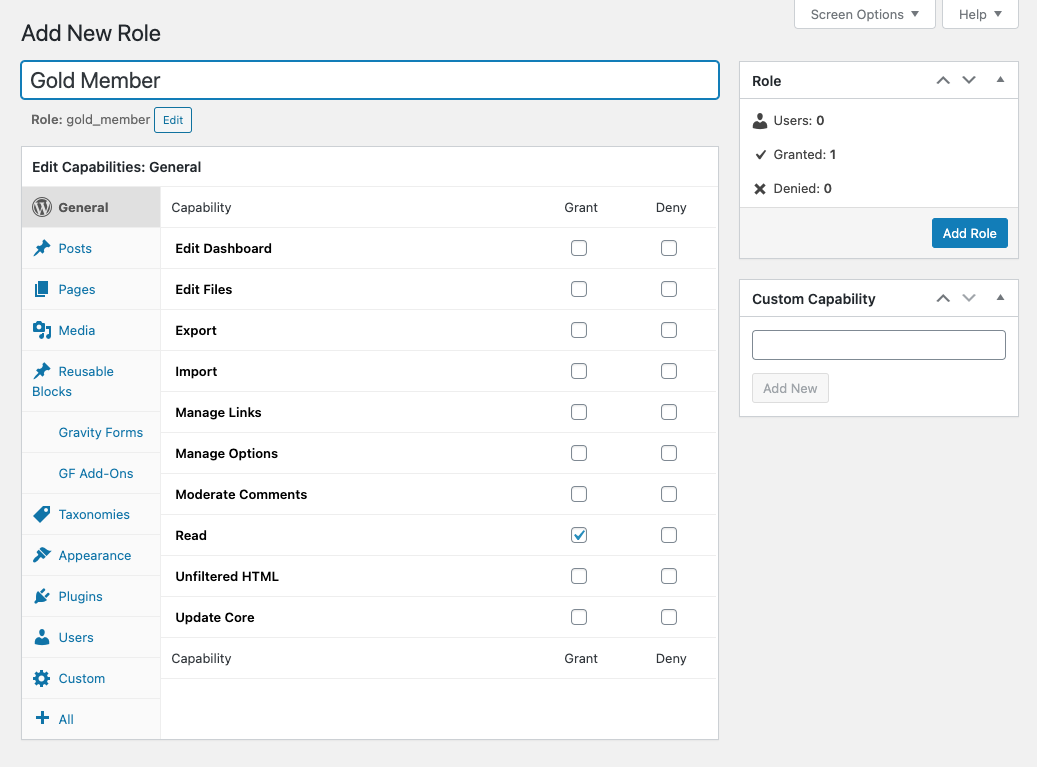
Create a new role for each desired membership level for your site. In each level, you can define the privileges that you would like to give to each membership level.
(At this stage, don’t worry about giving your custom roles any special privileges. You can come back here to edit a user role anytime and modify their permissions).
Step 2: Create a Signup Form
After defining user roles for each membership level, you need to create a signup form for new users. This form will collect all the relevant data from the users during registration.
To create a signup form in Gravity Forms, go to Forms > New Form in WordPress Admin. Alternately, you can choose an existing form to edit from Edit Forms.

You will need to collect some basic information from each new user to register them on your site. We’ll add a Name field to capture the member’s name and an Email field to capture their email address.
Add a Drop Down field and add our Bronze, Silver, and Gold membership levels as choices in this field. This will allow the user to select which membership level they’re interested in. Later on, we’ll use this field to assign the user to the correct membership role.
We’ll handle the payment collection in the next step but in order to prepare for that, go ahead and add a Stripe Credit Card field now. We’ll use Stripe to collect payments in this tutorial but Gravity Forms has a variety of payment gateway integrations!
(To add the Stripe field to your form you will need to first install the Stripe Add-On from the Gravity Forms Add-On browser within your WordPress admin. For more information on this, check out the extensive documentation on How to Get Started with the Stripe Add-On).
Add any other fields to capture the data you need for your membership site. Since you are collecting personal information about your users, you’ll want to ensure that you make informed decisions and only collect personal information that is absolutely required, and respects data protection laws like GDPR.
Step 3: Collect Payment
In this step, we’ll explore how you can use Gravity Forms to collect payments from users. Skip the section if you don’t intend to have paid memberships.
The payment could either be a one-time signup payment or a recurring payment (i.e. a subscription) where the user pays on a recurring schedule. Recurring revenue is a powerful way to generate revenue reliably and grow your membership business.
While we can use any of the many payment gateways available with Gravity Forms, we’ve used Stripe for this tutorial. It is one of the easiest payment gateways to get started with.
Before you can associate a signup form with the payment gateway you first need to configure your payment feed…
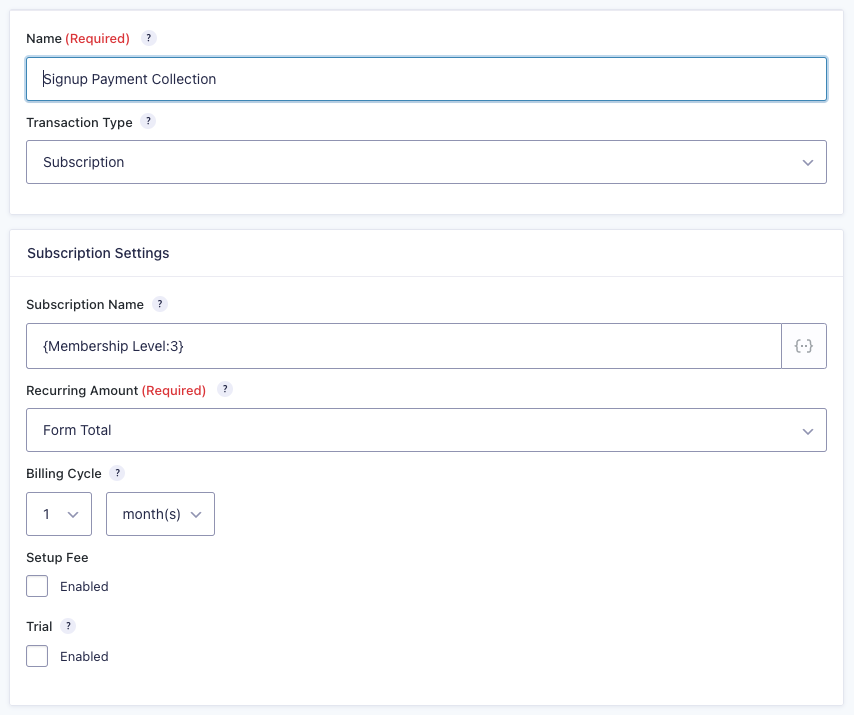
Give your payment feed a Name to identify it. In the Transaction Type, you can either select “Subscription” to create memberships that must be renewed or “Products & Services” to create a lifetime membership. In the Subscription Name, we’ll use the Membership Level field.
Next, you need to decide your subscription cost and the frequency with which your members are billed. If you selected “Subscription” as the transaction type, set the Recurring Amount to the “Form Total”.
Further, we’ll set the Billing Cycle to 1 month in this example. If you need to charge your members a registration fee, in addition to the recurring fee, mark the Setup Fee option to charge a one-time fee at the start of the subscription. Finally, if you would like to give users a chance to trial your services for free, enable the Trial setting.
To learn more about subscriptions with Stripe through Gravity Forms, checkout the full walkthrough here.
Step 4: Register the User
It’s time for the magic moment. Let’s actually set up member registration! We’ll use the User Registration Add-On to register a user on the site and assign them the correct membership role.
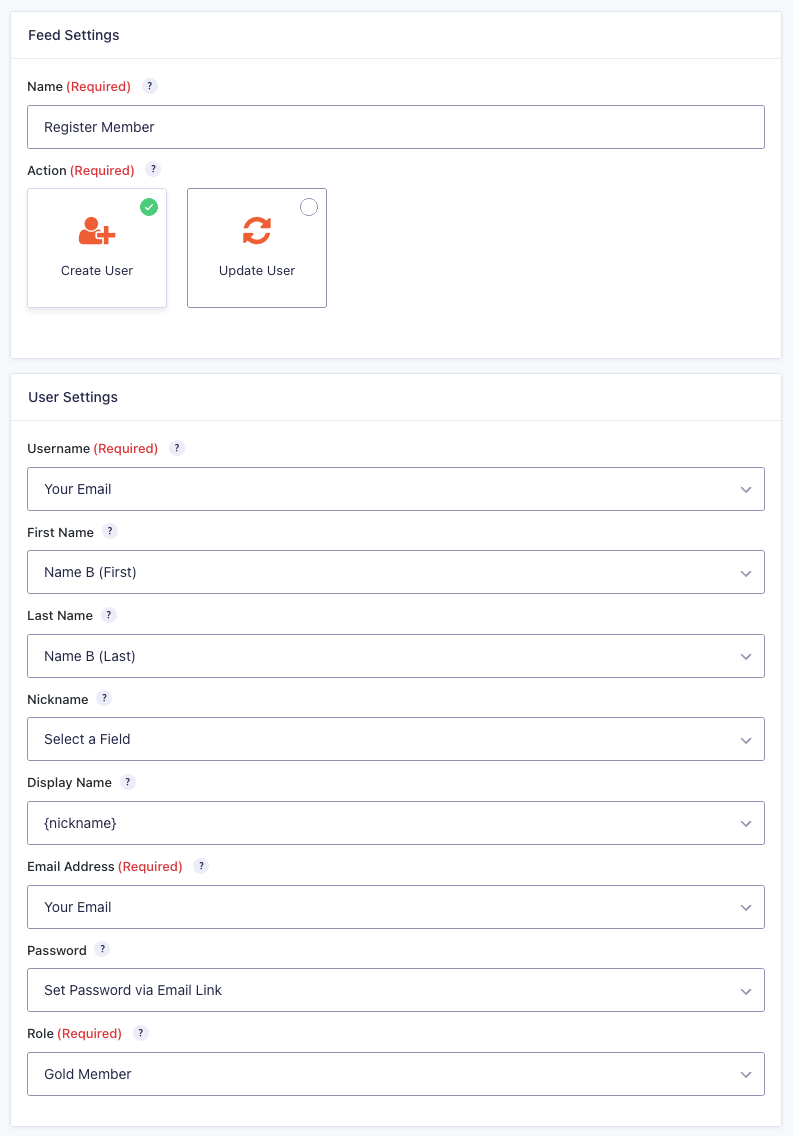
When saving a user, the minimum requirements are username, email, and role. You can reduce the numbers of requirements by using the email as the username. In this form, we are also capturing the users First Name and Last Name.
When mapping the Role (aka the membership level), we recommend using this simple snippet to set the role by field value. You can use this snippet to set the role based on your Membership Level field value (from Step 1). With this snippet in place, it doesn’t matter which role you set in the actual feed. The snippet will override it based on the selected field value when the user is created.
If you don’t want to touch any code, no worries! You can accomplish the same thing by duplicating the User Registration feed for each membership role and using conditional logic to process the applicable feed based on the selected Membership Level.
While we’ve already covered a lot, this is just the tip of the iceberg of what you can do with Gravity Forms and member registration. In the Beyond the Basics section below, we discuss how to set up powerful features like pending activations, mailing list signups, and payment collections!
Step 5: Restrict Members-Only Content
In Step 1, we used the Members plugin to create membership levels through user roles. Additionally, this plugin allows us to restrict content based on those roles.
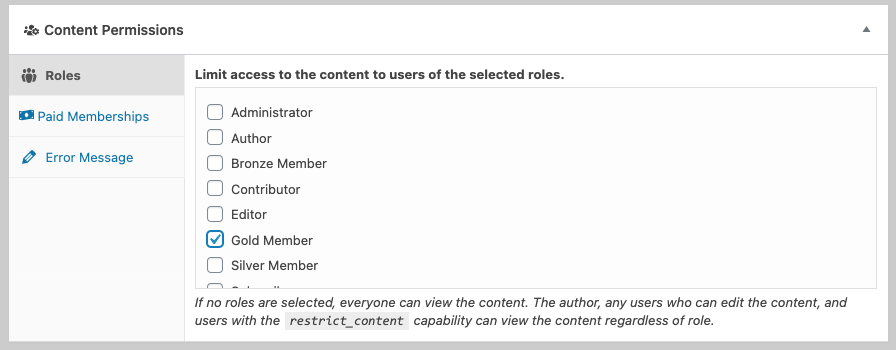
In the post or page that you wish to protect, scroll to the bottom when editing it. Select the membership roles that should have access to that content via the Content Permissions panel. Simple but powerful!
Beyond the Basics
Up to this point, we’ve explored, step by step, the process of creating a simple paid membership site. In this section, we look at a few easy options to make your membership site even better.
Don’t worry about implementing all of these awesome ideas all at once. Just skim through and see what jumps out at you now, then come back each time you’re ready to improve your process to get another idea.
Add Members to Your Mailing List or CRM
If you want to establish a clear line of communication with your registered members, you can add members directly to your mailing list or CRM through Gravity Forms. Gravity Form’s Basic license includes several top-notch mailing list and CRM integrations.
If you would like an easy alternative to contact registered users through email, the GF Email Users plugin enables you to email users who submitted a form.
Confirm the User’s Email
While we have added an email as an option on the form, it makes sense to confirm emails before you activate an account. Pending Activations is a feature provided by the User Registration Add-On. It enables you to have a user confirm their email by clicking on a confirmation link emailed to them. Here is a full walkthrough on customizing the user activation email.
This confirms that the user owns the email address they’re signing up with. Further, it can be an early flag for incorrectly typed email addresses. For free membership sites, this is a great way to limit spam signups.
Once you’re using pending activations, use GF Better User Activation to take complete control of the user activation page — and keep your branding tight!
Approve New Accounts
If you are running a niche membership site, you may wish to manually approve each signup. The Pending Activations feature by the User Registration Add-On can help here too! Just set the “User Activation” setting of the add-on to “manually or by form notification”.
If you don’t configure a form notification, no user activation email will be sent. You can then manually approve each user via the Pending Activations page – or – by configuring a form notification to be sent directly to you.
Auto Login
To create a seamless signup process that gets your members to the content they’ve paid for quicker, GF Auto Login sets up your site to automatically log into their account upon registration.
If you’re using pending activations, GF Auto Login integrates with GF Better User Activation to automatically (and securely) log the user in after activation.
Brand the Login Form
While WordPress’s default login form works well, it isn’t branded for your business. You can use User Registration’s built-in login form to bring the login form into your site so they never see the boring default WordPress login.
By the way, the User Registration login shortcode handles logging out and resetting of the password as well!
Registering Multiple Members at the Same Time
Do you need to target large groups like schools or big companies for a special members-only training course or an online event? Don’t make them submit your signup form over and over again. That’ll hurt their fingers and hurt your conversions!
Check out this awesome tutorial that walks you through the process of registering multiple users from a single form.
Limit How Many Times a Member Can Submit a Form
Gravity Forms allows you to build tools like quote and proposal generators, advanced calculators, and training quizzes.
Use GF Limit Submissions to selectively manage your members’ access to those tools and how many times each tool can be used. (Upsell your members to gain additional access!)
Speed Up Future Form Submissions for Your Members With Pre-Filled Data
If a member on your site goes to fill out another form, it makes sense to optimize the completion of that form by pre-filling the data you’ve previously collected from them. Make any form on your site a breeze for your members to complete by using GF Easy Passthrough to pre-fill previously collected information in a snap.
Want to invite your members to fill out a specific form and don’t want to require them to login? Use GF Email Users to send an email with a link to your form with a special pre-fill token. Full scoop here.
Optimize Your Signup Forms with A/B Testing
A/B testing is a process of showing two versions of a form randomly to users. Both versions will be shown to roughly the same number of users allowing you to assess which form converts better.
Try creating multiple versions of your signup form and use the free GF Split Testing plugin to determine which one converts the best – Don’t miss out on new members due to an underperforming signup form.
Final Thoughts
In this tutorial, we’ve explored the process of using Gravity Forms to create a paid membership site for your users by creating membership roles, building a signup form, collecting payments, registering a user, and restricting content based on membership level.
We then discussed a myriad of ways to further enhance your membership signup experience and even some post-signup tips. So are you ready to create your membership site?
Do you have some tips of your own for handling memberships with Gravity Forms? We’d love to hear about them in the comments!

This article has been contributed by Gravity Wiz.
If you are interested in contributing a guest article for our website, please check out this page – Guest Writing for Gravity Forms.
Newsletter
If you want to keep up-to-date with what’s happening on the blog sign up for the Gravity Forms newsletter!
"*" indicates required fields