
Need a form that performs calculations? Look no further than Gravity Forms!
With Gravity Forms’ calculations functionality, you can perform calculations inside form fields, in confirmation messages, in email notifications, and more.
You can use these calculations to offer calculator tools (e.g. a mortgage calculator), accurate quote forms, product pricing adjustments, and lots more.
In our ultimate guide to Gravity Forms calculations, you’re going to learn more about what you can build with calculations and how these forms can be helpful.
Then, we’ll share a general step-by-step guide for how to use calculations in Gravity Forms, as well as some specific use case tutorials for some of the most common types of calculation forms.
What Can You Do With Gravity Forms Calculations?
The Gravity Forms calculations functionality lets you use mathematical formulas to perform calculations based on input from the form submitter.
Users can enter numbers directly in the Number field. Or, you can assign numerical values to list items in other fields such as Checkboxes, Radio Buttons, Drop Downs, and more.
While users will interact with the plain text label, you’ll be able to use those numerical values to perform calculations as needed.
You can also use calculations inside Product fields, which opens up tons of eCommerce opportunities.
So – what can you do with this newfound ability to calculate?
Well, the possibilities are pretty endless, but here are a few examples to get your creative juices flowing:
- Calculator tools – create all types of helpful forms to let users perform various calculations, such as return on investment, mortgage/loan calculators, and lots more.
- Quote forms – generate an accurate quote based on the information that you collect from your customers.
- Sales tax/VAT – calculate sales tax or VAT based on a user’s chosen products and add it to the order.
- Customizable products – let users customize their products to generate an accurate price and check out right away.
- Bulk discounts – offer bulk discounts based on a customer’s order details.
- Conditional logic routing – use public or hidden calculated values with conditional logic to customize your forms. For example, you could assign new leads to different salespeople based on the calculated value of their business.
Again – these examples are just scratching the surface of what you can do with Gravity Forms calculations.
How to Set Up Gravity Forms Calculations
At this point, you should have a pretty good idea of what you can build with calculator forms and how these forms can help your business.
Now, we’re going to shift into the “how to” part of the post, starting with a general guide for using Gravity Forms calculations.
Then, in the next sections, we’ll make these tutorials a little more specific and show you how to set up calculations for specific use cases such as a return on investment calculator, a quote generator, eCommerce forms, and more.
1. Create a New Form
To get started, go to Forms → Add New to create a new form.
You can start from a blank form or choose one of the existing templates to add calculations to.

2. Set Up Form Fields to Collect Data for Your Calculator
With a calculator form, you’re able to perform calculations on the inputs from your visitors.
So – before you can start performing those calculations, you first need to collect those inputs.
To do this, you can add two or more Number fields.
You aren’t limited to just using Number fields, but we’re going to keep things simple to start.
Since this is just a generic example, we’ll call those number fields “Number 1” and “Number 2”.
To ensure the accuracy of your calculations, you might want to set up some validation rules for the number fields, such as a min/max range.
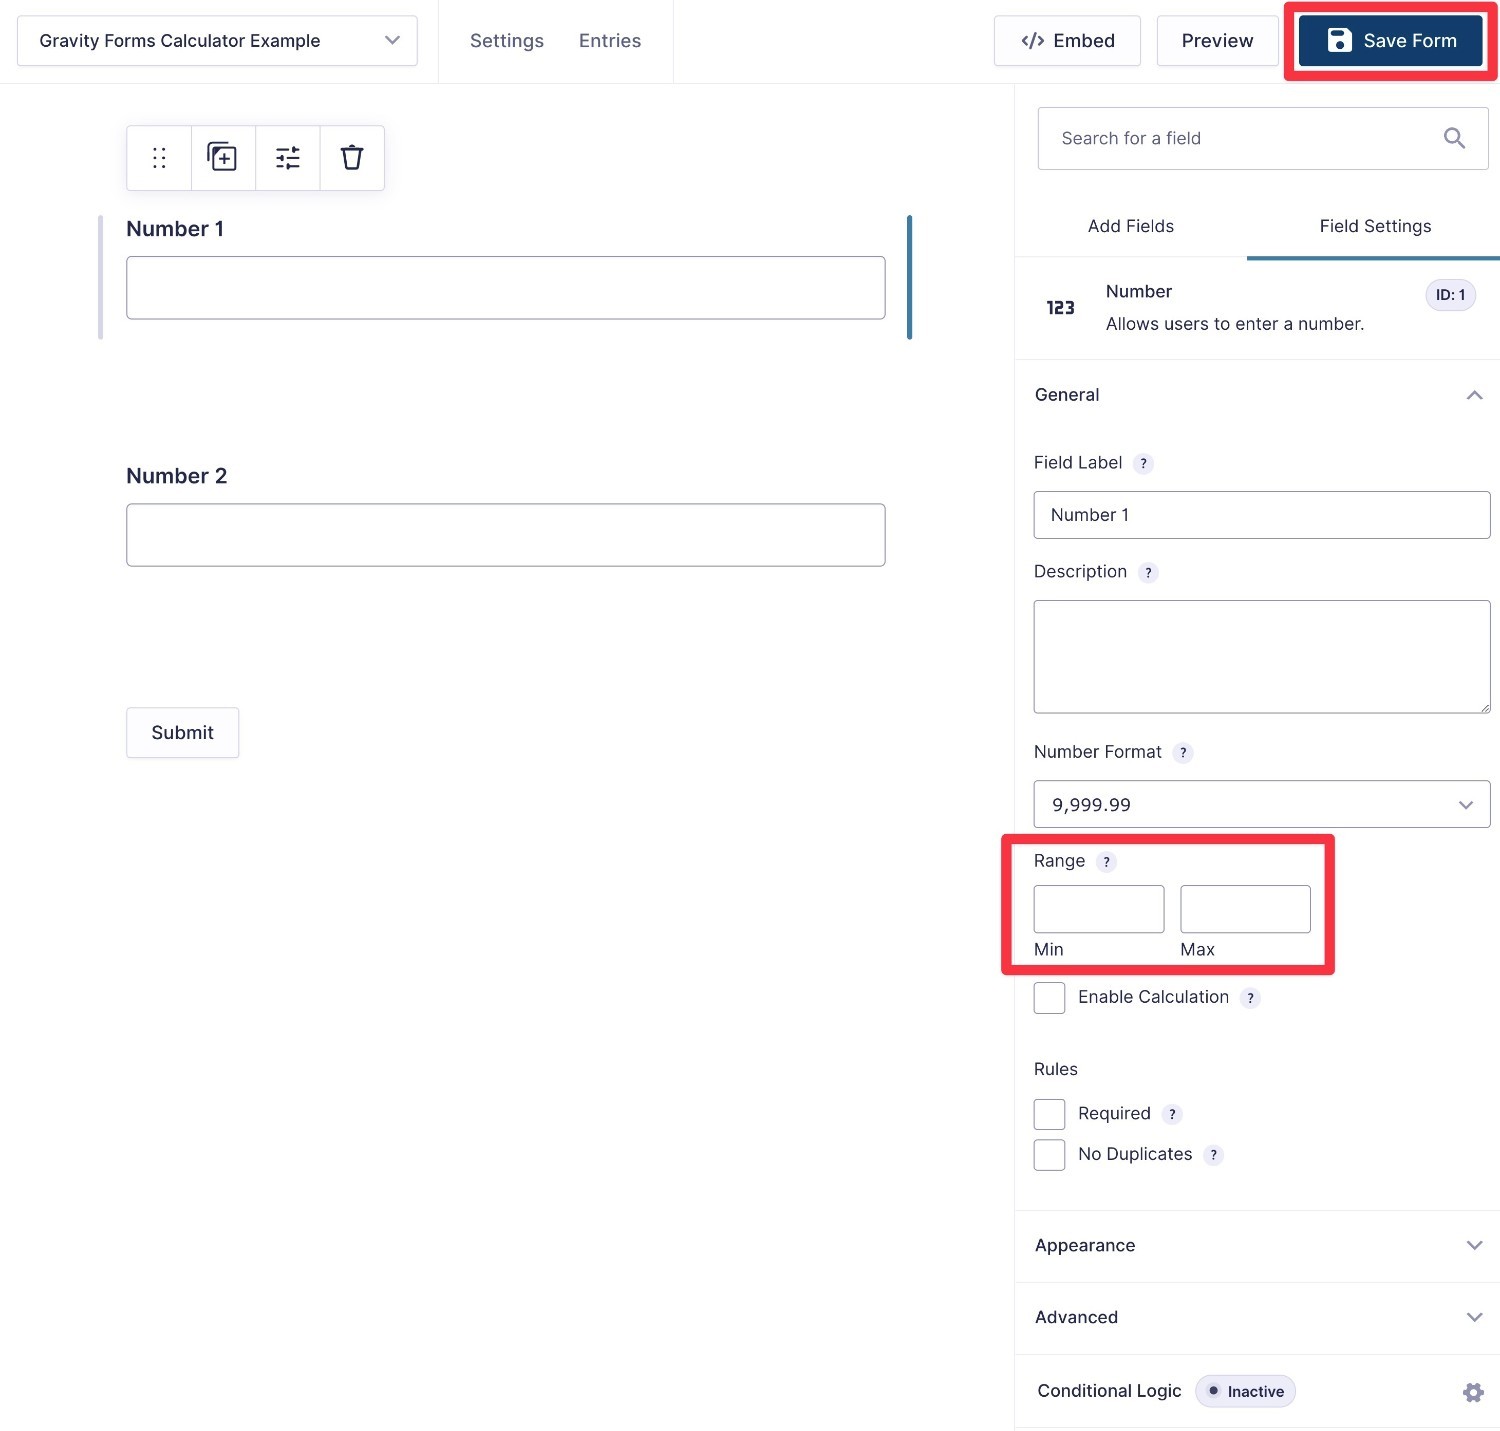
You’re also by no means limited to just two fields – you can add as many fields as needed for your calculations.
Once you’ve added the Number fields, make sure to click the Save Form button.
Then, reload the page.
This ensures that the number fields will have the proper labels when setting up your calculation formula.
3. Set Up Your Calculation Field
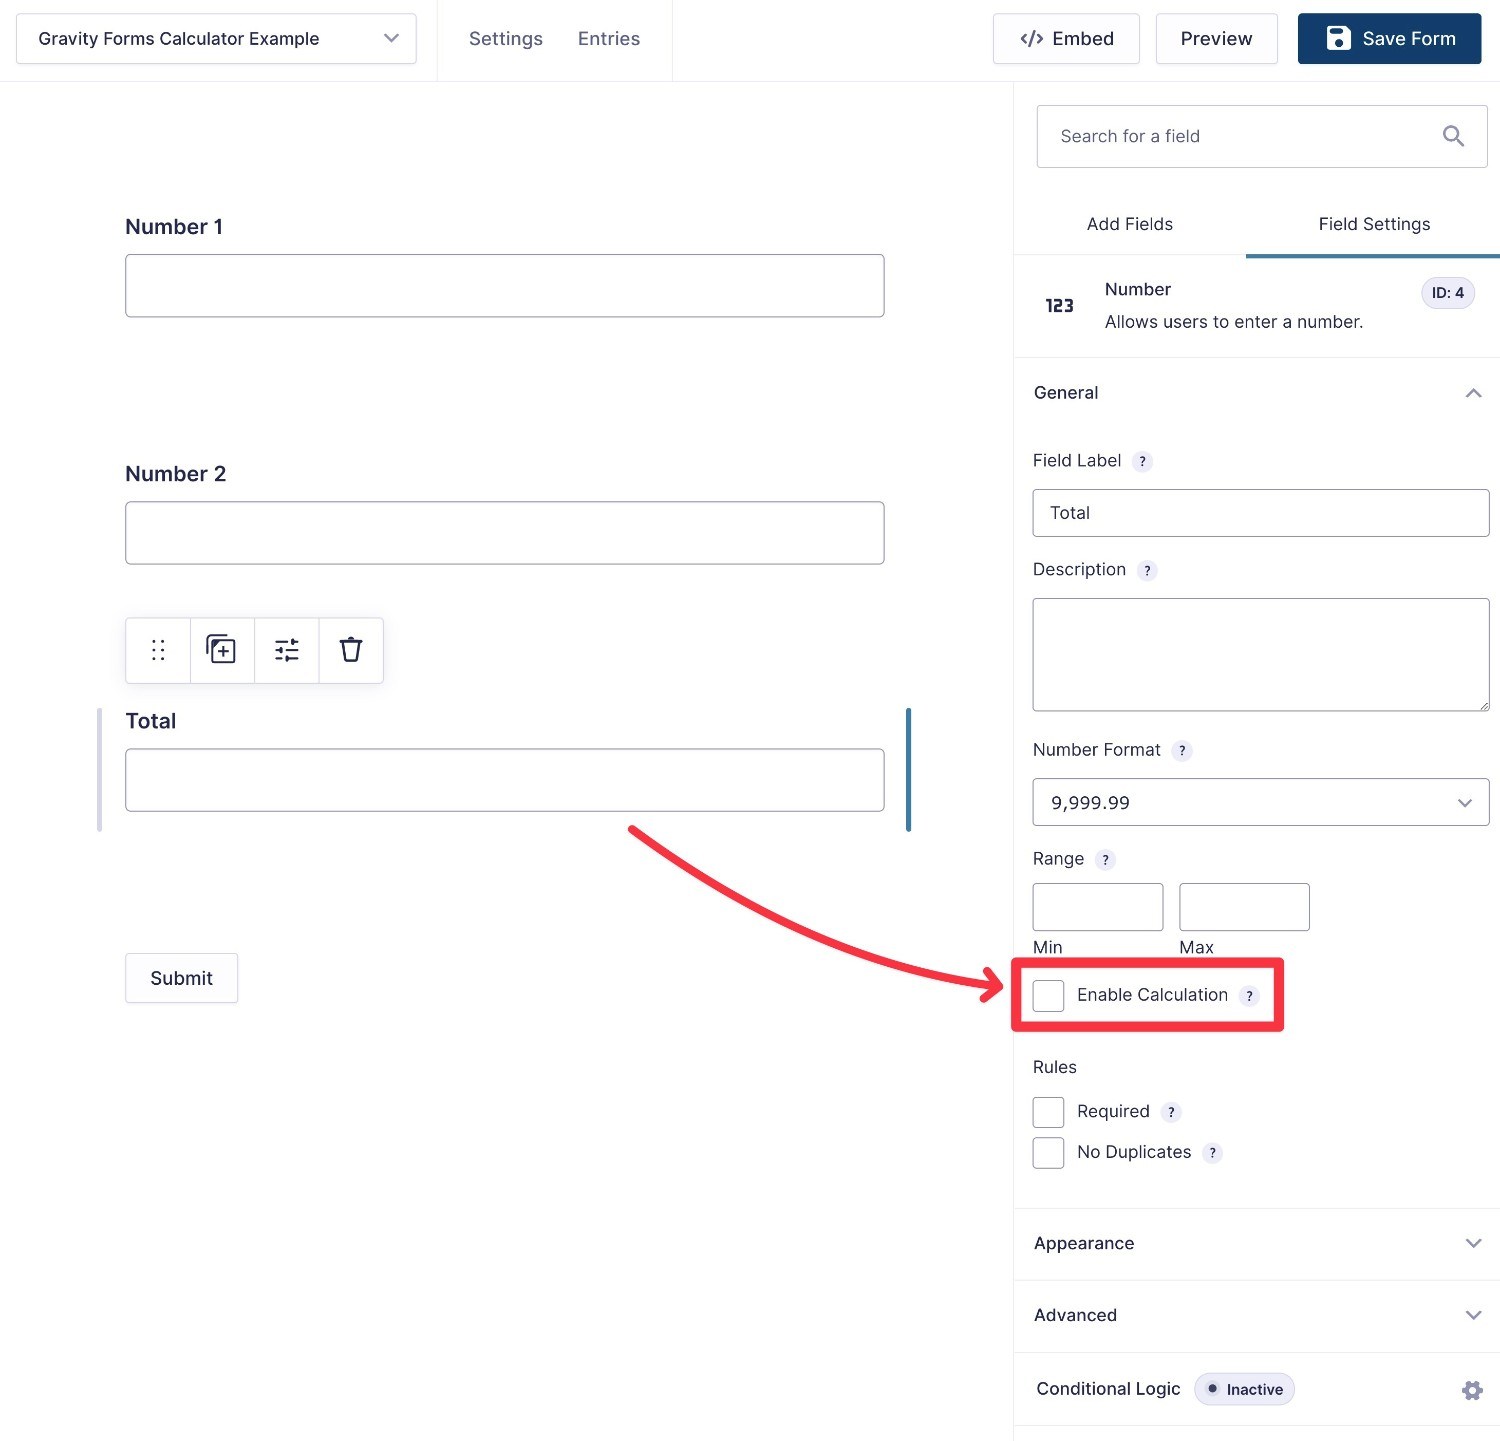
Once you’ve collected all of the data that you need for your calculator, you can set up the calculation field that will show the result.
To do this, add another Number field to your form and name it “Total” or something similar.
Note – you can also perform calculations in a Product field, which is usually what you want to do if you’re creating a payment form/selling products. We’ll cover this use case in more depth below.
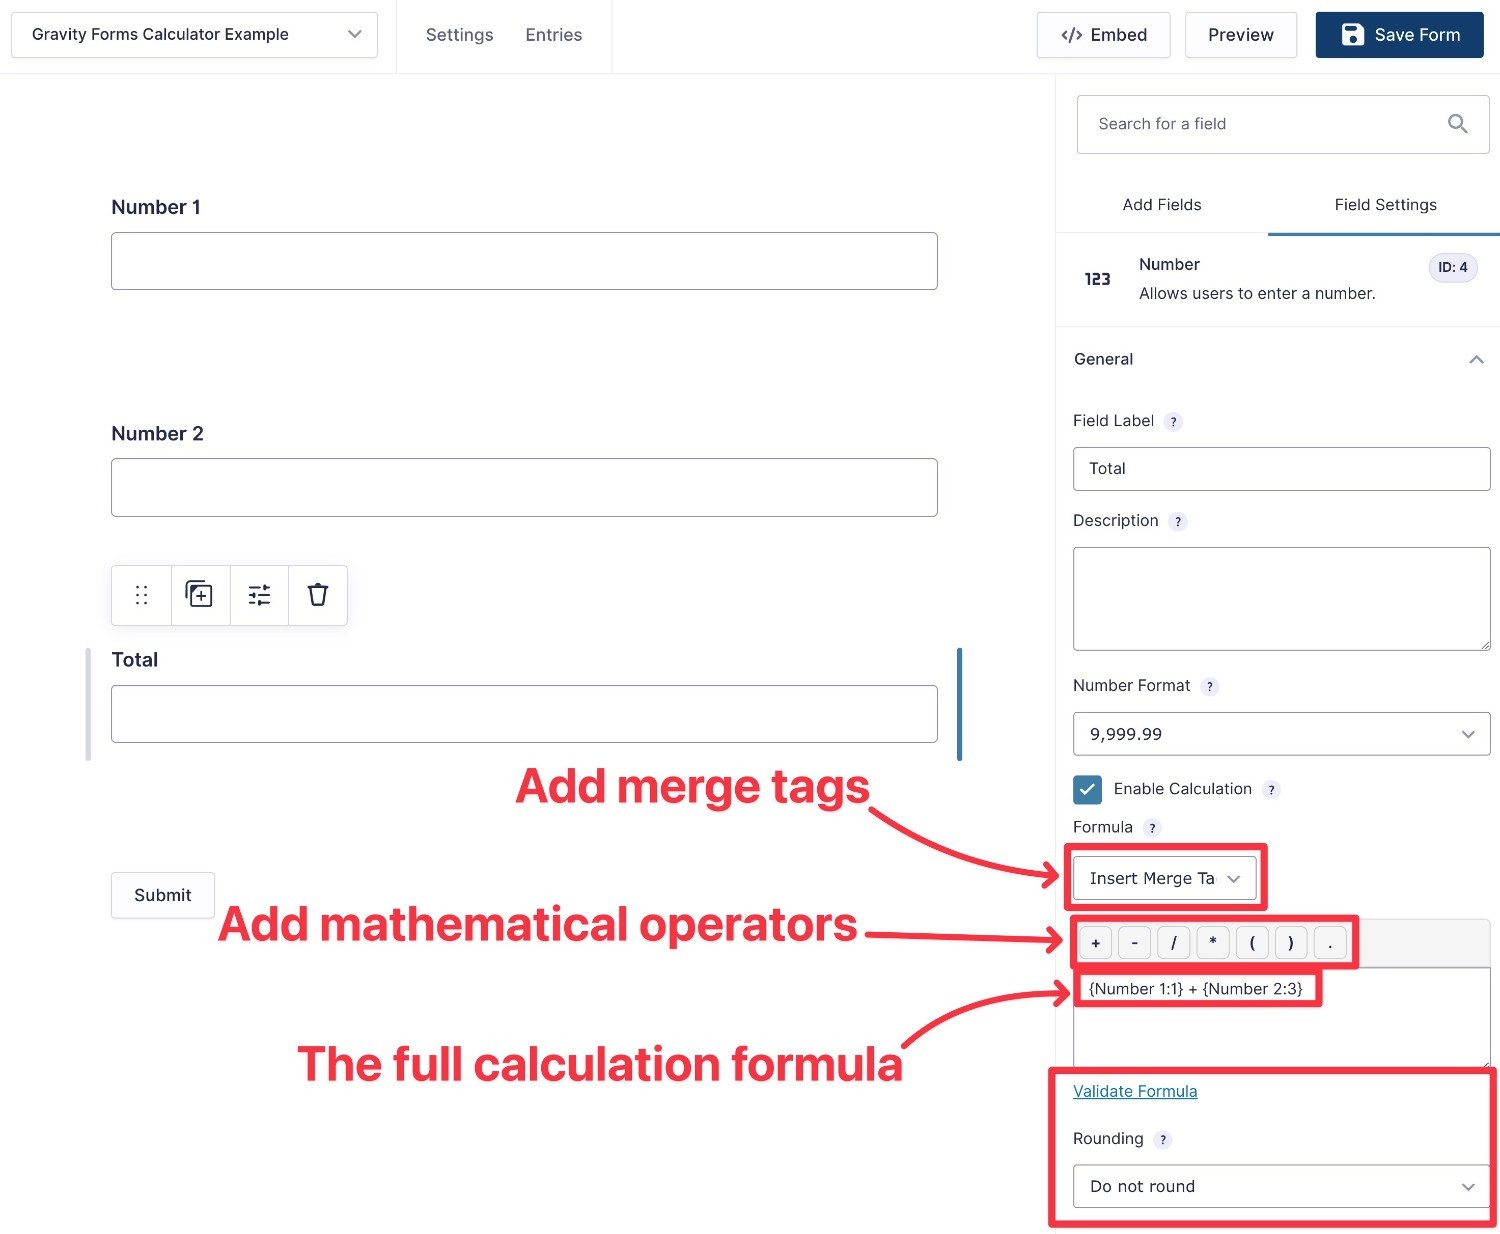
Open the field settings for your Total field and click the checkbox to Enable Calculation.
This will expand a new field where you can add your mathematical calculation formula.
There are two main parts to your formula:
- Merge tags – merge tags let you insert the user input into your formula. For example, to add the value from Number 1, you would add the merge tag for “Number 1” using the Insert Merge Tag drop-down.
- Mathematical operators – these let you control which operations to perform. You can add, subtract, multiply, and divide. You can also use parentheses – remember your order of operations (PEMDAS!).
Note – if you need more advanced mathematical operators, such as “2 to the power of 5”, you can use add-ons. More on this later.
By combining these two elements, you can create formulas that are as simple or as complex as needed.
For example, to add the two numbers together, the formula might look like this:
{Number 1:1} + {Number 2:3}
To multiply the two numbers, it might look like this:
{Number 1:1} * {Number 2:3}
To make sure that your formula works, you can click the Validate Formula button below the formula field.
You can also choose whether or not to round the answer. And if so, how many decimals to round it to.
4. Test Your Calculator Form
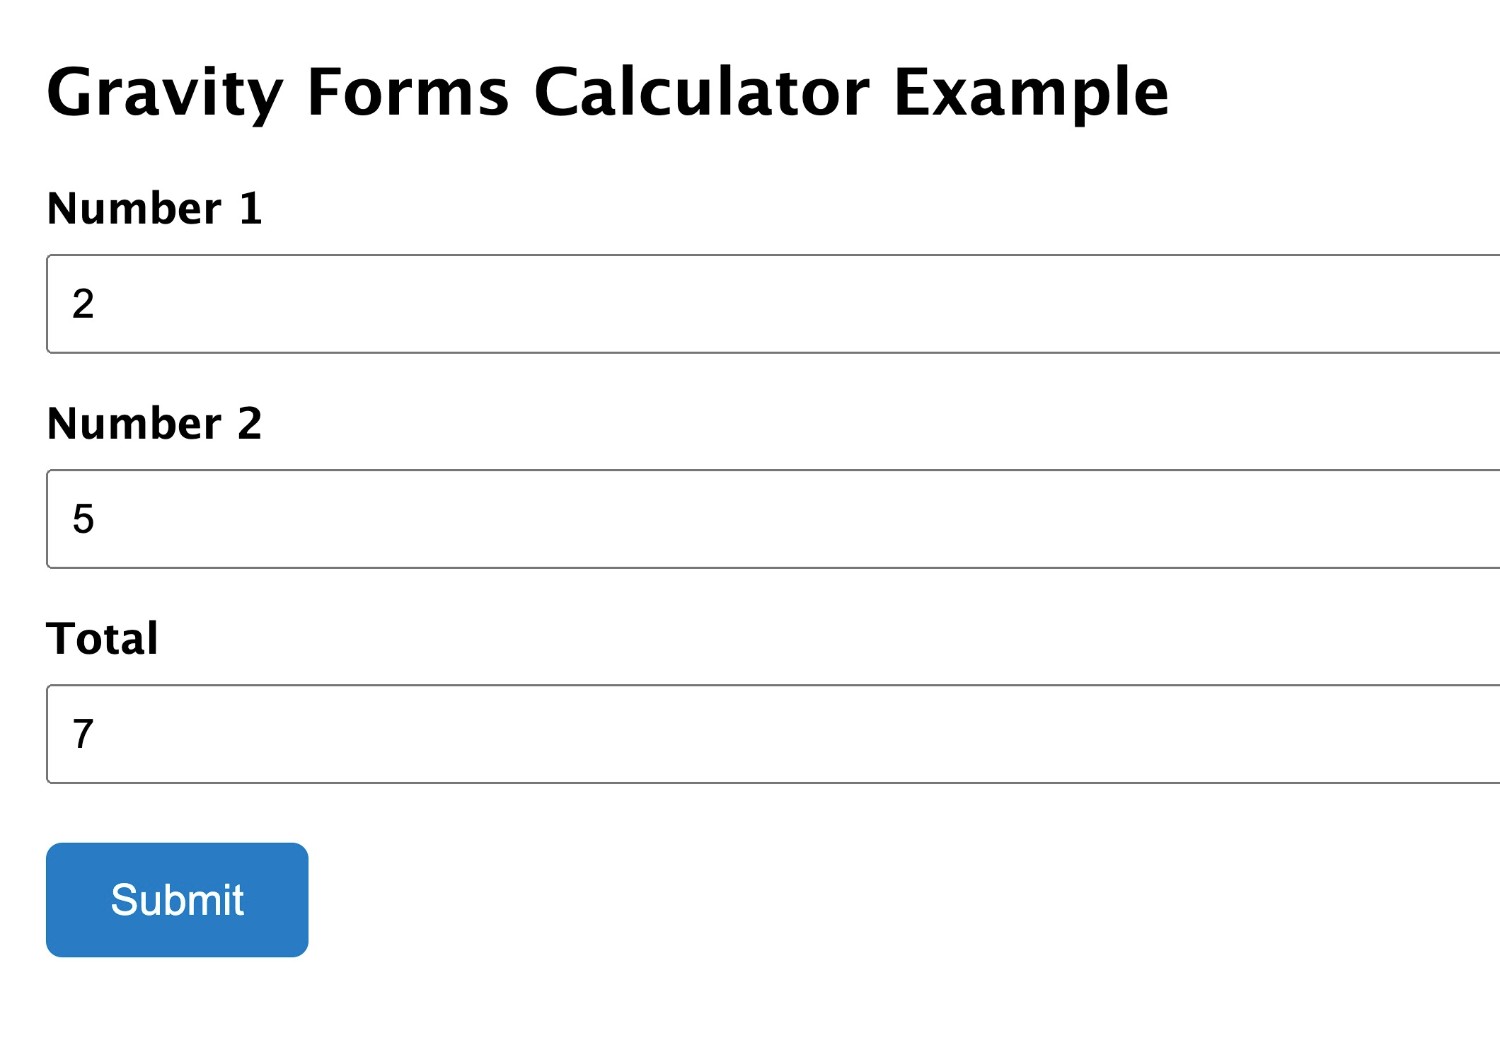
Once you’ve set up the calculation formula, you can click the Preview button to open a live preview that lets you test your calculations.
For this example, we’re just adding the fields together using this simple formula:
{Number 1:1} + {Number 2:3}
If we enter “2” in “Number 1” and “5” in “Number 2”, you can see the “Total” field shows the correct number – “7” in this case.
Now that you know how Gravity Forms calculations work at a high level, let’s dig into a few specific applications of how you can use this functionality:
- Creating an interest calculator form
- Creating a quote generator form
- Using calculations in Product fields – we’ll share one example for calculating VAT and another for creating a customizable product
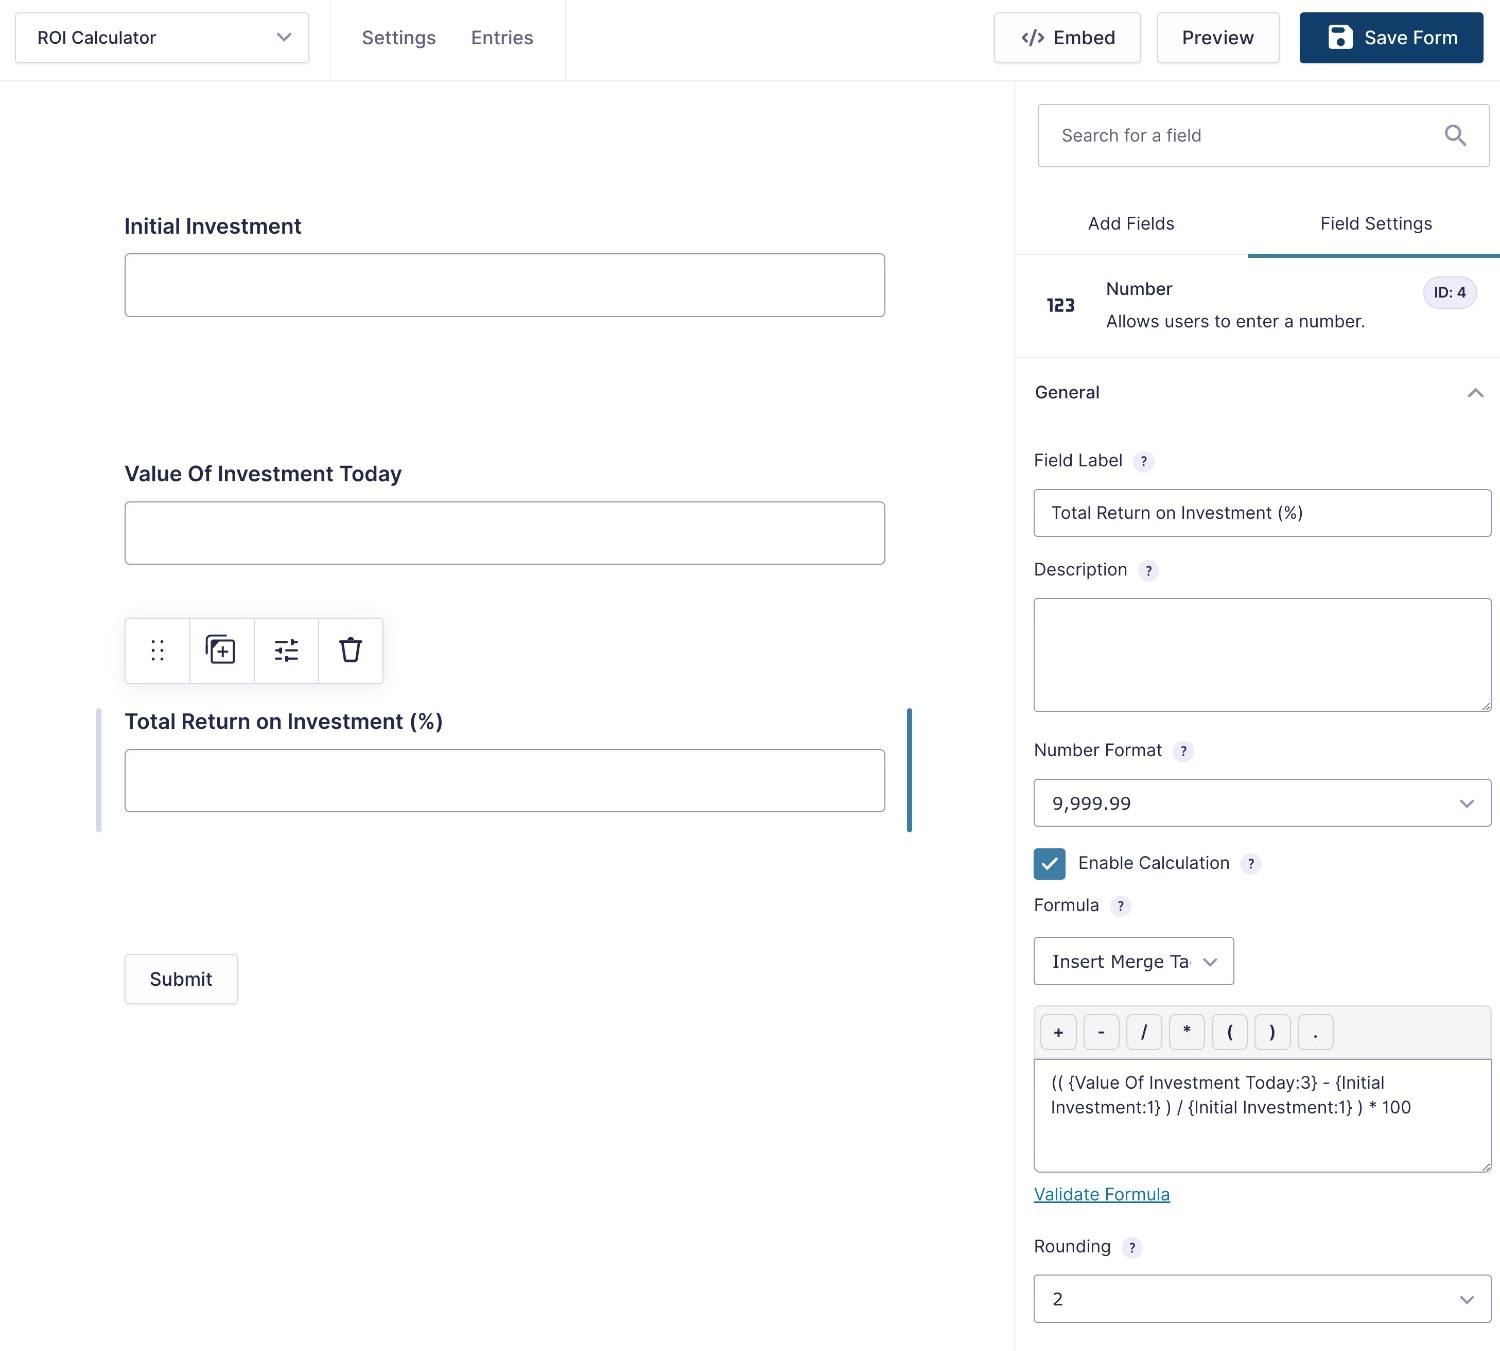
How to Create a Return on Investment Calculator Form
For this first use case specific calculation tool, let’s look at how to create a form that tells people their return on investment.
That is, it takes the initial value of a person’s investment and the final value of the person’s investment to calculate the total return, as a percentage.
To perform this calculation, you need to collect two pieces of information from the user:
- Initial investment
- Final value
Then, you can add a “Return on Investment” field that calculates the value using this formula and rounds it to two decimal places:
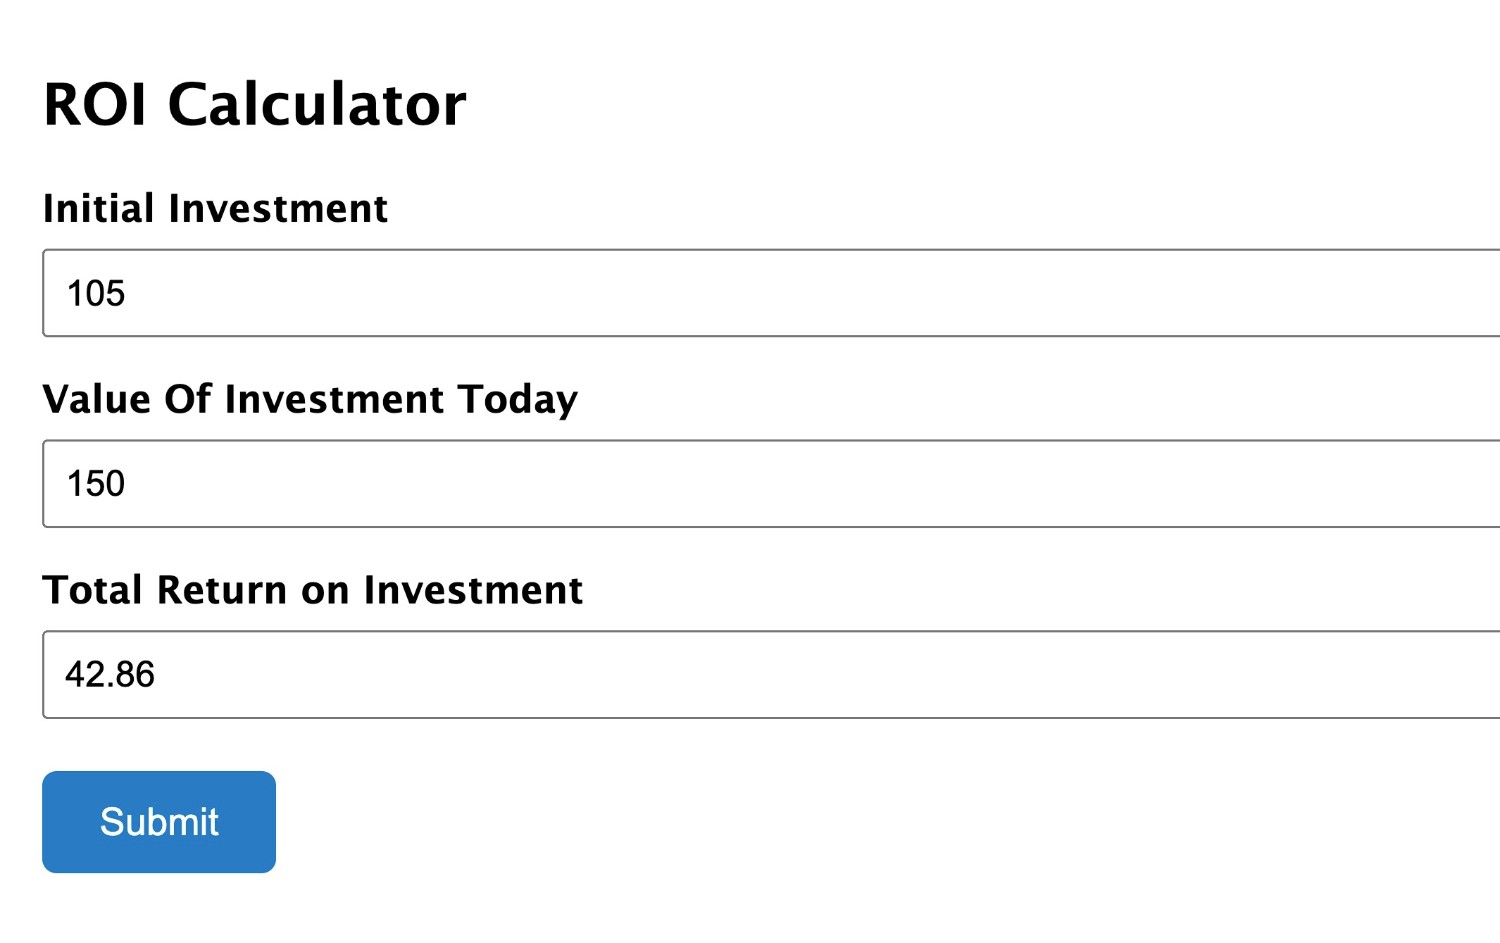
(( {Value Of Investment Today:3} - {Initial Investment:1} ) / {Initial Investment:1} ) * 100
For example, if the initial investment was 105 and the final value was 150, the form would calculate that the total return on investment was 42.86%.
If you want to calculate annualized rates of return/loan payments, you’ll need the ability to use exponents. You can add this with an add-on – more on this later.
How to Create a Quote Generator Form
For this next example, let’s say that you want to create a quote generator form.
For quote generators, you’ll likely want to add a new concept to your formula – hidden fields and/or values. Hidden fields/values let you add numbers to your calculations that aren’t visible to users.
For example, you might use a hidden field to store your hourly rate. You can then use this hourly rate as a variable in the formula that you use to generate a quote for your clients.
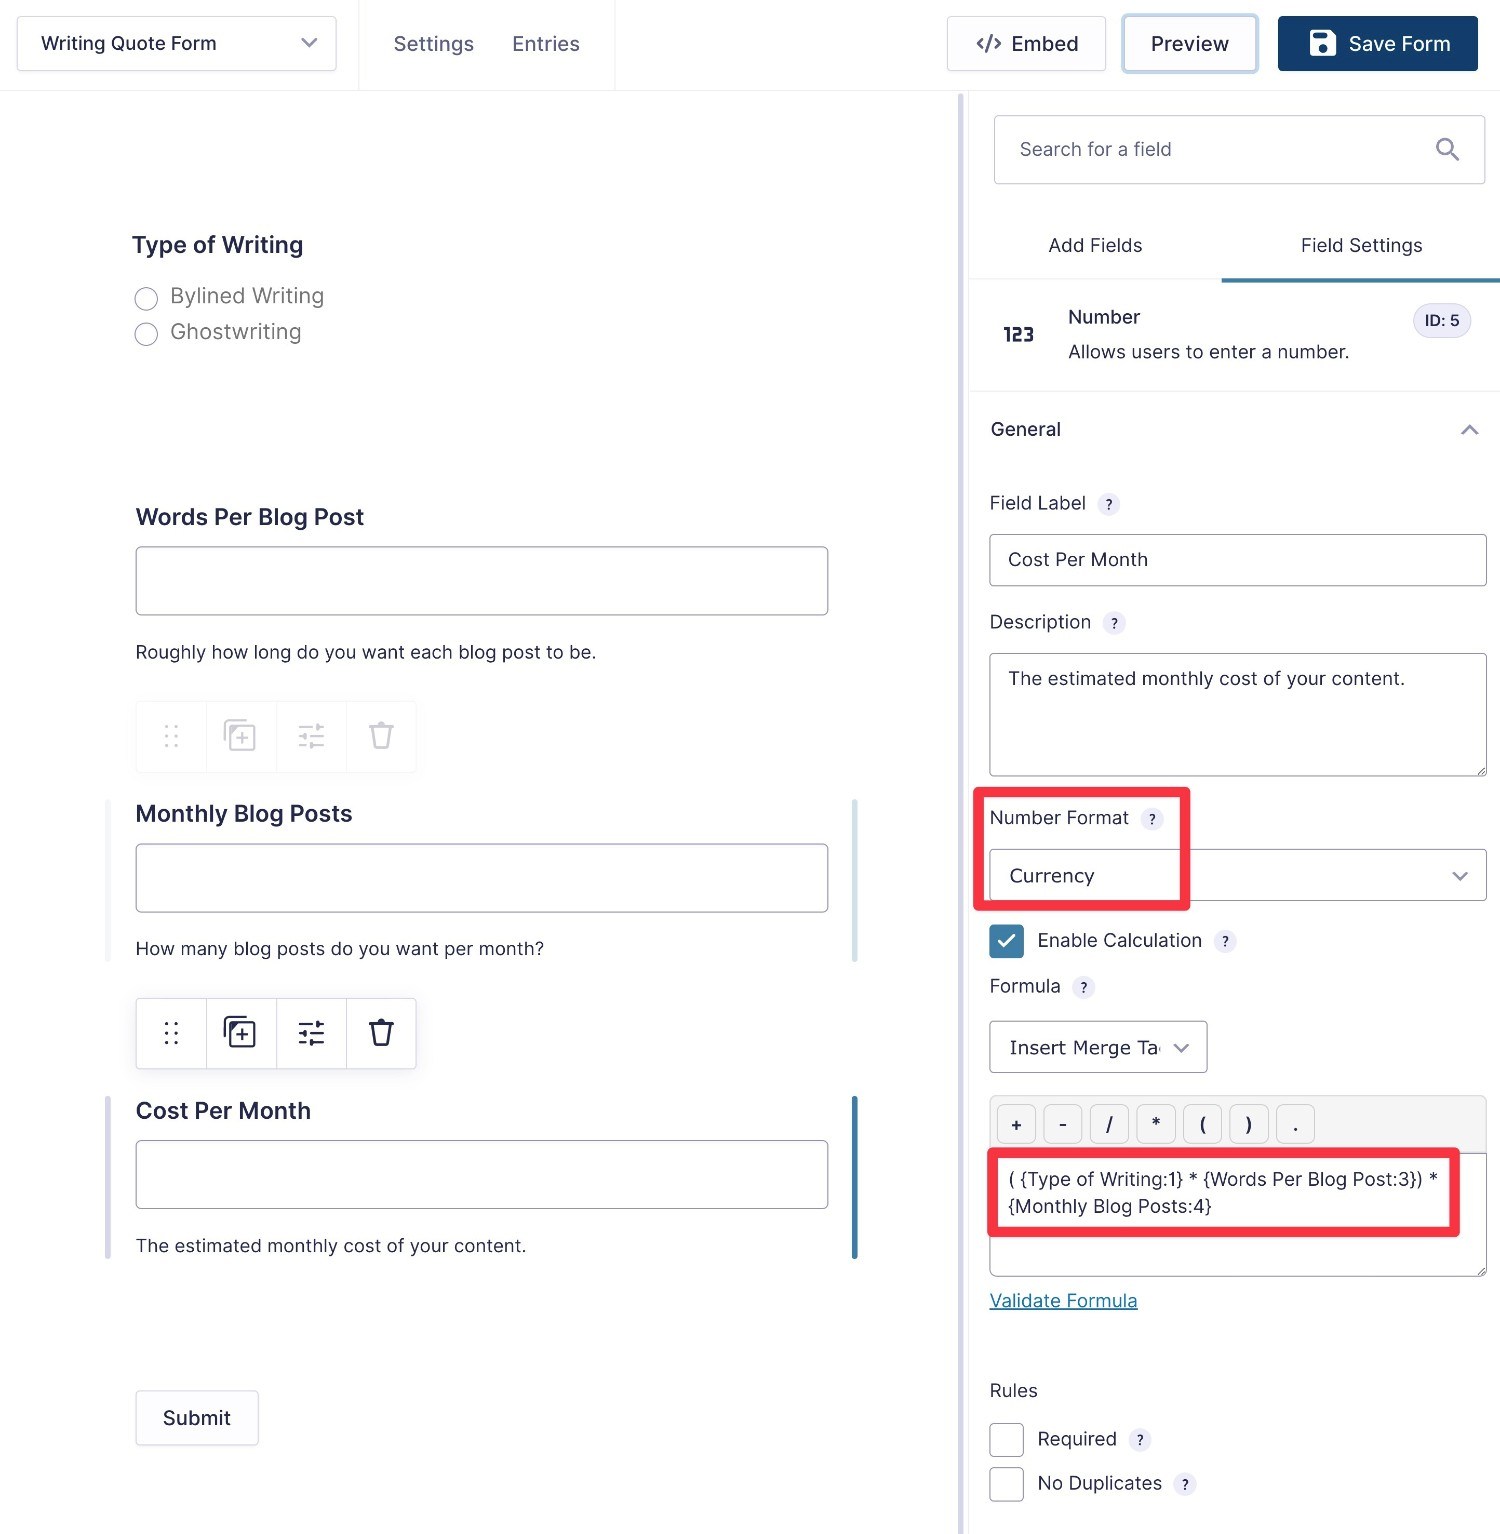
For this example, let’s say that you’re a freelance writer and you want to create a form that lets businesses estimate the monthly cost of content for their blog.
You bill per word, but you charge different rates depending on whether the content is bylined (it has your name on it) or ghostwritten (it has the client’s name on it).
To generate the quote, you need to collect three inputs from the business:
- Type of writing – you can use a Radio Buttons field to let users choose between bylined or ghostwritten content. You can then assign a hidden value to those choices to set the per-word rate for that type of content.
- Words per blog post – how many words each blog post should have.
- Number of blog posts per month – how many blog posts they plan to order each month.
To start, you would add a Radio Buttons field. When adding the choices, check the Show Values box and assign the value. For this example, it’s 18 cents per word for bylined writing (0.18) and 20 cents per word for ghostwriting (0.20).

To collect the other inputs, you could just use regular Number fields.
Then, to generate the quote estimate, you could enter the formula and set the Number Format equal to Currency:
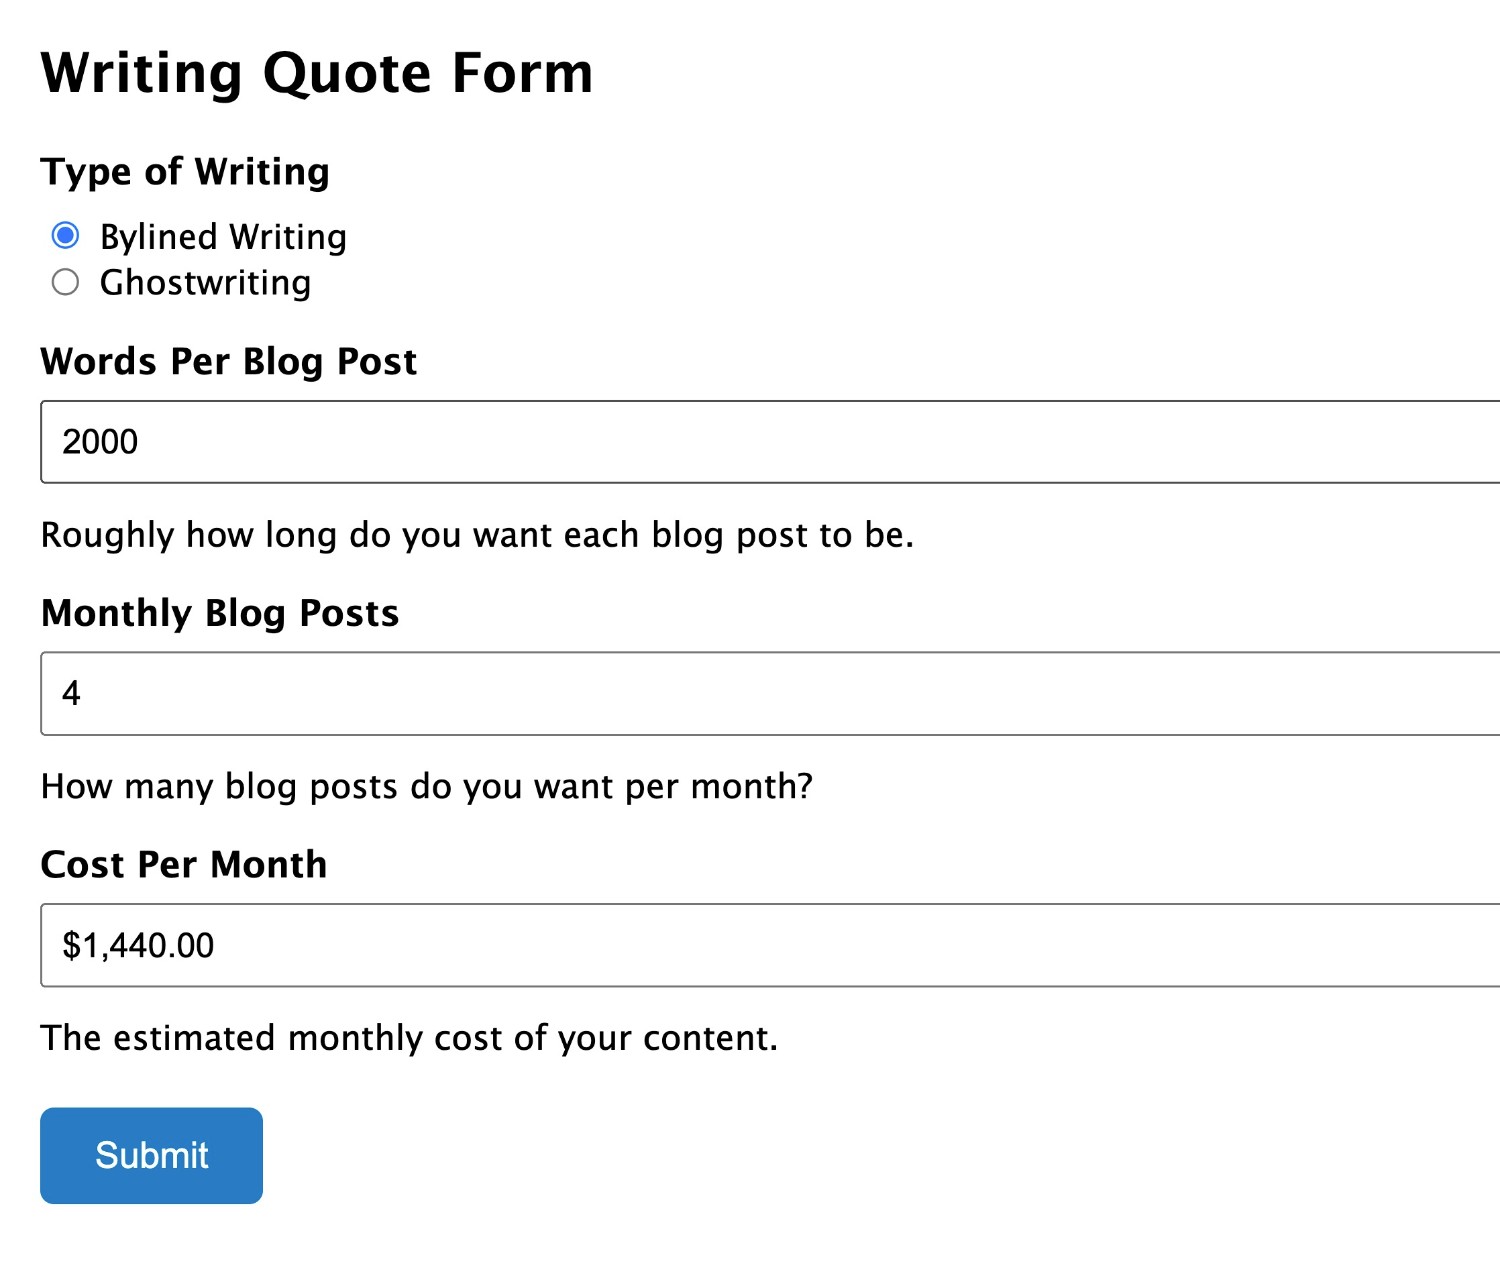
For example, four 2,000-word bylined blog posts per month would have an estimated cost of $1,440.
How to Perform Calculations in Product Fields (Taxes, Discounts, Custom Products)
In addition to using calculations in Number fields, you can also use calculations for Product fields. You can use this to charge VAT or other taxes, offer custom discounts, or generally create more configurable products.
Because there are a lot of opportunities for calculations when it comes to eCommerce forms, let’s look at two different examples here:
- Sales tax or VAT
- Configurable products
Example 1: Calculating VAT/Sales Tax
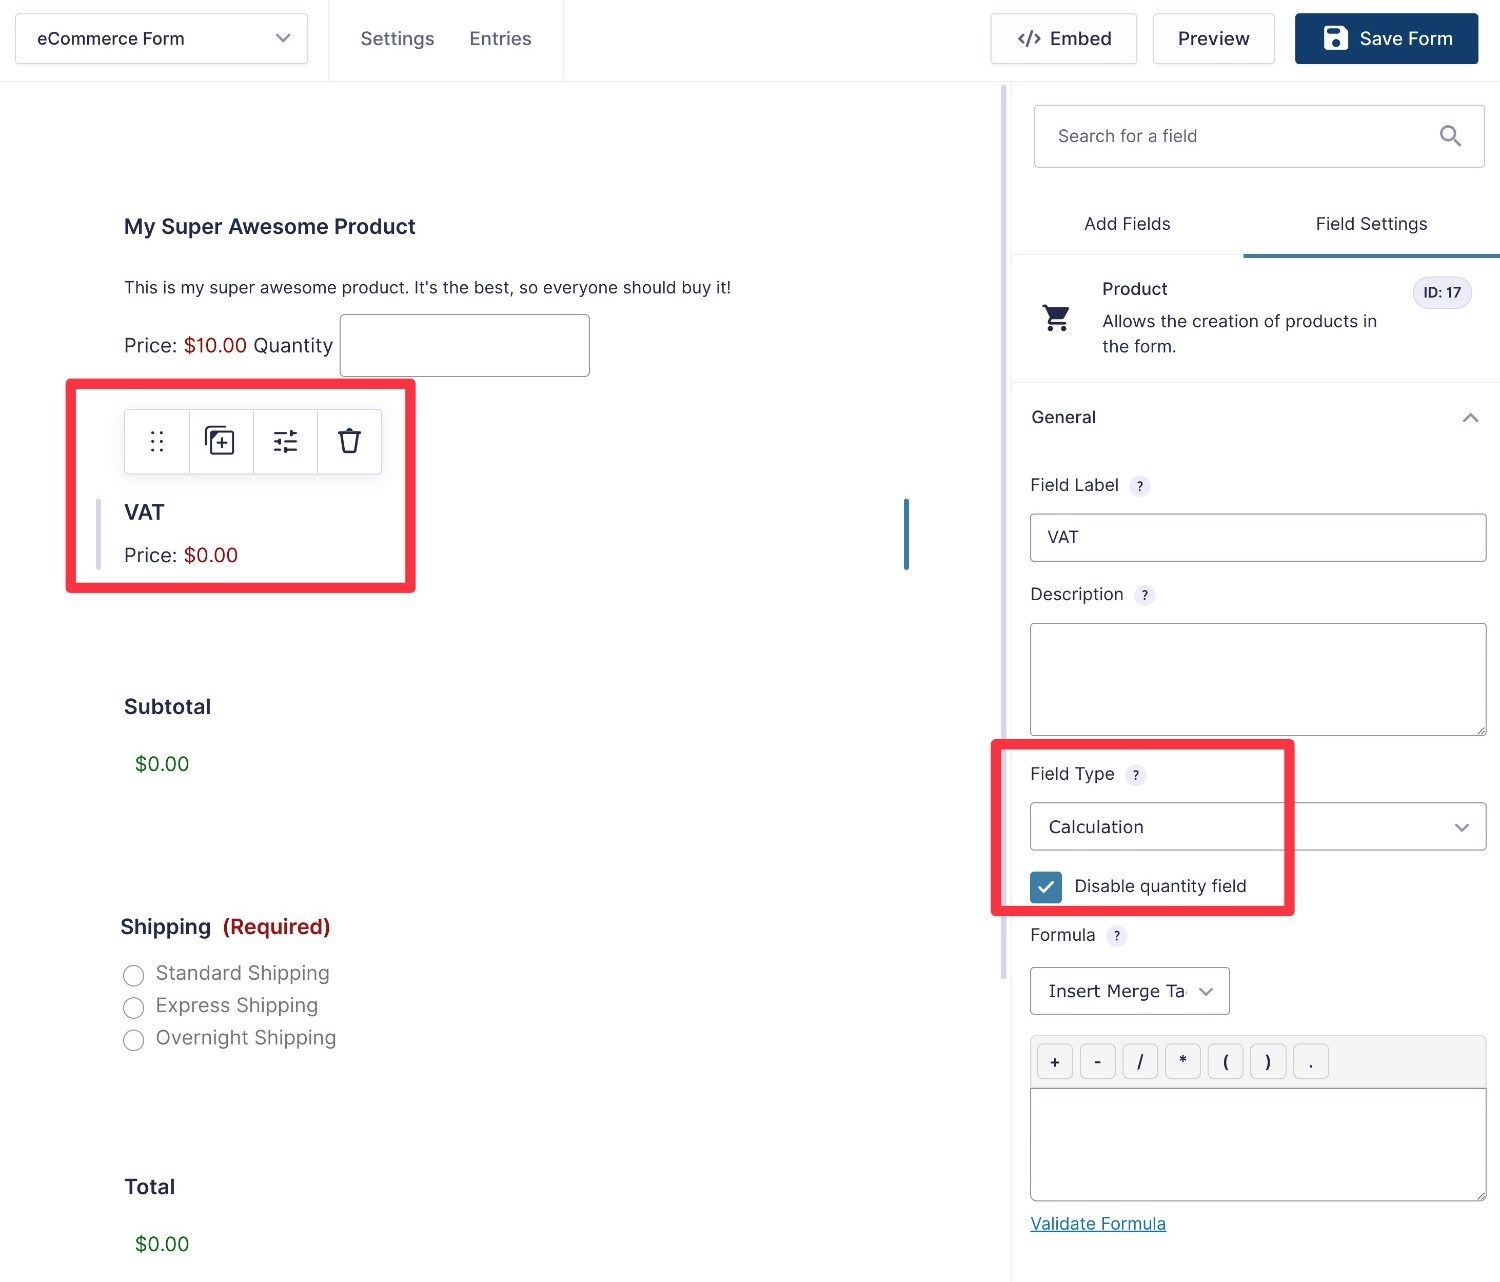
For this first example, let’s say you want to add a 10% VAT to the shopper’s order.
First, you would set up your order form as needed – we’re using the premade eCommerce form template as our base (with some of our own customizations).
To access the ability to use calculations in Product fields, you’ll first want to add a new Product field. Then, set the Product Field Type equal to Calculation in the Product field settings.
For our tax example, you would also want to disable the quantity field.
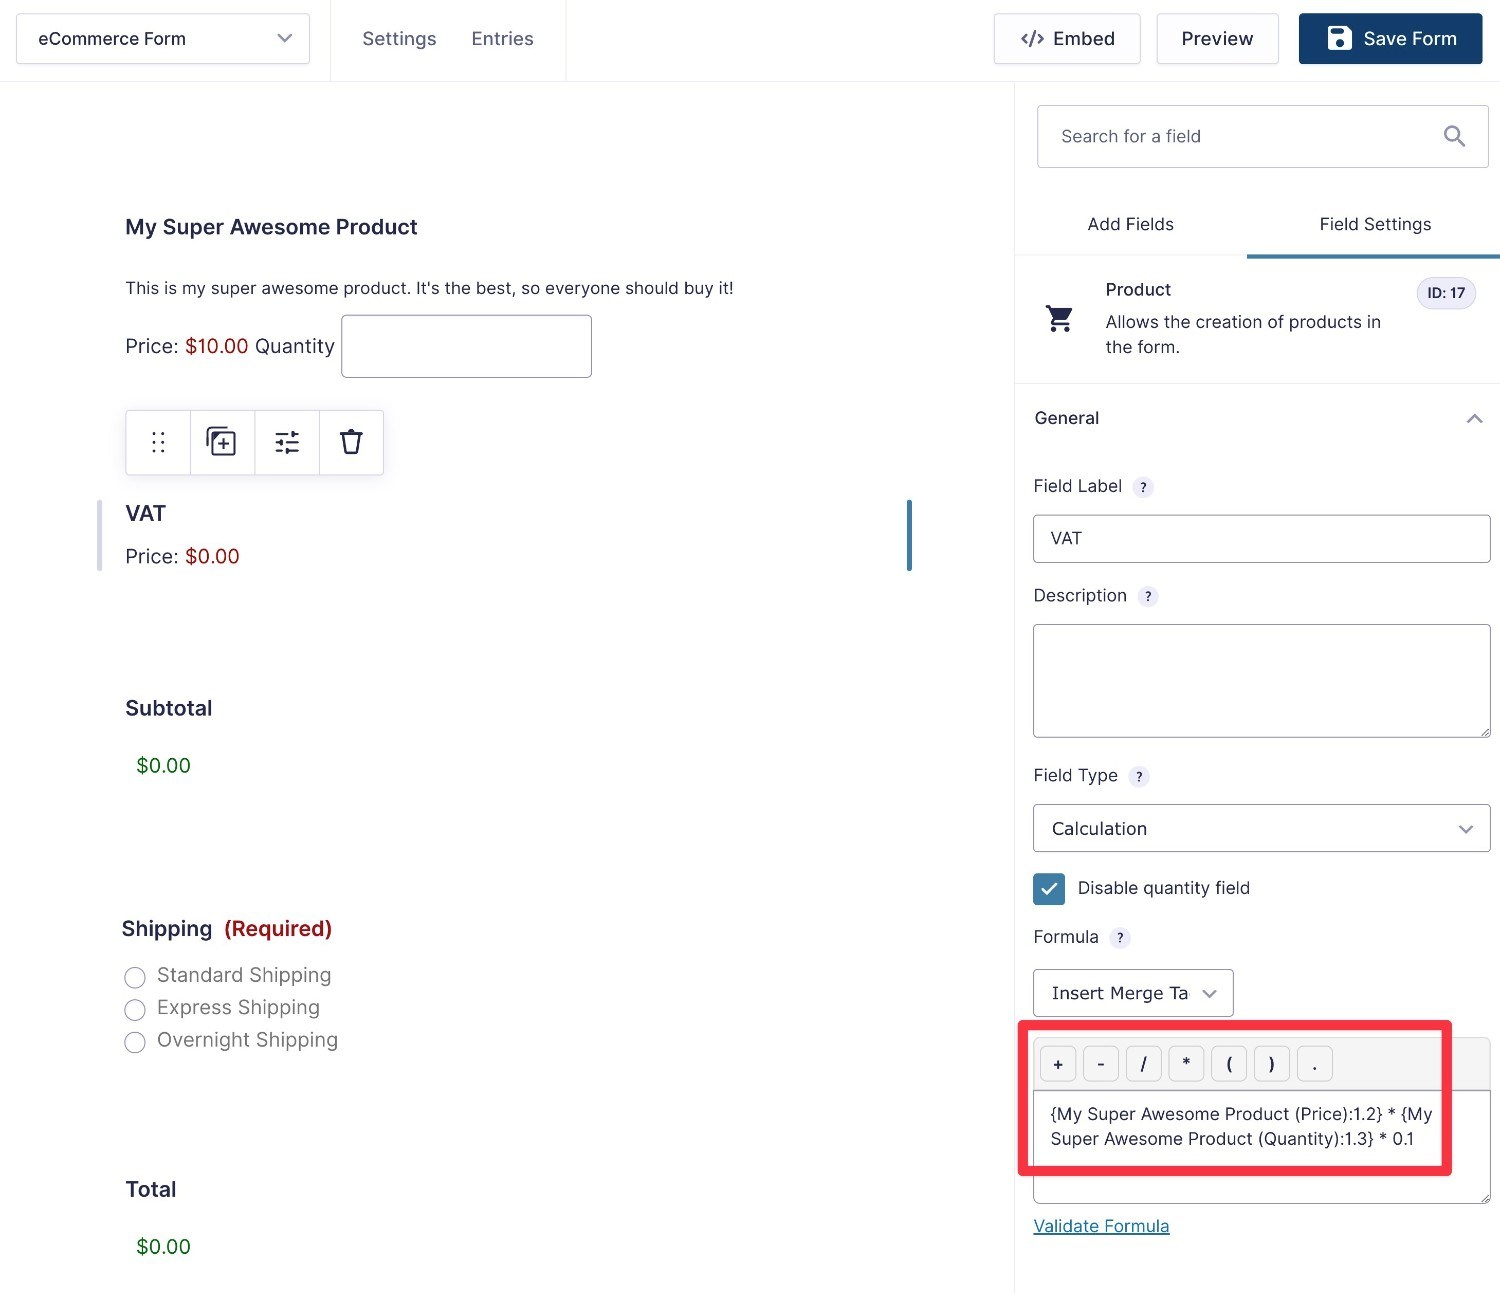
You can then enter the formula in the box.
To charge a 10% VAT, it would be something like this:
{My Super Awesome Product (Price):1.2} * {My Super Awesome Product (Quantity):1.3} * 0.1
And that’s it!
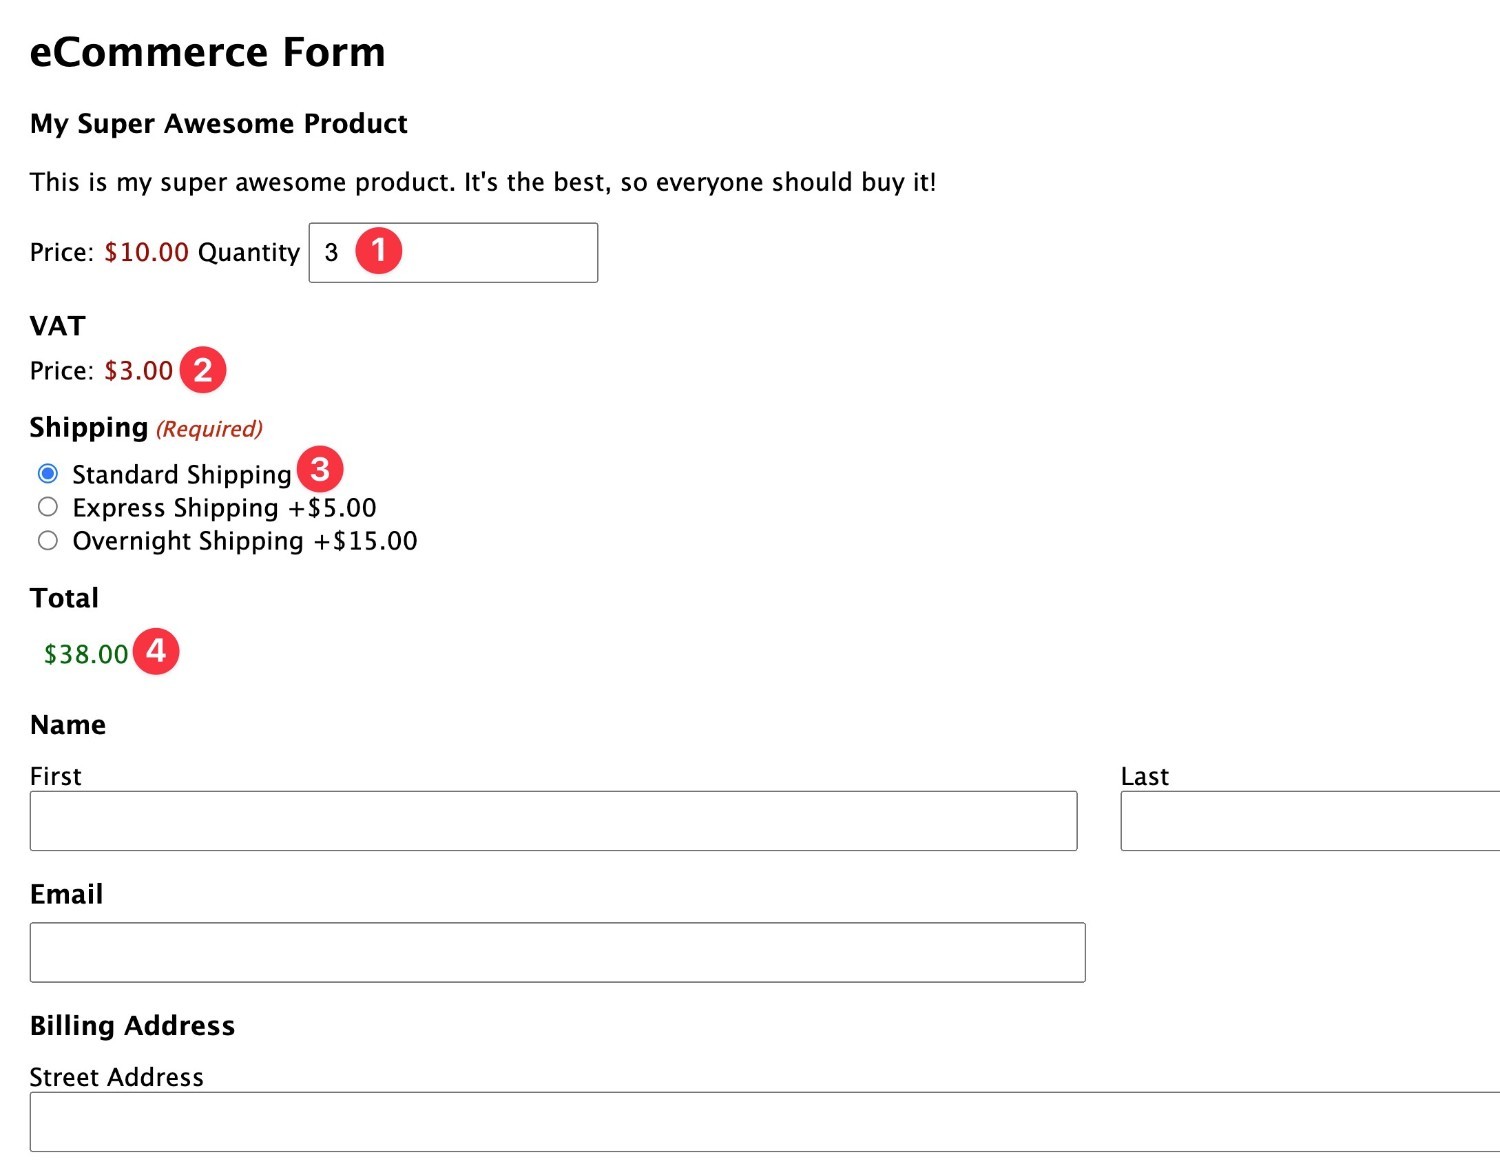
If we look at the preview, we can see the following:
- If we purchase 3 shirts at $10 each, the initial product value is $30
- The VAT field automatically calculates the right rate – $3 in this case (10% of $30).
- The user can then choose shipping (which there’s no VAT on in this example) to generate the final total.
Example 2: Changing Product Price Based on User Input
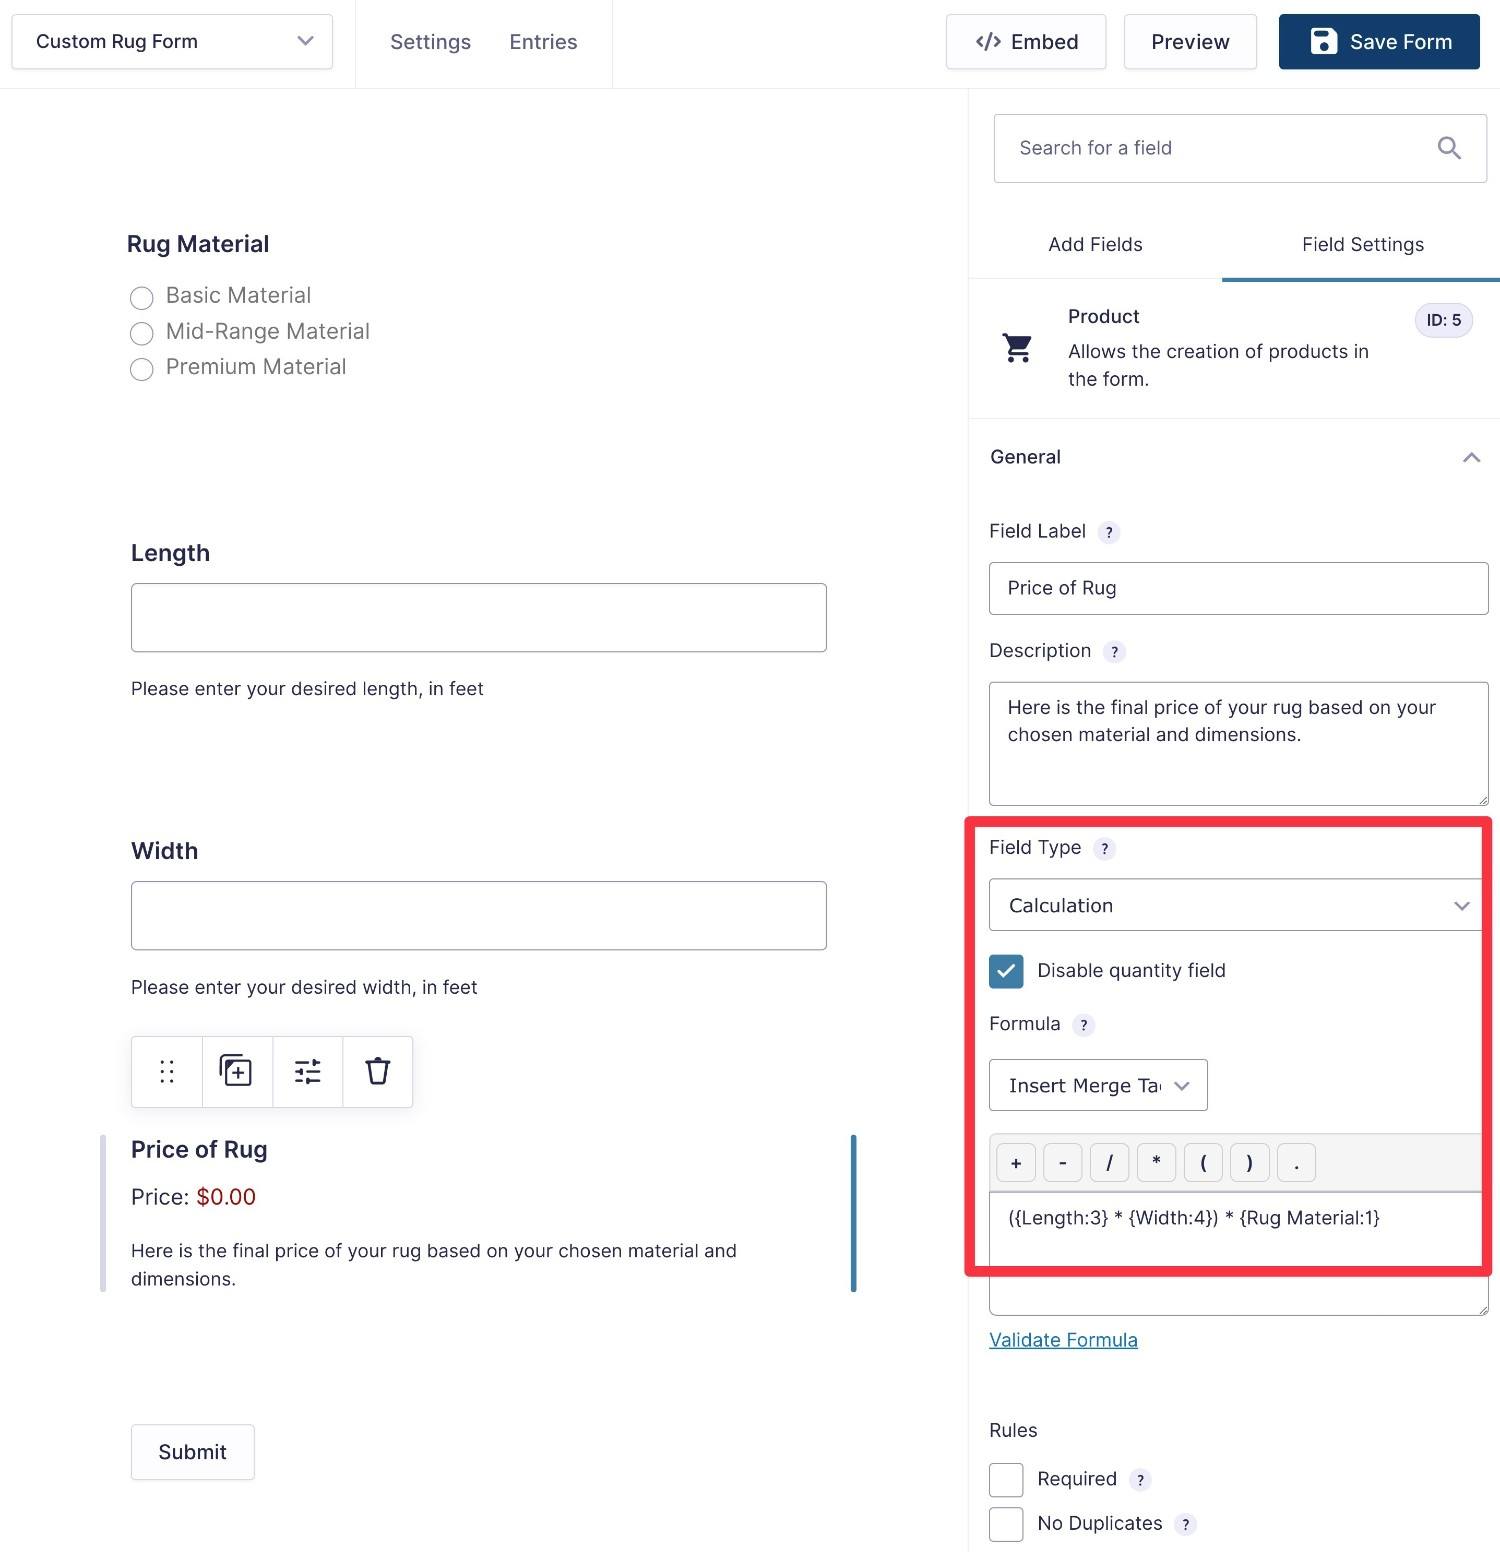
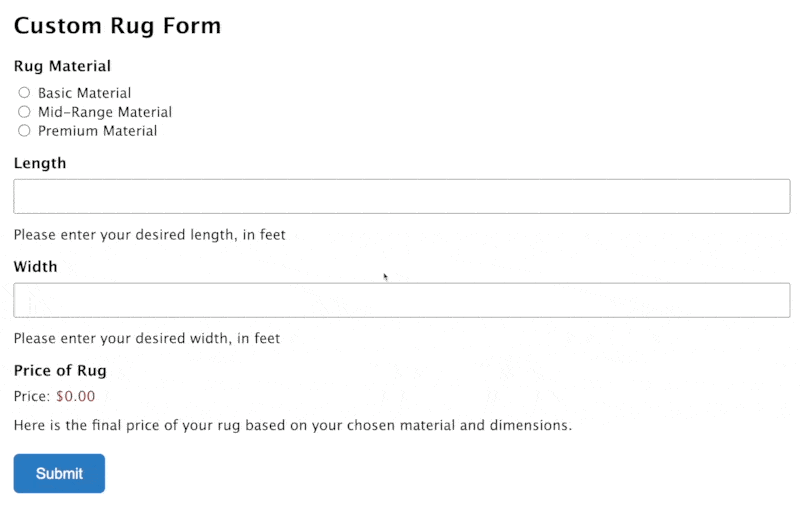
For a second example of Gravity Forms product calculations, let’s say that you sell customizable rugs.
On your payment form, shoppers can choose their preferred material and then enter the dimensions (length/width) of the rug that they want to purchase.
The form will then automatically calculate the right price and the shopper can check out and pay right away.
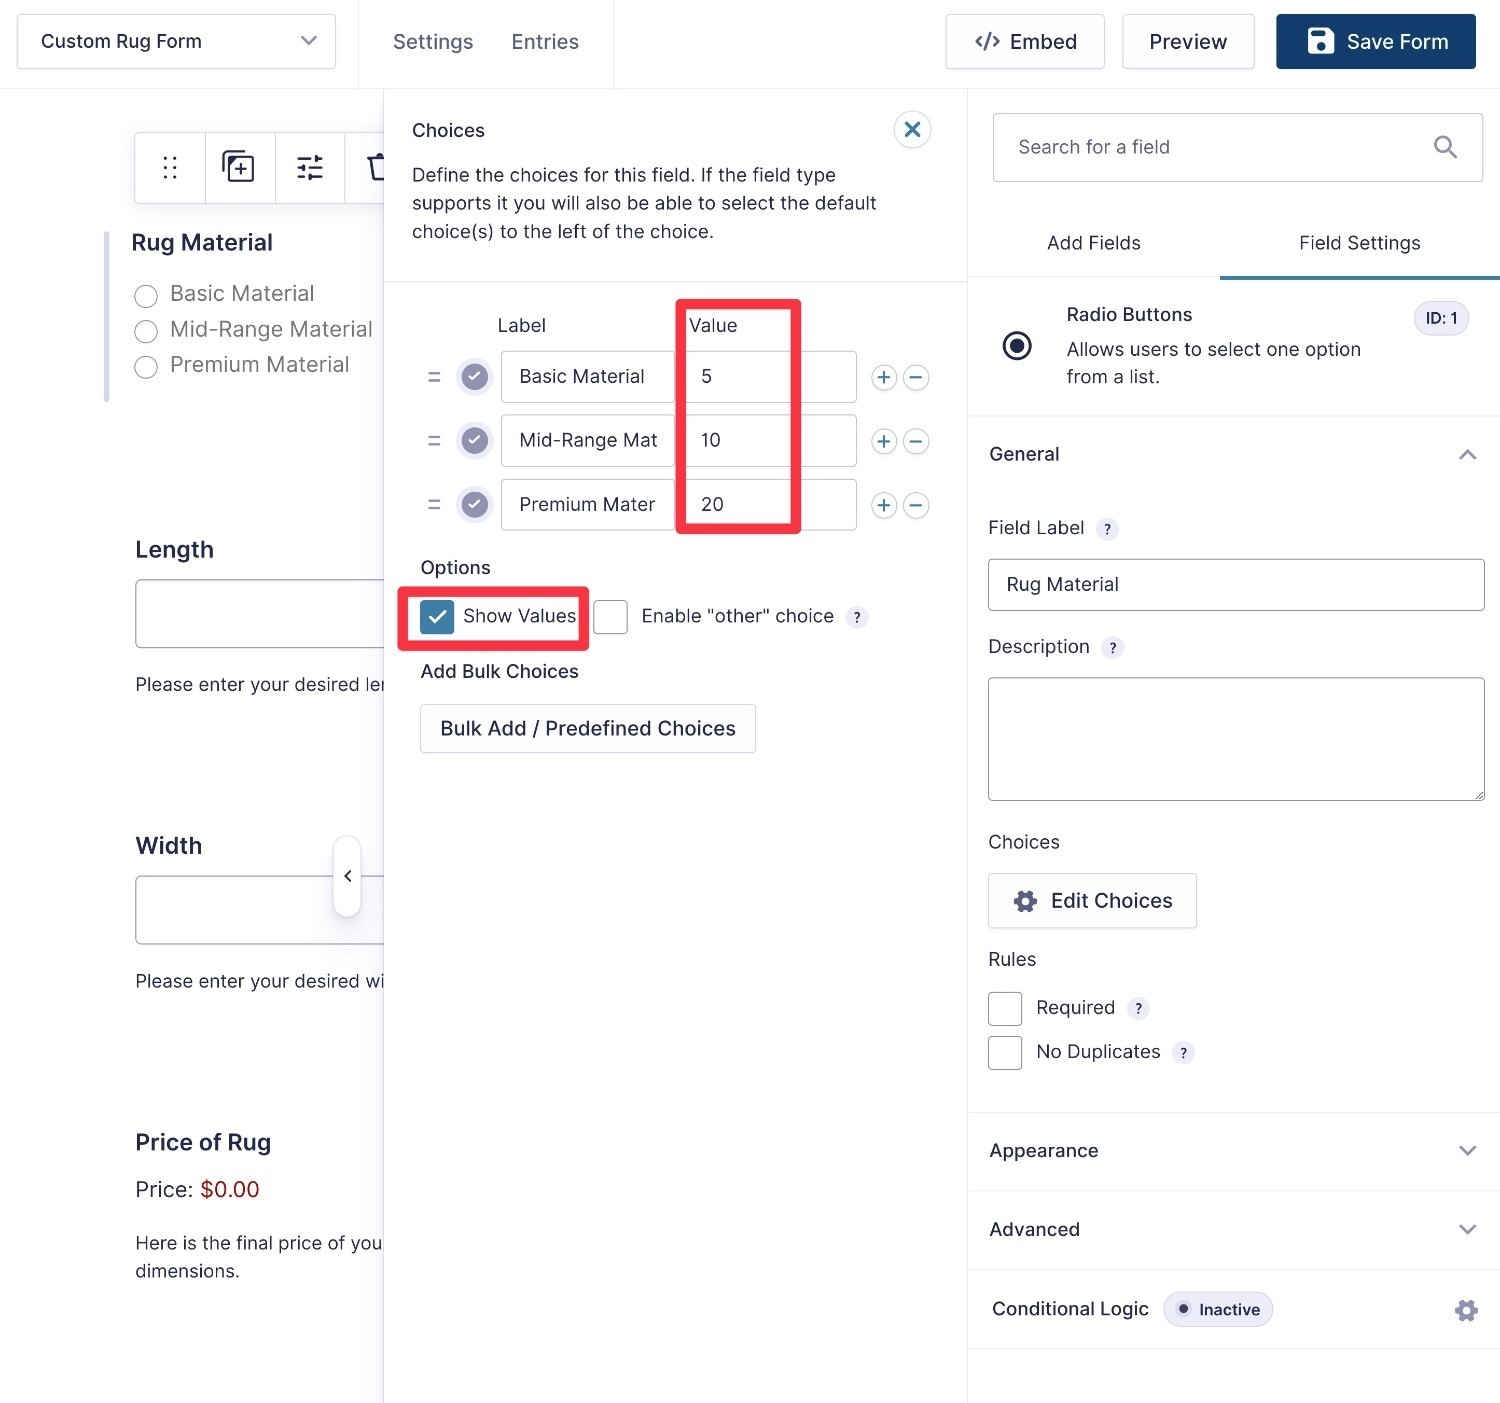
First, the shopper will choose their material from three options – we’ll make them generic to illustrate things better:
- Basic material – $5 per square foot
- Mid-range material – $10 per square foot
- Premium material – $20 per square foot
Then, they can enter the dimensions of the rug, in feet.
The form will then calculate the square footage of the customer’s rug by multiplying the length times the width. Then, it will apply the price per square foot of the customer’s chosen material to generate the final price.
First, you would set up a Radio Buttons field with the material options – make sure to check the Show Values option and set the value for each choice.
Then, you would add regular Number fields for the length and width.
To generate the price and create a purchasable product, you would finish things out as follows:
- Add a Product field.
- Set the Product Field Type equal to Calculation.
- Enter the formula in the box – here’s an example for this use case –
({Length:3} * {Width:4}) * {Rug Material:1}
To finish things out, you could add more fields for shipping, tax, or other relevant payment details.
On the preview of the form, you can see how the price of the rug automatically adjusts as the user’s choices change:
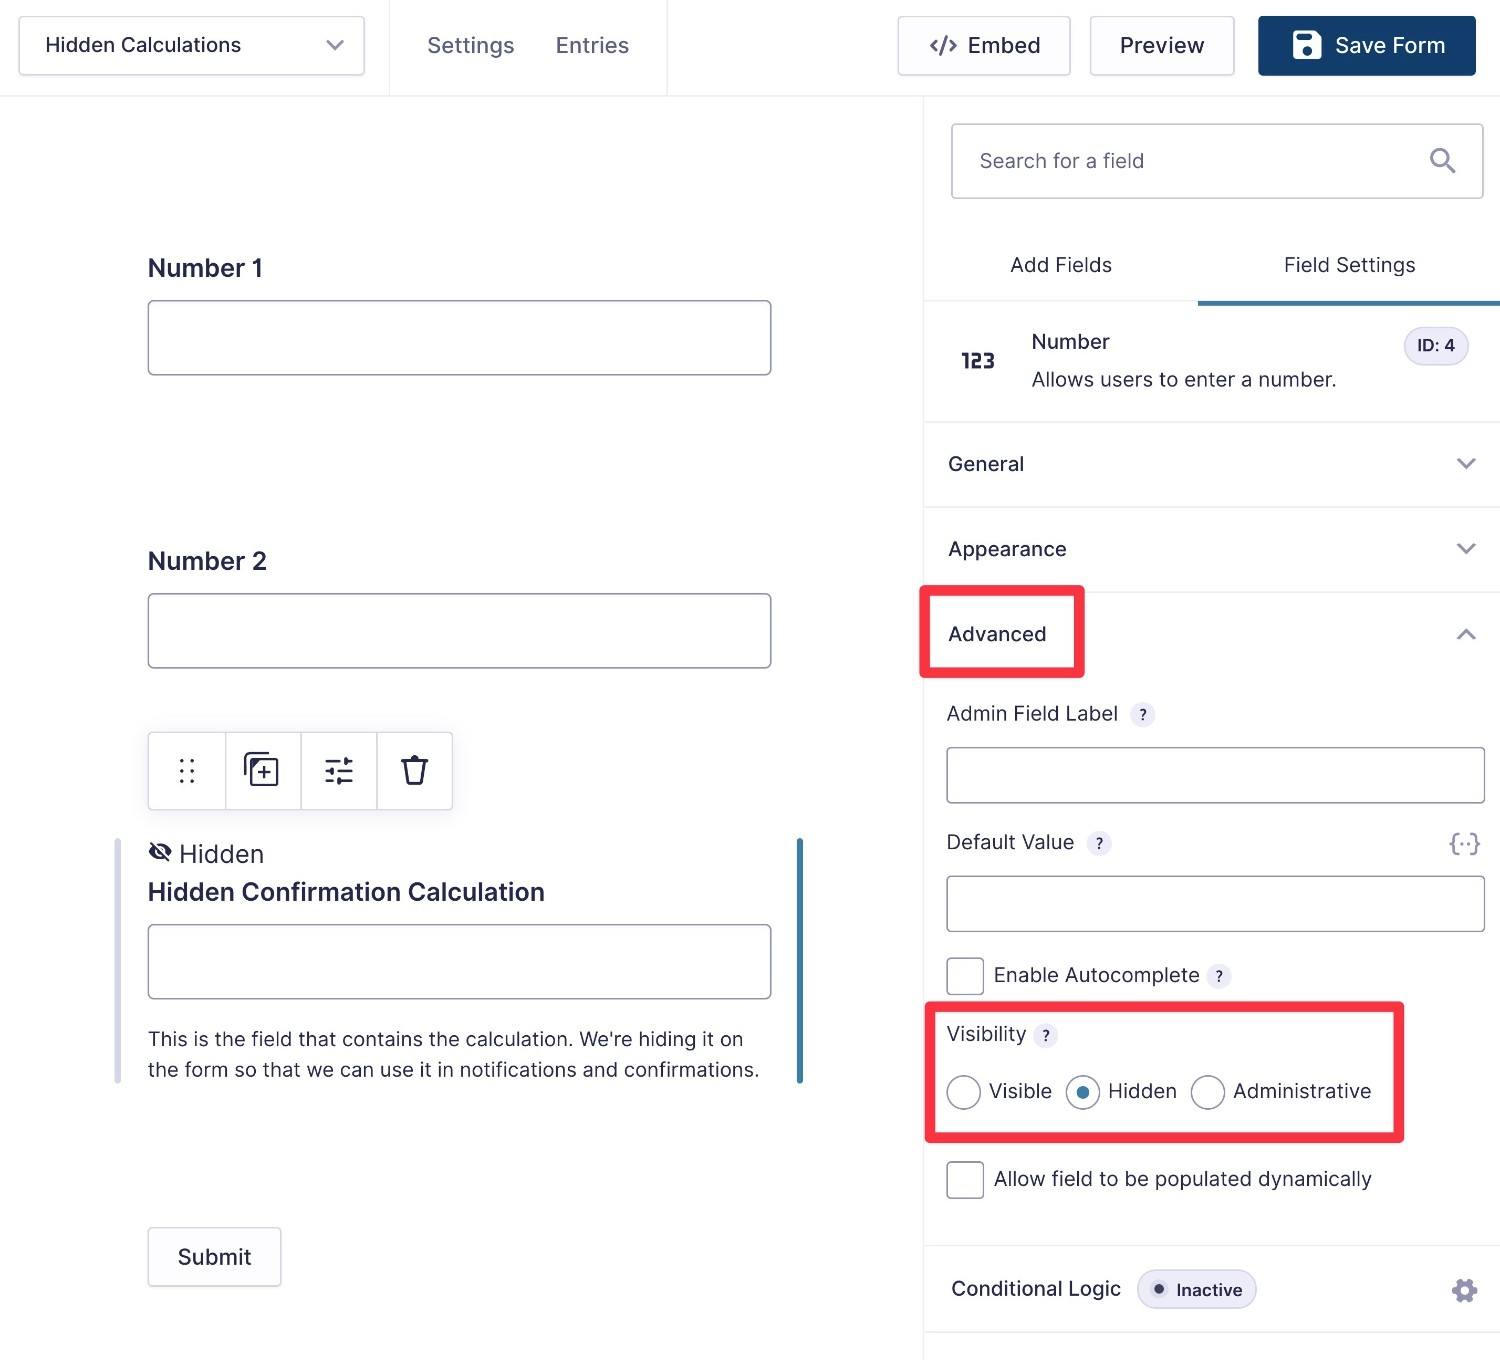
How to Show Private Calculated Values in Notifications or Confirmations
For some use cases, you might have situations where you want to include calculated values in your form notifications or confirmations but not show these values to the form submitter as part of the form.
To achieve this, you can perform calculations in a hidden field. You can then display that hidden field’s value in notifications or confirmations using merge tags.
For this use case, you can follow all of the same steps from above to create your calculation field.
The only difference is that you’ll go to the Advanced tab of the field with the calculation formula and set it equal to Hidden.
Extend Gravity Forms Calculations With Add-Ons
While the core Gravity Forms calculations functionality works great for mathematical formulas based on addition, subtraction, multiplication, and division, you might have situations where you need to create more complex formulas, such as including exponents in your formulas.
For example, let’s say you want to create a return on investment calculator that calculates the annualized rate of return over X number of years, rather than just the total return.
To do this, you need the ability to use exponents, which the core Gravity Forms calculations functionality doesn’t support.
If you want to extend the Gravity Forms calculations functionality, you can consider the following Gravity Forms Certified Add-Ons:
- GravityMath from GravityKit – this add-on gives you more flexibility for performing more advanced calculations and using more mathematical operators.
- Gravity Perks Advanced Calculations – this also adds more advanced mathematical operations. You can use it to create more advanced types of calculators including mortgages, auto loans, retirement projections, and more.
- Gravity Perks Date Time Calculator – perform calculations based on date and time fields, such as calculating the number of days between two date inputs.
- Gravity Perks eCommerce Fields – this makes it easier to work with eCommerce calculations, with dedicated fields for discounts, taxes, and more.
Create Your First Gravity Forms Calculator Form Today
The Gravity Forms calculation feature unlocks even more flexibility for creating dynamic forms.
You can use it for calculator tools, quote generators, eCommerce products/payments, and lots, lots more.
Best of all, the calculations functionality is a core Gravity Forms feature, so it’s available on all license plans.
If you’re already a Gravity Forms user, you can start adding calculations to your forms right away.
If you’re not a Gravity Forms user yet, purchase your license today to get started.
Or, you can spin up a 100% free, fully functioning demo site to play around with the Gravity Forms calculation functionality (along with all of the other Gravity Forms features and add-ons).

If you want to keep up-to-date with what’s happening on the blog sign up for the Gravity Forms newsletter!
"*" indicates required fields