Searching for how to accept ACH payments online?
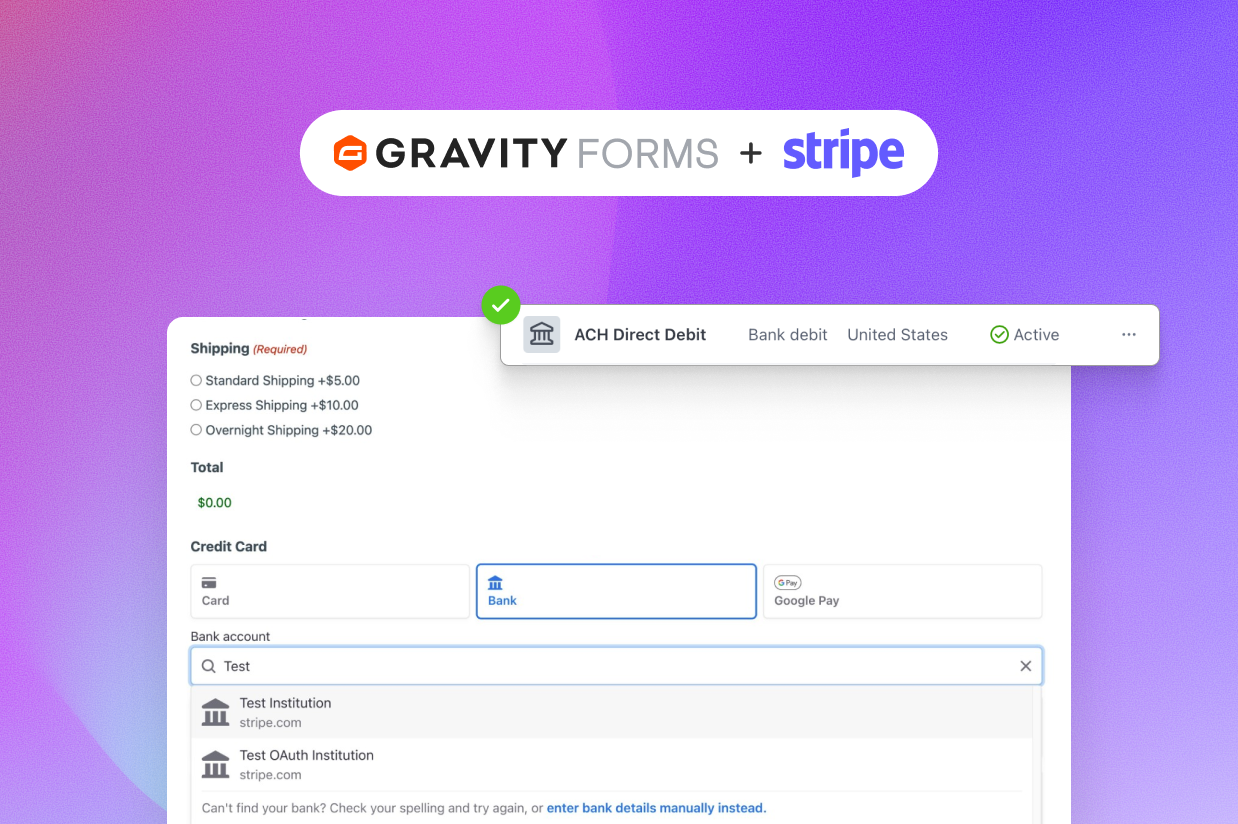
With Gravity Forms and its support for Stripe ACH debit payments, you can easily start accepting ACH payments via your WordPress site.
You can create a flexible payment form using Gravity Forms. Then, you can use Stripe’s ACH debit payment processing functionality to seamlessly process the ACH payments when people submit your form. Customers can search for their bank account to connect to it or manually enter their account/routing numbers.
In this post, we’ll share a step-by-step guide to help you start accepting your first online ACH debit payments using WordPress, Gravity Forms, and Stripe.
You do not need any special technical knowledge to set this up – just follow along with the tutorial and you’ll be up and running in no time.
What Do You Need to Accept ACH Payments Online?
While there are different ways to accept online ACH payments, we’re going to focus on a stack of three tools:
You’ll use WordPress as the foundation of the website where people will make their ACH payments.
From there, you can install the Gravity Forms WordPress plugin to create the payment form that you’ll use to process ACH payments.
Here’s an example of what it might look like:
To actually handle the ACH payment part, you’ll use Stripe, a popular payment processor. Stripe integrates seamlessly with Gravity Forms to make it easy for people to go from filling out the form to finalizing their ACH payment details.
Here are some reasons why we think that WordPress, Gravity Forms, and Stripe make a great option for online ACH payments…
- Flexibility – you can configure your payment form exactly how you need it to be. In addition to customizing the payment functionality, you can also add form fields to collect additional information from your customers as needed.
- Integrations – you can easily integrate your ACH payment form with other services that you’re using, such as automatically adding customers to your customer relationship manager (CRM).
- Cost-effectiveness – adding ACH payments to your WordPress site will cost you just a flat $13.25 per month. Stripe only charges a maximum of $5 per transaction (0.8% capped at $5), which is much cheaper than processing credit card payments.
- Self-ownership – your ACH payment form lives on your own website/server, which gives you full ownership. At the same time, Stripe handles processing the bank details for you, which means you don’t need to worry about processing/storing users’ bank details yourself.
How to Accept ACH Payments Online With Gravity Forms and Stripe ACH Payments
Now, let’s get into the actual step-by-step guide for how to accept ACH debit payments online using WordPress, Gravity Forms, and Stripe.
1. Create Your WordPress Site (If You Haven’t Already Done So)
If you already have a WordPress site, you can jump ahead to the next step.
However, if you don’t have a WordPress site yet, you’ll need to set up your basic WordPress site before you can install Gravity Forms and start processing online ACH payments.
You can purchase your own WordPress hosting and set up WordPress there. Or, if you want an even simpler solution, you can use the WordPress.com Creator plan (formerly known as the Business plan).
Just make sure to choose the Creator plan or higher. Otherwise, you won’t be able to install Gravity Forms or process ACH payments.
2. Install Gravity Forms and the Stripe Add-On
Once you have your WordPress site, the next step is to install the core Gravity Forms plugin, along with the official Gravity Forms Stripe Add-On.
To access the Stripe Add-On, you’ll need at least the Gravity Forms Pro license. You can purchase a new Pro license here or upgrade your existing Gravity Forms Basic license and only pay the prorated difference.
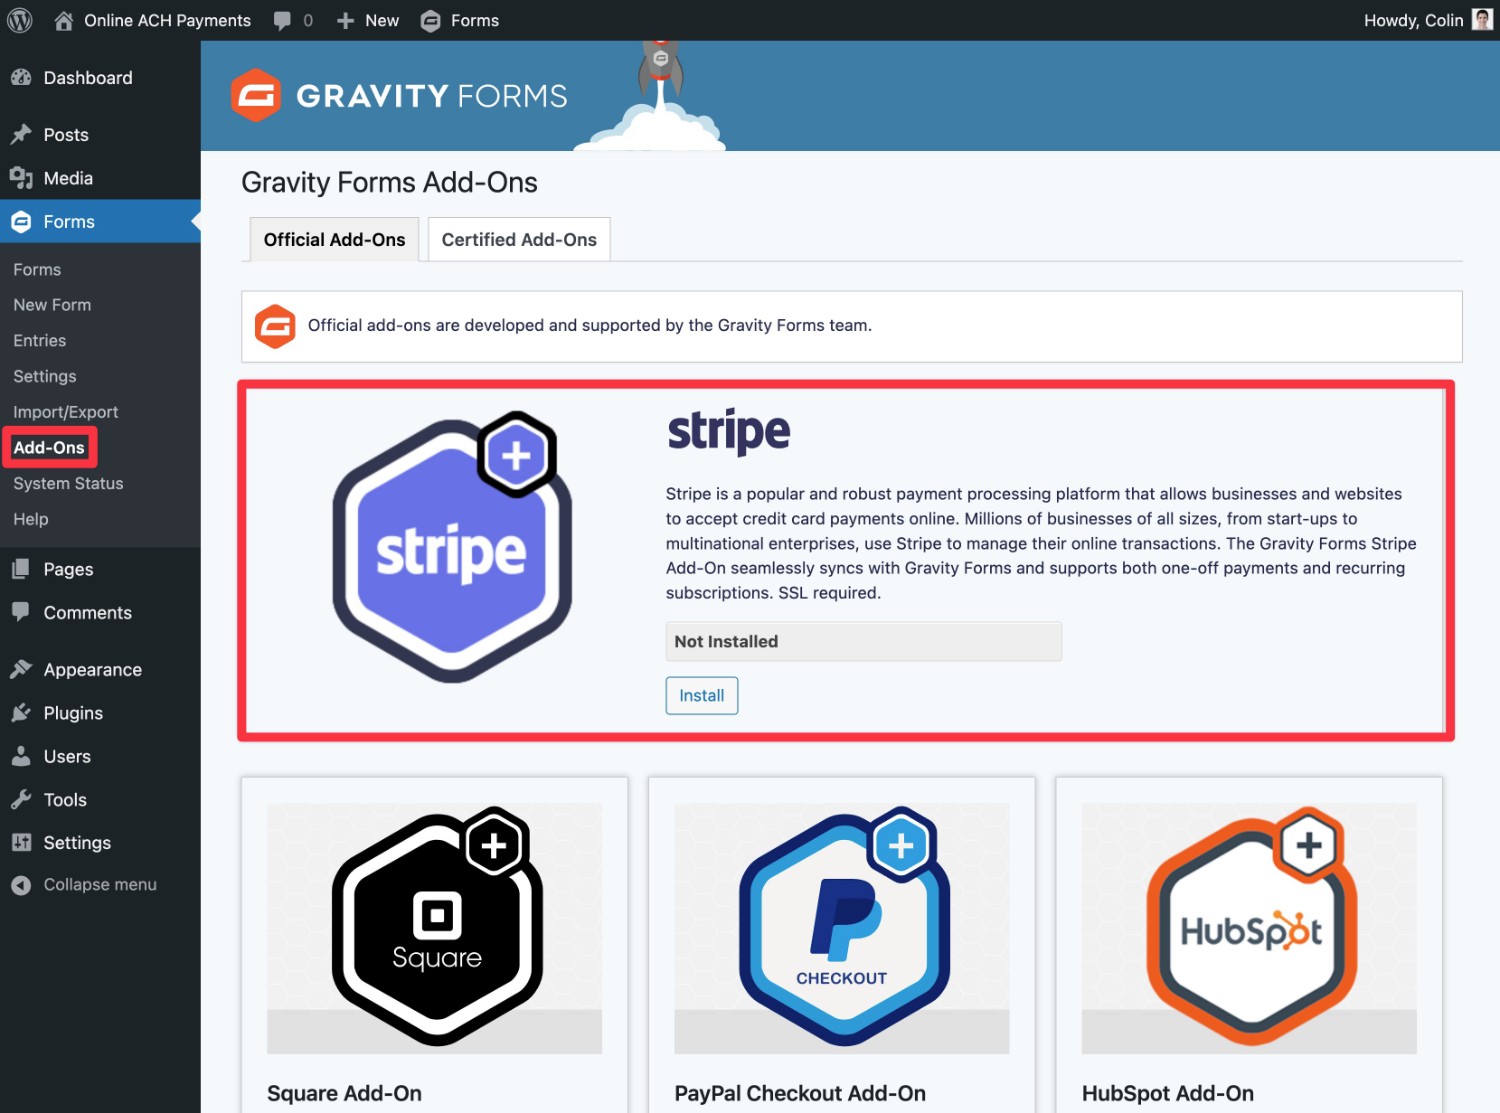
Once you’ve installed the core Gravity Forms plugin and added your license key, you can activate the Stripe Add-On by going to Forms → Add-Ons in your WordPress dashboard.
3. Connect Your WordPress Site to Stripe
Next, you’ll want to connect your WordPress site and Gravity Forms to your Stripe account.
If you don’t already have a Stripe account, you can register for your free Stripe account here.
Here’s how to set up the connection:
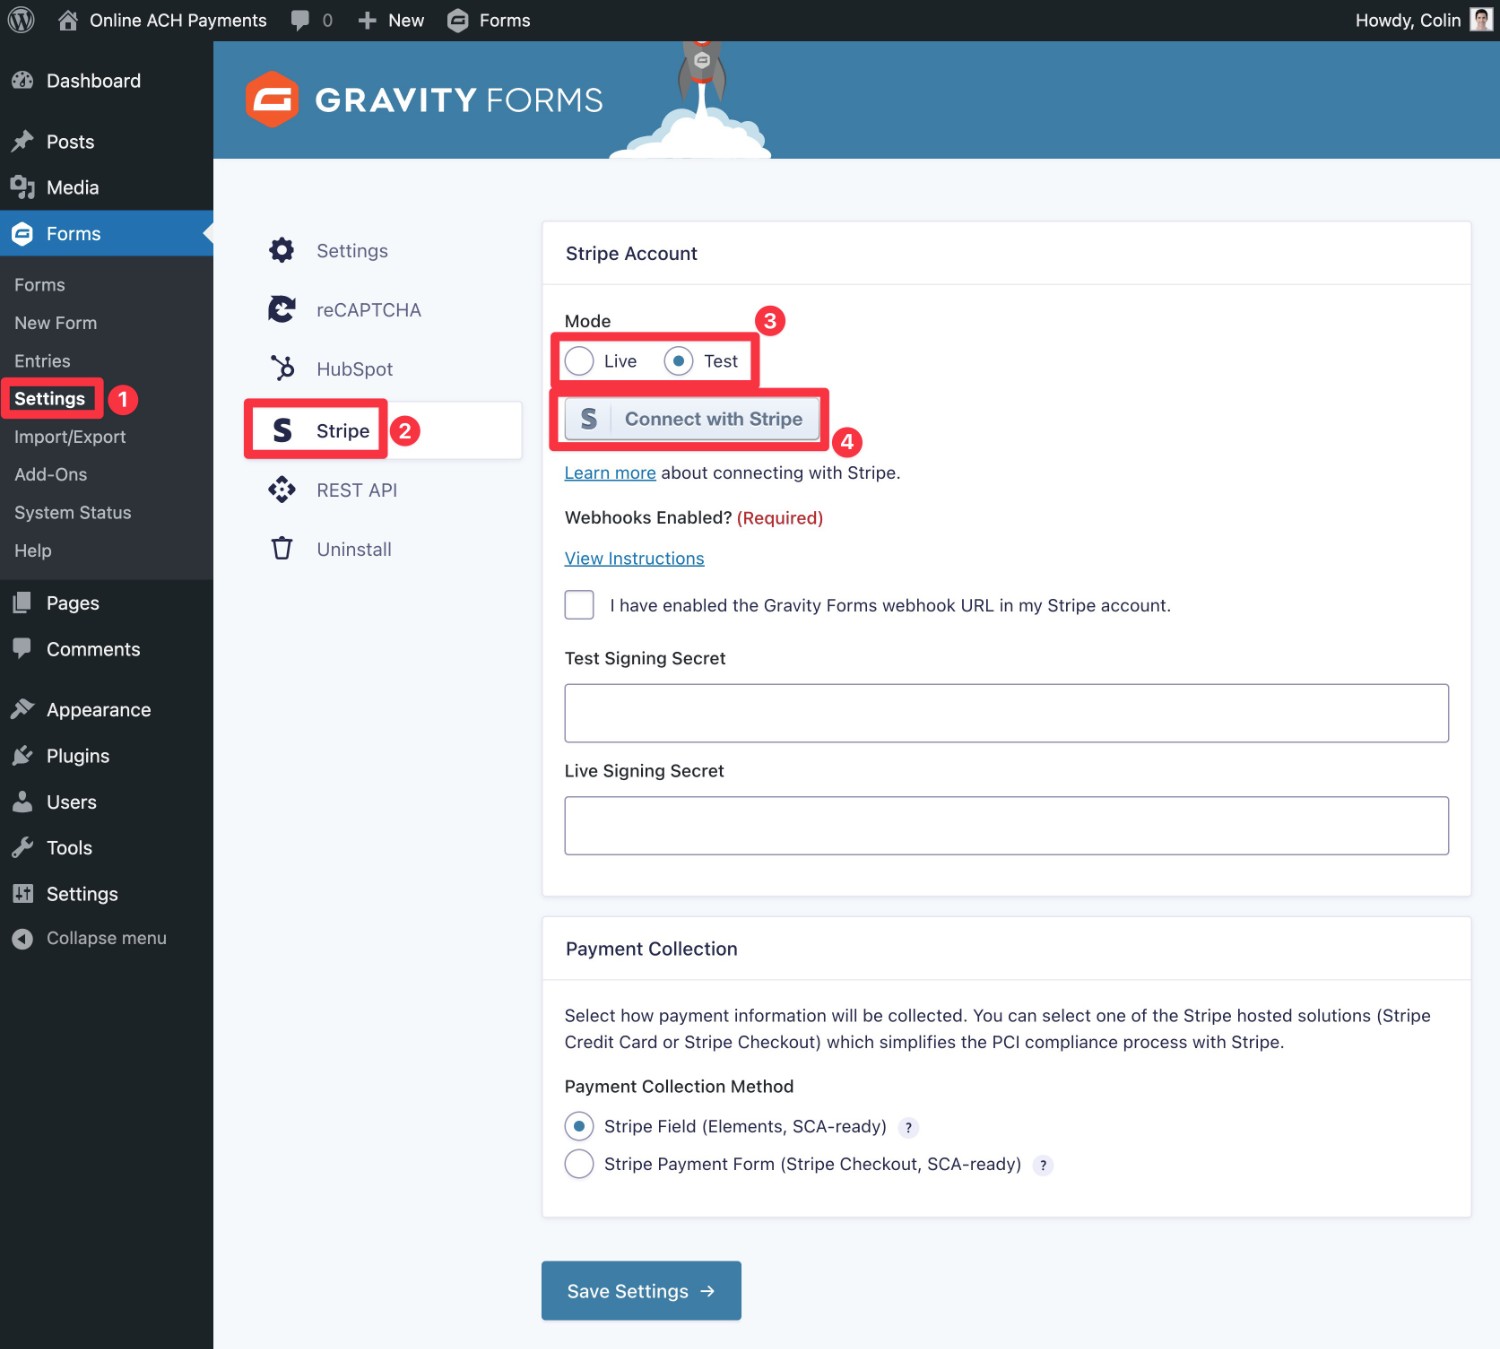
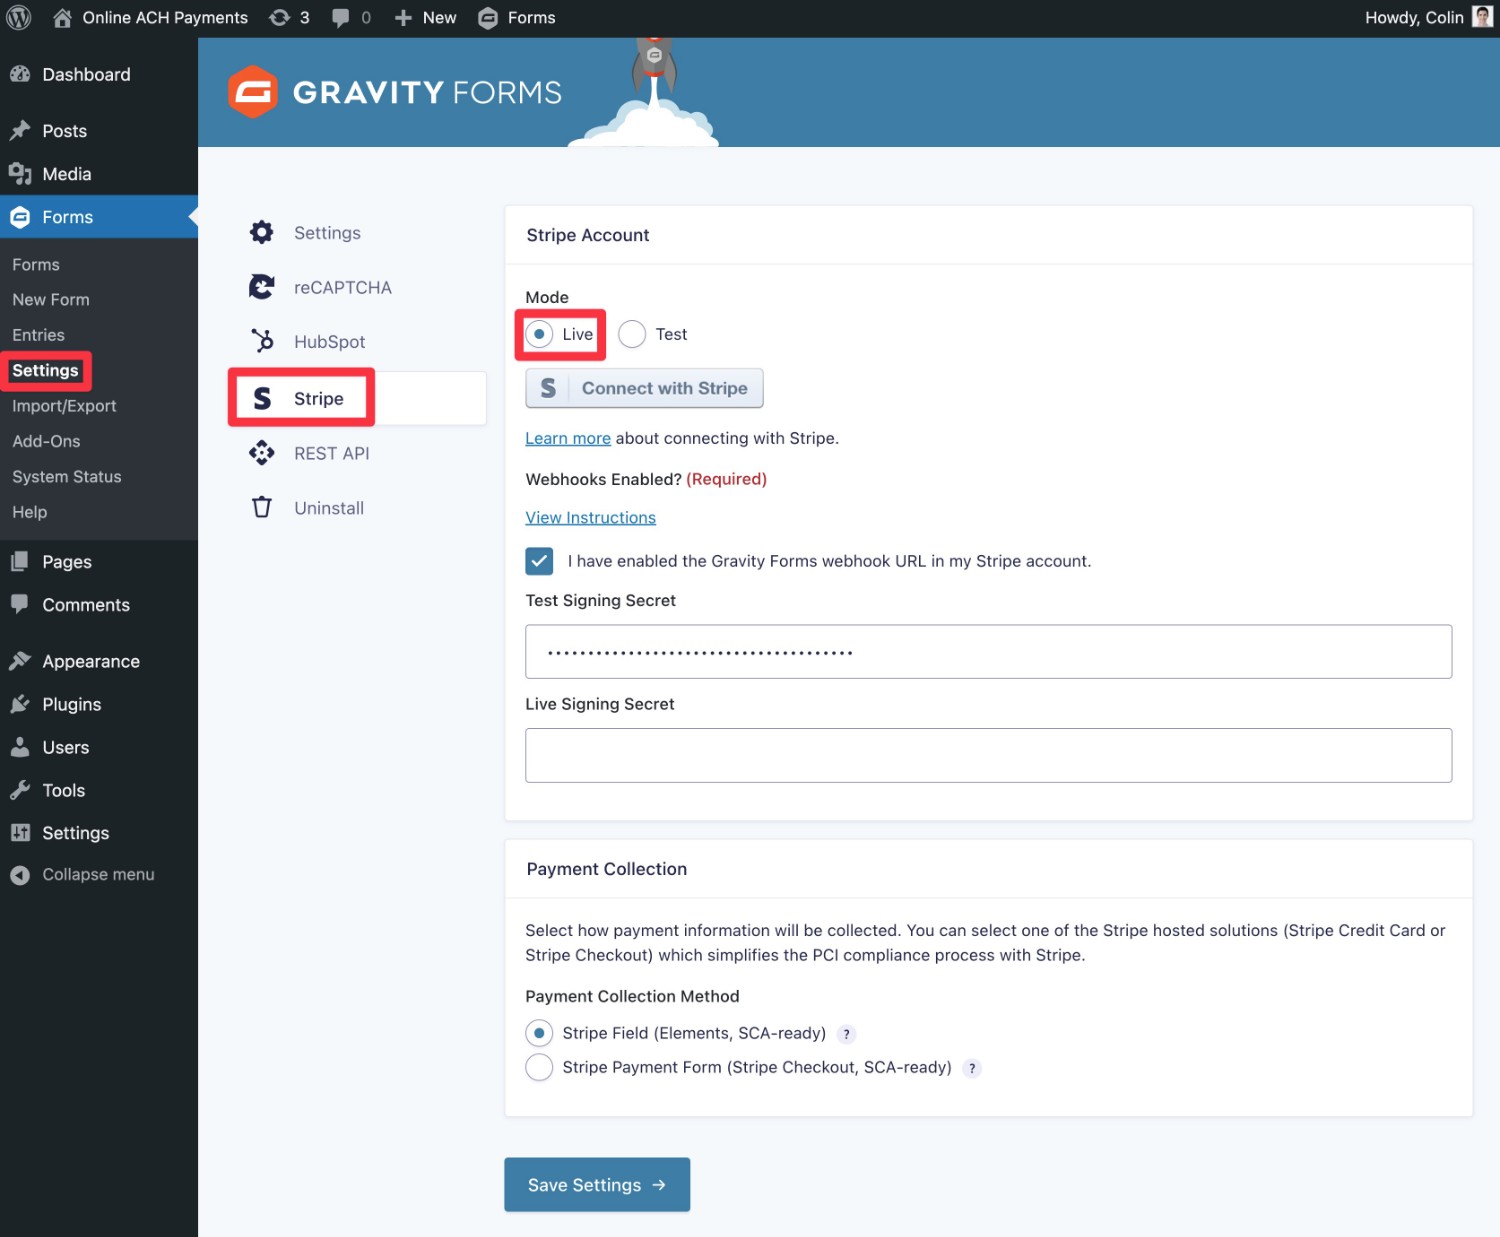
- Go to Forms → Settings in your WordPress dashboard.
- Select the Stripe tab in the sidebar.
- Choose your Mode. Starting with Test mode can be good while you’re just setting things up because it lets you test things with dummy payment information. You just need to remember to turn on live processing when you’re ready to accept real ACH payments.
- Click the Connect with Stripe button.
This will take you to Stripe’s website. Follow the prompts to connect WordPress/Gravity Forms to Stripe.
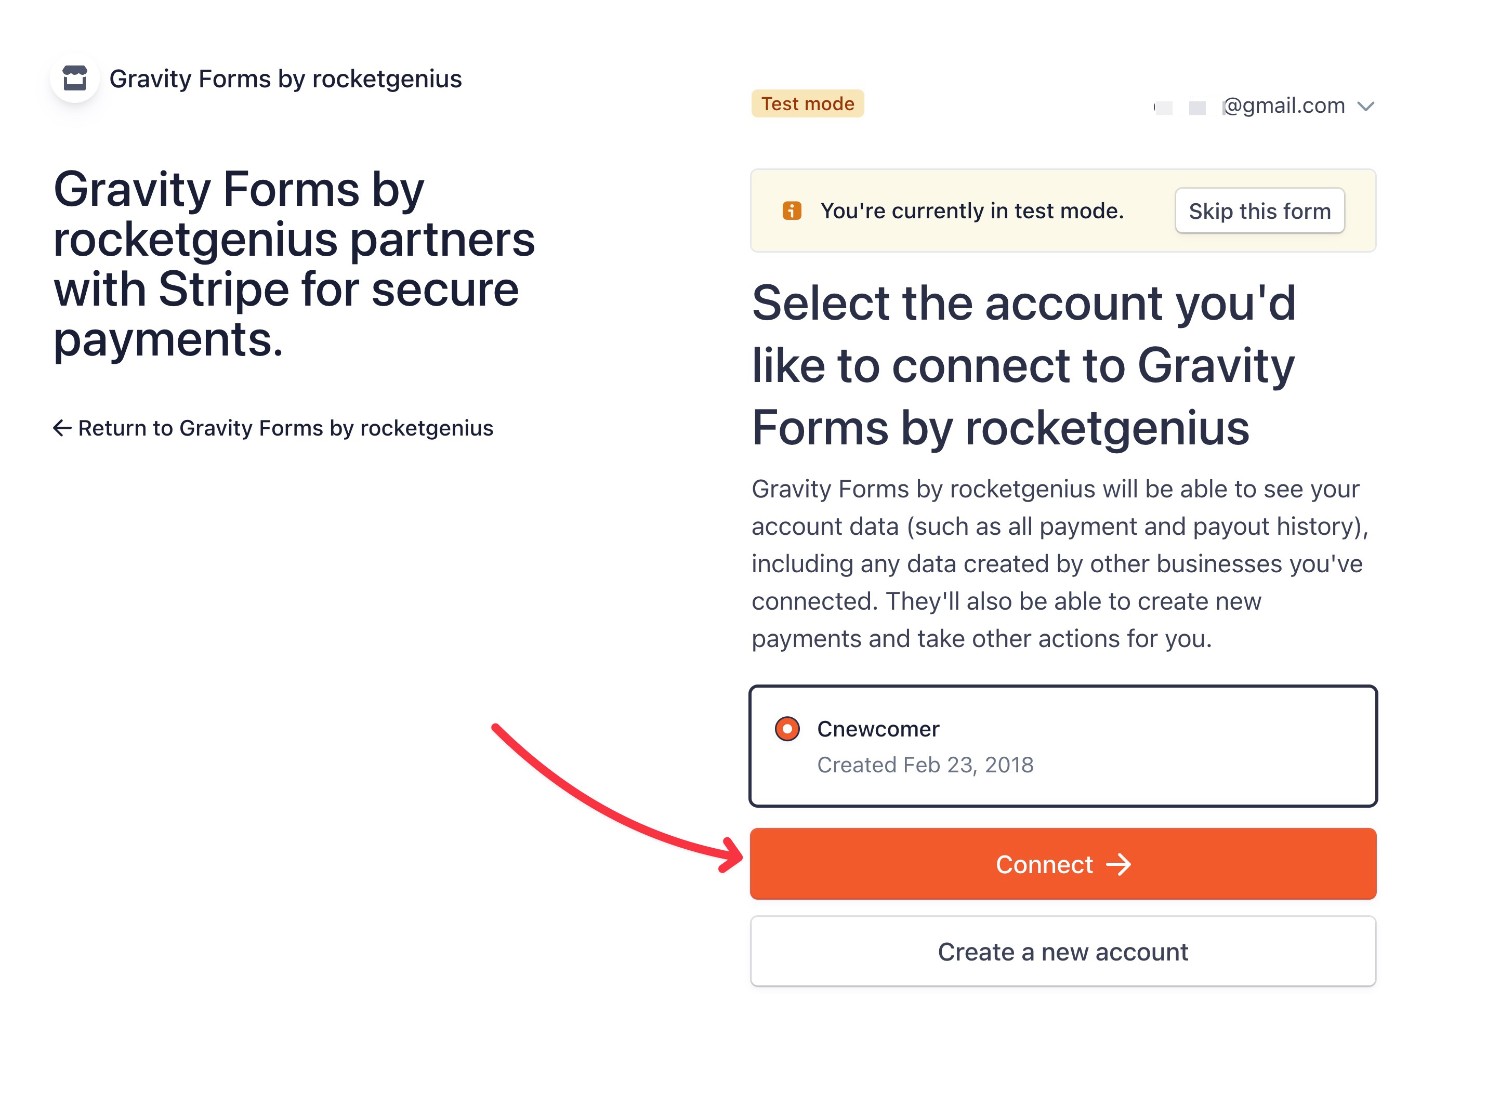
You should then be redirected back to your WordPress site.
Next, you’ll need to add the Gravity Forms webhook URL to your Stripe account.
To find this URL and view instructions, click the View Instructions link in the Gravity Forms Stripe settings area.
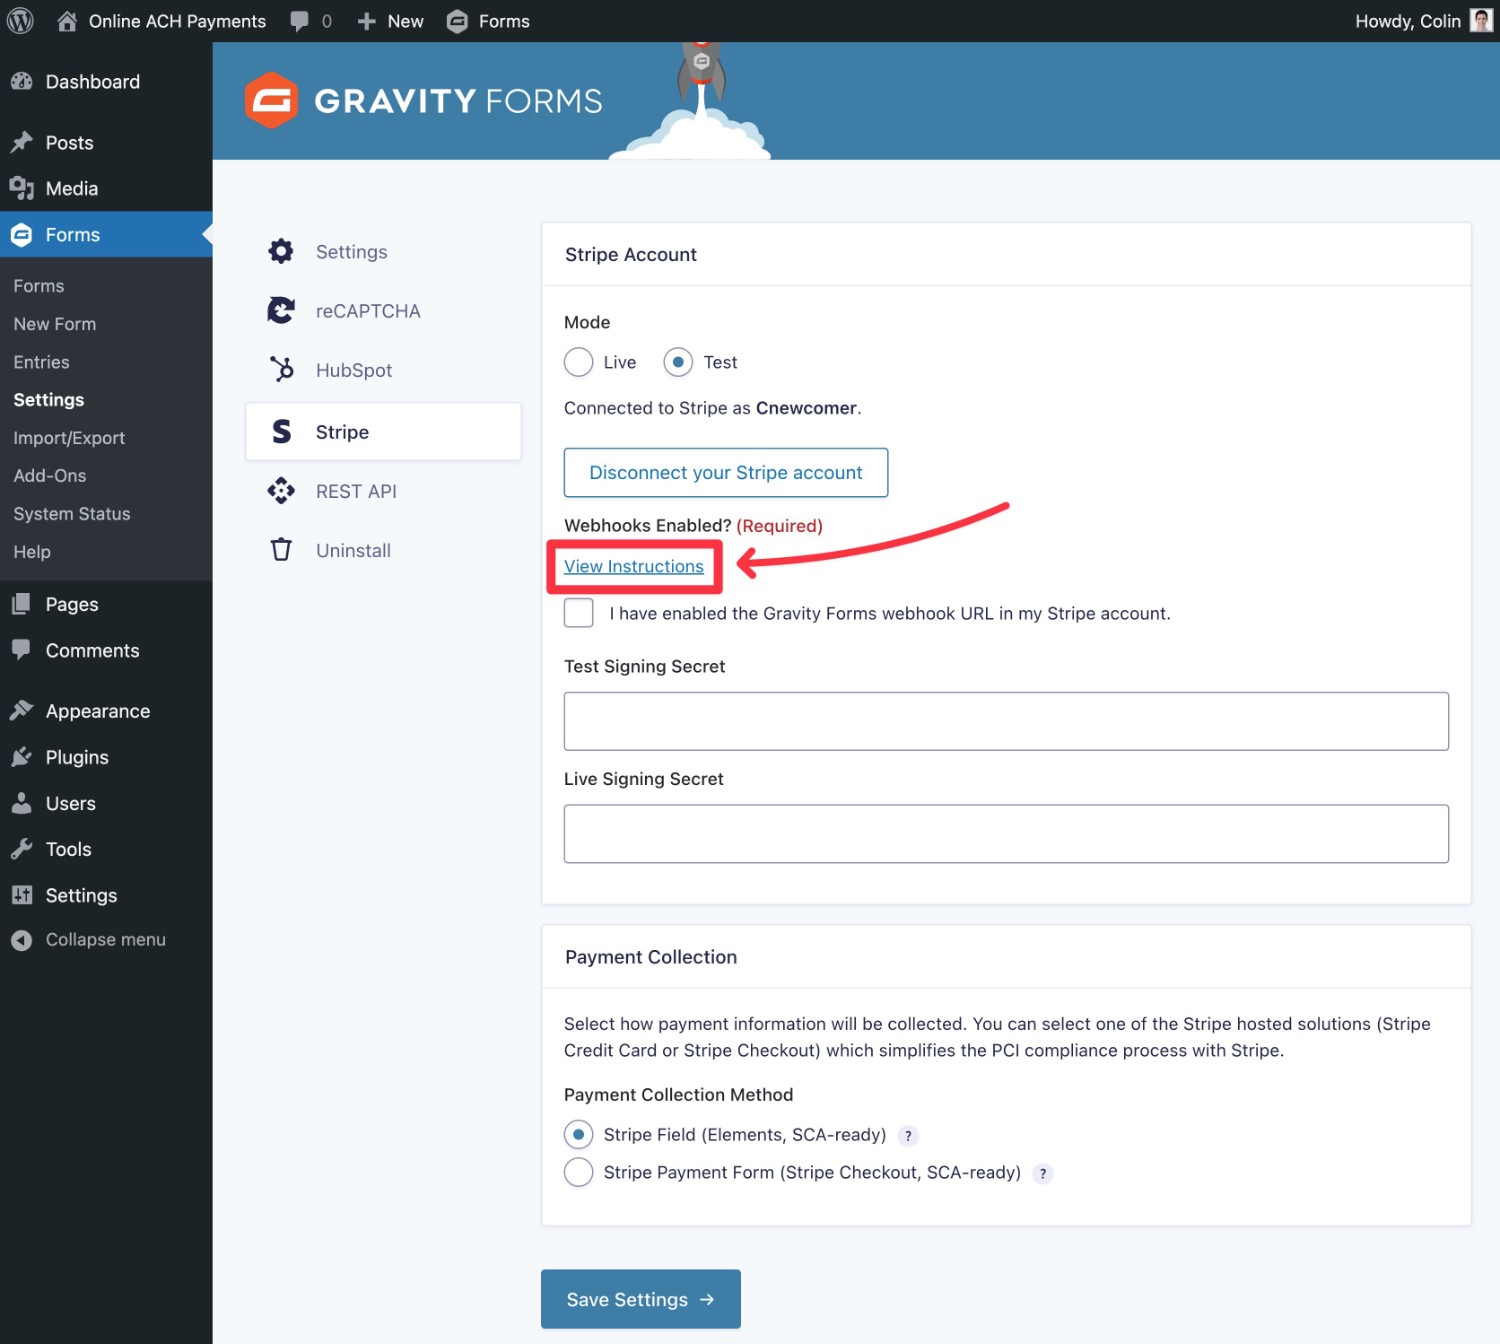
This will open a popup that displays the URL and instructions:
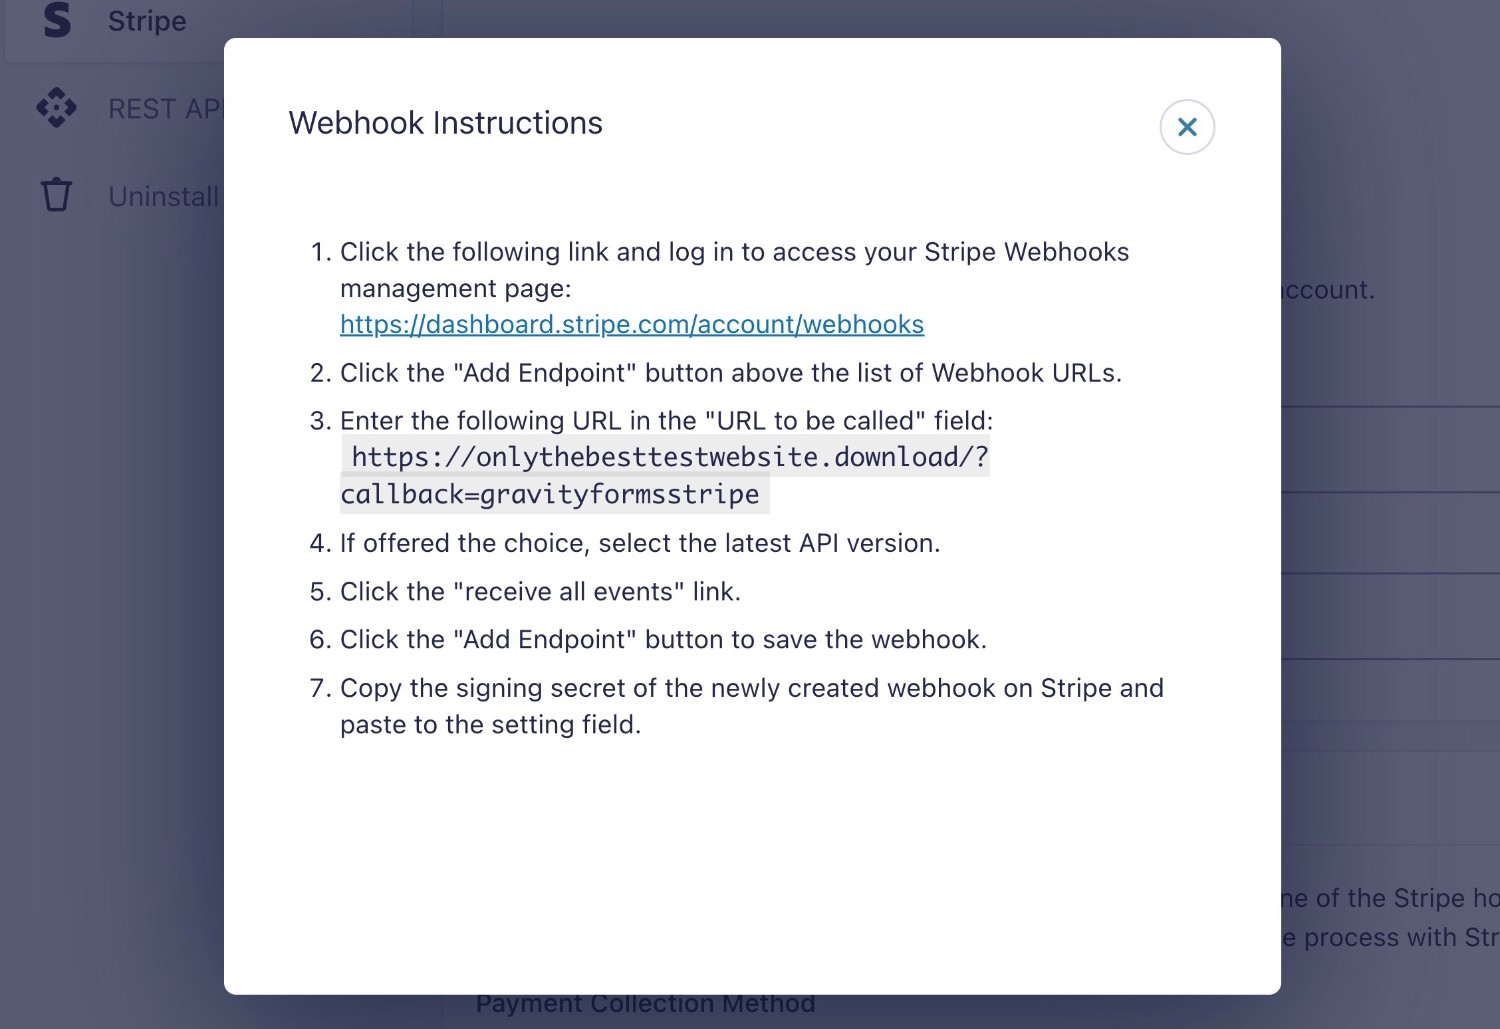
When adding the endpoint/webhook URL in Stripe, make sure to enable Test mode in your Stripe dashboard if you’re using test mode.
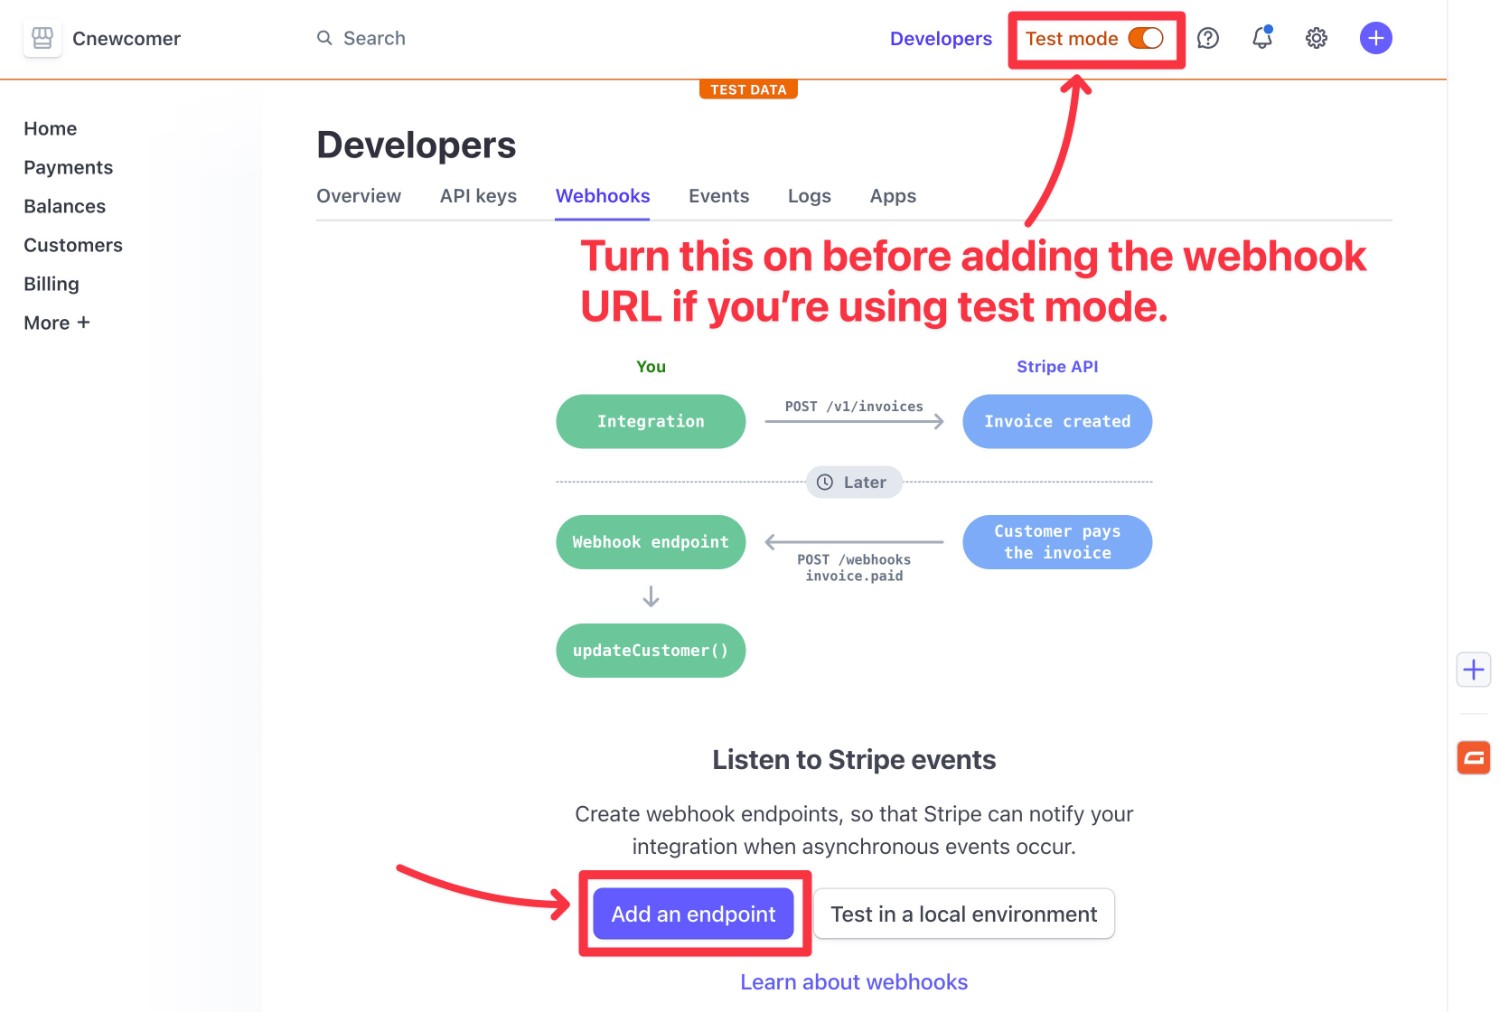
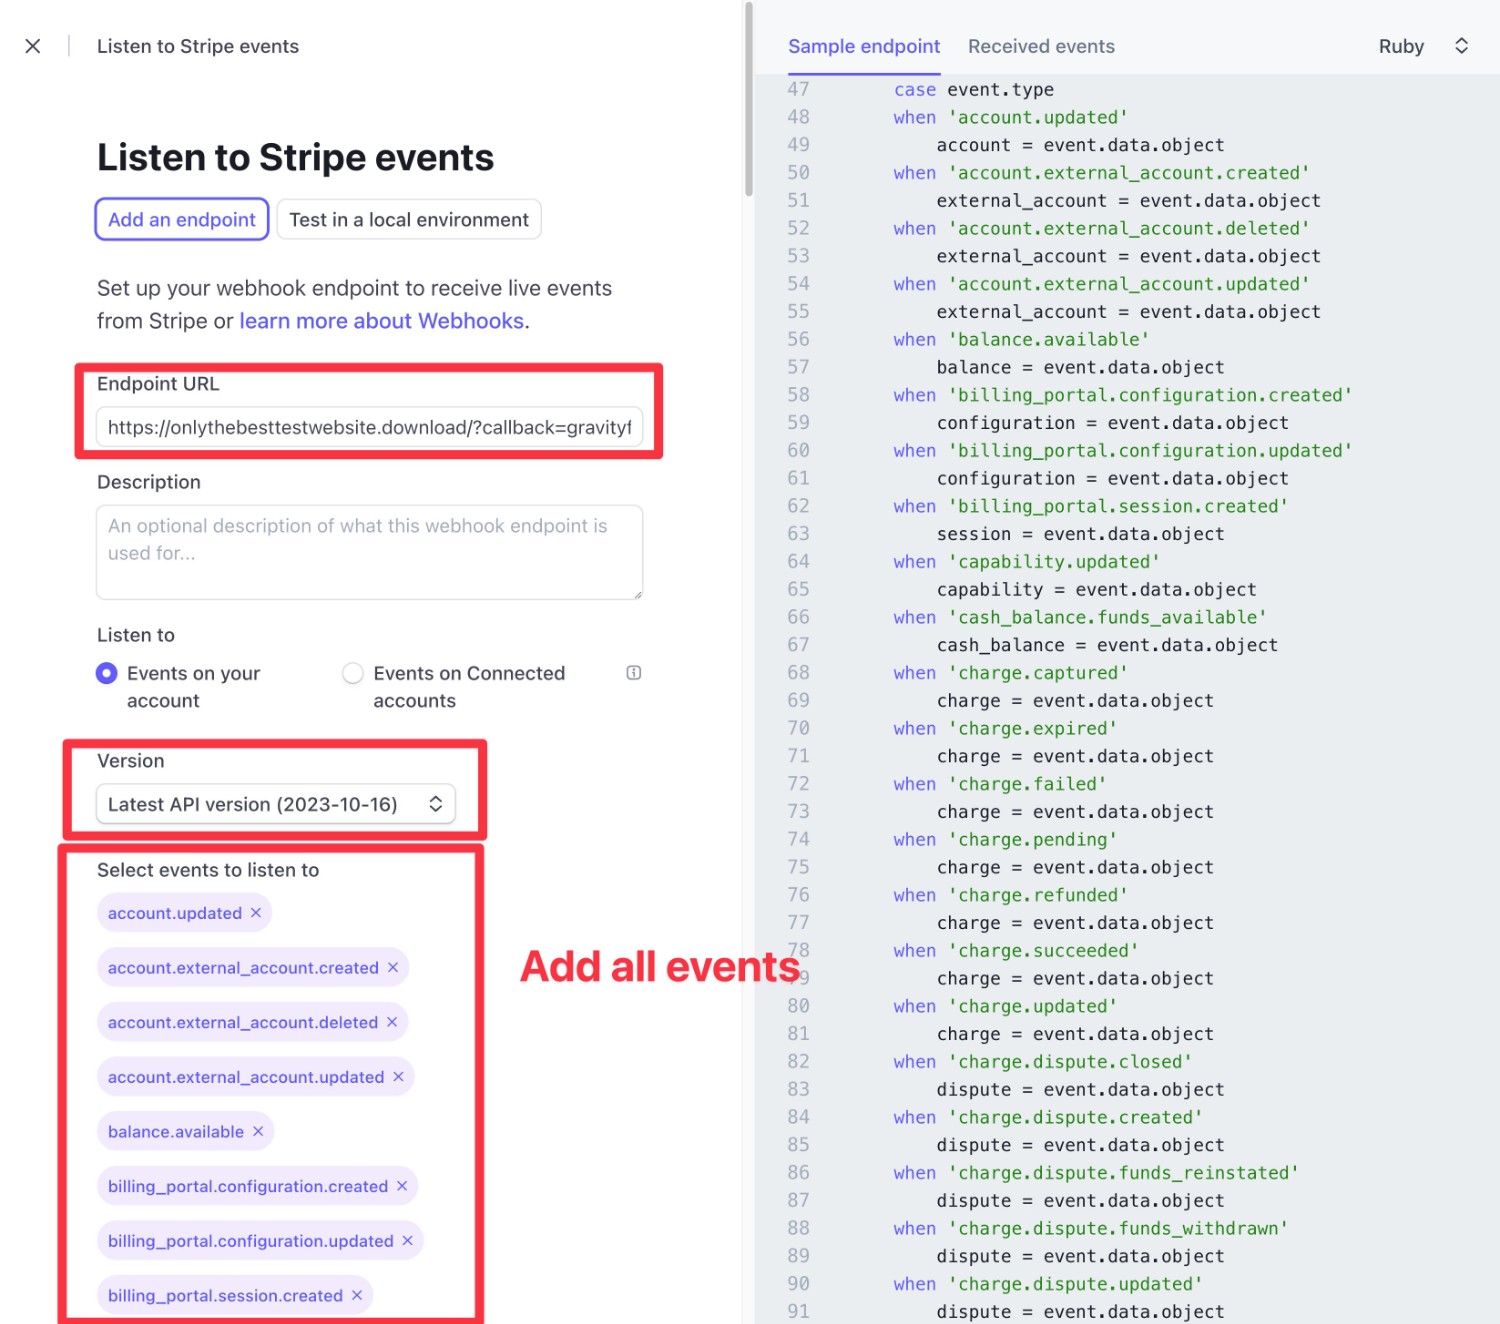
In the endpoint/webhook interface…
- Add the URL in the Endpoint URL box.
- Make sure to choose Latest API version in the Version drop-down.
- Use the Select events button and then choose Select All Events to add all events to the endpoint.
- Click the Add endpoint button at the bottom to save everything.
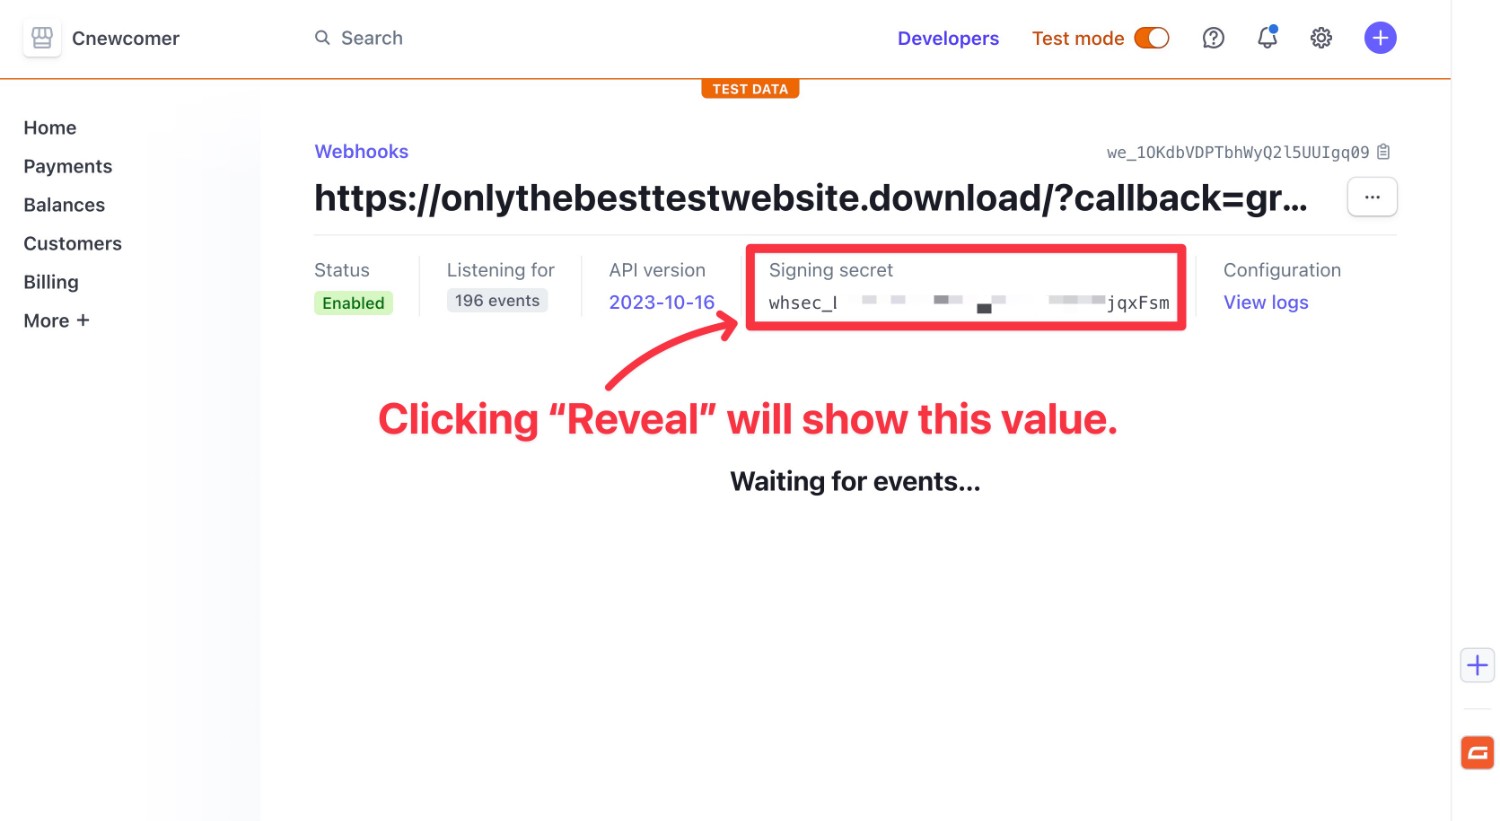
Stripe will then take you to the dashboard for that endpoint. Click the Reveal button under Signing secret to reveal the key that you need to add to Gravity Forms.
Then, finish things out by doing the following:
- Copy the signing secret value.
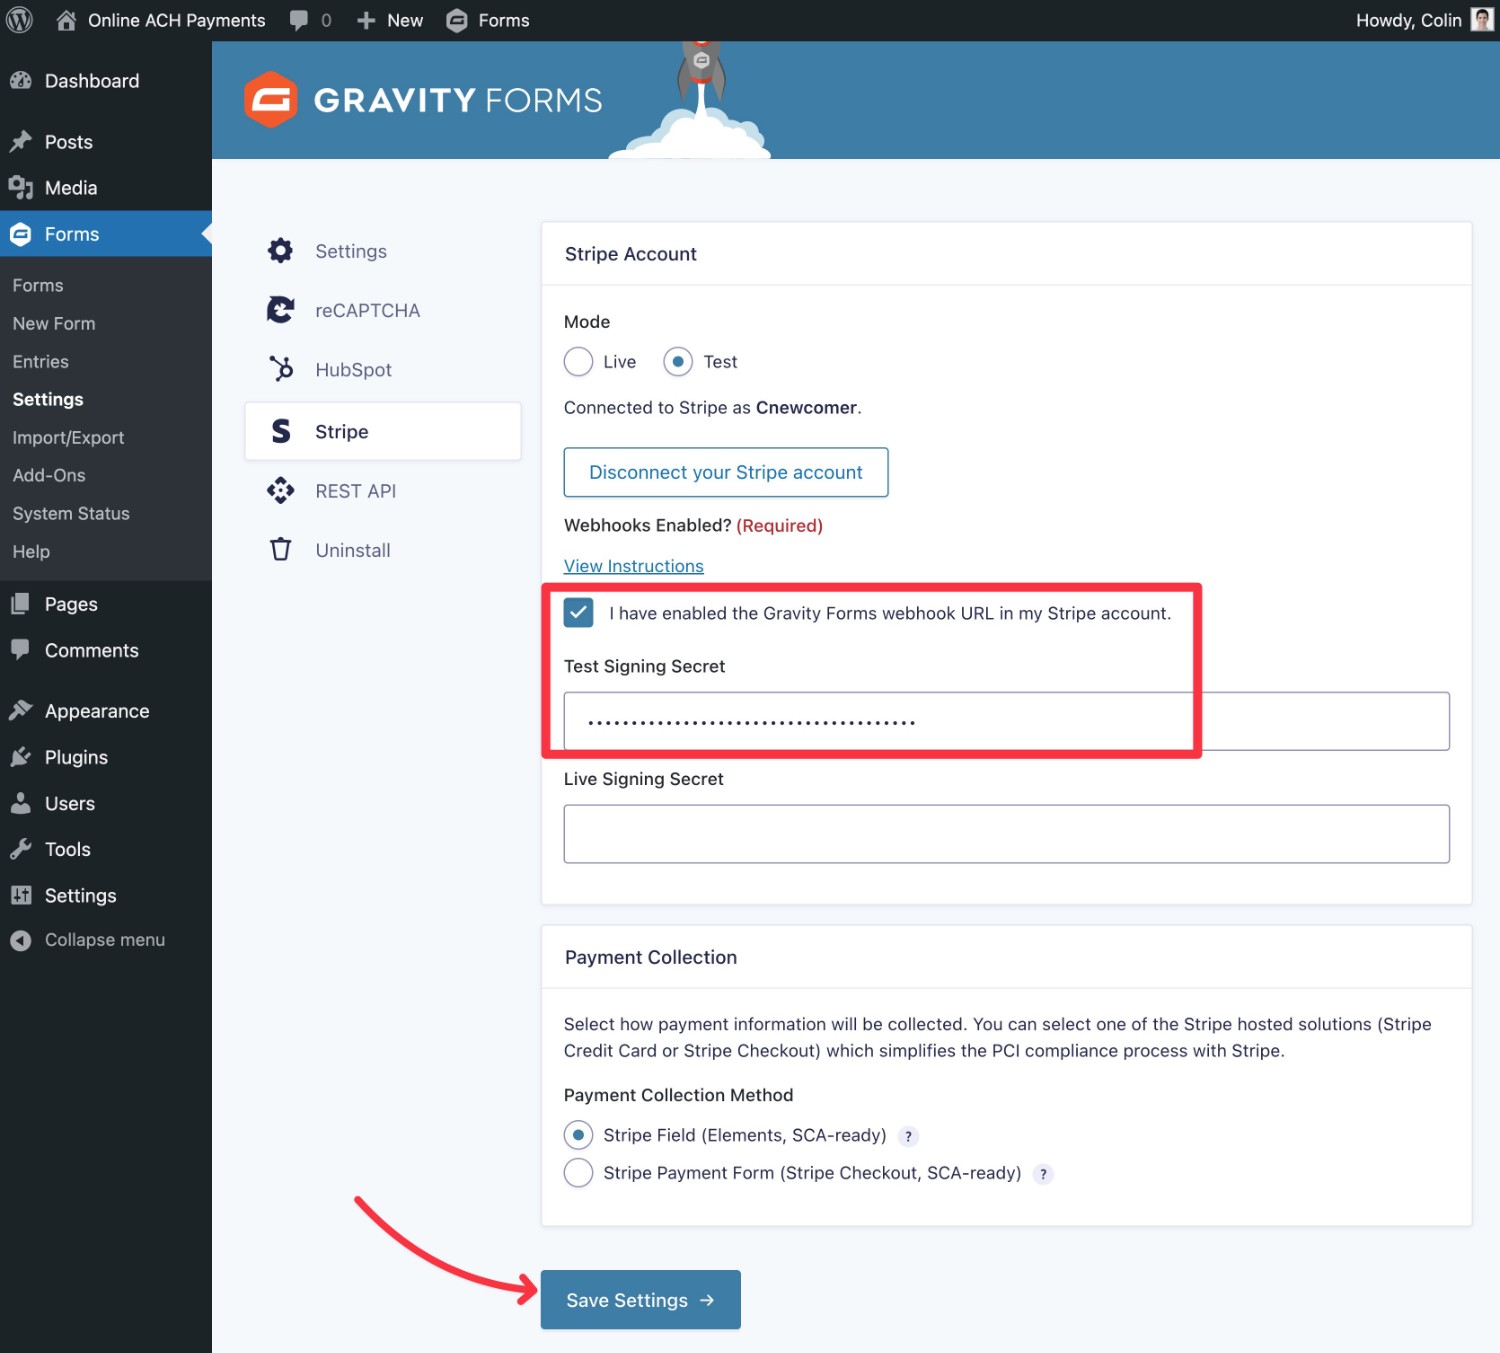
- Go back to the Gravity Forms Stripe settings in your WordPress dashboard.
- Paste the signing secret into the Test Signing Secret box (if using Test Mode).
- Check the I have enabled… box.
- Choose your Payment Collection method. The default Stripe Field works best for most use cases, but you can also use the Stripe Payment Form for ACH payments if you prefer that approach.
- Click the Save Settings button.
4. Enable ACH Payments In Stripe
Before going any further, you’ll want to make sure that you’ve also enabled ACH payments in your Stripe dashboard.
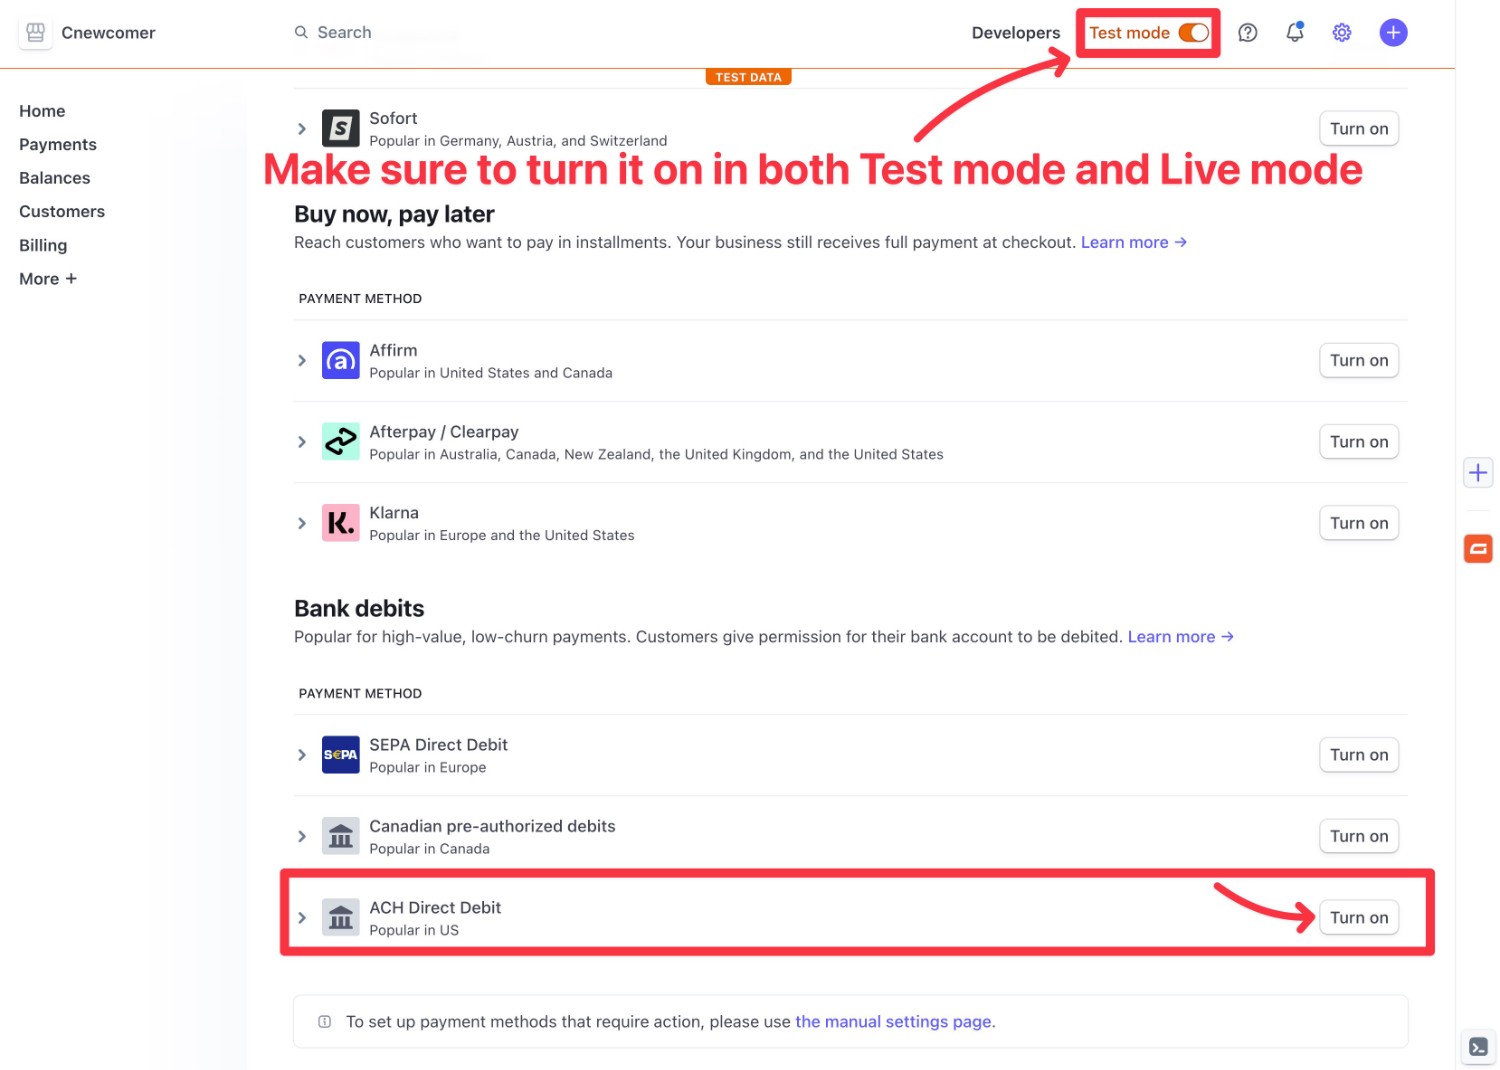
You should enable ACH payments in both Test mode and Live mode. This means you’ll need to turn on the toggle twice (once in each mode). Again, you can change between test and live modes in Stripe by using the toggle at the top.
Here’s how:
- Open the payment methods area in Stripe – you can click this link for live mode and this link for test mode.
- Find the ACH Direct Debit option – it should be at the bottom under Bank debits.
- Click the Turn on button.
Once you turn it on, the Turn on button will change to Confirm. You’ll need to click that again, which will open some additional options.
ACH Payments for Subscriptions
If you want to enable ACH debit payments for subscriptions, you’ll need to complete an extra step.
Since the Stripe subscriptions API uses Stripe invoices to process subscription payments, any payment method you want to be available when processing subscription payments also needs to be active for invoices, in addition to being an active payment method on your account.
To enable this, navigate to your Stripe invoice settings page and select Payment Methods.
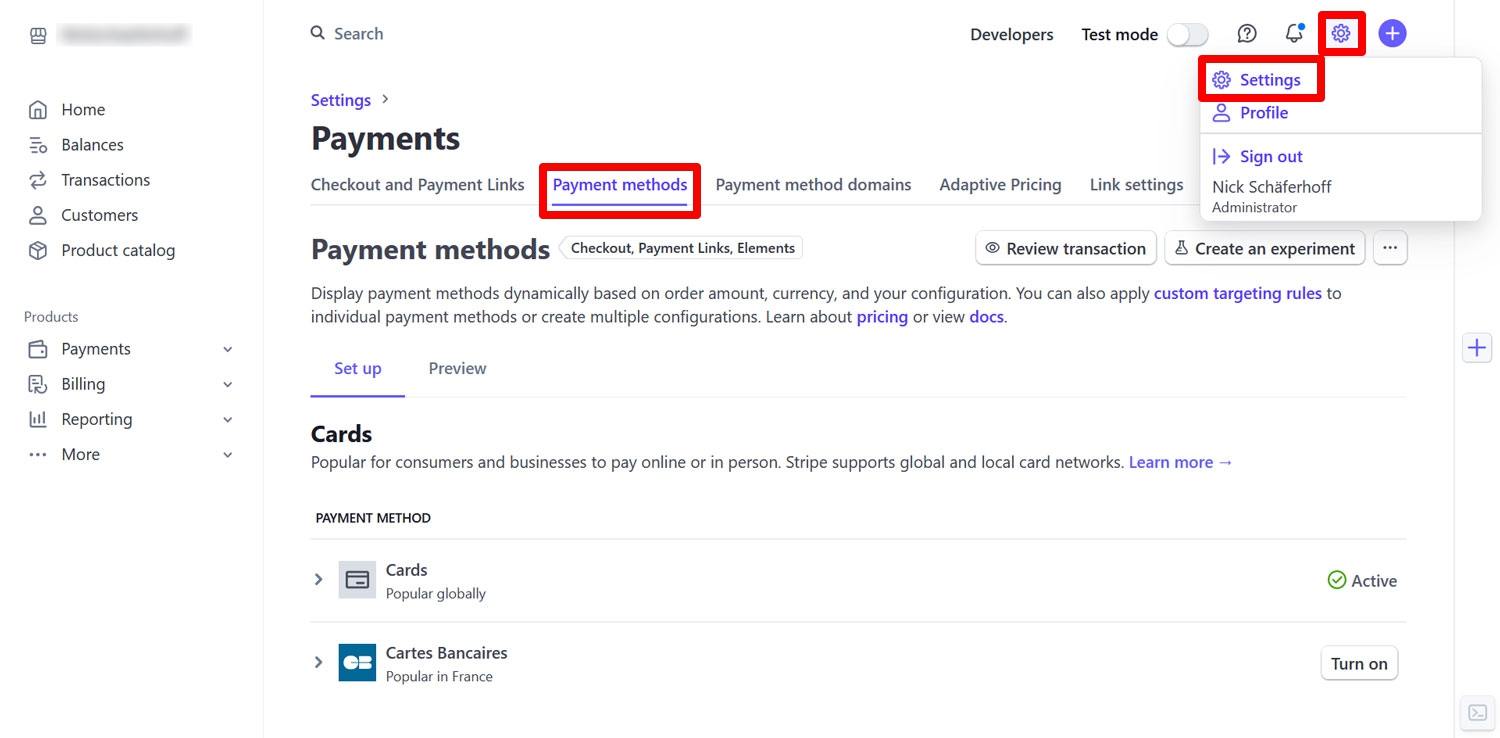
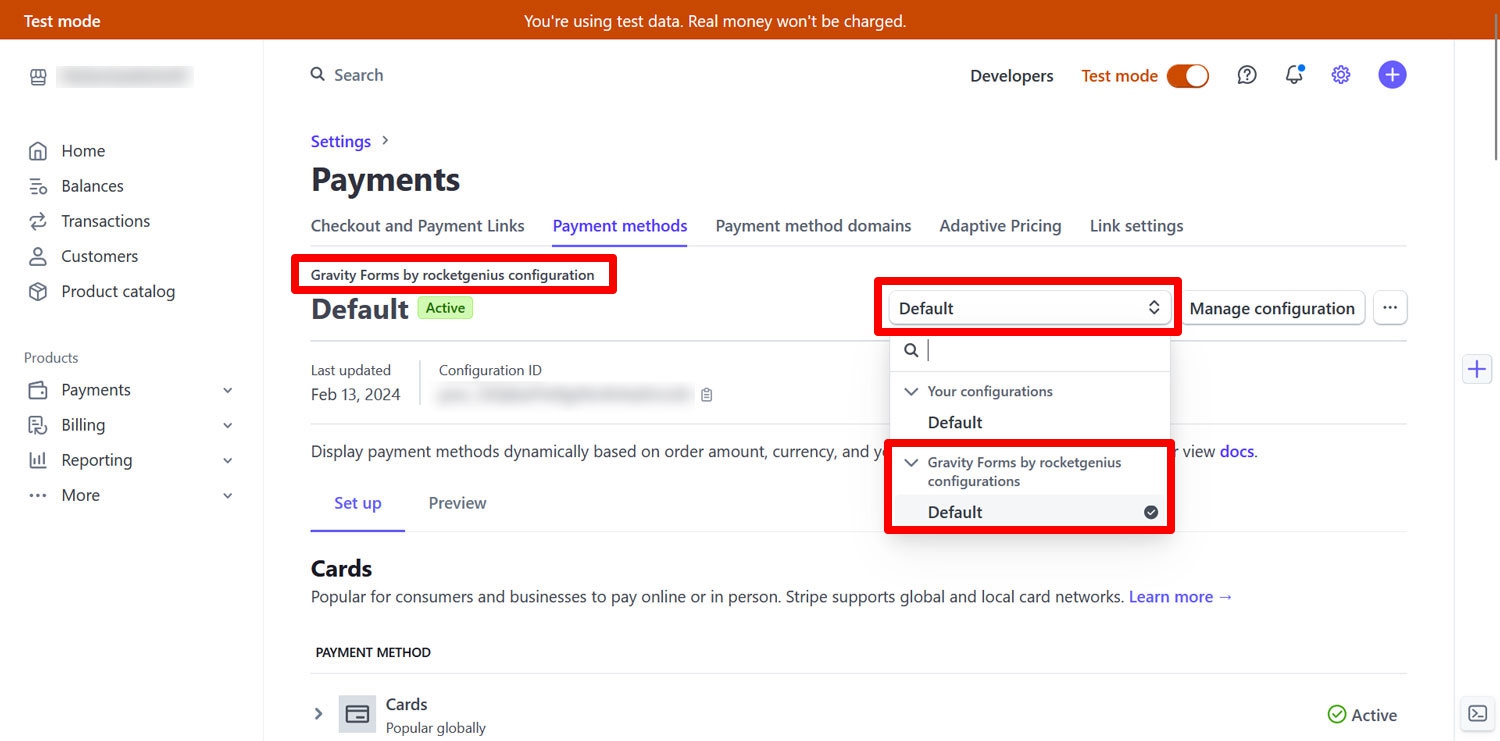
You need to be editing the Gravity Forms configuration, so if you are not, pick it from the drop-down menu.
Then Scroll to the Default payment terms section. There you should see an option to manage your payment methods.
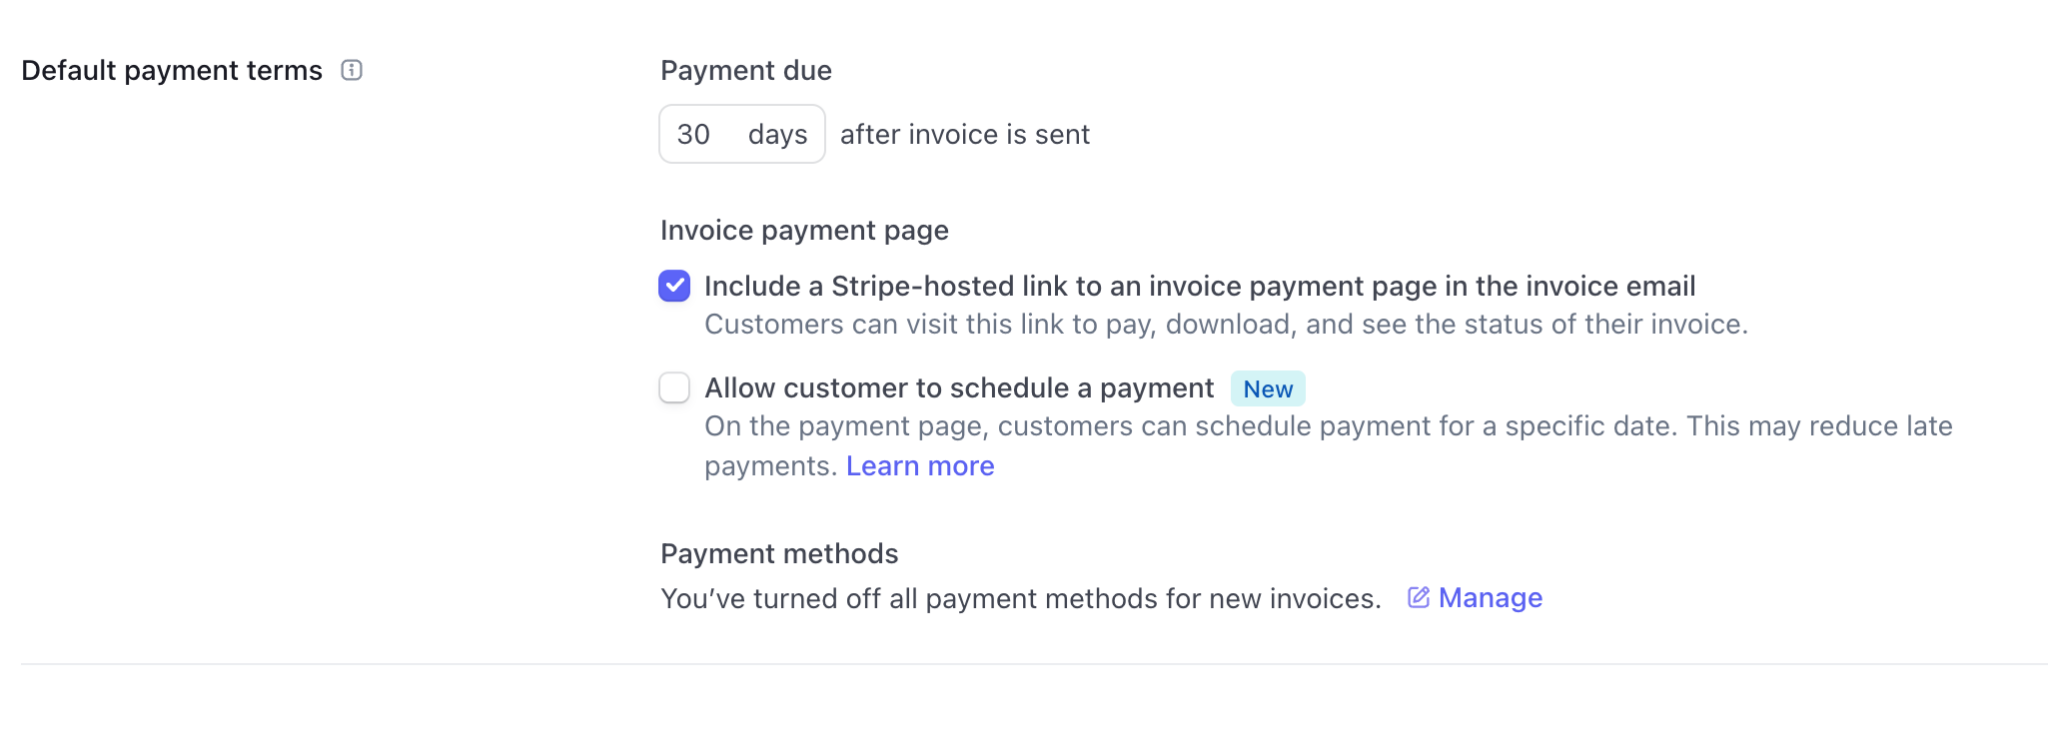
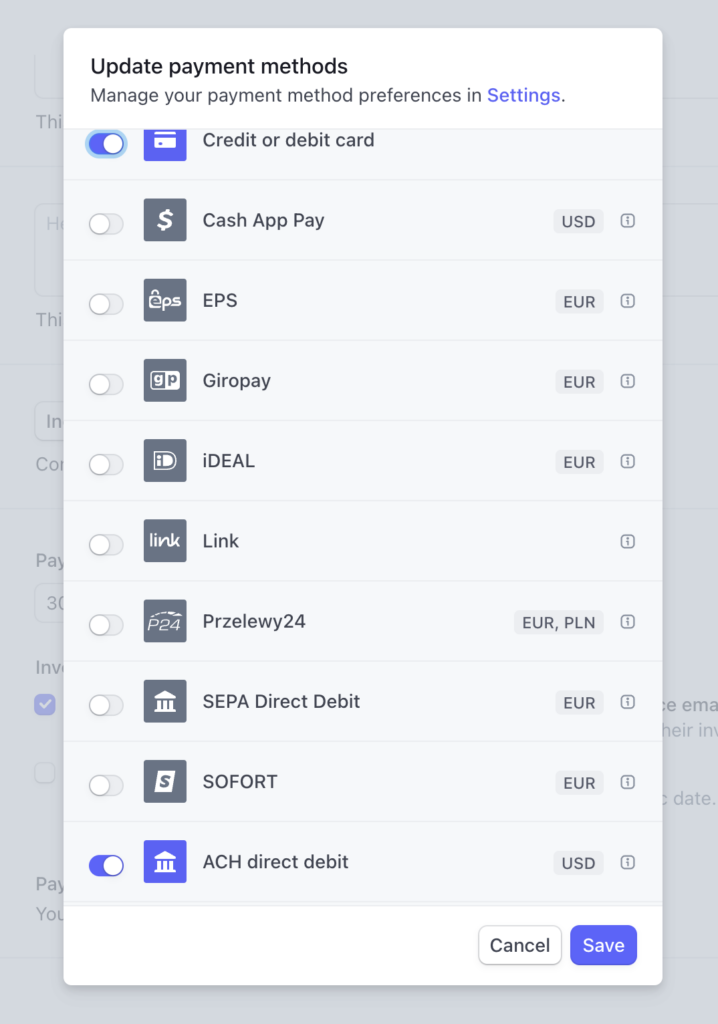
Select Manage and you will see a popup with your available payment methods. Here you can toggle on ACH direct debit, making this payment option available for subscription payments.
For more information on enabling ACH payments for subscriptions, check out this documentation.
5. Create Your WordPress ACH Payment Form
Now, you’re ready to create the actual form that you’ll use to accept ACH payments.
To begin, go to Forms → New Form.
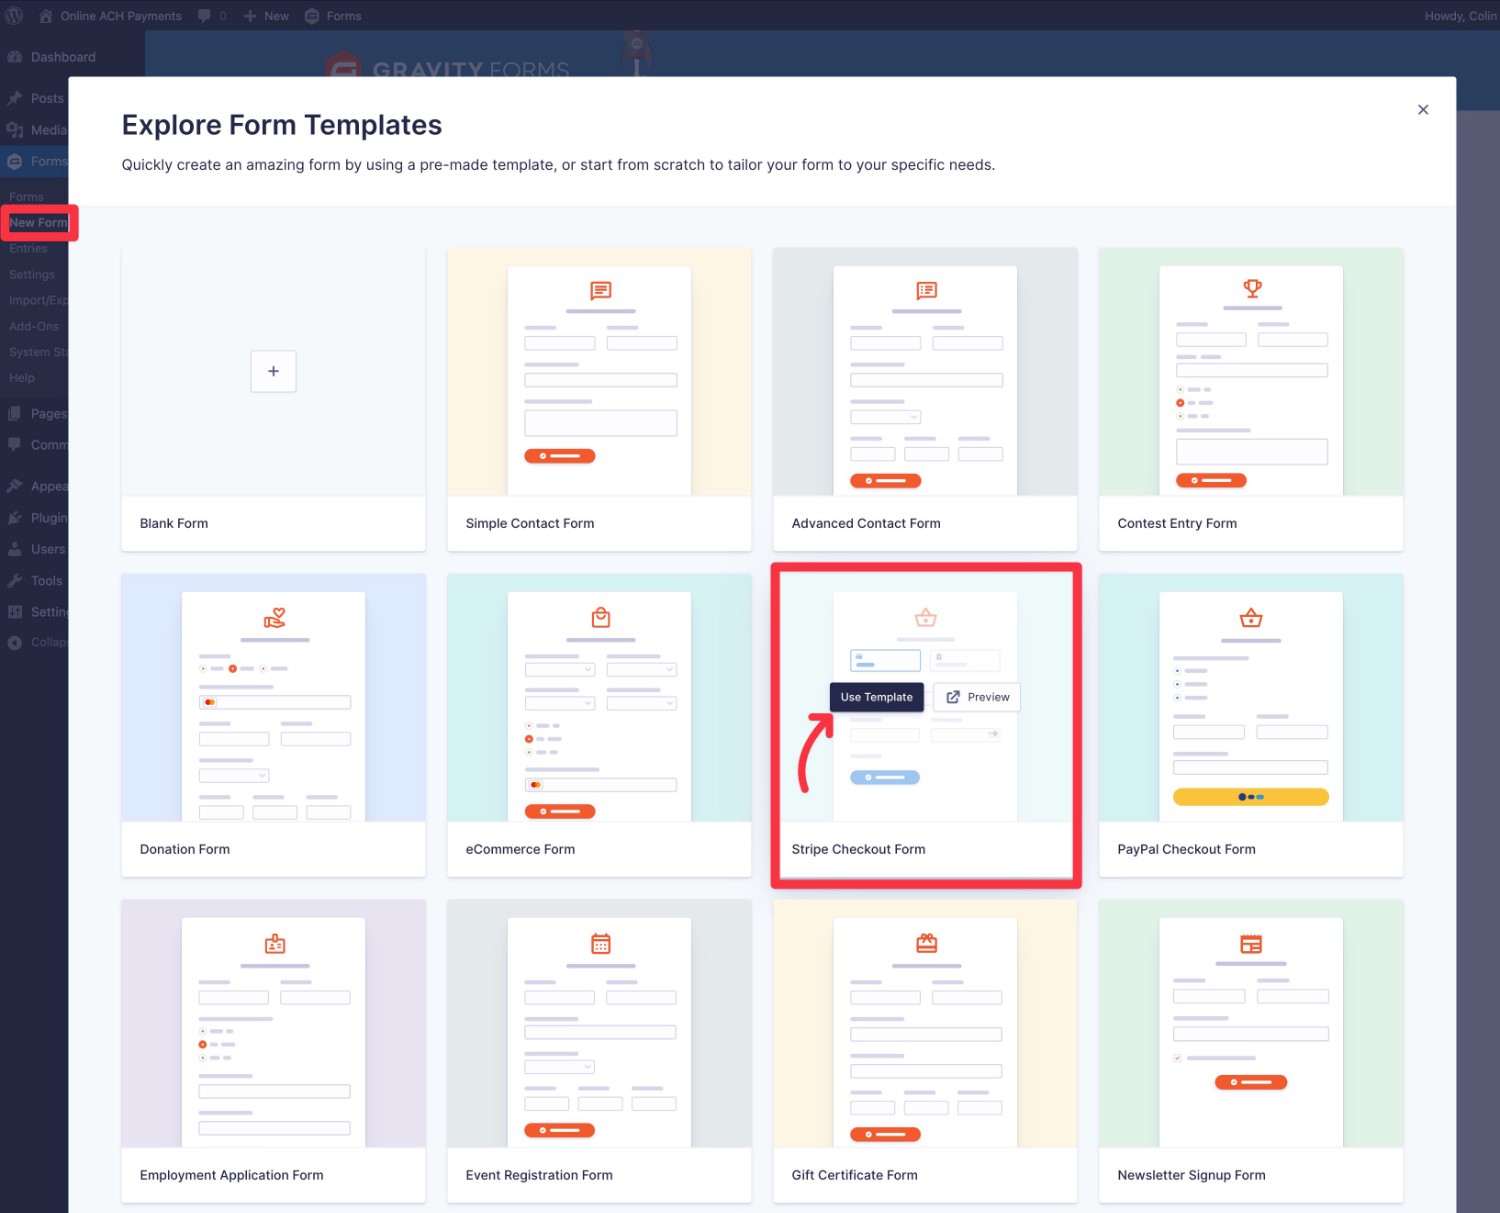
You can then choose between starting from a blank form or using one of the pre-made templates.
If you want to save time, using the Stripe Checkout Form template will start you off with all of the important fields that you need to accept ACH payments online. You’ll still be able to customize it as much as you want, though.
For this guide, we’ll use the Stripe Checkout Form template, but feel free to use a blank form if you prefer that approach.
Selecting your starting point will launch you into the form builder interface where you can add, edit, rearrange, and delete form fields as needed.
You’re free to add as many fields as you want to your ACH payment form.
However, here are some of the most important fields that you’ll need for your form:
- Product and Total field – these let you control the price/amount to charge. You could have one fixed amount that everyone pays or you could let users choose different options and/or perform calculations. You’ll also need a Total field to show the total payment amount. For more details, check out the pricing field documentation, which covers all the important fields that you need.
- Billing details – you’ll want to collect the person’s name and address, as well as any other billing information that you need.
- Stripe field – this is where you can enable the ACH payment option after creating your Stripe feed.
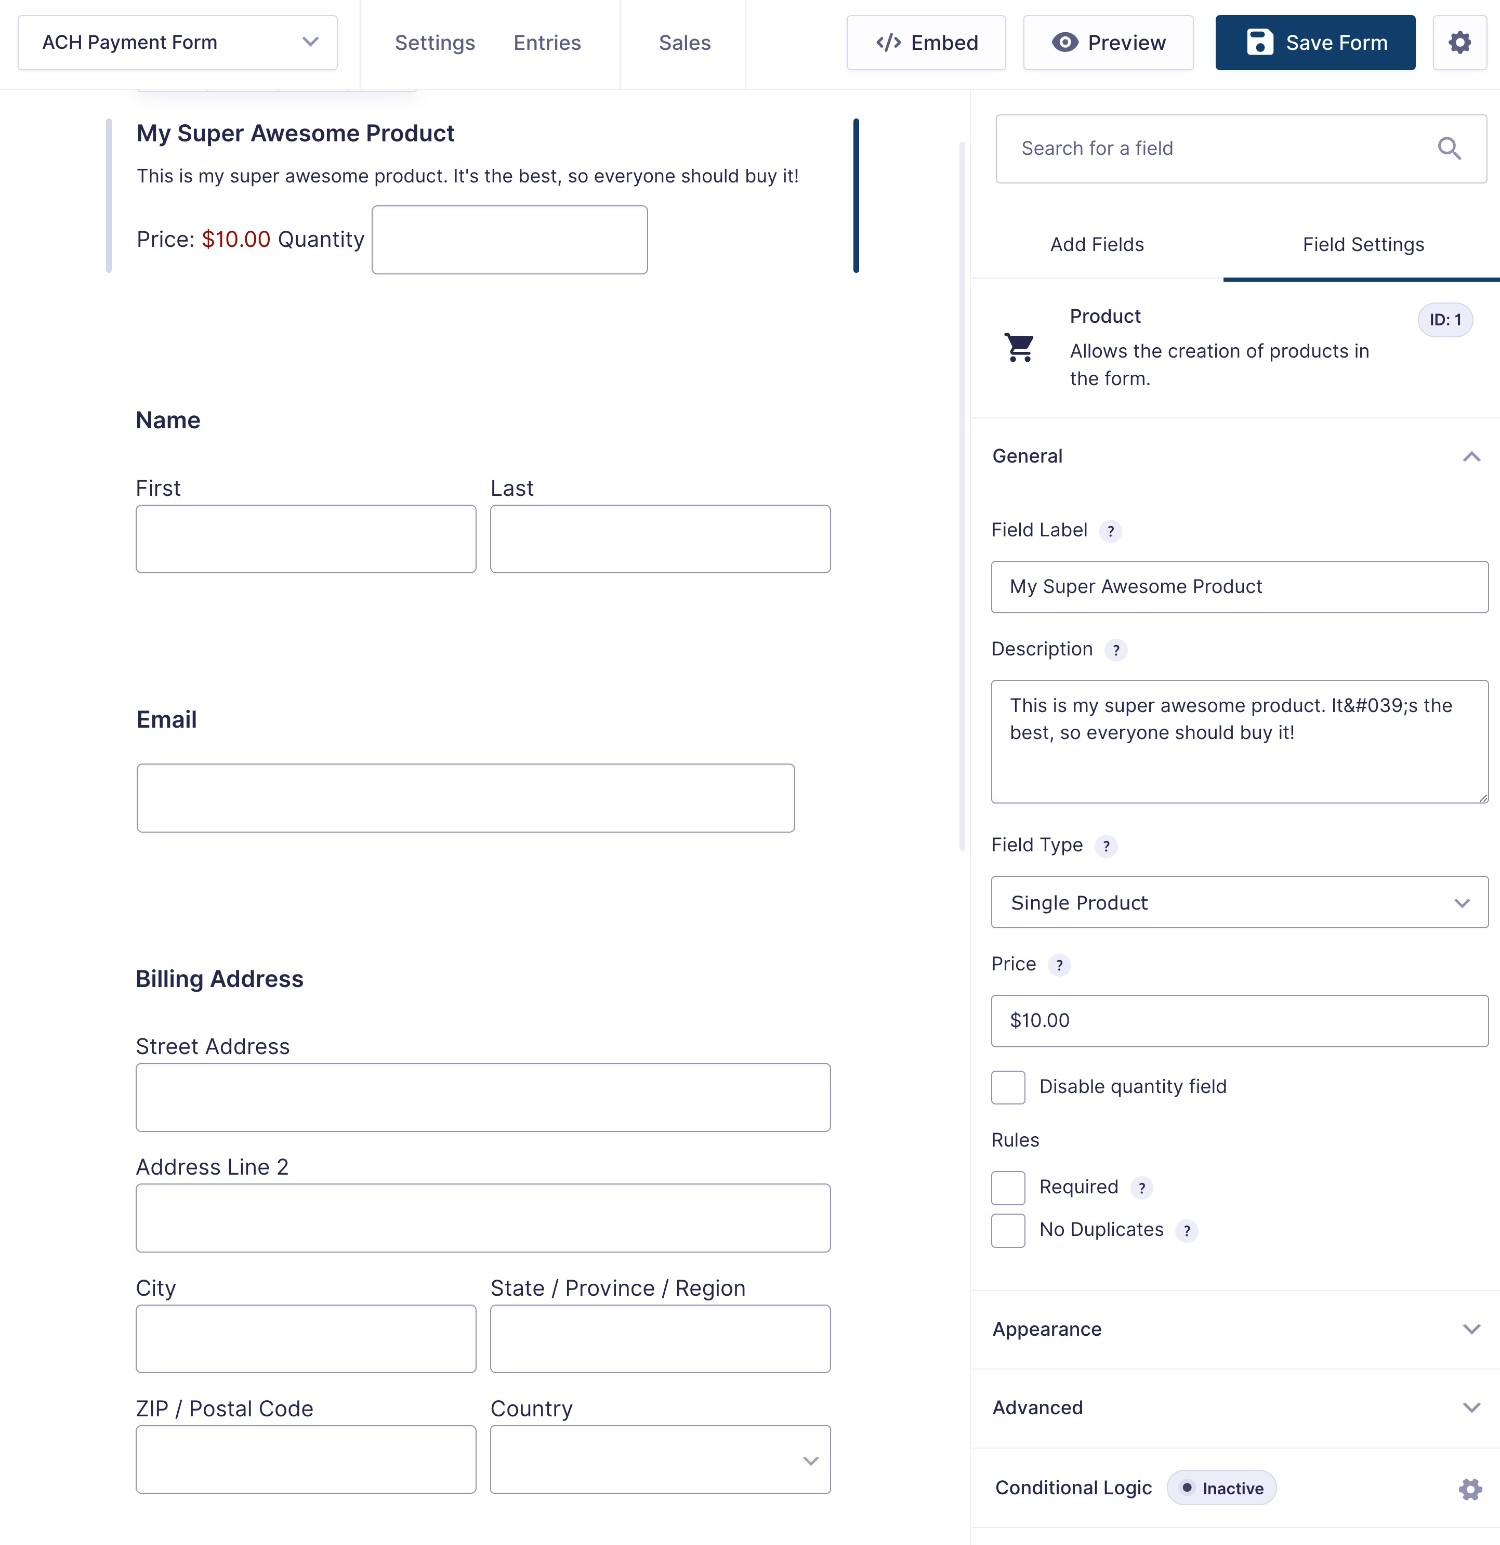
If you use the Stripe Checkout Form template, it will already include all of these fields. You just need to edit them according to your preferences (and add any additional fields that you want to use).
Don’t worry about editing/configuring the Stripe field yet. We will come back to that after you create your Stripe feed. Speaking of that…
6. Set Up a Stripe Feed to Control Payment Processing
Once you’re happy with the other fields in your form, you need to create a Stripe feed.
This tells Stripe how you want it to process payments, such as whether to set up a one-time or recurring payment.
This also lets you map the fields in your form to the fields in Stripe, such as making sure you properly map the person’s name and billing address to your Stripe account.
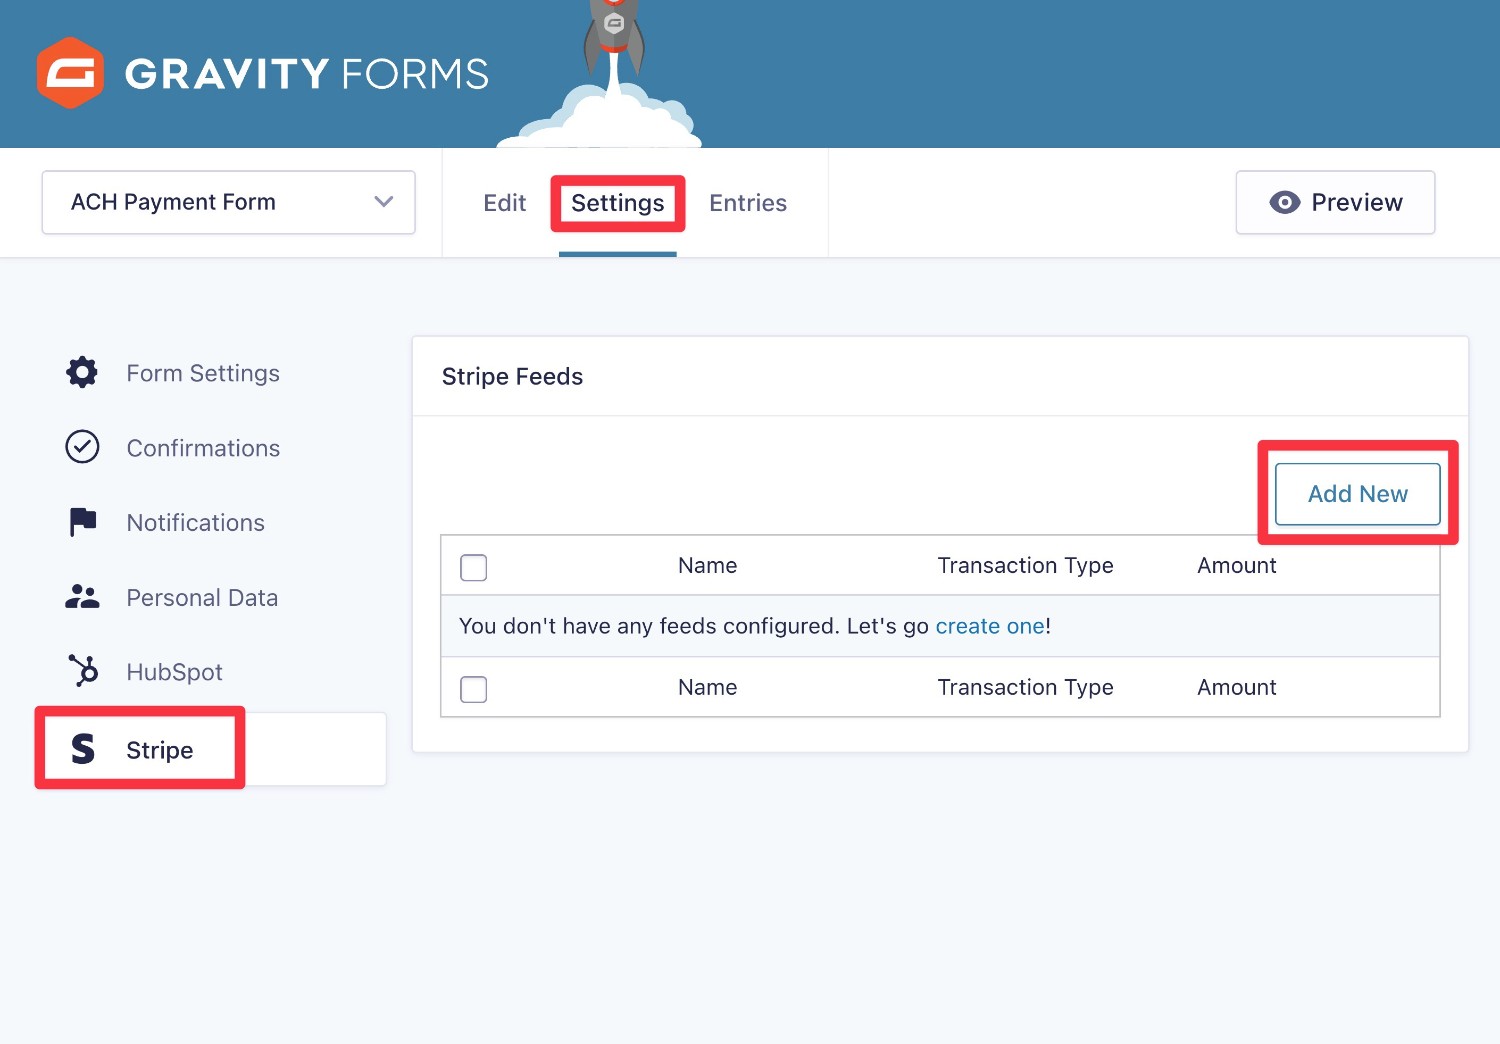
To create your Stripe feed, go to Settings → Stripe in the form editor. Then, click Add New to create a new feed.
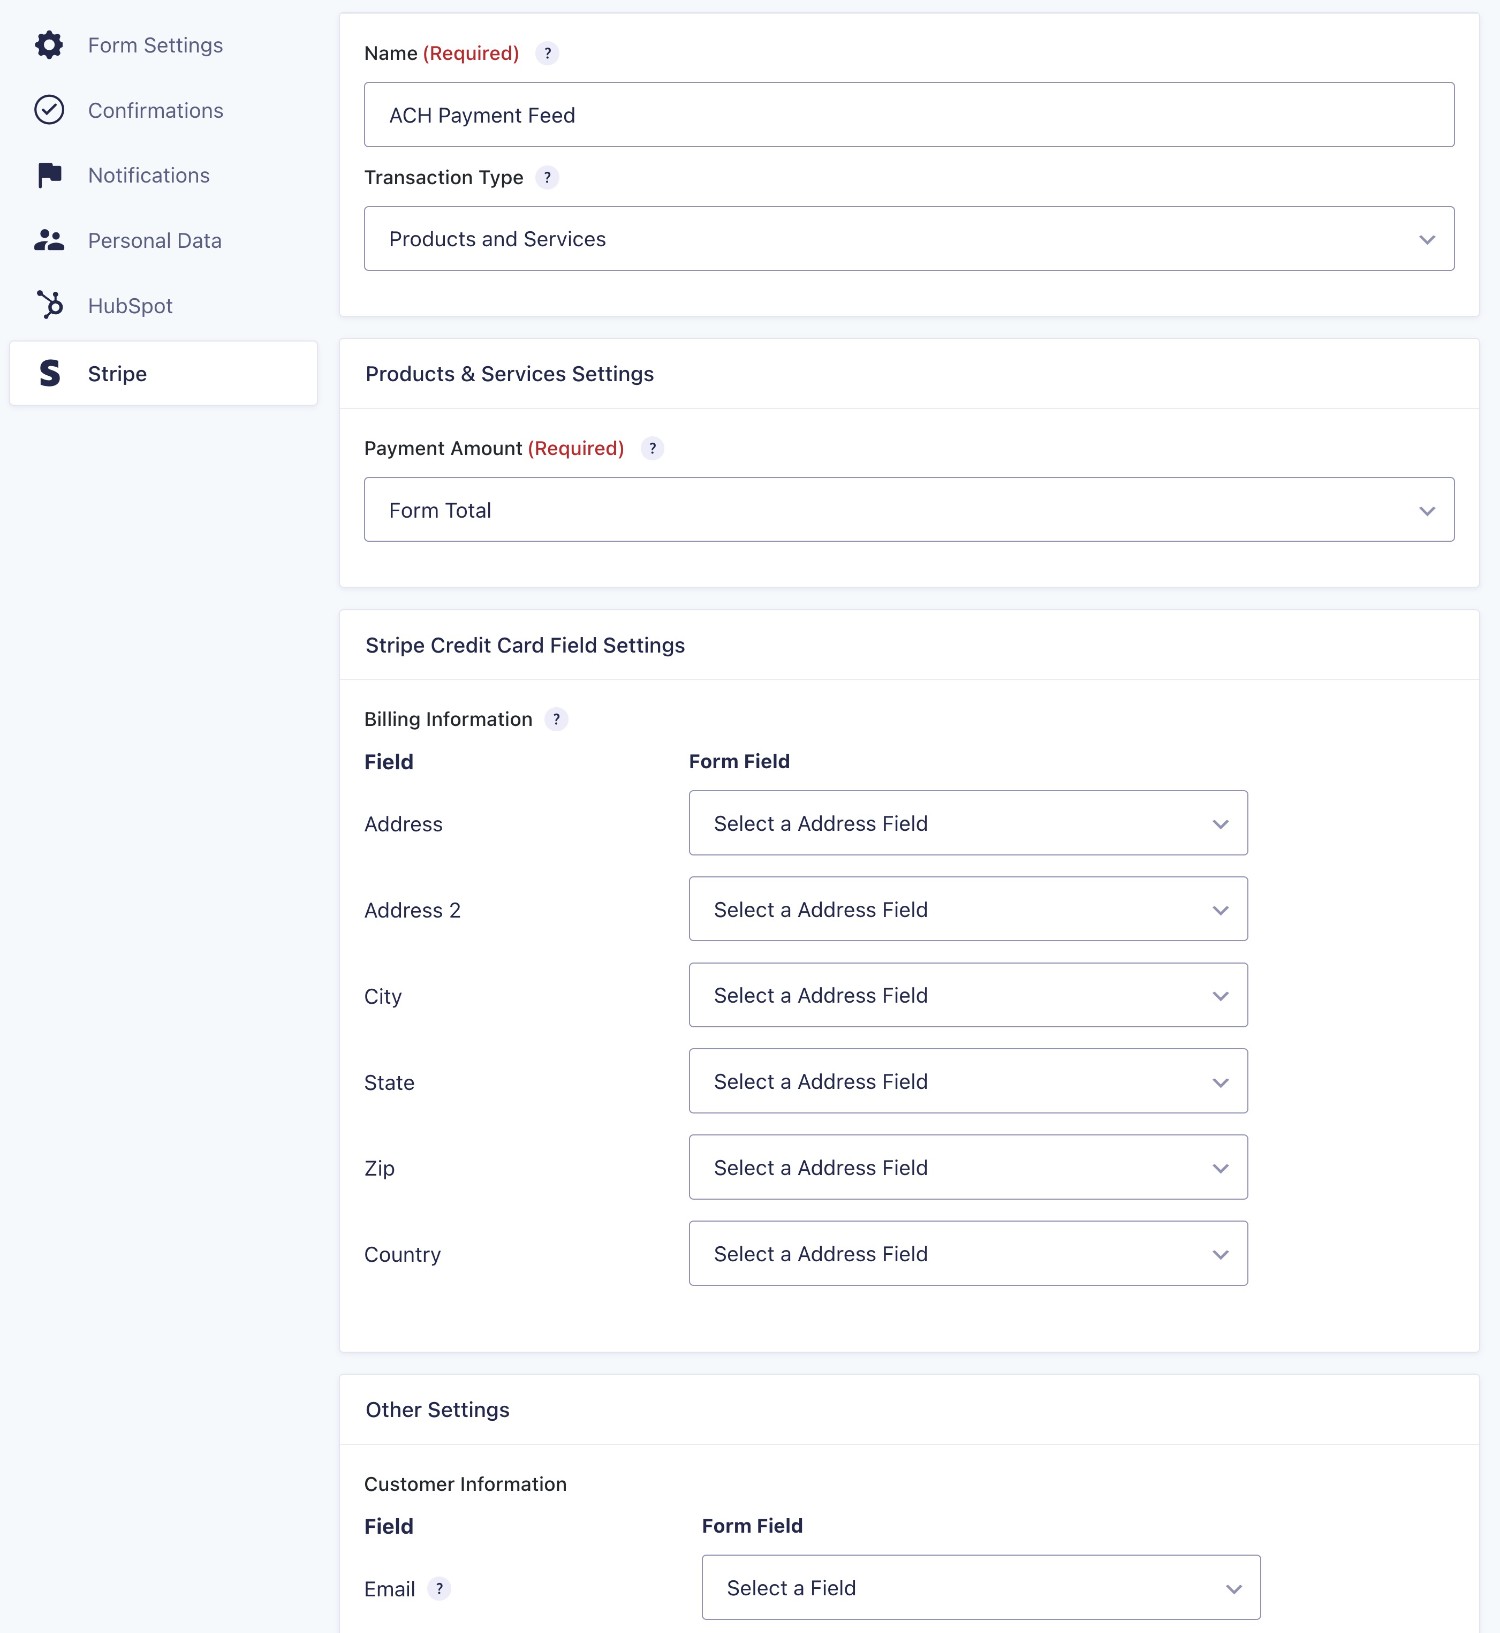
First, you’ll need to choose your Transaction Type:
- Products and Services – this is a one-time payment.
- Subscription – this will set up an automatic recurring payment that’s charged every billing cycle until canceled.
Once you choose the Transaction Type, you’ll see some additional settings below:
- You need to choose the payment amount. Usually, you’ll set this equal to the Total field from your form.
- You need to map the fields from your form to the Stripe billing details. For example, mapping the address field from your form to the address details in Stripe.
- If you’re setting up a subscription, you need to configure the billing cycle and other subscription-related details.
There are also a few other options, such as whether to send a Stripe receipt.
If you need some help here, check out the Stripe feed documentation.
Once you’ve filled everything out, click the Save Settings button at the bottom.
7. Configure the Stripe Form Field
Once you’ve set up at least one Stripe feed, you can go back to the form builder interface to configure the Stripe field and enable ACH payments:
- Open the settings for the Stripe field.
- Check the box to Enable additional payment methods to enable ACH payments (as well as any other additional payment methods that you enabled in Stripe, such as Google Pay or Apple Pay).
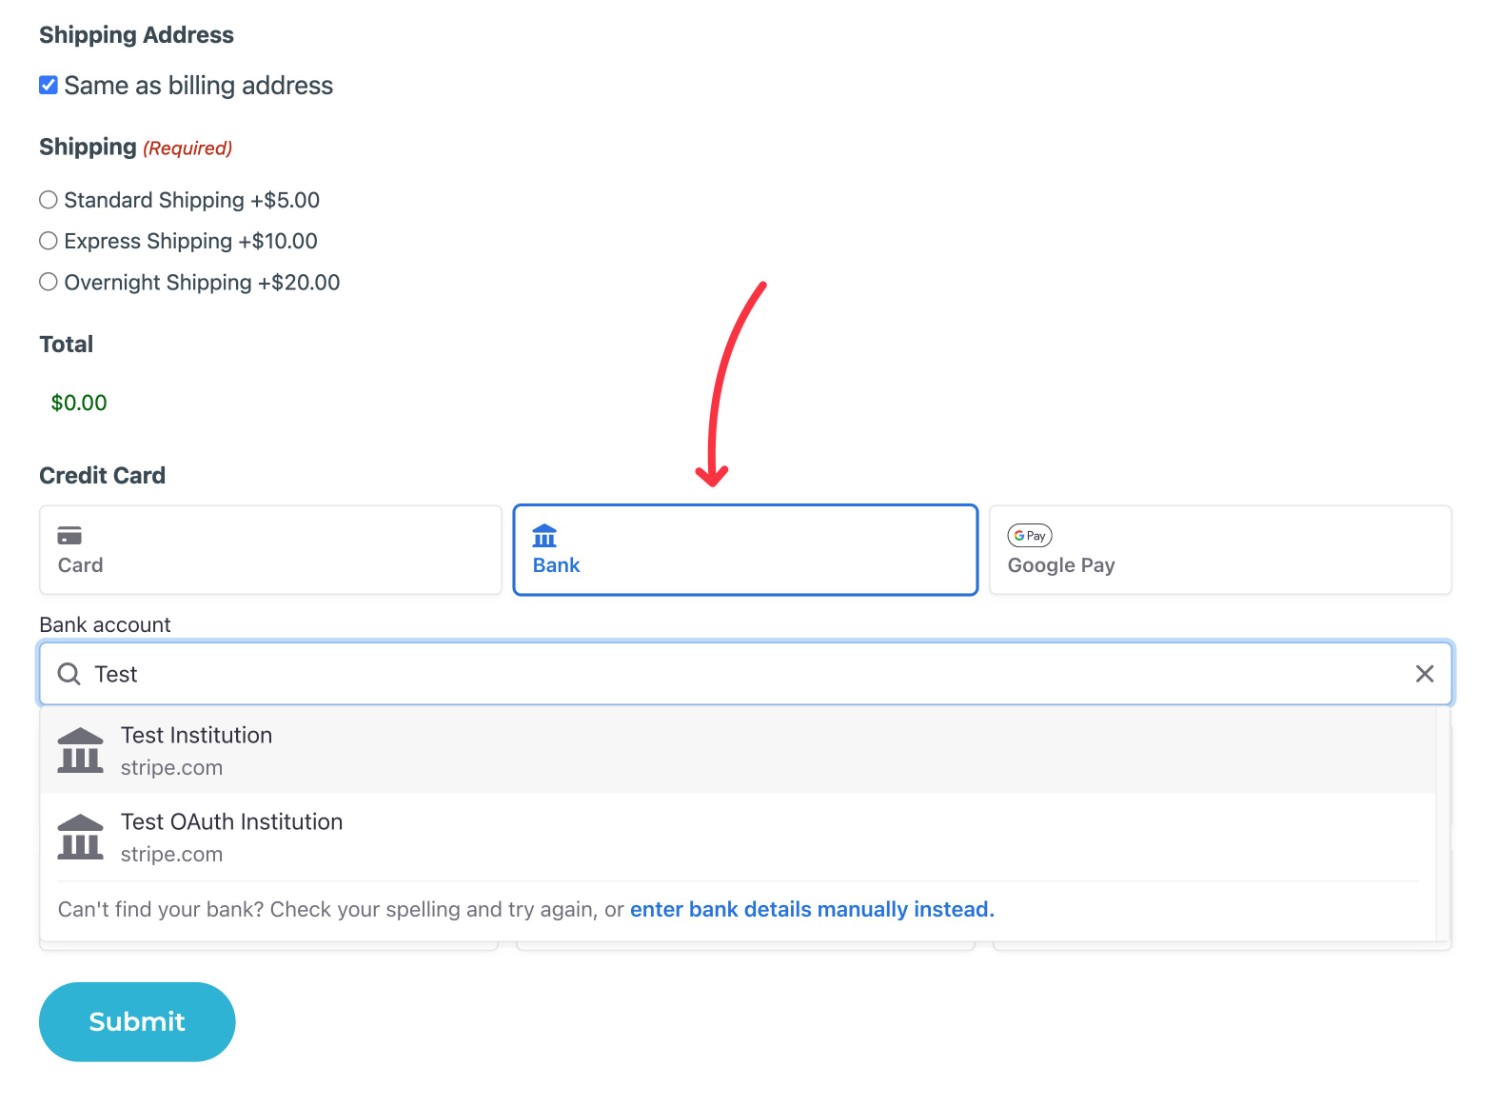
Note – you will not see the ACH payment field in the backend preview. However, it will be visible when you embed the form and you can also check it by clicking the Preview button next to the Save Form button.
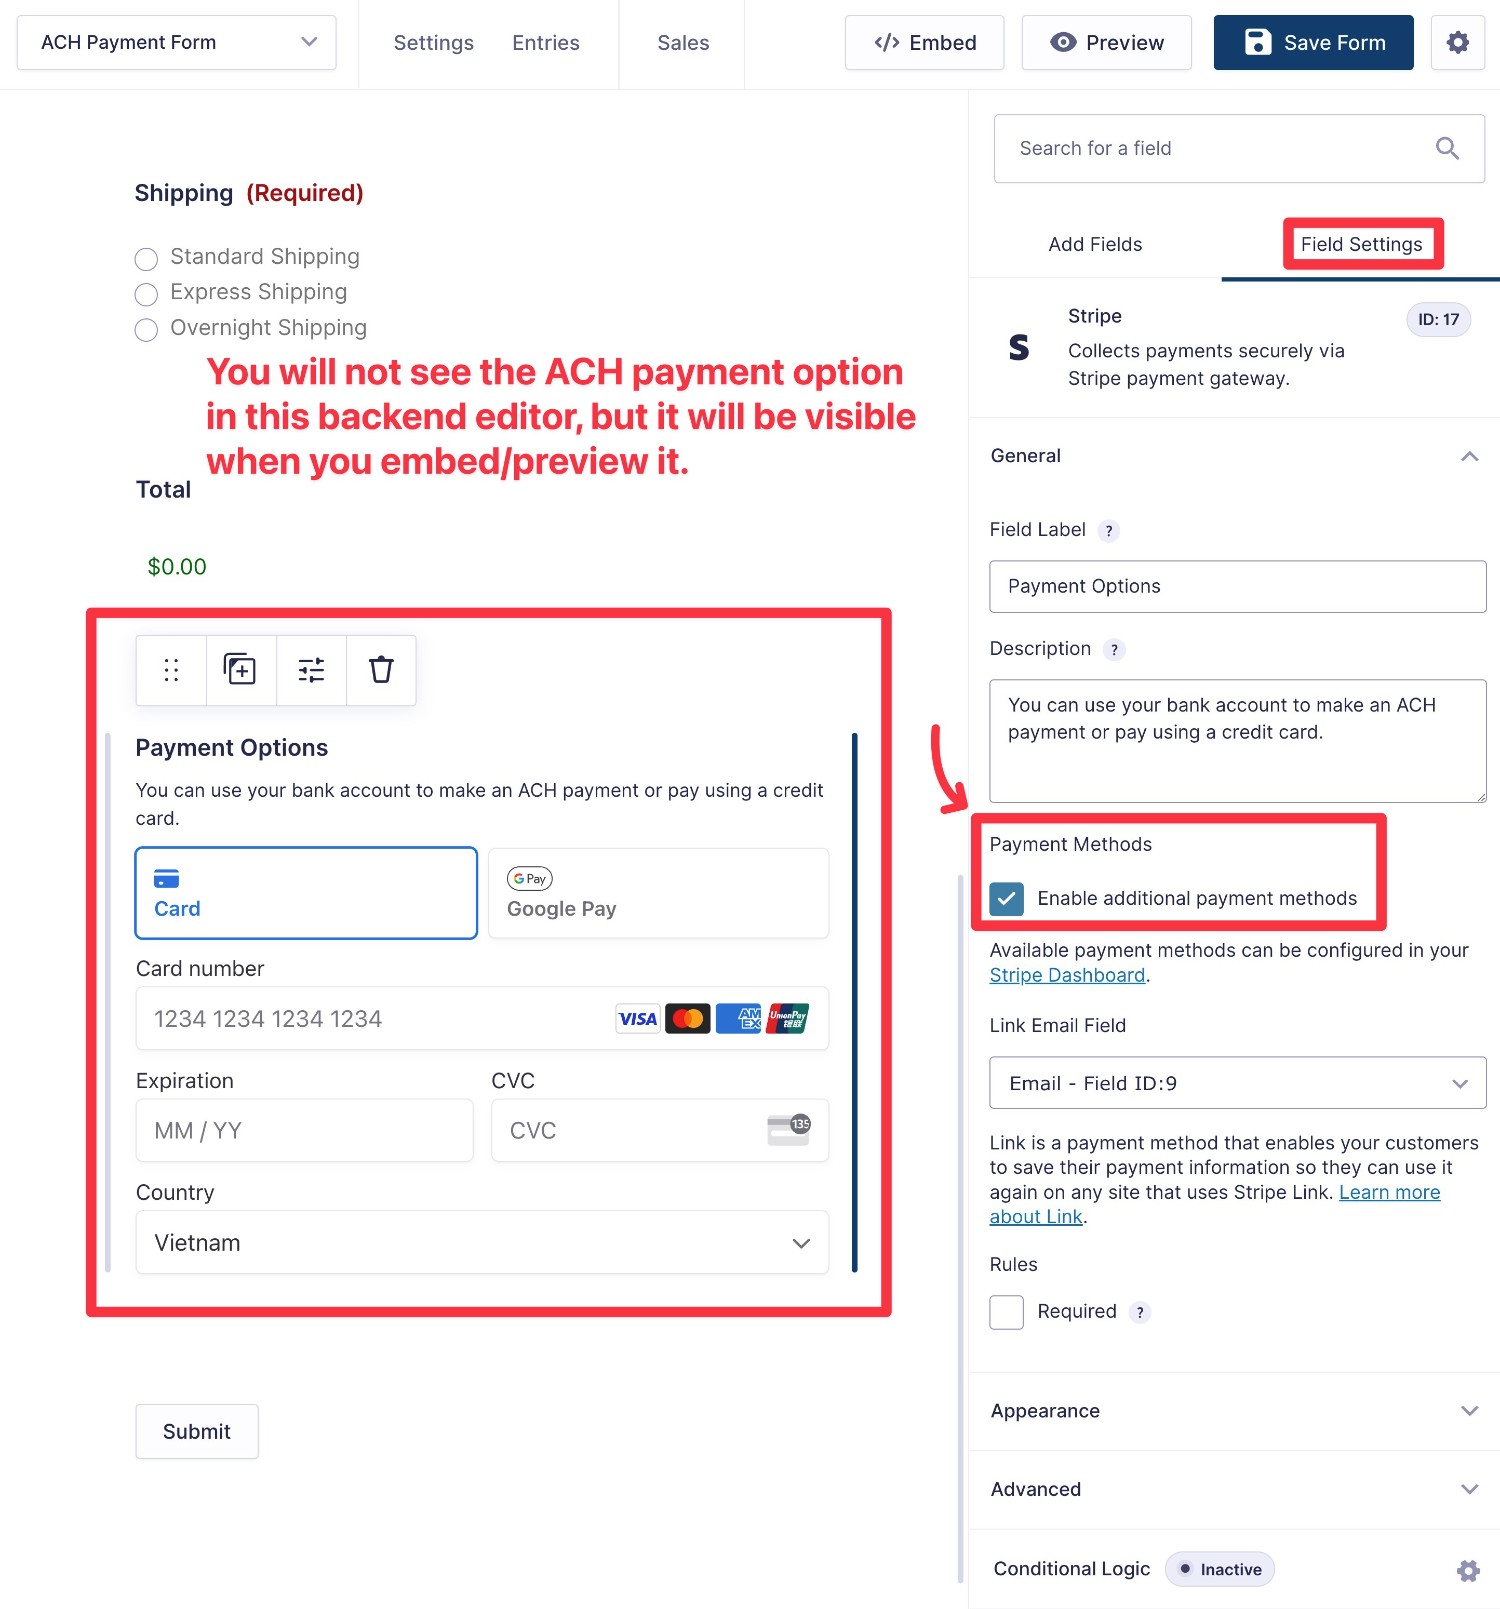
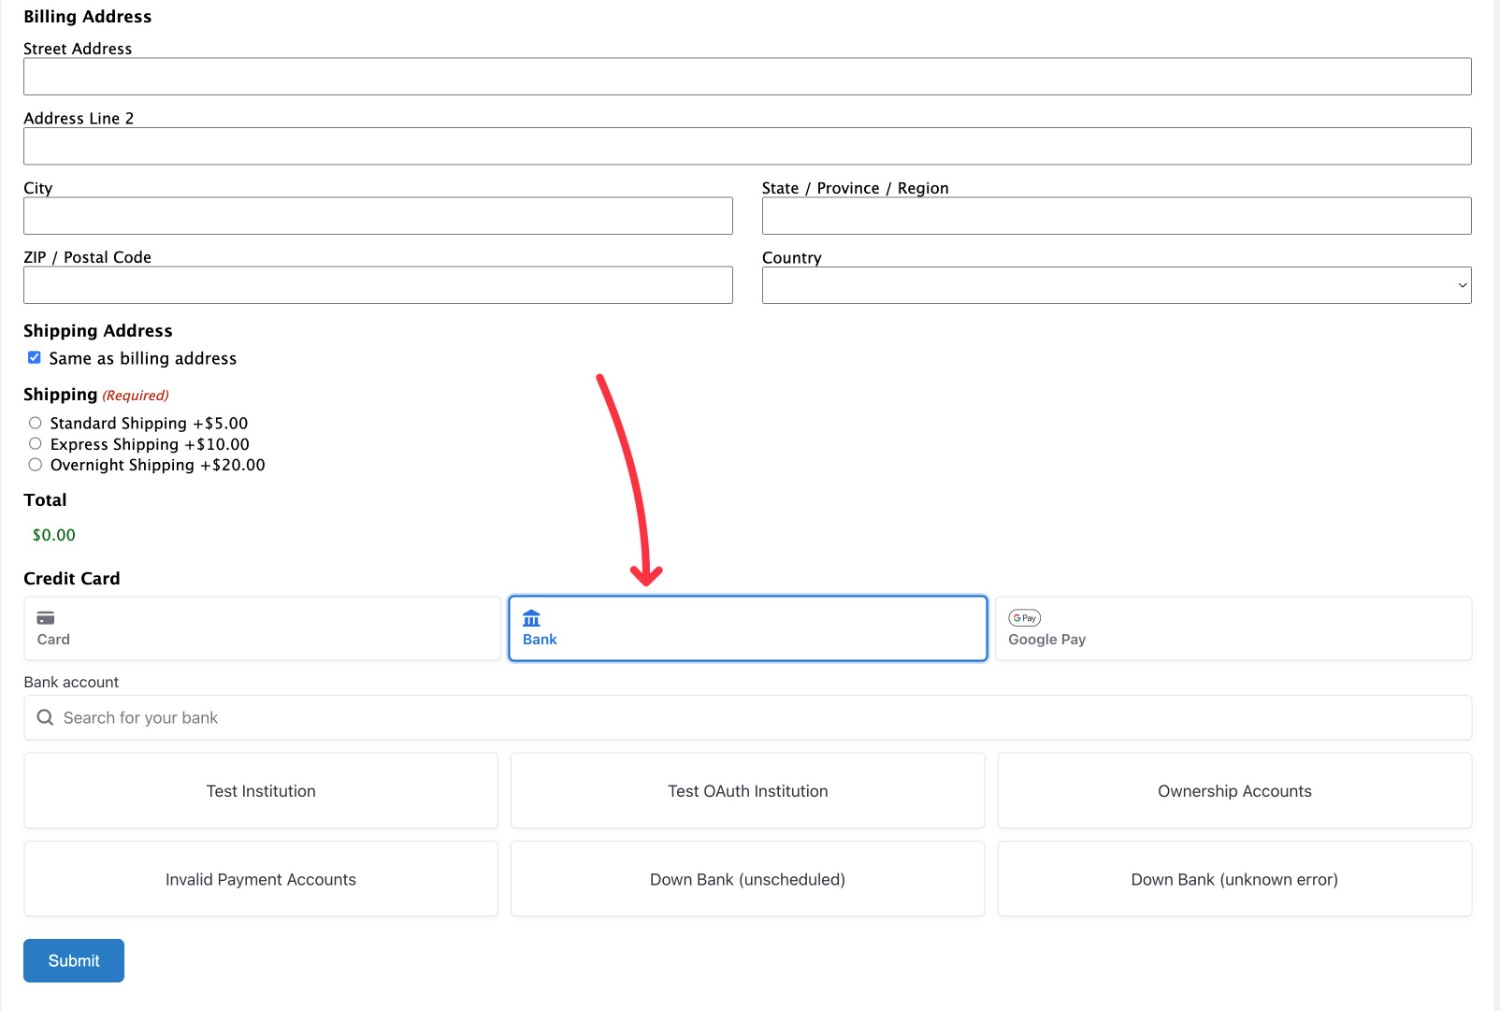
Here’s what the Preview looks like:
8. Embed Your Form and Start Accepting Payments
Now, you’re ready to add your Stripe ACH payment form to the frontend of your site and start accepting payments.
As part of this, we also recommend testing your form to ensure it works properly.
Embed Your Form
To embed your form:
- Open the page where you want to include your payment form
- Add the Gravity Forms block.
- Select your payment form from the drop-down in the block’s settings.
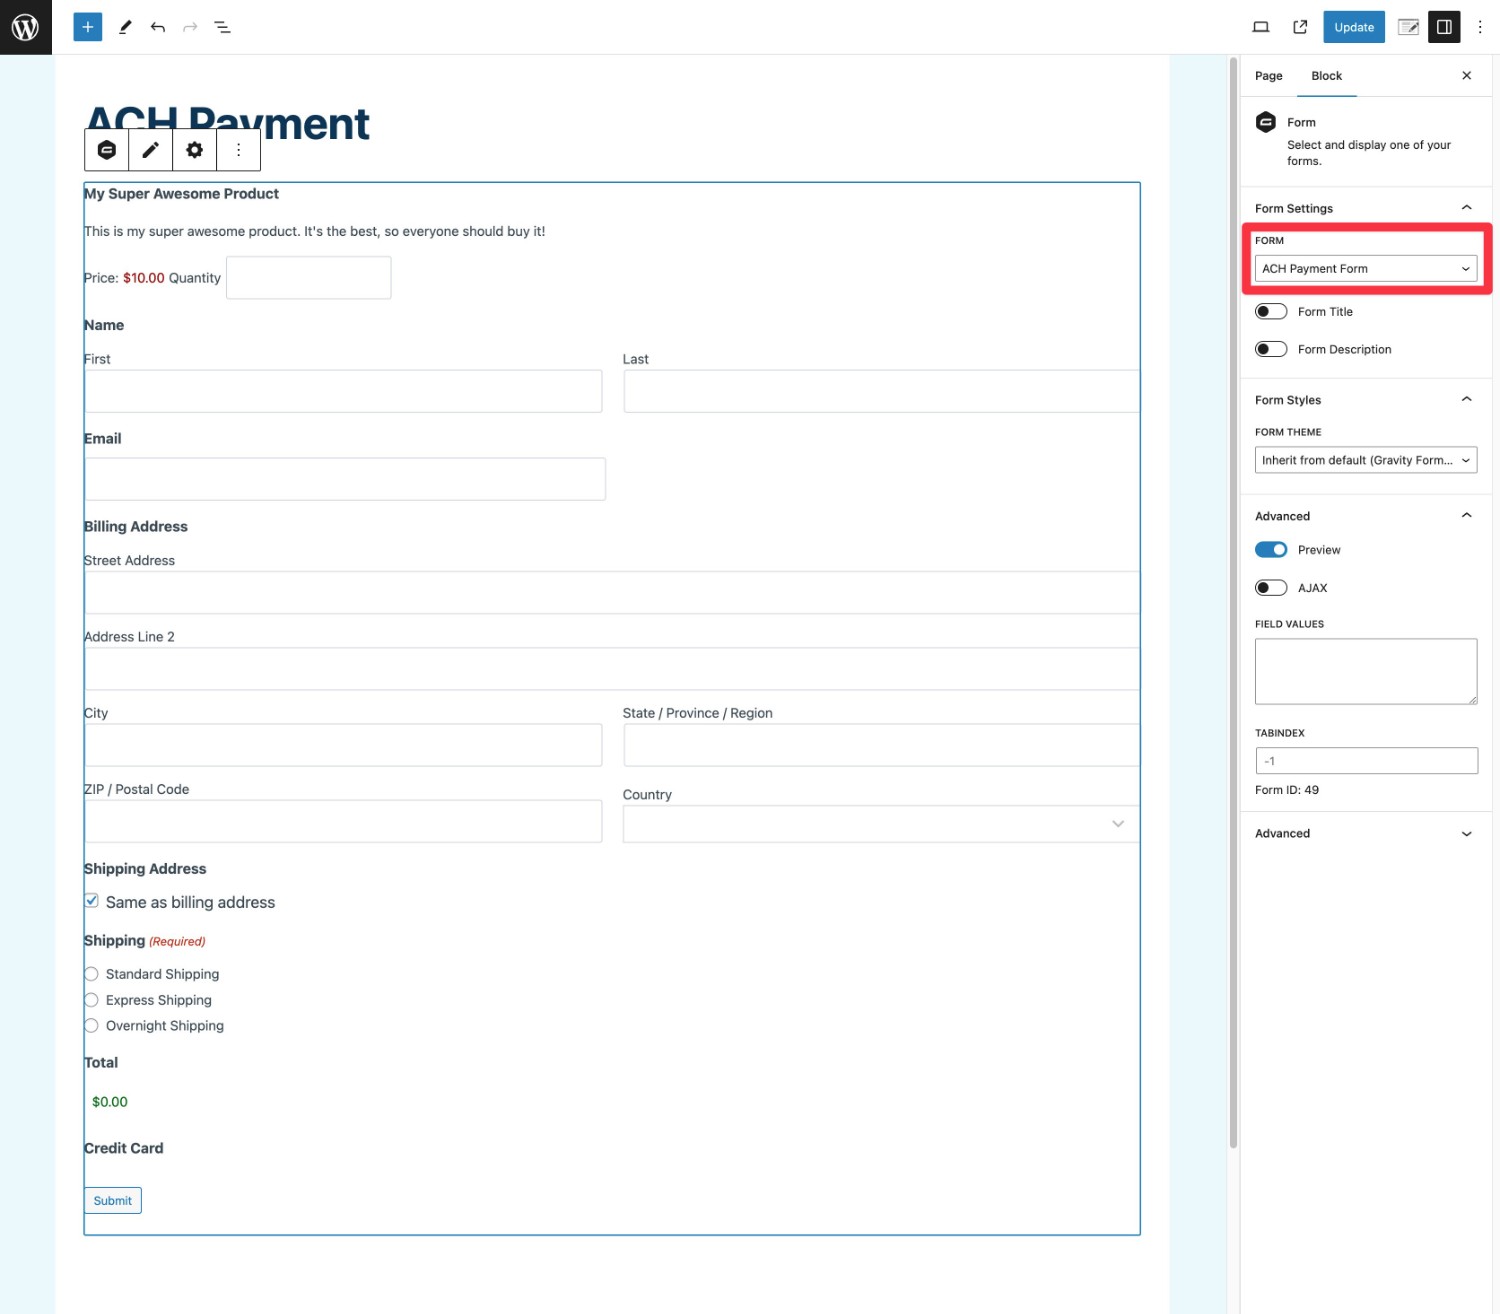
If you want to adjust the form’s styling, you can easily do so using the Orbital form theme and the style options in the editor. For more details, check out our full guide to styling forms.
Perform Some Test Payments
Once you’ve embedded your form, we recommend performing some test payments to make sure that it’s working as you expect it to.
Assuming you chose Test Mode when connecting to Stripe in Step #3, you can do this by using the test options that appear when you select Bank on your form, such as Test Institution.
Enable Live Mode to Accept Real ACH Payments
To start accepting real ACH payments, the last step is to enable Live Mode in the Gravity Forms Stripe settings:
- Go to Forms → Settings in your WordPress dashboard.
- Open the Stripe tab.
- Choose Live Mode.
- Click the Connect with Stripe.
- If you haven’t already done so, you’ll also need to add the Gravity Forms endpoint to the live Stripe dashboard and include your live signing secret. You can follow the same instructions from Step #3 above – you’re just doing everything for live mode instead of test mode.
- Click Save Settings.
Once you enable live mode, your form is ready to start processing real ACH payments.
You’ll be able to view payments from both your WordPress dashboard (Forms → Entries) and your Stripe dashboard.
Start Processing Online ACH Payments Today
That wraps up our step-by-step guide on how to accept ACH debit payments online using Stripe, Gravity Forms, and WordPress.
If you think that some/all of your customers might prefer paying directly from their bank accounts, offering ACH payments is a great strategy.
It can be especially useful when creating invoice forms, as a lot of clients will prefer to pay via their business bank accounts. However, it can also come in handy in other areas, including selling services or products.
To start accepting WordPress ACH debit payments, all you need is the core Gravity Forms plugin and the official Gravity Forms Stripe Add-On, which is available on the Pro, Elite, and Nonprofit licenses.
If you’re already holding the Pro or Elite licenses, you can follow this guide to get started today.
If you’re not, you can purchase a new license here or upgrade your existing Basic license and only pay the prorated difference.

If you want to keep up-to-date with what’s happening on the blog sign up for the Gravity Forms newsletter!
"*" indicates required fields