If there’s one thing that pretty much every type of WordPress form can benefit from, it’s email notifications.
You can use email notifications to provide a better experience for people filling out your forms, sending emails to provide them with confirmations, instructions, and other relevant information that they might need after submitting a form.
You can also use email notifications to streamline and optimize your own workflows. You could send yourself an email when someone submits a form, or send an email to the relevant member of your team (for larger organizations).
Because form notification emails are so helpful, we decided to dedicate an entire post to the email notification function in Gravity Forms.
We’ll cover the basics of how to set up one or more email notifications for your forms.
Then, we’ll get into some more advanced use cases, including conditional logic, multi-step workflows, additional notification triggers, and more.
We’ll also cover how you can audit/log notifications and how to improve the reliability of the email notifications that your site sends.
Let’s get into it…
Different use cases for email notifications
As we mentioned in the introduction, email notifications can be helpful for both visitor-facing and internal emails.
Here’s a quick rundown of a few example use cases for both types of emails…
Emails to visitors:
- Confirmation email – provide a confirmation that you received their form submission or payment.
- Record of submission – provide a copy of some/all of the data that they submitted via the form.
- Receipt – for payment/purchase forms, you could provide buyers with a receipt.
- Next steps – share details about what happens next.
- Onboarding – provide details about how to get started (e.g. for a new account registration).
- Lead magnet/content – share promised content (e.g. a lead magnet).
- Send files – attach a file to the notification that you send.
Emails to yourself and/or team members:
- New message – this lets you know immediately when someone fills out a contact form.
- New order – for purchase forms, you can know whenever someone makes an order/payment.
- New user registration – for user registration forms, you can know whenever someone signs up to your site.
- New user-generated content submissions – for example, if you have a job board, you could receive an email whenever someone submits a new job.
- Quote requests – receive details about the services that the person needs.
Again, these are just a few example use cases to give you some ideas of how you might use email notifications on your own site. These are, by no means, complete lists.
How to set up email notifications in Gravity Forms
Now, let’s get into the actual step-by-step guides on how to set up different types of email notifications in Gravity Forms.
For this guide, we’ll assume that you’ve already created a basic form for which you want to set up email notifications. If you haven’t done that yet, you can set up your form by going to Forms → New Form.
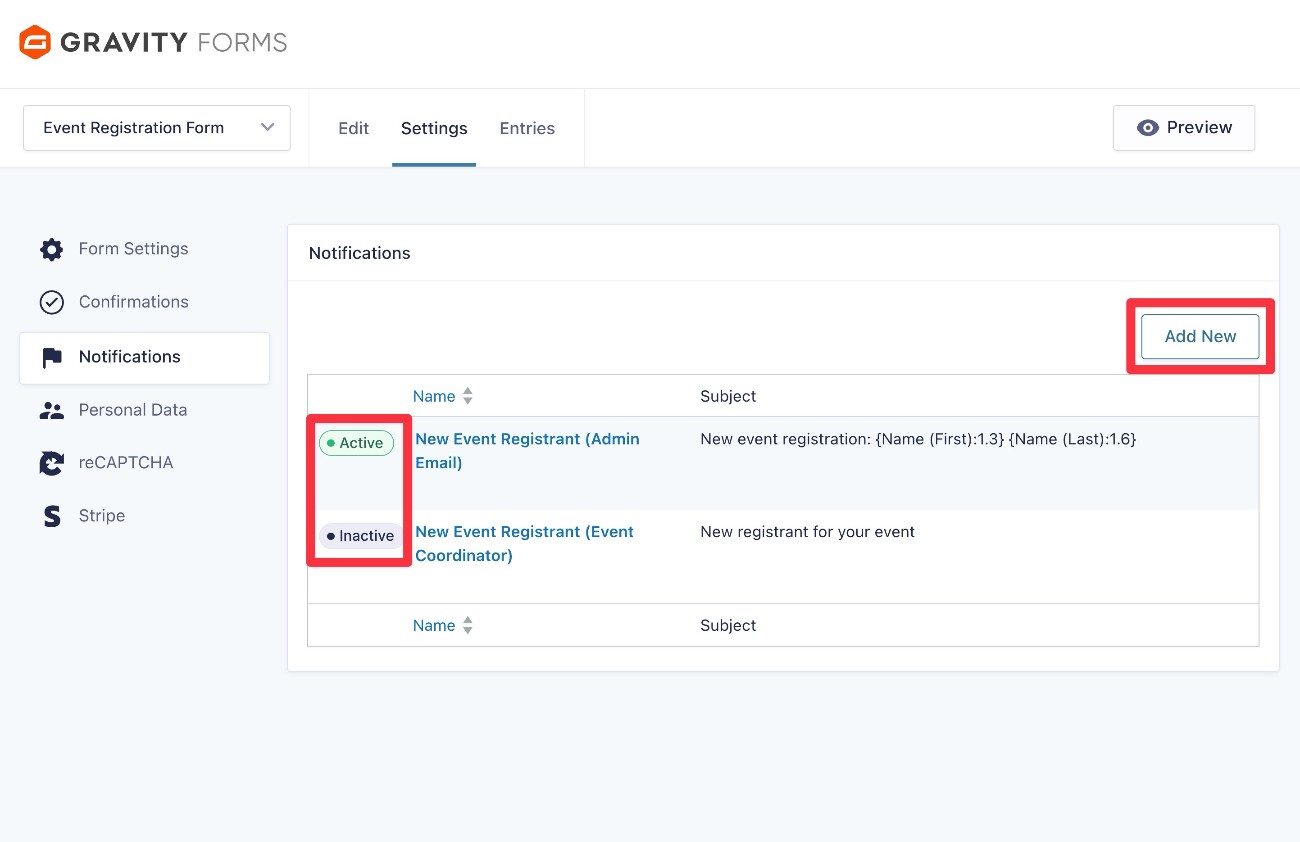
Create a single email notification
To create an email notification for any form, go to Settings → Notifications inside the form editor. Then, click Add new to create your first email notification.
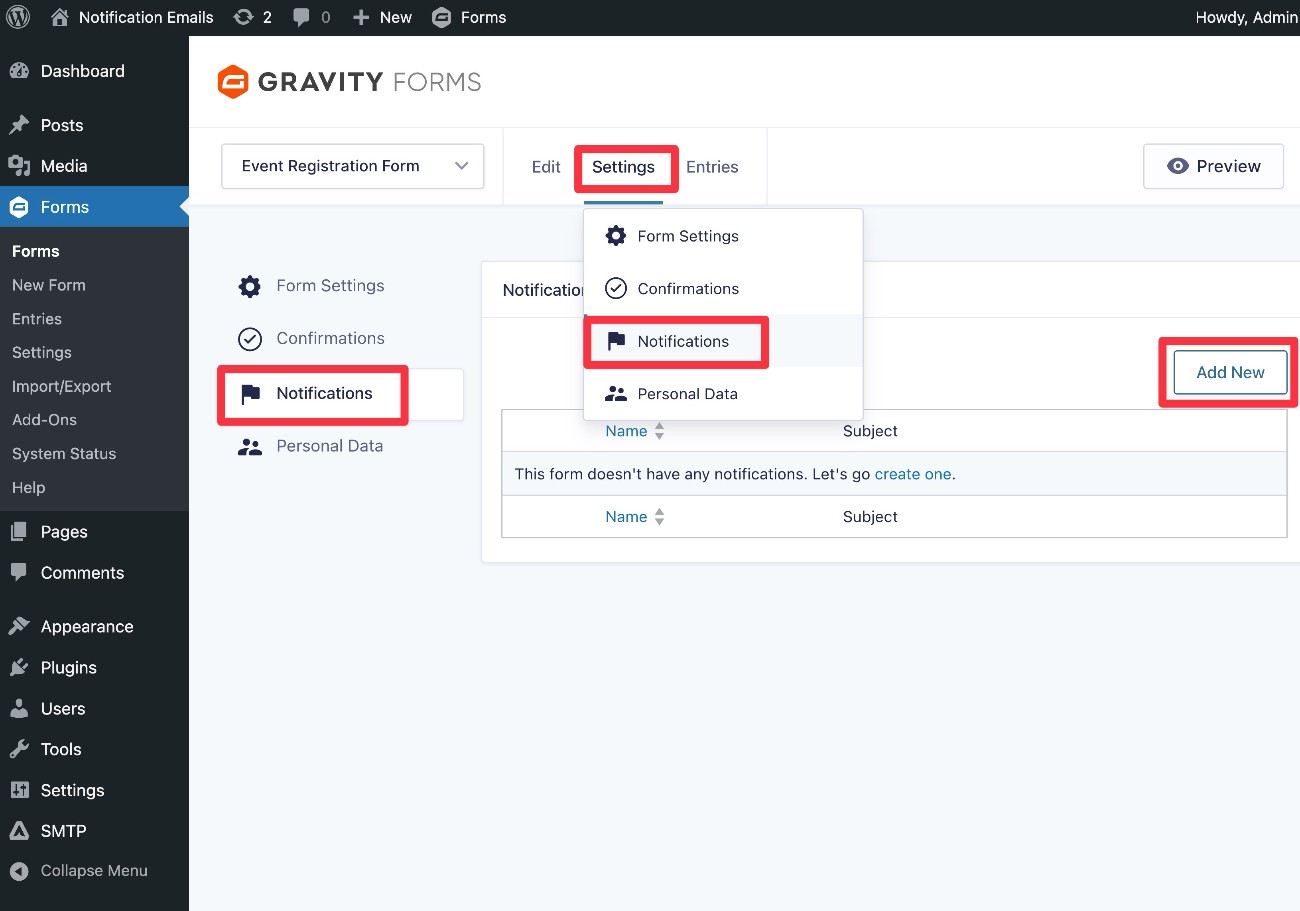
This will take you to the interface where you can fully configure the notification email.
Let’s go through it…
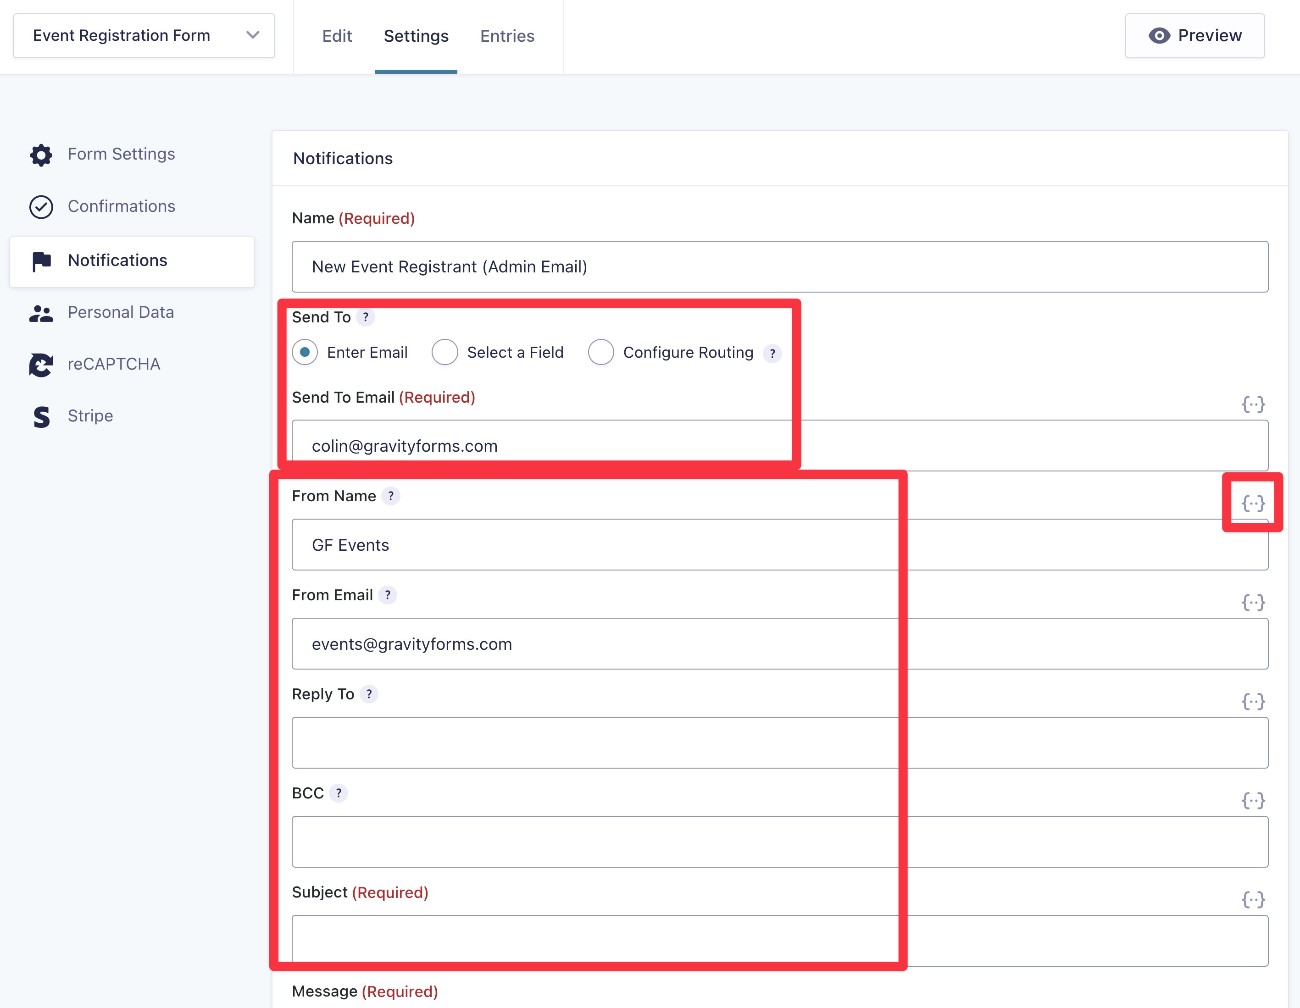
Choose who to send the email to and other email metadata
After giving your notification email a name, the first thing that you need to decide is to whom you want to send the email using the Send To and Send To Email options.
The Send To field gives you three different options:
- Enter Email – this lets you manually enter the email address to which you want to send the email. This works well if you want to always send the email to yourself or a member of your team.
- Select a Field – this lets you send the email to the email address that someone entered in the form. This works well if you want to send an email to the person who submitted the form (or to any email address that they entered in the form).
- Configure Routing – this lets you send the email to different email addresses based on how the person filled out the form. For example, you could send an email notification to your sales email if the person submitting the form chooses “Sales Question”, but send an email to your customer support email if they choose “Customer Support.”
Below that, you can choose where the email will be sent from, along with some other relevant details:
- From Name
- From Email
- Reply To – if you want the Reply To email address to be different from the From Email, you can enter that here.
- BCC – this is 100% optional and lets you BCC additional email addresses.
For all of these fields, it’s also important to note that you have two high-level ways of entering information:
- You can manually type in the information/details that you want to use.
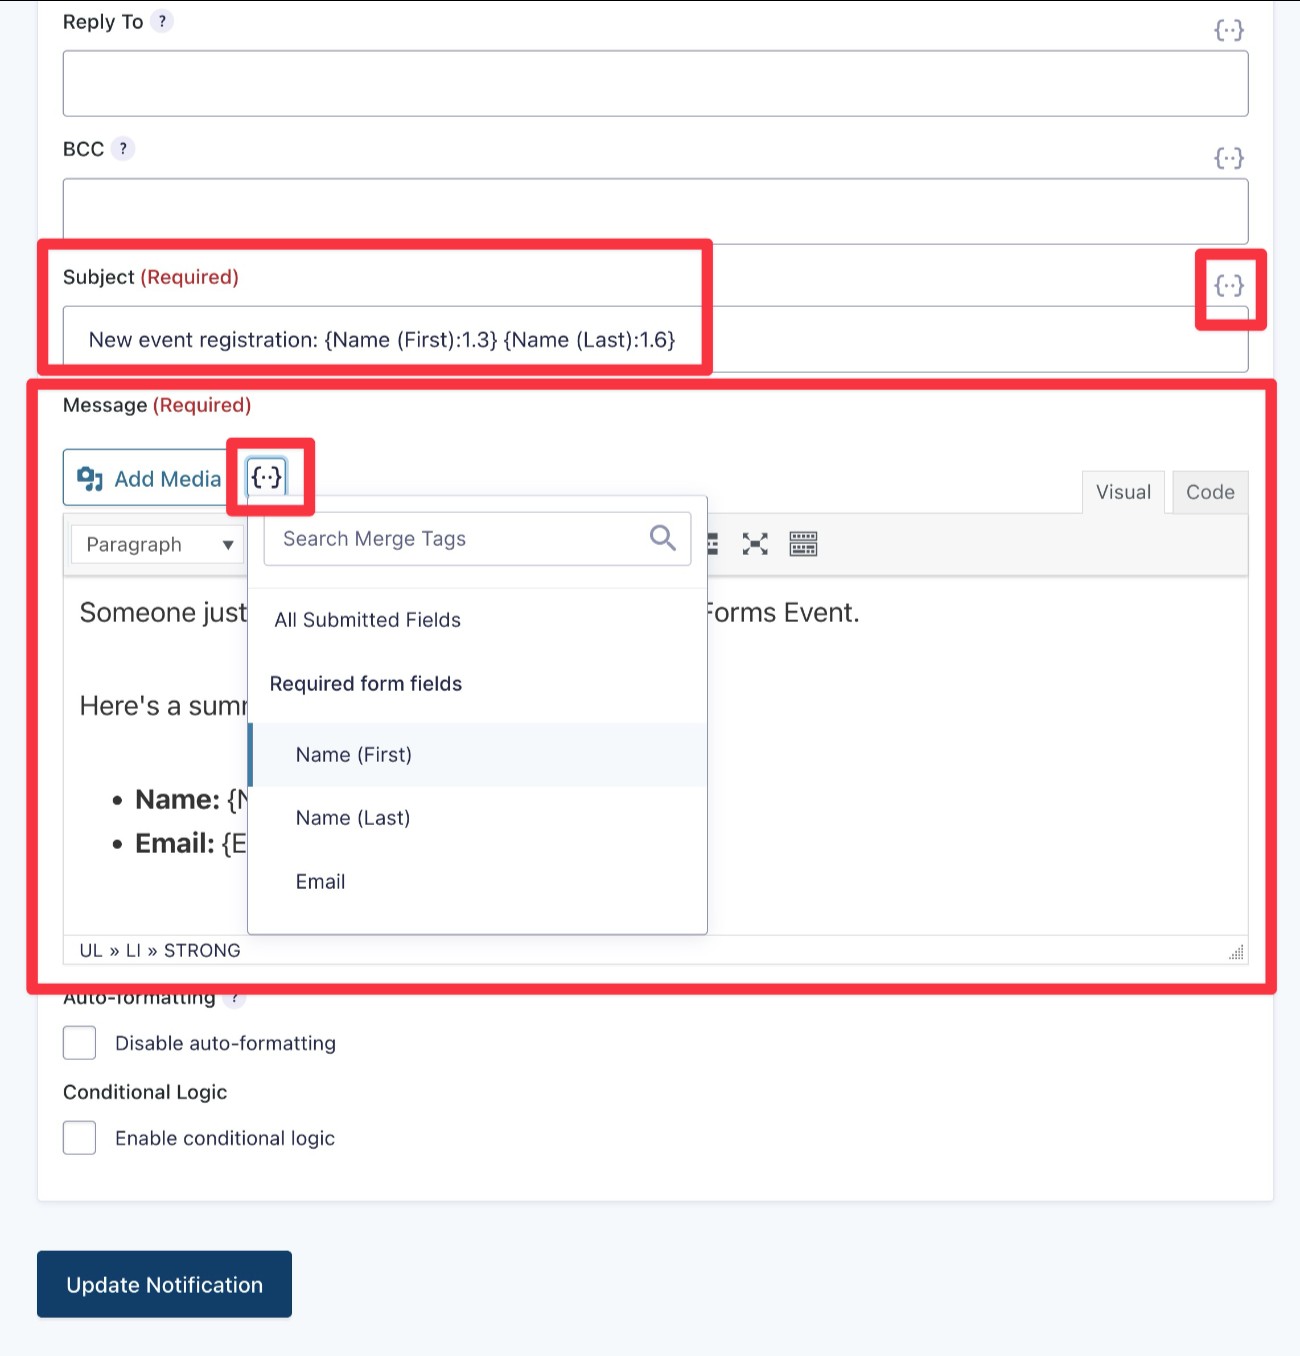
- You can use merge tags to dynamically insert information from the form and/or your site. You can access merge tags by clicking the {..} icon to the right of each field.
Enter email content
Next, you can configure the actual content of your email notification. There are two fields here:
- Subject – this will be the subject of the email address. Typically, you want to keep it short – most people recommend trying to stay under 50 characters if possible.
- Message – this is the body of the email address. You can add text content and format it using the editor. You also have the option of inserting images or other media by using the Add Media button.
As with the other fields, you have the option to enter static text and/or to use merge tags by clicking the {..} icon.
In many situations, you might want to use a mix of static text and merge tags.
For example, if you want to include a person’s name in the subject line, you could do something like this:
“Hi {Name (First):1.3}, here are the details of your quote request submission”
If the person entered “Dave” as their first name in the form, the actual email subject line that they see would look like this:
“Hi Dave, here are the details of your quote request submission”
You can do the same thing in the Message editor, which is useful if you want to provide a summary of the information that the person submitted in the form (perhaps as some type of confirmation).
If you’re sending an email to yourself or your team, you can also use merge tags to insert lots of useful data. For example, you could include the URL of the page where the person submitted the form, which could be helpful information if you’ve embedded a form in multiple different pages.
Configure other settings
Finally, you get a couple of additional settings at the bottom:
- Auto-formatting – if you want to use your own HTML to create email notification content, you can disable auto-formatting to avoid issues.
- Conditional Logic – this lets you only send the notification if certain conditions are met. We’ll cover this in a dedicated section below.
Once you’ve made all of your choices, click the Update Notification button to save your notification.
Set up and manage multiple notification emails
Gravity Forms lets you create as many notification emails as you want, which gives you a lot of flexibility in setting up your forms.
You can also use conditional logic rules to only send certain email notifications if one or more conditions are met, which we’ll discuss in the next section.
To create multiple email notifications, go back to the Notifications settings area (Settings → Notifications in the form editor) and click the Add New button again.
You can repeat the process to continue adding as many email notifications as needed.
The Notifications area also lets you manage all of the notifications associated with the form, including temporarily or permanently disabling specific notifications when needed.
To disable an email, just click the green Active button. After clicking it, it should change to Inactive. You can click again to make the email active.
Add conditional logic to an email notification
Earlier, we showed you how you can use the Configure Routing option to send emails to different email addresses based on how a person filled out the form.
However, you can also use conditional logic in other ways when setting up your notification emails. Some examples of what you might want to do could include the following:
- Changing email content or subject line based on how a person filled out the form.
- Using a different From Name or From Email based on how a person filled out the form.
- Choosing not to send a notification email in certain situations.
To handle all of these situations, you can use the Enable conditional logic checkbox at the bottom of the notification settings area.
When you check the box, you’ll be able to add conditions that must be met for this specific notification email to send.
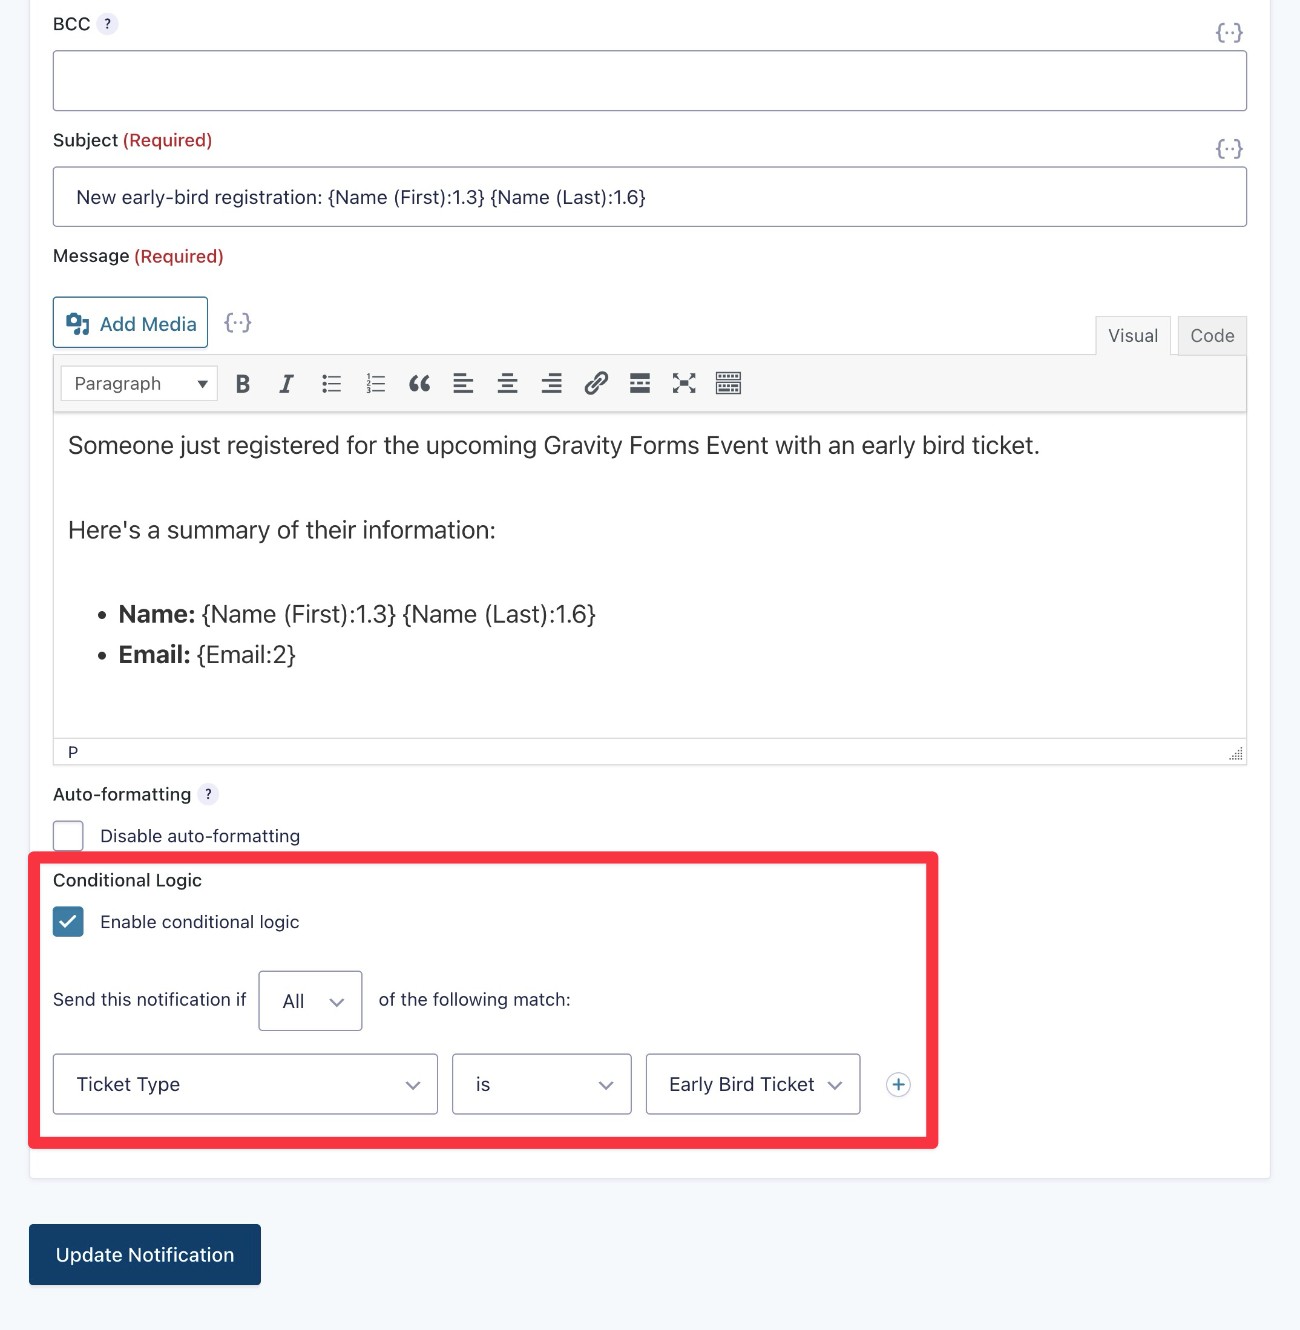
If you want to send different notification emails based on how someone filled out the form, you set it up like this:
- Create separate notification emails for each unique scenario.
- Add a conditional logic rule to each email so that only one email sends in each unique scenario.
Using additional notification triggers in Gravity Forms integrations
In addition to what we’ve covered so far, it’s important to note that some Gravity Forms add-ons will add their own triggers for sending notification emails.
For example, if you’re using one of the Gravity Forms payment processor integrations to create a payment form, you’ll be able to access additional triggers based on payment statuses such as:
- Successful payment
- Refunded payment
- Canceled subscription
If you’ve activated an add-on that includes these triggers and created the relevant feed for that form, you’ll be able to choose the trigger in the notification editor interface that we showed you above.
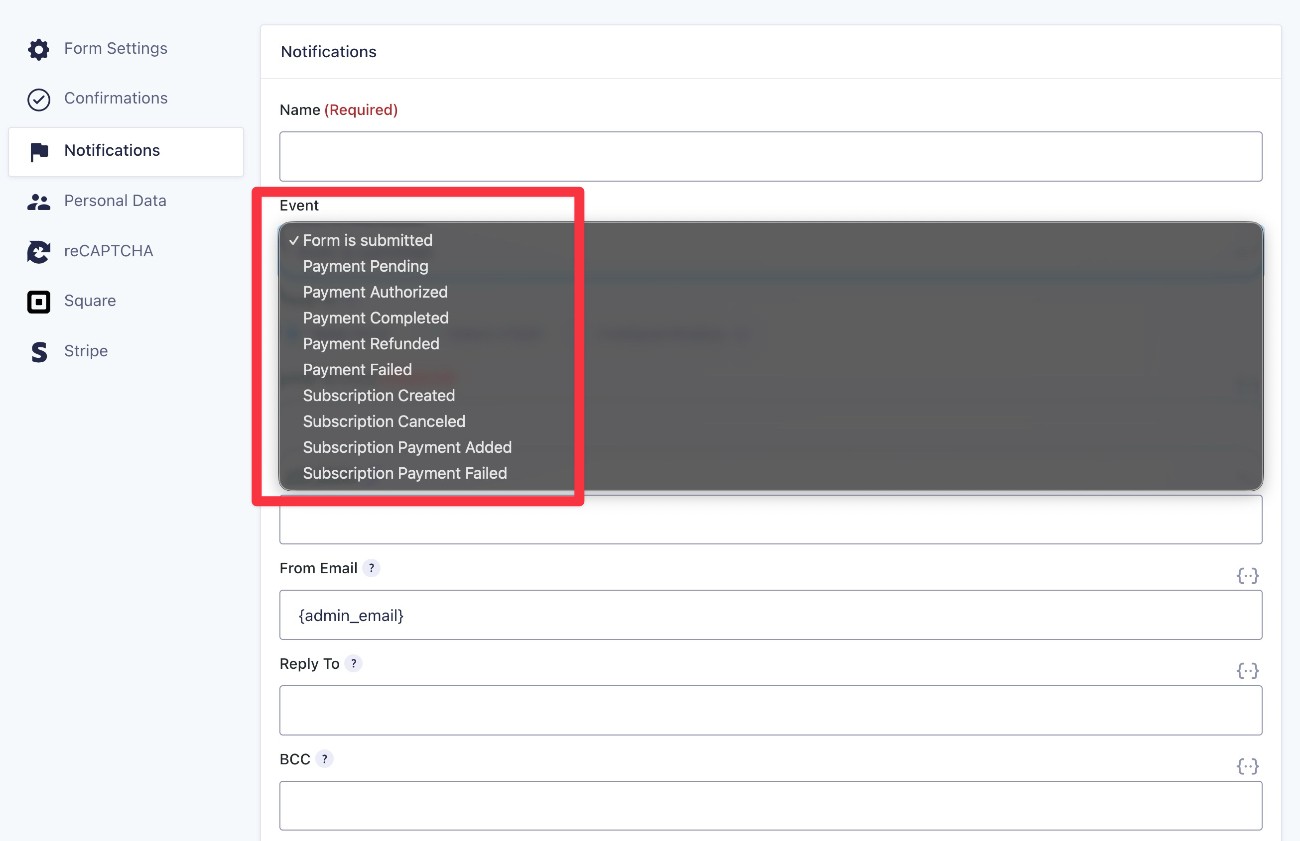
Note – you will only see these additional triggers if you’ve already created a feed for the form (e.g. a Stripe feed for a Stripe payment form).
How to improve notification email reliability with a transactional email service
With the default way that WordPress sends emails (wp_mail), you might run into issues with your Gravity Forms notification emails not reliably getting sent or getting flagged as spam by recipients’ email inboxes.
This is because WordPress is trying to send emails using your web hosting server, which isn’t optimized for sending emails and lacks proper authentication (which can make emails look spammy).
These problems are not unique to Gravity Forms. Instead, it’s just a result of the default way that WordPress sends its emails and these issues will happen to any plugin that uses the default WordPress email system (along with core WordPress emails).
The high-level solution to fix this is to configure your WordPress site to send emails using a dedicated email sending service instead. These services are called transactional email services.
While sites sending high volumes of emails might need to use a paid service, most regular WordPress sites will be fine with a free option. We cover the top options in our roundup of the best WordPress email sending services.
You have two ways to fix this for your Gravity Forms notification emails:
- Gravity Forms email integrations – these will let you send your Gravity Forms notification emails using a dedicated sending service, but it won’t change anything for the non-Gravity Forms emails that your site sends.
- A WordPress SMTP plugin like Gravity SMTP – the Gravity SMTP plugin lets you configure your WordPress site to send all of its emails using a dedicated email sending service. This includes Gravity Forms notification emails, along with core WordPress emails and emails from any other plugin that uses wp_mail.
Let’s quickly go through these two options
Gravity Forms transactional email integrations
If you’re just looking for a way to specifically make your form notification emails more reliable, Gravity Forms offers dedicated add-ons for some of the best transactional email services:
All three integrations are available on every single Gravity Forms license, including the Basic license.
As we mentioned above, these add-ons are exclusively for your Gravity Forms notification emails and will not affect how WordPress sends other emails.
If you’re interested in using one of these add-ons, we’ve published blog posts with detailed tutorials for each one:
Gravity SMTP plugin
If you want a solution to improve the reliability of all of your site’s emails (including form notification emails), you can use a WordPress SMTP plugin like the Gravity SMTP plugin.
Gravity SMTP is available for free to anyone holding one of these Gravity Forms licenses:
- Elite
- Nonprofit
- Developer
Gravity SMTP lets you configure your WordPress site to use 16+ different email sending services, and there’s also a custom SMTP option that lets you connect to additional services.
Beyond that, it also includes lots of other useful features to improve your site’s emails, including the following:
- Detailed email logging.
- High-level email reports, including open tracking.
- Backup email sending services.
- Real-time alerts if emails fail to send.
- Email suppression lists.
Our ultimate guide to Gravity SMTP covers everything that you need to know about the plugin, including how to set it up. We’ve also written detailed tutorials for all of the integrations that Gravity SMTP supports:
- Amazon SES
- Brevo
- Elastic Email
- Emailit
- Gmail / Google Workspace
- Mailchimp Transactional
- MailerSend
- Mailgun
- Mailjet
- Outlook / Microsoft 365
- Postmark
- Resend
- SendGrid
- SMTP2Go
- SparkPost
- Zoho Mail
How to track email notifications (and resend if needed)
To help you stay on top of the email notifications that your site sends, Gravity Forms will log every notification associated with each form submission.
You can also manually resend email notifications if needed.
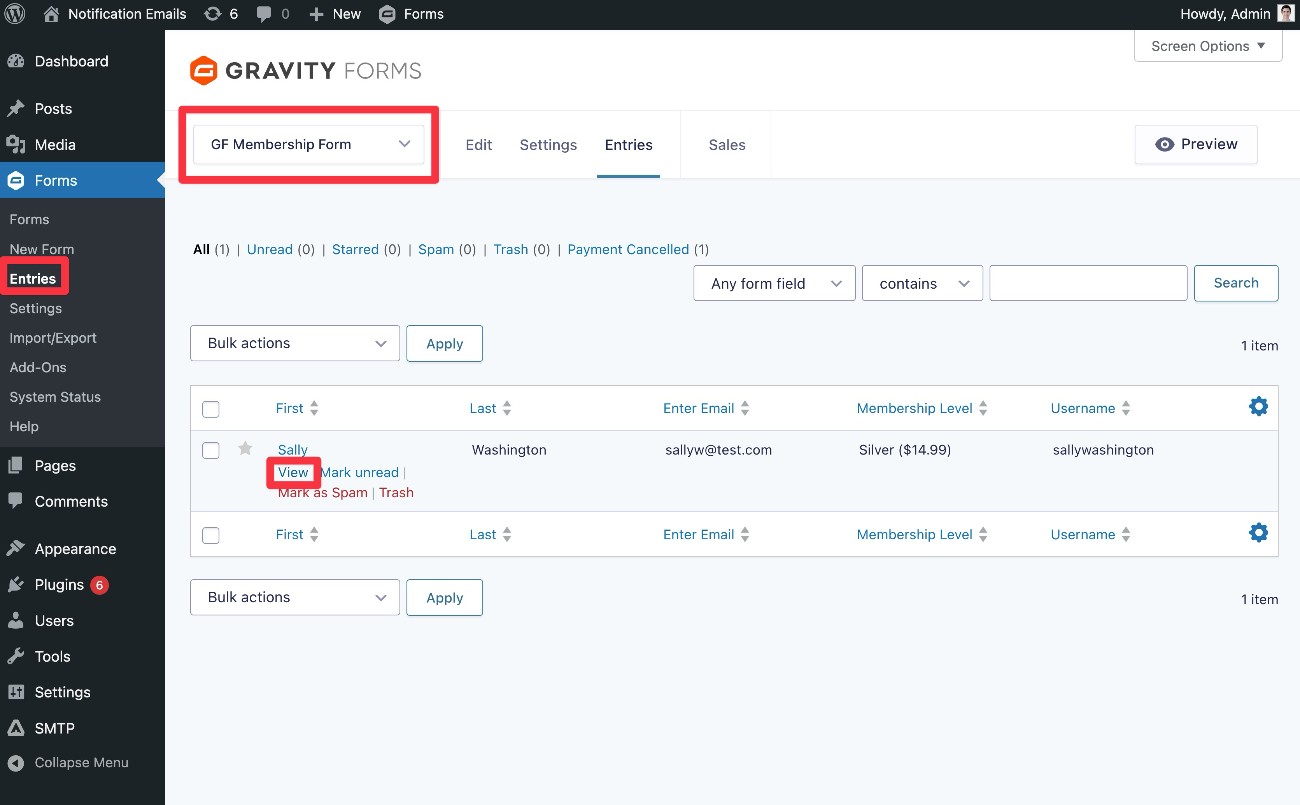
Here’s how to see the email notifications that have been sent for each form submission:
- Go to Forms → Entries in your WordPress dashboard.
- Use the drop-down to select the form that you want to check. This will display a list of form entries for just that form.
- Hover over the specific form entry that you want to check and click View.
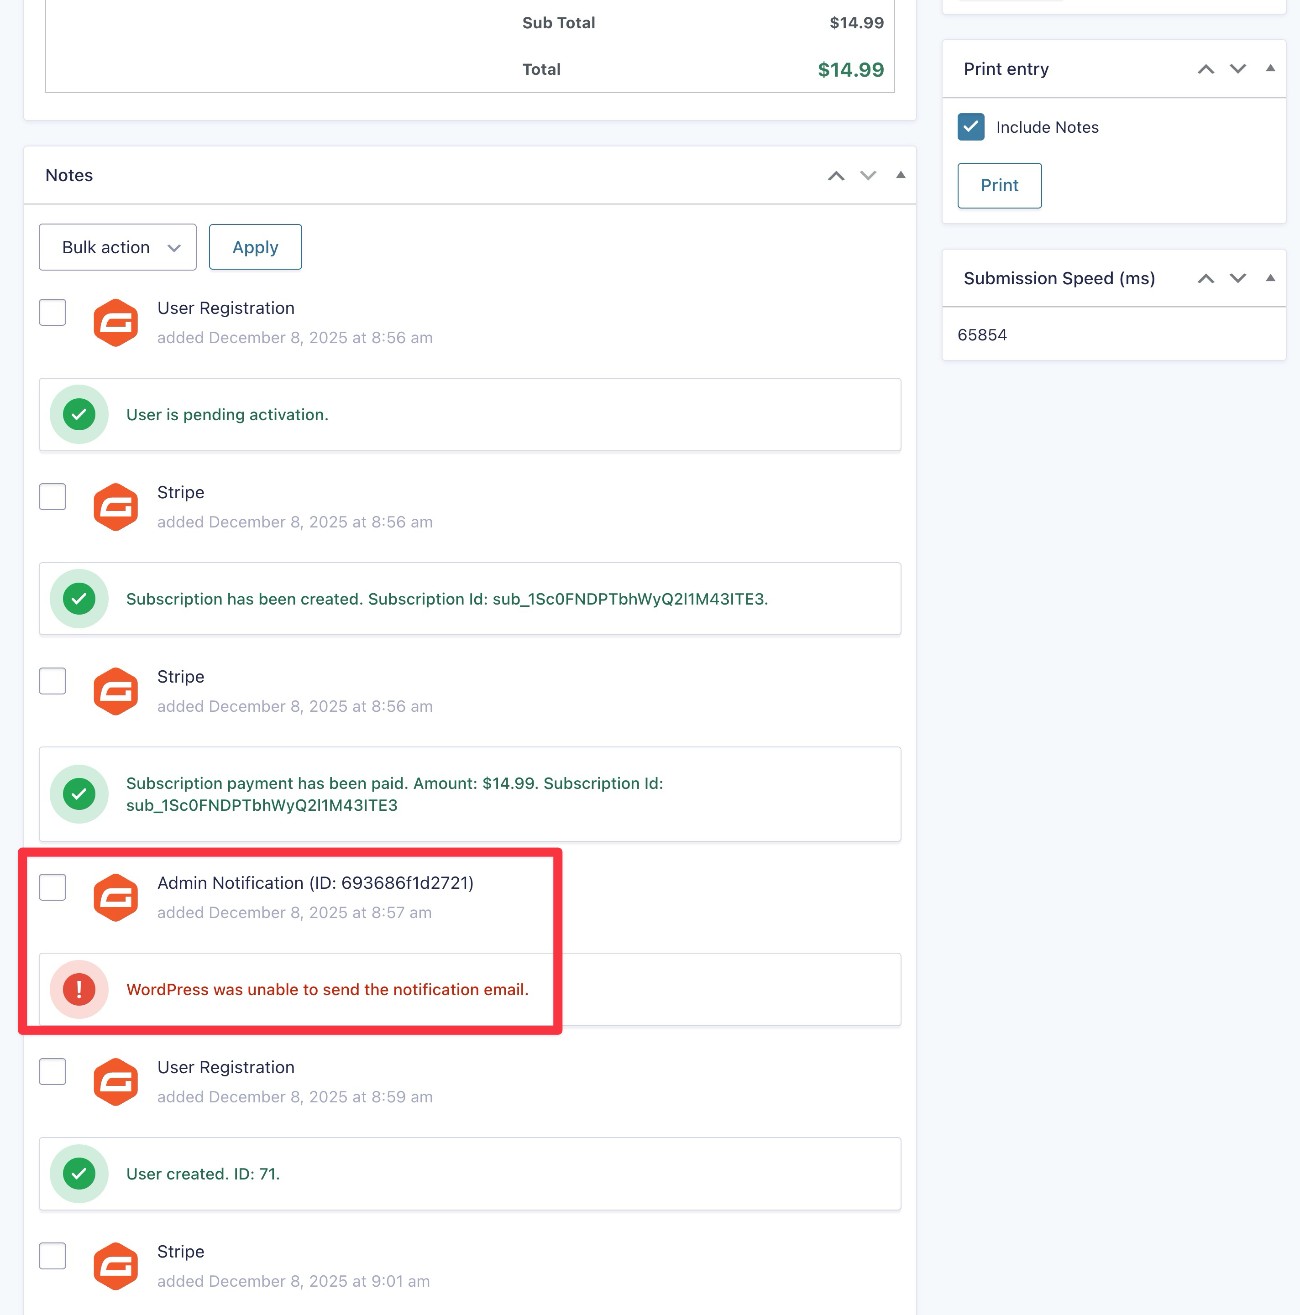
In the entry details interface, you have a couple of options.
First, you can scroll down to the Notes section to view a list of activities for that entry. As part of that, you’ll be able to see any form notifications, including whether there was an issue with the notification (as is the case in our example screenshot).
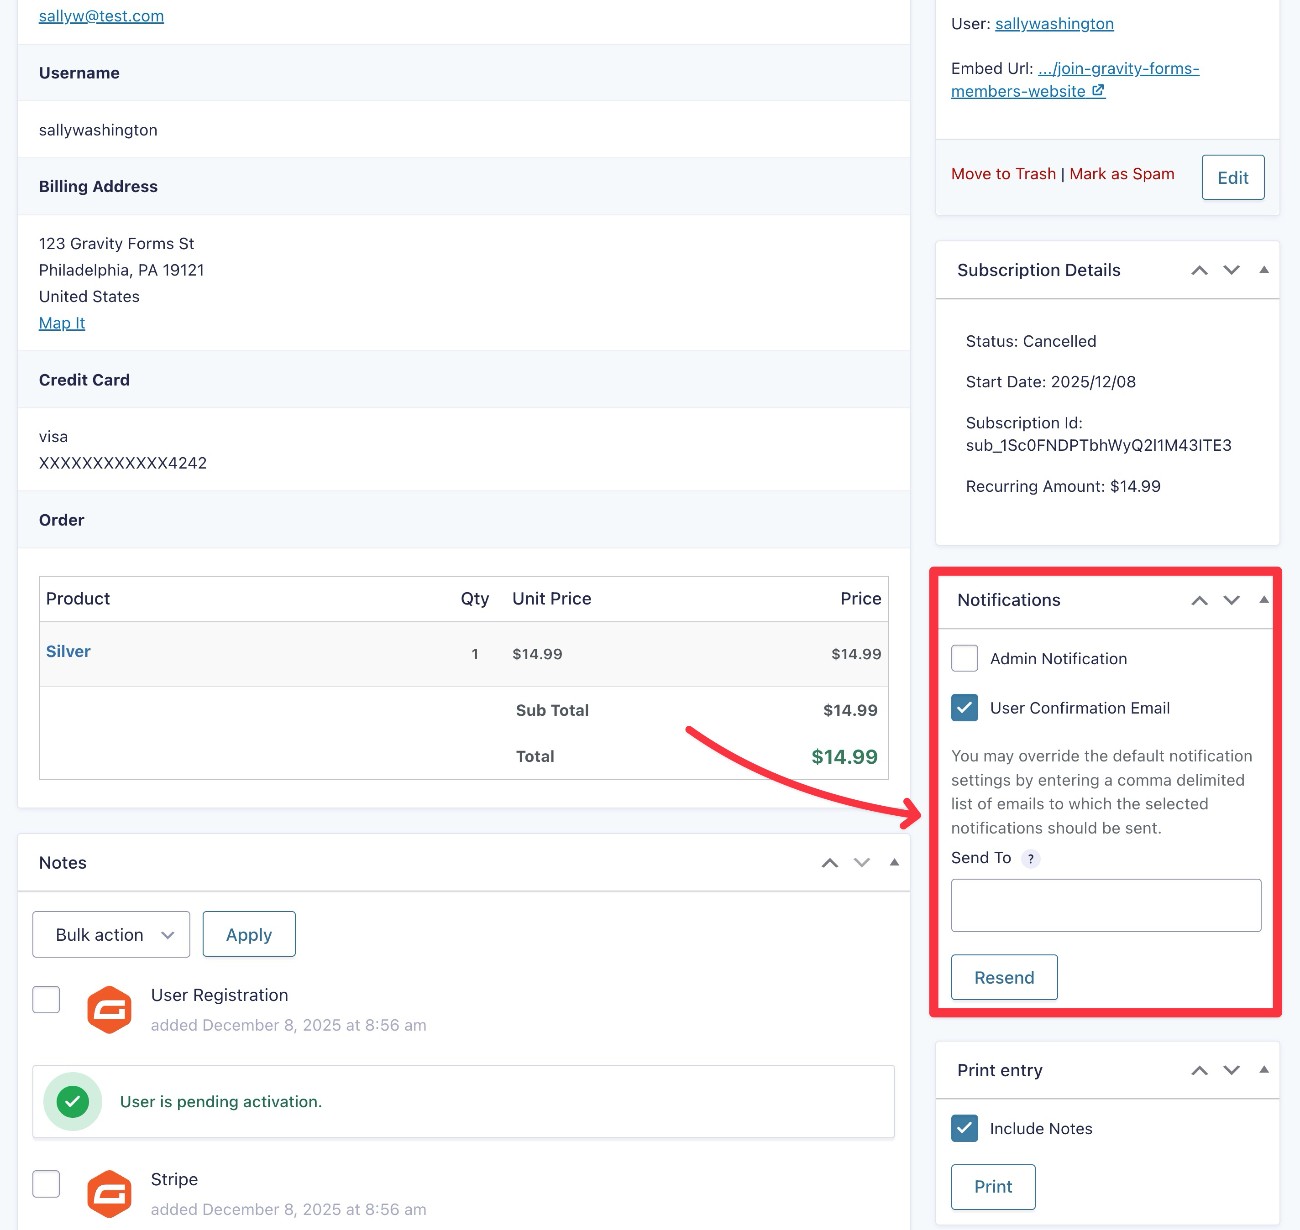
Second, you can use the Notifications box in the sidebar to resend one or more notification emails.
Use the checkboxes to select the notifications that you want to resend. When you select an email, you get an option to override the “Send To” email, which lets you send the email to a different address if needed.
Once you’ve made your choices, just click the Resend button to send the emails.
Using Gravity SMTP to log emails
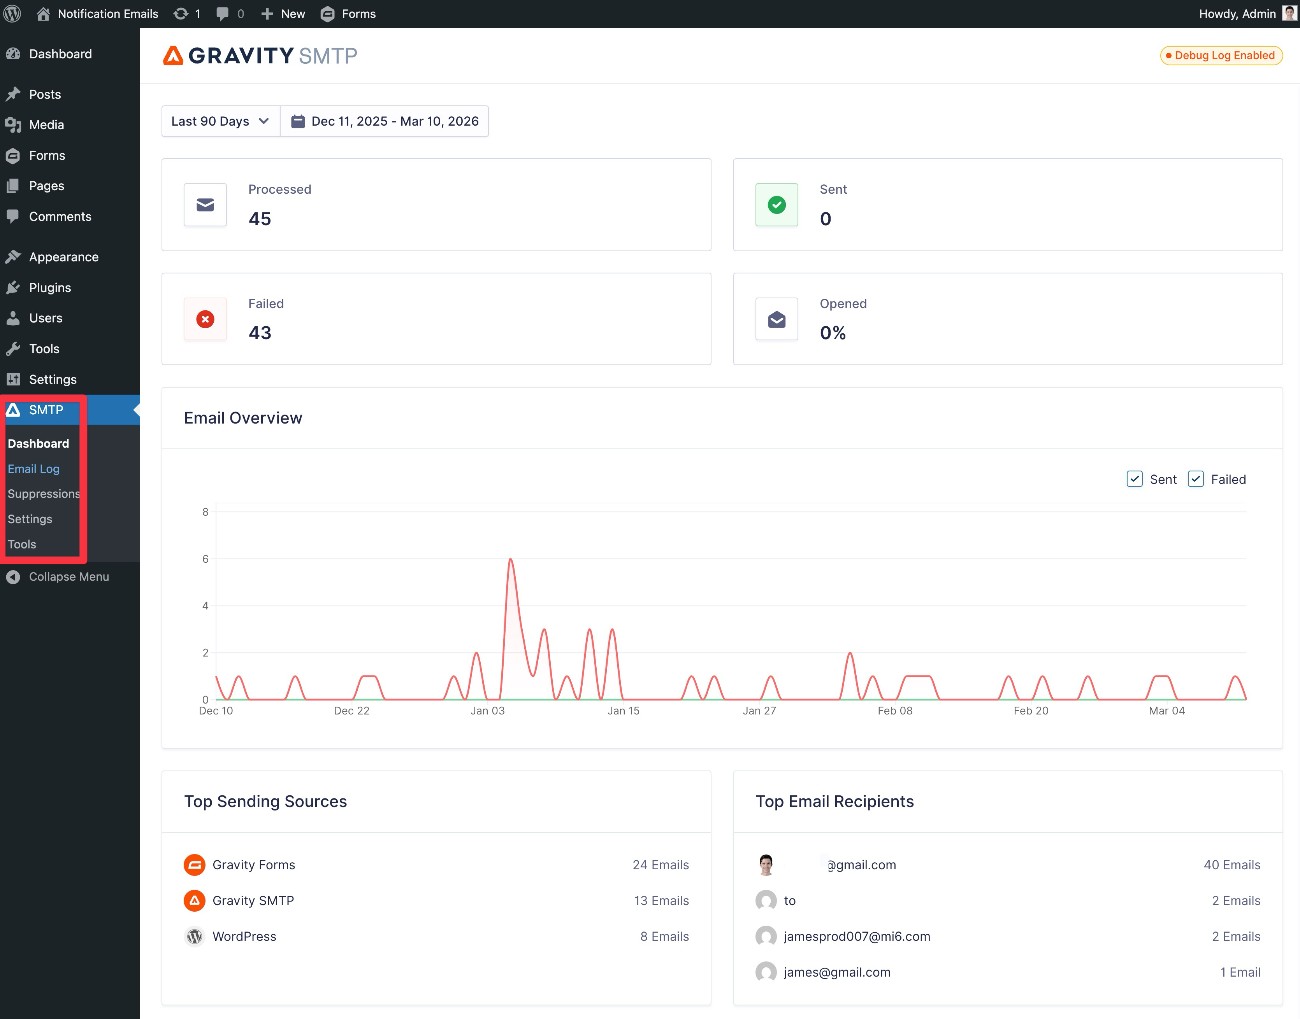
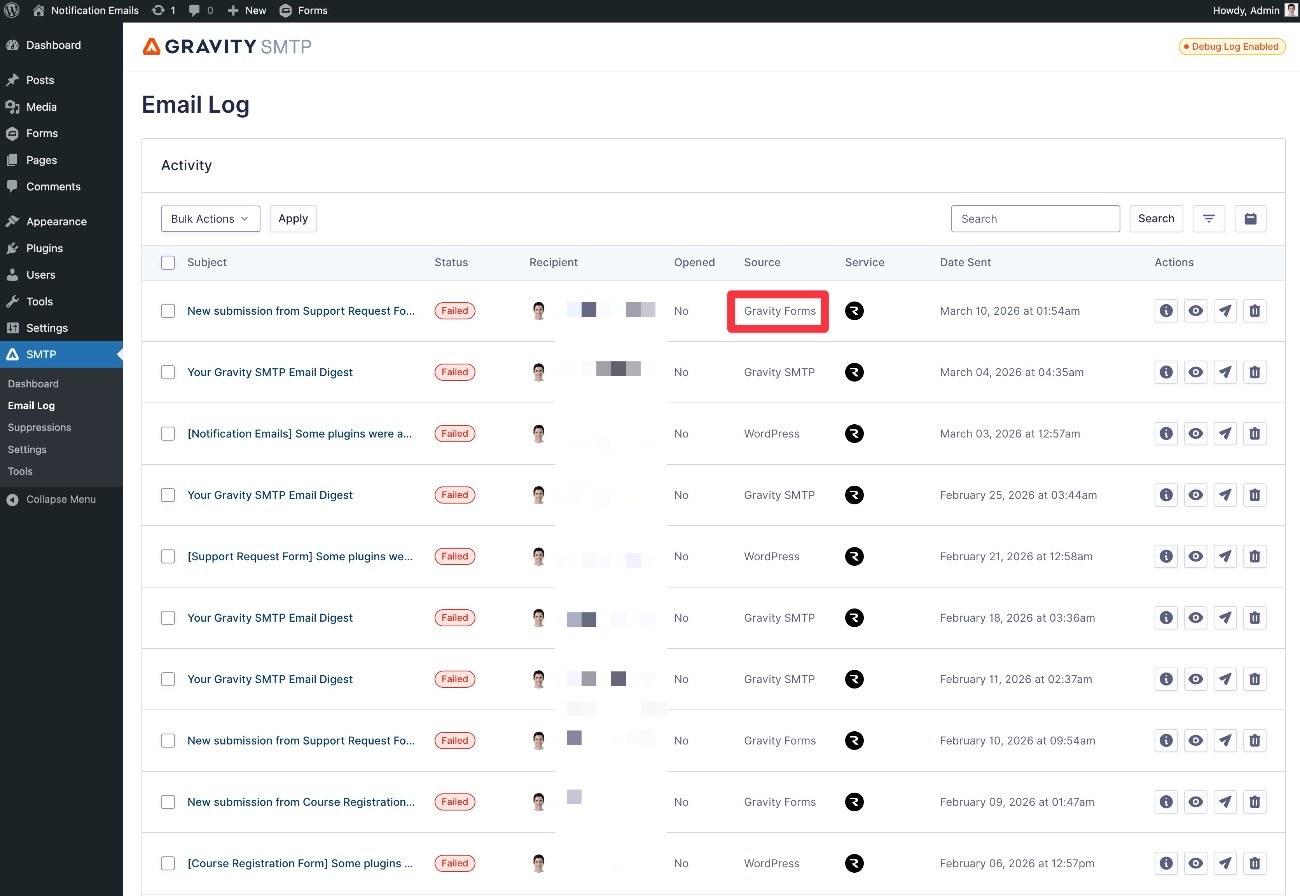
If you’re using the Gravity SMTP plugin that we discussed above, it also includes its own detailed email logging feature that can track every single email your site sends, including notifications from Gravity Forms, core WordPress emails, and emails from any other plugins that you’re using.
If you have the Gravity SMTP plugin installed, you can access this feature by going to SMTP → Email Log.
How to include email notifications in workflows with Gravity Flow
As you start getting into more complex use cases, you might want to include email notifications in multi-step workflows, instead of just sending them based on certain triggers.
For example, something like this:
- A visitor submits a form.
- The form submission is sent to a member of your admin team for approval.
- Once the admin approves the submission, the form submitter receives an email notification telling them that it’s been approved.
This is just one specific example – there are tons of other use cases where these types of workflows can be useful.
To set up these types of workflows, you can use the Gravity Flow plugin, which comes from the same team behind Gravity Forms.
Gravity Flow lets you build simple or complex workflows using 40+ different action steps. As part of those 40+ actions, you can send one or more email notifications at any point in the workflow.
Gravity Flow also opens up other useful tools for email notifications, such as giving you the ability to attach a PDF version of the form submission to email notifications.
If you want to try it for yourself, you can create a free Gravity Flow demo site to test everything before purchasing the add-on.
Get started with form notification emails today
Form notification emails are a great way to both deliver a better user experience to people interacting with your forms and also streamline/optimize your and your team’s workflows.
With the core email notifications functionality in Gravity Forms, you have a lot of flexibility for setting up as many email notifications as needed. You can also use conditional logic to only send certain notifications if specific conditions are met.
To improve the reliability of your site’s emails, you can use one of the dedicated add-ons or an all-purpose plugin like Gravity SMTP, which will improve the reliability of all of your site’s emails.
If you’re already using Gravity Forms, set up your first email notification today.
If you’re not using Gravity Forms yet, you can purchase your license here to get started or create a fully functioning demo website to try all of this functionality before you buy.

If you want to keep up-to-date with what’s happening on the blog sign up for the Gravity Forms newsletter!
"*" indicates required fields