Want to make sure that your forms’ notification emails make it to your users’ inboxes? With this month’s featured add-on – the Gravity Forms Postmark Add-On – you can feel confident that all of your notification emails will make it to the right spot.
The default WordPress mail function lacks proper authentication to avoid spam folders (and is even disabled by some hosts), which means you might experience issues with notification emails not sending.
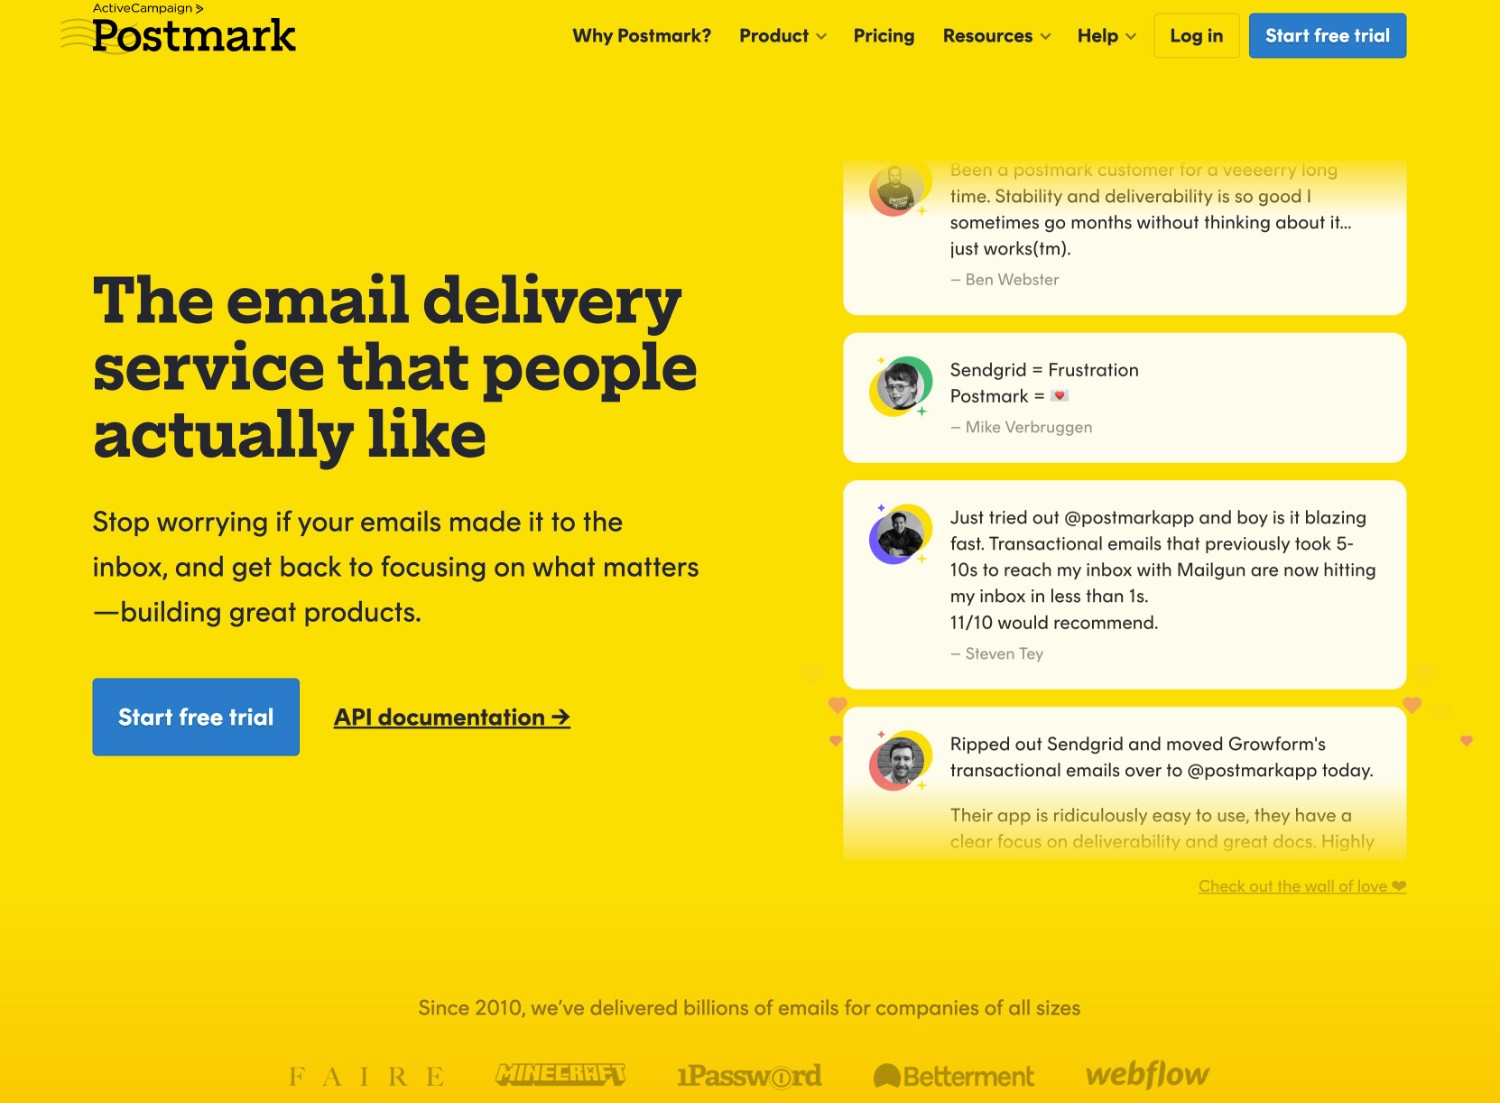
Postmark, in contrast, is built from the ground up to send emails in a reliable, authenticated way. And with the Gravity Forms Postmark Add-On, you can easily start using Postmark to send your form notification emails.
In this post, you’ll learn more about how Postmark can help you, as well as how to set up Postmark on your site by following a detailed, step-by-step tutorial.
Why Use Postmark with Gravity Forms
The main reason to use the Gravity Forms Postmark Add-On is to improve the reliability of your forms’ notification emails.
Postmark is specifically optimized to ensure that transactional emails (like your form notification emails) will reliably make it to users’ inboxes and avoid their spam folders.
With the Gravity Forms Postmark Add-On, you can access three important features:
- You can connect your WordPress site to Postmark using the Postmark API.
- You can enable Postmark as your form notification email sending service at the individual notification level, which lets you choose exactly when to use Postmark as your sending service.
- You can view your Postmark sending stats from WordPress.
For example, you could try to keep your Postmark usage/pricing down by only using it to send the most important form notification emails.
Speaking of pricing, Postmark lets you send up to 100 emails per month for free forever. If you need to exceed that (which many sites will), paid plans start at $15 per month for up to 10,000 email sends.
How to Use the Gravity Forms Postmark Add-On to Send Transactional Emails
Now that you have a better understanding of why you might want to use Postmark and the Gravity Forms Postmark Add-On, let’s get into a step-by-step guide on how you can set up Postmark for Gravity Forms.
Here’s a high-level look at the steps involved – keep reading for detailed instructions:
- Install the Gravity Forms Postmark Add-On.
- Register for a free Postmark account.
- Add your domain as a “Sender Signature” in Postmark.
- Create a new Postmark Server.
- Request approval for your Postmark account to send live emails.
- Add the Postmark API tokens to the Gravity Forms settings area.
- Choose Postmark as your sending service in the Gravity Forms notification settings.
Let’s go through these steps in more detail…
1. Install the Gravity Forms Postmark Add-On
To get started, you’ll want to install and activate the official Gravity Forms Postmark Add-On on your WordPress site.
You can access the Postmark Add-On on all Gravity Forms licenses, including the Basic license.
So – as long as you have an active license, you’ll have access to the Postmark Add-On.
If you don’t have an active Gravity Forms license, you can purchase your license here.
Here’s how to install the Gravity Forms Postmark Add-On on your site:
- Open your WordPress dashboard.
- Go to Forms → Add-Ons.
- Scroll down until you see the Postmark Add-On.
- Click the Install button.
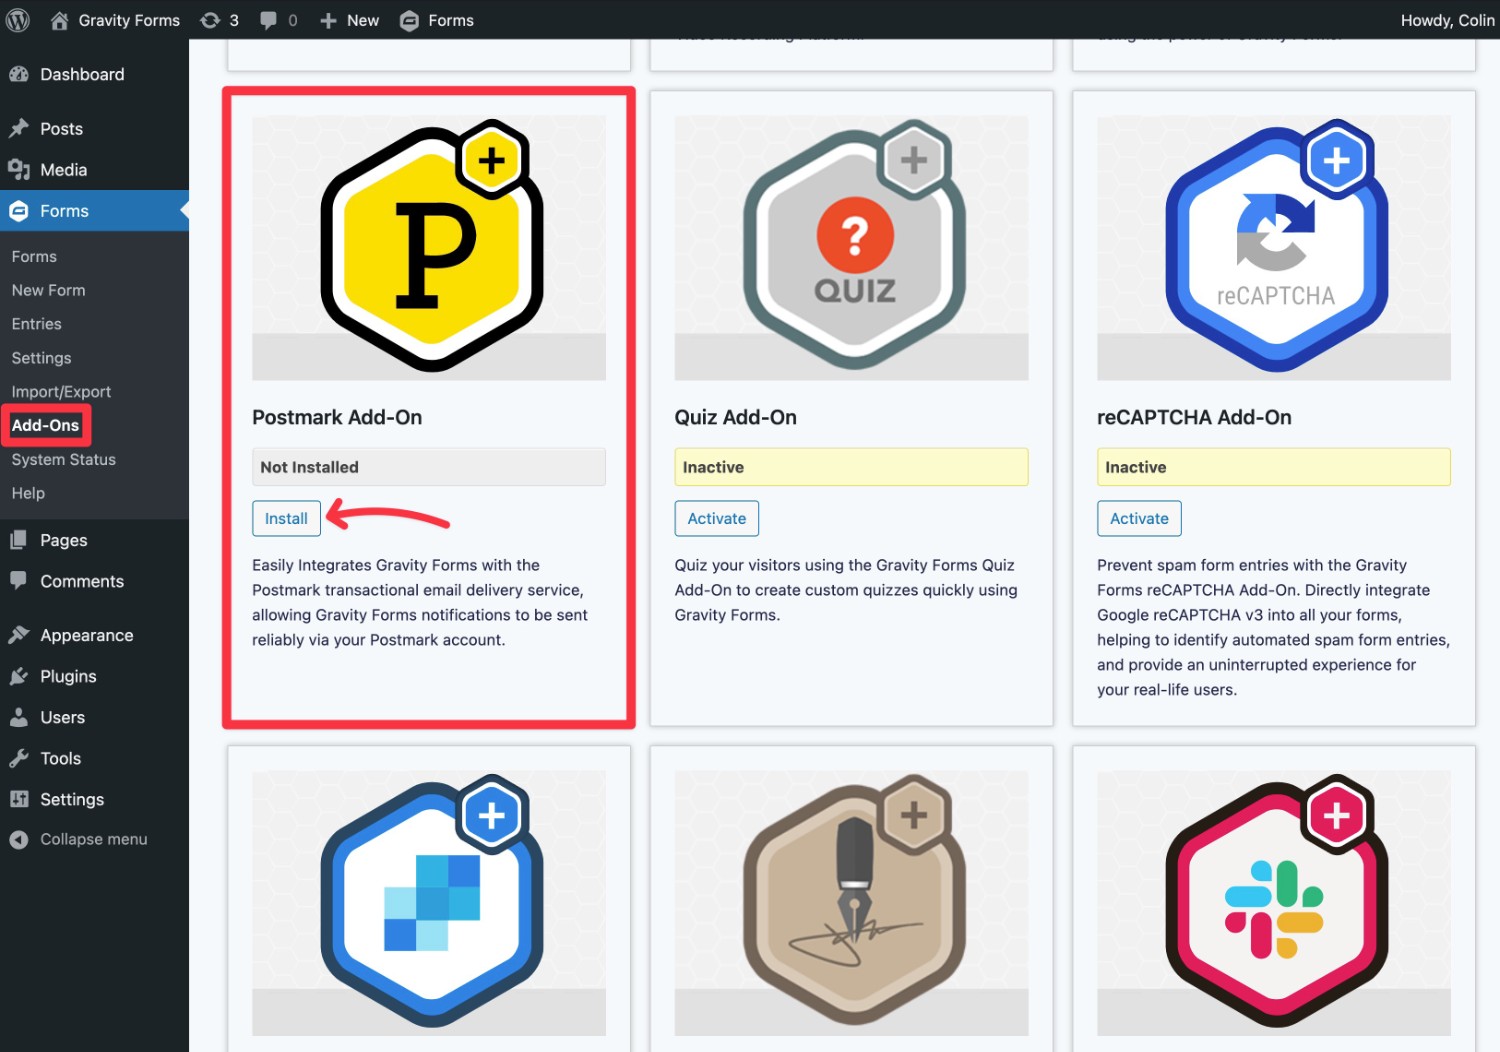
Make sure to also activate the add-on on the next screen.
If you’d like to see more detailed instructions, we have a whole guide on how to install Gravity Forms add-ons.
2. Register for a Free Postmark Account
Next, you’ll want to register for your free Postmark account.
It’s free to create a Postmark account and you do not need to enter a credit card to sign up and follow this tutorial.
Note – Postmark will not let you register using public email addresses like [email protected]. You will need to register using a custom email address – e.g. [email protected].
Postmark offers a forever free plan that lets you send up to 100 emails per month.
While that’s plenty of emails for testing, your WordPress site might exceed those limits, depending on how many form notification emails you need to send per month.
Remember – you can control which email notifications send via Postmark at the individual notification level, which helps you control your usage.
If you think that you might exceed the 100 emails per month limit on Postmark’s free plans, the paid plans start at $15 per month for up to 10,000 email sends, which should be plenty for most WordPress sites.
If you’re looking for a Gravity Forms email sending service with higher free sending limits, you might also be interested in SendGrid or Mailgun. You can easily integrate both into WordPress via the official Gravity Forms SendGrid Add-On or the official Gravity Forms Mailgun Add-On.
3. Add Your Domain Name As a “Sender Signature”
Once you’ve registered for your account, you’ll need to add your domain name as a “Sender Signature” in Postmark.
Essentially, this proves to Postmark that you control the domain name that you’re sending emails from. Without doing this, you won’t be able to enter your WordPress site’s domain name in the “From” address.
In addition to just generally being a requirement to use Postmark, adding this type of authentication also makes your emails look more trustworthy to users’ email clients, which helps you avoid the spam folder.
To begin, click on the Sender Signatures menu in Postmark. Then, click Add Domain or Signature.
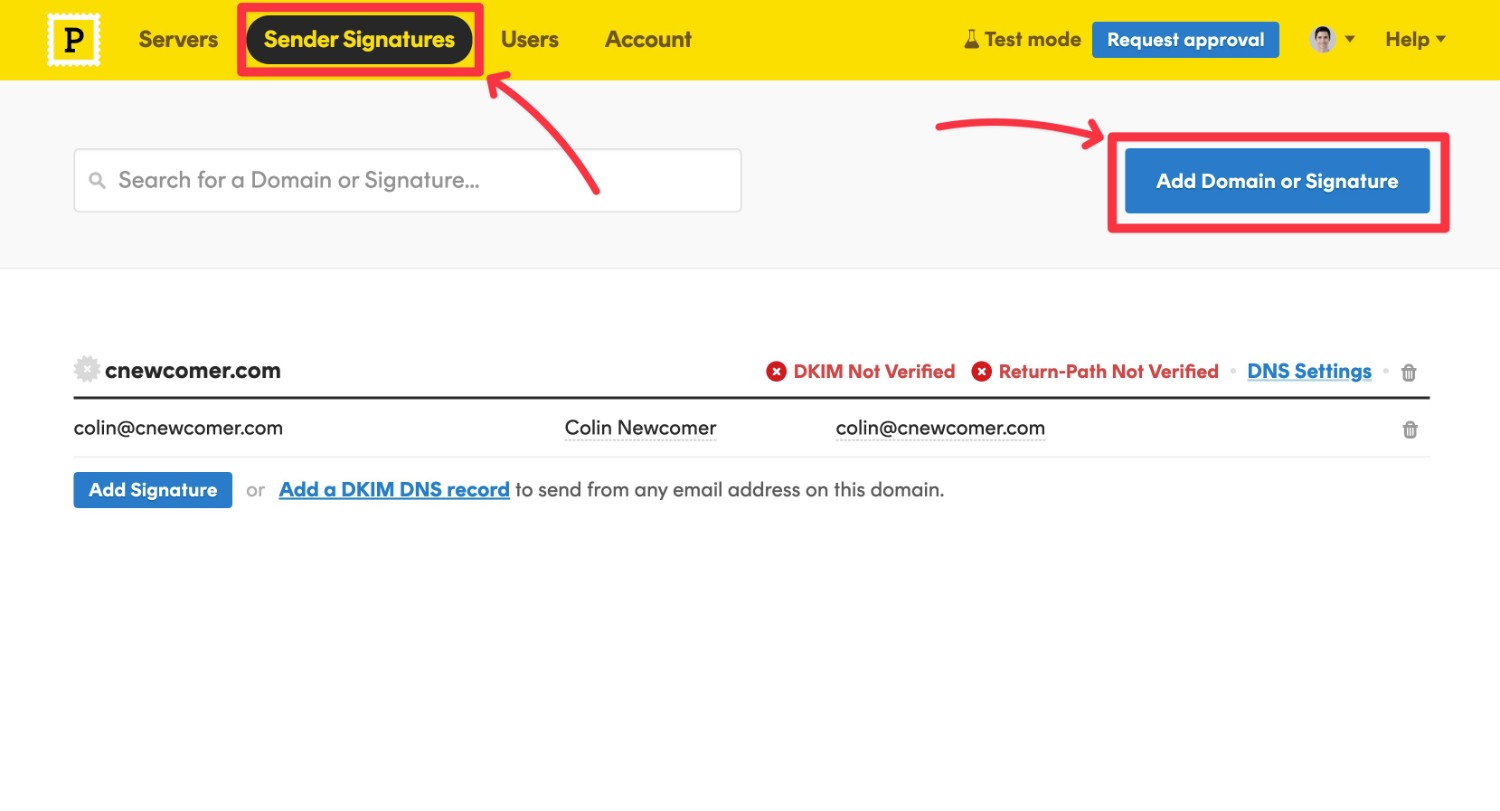
You’ll now see an option to add a domain name or a sender signature:
- Domain name – this adds the most authentication and lets you send using any email address on your domain name. You will need to add DNS records to your domain name to use this method.
- Sender signature – this lets you send from a single email address on your domain – e.g. only “[email protected]”. The upside is that it’s very simple to set up – all you need to do is click an activation link that Postmark sends to that email address.
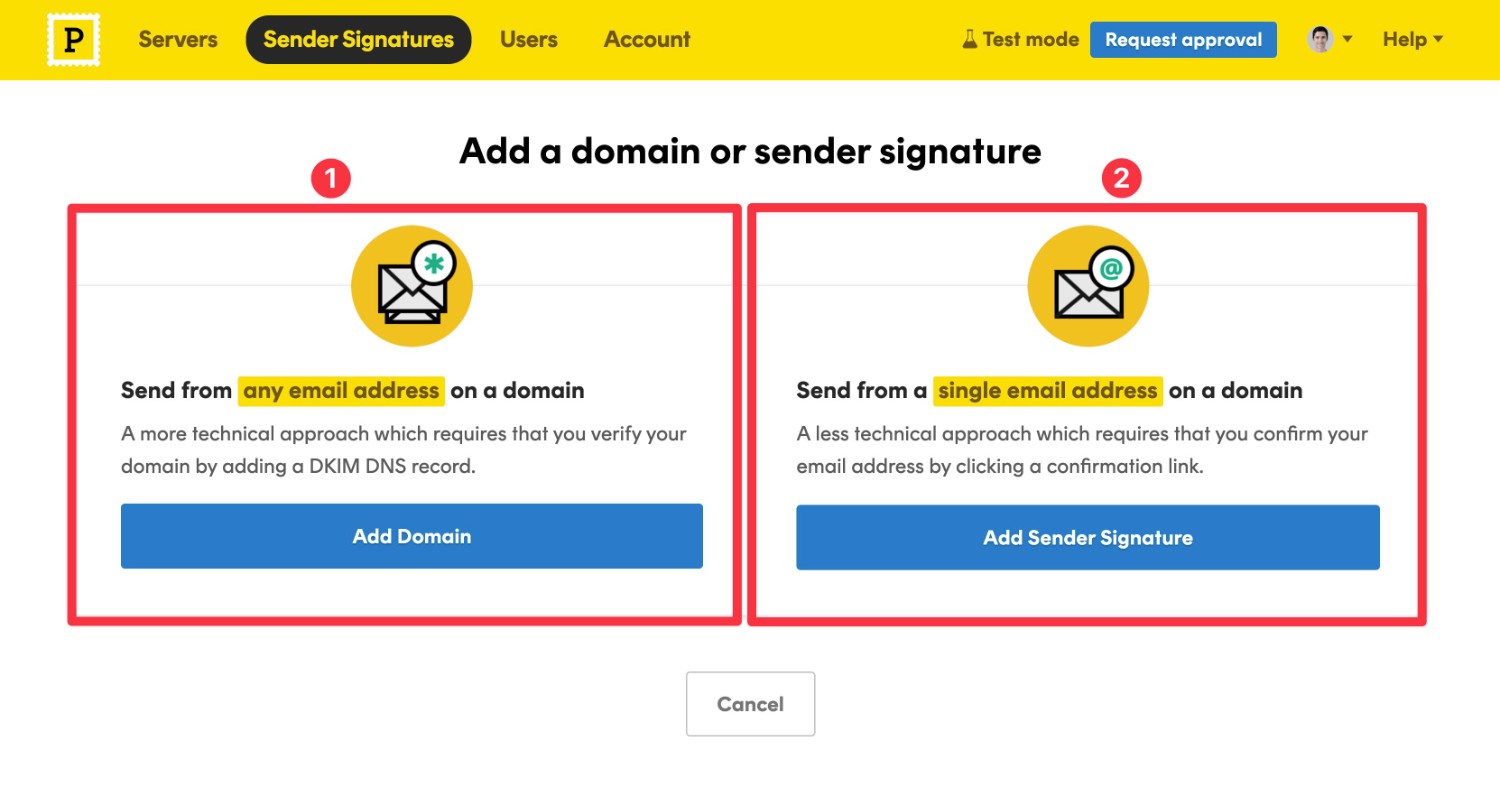
If you feel comfortable adding DNS records to your domain name, we recommend using the domain name option because it gives you the most flexibility.
However, if you’re not sure how to add DNS records, it’s fine to use the sender signature option.
We’ll show you how to set up the domain name authentication because it’s a little more involved.
If you do want to use the sender signature method, you’ll first enter your email address. Postmark will then send an email to that address with a verification link and all you need to do is click that link.
Once you click the Add Domain button, Postmark will show a popup box where you can enter your domain name and click Verify Domain:
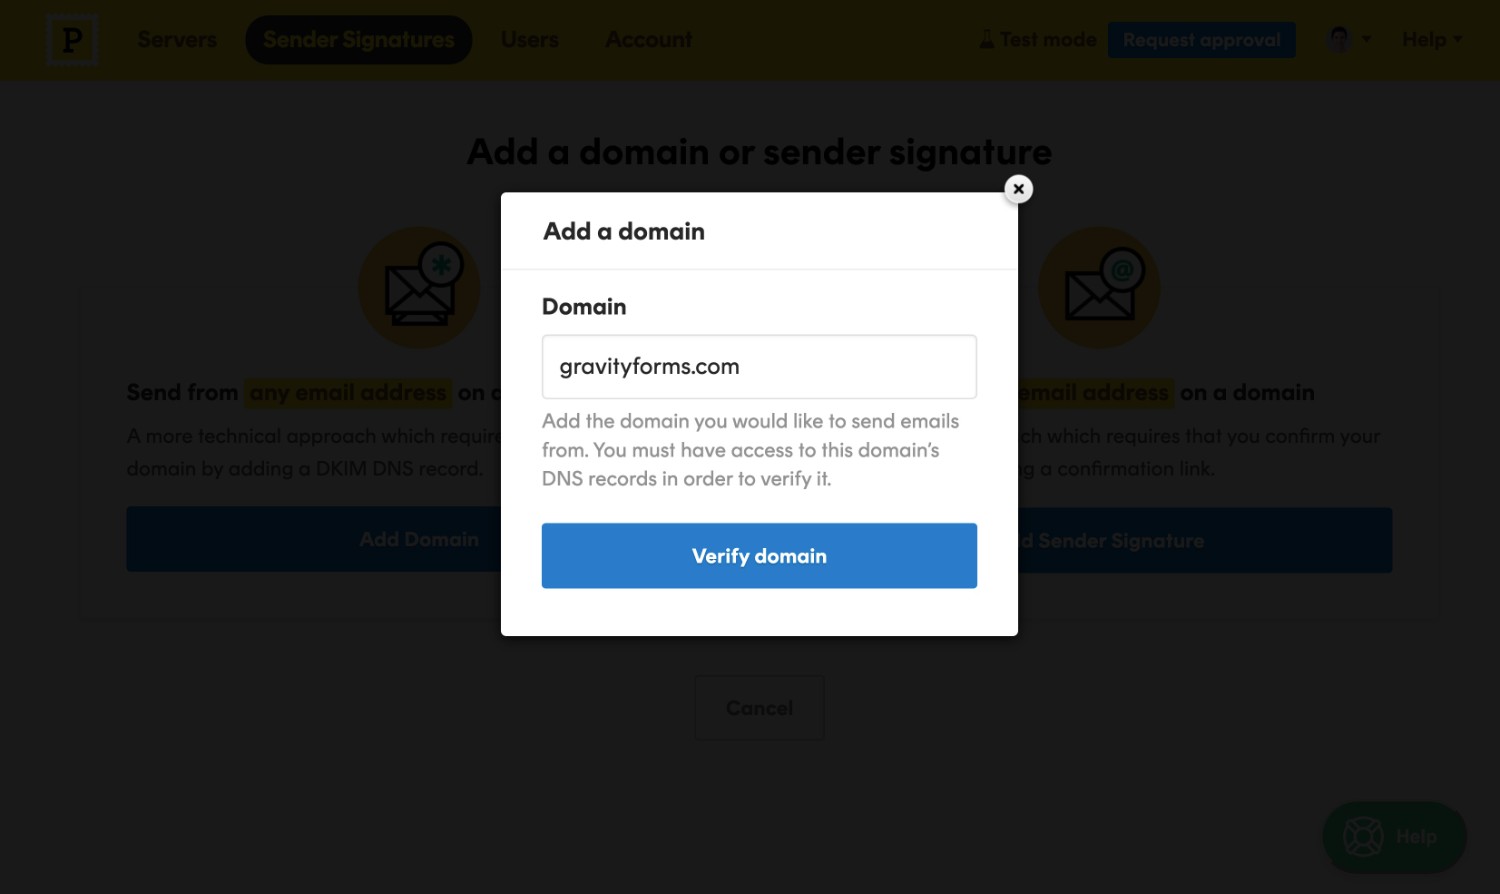
Postmark will then show two DNS records that you need to add to your domain name.

Where you add these DNS records depends on how you’ve configured your domain name. Here are some of the most common places:
- If you pointed your domain to your host’s nameservers, you’ll manage DNS records from your hosting account.
- If you pointed your domain name to your host using an A record/CNAME and an IP address, you’ll typically manage DNS records from your domain registrar.
- If you’re using Cloudflare, you’ll manage DNS records from Cloudflare’s dashboard.
Here’s what it looks like to add these records via Cloudflare:
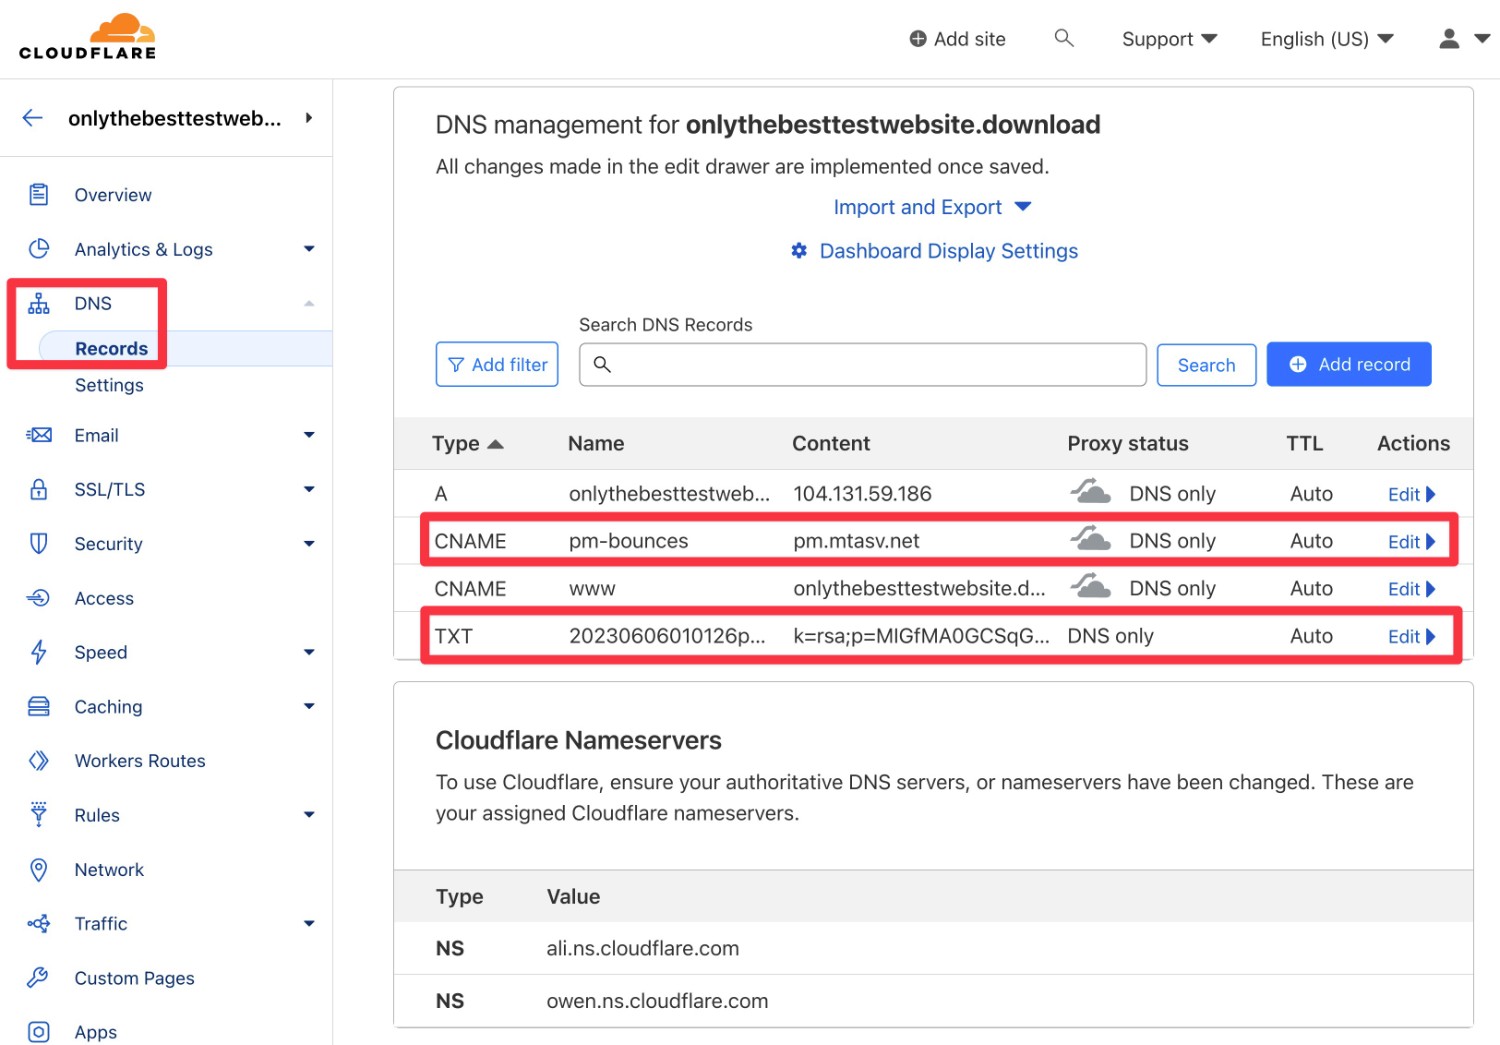
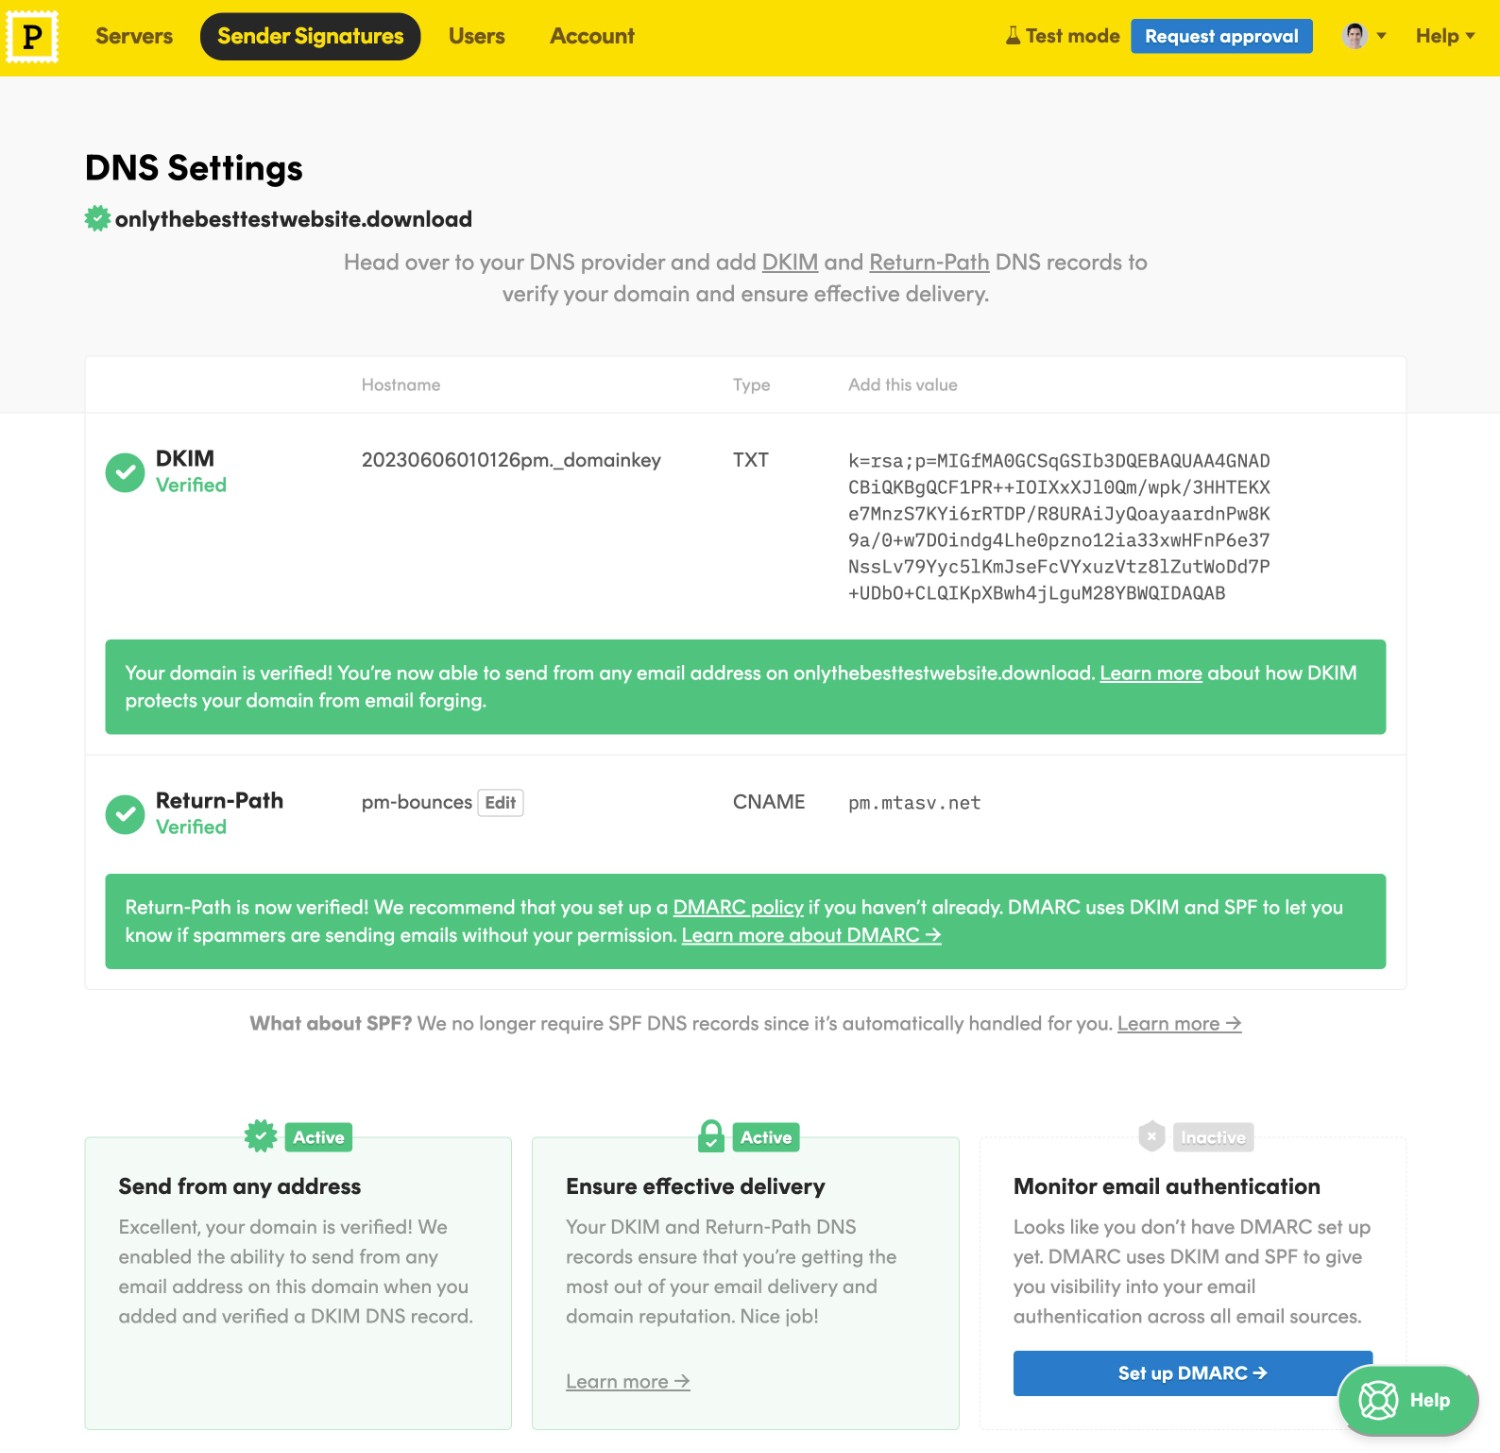
Once you’ve added the records, go back to the Postmark dashboard and click the Verify buttons.
You should see success messages for each record:
Once you’ve added your domain, you’ll also want to add a signature for each email address that you want to use. This is important because it will allow you to choose these email addresses in the Gravity Forms settings.
Go to Sender Signatures and click the Add Signature button under your domain name.
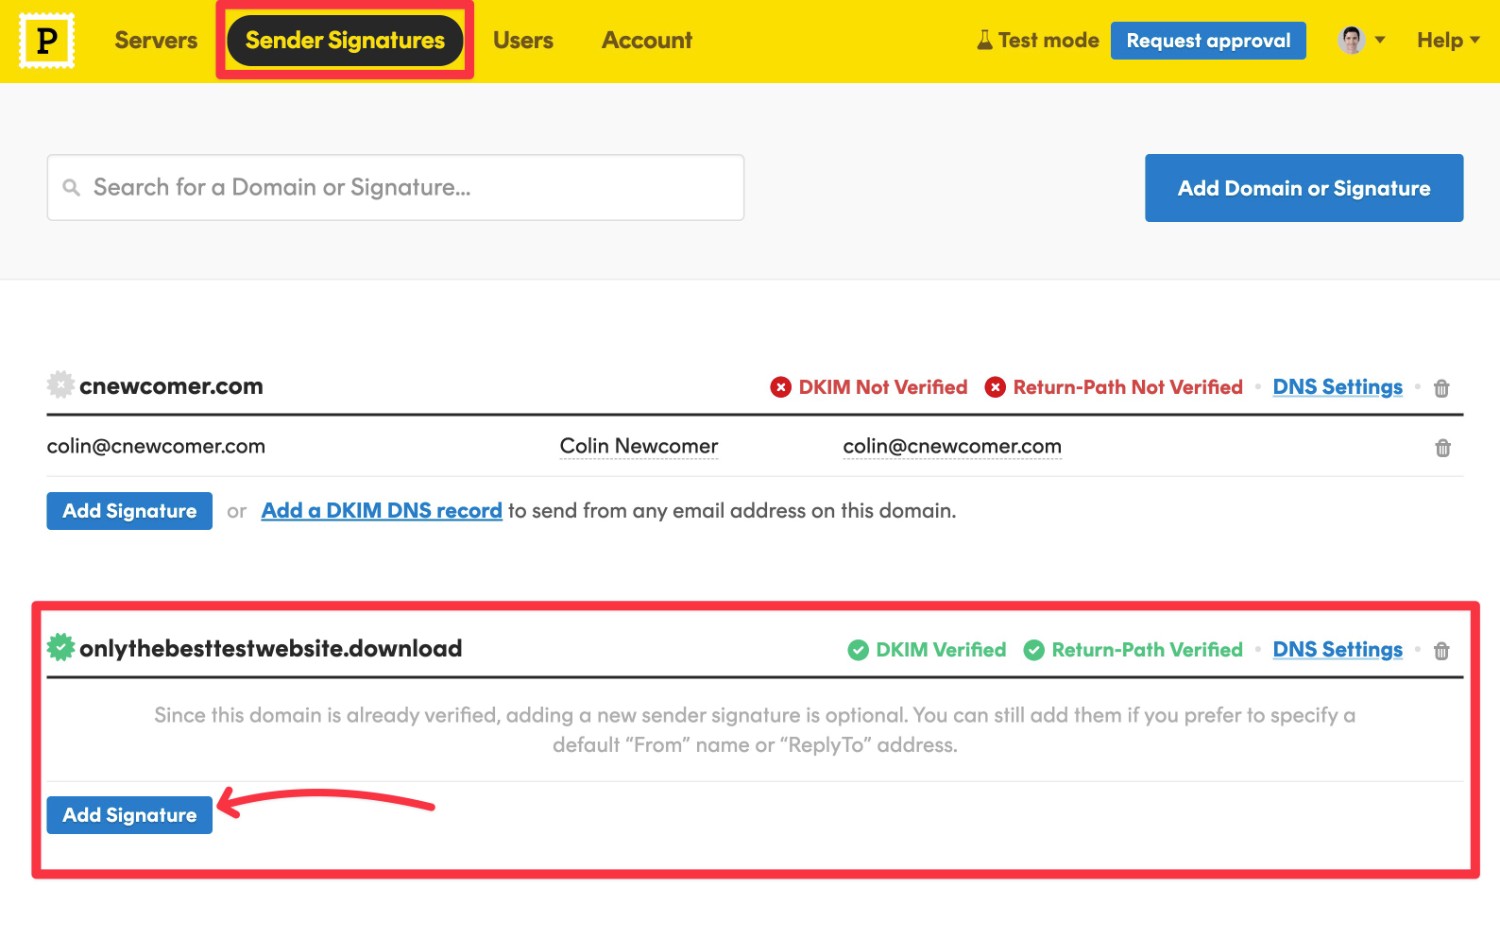
On the next screen, enter the email address and click Create Signature;
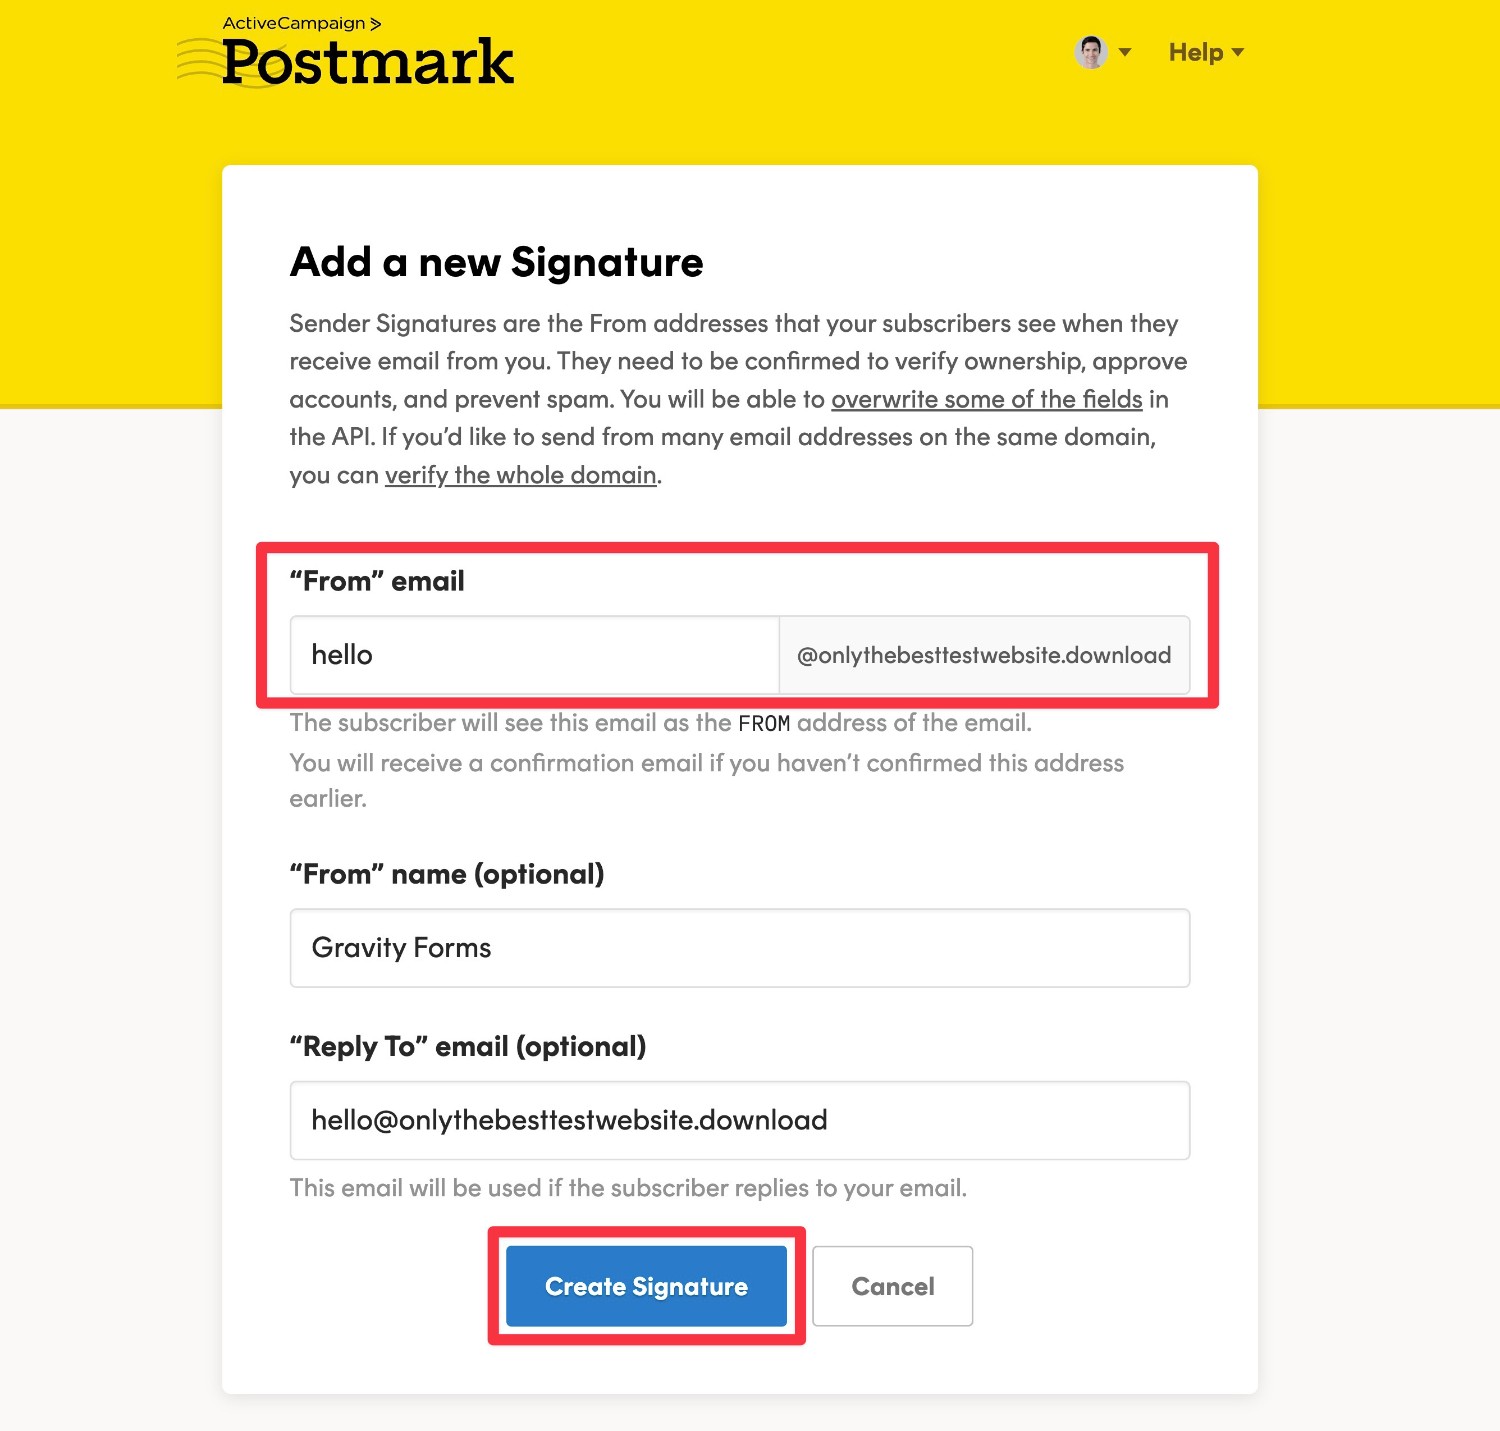
Because you already verified your domain name, there’s no need to click a verification link. You can repeat the process as many times as needed for all the email addresses that you want to send from.
4. Create a Postmark Server
Next, you’ll need to set up a Postmark server for your WordPress site.
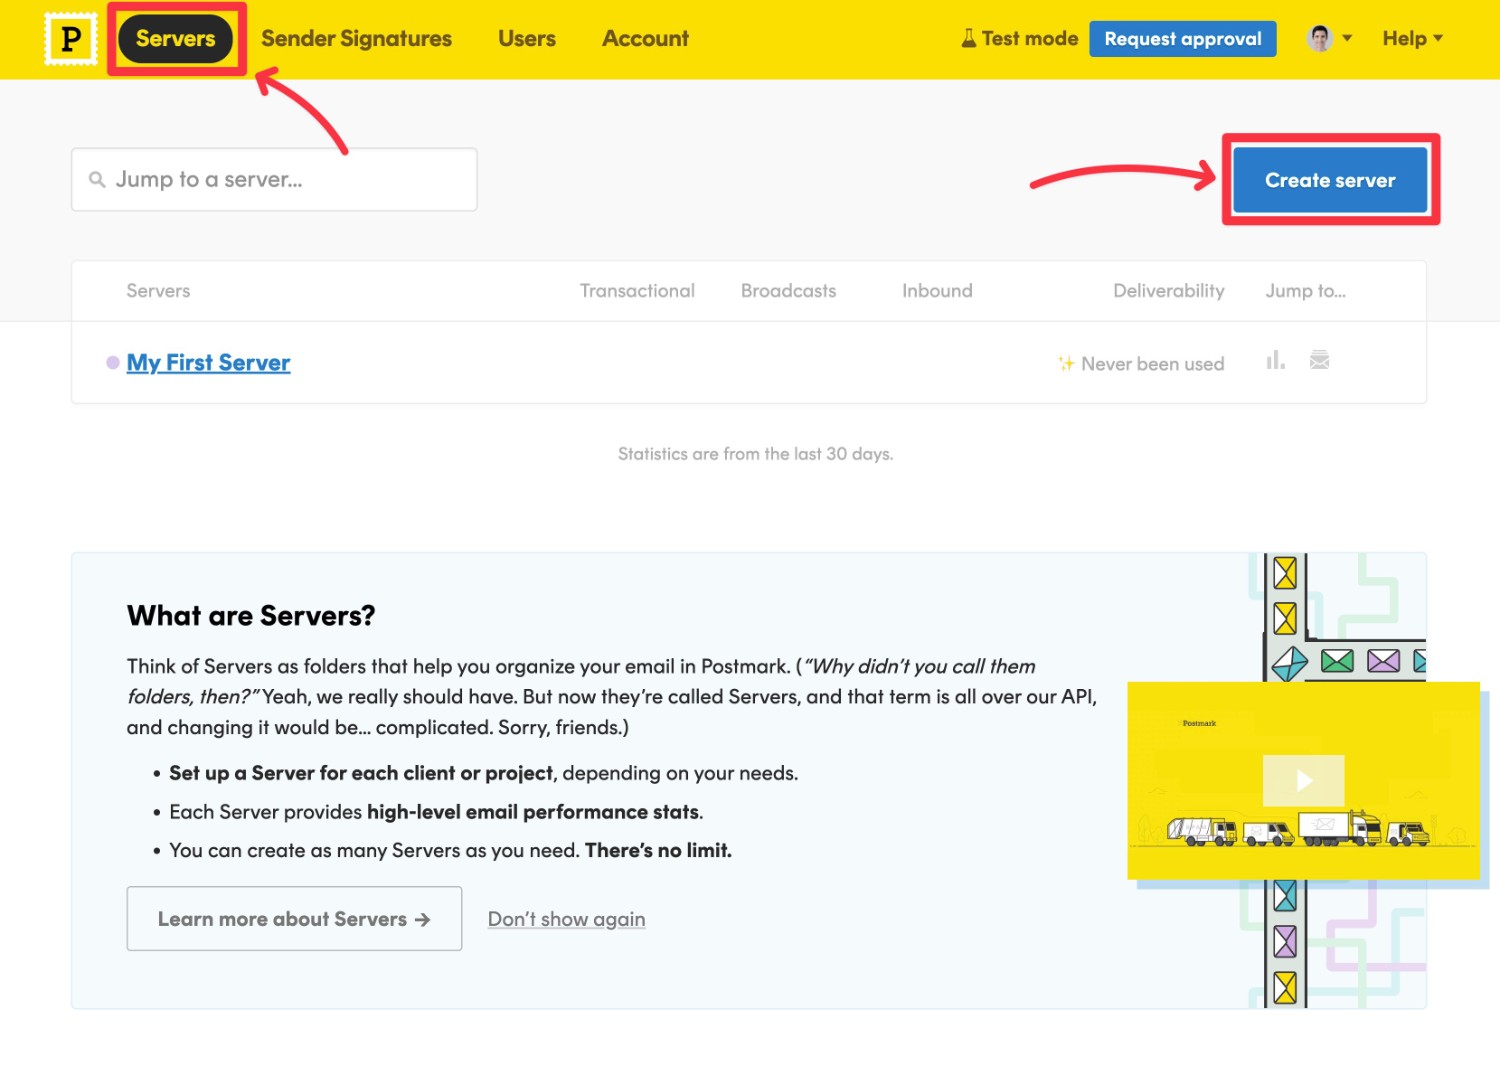
While this term sounds a little complicated, Postmark servers really just act “as folders that help you organize your email in Postmark”.
If you’re going to be using Postmark with multiple WordPress sites, you’ll want to create a different server for each site.
To create a server, go to the Servers tab in your Postmark dashboard and click Create server.
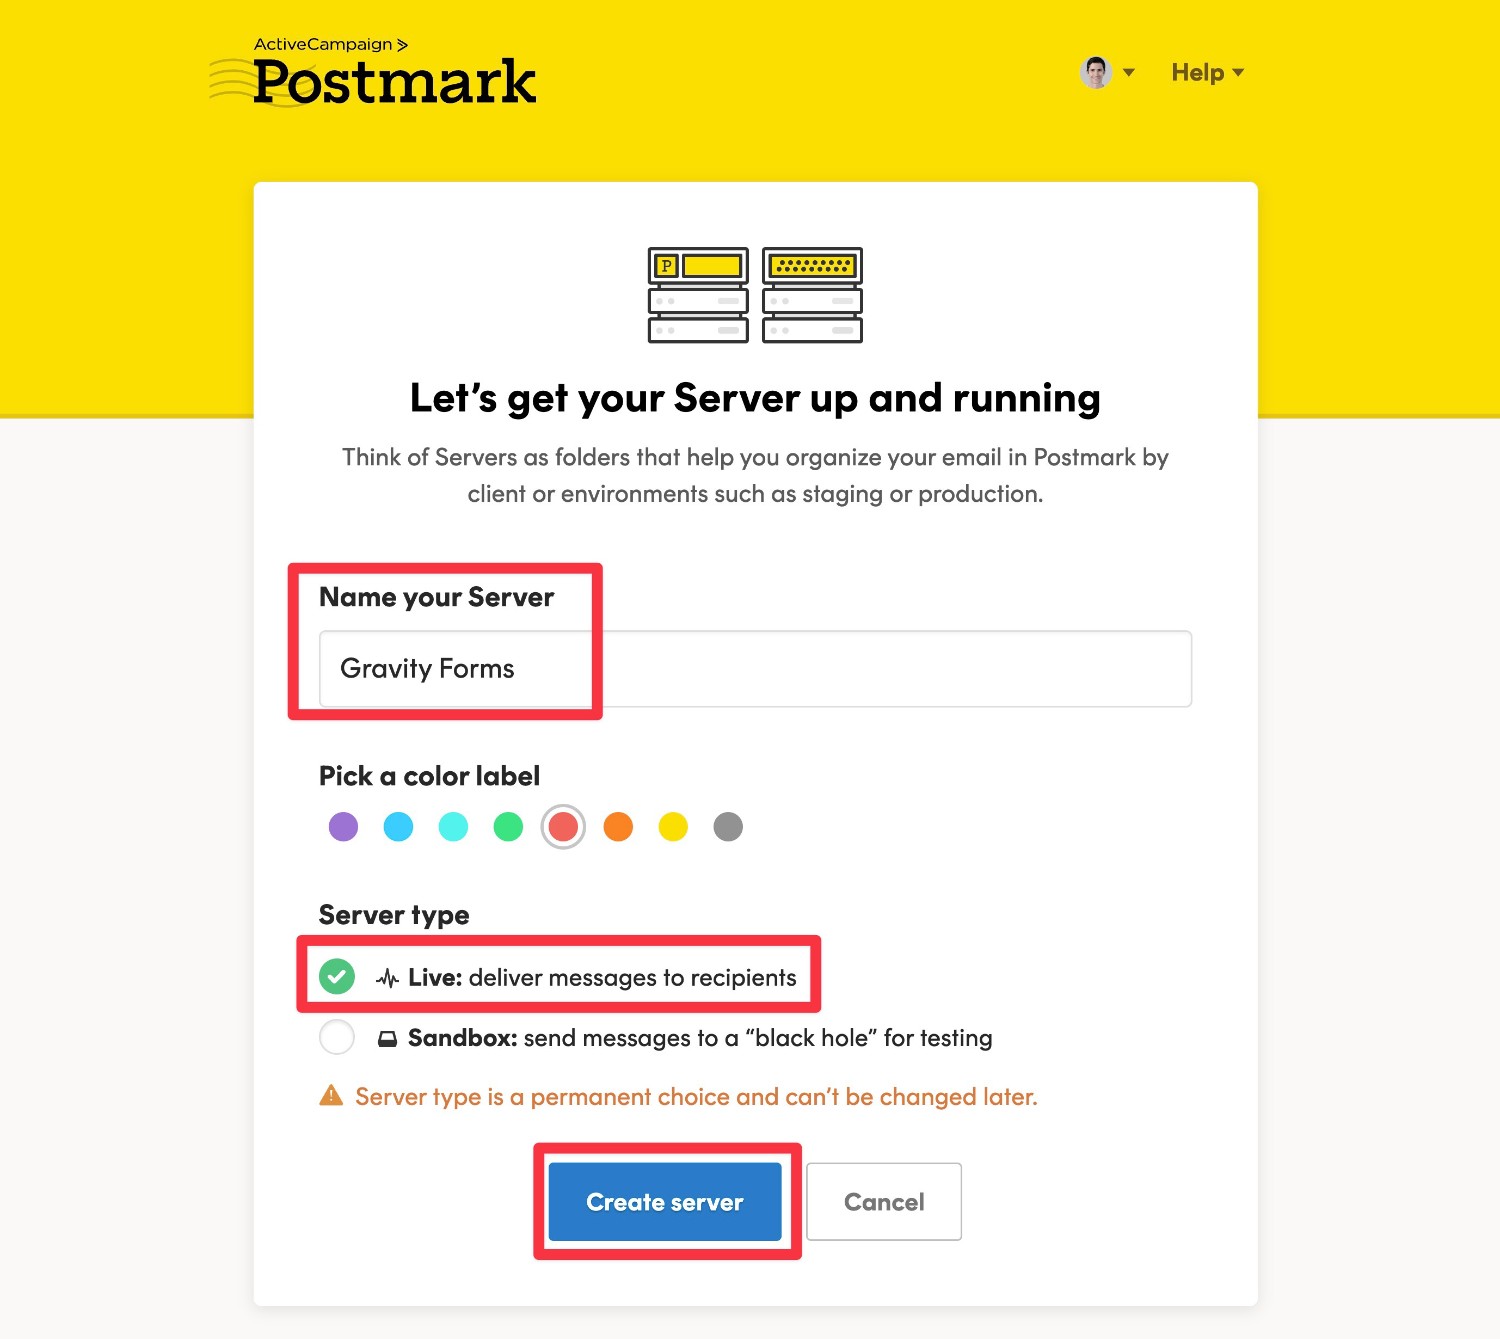
On the next screen:
- Enter an internal name to help you remember this server.
- Choose Live as the Server type.
- Click the Create server button.
5. Request Approval for Your Postmark Account to Send Live Emails
When you first register for Postmark, Postmark puts your account in “test mode”.
In test mode, you can access all of the functionality and fully configure Gravity Forms to send emails via Postmark.
However, you’re only allowed to send emails to your own domains in test mode – e.g. the email that you registered with and any other domains that you’ve verified with Postmark.
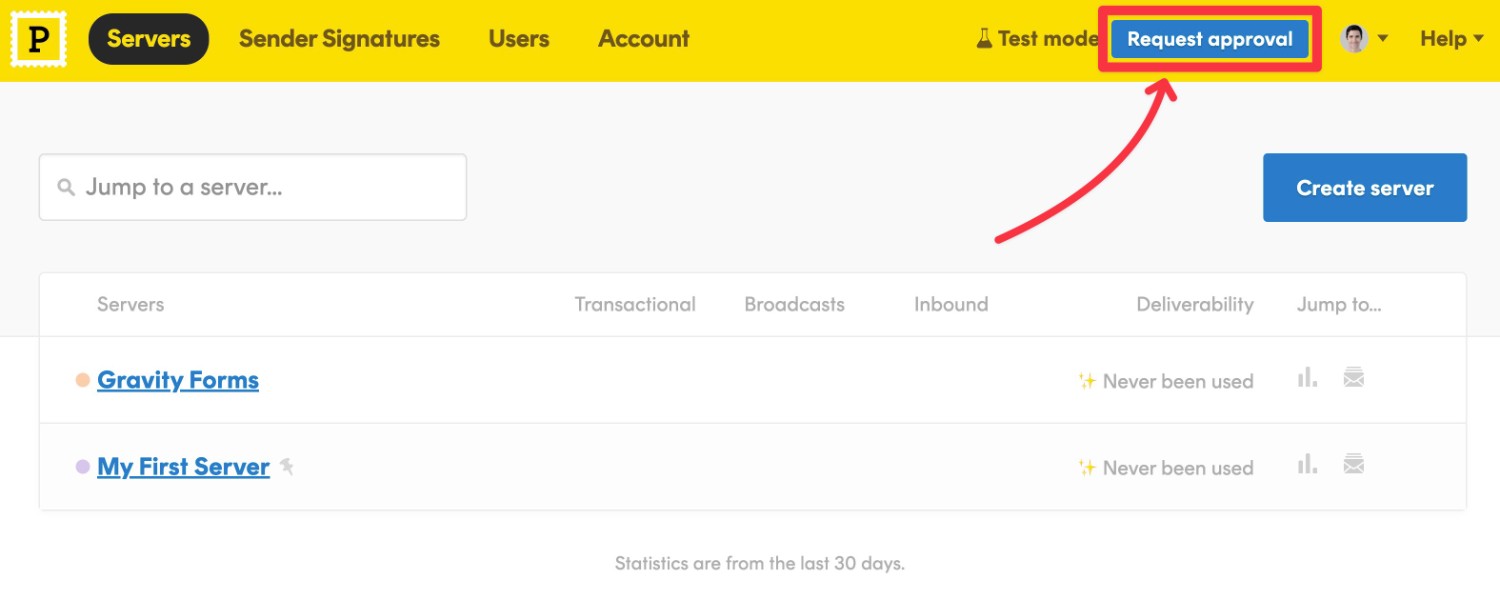
When you’re ready to send emails to other accounts, you’ll need to request approval to have Postmark enable live sending.
You can do this by clicking the Request approval button in your Postmark dashboard.
You can still continue this guide while you’re waiting for approval because you’ll be able to send emails to your own addresses right away.
You just won’t be able to send emails to other form submitters until your Postmark account is approved.
6. Add Postmark API Tokens to Gravity Forms Settings
Once you’ve verified your domain name and added a server, you’re ready to connect your WordPress website to Postmark.
To begin, you’ll need to access your Postmark Account API Token and Server API Token. You can click this link to go straight to the right dashboard area or follow these instructions:
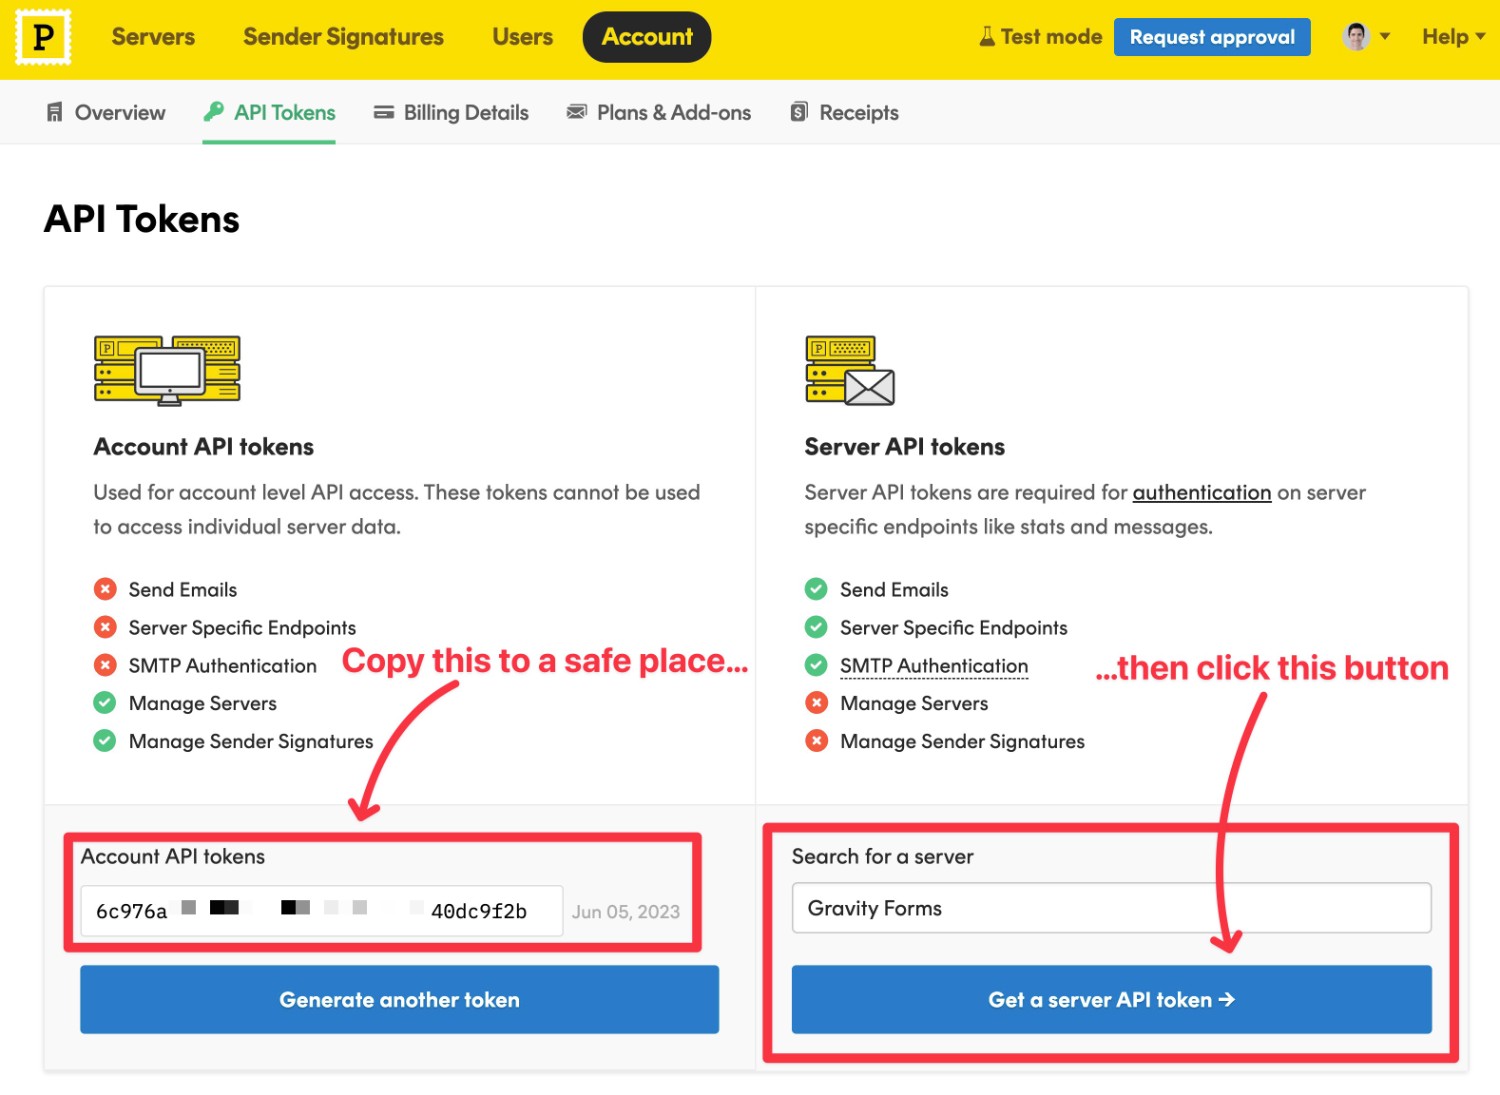
- Click on the Account tab in your Postmark dashboard.
- Go to the API Tokens tab.
You should see the Account API Token right away – copy this to a safe place.
To access the Server API Token, start by typing the name of the server that you just created in the box. Then, select it and click the Get a server API token button.
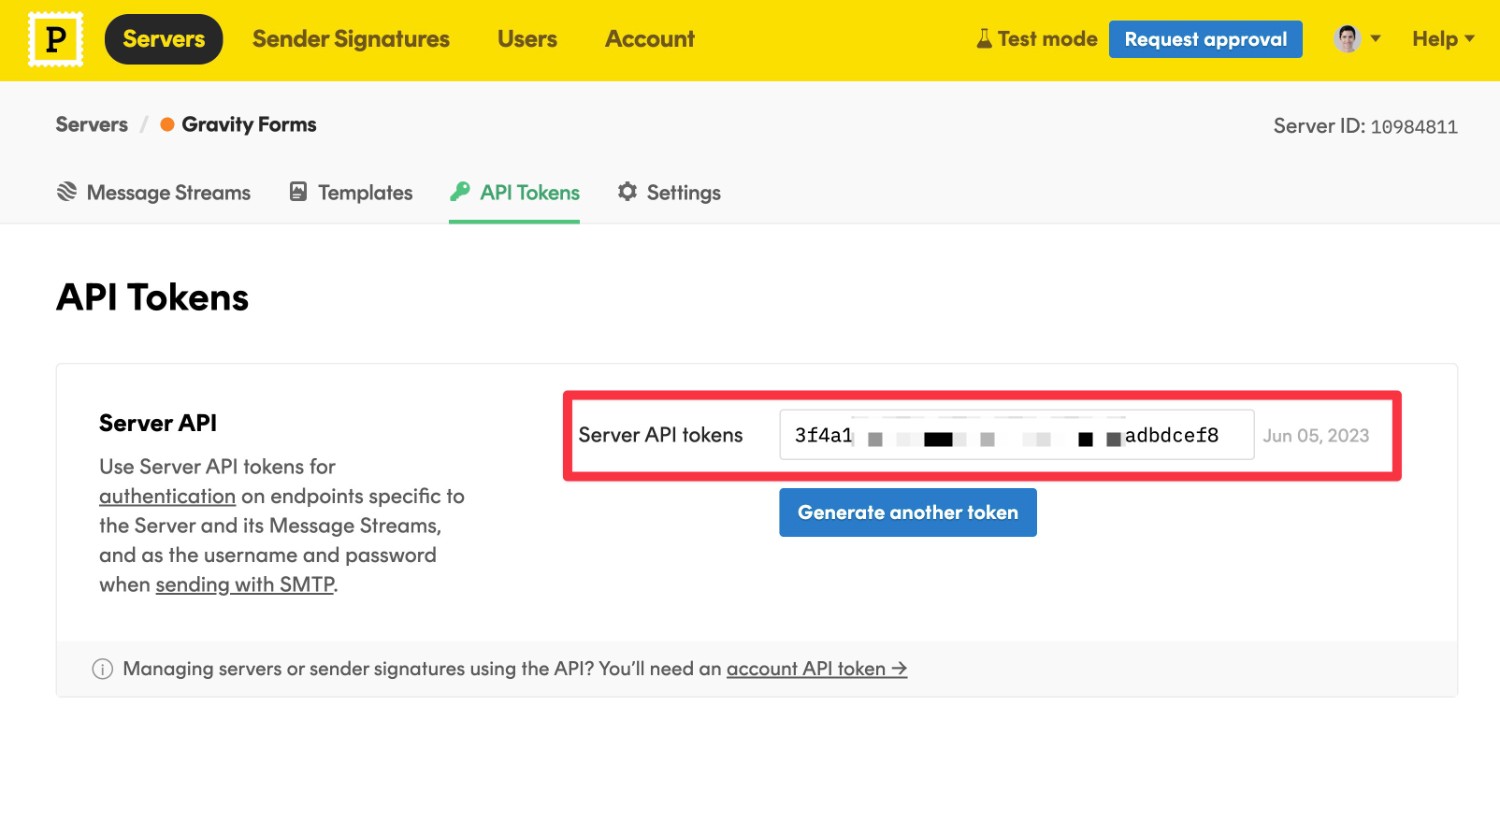
You should then see your Server API Token on the next page. You’ll also want to copy this to a safe place.
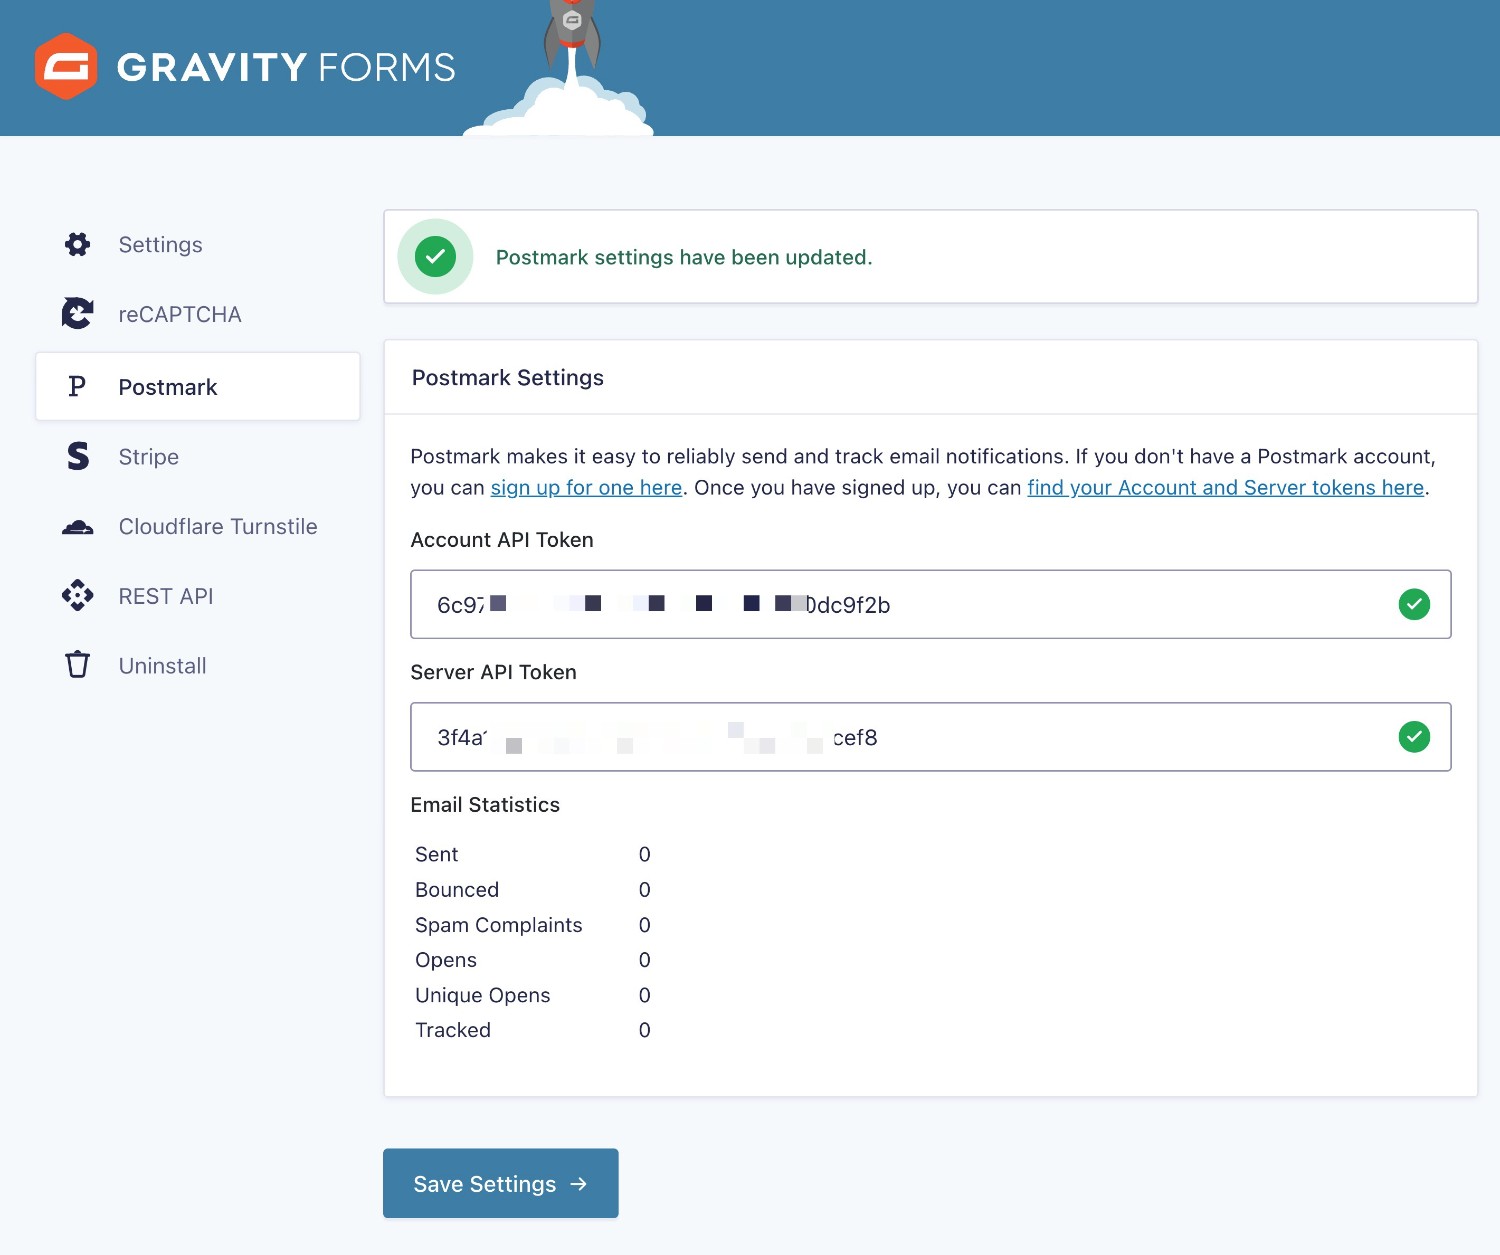
Next, you’ll want to add both API tokens to the Gravity Forms settings area:
- Open your WordPress dashboard.
- Go to Forms → Settings → Postmark.
- Add the Account API Token and Server API Token to the relevant boxes.
- Click the Save Settings button.
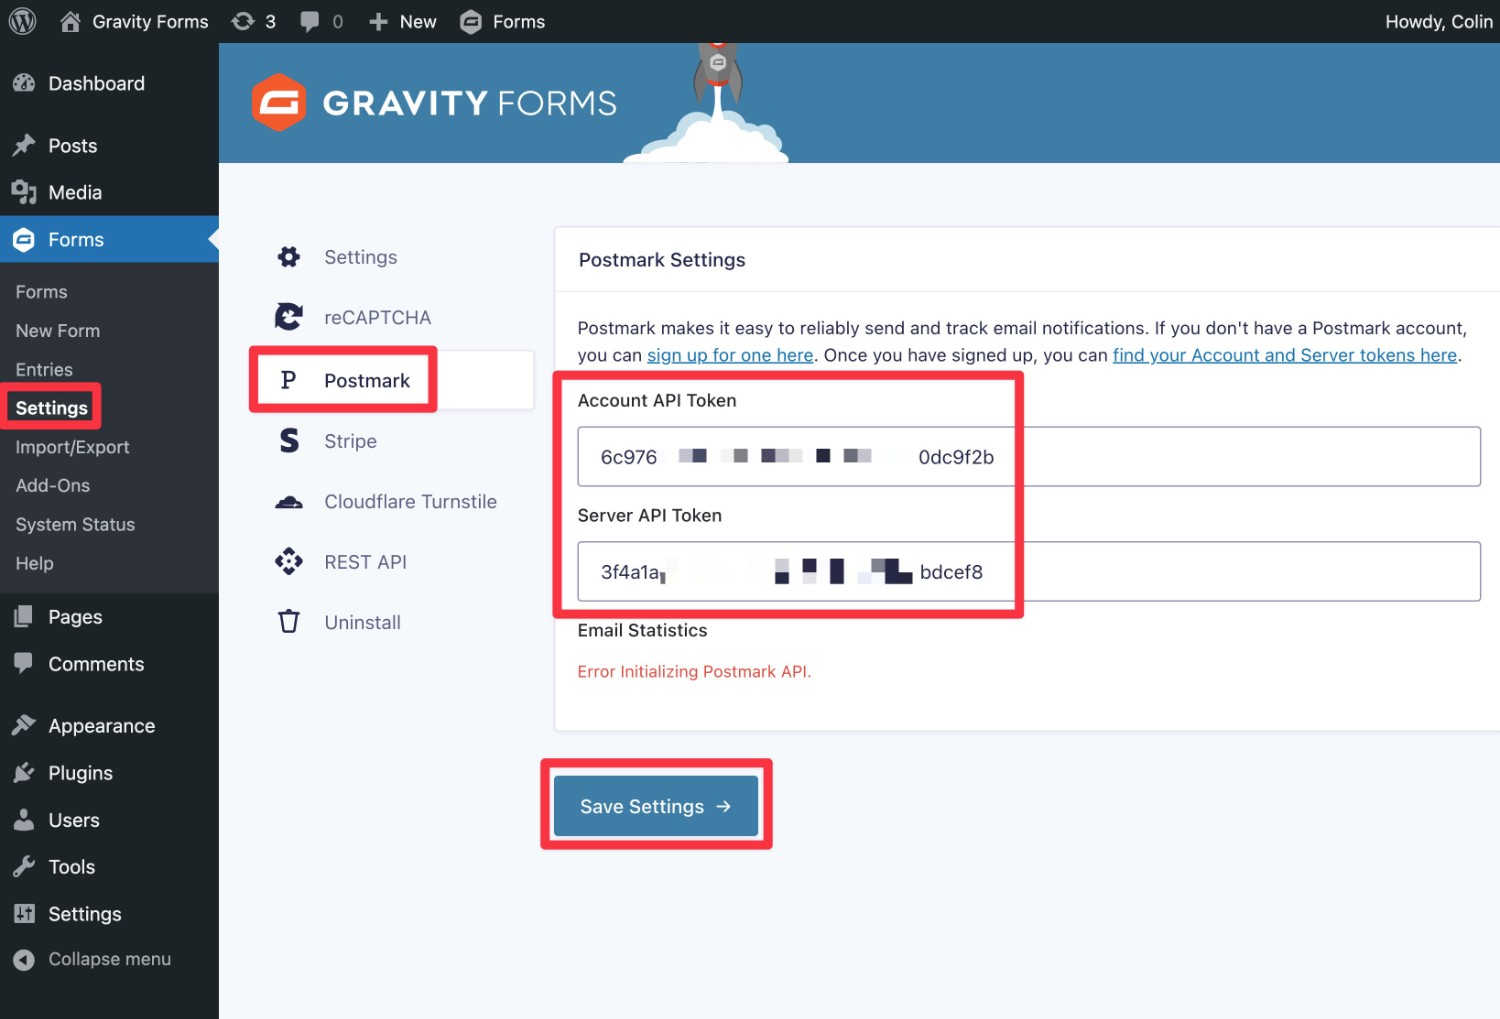
If you entered the correct API keys, you should see green checkboxes appear. You’ll also see your email statistics, which will all be zero for now.
7. Configure Notifications to Send Using Postmark
As we mentioned earlier, Gravity Forms lets you choose your email sending service on a per-notification level.
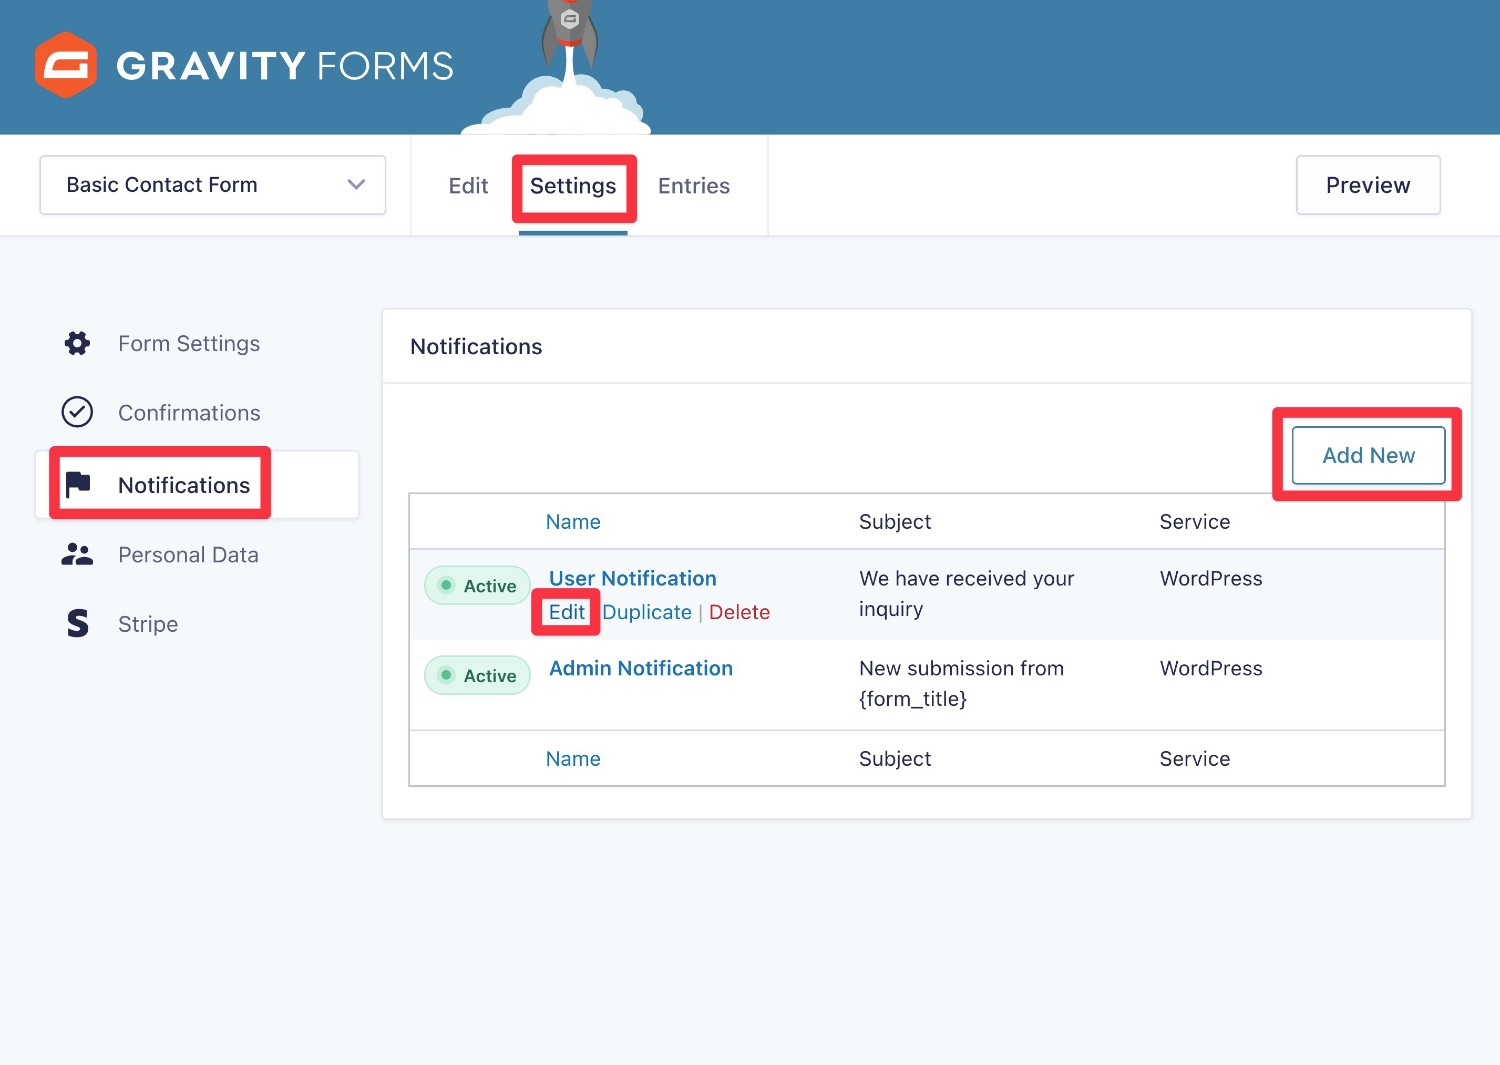
To finish out this guide, you’ll want to enable Postmark as the sending service for all the email notifications that you want to send via Postmark:
- Open the Notifications settings for the form where you want to use Postmark.
- Edit an existing notification or add a new notification.
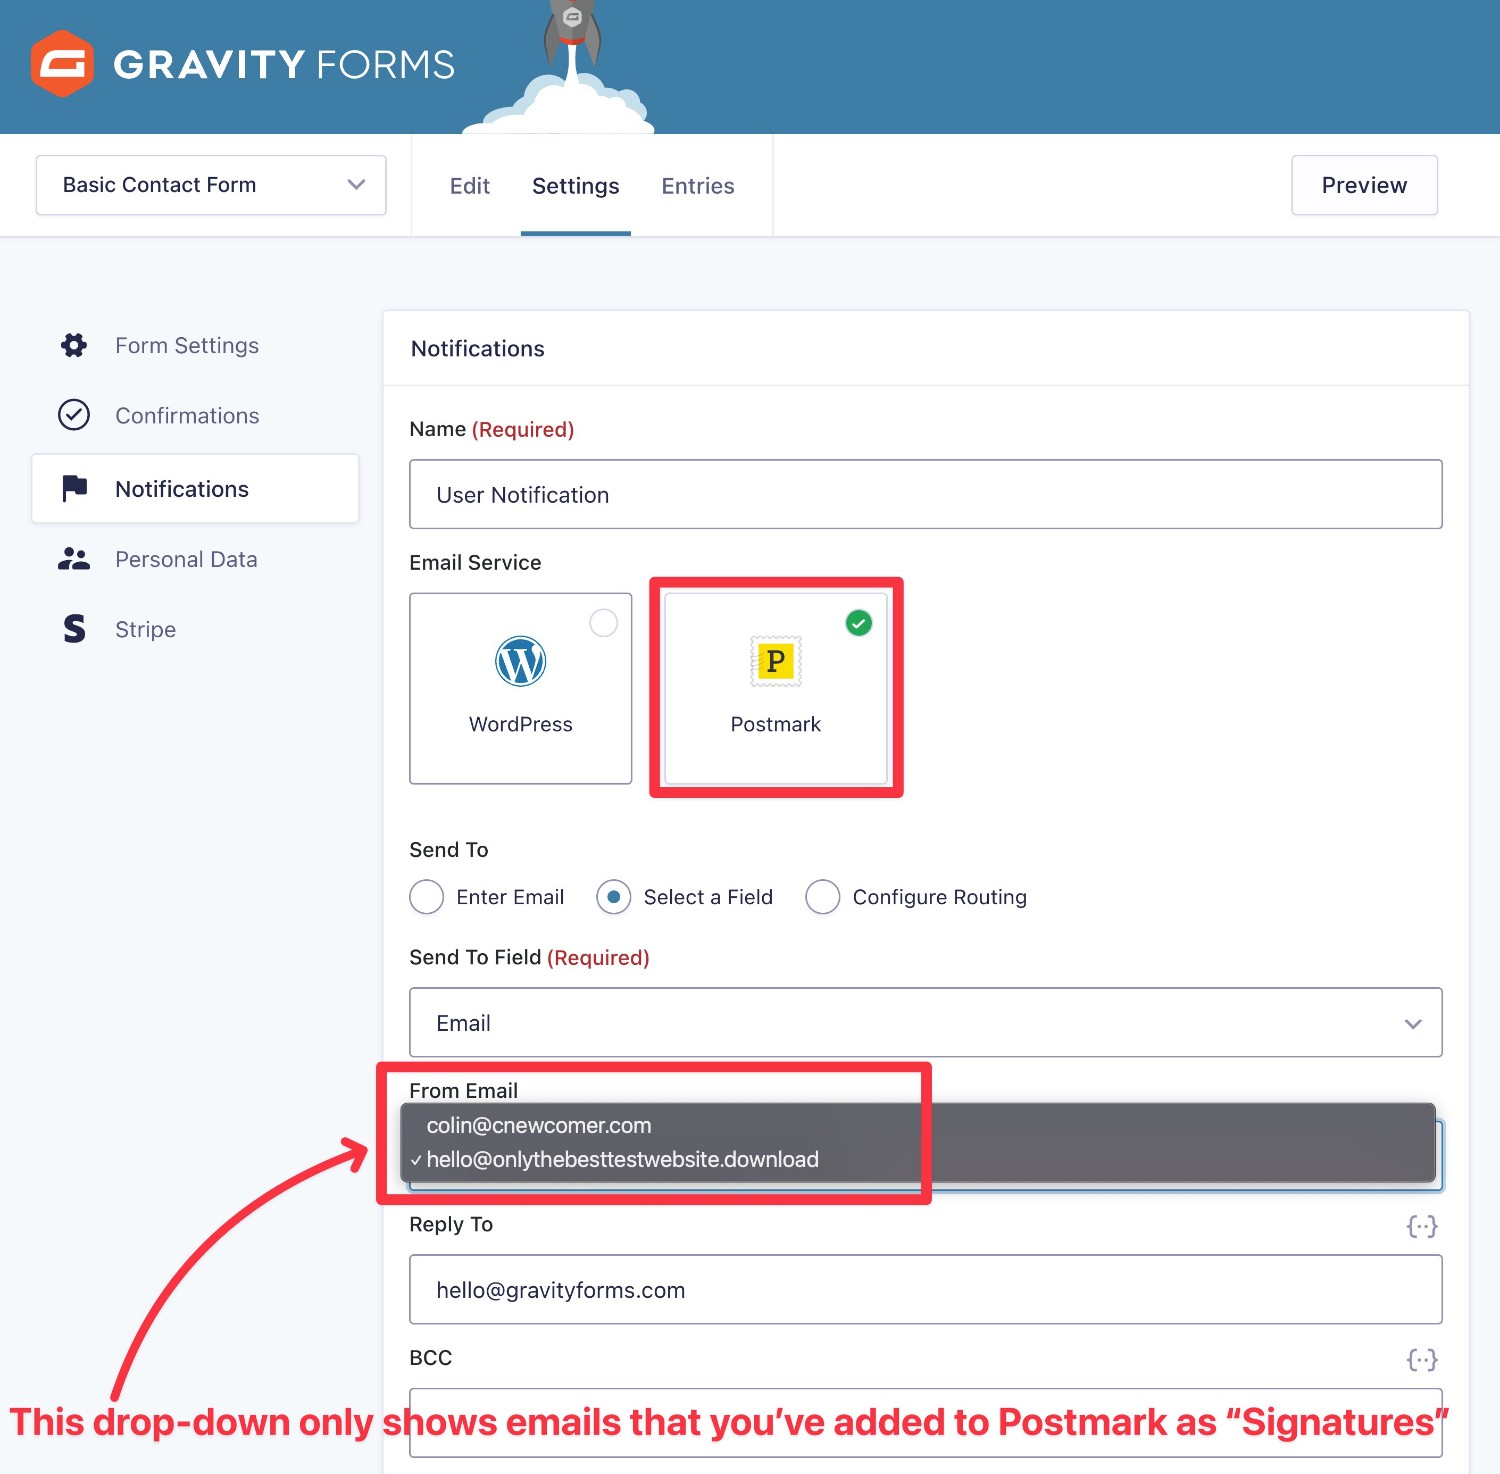
When you’re in the settings area for that notification, make sure to choose Postmark as the Email Service.
You can also use the “From” email address field to see a drop-down of all the available sender signatures you’ve added to Postmark:
- If you set up domain authentication by editing your DNS records, you can use any email address on your domain name. However, you still must add the individual email addresses as signatures in Postmark in order for them to appear in Gravity Forms.
- If you set up a single Sender Signature by clicking the verification link in an email, you must use that exact email address.
Make sure to save your settings. Now, that form’s email notifications will start sending using Postmark.
To enable Postmark for additional notification emails, just repeat this process for each email.
How to Track Postmark Usage
To track the emails that your site is sending via Postmark, you have a couple of options.
First, you can track your usage from Gravity Forms by going to Forms → Settings → Postmark:
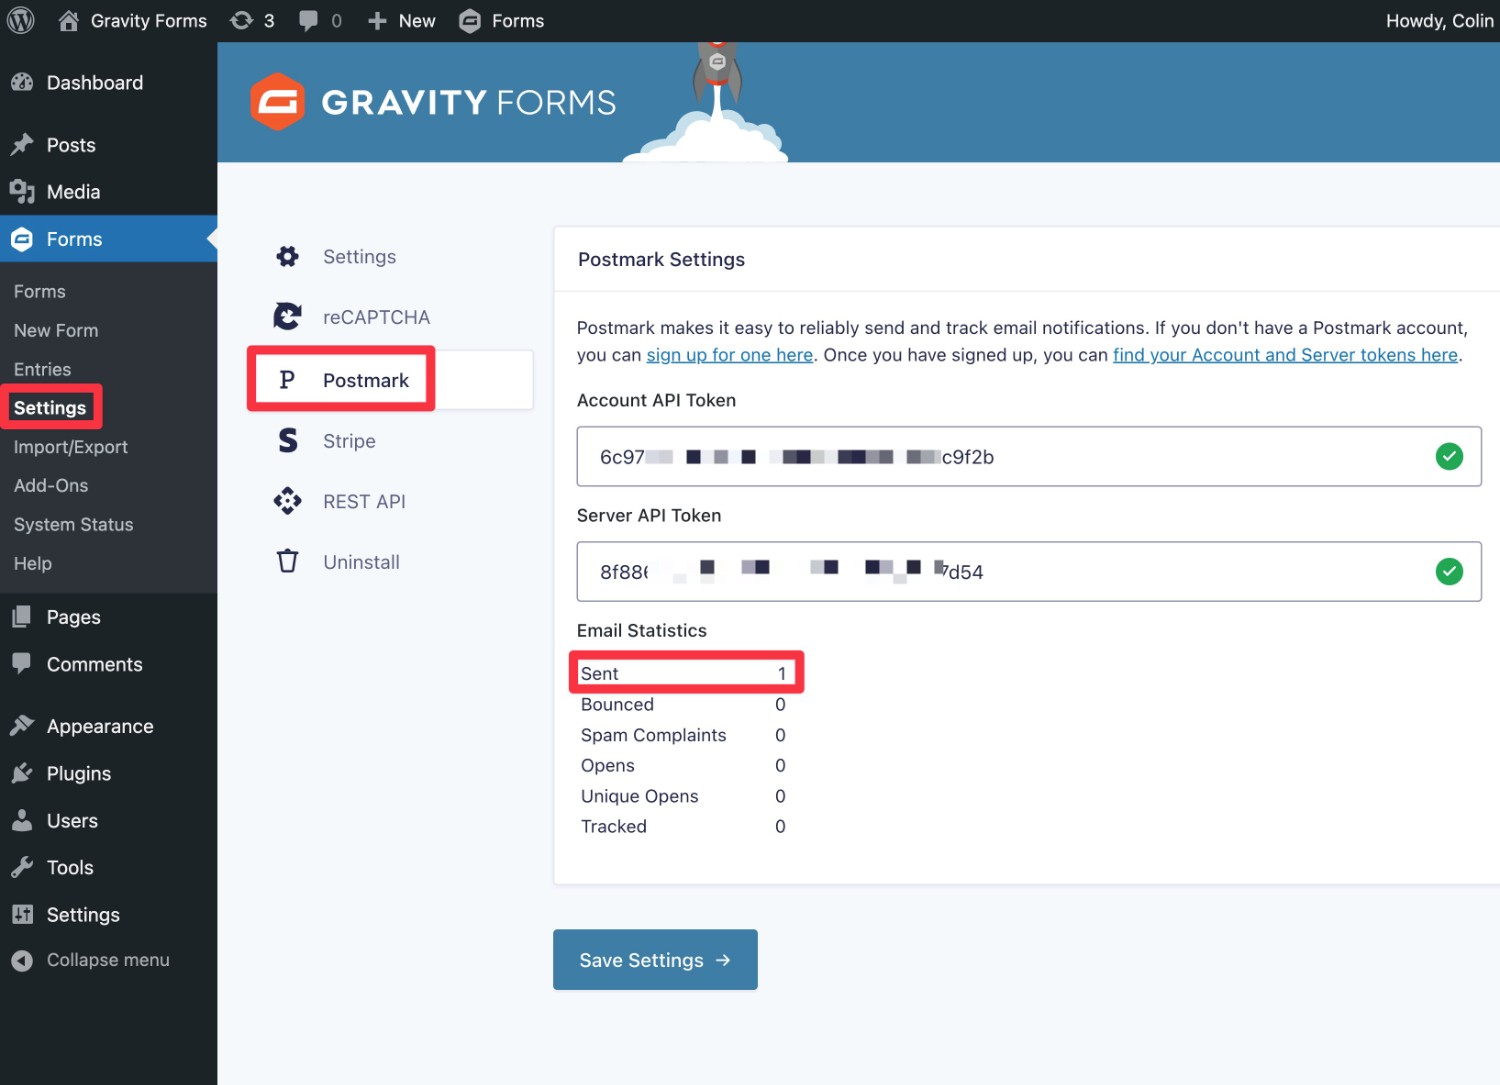
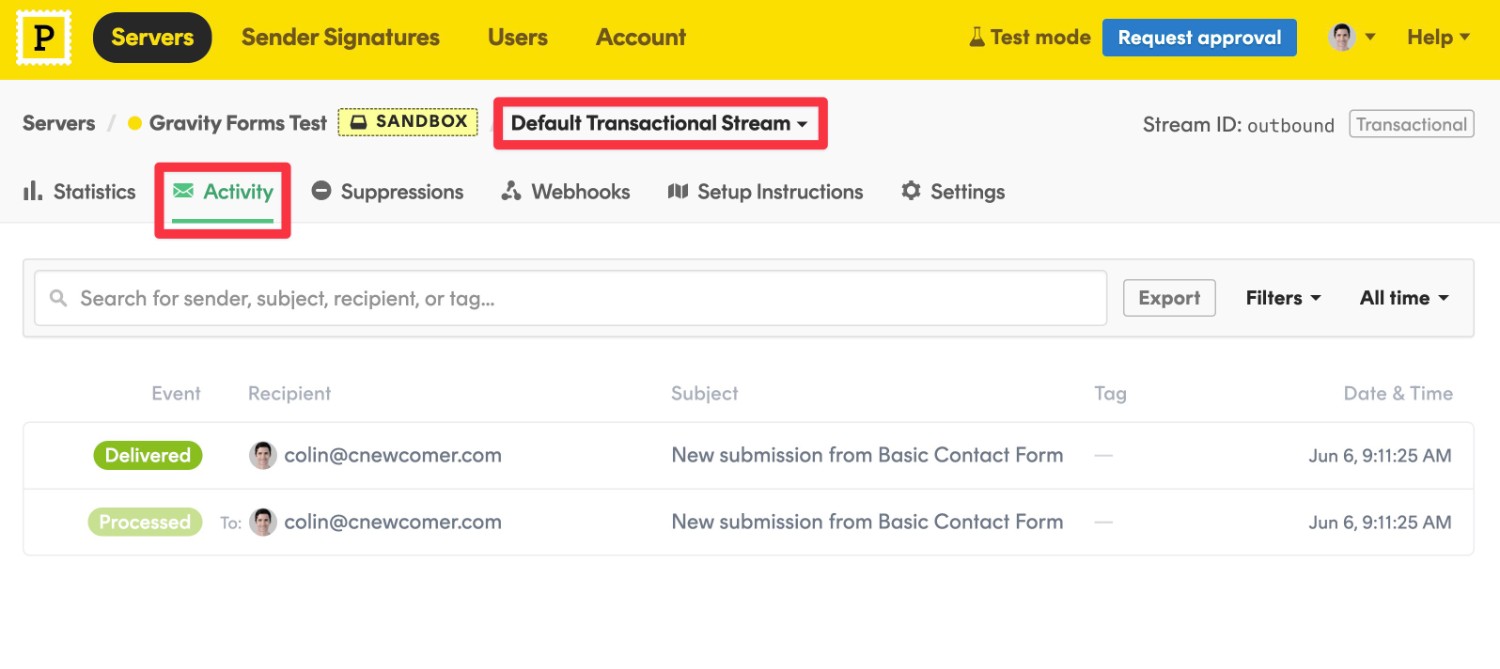
You can also go to the Activity tab of your Server in the Postmark dashboard – make sure to choose Default Transactional Stream as the option.
Try the Gravity Forms Postmark Add-On Today
If you want to help ensure your notification emails make it to users’ inboxes, the Gravity Forms Postmark Add-On is a great option to consider.
If your site sends fewer than 100 emails per month, you can stay on Postmark’s free plan forever. If you need to exceed that, the paid plans are still generally quite affordable.
The Gravity Forms Postmark Add-On is available on all Gravity Forms licenses, including the Basic license. To get started, all you need to do is install the add-on and follow this tutorial.
If you don’t have a Gravity Forms license yet, purchase your license today to get started.

If you want to keep up-to-date with what’s happening on the blog sign up for the Gravity Forms newsletter!
"*" indicates required fields