Want to feel confident that your form notification emails will be reliably sent, increasing the chances of them making it to users’ inboxes and avoiding spam folders? Then this month’s featured add-on – the Gravity Forms Mailgun Add-On – is a great option for your site.
By default, Gravity Forms will try to send its notification emails, AKA transactional emails, using the built-in WordPress mail function.
However, this default email function has a lot of issues with reliability and spam because it lacks proper authentication. What’s more, some hosts will outright block this function for WordPress sites, or not configure it in a way that works.
With the Gravity Forms Mailgun Add-On, you can instead use the dedicated Mailgun email sending service to send your forms’ notification emails. Because Mailgun is 100% focused on sending emails in an optimal way, it offers a much more reliable solution for your forms’ emails.
In this post, you’re going to learn everything that you need to know about Mailgun and the Gravity Forms Mailgun Add-On, including the following:
- Why you might want to use the Mailgun Add-On, along with some of its key features
- A step-by-step tutorial on how to set up and use the Gravity Forms Mailgun Add-On
Let’s jump in…
Why Use Mailgun with Gravity Forms
The primary reason to consider using Mailgun with Gravity Forms is to ensure that your form notification emails reliably make it to users’ inboxes.
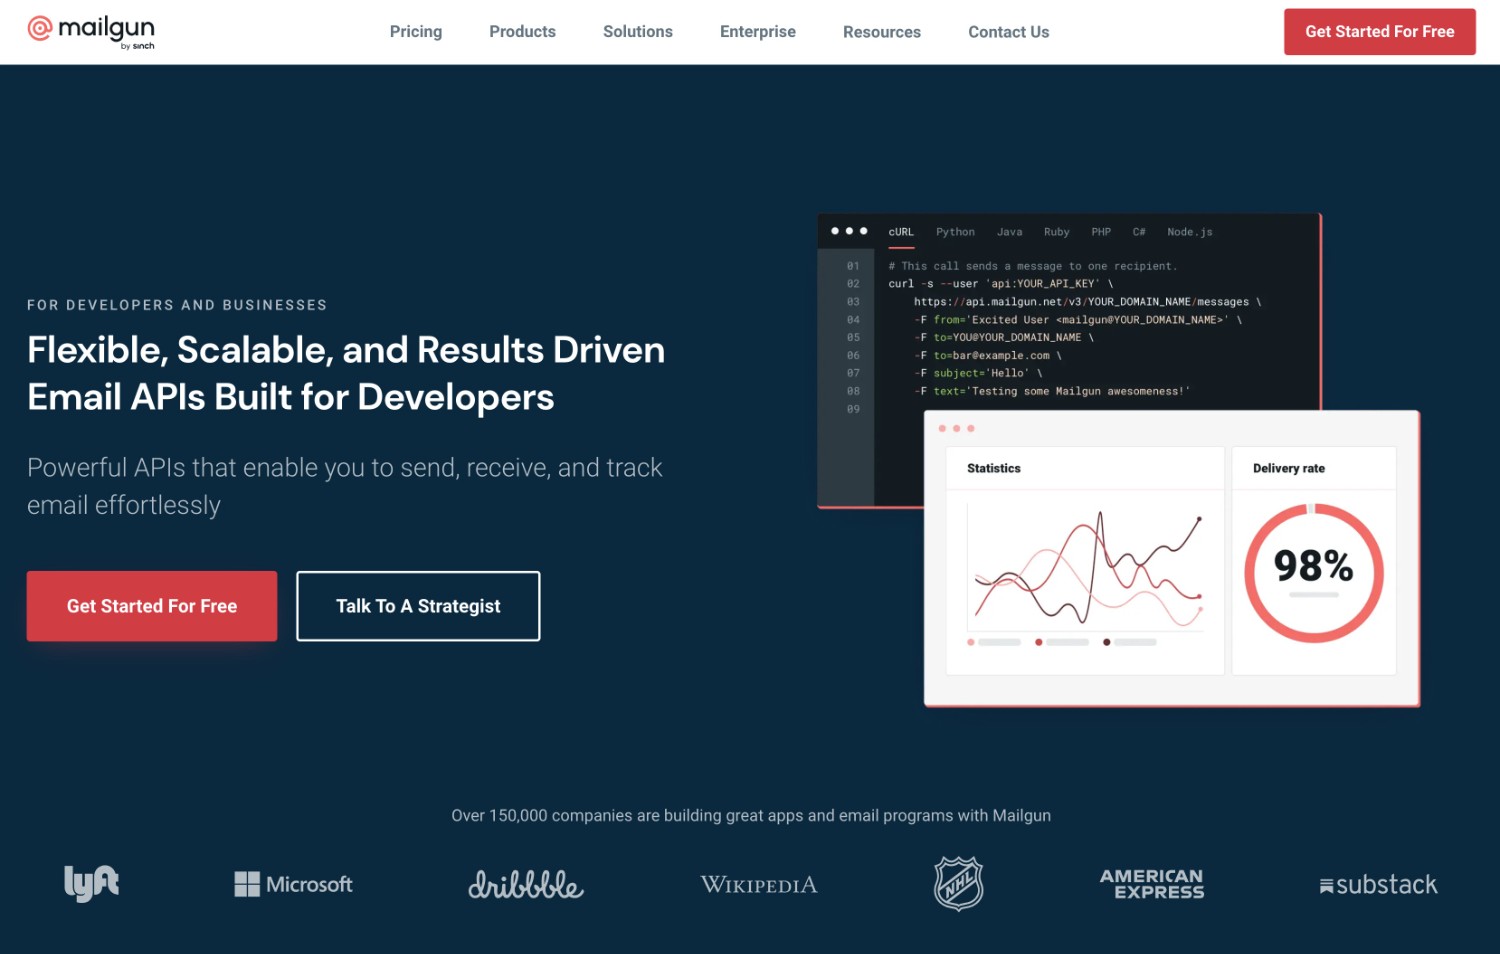
Mailgun is a transactional email service, which means it specializes in sending emails like Gravity Forms’ notification emails.
In Mailgun’s words, the Mailgun service offers “Powerful APIs that enable you to send, receive, and track email effortlessly”, which is a pretty good description of what you get.
With the Gravity Forms Mailgun Add-On, you get access to two key features to integrate Mailgun with Gravity Forms:
- You can connect to Mailgun using its API, which is the best and most reliable way to send your site’s emails with Mailgun.
- You can set up Mailgun as your notification sending service at the individual notification level. For example, you could use Mailgun for some email notifications, but use a different sending service for others.
In terms of pricing, Mailgun lets you send up to 1,000 emails per month for free forever.
If you need to exceed those limits, the plans are still pretty affordable – more on them below.
If you want to keep your email sending numbers down to stay below the 1,000 emails per month limit, the fact that the Gravity Forms Mailgun Add-On lets you control sending services on a per-notification level can be really handy.
For example, you could use Mailgun to send mission-critical notification emails (such as emails to your users), while using the default WordPress email function to send notification emails to yourself (where you can manually set up a filter to avoid spam issues).
For another reliable email sending solution with slightly higher free limits, you can also check out the Gravity Forms SendGrid Add-On. It offers a forever-free plan that lets you send up to 100 emails per day (~3,000 per month).
How to Use the Gravity Forms Mailgun Add-On to Send Transactional Emails
Now that you have some background on Mailgun and how it works with Gravity Forms, let’s get into the actual step-by-step guide for how to start using Mailgun to send your form notification emails.
Here’s a general look at the setup process – keep reading for the complete instructions:
- Install the Gravity Forms Mailgun Add-On.
- Register for a Mailgun account – it’s free, but you might need to enter a credit card.
- Authenticate your domain name with Mailgun – you’ll need access to the ability to add DNS records to your domain name.
- Add the Mailgun API key to Gravity Forms.
- Choose Mailgun as your sending service in the Gravity Forms notification settings.
Let’s go through these steps in more detail…
1. Install the Mailgun Add-On
To begin, make sure to install and activate the Gravity Forms Mailgun Add-On on your site.
The Mailgun Add-On is available on all Gravity Forms license plans. So as long as you have some type of active license, you can access it.
If you don’t currently have an active Gravity Forms license, you can purchase a license here.
To install the Gravity Forms Mailgun Add-On, follow these steps:
- Open your WordPress dashboard.
- Go to Forms → Add-Ons.
- Scroll down until you see the Mailgun Add-On.
- Click the Install button.
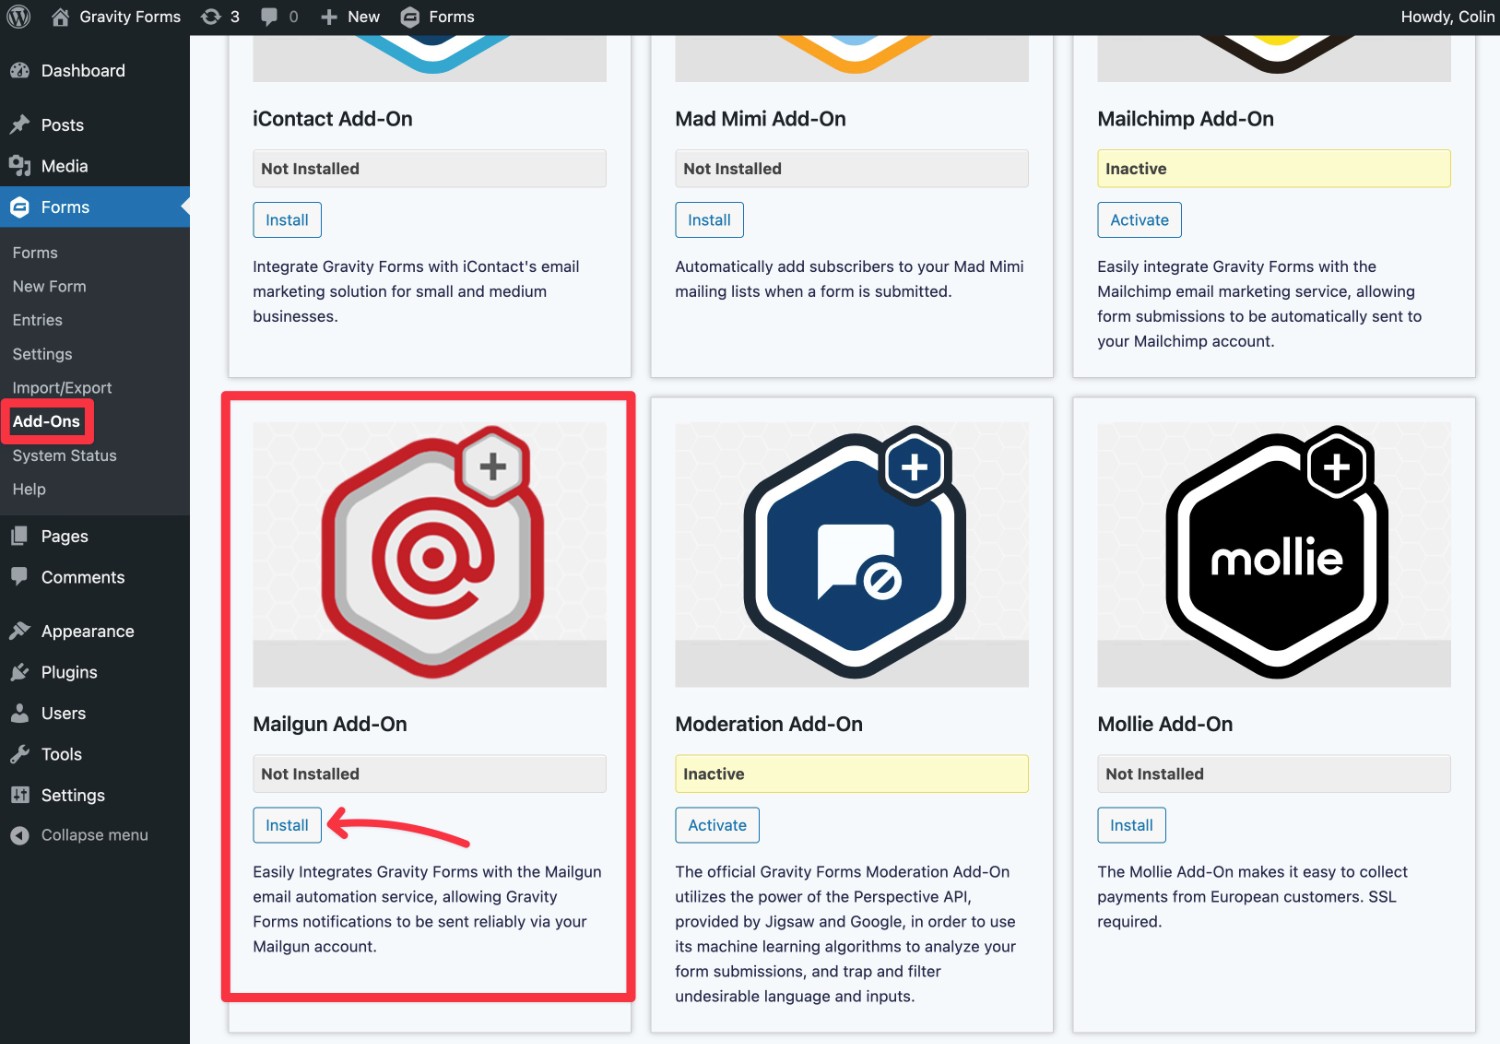
On the next screen, make sure that you also activate the add-on.

2. Create a Mailgun Account
Once you’ve installed the add-on, the next step is to register for a Mailgun account.
You can create a Mailgun account 100% for free.
Mailgun also offers a one-month free trial that lets you send up to 5,000 emails, and a more limited forever-free option after that.
That means you can follow everything in this tutorial without needing to pay anything or enter a credit card*.
*Mailgun does display a credit card field on the signup page, but you can skip it by unchecking the Add payment info now box. However, if you don’t add a credit card, you’ll only be able to send emails to five authorized recipients. While this is fine for testing, you’ll need to add a credit card to start sending live emails, even if you’re under the free limits.
After the first month, you have two options to continue using Mailgun:
- Flex Plan (pay as you go) – the Flex plan offers pay-as-you-go pricing with a free tier. You can send up to 1,000 emails per month for free. If you need to exceed that limit, you’ll only pay based on your actual usage at a rate of $1.00 per 1,000 emails.
- Fixed plans – Mailgun offers fixed plans that include more advanced features for a fixed rate per month (with optional overage fees if you need to exceed the sending limit on the fixed plans). These plans start at $35 per month for the Foundation plan, which includes up to 50,000 email sends.
For most WordPress sites, the pay-as-you-go Flex plan probably makes the most sense.
First off, many WordPress sites will send under 1,000 emails per month, which means you won’t need to pay anything. Even if you need to exceed that, the rates are pretty affordable at $1 per 1,000 emails.
Additionally, most sites won’t need the extra features on the Foundation or Scale plans.
3. Authenticate Your Domain Name With Mailgun
Once you’ve created your account, you’ll want to authenticate your WordPress site’s domain name with Mailgun.
While Mailgun does provide you with a free sandbox domain name for testing, the sandbox domain name only lets you send to authorized recipients.
To send to anyone, you’ll need to set up domain authentication. Adding domain authentication will also make your emails look more trustworthy, which helps them avoid users’ spam folders.
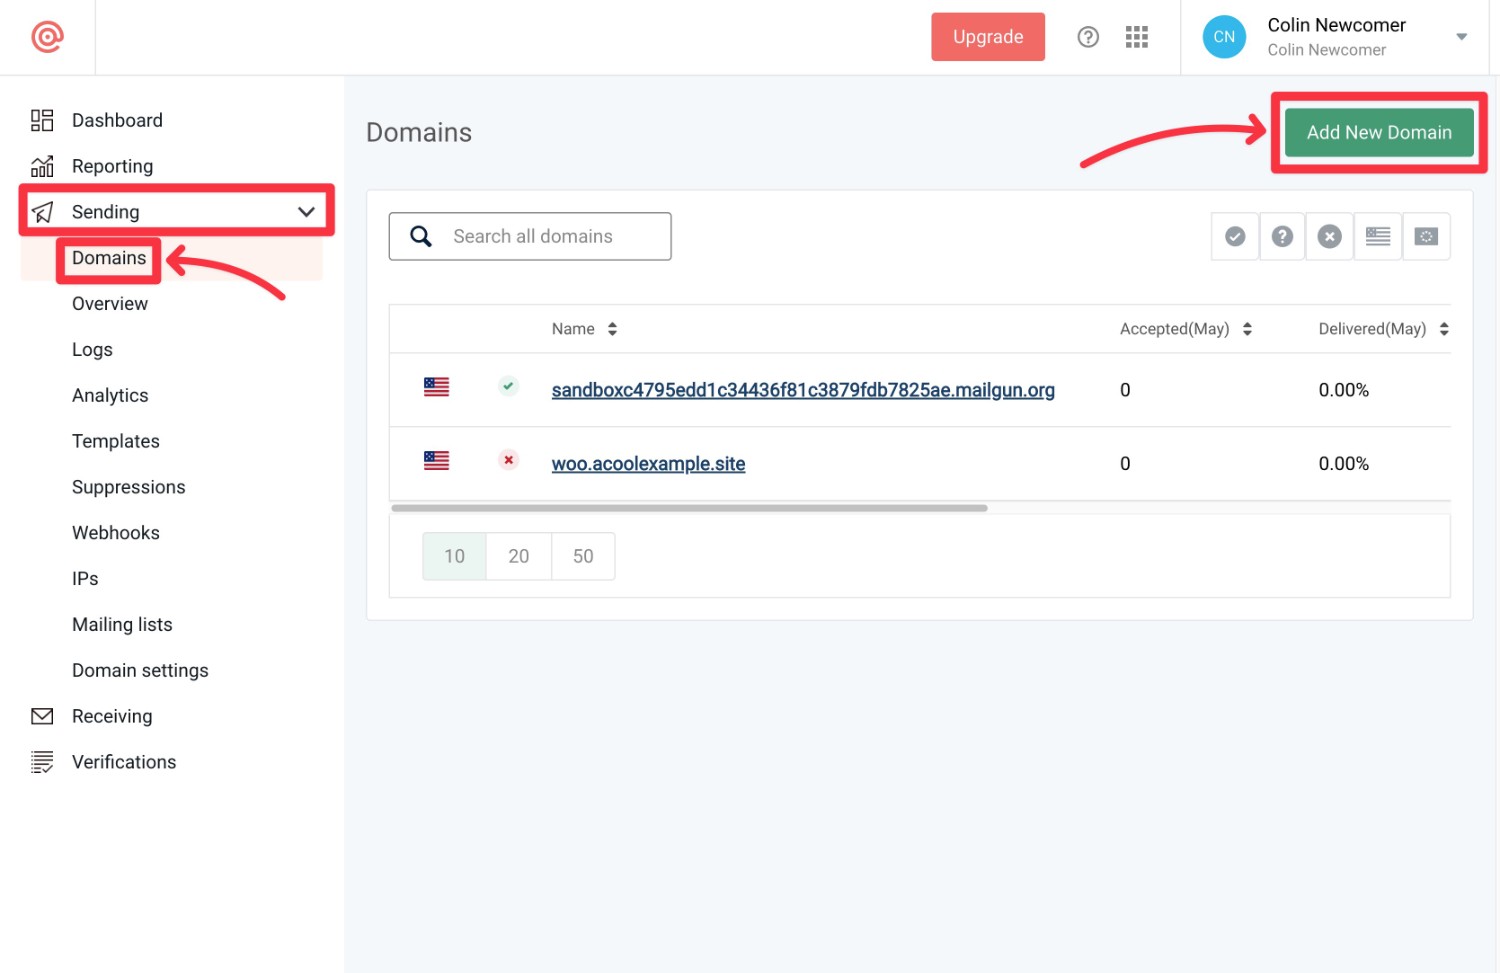
Before you can authenticate a domain name, you’ll first need to add it to Mailgun:
- Open your Mailgun dashboard.
- Expand the Sending submenu in the menu sidebar on the left.
- Select the Domains option under Sending.
- Click the Add New Domain button.
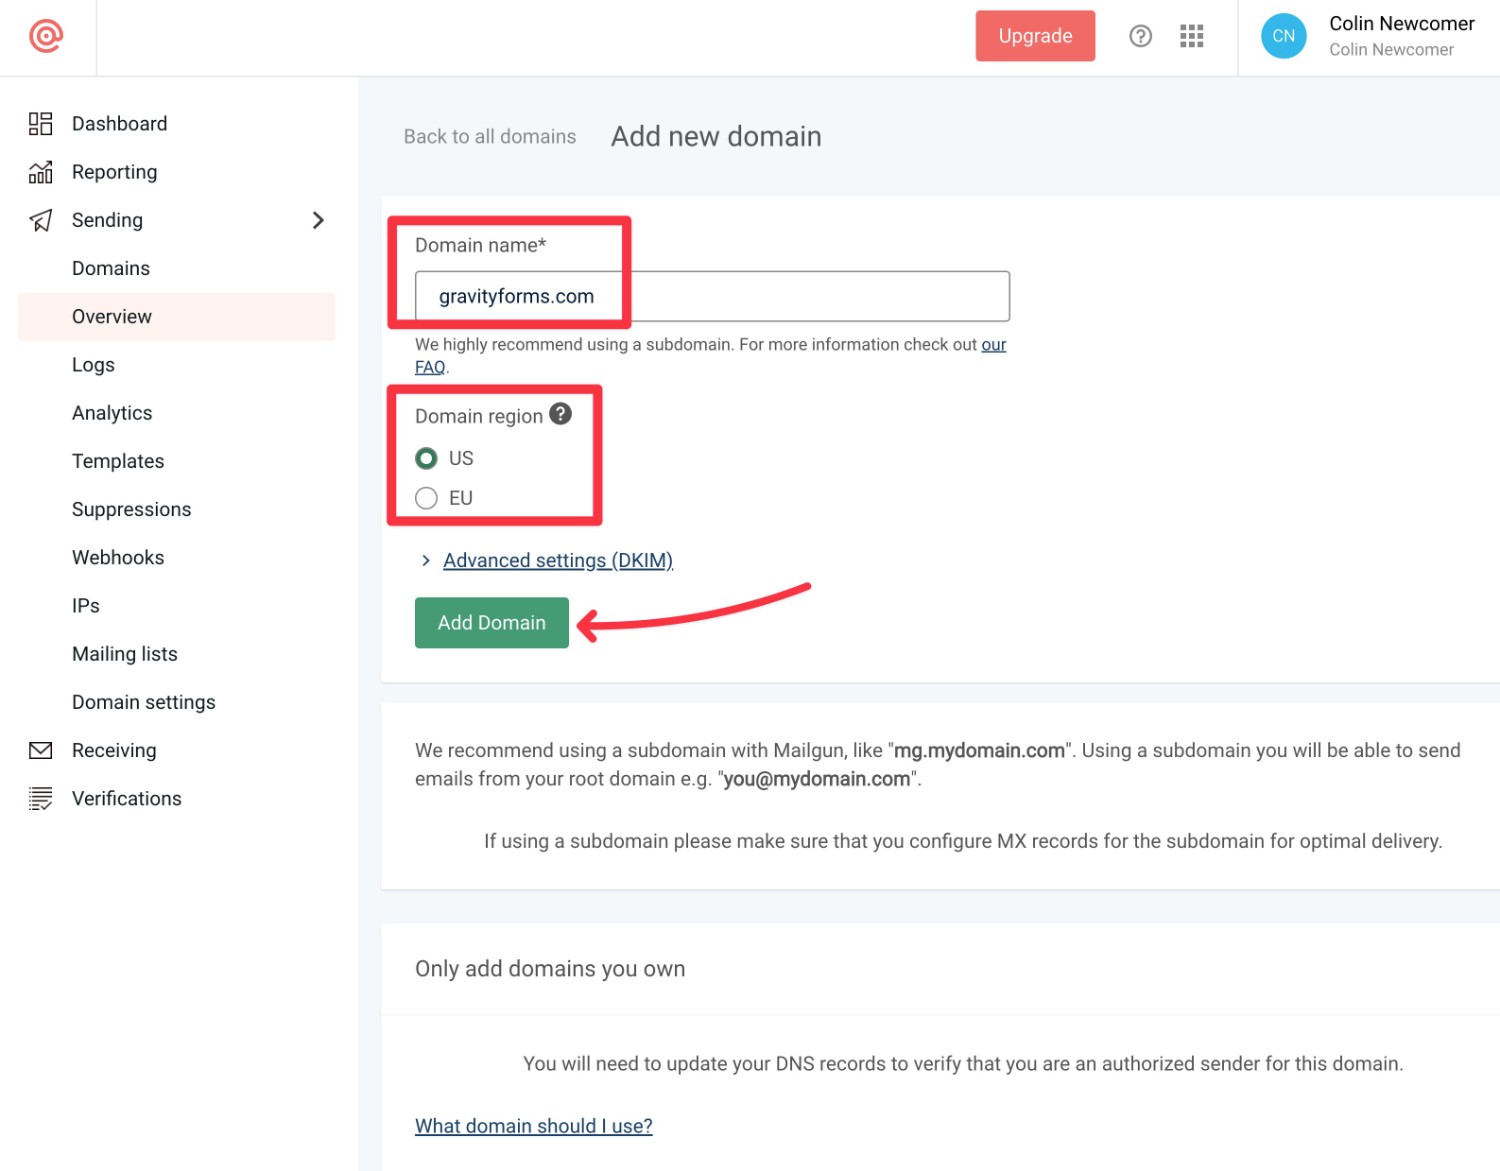
On the next screen:
- Enter your domain name.
- Select the region closest to your target audience.
- Click Add Domain.
You can use your root domain name or a subdomain.
If you’re only planning to use your domain name to send emails with Mailgun, it’s fine to use your root domain name.
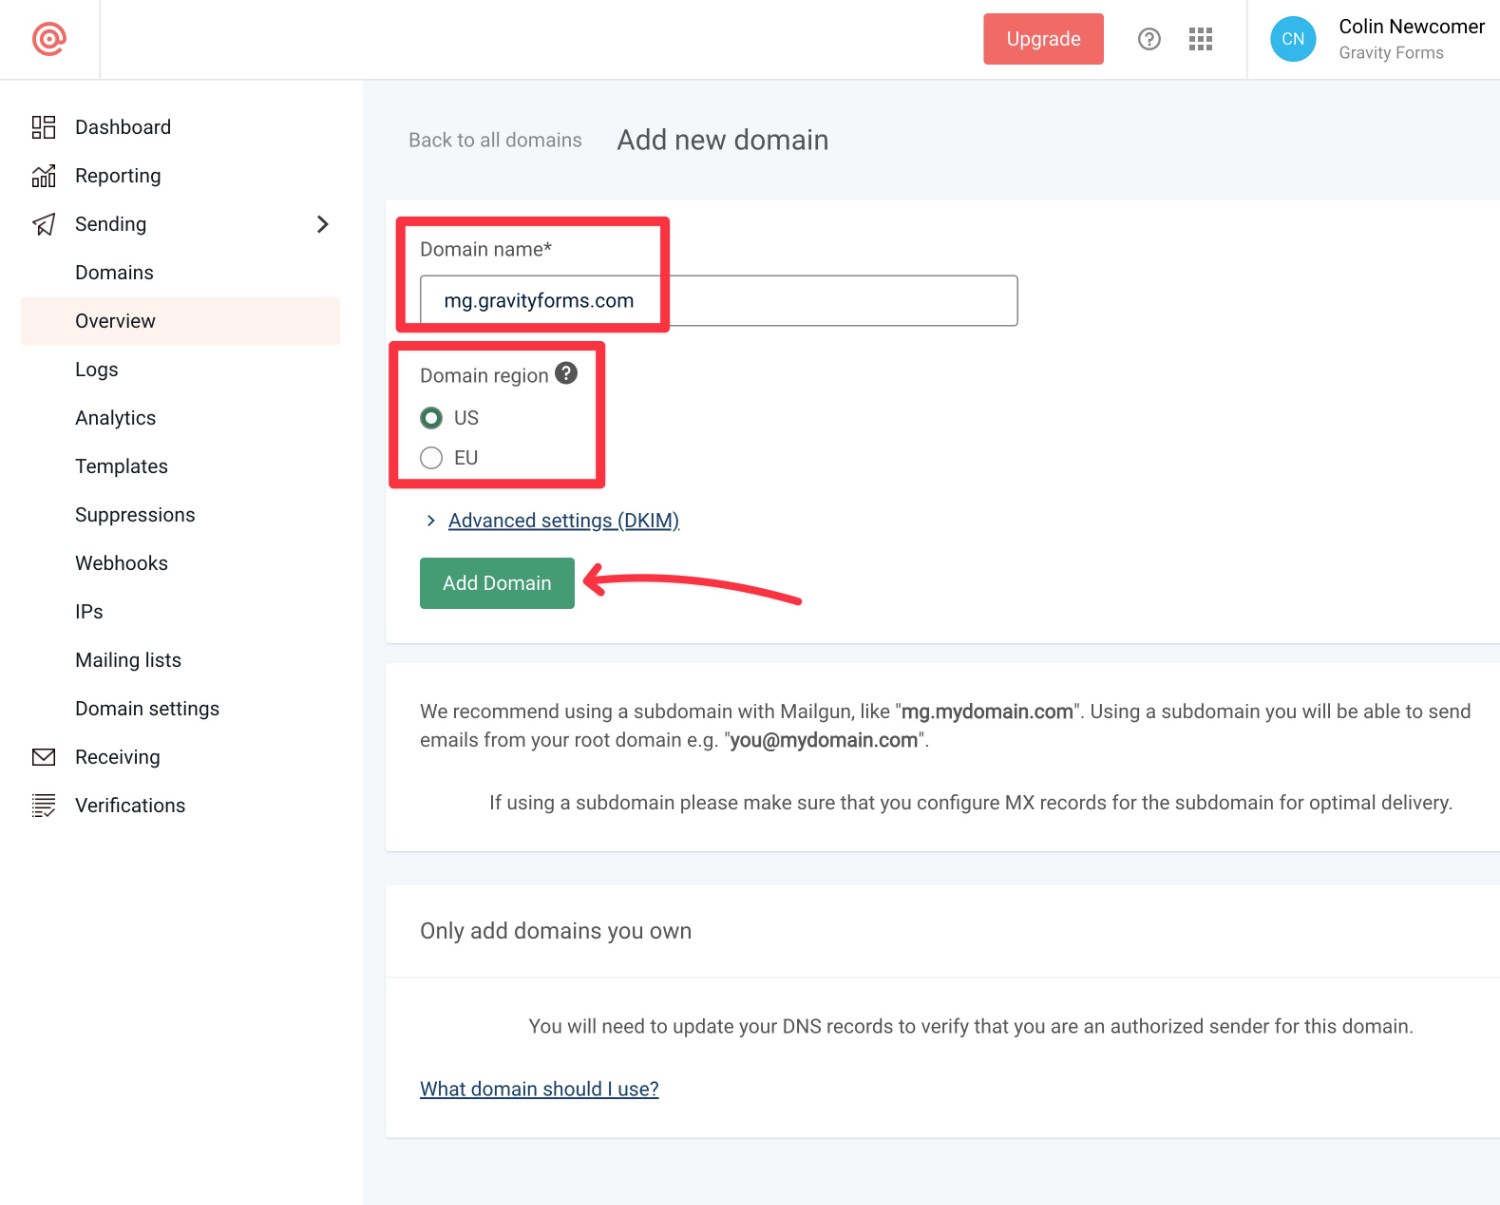
However, if you also want to receive emails, Mailgun recommends that you use a subdomain.
While it’s fine to authenticate a subdomain, doing so means that you’ll only be able to use emails on this subdomain as your “From” email in Gravity Forms notification emails.
For example, if you verify mg.yoursite.com in Mailgun, your Gravity Forms notification emails will need to come from something like [email protected].
If you would rather send from something like [email protected], you’ll need to authenticate your root domain name and not a subdomain.
Here’s what it looks like with the root domain:
Here’s what it looks like with the subdomain:
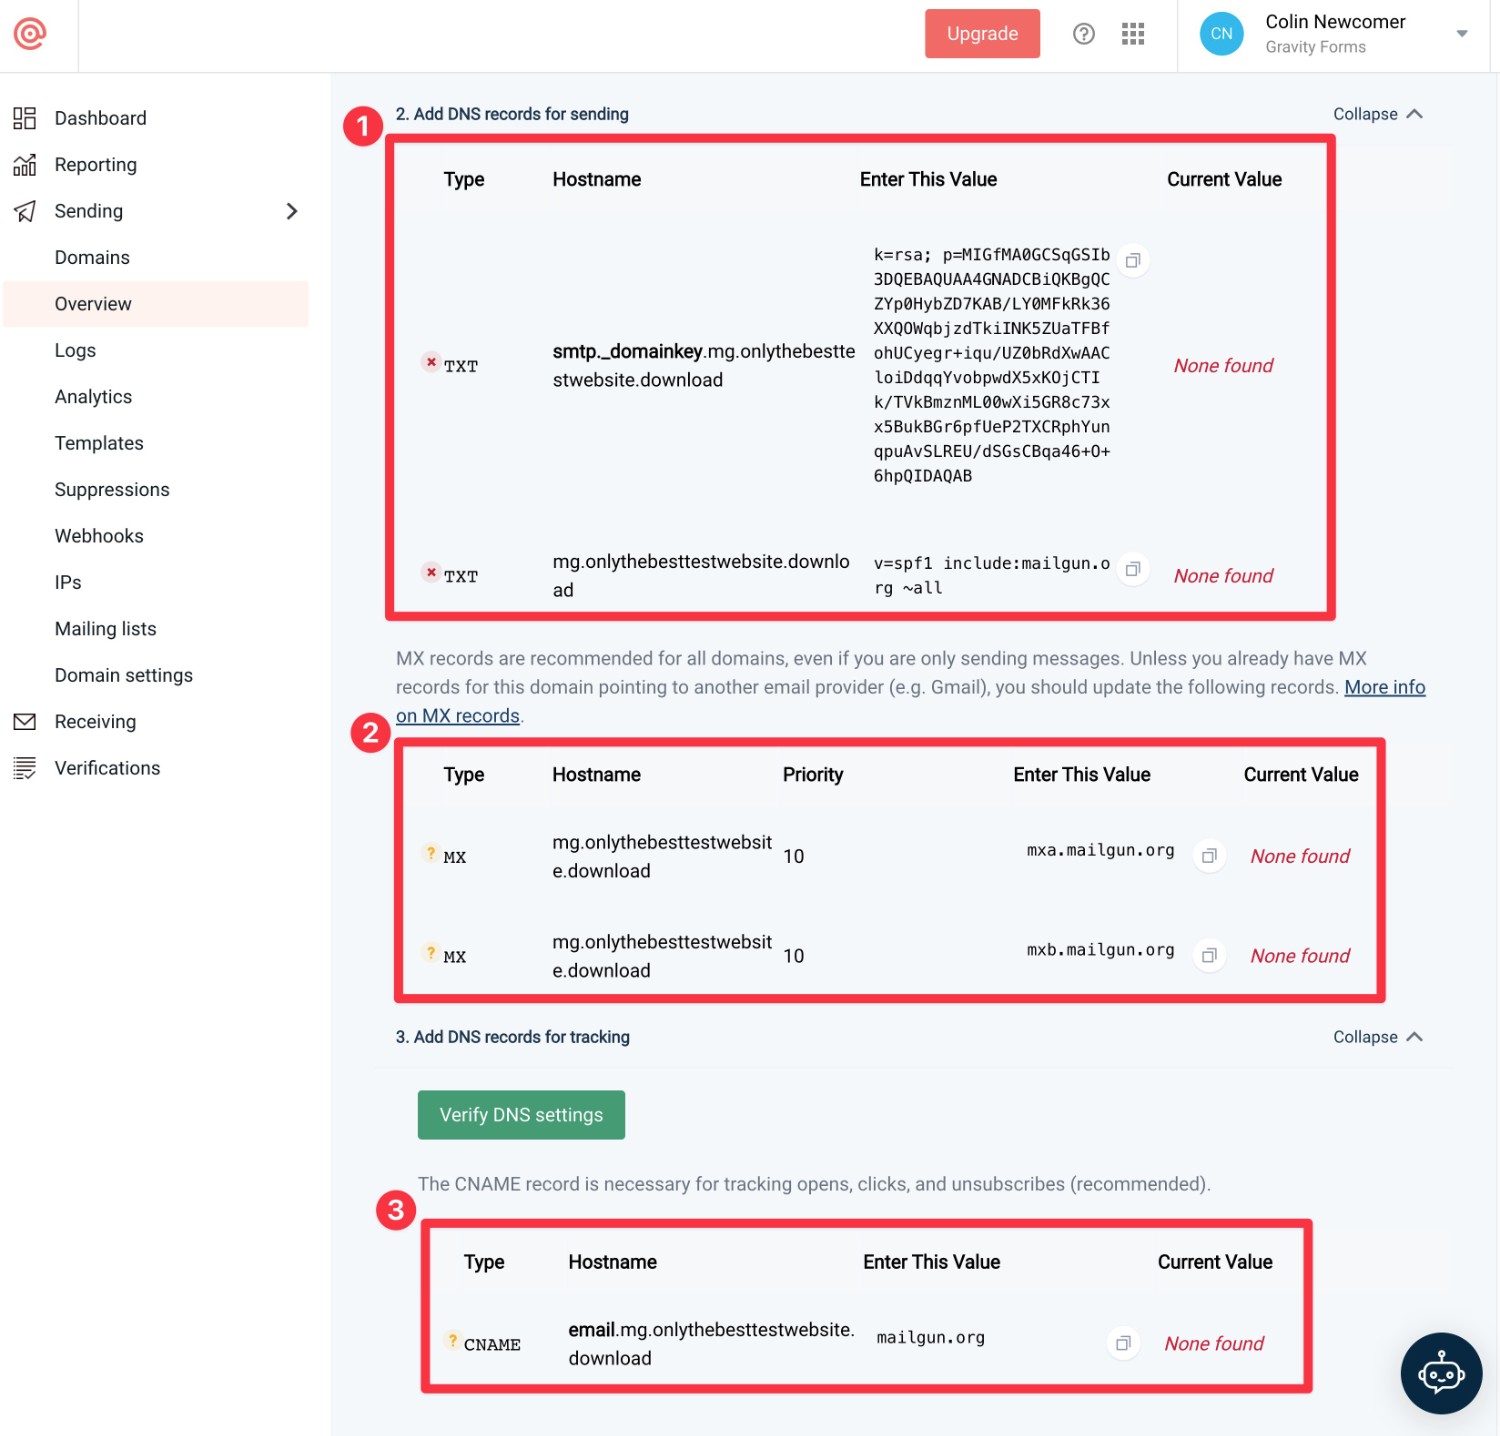
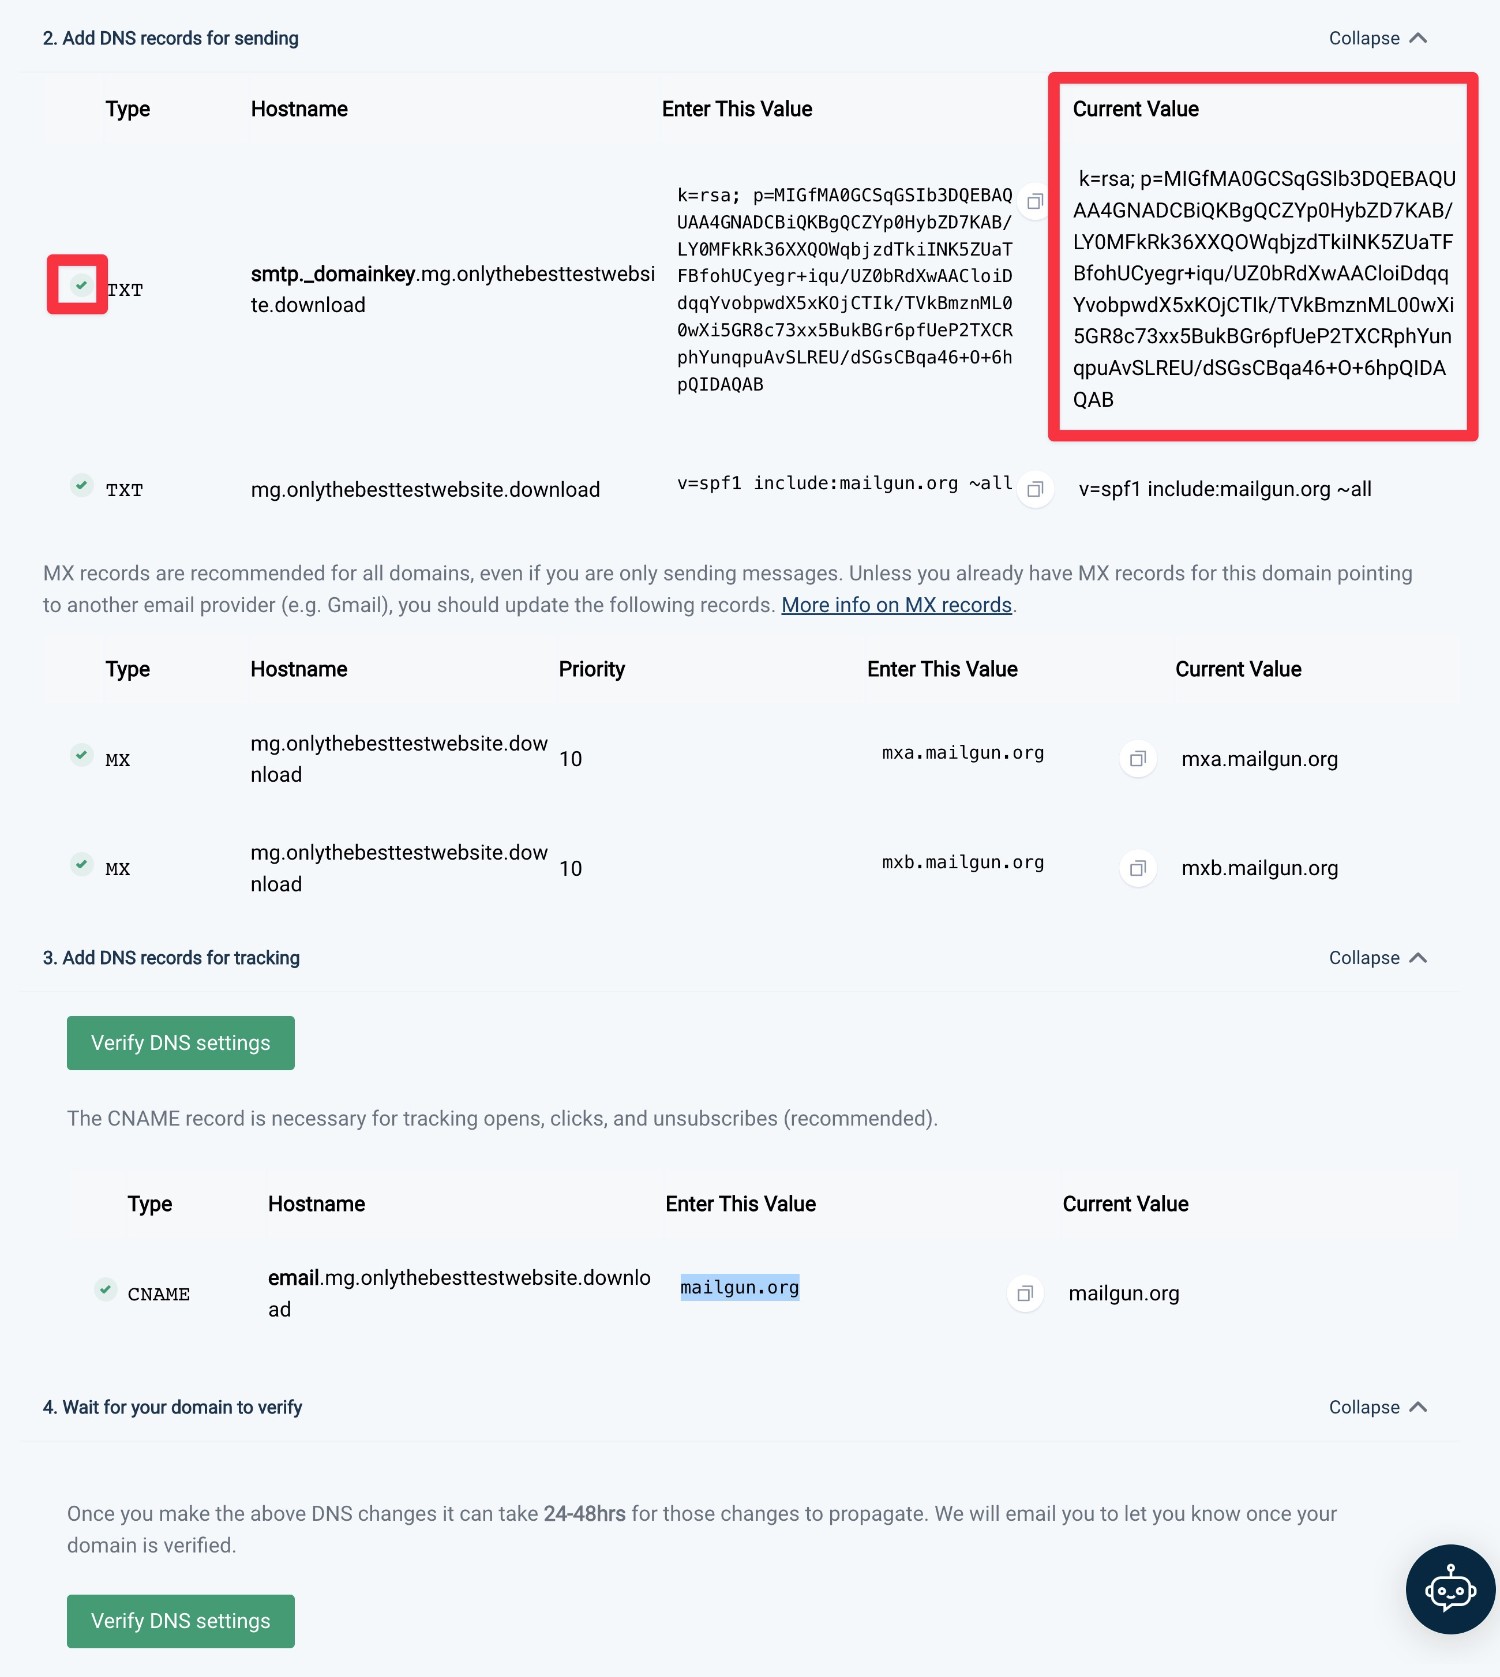
Regardless of whether you use your root domain or a subdomain, you’ll next be prompted to add some DNS records to your domain:
- TXT records – these authenticate your domain name with Mailgun.
- MX records – these add extra verification to decrease spam signals.
- CNAME – this lets you track opens, clicks, and unsubscribes.
You should definitely add the TXT and MX records. If you want to track opens, clicks, and unsubscribes, you should also add the CNAME record.
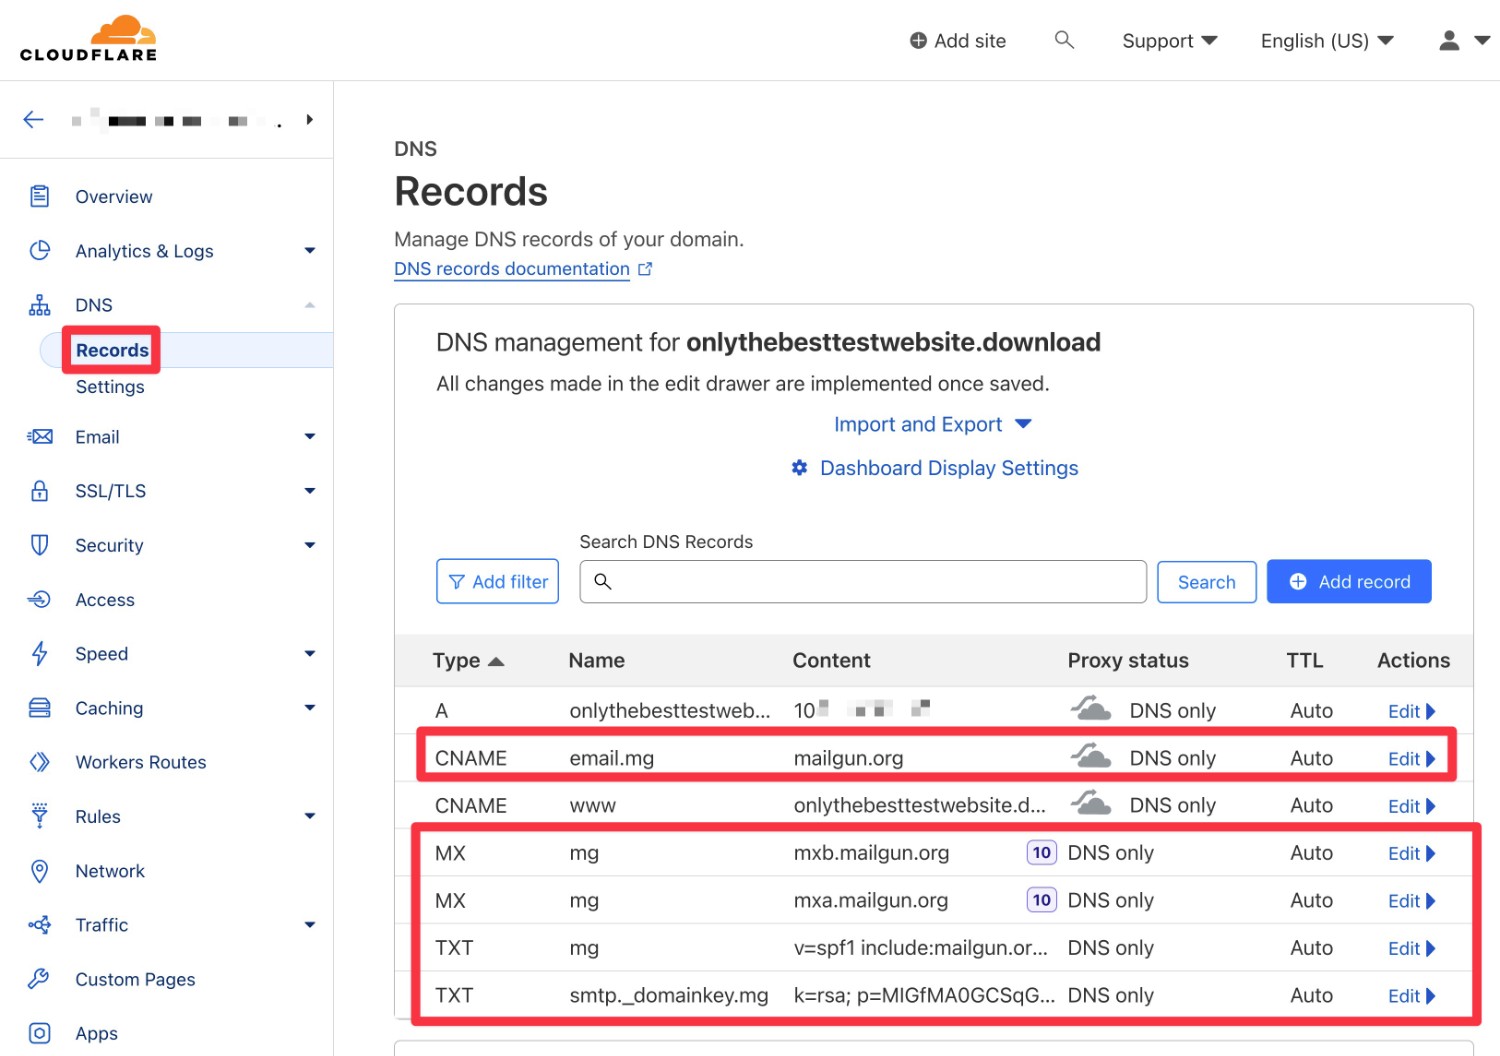
Where you add these records will depend on how you’ve configured your domain name:
- If you pointed your domain name to your host’s nameservers, you’ll typically manage them from your web hosting account.
- If you used A records to point your domain name to your server IP address, you’ll typically manage them from your domain registrar.
- If you’re using a reverse proxy like Cloudflare, you’ll typically manage them from the Cloudflare interface.
For example, here’s what it looks like to add these records via Cloudflare:
Once you’ve added the records, go back to Mailgun and click the Verify DNS Settings.
If you did everything correctly, you should see the details appear in the Current Value column, along with a green checkmark.
Now, you’re ready to start sending!
If you don’t see a success message, you might need to wait a bit for your DNS changes to propagate. It can take up to 24 hours, but it’s usually much faster.
4. Add Mailgun Private API Key to Gravity Forms
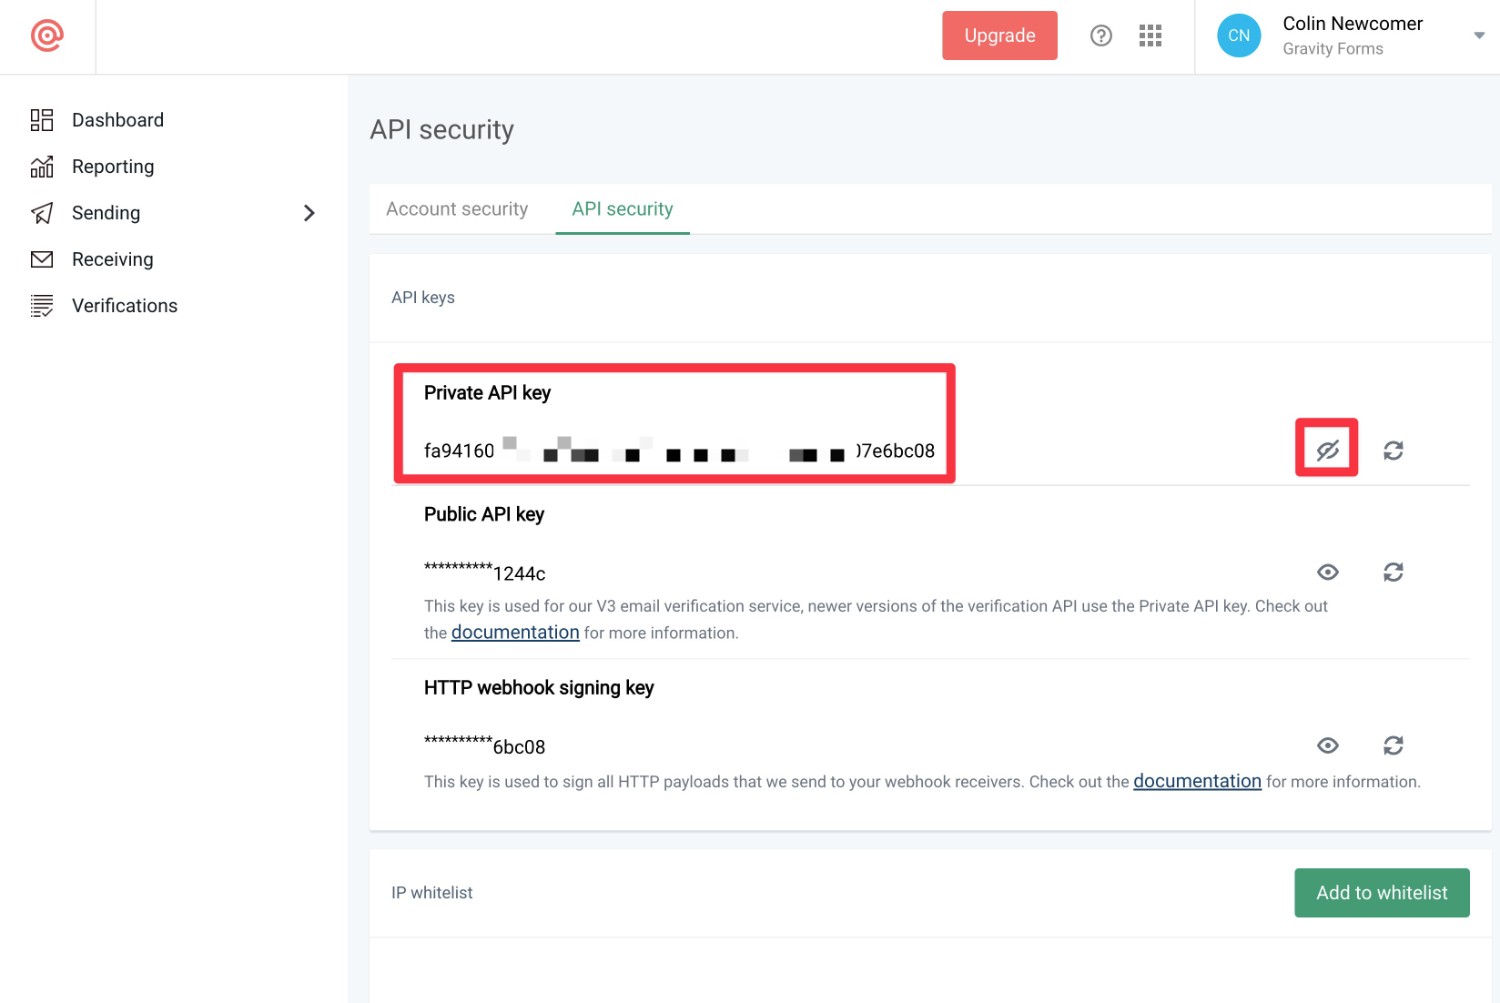
To connect Gravity Forms to Mailgun, you’ll need to add your Mailgun private API key to the Gravity Forms Mailgun Add-On settings.
To access your Mailgun Private API key, you can click this link to open the interface or follow these instructions:
- Click on your account name in the top-right corner of the Mailgun interface to expand a drop-down.
- Select API keys from the drop-down.
In the API key interface, click on the eyeball icon to show your private API key and then copy it to a safe place. You’ll need it in a second.
Once you have the private API key, here’s how to add it to Gravity Forms:
- Open your WordPress dashboard.
- Go to Forms → Settings → Mailgun.
- Choose your Region. Make sure it matches the region that you chose when authenticating your domain name with Mailgun.
- Paste your private API key into the relevant box.
- Click Save Settings.
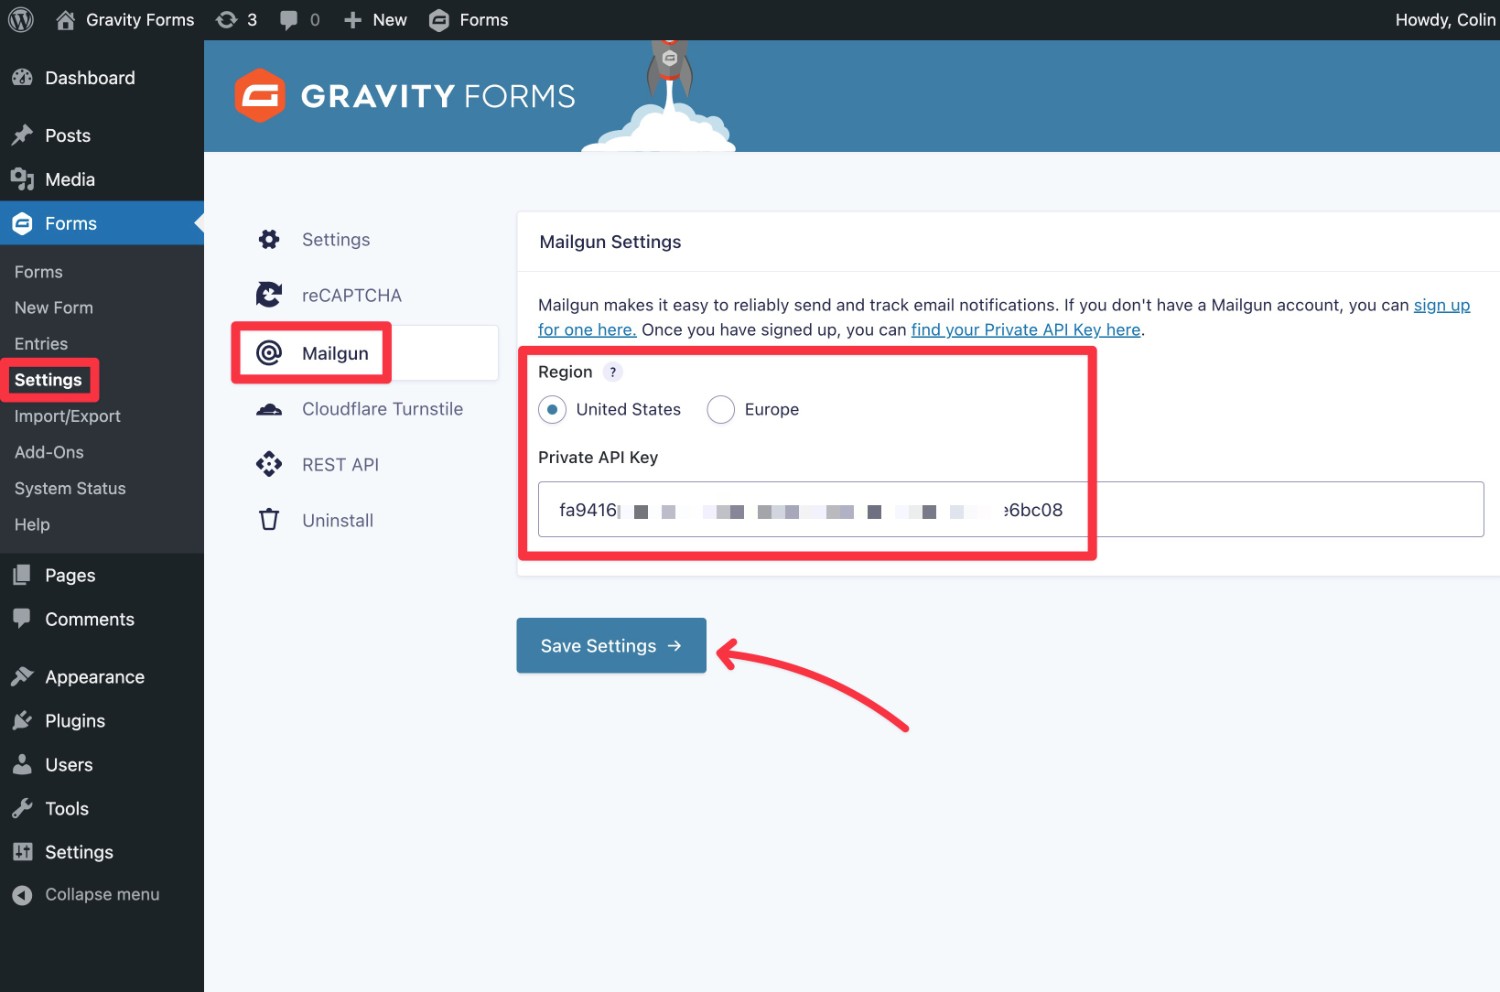
If you entered the correct API key, you should see a green checkmark appear after clicking the Save Settings button.
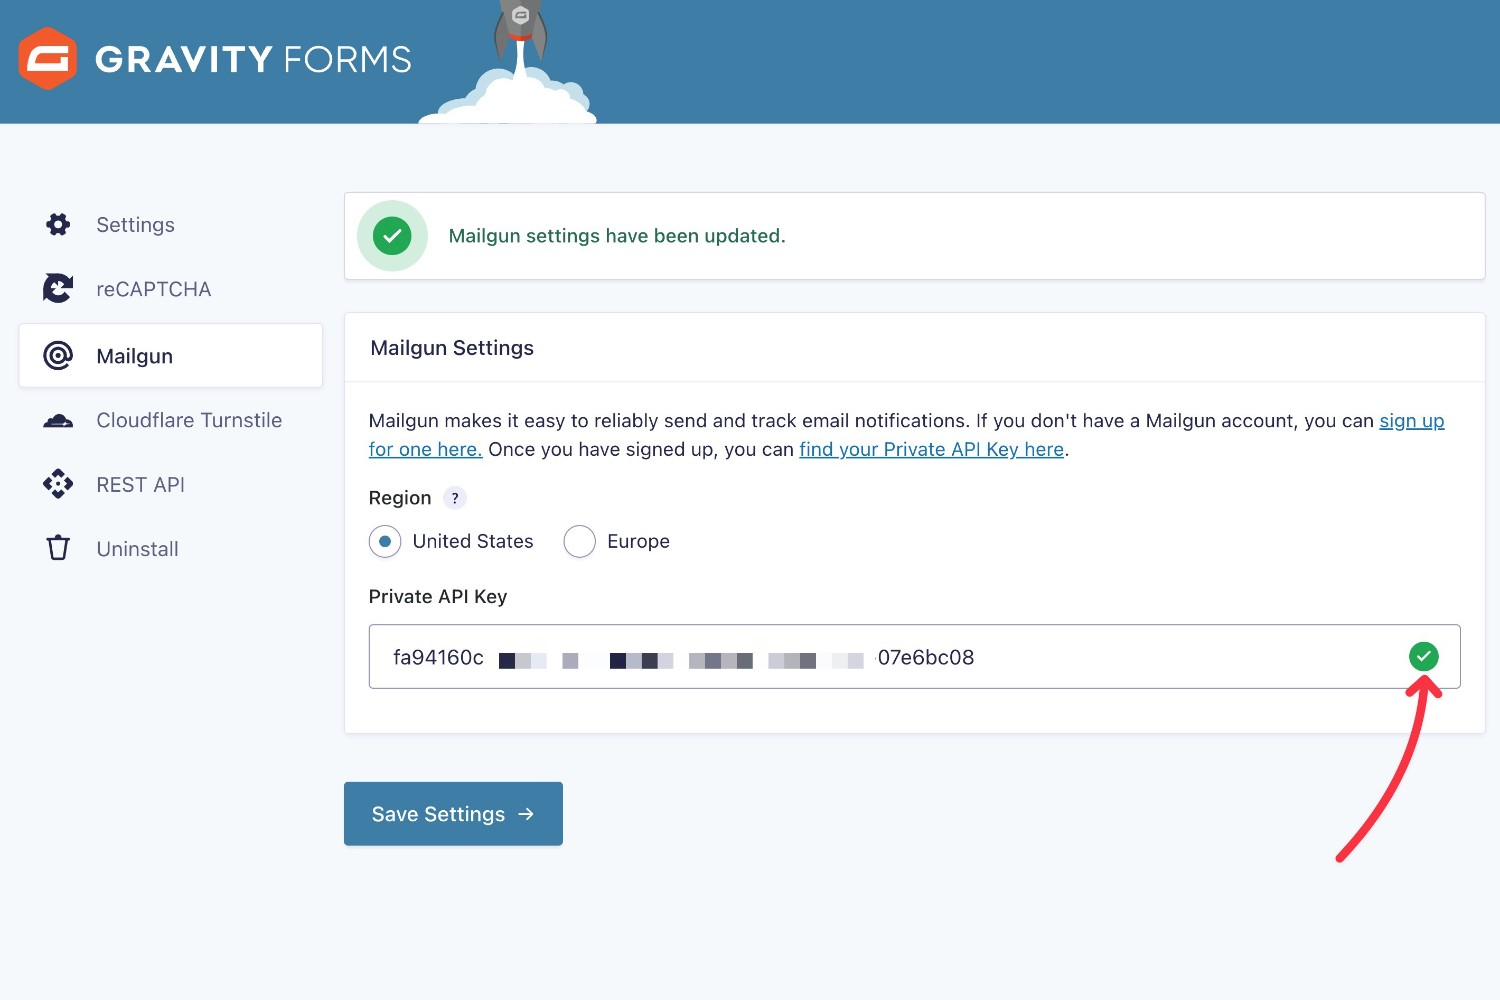
You’ve now successfully connected Gravity Forms to Mailgun. There’s just one more step!
5. Configure Notifications to Send Using Mailgun
As we mentioned earlier, Gravity Forms lets you choose your email sending service on a per-notification level.
So, for the last step, you need to enable Mailgun as the sending service for the form notifications where you want to use it:
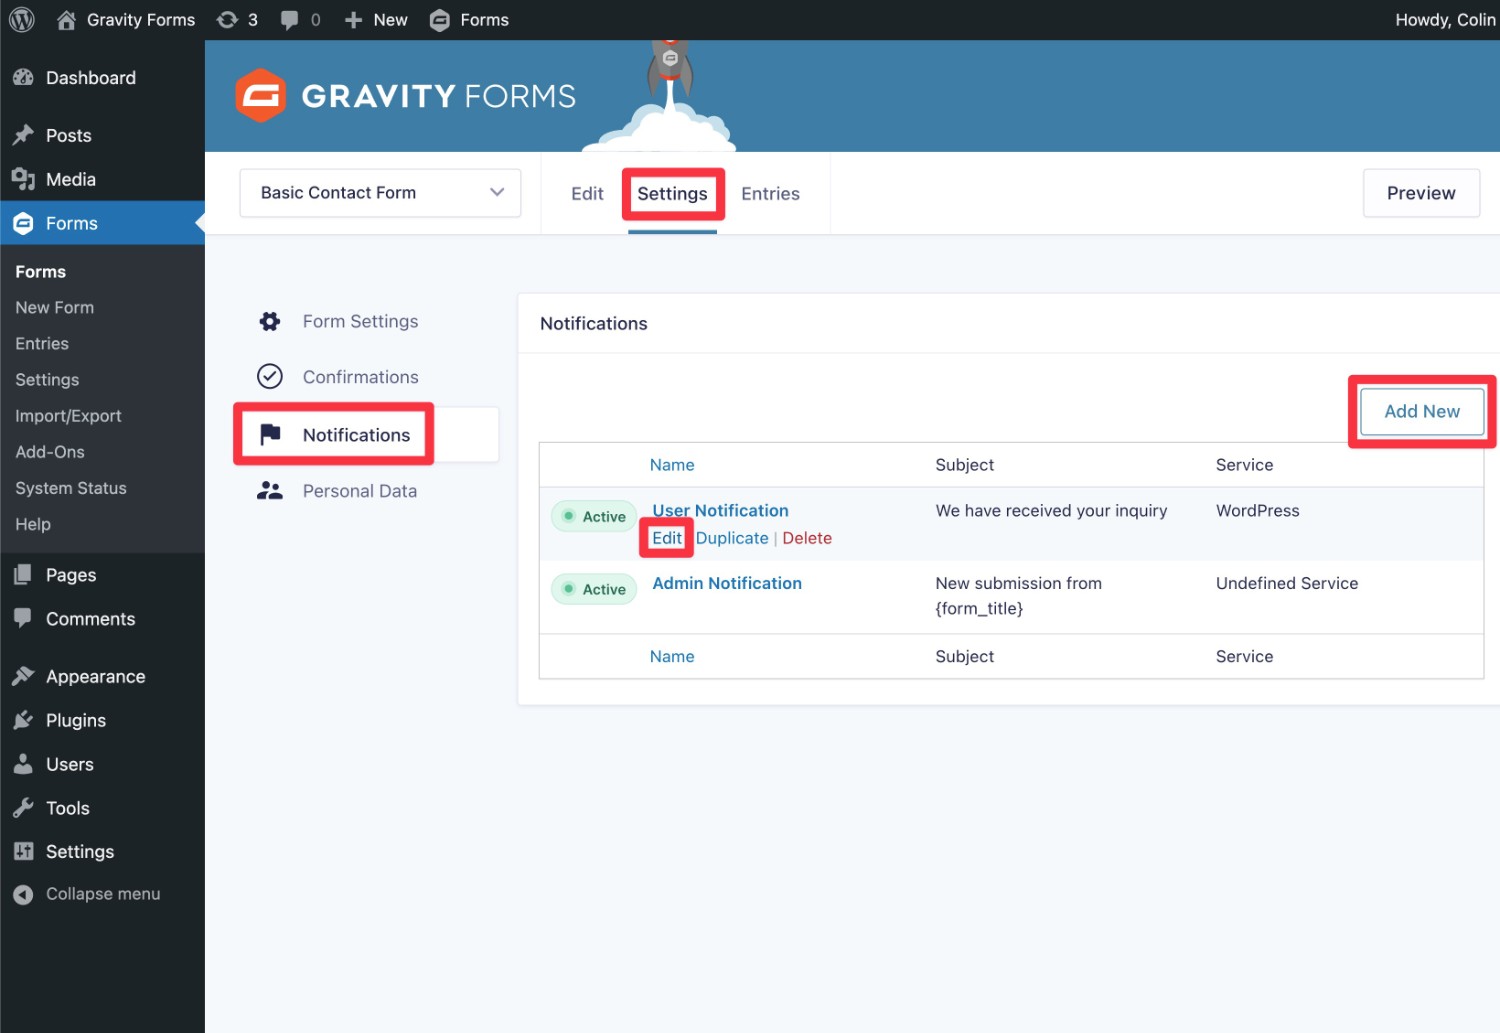
- Open the Notifications settings for the form where you want to use Mailgun.
- Edit an existing notification or add a new notification.
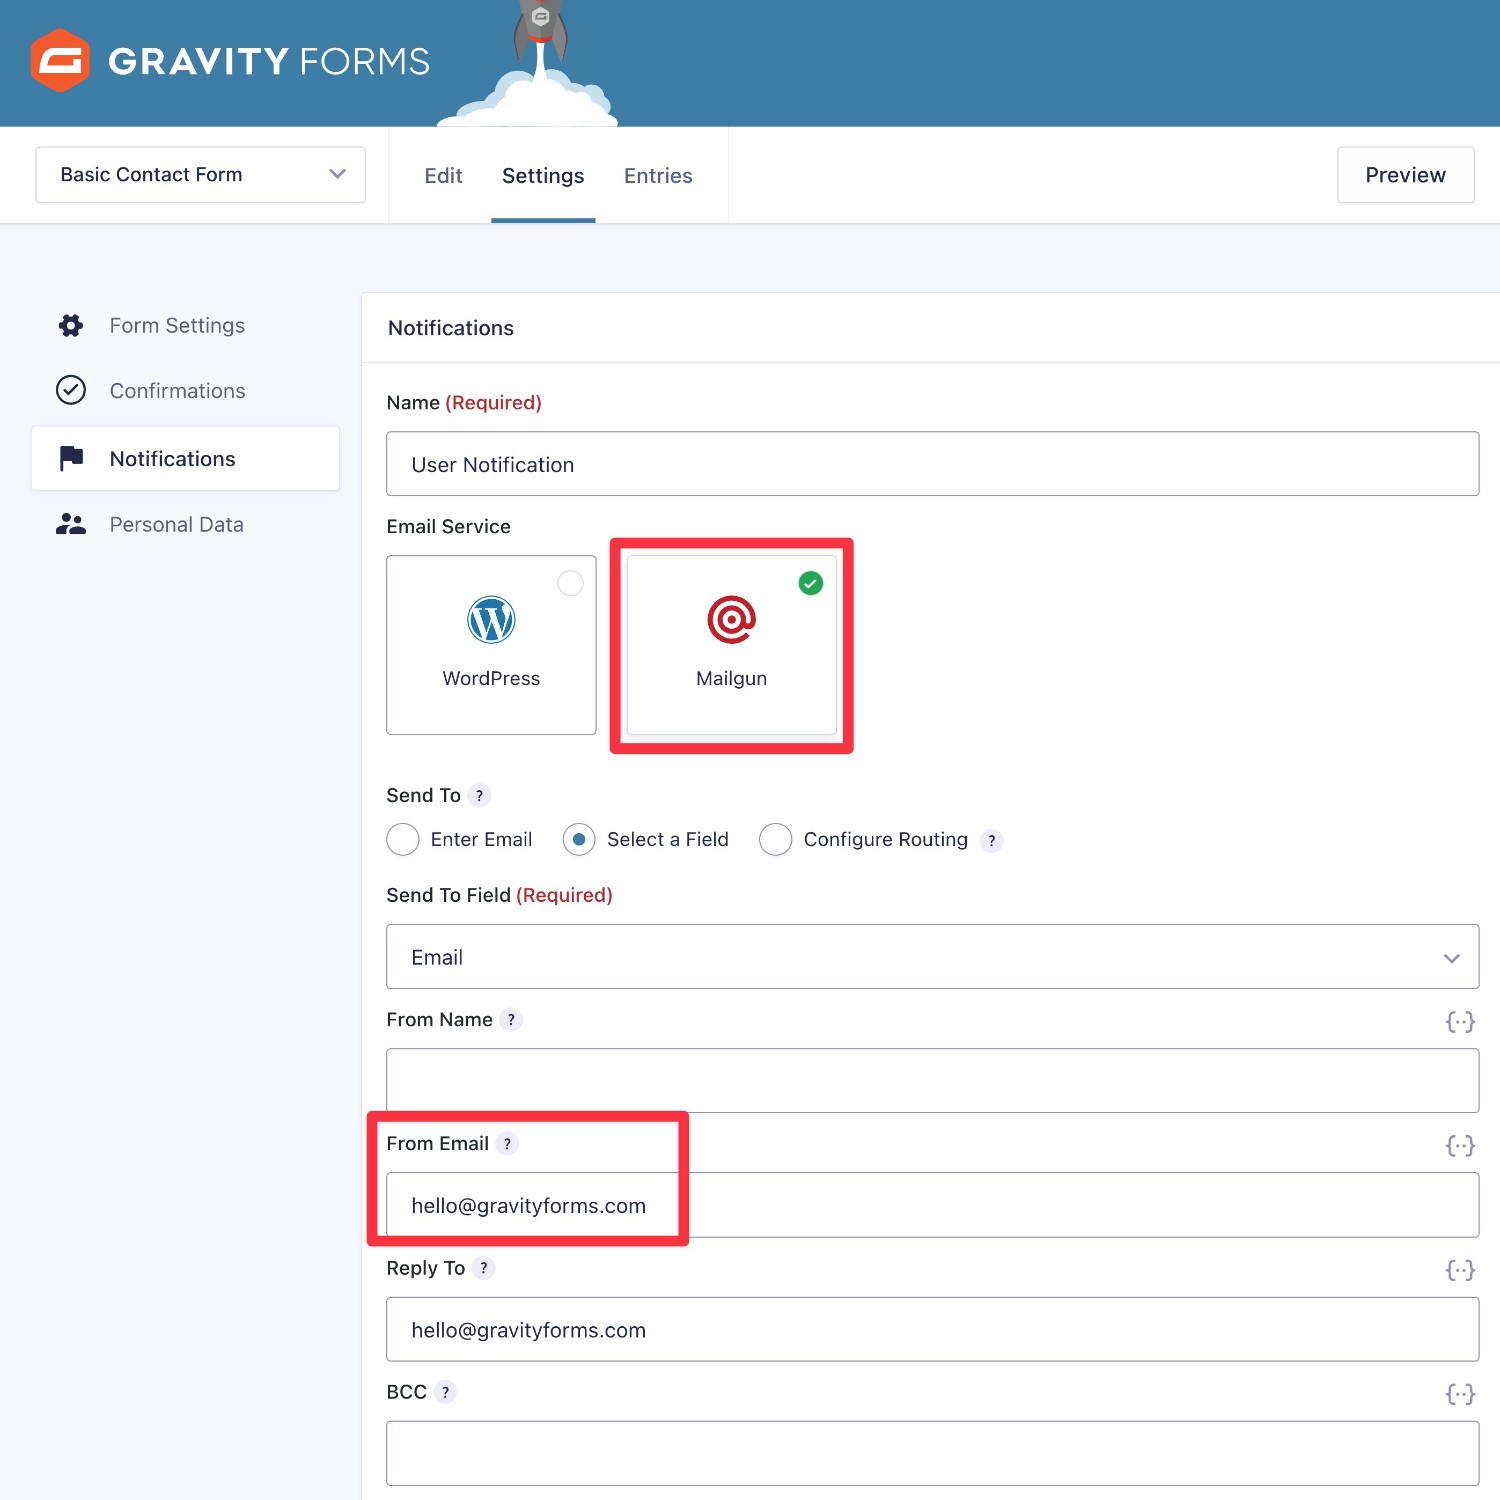
Then, choose Mailgun under the Email Service list.
You’ll also need to choose a “From Email” address that comes from the same domain that you authenticated with Mailgun.
If you authenticated a subdomain in Mailgun, your “From Email” needs to use that subdomain as well.
To use Mailgun for additional email notifications, just repeat the same steps for each notification.
Try the Gravity Forms Mailgun Add-On Today
If you want to improve the deliverability of your form notification emails, the Gravity Forms Mailgun Add-On is a great solution.
Mailgun’s Flex plan lets you send up to 1,000 emails per month for free, which should be enough for most WordPress sites.
That means you won’t need to pay anything to make your emails a lot more reliable. And even if you do need to exceed 1,000 emails per month, Mailgun’s Flex plan is still affordable at $1 per 1,000 email sends.
The Gravity Forms Mailgun Add-On is available on all Gravity Forms licenses, including the Basic license. To get started, all you need to do is install the add-on and follow this tutorial.
If you don’t have a Gravity Forms license yet, purchase your license today to set up your first form.

If you want to keep up-to-date with what’s happening on the blog sign up for the Gravity Forms newsletter!
"*" indicates required fields