
Offering a wide range of payment methods on your website improves your customers’ online experience and helps boost sales and revenue. Two payment methods that have gained popularity as alternatives to credit and debit cards are Apple Pay and Google Pay and you can now easily accept them on your WordPress site using the Gravity Forms Stripe Add-On.
Doing so offers a number of benefits. Most decisively, Apple and Android phones and tablets, on which these payment methods are present by default, make up more than 99% of the mobile device market. While that also includes older gadgets without mobile wallets, it gives you an idea of the number of visitors whose lives you could make easier by having credit card-less payment options on your site. Yet, there are other reasons.
To discuss these and more, in this article, we’ll take a detailed look at using Apple Pay and Google Pay in WordPress. We’ll discuss the benefits of letting visitors pay with their mobile wallet, what you can use Apple Pay, Google Pay, and Gravity Forms for in combination, and how to set up these payment methods using Stripe.
The Benefits of Offering Apple Pay and Google Pay
Apple launched Apple Pay in 2014. Since then, the payment method has steadily gained popularity. It’s available on all Apple devices, including the Apple Watch, and you can use it conveniently for both online and in-person payments.

Google Pay is Google’s answer to their competitor’s payment gateway. It’s been around since 2015 and allows users to make payments online, in apps, shops, and more. They can do so using desktops, Android phones, tablets, and watches.

In 2021 the two digital wallets already accounted for close to 65% of all contactless payments in the US, a figure that’s estimated to increase to almost 88% by 2026. Apple Pay is the far more popular choice. In 2023, it processed 14.2% of all online consumer payments. The US alone has an estimated 60.2 million Apple Pay users in 2024. And while Google Pay is only the third most popular choice by US consumers, that’s still millions of potential customers.
In short, people love to use Apple and Google Pay to buy things. And seeing as they are mostly used on mobile devices and mobile Internet users vastly outnumber their desktop counterparts, accepting them on your website is definitely a shrewd business decision. You’ll make it easy for the millions of mobile shoppers to pay for the goods on your site with a device they already use to communicate, work, and play.
Besides that, Apple Pay and Google Pay include the following incentives for using them on your website:
- Secure payments — Both wallets allow you to pay without sharing or transmitting credit card information. In addition, users can authorize transactions via biometrics such as facial recognition or fingerprints. This makes mobile payment via Apply Pay or Google Pay extremely secure.
- Trust signal — Due to their popularity, both options have become trusted household names. Thus, offering them on your site can contribute to higher conversions for your business.
- One-click payments — Once your customers store their card information in their wallet they can buy things online with a single click. This provides a much better user experience than having to manually input your digits each time. That’s also helpful for people who don’t have their credit or debit card with them at all times or memorized their numbers.
Stripe Features And Benefits
As mentioned, Apple Pay and Google Pay are available as payment methods in WordPress through our Stripe Add-On. Stripe is one of the most popular payment processors out there. It allows you to accept credit card payments on your website and millions of businesses worldwide use it.

Besides the possibility to use these two payment options , Stripe has several benefits:
- Fast setup — If you already have a Stripe account, all you have to do is connect it with Gravity Forms. Even if you don’t have one, signing up to Stripe is fast and easy.
- Many payment options — Besides Google and Apple Pay, the payment provider supports all major credit and debit cards as well as numerous other payment options like ACH Debit, SEPA, Bancontact, and more. Overall, more than 100 options are available.
- One-Time and Subscription Payments Handling — The payment processor and our Stripe Add-On support one-time and recurring payments. Consequently, you can use it sell products as well as subscriptions.
- Enable Registration Fees and Free Trials – Add free trials to subscription plans to help attract new users and enable registration or sign-up fees.
- Seamless WordPress Integration – Manage Stripe payment details, sales reports, subscriptions, and refunds directly from your WordPress dashboard via the add-on.
- Authorize and Capture Payments – Authorize payments now and collect them later for improved reservation and pre-order handling.
- Enhanced Checkout Experience With Stripe Link – Speed up the shopping experience with accelerated checkout features, including auto-filling customer payment and shipping details from Stripe Link.
What Can You Do With Apple Pay and Google Pay in Gravity Forms?
Now that we’ve covered the benefits of Apple Pay, Google Pay, and Stripe, let’s talk about what you can do when you add Gravity Forms to the mix. Here are a few practical use cases for this setup:
- Sell products through one-time payments — With this integration, you can sell both physical and digital products and let your customers pay with Apple Pay or Google Pay.
- Offer memberships or retainer services — Another possibility is to set up recurring billing for a membership program or retainer services.
- Set up a weekly or monthly product orders — Allow customers to restock on items in your shop without having to come back and place another order. Recurring payments can be set up for a fixed or variable amount.
- Accept online donations — If you run a nonprofit (check out our Nonprofit license!), you can use Apple Pay and Google Pay to field donations from your website visitors. You can even set up pre-determined donation amounts to further streamline the donation process.
- Combine with other add-ons — Gravity Forms has many other add-ons you can combine with Stripe to supercharge your forms. We’ll go over some concrete examples below.
The Stripe Add-On is available on Pro, Elite, and Nonprofit licenses. Get yours today or upgrade your existing license and pay only a pro-rated fee.
How to Set Up Apple Pay and Google Pay With WordPress and Gravity Forms
For the remainder of the article, we’ll go over the process of using Apple Pay and Google Pay in WordPress. In order to follow along, you need:
- A website with the main Gravity Forms plugin installed.
- A Stripe account. If you don’t have one yet, sign up here.
- To process payment data, your website must run over the HTTPS protocol, for which you need an SSL certificate. Talk to your hosting provider if you don’t have one yet.
If you are not yet a Gravity Forms customer and want to dip your toes, you can also sign up to a free demo site. It contains all the functionality you need for this tutorial.
1. Install and Connect the Stripe Add-On
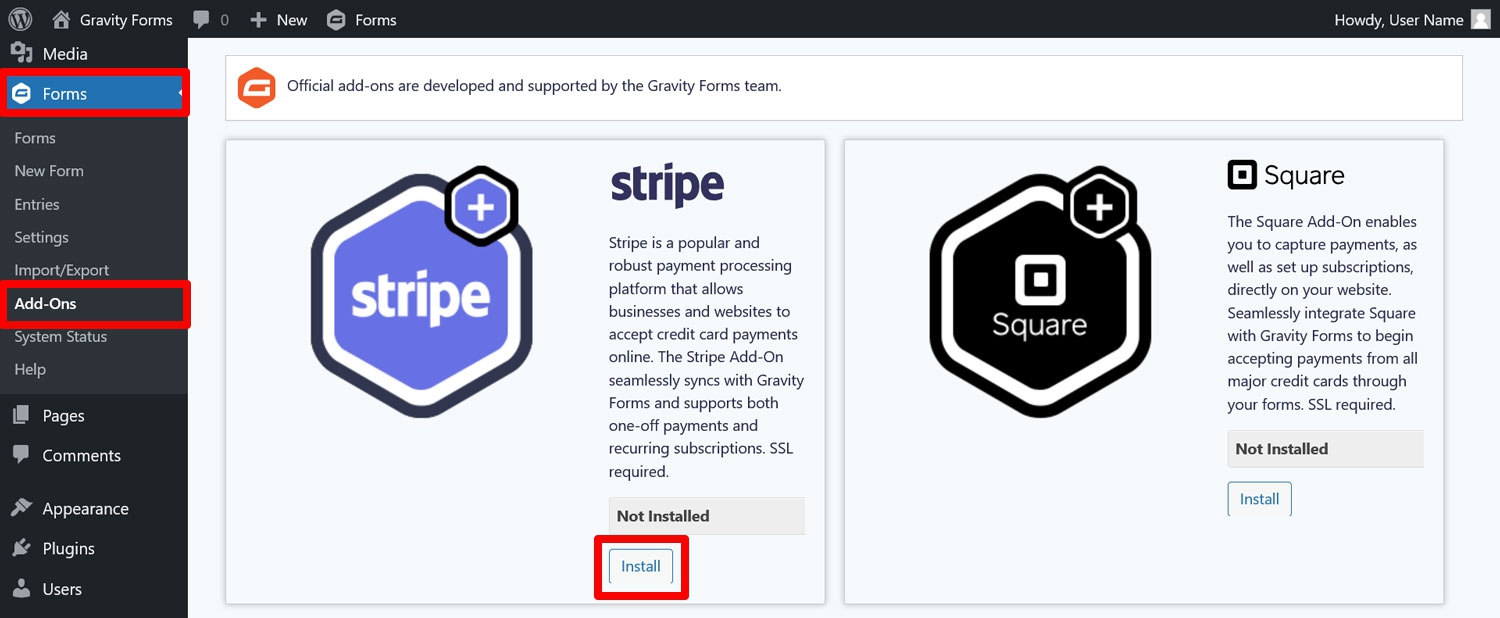
The first thing you’ll need is the Stripe Add-On. To download it to your site, go to Forms → Add-Ons. You’ll find it at the top of the list. Click the Install button underneath it.
Once it has been downloaded, activate the add-on. Alternatively, you can also download it from your Gravity Forms dashboard and upload it to your site.
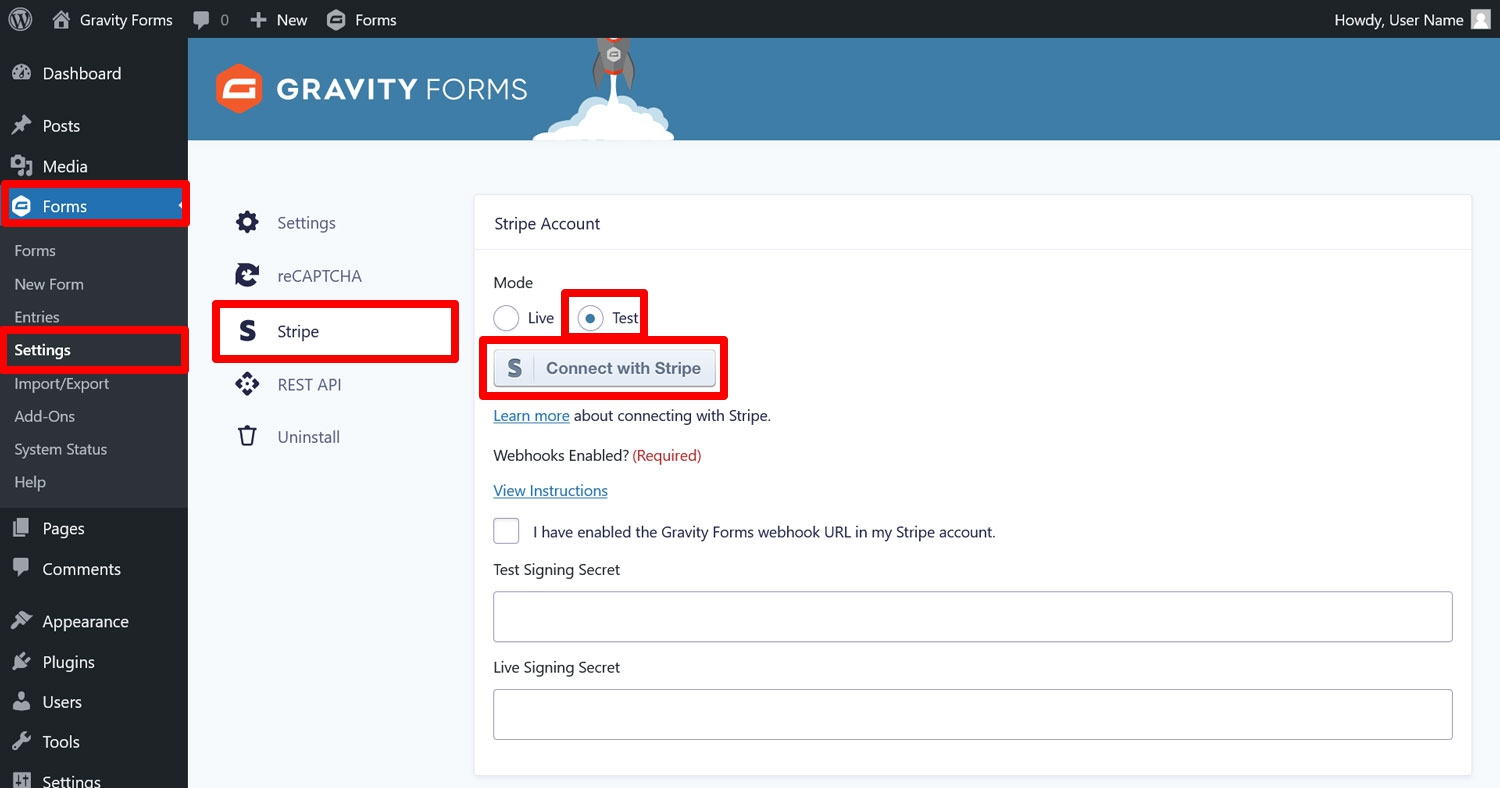
After that, you’ll need to connect your site with your Stripe account. To do so, go to Forms → Settings → Stripe in your WordPress dashboard. Here, choose Test under Mode. This will allow you to test your online payment forms without charging real money. Afterwards, click on Connect with Stripe.
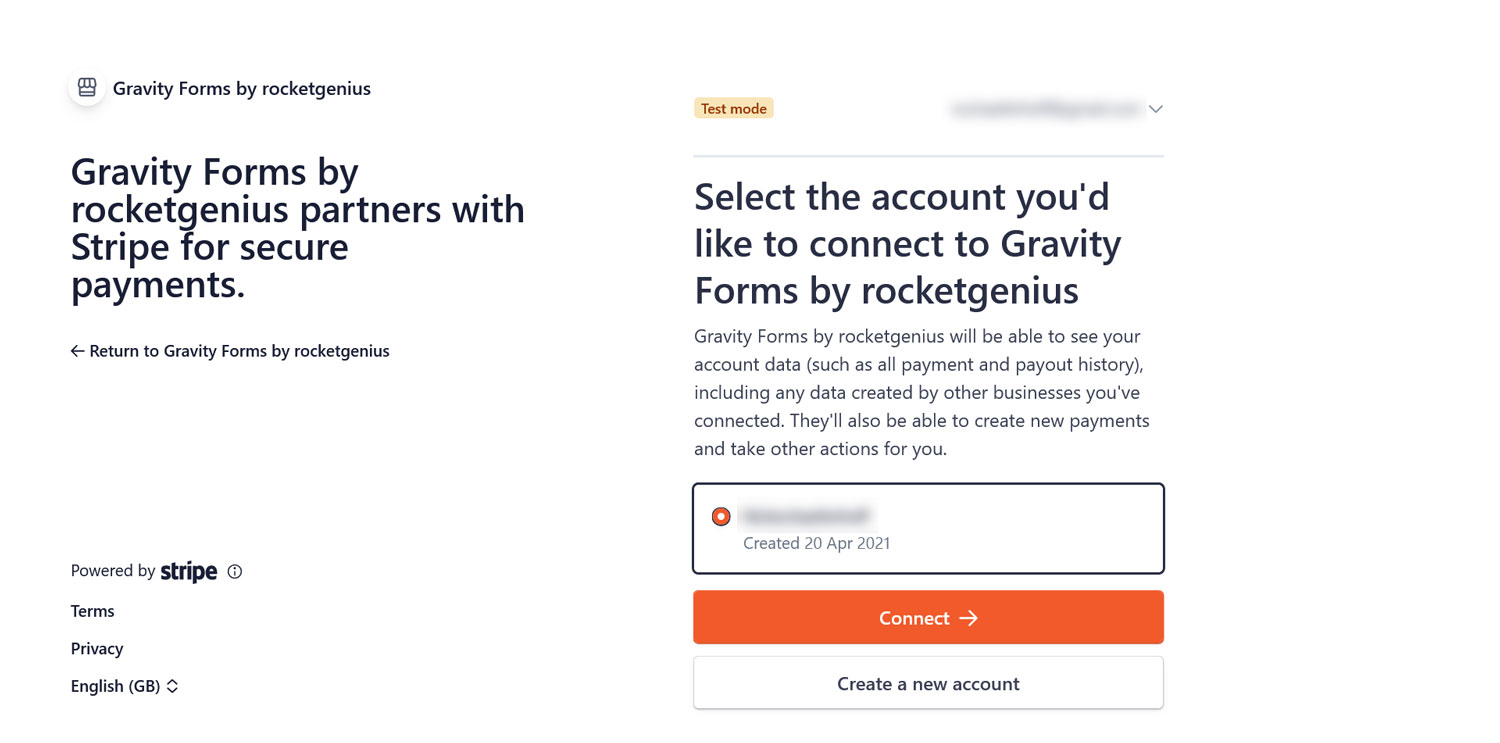
Doing so redirects you to the Stripe website, where you need to sign in, select your account, and click on Connect.
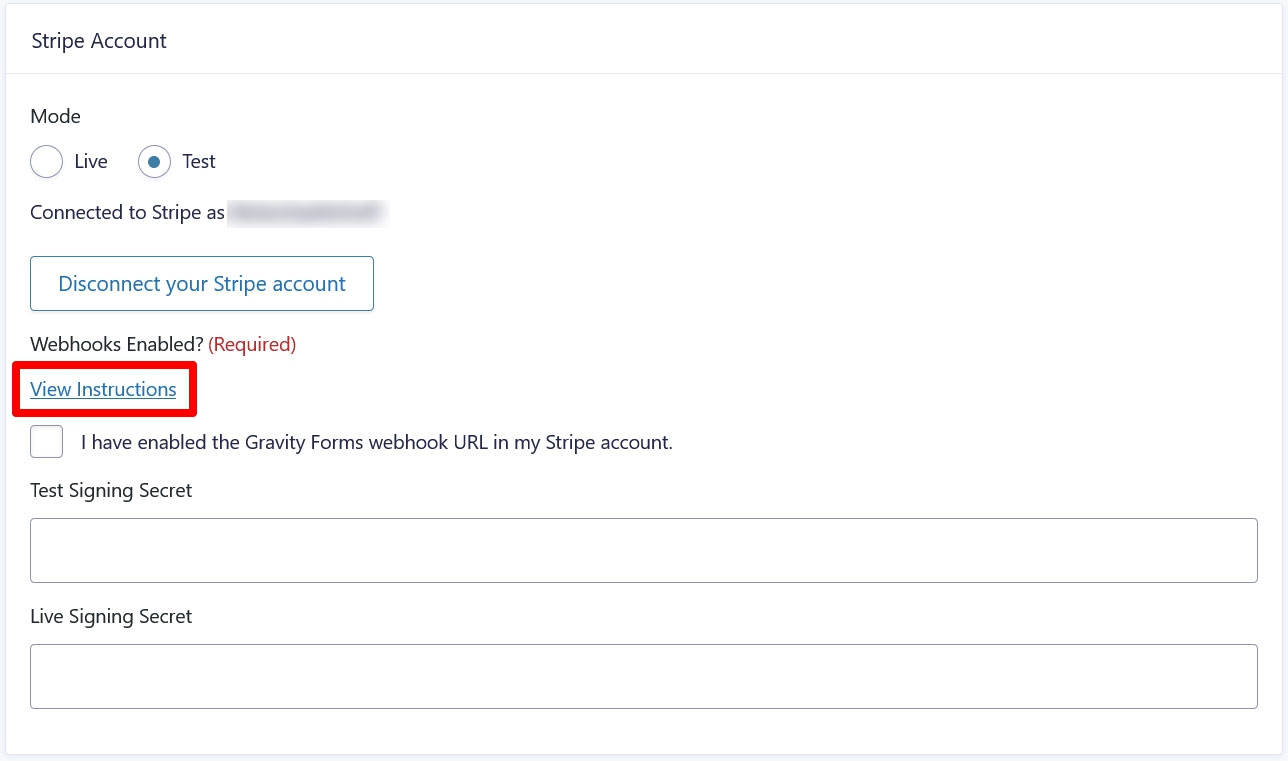
After that, you land back in the WordPress dashboard. The next step here is to add a Gravity Forms webhook to your Stripe account. You find the steps for that under Webhooks enabled? when you click on View Instructions.
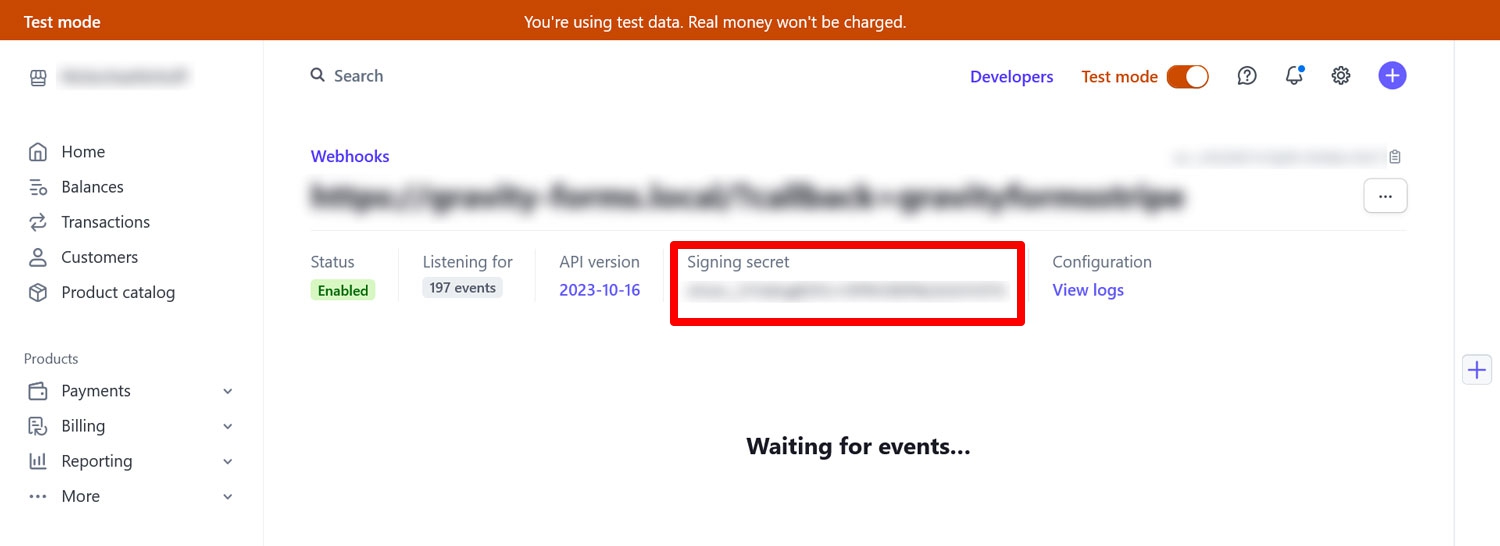
When you get to the Stripe dashboard to create your endpoint, be sure to first switch to test mode at the top.

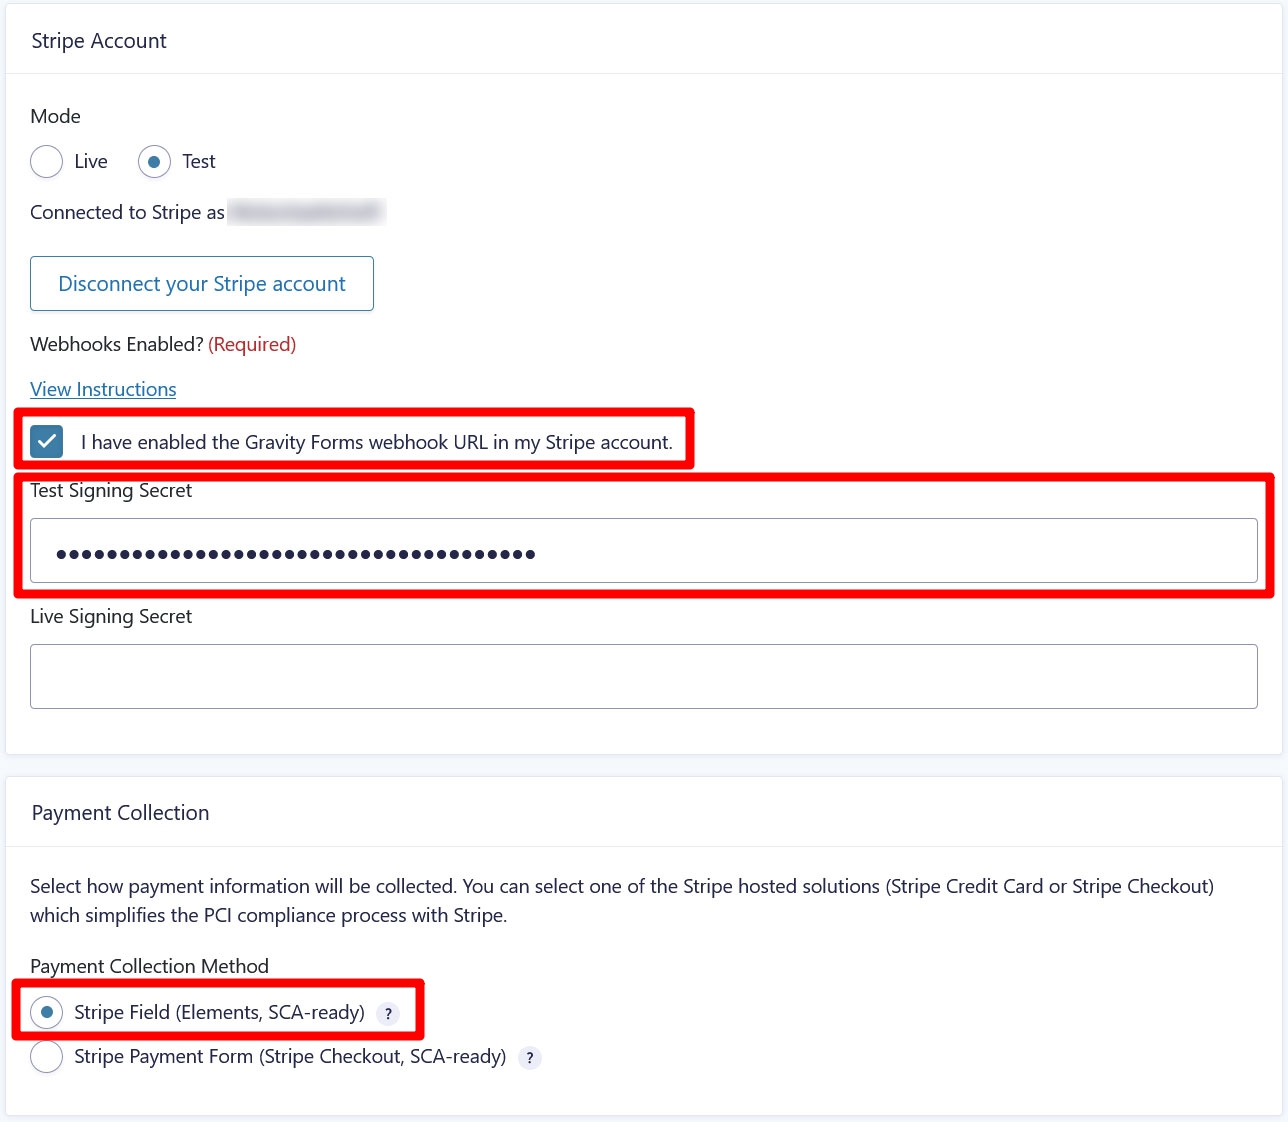
That way, you will create the right kind of webhook for test purposes. Then, simply follow the instructions. You end up with a test signing secret you need to add to the respective field in your Gravity Forms settings.
While you are doing so, be sure to check the confirmation box that you’ve created the endpoint. In addition, check under Payment Collection that it’s set to Stripe Field as the payment method, then save at the bottom.
For an even more advanced tutorial, check our Gravity Forms and Stripe guide.
2. Enable Apple Pay and Google Pay
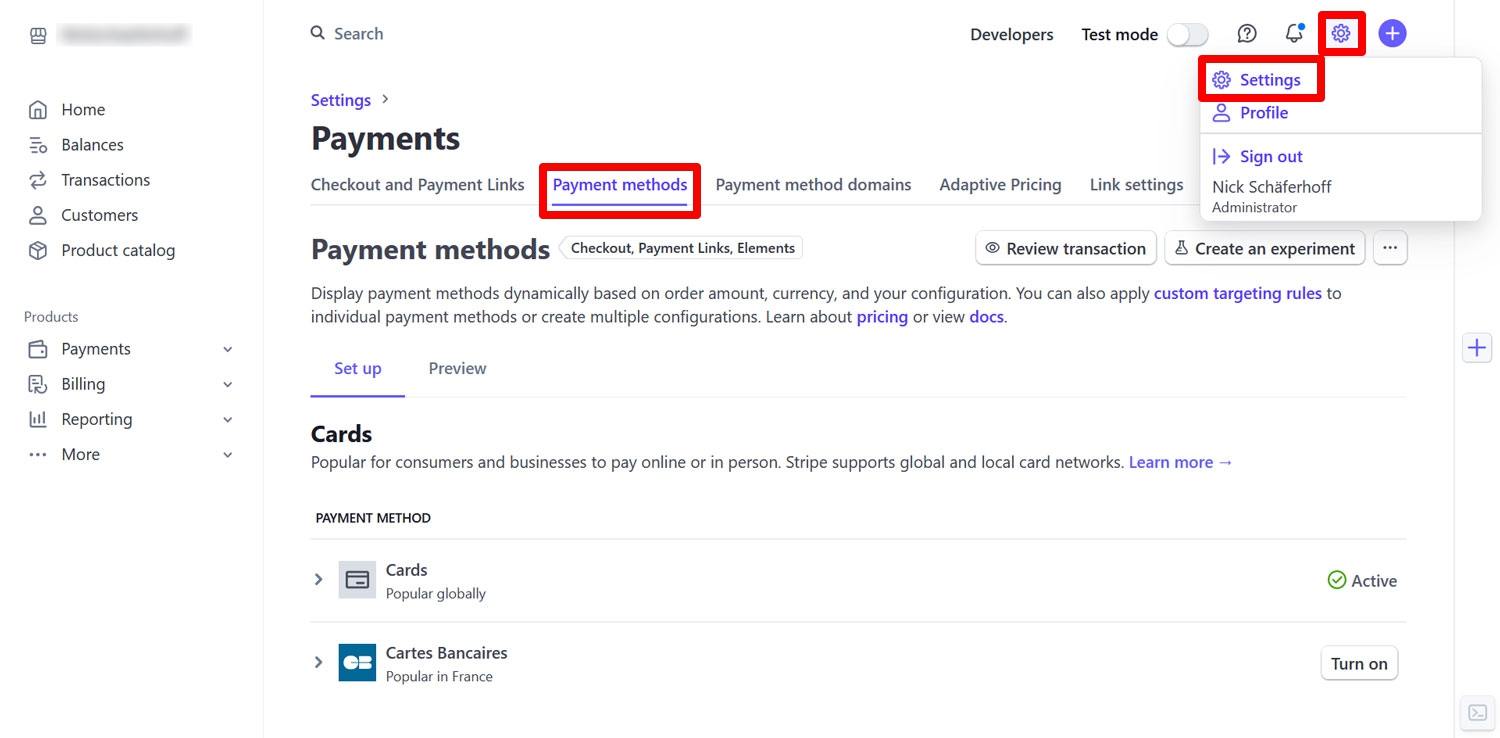
Next up, to use them on your WordPress site, we need to ensure Apple and Google Pay are switched on as payment options. These should be enabled by default, but may require you to enable them in the Stripe dashboard. When you are there, click on the cog icon in the upper right corner, then on Settings and, in the next screen, Payment Methods.
Here, too, be sure that you are in test mode and that you are editing the Gravity Forms configuration. If you are not, pick it from the drop-down menu.
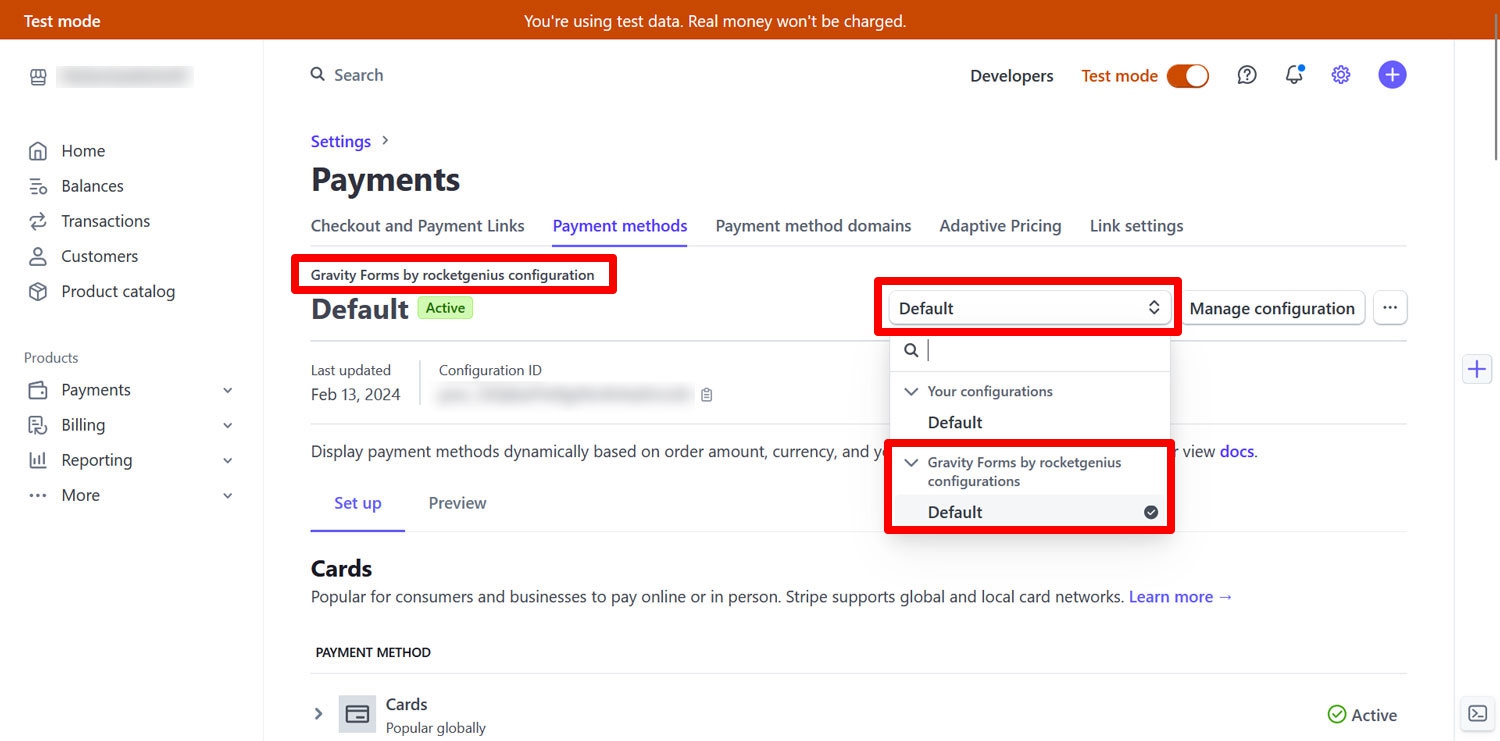
Scroll down to Wallets, find Google and Apple Pay in the list, and make sure it says either Active at the end of the row or that you click Turn on to activate the payment methods.

Of course, you are also free to look around if there are any other options you’d like to offer on your site. When you are done, it’s time to turn to your WordPress website.
3. Create Your Form
The next step in the process is to create a payment form. The good news is that you don’t have to start from scratch, thanks to the form template library, which contains blueprints for common types of forms complete with a pre-built layout and fields they commonly contain.
The one that’s most interesting for this use case is the Stripe Checkout Form. You can start building it by going to Forms → Add New.
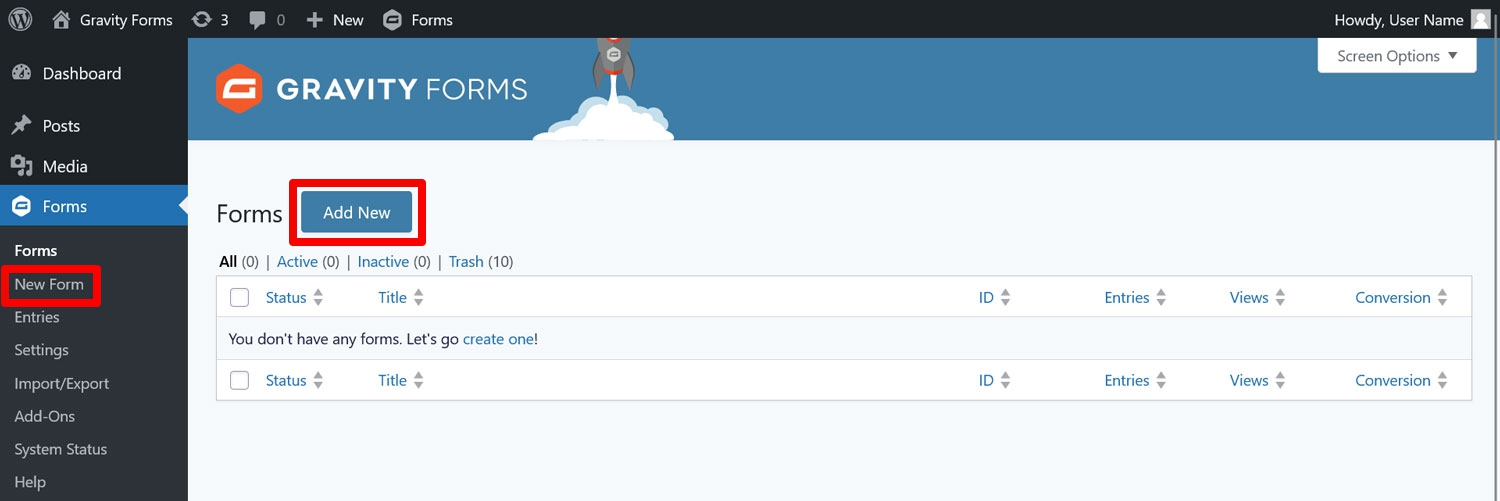
In the panel that appears, scroll down until you find the form, hover your mouse over it, and click Use Template.

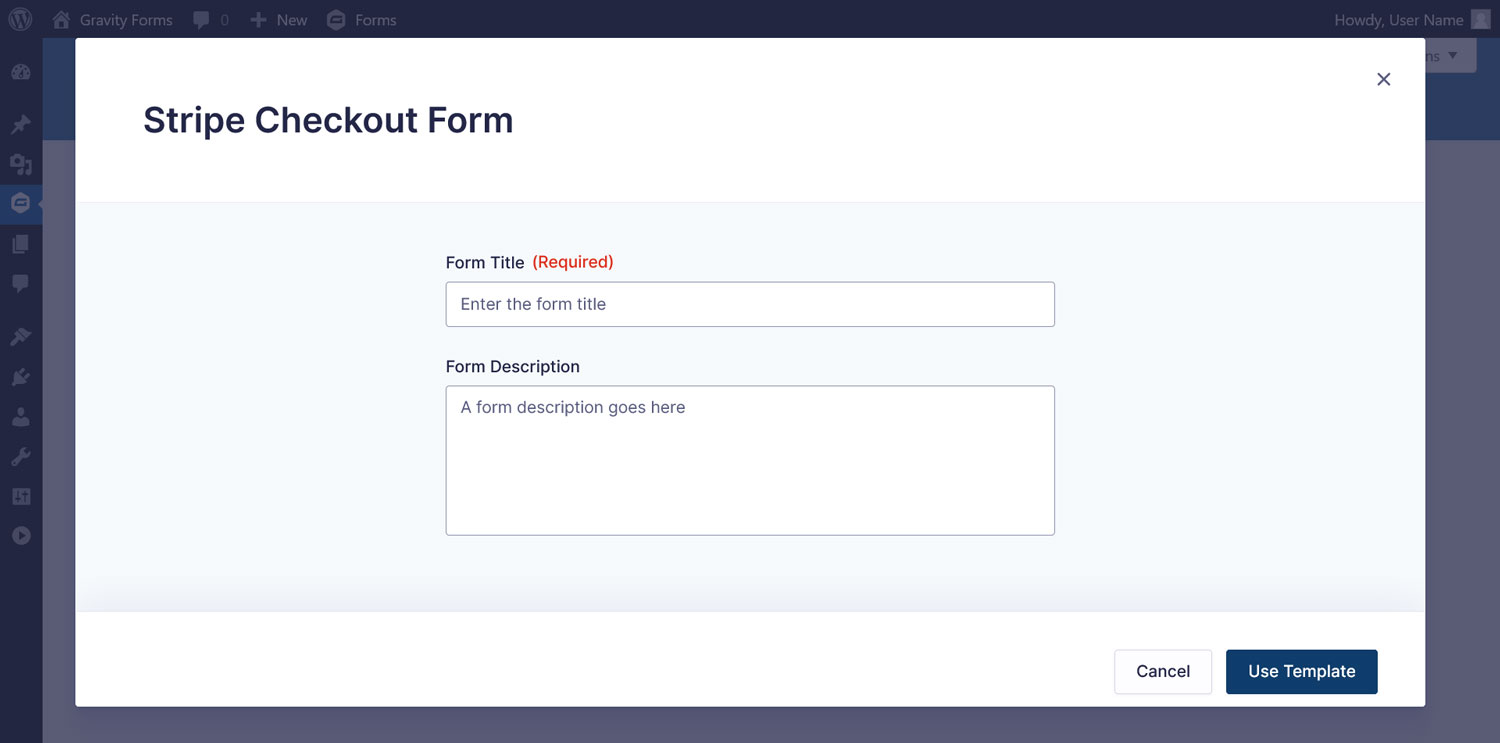
In the next step, name your form and, optionally, include a description.
After that, you will land in the Gravity Forms drag-and-drop editor.
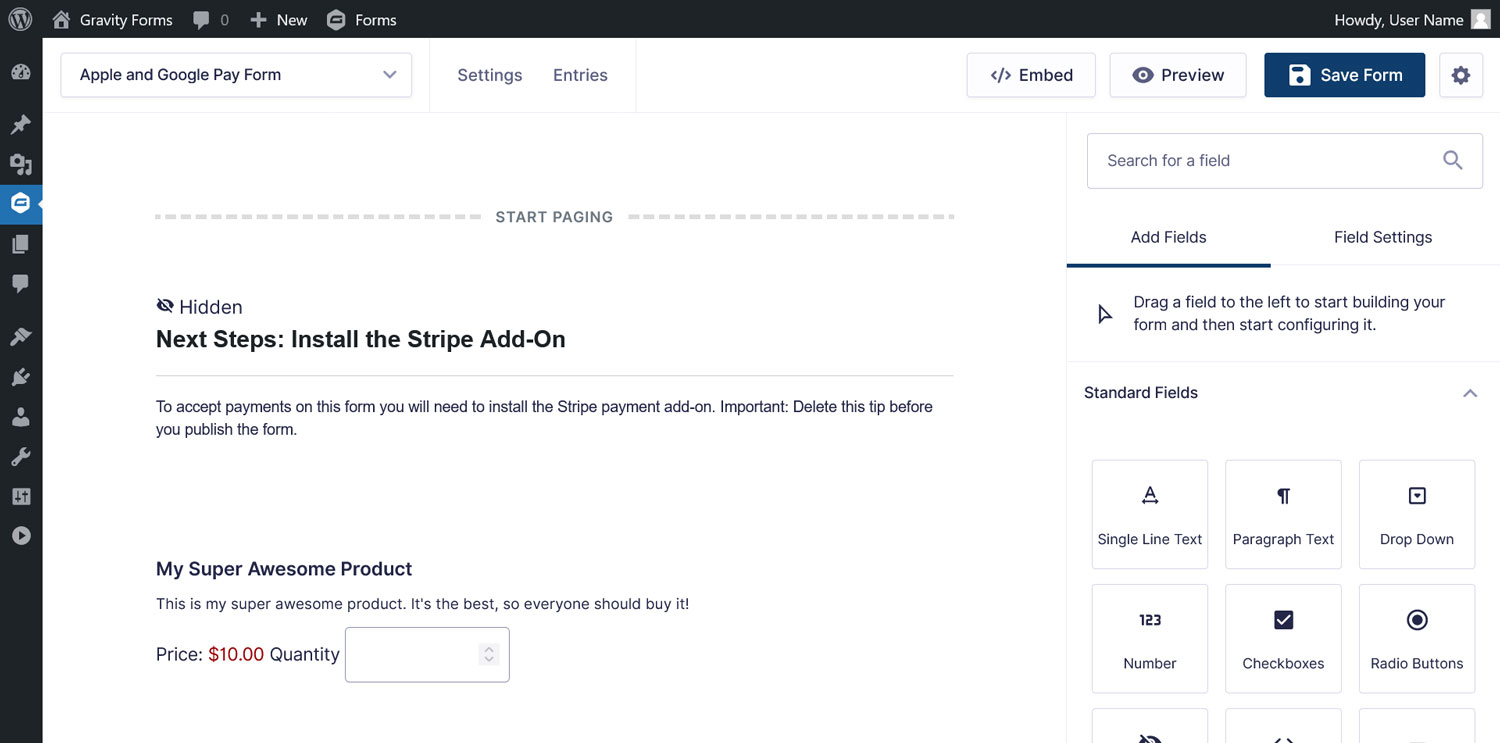
Thanks to the template, as mentioned, it already comes with a number of form fields, in particular for:
- Two different products
- Customer name and email
- Billing and shipping address
- Shipping methods
- A Total field to calculate the sum of the entire form
- The Stripe payment field
The form is also broken down into several pages to make it more digestible and less overwhelming.
4. Customize Your Form
You’ll most likely want to make changes to the form. At the very least, you probably want to change the name of the products it sells (unless yours are also called “My Super Awesome Product” and “Another Amazing Product”, in which case, your work is done!) and their prices. The Gravity Forms editor offers many ways in which to make changes like that.
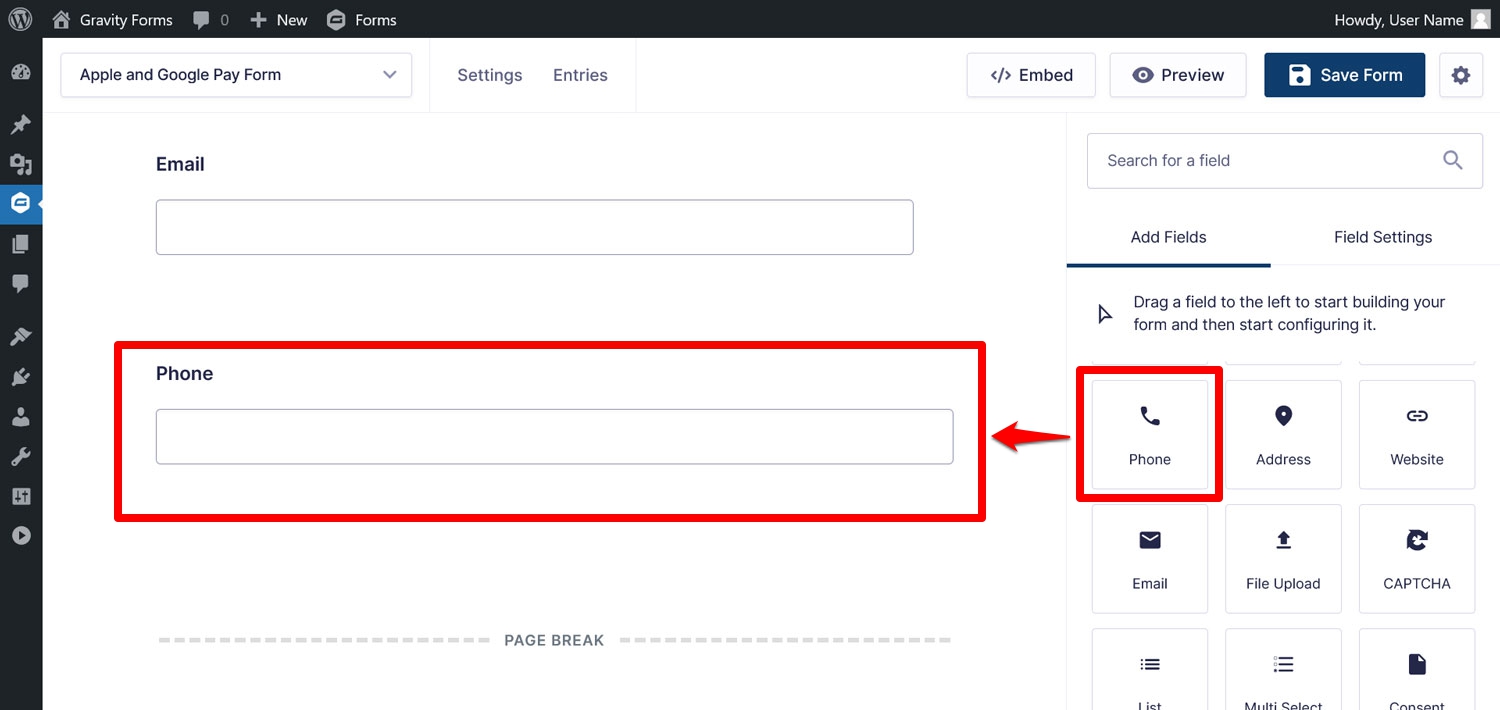
First of all, you find a wide collection of form fields in the sidebar on the right, which you can simply drag and drop to any position in the editor to add them to the form.
For example, if you were not using the Stripe Checkout template, you would have to manually add the Stripe field to the form so you can use it for payment processing.
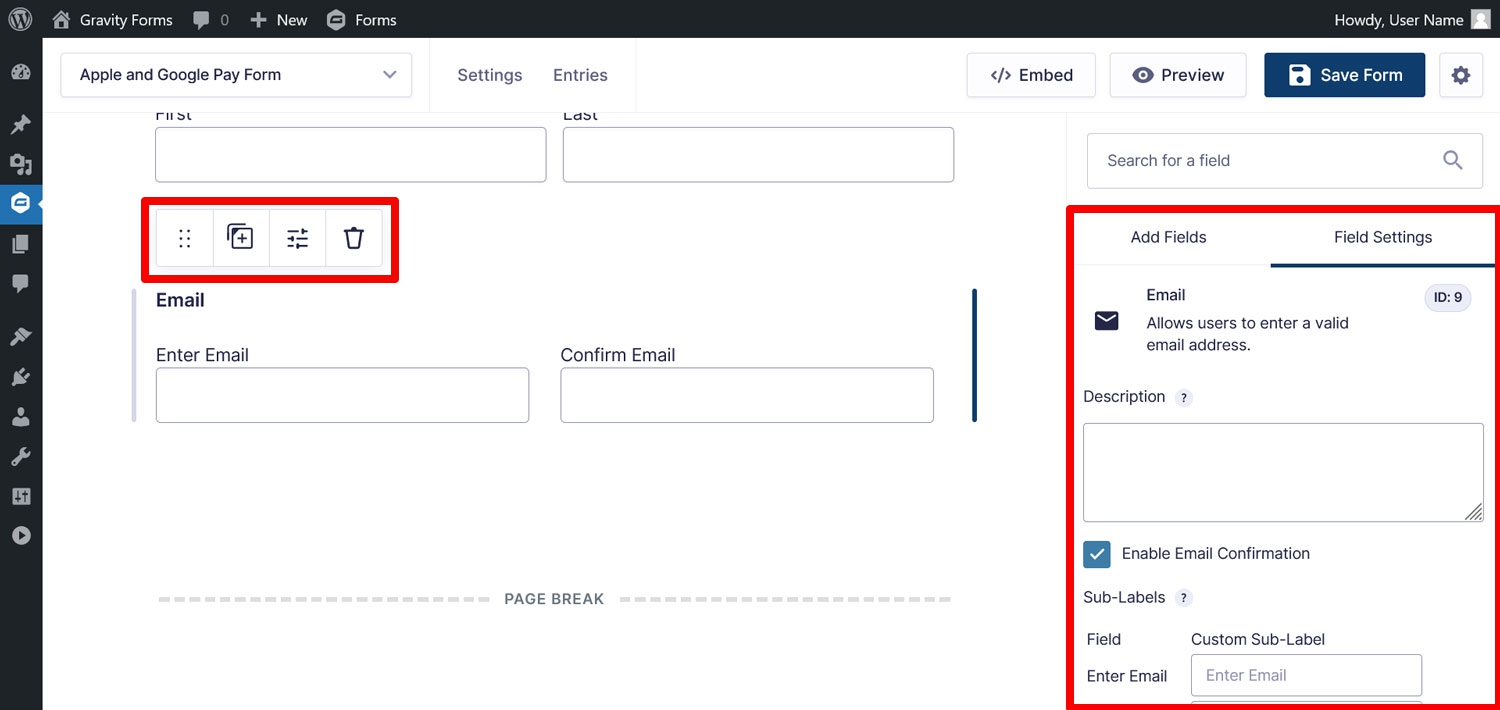
Additionally, if you select any fields already in the form inside the editor, you can customize them in two ways. For one, the menu bar that appears above allows you to to move, duplicate, and delete fields. The field settings also appear in the right sidebar, where you can make more extensive changes, such as:
- Changing their label and description
- Modifying the field type and available options (such as for the shipping options)
- Switching parts of the field on and off, for example, whether to ask for a person’s title or middle name
- Changing the appearance, e.g. where the label shows up
- Implement conditional field logic
In this example, we plan to sell two different e-books. To do so, we are making the following changes to the form:
- Change the titles, descriptions, and prices of the two product fields.
- Remove everything to do with shipping (since these are digital-only products).
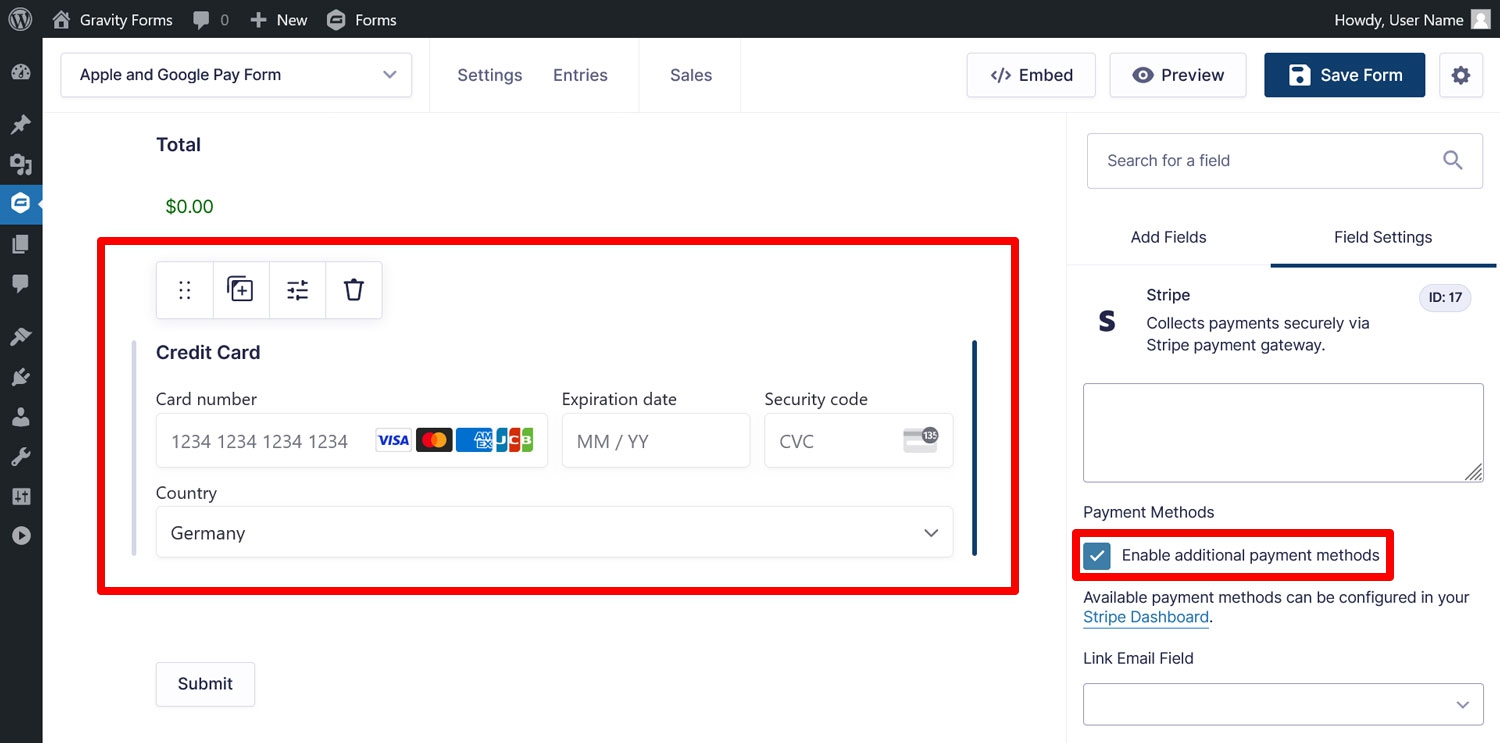
- To use Apple and Google Pay, check Enable additional payment methods in the Stripe field.
Save any modifications at the top.
5. Add a Stripe Feed To Your Form
Once the form is ready, it’s time to create a form feed. In Gravity Forms, you use feeds to configure how to process information submitted through your forms. Here, we want to pass it on to Stripe so that the payment can be handled. The feed also configures whether you are selling something that requires a one-time payment (which is what we are doing here) or a recurring one. If you need it, you can learn how to use Stripe for subscriptions here.
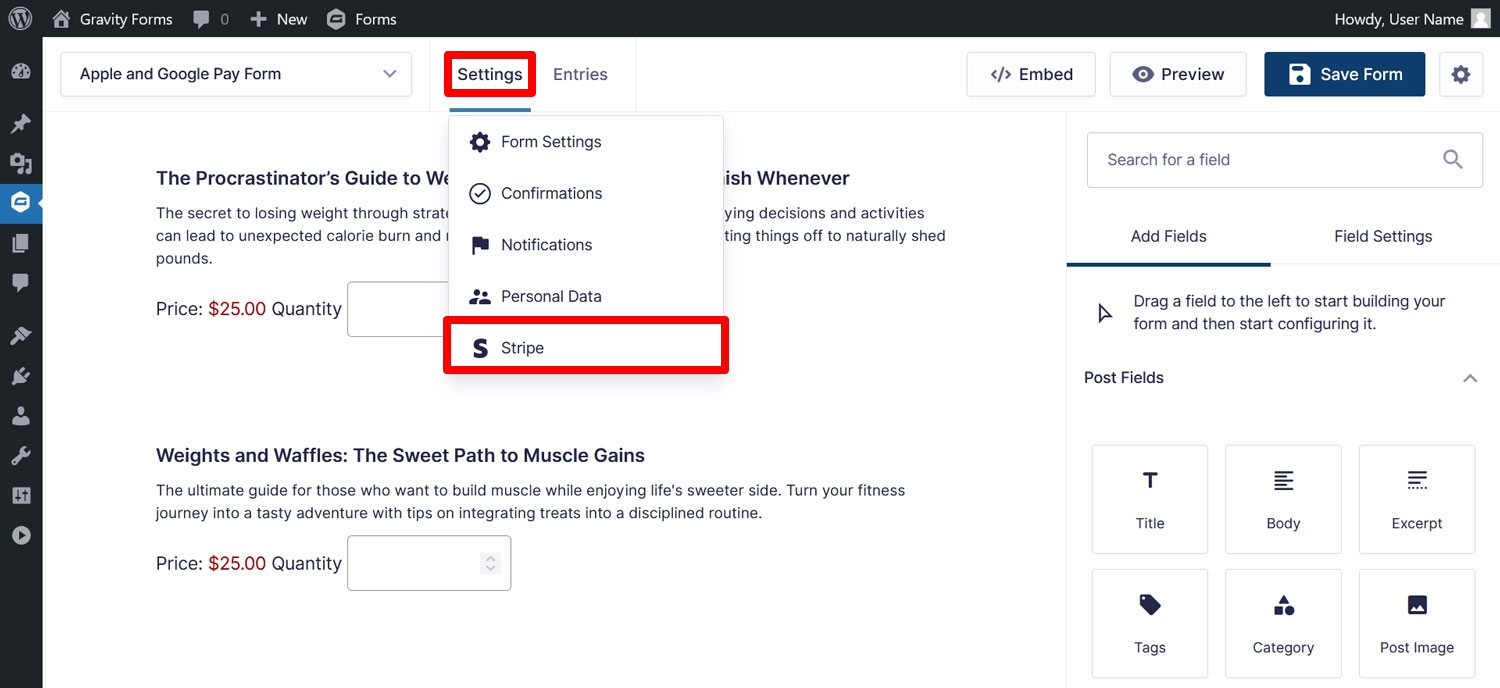
The first step in creating a feed is to go to Settings → Stripe in the form editor.
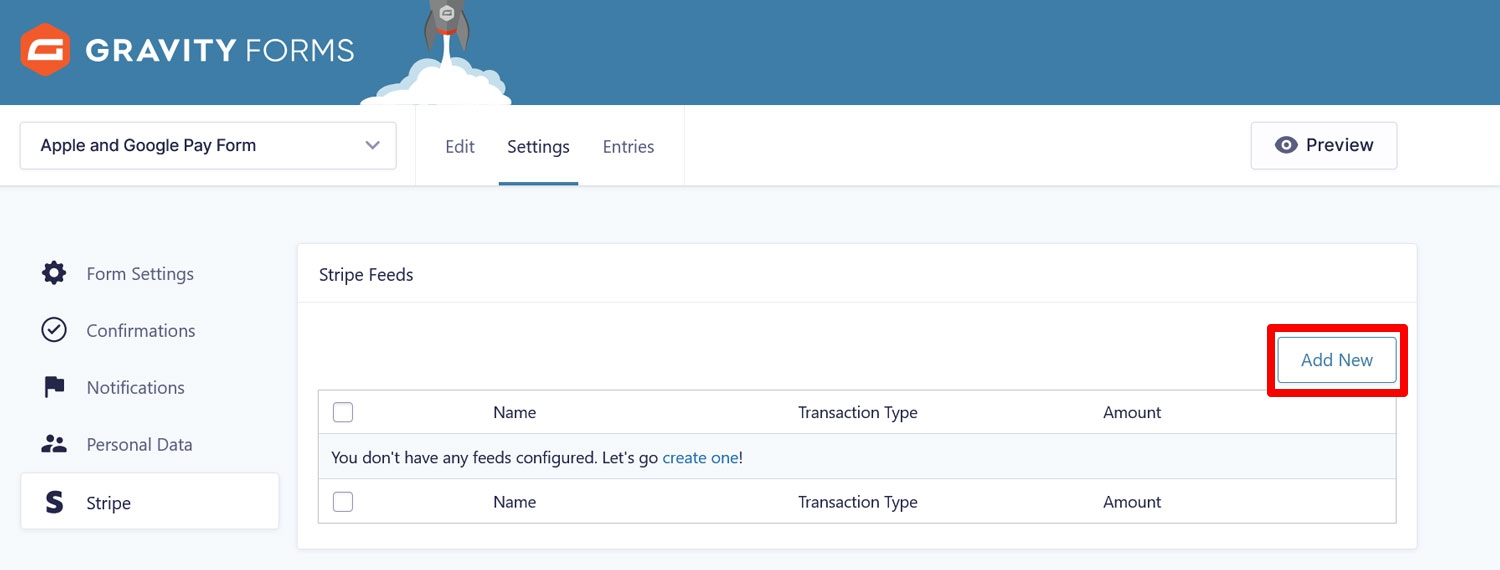
In the next screen, click Add New.
Here, first name your feed (in case you create several feeds, so you know what each is for) and choose Products and Services under Transaction Type.
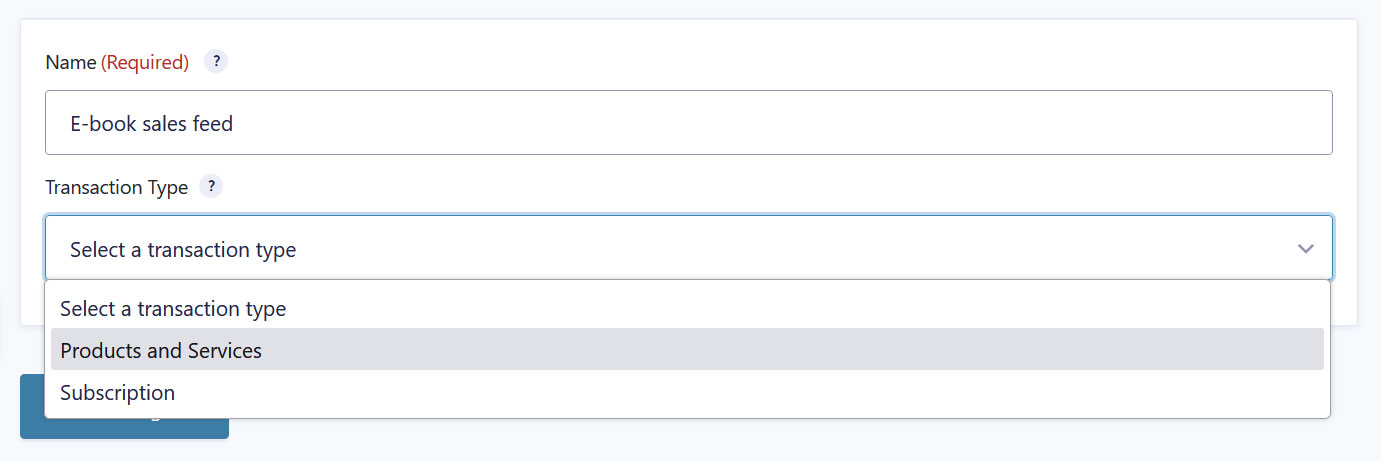
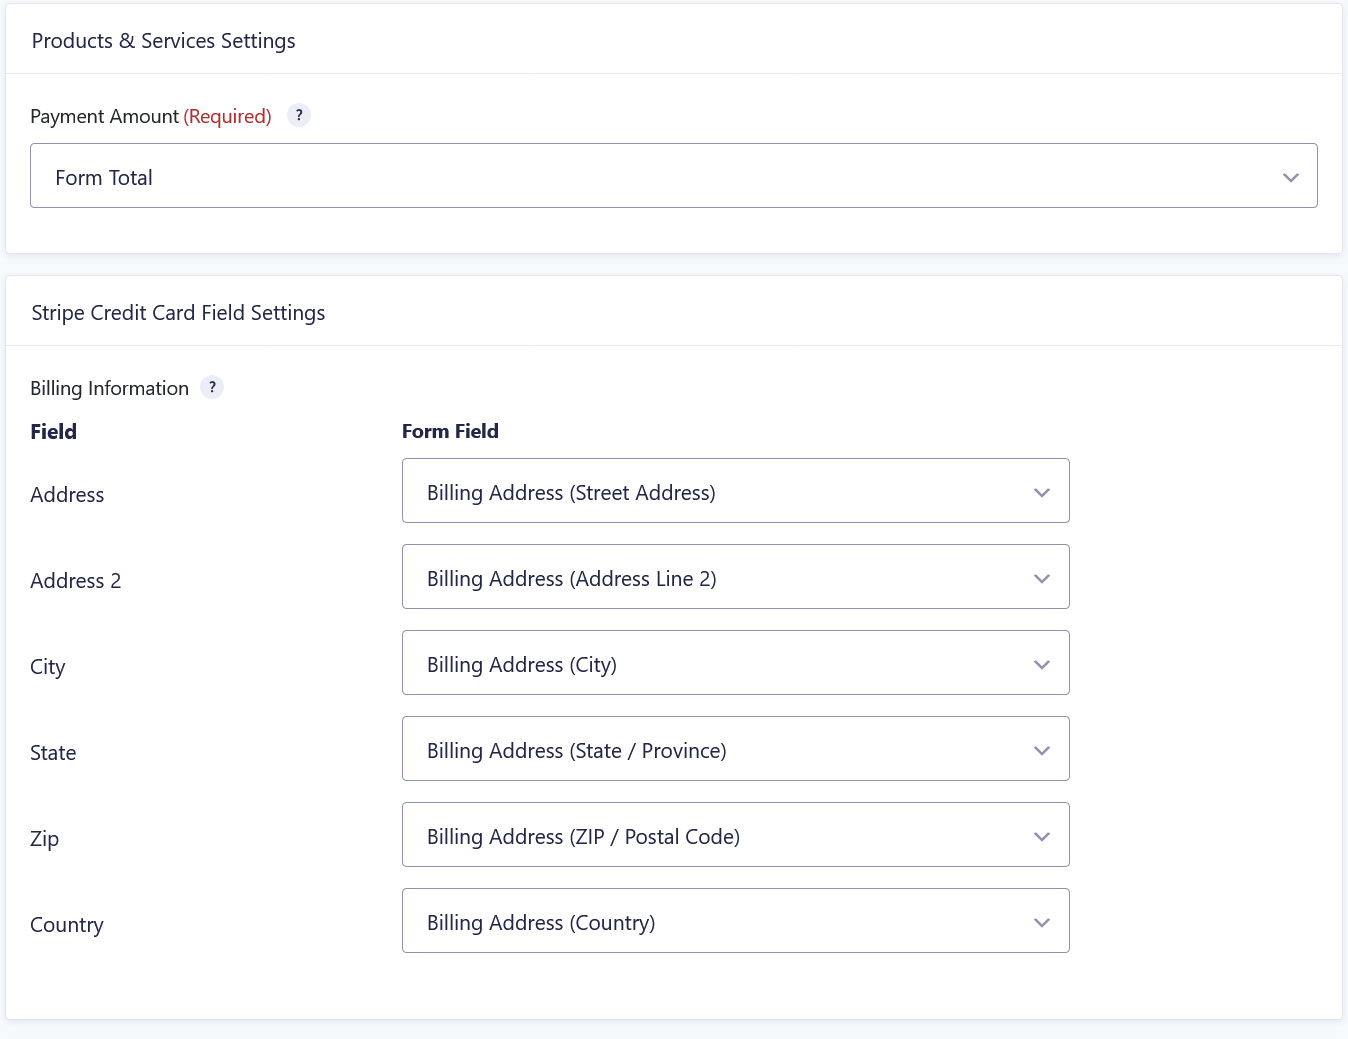
This is the setting for one-time payments. Once you pick it, new options will become available. Here, under Products & Services Settings make sure the drop-down menu is set to Form Total. After that, in the Stripe Credit Card Field Settings section, you need to map the billing information form fields to the respective data in Stripe.
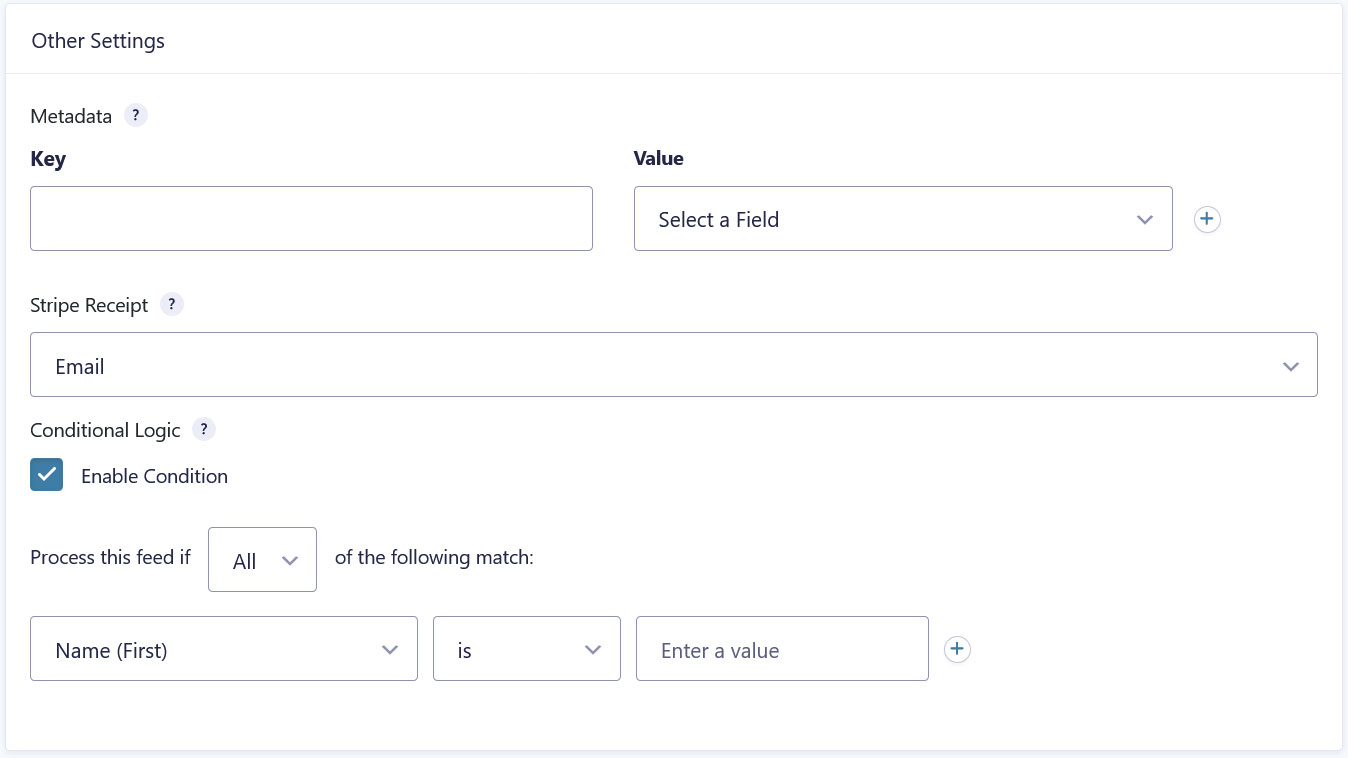
Finally, Other Settings contains three more options:
- Under Metadata you have the possibility to send along additional information about your customers. This can be anything, especially if you use custom fields.
- Stripe Receipt lets you define an email field in your form where Stripe will send a confirmation message.
- The last option, Conditional Logic, allows you to define conditions under which the feed will and won’t be processed.
What’s a use case for conditional logic? For example, if you were to sell a product that can also be turned into a monthly subscription by checking a box in the form, you would use two different feeds (one for the one-time payment, one for the subscription) and set their conditions so that each only spring into action when the box is or isn’t checked.
You can learn more about conditional logic here.
6. Enhance Your Form
With the form and feed ready, you are theoretically ready to go. At this point you could publish the form on your website and it would work. However, as mentioned previously, there are several ways in which you can further improve the form. Let’s go over a few options so you have a better idea about the possibilities.
- Add marketing features — Use add-ons to allow customers to join your email newsletter, connect your form to a customer relations management tool, or feed form data into project management software like Trello or Breeze.
- Use conversational forms — Make your forms more engaging by making them conversational. Instead of all form fields at once, conversational forms show each section on its own. That way, customers can through them step by step. Conversational forms also offer many more styling and design options. You can find examples here and learn more in our detailed tutorial.
- Offer coupons — With the Coupon Add-On you can create discount coupons only for certain forms or any form with a coupon field. Your coupons can use a flat rate or percentage and you are able to set their their start and expiration date, usage limits, and more.
- Connect to thousands of other services with Zapier –The Zapier Add-On allows you to integrate your form to the Zapier service and its 7,000+ supported applications. This allows you to collect customer data in Google Sheets or Excel, use third-party email marketing services like Brevo or CRMs like Zendesk, and much more.
7. Customize Confirmations and Notifications
Besides enhancing form functionality, there are two more aspects that deserve your attention, namely form confirmations and notifications.
Confirmations are the messages that display on your web page when someone submits your form. Options to create custom confirmations are located in the form settings under a menu of the same name.
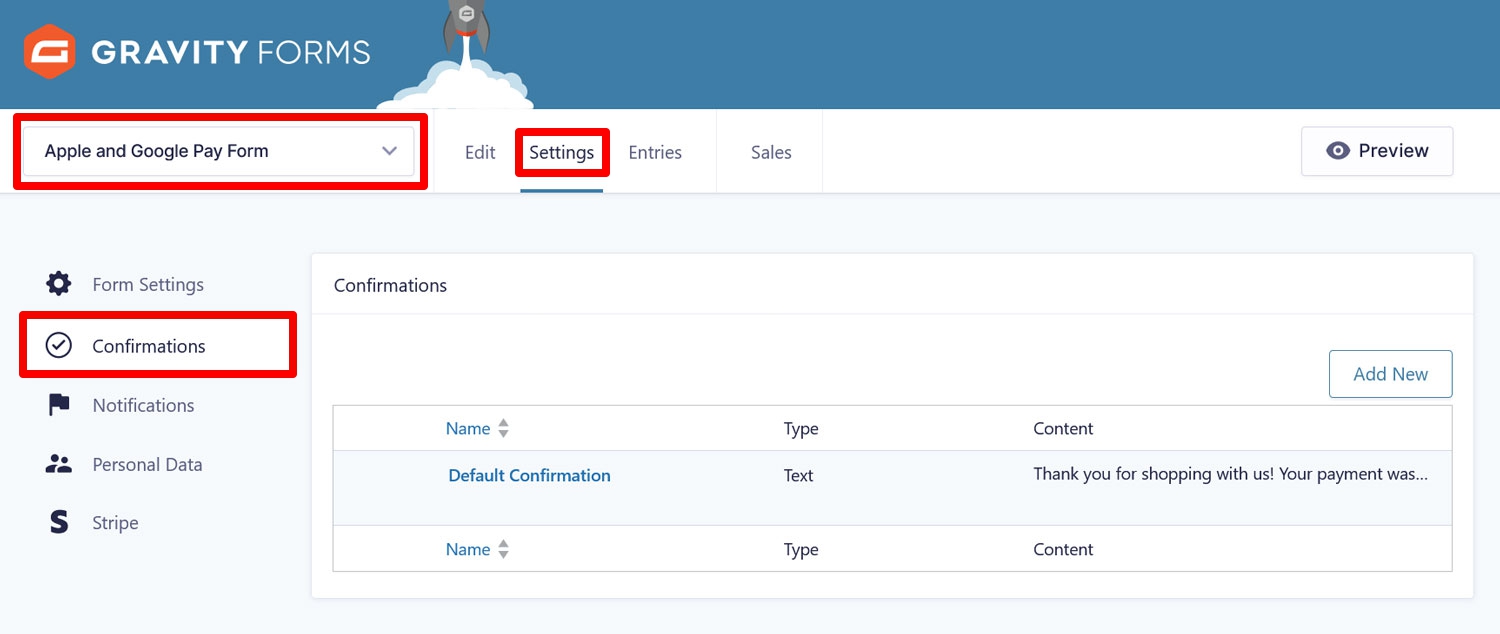
You can open the default message and write your own in the text editor.
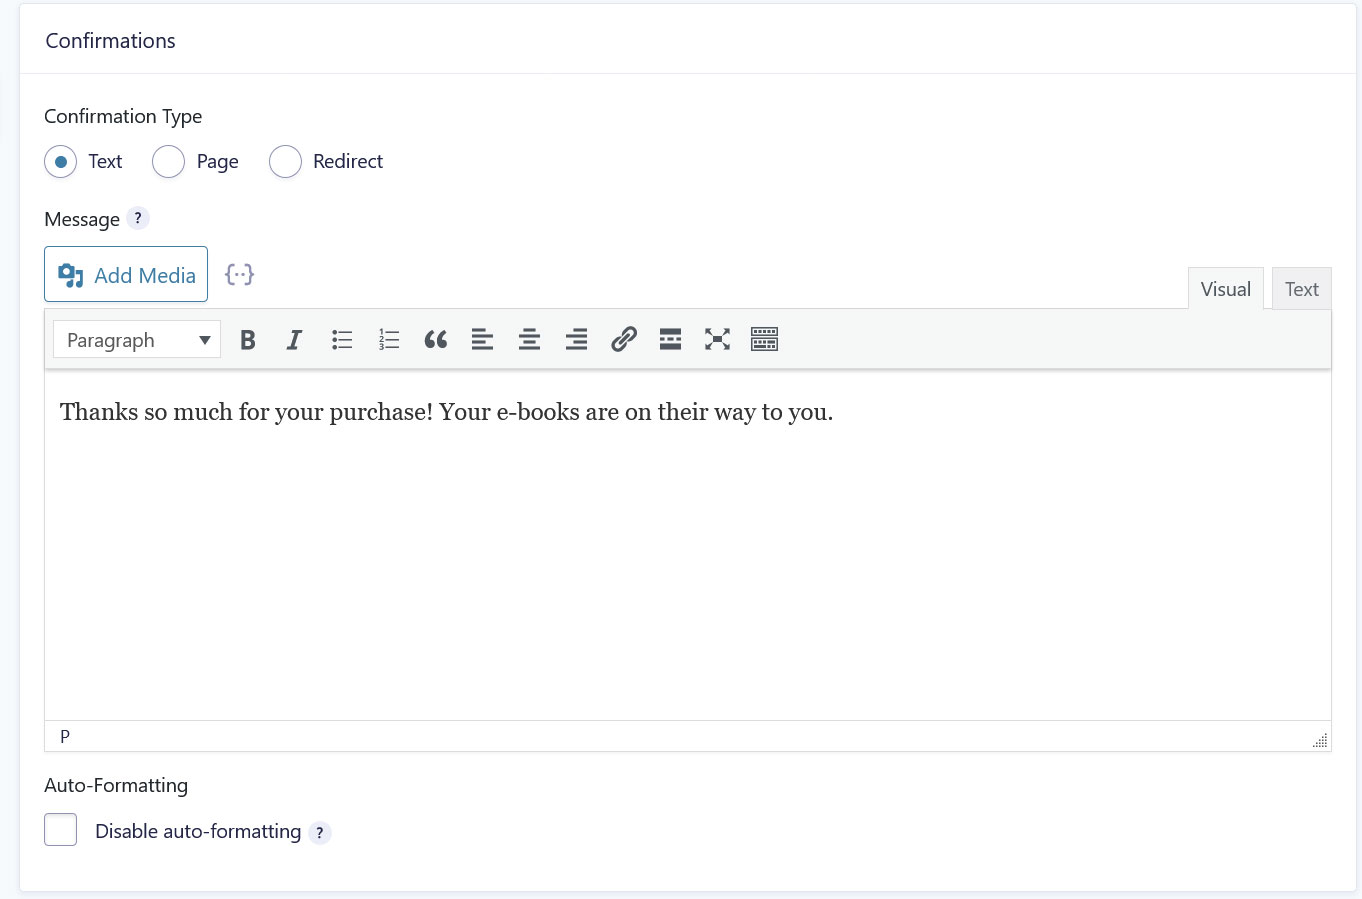
You also have the option to redirect customers to a new page by choosing Page or Redirect under Confirmation Type. Find a detailed post on this topic here.
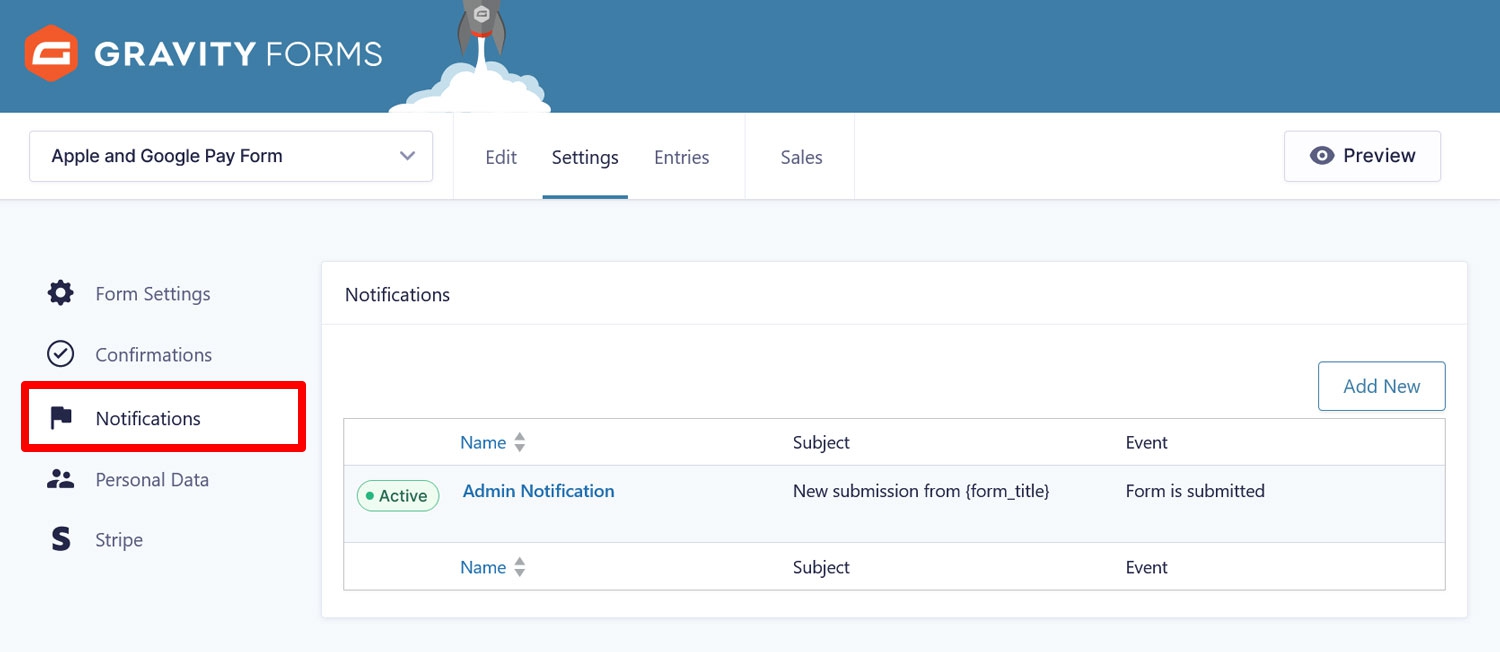
Notifications, on the other hand, are the email messages Gravity Forms sends out when someone uses your form. They can go to both you, your customers, or any other stakeholders that need to be informed. Your form settings contain an option to customize them at will. The template we used already contains one default notification.
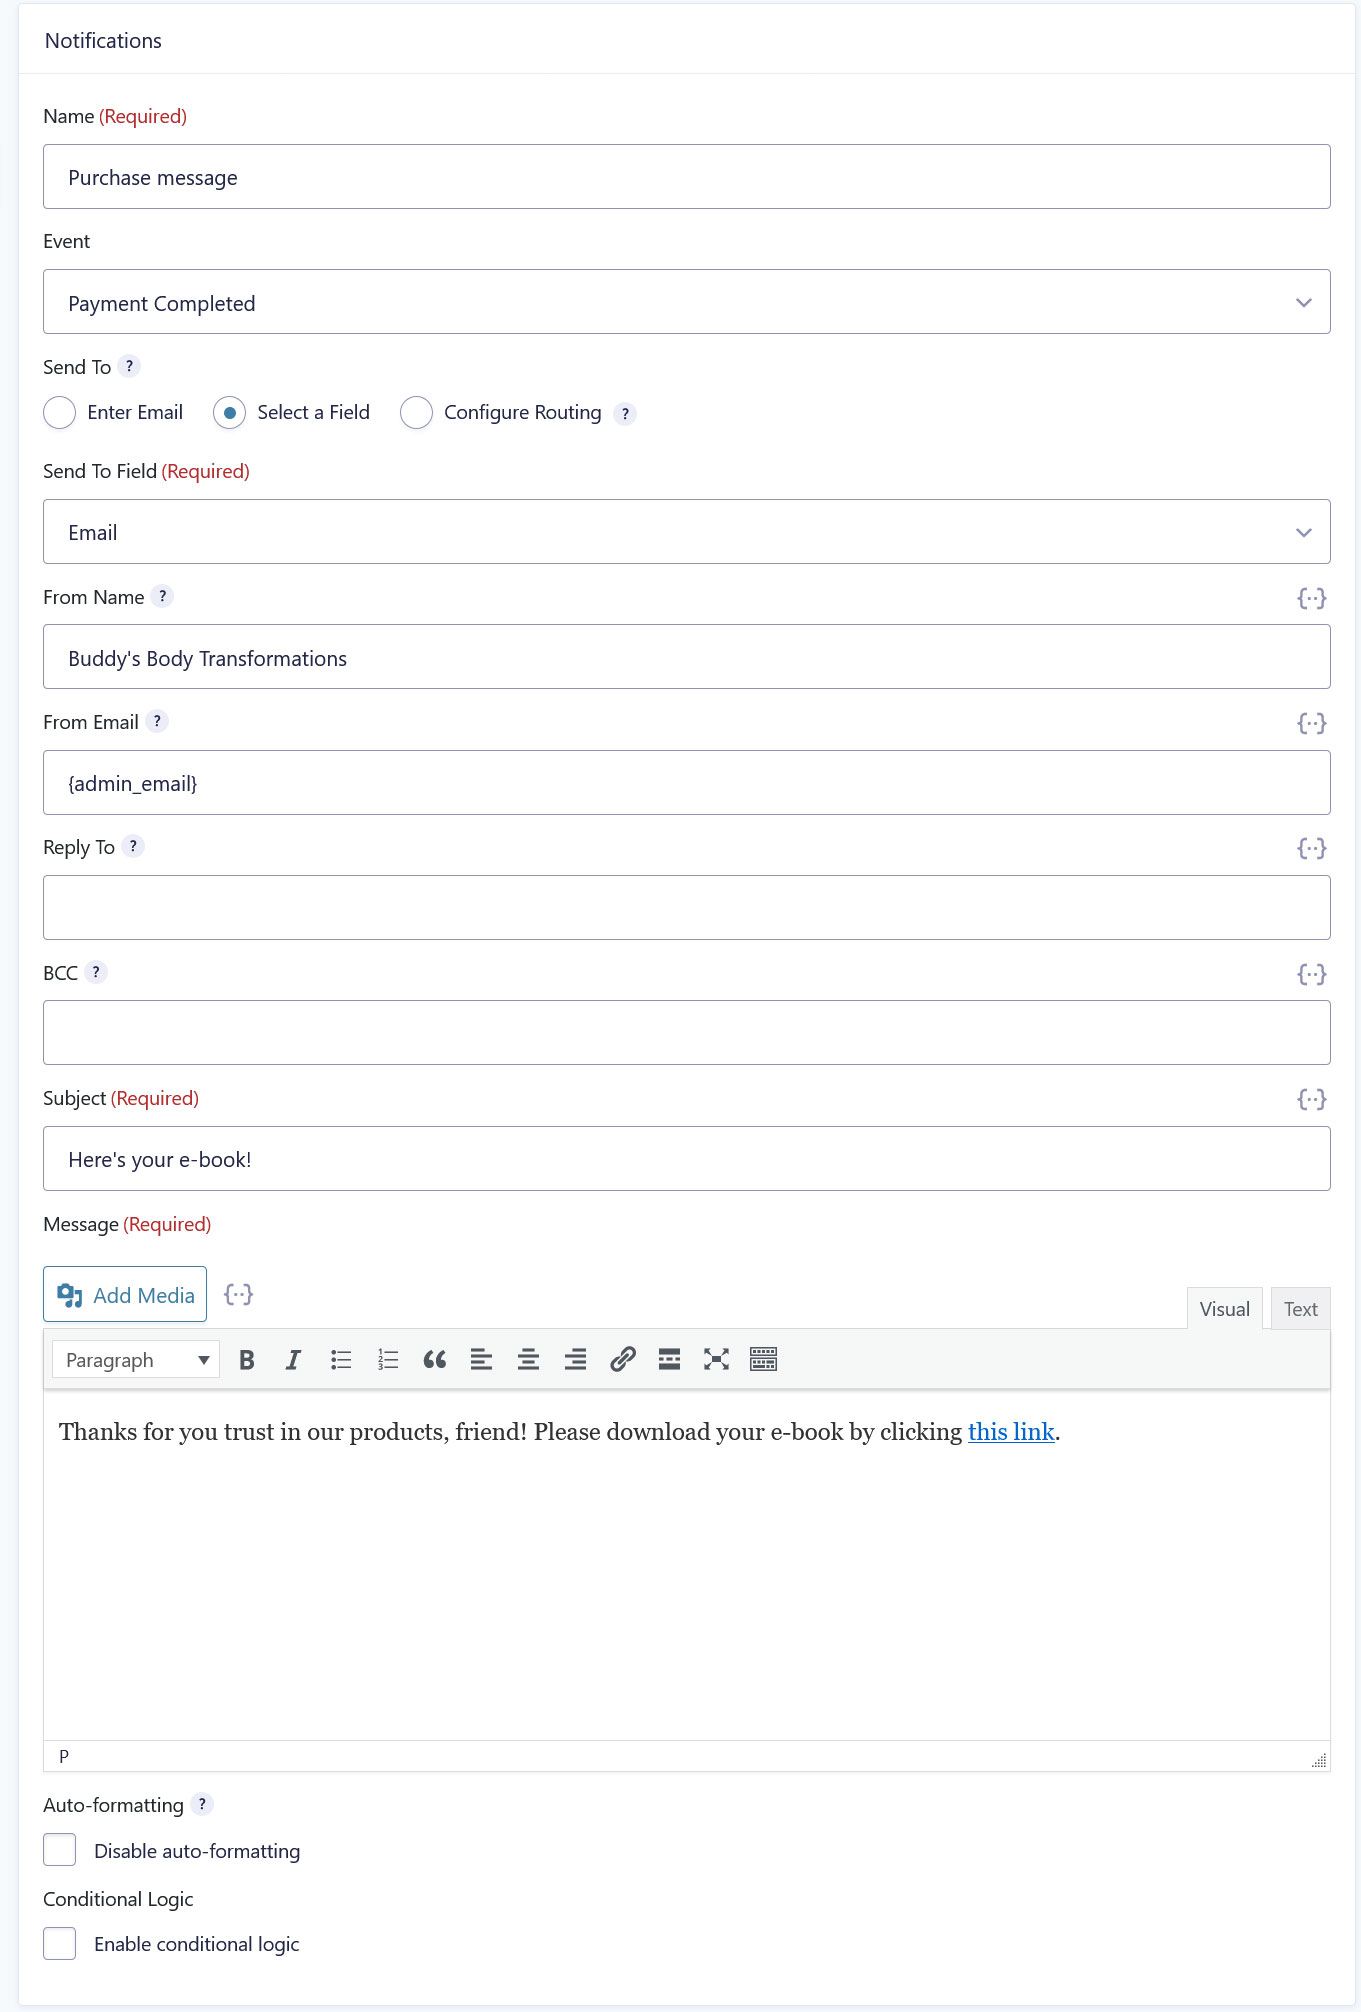
Since we are selling an e-book in this example, it definitely makes sense to create a new notification email that contains the link to the person’s purchase.
More about custom notifications here.
8. Embed the Form and Test It
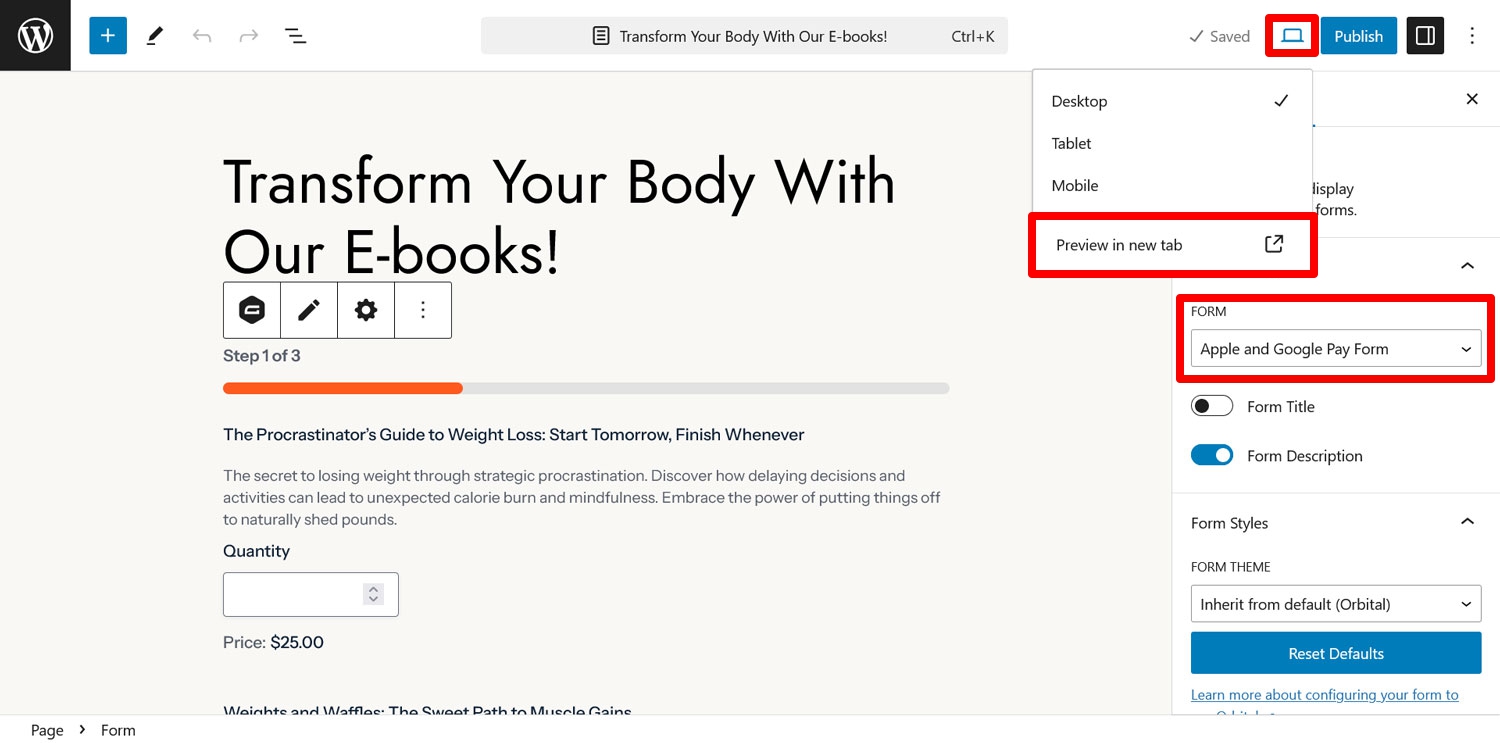
We are almost at the end. Once you have come this far, it’s time to publish your form. For that, embed it in a page using the Gravity Forms block or shortcode. Then you can preview the page by clicking the small laptop icon and Preview in new tab.
Since we want to test specifically Apple Pay and Google Pay, it makes a lot of sense to do this with a cellphone. That way, you can test the experience for your mobile visitors.
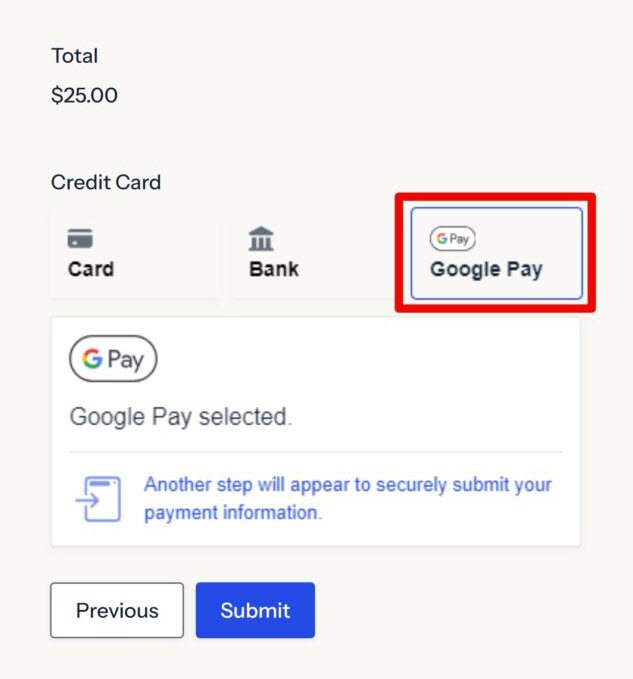
How do you test it? By simply using the form. Fill it with information, try out all its options, and submit it. Check that you receive the correct confirmations, notifications, and anything else you have set up in your form.
Bear in mind, you’ll need to be using Google Chrome or an Android device in order for the Google Pay button to appear on your forms, and equally, Safari or an iPhone to view and use Apple Pay.
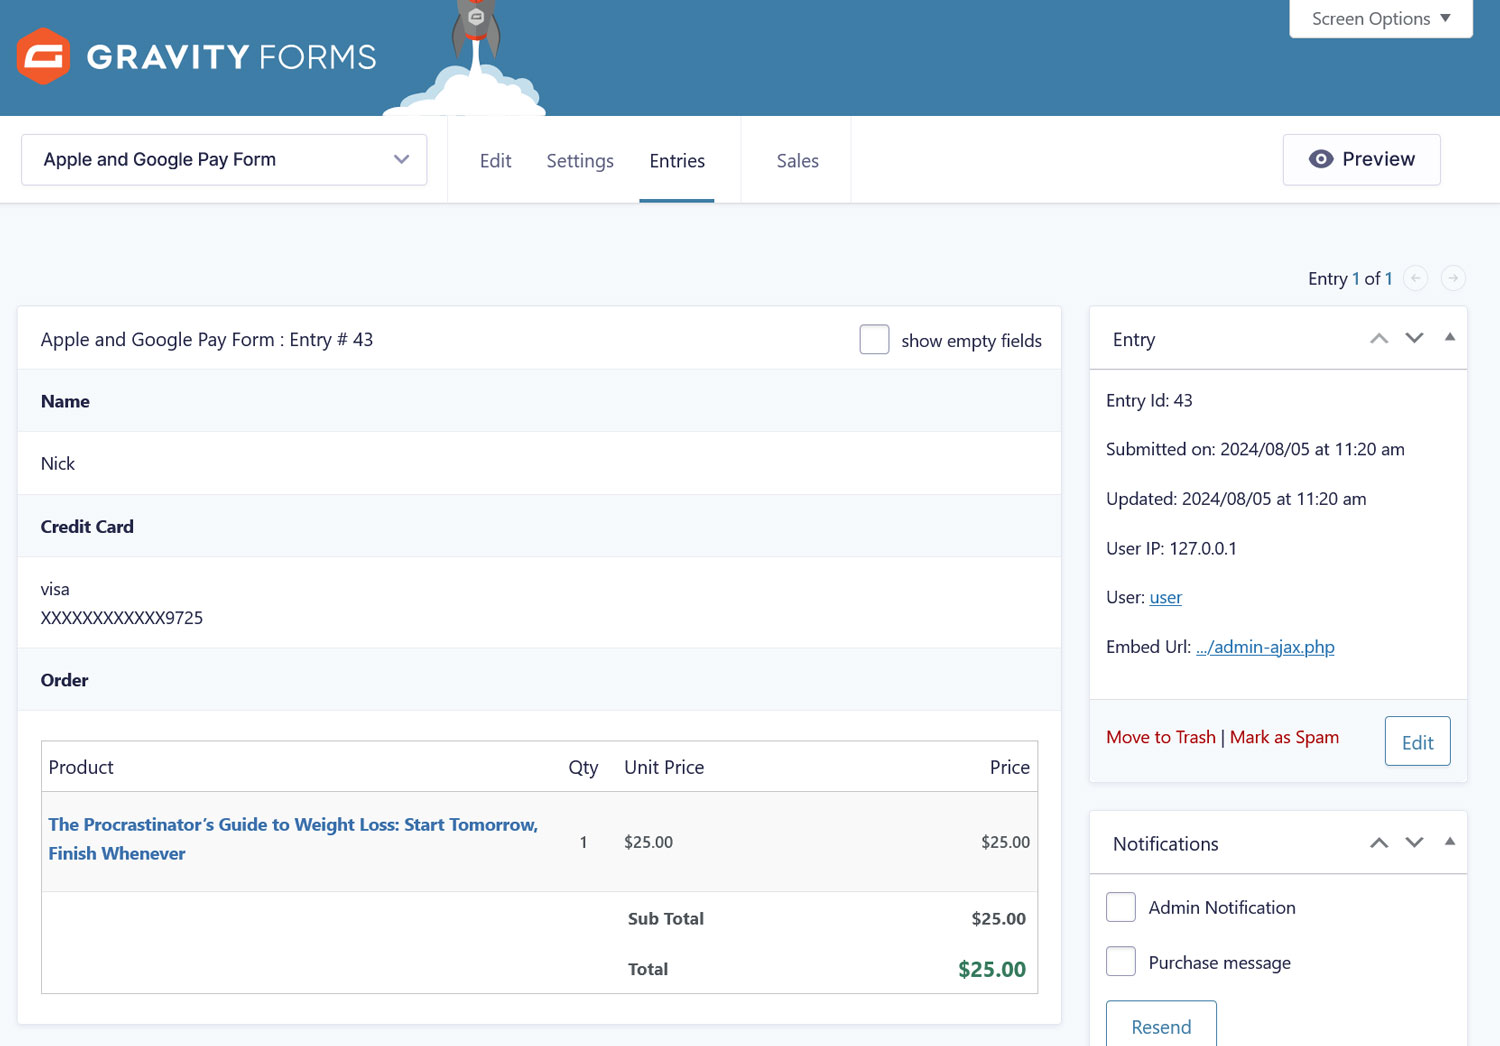
Once you do, any test payments should show up in the form’s Entries menu.

Click on single entries to see details.
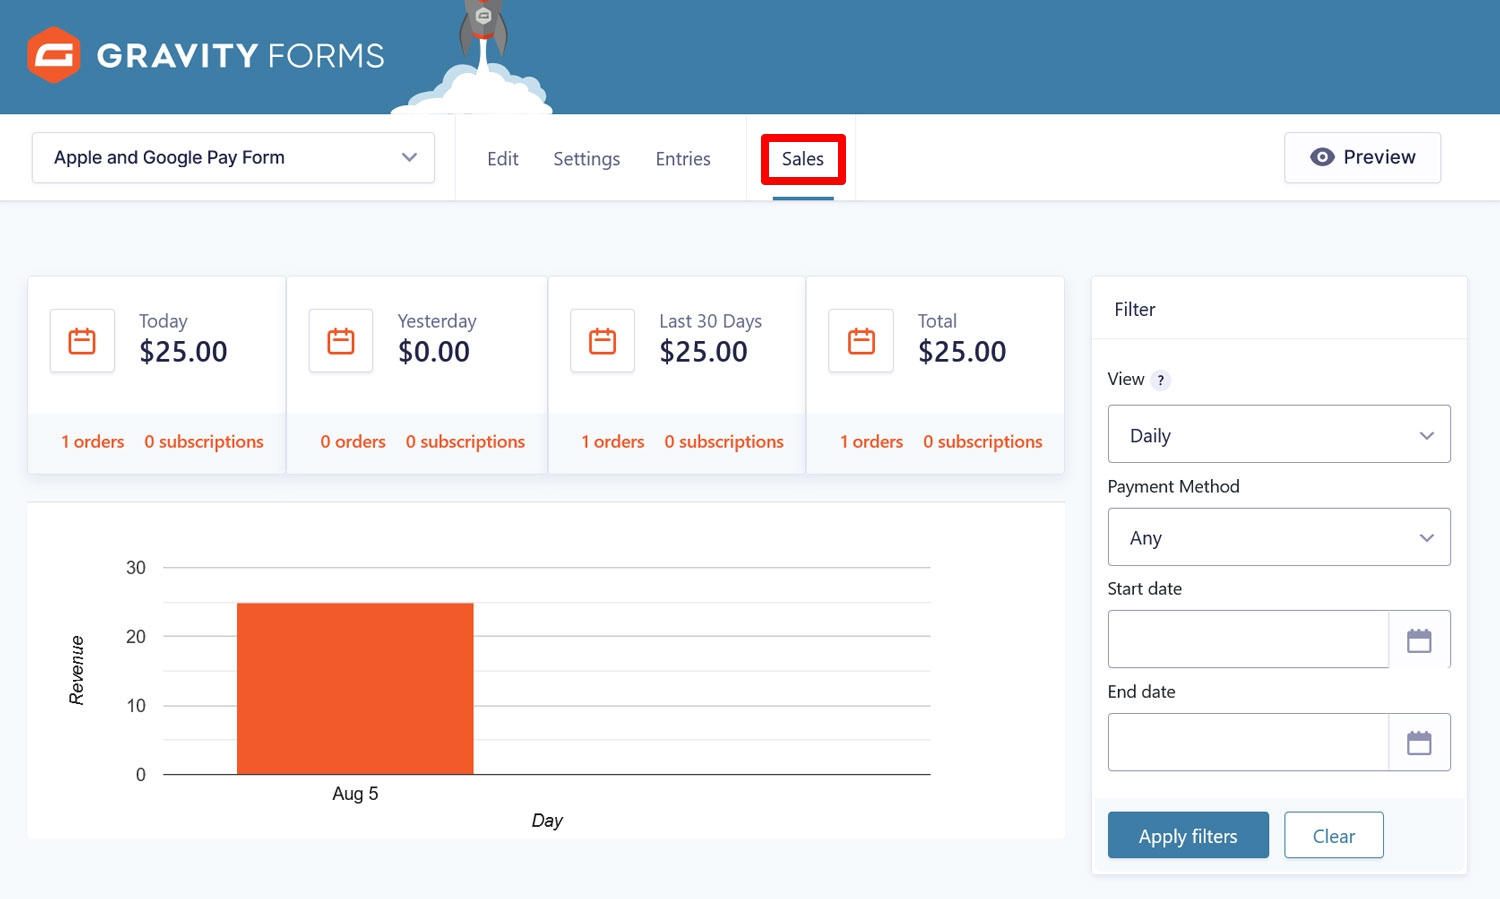
You can also use the Sales menu for an overview of customer purchases.
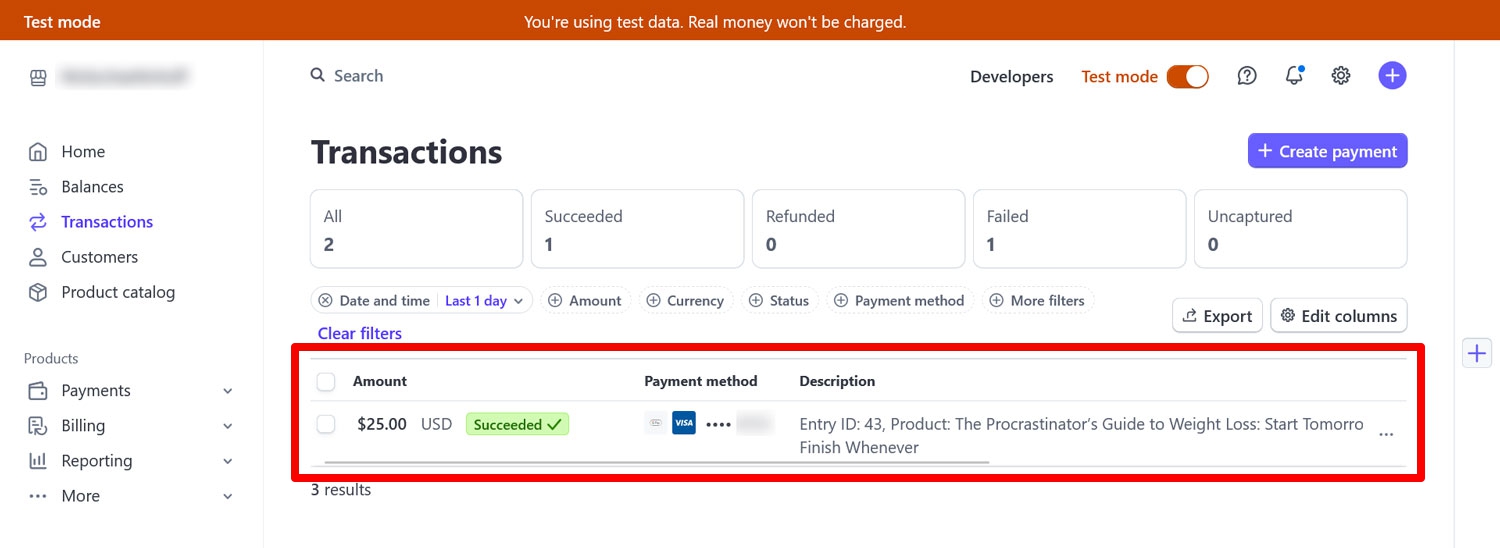
In addition, take a look whether they appear in the Stripe dashboard.
Once you are sure that all is working, you can make your form live by clicking Publish.
9. Make Stripe Live
The last but essential step is to switch your form to live mode. That way, you’ll be able to start accepting real payments.
So, go back to Forms → Settings → Stripe and switch Mode from Test to Live. Connect to Stripe again, disable test mode, and create another end point. Then copy over the live signing secret to the Gravity Forms settings.
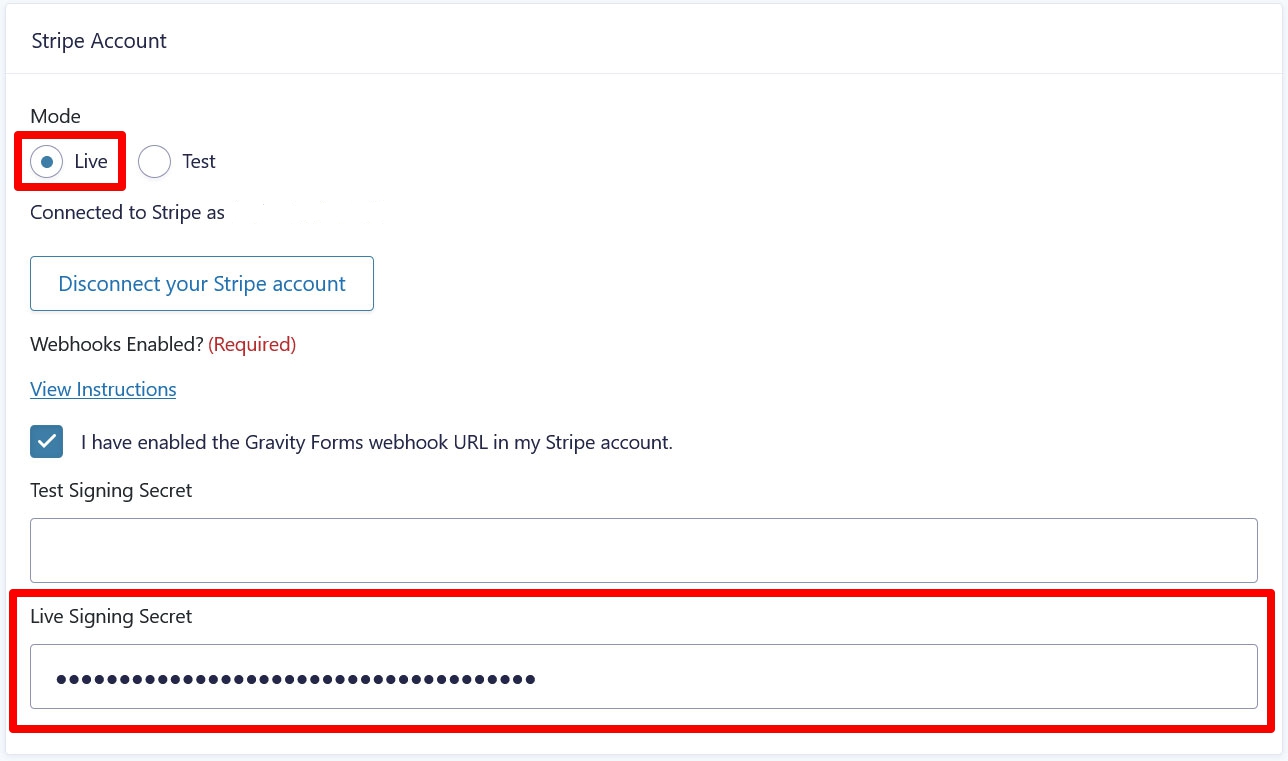
Save when you are done.
Start Using Apple Pay and Google Pay in WordPress
Apple Pay and Google Pay are among the most popular and trusted payment providers in existence. Offering them on your website allows customers to use their favorite way of paying, which is especially useful for mobile users.
Using the Gravity Forms Stripe Add-On, it’s super easy to add Apple Pay and Google Pay to your WordPress website. All you basically have to do is install the add-on, connect to Stripe, enable the two payment providers in your Stripe account, include the Stripe field in your form, and create a form feed.
While there is a lot you can do to further enhance your form, that’s the basic workflow. As you have seen, everything happens in easy-to-use interface, at no point do you have to handle any code.
Get your own Pro, Elite, and Nonprofit license now to start using Apple Pay and Google Pay in WordPress as well. Remember, you can upgrade your existing license or test drive Gravity Forms some more with a free demo site.