Conditional logic is one of the most helpful tools you have for building more powerful and effective WordPress forms with Gravity Forms.
Conditional logic can help you simplify your forms and create better user experiences, integrate with other services in different ways, optimize your administrative workflows, collect more data without annoying users, and more.
Best of all, it’s a core feature of the Gravity Forms plugin that’s available on all licenses.
In this post, we’re going to dig into everything that you need to know about conditional logic WordPress forms.
We’ll start with some general introductions to what conditional logic is and why you might want to use it.
Then, we’ll show you step-by-step how to create WordPress forms with conditional logic using Gravity Forms, covering a variety of different use cases.
What is conditional logic for WordPress forms?
Conditional logic lets you adjust how a WordPress form behaves based on conditions that you set, such as how a person answered a certain question in your form.
It essentially lets you set up “if → then” rules for your form.
For example, “IF a user checks a box indicating they have an allergy, THEN show an extra field that lets them list allergies” or “IF a user checks a box to join our email newsletter, THEN add that user’s email address to our email marketing software.”
You can use conditional logic in all kinds of different ways, including:
- Showing/hiding certain form content (fields, sections, or pages)
- Processing different form feeds, which works great for all of the integrations that Gravity Forms supports
- Sending different email notifications
- Showing different form confirmation messages.
We’ll cover these use cases in more detail later in our guide.
Here’s a real example to show conditional logic forms in action:
- If the user says that they want to order a meal, the form shows an additional section that lets the user choose their meal and provide other details.
- If the user says they do not want to order a meal, that section of the form remains hidden and the user never needs to interact with it.
Why use conditional logic for your forms?
There are a lot of different benefits of conditional forms in WordPress, but here are some of the most notable reasons to consider adding conditional logic to your forms:
- Build more flexible forms – for example, if you have a donation form, you can let people choose between making a one-time donation or setting up a recurring donation from the same form. Without conditional logic, you wouldn’t be able to process payments in different ways depending on how someone filled out the form.
- Simplify your forms and avoid showing unnecessary fields – conditional logic lets you only display the minimum number of fields that are needed based on how a person has filled out the form. This lets you avoid displaying lots of unnecessary form fields that annoy your visitors, which can also improve your form completion rates.
- Collect better, more qualified data – showing different fields based on how a person fills out the form can help you collect more accurate data and better qualify the people that are filling out your form (which can be especially important for lead generation forms).
- Create more personalized experiences – for example, instead of showing the same “thank you” page or sending the same email notification to every person who submits the form, you could create different experiences based on how the person filled out the form.
- Optimize administrative workflows – you can create much more streamlined workflows, such as assigning tasks or sending email notifications to different members of your team based on how a person filled out the form.
- Improve segmentation – if you’re adding contacts to a CRM or email marketing software, conditional logic can help you better segment your contacts, such as applying different tags based on how a person filled out the form.
As you read through the guide below, you’ll probably see some additional ways in which conditional logic might be able to help your specific use cases for WordPress forms.
How to set up conditional logic forms with Gravity Forms
Now, let’s get into some examples and tutorials for how to set up WordPress conditional logic forms using Gravity Forms.
Below, we’ll cover some of the most popular use cases. For each use case, we’ll explain how it can help you build better forms and share a short tutorial for how you can actually set up that use case on your own forms.
Here’s a quick summary of the use cases that we’ll cover – keep reading for detailed explanations and instructions for each:
- Show/hide form content – you can show/hide individual form fields, entire sections of forms, or entire pages (for multi-page forms).
- Execute different “feeds” in Gravity Forms – you can process feeds in different ways (or just not process certain feeds) based on how someone answered the form. We’ll explain what “feeds” are below, but this can be helpful for a ton of different use cases.
- Send different email notifications – you can send different email notifications with unique content, recipients, etc. Or, you can just choose not to send an email in certain situations.
- Show different confirmation messages – you can show different confirmation messages/pages.
A basic guide to conditional logic in Gravity Forms
Before we cover tutorials for the specific use case, let’s talk about the basic way that conditional logic works in Gravity Forms, regardless of use case.
The basic conditional logic settings look something like this:
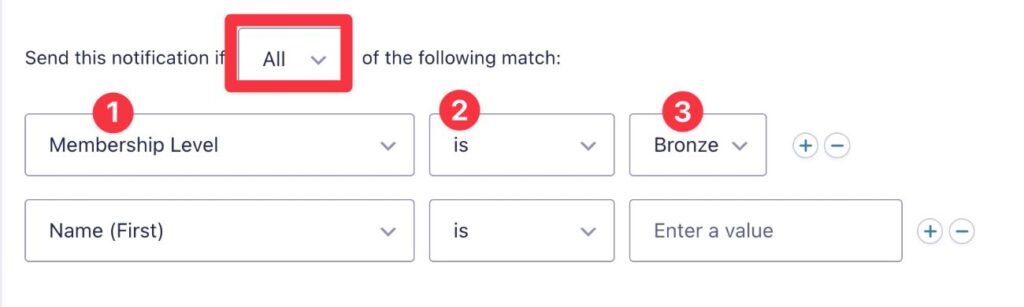
Some use cases will have a few additional settings, but they all have these fundamental options.
First, you can choose whether All conditional rules must be met, or just Any conditional logic rules:
- All – every single condition must be met in order for the rule to apply. This is the strictest implementation.
- Any – only one of the conditions must be met in order for the rule to apply. This is less strict.
Once you make that choice, you can add your rule(s).
The rule has three parts:
- Condition – this is what the rule is based on. It will include all of the fields in your form, along with some additional options depending on the add-ons that you’re using.
- Boolean operator – this lets you define how the condition is met. It includes options such as “is”, “is not”, “greater than”, “contains”, etc.
- Value – this lets you define the value of the condition. Sometimes it will be an open field, while other times it will be a drop-down of options. It depends on the condition.
You can add more rules by clicking the plus icon.
In the example above, the rule would be met if the user selected “Bronze” in the “Membership Level” field in the form.
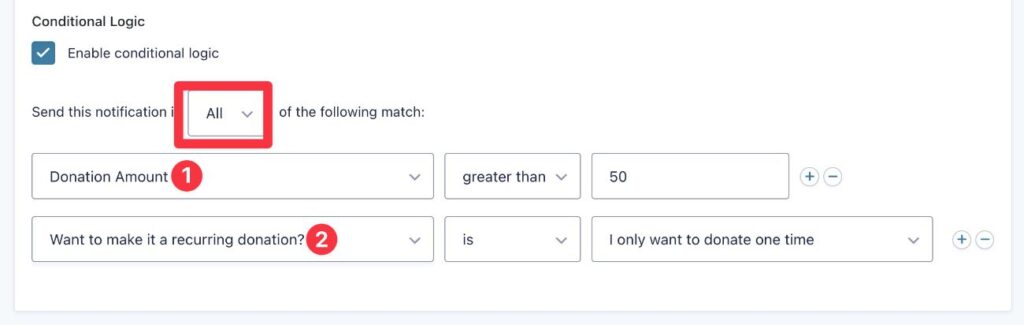
Now, let’s look at a more complex example of a conditional logic rule for a donation form.
This one has two rules. Because we chose All, both of these rules must be met in order for the conditional logic to apply:
- The amount of the person’s donation must be more than $50.
- They must have set up an automatic recurring donation, rather than making a one-time donation.
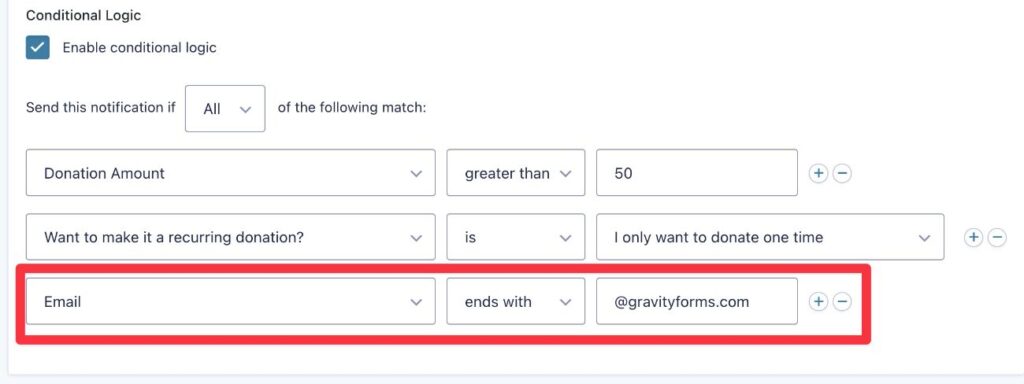
If we wanted to, we could make the rule even more specific.
For example, if we added another rule for “Email [ends with] @gravityforms.com”, the conditional logic would only apply if the donor were using an @gravityforms.com email address.
Now, let’s go through applying these basic principles to some specific use cases…
Show/hide certain form content (individual fields or sections)
Conditional logic can be really handy for customizing and personalizing your forms by showing or hiding certain form content based on conditional rules.
It lets you keep your forms as short and simple as possible, while still giving you the ability to collect additional information when needed.
For example, let’s say you’re creating an event registration form and people have the option to choose whether or not they want to order food at the event.
You could add a checkbox field that says “I want a meal at the event”. If users check that box, you could then show additional options that give users a choice of what meal to order.
If they don’t want a meal, all of those additional options would remain hidden, which avoids showing irrelevant options to people registering for the event.
Let’s go through how to show/hide form content at different levels…
Show/hide individual form fields
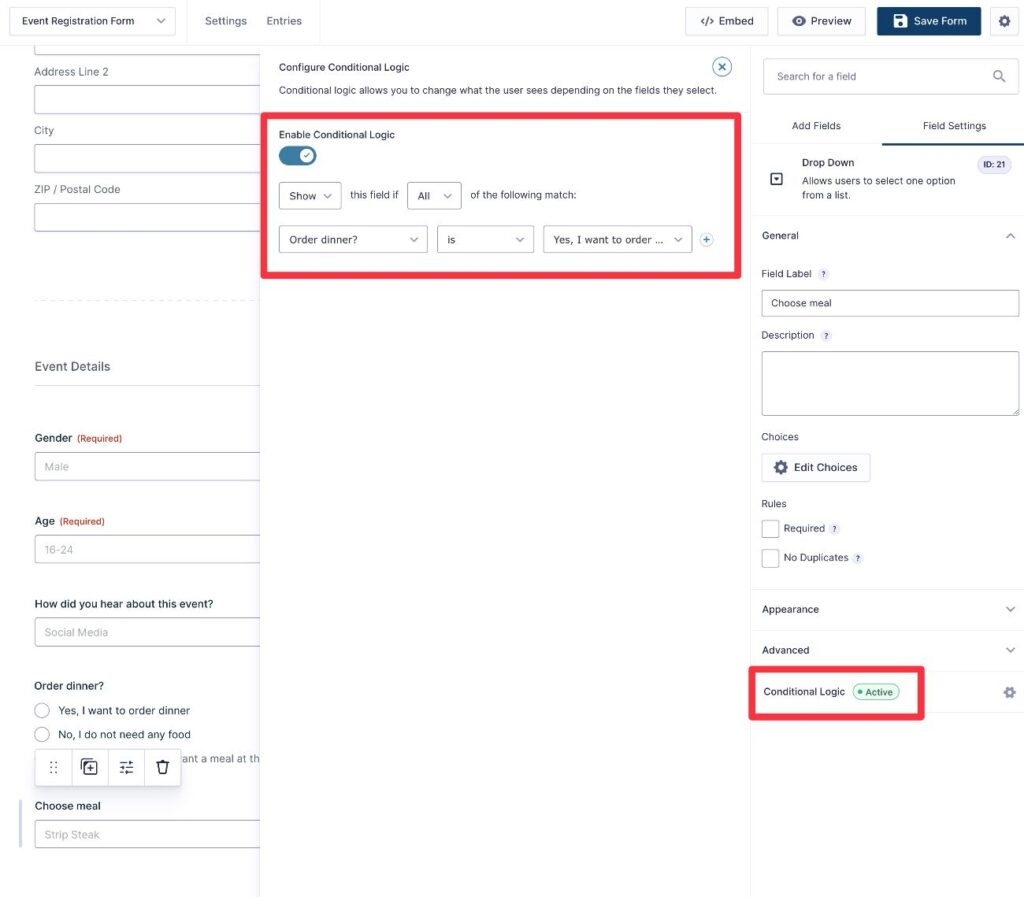
Here’s how to show/hide an individual field:
- Open the field’s settings in the editor.
- Choose the Conditional Logic option in the sidebar.
- Turn on the Enable Conditional Logic toggle in the slide-out that appears.
- Choose whether to Show the field if the conditional logic is met or Hide the field if the conditional logic is met.
- Add your conditional logic rule(s).
In the example screenshot below, the form will only show the “Choose meal” field if the person answered “Yes” to the “Order dinner?” field.
Show/hide form sections
In addition to showing/hiding individual fields, you can also apply conditional logic rules to entire sections. This can be useful if you have groups of fields that you want to apply conditional logic to.
Instead of needing to add the rule to each individual field, you can just group those fields in a section and add your conditional logic rules to the entire section.
First, add the fields inside two Section fields (Section Break).
For this example, we’ve added more fields to collect information about the person’s dinner order, such as allergies or special dietary restrictions.
You can follow the same basic steps as above. Only now, you’re applying the conditional logic to the Section field, rather than the individual fields inside the section.
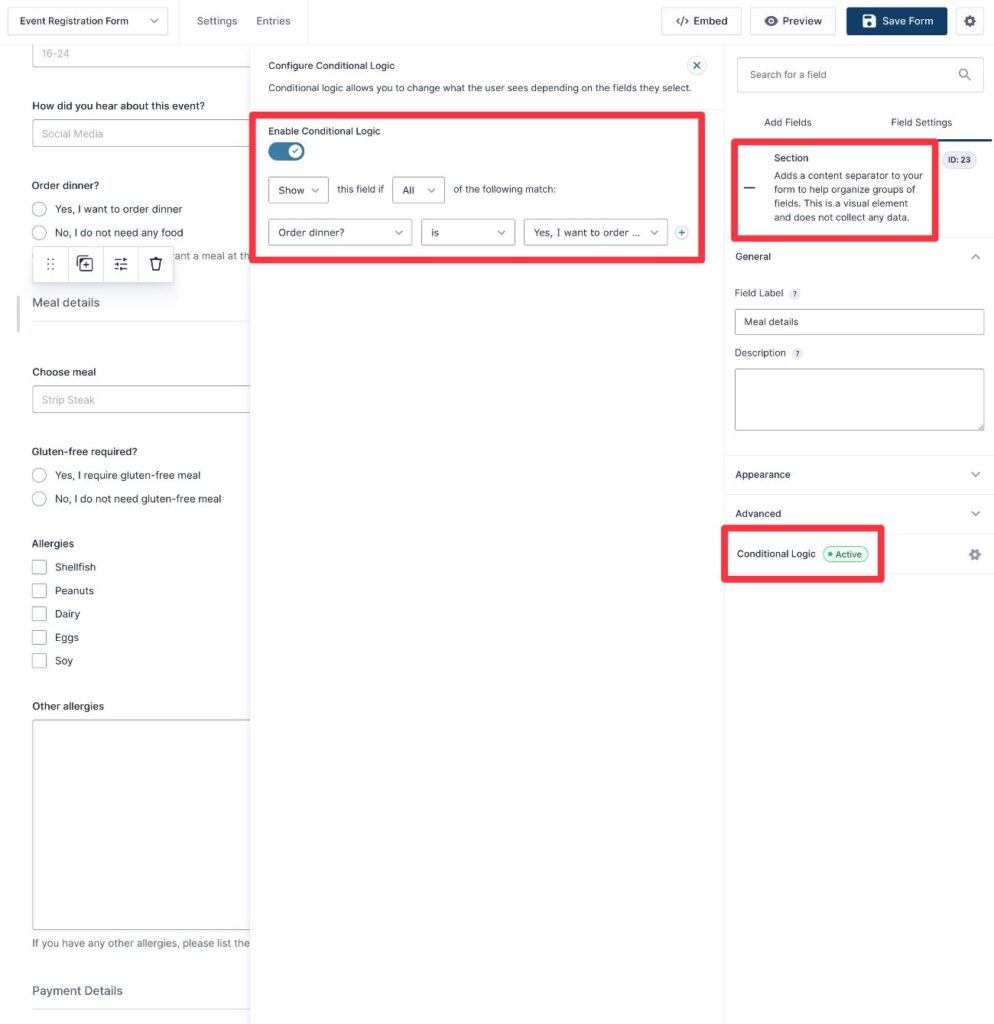
Now, the form will show the entire section if a user indicates that they want to order a meal:
Adjust form page behavior (show/hide, change buttons, etc.)
As with individual form fields and sections, you can also show/hide entire pages of a multi-page form using conditional logic.
However, when you apply conditional logic rules to form pages, you also get some additional options.
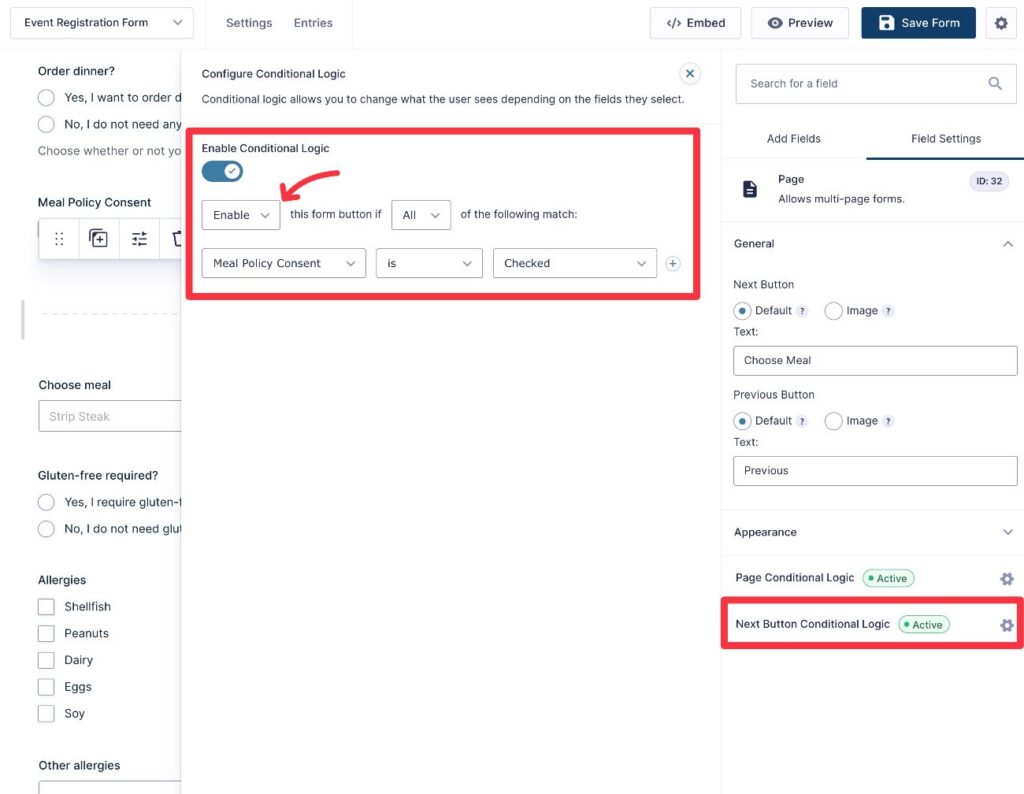
When you edit the Page Break, you can first set up Page Conditional Logic. This lets you show/hide the page, just like sections.

Then, you also get a new set of Next Button Conditional Logic settings. This lets you enable or disable the “Next” button based on how a person has answered.
This can be useful in situations where you don’t want to let users advance to the next page unless they meet certain conditions. For example, you could hide the “Next” button if the user hasn’t checked a box to agree to your terms of service.
Here’s an example of conditional logic working to show/hide form pages:
- If the person says they want to order a dinner meal, the next page will ask them to choose their meal. After choosing their meal, the page after that will be the payment details.
- If the person doesn’t want to order a meal, the form will take them straight to the payment details page, completely skipping the page that lets people choose their meals.
Execute different “feeds” in Gravity Forms
Conditional logic can be incredibly useful when setting up feeds in Gravity Forms.
If you’re not familiar with what a Gravity Forms “feed” is, here is the definition of a feed:
“A feed is a configuration within Gravity Forms that defines how form submission data should be sent to an add-on or external service. Each time a user successfully submits your form, any active feeds associated with that form will process and send the relevant data according to your configuration.”
Most of the Gravity Forms integrations rely on feeds, along with some core features (such as user registration).
For example, a feed controls how to process payments (payment forms), how to map a form field’s data to fields in your CRM (lead generation forms), how to create a user account for a person (user registration forms), etc.
Because feeds are such an important part of unlocking the power of Gravity Forms, being able to apply conditional logic rules to those feeds gives you even more flexibility.
In this section, we’ll look at a few different examples of applying conditional logic rules to Gravity Forms feeds.
However, these examples are by no means the complete list of everything that you can do with conditional logic feeds. You’ll definitely have your own use cases that go beyond these examples.
How to add conditional logic rules to Gravity Forms feeds
Before we look at some specific examples, let’s talk about the process in general.
Regardless of what add-on you’re using and the type of feed that you’re creating, you will always find the conditional logic options somewhere at the bottom of the feed settings interface.
First, open the feed editor, either by adding a new feed or editing an existing one.
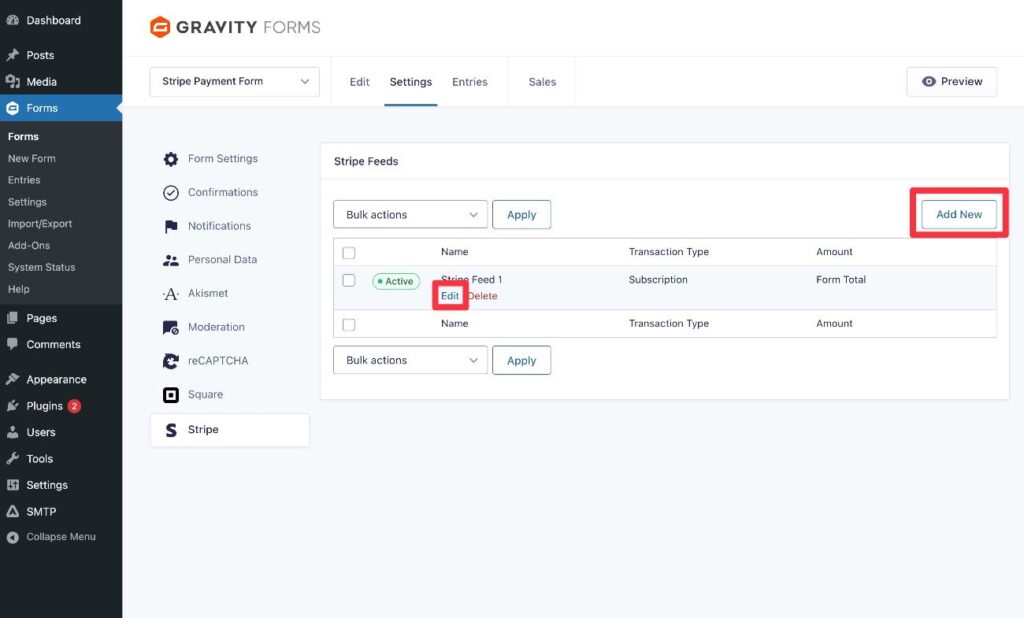
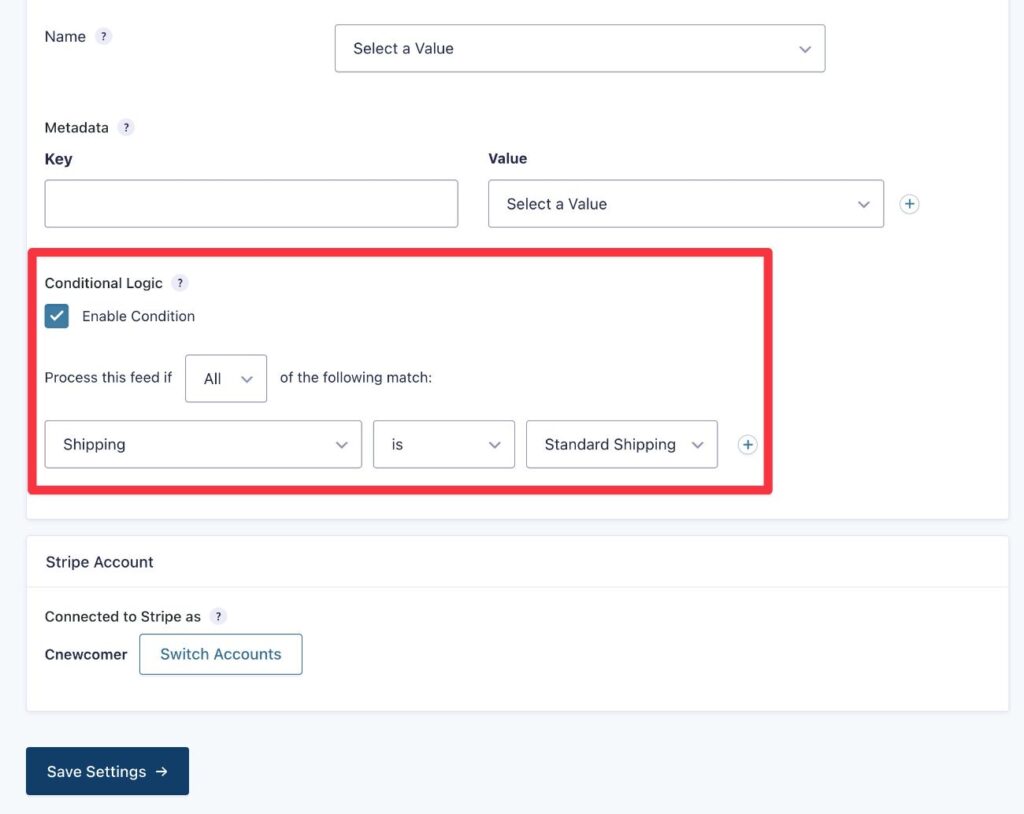
You will then find the Conditional Logic option near the bottom of the feed editor.
Check the box to Enable Condition and then use the options to add your rules.
Now, let’s look at some specific examples.
Process payments in different ways
Conditional logic can help you process payments in different ways depending on the conditions that you set.
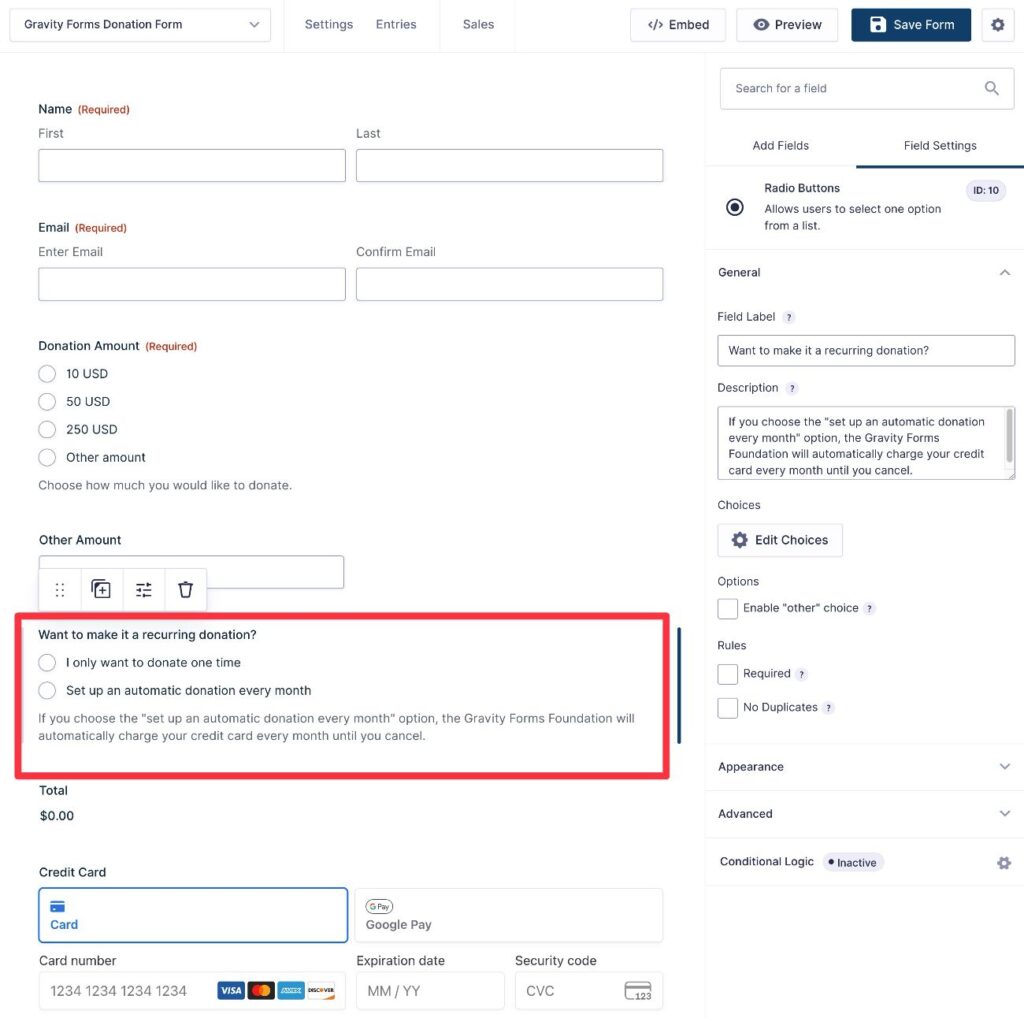
For example, let’s say you’re creating a donation form and you want to give donors the choice between making a one-time donation or setting up a recurring monthly donation.
You could add a radio button field to the form that lets donors make their choices. Based on the option they select in that field, you could then use conditional logic to choose whether to execute the payment feed for a one-time payment or a subscription payment.
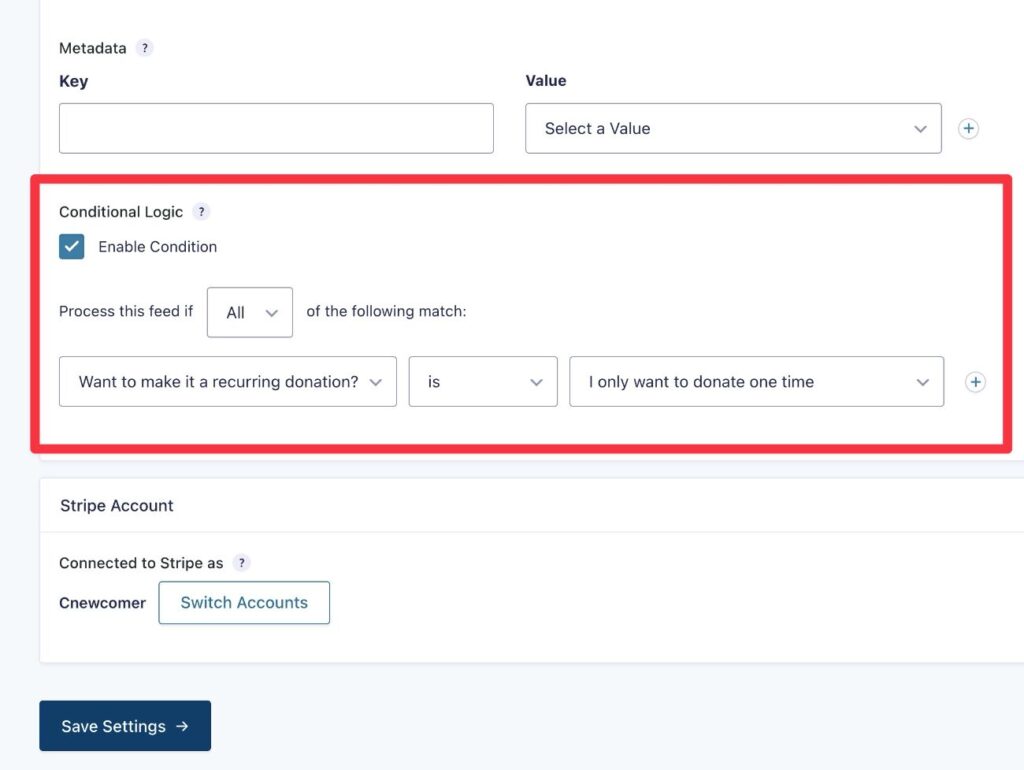
To set this up, you would create two payment feeds.
The first payment feed would use the one-time Products and Services option for the Transaction Type and only execute if the user chooses the one-time option.
The second payment feed would use Subscription as the Transaction Type with a different conditional rule:
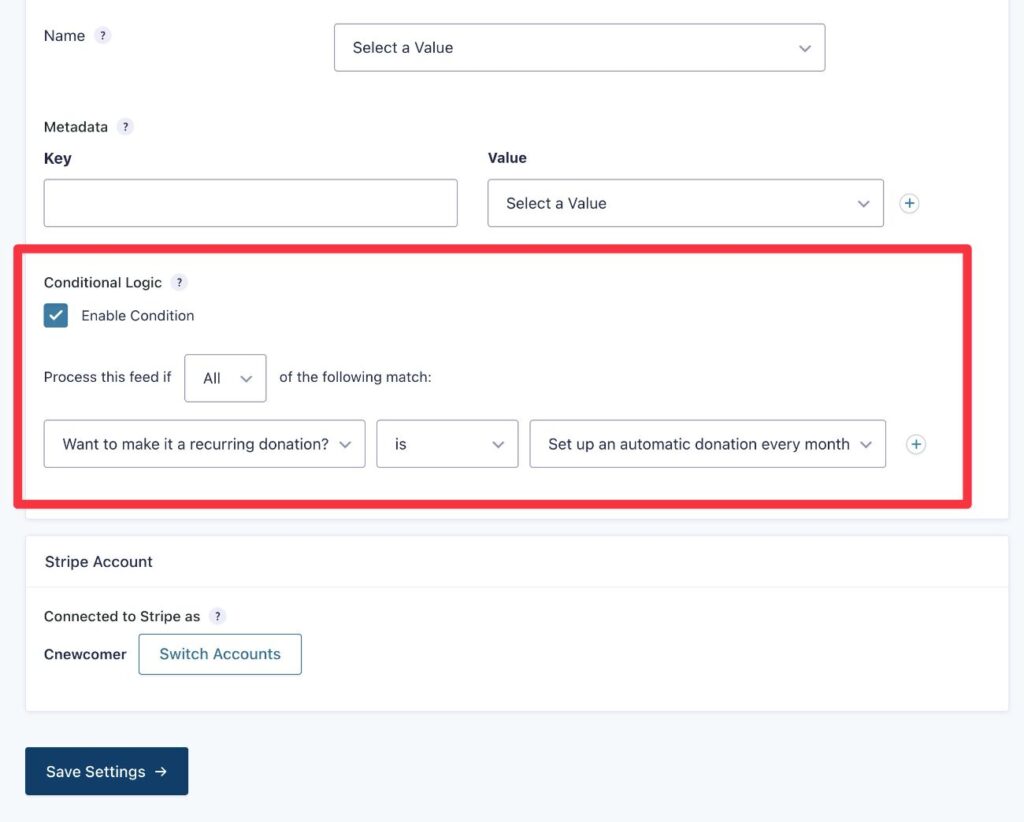
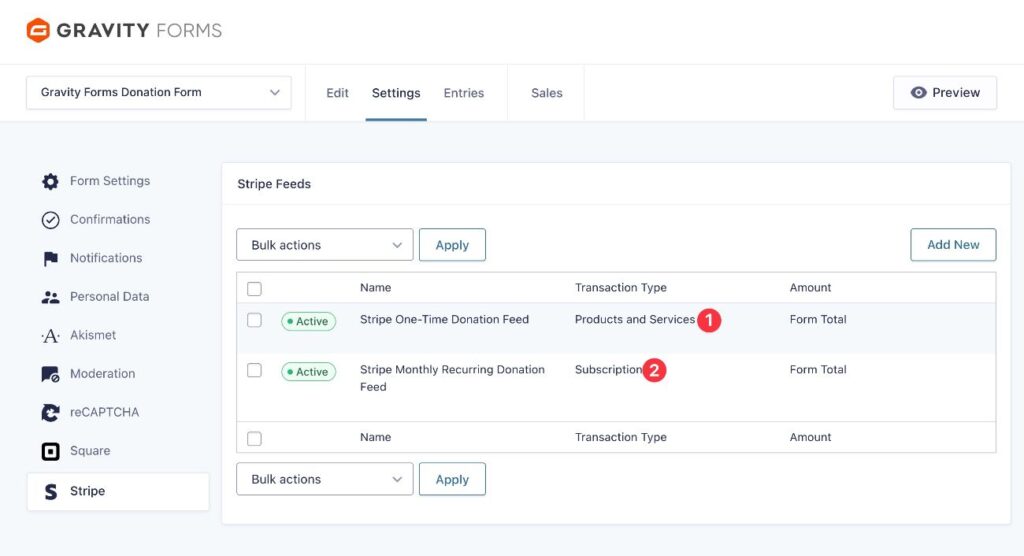
At the end, you’ll have two different payment feeds like this:
Choose whether or not to subscribe a person to your email list
If you’re creating an email subscribe form, a common use for conditional logic feeds would be to only subscribe a person to your email newsletter if they check an opt-in box in the form.
Without explicit opt-in, you can choose not to sync that contact to your email marketing software.
For this example, we’ll use Mailchimp, but the same principles apply to any email marketing tool.
To set this up, you only need one feed.
First, you would add the opt-in checkbox to your form – we’re using our same donation form from the previous example.
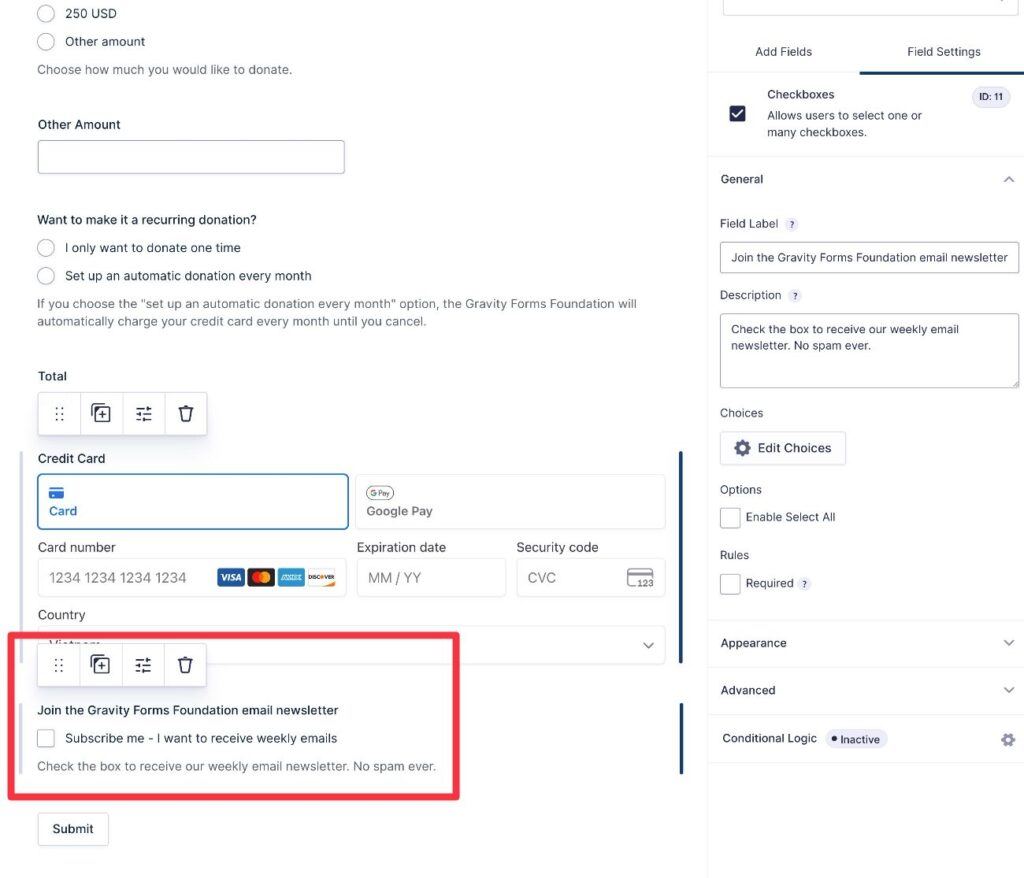
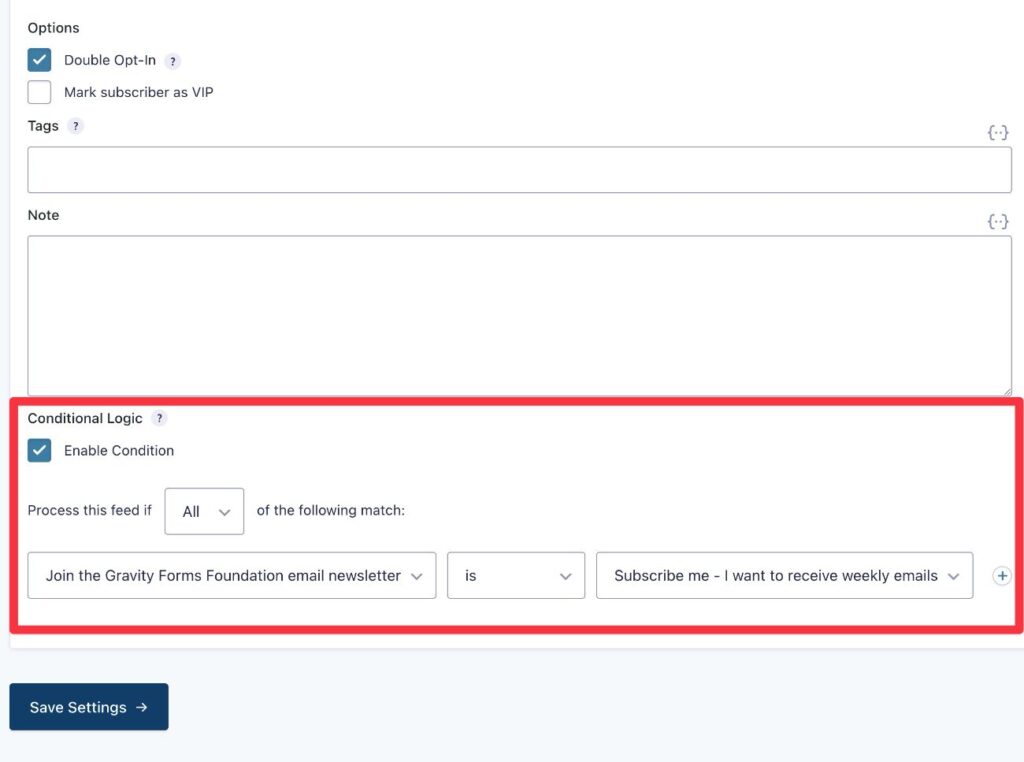
Then, when you set up your email marketing feed (e.g. our Mailchimp feed), you can add a conditional logic rule to only add the contact if they’ve checked that box in the form.
Apply these same principles to your own use cases
Regardless of which Gravity Forms add-on you’re using, you’ll be able to apply these same conditional logic feed options to your own unique situations.
Here are a few more ideas:
- Apply different CRM tags.
- Assign contacts to different CRM owners.
- Create different types of tasks in your project management software.
- Send SMS messages to different people.
- Assign help tickets from your support request form to different people.
- Connect a form to Zapier in different ways, which lets you apply conditional logic to the thousands of apps that Zapier supports.
- Send different webhooks, which gives you another way to use conditional logic to connect to different apps.
Again, these examples are just scratching the surface of what you can do with feeds and conditional logic forms.
Send different email notifications
Conditional logic can also be useful for sending email notifications after people submit your form.
You can use conditional logic rules to send different emails to the person who submitted the form, yourself, or your team.
You actually have two different ways to set up conditional logic rules with email notifications:
- Full conditional logic – you can apply conditional logic to the entire email notification. This would let you create multiple separate notifications, each with its own rules.
- Routing – if you just want to send an email to different people (but don’t need to change anything else, such as content), you can use the built-in routing feature.
Using full conditional logic for email notifications
The most flexible way to control email notifications is to enable the full conditional logic functionality.
This lets you use conditional logic to control whether or not to send a notification. Some potential use cases here include:
- Not sending a certain email unless specific conditions are met. For example, you could send an email to people who check a box in the form indicating that they want more information, but not send any emails to people who don’t check that box.
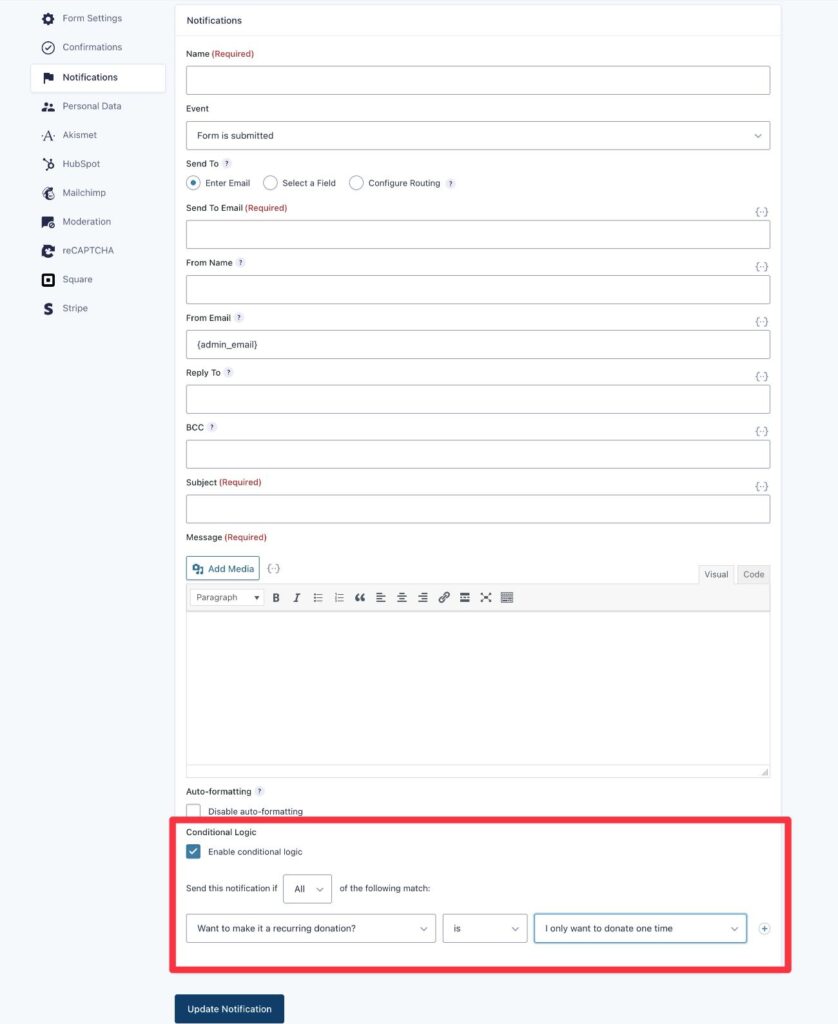
- Sending different emails depending on how a person answered the form. You can fully customize each email, including the content, recipient, and more. For this use case, you would create multiple notifications and add conditional rules to each notification to control when it should send.
To add conditional logic rules to an email notification, check the Enable conditional logic box at the bottom of the add/edit notification interface.
Using notification routing to send emails to different addresses
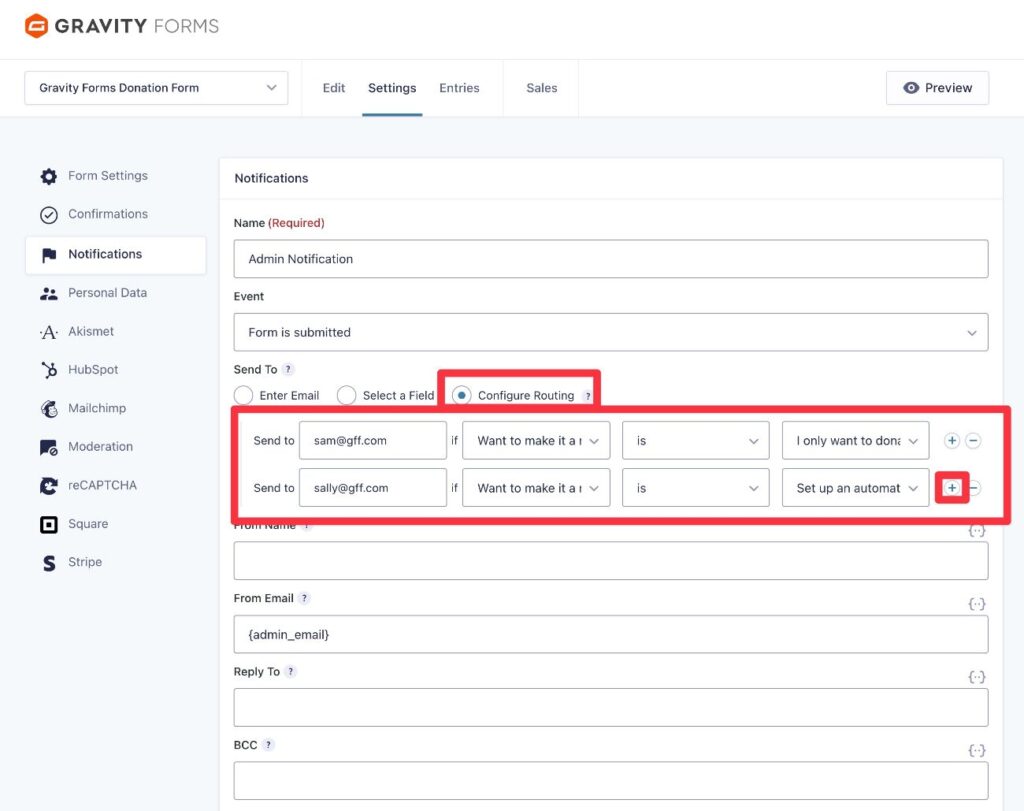
If you just want to send the same email notification to a different email address depending on how a person filled out the form, you can use the Configure Routing option under Send To.
This allows you to set up unlimited conditional routing rules to control which email address to send the notification to, though you don’t get quite as much flexibility for setting up multiple conditions within a single rule.
You can click the plus icon to add more conditional routing rules as needed.
In the example screenshot below:
- The notification would be sent to [email protected] if the person makes a one-time donation.
- The notification would be sent to [email protected] if the person sets up a recurring donation.
Show different confirmation messages
You can also use conditional logic to display different confirmation messages and/or to redirect users to different confirmation pages.
This can be helpful in situations where you need to share different information with different types of people after they submit the form.
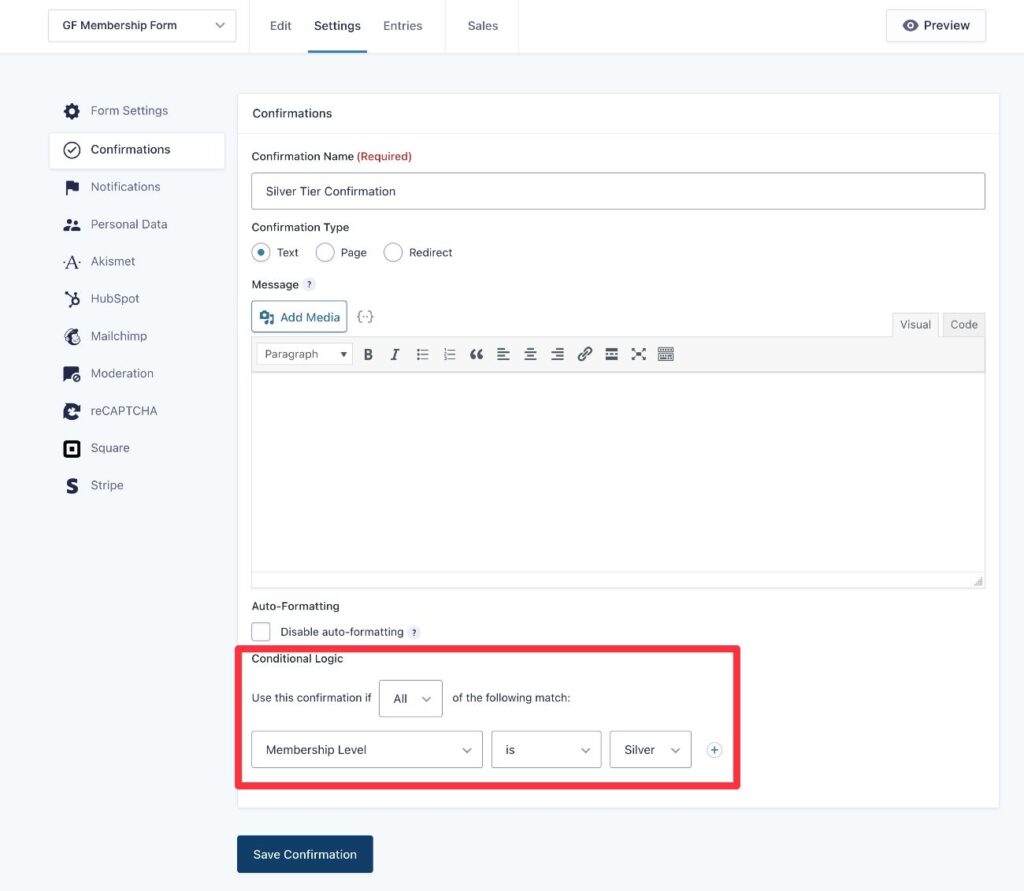
For example, let’s say you create a membership form that lets users choose between multiple membership levels as part of the form.
You might want to display a different message to users depending on the membership level that they choose, which is what conditional logic allows you to do.
Because each form can only have one active confirmation message at a time (and each form must have at least one confirmation), Gravity Forms will automatically enable conditional logic when you create additional confirmations beyond the first one (Settings → Confirmations → Add New).
For situations where the conditional rules are met, Gravity Forms will show the relevant confirmation. For all other scenarios, Gravity Forms will show the default confirmation.
When you’re adding/editing confirmations beyond the default, you will automatically find the Conditional Logic rules at the bottom.
Extend Gravity Forms conditional logic forms with certified and community add-ons
All the functionality for conditional logic WordPress forms in the previous sections is available in the core Gravity Forms plugin.
However, if you want to go even further with conditional logic, you can find a number of third-party add-ons from Certified and community developers.
You can browse the Gravity Forms Marketplace here, but here are a few examples:
- Advanced Conditional Logic – Expand Gravity Forms conditional logic with multiple AND/OR rule groups, four new operators, and support for dates, times, formulas, and dynamic values. This powerhouse add-on is brought to you by Gravity Wiz – a Certified Gravity Forms developer.
- Conditional Logic Dates – use date and time in your conditional logic rules, such as only showing certain form fields on specific dates and/or during certain times of day.
- Conditional Pricing – adjust prices based on conditional rules, which is useful for payment forms.
- Advanced Conditional Logic – adds more options, such as the ability to use multiple groups of conditions and base conditional rules on values in a CSV.
- Visual Logic Builder – manage conditional logic rules using a visual builder.
For add-ons from developers that aren’t Gravity Forms Certified Developers, we encourage you to do your own due diligence before installing them.
Get started with conditional logic forms today
With WordPress conditional logic forms, you get a lot of flexibility for controlling how your forms behave in different situations.
Conditional logic can help you:
- Show/hide individual form fields, sections, or entire pages of a multi-page form
- Process Gravity Forms feeds in different ways, which gives you more flexibility for integrating with other services
- Adjust email notifications
- Show different confirmation messages
Best of all, conditional logic is a core Gravity Forms feature, so you can access conditional rules on any Gravity Forms license.
If you’ve already been using conditional logic in your forms, we hope that this guide gave you some new ideas for how you can use it. And if you haven’t experimented with conditional logic yet, give it a try the next time you’re creating or editing one of your forms.
If you’re not holding a Gravity Forms license yet, purchase your license today to get started with conditional logic, along with all of the other great features in Gravity Forms.
Newsletter
If you want to keep up-to-date with what’s happening on the blog sign up for the Gravity Forms newsletter!
"*" indicates required fields