
Having the ability to create conversational forms with Gravity Forms has long been a hotly requested feature.
With the new Gravity Forms Conversational Forms Add-On, we are happy to announce that you now have an official, code-free way to set up conversational forms for your sites.
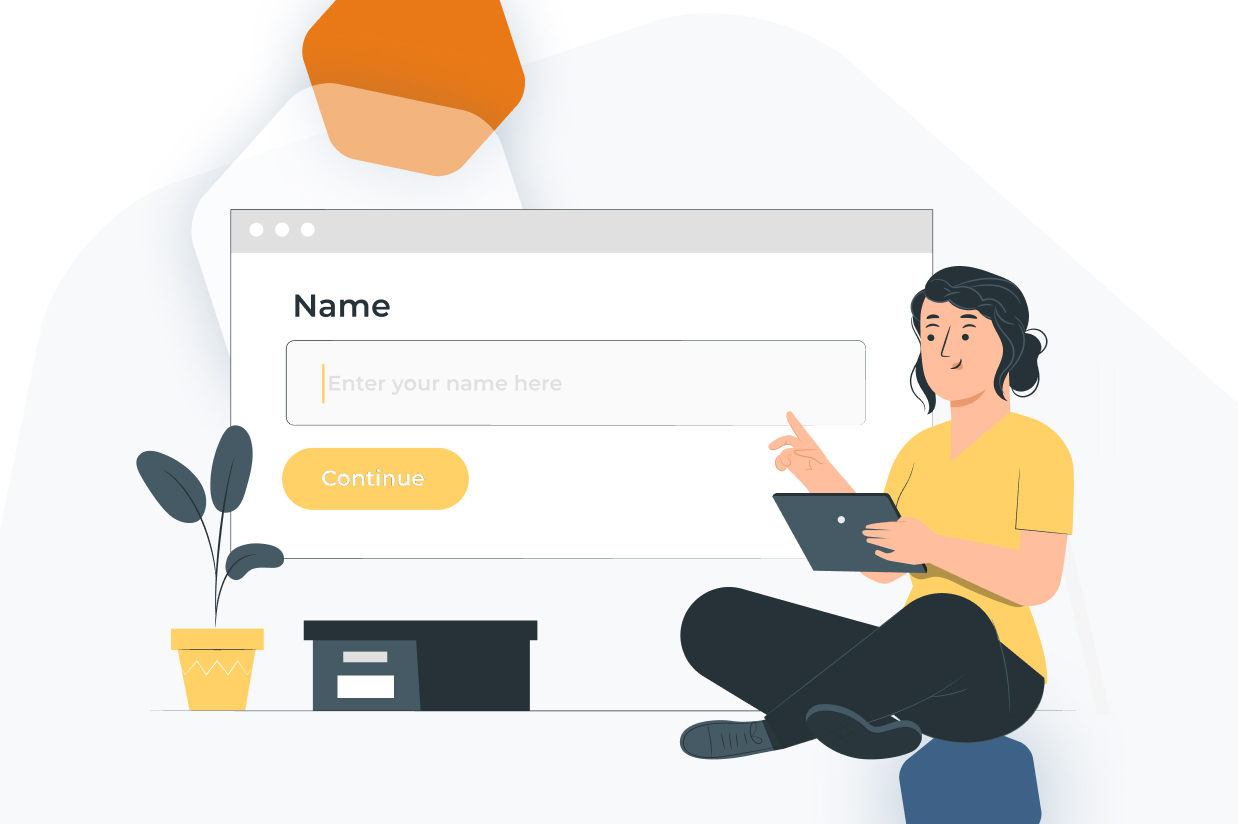
If you’re not familiar with the concept of conversational forms, the basic idea is that customers fill out one field at a time and then advance to the next field. As a result, filling out the form feels more like a “conversation” – hence the name.
Here’s an example of what it might look like for a simple contact form:
With the Conversational Forms Add-On, you can easily enable this type of interface for any form on your site – even those that you’ve already created.
In this post, we’ll share a little bit more about what the add-on does. Then, we’ll show you step-by-step how to create your first Gravity Forms conversational form.
What Does the Gravity Forms Conversational Forms Add-On Do?
As we showed you in the example above, the core feature of the Conversational Forms Add-On is that it lets you display a form in a conversational interface, rather than the traditional web form layout.
Here are a few reasons why some people prefer using this conversational layout over the traditional web form layout:
- It can be more engaging because users interact with each field and then advance, rather than seeing every field at once. Again, it’s supposed to feel like a “conversation”.
- It can make forms feel less overwhelming because users only see one field at a time.
- It can be more mobile-friendly because working with one field at a time is generally an easier approach on mobile devices with small screens and touch-based interactions.
- You can more easily customize the form to your branding, such as adding background images, using colors in more interesting ways, and so on.
The great thing about using the official add-on is that you can still build your forms just like you normally would. There’s no need to learn a new interface.
Instead, all you need to do is enable a toggle in the form’s settings and choose which URL you want to use for your conversational form.
You’ll also still be able to use the traditional web form layout in other places, which is great if you want to use both interfaces.
Beyond that, you get lots of options to customize the conversational interface, including the following:
- Choose from three preset layouts.
- Add your logo and/or a background image.
- Customize all the colors in the interface.
- Add an optional welcome screen, complete with custom text and an image.
- Customize the button text.
- Add a progress bar to the footer.
You can also still use the vast majority of the advanced Gravity Forms features and add-ons that you’ve become familiar with.
For example, you can include conditional logic, accept payments, and lots more.
There are only a very small number of incompatible features, which we’ve listed here. For example, you won’t be able to use the Using the Cloudflare Turnstile Add-On or CSS ready classes.
How to Set Up Conversational Forms for Gravity Forms
Now that you know what the add-on offers, let’s get into the actual step-by-step guide for how you can set up your first conversational form with Gravity Forms.
1. Install the Gravity Forms Conversational Forms Add-On
To get started, you’ll first want to install the official Gravity Forms Conversational Forms Add-On on your site.
The Conversational Forms Add-On is available on the Elite license (as well as the Nonprofit license for registered nonprofits).
If you’re not using the Elite license yet, you can make your purchase here or upgrade your license and only pay the prorated difference.
To install the add-on, go to Forms → Add-Ons in your WordPress dashboard and look for the Conversational Forms Add-On.
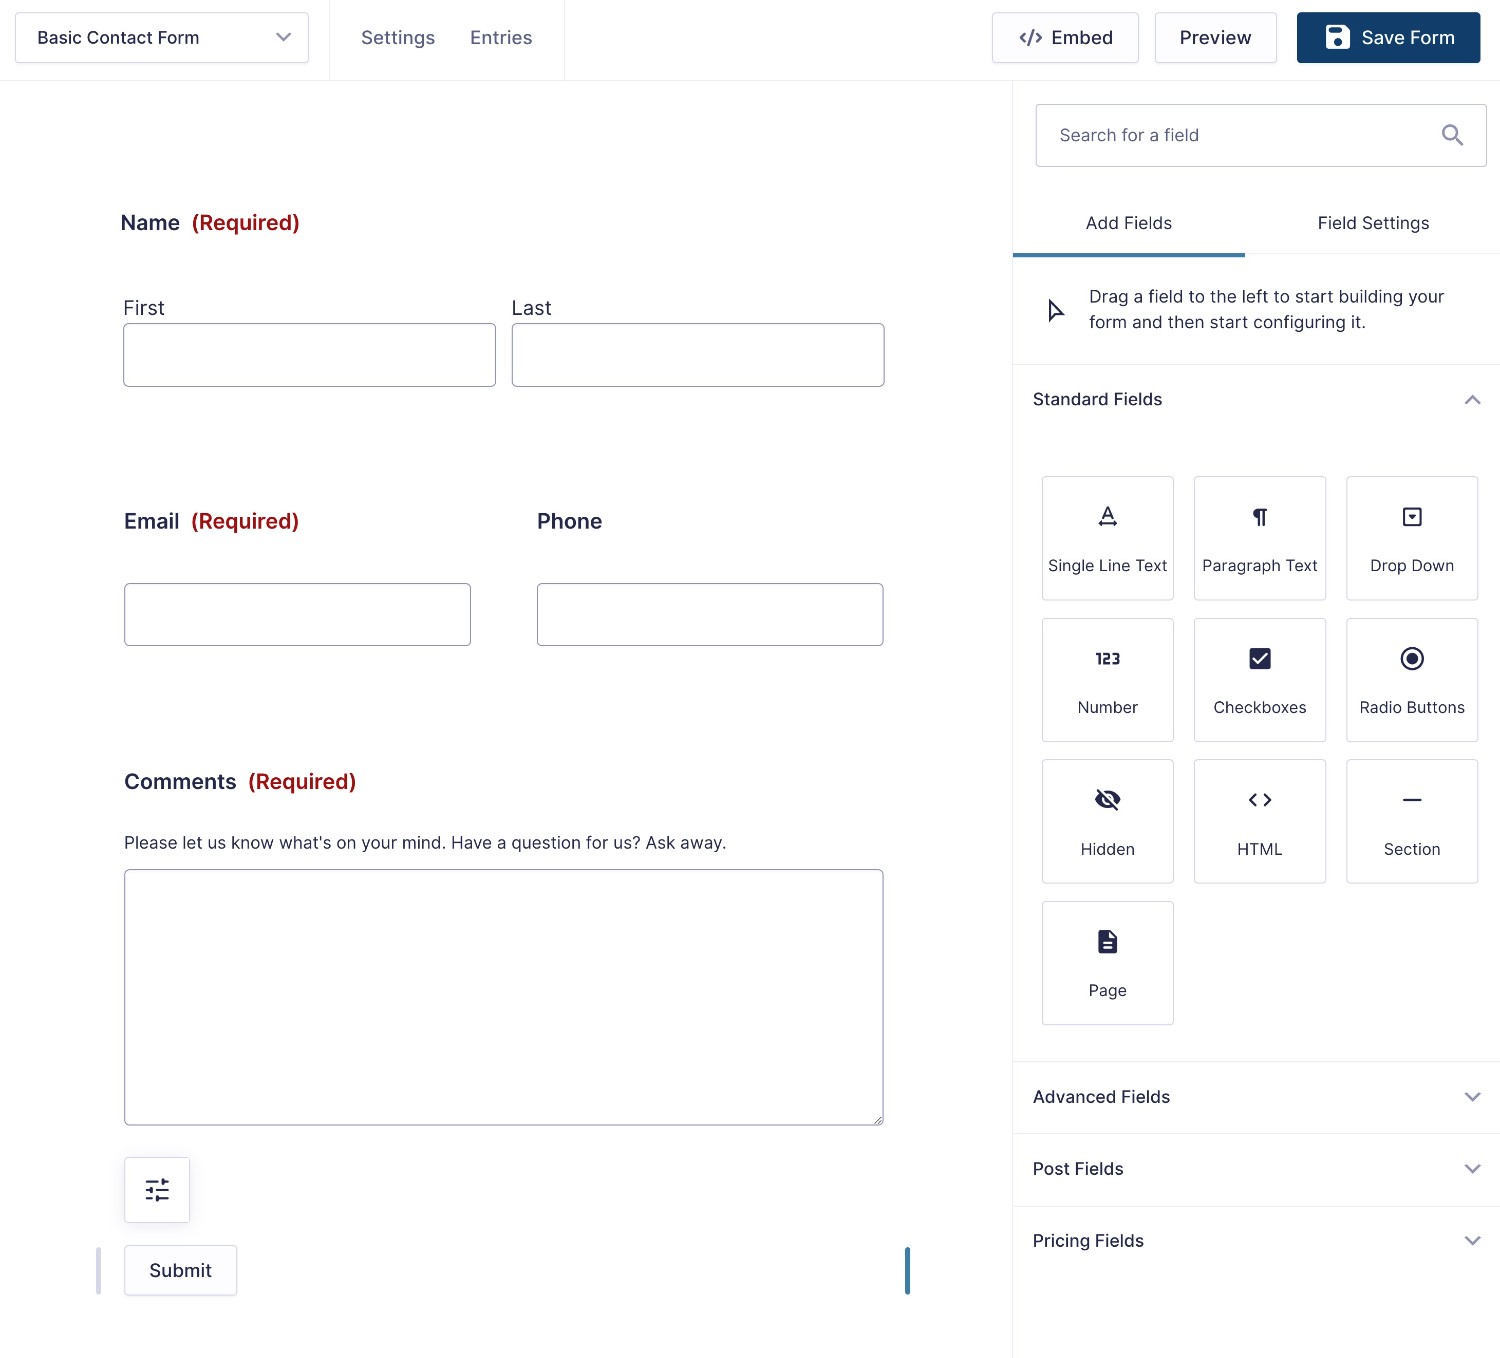
2. Set Up Your Form (Like Normal)
Once you’ve installed the add-on, you’ll next want to set up the form that you want to use for conversational forms.
You can do this just like you were creating any other form – there’s nothing different about conversational forms in terms of the basic setup process.
You can go to Forms → New Form and set up a brand new form, using either a blank canvas or one of the pre-built form templates.
Or, you’re also free to add a conversational interface to one of your existing forms. Even if you set up a conversational interface for an existing form, it will not change the layout/interface for any existing form embeds, so you don’t need to worry about breaking anything.
In terms of setting up form fields, you’re free to use all of the available field types that Gravity Forms offers.
Gravity Forms will display each field as its own screen in the conversational flow. The fields will appear in the order that you add them in the interface, from top to bottom.
If you’ve added multiple fields on the same row in a multi-column design, the field on the left will display before the field on the right.
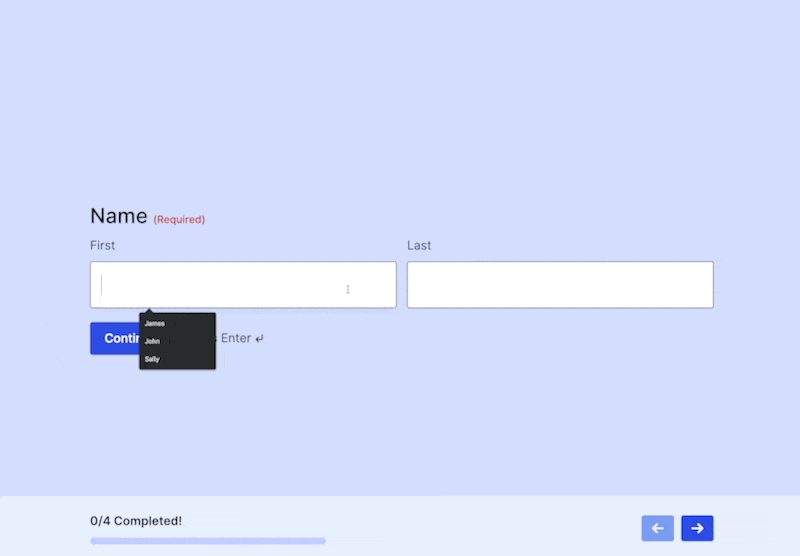
For example, consider the layout of this simple contact form:
In the conversational forms interface, the flow would be as follows:
- First and last name (because this is still a single Name field, it displays as a single step)
- Phone
- Comments
3. Enable the Conversational Form Page
Once you’re happy with your basic form settings, you’re ready to set up your conversational interface.
To get started, go to Settings → Conversational Forms in the form editor.
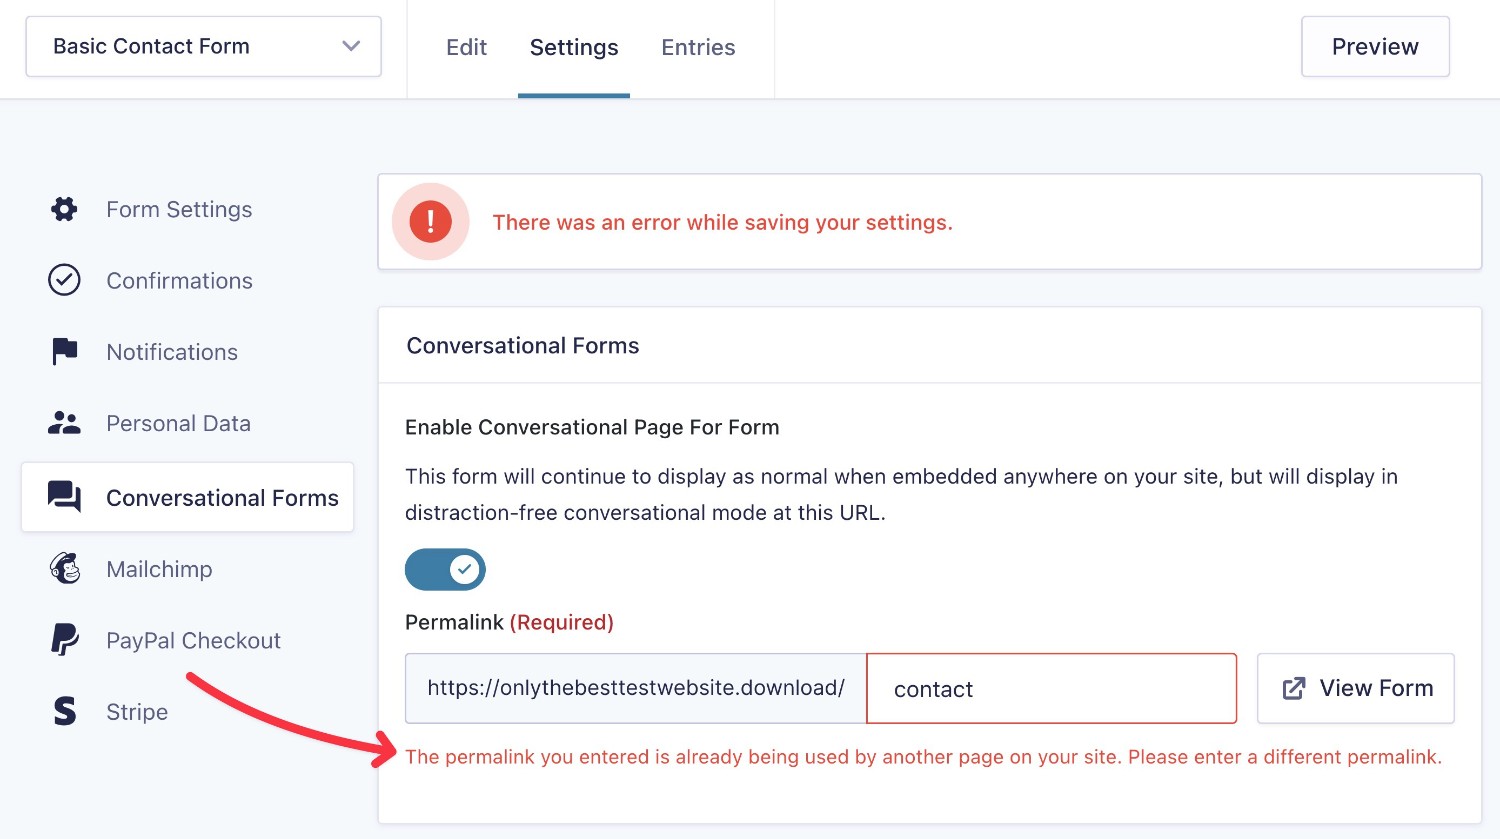
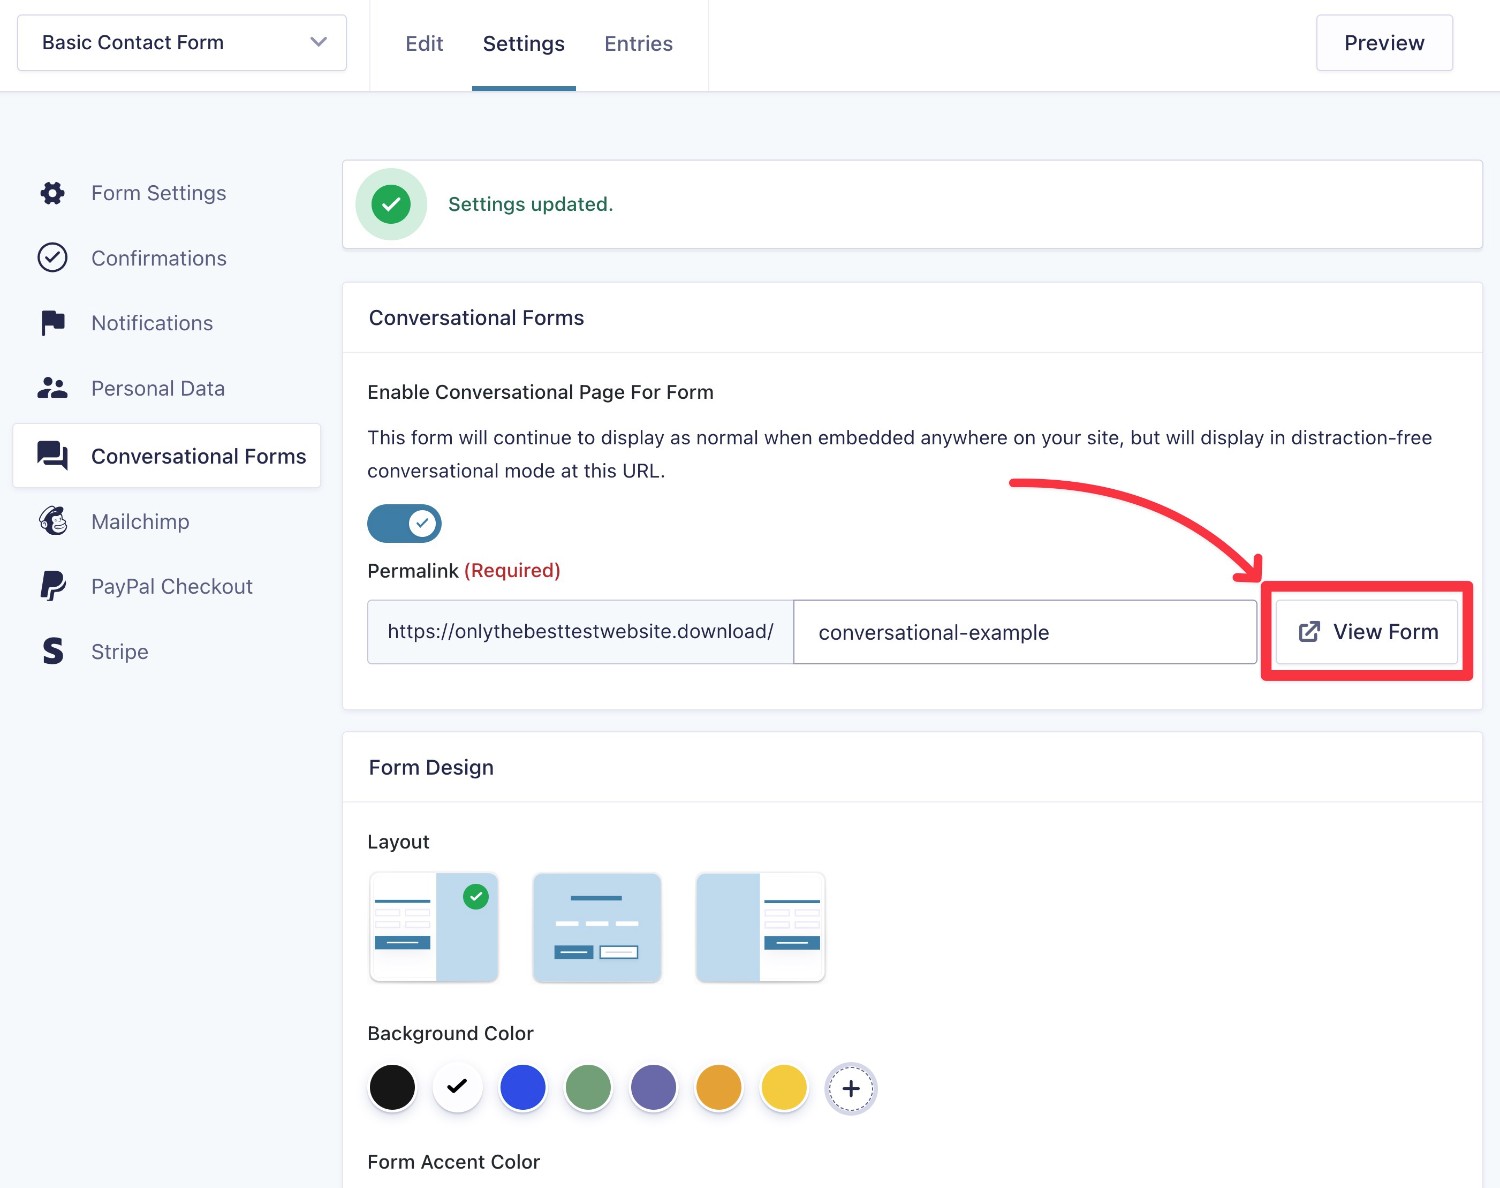
First, you’ll want to enable the conversational page and then set the conversational form page URL.
Important: The conversational interface for this form will only display at this specific URL.
If you embed the form somewhere else using the block or shortcode, it will still use the traditional web form layout, not the conversational layout.
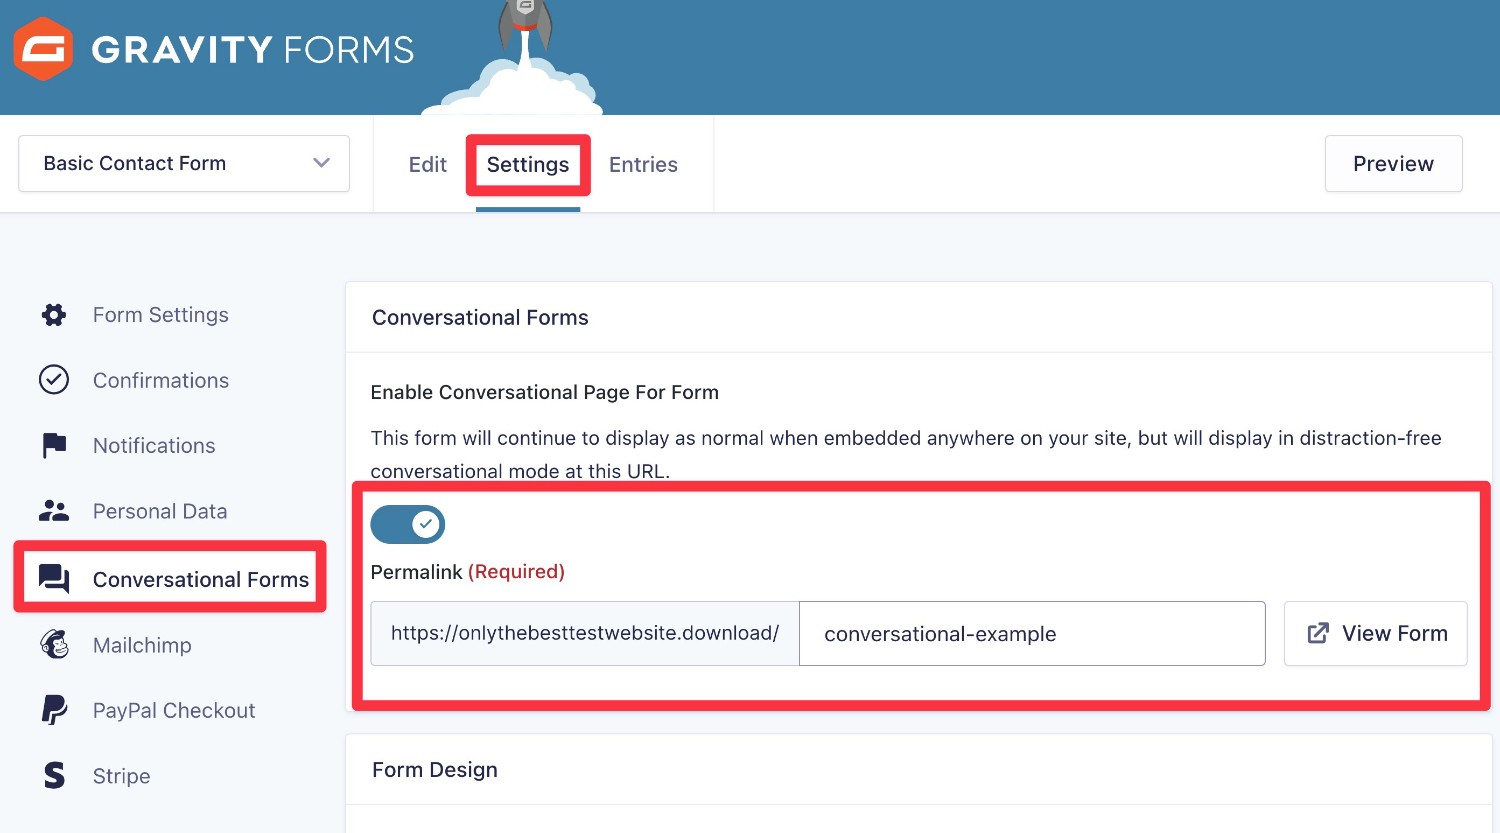
Make sure to enter a unique URL slug that doesn’t conflict with any existing pages on your site. If you do try to enter a URL that already exists, Gravity Forms should automatically detect this and ask you to enter a different URL.
4. Configure the Design of the Conversational Interface
Once you’ve enabled the conversational form page, you have a working conversational form. You can preview it by clicking the button to open the form URL.
If you like how it looks, you don’t need to change anything. But if you do want to customize the interface and style, Gravity Forms gives you lots of options to do that.
Let’s go through them…
Choose Layout and Colors
First, you can choose from three different pre-built layouts.
Here’s how to preview the different layouts:
- Choose a layout.
- Click Save Settings at the bottom.
- Click the View Form button next to your conversational page URL.
To match the conversational interface to the rest of your site’s branding, you also get several options to change the colors of the interface, as well as add your own logo and background image, if desired.

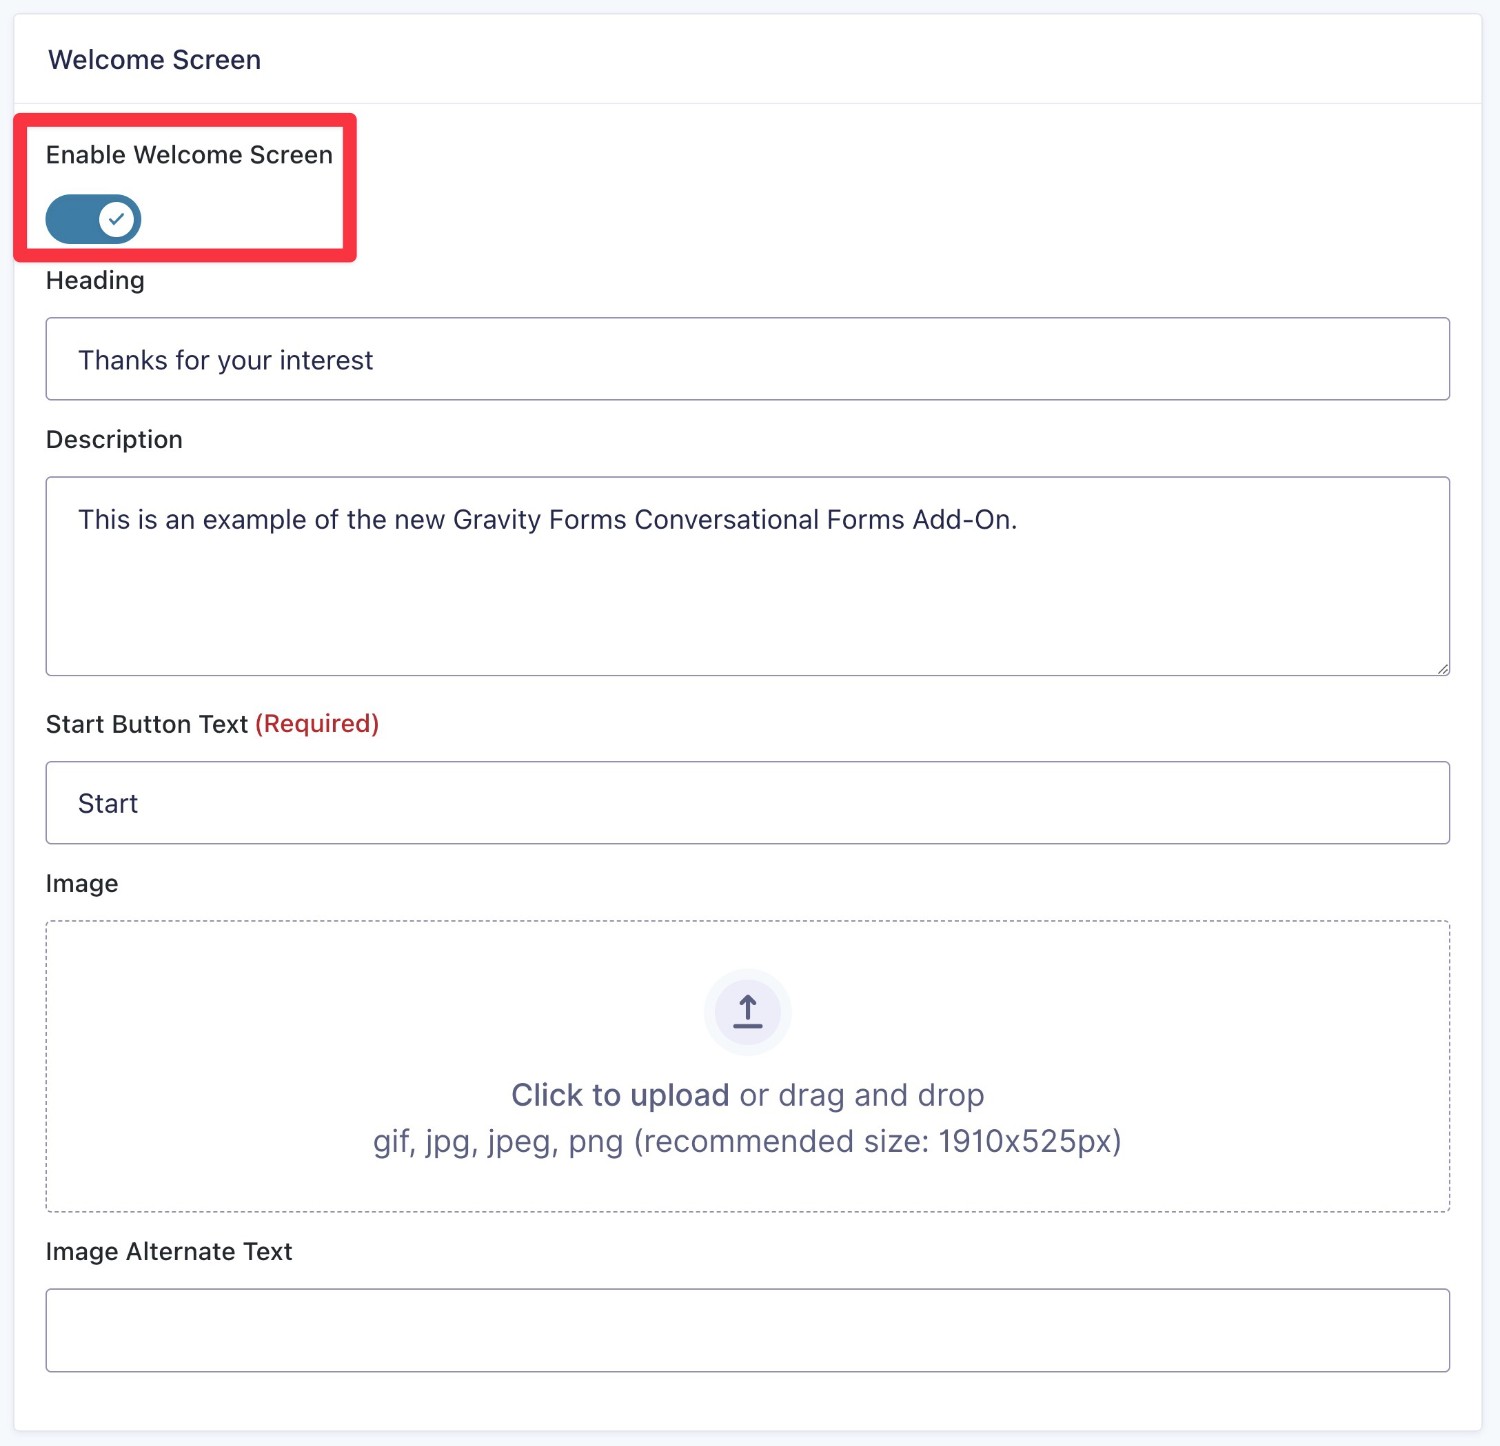
Set Up a Welcome Screen (Optional)
By default, the conversational interface will start at the first form field.
However, you also have the option to set up a custom welcome screen that will appear before any form fields.
If you enable the welcome screen toggle in the Welcome Screen box, you can enter five pieces of information:
- Heading
- Description
- Start Button Text – users click this button to start the form experience
- Image
- Image alternate text
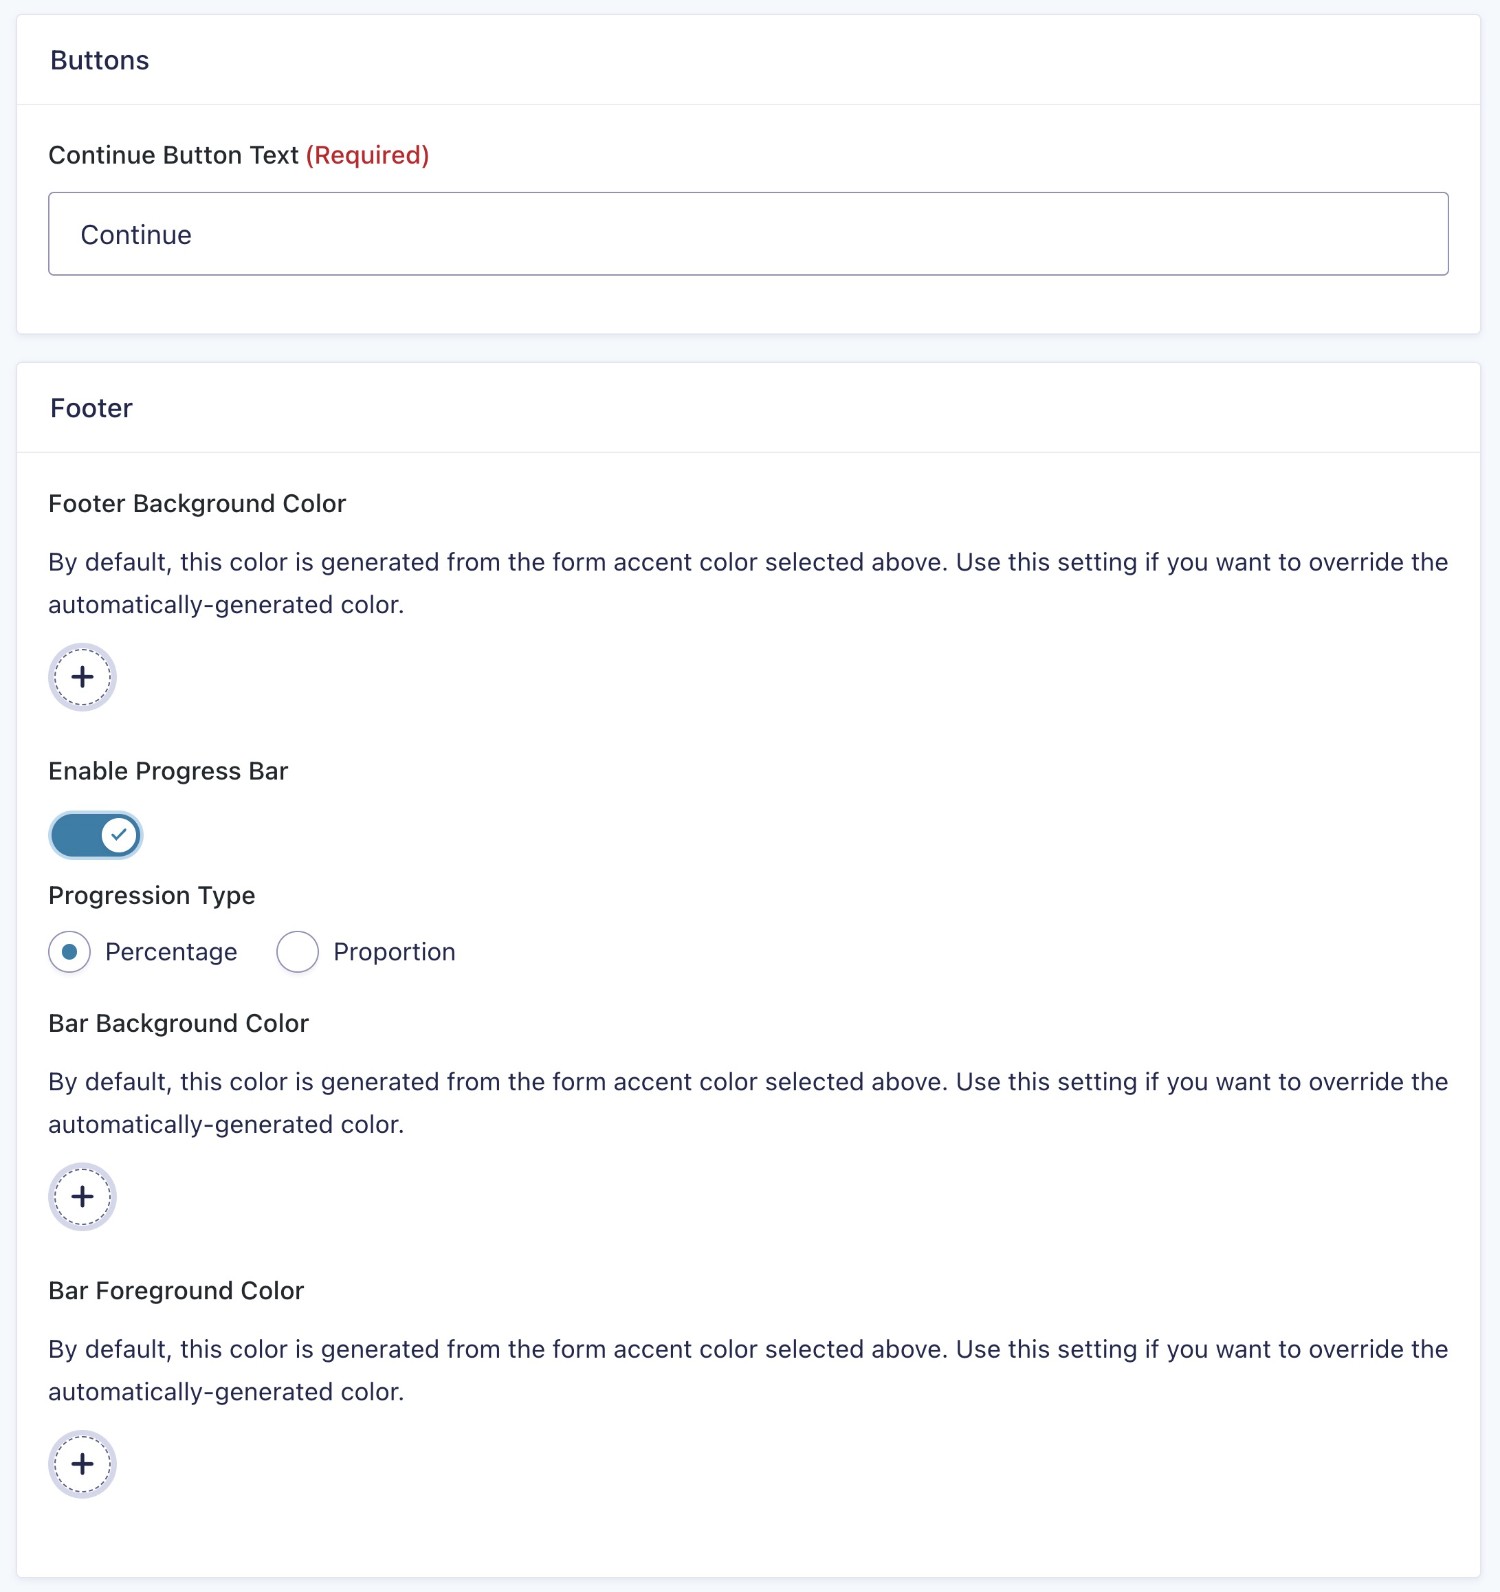
Configure Buttons and Footer
Finally, you get two more options at the bottom of the settings area.
First, you can use the Buttons option to change the text of the button that advances users to the next field in the conversational flow.
Second, you can use the Footer box to change the footer background color and, optionally, enable a progress bar to give users an idea of their progress through the form.
If you enable the progress bar, you’ll see additional settings to control its colors and behavior.
When you’ve configured all of the settings, make sure to click the Save Settings button at the bottom.
5. Test Your Conversational Form
Because you already specified the URL to use for your conversational form, there’s no need to manually embed your form like you would with other forms.
In fact, your form will only use the conversational form layout at the specific URL that you entered – any other form embeds will still use the traditional web form layout.
To make sure everything is working properly, you can test your form by opening the URL that you chose – click the View Form button next to the URL and it should automatically open your conversational form URL in a new browser tab.
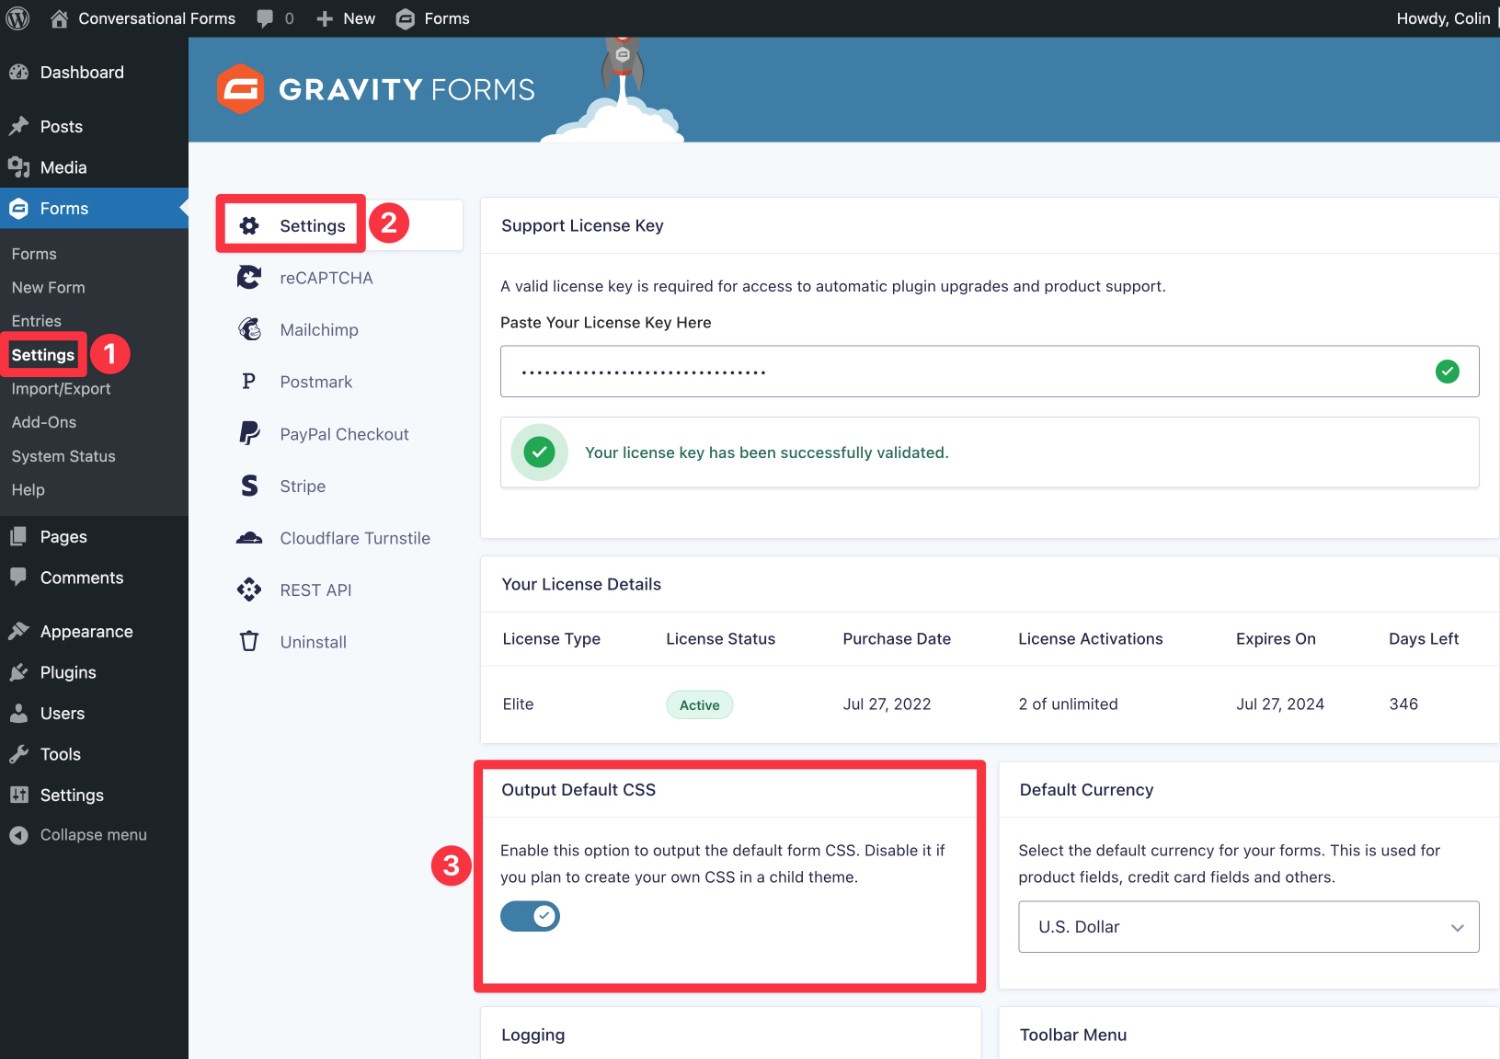
If you’re having issues, make sure that you’ve enabled the Output Default CSS option in the main Gravity Forms settings area (Forms → Settings). The conversational forms feature will not work if this setting is disabled.
And that’s it! When people submit your form, you’ll be able to manage those entries just like any other form.
You’re also free to set up notifications and confirmations as needed. Again, these work just like a regular form.
Get Started With Conversational Forms for Gravity Forms
With the official Gravity Forms Conversational Forms Add-On, you can offer your visitors a more interactive way to fill out form information.
You can create forms that exclusively use the conversational interface. Or, you can also offer multiple interfaces for the same form with both a traditional web form interface and the conversational interface.
The Conversational Forms Add-On is available on the Gravity Forms Elite license, as well as the Nonprofit license (if your organization is a registered nonprofit).
If you’re already using the Elite license, you can install the add-on today to get started.
If you’re not an Elite license holder yet, you can purchase the Elite license today to begin. If you’re already using the Basic or Pro licenses, you can upgrade directly from your My Account area and only pay the prorated difference.
Or, you can also spin up a free Gravity Forms demo site to test the conversational forms feature before making your purchase.

If you want to keep up-to-date with what’s happening on the blog sign up for the Gravity Forms newsletter!
"*" indicates required fields


