

Searching for the best way to create a WordPress contact form?
If you have a website, you probably need a contact form – regardless of what your site is about.
Your contact form gives users a way to get in touch with you, without forcing you to publicly share your email address.
And if you’re running a business, your contact form might be the main way in which you connect with customers and generate revenue. That makes it one of the most important elements on your site, as an unoptimized contact form might have a negative effect on your revenue and/or make your business less efficient.
With the Gravity Forms plugin, you can easily make a WordPress contact form that’s customized to your unique needs.
In this post, you’ll learn step-by-step how to set everything up, either by using one of Gravity Forms’s pre-made contact form templates or building your form from scratch.
Beyond setting up the basics of your contact form, you’ll also have the option to set up more advanced functionality such as sending customizable email notifications, using conditional logic to personalize your form, integrating your form with other services that you’re using (such as your CRM or project management software), and lots more.
Why Use Gravity Forms for Your WordPress Contact Form?
While there are a lot of WordPress contact form plugins out there, we think that Gravity Forms makes the best option for a few different reasons:
- Visual, drag-and-drop builder – you can easily set up your contact form using a non-technical drag-and-drop editor.
- Pre-made contact form templates – while you can always build your contact form from scratch, Gravity Forms also offers multiple pre-made contact form templates.
- Easy form styling – you can style your form right in the WordPress block editor without needing to use custom CSS (though you’re free to use CSS if you prefer that approach).
- In-dashboard entry management – you can view all of your contact form submissions right from your WordPress dashboard.
- Advanced features – you can access more advanced features to customize your contact form, such as using conditional logic to show/hide certain fields depending on how the person answered previous fields.
- Custom notifications – you can also send yourself (or others) a customizable email when someone submits the form.
- Tons of integrations – you can integrate your contact form with other tools that you’re using such as your CRM, email marketing service, project management software, and more.
- More than just contact forms – while this post is focused on contact forms, Gravity Forms can do a lot more than just contact forms. You can also use it to build payment forms, email opt-in forms, registration forms, and lots, lots more.
How to Create a WordPress Contact Form With Gravity Forms
Now, let’s jump into the full step-by-step guide for how to make a WordPress contact form with Gravity Forms.
For this guide, we’re going to cover a lot of different ways that you can enhance your WordPress contact form, such as using conditional logic to personalize the form and syncing contacts to your CRM.
However, you’re free to make your contact form as simple or as complex as you want it to be.
If you just want a simple contact form that stores the message in your WordPress dashboard (and maybe sends you an email), you can set that up in just a few minutes. We’ll mark the optional steps as “Optional” so that you know which ones you can skip.
But by covering some additional ways to customize your form, we’re hoping to give you options and also show you some of the more advanced ways in which Gravity Forms can help automate and improve your website.
Let’s get started…
1. Install Gravity Forms (Plus Any Add-Ons That You Want to Use)
Before going any further, you’ll first want to make sure that you’ve installed the Gravity Forms plugin on your WordPress site.
If you don’t already have a Gravity Forms license, you can purchase your license here.
You can use the Basic license for most contact forms. If you later decide that you want to access some of the features on the other license tiers, you can always upgrade and you’ll only pay the prorated difference.
Or, if you want to test things out before you make a purchase, you can also create a fully functioning Gravity Forms demo site to follow along with this guide.
2. Create a New Form
You have two options to use as a starting point for your contact form:
- You can use one of the pre-made contact form templates.
- You can build your contact form from a blank canvas.
Even if you start with a template, you’ll still be able to fully customize everything about your form, including adding or removing form fields.
To get started, go to Forms → New Form in your WordPress dashboard.
This will open a popup that shows the Gravity Forms template library.
Here’s what it looks like to use both a pre-made template and a blank canvas.
Use the Gravity Forms Contact Form Templates
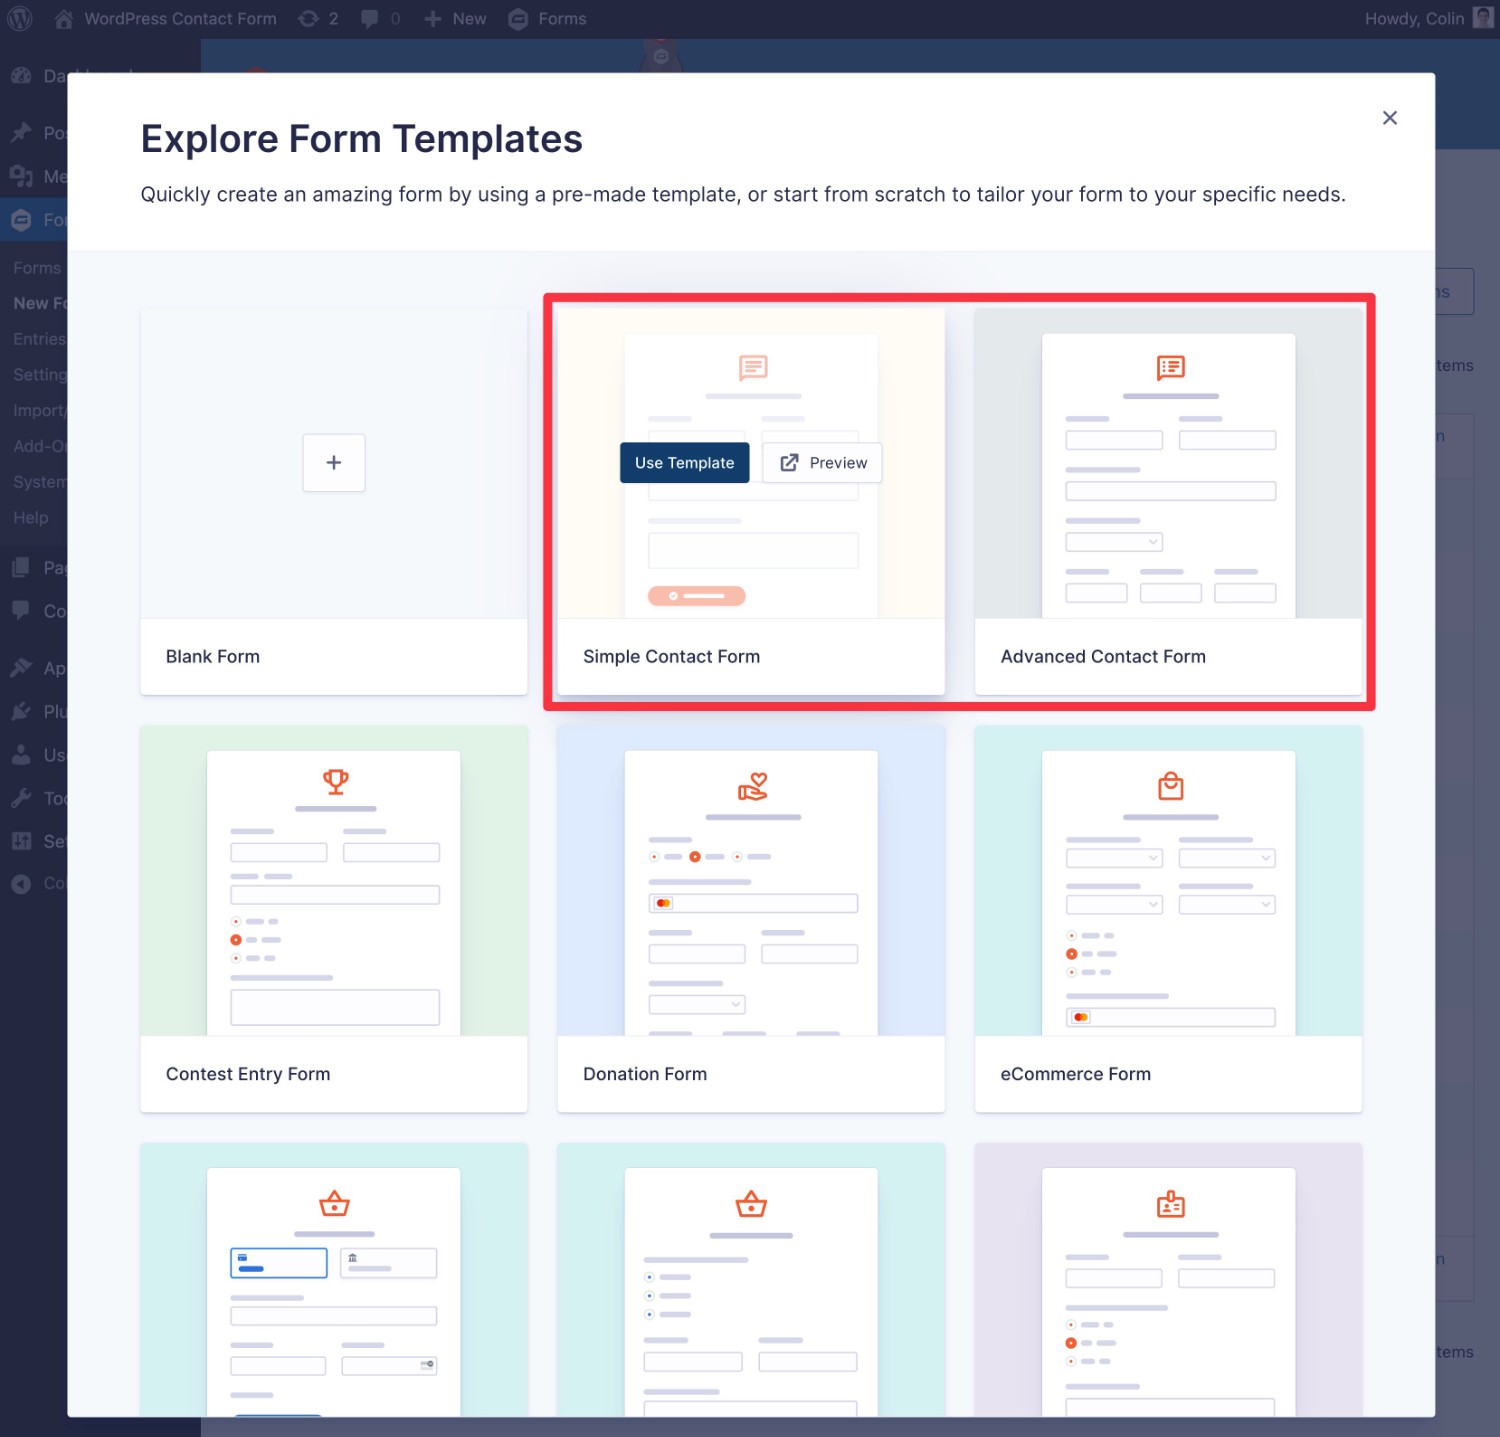
Gravity Forms offers two dedicated contact form templates:
- Simple contact form – this includes fields for a person’s name, email address, and message.
- Advanced contact form – this collects additional information such as a user’s address and preferred method of contact. Depending on which contact method a person chooses, it will display additional fields relevant to that contact method.
To choose a template, all you need to do is hover over it and click Use Template:
Then, you can give your form a name to help you remember it, as well as an optional description.
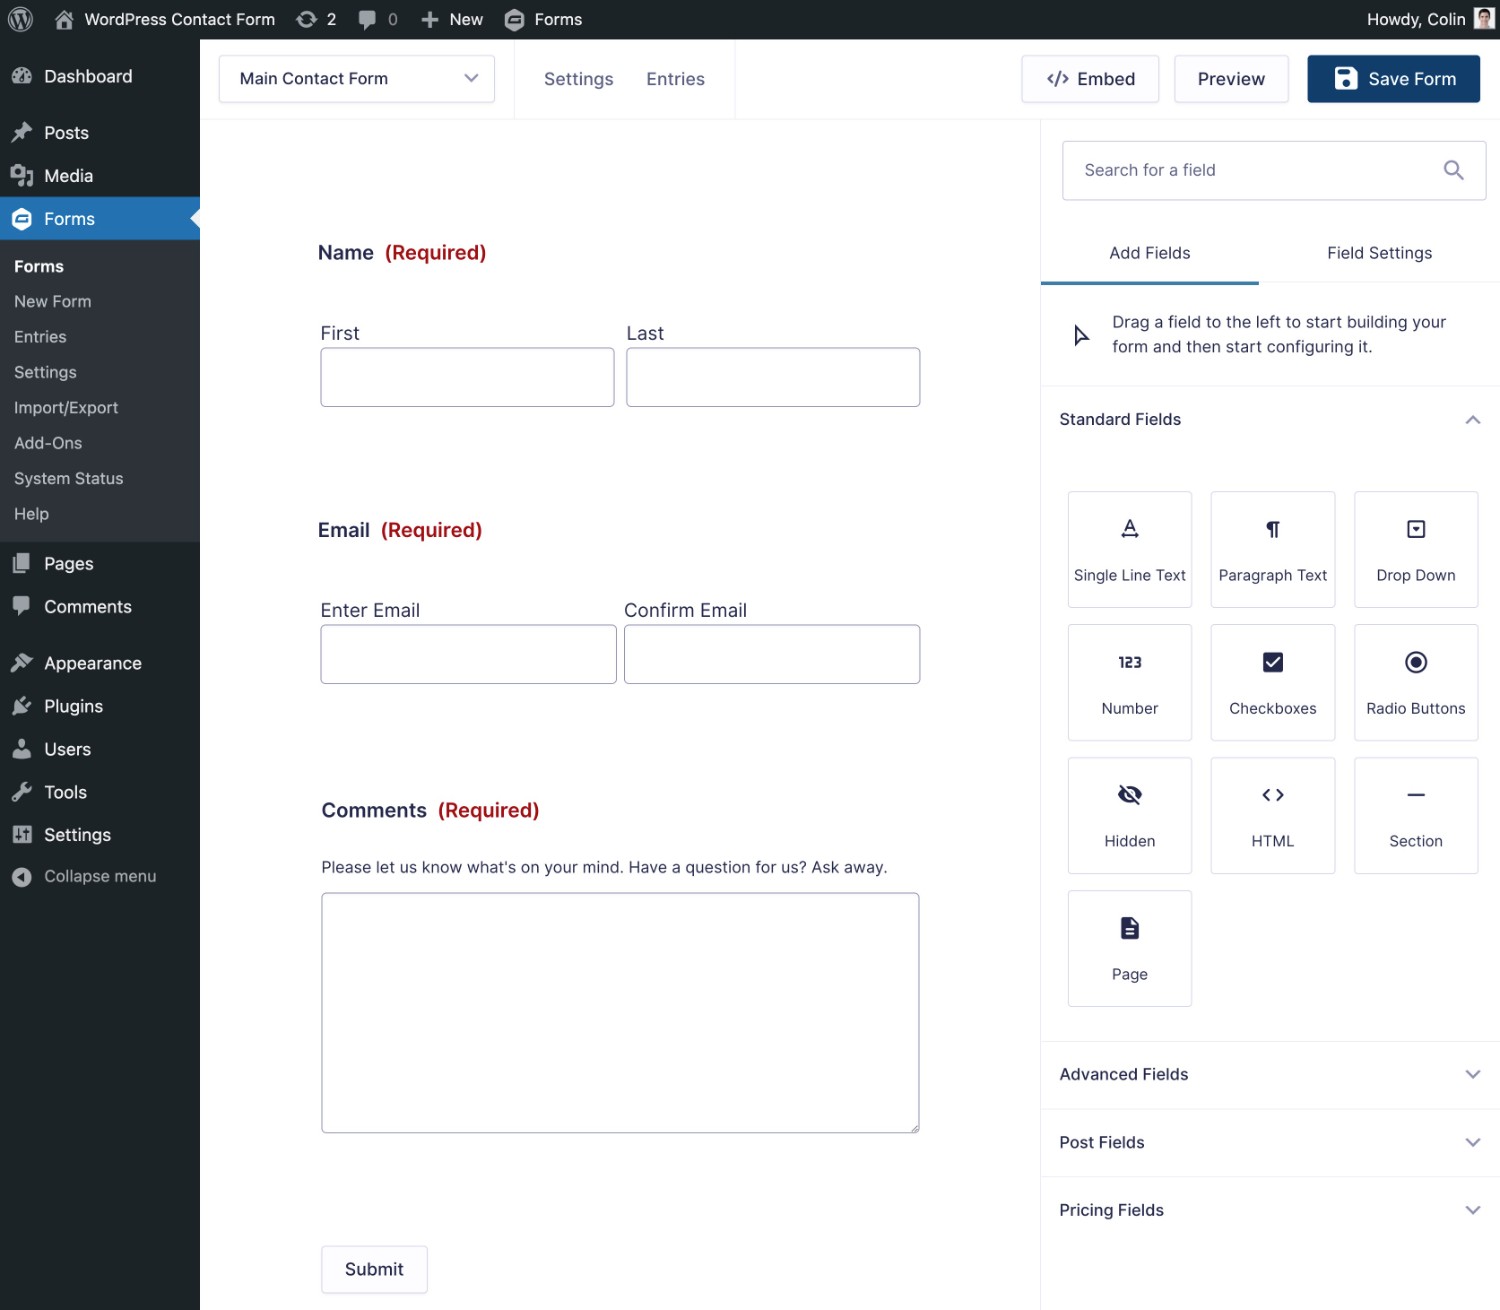
From there, Gravity Forms will automatically open its drag-and-drop form builder interface, with the relevant template pre-loaded.
In the next step, we’ll cover how to customize your form. But first, let’s look at starting from a blank canvas instead.
Use a Blank Canvas
If you don’t want to use one of the Gravity Forms contact form templates, you can choose the Blank option instead.
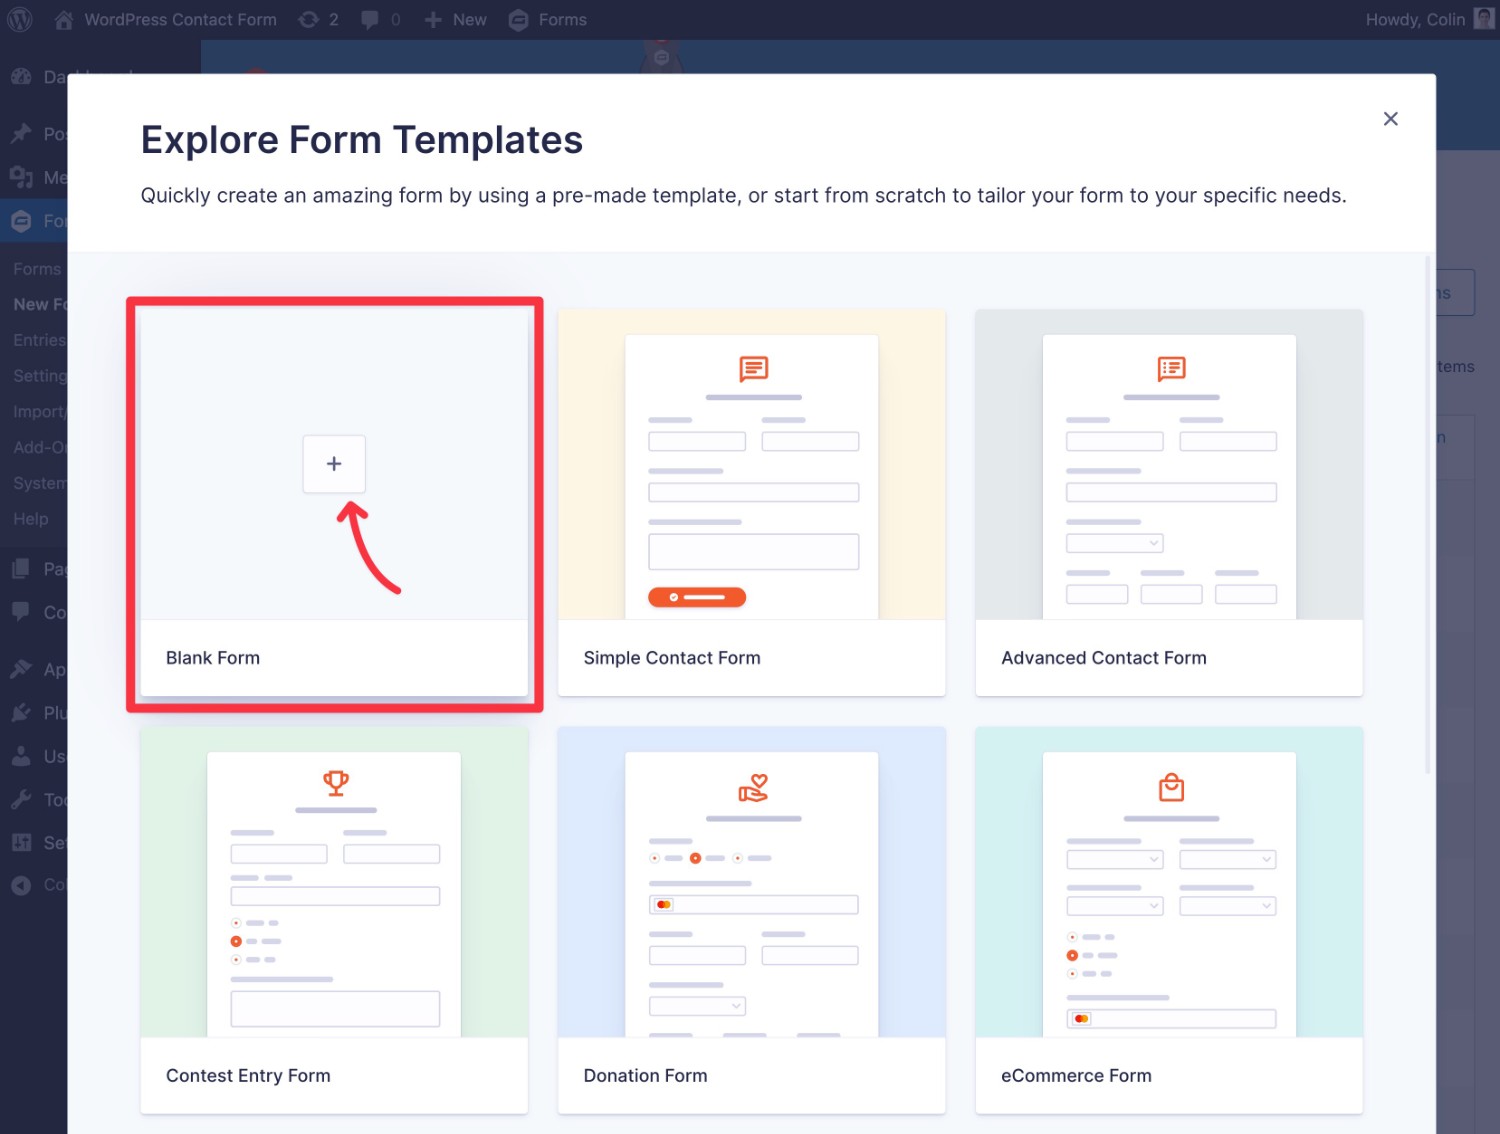
Once you give your form a name, you’ll then be launched into the same visual editor. However, unlike using a template, your form will start without any fields.

3. Customize Your Contact Form Fields
Whether you started with a template or a blank canvas, the next step is to customize your form’s fields.
You’ll be able to add, rearrange, and delete fields as needed. You can also adjust the settings for each individual field to customize how it works.
Add, Rearrange, and Remove Fields
If you’re starting from a blank slate, you’ll need to add all of the fields to your form.
However, if you started from a contact form template, you might just want to rearrange or tweak fields (though you’re also free to add new fields or delete existing fields).
To add a field to your form, all you need to do is drag it over from the list on the right side of the interface.
While the exact fields that you use will depend on your form, there are a few basic fields that almost all contact forms will use:
- Name – this is a dedicated field for collecting a person’s name.
- Email – this is a dedicated field for collecting a person’s email address.
- Paragraph – this lets users make their messages as long as needed.
If you want to move a field to a different location, you can drag it anywhere on the form by using the “six dots” icon on the field’s toolbar.
Similarly, you can delete a field by clicking the delete icon on the toolbar.
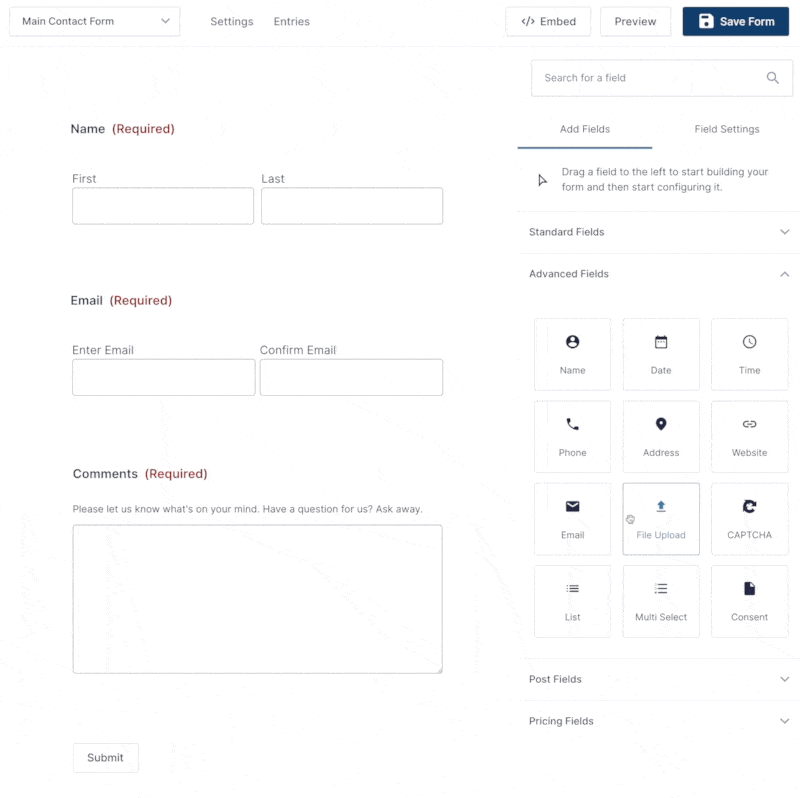
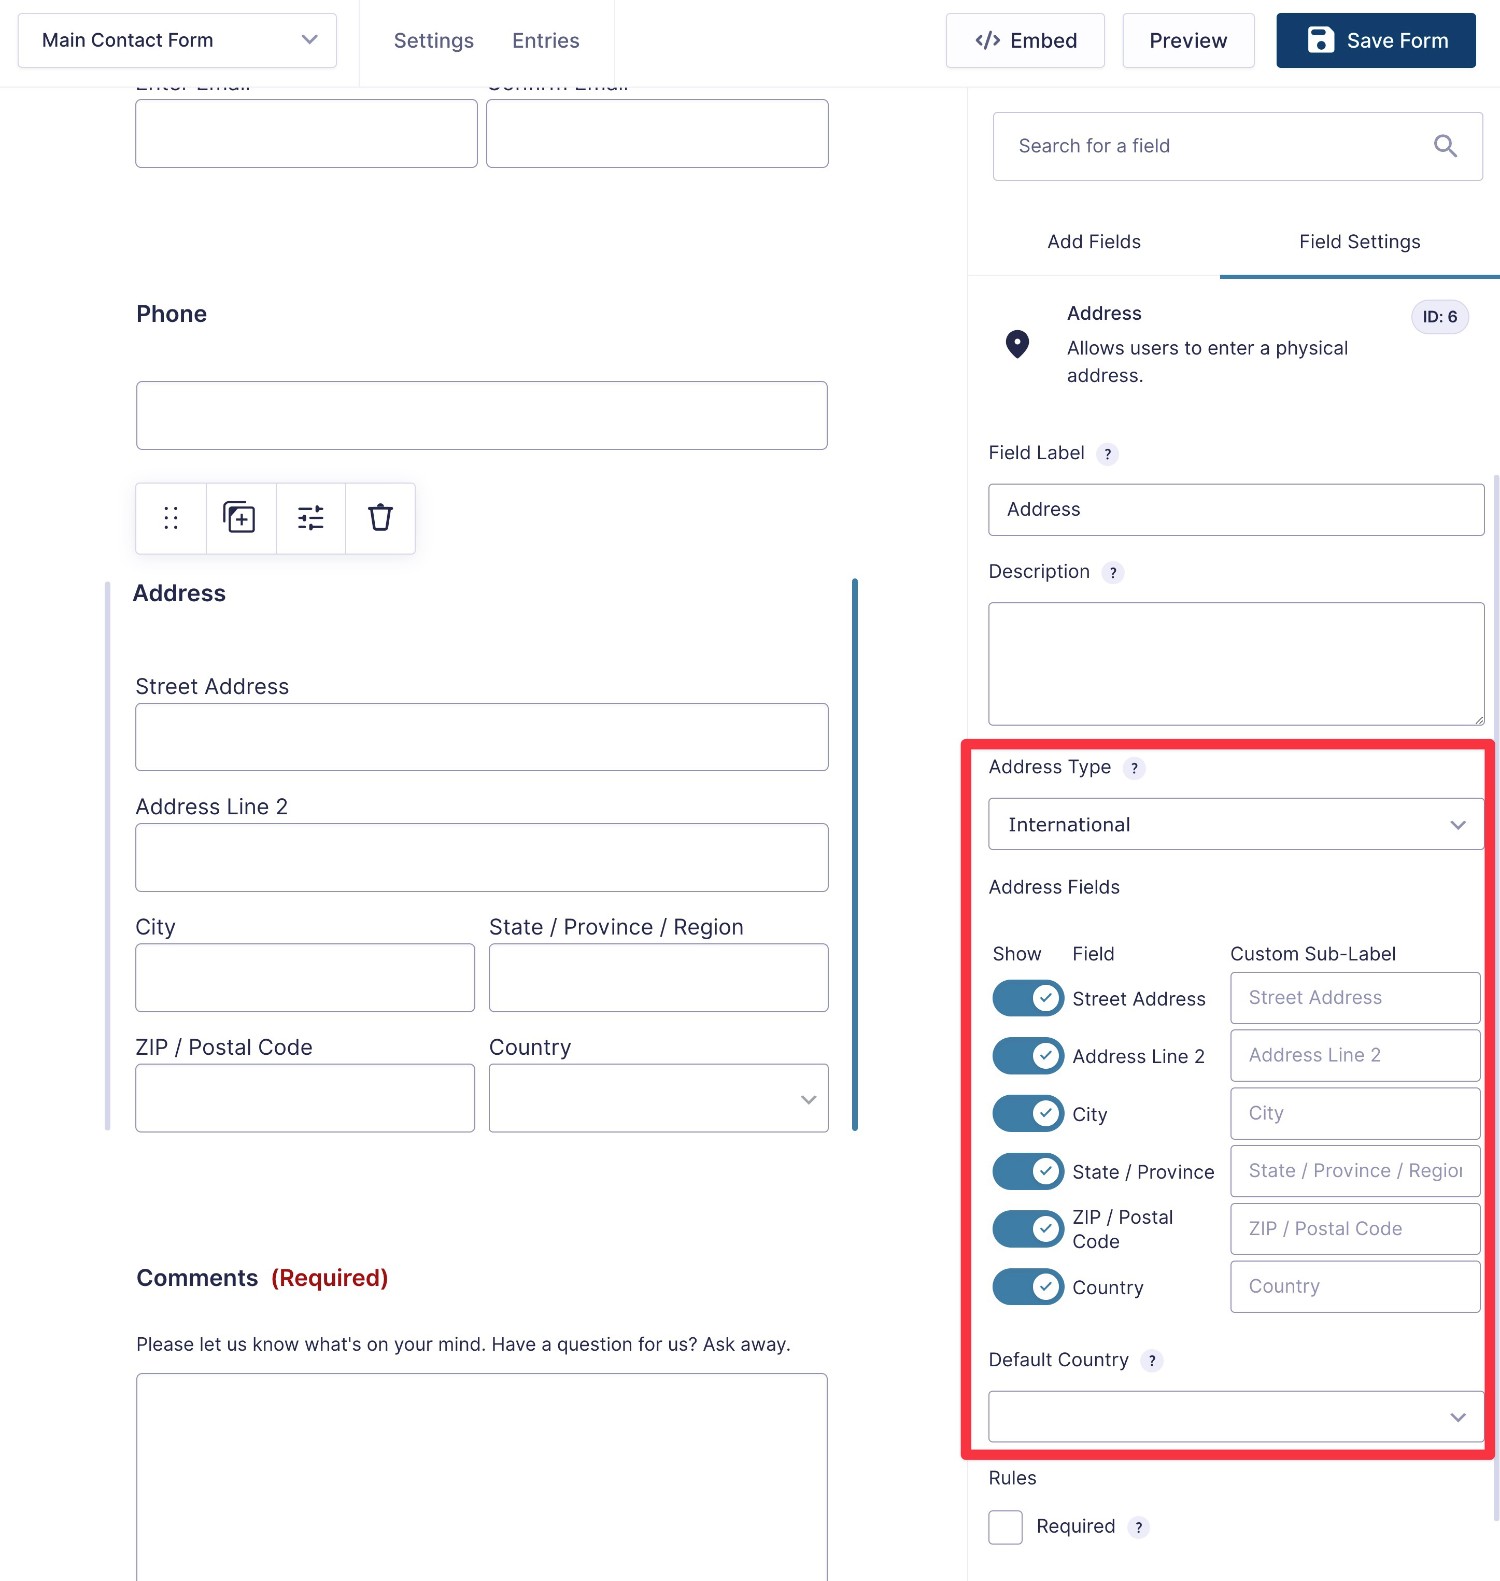
Customize Field Settings
Each field in your form has its own settings area where you can configure important details such as labels, placeholder text, formatting, whether it’s required, and more.
To access these field settings, you can select the field on the preview and click the settings icon on the toolbar.
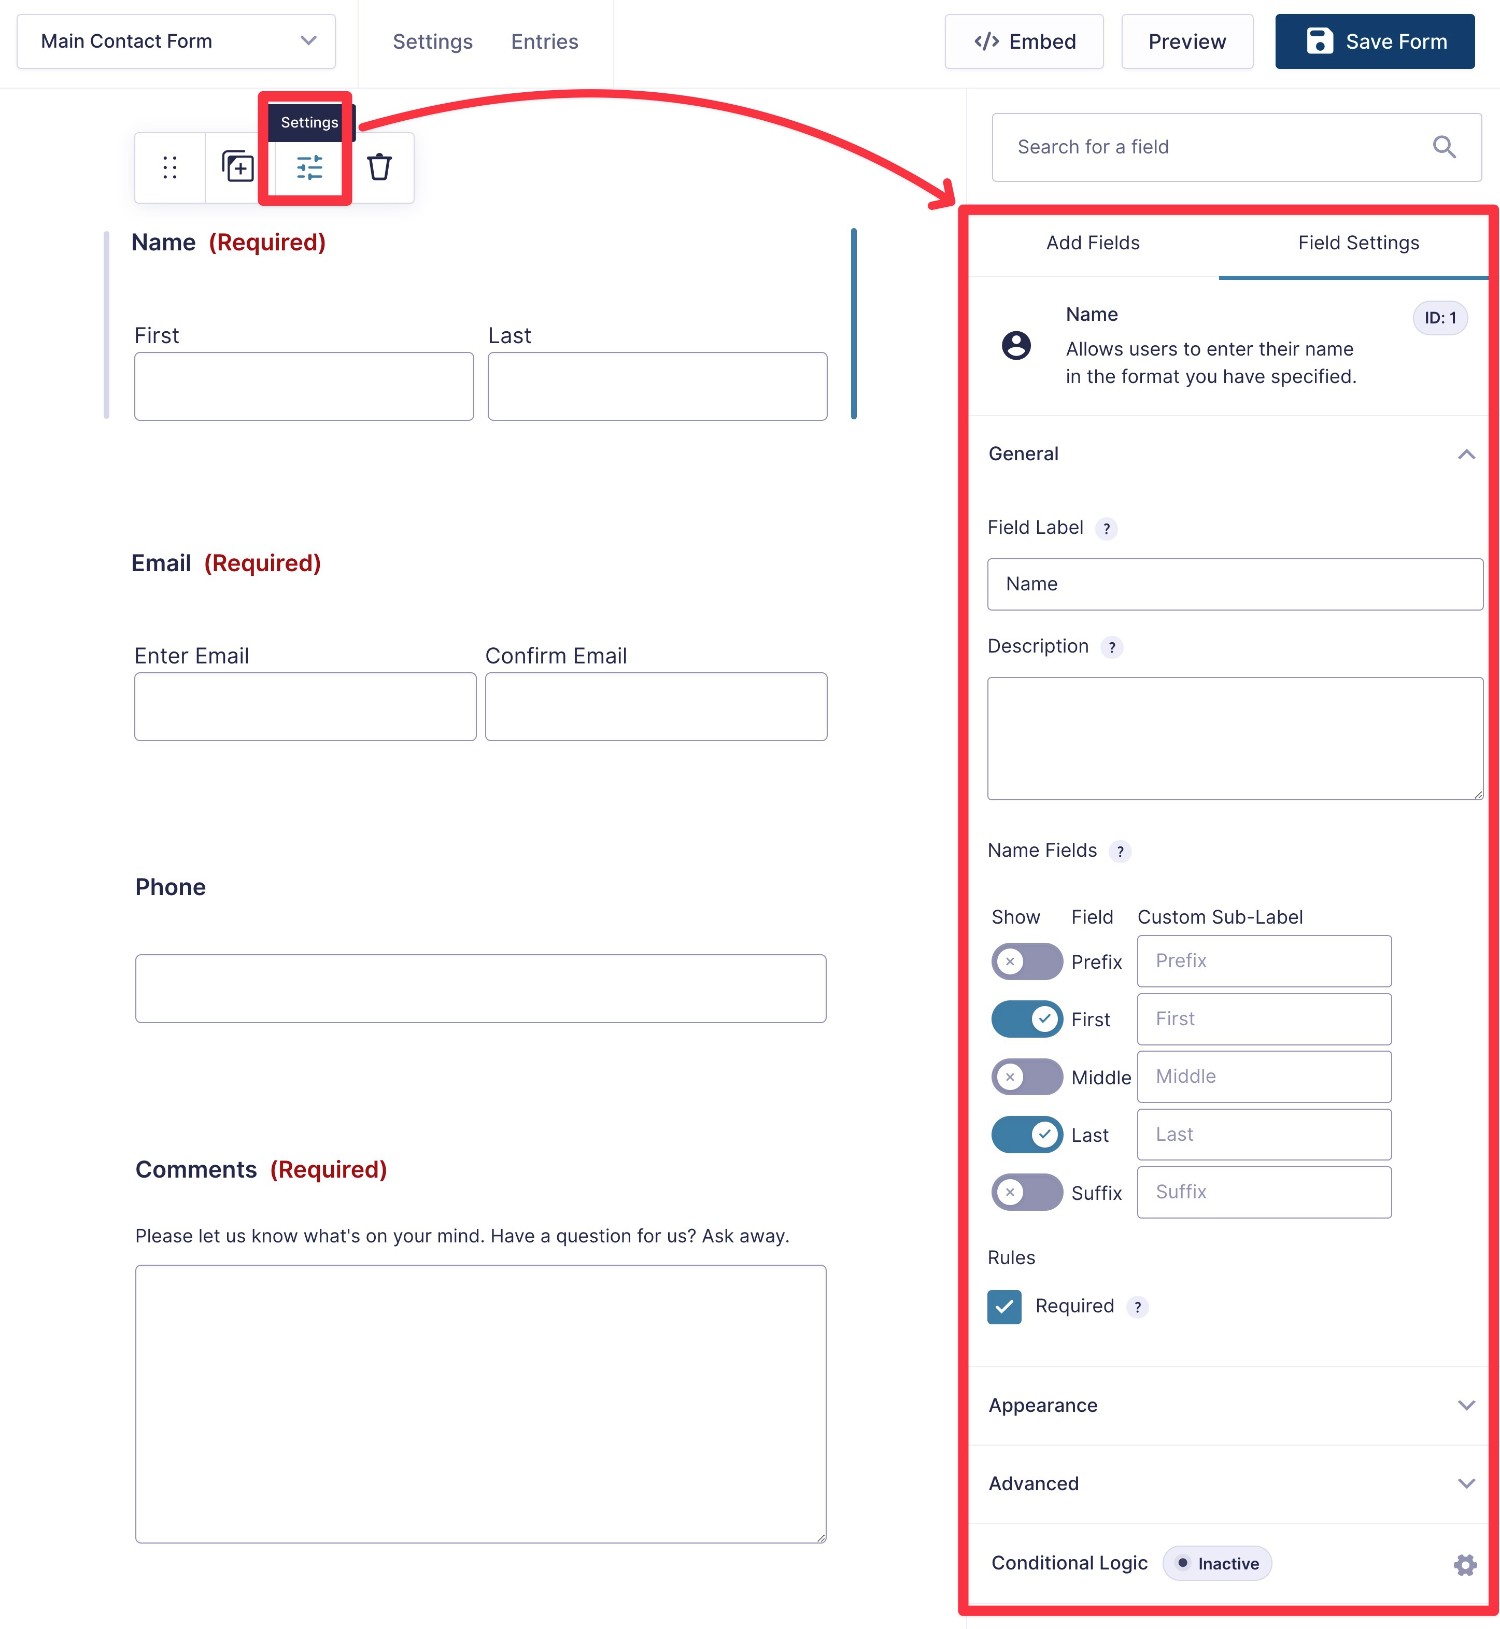
While there are some common settings that are available for all fields, some fields will also have their own field-specific settings. For example, if you’re collecting a user’s address, the Address field includes options to control the formatting of the address.
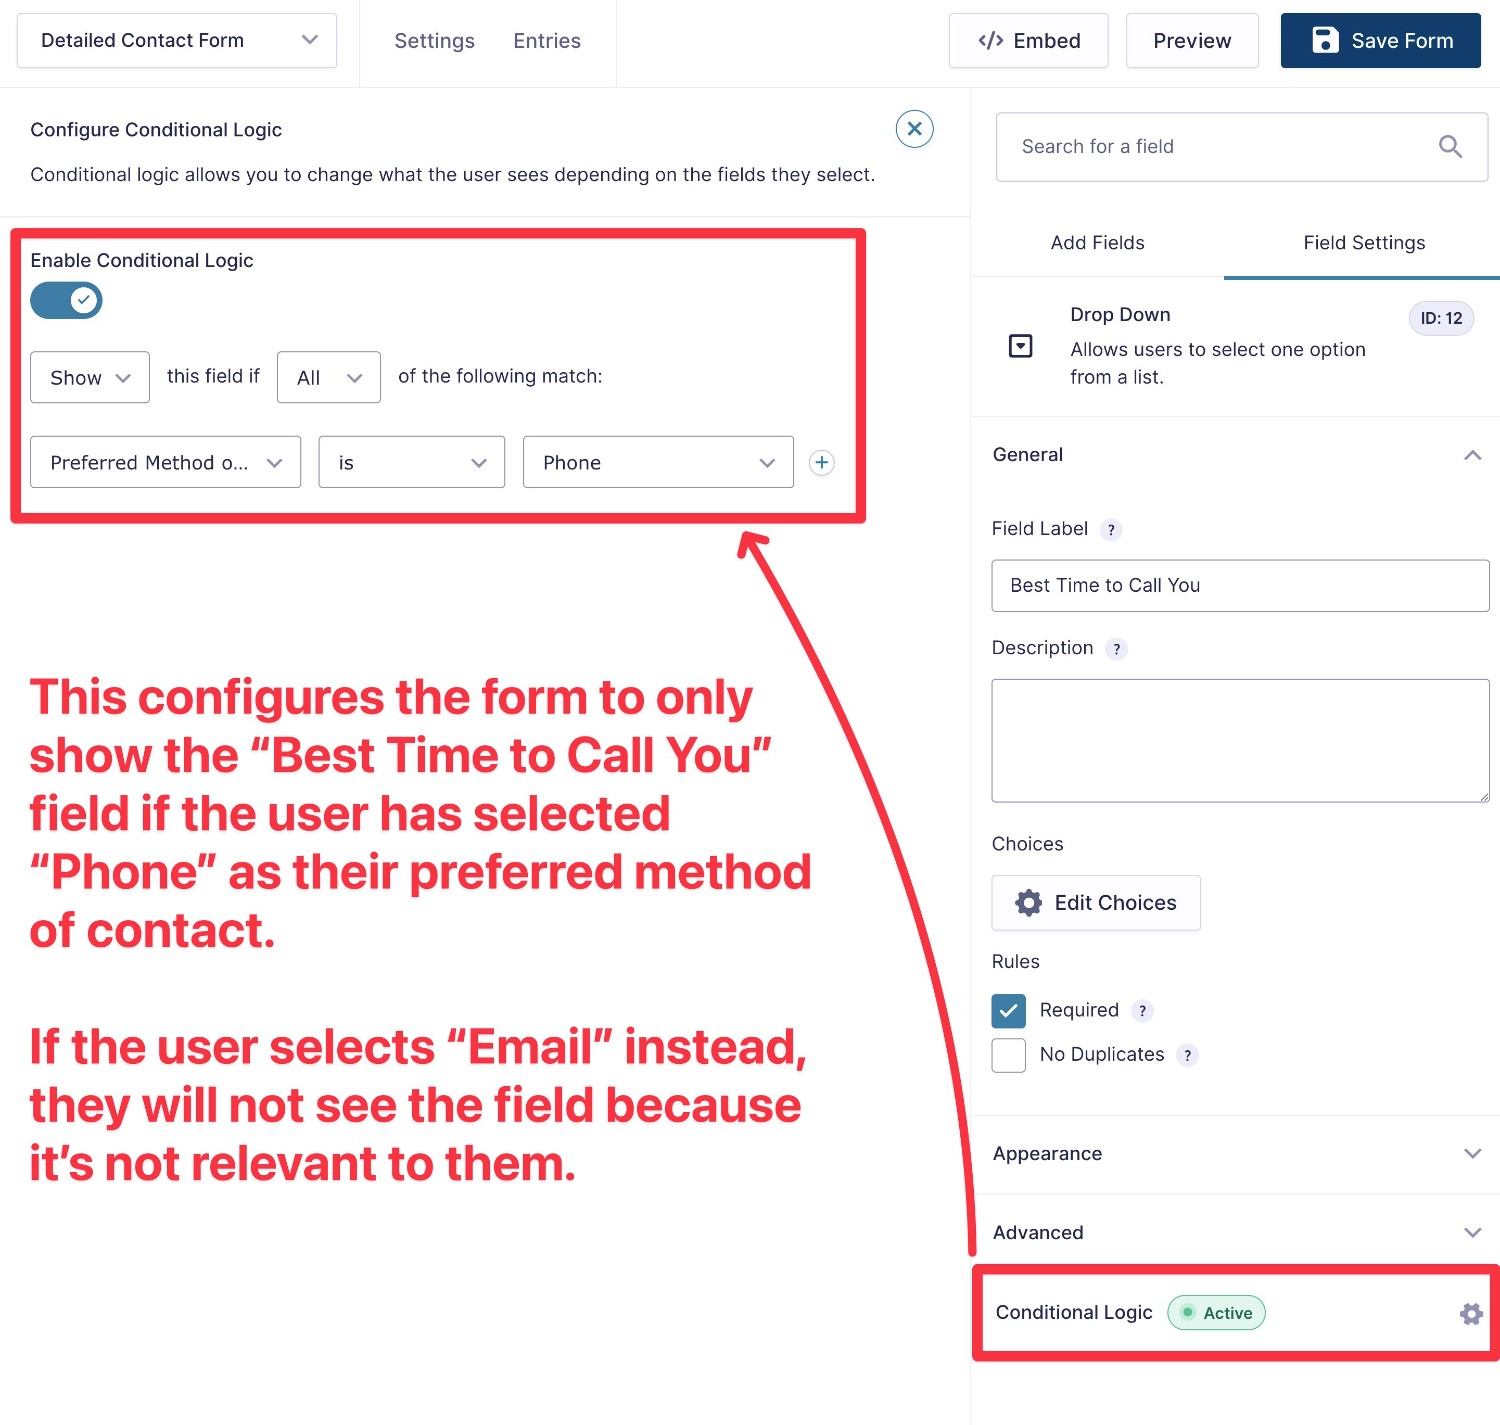
Use Conditional Logic to Personalize Your Form (Optional)
With conditional logic, you can adjust your form based on how people have answered earlier fields in the form.
This lets you collect additional information when needed, while still keeping your form as short as possible and not bothering users with unnecessary information.
For example, if a user indicates that they want to be contacted by phone, you could display additional fields to collect their phone number and the best time to call them.
However, if they indicate that they want to be contacted by email, you could not show the phone number-related fields because those fields wouldn’t be relevant.
The Advanced Contact Form template already includes this functionality.
You can set up conditional logic by enabling it in the field settings sidebar and then adding your conditional rules.
In addition to using conditional logic to show/hide fields in your form, you can also use it in other places, such as your form’s notifications and confirmations. Speaking of those…
4. Set Up Contact Form Notifications and Confirmations
After someone someone submits your contact form, Gravity Forms lets you send/display two types of messages:
- Notifications – these are emails that you can send to yourself, the form submitter, and/or any other email address.
- Confirmations – these are messages that display on your site after someone submits the form.
With official Gravity Forms add-ons, you can also set up other types of messages. For example, you could send an SMS/text message or a message on Slack. However, we won’t cover these in our tutorial.
Create/Edit Notifications
To create an email notification, go to Settings → Notifications in the form editor interface. You can then click Add New to create a new notification or edit one of the existing notifications.
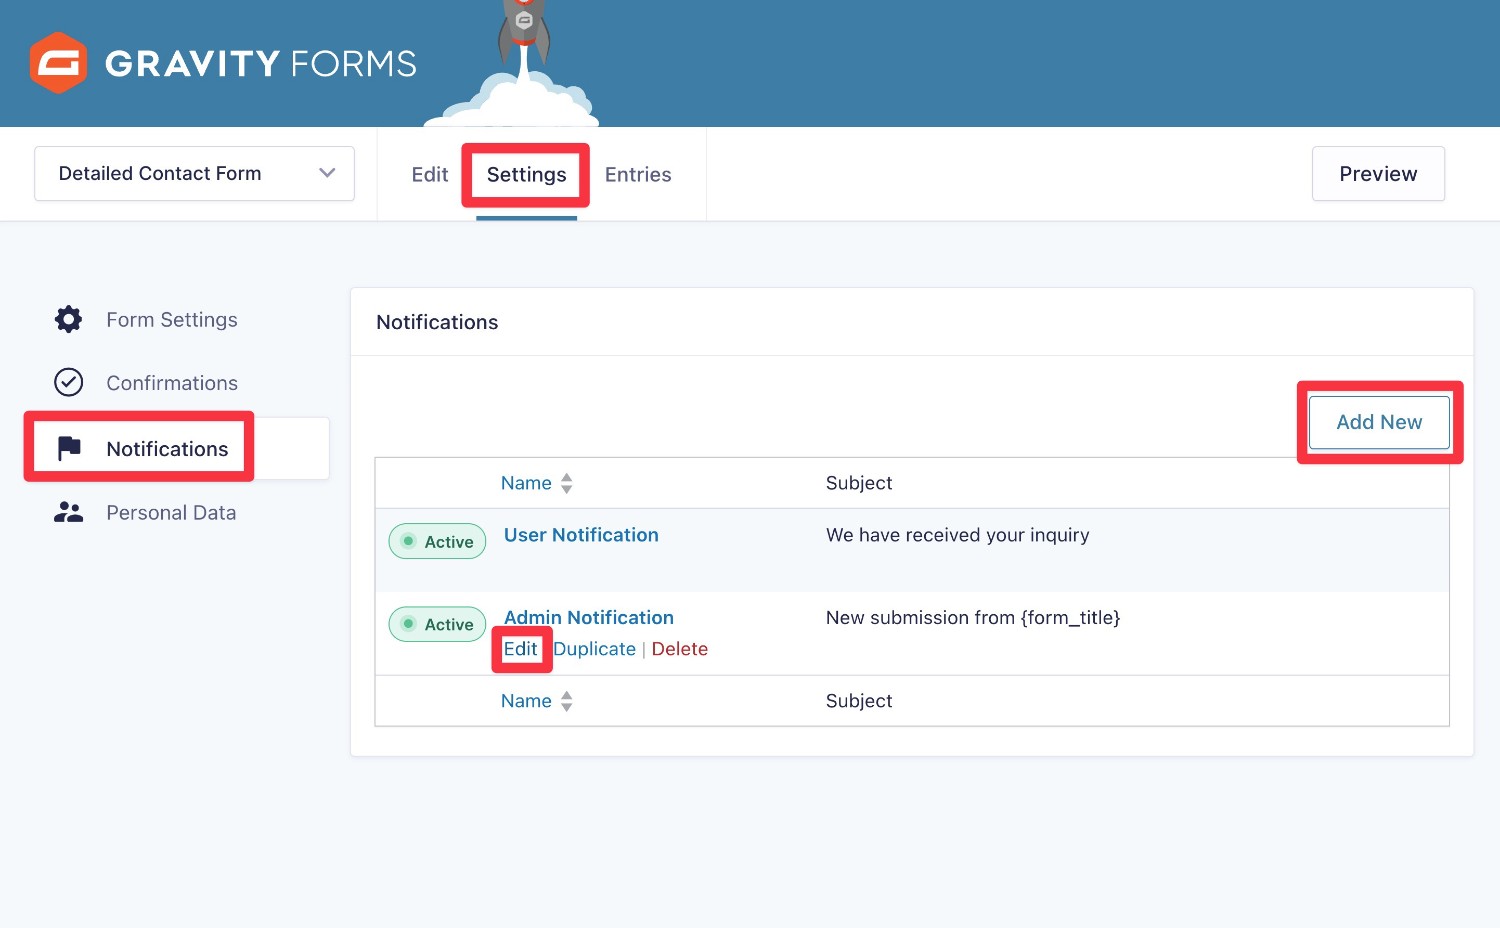
One cool thing here is that you can use merge tags to dynamically insert information from the form in the notification. For example, you could include the person’s contact details and message in the email notification that you send to yourself.
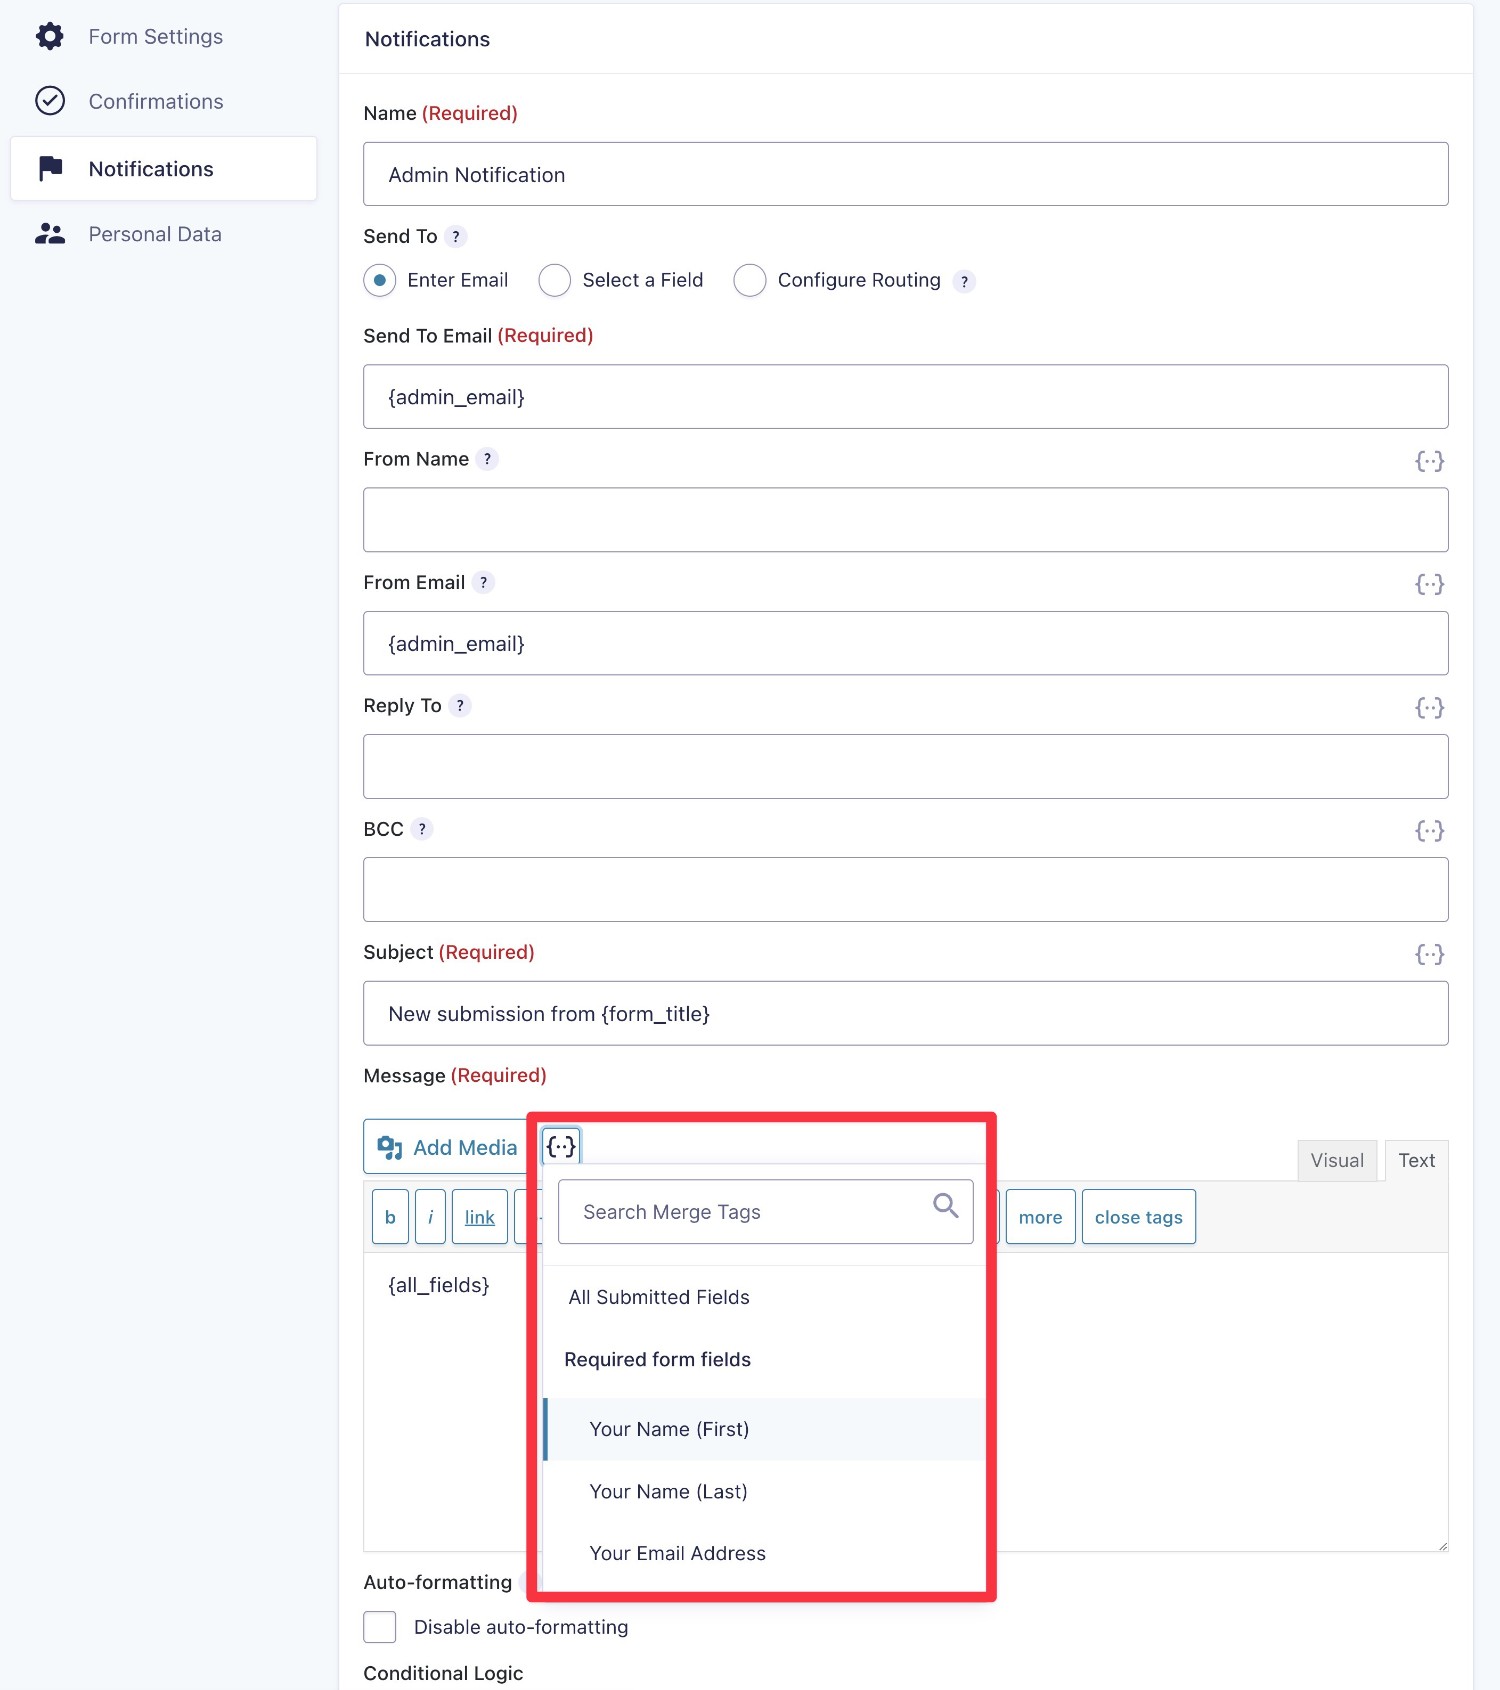
You’re free to create as many notifications as you want. For example, you could create one notification for yourself and another for the person who submitted the form.
You can also use conditional logic to send different notifications depending on how someone fills out the form.
Create/Edit Confirmations
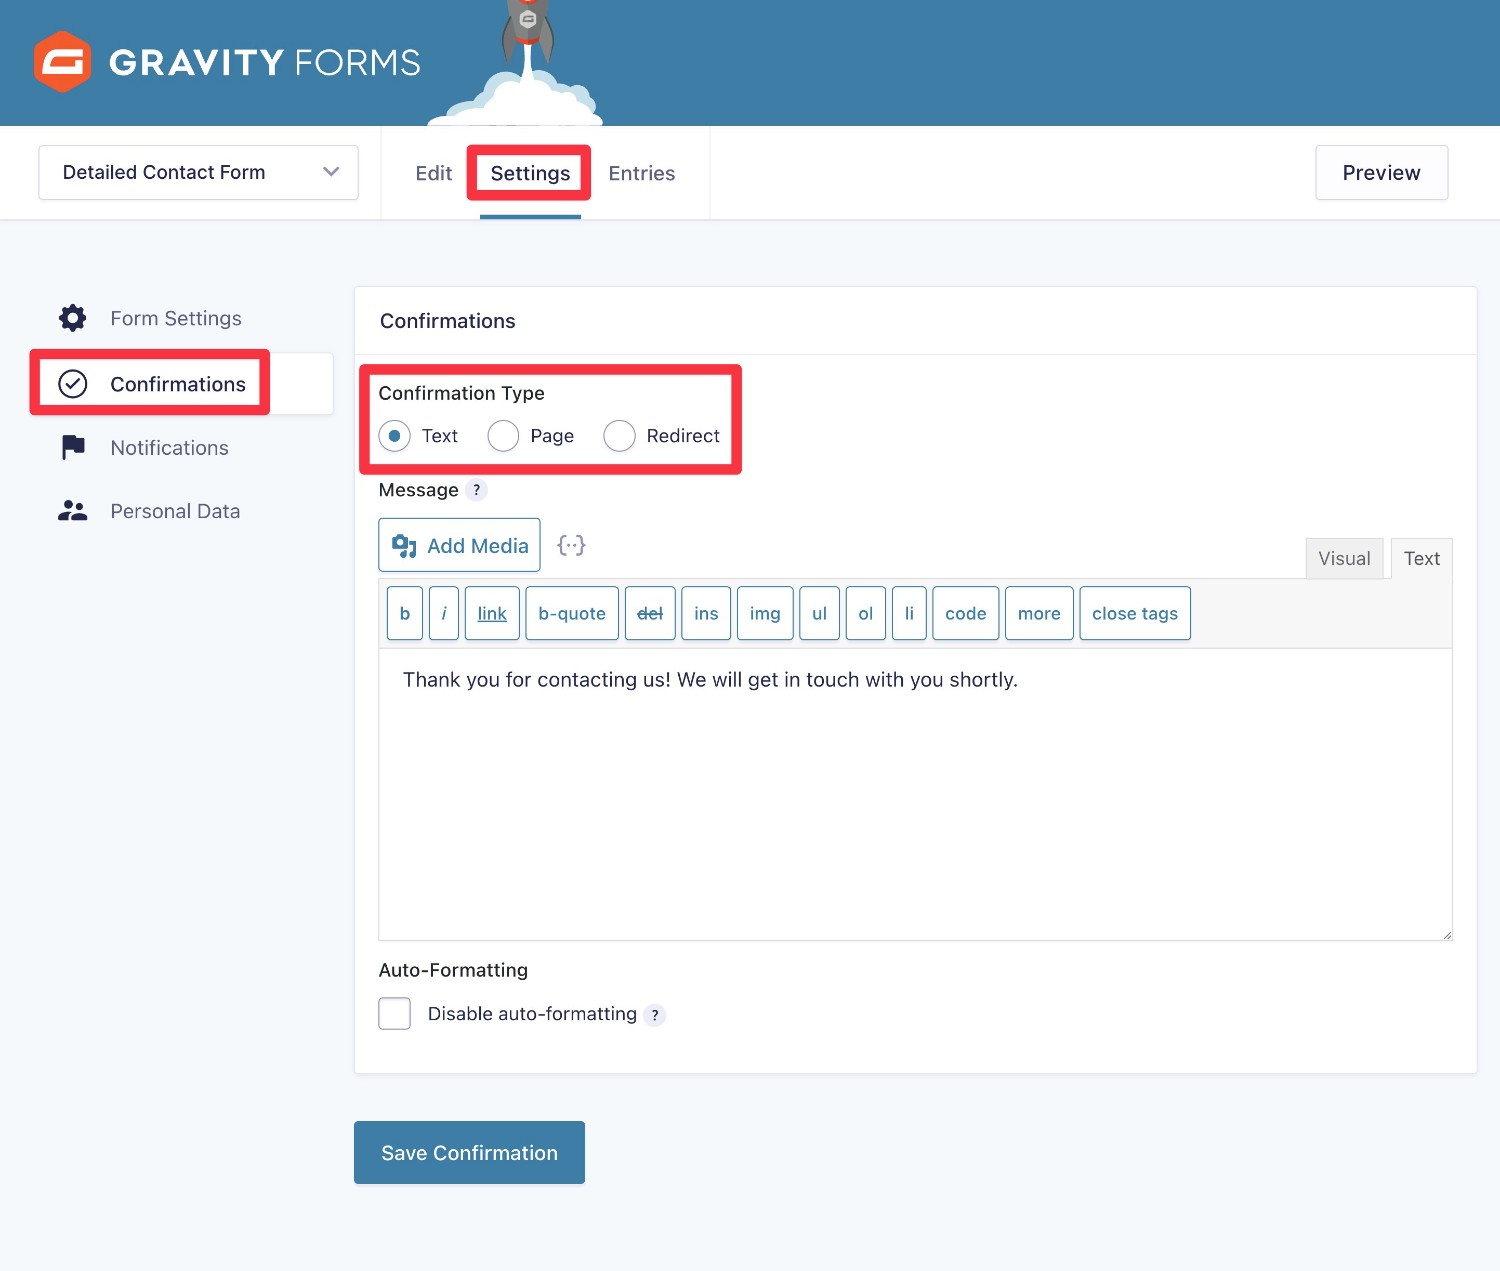
To create/edit a confirmation, go to Settings → Confirmations. You can then click Add New to create a new confirmation or edit one of the existing confirmations.
Gravity Forms lets you choose from three types of notifications:
- Text – this displays a text message after the user submits the form.
- Page – this sends users to a specific WordPress page after they submit the form, such as a dedicated thank you page.
- Redirect – this lets you redirect users to any URL, whether that’s a URL on your own site or a third-party website.
You can also use conditional logic to use a different confirmation depending on how the person answered the form.
For more details, check out our guides on how to display a form confirmation message or how to redirect users after they submit your form.
5. Set Up Integrations With Marketing Tools or Other Tools (Optional)
This step is totally optional.
However, if you’re creating a contact form for a business, you might want to automatically sync contact form submissions to your marketing platform, such as your customer relationship manager (CRM) or email marketing service. Or, you might want to set up integrations with other tools that you’re using.
To help you do this, Gravity Forms offers dedicated integrations for most popular services. And if you can’t find a dedicated integration for the service that you’re using, Gravity Forms also supports Zapier.
For this example, we’ll show you how to connect your contact form to HubSpot. However, the same basic steps will apply to other marketing integrations, as well.
Install the HubSpot Add-On
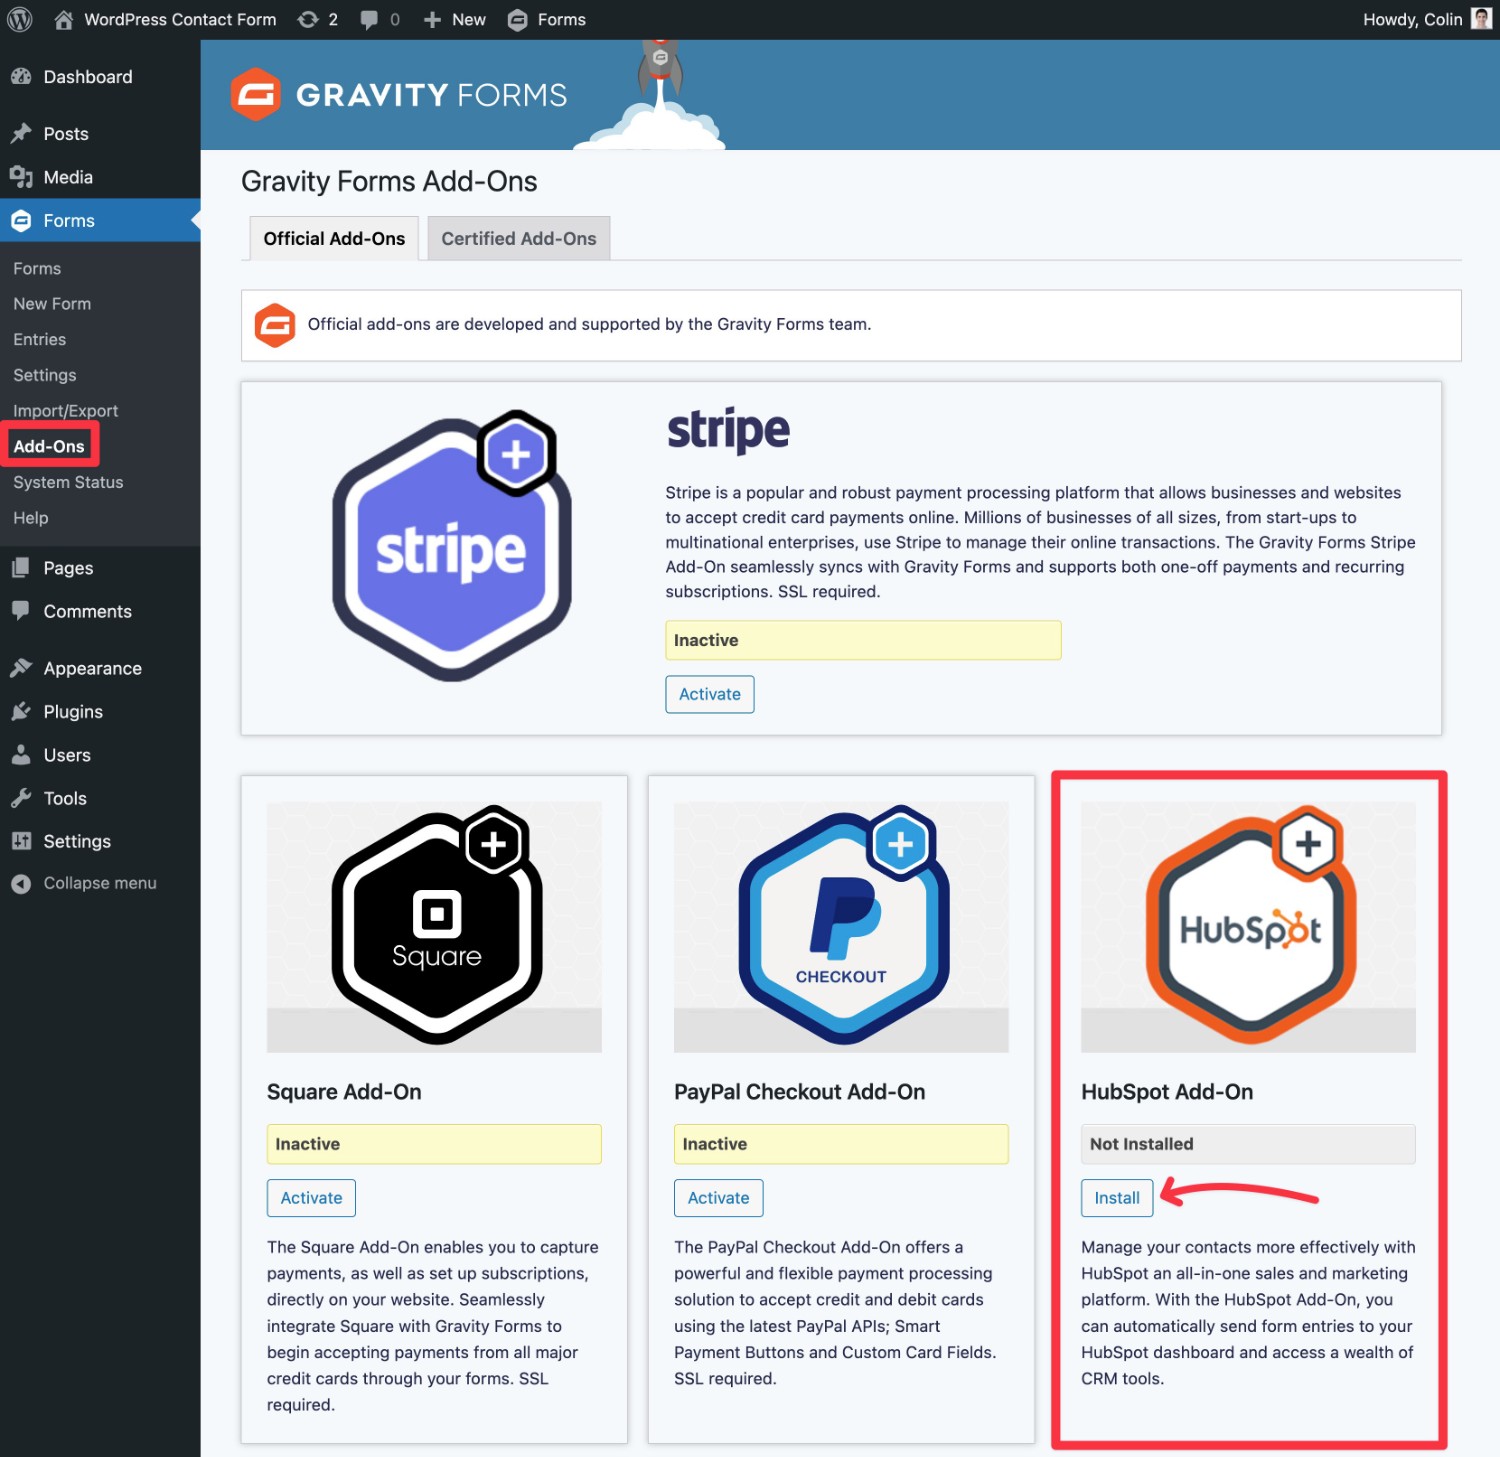
To begin, you’ll want to install the Gravity Forms add-on for the service that you want to connect to:
- Go to Forms → Add-Ons in your WordPress dashboard.
- Find the relevant add-on in the list. For our example, it’s the HubSpot add-on.
- Click the Install button for that add-on.
- Once the installation finishes, make sure to activate the add-on.
Connect Your WordPress Site to HubSpot
Next, you’ll need to connect your WordPress site to HubSpot:
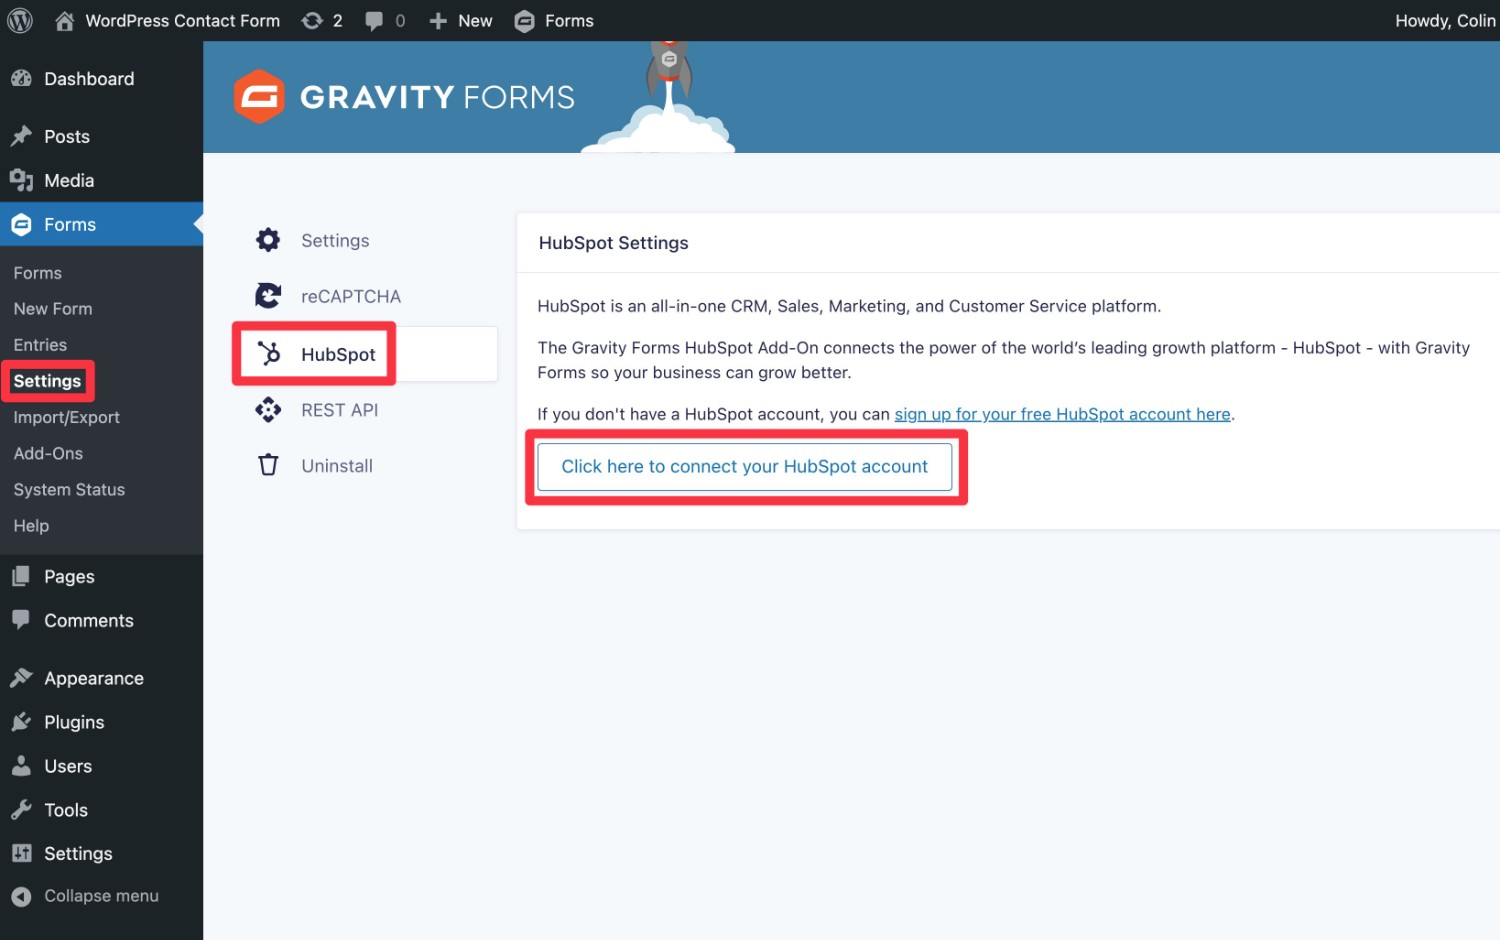
- Go to Forms → Settings → HubSpot in your main WordPress dashboard (not the form builder interface).
- Click the button that says Click here to connect your HubSpot account.
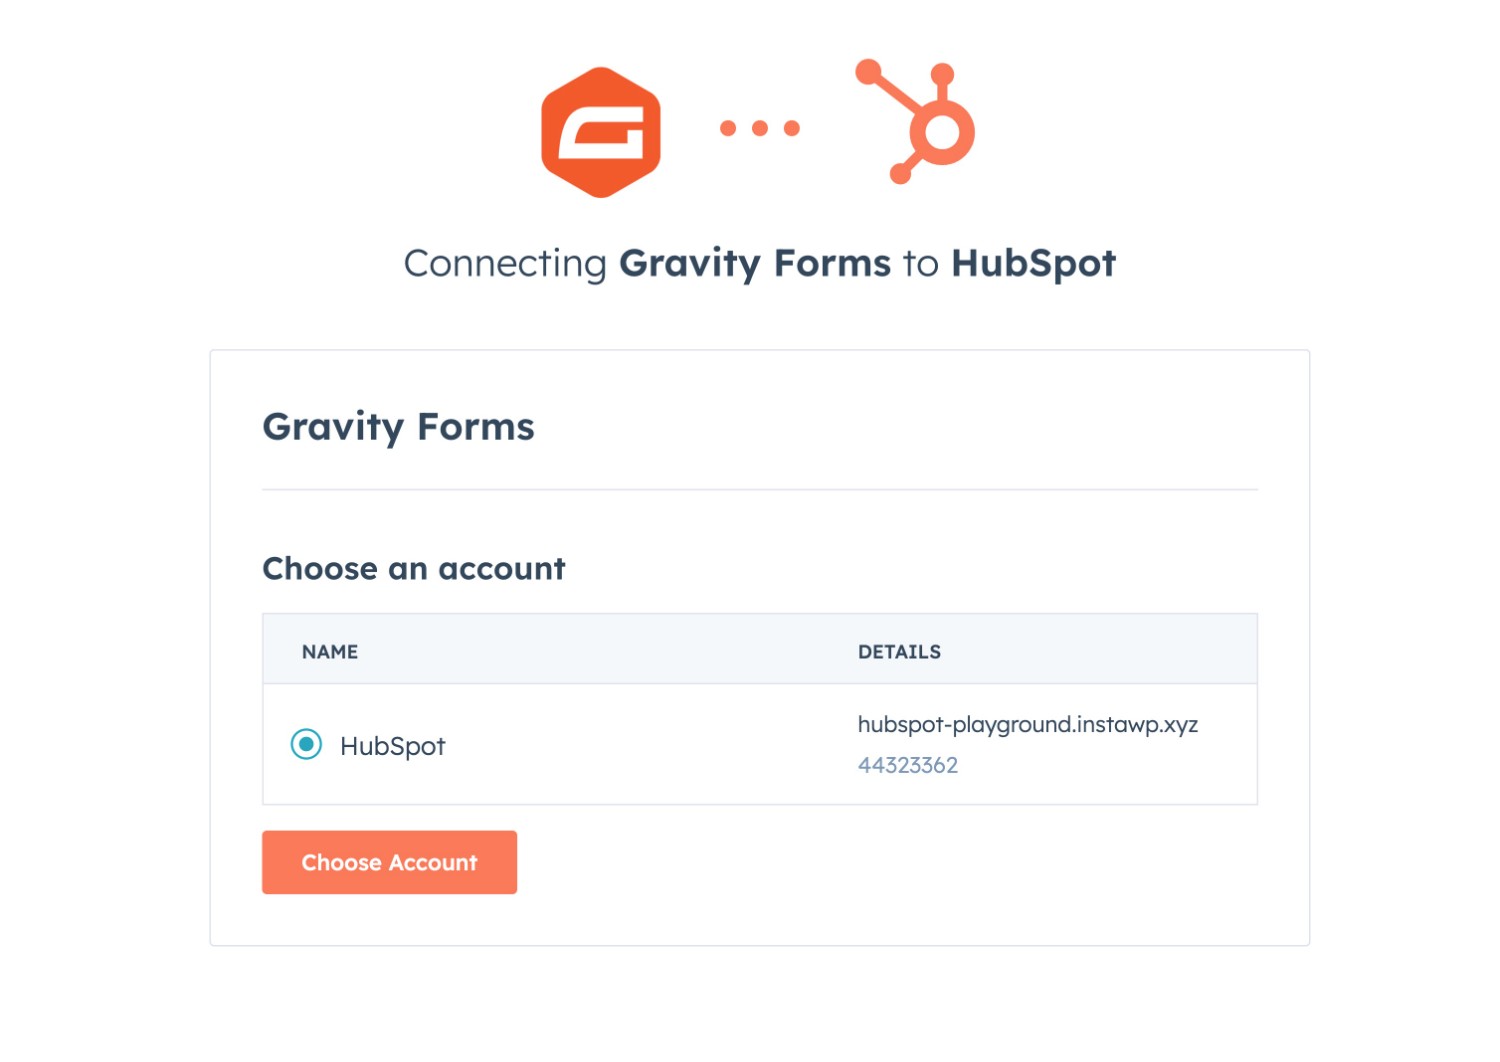
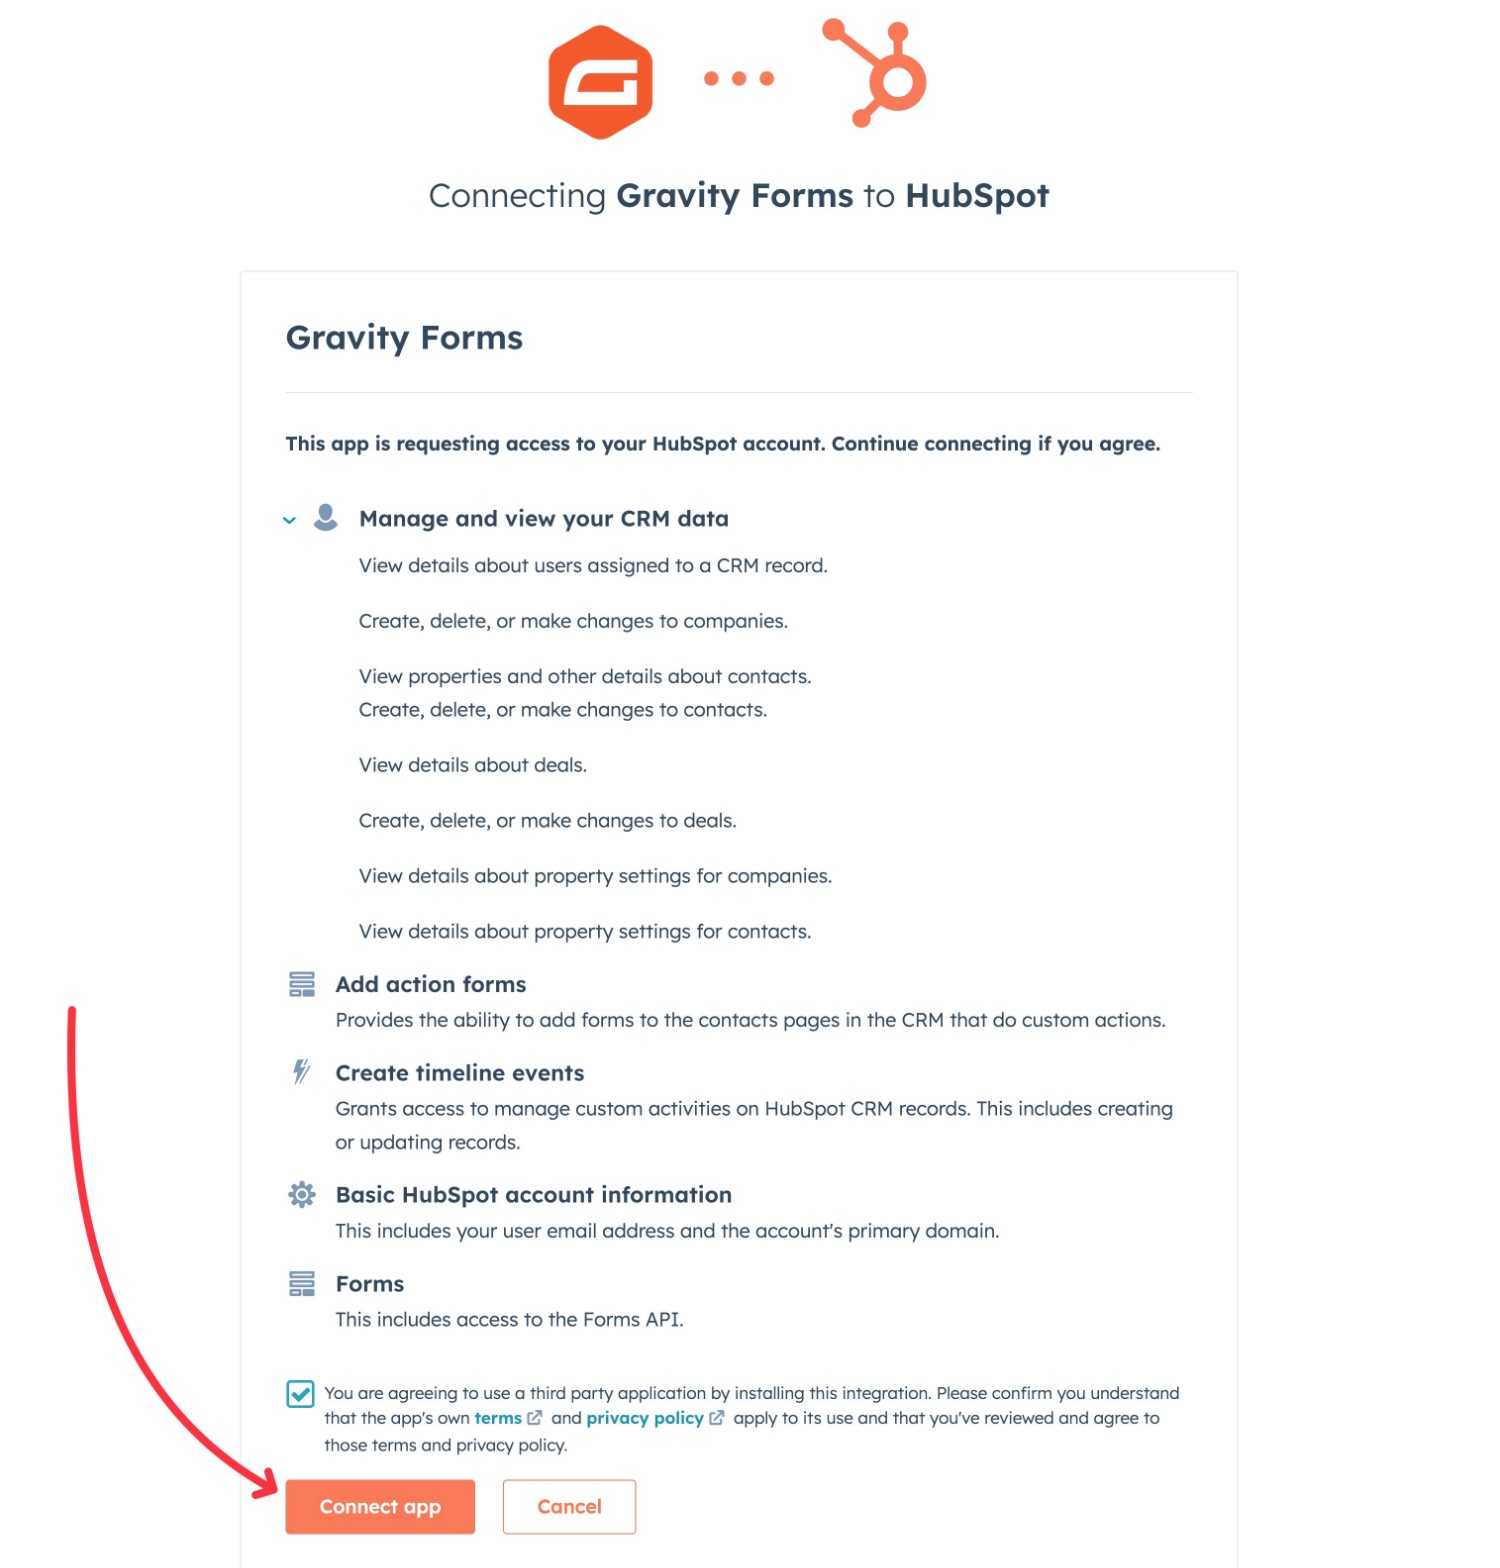
- Follow the prompts in the HubSpot authorization flow. You just need to choose your account and then click Connect App.
First, choose your HubSpot account:
Then, click Connect app.
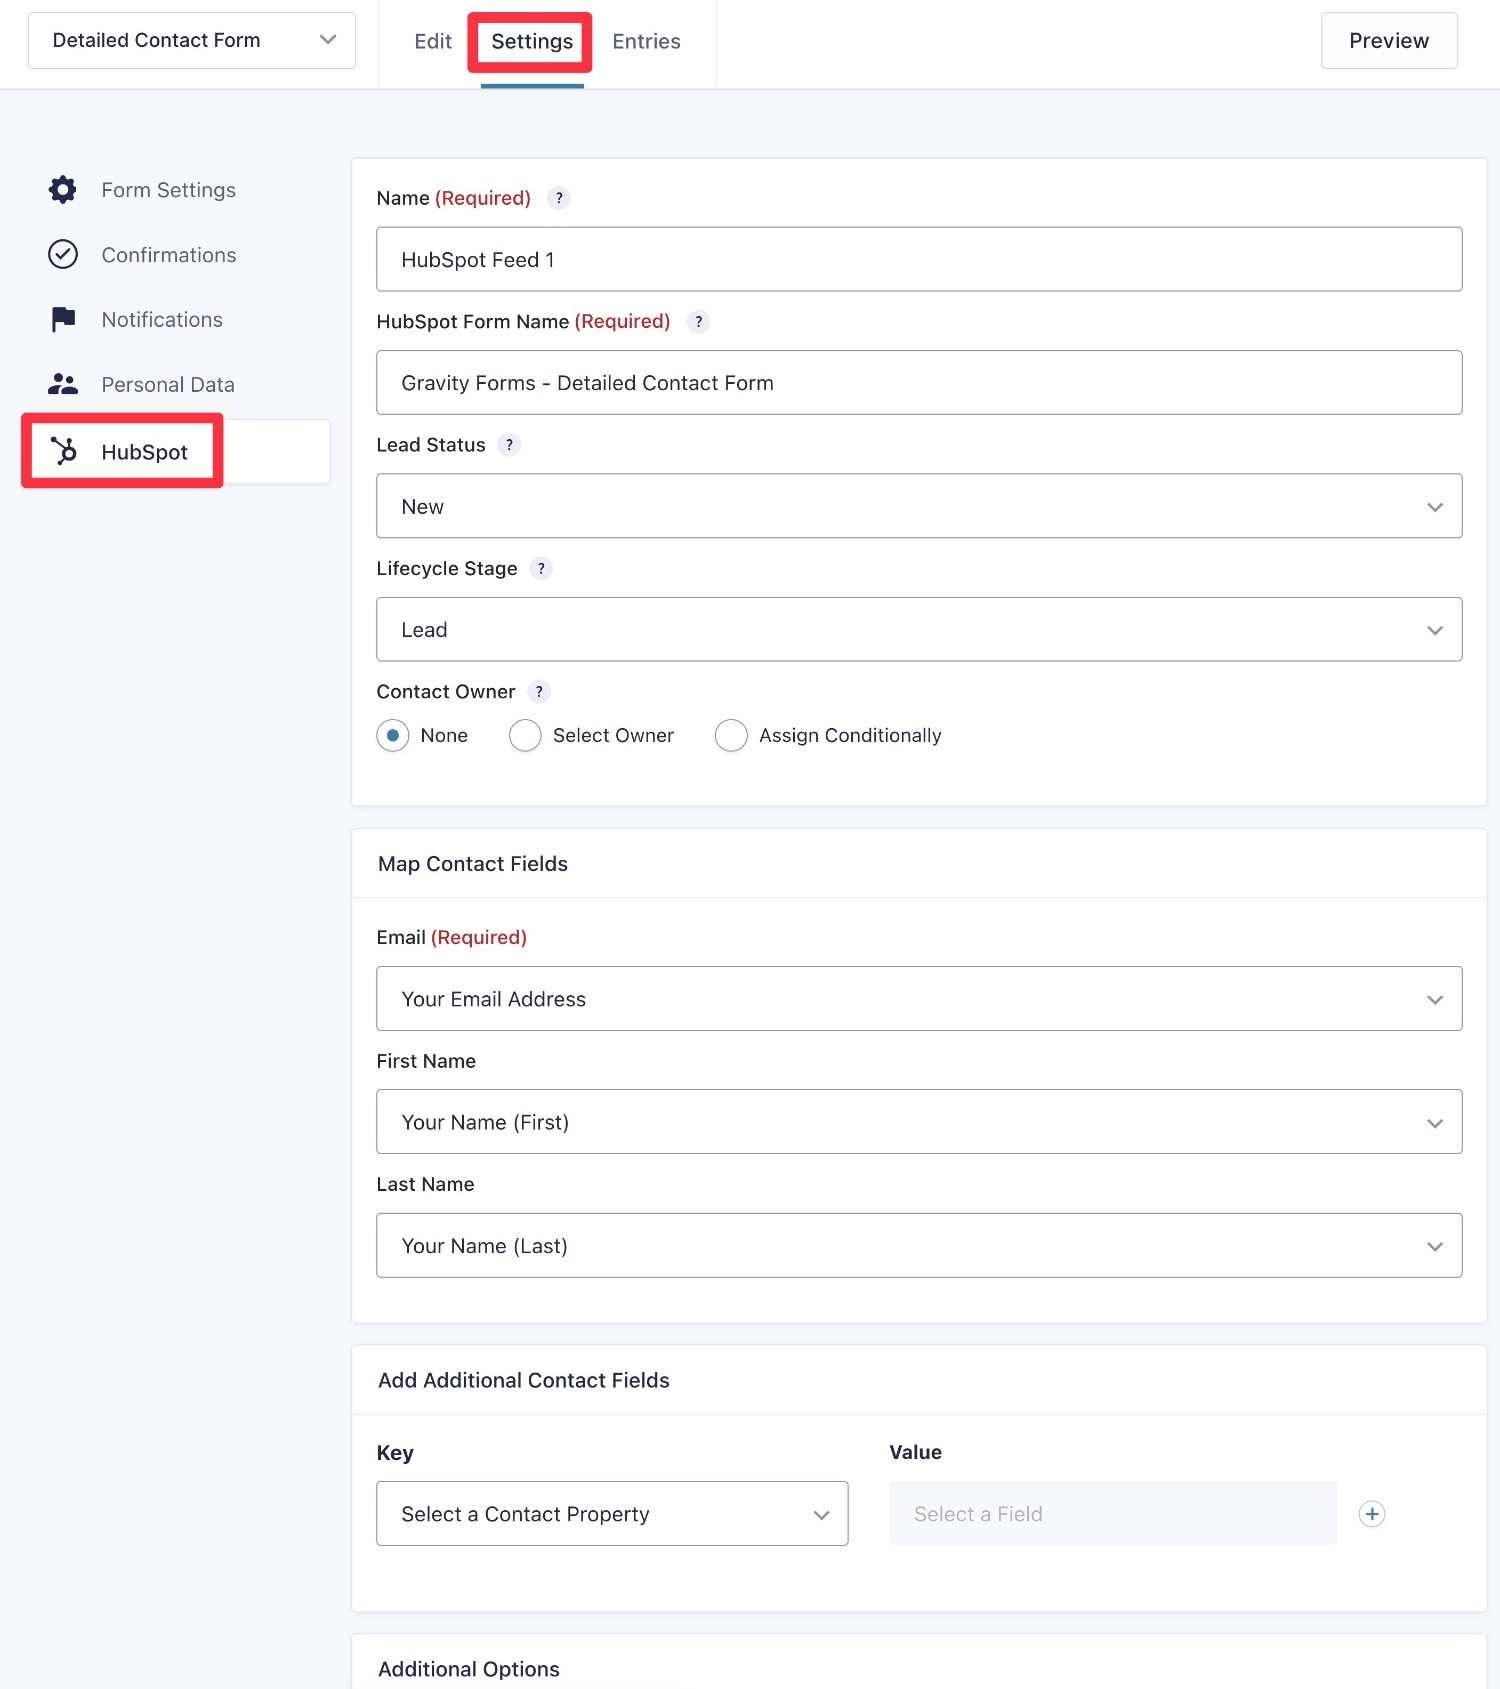
Create a HubSpot Feed In Your Contact Form
Once you’ve connected Gravity Forms to HubSpot, you’re ready to set up the HubSpot integration for your contact form.
Open the form editor for your contact form and go to Settings → HubSpot. Then, click Add New to create a new HubSpot “feed”, which lets you control how to sync information with HubSpot.
Set Up Other Integrations As Needed
In addition to connecting to CRMs, Gravity Forms also supports lots of other integrations that might be useful for a contact form:
- Project management software – create a new task in your project management tool when someone sends you a message, such as adding a card in Trello.
- Email marketing services – subscribe people to your email list (if they give opt-in consent).
- Audio/Video messages – accept video and/or audio messages from users using the Pipe integration.
To discover more options, check out all of the Gravity Forms Add-Ons here.
6. Embed Your Form (and Customize Styling If Needed)
At this point, your contact form should be finished – you just need to embed it on your site so that people can start sending you messages.
One of the nice things about Gravity Forms is that it gives you code-free options to customize the style of your form right from the block editor.
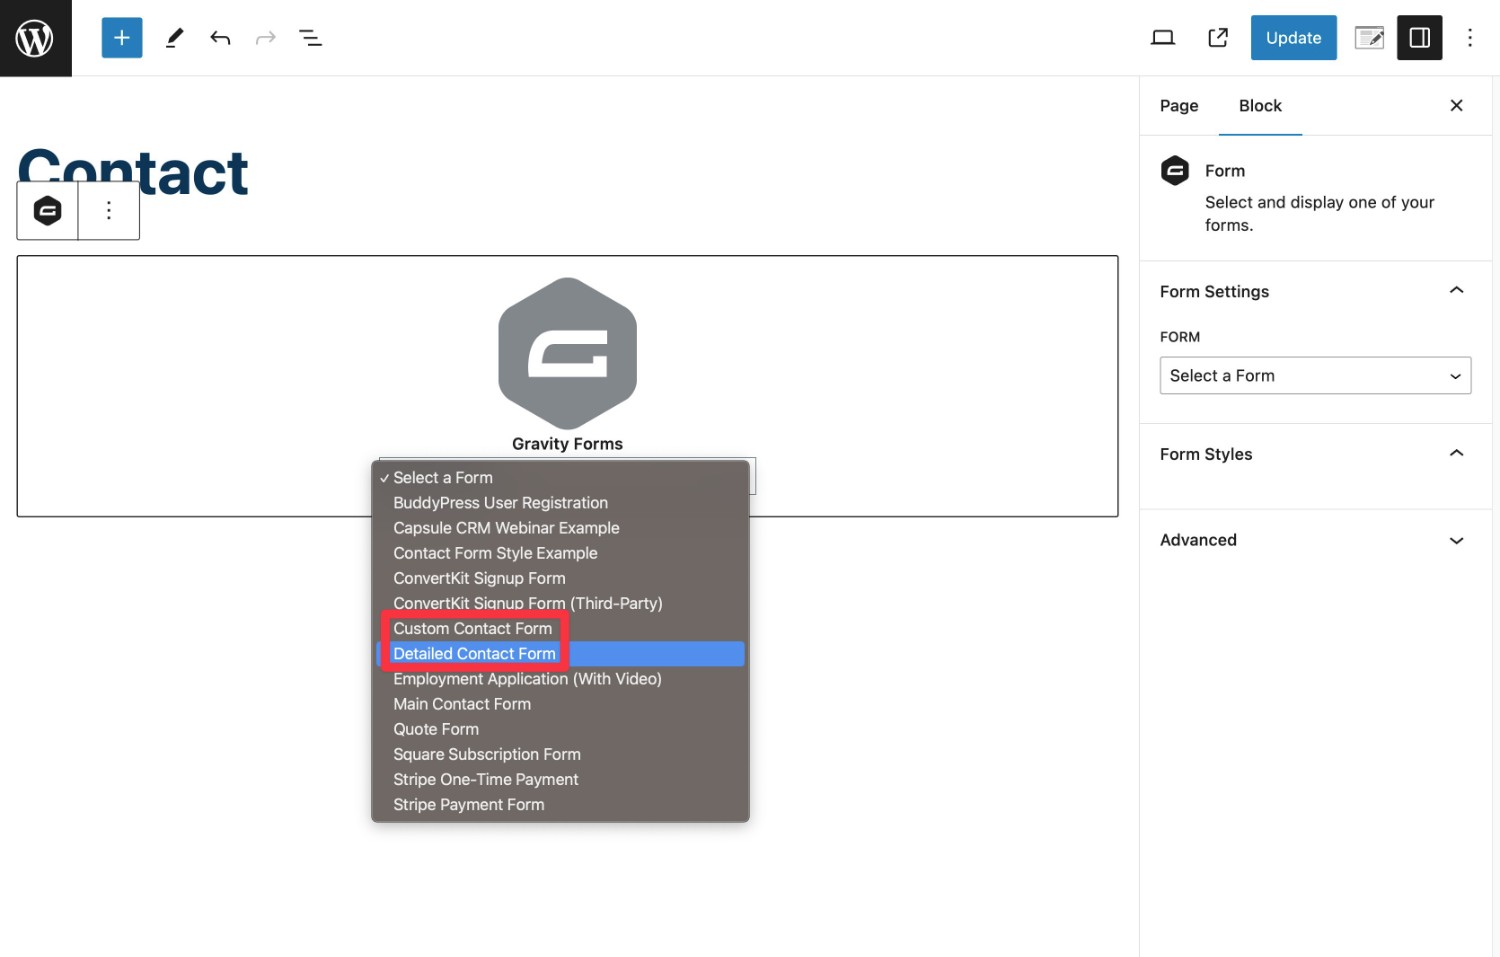
First, you’ll need to embed your form:
- Open the post or page where you want to add your contact form.
- Add the Form block from Gravity Forms.
- Choose your contact form from the block’s drop-down menu.
If you’re not using the block editor, you can also embed your contact form using the Gravity Forms shortcode.
You should then see a preview of your form appear right in the editor.
To style your form, you can use the style options that appear in the Form block’s settings. If you don’t see these style options, make sure that you’ve selected the Orbital form theme in the block’s settings.
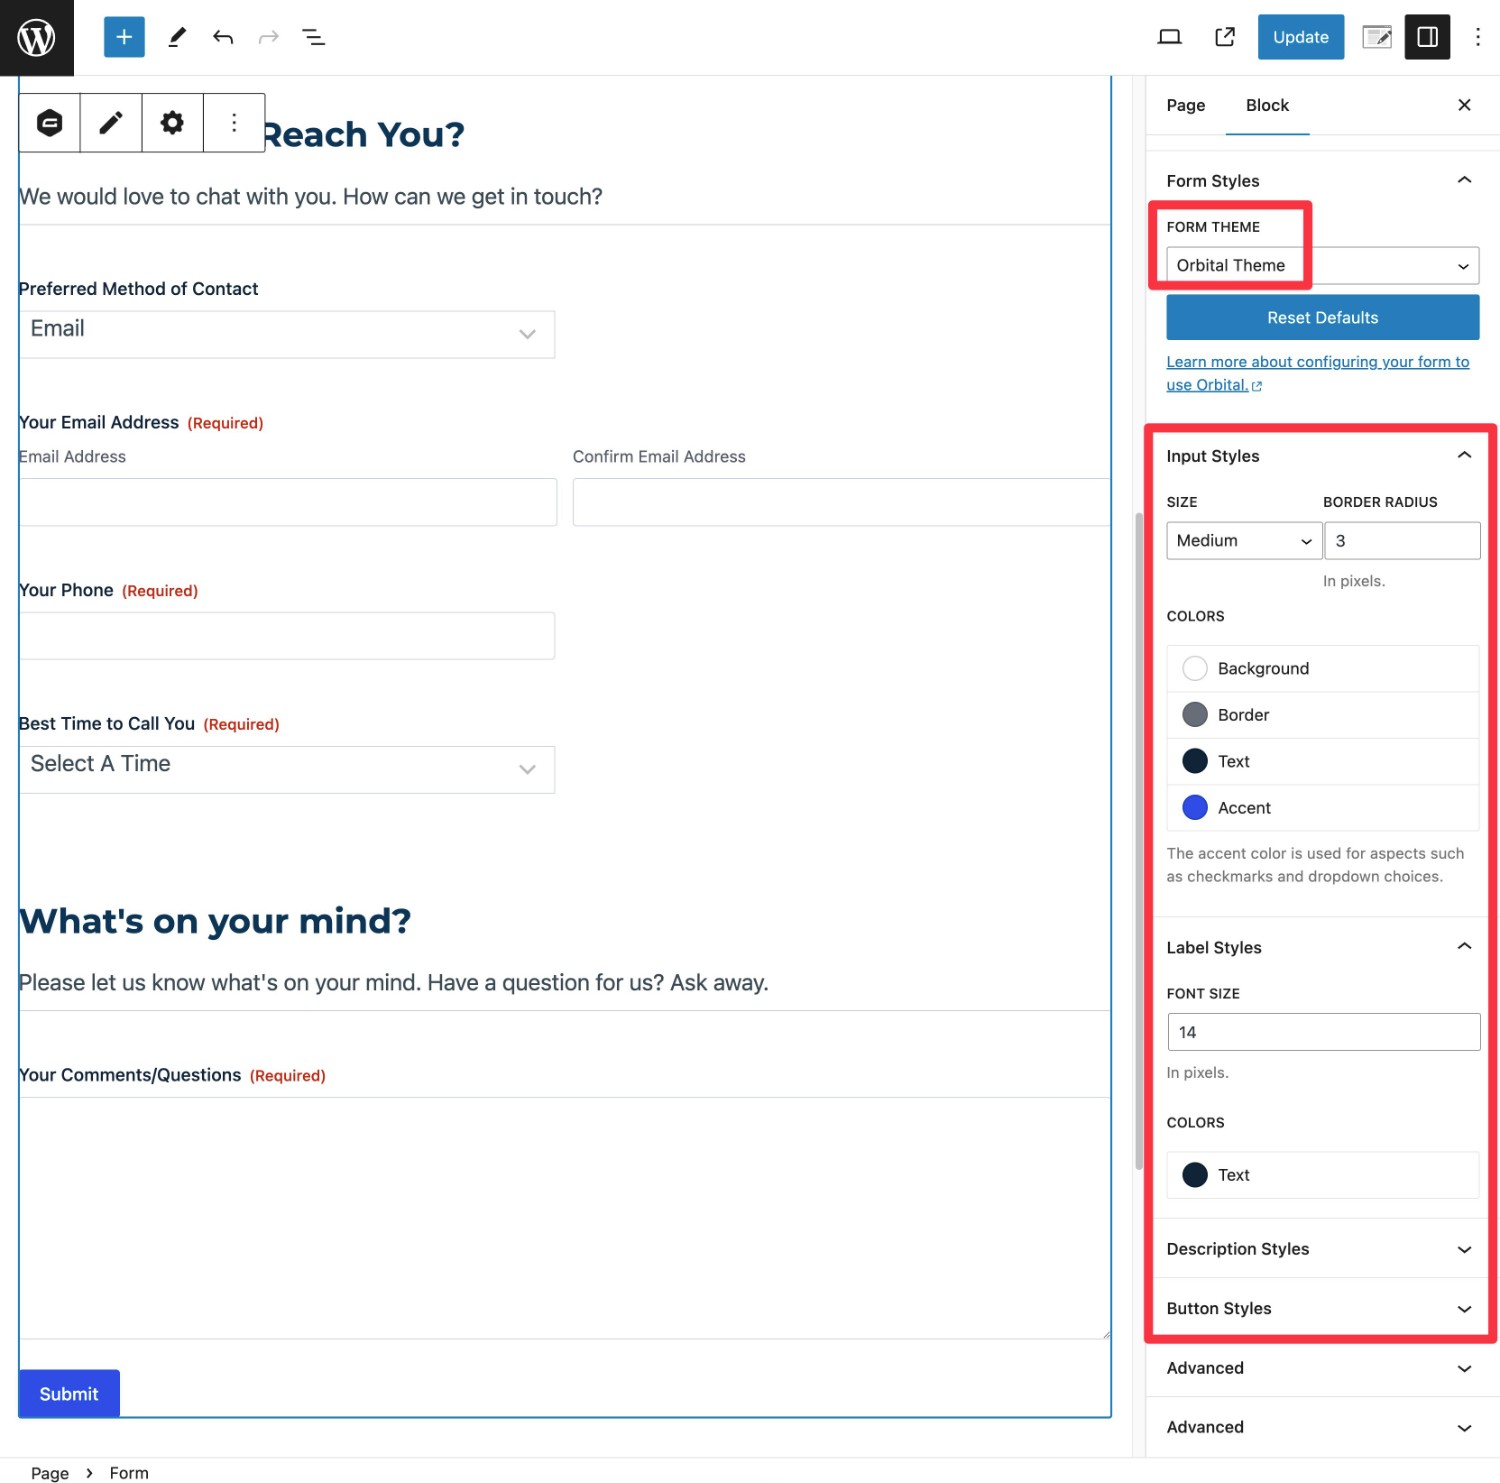
Beyond using the style settings in the Form block, you’re also free to use all of the native WordPress blocks. For example, you could place the Form block inside a Group block, which would let you add a custom background to the form and control other layout options.
To learn more about styling your form, you can read our complete guide to form styling in Gravity Forms.
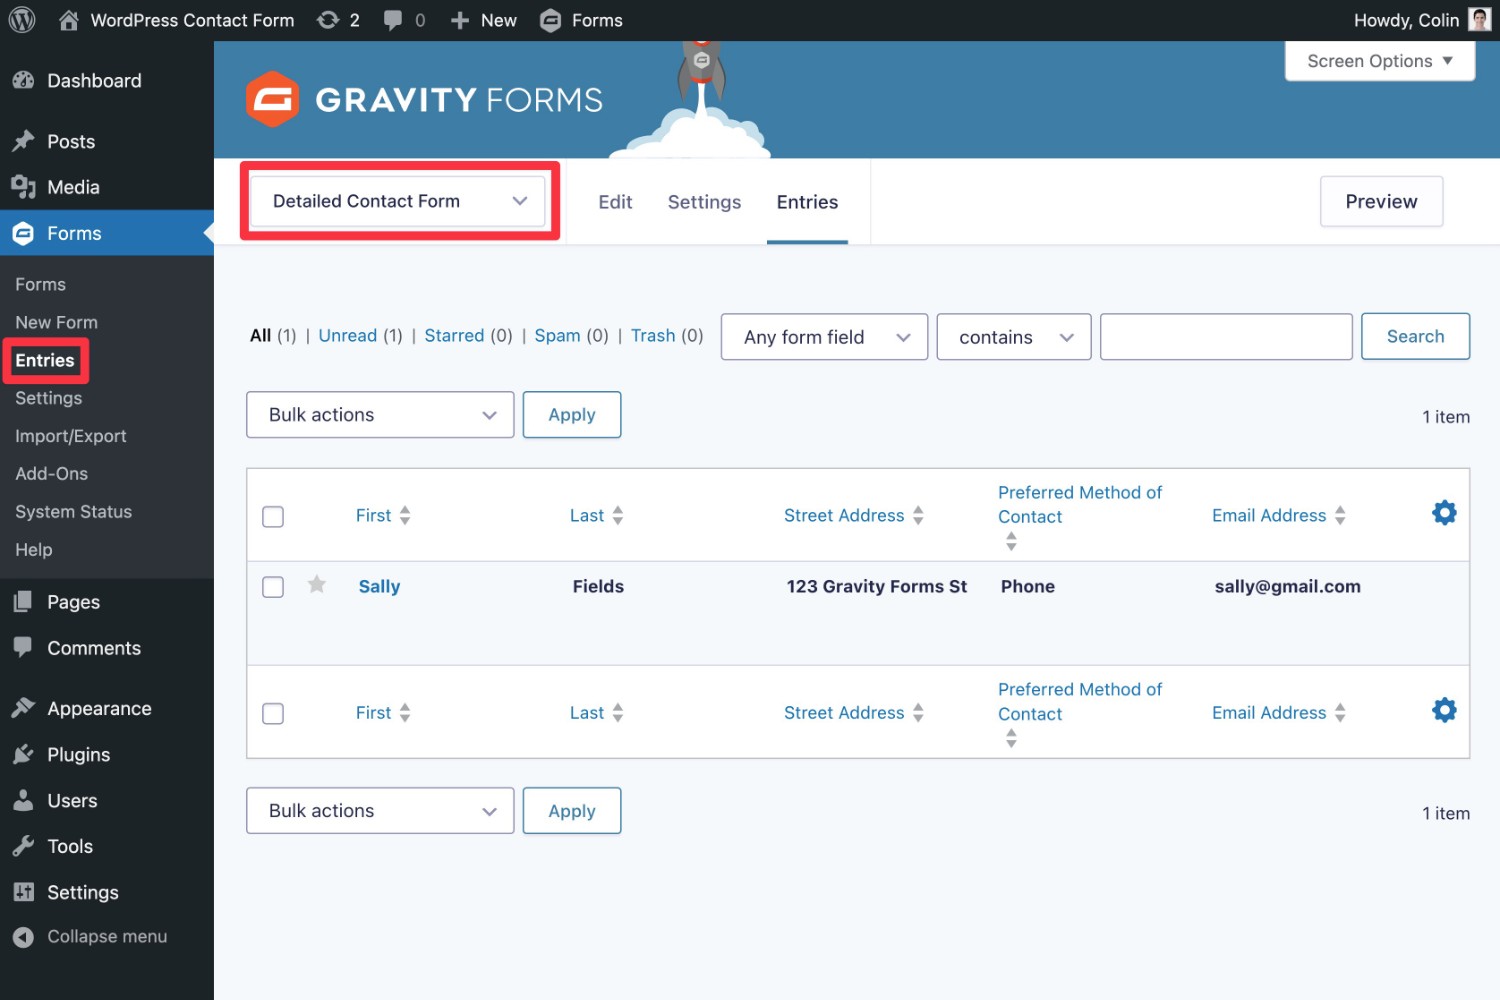
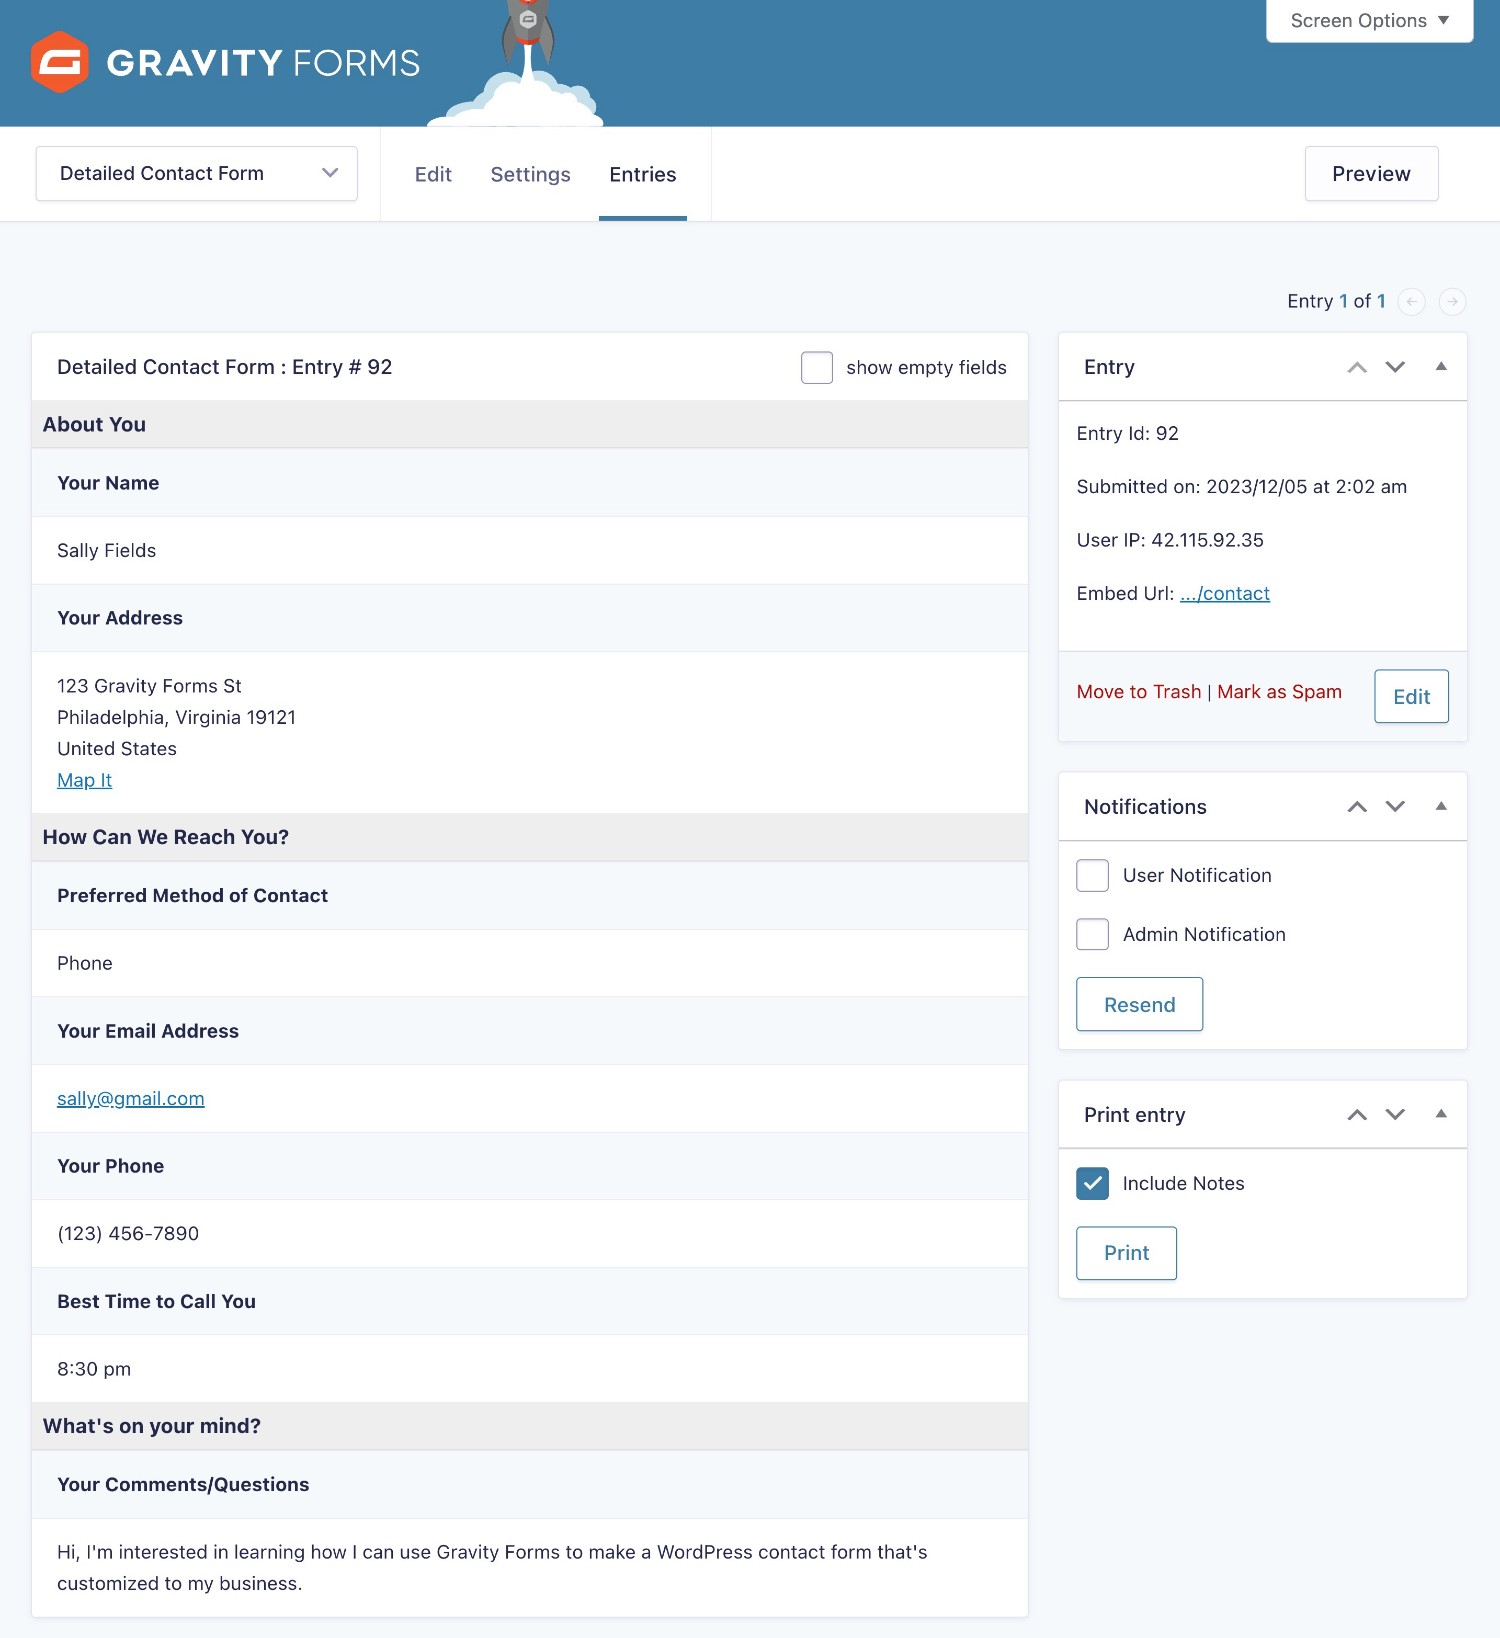
7. View Contact Form Entries
At this point, your site’s visitors can start sending you messages via your contact form.
In addition to any email notifications that you’ve set up, Gravity Forms also makes it easy to view contact form messages directly in your WordPress dashboard:
- Go to Forms → Entries in your WordPress dashboard.
- Select your contact form from the drop-down to view entries for that specific form.
- Click on a specific entry to view the full content of that message.
Entry list page:
Entry detail page:
If you’re having issues with spam entries, Gravity Forms offers tons of features to protect your forms. You can read our full Gravity Forms anti-spam guide to learn about your options.
Create Your WordPress Contact Form Today
That wraps up our step-by-step guide on how to add a WordPress contact form on WordPress using the Gravity Forms plugin.
With Gravity Forms, you can make your contact form as simple or as advanced as you want it to be.
Just want a simple WordPress contact form? You can import the simple contact form template, embed it on your site, and have a working contact form in under five minutes.
Want a more advanced contact form with conditional logic, marketing service integrations, and more? Gravity Forms can also help you get the job done.
If you’re ready to get started, purchase your Gravity Forms license today and follow this guide to make your contact form.
Or, if you’d rather try things out before buying, you can also create a free, fully functioning Gravity Forms demo site.

If you want to keep up-to-date with what’s happening on the blog sign up for the Gravity Forms newsletter!
"*" indicates required fields


