
If you have a gym or any other type of fitness organization, creating a digital gym membership form can help you streamline member signup processes and simplify collecting payments.
With the Gravity Forms plugin, you can easily create your own gym membership form on WordPress, including fully customizing it to your business’s unique use case:
- Collect as much as little information as you need from each member.
- Divide the form into multiple pages to make it easier for people to fill out.
- Collect payment directly from the form, including setting up an automatic recurring subscription or selling one-time class/session packages.
- Automatically sync members with your marketing tools, such as your CRM and email marketing service.
- Build your own business process workflows that are automatically triggered when a member signs up.
In this post, we’ll share a full, step-by-step tutorial on how to create your own digital gym membership form with Gravity Forms and WordPress.
Benefits of a digital gym membership form
Using a digital gym membership form instead of a physical signup process can have benefits for both your business and your members.
Here are some of the main reasons to consider implementing a digital gym membership form:
- Onboard new members faster and save your staff time when adding new members.
- Avoid errors by using a structured digital form (and no messy handwriting to read)
- Collect gym membership dues and set up a recurring subscription instantly. You can accept credit/debit cards, as well as other methods. Or, you can also accept one-time payments, which is great if you’re selling class/session packages.
- Collect liability waivers and other consent agreements instantly, while also benefiting from simpler, more accurate digital recordkeeping.
- Integrate your membership form directly with marketing tools, such as your customer relationship manager (CRM) and email marketing service.
Your customers might also prefer it because they can sign up for your gym from their homes or mobile devices.
What types of businesses can use a digital membership form?
A digital membership form can be a great solution for all kinds of businesses and solopreneurs in the fitness space.
Here are a few example real-life use cases for the form from this tutorial, though this is by no means a complete list:
- Independent gyms – Offer multiple membership tiers, optional add-on packages (like PT sessions), and more. You can also collect consent for gym rules and a liability waiver.
- Yoga or pilates studios – Let people purchase one-time class packages or sign up for a recurring subscription.
- Personal trainers – Collect information about your clients’ goals and limitations. You can also charge for one-time session packages or set up a recurring retainer.
- Bootcamp/outdoor classes – Let members choose from different locations and/or time slots, while also collecting payments.
One of the nice things about using Gravity Forms is that you can also easily adapt your membership form to other use cases and feature needs beyond what we discussed above.
How to create a gym membership form on WordPress
With the Gravity Forms plugin and its gym membership form template, you can easily set up a membership form for your gym, fitness center, yoga studio, or any other similar type of business.
For this tutorial, we’ll use the example of creating a signup form for a gym with recurring monthly subscriptions, but you can easily adapt the same basic principles to any other use case.
The only thing that we’ll assume is that you already have a WordPress website. From there, we’ll cover every other step.
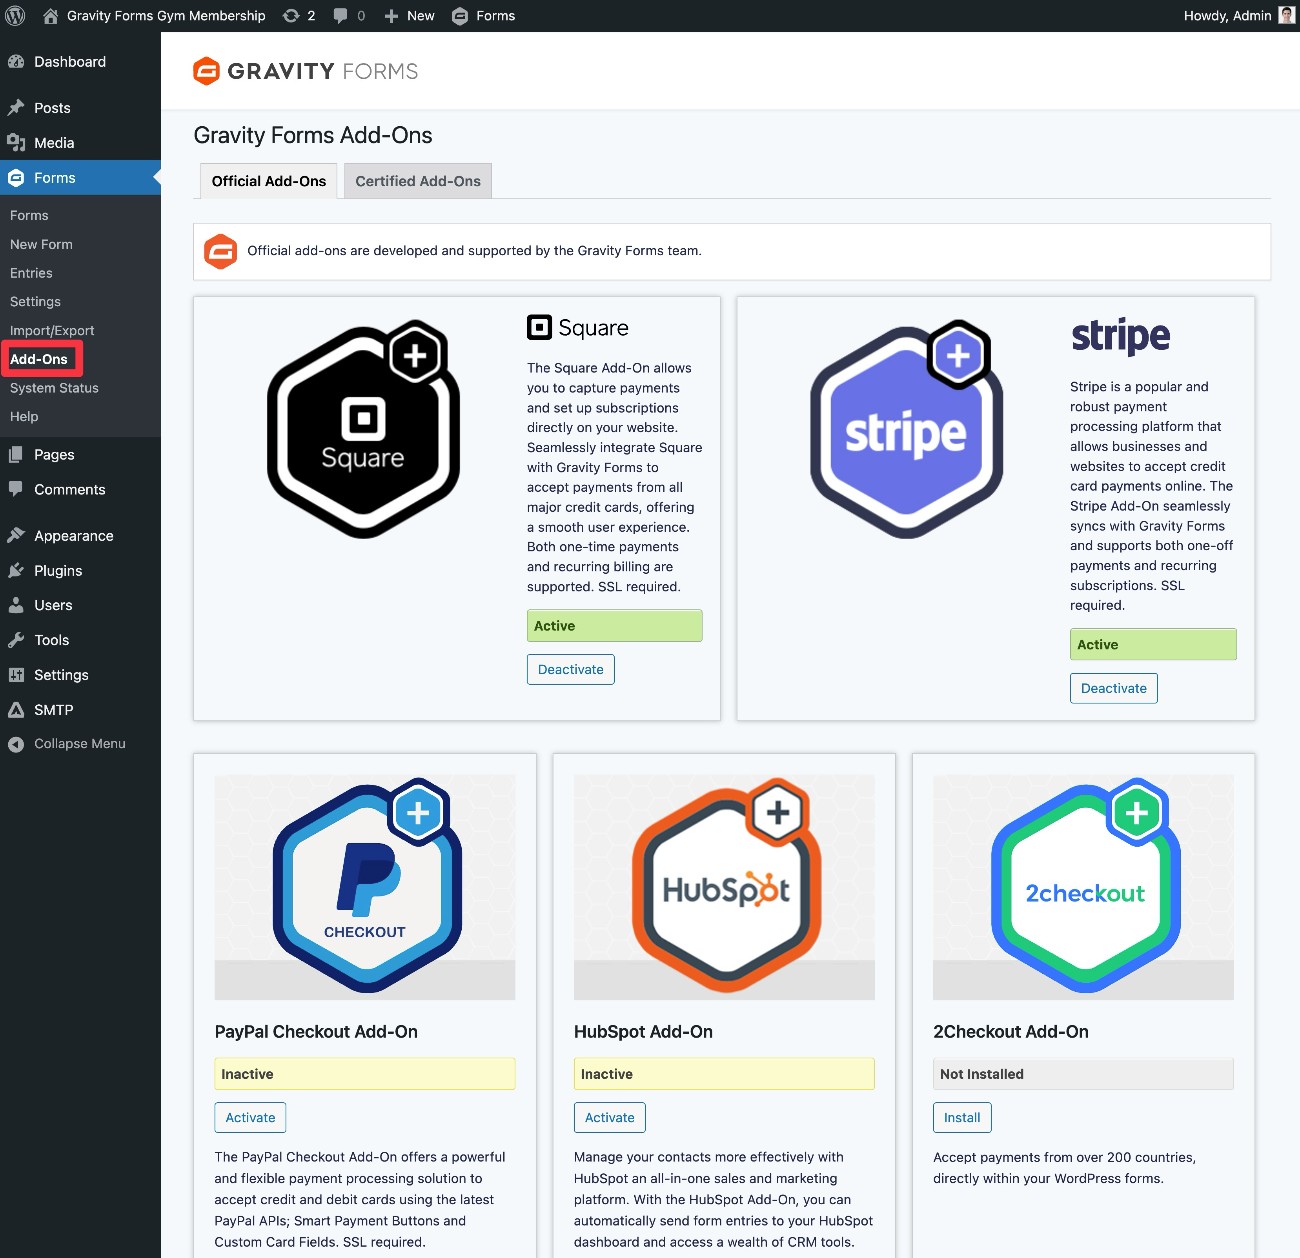
1. Install Gravity Forms and integrations
To get started, you’ll need to install the core Gravity Forms plugin, along with any add-ons that you’ll need.
To use the gym membership form template, you’ll only need one add-on for the payment processor that you want to use. The template uses Stripe by default, but you could change to one of the other payment processors that Gravity Forms supports.
However, you might want to optionally install other add-ons for certain functions, such as marketing automation. We’ll discuss these later in the post.
The Gravity Forms Stripe Add-On (and most other payment add-ons) is available on the Gravity Forms Pro, Elite, and Nonprofit licenses.
If you’re not holding one of those licenses yet, you can purchase a new license here or upgrade your existing license and only pay the prorated difference.
Once you’ve installed the core Gravity Forms plugin and added your license key, here’s how you can install add-ons:
- Go to Forms → Add-Ons in your WordPress dashboard.
- Find the add-on that you want to install in the list of available add-ons.
- Click Install.
- Once the installation finishes, make sure to click the Activate Plugin button.
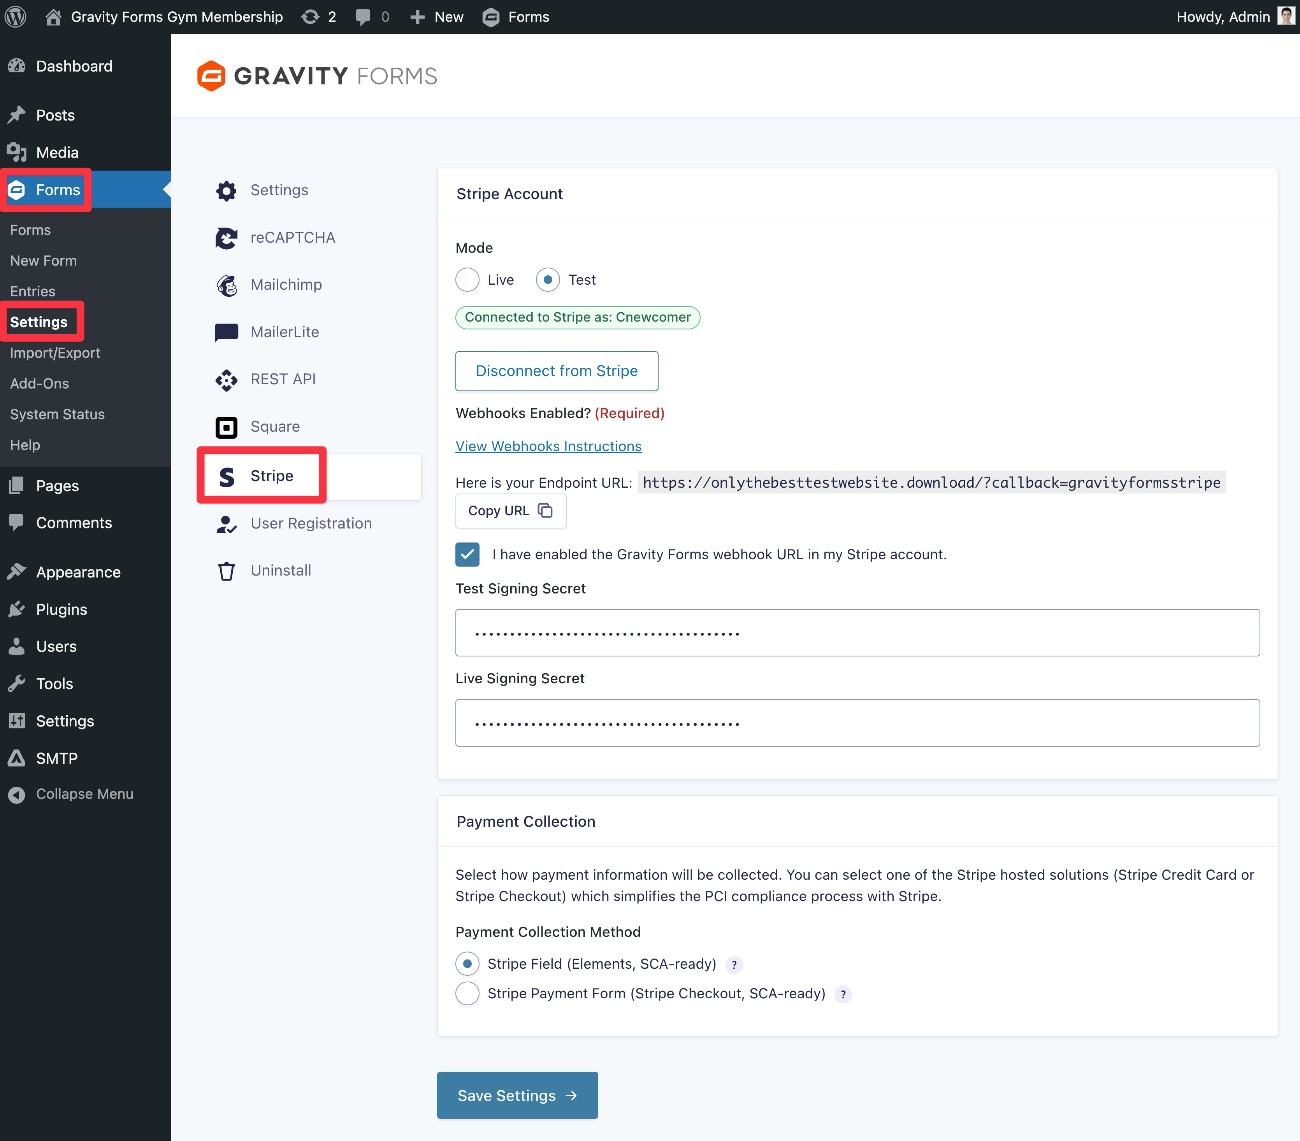
2. Connect Gravity Forms to Stripe
Before you start setting up the gym membership form template, you’ll first need to connect Gravity Forms to Stripe (or whichever payment processor you want to use).
We will cover the high-level steps below. However, to view more detailed instructions for Stripe and other payment processors, you can find links to the full documentation below:
For Stripe, here’s the basic rundown of what you need to do:
- Create a free Stripe account (if you don’t already have one).
- Connect Gravity Forms to Stripe using the Stripe authorization flow (Forms → Settings → Stripe → Connect with Stripe). This article has the full instructions. We recommend starting in Test mode so that you can test your form with test credit card details – you can switch to Live mode when you’re ready to accept real payments from gym members.
- Set up the Gravity Forms webhook endpoint in Stripe using Stripe Workbench. You need to add the webhook endpoint in both the Live and Test dashboards in Stripe. You can use these links to add a Test webhook endpoint and add a Live webhook endpoint. Here are the full instructions for setting up webhook endpoints.
- After adding the webhook endpoints, Stripe will give you a Signing Secret key for both Test and Live modes. Add each key to the correct box in the Gravity Forms Stripe settings. Once you’ve added both keys, check the box that says I have enabled the Gravity Forms webhook URL in my Stripe account. Then, click Save Settings at the bottom of the settings area.
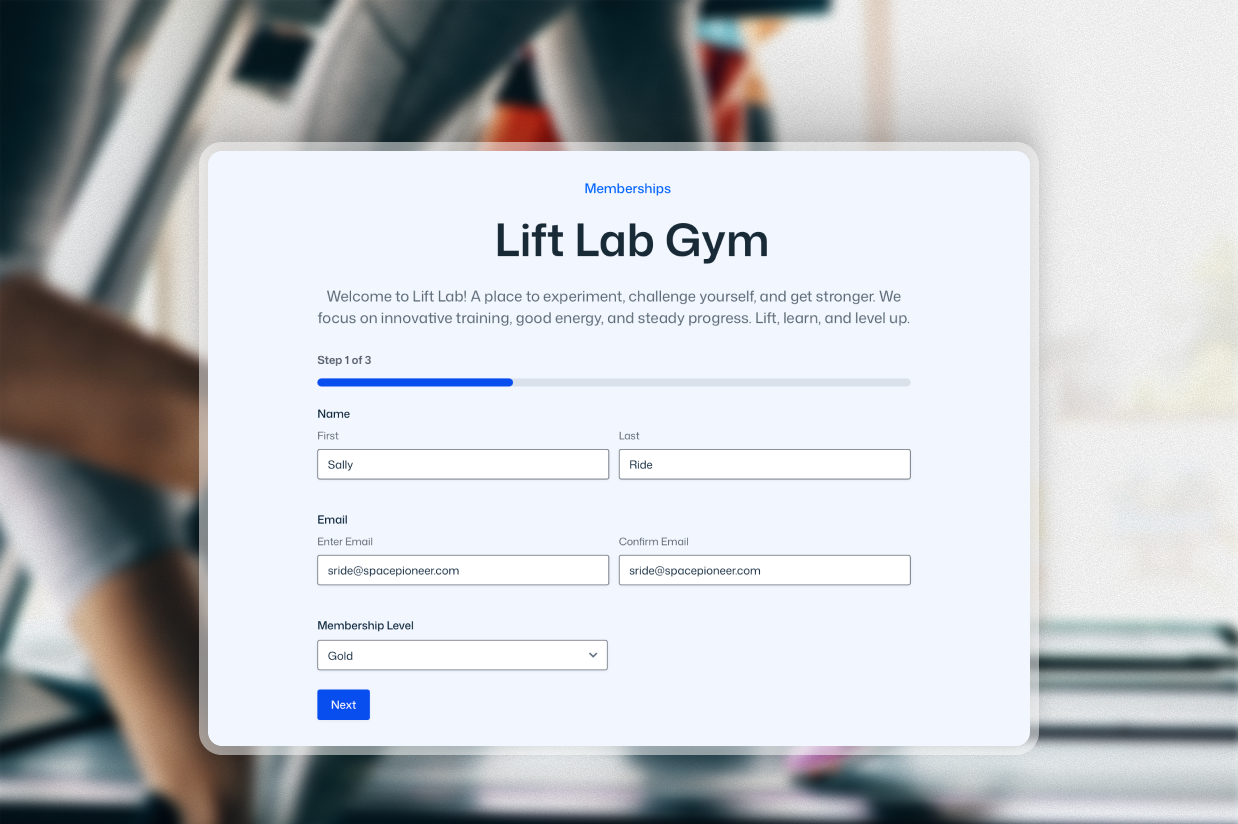
3. Create a form using the gym membership form template
Now, you’re ready to customize the gym membership form template.
To begin, create a new form by going to Forms → New Form in your WordPress dashboard.
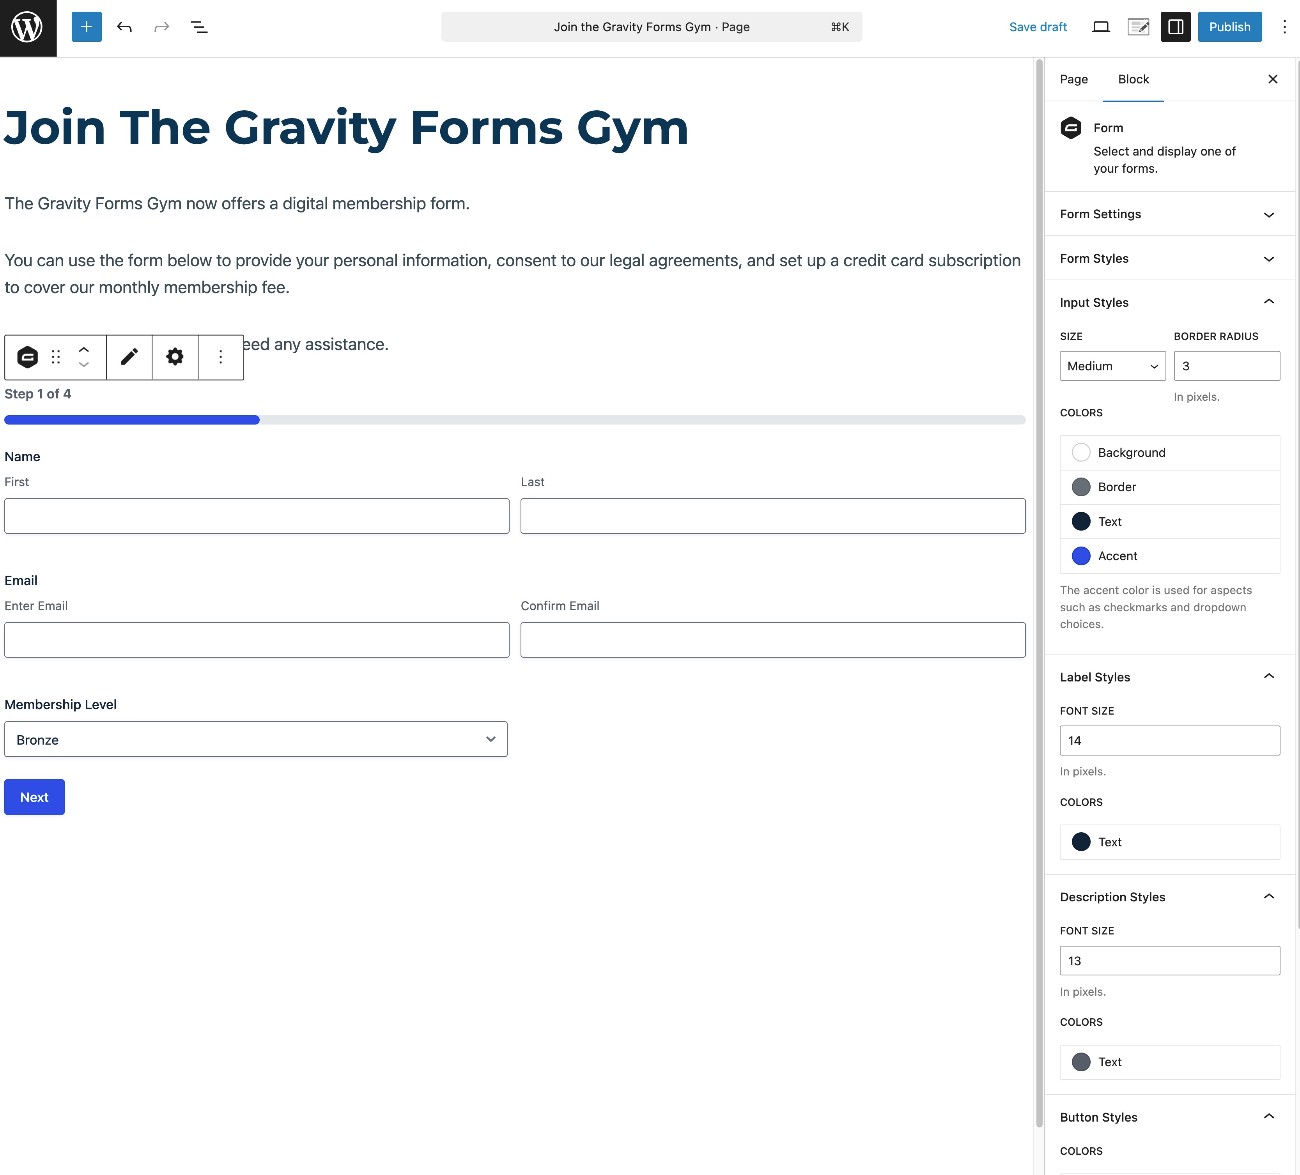
Find the Stripe Membership Form template in the list and choose Use Template.
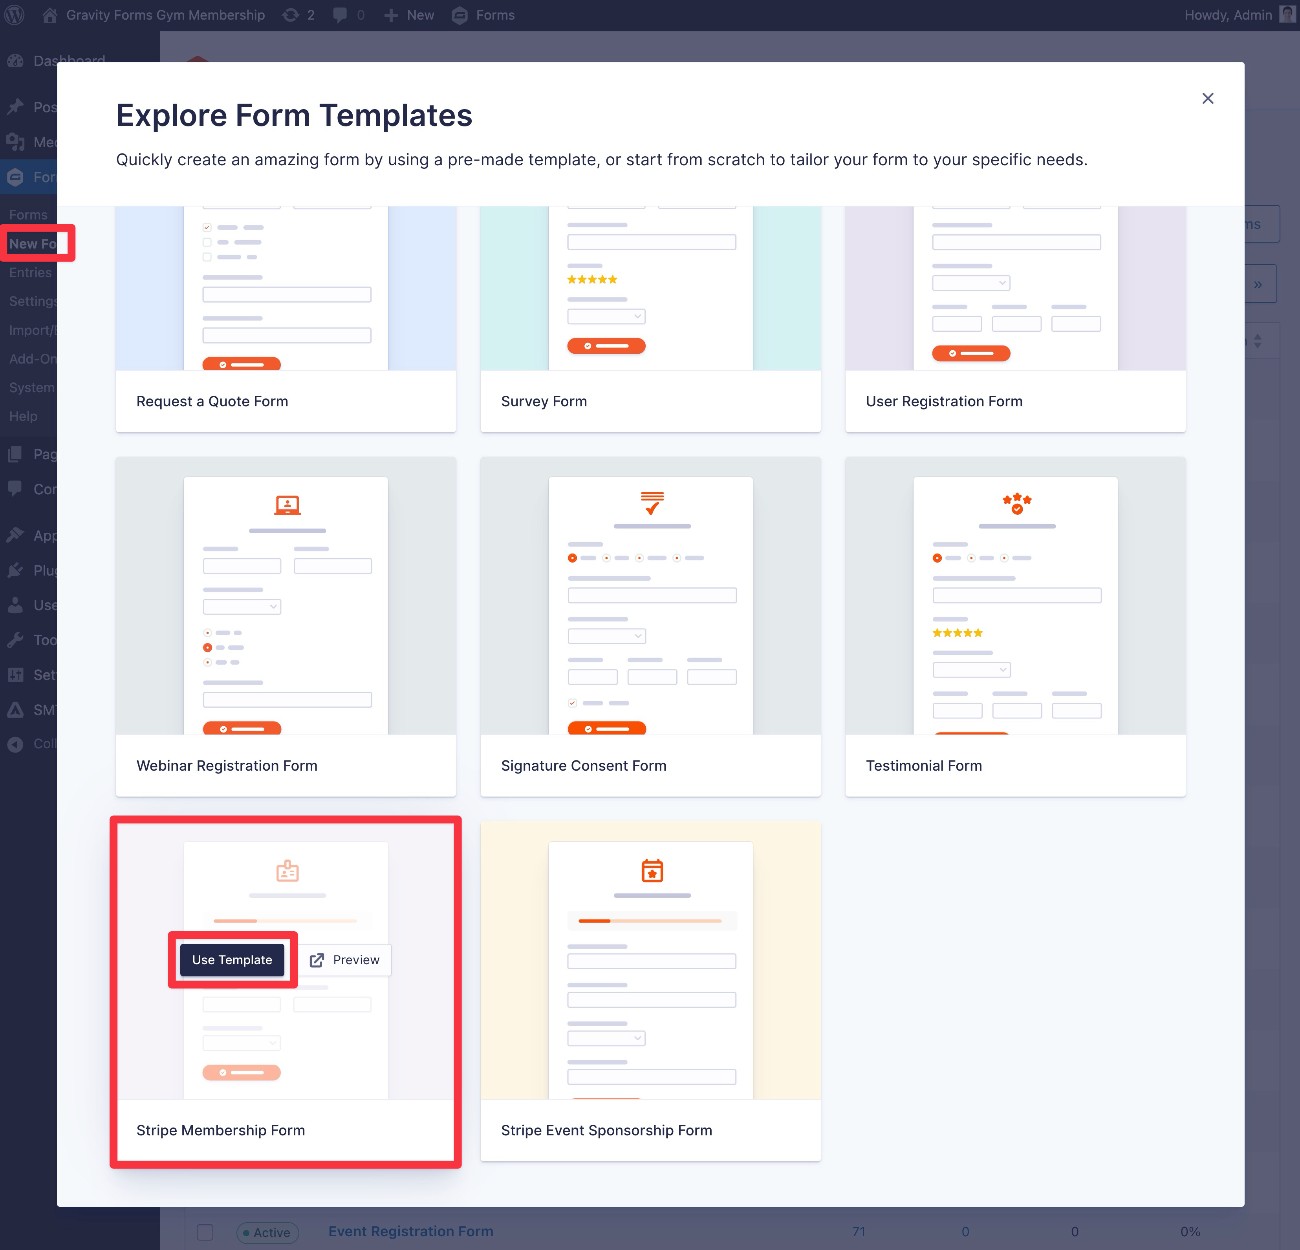
You can then give your form a name and an optional description. Then, click Use Template again to launch the drag-and-drop form editor.
While the template includes most of the essential fields that you need for a fitness membership form, you’ll still probably want to customize things for your use case. Using the editor, you’re free to…
- Add new fields from the sidebar on the right.
- Edit the existing fields in the template (in fact, you must edit some fields, which we’ll cover below).
- Remove fields that you don’t want to use.
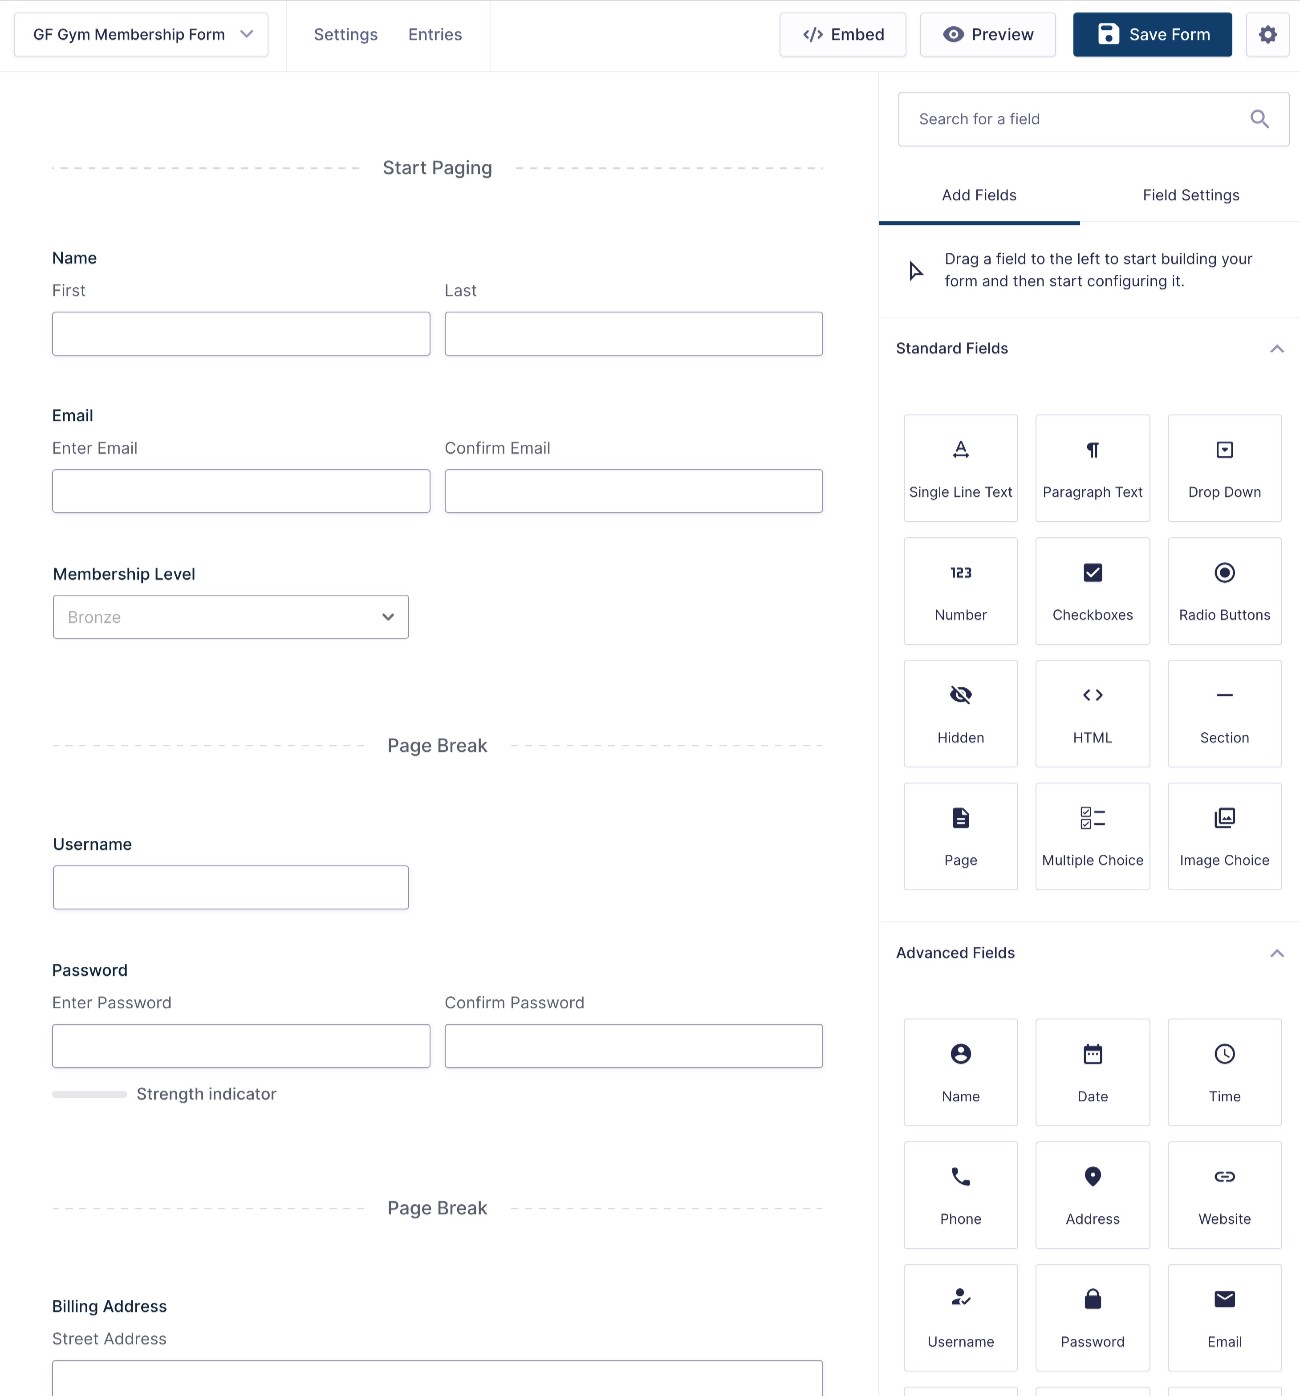
There are a few areas that you’ll want to pay special attention to.
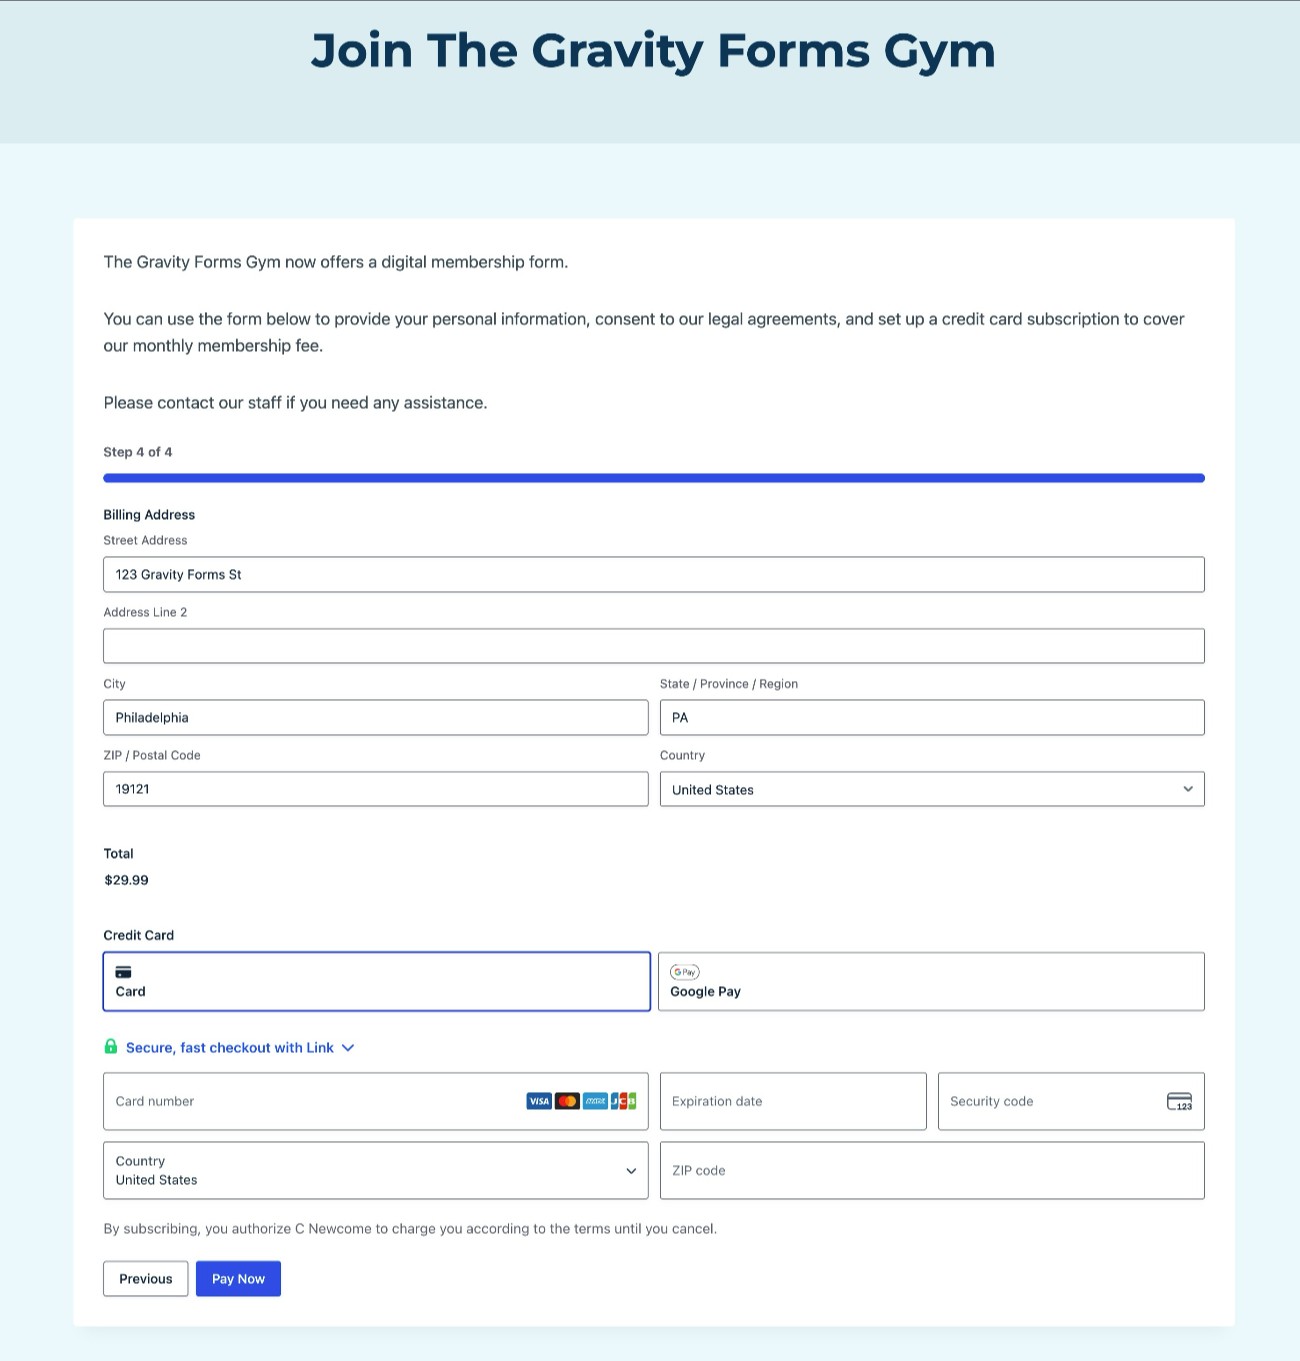
First, consider the “Membership Level” Product field:
- If your gym has multiple pricing tiers, you can add each tier as a single level. You could also offer multiple class/session package options.
- If you only have a single price for all members, you can change the Field Type to Single Product in the Product field settings.

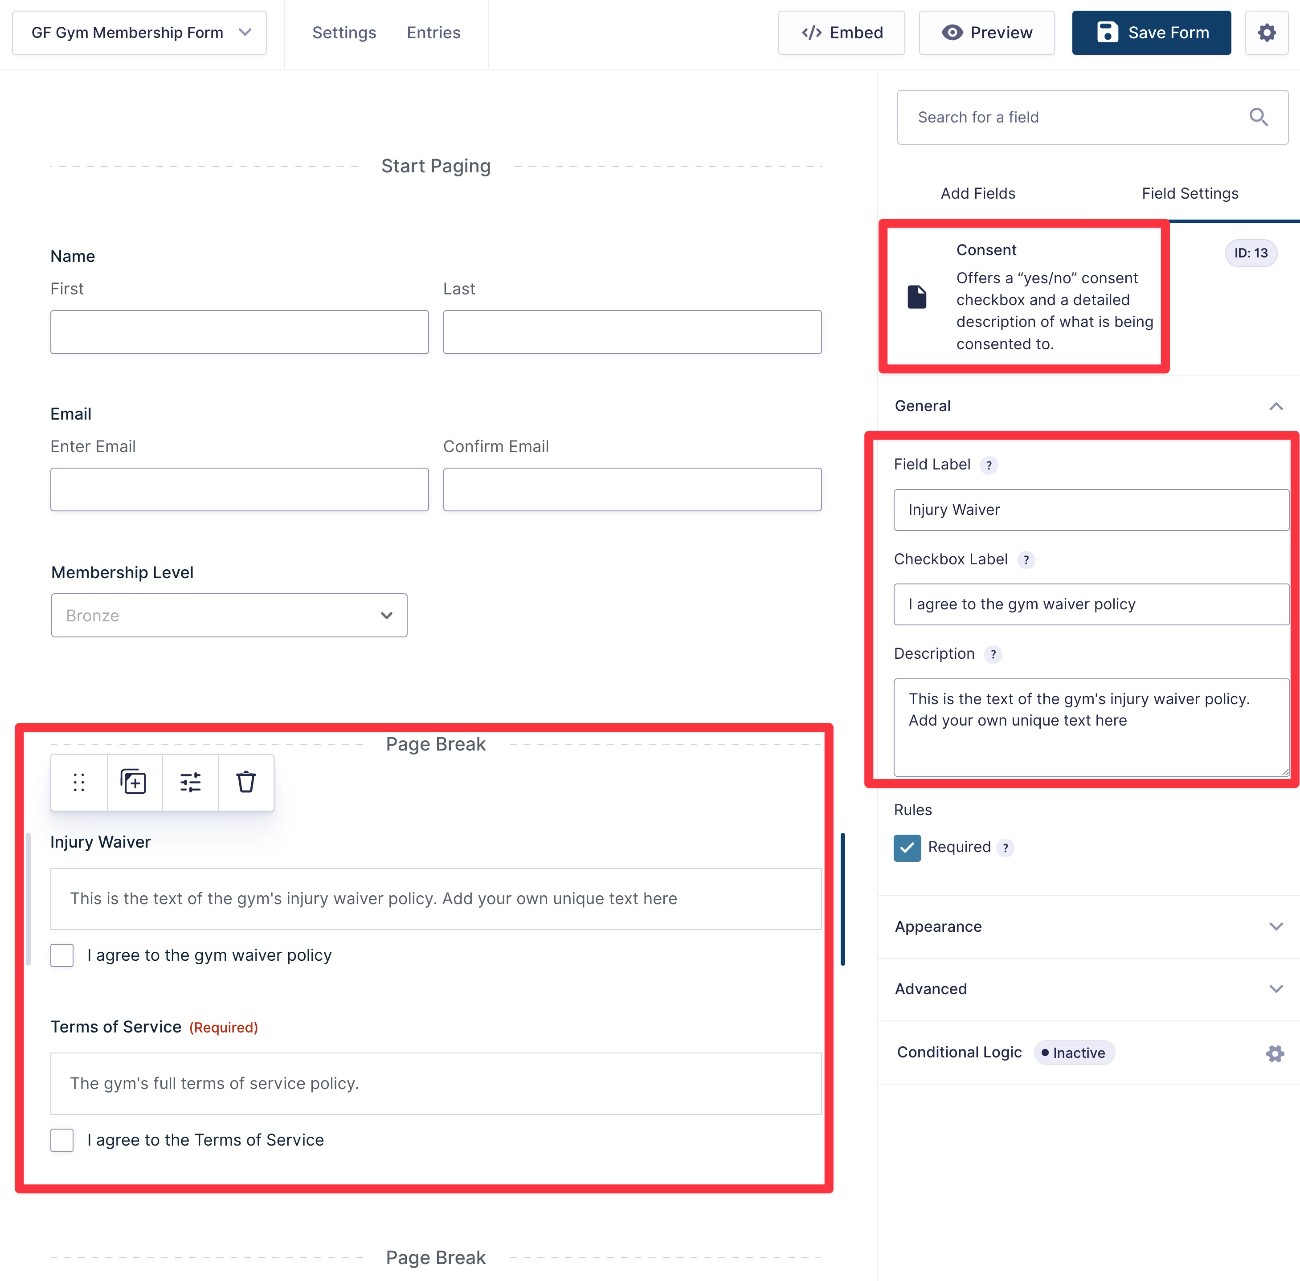
We also recommend adding the Consent field, which you can use for waivers, consent agreements, etc.
The nice thing about this field is that it will store the full text of the agreement/waiver when someone submits the form. That way, if you ever update the text in the future, you’ll still have a record of exactly what the text was at the time that the person provided their consent.
You can find this field in the Advanced Fields box.
You can also add multiple Consent fields if needed, such as one for an injury waiver and one for terms of service.
Feel free to add/edit any other fields that fit your gym’s unique use case.
For example, if you do not want to create a WordPress user account for gym users, you can delete the fields that collect a member’s preferred username and password. More on this later.
Finally, there’s also a Stripe field at the bottom that controls payment details, including whether to accept additional payment methods beyond credit/debit cards. You won’t be able to see a preview of this field until you create a Stripe feed in the next section. If you want to adjust it, you can always come back and edit it once you complete the next step.
Make sure to click the Save Form button once you’re finished working.
3. Create a Stripe feed to control payments
Once you’re happy with the fields in your form, the next step is to create a Stripe feed.
The Stripe feed lets you control how to charge members, including important details such as the following:
- Whether to process a one-time payment or set up an automatic recurring subscription.
- For subscriptions, how often to bill members (e.g. every month or every year).
To create your Stripe feed, go to Settings → Stripe → Add New inside the form editor interface.
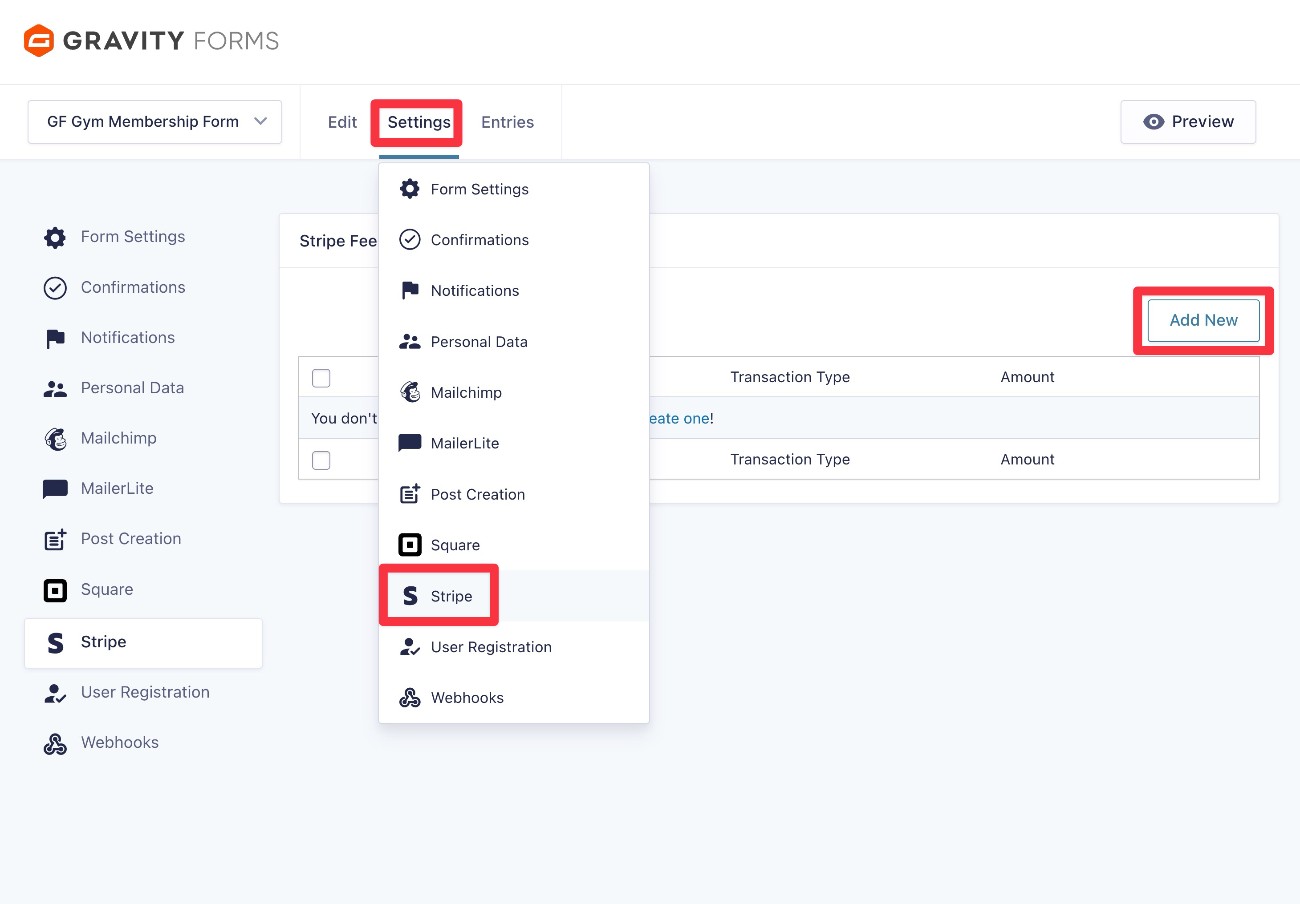
First, you need to choose the Transaction Type:
- Products and Services – Use this if you want to charge a one-time payment. This could work well if you sell class/session packages, rather than monthly subscriptions.
- Subscription – Use this to set up an automatic recurring subscription. The subscription will continue until it’s canceled.
For most gyms and fitness centers, the Subscription option makes the most sense. For that reason, we’ll use a subscription as the example for this tutorial.
However, if you want to sell class/session packages, you can choose the one-time payment option, and all of the basic ideas are the same.
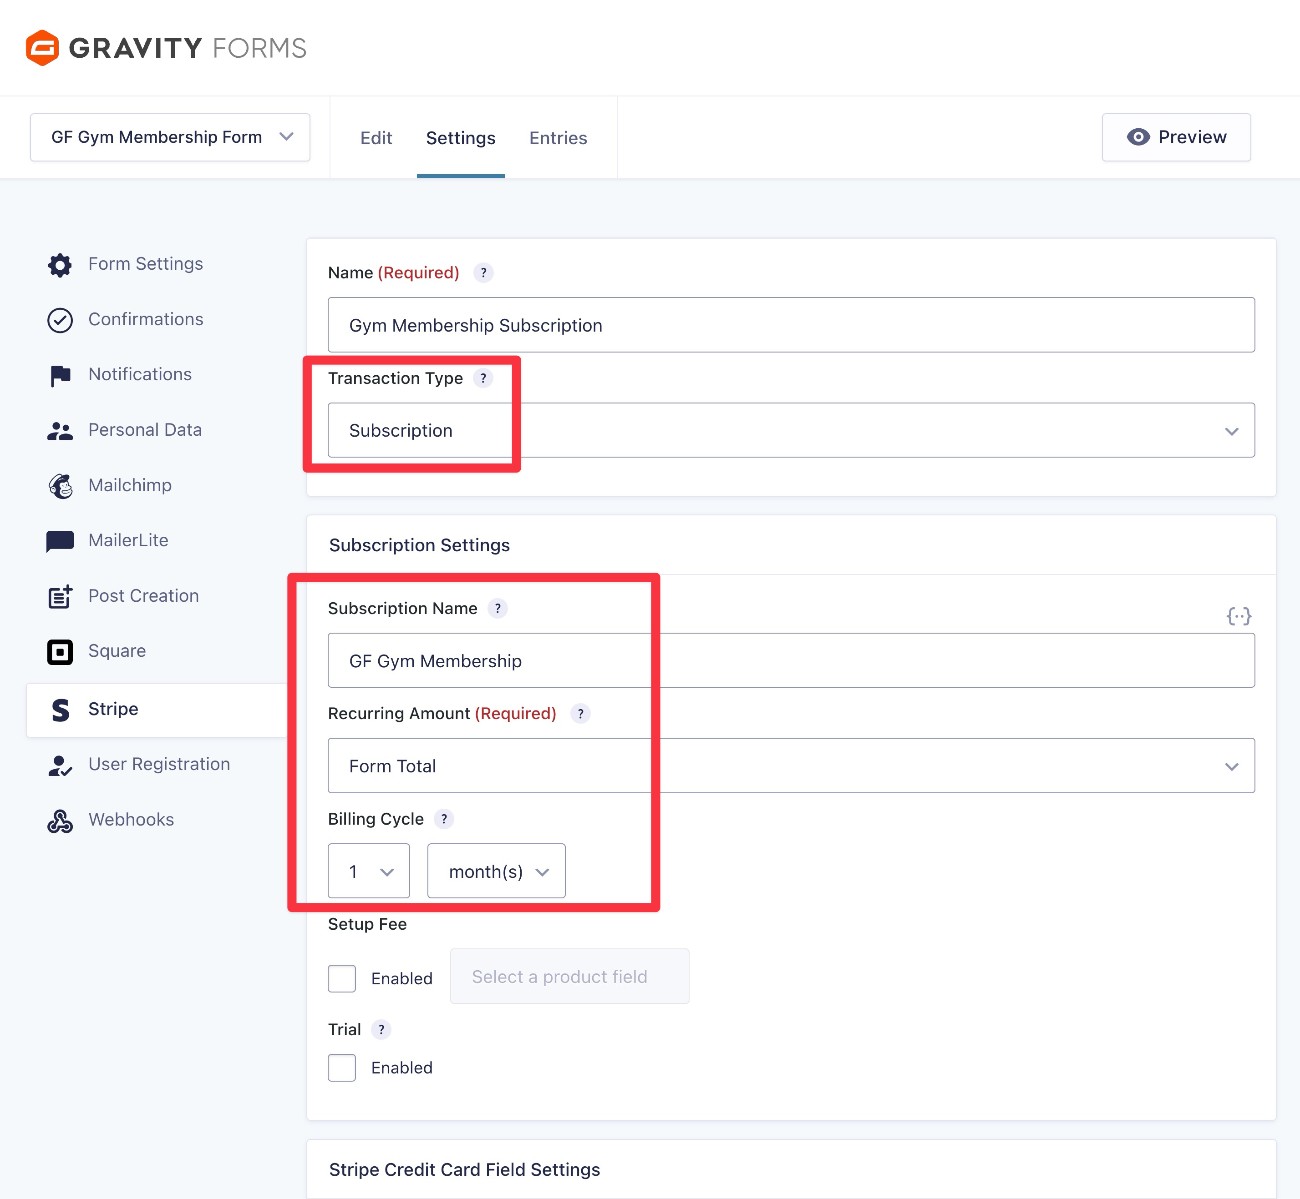
Once you choose the transaction type, you’ll get access to some additional settings.
We recommend considering all of the options, but here are some of the most important settings to focus on:
- Recurring Amount – This is the payment amount of the recurring subscription. Usually, you’ll set this equal to the Form Total option, which will automatically update based on the option that users choose (important if you have multiple membership tiers).
- Billing Cycle – This lets you control how often to bill gym members. For example, monthly or annually.
- Setup Fee – If your gym charges a one-time signup fee on top of the recurring membership, you can use this option to add an extra amount that’s only charged on the first billing cycle.
- Trial – If you want to offer gym members a free trial before you start charging them, you can use this option.
Below these options, you can also map the fields from your gym membership form to fields in Stripe, such as a member’s billing address.
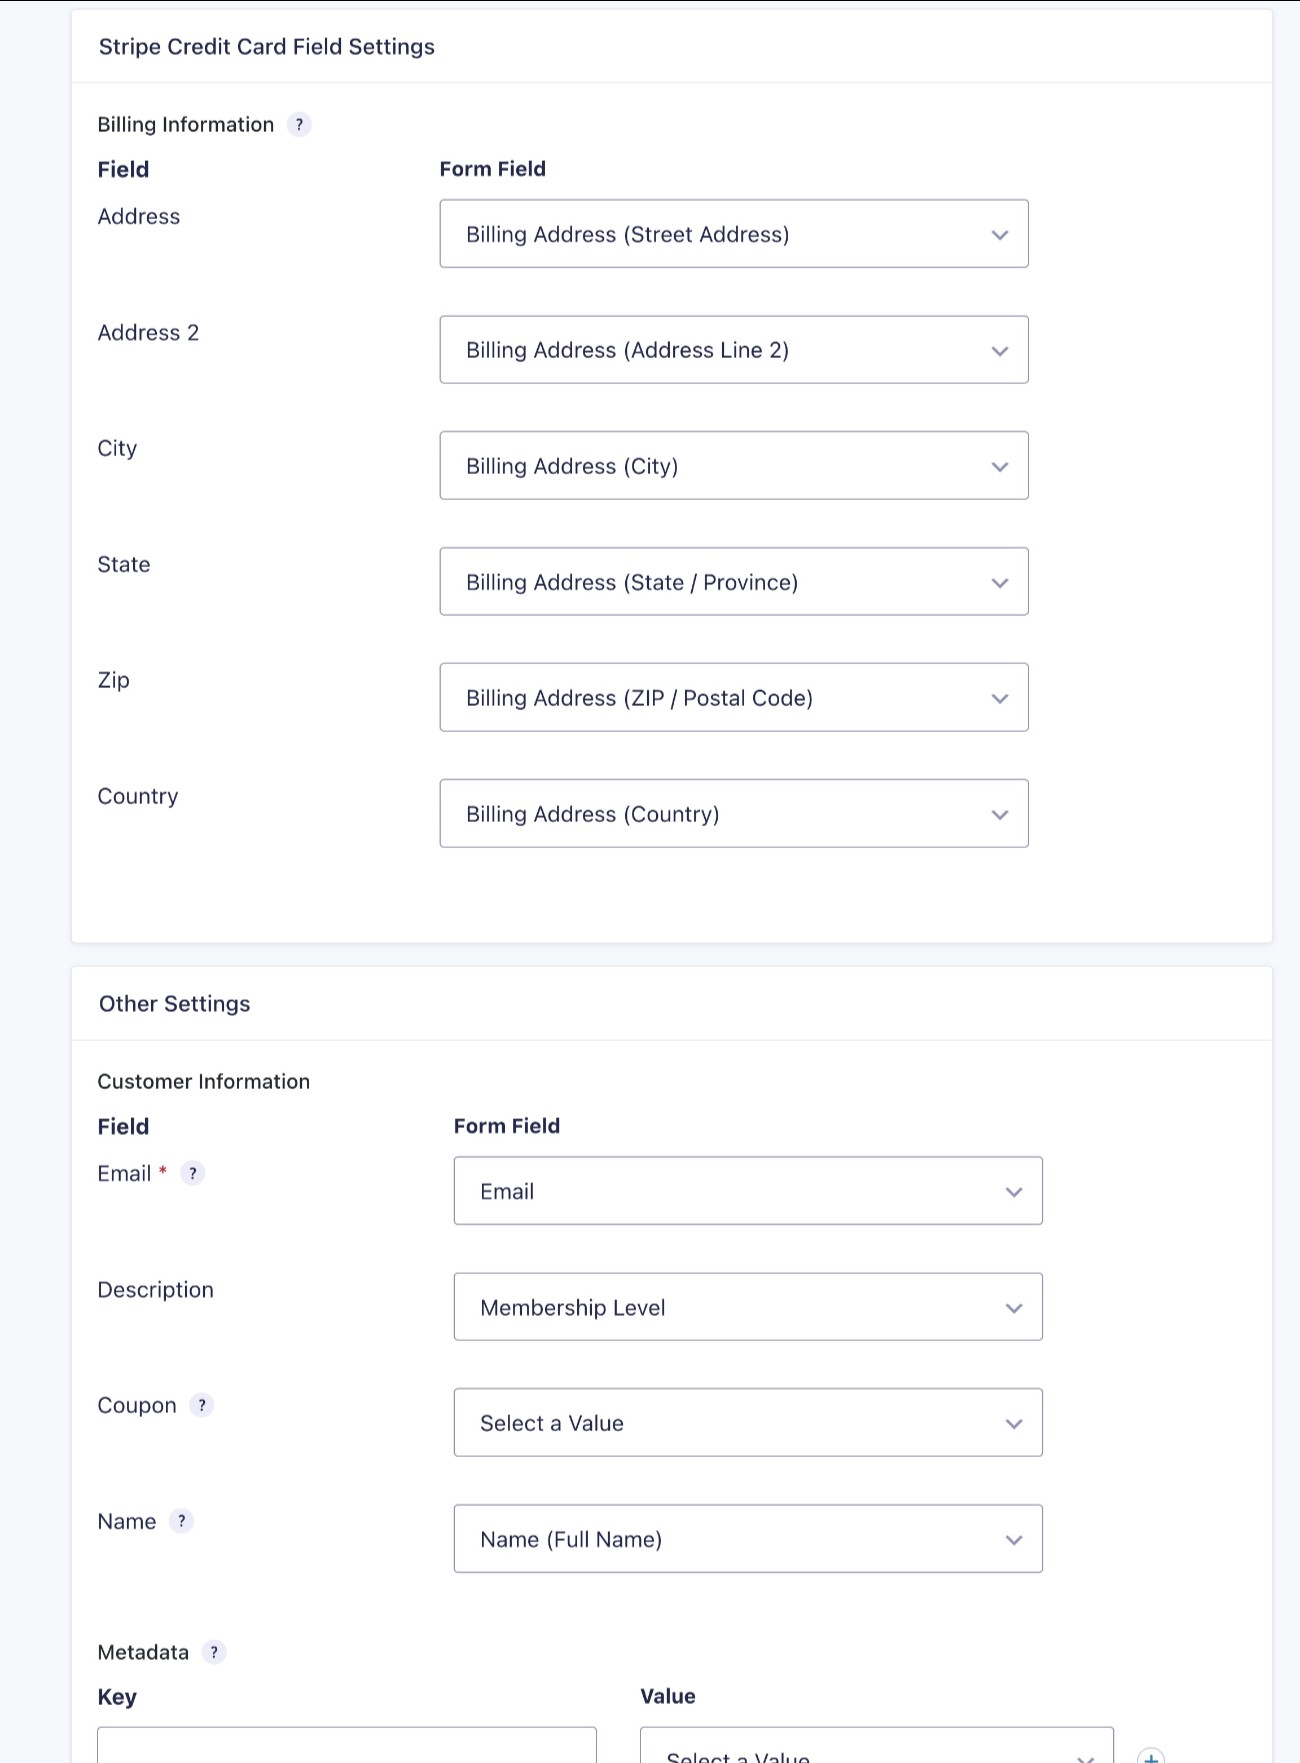
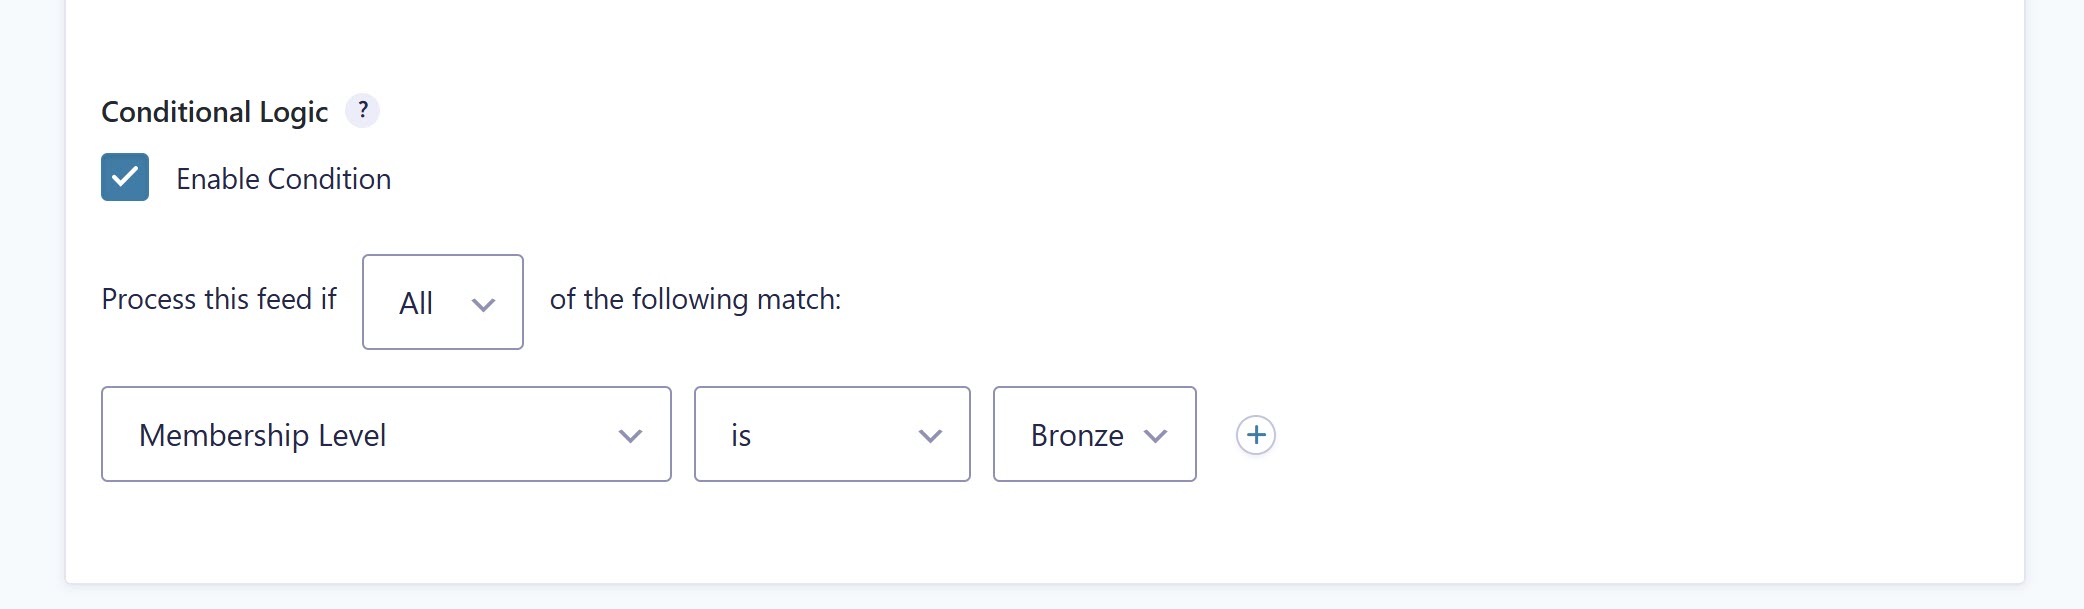
At the very bottom, you can also add conditional logic rules. These let you only execute this feed if certain conditions are met.
For example, if you have different membership levels with multiple pricing tiers, you will need to set up one feed per membership pricing option, and configure the conditional logic for each of those feeds to only process when required.
Once you’ve made all of your choices, click the Save Settings button at the bottom.
Additionally, if you’d like to accept payments using Stripe Link, digital wallets like Apple or Google Pay, or more regional payment methods, you’ll need to enable Stripe Payment Element within the Stripe field settings.
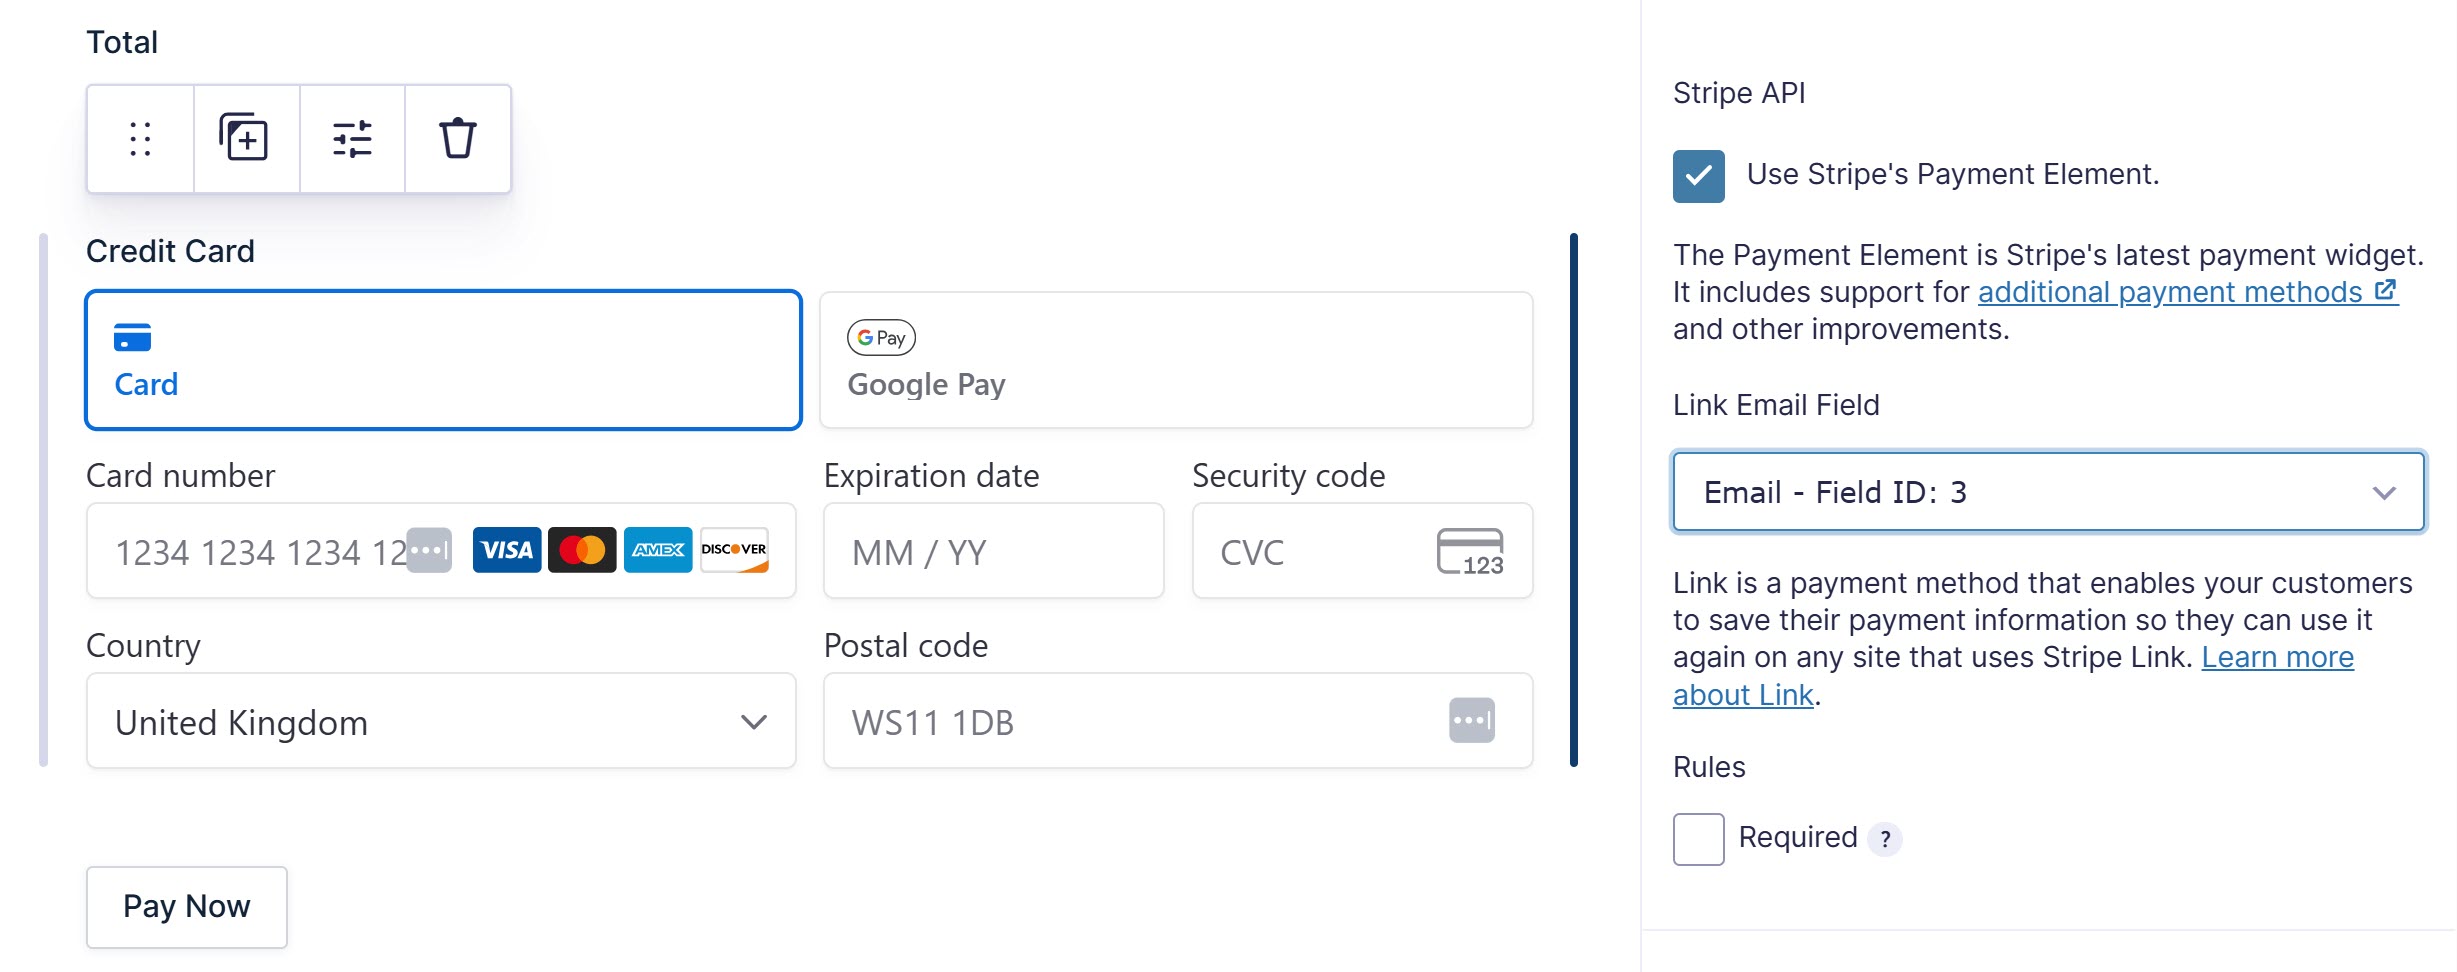
Note: You’ll also need to enable many of the regional payment methods from within your Stripe dashboard.
4. Enhance your gym membership form with marketing, user accounts, and more (optional)
The ideas in this section are 100% optional.
However, another big advantage of using Gravity Forms for a gym membership form is the ability to extend your form with the other official integrations and community add-ons that are available for Gravity Forms.
In this section, we’ll share some ideas and tutorials for common enhancements that you might want to make to your own form, including the following:
- Storing customer data in a customer relationship manager (CRM)
- Subscribing customers to an email newsletter (if they opt in)
- Creating WordPress user accounts for customers to give them access to exclusive content or tools
- Automating business process workflows, such as administration tasks related to signing up a new member.
Store customer data in your gym’s CRM
Most gyms will use some type of customer relationship manager (CRM) to help with marketing, sales, customer service, and other important aspects of managing customer relations.
To help you more easily sync members’ information to your CRM, Gravity Forms integrates directly with most popular CRM platforms including Salesforce, HubSpot, Zoho CRM, Capsule, Agile CRM, and others. If you’re using a CRM without a direct integration, you can still connect your gym membership form using the Zapier Add-On or Webhooks Add-On.
While the specifics will depend on your specific CRM/add-on, you’ll generally be able to map form data to fields in your CRM, assign contact owners, use conditional logic, and more.
To add this functionality to your gym membership form, the basic process works like this:
- Install the Gravity Forms Add-On for your chosen CRM.
- Connect Gravity Forms to your CRM in the Gravity Forms settings (much like you connected Gravity Forms to Stripe).
- Create a feed for your CRM in the gym membership form settings.
Subscribe members to your gym’s email newsletter
In addition to adding members to your CRM, you might also want to give them an option to subscribe to your gym’s email newsletter.
As with CRM platforms, Gravity Forms integrates directly with most popular email marketing services including Mailchimp, ActiveCampaign, Campaign Monitor, AWeber, Brevo, Kit, and many others.
You can add a field to your gym membership form that lets users opt in to joining your newsletter. Then, you can use conditional logic rules to only subscribe members if they choose to opt in.
The basic process of setting things up is similar to CRMs:
- Install the Gravity Forms add-on for your chosen email marketing service.
- Connect Gravity Forms to your email marketing service in the Gravity Forms settings.
- Create a feed for your email marketing service in the form settings.
Create WordPress user accounts for gym members
If you want to offer special website content for gym members and/or give members the option to manage their memberships from your website, you might want to create an actual WordPress user account for them when they submit your gym membership form.
If needed, you can set this up using the official Gravity Forms User Registration Add-On. It will let you create an account for users, including assigning them a specific user role and controlling other important details.
You can then extend this functionality as needed:
- If you want to offer members-only restricted content, you could use a content restriction plugin to restrict content based on users’ roles. We cover this in our guide to creating a WordPress membership form.
- If you want to let gym members manage their subscriptions from your site, you can add this ability anywhere on your site using a shortcode. Note – this only works if you’re using Stripe for payments.
Automate business process workflows and administrative tasks with Gravity Flow
As part of signing up a new member for your gym, you might have some associated administrative workflows.
To simplify your processes, you can automate these workflows within your forms using the Gravity Flow plugin, which comes from the same team behind Gravity Forms.
Gravity Flow lets you use a visual interface to create your own custom workflows based on 40+ action steps, including things like assigning tasks to users, requiring approvals, generating PDFs, adding additional payment steps, and more.
5. Embed your form and test
Once you’ve set up the gym membership form template and any other optional add-ons that you want to use, you’re ready to embed the form on your website so that users can start signing up for your gym.
You can easily embed the gym membership form anywhere on your site using the Gravity Forms block, shortcode, or PHP function.
If you use the block, you’ll also be able to visually style the form directly from the WordPress editor.
Once you embed the form, we recommend testing it to make sure that everything is working as you want it to.
Because we had you set up Stripe in Test mode to start, you can do this by using one of Stripe’s test card numbers.
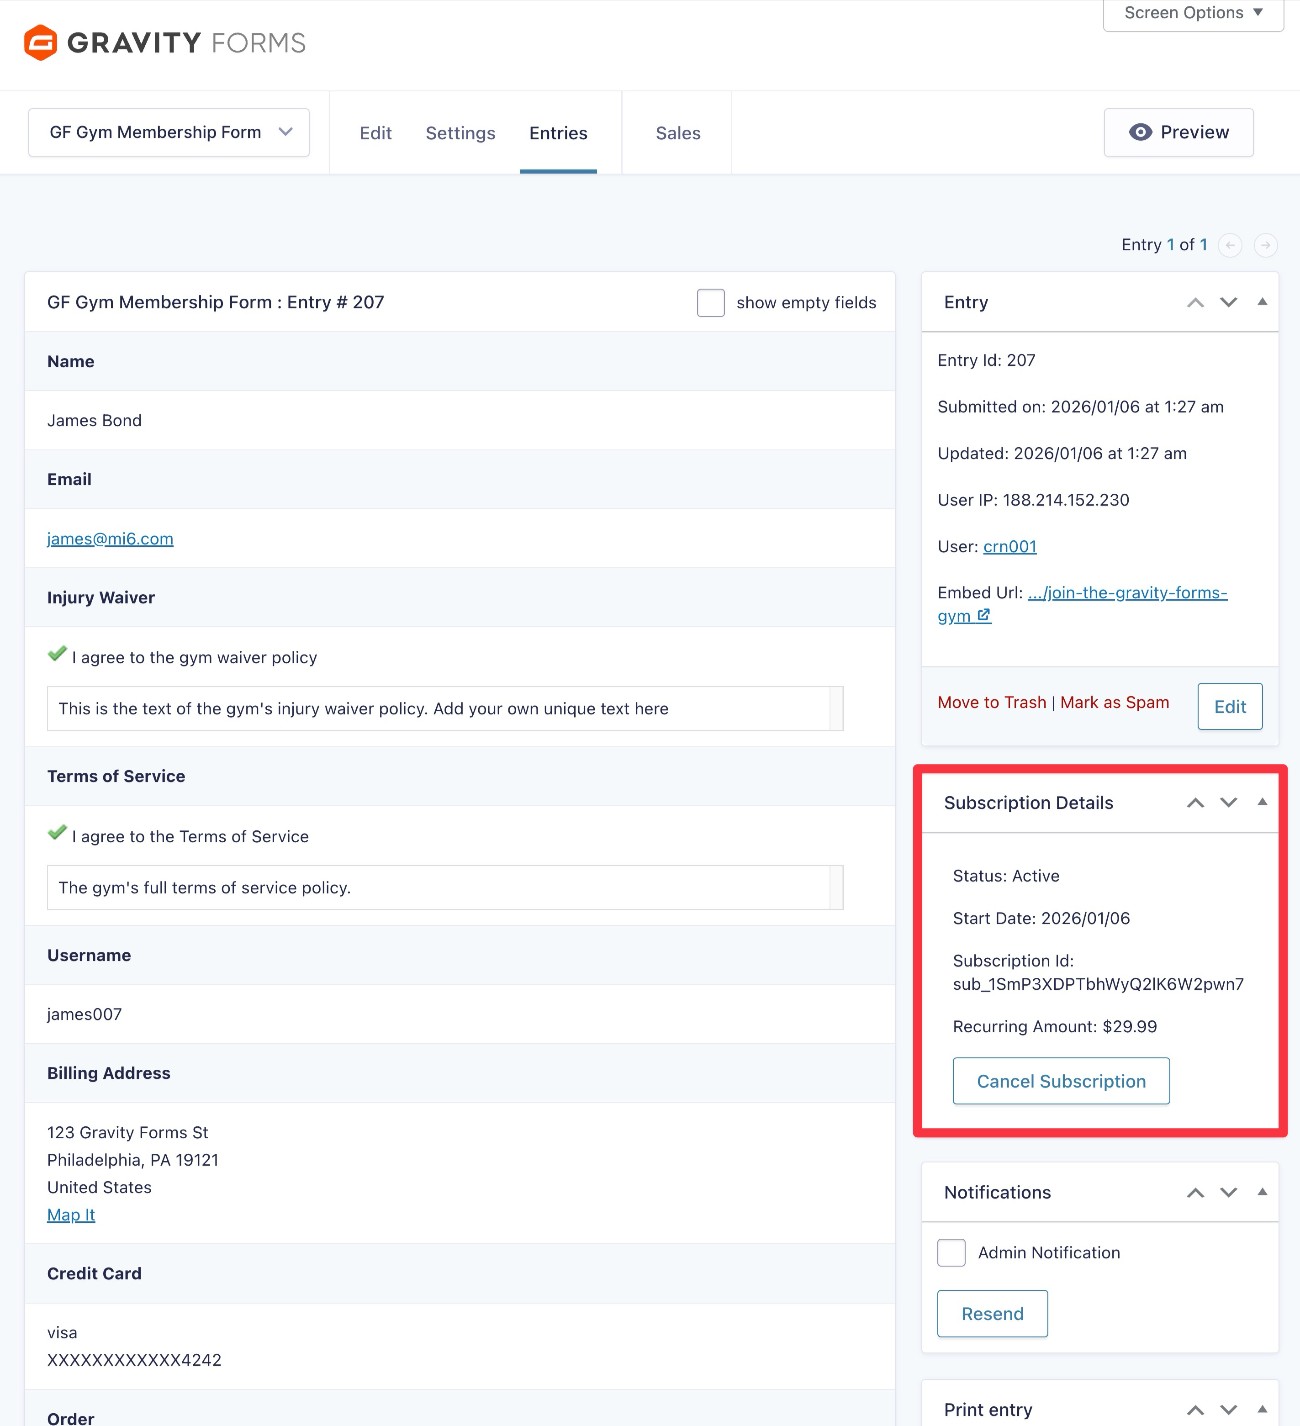
Once you submit the form, the entry will appear in your WordPress dashboard and you’ll also see the payment information in your Stripe dashboard.
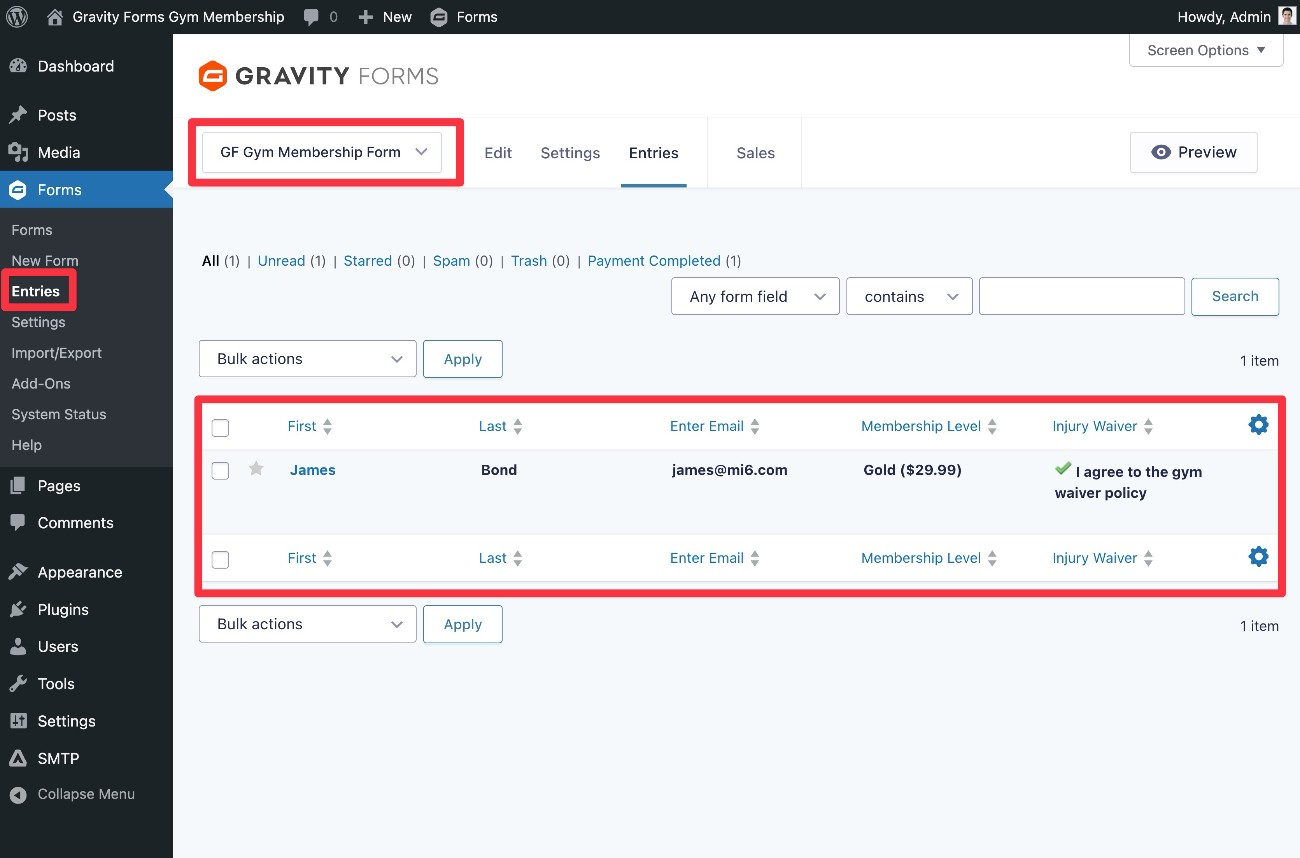
You can manage or cancel a member’s subscription from either dashboard.
6. Enable live payments to accept real money
Once you’ve tested your gym membership form, the last step is to enable live payments for your payment processor so that you can start collecting real money from your gym members.
To do this, go to Forms → Settings → Stripe in your WordPress dashboard.
Change the mode from Test to Live and repeat the same steps to connect your WordPress site to your live Stripe account.

Once you’ve connected in Live mode, make sure to click the Save Settings button in the Gravity Forms interface. Then, you’re finished and ready to start using your new gym membership form.
Create your WordPress gym membership form today
If you run a gym or fitness center, creating a digital membership form can be a great way to create a more streamlined signup experience for your members, while also simplifying your own business processes and recordkeeping.
With Gravity Forms, you can easily create a membership form that collects all of the information you need, lets members make important choices, processes payments, and integrates with other tools that your business relies on (such as marketing tools).
To create a gym membership form with payments, you’ll need a Gravity Forms Pro, Elite, or Nonprofit license. If you’re not holding one of those licenses yet, you can purchase a new license here or upgrade your existing license and only pay the prorated difference.
Or, if you’d rather try it out before making your purchase, you can create a free, fully functioning Gravity Forms demo site.

If you want to keep up-to-date with what’s happening on the blog sign up for the Gravity Forms newsletter!
"*" indicates required fields


