This Month’s Featured Add-On PayPal Checkout
 If you sell products or services, it’s essential for your website to have the ability to accept payments. This means you don’t have to worry about your customers making manual payments or sending checks. Instead, they can pay right there on your website.
The best part is that you don’t have to install a separate plugin. With Gravity Forms and PayPal Checkout Add-On, you can easily and quickly take payments on your site.
In this article, we’ll explain what kind of payments you can accept with PayPal Checkout, how to install the add-on, and share tips for creating payment forms on your website.
PayPal Checkout Add-On: An Introduction

The PayPal Checkout Add-On allows you to easily accept payments on your site in over 100 currency types. You can capture credit card details the moment someone submits the form, set up subscriptions, enable authorize and capture, or refund a payment from within your WordPress Admin.
In addition to that, thanks to PayPal’s real-time intelligence and adaptive machine learning you’re protected against fraudulent transactions, making it a great choice for anyone running a business, large or small.
What Kind Of Payments Can You Accept With The PayPal Checkout Add-On
Here are a few examples of different types of payments you can accept with Gravity Forms once you enable the PayPal Checkout Add-On:
- Accept payments for digital and physical products.
- Create recurring subscriptions for popular products or services that require an ongoing monthly fee.
- Accept payments for one-time services.
- Charge for event tickets.
- Take payments for membership sites.
- Allow users to submit and pay for a sponsored post on your site.
- If you’re a non-profit organization, you can accept donations.
- Accept payments from advertisers to display their ad on your site.
- Allow users to register for a webinar on your site and collect payments.
- Create and sell gift certificates that your visitors can gift to other users to spend on your site.
PayPal Checkout Add-On Features
Now that you know what types of payments you can accept, let’s take a look at the top features the PayPal Checkout Add-On has to offer:
- One time payments — when someone submits a form, you can automatically capture their payment for all kinds of one time payments.
- Subscriptions — create a reliable source of revenue with recurring subscriptions.
- Support for refunds — a new feature in the PayPal Checkout Add-On allows you to refund customers right from within your WordPress dashboard.
- Support for payment authorization and capture — another new feature PayPal Checkout now offers is to allow you to authorize a payment on the users credit card and then charge them for it later.
- Advanced fraud protection — as mentioned earlier, PayPal Checkout uses PayPal’s real-time intelligence to monitor for fraudulent activity and protect your business from fraudulent transactions.
- Global support — PayPal is a popular payment provider with infrastructure in more than 200 countries all over the world. They take care of all the global compliance issues including PCI, AML, and OFAC sanctions. On top of that, you can talk to their support team 24/7 and get help if and when you need it.
- Powerful insights — thanks to real-time data, you can get an instant overview of how your business is doing financially and make educated decisions to increase your profits.
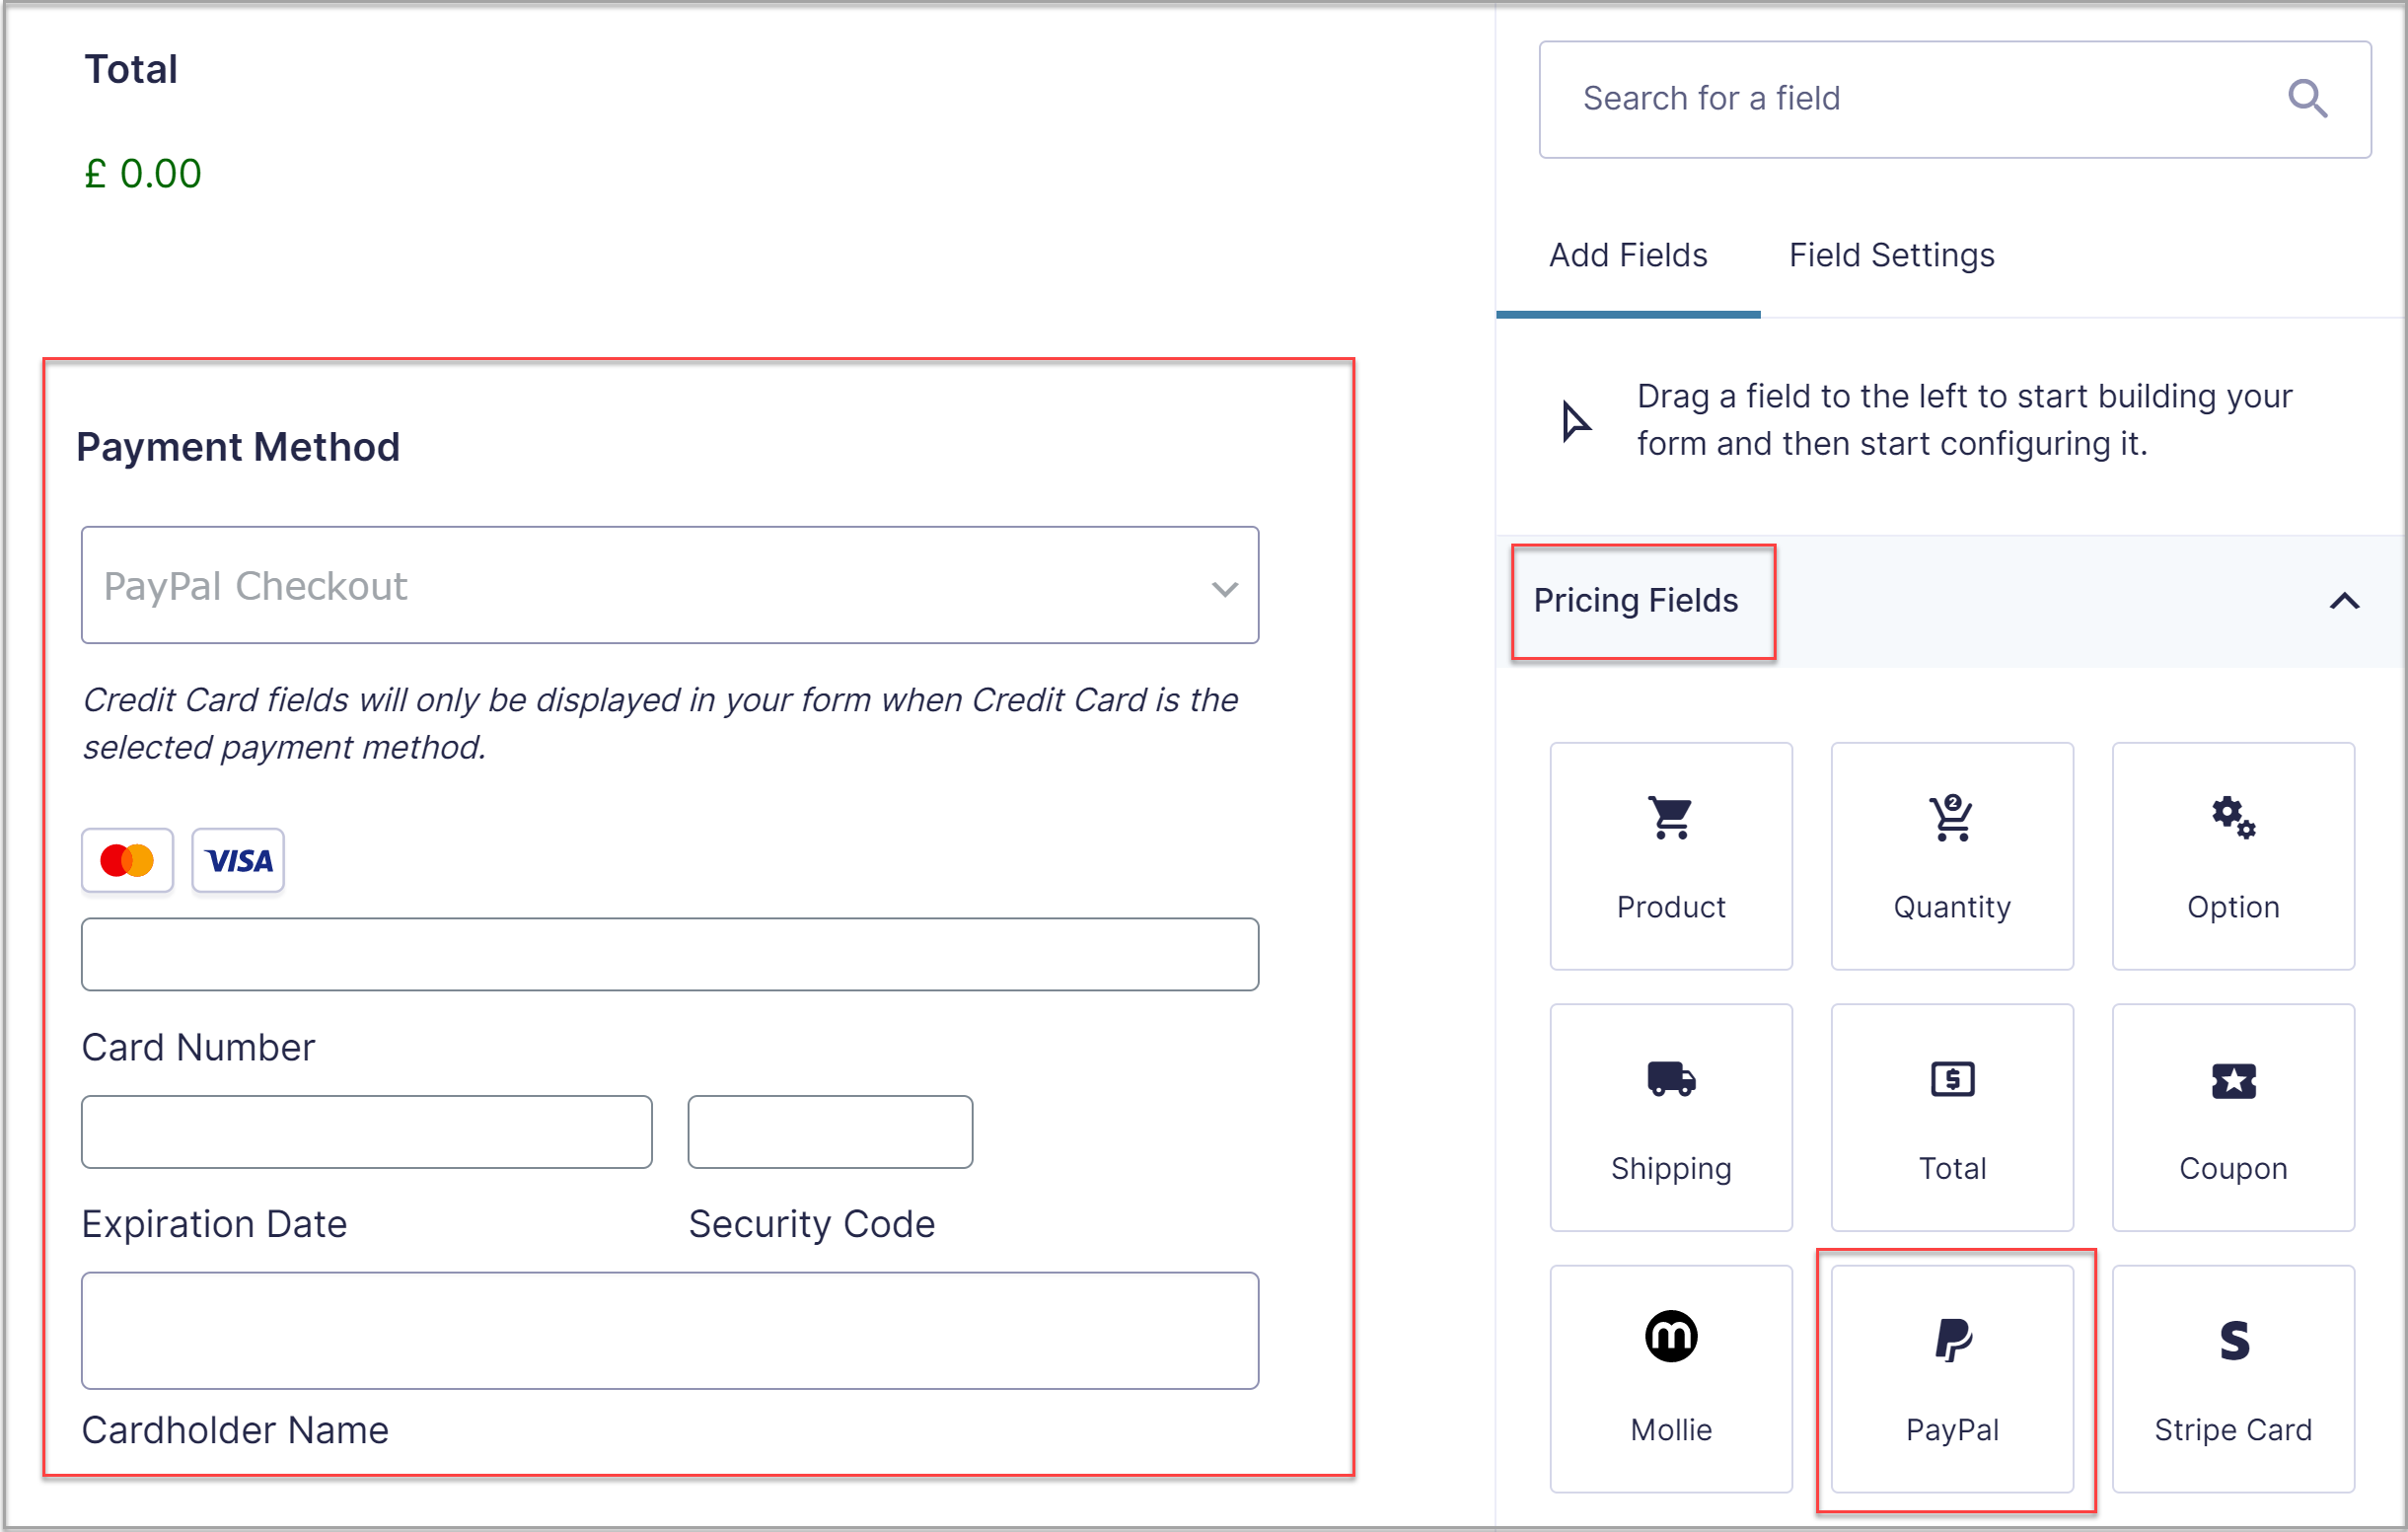
How To Install the PayPal Checkout Add-On
To install the PayPal Checkout Add-On, you’ll need a Gravity Forms Pro or Elite license. Let’s take a look at how you can install and enable PayPal Checkout on your site.
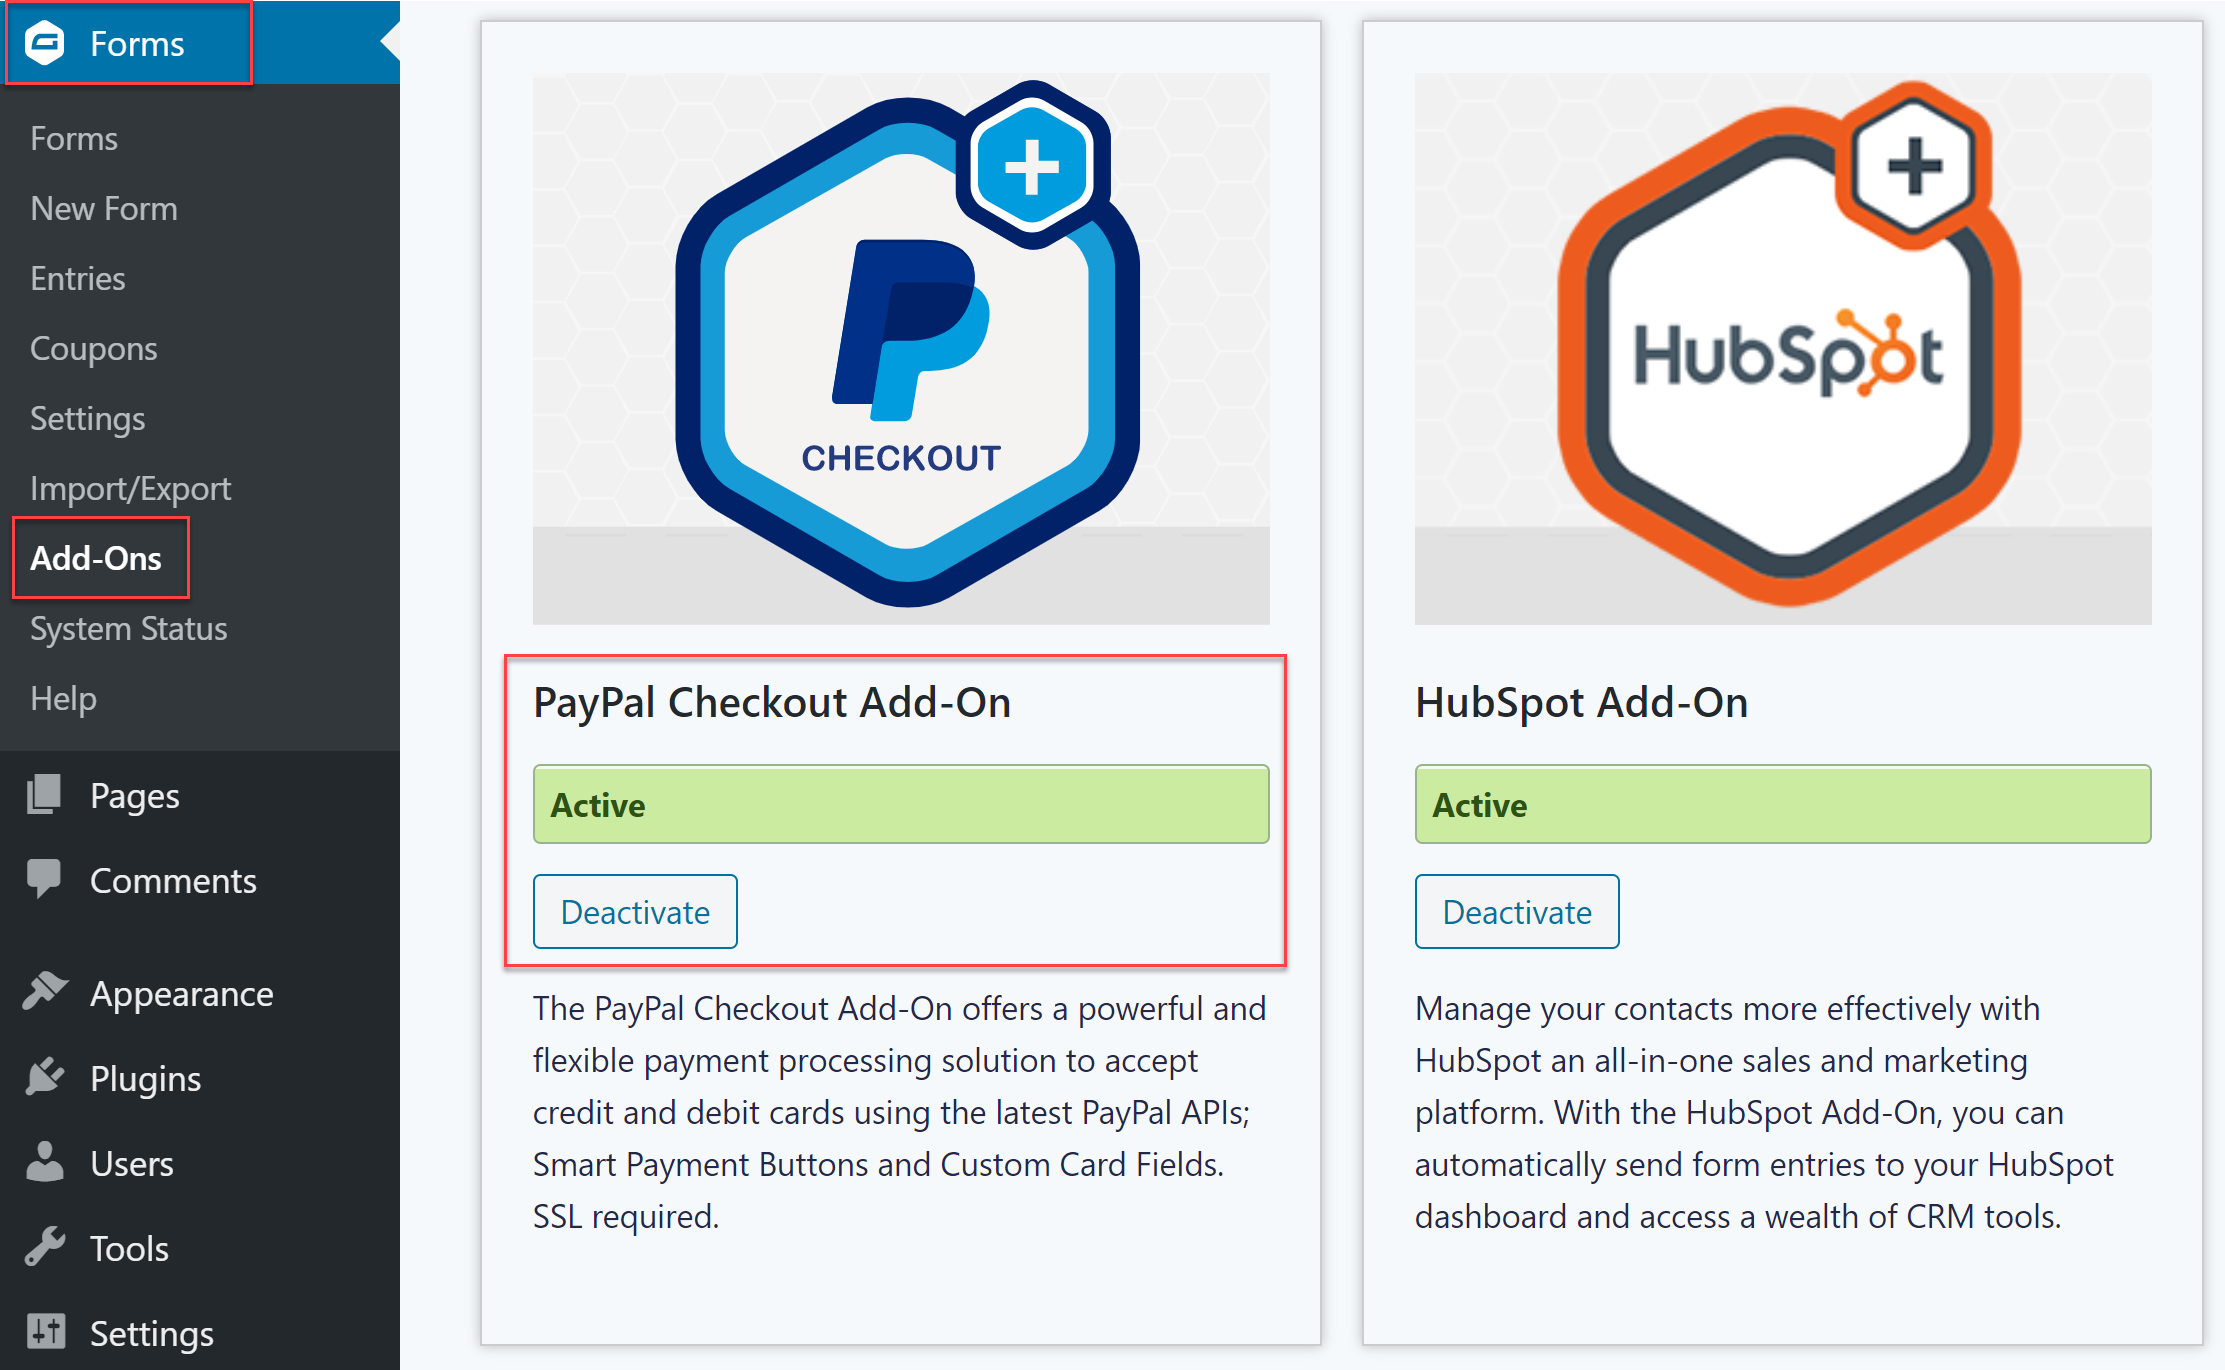
1. Enable the PayPal Checkout Add-On
Go to Gravity Forms > Add-Ons. Scroll down until you find the PayPal Checkout Add-On. Click Install > Activate to make it active on your site so you can start accepting payments.
 Then, go to Gravity Forms > Settings and click on the PayPal Checkout tab. You’ll see the option to choose between the Live and Sandbox environment. It’s recommended to switch to Sandbox mode so you can test the add-on and make sure you’ve set up everything correctly.
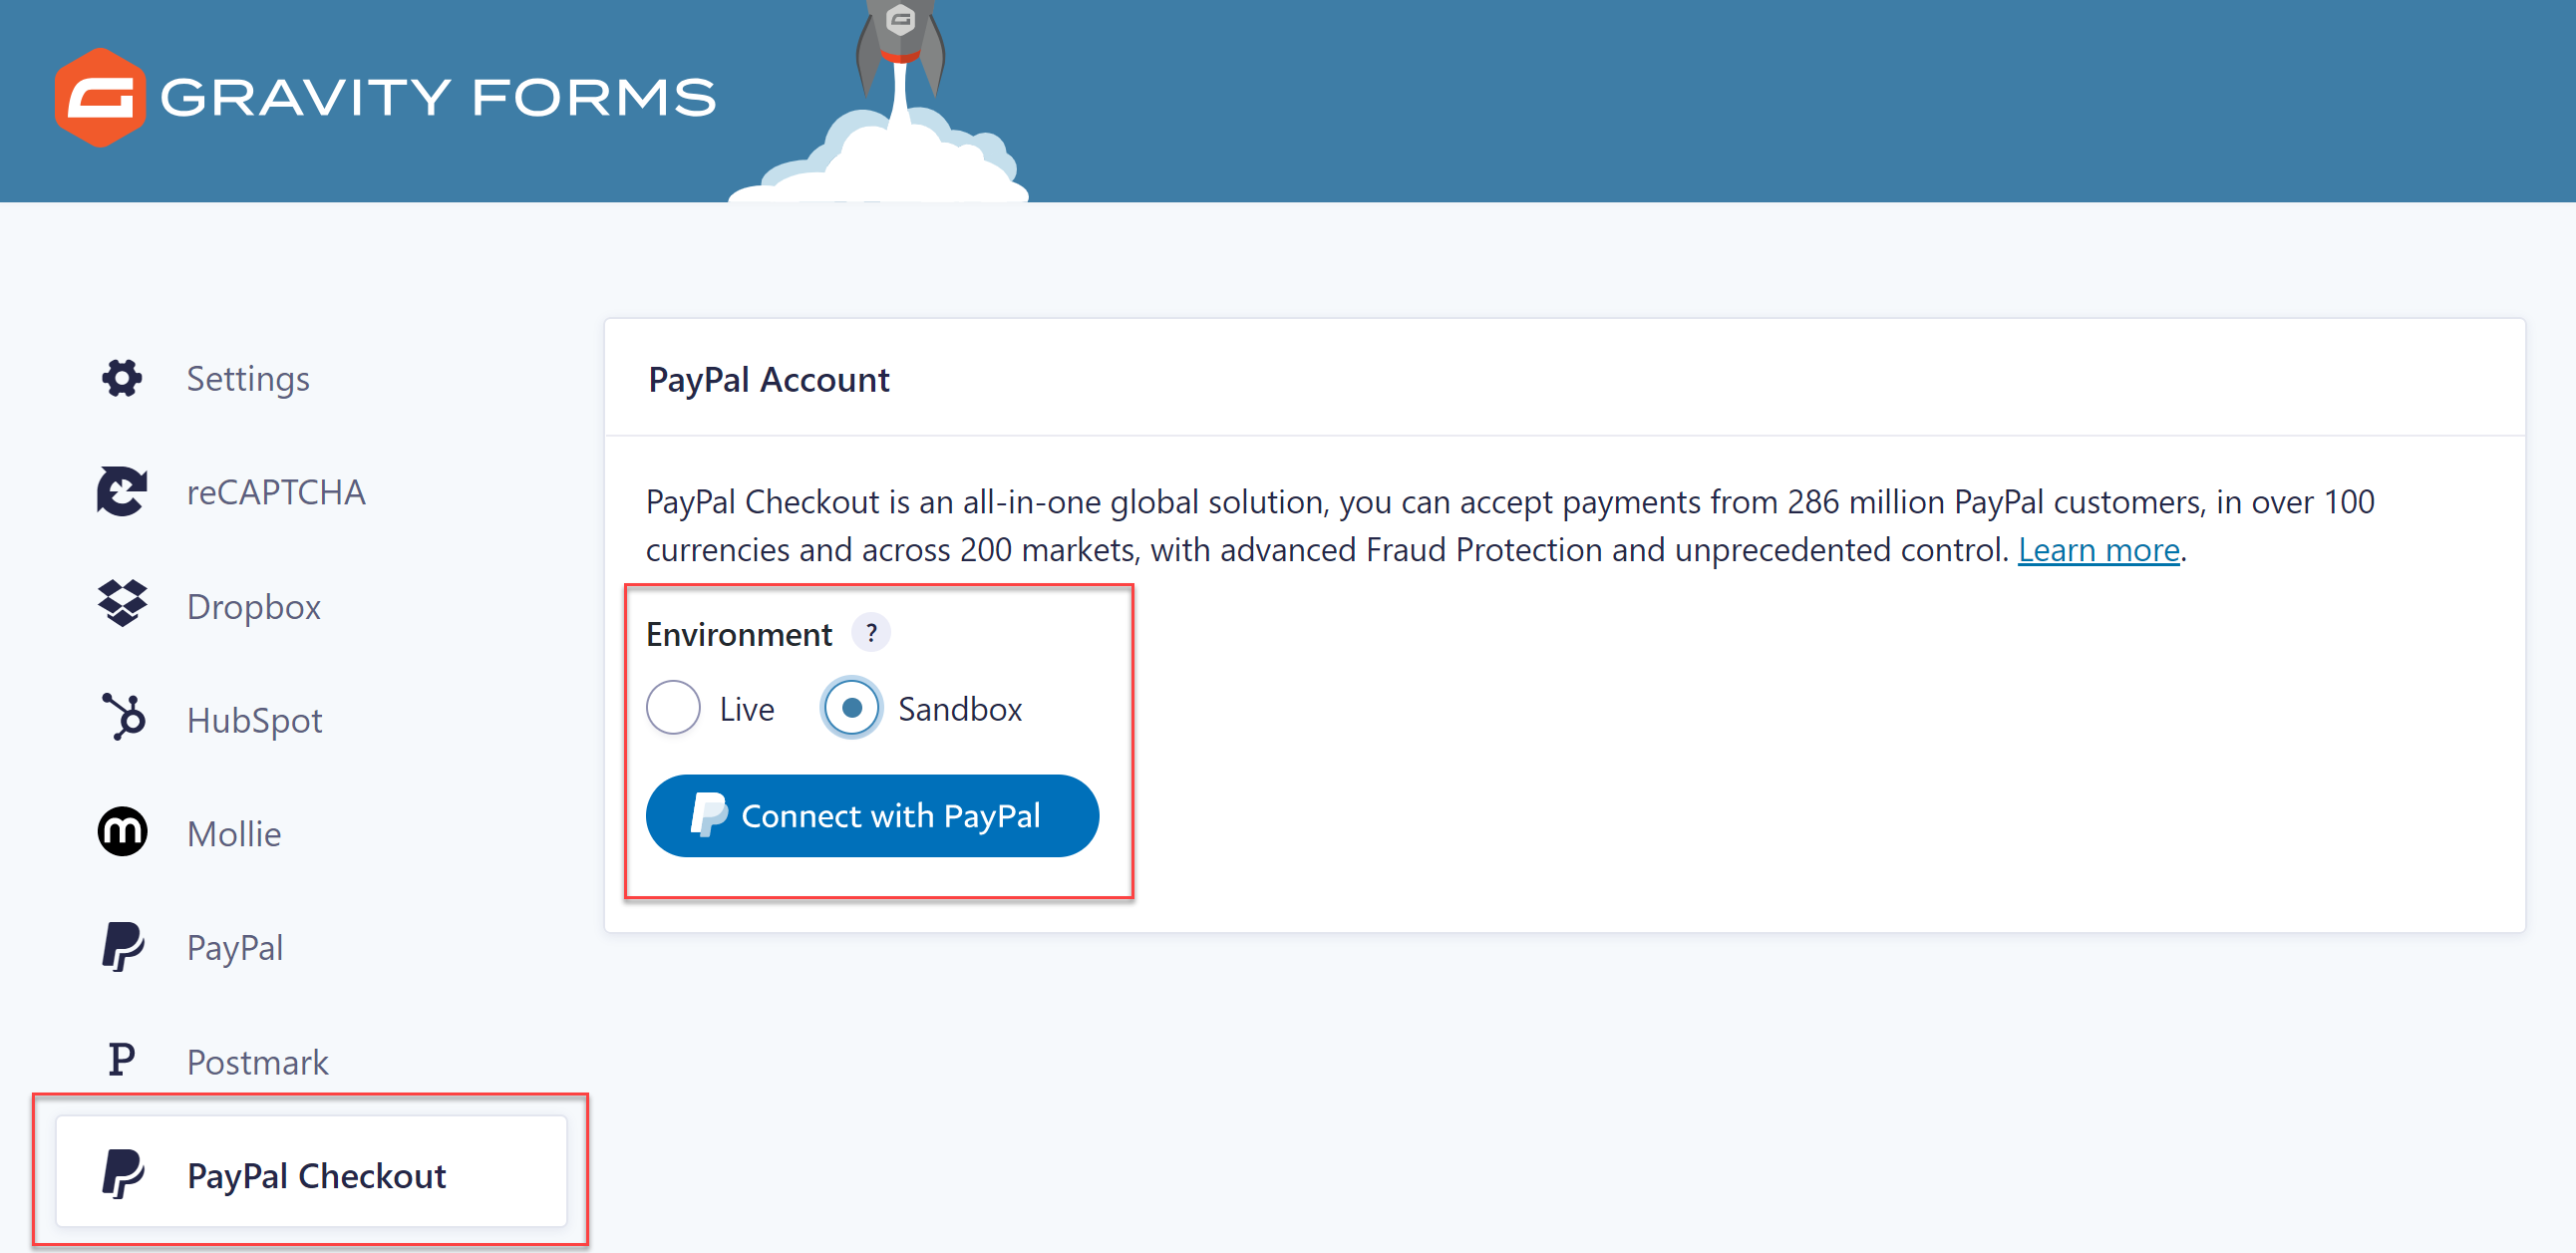 Then, click the Connect With PayPal button and either log in to your PayPal account or create a new one. When you’re done, click the Go to Gravity Forms button and you’ll be taken back to your dashboard where you can check that your PayPal account has been connected.
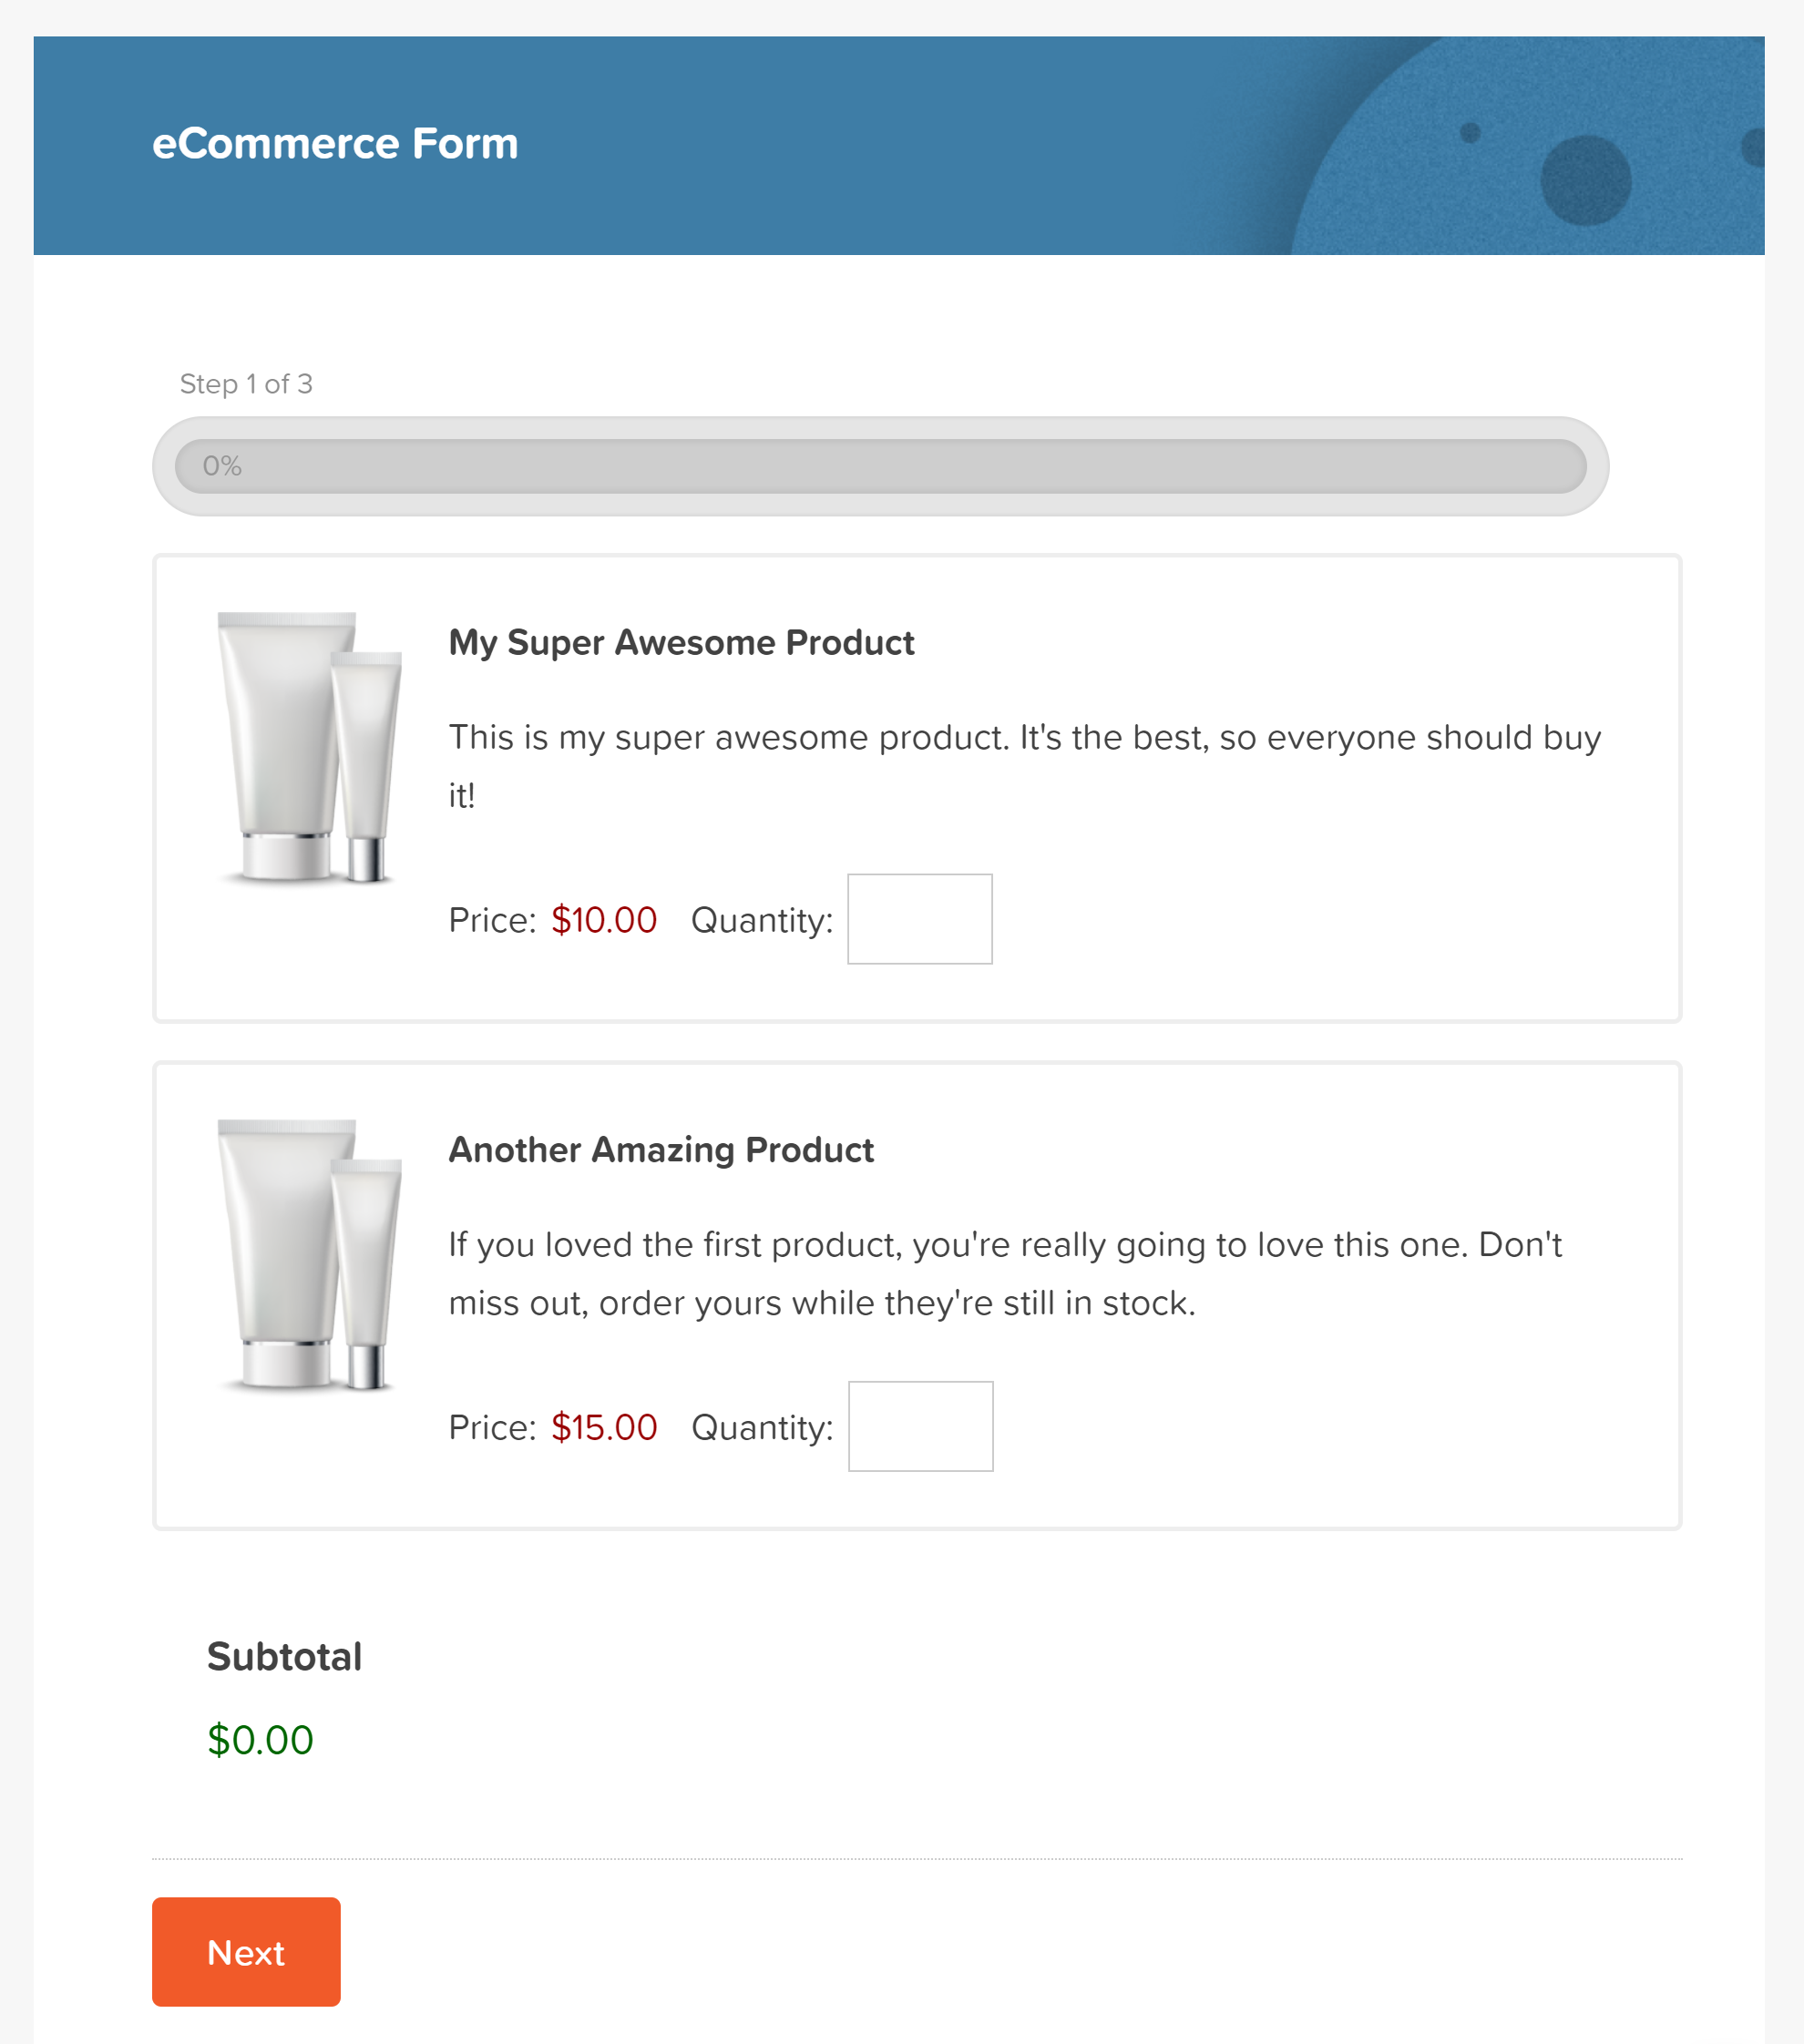
2. Import And Customize Payment Form Template
Next you need to create a form that can take payments. Luckily, you don’t have to start from scratch. We have several different premade payment form templates in our Form Templates Library that you can use as a starting point.
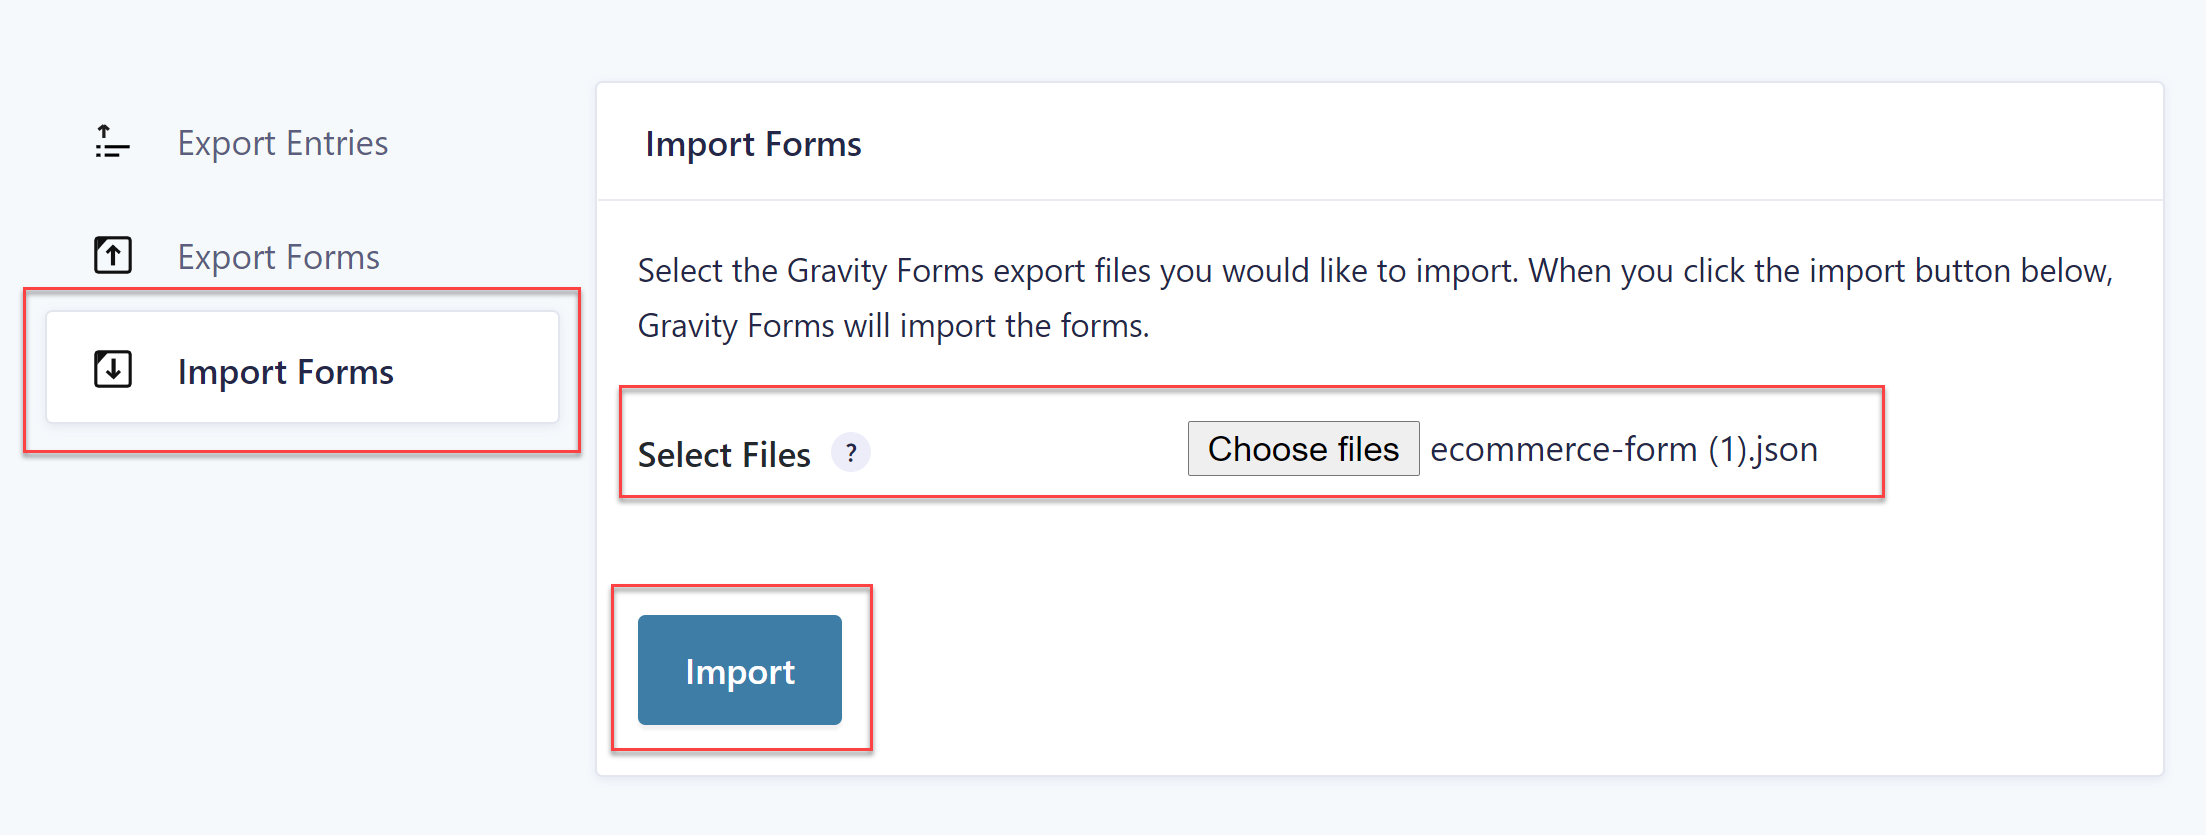
 Select the payment form template that is most appropriate for your project and download it to your computer. Go back to your WordPress dashboard and navigate to Gravity Forms > Import/Export. Click the Import tab and select the downloaded form template from your computer. Press Import.
 Once the form has been imported, you can customize it to your liking. You can add more fields, delete the fields you don’t need, change the text and the settings of existing fields, and much more.
Importantly, if the template you are using is displaying a different payment processor payment field, then you will need to delete it and add the PayPal field to your form.
3. Create a PayPal Checkout Feed for Your Form
Once your form is created, you need to set up a PayPal Checkout feed, connecting your form and PayPal account. To do so, select Form Settings > PayPal Checkout.
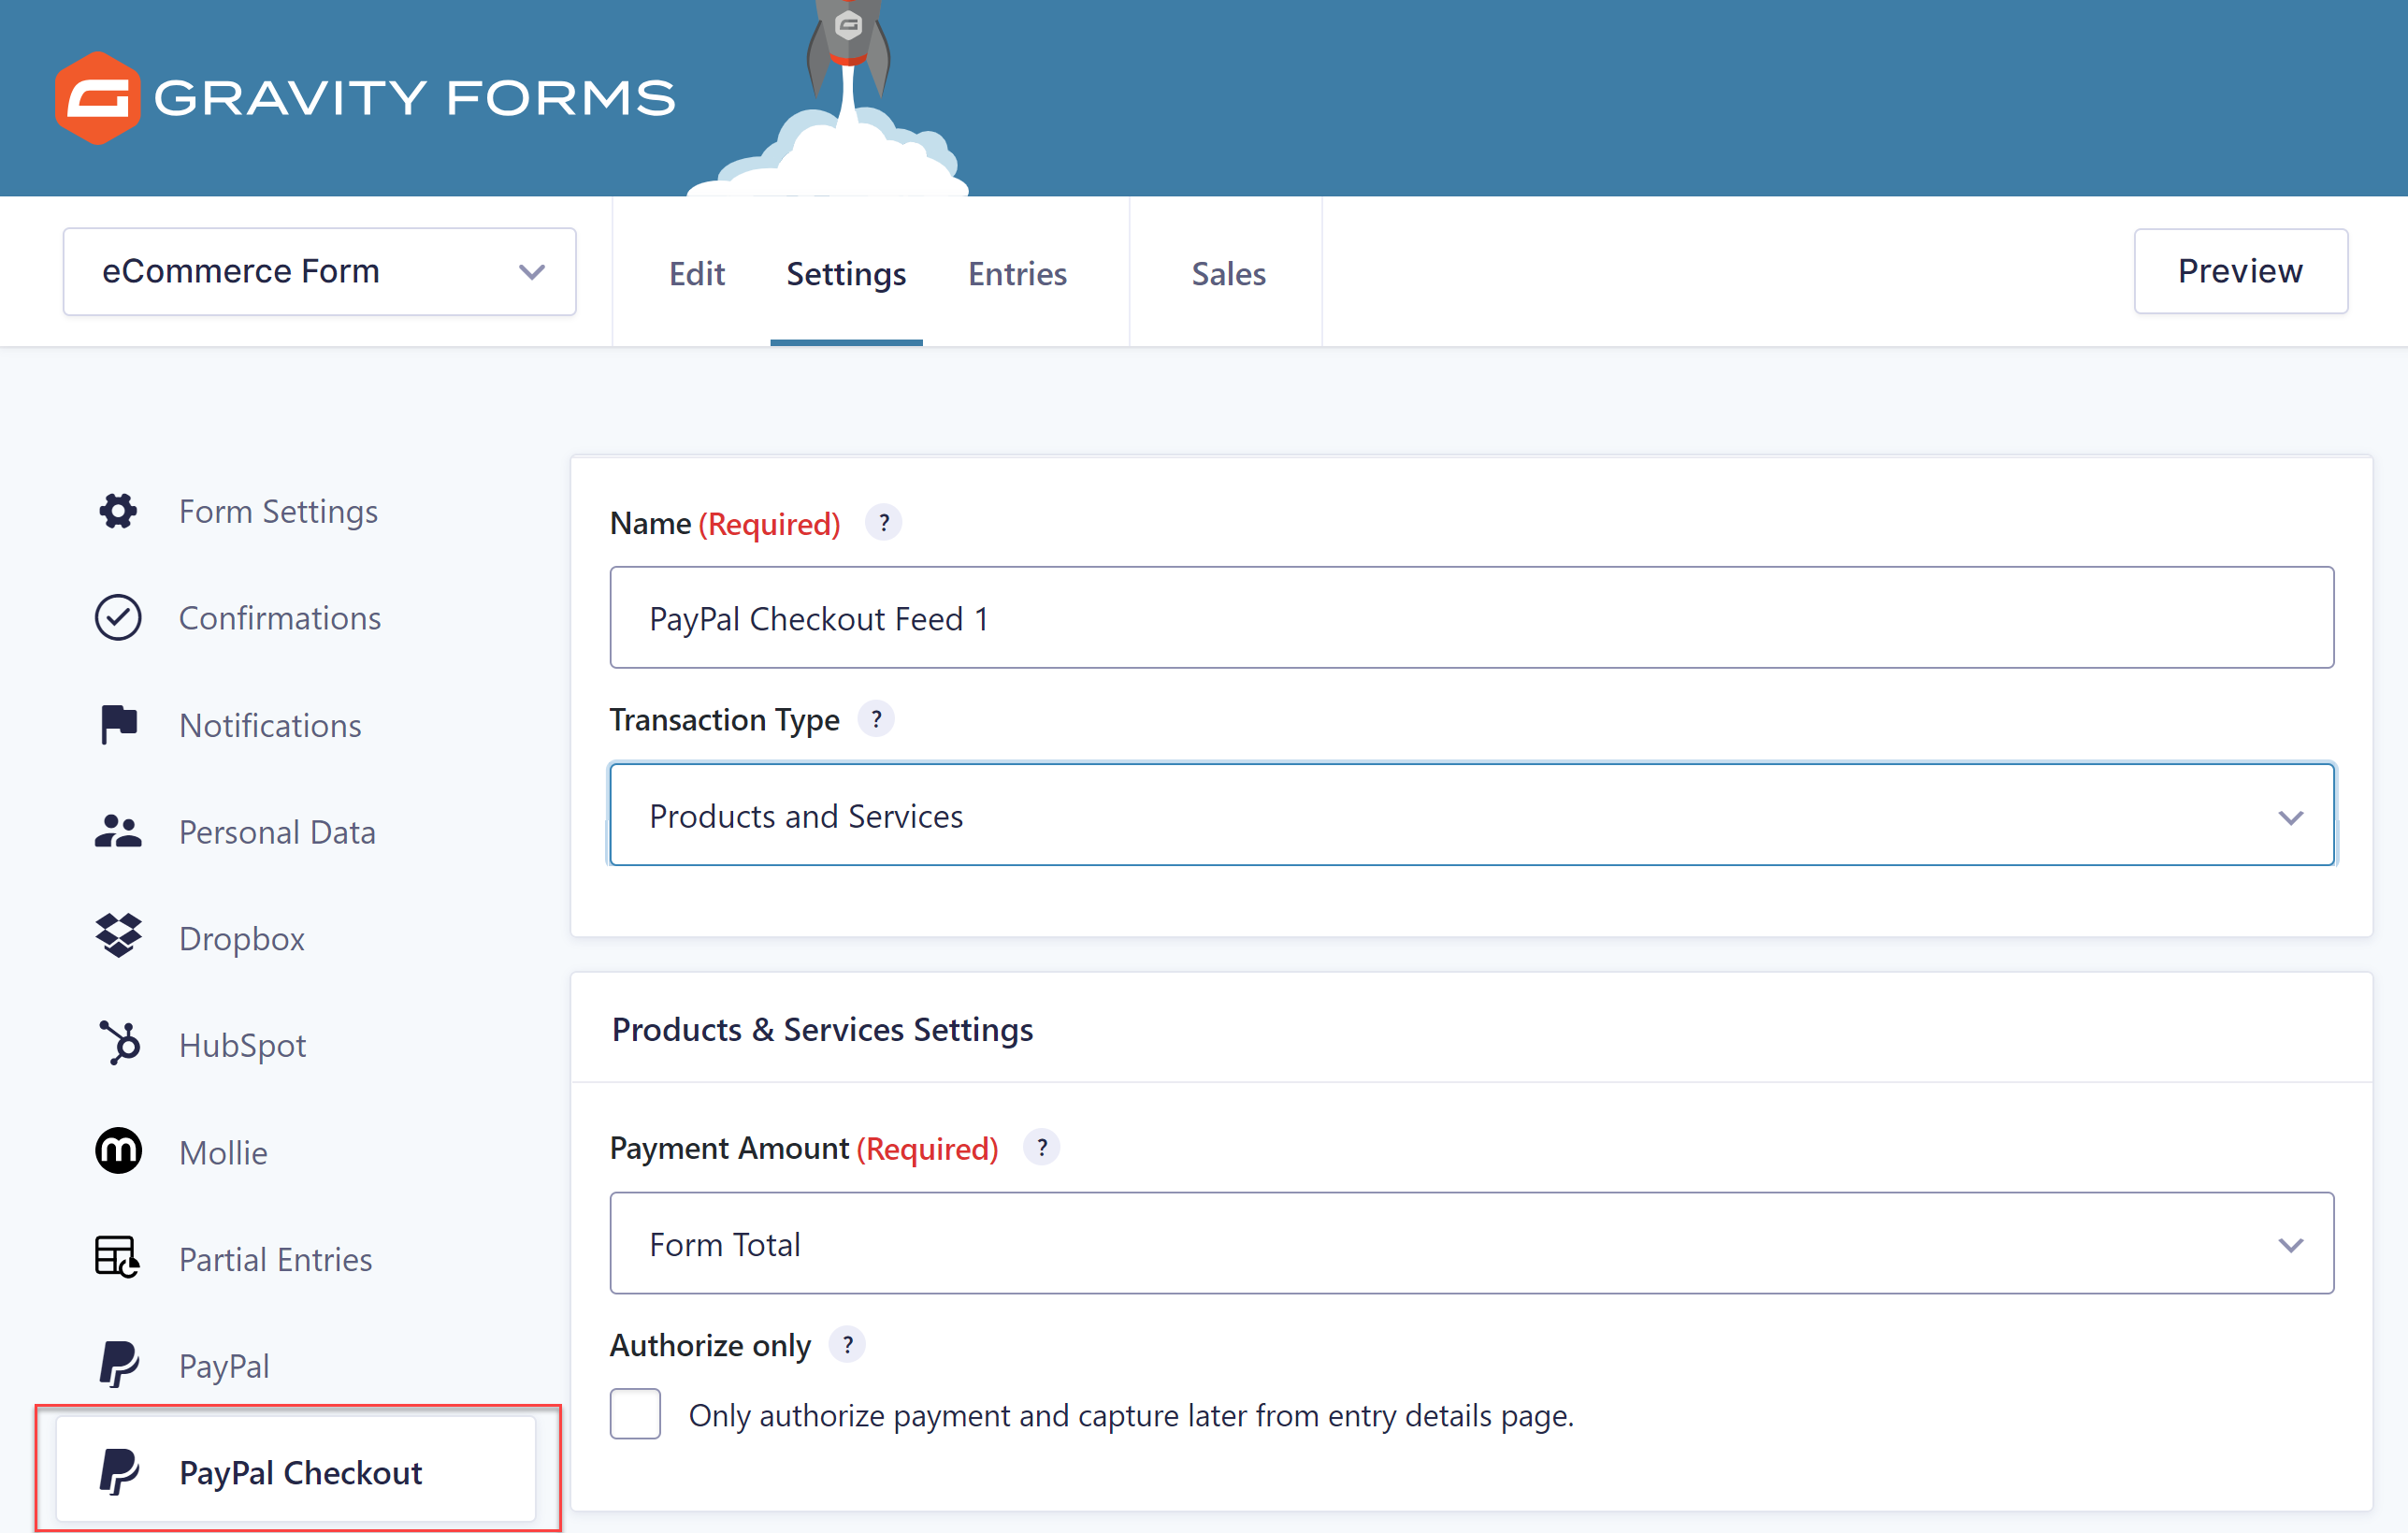 Here you can select the transaction type – Products and Services for one-time payments, or Subscriptions – as well as enable authorize and capture, check that the Billing Information fields are mapped to the correct form fields, and much more.
For more information on how to accept payments with the PayPal Checkout, check out the Gravity Forms documentation.
Top Tips For Creating Payment Forms
Now that you know what kinds of payments you can accept with the PayPal Checkout Add-On and how to enable it on your site, let’s go over some tips about creating payment forms.
1. Reduce The Number Of Form Fields
According to one study, the more form fields you have, the lower your conversion rate will be. In other words, the shorter your forms, the more people will fill them out. Consider reducing the number of fields on your forms instead of making your visitors jump through to hoops just to pay you.
2. Ask For Necessary Information
Directly tied to the tip above, don’t ask for information you don’t need. If you sell digital products, do you really need to ask for their home address? Make it easy to fill out the form and submit a payment – then watch your conversion rate go up.
If your form is still lengthy, even after stripping out all unnecessary form fields, make use of Gravity Forms built-in features, like conditional logic or multi-page functionality, to help the form appear more manageable to your audience.
3. Redirect Them To A Thank You Page
After someone submits a payment, don’t leave them wondering what’s next. Instead, redirect them to a Thank you page that notifies them payment was successful and what they can expect next. This can include information on accessing their product or any shipping information they might need to know.
4. Reduce Distractions On The Payment Form Page
Our last tip is to reduce the number of distractions on the page that has your payment form. Consider removing the menu and don’t include links to your social media profiles. The less distractions you have on the payment form page, the better the chances of users completing the form.
Ready To Accept Payments On Your Site?
Accepting payments on your WordPress website is easy with Gravity Forms and the PayPal Checkout Add-On. These resources will help you learn more about accepting payments on your site:
- Introducing the Official PayPal Checkout 2.0 Add-On for Gravity Forms
- How to Increase Your Revenue With Recurring Subscriptions
- PayPal Checkout Add-On Official Docs
If you don’t have Gravity Forms yet, don’t worry. Sign up for a free personalized demo of Gravity Forms and explore all the features our plugin has to offer. Build a form from scratch using the intuitive drag and drop form builder, browse through the add-ons, and explore premade form templates to get a sense for what’s possible with Gravity Forms.

If you want to keep up-to-date with what’s happening on the blog sign up for the Gravity Forms newsletter!