Looking to set up WordPress SMTP.com transactional emails on your site?
With the Gravity SMTP plugin, you can easily connect your WordPress site to SMTP.com and send all of your site’s emails using the SMTP.com email API.
At the same time, you’ll also be able to access other useful features to help you monitor and improve your site’s transactional emails.
In this post, we’ll briefly introduce you to how SMTP.com and Gravity SMTP work for WordPress transactional emails.
Then, we’ll show you step-by-step how to set up everything and start sending your WordPress transactional emails using SMTP.com.
Let’s get into it…
Why use SMTP.com for WordPress transactional emails?
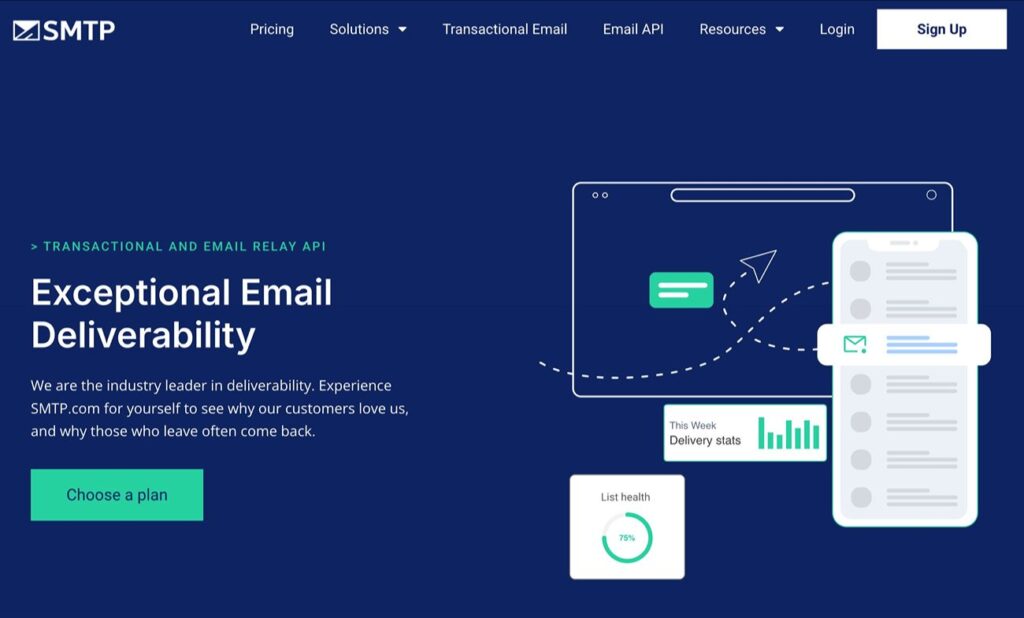
SMTP.com is a well-known email sending service that can help you send both transactional emails and marketing emails. It’s used by big brands such as Best Buy, T-Mobile, and Virgin Atlantic.
For WordPress users, SMTP.com offers an email relay API that you can use to send your site’s transactional emails.
It can support small sending volumes under 50,000 emails per month, as well as high-volume senders even up into the hundreds of millions of emails per month.
In addition to the easy-to-use API, SMTP.com also offers some other notable core features and optional add-ons:
- Fast email sending and 99.99% uptime.
- Detailed reporting dashboards.
- Dedicated IP addresses on all plans excluding the entry-level plan (which uses shared IPs).
- Export support if you need any help.
- Optional Reputation Defender add-on to protect your sending reputation.
SMTP.com pricing
SMTP.com offers four present pricing plans at the time of this writing, along with a custom option for senders who need higher limits.
Plans start at $25 per month to send up to 50,000 emails per month.

Because the cheapest plan already starts at 50,000 emails per month, SMTP.com is likely not the most cost-effective solution for very low-volume email sending (e.g. a few thousand emails per month, or even smaller volumes).
On the other hand, if your site is sending tens of thousands of transactional emails each month, SMTP.com can be a cost-effective solution for that situation.
How Gravity SMTP helps you use SMTP.com on WordPress
Gravity SMTP is a WordPress SMTP plugin that helps you connect your WordPress website directly to the SMTP.com email API, which is the most reliable way of sending emails with SMTP.com.
Beyond that, Gravity SMTP also includes other features to help you monitor and optimize your site’s transactional emails:
- Email reports – View high-level reports about your site’s transactional emails, including email open rates, top sending sources, top recipients, and more.
- Email logging – Log every email that your site sends. For each email, you can see technical information, full email content, design, and attachments. You’re also able to fully or partially disable logging, such as choosing not to log attachments.
- Backup email sending methods – Connect to an extra backup sending service. Gravity SMTP will automatically resend any emails that fail to send via SMTP.com.
- Email resends – Resend any email by clicking one button in the email log.
- Conditional routing – If needed, use different transactional email services based on conditional rules that you configure.
- In-dashboard suppressions – Manage suppression lists directly from your WordPress dashboard, rather than needing to go through SMTP.com.
- Dedicated support – Get direct, one-on-one support from the friendly Gravity Forms team whenever you need help.
Gravity SMTP is available at no extra cost to anyone holding the Gravity Forms Elite, Nonprofit, or Developer licenses.
You do not need to have Gravity Forms installed to use Gravity SMTP, though Gravity SMTP does work well for sending your site’s form notification emails using a transactional email service.
How to set up WordPress SMTP.com email sending with Gravity SMTP
Now, let’s get into the full guide on how to use SMTP.com to send WordPress transactional emails with Gravity SMTP.
1. Install the Gravity SMTP plugin
To get started, make sure to install and activate the Gravity SMTP plugin on the site that you want to connect to SMTP.com.
Gravity SMTP is currently available for free to anyone holding the Gravity Forms Elite or Nonprofit licenses (or the legacy Developer license). You can download it from your Gravity Forms account area.
2. Register for your SMTP.com account
Next, you’ll need to register for your SMTP.com account, if you don’t already have one.
SMTP.com does not currently offer a free plan or free trial, so you’ll need to purchase one of the paid plans.
To get started, click this link to go to SMTP.com and then choose View Plans & Pricing to choose the plan that meets your sending needs.
3. Authenticate your domain name with SMTP.com
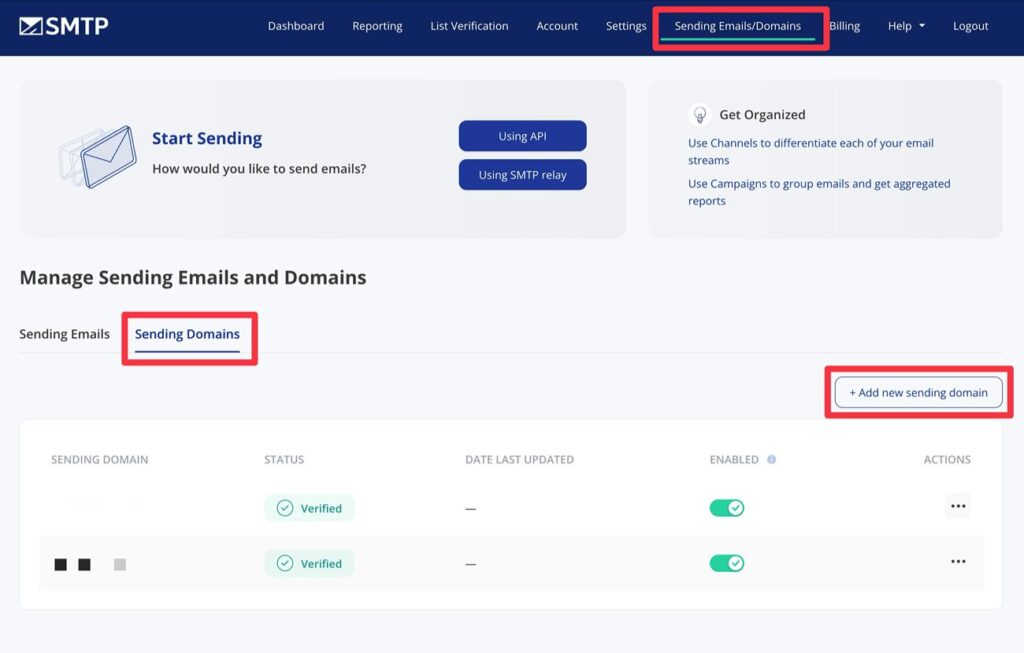
Before you can start sending emails, you need to authenticate your WordPress site’s domain name with SMTP.com by adding it as a sending domain.
You can also add a single sending email address, which would only allow you to send from that specific email address. However, we’re not going to focus on that method in this tutorial because authenticating your site’s domain will give you the flexibility to send from any email address on your domain.
Here’s how to get started:
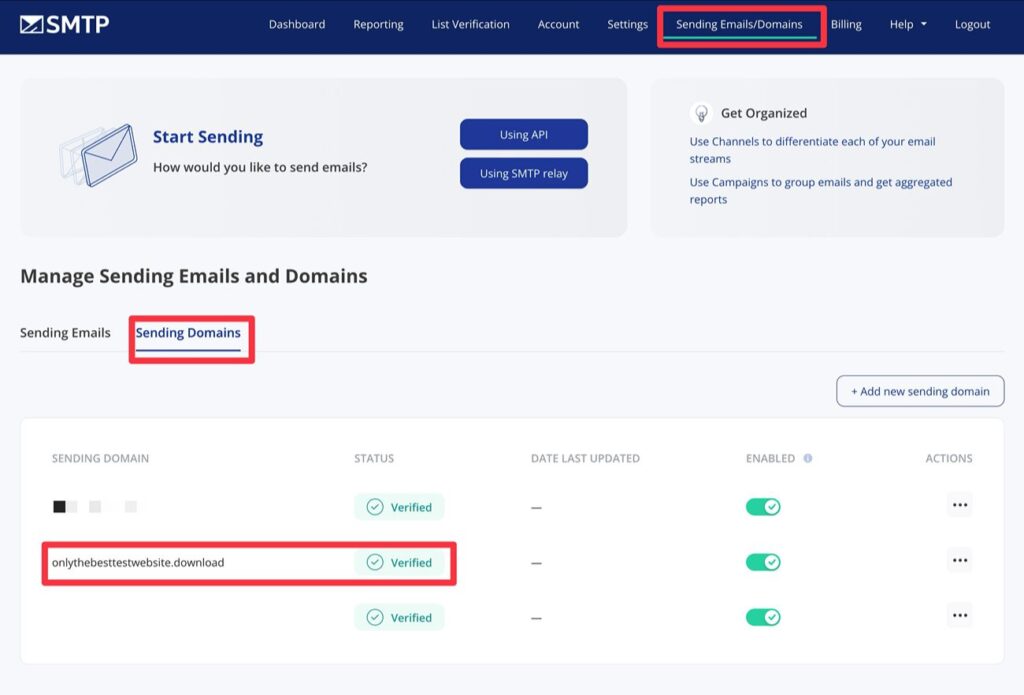
- Select the Sending Emails/Domains area on the top SMTP.com menu bar.
- Go to the Sending Domains tab.
- Click the + Add new sending domain button.
If you want to add a single sending email instead, you can do so from the Sending Emails tab.
On the next screen, enter your WordPress site’s domain name and click Save.
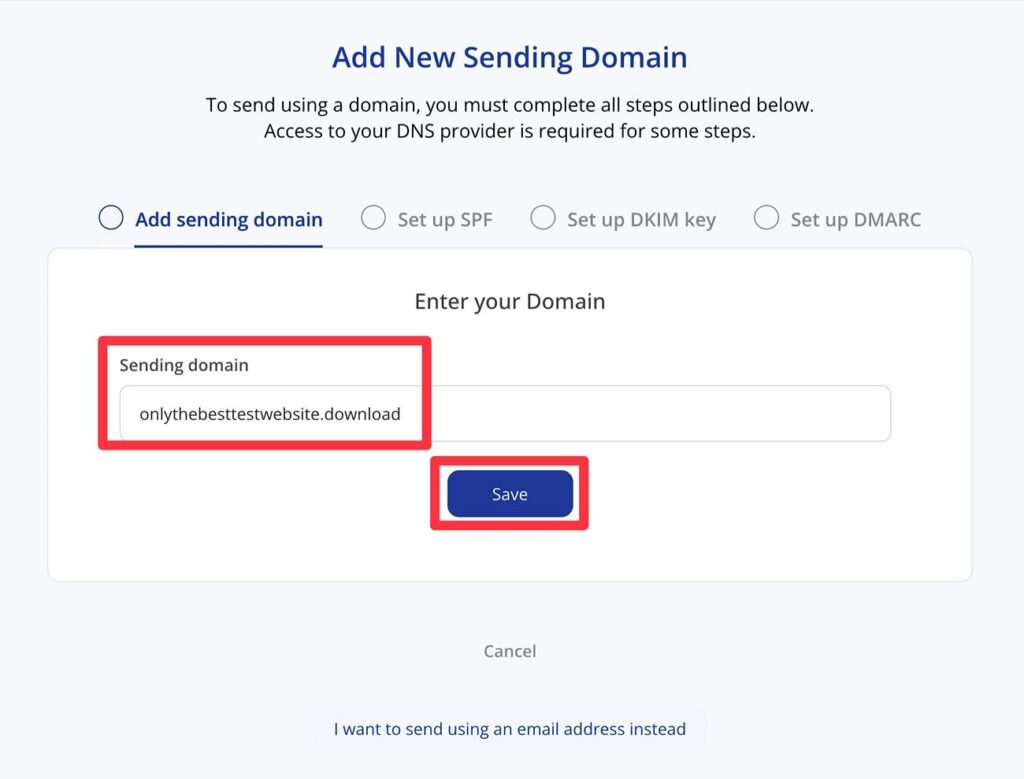
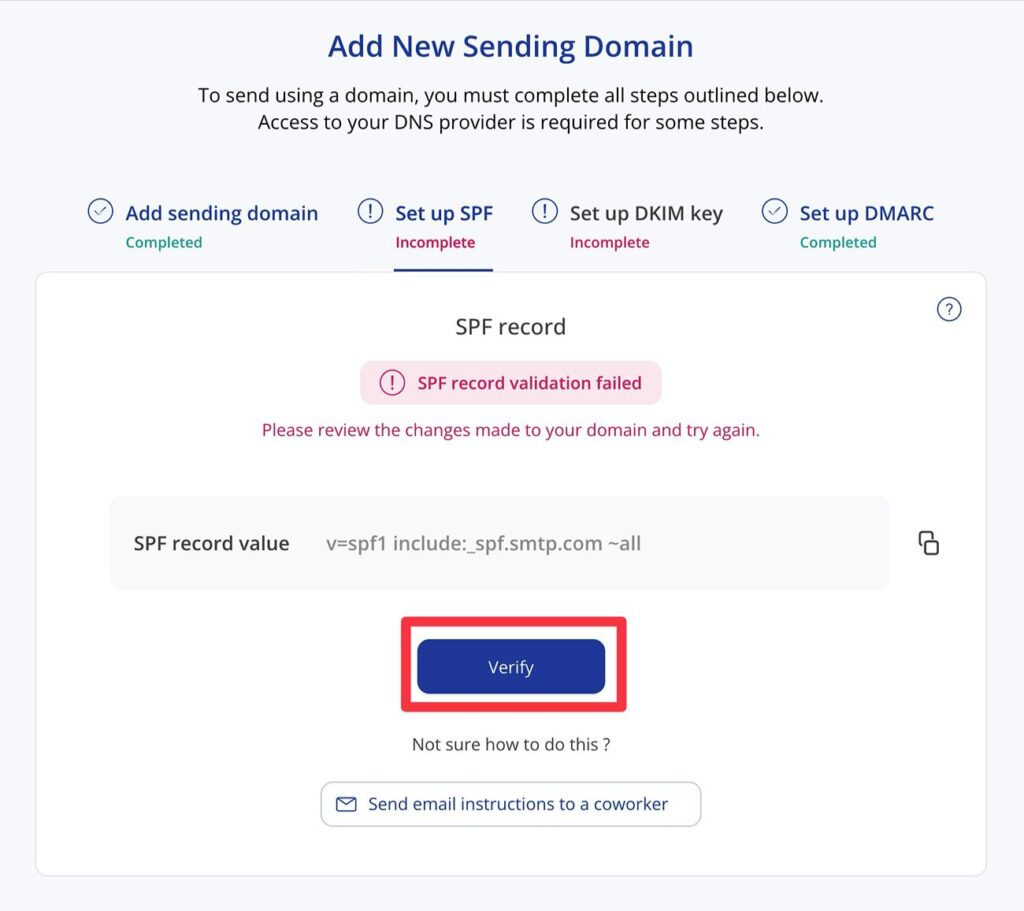
Then, you’ll be prompted to add some TXT records to your DNS:
- SPF – use @ as the Name/Host/Label if you’re verifying your root WordPress domain name (e.g. yoursite.com). If you’re using a subdomain, you can use that subdomain value instead (e.g. mail.yoursite.com).
- DKIM
- DMARC
You’ll need to add these records wherever you manage your domain’s DNS. Depending on how you’ve set things up, this could be:
- Your domain registrar
- Your hosting account
- A reverse proxy service like Cloudflare
After you’ve added each record, click the Verify button to advance to the next record.
Once you’ve added all the records, you should see your domain name appear as Verified in the Sending Domains list.
4. Create your SMTP.com API key and channel
Once you’ve added your site as a sending domain, the next step is to create an API key and channel. The API key is what Gravity SMTP will use to connect your WordPress site with SMTP.com, and the channel is what controls email traffic from your WordPress website.
API key
Here’s how to create an API key:
- Go to the Account tab on the top menu bar of the SMTP.com dashboard.
- Select the Manage API Keys tab.
- Click the + Generate new button.
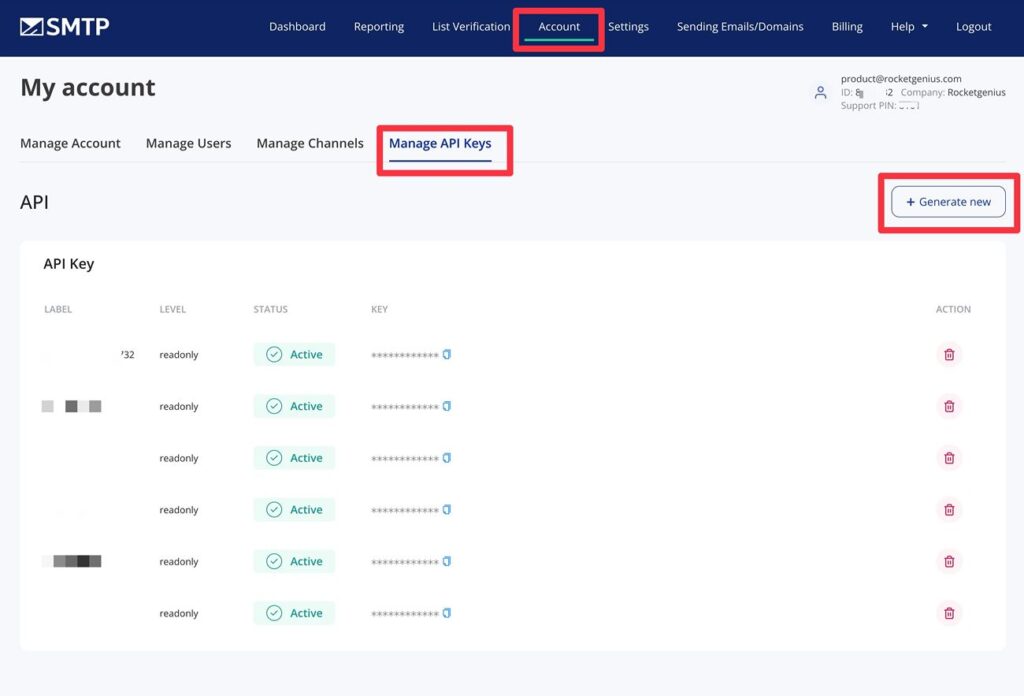
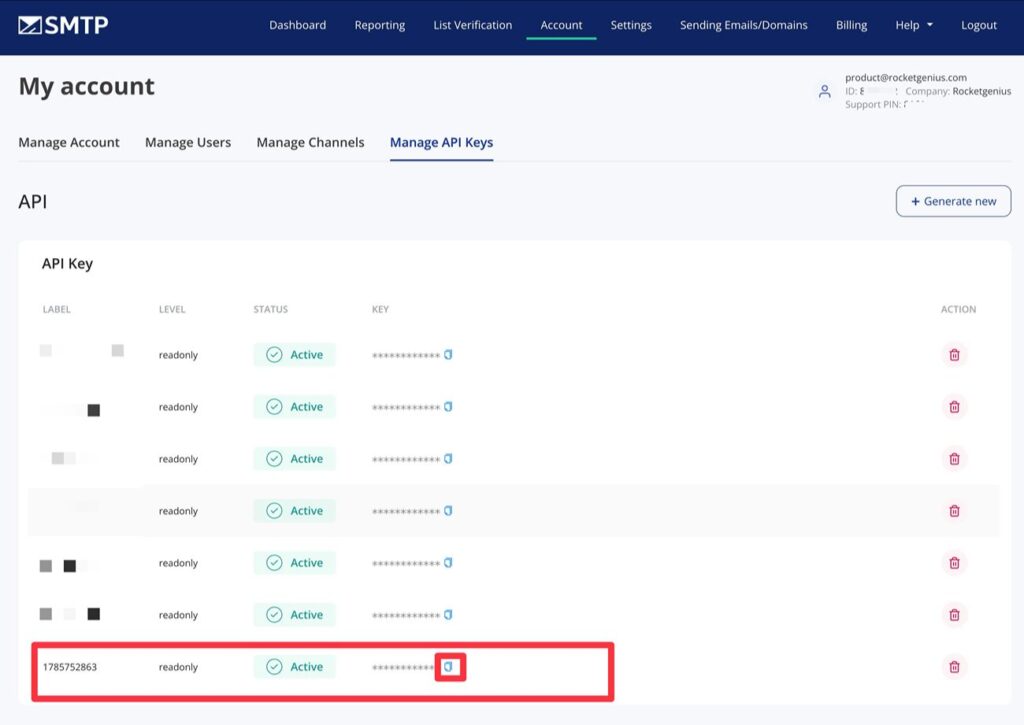
In the popup prompt that appears, click Ok. Then, SMTP.com will create a new API key for you.
You can copy the value of the key by clicking the Copy icon in the Key tab. Keep this value handy because you’ll need it in the next step.
Channel
Here’s how to create a channel:
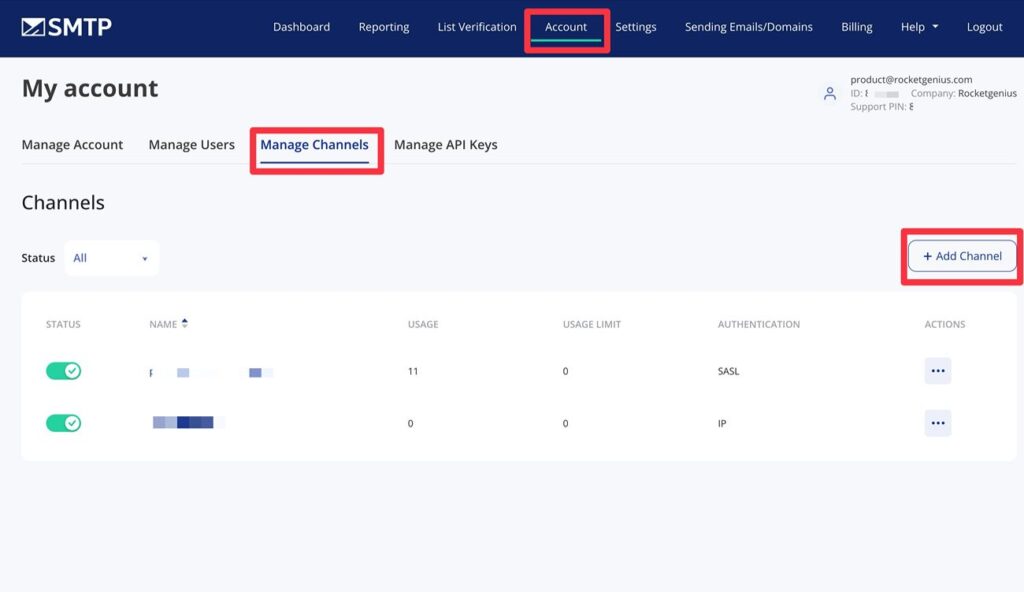
- Go to the Account tab on the top menu bar of the SMTP.com dashboard.
- Select the Manage Channels tab.
- Click the + Add Channel button.
This will open a popup where you can configure the channel:
- Channel Label – give your channel an internal name to help you remember it. For example, the name of your WordPress website (with lowercase and underscores/dashes for spaces).
- Monthly Usage Limit – you can allow unlimited usage or set a hard cap for this WordPress site.
- Authentication – this isn’t important because you’ll be connecting via the API. You can just choose Login and password (SASL) and enter some dummy information.
Then, click Save.
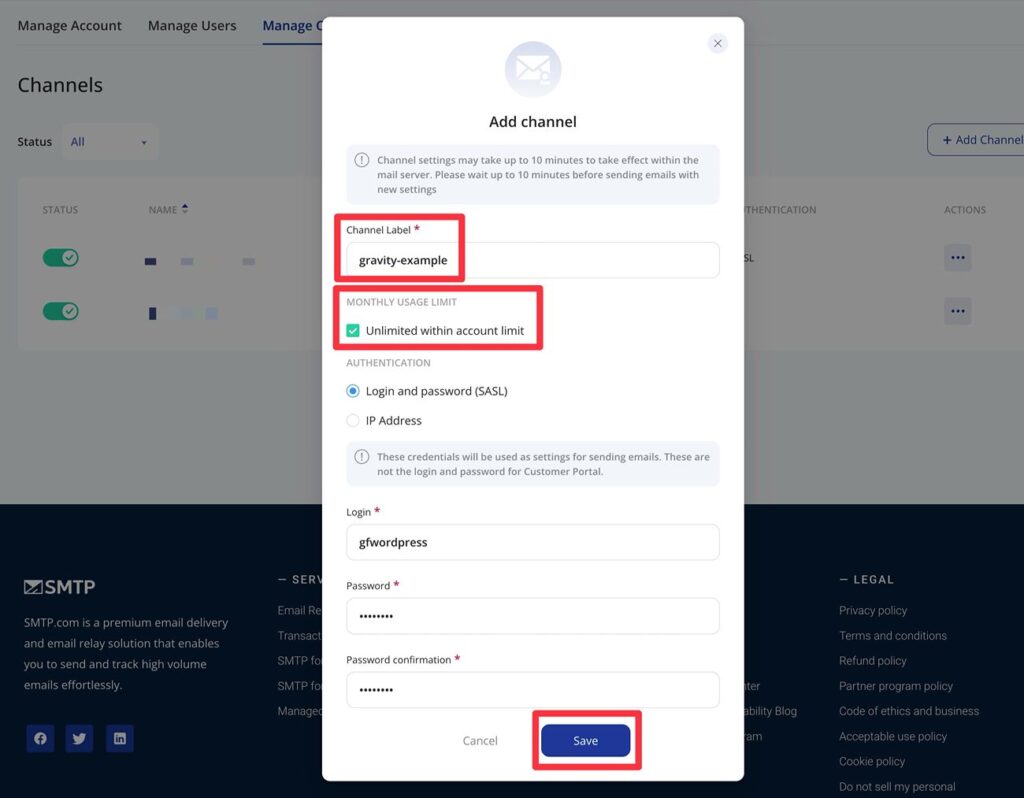
Make sure to copy your channel label/name to a safe place because you’ll also need it in the next step (along with your API key).
5. Connect Gravity SMTP to SMTP.com
Once you have your API key and channel name, you can perform the rest of the setup from inside your WordPress dashboard.
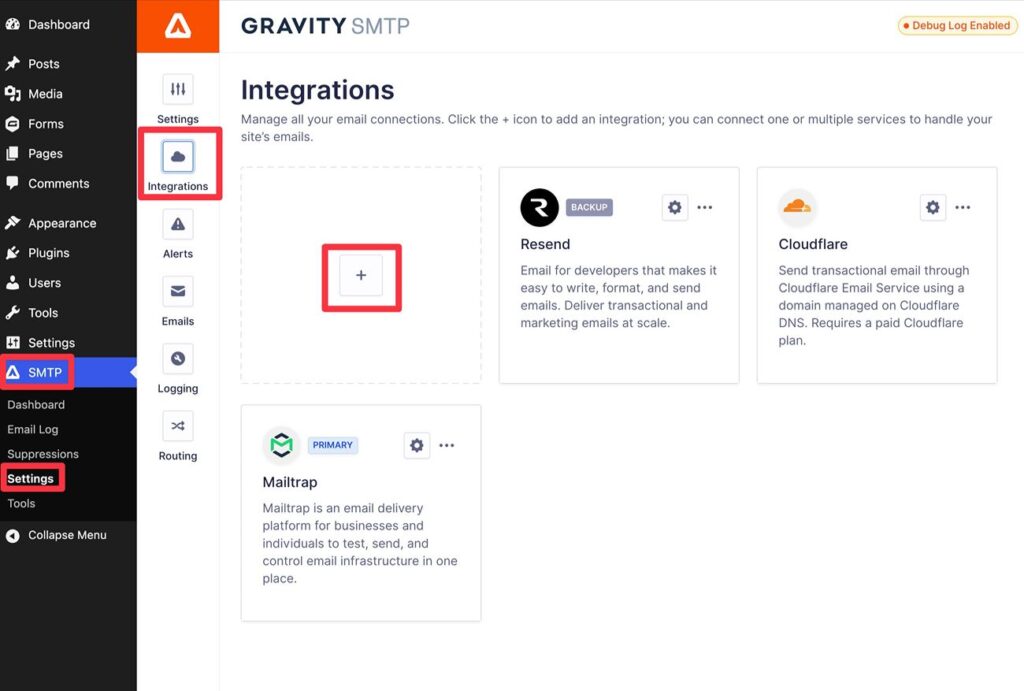
To connect Gravity SMTP to SMTP.com, go to SMTP → Settings → Integrations in your WordPress dashboard. Then, click the Plus icon to add a new integration.
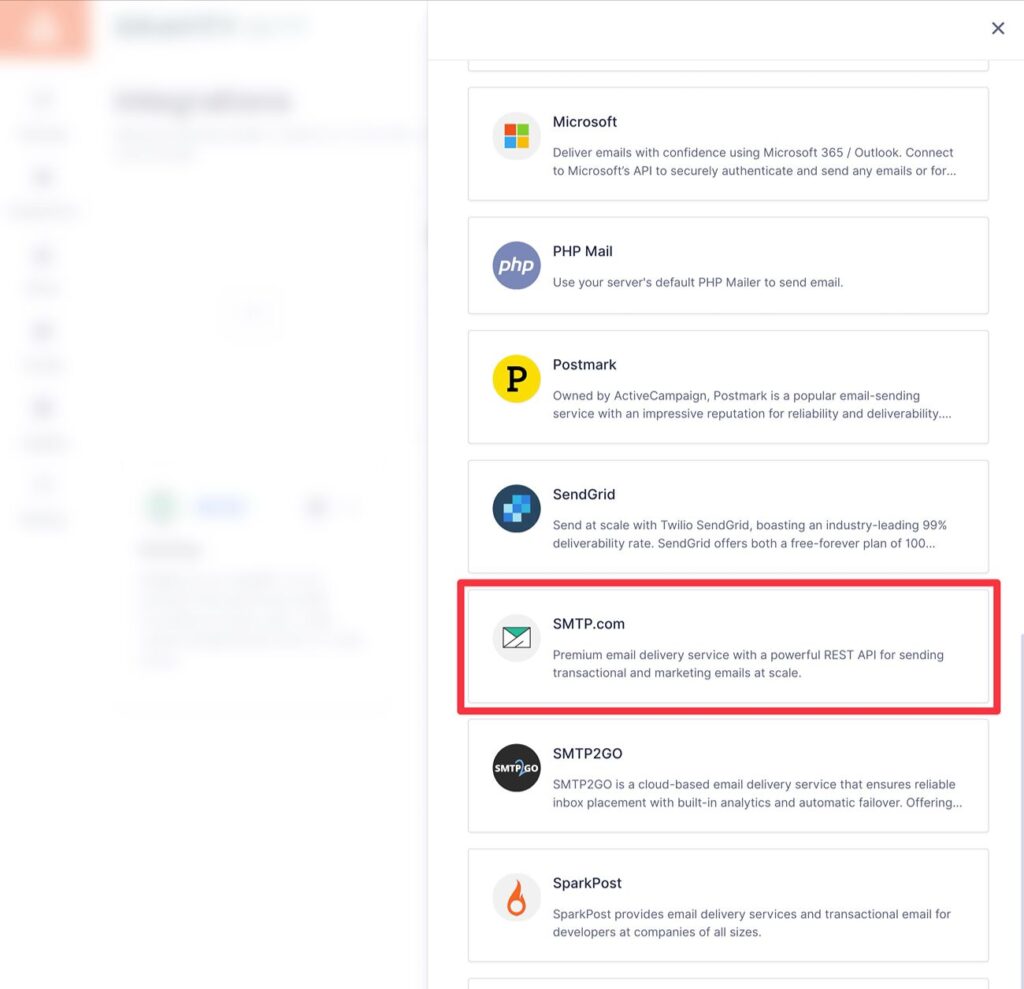
This will open a slide-out that lists all of the integrations that Gravity SMTP offers. Find and select SMTP.com to open the integration settings.
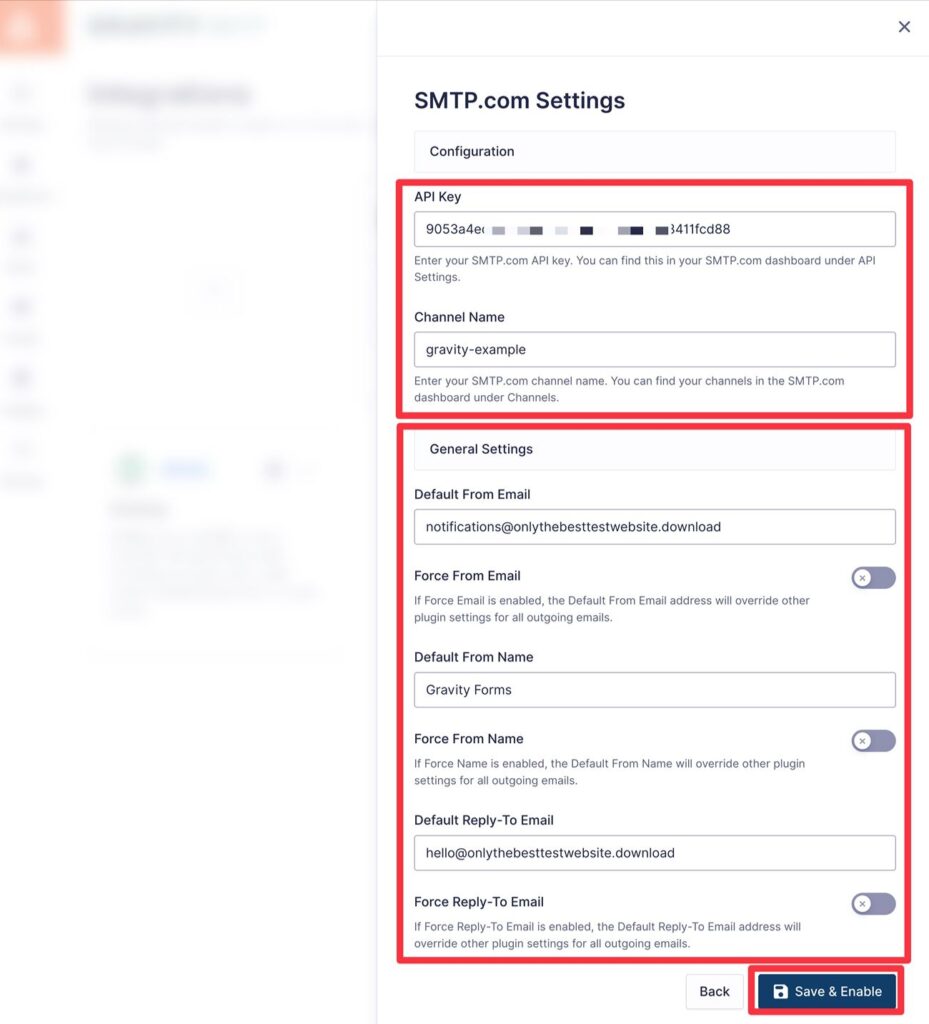
First, paste in your SMTP.com API Key and Channel Name in the Configuration settings. These are the two pieces of information that you created/located in the previous step.
Then, in the General Settings box, you can configure a few additional details:
- Default From Email – this should be an email address that uses the domain name you authenticated with SMTP.com (if you added a sending domain). If you only added a single sending email address, you must enter that exact email address.
- Default From Name
- Default Reply-To Email
- Whether to force all plugins on your site to use some/all of these details
Once you’ve entered everything, click Save & Enable at the bottom.
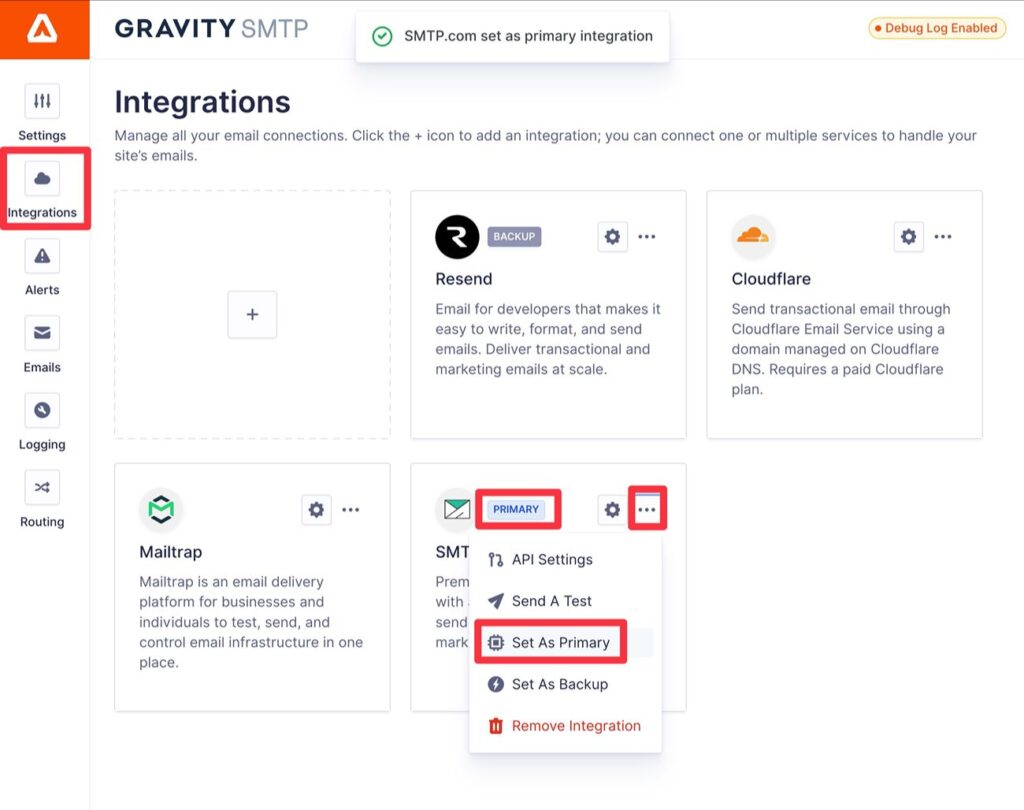
Then, make sure that SMTP.com is set as your site’s primary email sending service. You can verify this by looking for the Primary label next to SMTP.com.
If needed, you can manually set it as your primary service by clicking the three dots icon and selecting Set as Primary.
6. Test your SMTP.com emails
At this point, your site is already configured to send its transactional emails using SMTP.com.
To make sure everything is working properly, we recommend sending a test email using Gravity SMTP’s built-in testing tool.
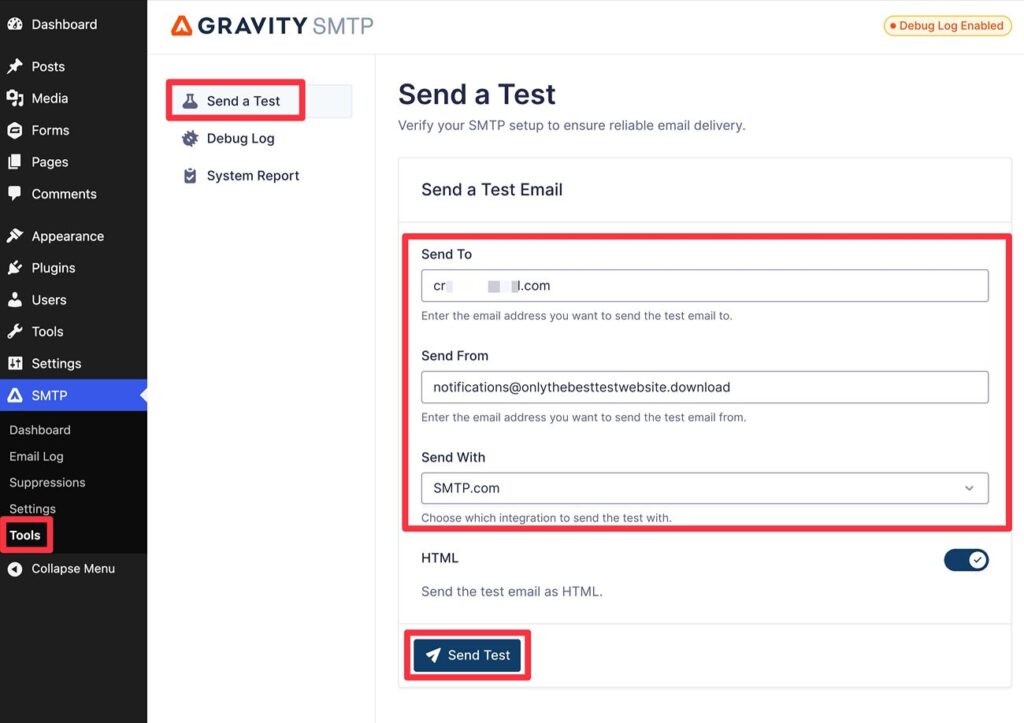
Go to SMTP → Tools → Send a Test in your WordPress dashboard and fill out the form:
- Send To – the email address to which you want to send the test email.
- Send From – usually, you should enter the same From Email that you used when setting up the integration. Make sure this is an email using the domain name that you added to SMTP.com.
- Send With – Choose SMTP.com from the drop-down.
Then, click the Send Test button to send the test email.
You should see a success message appear in the interface. Then, if you open your email inbox, you should see a test message that looks something like this:

7. Set up a backup email sending service (optional)
This step is 100% optional.
However, for mission-critical transactional emails, Gravity SMTP gives you some additional options to ensure the reliability of your site’s emails. This way, if an email ever fails to send via SMTP.com, Gravity SMTP can automatically resend that email using your chosen backup service.
To enable a backup service, you’ll first need to connect Gravity SMTP to the backup service that you want to use, similarly to how you connected to SMTP.com.
Here are dedicated guides for most of Gravity SMTP’s direct API integrations, along with the custom SMTP option:
- Amazon SES
- Brevo
- Elastic Email
- Emailit
- Gmail / Google Workspace
- Mailchimp
- Mailersend
- Mailjet
- Mailgun
- Outlook / Microsoft 365
- Postmark
- Resend
- SendGrid
- SMTP2Go
- SparkPost
- Zoho Mail
- Custom SMTP
You can also find the integration documentation here.
Once you’ve connected your site to the backup service, here’s how to enable the service as your backup method:
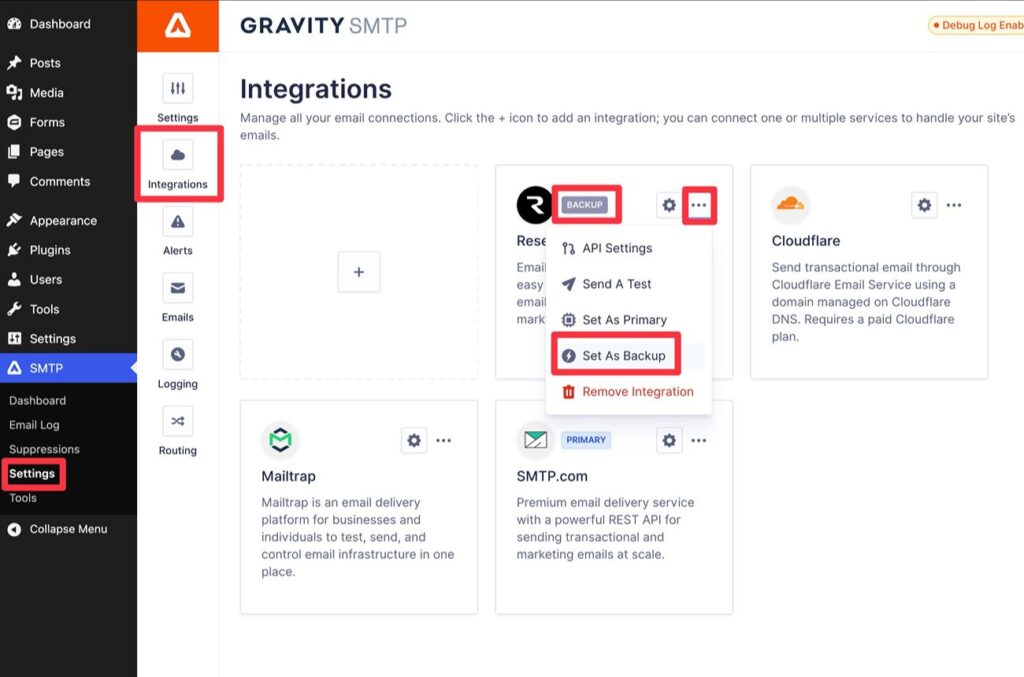
- Open the Gravity SMTP Integrations area (SMTP → Settings → Integrations).
- Click the three dots icon next to the service.
- Choose Set as Backup from the drop-down.
- Verify that the Backup label appears next to the service.
How to monitor your site’s email usage
Once your site starts sending some emails via SMTP.com, Gravity SMTP gives you multiple ways to monitor your site’s emails.
First, you can view high-level reports for your site’s email sending by going to SMTP → Dashboard. This will show you overall emails sent, top sending sources, top email recipients, and more.

To see individual emails that your site has sent, you can access the full email log by going to SMTP → Email Log.
You’ll see a list of each email, along with details such as the recipient, source, service, and more. You can also use the Actions column to…
- See the full technical details about an email.
- View the content and design of each email (along with attachments, if you enable attachment logging).
- Manually resend an email.

To adjust email log behavior, you can go to SMTP → Settings → Logging.
You can also view detailed reports from inside the SMTP.com dashboard.
Get started with WordPress SMTP.com sending today
SMTP.com offers an easy-to-use email sending API that can work for both transactional and marketing emails. It’s especially well-suited for WordPress sites that need to send tens of thousands of emails per month (or even much higher, into the millions).
With the Gravity SMTP plugin, you can easily connect your WordPress site directly to the SMTP.com email API, while also accessing other useful features to improve the reliability of your site’s transactional emails and monitor everything that’s happening.
Install Gravity SMTP today and follow this guide to get started with using SMTP.com for WordPress emails.

Newsletter
If you want to keep up-to-date with what’s happening on the blog sign up for the Gravity Forms newsletter!
"*" indicates required fields