Looking to set up your own flexible Calendly WordPress integration?
With the new Gravity Forms Calendly Add-On, you can turn form submissions on your WordPress website into scheduled meetings in Calendly.
When someone submits the form, you can generate a unique invitation link in the confirmation message. You can choose a specific Calendly event type for the link and use form data to pre-fill the Calendly scheduling form with details such as their names, email addresses, and answers to any custom questions.
In this guide, we’ll introduce you to the Gravity Forms Calendly Add-On and its key features in more detail. Then, we’ll show you step-by-step how to set up everything on your WordPress website.
Note: The Gravity Forms Calendly Add-On is part of Gravity Labs — our home for experimental add-ons. It’s free with your Gravity Forms license, but it’s experimental and outside our official support. Labs is also how we learn what our community wants to see in the product, so if you try it, let us know what you think.
Why use the Gravity Forms Calendly Add-On?
With the Gravity Forms Calendly Add-On, you can move form visitors directly from submitting a form on your site to scheduling an appointment, without the need to manually send them an invitation link.
When a person submits a form on your site, you can generate a unique invitation link for them and pre-fill any relevant information from the form submission.
Not only does this simplify your workflows, but it also lets you connect with the person submitting the form while they’re most engaged and make sure you’re able to schedule appointments with qualified leads/form submissions.
Here are some of the key features of the Calendly Add-On:
- Support for multiple event types – if you have a paid Calendly account, you can choose which event type to send an invitation for from all of the event types you’ve added to your Calendly account.
- Unique meeting invitation link – generate a unique Calendly invitation link when someone submits a form on your site. Each link is single-use, so you don’t need to worry about form submitters sharing links with others.
- Pre-fill attendee details using form information – you can map form fields to fields in the Calendly booking form to pre-fill them. You can pre-fill a person’s contact details as well as answers to any custom questions you’ve added in Calendly.
- Conditional logic – you can add conditional rules to your feed, such as only generating an invitation link if a person answers in a certain way or creating invitation links for different event types based on how a person fills out the form.
How to set up a WordPress Calendly integration with Gravity Forms
Now, let’s get into the full step-by-step guide on how to set up your Calendly WordPress integration using Gravity Forms.
To follow this guide, the only thing that we’ll assume is that you already have a Calendly account. The add-on will work with both free and paid accounts, so you can follow this guide no matter what.
If you don’t have a Calendly account yet, you can register for one here.
1. Install the Gravity Forms Calendly Add-On
To get started, you need to install the Gravity Forms Calendly Add-On on your site.
As we mentioned in the introduction, the Calendly Add-On is currently part of Gravity Labs. While these add-ons are free with any Gravity Forms license, they sit outside the normal suite of Gravity Forms add-ons.
First, you need to download the add-on from the Gravity Labs website:
- Go to the Calendly Add-On page at Gravity Labs.
- Log in to your existing Gravity Forms account on Gravity Labs, if you haven’t done so already.
- Click the Download button.
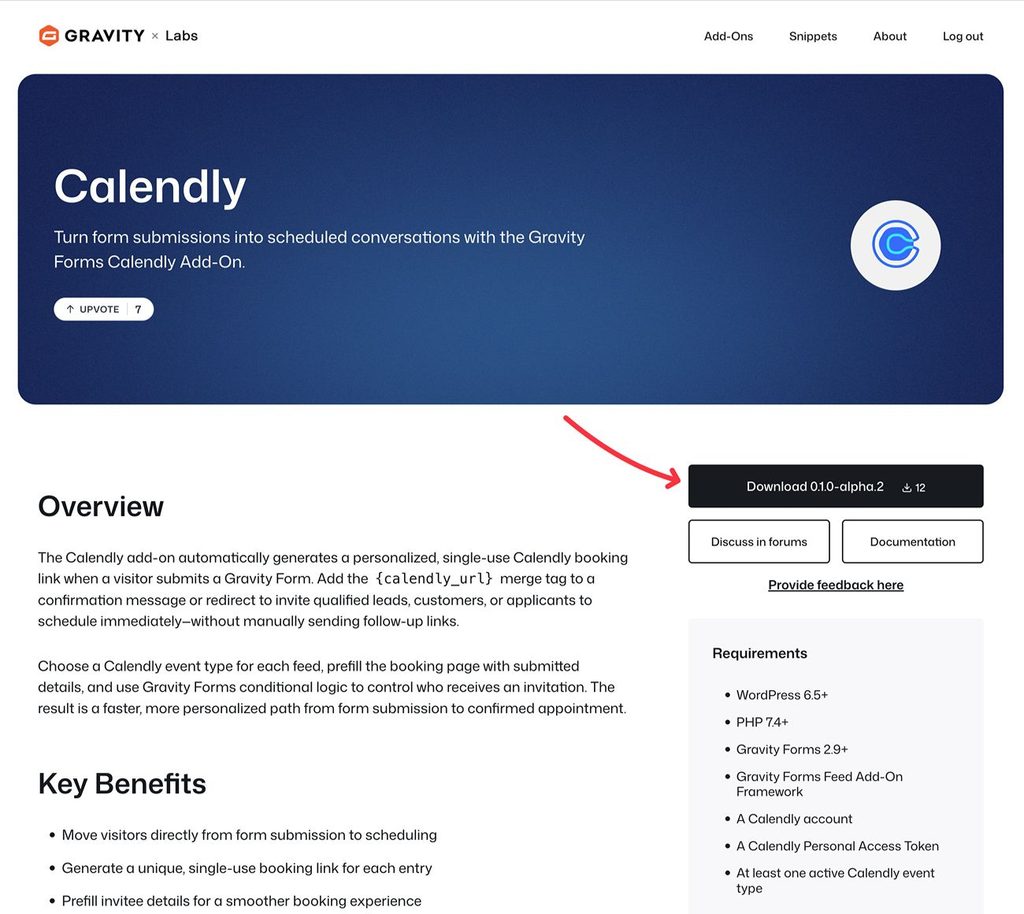
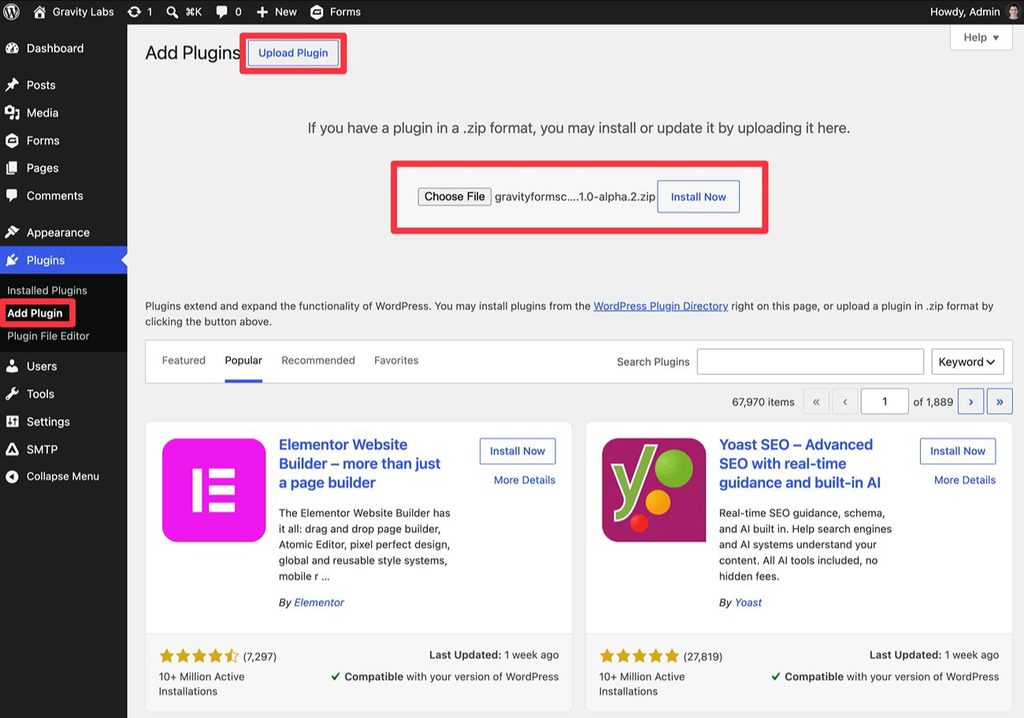
After you’ve downloaded the add-on’s ZIP file to your computer, you can upload and install it like any other WordPress plugin:
- Go to Plugins → Add Plugin in your WordPress dashboard.
- Click the Upload Plugin button.
- Select the ZIP file and click Install Now.
- On the next screen, make sure to activate the plugin.
2. Create your Personal Access Token
Next, you need to create your Calendly Personal Access Token, which is what Gravity Forms will use to connect to your Calendly account.
You can create your Personal Access Token by clicking this link. Or, you can go to Integrations & apps in the Calendly dashboard and then search for and select API and webhooks in the list of options.
Then, click the Get a token now link under Personal access tokens.
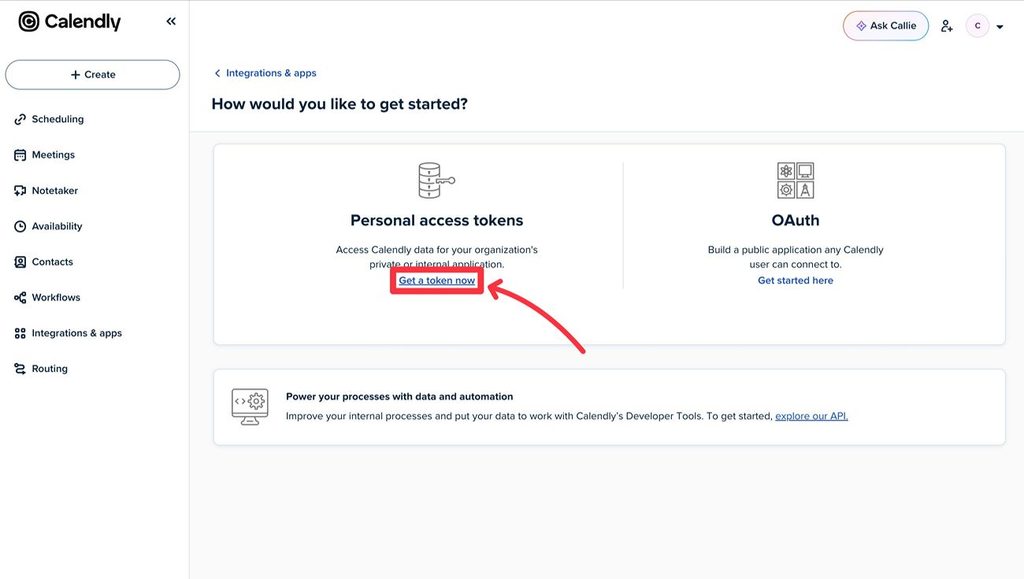
Click Continue in the prompt that appears.
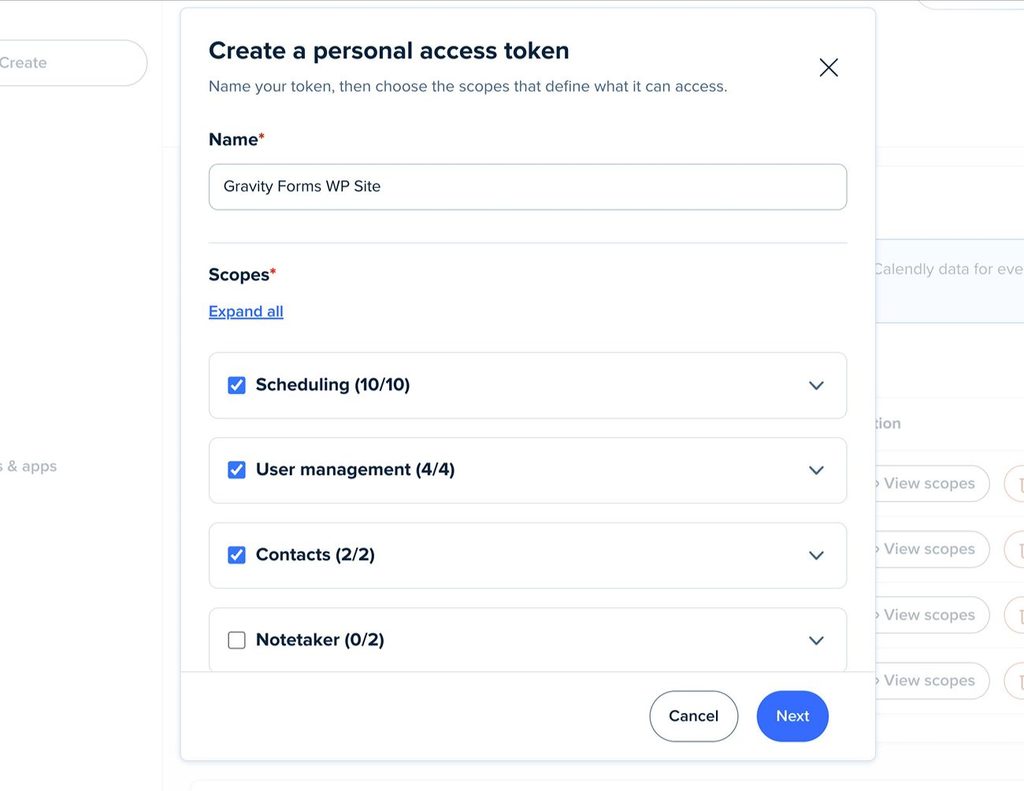
Give your token a name to help you remember it and grant it access to at least the following under Scopes:
- Scheduling
- Contacts
Then, click Next.
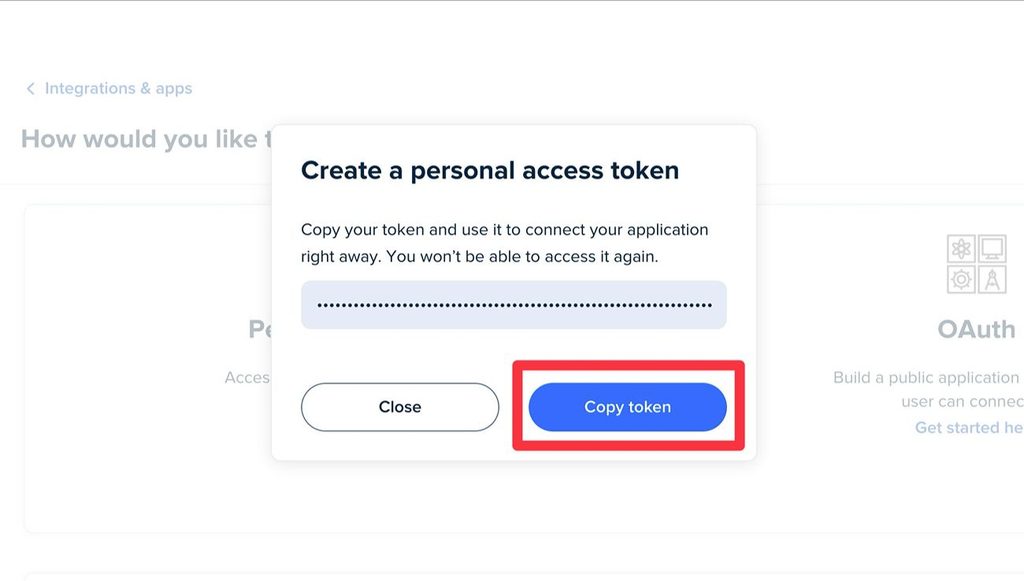
Calendly will then email you a verification code that you’ll need to paste into the interface. Then, you should see your personal access token in the popup.
Copy this value to a safe spot because Calendly will only display it one time. Don’t worry, though – if you lose track of it, you can just repeat these steps to create another token.
3. Connect Gravity Forms to Calendly
Once you have your Calendly personal access token, you can proceed with connecting Gravity Forms to Calendly.
Here’s how to set it up:
- Open your WordPress site’s dashboard.
- Go to Forms → Settings.
- Select the Calendly tab in the Gravity Forms settings area.
- Paste the Calendly personal access token that you just created into the Personal Access Token field.
- Click Save Settings.
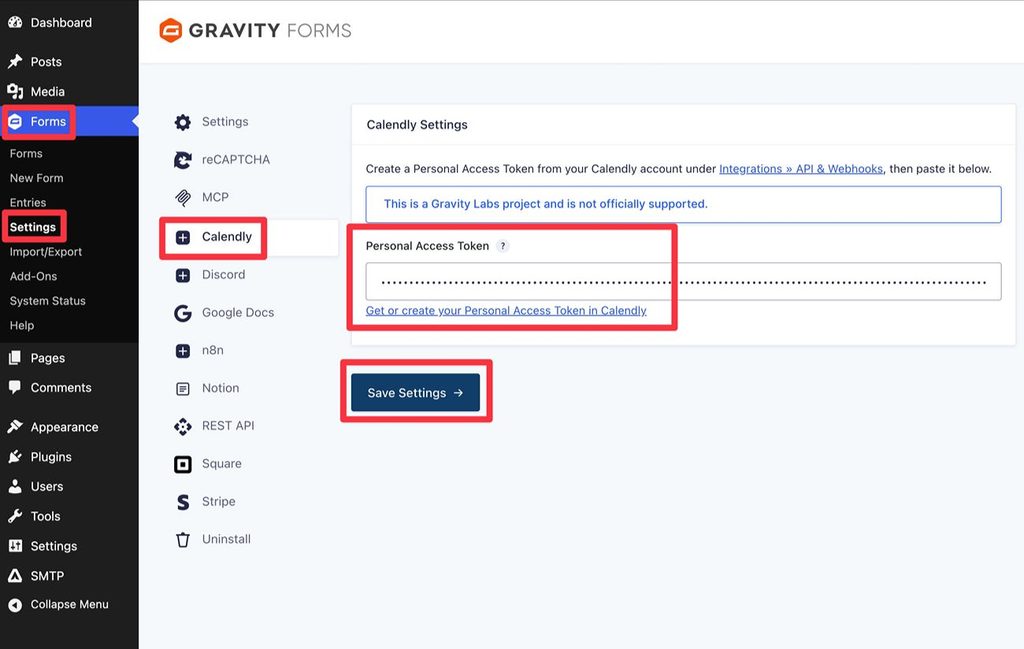
You should then see a green checkmark appear next to your personal access token.
If you see a red “X” instead of a green checkmark, try the following:
- Make sure you pasted the full personal access token and didn’t make any typos.
- Check to see if you enabled all of the permission scopes needed for your personal access token. Even if the token is valid, it will still show a red “X’ if you didn’t grant the token all the permissions that it needs.
4. Create or edit the form that you want to connect to Calendly
Now, you’re ready to set up the form that you want to integrate with Calendly.
If you already have a form, you can just edit the existing form. Or, you can create a new form using one of the pre-made templates that Gravity Forms offers or a blank canvas.
When setting up the form, you’re free to configure it however you want.
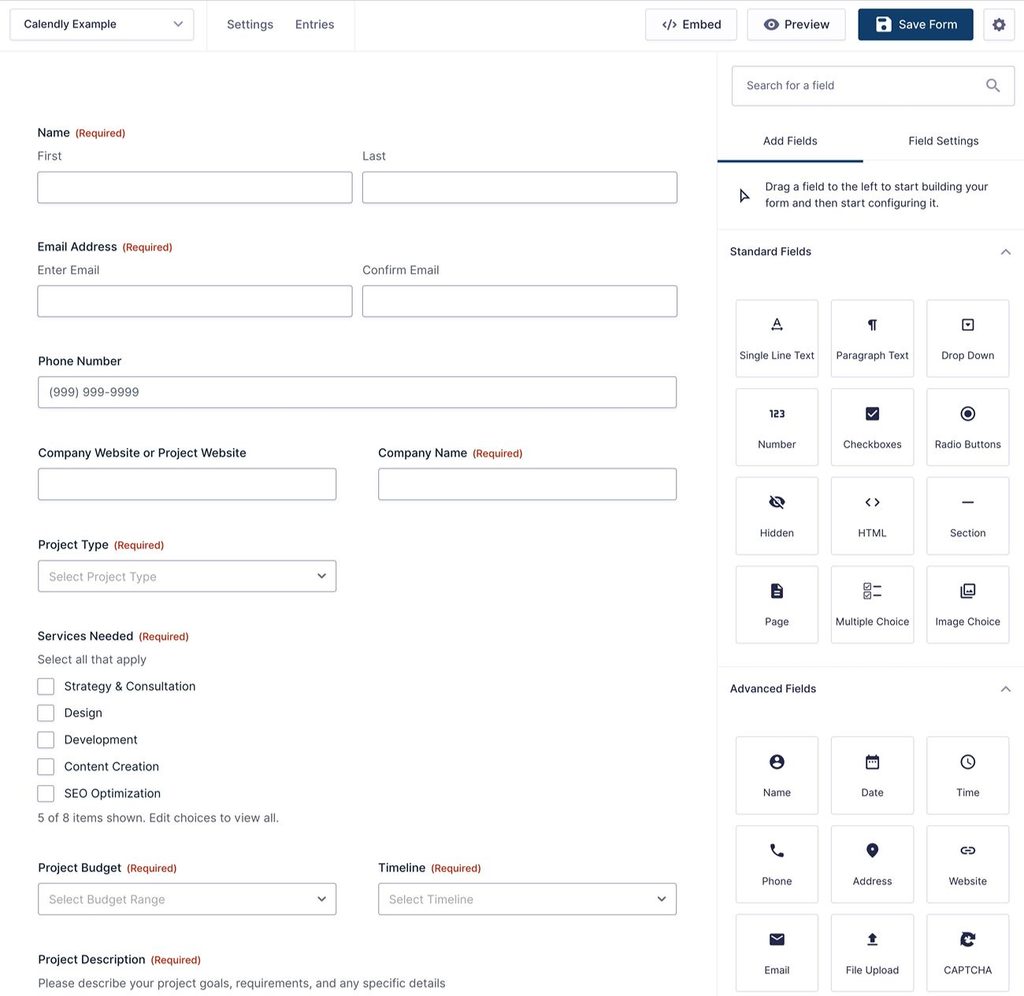
If you want to pre-fill the invitee’s booking page in Calendly, you should add fields to collect that information. This can include the person’s name and email address, as well as answers to any custom questions that you might have included in the Calendly booking form.
However, this is optional and not required to set up the WordPress Calendly integration.
For this example, we’re using the pre-made Agency Project Inquiry Form template.
5. Create a Calendly feed for your form
Once you’re happy with the form itself, you can set up the Calendly integration by creating a Calendly feed for your form.
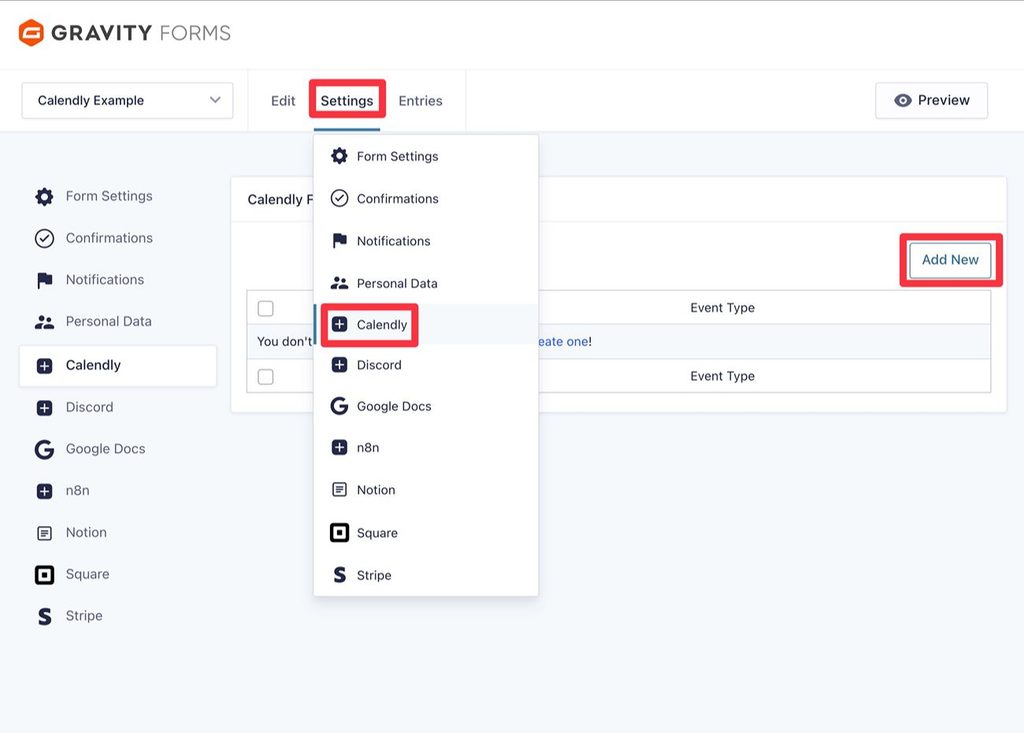
Go to Settings → Calendly inside the form editor interface. Then, click the Add New button to create a new Calendly feed.
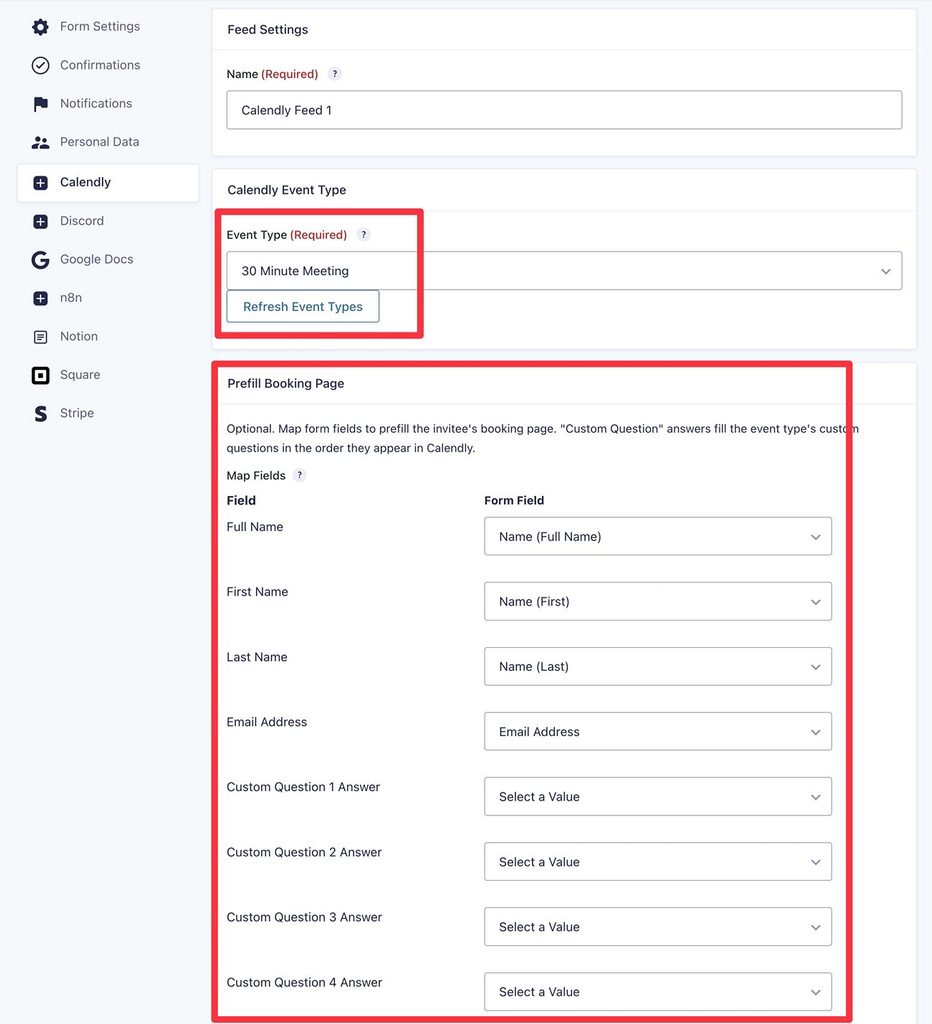
Inside the feed settings interface, the only thing you must configure for your feed is choosing the Calendly Event Type. For example, a 30-minute appointment or a one-hour appointment.
If you’re using a free Calendly account, you can only have one event type. However, paid Calendly accounts let you create multiple event types.
Below that, you have the option to set up field mapping to pre-fill the invitee’s Calendly booking page using data from your form. You can pre-fill their name and email address, along with answers to custom questions that you set up in Calendly.
For this example, we’ll map the person’s name and email address.
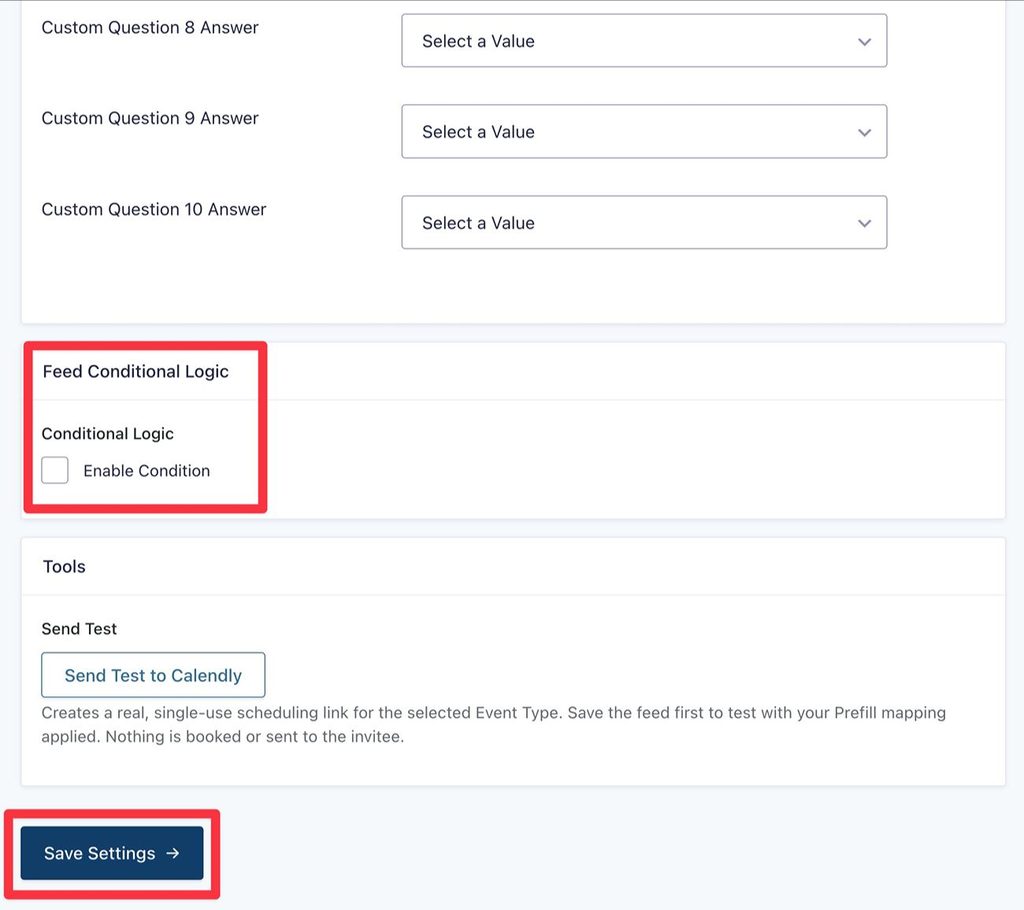
Further down the settings page, you have the option to add conditional logic. For example, you could only show the Calendly appointment link if a user checks a box in the form indicating they want to schedule a meeting.
Or, if you have a paid Calendly account, you could create appointment links for different Calendly event types based on how a person fills out the form.
Once you’ve made your choices, click Save Settings at the bottom. We’ll cover what the Send Test tool does in a second.
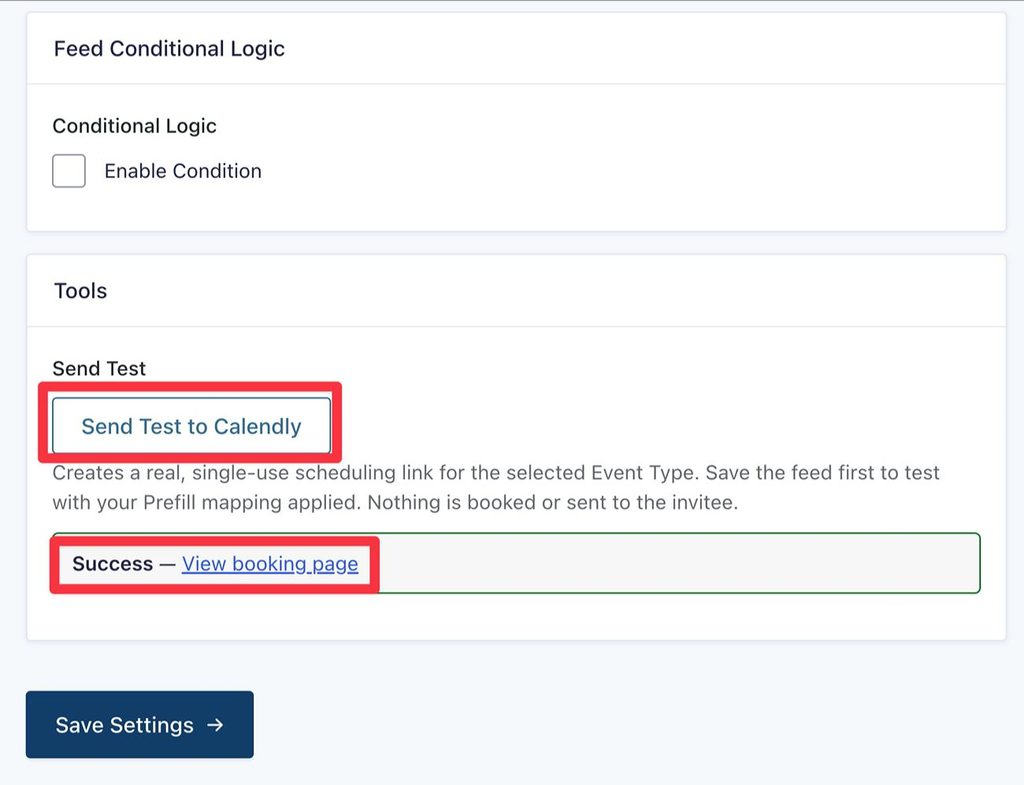
Once you’ve saved your form, you can click the Send Test to Calendly button to create a real, single-use scheduling link for your selected event type. If you’ve set up field mappings, this lets you test them to make sure that everything is working as you want it to.
Click the View booking page link to open the example page in a new window:
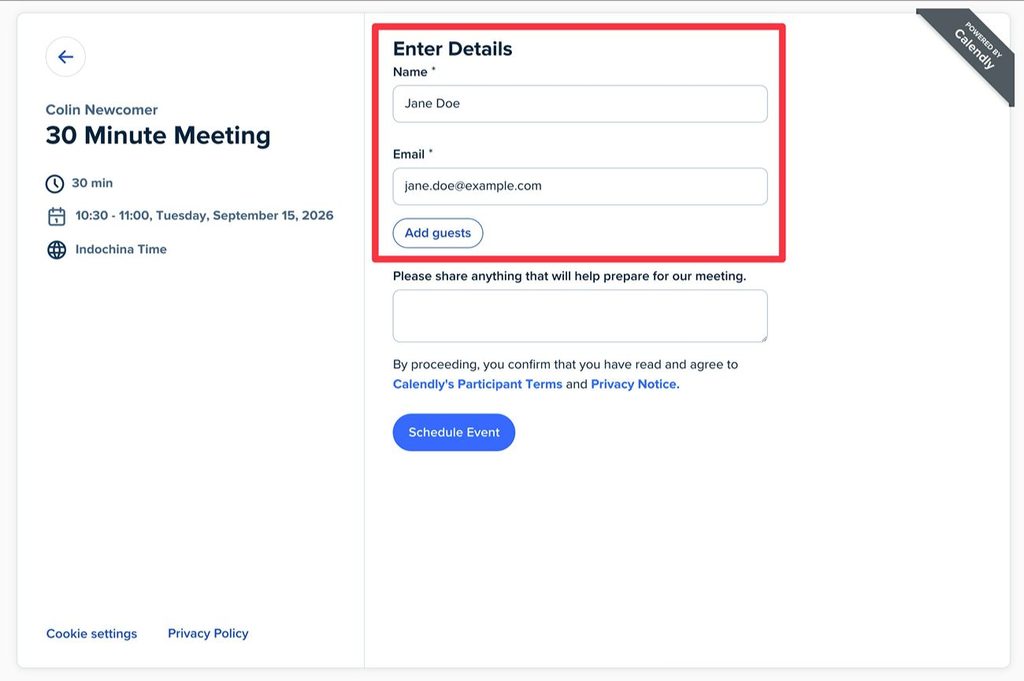
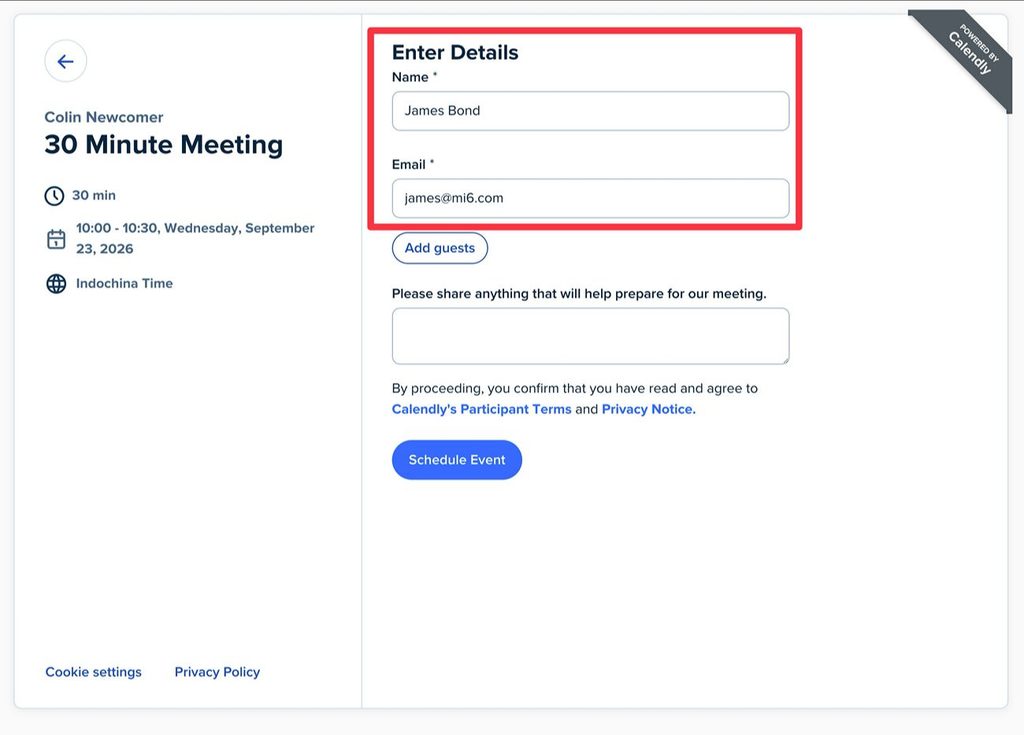
For our example, you can see that Gravity Forms pre-filled the name and email fields with sample data. On a live form, this data would come from the user’s answers.
6. Add Calendly merge tag to form confirmation
To finish setting up the Calendly integration for your form, you need to configure your form’s Confirmation to display a link to the Calendly booking form.
This is what allows Gravity Forms to create a pre-filled link for the Calendly booking interface after a user submits the form.
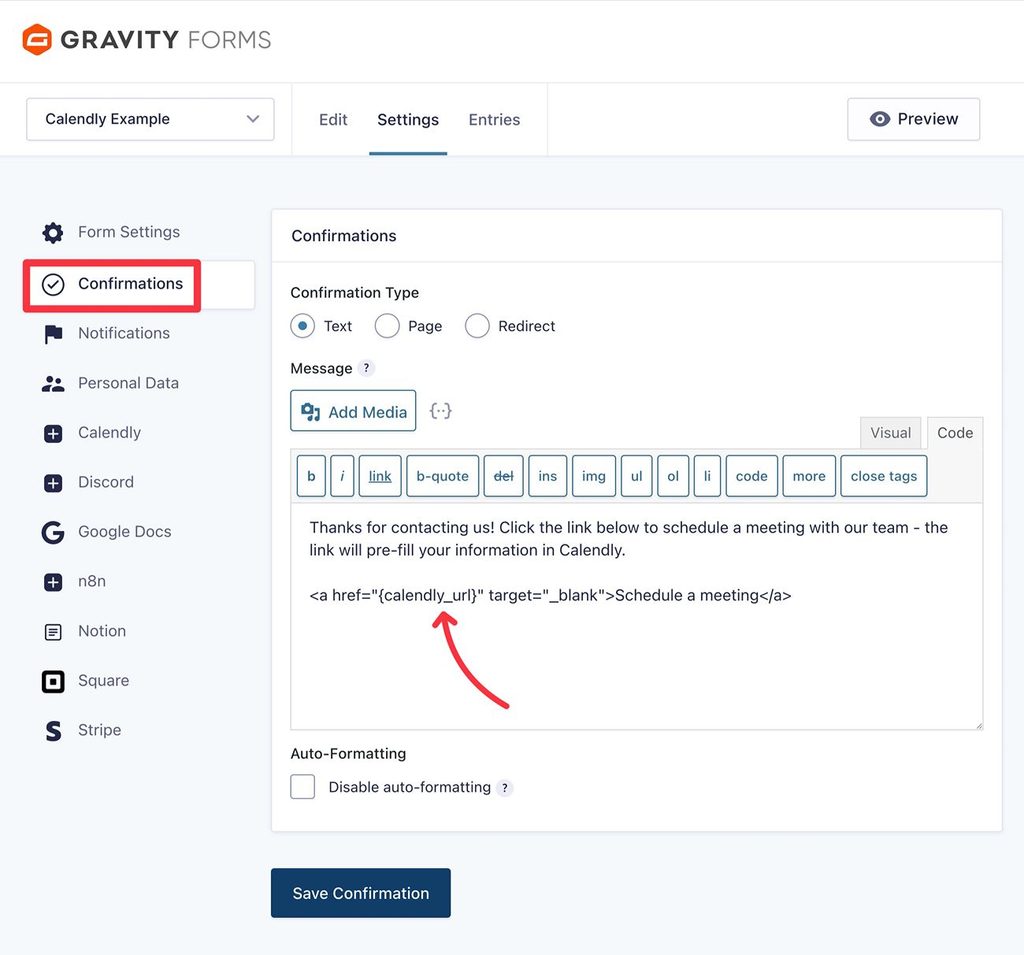
Go to Settings → Confirmations inside the form editor. Then, edit the default confirmation or create a new one.
To insert the Calendly invitation URL, you can use the {calendly_url} merge tag anywhere in the text editor.
Note: The merge tag only inserts the raw URL, so you need to insert it inside of a link to create a clickable URL. You could also display it as a button using some simple HTML.
7. Embed and test your live form
To finish things out, you need to embed the live form on your WordPress website.
You can do this using the Gravity Forms block, shortcode, or PHP function.
Once you’ve embedded the form, we recommend submitting it with some sample information to test everything one more time.
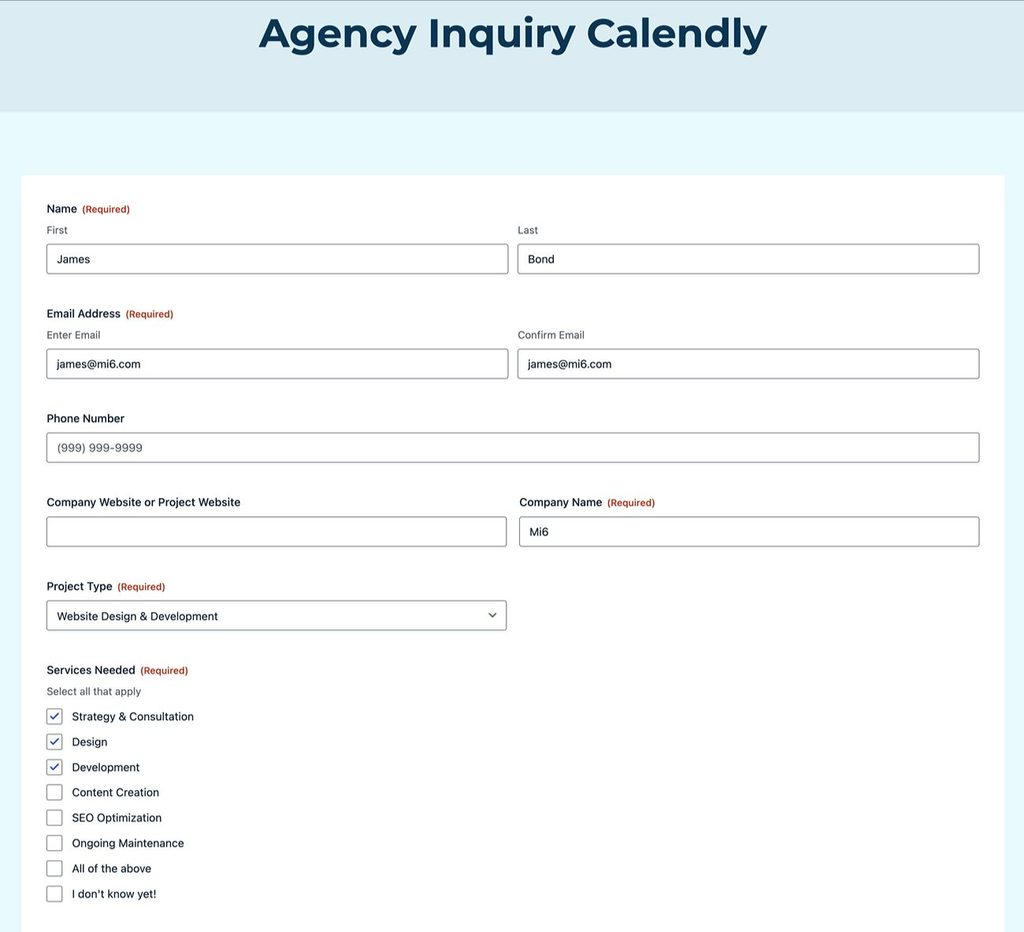
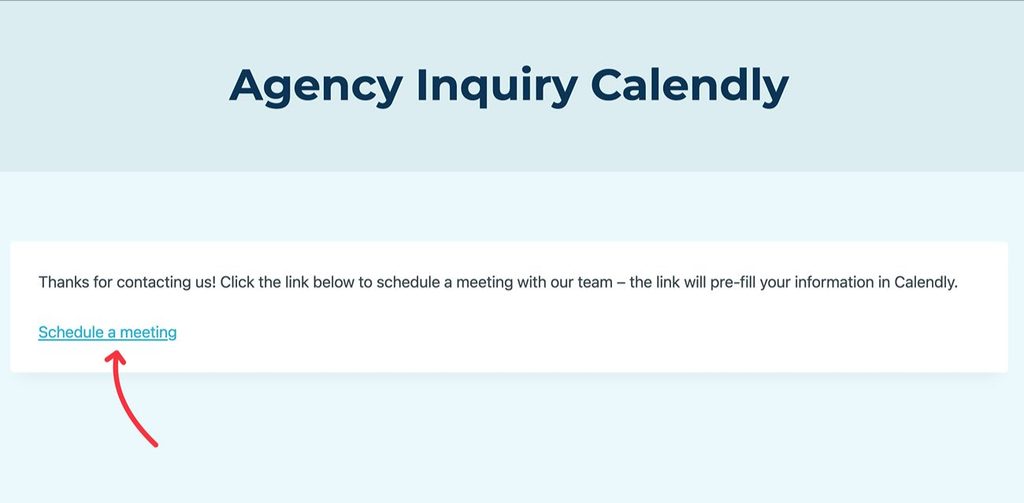
When you submit the form, you should see a unique Calendly invitation link.
Clicking that link will open the Calendly booking interface, complete with pre-filled information.
And that’s it! You’re all finished.
Set up your WordPress Calendly integration today
The Gravity Forms Calendly Add-On is available now in Gravity Labs. It’s free with any Gravity Forms license. As a Labs add-on, it’s experimental and sits outside our standard support — and your feedback helps shape what we build next. If you give it a try, we’d love to hear how it works for you.

Newsletter
If you want to keep up-to-date with what’s happening on the blog sign up for the Gravity Forms newsletter!
"*" indicates required fields