With the WordPress conditional email routing feature in the Gravity SMTP plugin, you can use different transactional email services to send different kinds of emails on your site.
This lets you use the optimal transactional email service for each type of email, which can help you optimize deliverability, reduce your costs, protect your sender reputation, and more.
In this post, we’ll introduce you to what conditional email routing is, including some of its main benefits and some example use cases.
Then, we’ll show you step-by-step how to set up your own WordPress conditional email routing rules with the Gravity SMTP plugin.
What is WordPress conditional email routing?
Conditional email routing lets you send your WordPress site’s transactional emails using different sending services based on conditional rules that you define.
For example, you could send external-facing emails to customers using Postmark while sending less important internal emails using the free Gmail API.
You can set up your rules using your preferred mix of a large number of conditions, including the following:
- Subject line
- Body (content of the email)
- Content type
- Message size
- From email address
- From name
- Reply-to email address
- Recipient email address
- CC email address
- BCC email address
- To count (number of people receiving the email)
- CC count
- BCC count
- Whether the email has an attachment
- Number of attachments
- Attachment size
- Source (e.g. if the email comes from a specific plugin, such as all WooCommerce emails)
- Source type (e.g. whether the email comes from the WordPress core or any WordPress plugin)
Here are some plain-language examples of how these conditions might work:
- Send emails to your own personal admin email using the free Gmail API, while using a dedicated transactional email service for emails sent to any other address.
- Send all emails with “Invoice” or “Receipt” in the subject line using one service, while using another service for all other emails.
- Send Gravity Forms notifications using one service, while using another service for WooCommerce emails.
- Send emails with attachments larger than 500 KB using one service, while using another service for all emails without attachments or with smaller attachments.
You can also combine multiple conditions into a single rule, using “AND” or “OR”. For example, emails with a certain subject that also are being sent to an email address that ends in “@gravityforms.com”.
Benefits of conditional email routing
The high-level benefit of conditional email routing is that it lets you use the best email service for each type of email.
Some of the more specific benefits of this level of granular control include the following:
- Optimized deliverability – By matching the emails that your site sends to the email sending service that best fits each use case, you can optimize email deliverability for different types of emails.
- Cost management – You can save money by routing some emails to free/cheap services, while still using a premium delivery service for your site’s most important emails (especially for emails to customers).
- Sender reputation protection – You can protect the sender reputation of your most important emails, while routing less important high-volume emails through a different service (e.g. bulk notifications).
Example use cases for conditional email routing
The benefits above can apply to all different kinds of use cases, but here are a few notable examples to give you an idea of how conditional email routing might work in practice:
- Admin vs user partitioning (internal vs external emails) – You can use one service to send emails to yourself and/or your team, while using a separate service for user-facing emails. For example, you could use the free Gmail API for internal emails, because you can set up internal filters to avoid spam filter issues. Then, you could use a dedicated service for user-facing emails that require a better sender reputation.
- High-volume sending/alerts – You can use a cheap high-volume sender for low-importance alerts to keep costs down, while using a premium service for more important emails.
- Ecommerce separation – You can send all of your ecommerce-related emails using one service, while sending general site emails using a different one.
- Large attachments – You can send emails with large attachments (e.g. digital asset delivery) using a service that’s optimized for that use case, while using a different service for other emails.
How to set up WordPress conditional email routing with Gravity SMTP
Now, let’s get into the full guide on how to set up WordPress conditional email routing using Gravity SMTP.
For this guide, we’ll assume that you’ve already installed and activated the Gravity SMTP plugin on your site.
If you’re not using Gravity SMTP yet, it’s available at no extra cost to anyone holding the Gravity Forms Elite or Nonprofit licenses. You can download it from your Gravity Forms account. If needed, you can purchase a new license here.
1. Connect to all of the email services that you want to use
Before you set up any conditional rules, you’ll first want to make sure that you’ve connected to all of the different services with which you want to send emails.
You’ll need to be using at least two different services at a minimum. Otherwise, there’s no reason to set up conditional rules. However, you’re free to use as many services as you want, so you can certainly go beyond two services.
If you need help connecting to different services, you can read our ultimate Gravity SMTP guide or the tutorials that we’ve written for most of the dedicated API integrations that Gravity SMTP offers:
- Amazon SES
- Brevo
- Cloudflare Email Service
- Elastic Email
- Emailit
- Gmail / Google Workspace
- Mailchimp
- Mailersend
- Mailjet
- Mailgun
- Outlook / Microsoft 365
- Postmark
- Resend
- SendGrid
- SMTP.com
- SMTP2Go
- SparkPost
- Zoho Mail
- Custom SMTP
You can also find the integration documentation here.
2. Create your conditional email routing rules
Once you’ve connected to all of the services that you want to use, you’re ready to start setting up your conditional logic rules.
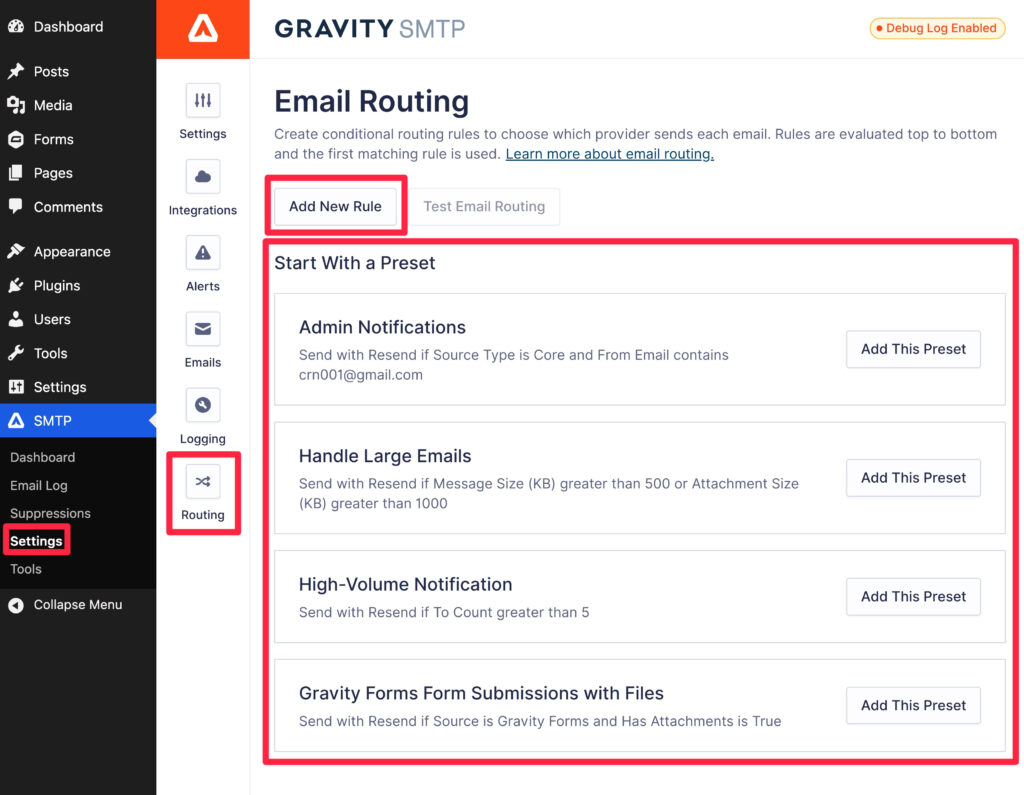
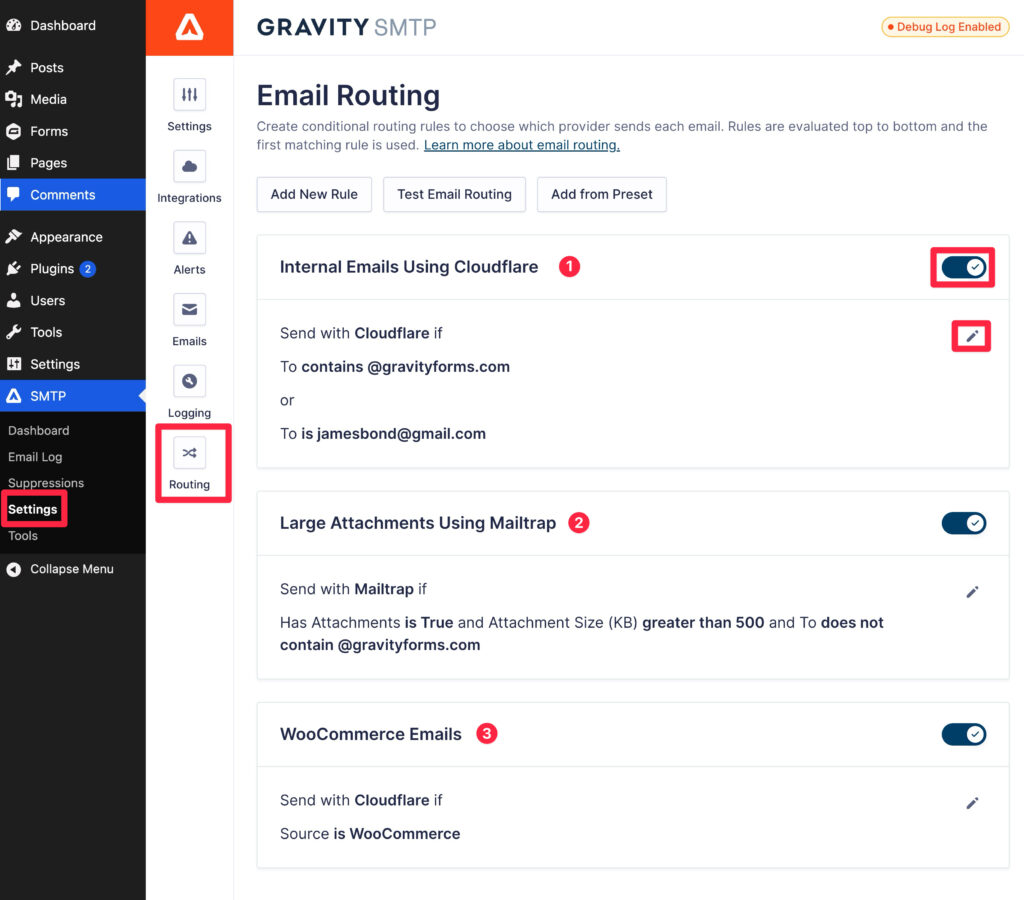
To get started, go to SMTP → Settings. Then, select the Routing tab inside the Gravity SMTP settings area.
You have two options to create your first rule:
- Build from scratch – you can click the Add New Rule button to create a new conditional routing rule from scratch.
- Start with a preset – you can choose one of the presets for common scenarios such as admin notifications, emails with attachments, etc.
For this tutorial, we’ll click Add New Rule to start from scratch.
Choose which email sending service to use
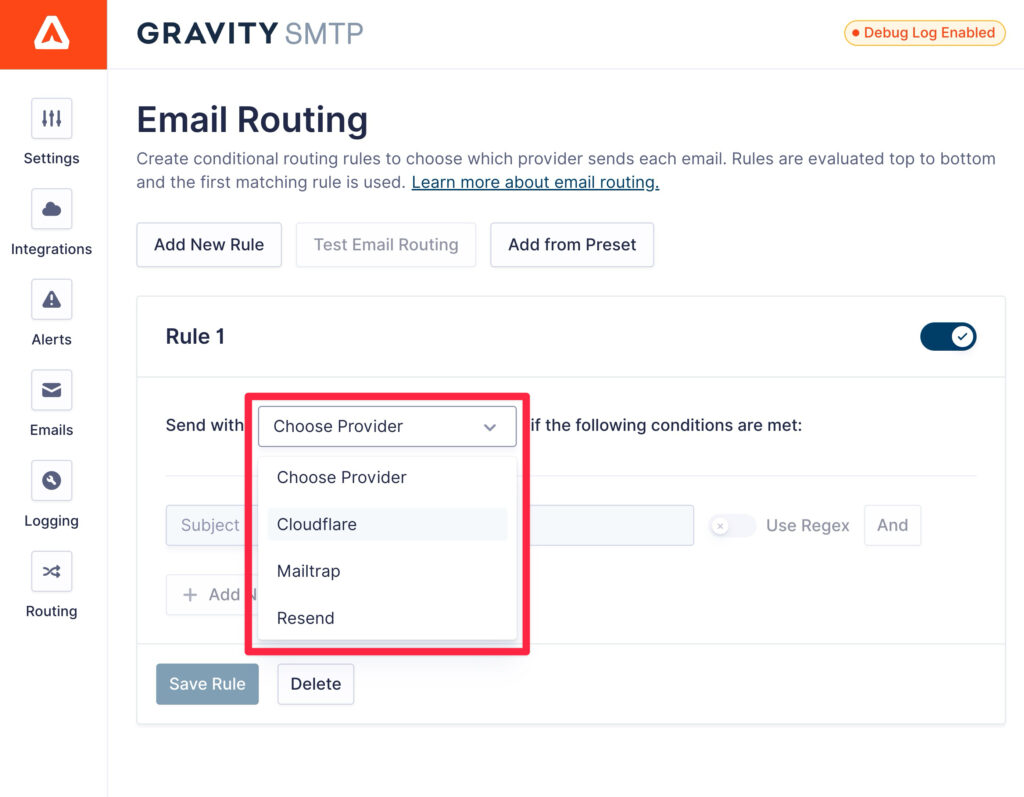
First, you can use the Send with drop-down to choose which transactional email service provider this rule should apply to. The drop-down will automatically populate with all of the sending services for which you’ve set up an active connection.
Add your conditions
Next, you can start adding the rules that will apply to this sender.
Each rule is comprised of three main elements:
- Condition – Use the drop-down to choose from the 18+ conditions that we mentioned above.
- Operator – Choose how to apply that condition. For example, “is”, “is not”, “contains”, “does not contain”, etc.
- Value – Choose the value of the condition. Usually, this is an open text field, but some conditions will have set values that you can choose from. Some conditions also give you the ability to use Regex.
If you want to add multiple conditions to the same rule, you can add more conditions using “AND” or “OR”:
- AND – all of the grouped conditions must be met in order for the rule to be true.
- OR – only one of the grouped conditions must be met in order for the rule to be true.
You can also include multiple conditions within each “AND” or “OR” group.
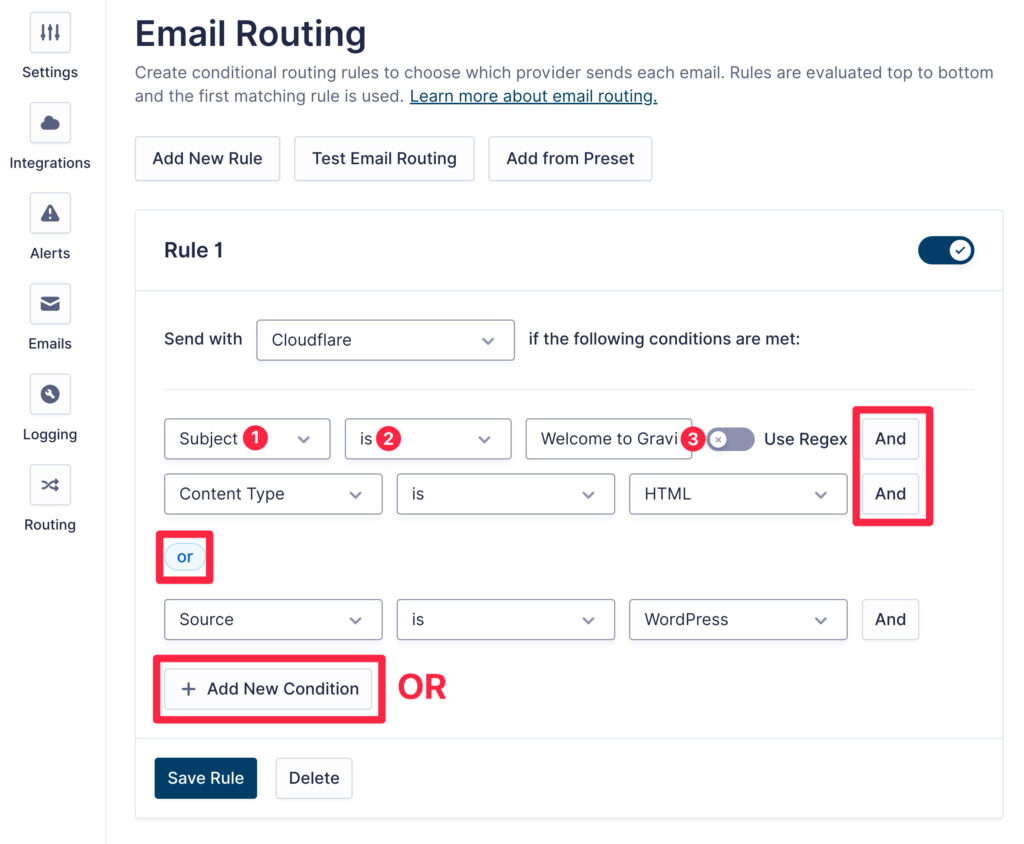
Once you’ve configured the rule, make sure to click the Save Rule button at the bottom.
Let’s look at a few examples to show how it works…
Send internal emails using a different service
One common use case would be to use a different email service to send all of your internal emails.
For this example, let’s say you want to use the service for:
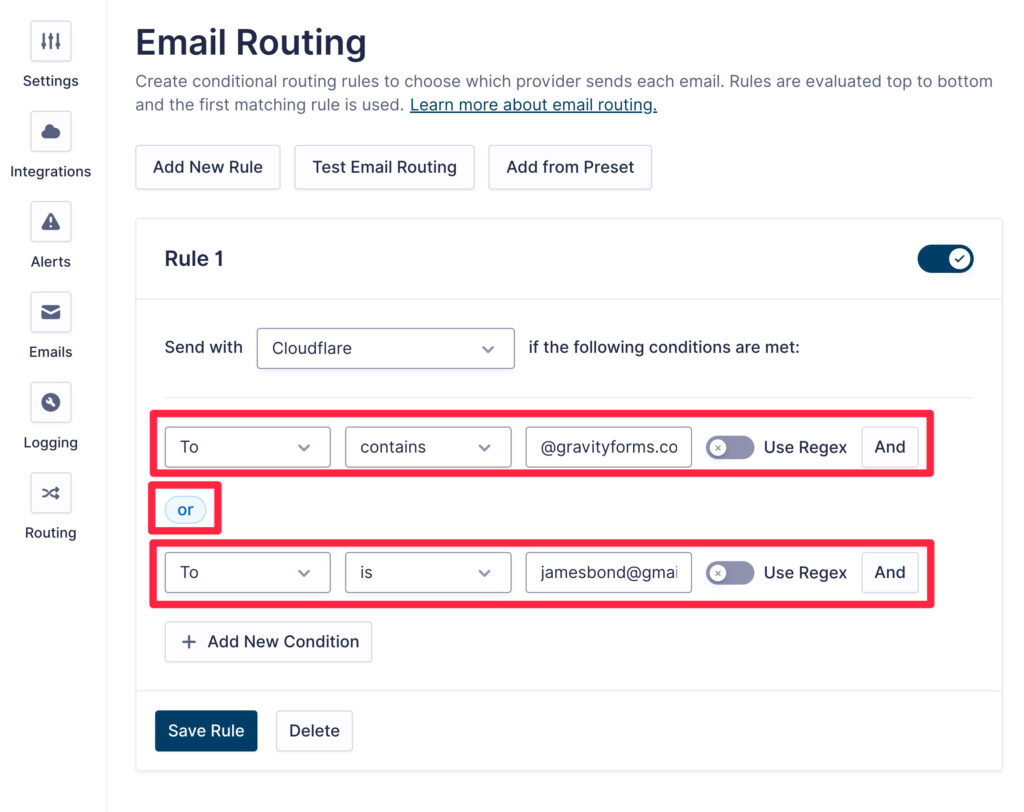
- All emails sent to an “@gravityforms.com” email address.
- Emails sent to your personal account – “[email protected]”.
You could set up a rule like this:
To | contains | @gravityforms.com
OR
To | is | [email protected]
Send large attachments using a different service
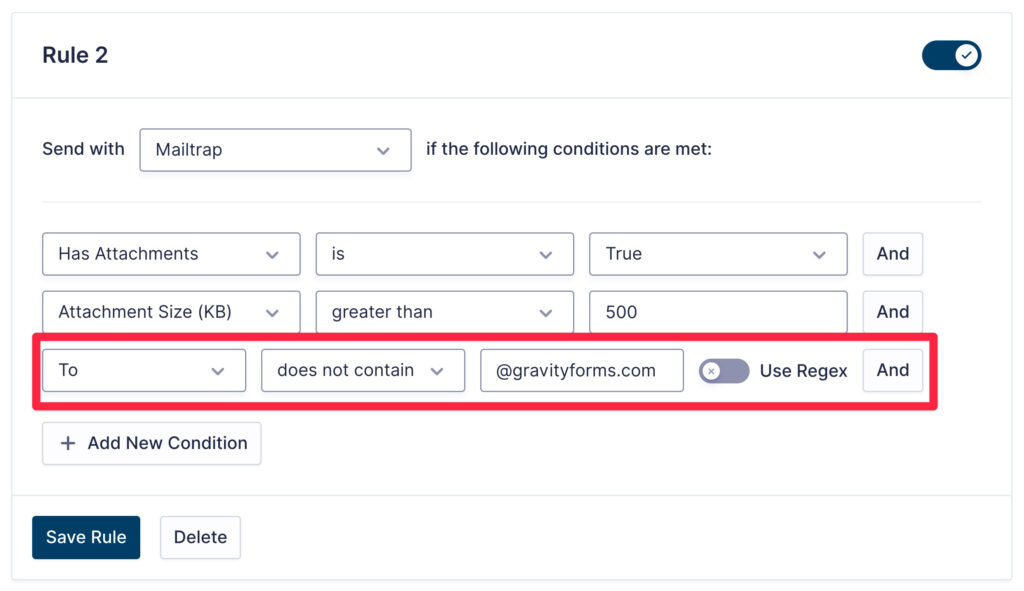
Another common use case would be to use a different email service to send emails with large attachments.
For example, let’s say you’re fine with using your primary sending service for emails without attachments or with small attachments, but you want to use a different service for all attachments that are larger than 500 KB.
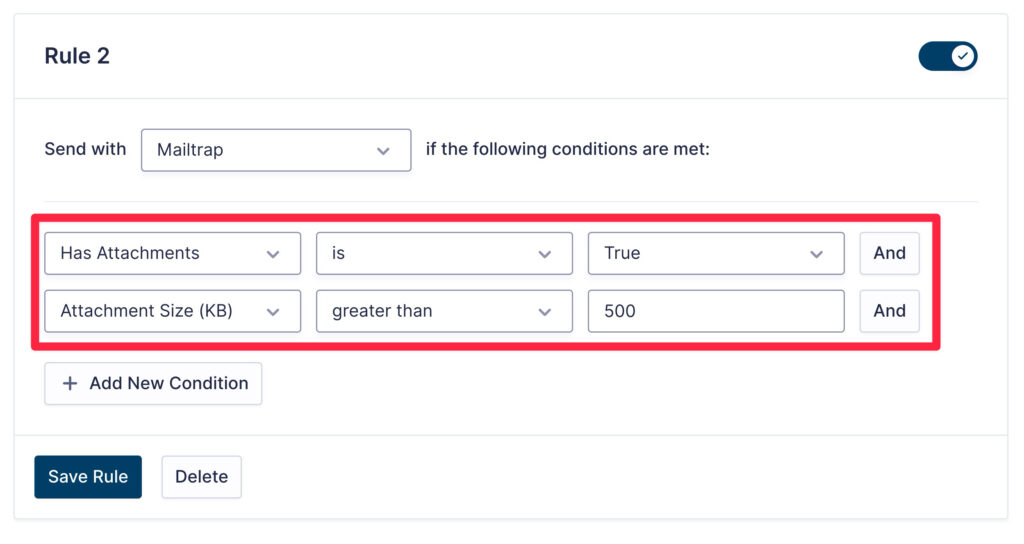
You could add one rule with two conditions:
Has attachments | is | True
AND
Attachment Size (KB) | greater than | 500
Maybe you want to go one step further and make this rule only apply to external emails, defined as any email being sent to an email address that is not @gravityforms.com.
You could add a third condition as follows:
To | does not contain | @gravityforms.com
Send emails from a certain plugin using a different service
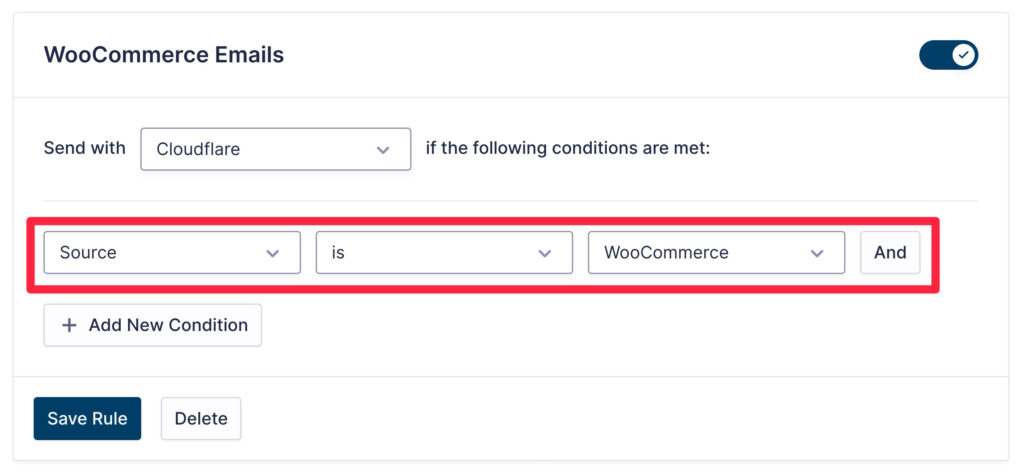
For this last example, let’s say that you want to send all emails from a certain plugin with a different service. For this example, we’ll use WooCommerce, but you can use the same idea for any plugin.
For this, you just need a single condition:
Source | is | WooCommerce
Create additional rules as needed
You can use these same basic steps to create as many conditional routing rulesets as needed.
As you add more rules, you’ll see a summary of the rule appear in the main Routing area.
For example, in the screenshot below, you can see that we’ve added three different rules. You can also use the toggle icons to turn rules on or off and click the edit pencil icon to edit a rule.
What happens if multiple rules apply to the same email?
Depending on how many rules you set up, you might run into situations where multiple rules could apply to the same email.
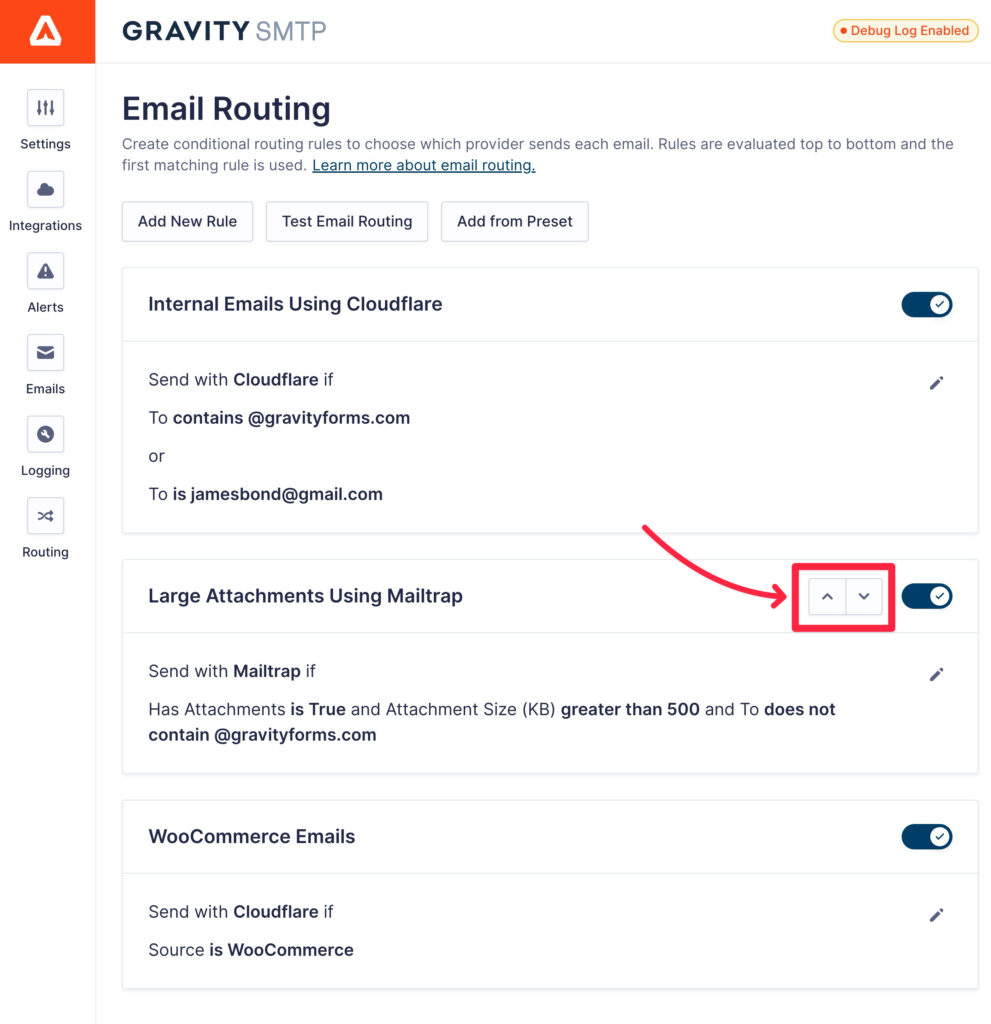
In these situations, Gravity SMTP will evaluate rules from top to bottom and use the first rule that applies to the email. That is, the rule that appears nearest to the top of the list.
If you want to change the order/priority of your rules, you can use the up and down arrows that appear for a rule when you hover your mouse over it.
3. Test your conditional email routing rules
To finish things out, we recommend testing your routing rules using Gravity SMTP’s built-in tool.
You can access this tool by clicking the Test Email Routing button in the Routing settings.
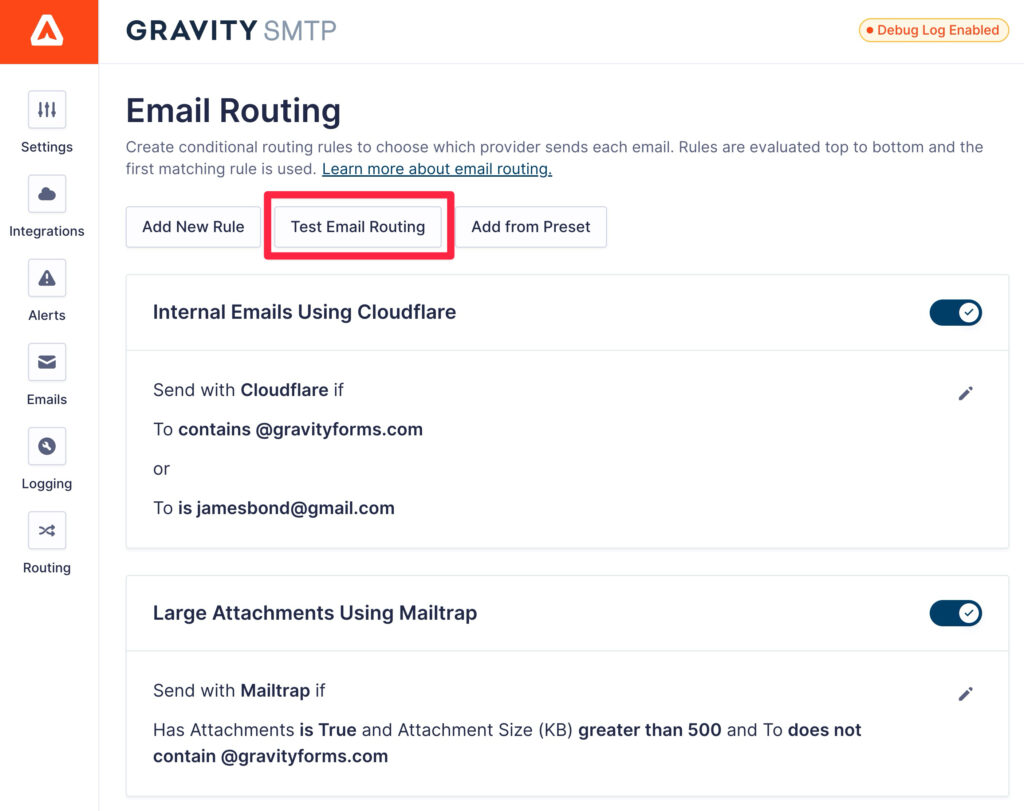
This will open a popup where you can enter your test conditions.
You do not need to fill out all of the fields. You can choose to only fill out the fields that apply to the scenario that you want to test.
For example, to test our rule about attachments greater than 500 KB, we could configure the test to run as if the email has a 600 KB attachment.
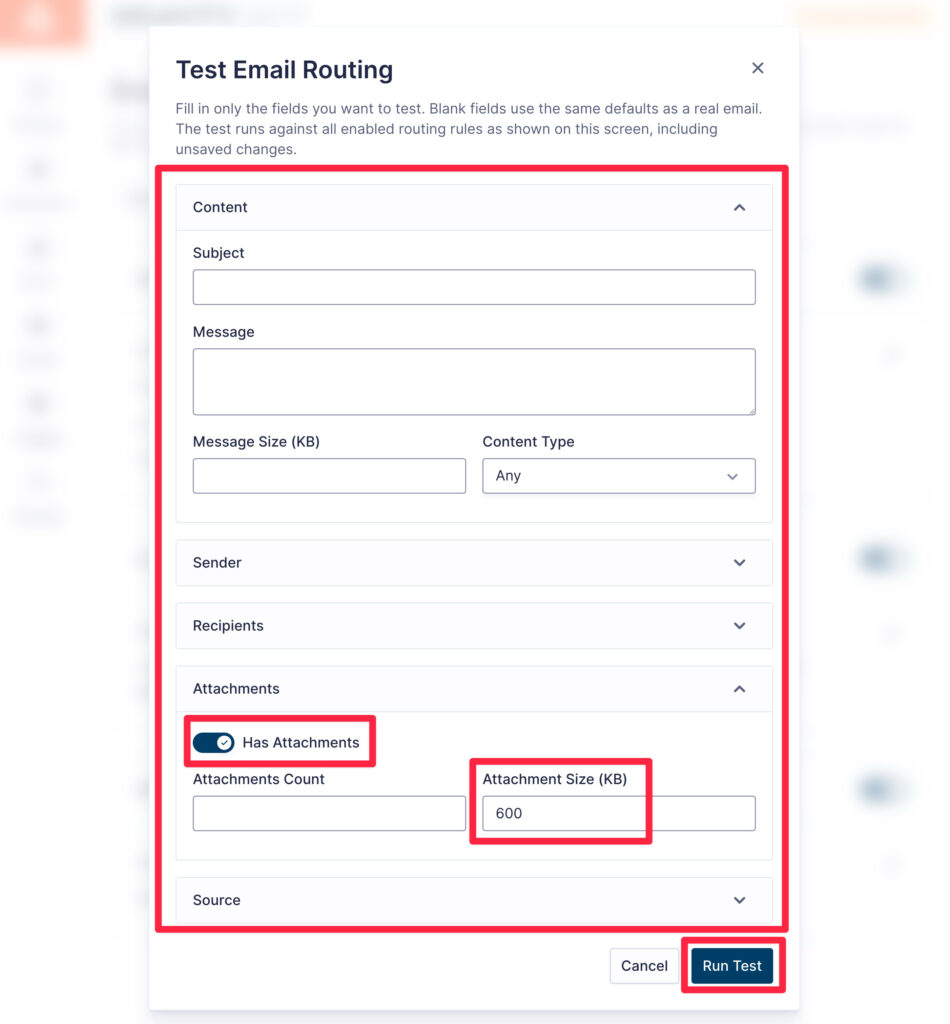
After clicking Run Test, Gravity SMTP will evaluate that scenario against all of your rules and tell you which rule would apply. In this case, it successfully uses our rule for large attachments.
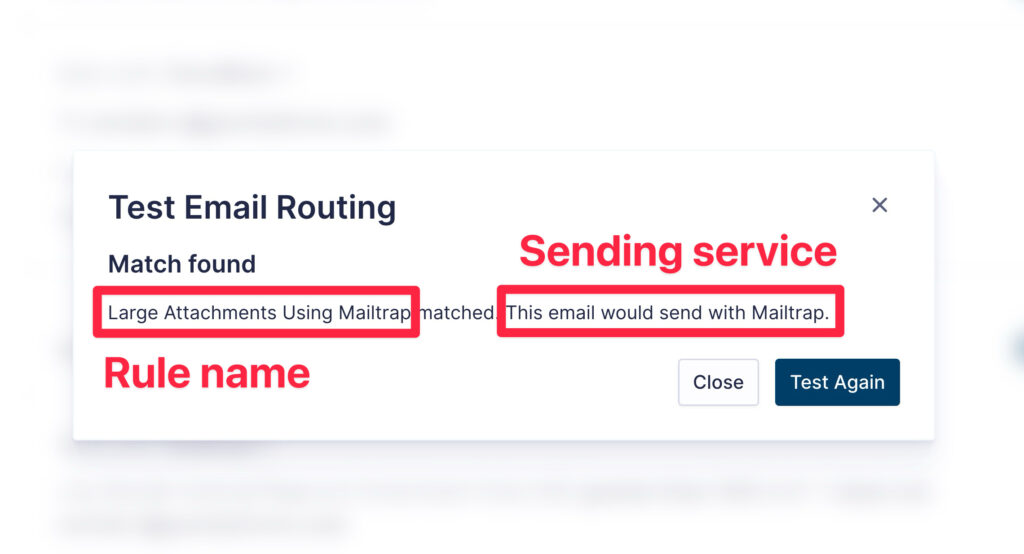
Remember: if multiple rules apply to the same email, Gravity SMTP will use the rule that appears higher in the list. So, if you find that a rule isn’t applying correctly, you might need to move it higher in the priority list (or adjust the rule conditions of other rules to make them more specific).
Get started with WordPress conditional email routing today
With the new conditional email routing feature in the Gravity SMTP plugin, you can easily set up as many rules as you need to ensure that every email on your site is sent using the optimal service.
You can build your rules using 18+ base conditions, each of which gives you a lot of flexibility for targeting the right emails.
If you’re already using the Gravity SMTP plugin, try the new email routing feature today if it fits your needs.
And if you’re not using Gravity SMTP yet, check out our ultimate guide to Gravity SMTP to learn how you can get started.

Newsletter
If you want to keep up-to-date with what’s happening on the blog sign up for the Gravity Forms newsletter!
"*" indicates required fields