Need to create a fundraising event registration form on your WordPress website?
With the Gravity Forms plugin, you can easily create a fully customizable form for your fundraising event(s), including the ability to accept one-time or recurring donations directly from the form.
You can get started using a premade event registration form template. Then, you can use the drag-and-drop editor to tweak everything to meet the unique needs of your organization.
This template and tutorial can work well for all different types of fundraising events. A partial list of example use cases includes:
- Charity runs/walks, with individuals and/or teams
- Fundraising dinners/galas
- Charity auctions
- Fun days/fetes with vendor stalls and other attractions
- Etc.
For the full, step-by-step tutorial, we’ll use the example use case of creating a registration form for a charity run/walk fundraiser, but you can easily adapt it to those other use cases.
Key features of the fundraising event registration form
If you follow this guide, you’ll be able to fully customize the fundraising event registration form to meet your unique needs.
With that being said, here are some of the main features that will apply to most forms:
- Drag-and-drop builder – You can use a non-technical form builder interface to fully customize the event registration form template, including adding, editing, and removing fields as needed.
- Built-in donation/payment support – You can accept one-time or recurring donations directly from the form. This includes letting registrants choose from preset amounts or enter their own custom donation amounts. You can also give people the option to choose between making a one-time donation or a recurring donation. Or, you’re always free to skip this and collect donations in-person at the event.
- Support for multiple payment processors – We’ll use Square for the tutorial, but you can easily swap in other payment processors such as Stripe, PayPal, Mollie, and more.
- Conditional logic – You can use conditional rules to adjust the form based on how people fill it out. For example, you could only show team-related form fields if a person chooses to register as a team instead of an individual.
- Repeater fields for team events – If you’re running a team event (e.g. a team charity walk), you can use Repeater fields to let registrants add the details for as many individual team members as needed.
- Integrations with other services – You can integrate your form with other services that your organization is using, such as your customer relationship manager (CRM), email marketing service, and more.
You can also take advantage of all of the other functionality and integrations in Gravity Forms, including the many official and third-party add-ons.
How to create a fundraising event registration form
Now, let’s get into the full step-by-step guide on how to set up a fundraising event registration form on WordPress.
We’ll use the event registration form template in Gravity Forms as the base and then take you through customizing it for a fundraising event.
As we mentioned earlier, we’re going to use the use case of creating a form for a fundraising charity walk. However, you can easily adapt your form to any other type of fundraising event.
1. Install Gravity Forms and necessary add-ons
To get started, you’ll need to install the core Gravity Forms plugin, if you haven’t done so already.
If you want to accept donations as part of your event registration form, you’ll also need to install one of the Gravity Forms payments add-ons. We’ll use Square and the Gravity Forms Square Add-On for this tutorial, but you could easily swap in one of the other payment add-ons that Gravity Forms supports.
If you don’t have a Gravity Forms license yet, here are your options for accessing these add-ons:
- Registered nonprofits can purchase the Gravity Forms Nonprofit license, which gives discounted access to every single Gravity Forms add-on.
- Otherwise, you can purchase at least the Pro license, which gives you access to all of the payment add-ons and other useful add-ons (such as the Zapier Add-On).
Once you’ve installed the core Gravity Forms plugin and added your license key, here’s how you can install add-ons:
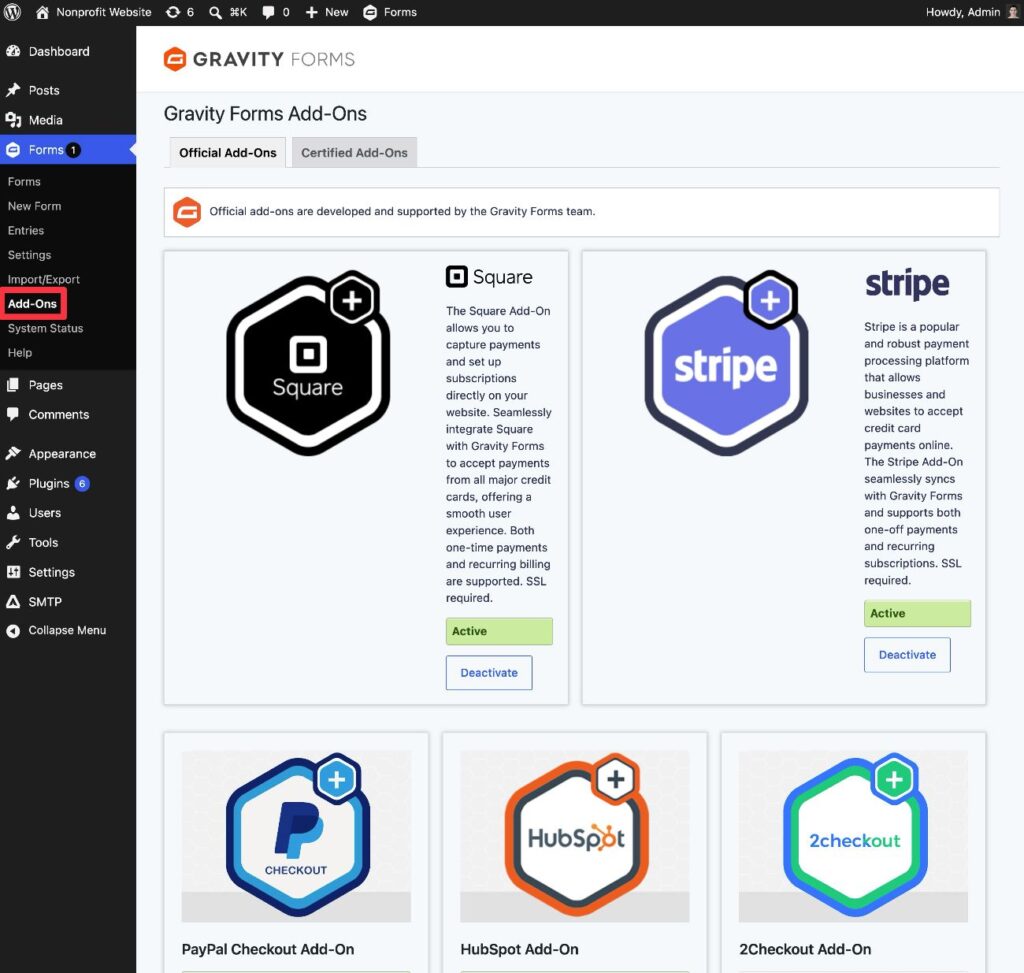
- Go to Forms → Add-Ons in your WordPress dashboard.
- Find the add-on that you want to install – for example, the Square Add-On if you want to accept donations directly from your event registration form.
- Click Install.
- Once the installation finishes, make sure to activate the add-on.
In addition to a payment add-on to accept donations, you also might want to install other add-ons for use cases such as subscribing people to your email newsletter, adding them to your CRM, and more.
We’ll cover these use cases later in the guide – you can always come back later and install more add-ons if needed.
2. Connect Gravity Forms to payment processor (optional)
If you don’t need to accept payments/donations as part of your event registration form, you can skip this step.
For example, maybe you just want to let people register via the form but you’ll actually collect donations in person at the event. This could be true for something like a charity auction (unless there’s a required donation just to attend the auction).
However, if you do want to accept donations via the form (either as a requirement or as an option), you’ll need to connect Gravity Forms to your preferred payment processor before you set up the actual form.
For this tutorial, we’re going to use Square to process donations, but the same basic steps will apply to other payment processors that Gravity Forms supports.
Square is easy to use, has competitive processing rates, and works well for both online and in-person payments. The latter is useful if you’re hosting a physical event and want to also have the option to collect in-person donations at the event.
For new Square customers, Gravity Forms and Square have partnered to offer a special promotion:
- Zero transaction fees for the first $5,000 in payments processed during your first 180 days.
- $20 off hardware, which is helpful if your organization also wants to accept in-person donations.
To get the promotion, all you need to do is sign up using this link.
Once you’ve registered for your free Square account and installed the Gravity Forms Square Add-On, here are detailed instructions for how to connect Gravity Forms to Square:
Open those posts if you want full tutorials, but here’s a quick guide on how to do it:
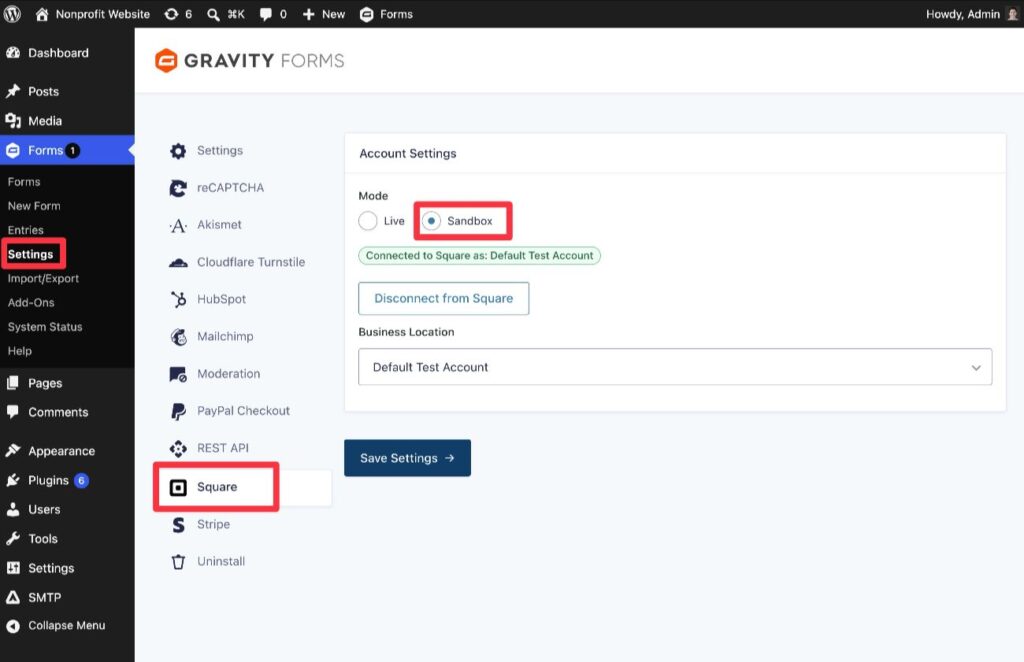
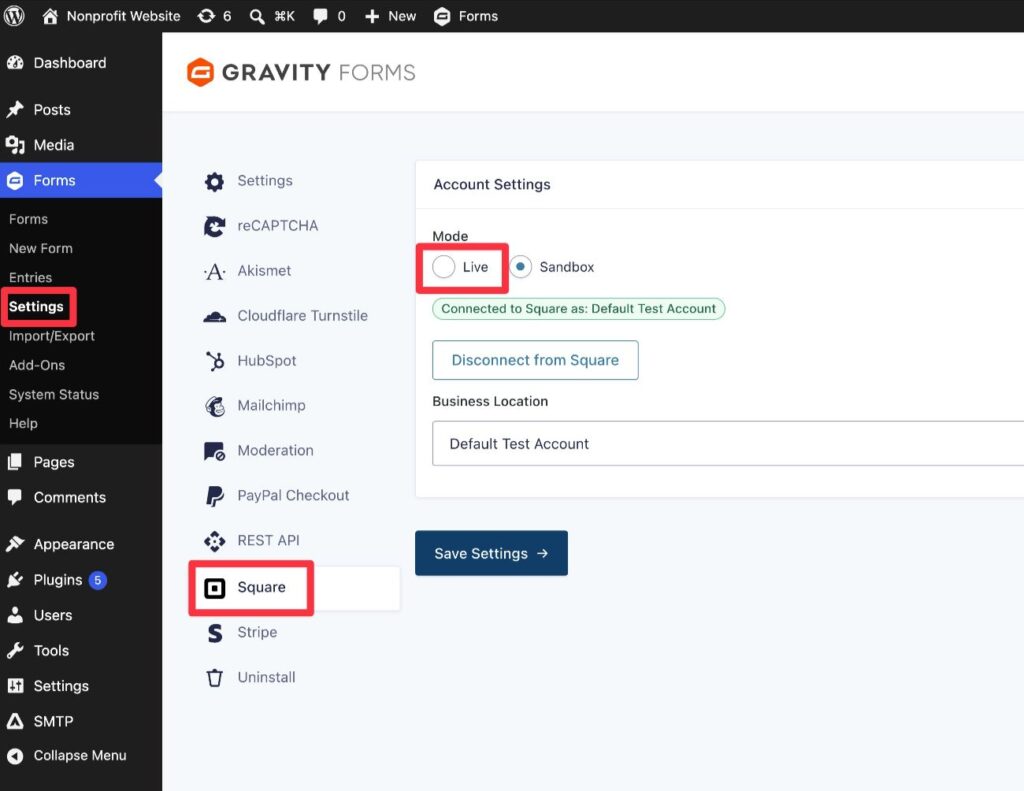
- Go to Forms → Settings in your WordPress dashboard.
- Select the Square tab in the Gravity Forms settings.
- Follow the prompts to connect your site to Square. We recommend connecting in Sandbox mode while you’re setting up your form, as it will let you test your fundraising registration form with dummy payments. When you’re ready to accept real payments, you just need to come back here and set up Live mode.
3. Set up your form using the Event Registration template
Now, you’re ready to set up the actual form:
- Go to Forms → New Form in your WordPress dashboard.
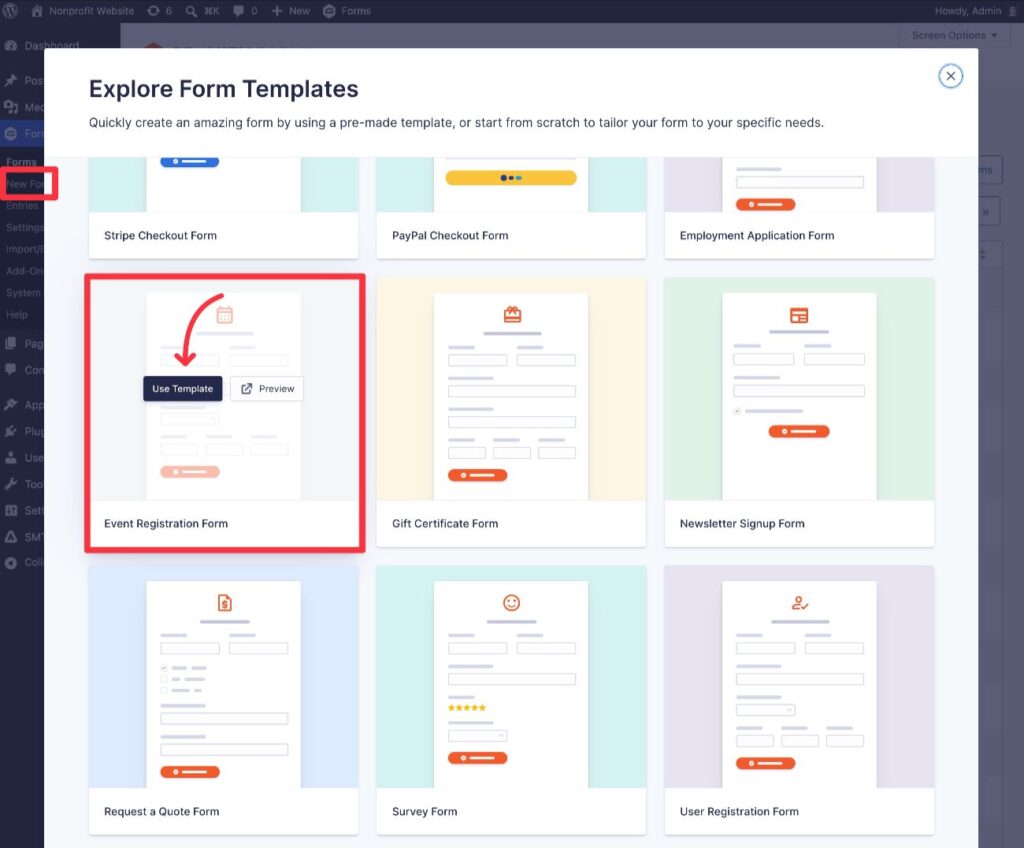
- Find the “Event Registration Form” template in the list of available templates. While you’re always free to start from a blank slate, the template will save you time because it already includes many of the essential fields that you’ll need.
- Hover over the template and click the Use Template button.
- On the next screen that appears, give your form a name and an optional description. Then, click Use Template again to advance to the form editor interface.
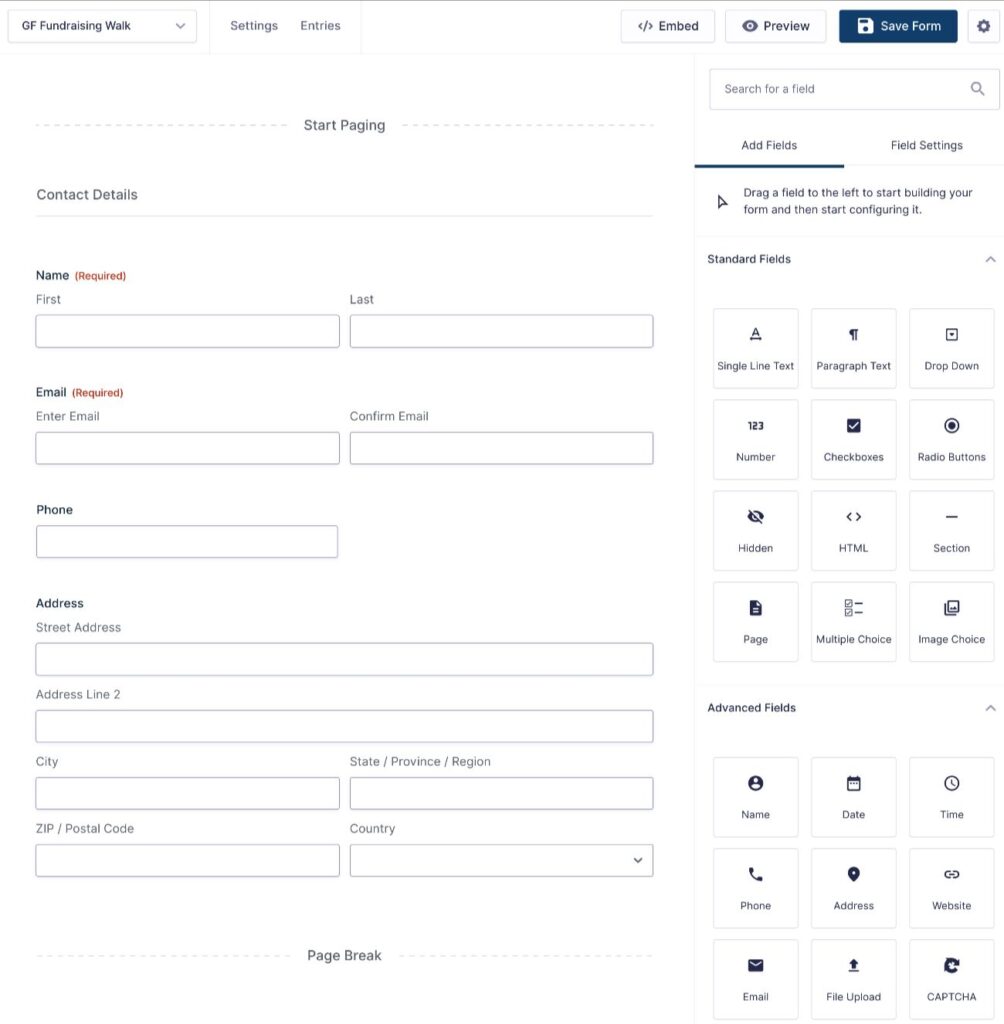
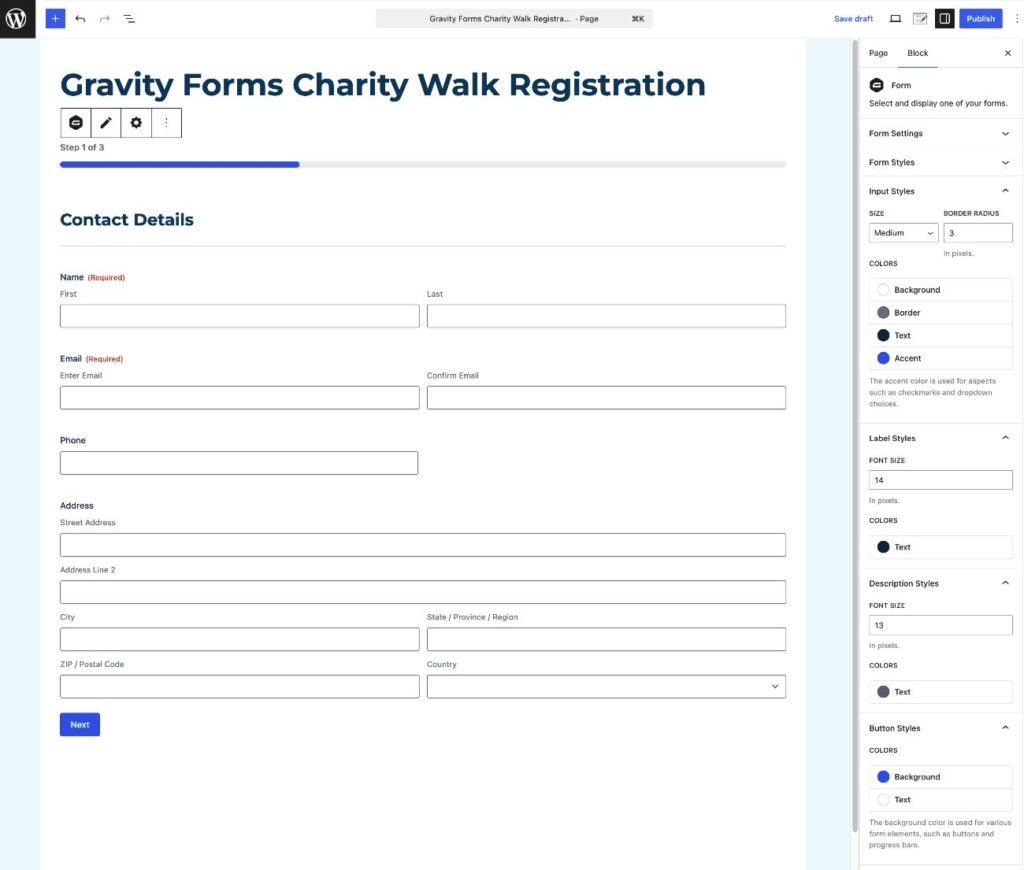
Gravity Forms will then take you to its drag-and-drop form editor, where you can easily customize your form including:
- Editing any of the default fields that are included in the Event Registration Form template.
- Adding new fields that are specific to your fundraising use case.
- Deleting any fields that don’t apply to your use case.
You can make the form as simple or complex as you want it to be.
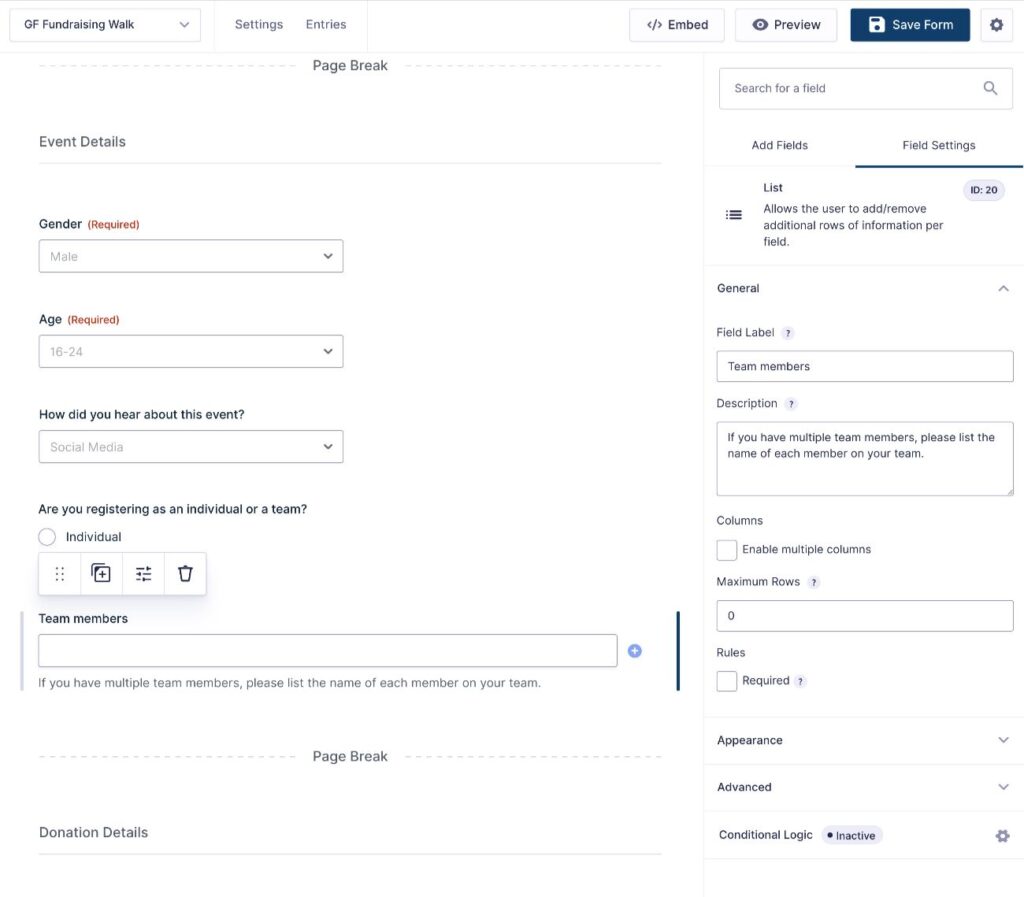
For example, if you want to allow teams to join your event (rather than just individuals), you could use some type of repeater field to let people add as many team members as needed.
The List field could work fine if all you need is names or other basic details. If you need to collect more details about each team member, you could use the beta Repeater field (which doesn’t currently have a UI element). Gravity Wiz, a Gravity Forms Certified developer, has a great overview of using repeaters in Gravity Forms if you’d like more details here.
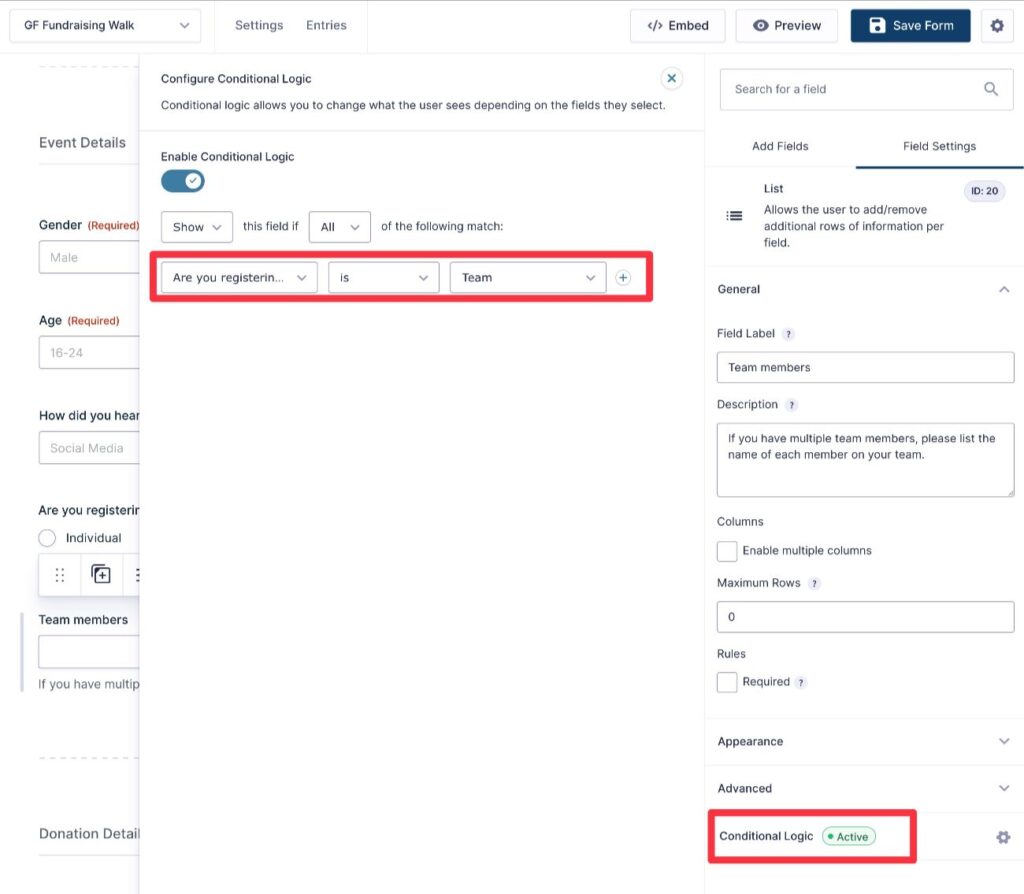
You can also use conditional logic to keep your form streamlined and easy to fill out. Most notably, you can only show certain fields or groups of fields if they apply to the registrant’s situation.
For example, you could ask them whether they want to register as an individual or as a team. If they choose the “Team” option, you could then display additional fields to collect information about the other team members.
If your form is getting long, you can use the Page field to break the form into multiple pages.
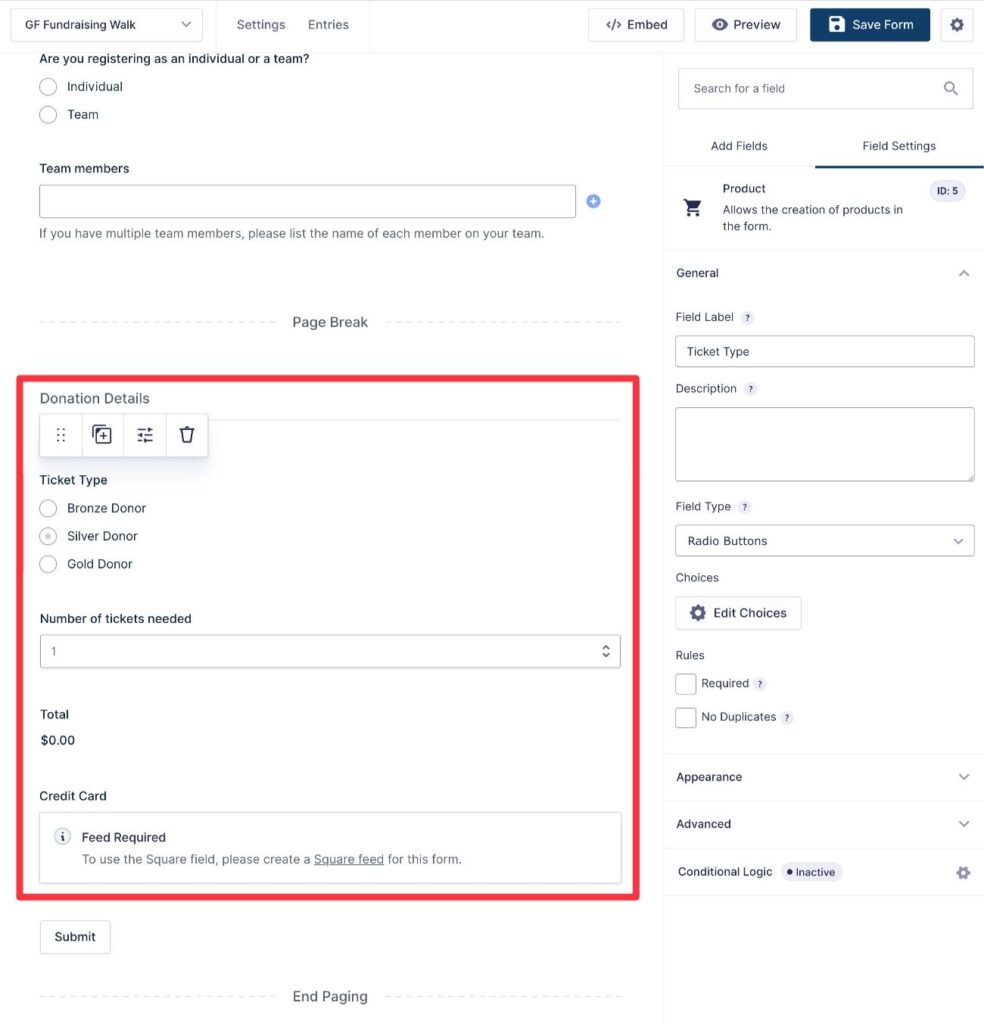
Setting up donations for your form
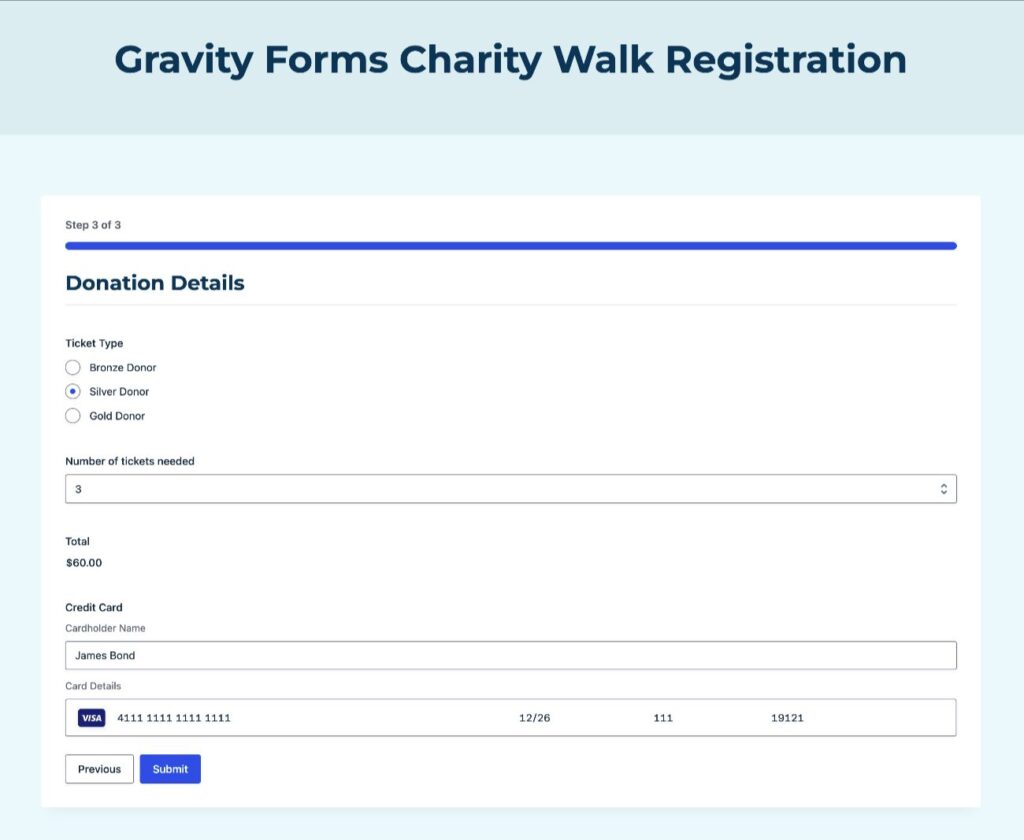
If you want to accept/require donations as part of the event registration form, you need to add at least one Product field to control the amount of the donation. This lets you control the amount that people will be charged to register for the event.
You can have one fixed price that applies to everyone. Or, you can offer multiple pricing options.
You can also add a quantity option, such as giving people the ability to purchase multiple registrations/tickets for an event from a single form submission.
The template already comes with a multi-choice ticket option, along with a quantity picker. You can adjust these as needed.
You should also make sure that you’ve added a Square field to the bottom of the form, which is where registrants will actually enter their payment information.
4. Create a payment feed (if accepting payments from the form)
If you’re not processing payments as part of your fundraising event registration form, you can skip this step.
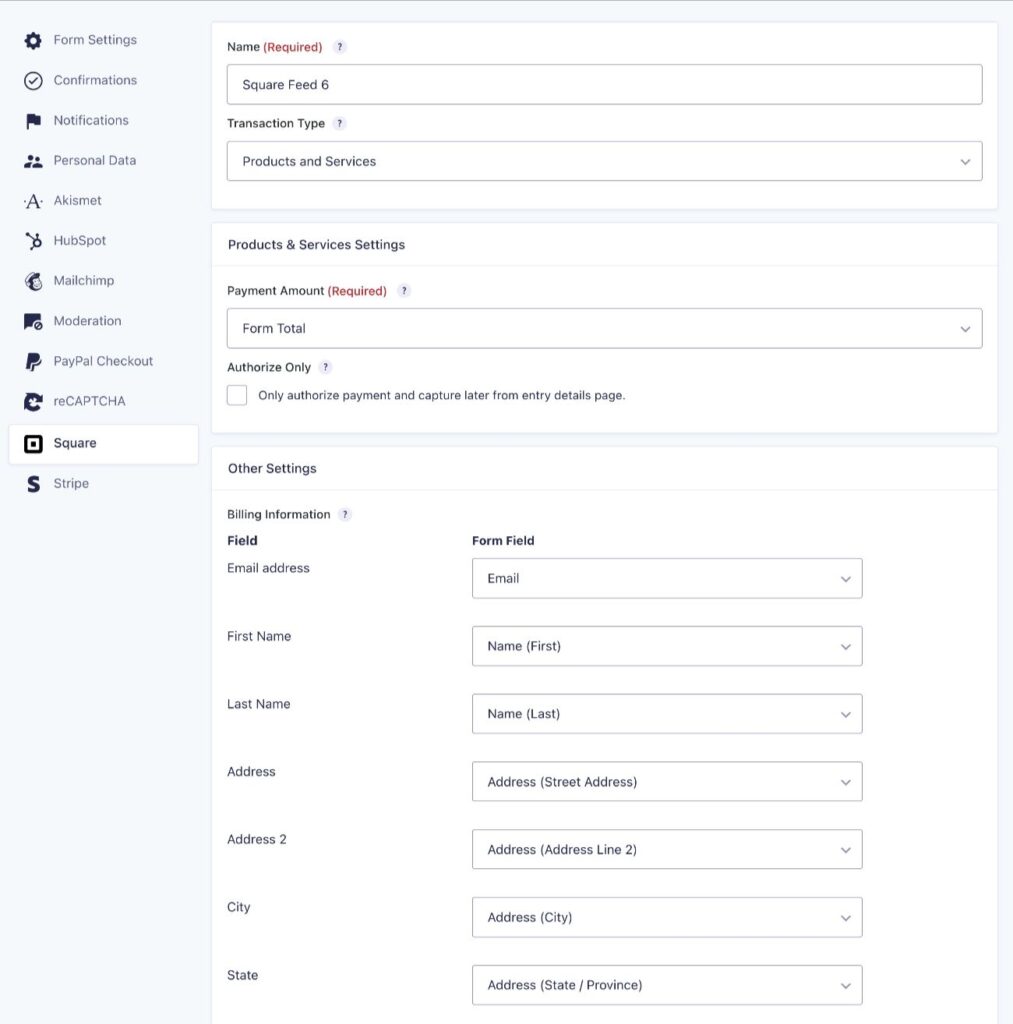
However, if you are accepting payments, you’ll also need to create a payment feed to control how Gravity Forms should process payments.
If you’re using Square, you can create a Square feed by going to Settings → Square → Add New inside of the form editor.
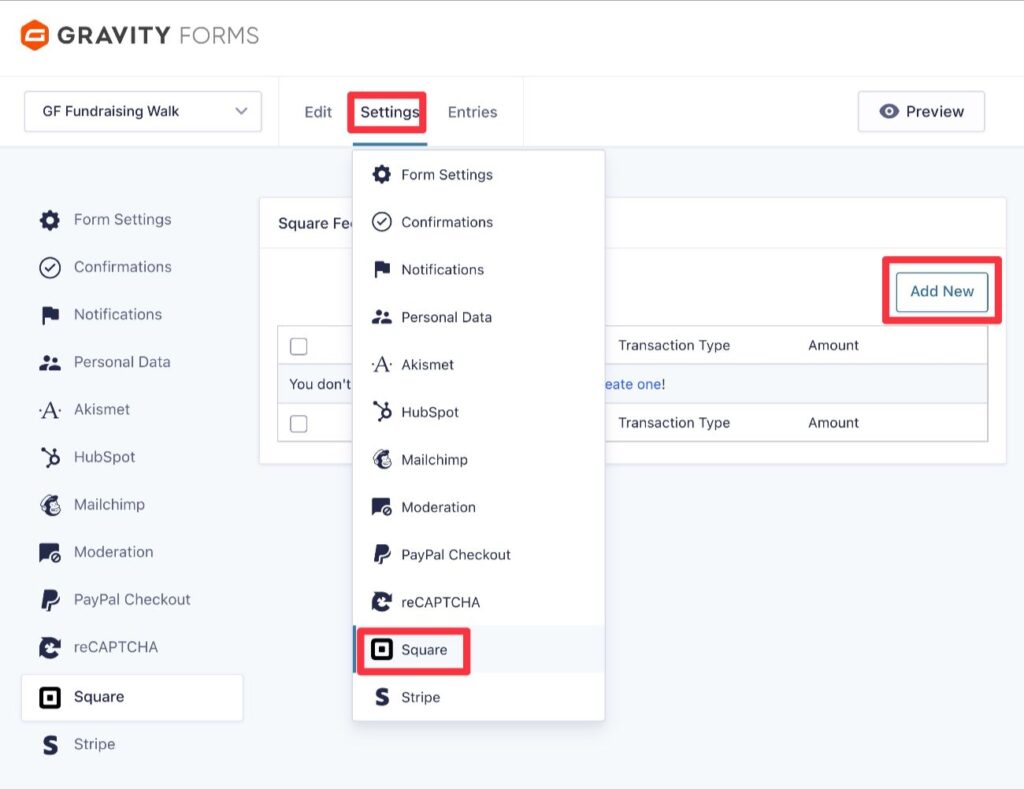
You can then configure the payment feed using the available settings. For more details, check out our documentation on configuring a Square feed.
5. Set up email notifications and confirmation messages
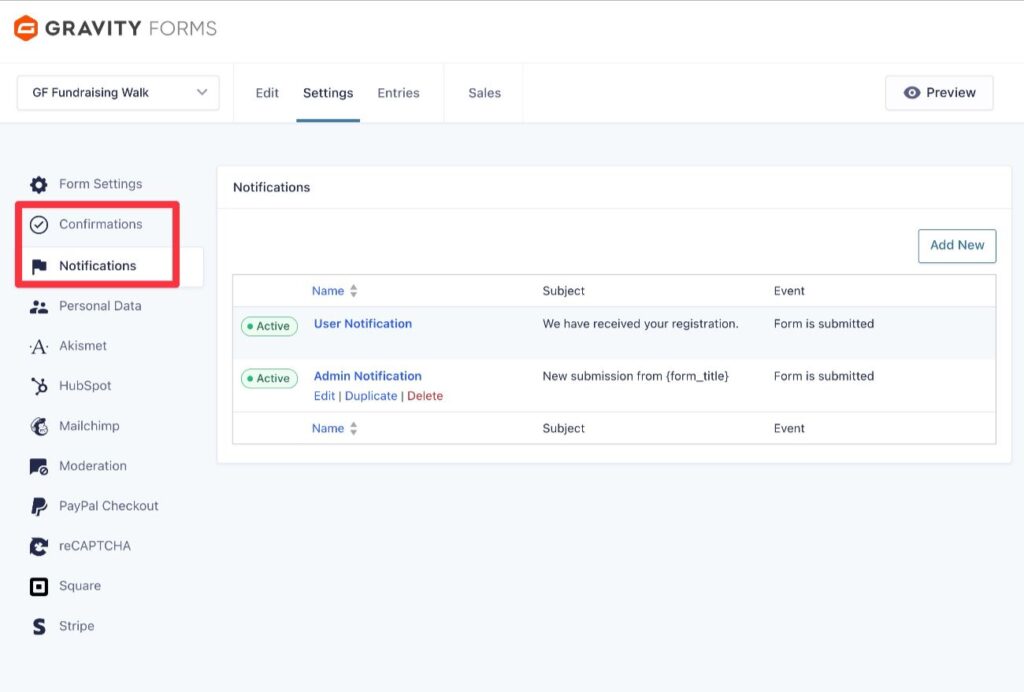
Next, you’ll want to set up two other backend features:
- Notifications – Notifications let you send one or more emails to any email address when someone registers for the event. You can send emails to yourself, your team, and/or the event registrant.
- Confirmations – Confirmations let you display a message after someone registers for the event. Or, you can redirect them to a custom thank you page that provides more details about the event.
You can set these up by going to Settings → Notifications and Settings → Confirmations, respectively.
You can also add conditional logic rules to both notifications and confirmations, which gives you even more flexibility for controlling their behavior:
6. Set up other integrations and add-ons to enhance your form (optional)
This step is 100% optional.
Another one of the big advantages of using Gravity Forms for your fundraising event form is that you also have the ability to enhance your form with all of the other integrations and features that Gravity Forms supports.
Most notably, these integrations let you integrate your form with a lot of the other services that your organization might be using.
Here are a few of the most notable examples, though this is not a complete list:
- Automatically subscribe people to your email newsletter – You could automatically subscribe people to a newsletter for event updates. Or, you could also give them an option to subscribe to your general email newsletter.
- Sync contacts to your customer relationship management (CRM) software – You can automatically add contacts to your CRM so that you can more easily engage with and support them. You can also apply special tags based on the events that they’re attending.
- Create tasks in your project management software – If you have tasks that you need to perform whenever someone registers for the event, you can automatically create those tasks in your software. For example, creating a Trello card when someone registers.
- Connect to Zapier and the thousands of apps that Zapier supports – The Gravity Forms Zapier Add-On lets you use Zapier to integrate with thousands of different apps.
Add-ons can also help you streamline the administrative processes around your event. For example, with the Gravity Flow plugin, you can build entire automation workflows based on 40+ different action steps. These can help you automate a lot of the tasks associated with people registering for your event.
Some of those 40+ action steps include things like:
- Assigning tasks.
- Requiring approvals.
- Generating PDFs.
- Collecting payments at later parts of the process.
- Sending emails at later parts of the process (such as sending an email when someone’s “walkathon” team was approved).
Gravity Flow comes from the same team behind Gravity Forms – you can learn more about it at the Gravity Flow website.
Again, these are just a few ideas for how you might want to enhance your form. To find even more add-ons, you can use the links below:
7. Embed your fundraising event registration form
Once you’re happy with the fields in your form and you’ve set up all of the background functionality and integrations that you need, you’re ready to embed the form on your website so that your visitors can access it.
You can embed the form anywhere on your site using the Gravity Forms block, shortcode, or PHP function.
If you use the block, you’ll also be able to style your nonprofit event registration form directly from the editor.
Once you’ve embedded the form, we recommend submitting a test entry to make sure that all of the functionality and integrations are functioning as you want them to.
If you set up Square in Sandbox mode, you can also submit a test payment using one of Square’s card testing numbers.
When you’re ready to accept real donation payments, you just need to go back to the Gravity Forms Square Add-On settings area and repeat the same basic steps for Live mode:
- Go to Forms → Settings in your WordPress dashboard.
- Select the Square tab in the Gravity Forms settings.
- Change the mode from Sandbox to Live.
- Follow the prompts to connect your site to Square.
- Click Save Settings when you’re done.
How to view event registrations
To keep track of people registering for your fundraising event, you have a few options.
The simplest is to use the built-in Gravity Forms entry system.
To view all of the registrants for your form, you can go to Forms → Entries and select your fundraising event registration form from the drop-down.
You can also customize the columns that appear in the list, which lets you quickly see important information about each registrant without opening the full details page.

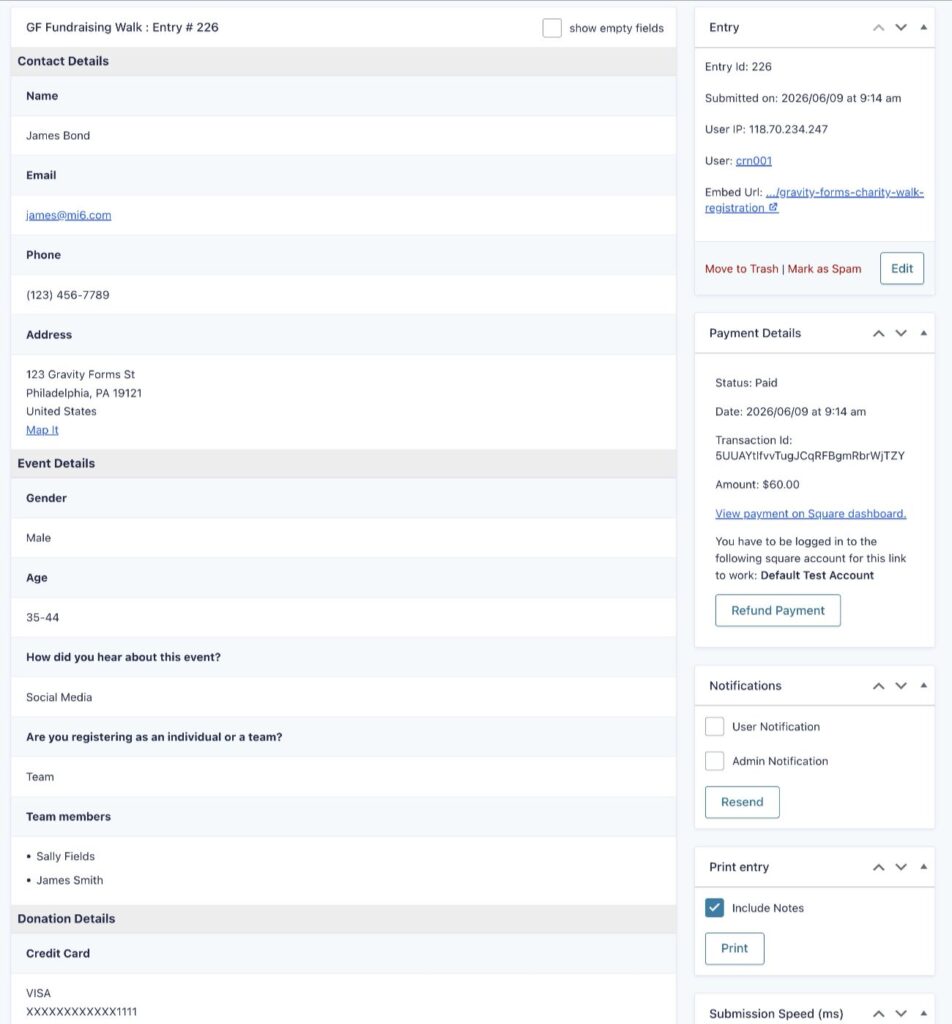
If you do need to see detailed information about a registrant, you can hover over it and click View. This will show you all of the information from their registration submission.
If you’re accepting donations directly from the form, you can also refund a person’s payment if needed.
In addition to working through your WordPress dashboard, you can also connect your form to other systems that you’re using to manage registrations.
For example, if you use Google Sheets to manage registrations, you can automatically sync registrations to Google Sheets using Zapier and the Gravity Forms Zapier Add-On.
You can also connect to any of the other thousands of apps that Zapier supports. Or, you can use the Gravity Forms Webhooks Add-On to send registrant information to any service that supports incoming webhooks.
Create your fundraising event registration form today
With the Gravity Forms plugin, you can easily create a WordPress fundraising event registration form for any use case.
You can accept donation payments directly from the registration form, collect all of the information that your organization needs from registrants, and integrate with other key services that your organization uses, such as your email marketing service.
If you’re not already holding a Gravity Forms license, here’s how you can get started:
For registered nonprofits, you can apply to get discounted access to every single add-on that Gravity Forms offers. Purchase your Nonprofit license today to get started.
For others, you can purchase one of the Gravity Forms licenses based on the add-ons that you need access to. Purchase your license today to get started.
If you want to try all of this functionality before making a purchase, you can also create a free, fully functioning Gravity Forms demo site, which includes access to every single add-on.
Newsletter
If you want to keep up-to-date with what’s happening on the blog sign up for the Gravity Forms newsletter!
"*" indicates required fields