
Searching for a way to use Postmark email sending for your WordPress site?
By default, the way that WordPress sends its emails can cause a lot of issues, either because your website just plain won’t send emails or those emails end up getting flagged as spam.
With a WordPress SMTP plugin like Gravity SMTP, you can configure your WordPress site to use Postmark email sending instead of the default WordPress method, which means that you can be confident that your WordPress transactional emails will quickly and reliably make it to users’ inboxes.
In this post, we’ll show you step-by-step how to set up Postmark email sending on WordPress using the Gravity SMTP plugin.
Once you’ve set up your Postmark account, Gravity SMTP can help you connect your WordPress site in just a few minutes. Plus, it also gives you testing and logging tools to help you make sure everything is working both now and in the future.
How Gravity SMTP helps you use Postmark on WordPress
If you want to connect WordPress to Postmark, you’ll need the help of a WordPress SMTP plugin.
Gravity SMTP is a new standalone SMTP plugin from the same team behind Gravity Forms. It can help you configure your WordPress site to send all of its emails using Postmark, including core WordPress emails as well as emails from any plugins that you’re using.
While Gravity SMTP does work great for Gravity Forms notification emails, you do not need to install Gravity Forms to use Gravity SMTP. Again, Gravity SMTP is a standalone plugin.
Here are some of the key features that Gravity SMTP offers to help you set up Postmark on WordPress:
- Easy Postmark integration – all you need to do is add your Postmark API key to Gravity SMTP to start sending your site’s emails with Postmark.
- Testing tools – you can use multiple features to test the Postmark connection and make sure everything is working.
- Support for multiple sending services – in addition to Postmark, you can also connect other email sending services like SendGrid, Brevo, and more. You could configure one of these services to use as a fallback if you ever experience problems with Postmark.
- Real-time alerts for failed emails – You can receive immediate alerts for failed emails via webhooks or SMS (powered by Twilio).
- Email suppressions – Use Gravity SMTP to create suppression lists directly from your WordPress dashboard.
- Reporting dashboard – you can view high-level reports to track email usage on your site right from your WordPress dashboard, including the top sending sources and email open rates.
- Email logging functionality – you can log each individual email that your site sends. This includes technical information for each email, as well as the actual content/design of an email and its attachments (which is optional).
- Reliability and support – you can trust that Gravity SMTP is supported by the same team behind Gravity Forms and one of the most established companies in WordPress.
Why use Postmark over other email sending services?
While Postmark doesn’t offer a free plan like some other sending services, it can be a great option for people who are willing to invest in excellent deliverability and reliability.
Here are some of the standout reasons to consider using Postmark:
- Exclusively for transactional emails – whereas a lot of other services support both marketing and transactional emails, Postmark is exclusively for transactional emails. This helps them boost their reputation with email clients and connects to the two next points on our list.
- Fast delivery times – with some cheaper services, there can be a delay in sending emails. This delay might be small (e.g. 30 seconds), but it can add some friction to time-sensitive emails like password reset emails. In contrast, Postmark offers one of the fastest deliveries out there. The Postmark team is so proud of their speed that they even publicly post their Time to Inbox metrics for various email providers (it varies depending on the email client).
- Excellent deliverability – Postmark boasts a 99% deliverability rate, which is one of the best in the business. You can achieve this even without needing a dedicated IP address (which a lot of other services charge extra for).
- Detailed analytics – Postmark offers detailed analytics tools to track everything about your transactional emails, including opens, clicks, bounces, and more.
How to configure WordPress and Postmark email sending
Now that you have some context, let’s dig into the actual guide for how to set up WordPress Postmark email sending using the Gravity SMTP plugin.
Here’s a high-level look at the process – keep reading for all of the details:
- Install the Gravity SMTP plugin
- Register for your Postmark account
- Add your domain name to Postmark
- Create a Postmark server
- Request approval to send live emails
- Locate your server API key
- Connect Gravity SMTP to Postmark
- Send a test email
1. Install the Gravity SMTP plugin
To get started, you’ll want to install and activate the Gravity SMTP plugin on the site where you want to set up Postmark email sending.
Gravity SMTP is a standalone plugin, which means that you do not need to have Gravity Forms installed to use it (though it does work great with Gravity Forms).
Currently, you can access Gravity SMTP at no extra cost with a Gravity Forms Elite license.
If you’re holding the Elite license, you can download Gravity SMTP from the My Account area on the Gravity Forms website.
2. Register for your Postmark account (if you haven’t already)
Next up, you’ll want to register for your Postmark account, if you haven’t already done so.
Postmark offers a free trial, but it only lets you send up to 100 emails per month. Given that, it’s not going to be a viable option for most sites.
Still, it is convenient because it means that you can follow this guide and set everything up without ever needing to pay or enter your credit card.
However, once you start sending live emails, you’ll probably need to go with one of the paid plans, which start at $15 per month.
3. Add your domain name to Postmark
In order to send emails from your own domain name, you need to add your domain name to Postmark as a “Sender Signature”.
Postmark actually gives you two options to authenticate your site:
- Domain Name authentication – this lets you authenticate your entire domain name with Postmark, which means that you can send from any email address on your domain name.
- Sender signature authentication – this lets you authenticate a single email address, rather than your entire domain name. For example, “[email protected]”.
The second option is simpler to set up because all you need to do is click a link in an activation email that Postmark sends you.
However, we still recommend going with the full domain name authentication approach because it gives you more flexibility and also lets you more fully authenticate your domain name with technologies like DKIM, which can improve your email deliverability.
For that reason, we’re going to focus exclusively on the domain name authentication approach in this tutorial.
With that being said, the single sender signature is an option if you can’t authenticate your domain name for some reason, such as not being able to add/edit DNS records for your domain name.
Here’s how to get started:
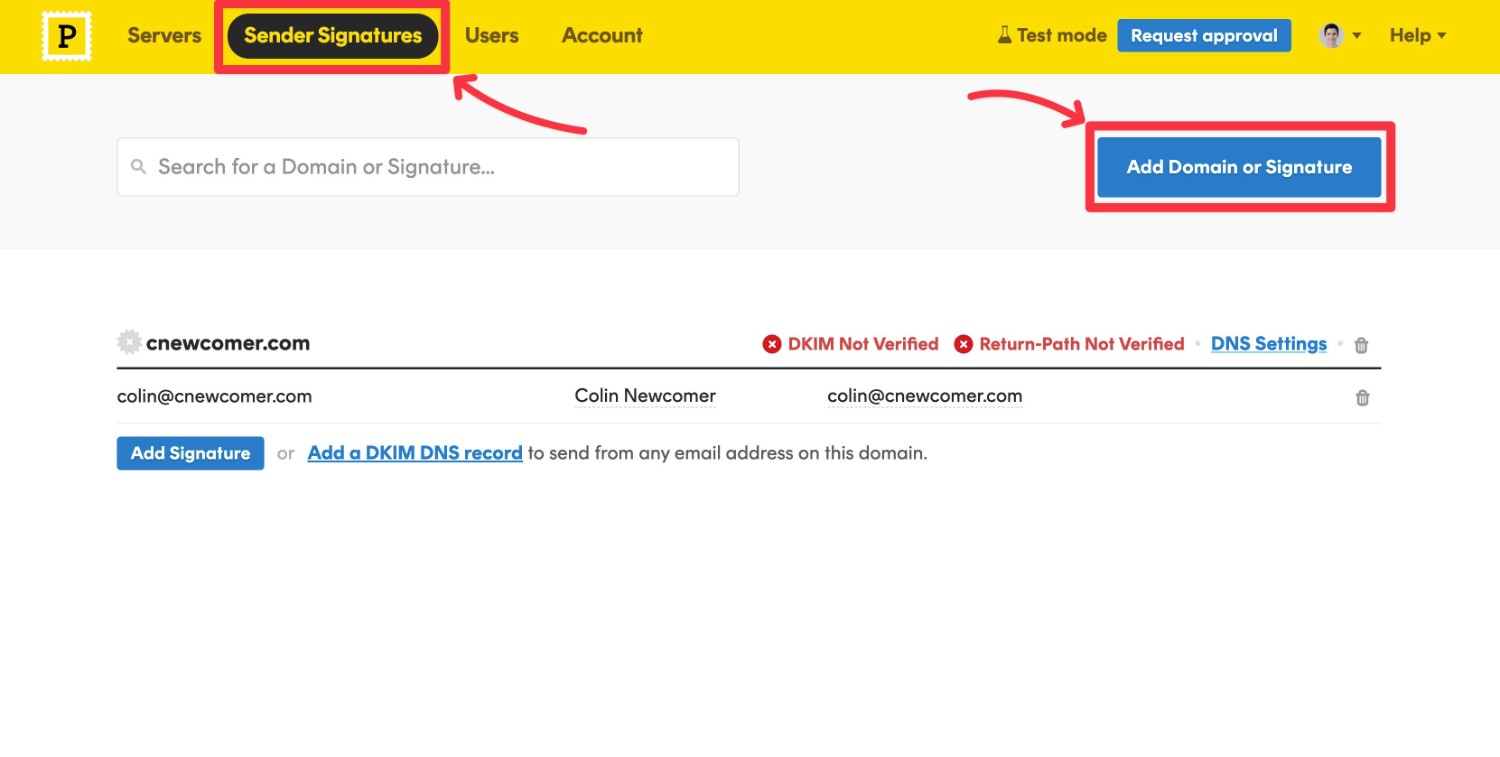
- Open your Postmark dashboard.
- Click on the Sender Signatures option on the top menu.
- Click the Add Domain or Signature button.
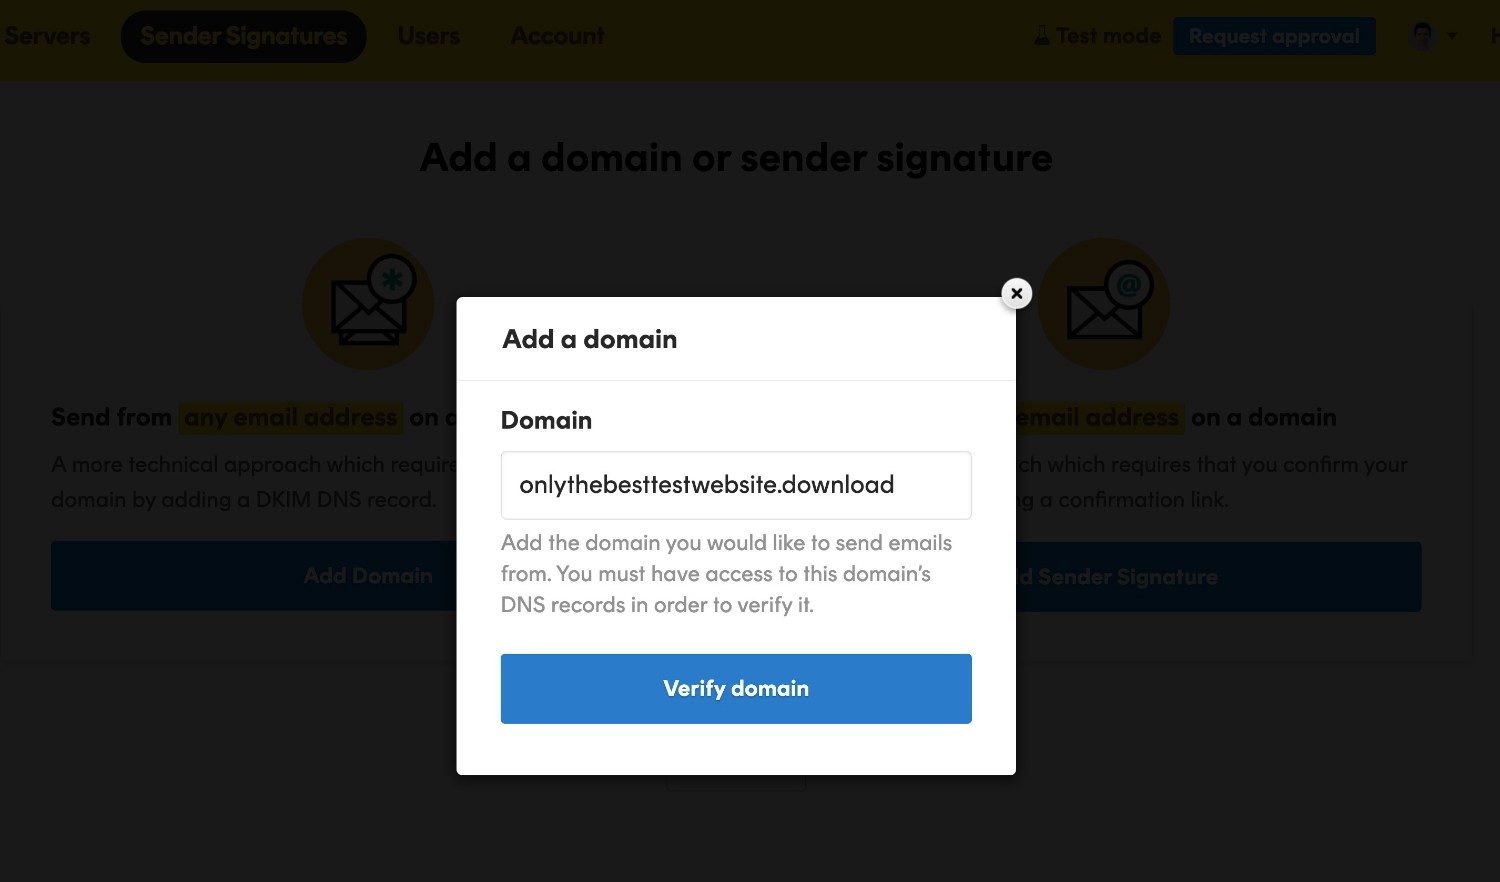
On the next screen, click the Add Domain button to advance with the domain authentication method.

This will open a popup box – enter your site’s domain name and click Verify domain.
Postmark will then provide you with two DNS records that you’ll need to add to your domain name.
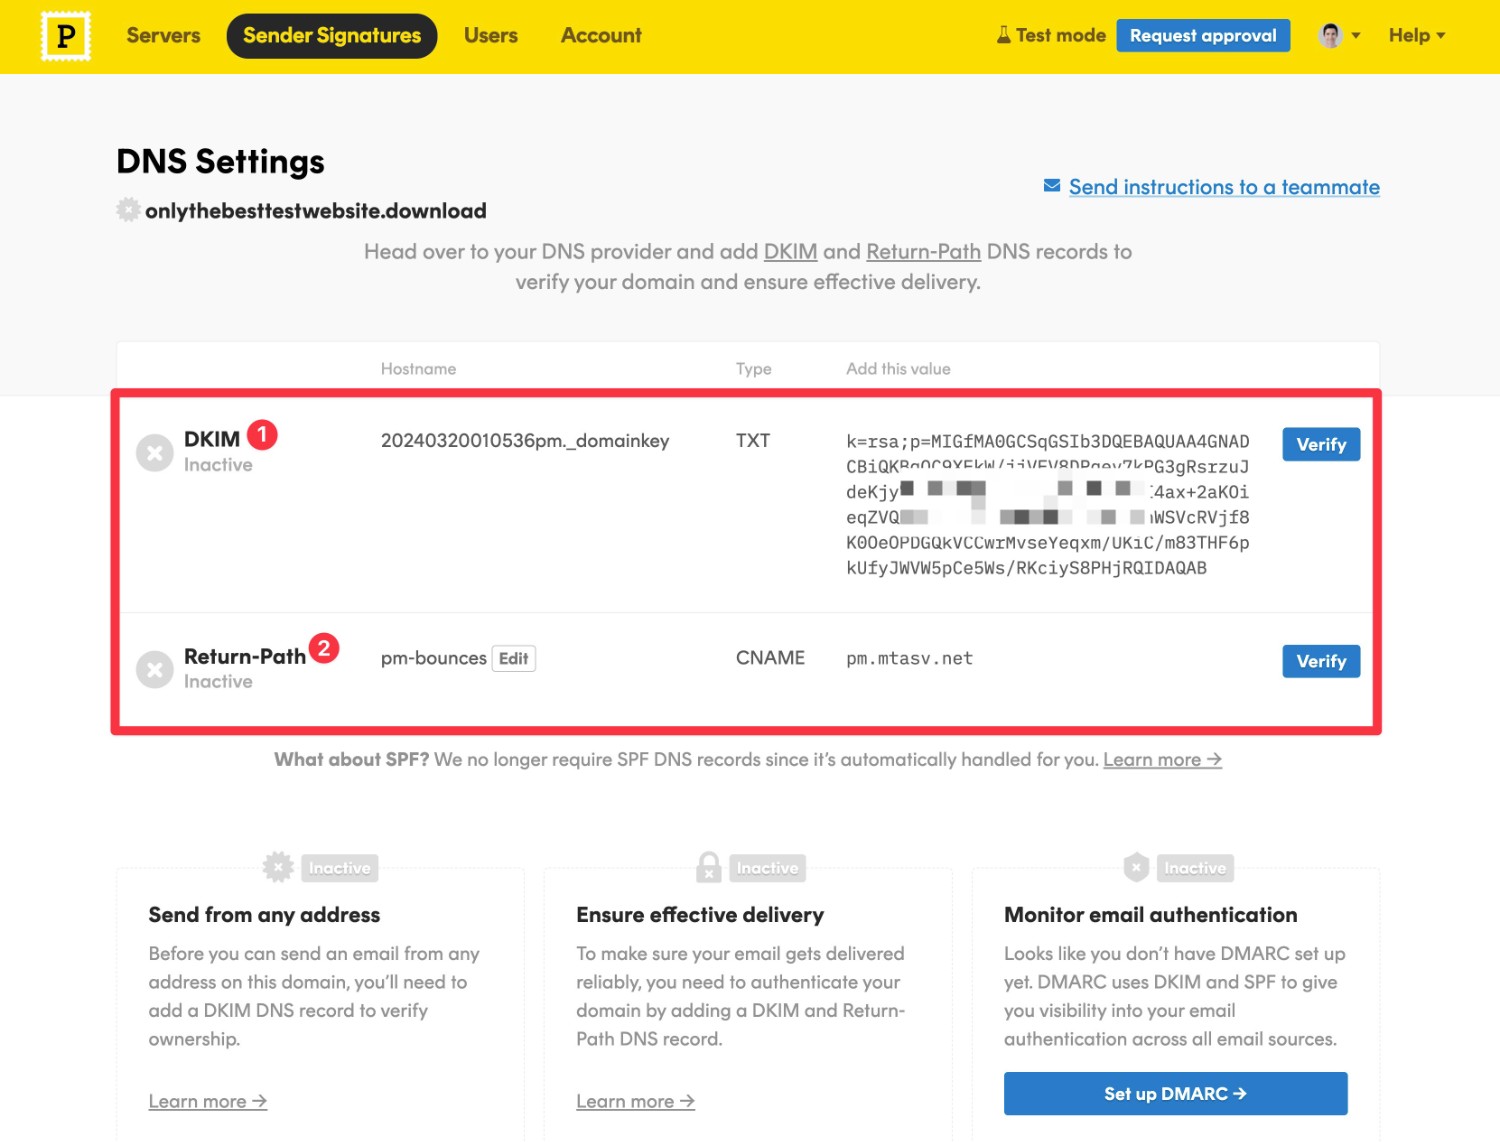
You’ll need to add these records wherever you manage your domain’s DNS records, which could be your domain registrar, your hosting account, or a service like Cloudflare.
Here’s how it looks to add these two records to Cloudflare:
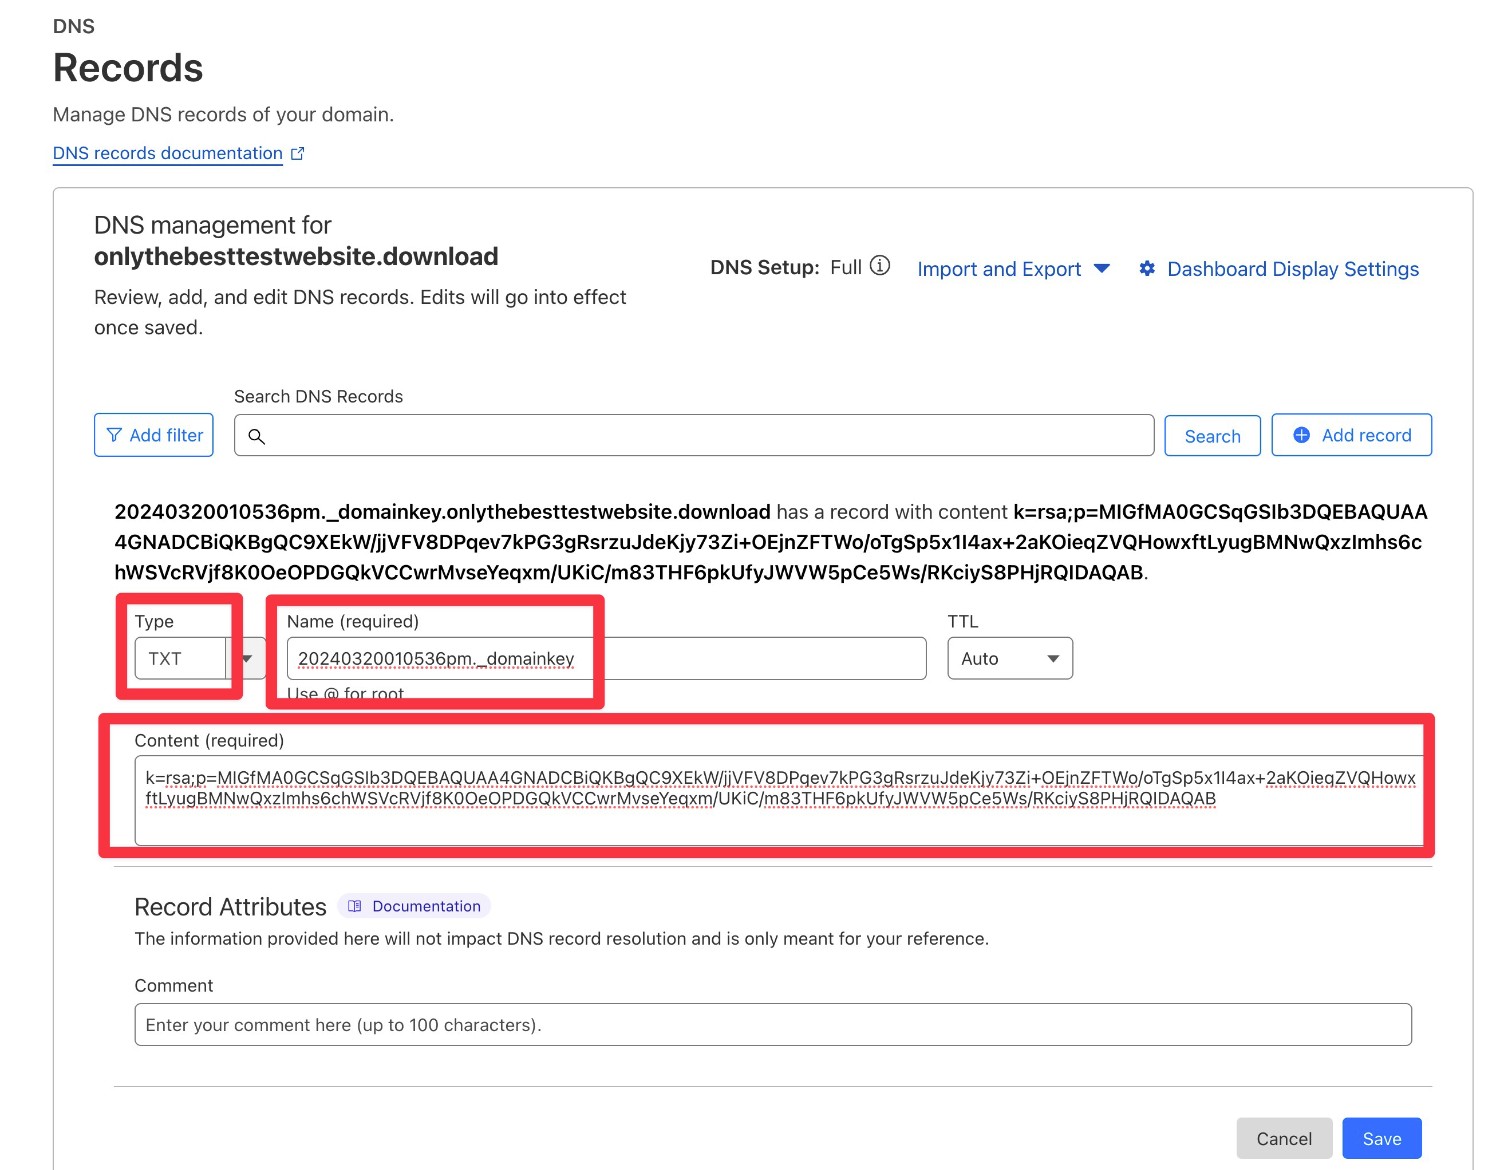
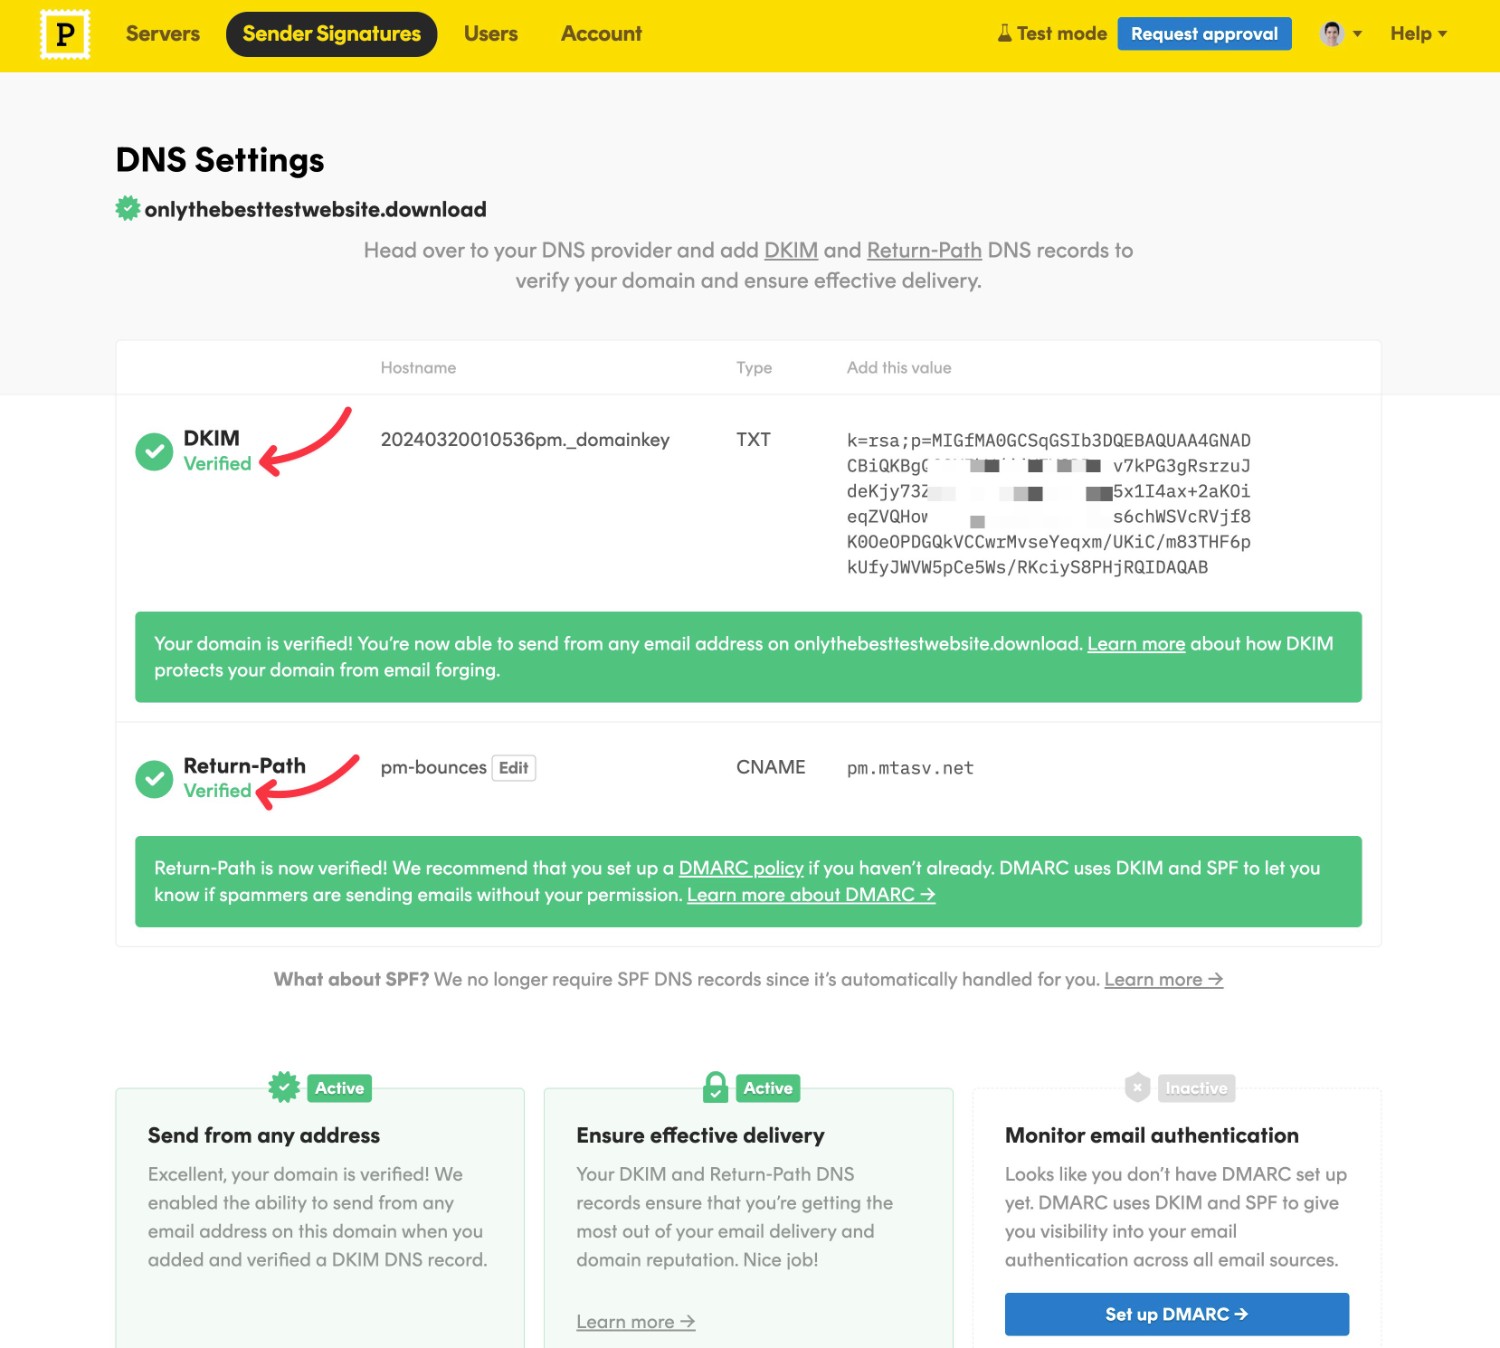
After adding both records, you can go back to your Postmark dashboard and click the Verify buttons next to each record.
If you added them properly, you should see a green checkmark for each record.
If you don’t see the green checkmark, we recommend waiting an hour or two and then trying again. Sometimes it can take DNS records a few hours (or even longer) to update.
4. Create a Postmark server
Next, you’ll need to create a Postmark “Server” for your WordPress site.
The “Server” terminology is a bit confusing because really Postmark servers just act “as folders that help you organize your email in Postmark”.
In a nutshell, you’ll want to create a Postmark server for each website that you want to send emails for.
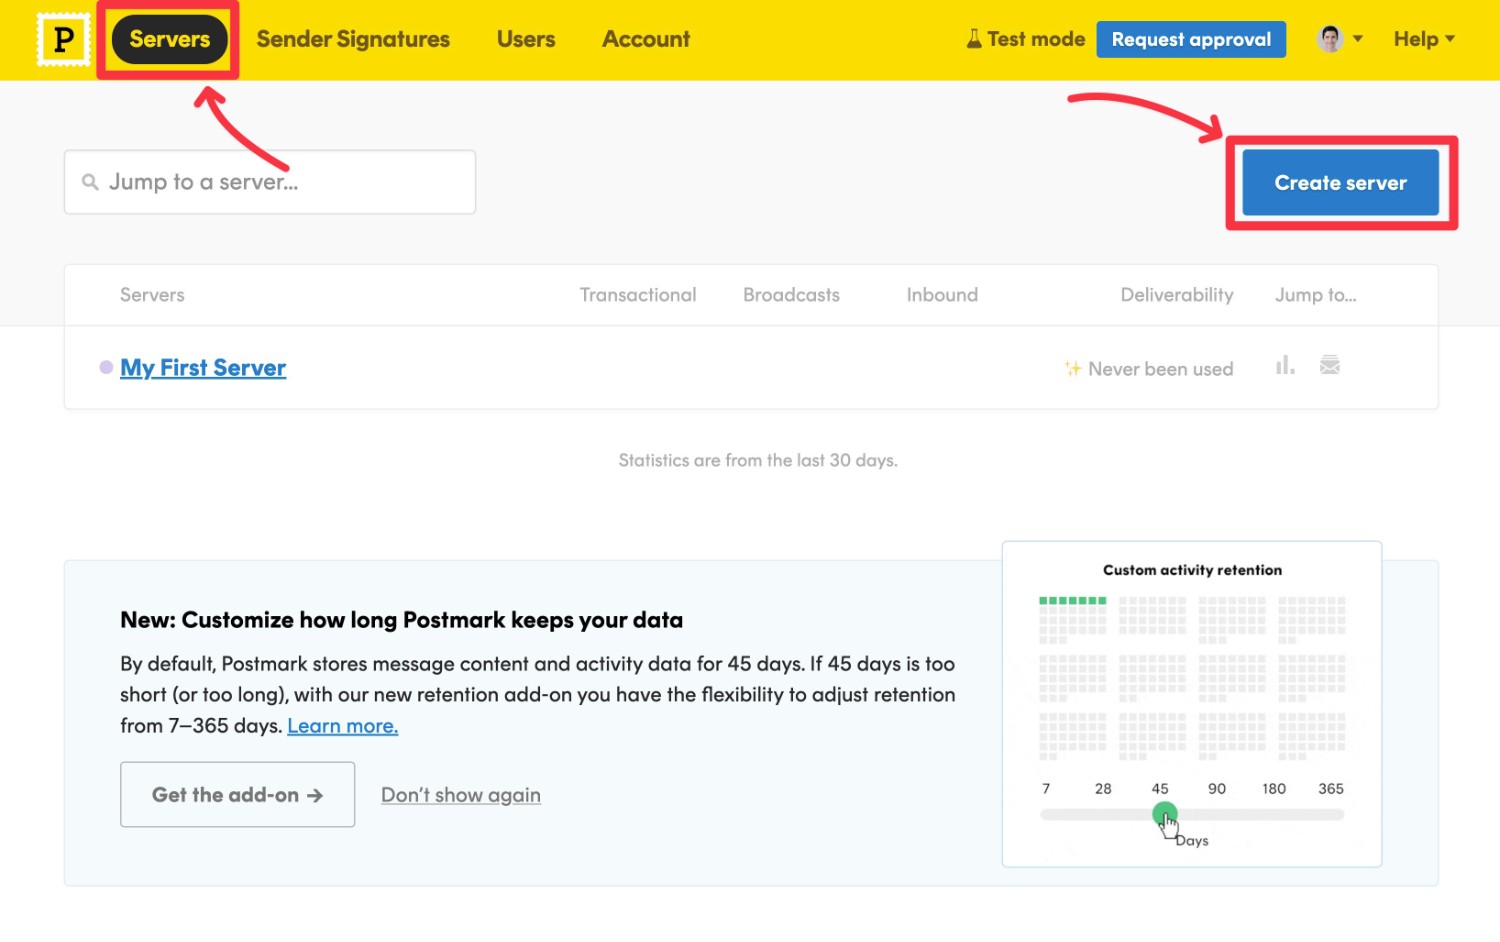
To create your first server:
- Click on the Servers option in the main menu bar.
- Click the Create Server button.
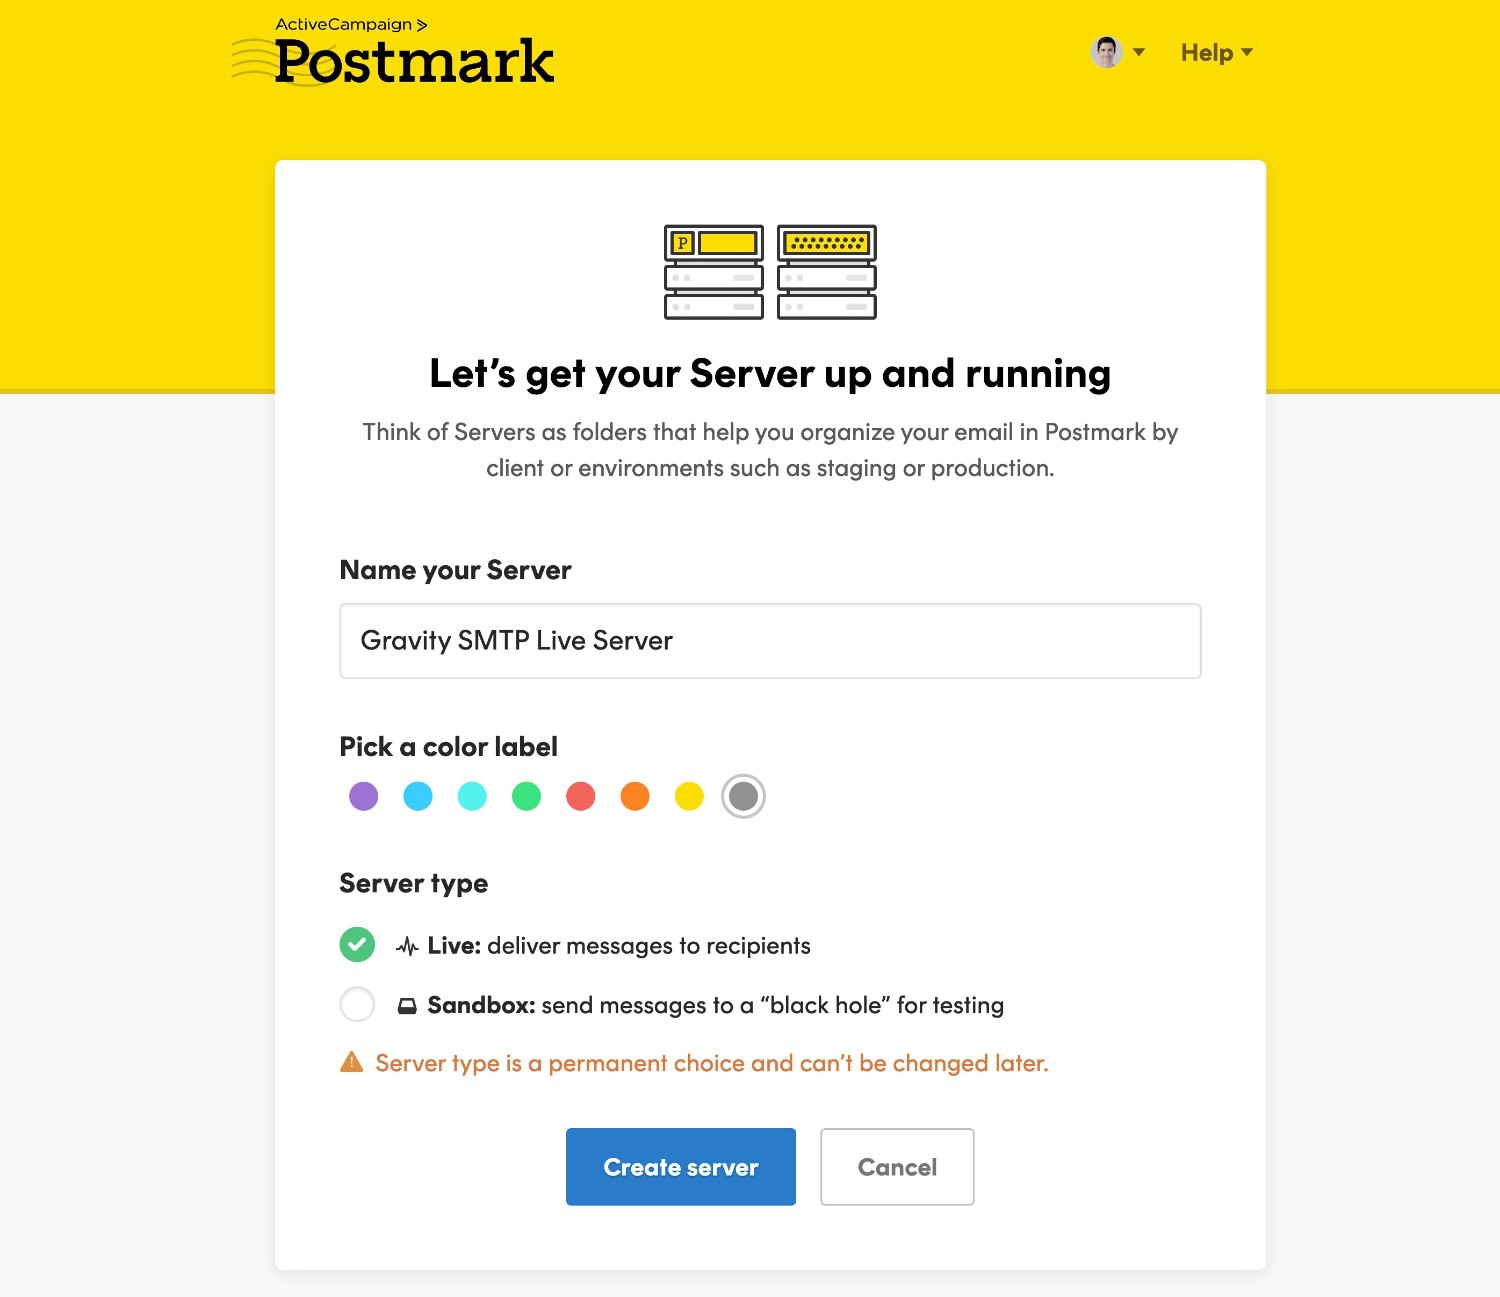
You can then fill out a few basic details about your server:
- Name – this is an internal name to help you remember it.
- Label color – it’s totally up to you!
- Server type – choose Live if you want to send real emails.
Then, click Create server.
5. Request approval to send emails to other people
Postmark automatically puts new accounts in test mode. This lets you fully configure everything, but you’re only allowed to send emails to email addresses on domains that you’ve verified with Postmark (i.e. your own domains).
To lift this lock and send emails to other people, you’ll need to click the blue Request approval button in the top-right corner.
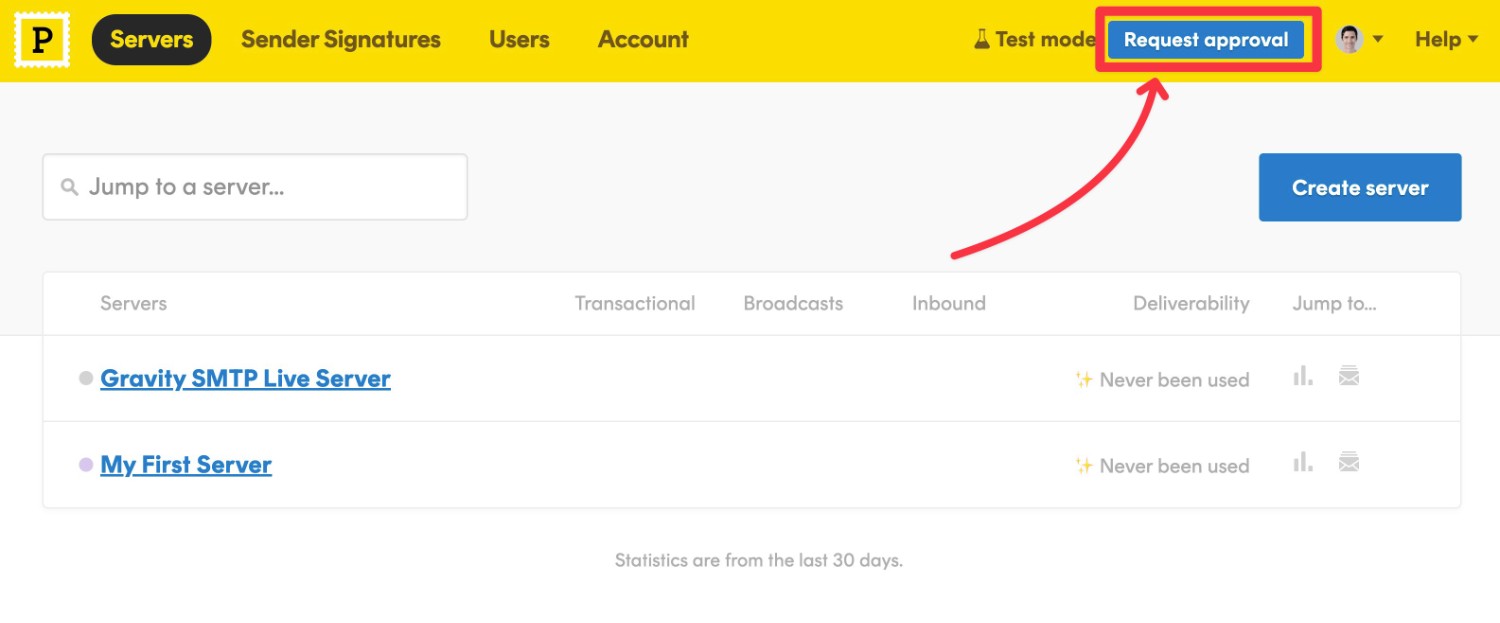
The approval process is not instant – it will take some time for Postmark to review your account.
However, you can still continue the rest of this guide while you’re waiting, because you will still be able to send test emails to your own email accounts.
6. Find your Postmark server API token
There’s just one more step to complete in your Postmark dashboard before you switch over to WordPress and start sending emails!
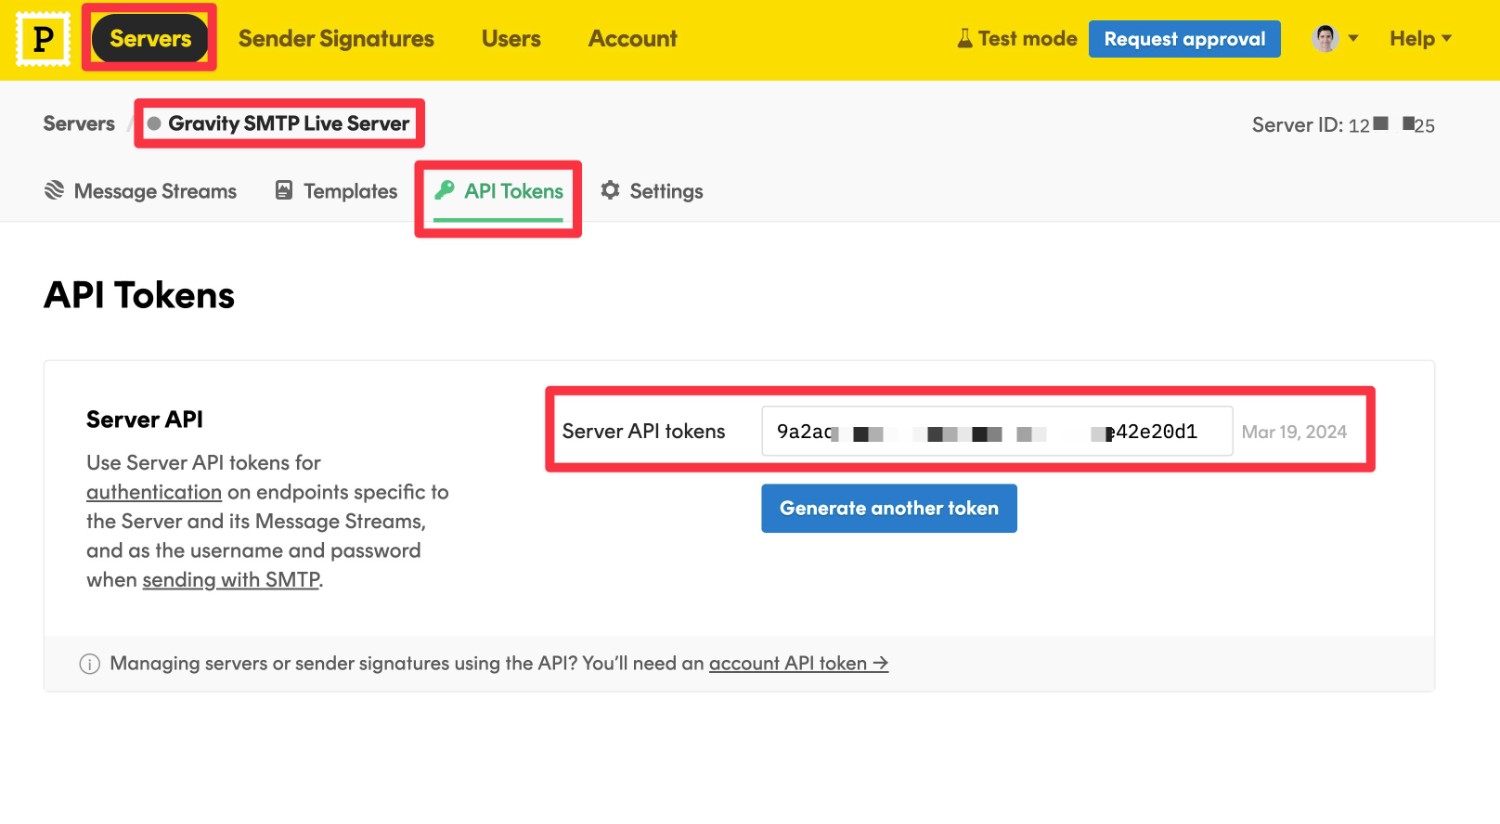
In order to connect Gravity SMTP to Postmark, you’ll need to find your Postmark Server API token:
- Click on the Servers menu option.
- Select your server from the list to open its settings.
- Go to the API Tokens tab in the server settings.
- Copy the Server API tokens value to a safe spot because you’ll need it in the next step.
7. Configure Postmark email in Gravity SMTP
Now that you’ve copied the API token to a safe spot, you’re ready to configure Gravity SMTP to use Postmark:
- Open your WordPress dashboard.
- Go to SMTP → Settings to open the Gravity SMTP settings area.
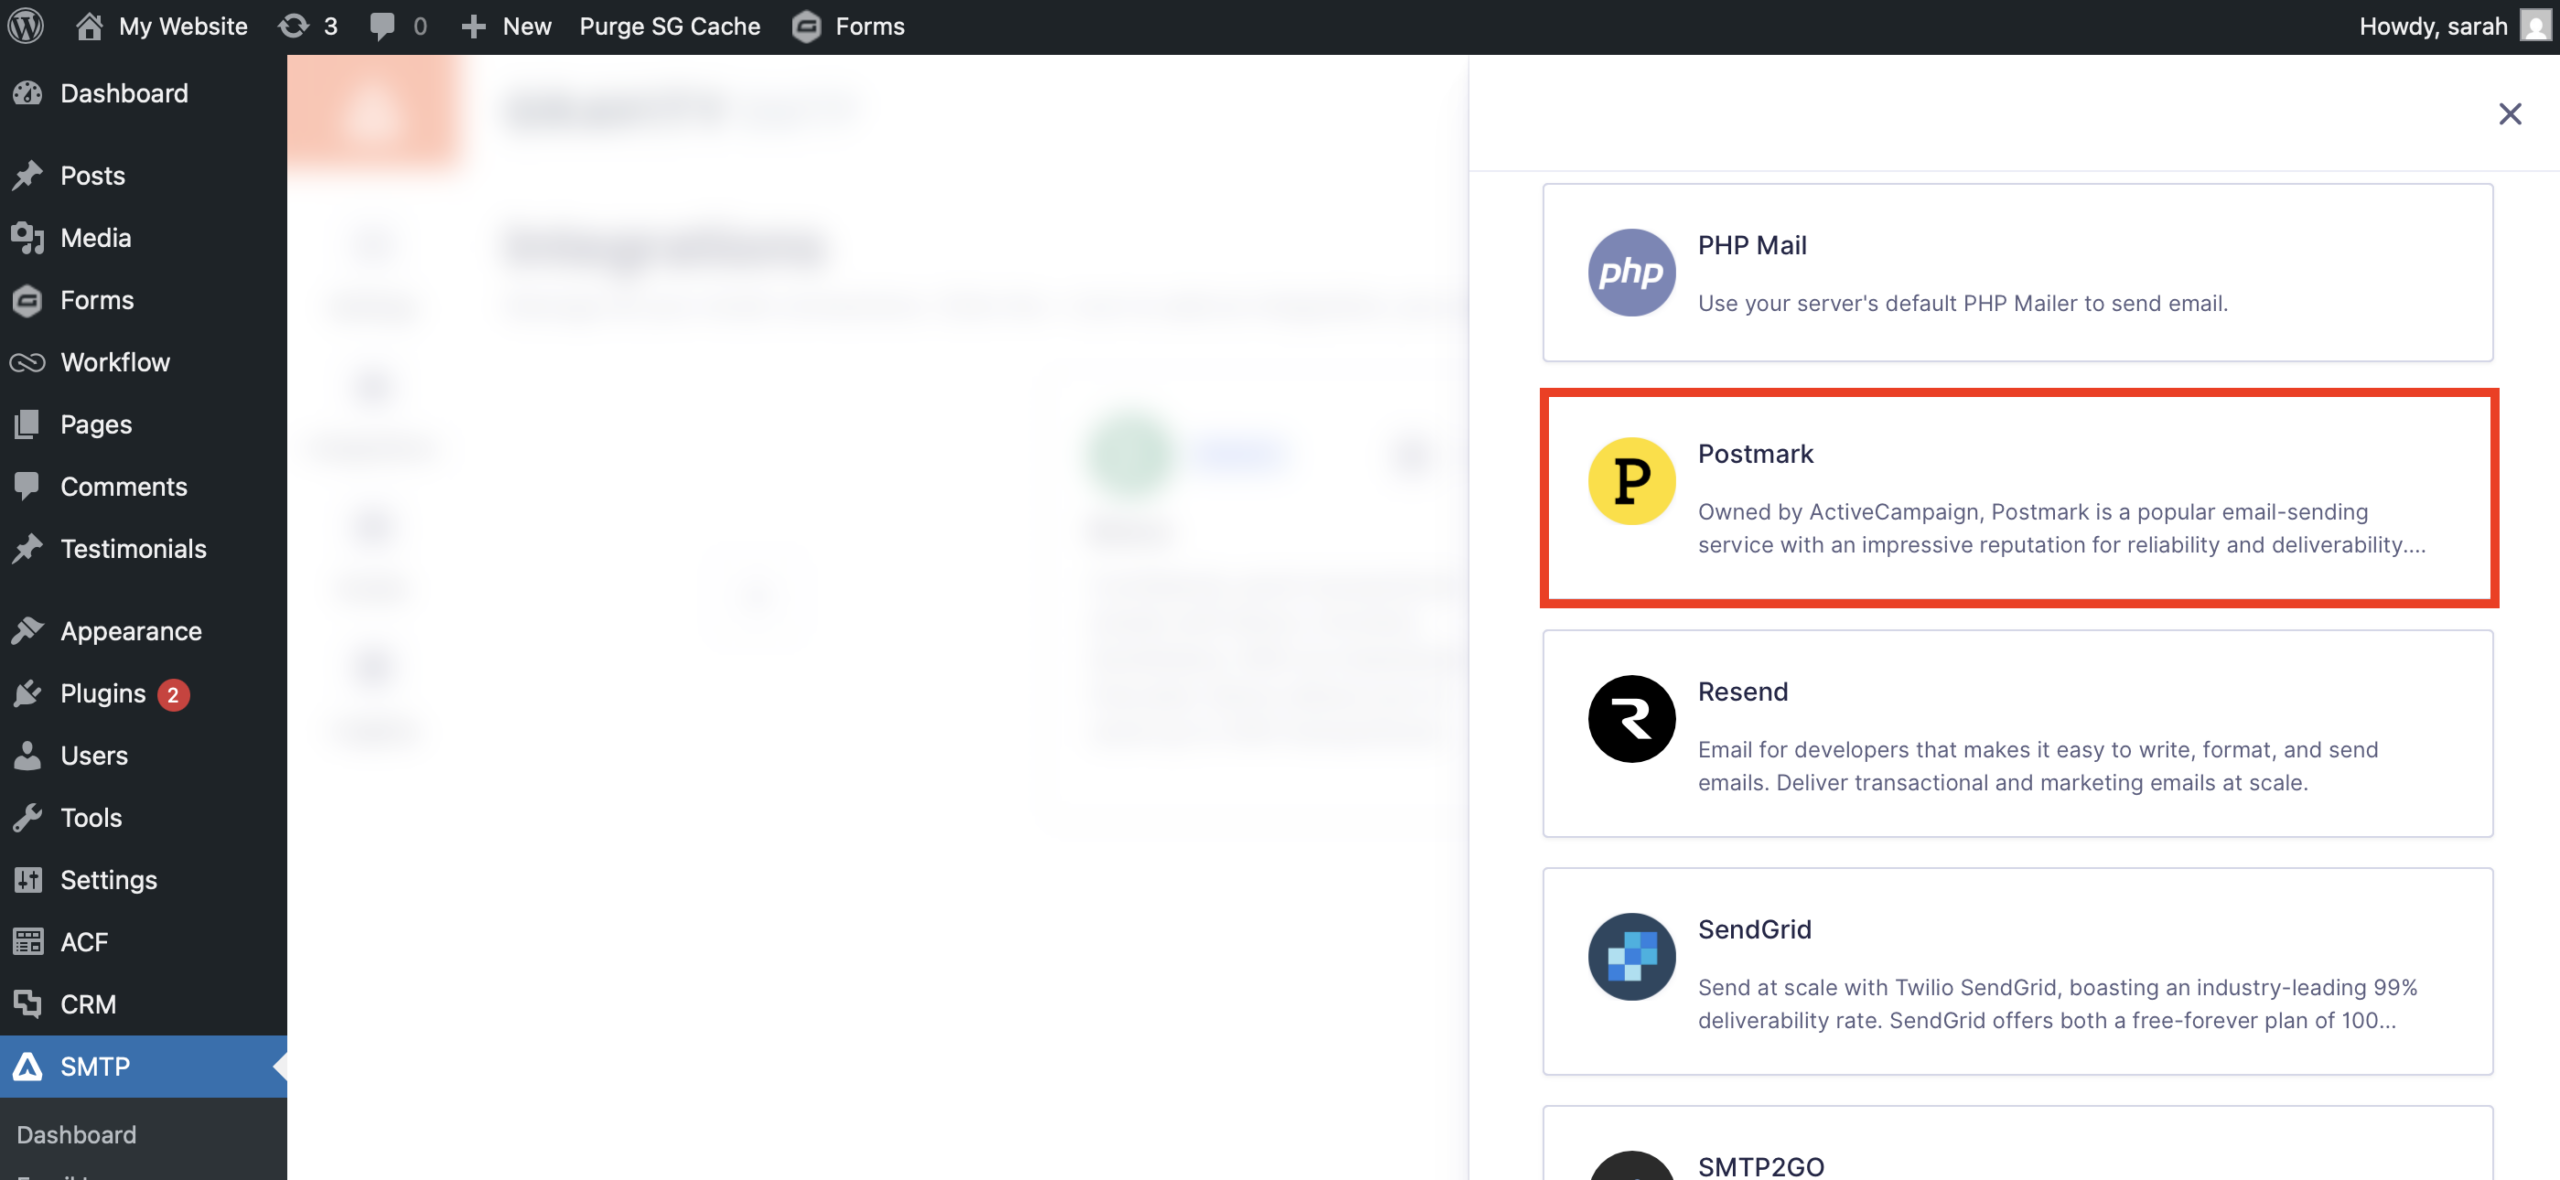
- Select the Integrations tab.
- Click the plus icon to add a new integration, and choose Postmark.
Clicking the gear icon should open a Postmark Settings popup where you can add a few key pieces of information:
- Server API Token – paste in the server API token that you got in the previous step.
- Default From Email – choose the email address that you want to send your emails from. Make sure this is an email address that you’ve added as a “signature” in Postmark, either via domain authentication or single sender authentication.
- Force From Email – when you enable this toggle, Gravity SMTP will force emails sent from other plugins to use this same address.
- Default From Name – choose the name that you want to send your emails from.
- Force From Name – this lets you force other plugins to use this same name.

Once you’ve added everything, click the Save Changes button.
If this is the first email sending service you’ve integrated with, it will become the primary integration by default.
8. Set up a backup email sending service (optional)
At this point, your site is properly configured to send all of its transactional emails using Postmark, and you can consider this tutorial finished.
However, one of the nice things about Gravity SMTP is that it gives you some additional tools to ensure the reliability of your site’s transactional emails.
Firstly, Gravity SMTP also lets you set up an optional backup email sending service. If an email ever fails to send with SendGrid for some reason, Gravity SMTP can automatically resend that email using your backup service.
If you want to set up a backup email sending service, you first need to connect your site to that service. Here are guides for the direct API integrations that Gravity SMTP supports, though you also have the option to use a custom SMTP service:
- Amazon SES
- Brevo
- Elastic Email
- Emailit
- Gmail / Google Workspace
- Mailchimp Transactional
- MailerSend
- Mailgun
- Mailjet
- Outlook / Microsoft 365
- Resend
- SendGrid
- SMTP2Go
- SparkPost
- Zoho Mail
- Custom SMTP
Once you’ve connected to a service, you can click the three dots icon next to that service in the Integrations list and choose Set As Backup.
9. Send a test email to make sure everything is working
At this point, your site should be properly configured to send all of its emails using the Postmark email sending service.
To make sure that everything is working properly, Gravity SMTP includes a feature to let you send a test email:
- Go to SMTP → Tools.
- Select the Send a Test tab.
- Enter the email address to which you want to send a test email. If your Postmark account is still in Test Mode, you’ll need to choose an email address on your own domain name. If you’ve received approval, you can send to any email address.
- Click the Send Test button.
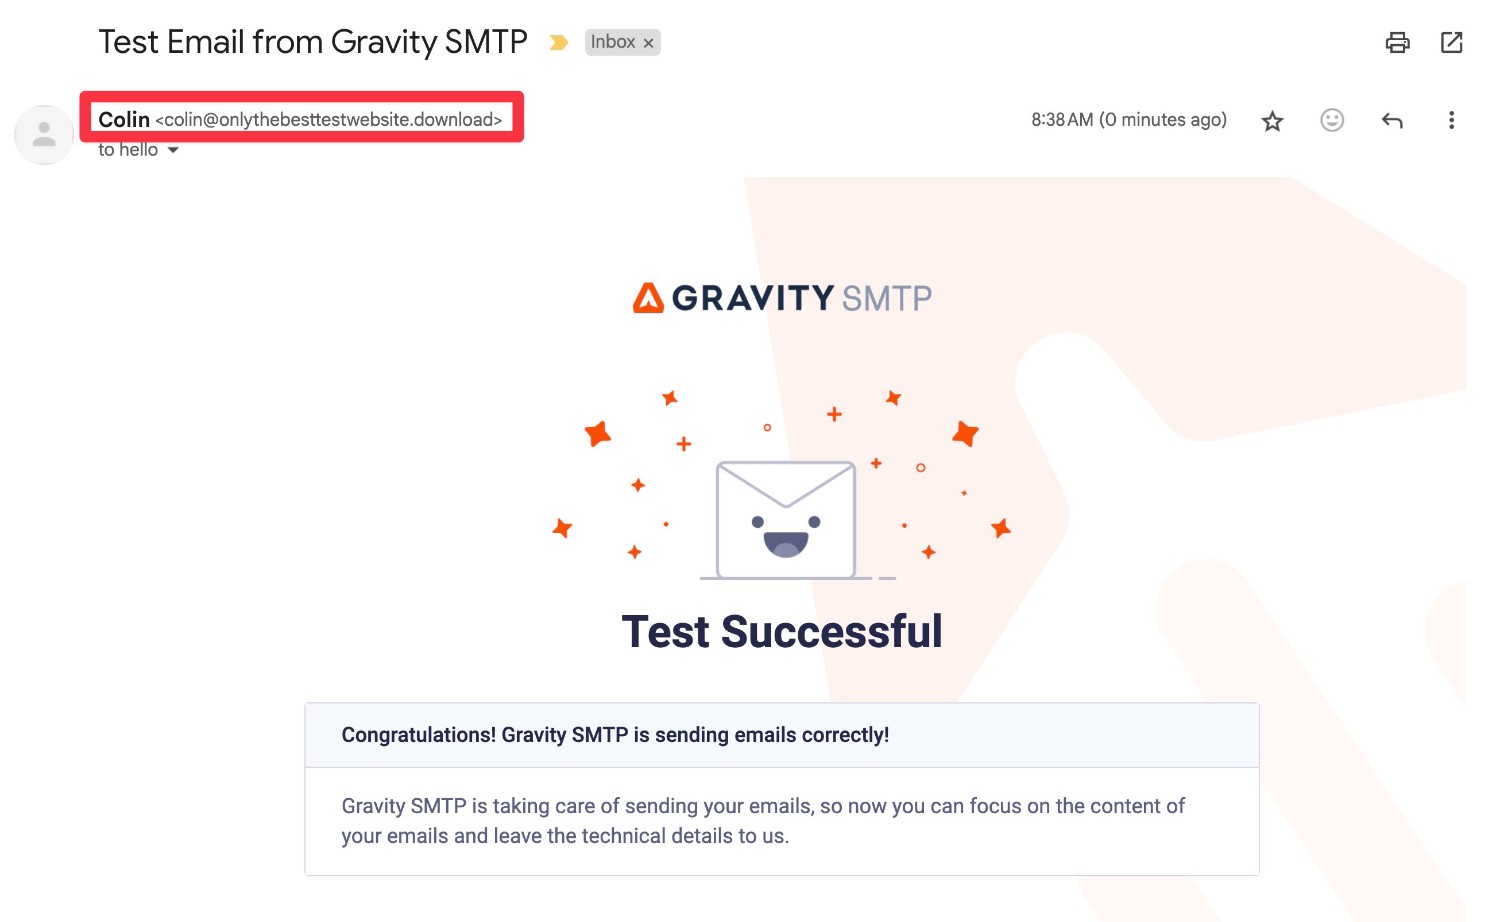
If it works, you should see a success message in the interface. Then, if you open your email inbox, you should see the test email.
In addition to making sure that the email arrived, we also recommend checking the “From Email” and “From Name” for any issues.
9. Monitor your site’s emails and set up alerts
In addition to its email test tool, Gravity SMTP also includes an email logging feature to help you monitor your site’s emails going forward. You can use this to make sure everything is working and flag potential issues before they become problems.
To access these logs, go to SMTP → Email Log.
On the main log page, you’ll see a list of all the emails that your site has sent, along with their status and other basic details.
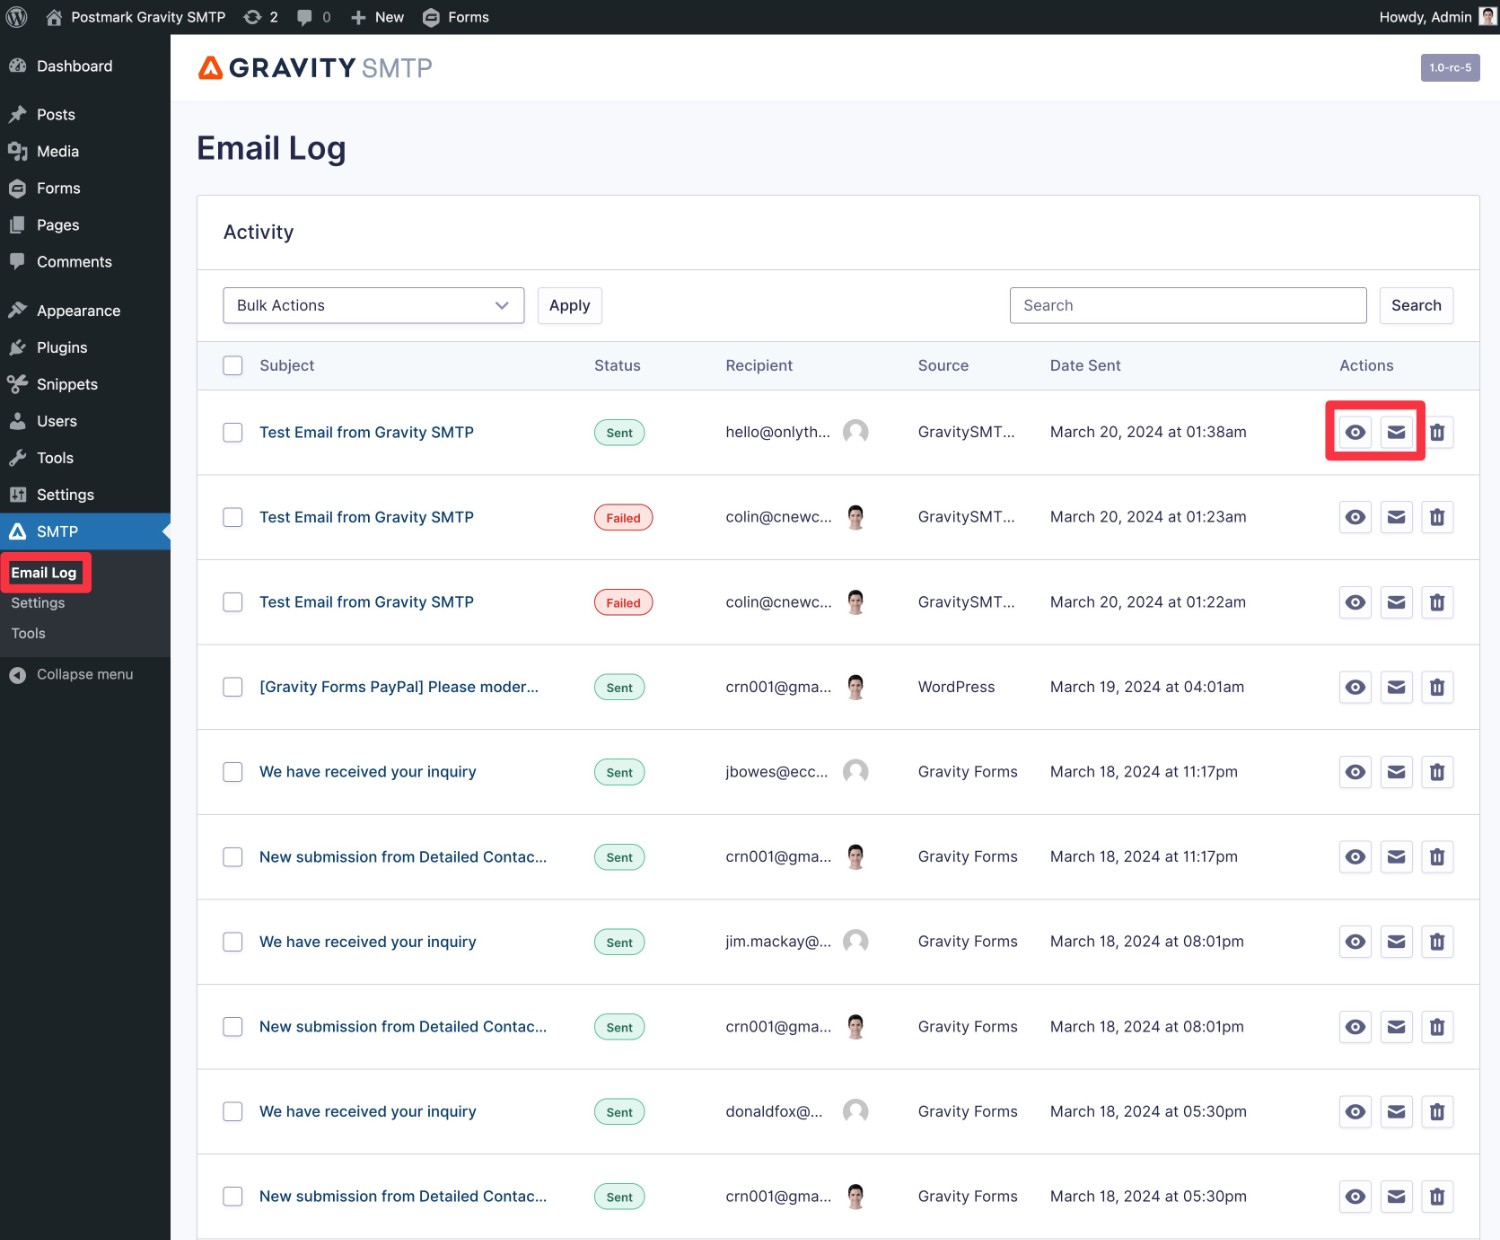
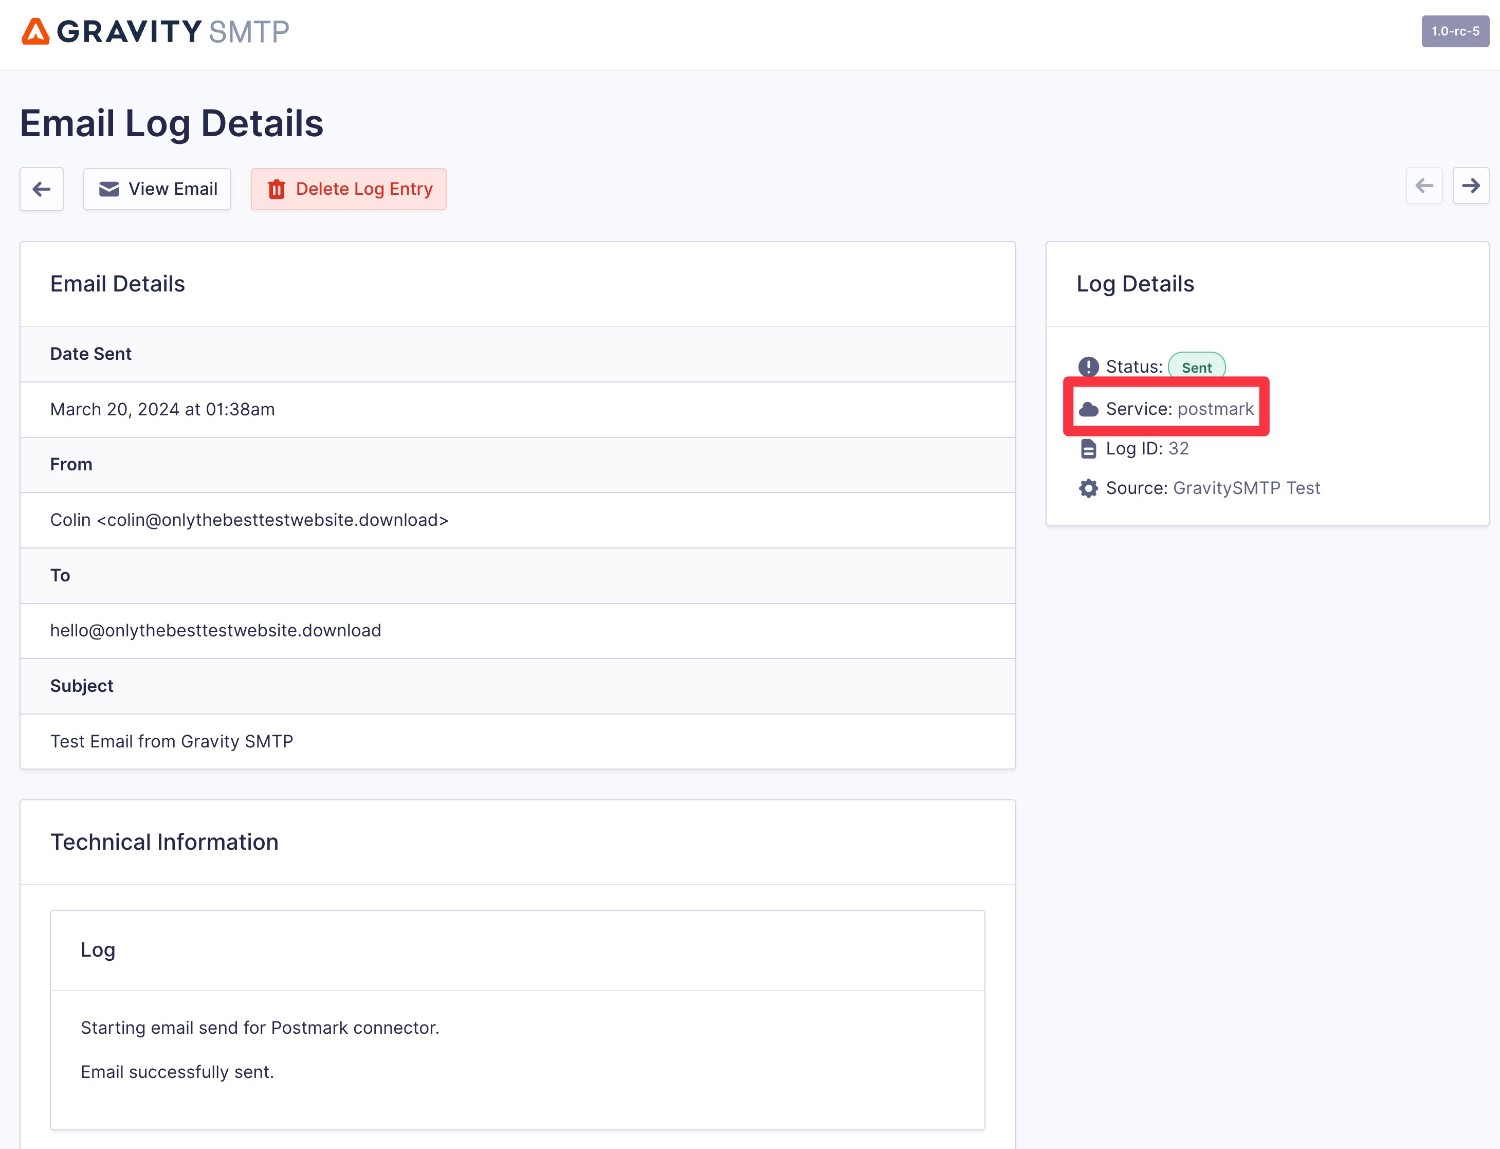
You can also use the options in the Actions column to access more information:
- View email log – you can view more technical details about that specific email, including which service it was sent with (e.g. Postmark), the source of the email (e.g. a certain plugin), and more.
- View email – you can see a visual preview of the actual email.
If you want to adjust the logging period or completely disable logging, you can do so by going to SMTP → Settings → Logging.
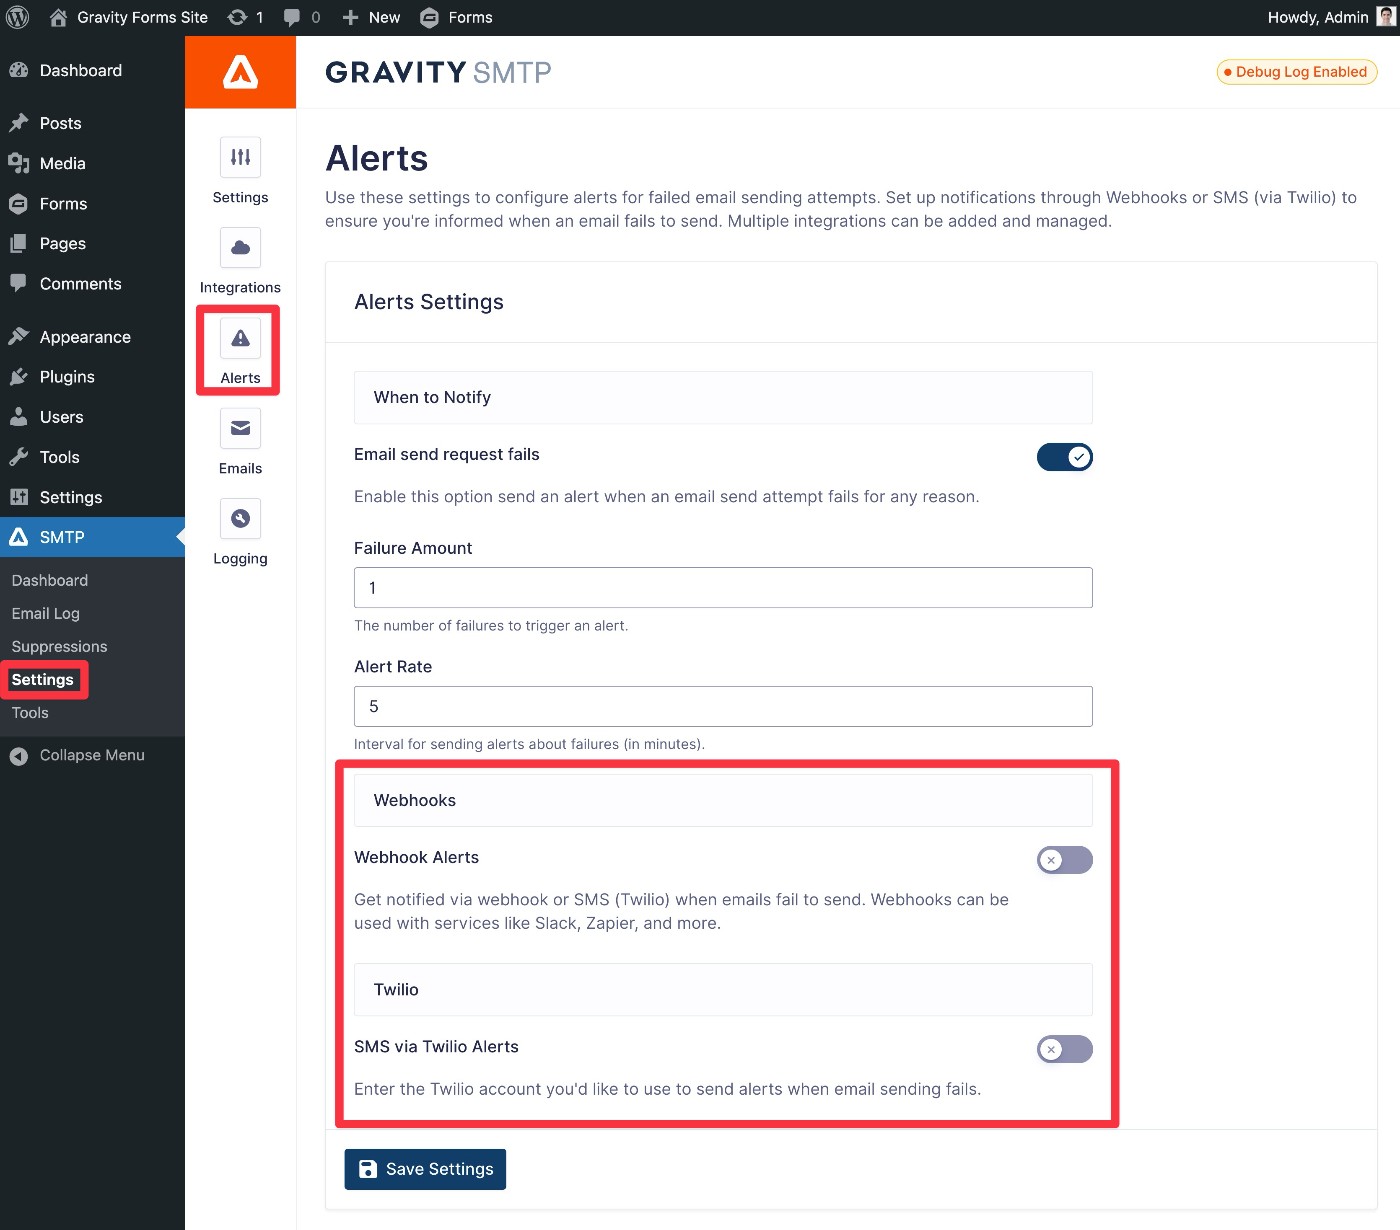
Secondly, if you want to set up real-time alerts, Gravity SMTP currently supports two methods:
- Webhooks – This lets you send an alert to any service that can receive webhooks, such as receiving a Slack message.
- SMS – This lets you receive real-time text messages using Twilio.
You can set up alerts by going to SMTP → Settings → Alerts and the links above cover tutorials for both methods.
For more in-depth details on Gravity SMTP and getting started with Postmark, check out the documentation.
Get started with Postmark on WordPress
That wraps up our guide on how to use the Postmark email sending service on WordPress.
With Gravity SMTP, you can easily configure your WordPress site to start sending its emails using Postmark, while also benefiting from other helpful tools like email testing and logging.
If you have a Gravity Forms Elite license, give it a try today and you can be confident that all of your site’s emails will make it to your users’ inboxes!

If you want to keep up-to-date with what’s happening on the blog sign up for the Gravity Forms newsletter!
"*" indicates required fields