
Do you want to give users the power to create and submit their own content without giving them access to your WordPress dashboard?
If you rely on users to submit their own content, it can become incredibly time consuming to copy and paste their submissions into new WordPress pages and posts. And this problem only grows as your site becomes more popular. It’s smart to set up an automation that handles all the busy work for you.
“But wait,” you might be thinking. “Why would I want users to create their own pages and posts?”
User-generated content is actually quite common. It’s a powerful tool to get content for your website without doing the work yourself. In some cases, you can even charge people to let them submit their own content.Here are some examples:
- You want users to submit ads for a job board.
- You want guest posters to submit their articles.
- You want customers to submit products to your eCommerce store for you to sell.
- You want users to submit events to a calendar.
- You want users to submit documents that other users can access (often used in conjunction with a document library WordPress plugin).
- You want users to submit their information to a directory.
User-generated content is a powerful tool to get content for your website without doing the work yourself.
Imagine you run a job board that gets 50-100 new job listings each day. Manually creating a new post for each listing would be tedious. Wouldn’t it be easier if that just happened automatically?
Fortunately, Gravity Forms can manage this for you. It’s possible to create a form that turns the user’s submission data into a new WordPress page or post.
How to Create a Form for User-Submitted Posts
Follow these steps to create a form that creates a unique page or post when users submit content.
Step 1: Install Gravity Forms
Your first step is to install the Gravity Forms plugin to your WordPress site. If you’ve never installed a plugin before, check out our Getting Started Guide.
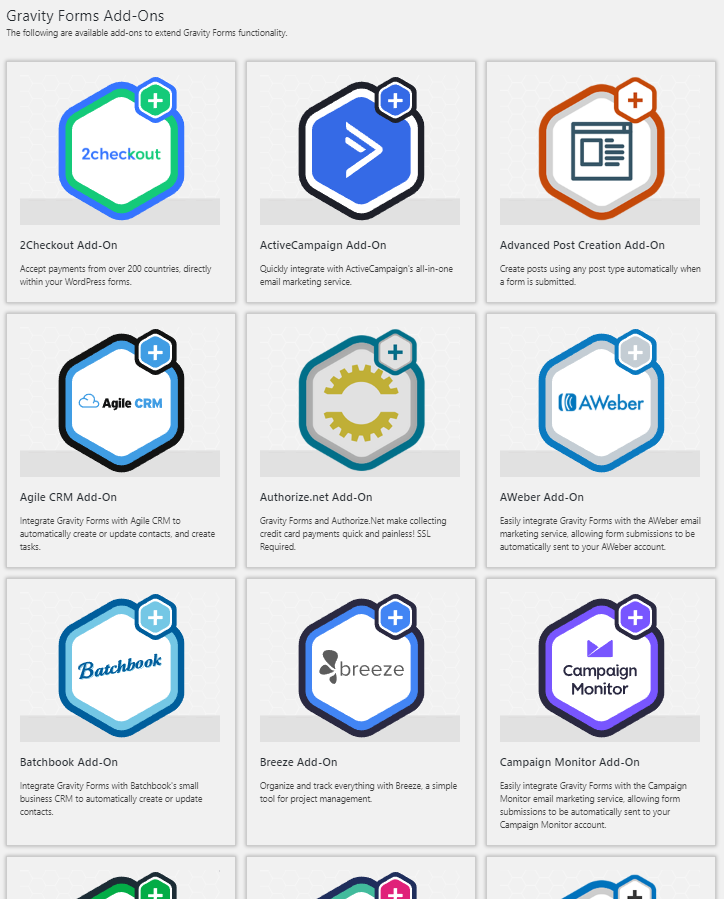
Step 2: Install the Advanced Post Creation Add-On
In order to convert form entries into a WordPress post or page, you’ll need the Advanced Post Creation Add-On. This add-on comes with a Gravity Forms Elite License.
If you’re on the fence about purchasing the Elite License, keep in mind that it grants you access to every Gravity Forms add-on. You’ll have the plugin’s complete functionality. If you need a form for user-generated content, you’ll probably find value in many of our other add-ons, like User Registration, Signature, Quiz, Survey, or our payment integrations (Stripe, PayPal Payments Pro, and 2Checkout).
Installing an add-on is simple. Hover over Forms on the left side of your WordPress dashboard and click Add-Ons. Click the Install button beneath the Advanced Post Creation Add-On.
WordPress will handle the installation, but you’ll need to click Activate Plugin on the installation page.
If you get stuck, read our full guide on Installing a Gravity Forms Add-On.
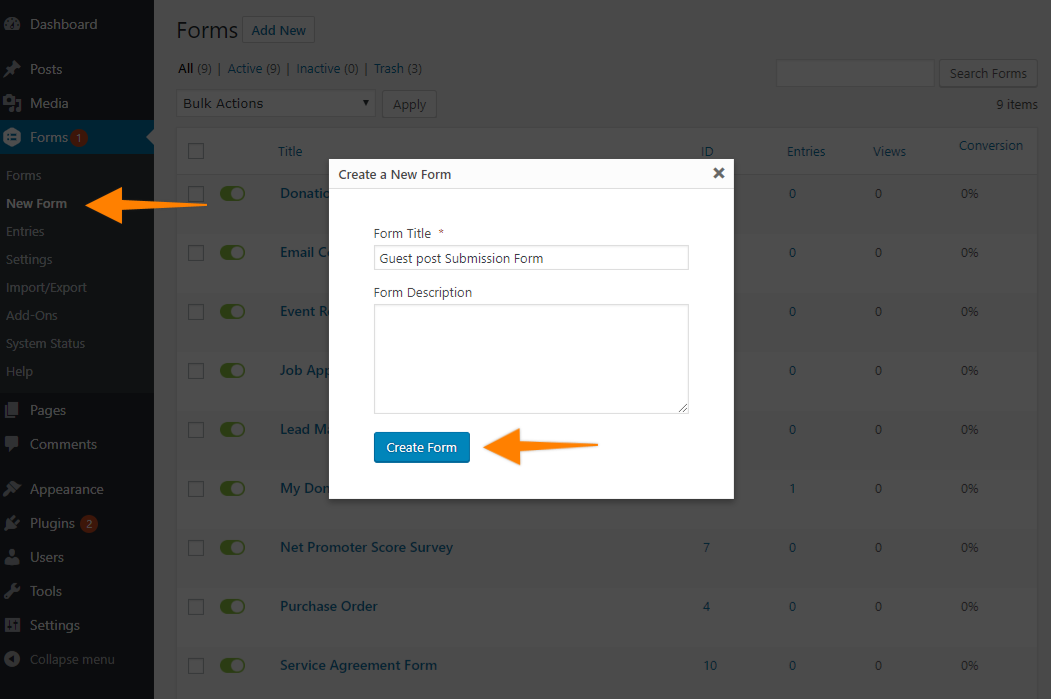
Step 3: Create a New Form
Let’s create that new form! Hover over Forms on the left side of your dashboard and select New Form. Give your new form a name. For the sake of this tutorial, let’s suppose you’re creating a form for guest posters to submit their content.
If you’re struggling to create a new form, read our full guide: How to Create a Form in WordPress.
Step 4: Add Fields to Your New Form
Things get a little more complex during steps three and four here. We suggest reading them completely before you build your form so you get an idea of what you need to do.
Gravity Forms needs to know which fields contain data it should display as content in the final page or post. It needs to know, for example, which Single Line Text Field represents the page/post’s title, or which Paragraph Field represents the page/post’s body content.
Gravity Forms can’t assume these data points because you may want to include fields in your form that shouldn’t appear on a page/post. For instance, you may want the submitter’s telephone number stored in your form entries, but you don’t want to display that information on a public page or post.
You’ll help Gravity Forms understand which fields should appear on the page/post in the next step, but keep that in mind as you build your form.
Okay! It’s time to start adding fields.
Like we said, you can collect any data point you want in your form, but here are the data that you may need to create pages and posts:
- Title (required)
- Body Content (required)
- Featured Image
- Tags
- Categories
- Custom Field
To collect this data with your form, you will want to use any of the standard fields or advanced fields, and map them to the appropriate feed setting. For example, you can use a Single Line Text field for the Post Title and a Paragraph Text for the Post Body, or a File Upload field for the Post Image.
Please keep reading for more details.
Step 5: Create a Feed for the Advanced Post Creation Add-On
Once your fields are in place, it’s time to create a feed. A feed gives your forms the ability to send data to another source. In this case, your form will send data to a page or post.
Once you’re inside your new form, hover over Settings and click on Post Creation. Click Add New to create a new feed. You should see the Advanced Post Creation feed settings screen.
General Settings

Give your feed a name. This is only used for internal identification, so put anything.
Post Settings: This section determines how the post or page will behave. You’ll need to configure each option.
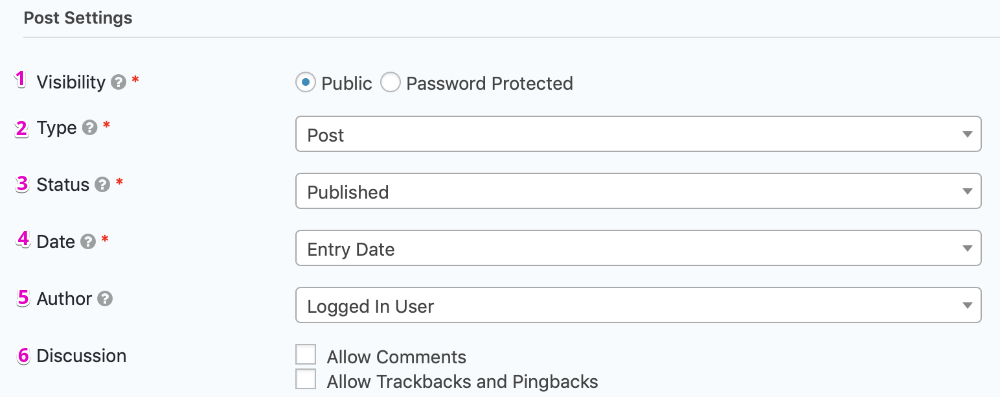
- Visibility: Do you want anyone to use the form, or do you want it hidden behind a password?
- Type: Choose whether the form will publish a post or a page. If your site has any custom post types, those will be available here as well.
- Status: Choose how WordPress will save the new post or page. For instance, you might want everything saved as a draft so you can approve it first.
- Date: Choose how WordPress will give the new page or post a date. Entry date will give the date of the submission.
- Author: Set the author to the post. You can set this to whoever is logged in at the time or an existing user.
- Discussion: Choose whether to allow comments and trackbacks and pingbacks.
Post Content
This is how Gravity Forms knows where to put the submission data in a new page or post. You’ll need to map each field. Map each option to the corresponding field on your form.
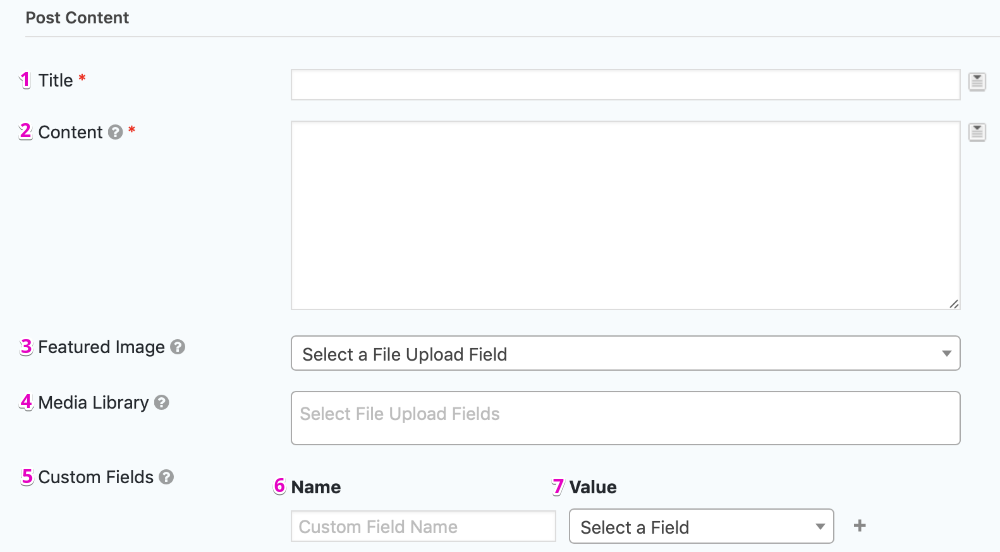
- Title: This is for the page/post title. It should link with the field you added for the Title.
- Content: This is for the body content. It should link the field you added for the main content of your post/page.
- Featured Image: This is for the page/post’s featured image and should link with the file upload field that you have been added for this purpose.
- Media Library: These are for any additional images the submitter wants to load into your media library. For instance, they may want to display a graphic inside the post. These should link with another file upload field, you can enable the Multi-File Upload setting for this field if you to allow the user to submit multiple files with one field only.
Numbers 5, 6, and 7 on the image above relate to custom fields. These only apply if you’ve set up custom fields on your pages and posts.
Remember you can use any of the standard fields or advanced fields to gather the data you want to map to your custom fields, based on your needs.
Taxonomies
Taxonomies are how WordPress classifies your pages and posts, such as categories and tags. You can give users the power to attach tags and categories to their user-submitted posts.
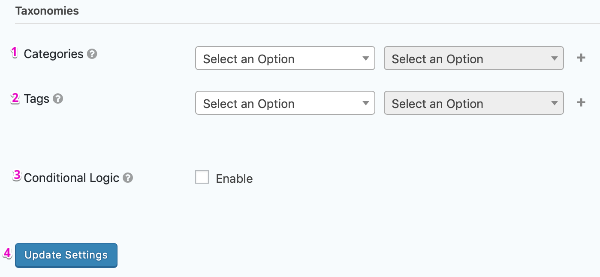
- Categories: Use “Field Value” to set a category based on a value in the adjacent field. Use “Assign Category” to assign every new post/page to an existing category.
- Tags: Use “Field Value” to set a tag based on a value in the adjacent field. Use “Assign Tag” to assign every new post/page to an existing tag.
- Conditional Logic: Use these fields to create conditional logic rules to dynamically control whether or not a post should be created based on the value of one or more submitted fields.
Gravity Forms will match your categories and tags to existing categories and tags by the same name. If it can’t find a matching category or tag, it will create a new one.
Need a little more help setting taxonomies for your user-submitted pages and posts? Watch our short explainer video.
Need additional details about any of the Advanced Post Creation feed settings? Check this documentation page.
Don’t forget to click Update Settings before leaving the page!
Step 6: Add the Form to a Page
Once you finish configuring your form, it’s time to embed it on a page. This is a simple process. You just have to use the form’s shortcode or the Gravity Forms block. Read our documentation to learn how.
Going Forward
Hopefully this post helps you understand how to use Gravity Forms to turn user submissions into new pages and posts. You’ll be amazed at how much time you get back once your form is configured properly. If you have any questions, don’t hesitate to reach out to us.


