
Do you use Gravity Forms and Stripe to accept recurring subscriptions or donations via your WordPress website? You can now significantly improve your customer experience by integrating with the Stripe Customer Portal, allowing logged in users to self-manage their subscriptions, including updating credit card information, viewing payment history, and more.
In this article, we’ll look more at what the Stripe Customer Portal offers, and who can benefit from implementing this feature. We’ll then run through how to set it up on your WordPress website to get you up and running with user subscription self-management.
Let’s jump in…
Stripe Customer Portal: An Introduction
Whether you run a subscription site, accept recurring online donations for your nonprofit, or charge a monthly subscription for an ongoing service or membership, allowing your customers and clients to self-manage their subscriptions is key when it comes to user experience.
Subscription self-management not only gives your customers autonomy over the money leaving their bank every month, it also saves you time, removing you from any necessary involvement when subscription alterations need to be made.
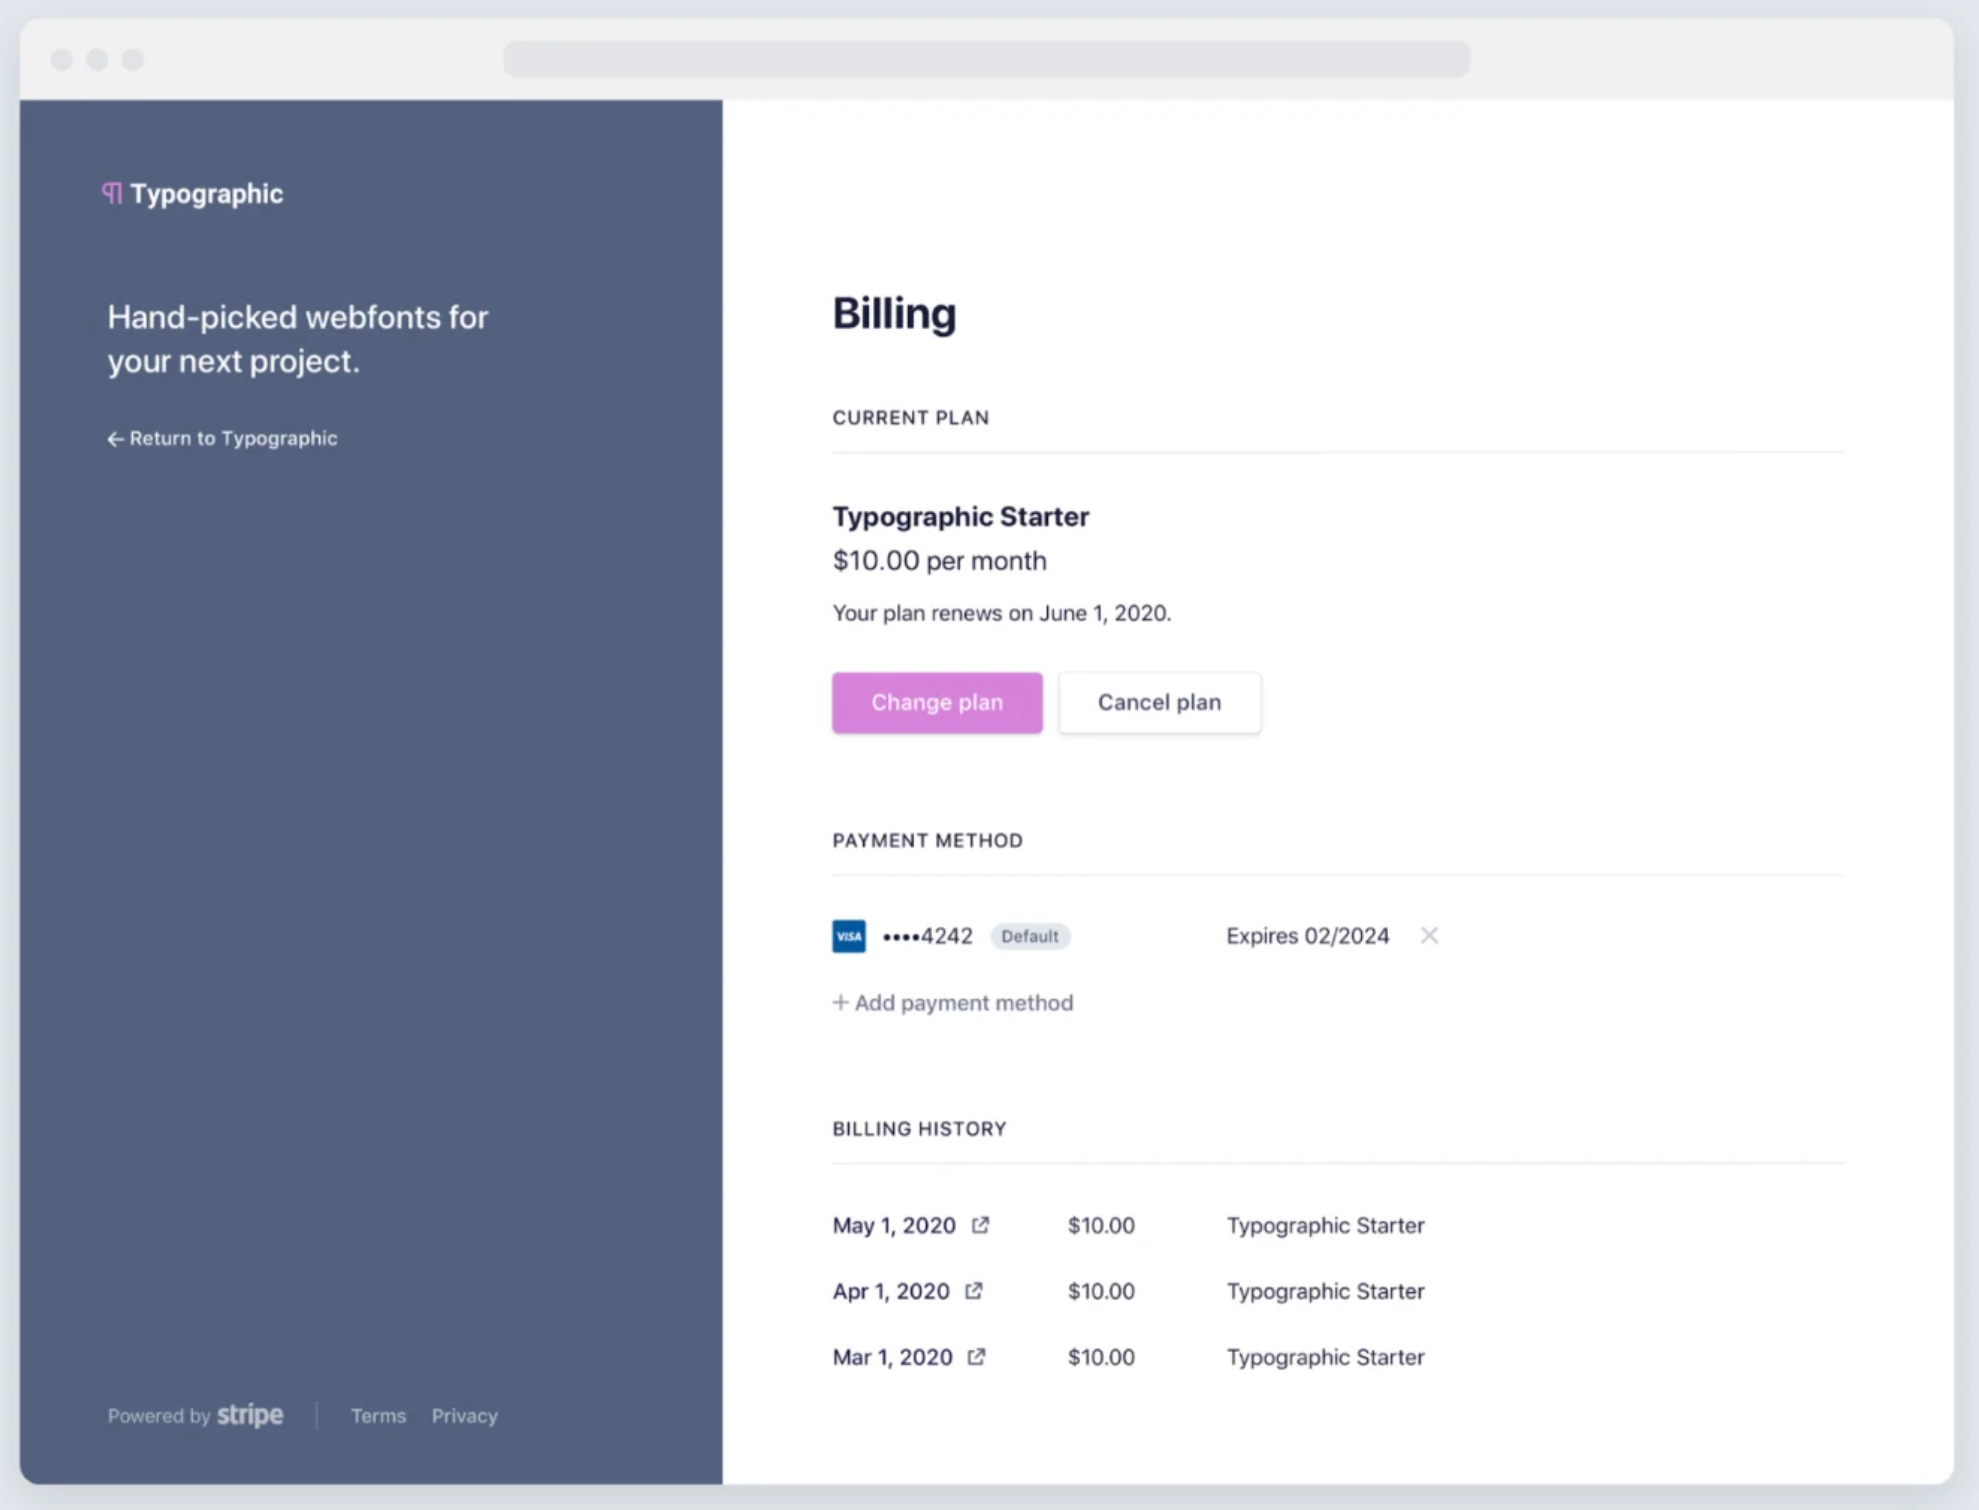
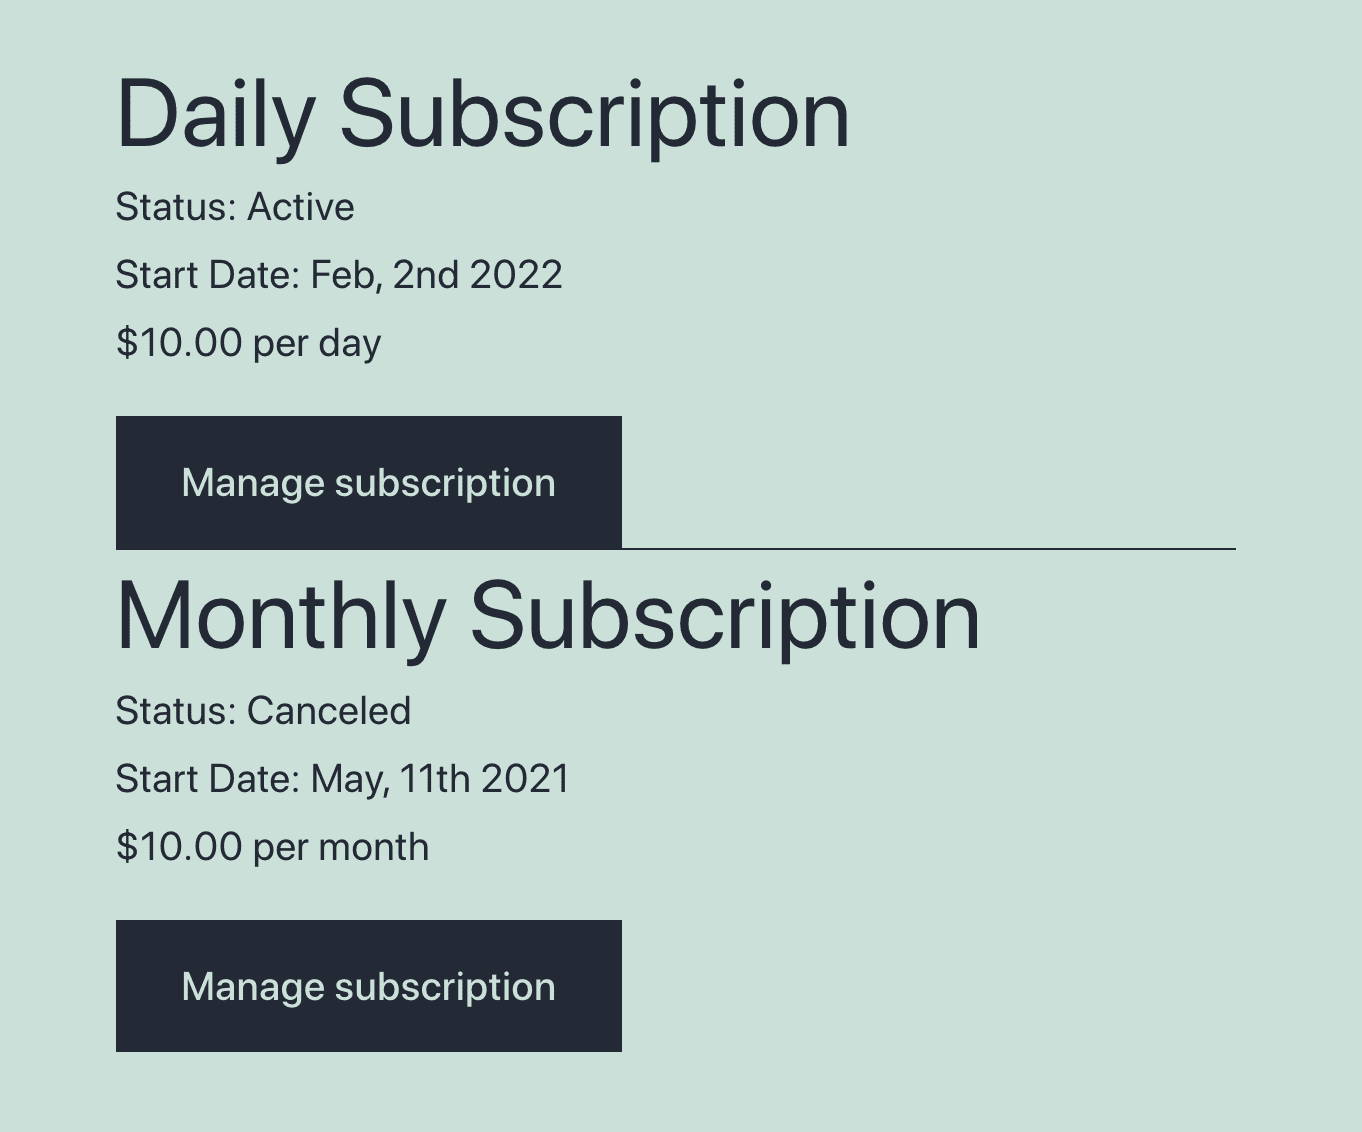
The Stripe Customer Portal is a powerful tool that can easily be integrated with your WordPress website. By adding a simple shortcode to a page on your website, logged-in users can view their active and canceled subscriptions, including information on the start date of each subscription, as well as the amount and frequency of payments, all without leaving your site.
If customers want to make alterations to their subscriptions, they can click directly through to the Stripe Customer Portal, a Stripe-hosted page. Here a user can…
- Upgrade, downgrade, pause, or cancel a subscription
- Add a new payment method or switch between existing payment methods
- Update billing and shipping information
- Check their payment history
- View and download all invoices and receipts
Stripe also allows for the customization of the customer portal. Easily edit the logo, headline, brand color, add links, and more, ensuring that, when customers land on it, it feels like a natural extension of your brand.
Note: The Stripe Customer Portal is only available to active Stripe Billing and Invoicing customers.
Get Started with the Stripe Customer Portal
Integrating your WordPress website with the Stripe Customer Portal is a quick and easy process that we will walk you through next.
However, note that the below steps presume you already have Gravity Forms and Stripe set up on your site and are accepting subscriptions through an existing payment form. If you are yet to get up and running with Gravity Forms and Stripe, have a read of this article – How to take Subscriptions with Stripe.
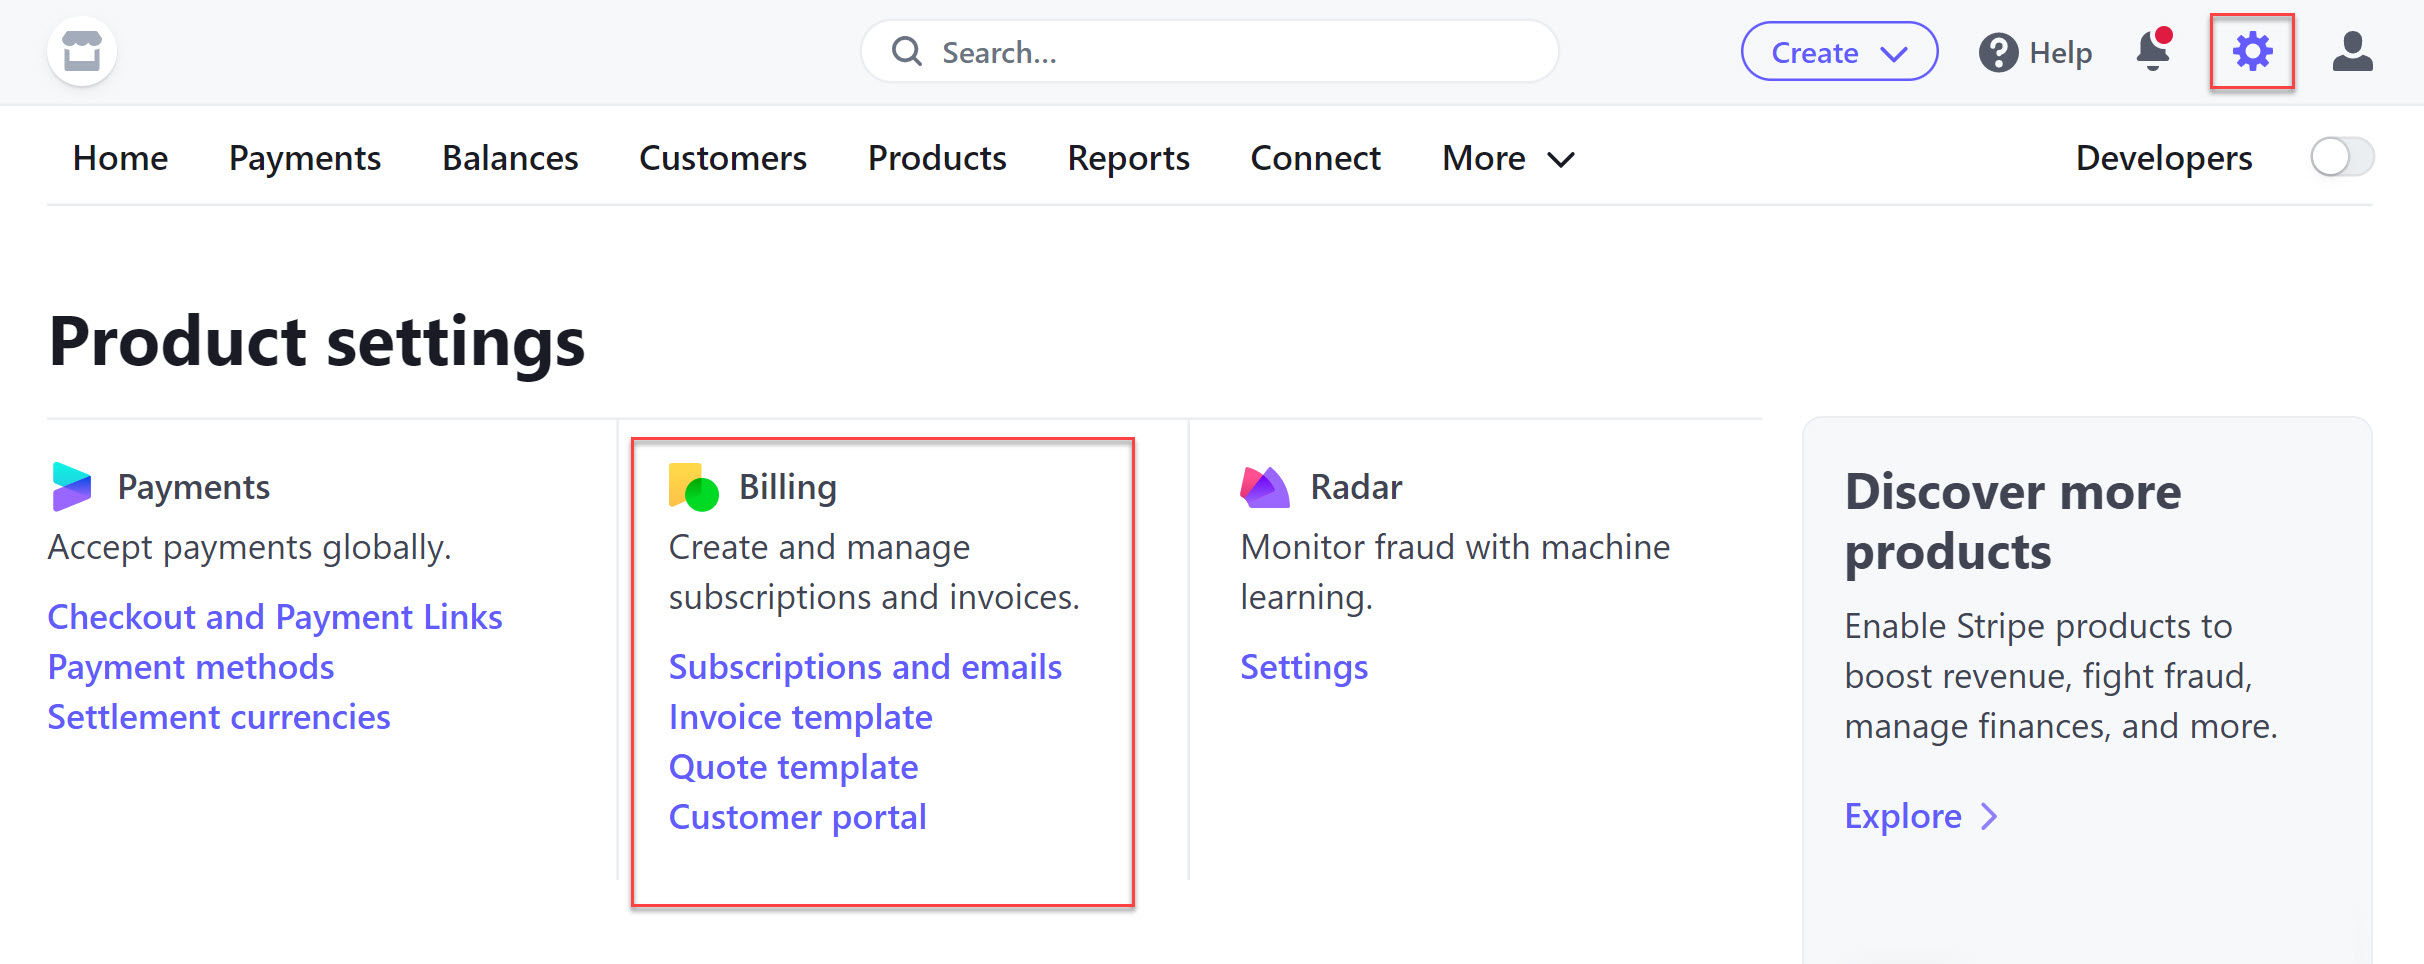
Step 1: Configure the Stripe Customer Portal
The first step is to log into your Stripe account and configure the Stripe Customer Portal. To do so, within your Stripe dashboard select Settings and under Billing click on Customer Portal.
Then enable the settings within the customer portal, selecting the functionality you would like to provide to your customers.
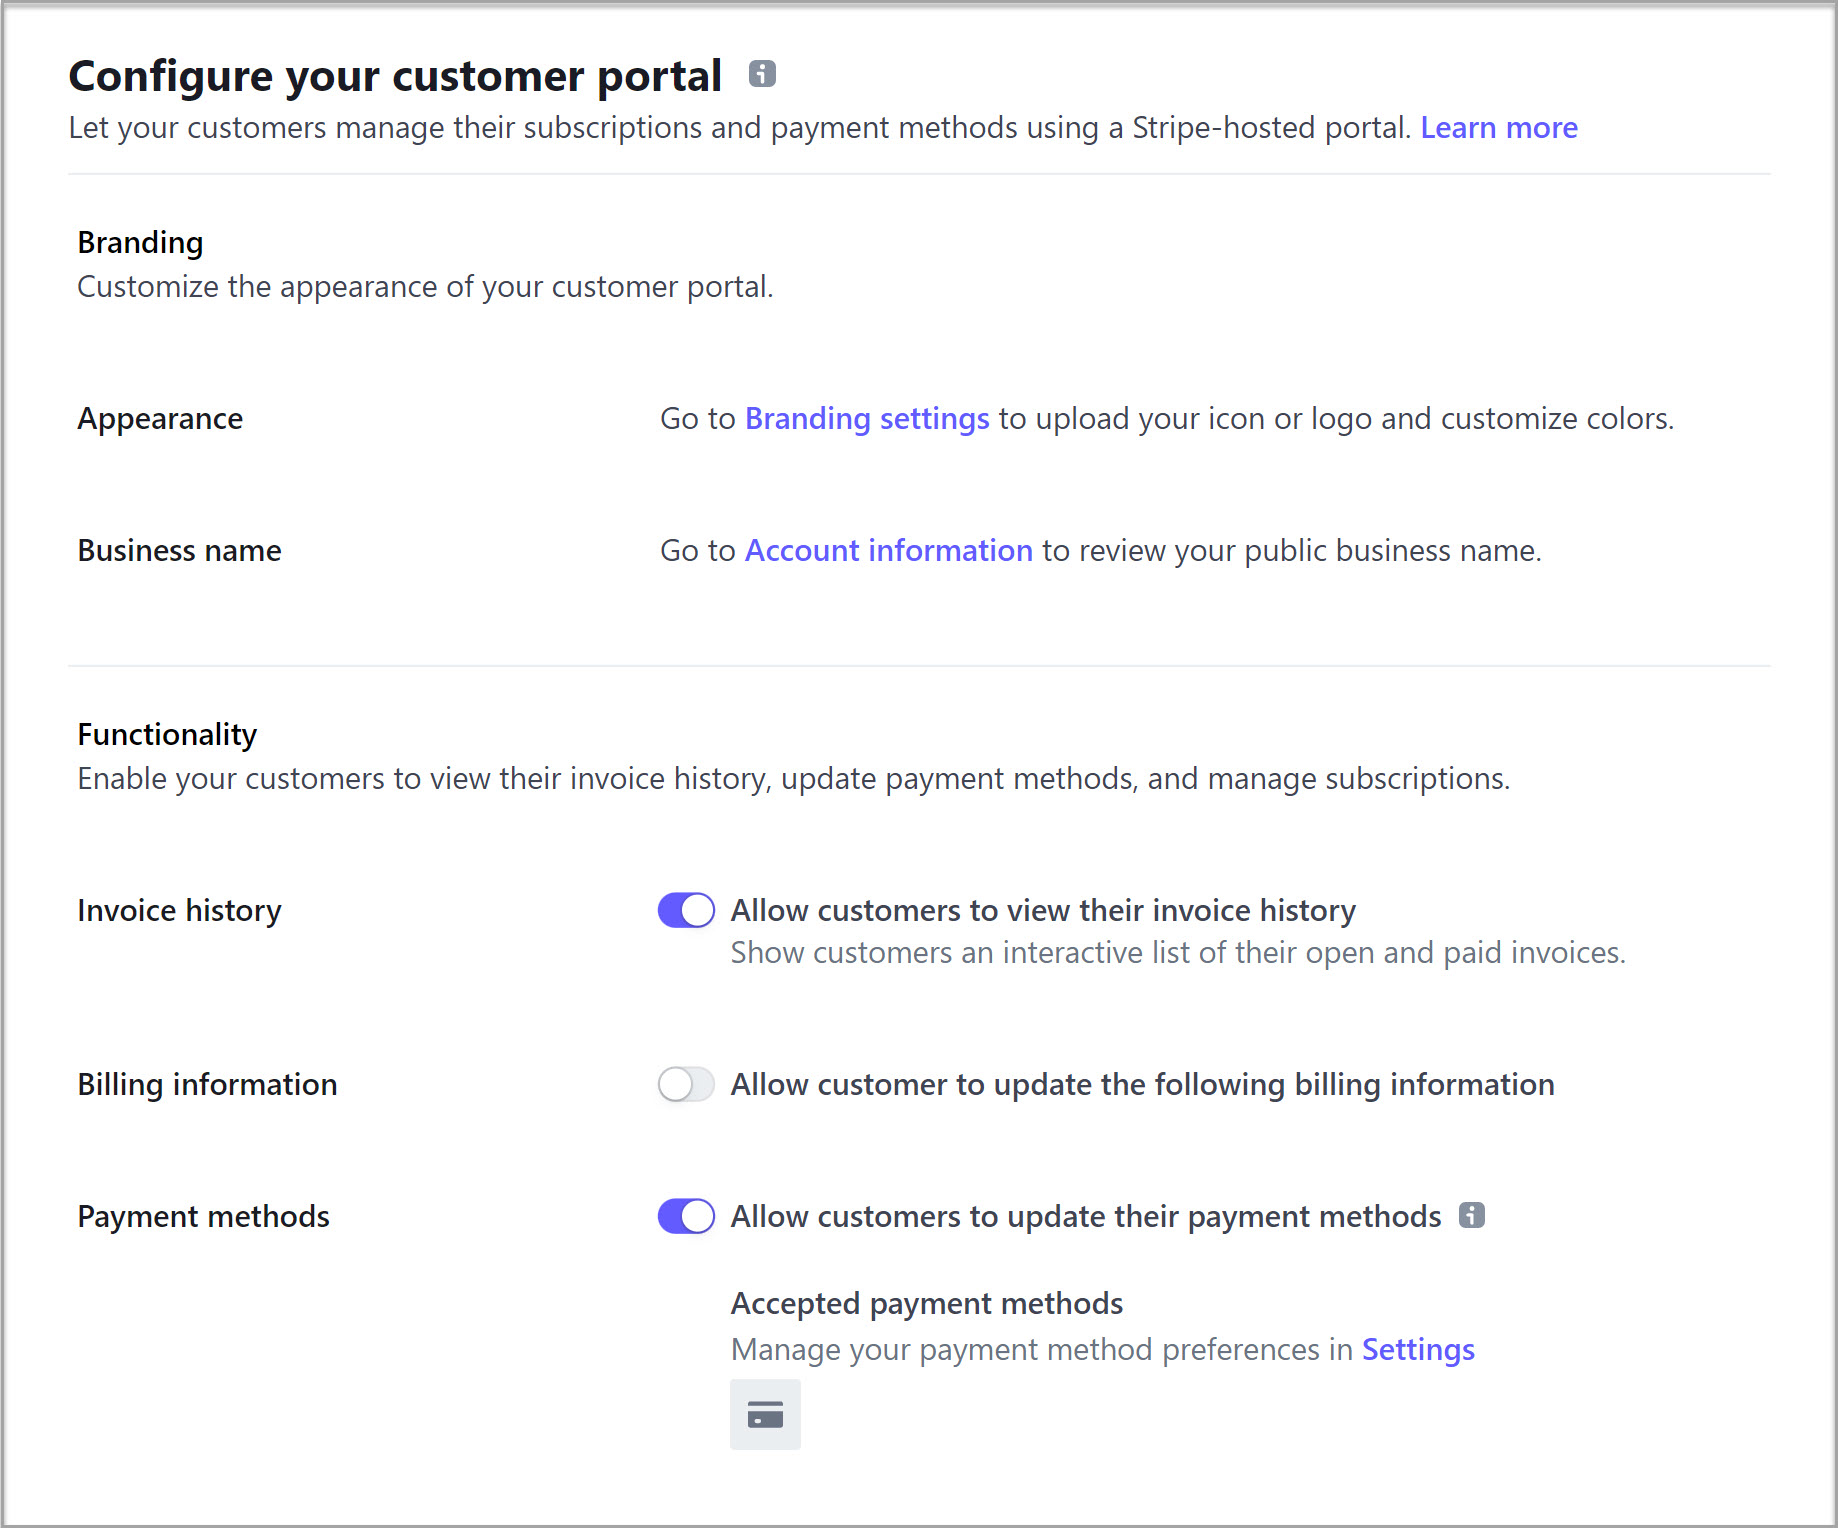
Here you can also update the customer portal branding, uploading your company logo, adding links to Terms of Service and Privacy Policies, and much more.
Once you’ve finished select Save at the bottom of the page and Preview the portal.
Step 2: Add the Stripe Customer Portal Shortcode to your WordPress Website
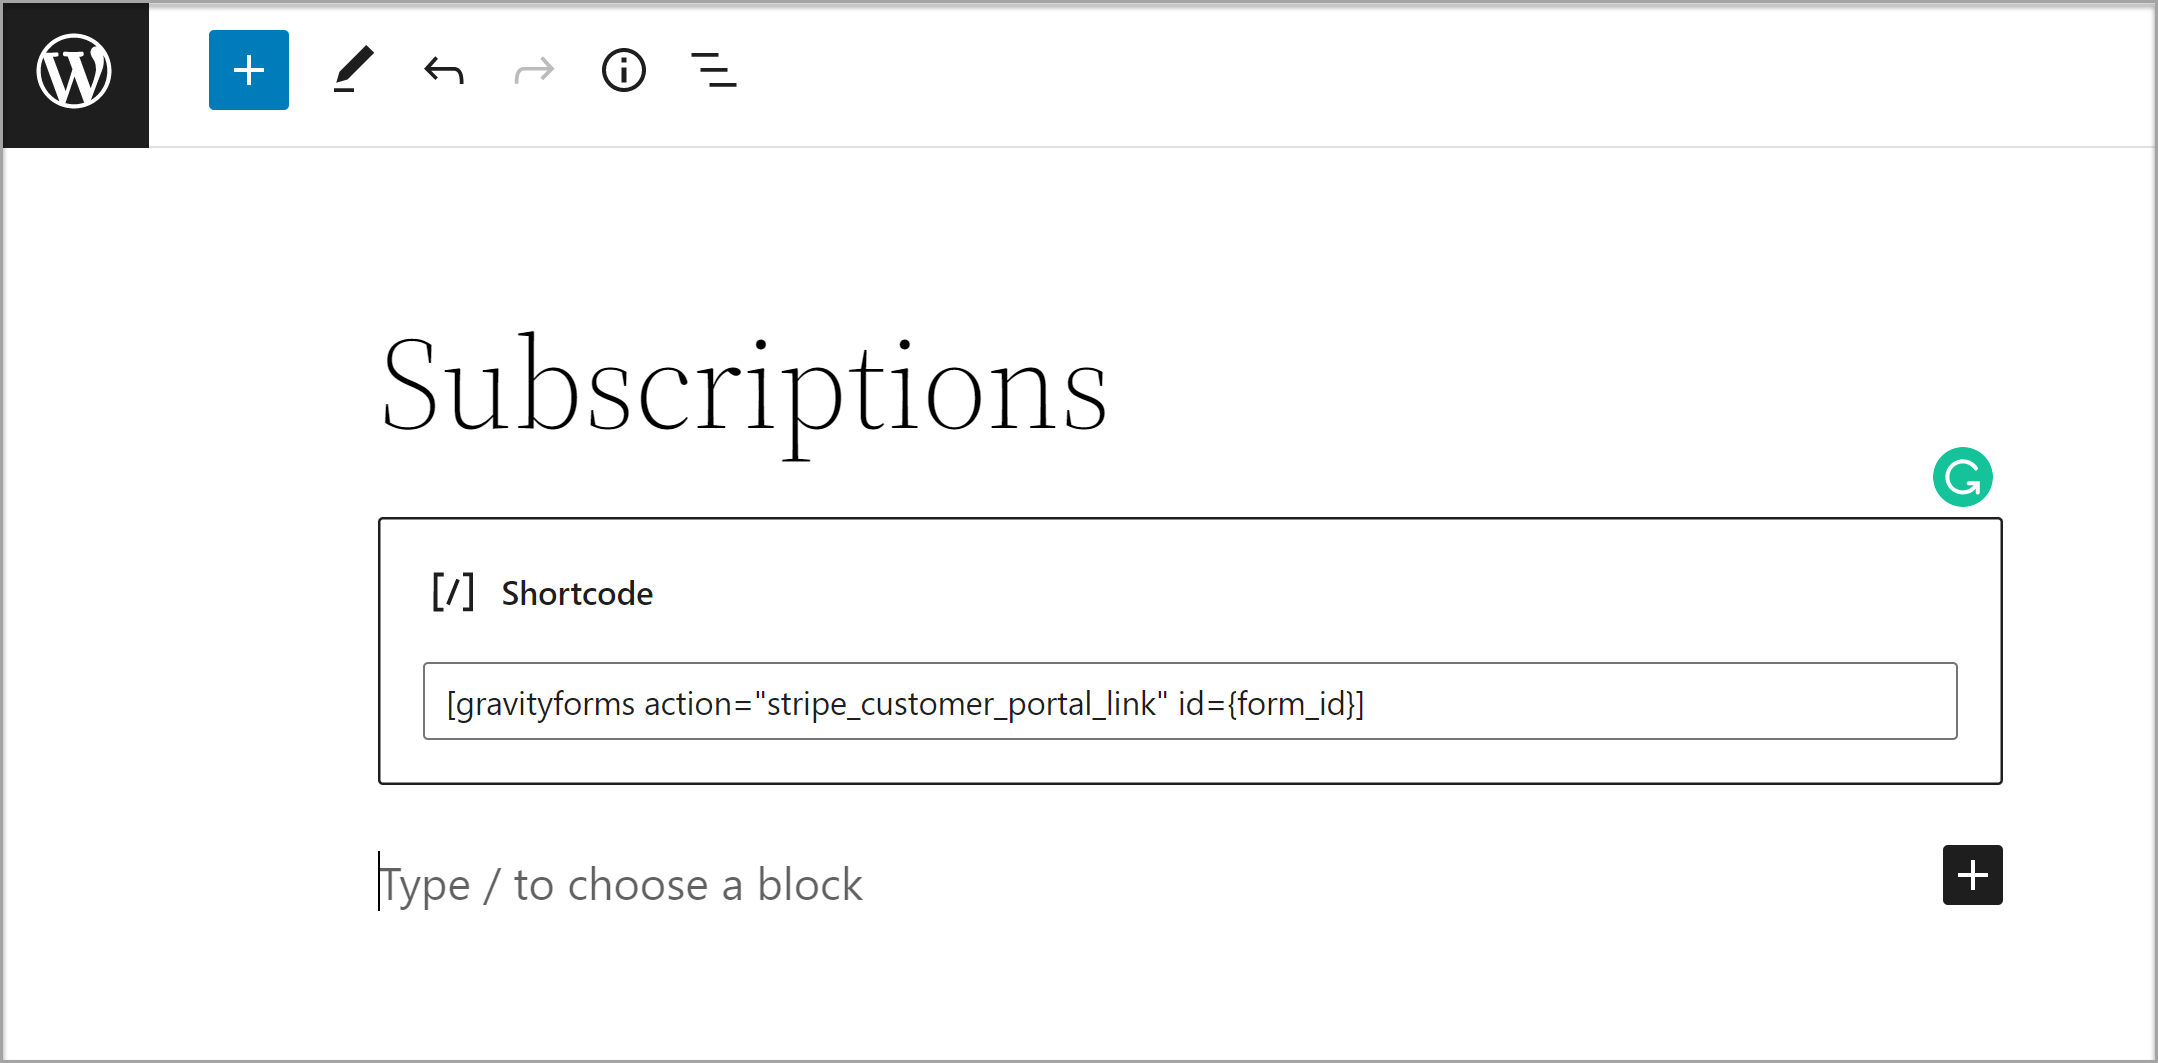
Next, you need to add support for the Stripe Customer Portal to your WordPress website. This simply involves pasting a shortcode into a page on your website. Once done, customers will be able to view their billing history via this page, as well as click through to the Stripe Customer Portal.
To get started, create a new page on your website and within the Block Editor, select the Shortcode block. Then add this shortcode:
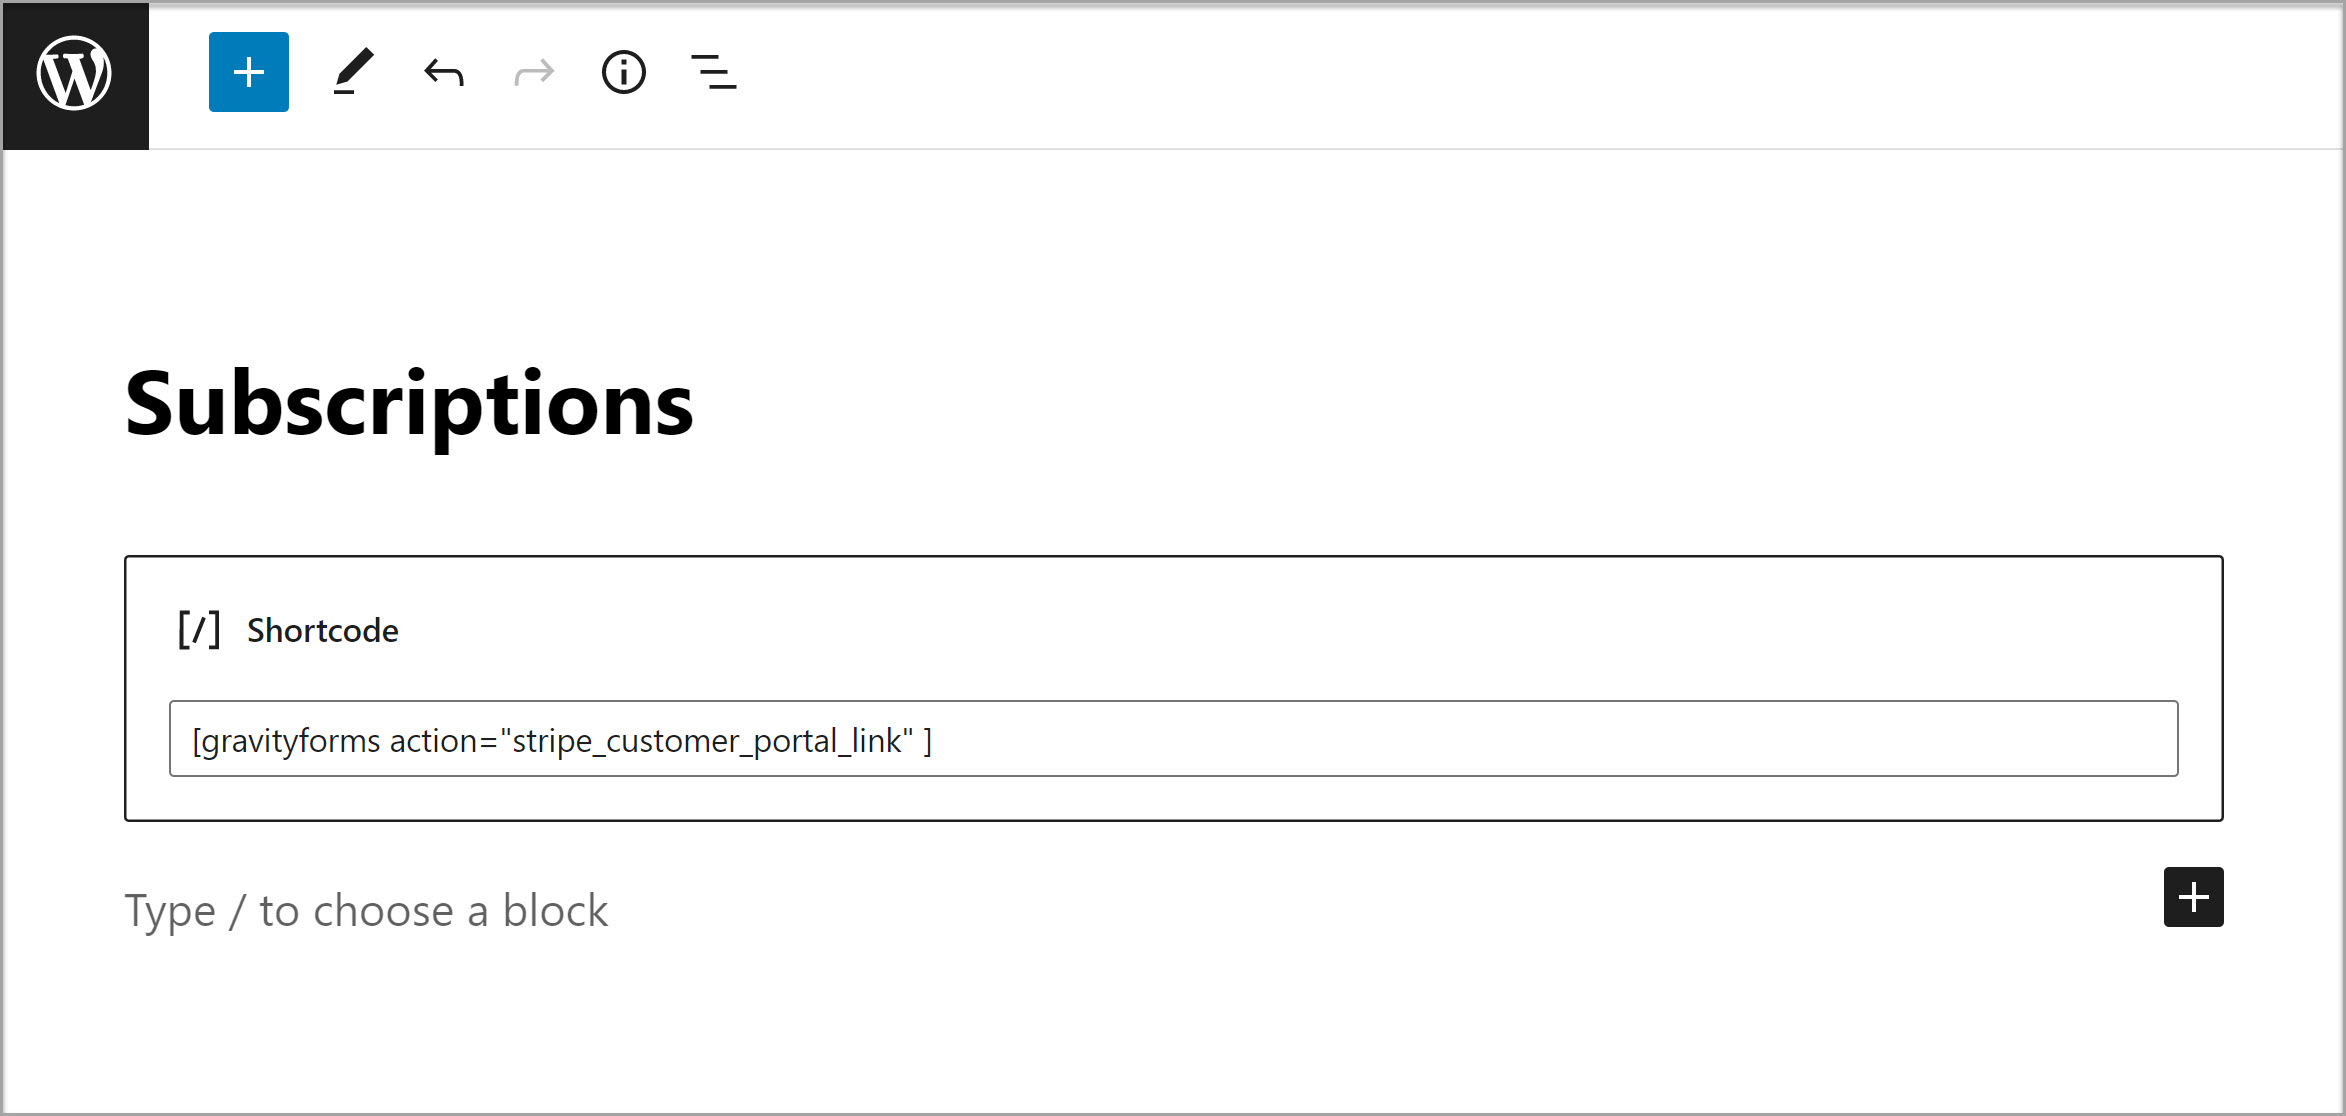
Customize the page however you require, then Save.
Now when a customer visits this page, they will be able to see their billing history as well as be able to click on the Manage Subscriptions button to open the Stripe Customer Portal and manage their subscriptions.
It is important to note that a customer needs to be registered and logged into your WordPress website to access the billing history page and the customer portal. If they are not logged in, when they try to open the page they will be redirected to the login form.
For more information on how to register users on your website using the Gravity Forms User Registration Add-On, check out this article – How to Set Up User Registration on your WordPress Website.
Step 3: Additional Shortcode Parameters (if required!)
There are a number of parameters that you can add to the shortcode to further customize the user experience on your WordPress website. These include…
- Only Show Subscriptions for a Specified Form – It may be that you only want to display customers’ subscriptions that were set up via a certain form. To do, so add the form ID to the shortcode using the parameter id={form id}.
Example:
- Only Show Active Subscriptions – You may want to only show active subscriptions, ensuring it’s easy for customers to find the information they need. If this is the case, add the shortcode with the parameter show_inactive=false.
Example:

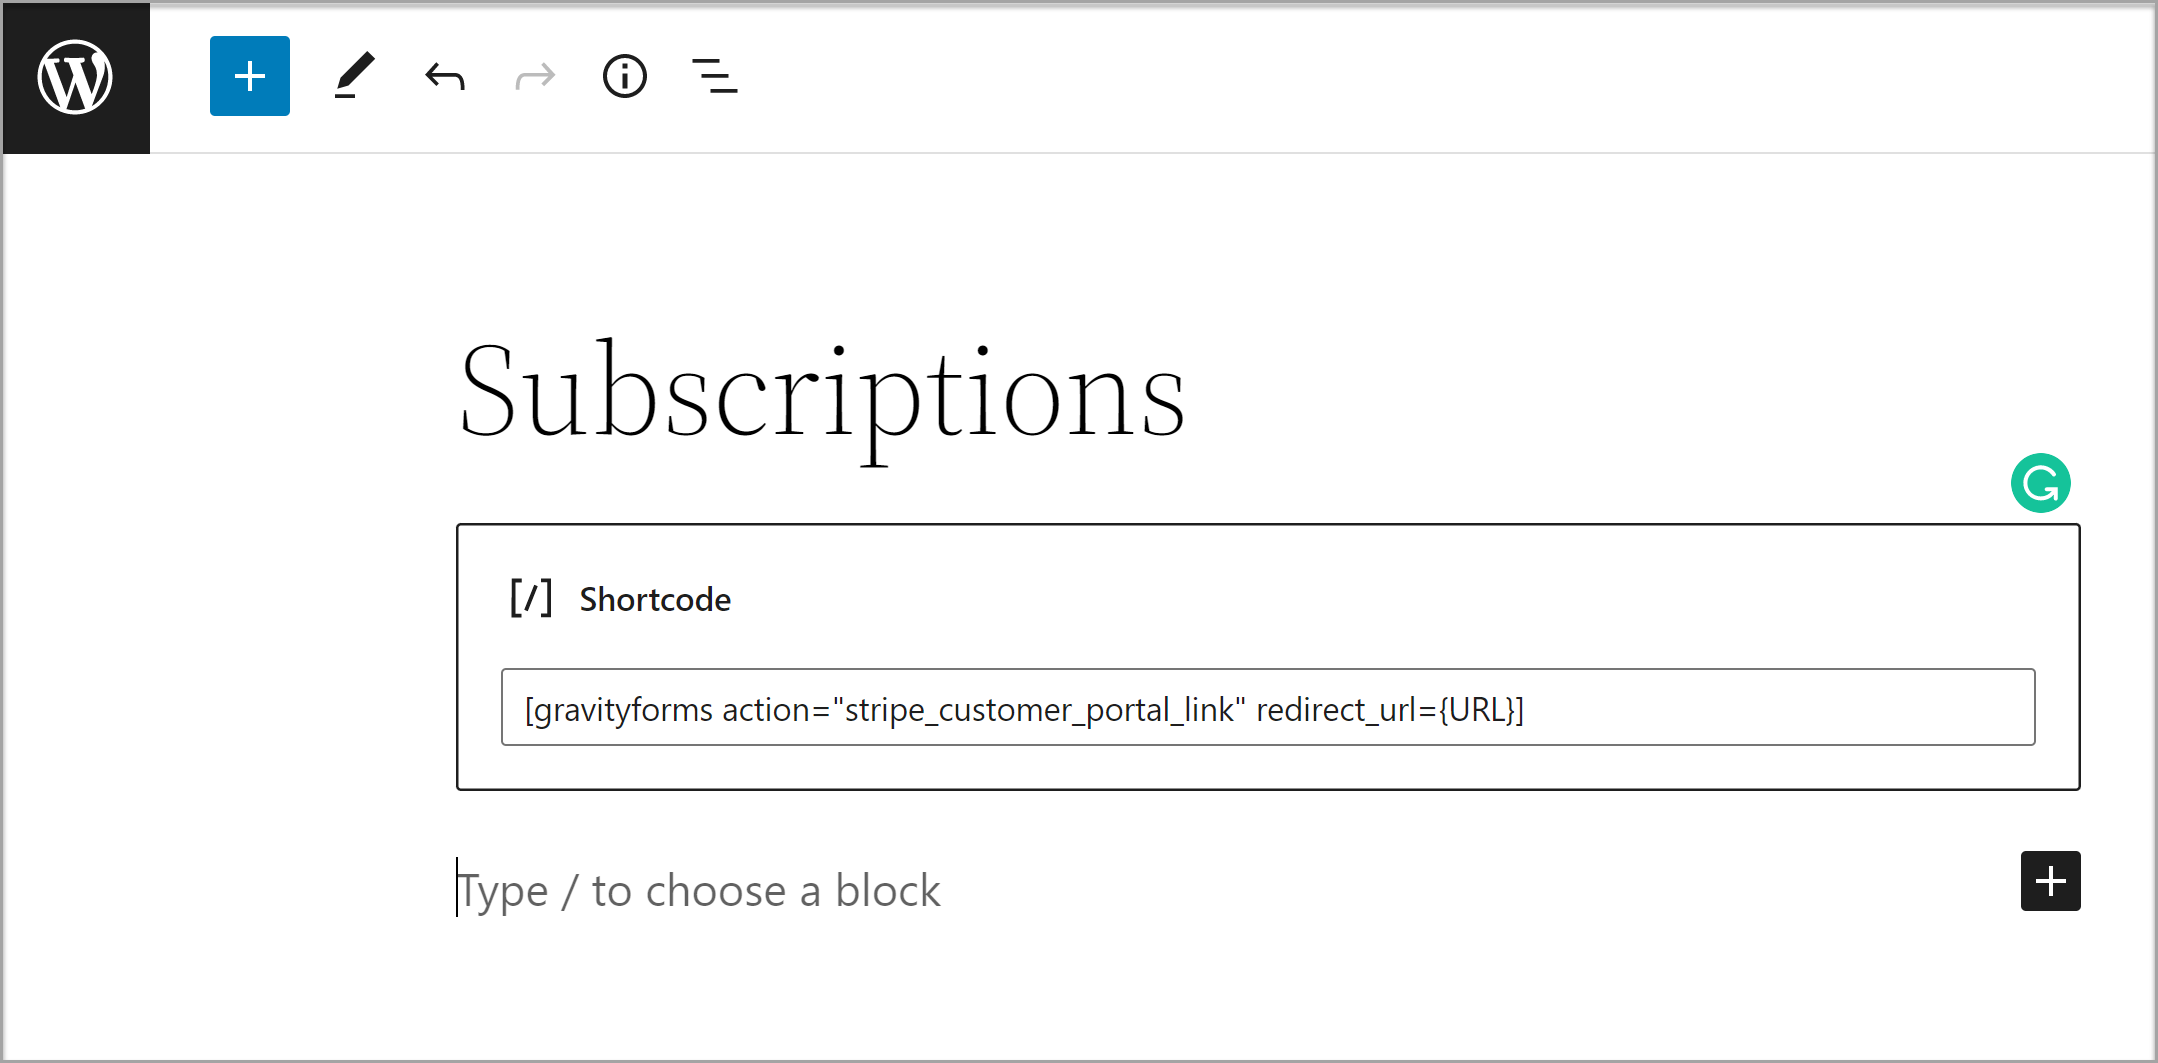
- Redirect Customers to a Different Login Page – If a customer is not logged in, they will be redirected to the default WordPress login page unless you specify a different URL. To do so, use this parameter redirect_url={URL}.
Example:
For more information on using the Stripe Customer Portal shortcode action, have a read of the Gravity Forms Documentation.
Yet to Get Started with Gravity Forms and Stripe?
Taking payments online is key for the majority of businesses, and whether you need to accept one-time payments on your site or set up ongoing subscriptions, Gravity Forms has you covered.
By taking advantage of our powerful built-in features and extensive ecosystem add-ons, you can also easily manage inventory, customer service, and other business processes, ensuring that every aspect of your business is integrated and efficient.
Stripe is a popular payment processor platform, used globally by businesses of all sizes – from small stand-alone websites and startups to public companies and multinationals. And with the Gravity Forms Stripe Add-On you can integrate Stripe seamlessly with any form you create on your website.
Use Gravity Forms and Stripe to quickly set up stylish custom payment forms, allowing you to easily accept subscriptions and recurring donations, helping to increase revenue and grow your business or nonprofit.
For more information on getting started with Gravity Forms and Stripe, check out these resources…
- This Month’s Featured Add-On… Stripe
- Drive Revenue Growth with a Gravity Forms Pro License
- Gravity Forms Documentation: Stripe Add-On
Test out everything in this article for free inside your own personalized Gravity Forms demo and see why Gravity Forms is the top choice for WordPress sites worldwide.
Already in love? Purchase our premium WordPress form plugin today!
Newsletter
If you want to keep up-to-date with what’s happening on the blog sign up for the Gravity Forms newsletter!
"*" indicates required fields