
For most firms, client intake is an inbox. A prospective client fills out a contact form or sends an email, and what happens next depends entirely on who sees it first, how busy they are, and whether they remember to pass it along.
The results are predictable. A well-qualified prospect waits four days for a reply and signs with someone faster. A poor-fit inquiry gets a full consultation because nobody screened it. Two partners respond to the same person with two different answers. And nobody can say how many inquiries came in last month, because the inbox doesn’t keep score.
In this post we’ll build client intake that works like a system instead: a client intake form that captures what you actually need to assess fit, and a workflow that screens each inquiry, puts the take-on decision in front of the right person, and assigns accepted clients to the right team member automatically. The division of labor is simple: Gravity Forms captures the inquiry, and Gravity Flow handles everything after submit.
If you’re an agency or consultant, this one is for you first.
For agencies: your client brings the problem, you bring Gravity Flow
This build is doubly useful, because you have two places to put it.
The first is your clients’ businesses. Law firms, accounting practices, consultancies, therapy practices, and trade businesses all live and die by how they handle inquiries, and almost all of them handle inquiries through an inbox. When a client complains that leads go cold, that the wrong people get consultations, or that new business depends on one partner’s email habits, they’re describing this workflow. It belongs on the website you already run for them, which is usually where the inquiries arrive anyway.
The second place is your own agency. Your intake process is a client’s first impression of how you run projects, and an agency that screens, decides, and responds systematically looks like an agency that will run a project the same way. Build it for yourself first and it becomes the demo you show every services client afterward.
Running intake for your own firm rather than a client’s? Everything below works exactly the same. Let’s get into it…
The problem with inbox intake
The inquiry itself isn’t the problem. The problem is everything between the inquiry arriving and someone acting on it:
- Speed depends on luck – Whoever happens to check the inbox decides how fast a prospect hears back, and prospects choose the firm that responds first far more often than firms like to admit.
- There’s no screening – Every inquiry costs the same senior attention, whether it’s a perfect-fit engagement or someone shopping far outside your services or budget. The poor fits crowd out the good ones.
- Assignment is informal – Who takes the new client gets decided in a hallway, which means it gets decided by availability and memory rather than by who’s actually right for the work.
The fix is a pipeline: every inquiry gets captured with the same information, screened the same way, decided by the right person, and assigned on purpose.
What this workflow does
Here’s the finished system we’re building:
- A prospective client submits the intake form, including the screening questions that reveal fit.
- The inquiry lands with a reviewer, who assesses it and records their recommendation on the entry.
- The take-on decision goes to the right decision maker as a formal approve or decline.
- Accepted clients are assigned to the right team member based on the service they need, and a welcome message goes out with next steps.
- Declined inquiries receive a prompt, polite response, and every decision is logged in the entry’s timeline.
Step 1 is Gravity Forms. Steps 2 through 5 are all Gravity Flow. The form matters more than usual in this build, because the screening happens there, but we’ll still spend most of our time on the workflow.
What you’ll need
- Gravity Forms (any license) to build the intake form
- Gravity Flow to run the review and assignment workflow on top
Gravity Flow is a separate plugin that extends Gravity Forms. With both installed and activated, you’ll find a Workflow tab in each form’s settings, and that tab is where everything from Step 2 onwards happens.
Step 1: Build the client intake form (Gravity Forms)
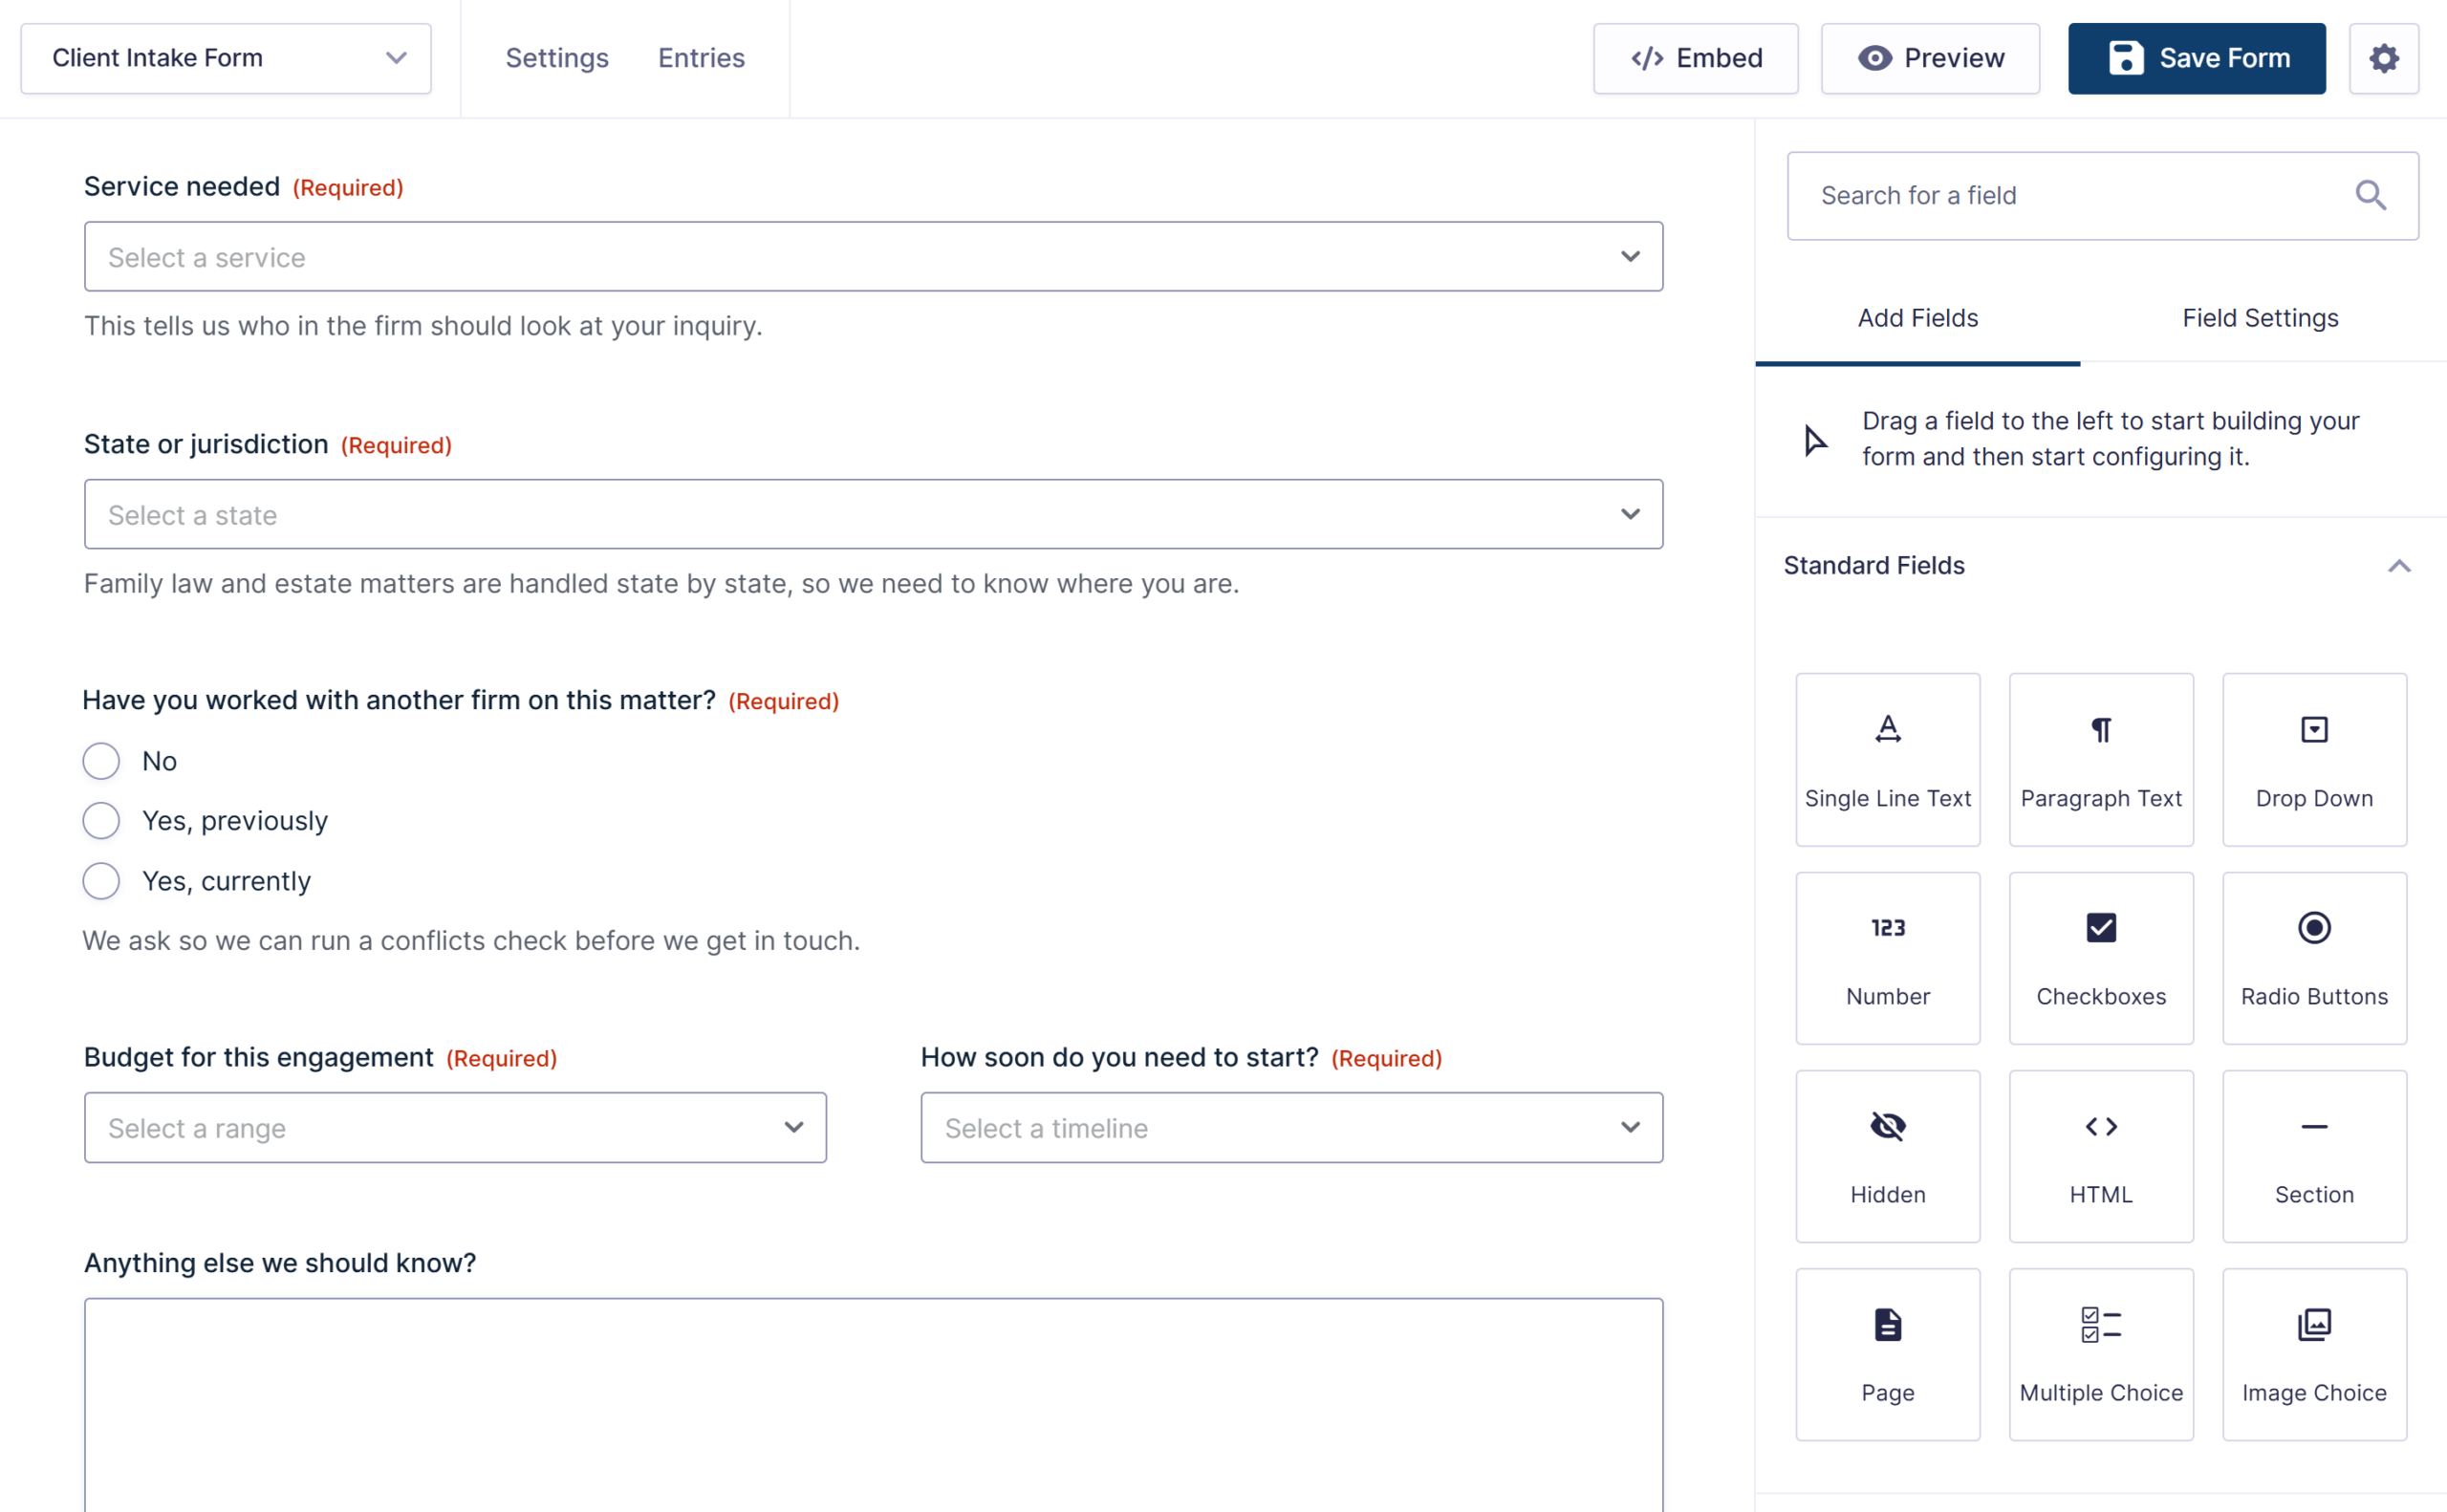
An intake form has to do more than collect contact details. It has to gather enough information for someone to judge fit without a phone call. Alongside name, email, and phone, that means:
- Service needed (dropdown) – The assignment in Step 4 routes on this, and it’s also your first screening signal.
- The screening questions that matter for your firm – For a law practice, that might be the matter type and jurisdiction. For a consultancy, the company size and timeline. For an accounting firm, the entity type and revenue range. Two or three well-chosen questions are enough to separate strong fits from poor ones.
- Budget or engagement size (dropdown with ranges) – Prospects tolerate this question far better than firms expect, and it saves both sides a consultation that was never going anywhere.
- How soon they need to start (dropdown) – Urgency changes who should handle the inquiry and how fast.
- Anything else we should know (paragraph field, optional).
Conditional logic keeps the form respectful of the prospect’s time: the jurisdiction question only appears for the matter types where it matters, and the timeline question can adjust its options based on the service selected. A prospect only ever sees the questions relevant to their inquiry.
Now for the workflow. From here on, everything we build lives in Gravity Flow.
Step 2: Screen the inquiry (Gravity Flow)
Add a new step in the form’s Workflow tab, set the type to User Input, and name it “Intake review.”
A User Input step assigns the entry to someone and asks them to complete additional fields before the workflow moves on. For intake, those fields are the reviewer’s assessment: add fields to the form that only appear in the workflow, such as a fit rating, a conflicts check confirmation for legal work, and a recommendation with notes.
The reviewer receives a notification when an inquiry arrives, opens the entry, sees everything the prospect submitted, and records their assessment directly on the same entry.
That last part is the quiet win. The inquiry, the screening answers, and the reviewer’s judgment all live in one place, instead of the inquiry being in the inbox and the opinion being in a reply-all.
Step 3: Make the take-on decision
Screening recommends; someone still has to decide. Add an Approval step, name it “Take-on decision,” and assign it to whoever genuinely makes that call in your firm, whether that’s a managing partner, a practice lead, or an intake committee.
The decision maker receives the full picture (the prospect’s answers and the reviewer’s assessment) and approves or declines directly from the notification, without logging in to the WordPress admin.
If decisions tend to sit, enable the step’s expiration so an unanswered inquiry escalates after a set number of days. A prospect who hears back in two days is still warm. A prospect who hears back in two weeks has hired someone else.
Step 4: Assign accepted clients to the right person
On approval, the new client needs an owner, and this is where the Service Needed field from Step 1 pays off. Add a User Input step named “Client assignment,” and in the assignee settings choose Routing to build one rule per service:
- If Service Needed is Family law, assign to the family law practice lead.
- If Service Needed is Business formation, assign to the corporate team lead.
- If Service Needed is Tax planning, assign to the tax lead.
The assigned team member confirms they’ve taken the client and records their first action, which gives the workflow a completion state instead of an assumption. New clients get an owner by rule, not by hallway.
One routing note worth keeping: when only the person changes, route the assignee, as we’ve done here. If your service lines need entirely different intake processes end to end, the Choice Routing step from Gravity Flow 3.1 can send each inquiry down its own branch of steps instead.
Step 5: Close the loop, both ways
Every inquiry deserves an ending, so add notification steps for both outcomes:
- On acceptance: a welcome message to the new client with next steps, and an internal notification so the team knows who’s joining the roster and who owns them.
- On decline: a prompt, courteous response to the prospect. If the inquiry was outside your services, this is the place to point them somewhere more suitable. A graceful no today is a referral source tomorrow.
And the entry’s timeline records the whole journey: when the inquiry arrived, who reviewed it, what they recommended, who made the decision, and who took the client. When someone asks how long inquiries take to turn around, or why a prospect was declined in April, the answer is on the entry.
The workflow at a glance
Here’s the complete build, end to end:
Intake form submitted with screening questions → Intake review (User Input step, reviewer records their assessment) → Take-on decision (Approval step with expiration) → Client assignment (routed by service) → Welcome or decline notification. Every step logged in the entry’s timeline.
One form, three workflow steps, and a pair of notifications. Before going live, submit one strong-fit and one poor-fit test inquiry and follow each through to its ending.
Intake that doesn’t depend on the inbox
That’s the build. Every inquiry gets the same screening, decisions get made by the right person on a deadline, accepted clients get an owner immediately, and declined prospects hear back promptly instead of never. And the firm finally has numbers: how many inquiries, how many accepted, how long each stage takes, all sitting in the entries.
Already using Gravity Forms? The intake form is the part you already know. Gravity Flow adds the review, the decision, and the assignment on top. Check out Gravity Flow pricing to get started, or sign up for a personalized demo to see an intake workflow in action.
More workflow builds on the blog: time off requests, purchase orders, volunteer onboarding, and employee onboarding.

Newsletter
If you want to keep up-to-date with what’s happening on the blog sign up for the Gravity Forms newsletter!
"*" indicates required fields