Looking for a way to connect your WordPress forms to your Mailjet email lists?
With the Gravity Forms Mailjet Add-On, you can connect any of the forms that you create with Gravity Forms to any of your Mailjet lists.
In this post, we’ll introduce you to the add-on and why you might want to use it. Then, we’ll show you step-by-step how to set it up and start syncing your WordPress forms to Mailjet.
Note: The Gravity Forms Mailjet Add-On is part of Gravity Labs — our home for experimental add-ons. It’s free with your Gravity Forms license, but it’s experimental and outside our official support. Labs is also how we learn what our community wants to see in the product, so if you try it, let us know what you think.
Why use the Gravity Forms Mailjet Add-On?
With the Gravity Forms Mailjet Add-On, you can connect any of the forms on your site to your Mailjet email lists.
If you’re using Mailjet to manage subscriber lists and send newsletters or marketing emails, this gives you a lot of flexibility for connecting your WordPress website to your Mailjet lists.
First, you can use the add-on to create dedicated email subscribe forms. When people submit the form, you can automatically sync them to your Mailjet lists.
While Mailjet does include a tool to create basic email subscribe forms, Gravity Forms will give you a lot more flexibility. Plus, you’ll also be able to take advantage of the other features in Gravity Forms, such as conditional logic.
Where the add-on gets even more useful, though, is that you can also connect other types of forms to Mailjet.
For example, you could give people an option to subscribe to your email list as part of other types of forms including, but not limited to, the following:
- Payment forms
- Donation forms
- User registration forms
- Event registration forms
- Content submission forms
- Etc.
For each form, you’ll be able to choose the specific Mailjet list to which you want to subscribe users. You’ll also be able to map data from your form fields to the Mailjet email and name fields.
You can even add conditional rules to subscribe users to different lists based on how they fill out the form. Or, you could choose not to sync users if they don’t meet certain conditions, such as checking an email opt-in checkbox.
How to sync Gravity Forms submissions to Mailjet
Now, let’s get into the full step-by-step guide on how you can start syncing your Gravity Forms submissions to Mailjet.
For this tutorial, the only thing we’ll assume is that you already have a Mailjet account and some lists you want to sync form submissions to.
If you don’t have that yet, you can register for a free Mailjet account here.
Once you have your Mailjet account, here’s how to connect Gravity Forms and WordPress to Mailjet…
1. Install the Gravity Forms Mailjet Add-On
To get started, you’ll need to install and activate the Gravity Forms Mailjet Add-On on your WordPress site.
As we mentioned in the introduction, the Mailjet Add-On is currently part of Gravity Labs. While these add-ons are free with any Gravity Forms license, they sit outside the normal suite of Gravity Forms add-ons.
First, you need to download the add-on from the Gravity Labs website:
- Go to the Mailjet Add-On page at Gravity Labs.
- Log in to your existing Gravity Forms account on Gravity Labs, if you haven’t done so already.
- Click the Download button.
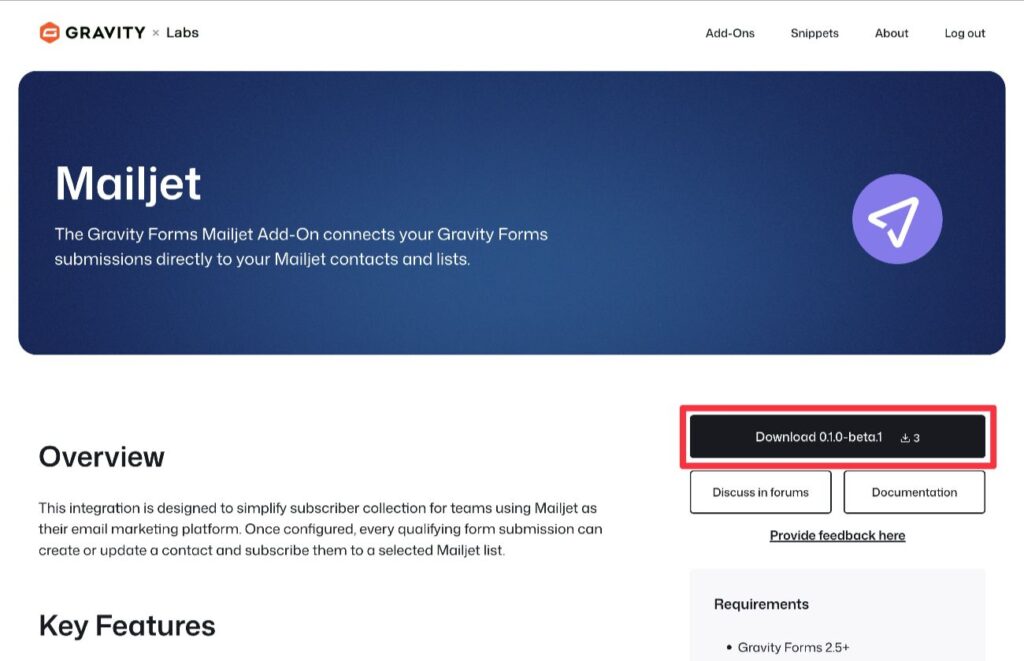
Once you download the add-on’s ZIP file to your local computer, you can upload and install it like any other WordPress plugin:
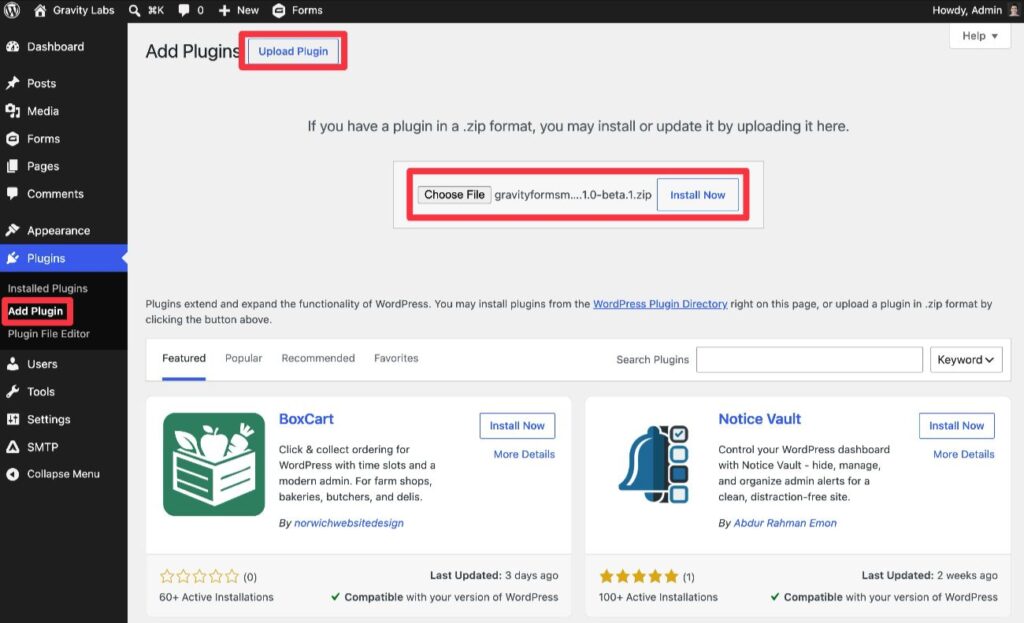
- Go to Plugins → Add Plugin in your WordPress dashboard.
- Click the Upload Plugin button.
- Select the ZIP file and click Install Now.
- On the next screen, make sure to activate the plugin.
2. Create a Mailjet API key
Next, you need to create a Mailjet API key, which is what Gravity Forms will use to connect your WordPress site to Mailjet.
To get started, log in to your Mailjet account, if you haven’t done so already.
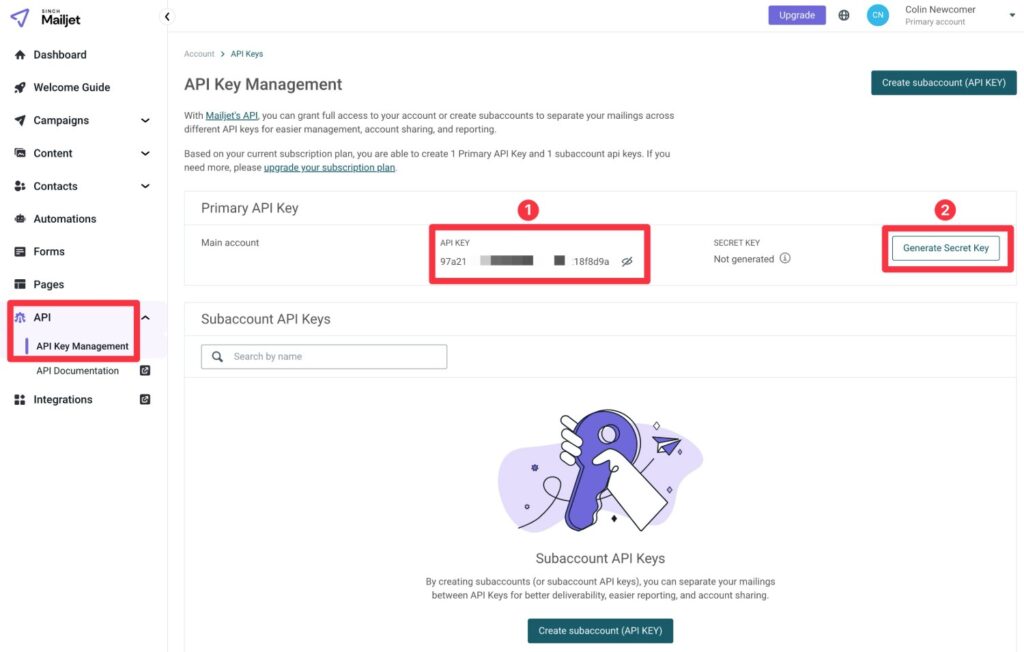
Then, go to API → API Key Management in the Mailjet dashboard sidebar. Or, click this link to open the page directly.
Mailjet supports two types of API keys:
- Primary API Key – This is a single key for your entire account.
- Subaccount API Keys – This lets you create separate API keys to organize different websites or projects.
With a free Mailjet account, you can only create a single subaccount API key. However, paid accounts let you create as many subaccount keys as you want.
We’ll use the primary API key for this tutorial. However, if you need to connect multiple different sites/services to your Mailjet account, you can also use a subaccount API key. The same basic ideas that we cover below also apply to subaccount API keys.
There are two parts to your API key:
- API Key (public) – Copy the value under the API Key heading and save it to a safe spot.
- Secret key (private) – Click Generate Secret Key to create your secret key.
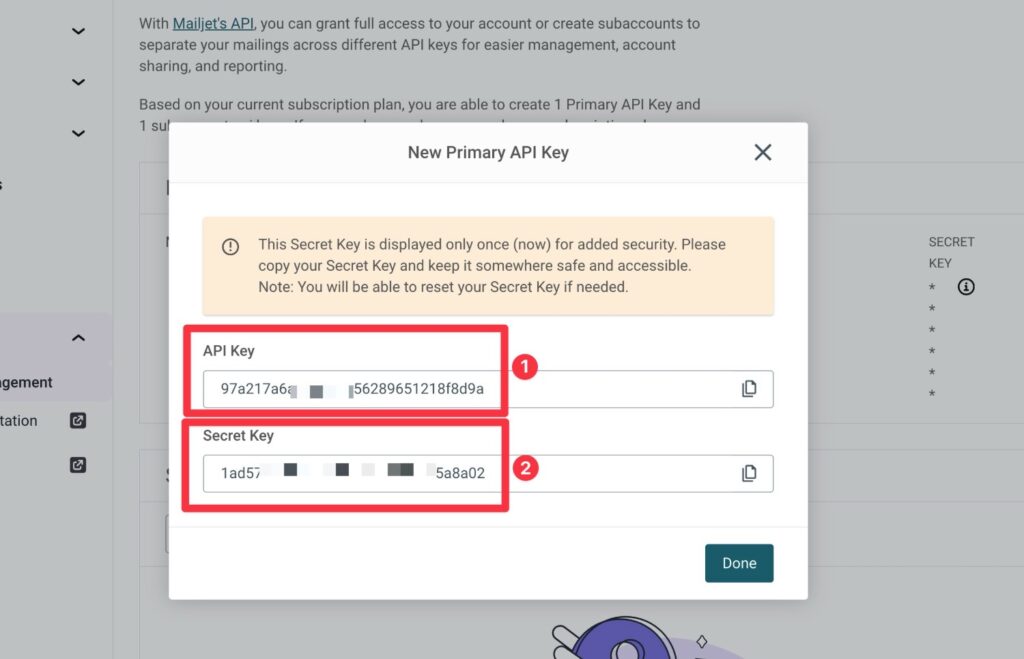
After clicking Generate Secret Key, Mailjet will display a popup that contains both your public API key and the Secret Key.
Make sure to copy both values to a safe spot because you’ll need both in the next step.
Mailjet will only display the Secret Key one time. However, if you lose track of it, you can reset it by clicking the gear icon next to it in the API Key Management interface.
3. Connect Gravity Forms to Mailjet
Once you have your Mailjet API key, you next need to connect Gravity Forms to Mailjet:
- Open your WordPress dashboard.
- Go to Forms → Settings.
- Select the Mailjet tab in the Gravity Forms settings area.
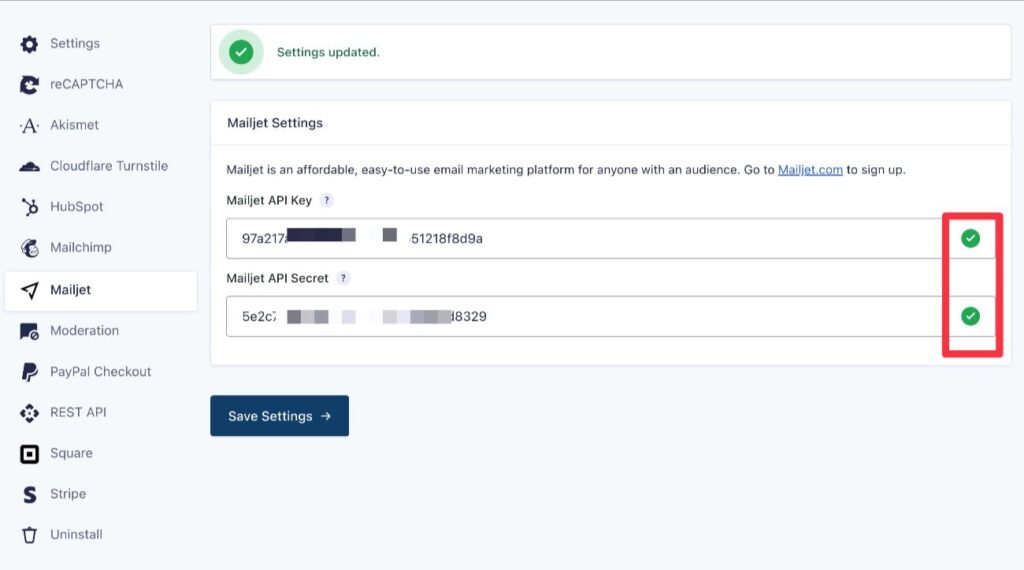
- Add your Mailjet API Key and Mailjet API Secret to the relevant boxes.
- Click the Save Settings.
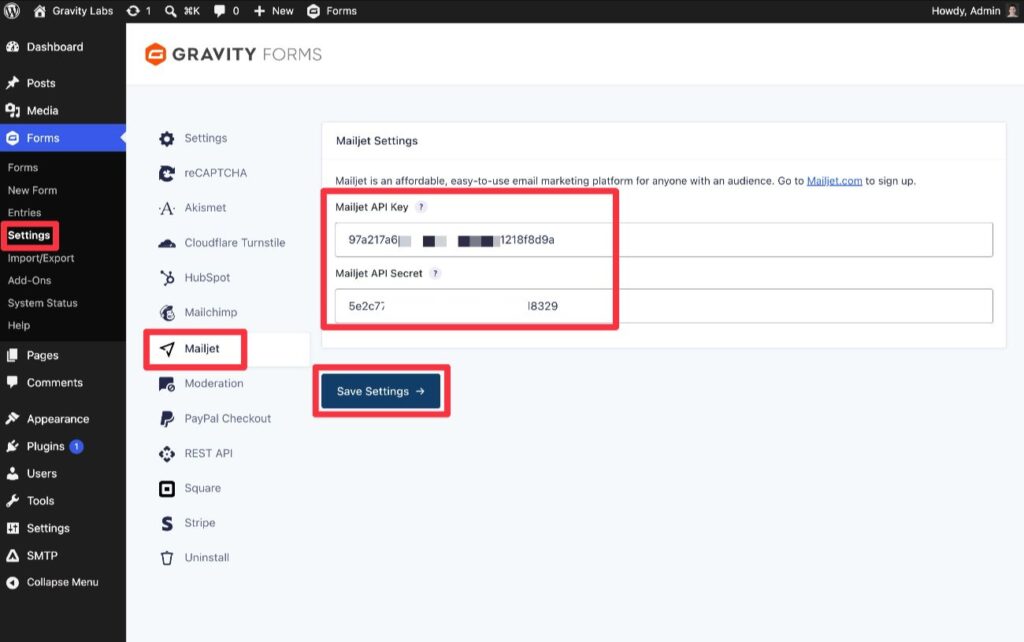
If Gravity Forms is able to connect, you should see green checkmarks appear next to each key.
If you see a red “X” instead, double check to make sure that you haven’t made a typo or accidentally pasted one of the keys into the wrong box.
4. Create or edit the form that you want to connect to Mailjet
Next, you need to create the WordPress form that you want to connect to Mailjet, if you haven’t done so already.
Or, if you already have the form, you should open the editor for that form.
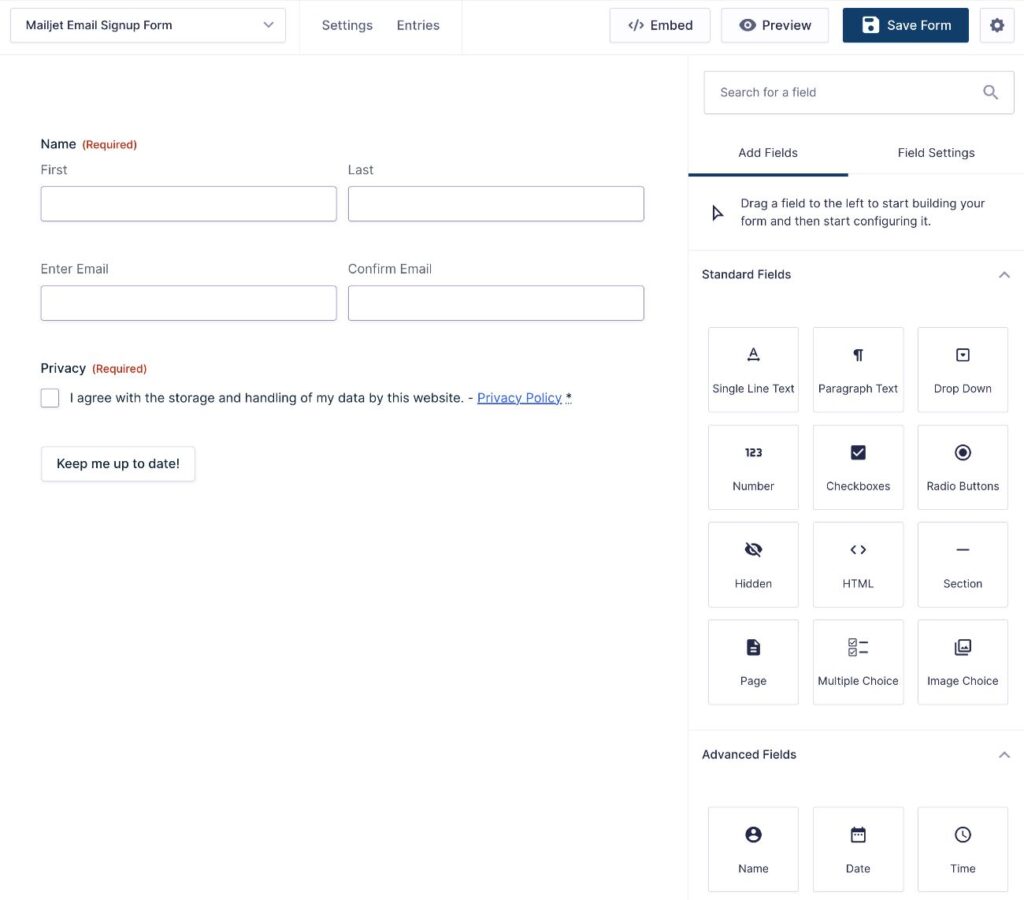
For this guide, we’ll just use a simple email opt-in form that we created using the pre-made Newsletter Signup Form template.
However, you can add the Mailjet integration to literally any form on your site. For example, you could give people an option to subscribe to your Mailjet newsletter as part of payment forms, user registration forms, event registration forms, donation forms, and lots more.
5. Create a Mailjet feed for your form
Once you’ve finished setting up your form, you need to create a Mailjet feed to connect your form to your Mailjet lists.
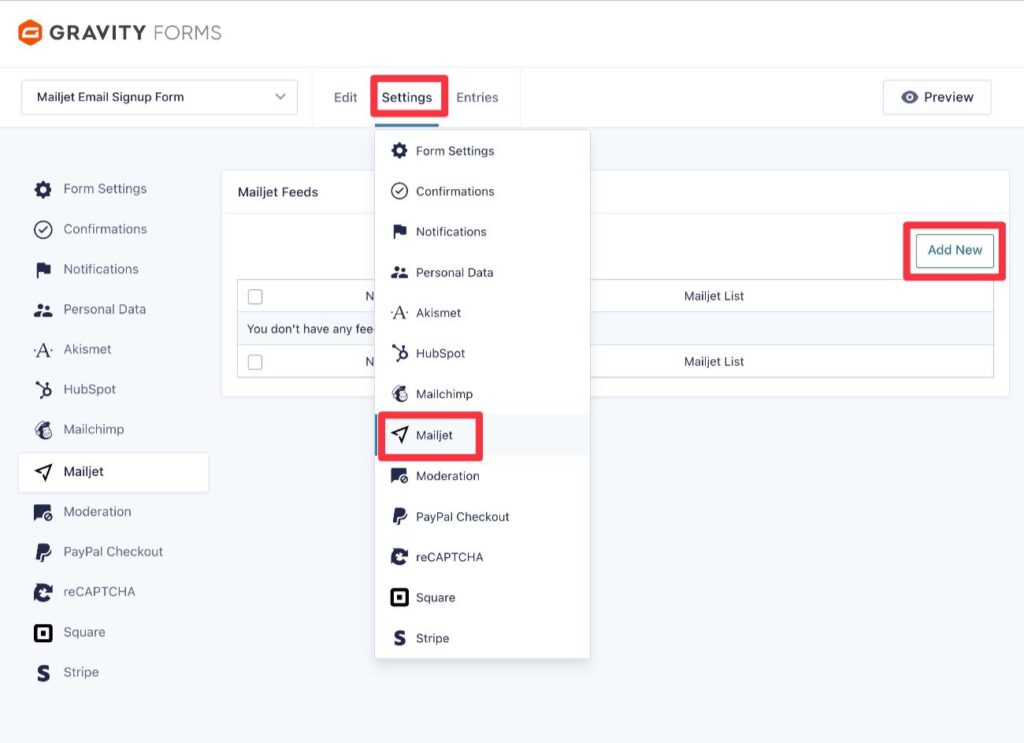
Inside the form editor, go to Settings → Mailjet. Then, click the Add New button to create a new Mailjet feed.
Then, you’ll be in the interface to configure your feed.
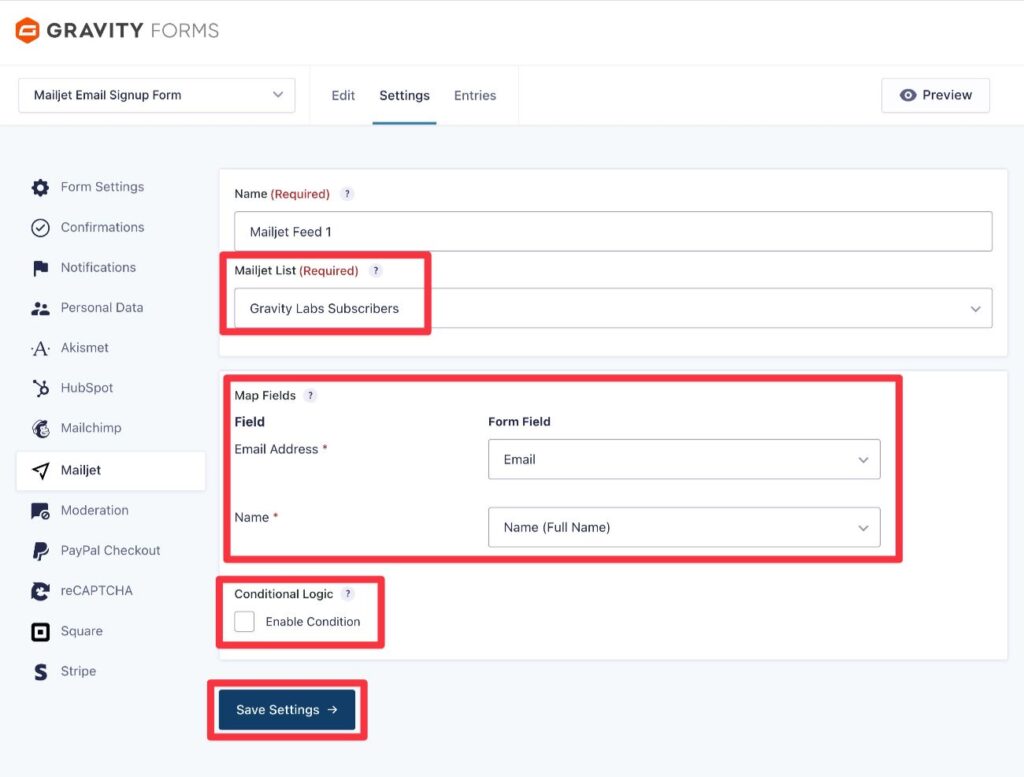
First, you can use the Mailjet List drop-down to choose the specific list to add subscribers to. The drop-down will automatically display all of the lists that you’ve created inside your Mailjet account.
In your Mailjet dashboard, you can create a new list by going to Contacts → Contact Lists → Create a contact list.
Once you’ve made that choice, you’ll see additional options that let you map the fields from your form to the email address and name fields in Mailjet.
You also have the option to add conditional logic rules. For example, you could only sync subscribers to Mailjet if they check an opt-in box in your form.
Or, you could subscribe users to different Mailjet lists based on how they’ve filled out the form. You can do this by creating a separate Mailjet feed for each list and then adding a conditional logic rule to each feed to control when to sync subscribers to each list.
Once you’ve made your choices, click the Save Settings button at the bottom.
6. Embed and test your WordPress form
To finish things out, we recommend testing your form to make sure the integration is working as you want it to.
If you haven’t already done so, you’ll first need to embed the form somewhere on your site. You can do this using the Gravity Forms block, shortcode, or PHP function.
Once you’ve embedded the form, you can submit an entry with some test information.
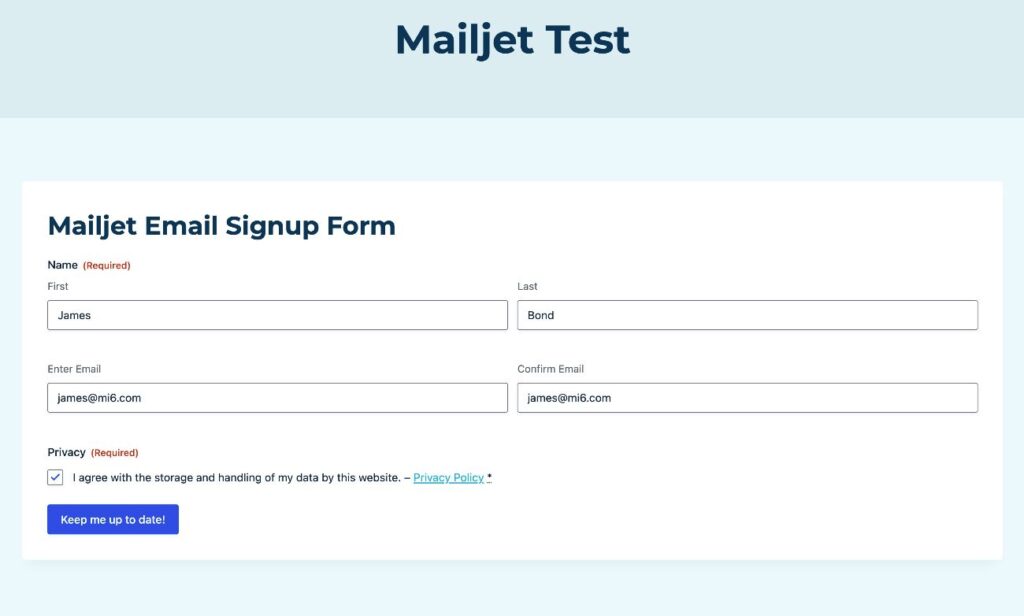
If everything works correctly, you should see the contact’s details appear in your Mailjet list according to the mapping rules that you set up when creating your form’s Mailjet feed.
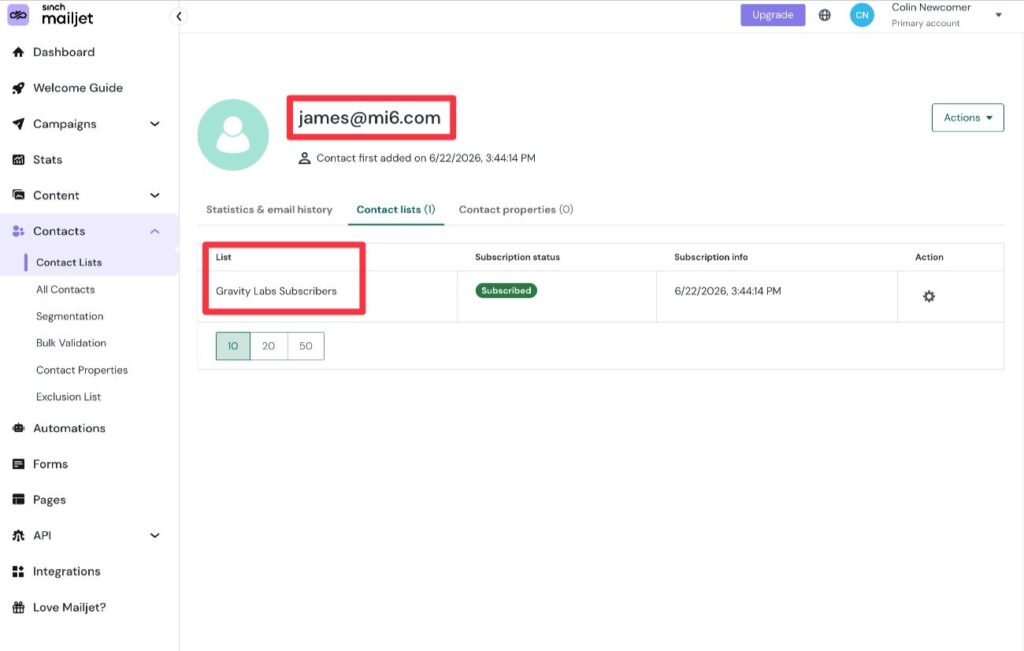
And that’s it! You’re all finished.
Whenever someone submits that form, their contact information will be synced to Mailjet. Or, if you’ve added conditional logic rules to your Mailjet feed, contact information will only be synced if those conditional rules are met.
Try the Gravity Forms Mailjet Add-On from Gravity Labs
The Mailjet Add-On is available now in Gravity Labs. It’s free with any Gravity Forms license. As a Labs add-on, it’s experimental and sits outside our standard support – and your feedback helps shape what we build next. If you give it a try, we’d love to hear how it works for you.
While the Mailjet Add-On is focused on using Mailjet for marketing emails, Mailjet also supports sending transactional emails. If you’re interested in also using Mailjet for transactional emails, you can set that up using the Gravity SMTP plugin. Check out our step-by-step Gravity SMTP Mailjet tutorial to learn how that works.

Newsletter
If you want to keep up-to-date with what’s happening on the blog sign up for the Gravity Forms newsletter!
"*" indicates required fields