Ever wished that you could send a message to a Discord channel when someone submits a form on your WordPress website?
With the new Gravity Forms Discord Add-On, you can send a flexible rich embed message to any channel on your Discord server.
You can add a custom title and description, along with including data from form fields in the Discord message. If needed, you can also add conditional logic rules to only send messages in certain situations, or to send messages to different Discord channels based on your conditions.
In this post, we’ll introduce you to the new Gravity Forms Discord Add-On and some of its key features. Then, we’ll show you step-by-step how to set up your own WordPress Discord integration and start sending messages to your own Discord server whenever someone submits a form.
Note: The Gravity Forms Discord Add-On is part of Gravity Labs — our home for experimental add-ons. It’s free with your Gravity Forms license, but it’s experimental and outside our official support. Labs is also how we learn what our community wants to see in the product, so if you try it, let us know what you think.
Why use the Gravity Forms Discord Add-On?
With the Gravity Forms Discord Add-On, you can immediately deliver a message to any channel on your Discord server as soon as there’s a form submission on your site.
The add-on accomplishes this by using Discord’s built-in webhooks system, which is available on both free and paid Discord servers.
While sending form submission notifications can be useful for all kinds of forms, here are some specific use cases you might want to consider for this add-on:
- Sales lead notifications
- Contact form alerts
- Course/coaching registration notifications
- Support request notifications and intake management
- Job application notifications
- Event registration alerts
- Internal operations alerts
- Team-based workflow routing through Discord channels
Here are some of the specific features available with the Gravity Forms Discord Add-On:
- Rich embed formatting – Post form submissions as structured Discord embeds, complete with titles, descriptions, custom colors, and mapped fields from your form. This allows you to easily include dynamic information from the user’s form submission in the Discord message.
- Merge tag support for field mapping – In addition to including field data in the rich embed, you can also include fields in the title and description of the embed.
- Conditional logic rules – You can choose to only send a Discord message if the user fills out the form in a certain way.
- Asynchronous processing – Gravity Forms processes webhook deliveries in the background so that it doesn’t delay form submissions.
- Built-in testing tool – Easily test your feed settings by sending a test message with just a single click.
- Delivery status tracking and manual resends – Track a message’s delivery status in the entry details page and manually resend if needed.
How to set up the WordPress Discord integration with Gravity Forms
Now, let’s get into the full step-by-step guide on how you can set up your own WordPress Discord integration using Gravity Forms.
For this guide, we’ll assume that you already have a Discord server that you want to integrate with your WordPress website. If you don’t, here is Discord’s documentation on creating a server.
As we mentioned above, you can use the add-on with both free and paid Discord servers.
Once you have your Discord server ready to go, we’ll cover every other step in the tutorial below.
1. Install the Gravity Forms Discord Add-On
To kick things off, you need to install the Gravity Forms Discord Add-On on your site.
As we mentioned above, the Discord Add-On is part of Gravity Labs. While these add-ons are free with any Gravity Forms license, they sit outside the normal suite of Gravity Forms add-ons.
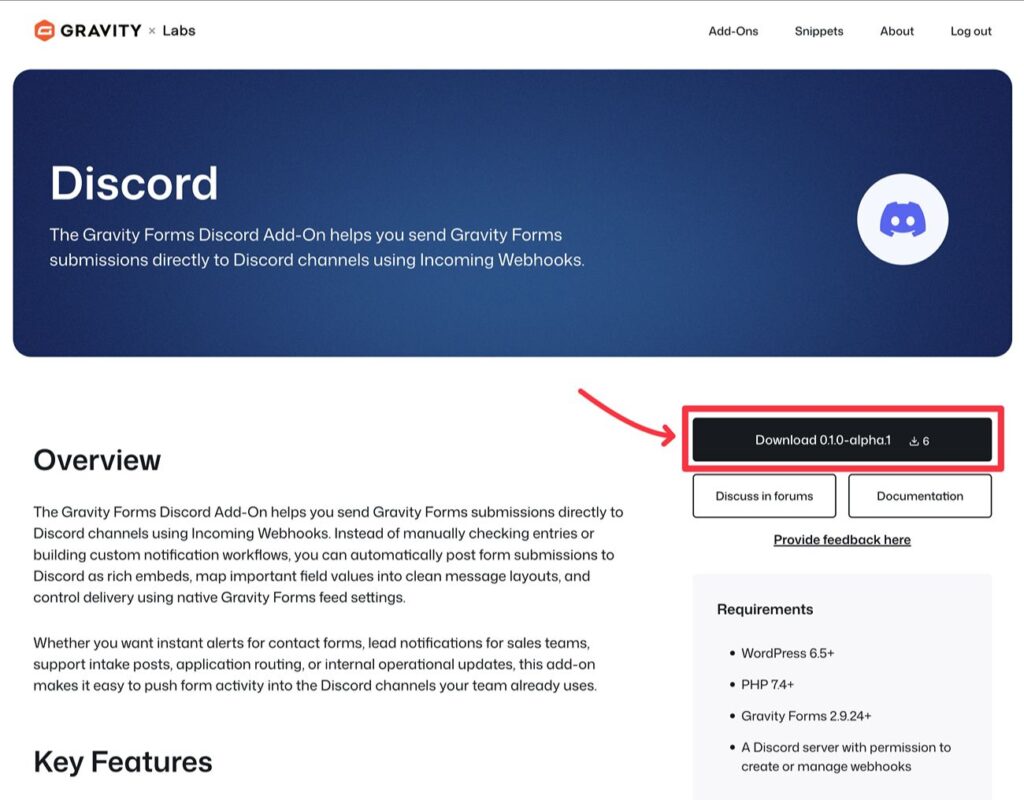
First, you need to download the add-on from the Gravity Labs website:
- Go to the Discord Add-On page at Gravity Labs.
- Log in to your existing Gravity Forms account on Gravity Labs, if you haven’t done so already.
- Click Download.
After you’ve downloaded the add-on’s ZIP file to your computer, you can upload and install it like any other WordPress plugin:
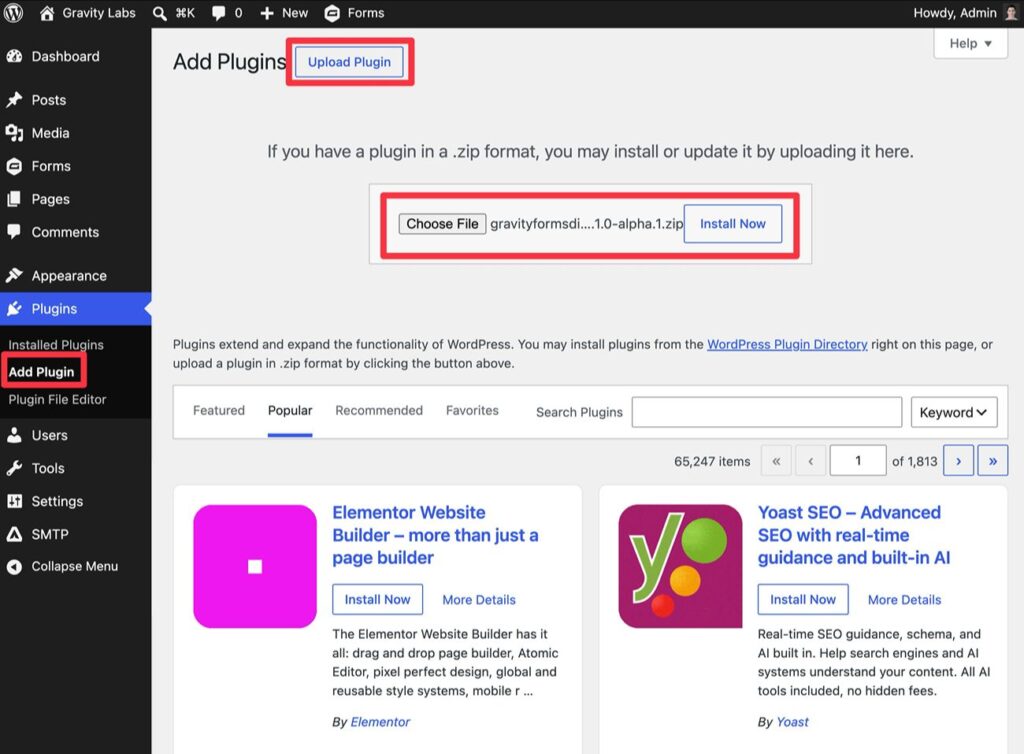
- Go to Plugins → Add Plugin in your WordPress dashboard.
- Click the Upload Plugin button.
- Select the ZIP file and click Install Now.
- On the next screen, make sure to activate the plugin.
2. Create the form that you want to connect to Discord
If you haven’t already done so, you’ll next want to create the form that you plan to connect to Discord.
You can connect any type of form. When you set up the Discord feed later in this guide, you’ll be able to map form fields to control how the message should appear in Discord.
If you’re creating a new form, feel free to start from one of the many templates that Gravity Forms offers. Or, you can always start from scratch using a blank form.
3. Create a new Incoming Webhook for your Discord server
Next, you need to switch to the Discord interface to create a new Incoming Webhook for your Discord server. This is what allows Discord to receive notifications from Gravity Forms for new form submissions and set up your WordPress to Discord integration.
You can create webhooks from both the web app and the desktop app. We’ll use the web app for our example screenshots, but the basic steps apply to both.
Here’s how to get started:
- Open your Discord server
- Find the channel to which you want to send messages for new form submissions.
- Hover over the channel and click the gear icon to Edit Channel.
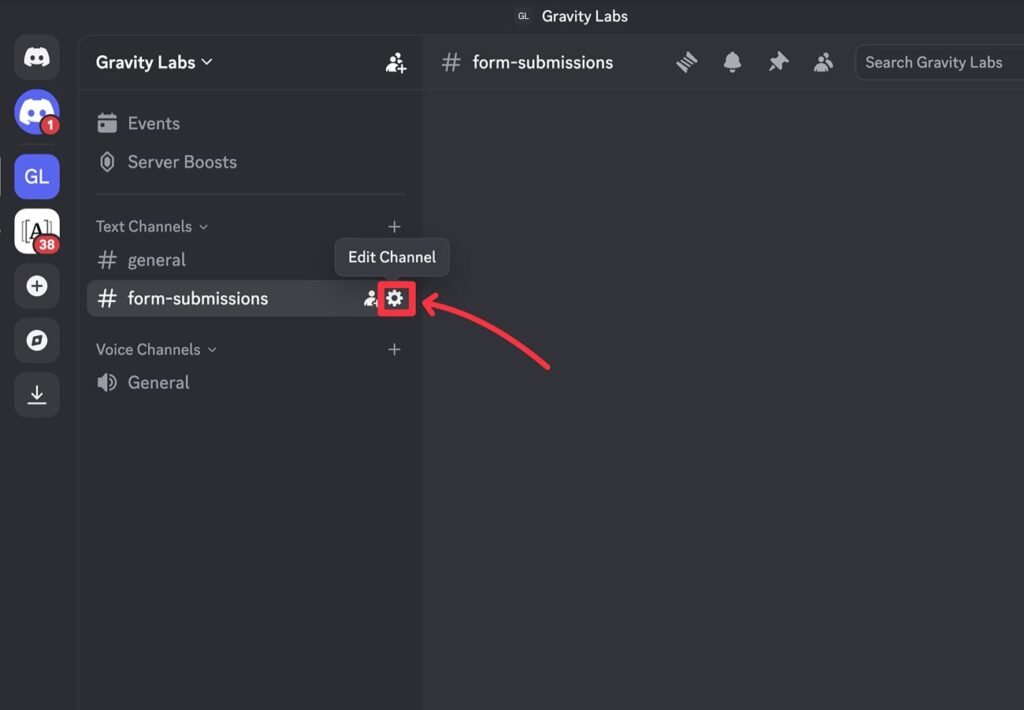
This will open an overlay with various settings.
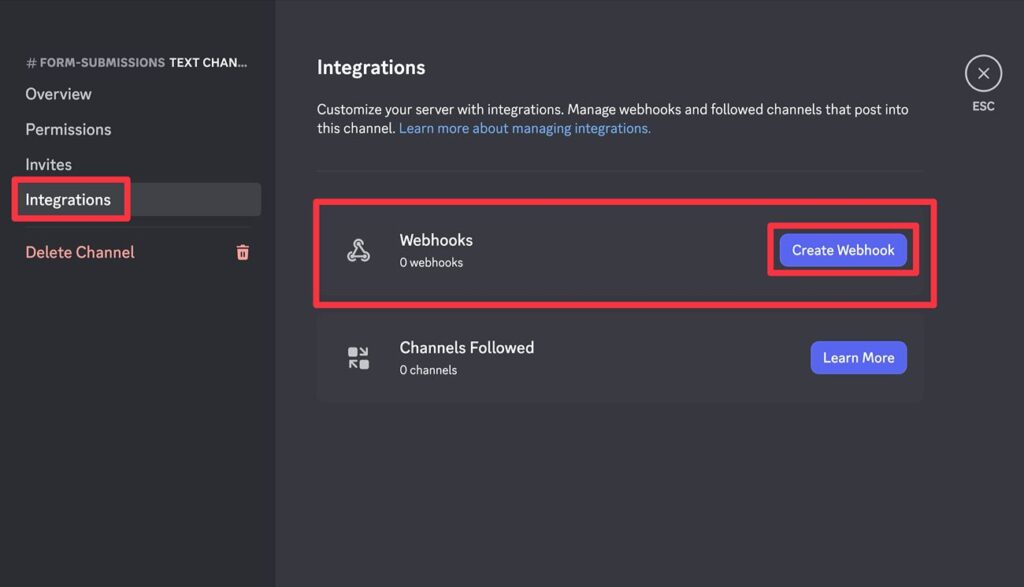
In the overlay sidebar, select the Integrations tab. Then, click Create Webhook next to Webhooks.
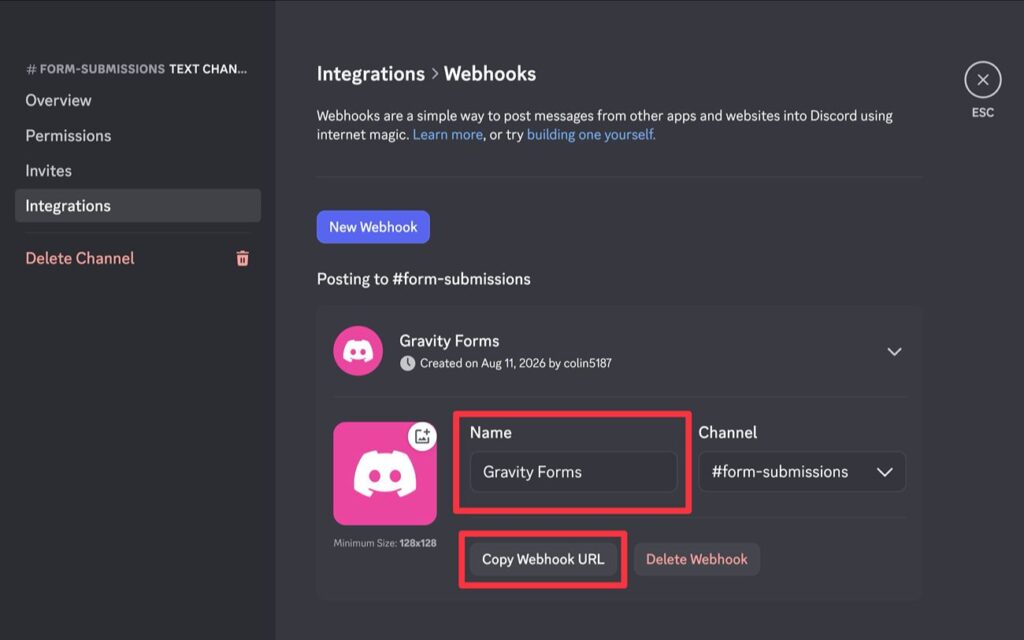
On the next screen, you can edit the webhook name to help you remember it. Then, click the Copy Webhook URL button to copy the webhook URL. Keep this URL in a safe place because you’ll need it when you create a Discord feed for your form in the next step.
4. Create a Discord feed for your form
Once you have your Discord webhook URL copied to a safe place, you’re ready to create the Discord feed for your form.
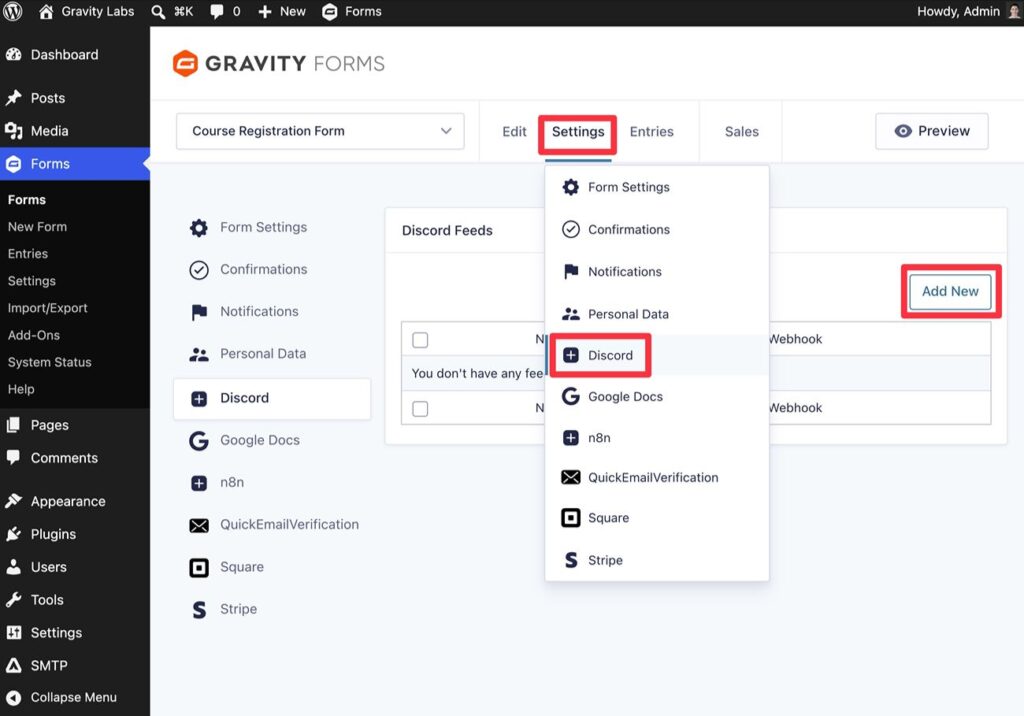
To get started, open the form editor in your WordPress dashboard. Then, go to Settings → Discord and click Add New to create your first Discord feed.
This will open a new screen that lets you configure your feed.
First, paste your Discord webhook URL into the Webhook URL box. The URL should look something like this:
https://discord.com/api/webhooks/1536671761572477874/5hn74eDV45QncaMJQu5HXYDTL3eLlD7v6E9ou9b8597Dl6UFnAcjlZTSWVVoon24mayk
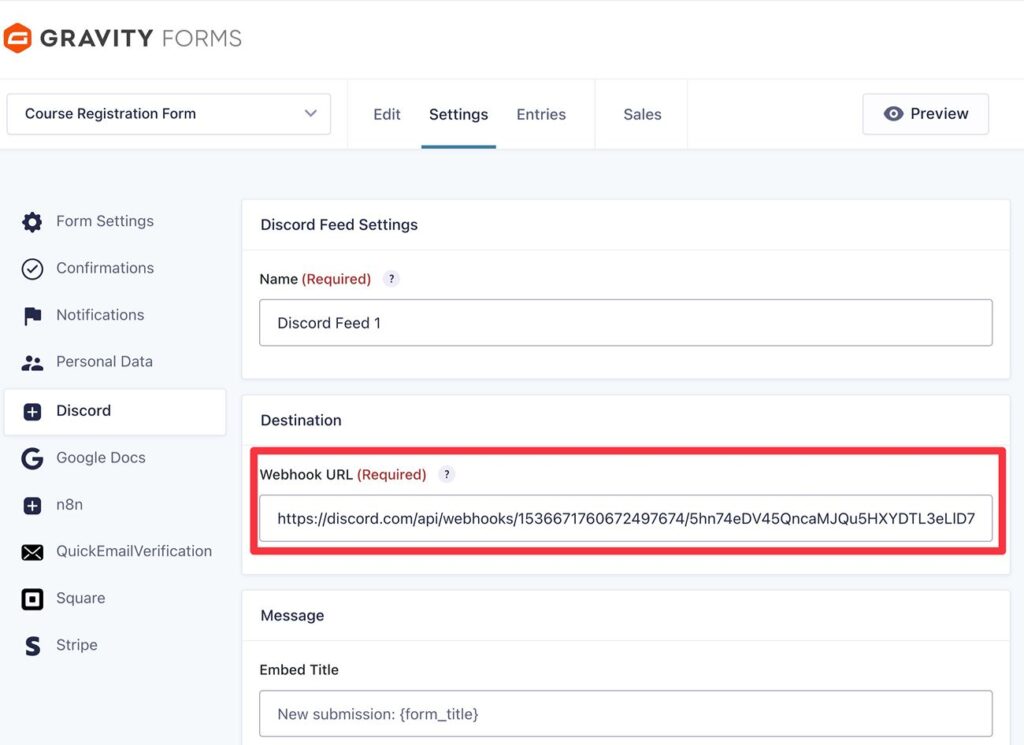
Below that, you can use the Message settings to control the content of the message that will be posted to Discord.
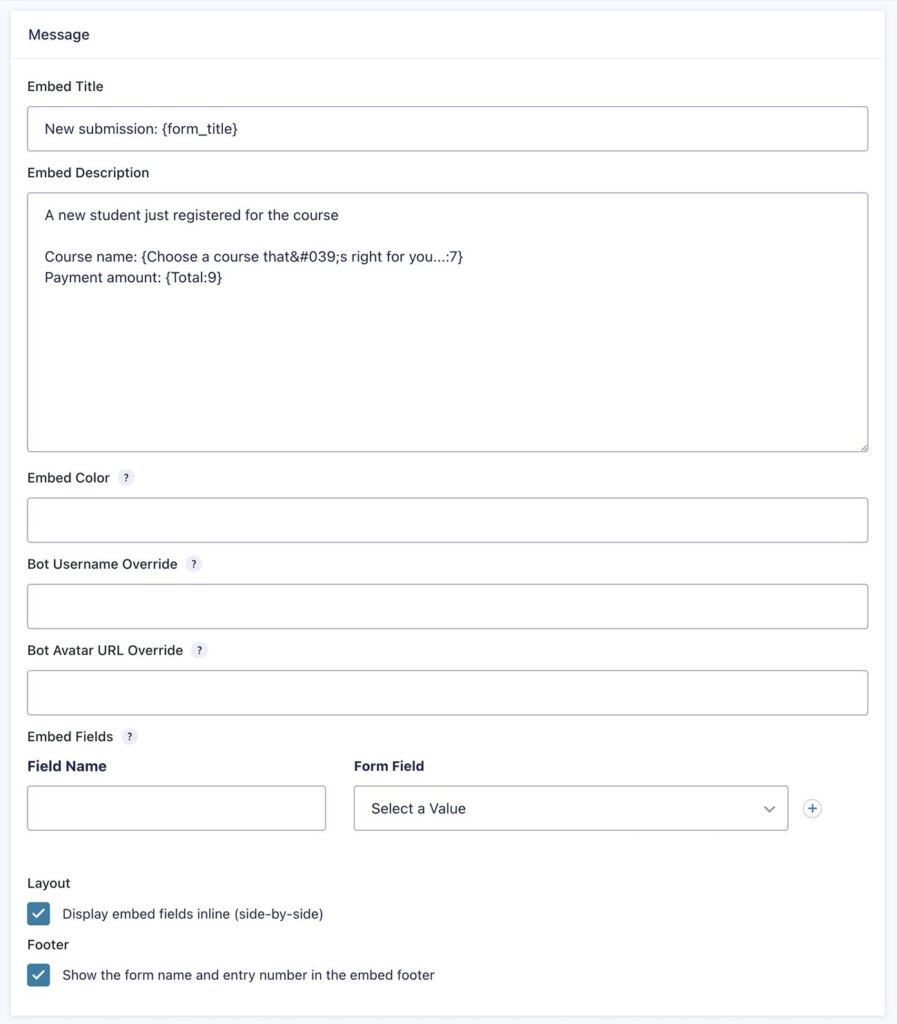
Within the Embed Title and Embed Description fields, you can use Gravity Forms merge tags to dynamically insert information from your form. Or, you can also include form fields as embed fields using the options below.
You also get options to override the embed color, the bot username, and the bot avatar. If you’re fine with the defaults configured for your webhook, you can ignore these settings.
You also get some basic layout options in the Message settings.
Finally, you also have the option to add Conditional Logic rules:
- You could add a rule to only send a message to Discord if the user fills out the form a certain way.
- You can create multiple Discord feeds and add conditions to each feed. For example, you could send a message to a different Discord channel based on how someone fills out the form. You can do this by using different Discord webhook URLs for each feed, each of which is connected to a different Discord channel.
Once you’ve made your choices, we recommend clicking the Send Test to Discord button to send a sample message to your Discord channel. We’ll show you an example screenshot below.
If everything looks good with your test message, you’re finished. Make sure to click Save Settings at the bottom to save your feed.
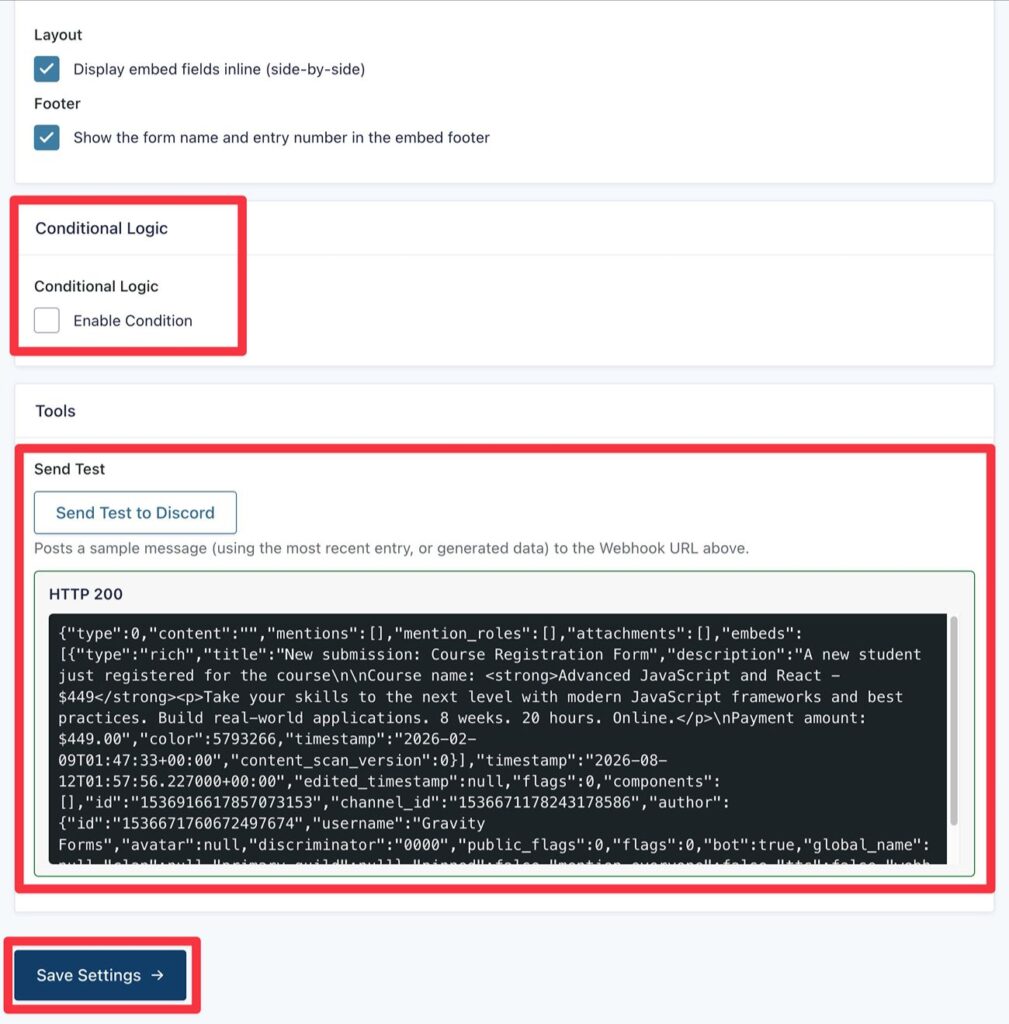
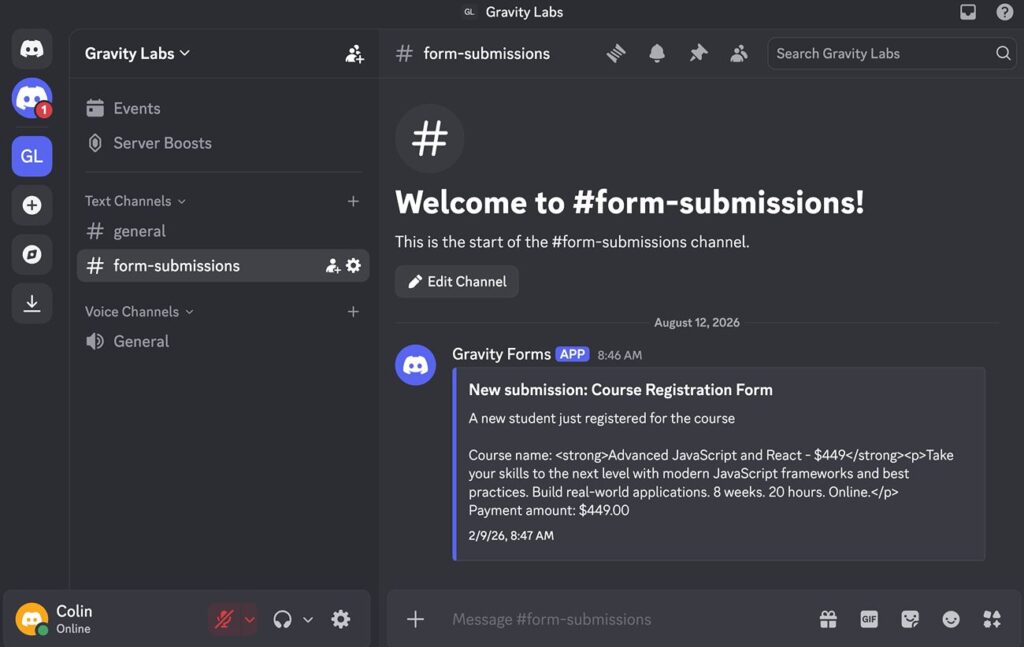
For reference, here’s an example of what our Discord test message looks like using merge tags in the title and description, rather than embedded form fields:
And that’s it! You can repeat the same process to create additional Discord feeds for this form (with conditional logic rules) or for other forms on your site.
5. Monitor Discord messages and resend if needed
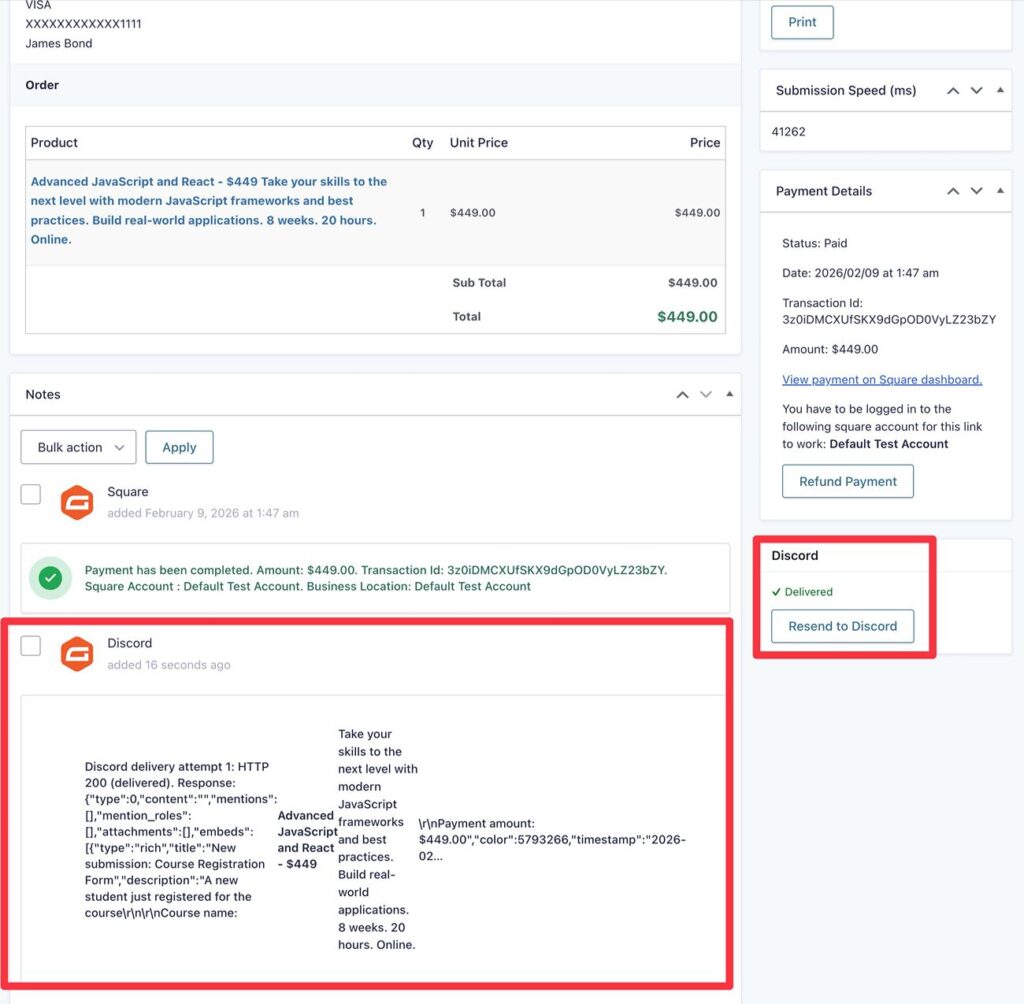
If needed, you can check to see whether an entry’s Discord message was delivered from the entry details page. You can see a Discord status in the sidebar, as well as a more detailed summary of each Discord message in the Notes section.
If needed, you can also manually resend an entry’s message to Discord by clicking Resend to Discord in the sidebar.
Set up your WordPress Discord integration today
If you’re looking to set up your own WordPress to Discord integration, Gravity Forms makes it easy to send messages to any channel whenever someone submits a form.
The Gravity Forms Discord Add-On is available now in Gravity Labs. It’s free with any Gravity Forms license. As a Labs add-on, it’s experimental and sits outside our standard support — and your feedback helps shape what we build next. If you give it a try, we’d love to hear how it works for you.

Newsletter
If you want to keep up-to-date with what’s happening on the blog sign up for the Gravity Forms newsletter!
"*" indicates required fields