Ever wished that you had an easy way to track and monitor changes to the forms that you create with Gravity Forms?
With the new Gravity Forms Versioning Add-On from Gravity Labs, you can automatically log changes to your site’s forms, including comparing two versions to see what changed, restoring older versions, importing/exporting entire version histories, and more.
In this post, we’ll introduce you to the add-on and some of its use cases. Then, we’ll show you step-by-step how to set it up and start tracking form version histories on your site.
Note: The Gravity Forms Versioning Add-On is part of Gravity Labs — our home for experimental add-ons. It’s free with your Gravity Forms license, but it’s experimental and outside our official support. Labs is also how we learn what our community wants to see in the product, so if you try it, let us know what you think.
Why use the Gravity Forms Versioning Add-On?
The Versioning Add-On gives you an easy way to track changes to your forms.
Depending on your preferences, you can:
- Manually choose when to take a snapshot of a form and save it in the version history.
- Automatically capture a new version whenever you save a form. You can choose to store unlimited revisions or set a maximum limit.
You can also choose to receive an email whenever a form is changed, and the add-on also includes a feature to skip capturing a version if nothing in the form has changed (to avoid capturing duplicates).
Inside a form’s version history, you also get several useful features:
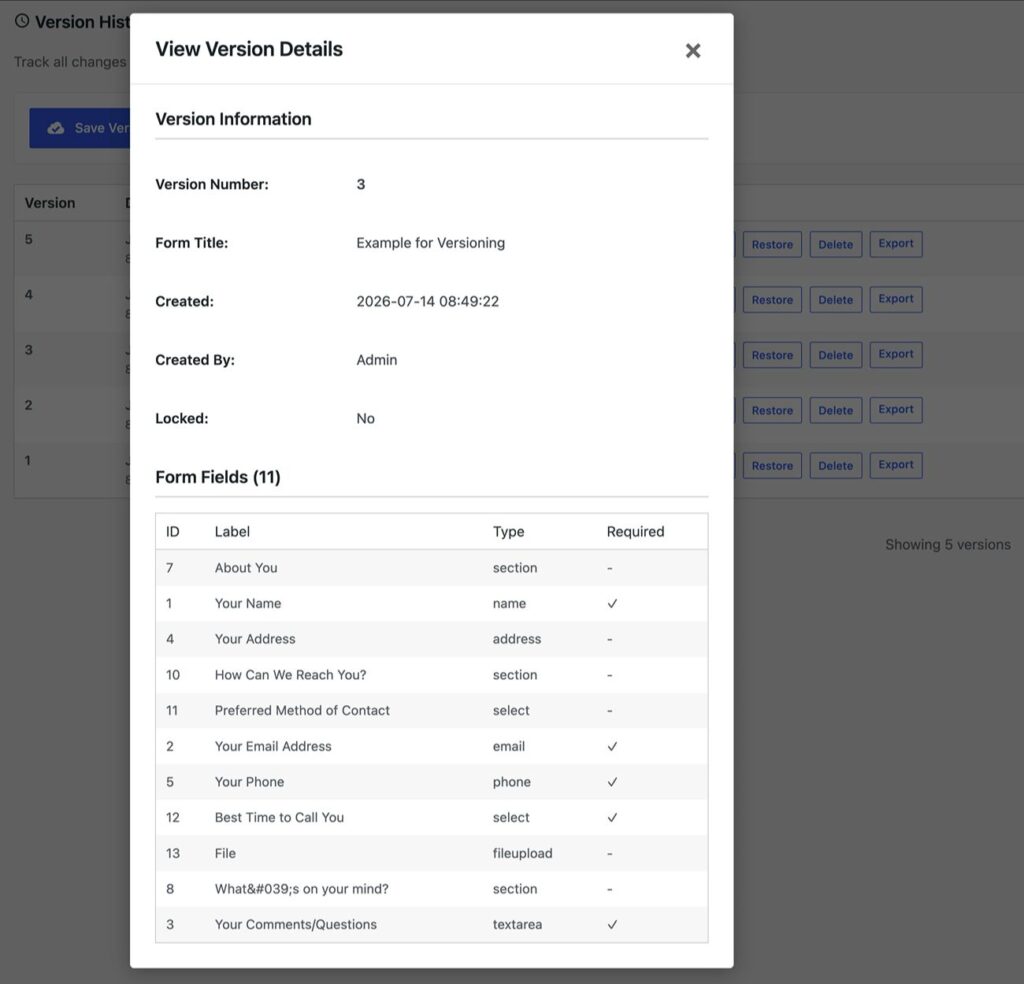
- View version – View the full details about any version, including form fields, date created, which user created it, and more.
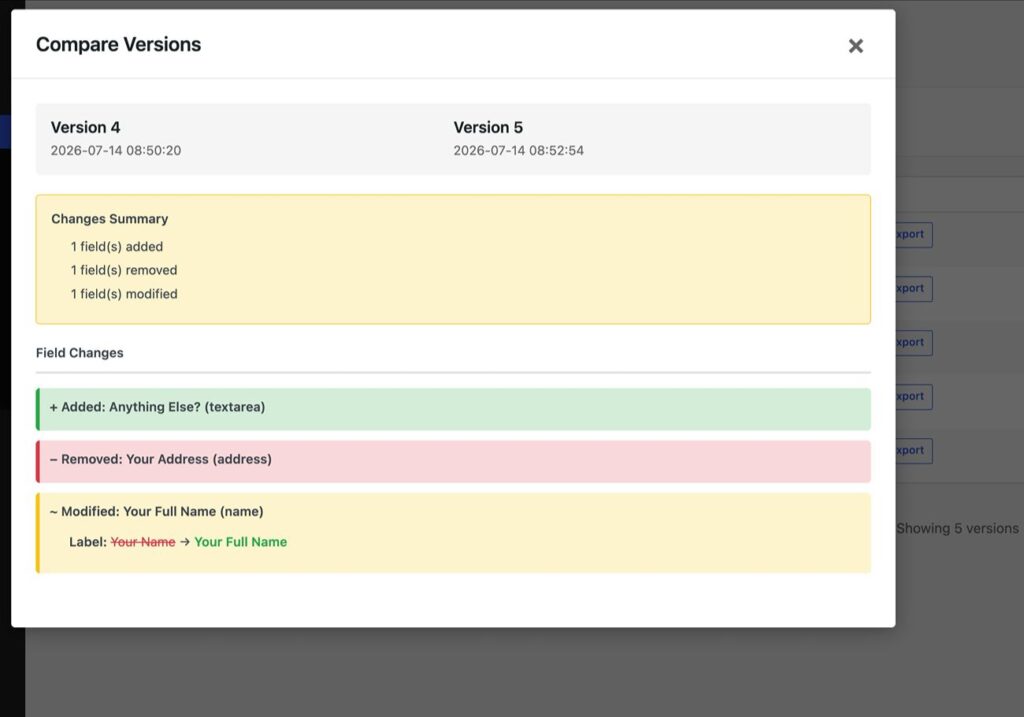
- Compare versions – Compare two versions and the add-on will automatically highlight what changed between them.
- Restore version – Restore a version to the live version of your form. When you do this, the add-on will automatically back up the version of the form that you replaced, which allows you to easily revert the action if needed.
- Export/import – Export and import individual form versions or a form’s entire version history.
Here are some example use cases for when you might want to use the Versioning Add-On:
- Manage forms across different environments – If you’re working across multiple environments (e.g. staging and production), the add-on can help you track changes to forms and make sure everything is correct in each environment.
- Monitor your organization/team – If multiple users have access to your site, you can use the Versioning Add-On to stay on top of any changes to your forms.
- Protect against malicious actors – If a malicious actor were to somehow get access to your WordPress dashboard with a privileged user account, the Versioning Add-On can help you detect if they made any changes to your forms. You can even receive email alerts so that you know right away.
How to set up and use Gravity Forms Versioning
Now, let’s get into the step-by-step guide on how you can use the Gravity Forms Versioning Add-On to start tracking changes and revisions on your site.
1. Install the Gravity Forms Versioning Add-On
To get started, you need to install the Gravity Forms Versioning Add-On on the site where you’re using Gravity Forms.
As we discussed above, the Versioning Add-On is part of Gravity Labs. While these add-ons are free with any Gravity Forms license, they sit outside the normal suite of Gravity Forms add-ons.
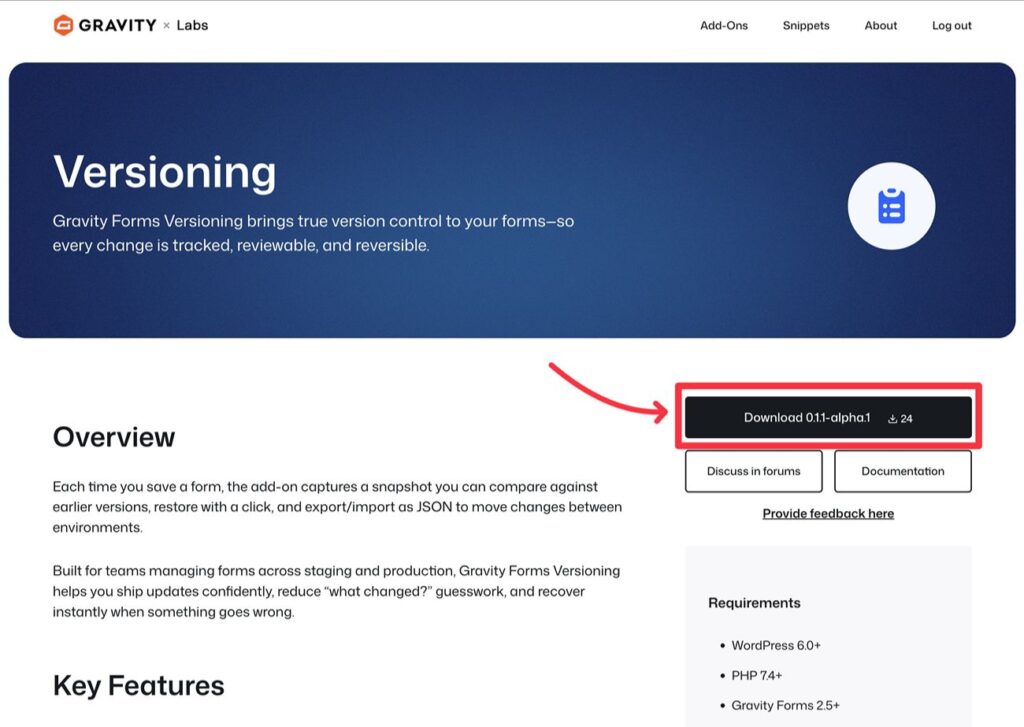
First, download the add-on from the Gravity Labs website:
- Go to the Versioning Add-On page at Gravity Labs.
- Log in to your existing Gravity Forms account on Gravity Labs, if you haven’t done so already.
- Click Download.
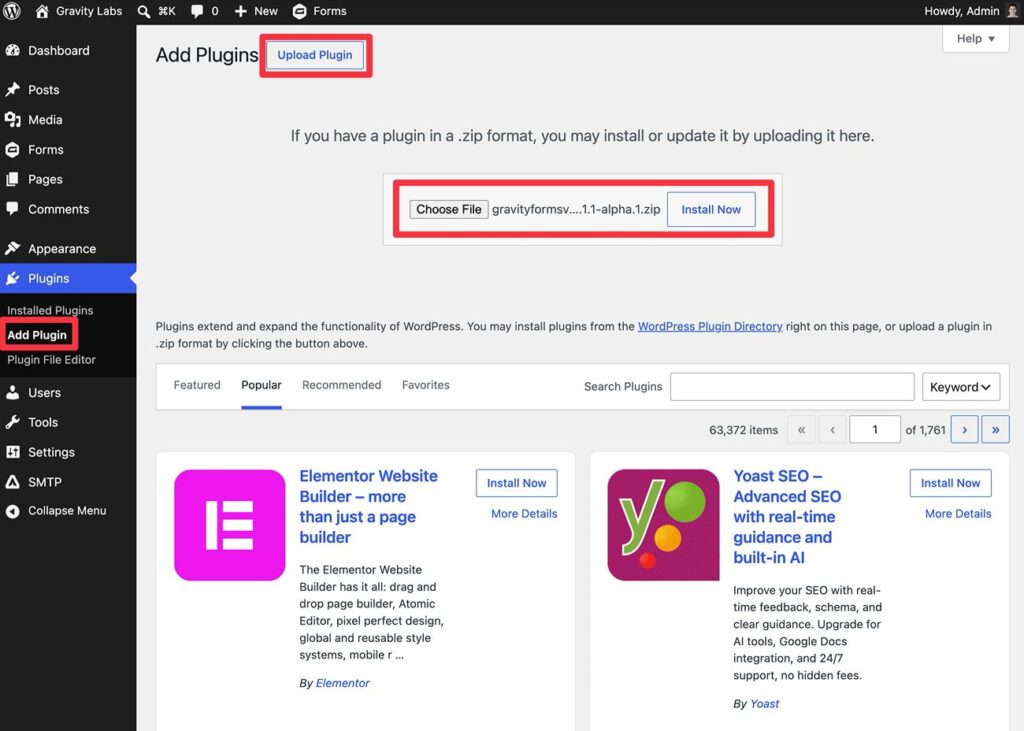
Once you’ve downloaded the add-on’s ZIP file to your local computer, you can upload and install it like any other WordPress plugin:
- Go to Plugins → Add Plugin in your WordPress dashboard.
- Click the Upload Plugin button.
- Select the ZIP file and click Install Now.
- On the next screen, make sure to activate the plugin.
2. Configure versioning settings
Once you install and activate the add-on, you can configure a few basic settings.
To access them, go to Forms → Settings in your WordPress dashboard. Then, select the Versioning tab inside the Gravity Forms settings area.
In the General Settings box, you can configure a few settings:
- Auto-Version Capture – If enabled, Gravity Forms will automatically save a new version whenever you save the form (using the normal save form button). If you leave this disabled, Gravity Forms will only save a version if you manually choose the option to save a new version inside the form editor.
- Maximum Versions Per Form – You can leave this blank to store unlimited versions, or set it equal to any number. If you set a limited number, Gravity Forms will automatically delete the oldest version in order to make room for the new version (once the limit is reached).
- Email Notifications – If you enable this checkbox, you can enter one or more email addresses that will receive an email any time a form is changed. To make sure that these emails make it to your inbox, we recommend setting up a dedicated transactional email service using Gravity SMTP or one of the Gravity Forms transactional email add-ons.
Then, in the Advanced Settings box, you can enable a setting to skip saving the version history if Gravity Forms detects a duplicate. That is, if the form hasn’t changed. Gravity Forms can verify this by using an SHA-256 checksum.
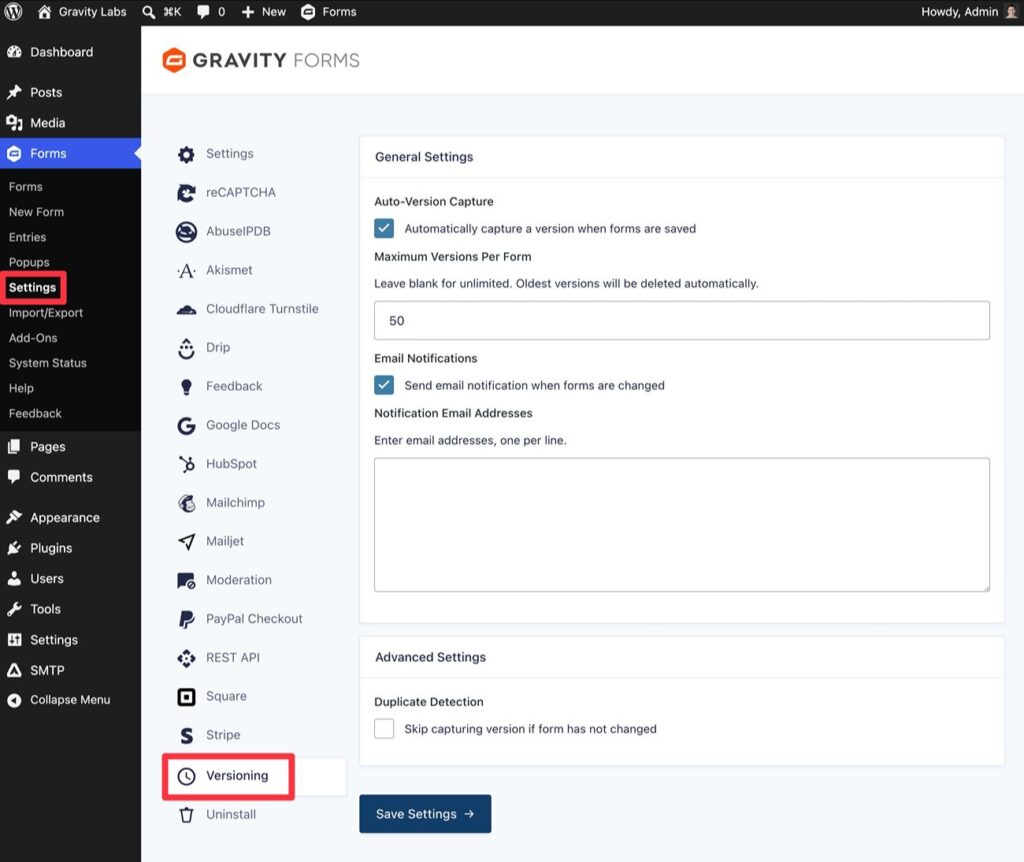
Make sure to click Save Settings once you’ve made your choices.
3. Use the version history
You can access the version history for any form by going to Settings → Version History inside of the form editor.
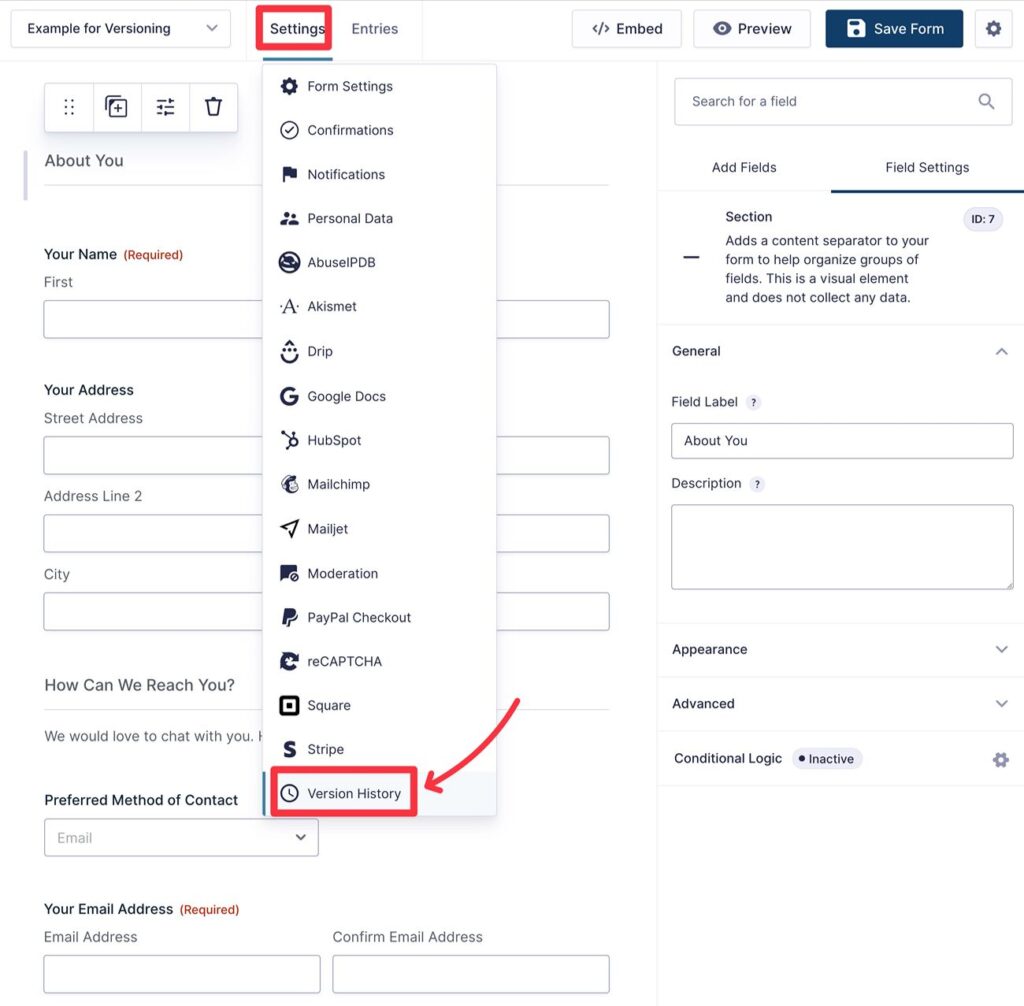
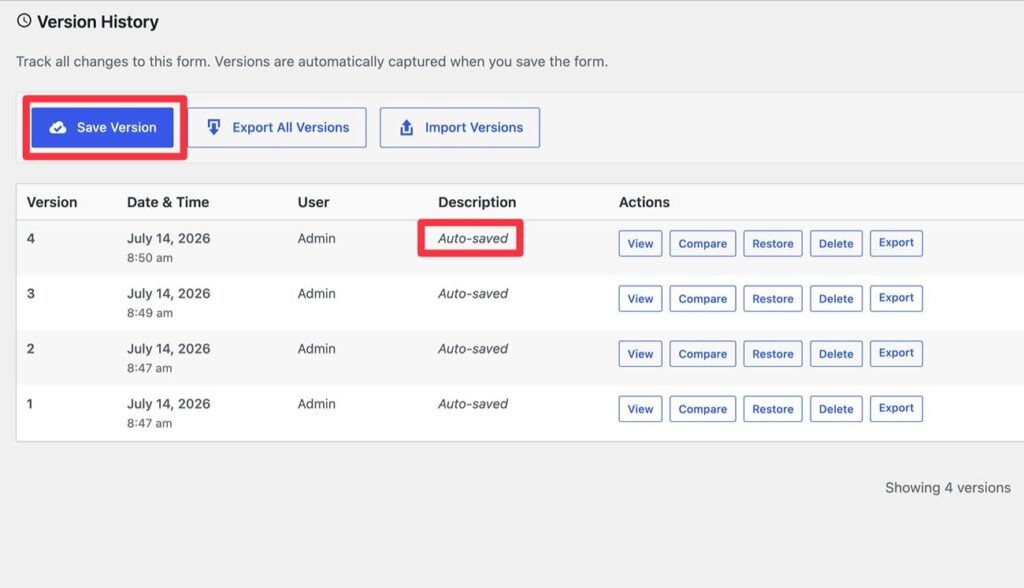
If you enabled Auto-Version Capture, you’ll see a version for every time you click the Save Form button. Otherwise, you can manually save a new version of the form by clicking Save Version.
For each version, you’ll see the date and time of the version, the user who created that version, and where the version came from (the “Description”). Each version will have its own unique version number.
If needed, you can also delete a specific version by clicking the Delete button in the Actions column.
For each version, you’ll also get several other options. Let’s go through what you can do below…
View or compare version histories
To view a specific version, you can click the View button in the Actions column.
This will show you a snapshot of just that specific version, with no context of how it compares to other versions.
If you instead want to see how an older version compares to the previous version of the form, you can click the Compare button.
This will highlight the number of changes between that version and the previous version, along with what those specific changes were.
Restore an older version of the form
You might have some situations where you want to revert to an earlier version of the form.
Once you’ve used the previous options to make sure you know the exact version number that you want to restore, you can do so by clicking the Restore button in the Actions column.
You’ll then need to confirm in an additional browser prompt to complete the restore.
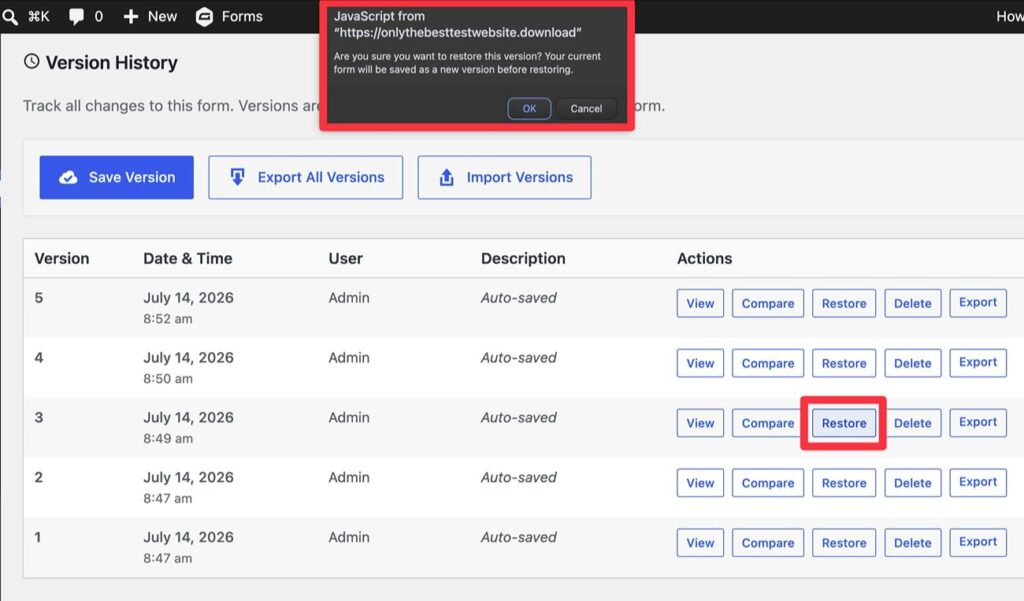
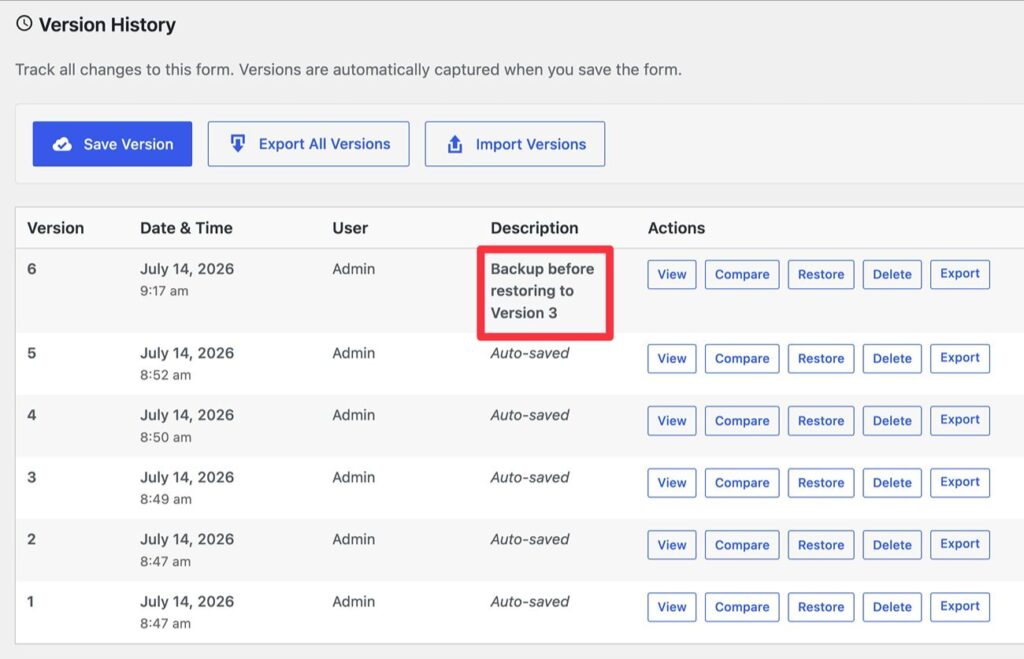
When you restore an older version, Gravity Forms will automatically save the current version of the form as its own version with a description. That way, you can also easily revert back to the current version if needed.
Import/export full form version history or individual versions
The last major feature is the ability to import and export individual versions of a form, or a form’s entire version history.
For example, this can be useful if you need to move forms between different environments, such as your staging and production environments.
Export version history
You have two options to export your form’s version history.
First, you can click the Export All Versions button at the top to export the entire version history of the form.
Second, you can choose to export just a single version of the form by clicking the Export button in the Actions column for that version.
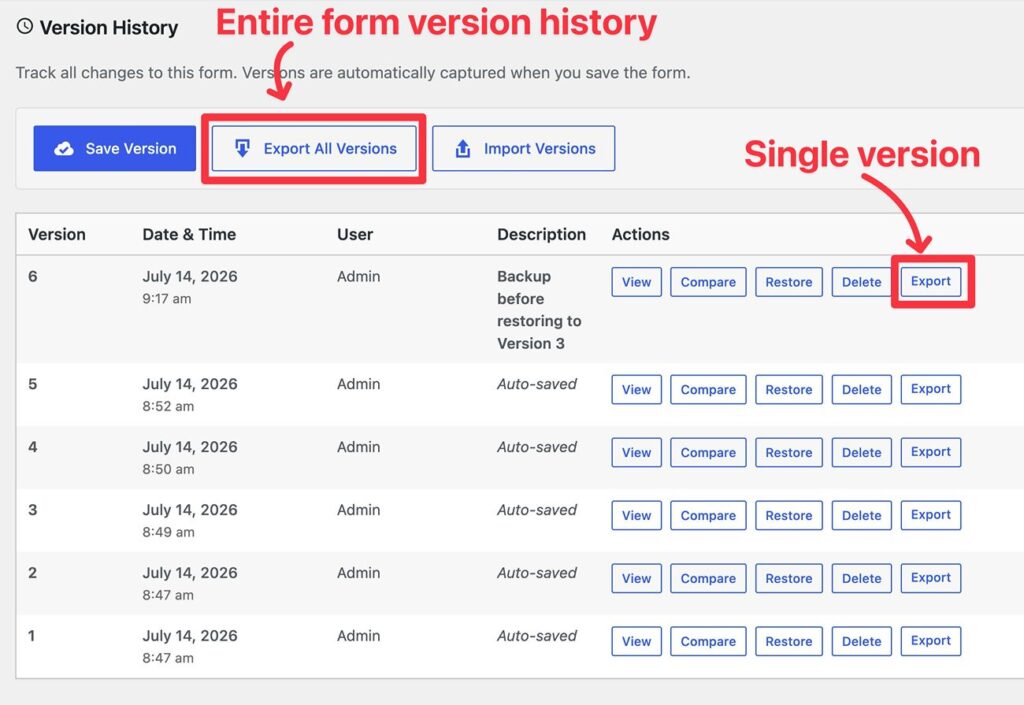
Regardless of whether you export the entire version history or just a single version, the export will download to your local computer as a single JSON file.
Import form versions
To import a form’s version history, open the form to which you want to import the history. For example, if you were working on the staging version of your site, you would open the form on the production version of your site.
Or, if you haven’t created the form yet on your site, you can just create a new blank form. The add-on gives you the option to create forms if they don’t exist yet.
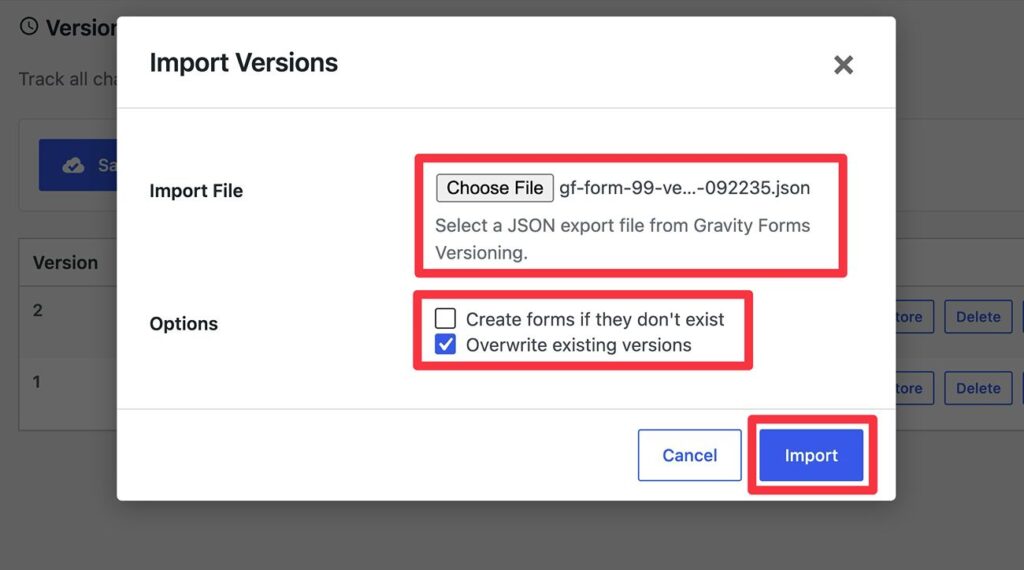
Once you’re in the version history, click the Import Versions button.
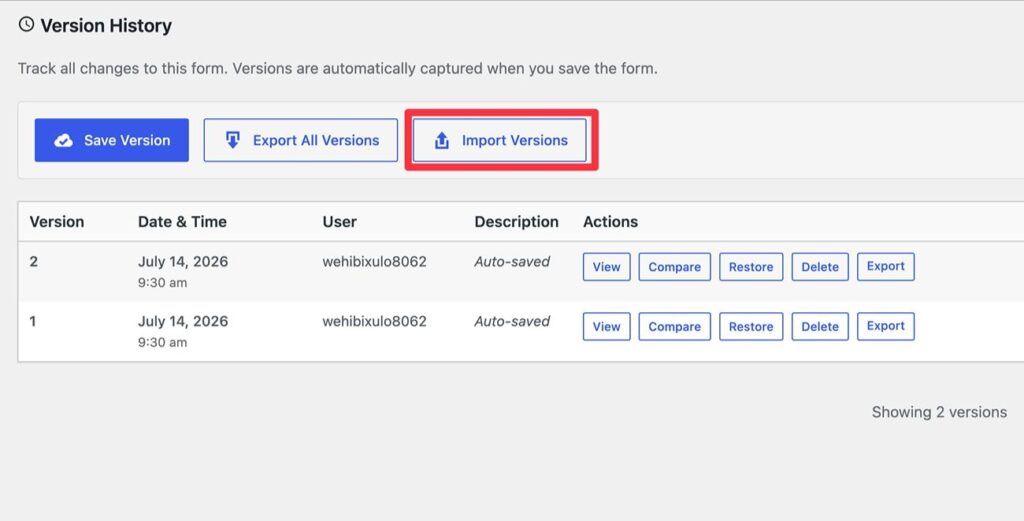
This will open a popup where you can control the import process:
- Import File – select the JSON file that you downloaded when you exported the form’s version history.
- Create forms if they don’t exist – check this if the form doesn’t exist on your current site yet and you want to create it as part of the import process.
- Overwrite existing versions – check this if you want to completely replace the form’s current version history with the import.
Then, click the Import button.
Try the Gravity Forms Versioning Add-On today
The Versioning Add-On is available now in Gravity Labs. It’s free with any Gravity Forms license. As a Labs add-on, it’s experimental and sits outside our standard support – and your feedback helps shape what we build next. If you give it a try, we’d love to hear how it works for you.

Newsletter
If you want to keep up-to-date with what’s happening on the blog sign up for the Gravity Forms newsletter!
"*" indicates required fields