n8n is a popular automation platform that lets you integrate two or more apps to build your own automated workflows.
With the Gravity Forms n8n Add-On, you can set up an n8n WordPress integration and connect your website’s forms to your n8n workflows.
You can send data to n8n when there’s a form submission on your site, which allows you to integrate your forms with any of the thousands of apps that n8n supports. You can also update an entry in Gravity Forms based on data that you receive from n8n, which allows for two-way communication with the apps that n8n supports.
In this post, we’ll introduce you to the add-on in more detail and then show you step-by-step how to set up everything and connect Gravity Forms to n8n workflows.
Note: The Gravity Forms n8n Add-On is part of Gravity Labs – our home for experimental add-ons. It’s free with your Gravity Forms license, but it’s experimental and outside our official support. Labs is also how we learn what our community wants to see in the product, so if you try it, let us know what you think.
Why use the Gravity Forms n8n Add-On?
As we mentioned in the introduction, n8n is an automation platform that functions in a similar way to Zapier.
It lets you build your own custom workflow automations that connect thousands of different apps, including the WordPress forms that you create with Gravity Forms.
One of the main advantages of using n8n over platforms like Zapier is that you can host the Sustainable Use-licensed n8n software on your own server, which lets you use it for the cost of your hosting (which could make it essentially free if you already have access to web hosting that’s capable of running n8n).
If you don’t want to use the self-hosted version, n8n also offers a paid cloud-hosted version that starts at $20/month at the time of this writing. You can test the hosted version with a free 14-day trial.
With the Gravity Forms n8n Add-On, you can connect your forms to n8n to both send and receive data:
- When someone submits the form, you can pass form data to your n8n workflow, which lets you connect your forms to the thousands of apps that n8n integrates with.
- You can also receive data back from n8n and use that data to update a form entry in Gravity Forms, which allows for two-way communication between Gravity Forms and the other services in your n8n workflows.
In addition to sending and receiving data between Gravity Forms and n8n, here are some of the other features that you get access to with the Gravity Forms n8n Add-On:
- API connection or manual setup – Connect your site to the n8n API for automatic workflow discovery. Or, you can also skip the API and just manually set up your workflows using n8n’s webhooks. This works for both production and test workflows.
- Control what form data to send – You can choose to send all of a submission’s data to n8n or you can only send specific form fields/metadata. You can also send data as JSON or form-encoded payloads.
- Multiple authentication methods – If you want to use authentication, the add-on supports multiple methods including Header Auth, Basic Auth, HMAC signing, and custom headers.
- Built-in send test tool – Send test data to n8n with a single click to help you more easily set up your workflow.
- Delivery tracking and resends – Track whether an entry’s data has been sent to n8n and manually resend it if needed.
- File upload support – Include uploaded files in your n8n workflows.
How to set up the n8n WordPress integration for Gravity Forms
Now, let’s get into the full guide on how to connect your WordPress forms to n8n.
For this guide, we’ll choose one specific example of using n8n to connect Gravity Forms to Google Sheets. However, the same basic steps that we show here will also apply to the many other integrations and automations that n8n supports.
So, while we’re only focusing on one single use case for this example, you can easily apply these principles to your own unique automation needs.
Let’s get into it…
1. Install the Gravity Forms n8n Add-On
To get started, you need to install the Gravity Forms n8n Add-On on your site.
As we mentioned earlier, the n8n Add-On is part of Gravity Labs. While these add-ons are free with any Gravity Forms license, they sit outside the normal suite of Gravity Forms add-ons.
First, you need to download the add-on from the Gravity Labs website:
- Go to the n8n Add-On page at Gravity Labs.
- Log in to your existing Gravity Forms account on Gravity Labs, if you haven’t done so already.
- Click Download.
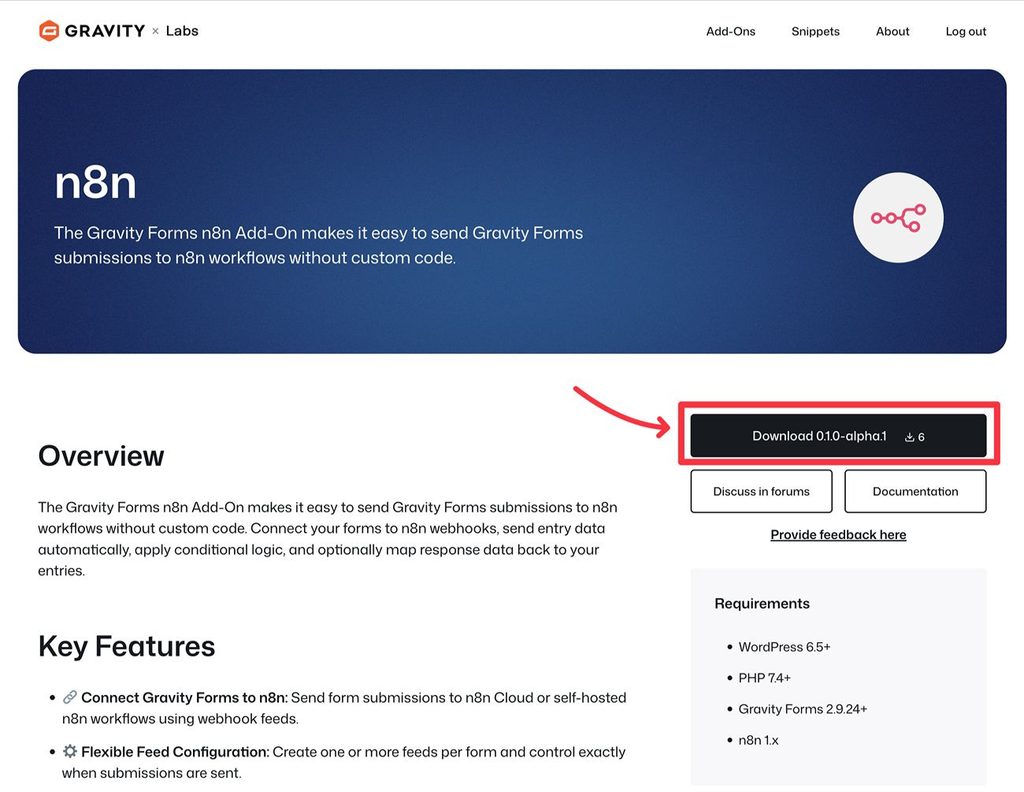
Once you’ve downloaded the add-on’s ZIP file to your local computer, you can upload and install it like any other WordPress plugin:
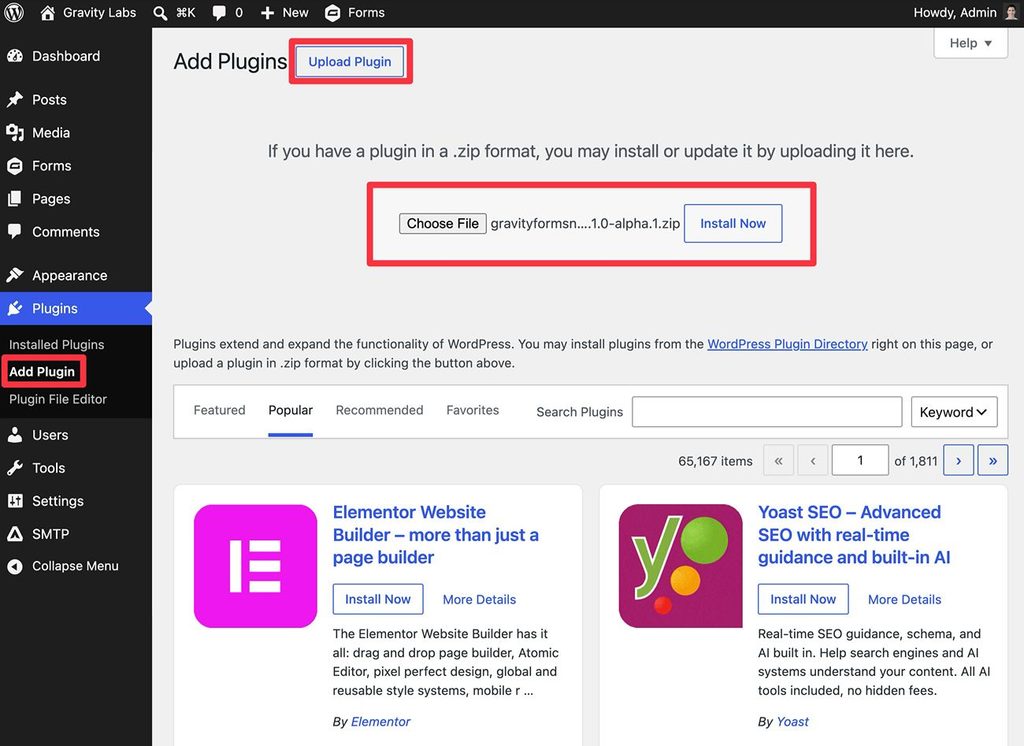
- Go to Plugins → Add Plugin in your WordPress dashboard.
- Click Upload Plugin.
- Select the ZIP file and click Install Now.
- On the next screen, make sure to activate the plugin.
2. Set up n8n (self-hosted or hosted version)
Next, you need to set up n8n, if you haven’t already done so.
Depending on your approach, this could be:
- Hosting the community version on your own web hosting. Here are n8n’s docs for popular methods of self-hosting the software. While n8n is not technically open source, the Sustainable Use License that it uses achieves the same effect for the purposes of most WordPress websites.
- Signing up for one of n8n’s paid hosted plans.
For this tutorial, we’re using the hosted plan. However, the same steps apply to the self-hosted version.
3. Connect Gravity Forms to n8n API (optional)
This step is optional. You can still set up workflows without connecting Gravity Forms directly to your n8n instance.
The main advantage of connecting Gravity Forms to the n8n API is that it enables automatic workflow discovery, which eliminates the need to manually copy and paste webhooks when creating an n8n feed for your form.
If you don’t mind manually pasting the webhook URL into your form’s n8n feed, you can skip this step.
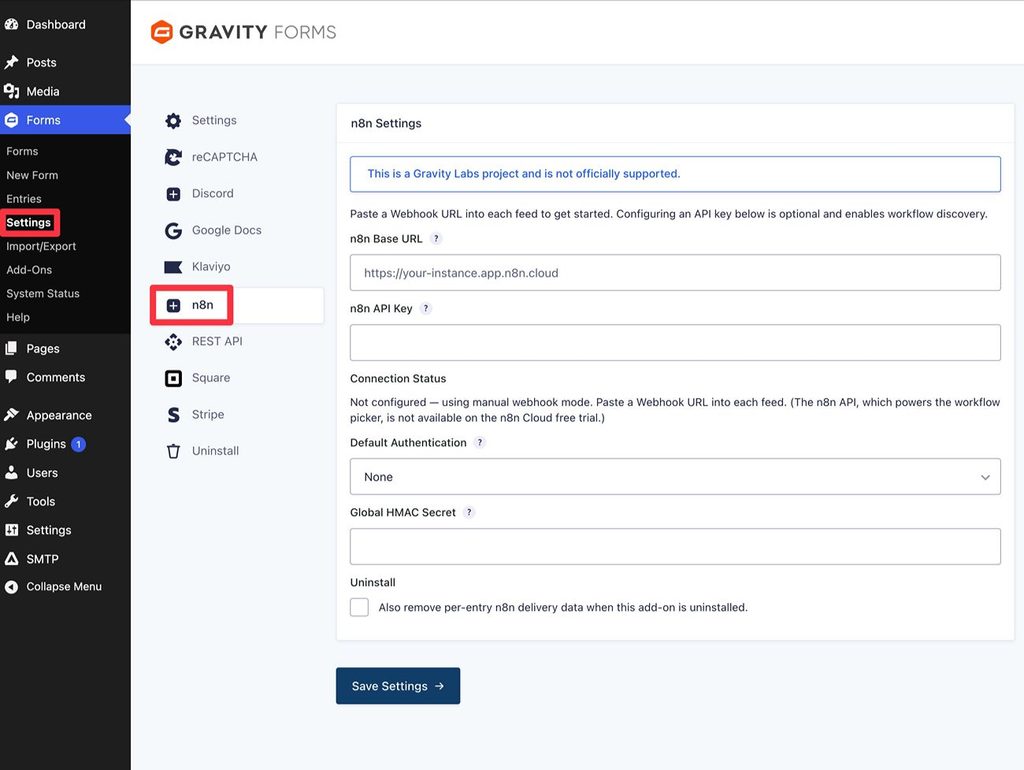
If you do want to set up the global connection, you can go to Forms → Settings → n8n. There, you’ll need to add two pieces of information:
- n8n Base URL – this will look like “https://instance-name.app.n8n.cloud/” for Cloud-hosted instances. For self-hosted instances, it will depend on how you’ve configured n8n, but you can find it by looking at the URL of your n8n dashboard.
- n8n API Key* – you can create an API key by going to Settings → n8n API inside of your n8n dashboard.
*Note: If you’re using the n8n Cloud free trial, you cannot access the n8n API, so you won’t see this option in settings. You can still set up automations – you’ll just need to manually copy the webhook URL.
You also have the option to set your default authentication method for new feeds, though you can manually enter/override these for each feed if you prefer.
4. Create the form that you want to automate with n8n
If you haven’t done so already, you’ll need to create the form that you want to connect to n8n. Or, if you have an existing form that you want to connect to n8n, you can just edit that form.
You can build your form from scratch or use one of the many pre-made templates that Gravity Forms offers. Just make sure to include form fields for all of the data that you want to include in your n8n workflow.
5. Create a new n8n workflow and set up trigger
Next, you’ll switch from your WordPress dashboard to the n8n dashboard.
Before you can set up your n8n feed in Gravity Forms, you first need to create your workflow in n8n.
When you set up the workflow, choose On webhook call as the workflow trigger.
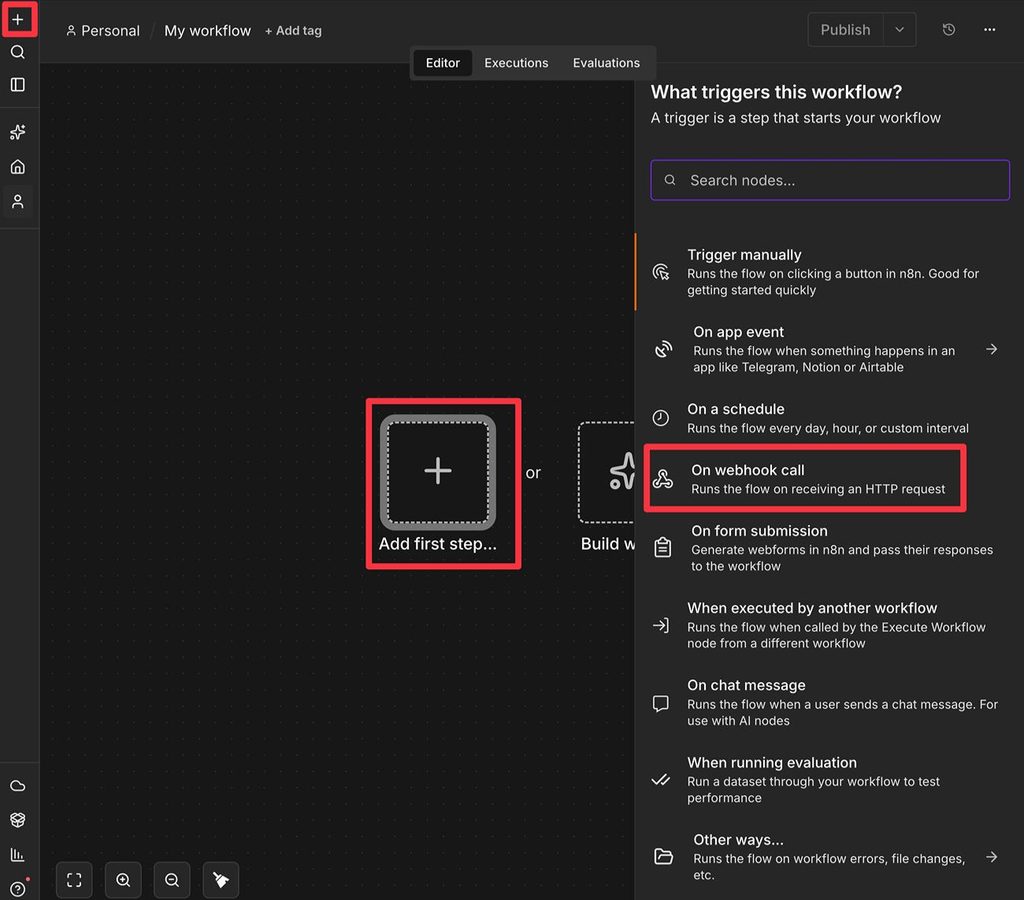
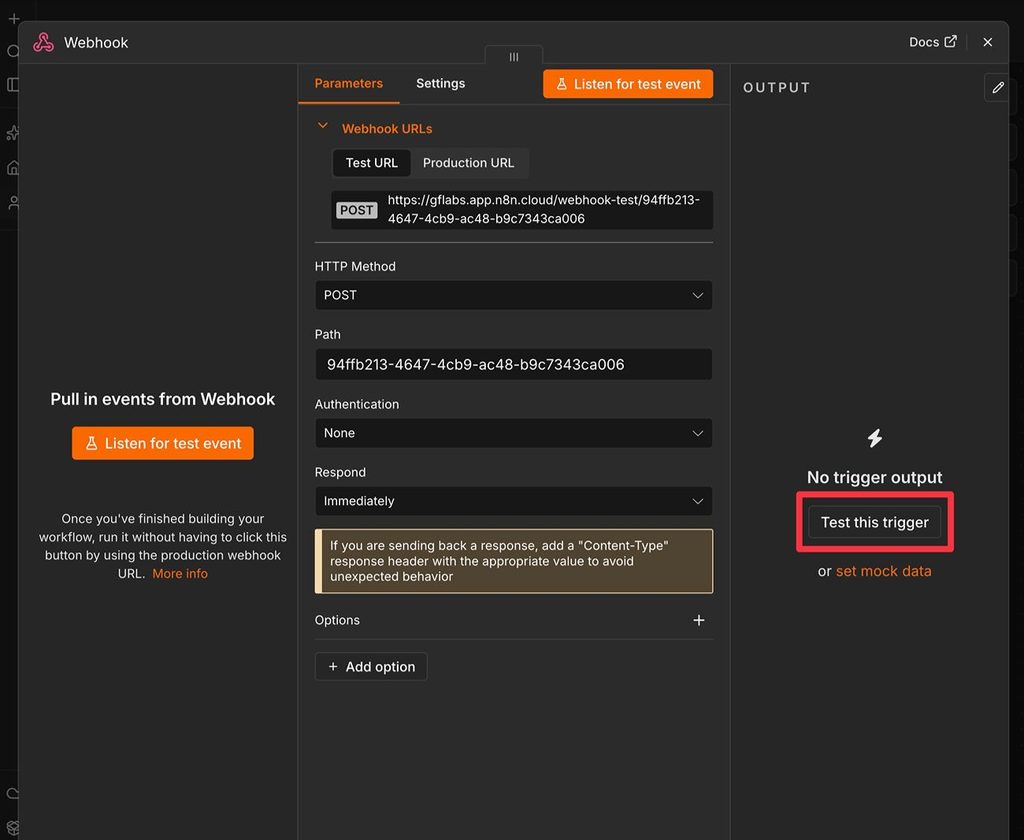
This will open a window that gives you two webhook URLs:
- Test URL – You can use this URL while testing your workflow.
- Production URL – If you start with the Test URL, you’ll want to switch it to the Production URL when you’re ready to accept live form submissions.
Below that, change the HTTP Method to POST.
You can also set up Authentication rules if you want, but this is optional and not required to create an n8n feed.
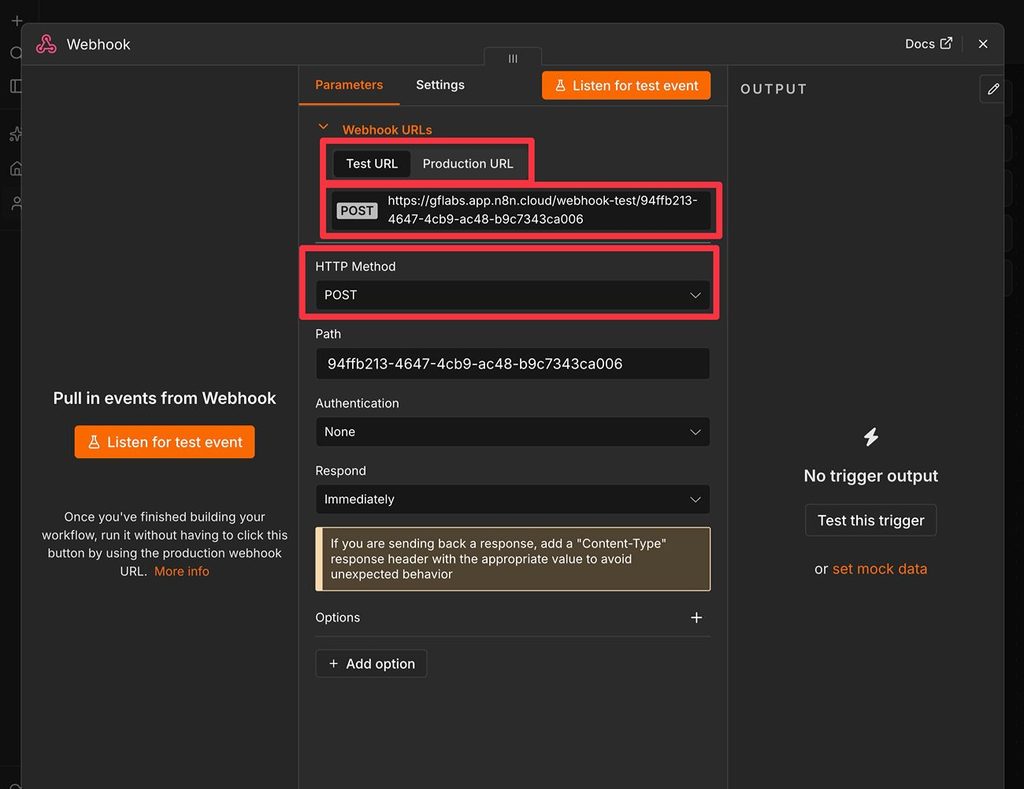
If you didn’t connect to the n8n API, you’ll need to copy the webhook URL to use in the next step. We recommend starting with the Test URL.
Either way, keep this window open because you’ll need to come back and finish setting up your workflow later on. But first, you’ll want to set up the n8n feed for your form.
6. Create an n8n feed for your form
Once you’ve set up your workflow trigger in n8n, you can go back to your form’s settings in WordPress to create an n8n feed for your form. This is what allows you to pass data from your form to your n8n automation.
Inside the form editor, go to Settings → n8n. Then, click Add New to create a new feed.
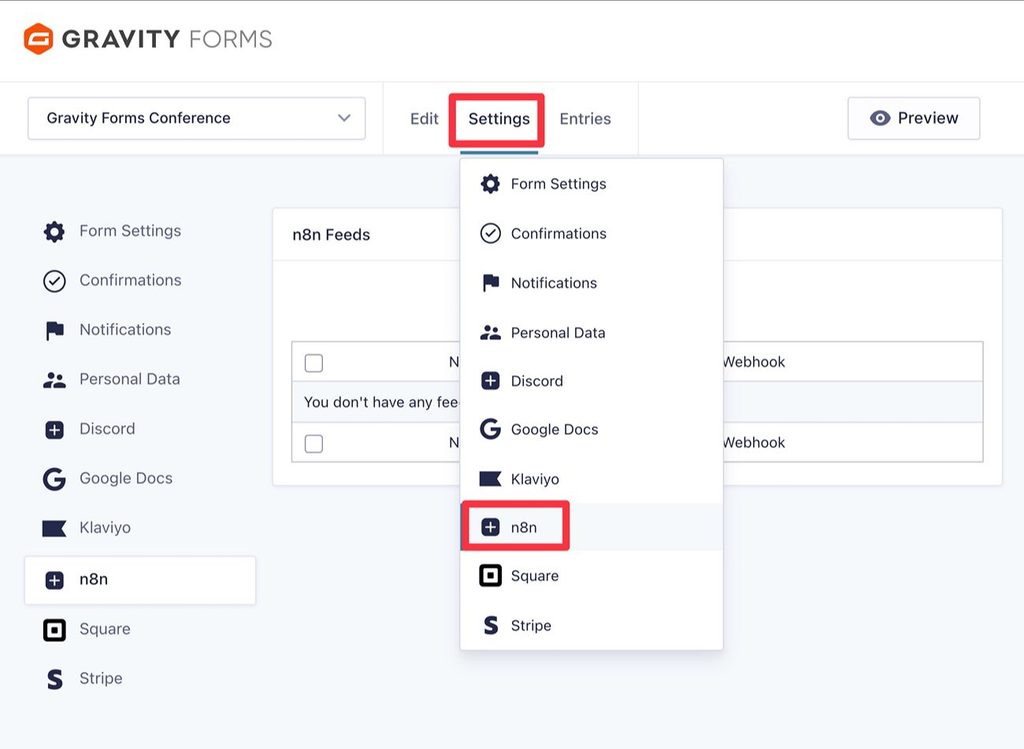
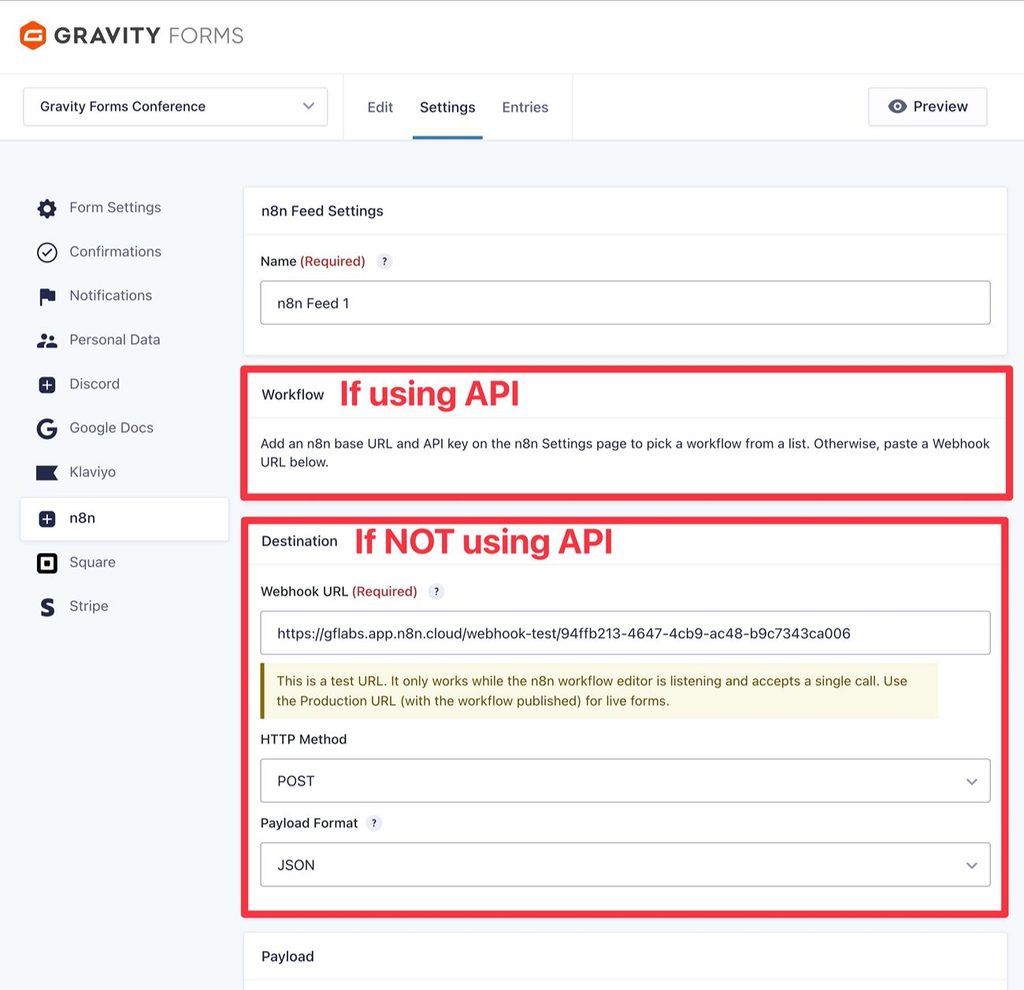
In the feed settings, there are two ways to connect to your automation:
- If you connected Gravity Forms to the n8n API in Step #3, you can choose your workflow from the list that Gravity Forms will automatically sync with your n8n instance.
- If you did NOT connect to the n8n API, you need to manually paste your n8n webhook into the Webhook URL box. We talked about where to find this in the previous step. You should be able to leave the HTTP Method and Payload Format as the defaults, unless you want to make your own modifications.
For this example, we’re manually pasting in the webhook URL. However, the rest of the steps are the same regardless of which approach you’re using.
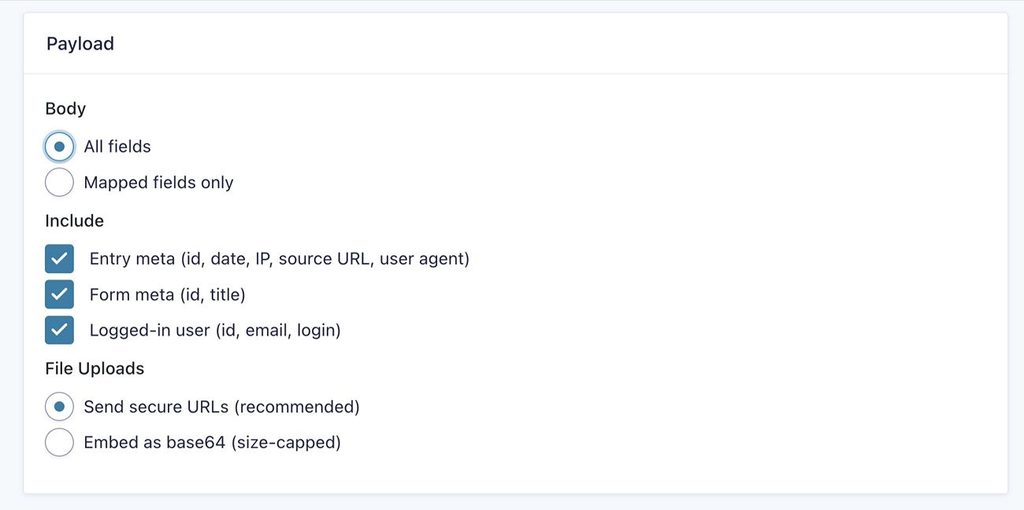
Below that, you can set up the Payload, which lets you control what data to send to n8n.
By default, it will send all of the form fields, along with entry, form, and user metadata. You can then choose what data you want to use when you finish setting up your n8n workflow.
However, if you don’t want to send certain data to n8n (maybe for privacy or security reasons), you can adjust these settings to only send the specific data that you need for your workflow.
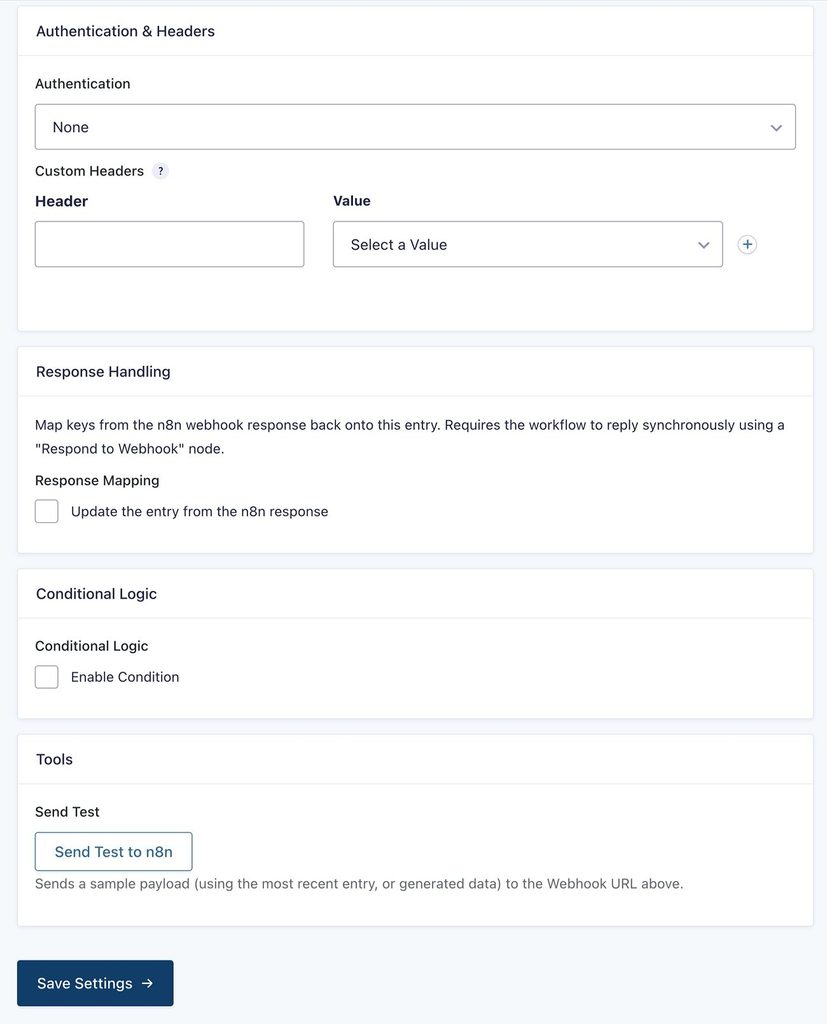
Further down, you’ll get three more settings boxes:
- Authentication & Headers – This is optional, but it gives you the ability to set up authentication and add custom headers if needed.
- Response Handling – This is an advanced feature that lets you update the Gravity Forms entry based on a response from n8n. If you check the box, you’ll be able to map response keys from n8n to form fields/meta. Note: Response mapping only works with synchronous JSON webhook responses.
- Conditional logic – You can add conditional rules to only pass data to n8n if certain conditions are met. Or, you could create multiple n8n feeds and connect to different workflows based on your conditions.
For this example, we’ll leave all of these as the defaults, but you’re free to set them up if it fits your use case.
However, it’s important to note that enabling some of these will require additional configuration in your n8n workflow. For example, if you want to set up authentication, you should also set up authentication in the n8n workflow settings.
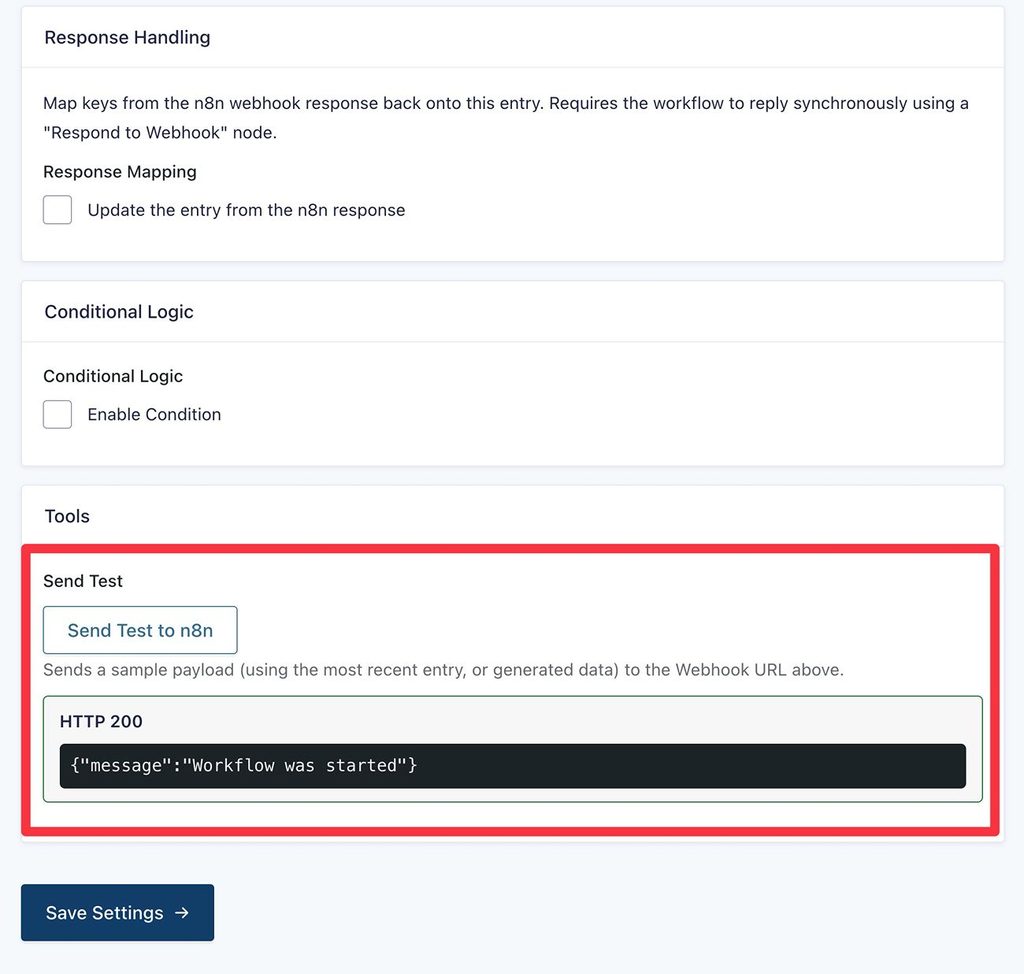
Once you’ve made these choices, click the Save Settings button at the bottom. You can ignore the Send Test option for now, as we’ll cover that in the next step.
7. Send test data to n8n
Now, you need to send some test data to n8n. This will allow you to configure how to use that data in your workflow.
First, go back to the n8n interface and click the Test this trigger button:
Then, go back to your n8n feed settings in WordPress and click the Send Test button at the bottom of the feed settings to send some test data to your n8n workflow.
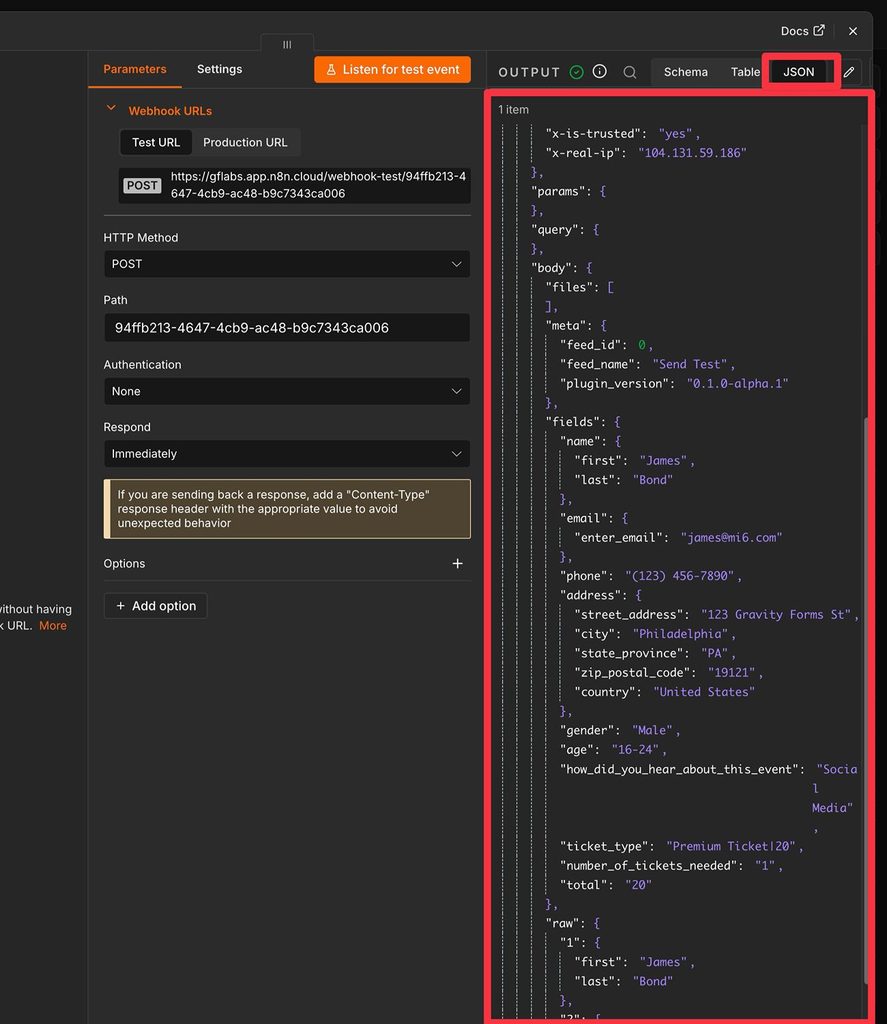
If you go back to n8n, you should see the data that n8n received from Gravity Forms.
8. Finish setting up your n8n workflow
At this point, your n8n workflow is able to successfully receive data from Gravity Forms.
You can now choose what to do with that data by adding another step to your workflow. To connect to Google Sheets, you would choose Action in an app.
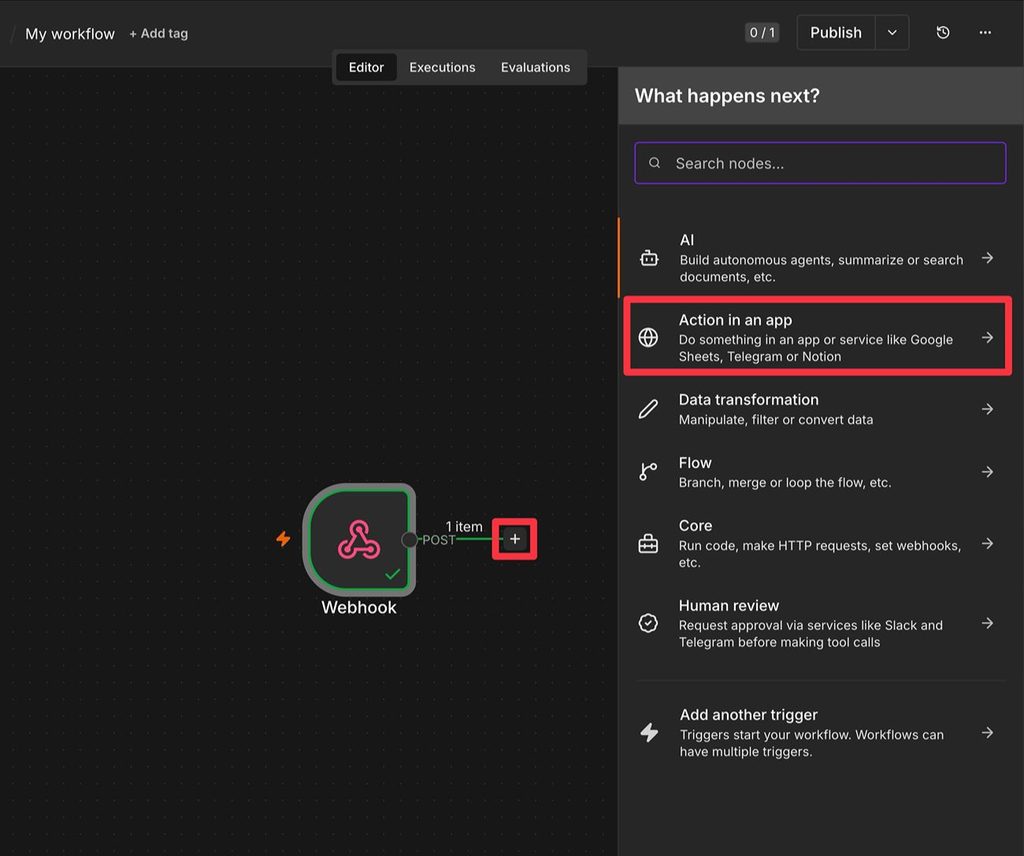
This would require you to choose the action (e.g. append or update a row within a document) and authenticate your Google account.
You can then map the data that you receive from Gravity Forms to the rest of the workflow using drag and drop.
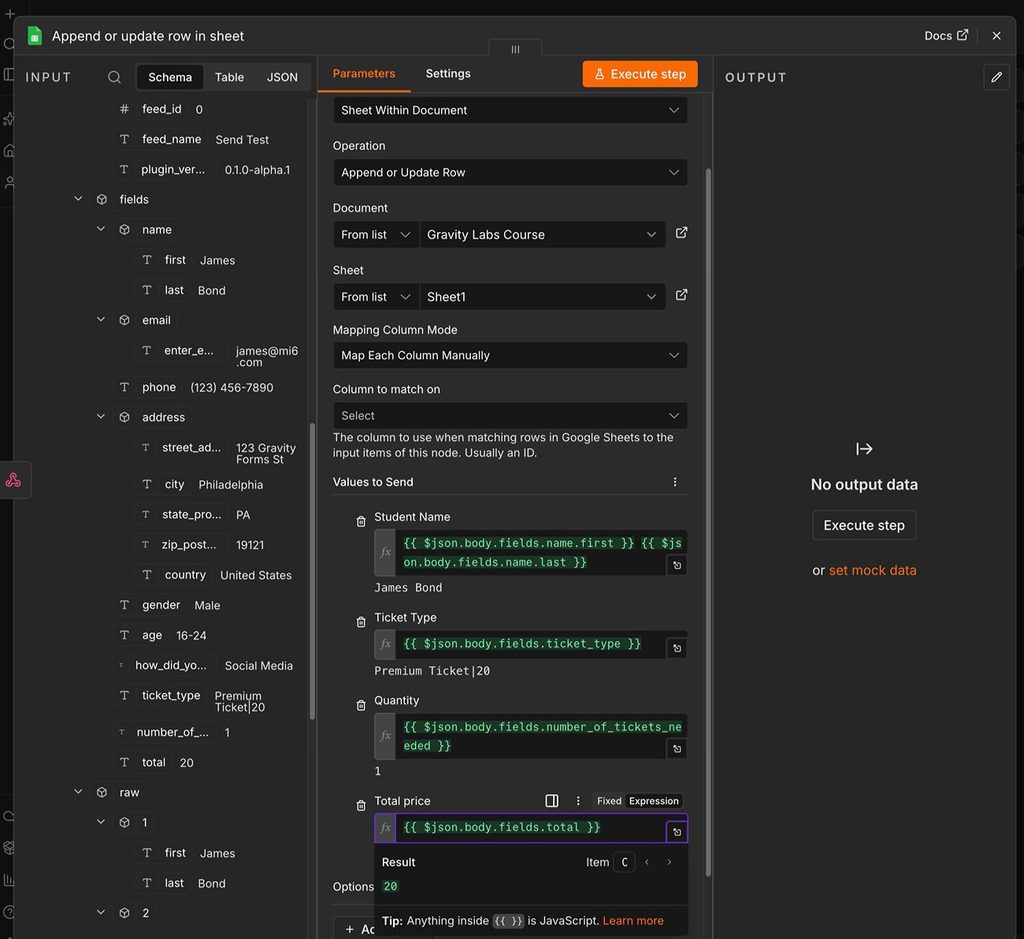
To test that everything is working, you can click Execute step.
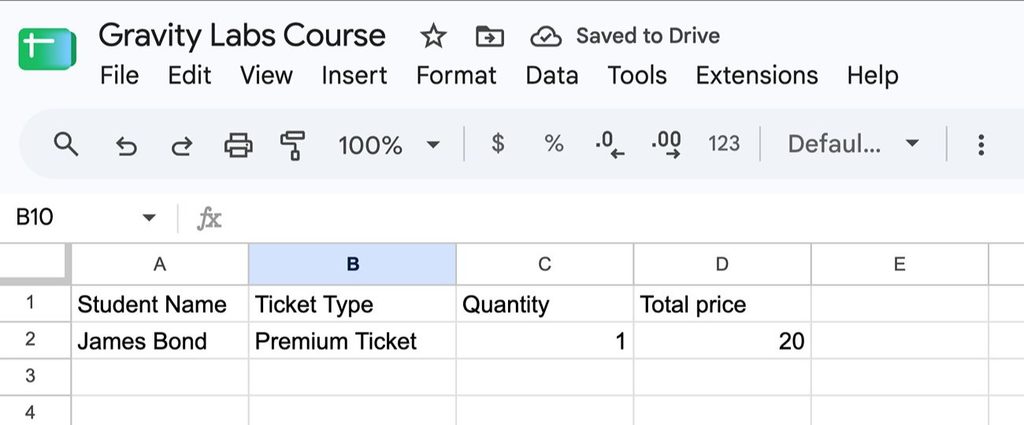
You’ll then see the form data appear in whatever destination/action you’ve specified. For our example, the data shows up as a new row in Google Sheets.
9. Switch to webhook Production URL and publish workflow
At this point, you’re pretty much finished.
When you’re ready to go live, make sure that you update your form’s n8n feed to use the Production URL from n8n, rather than the Test URL.
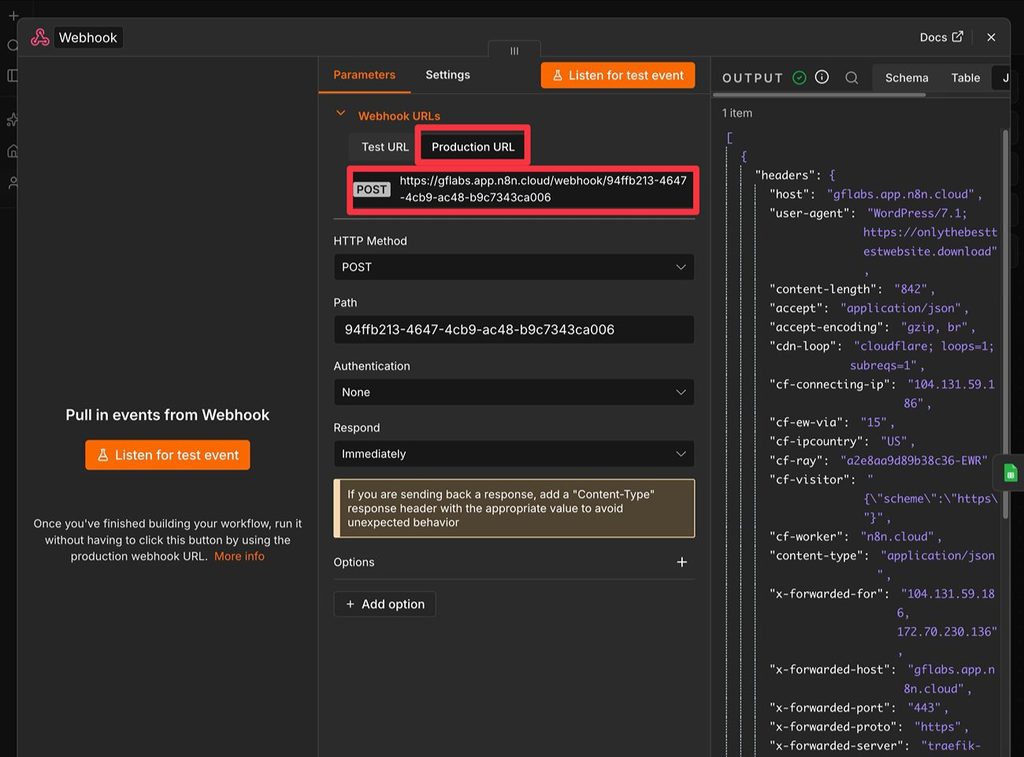
You also need to click Publish in your n8n workflow settings to make your workflow live, which will allow your form to send data to the Production URL.
10. Monitor n8n workflow executions as needed
Once your production workflow is running, you can monitor your n8n workflow executions in a few different places.
First, if you go to the form entry detail page in Gravity Forms, you can see a log of whether the entry was delivered to n8n, along with manually resending the entry if needed.
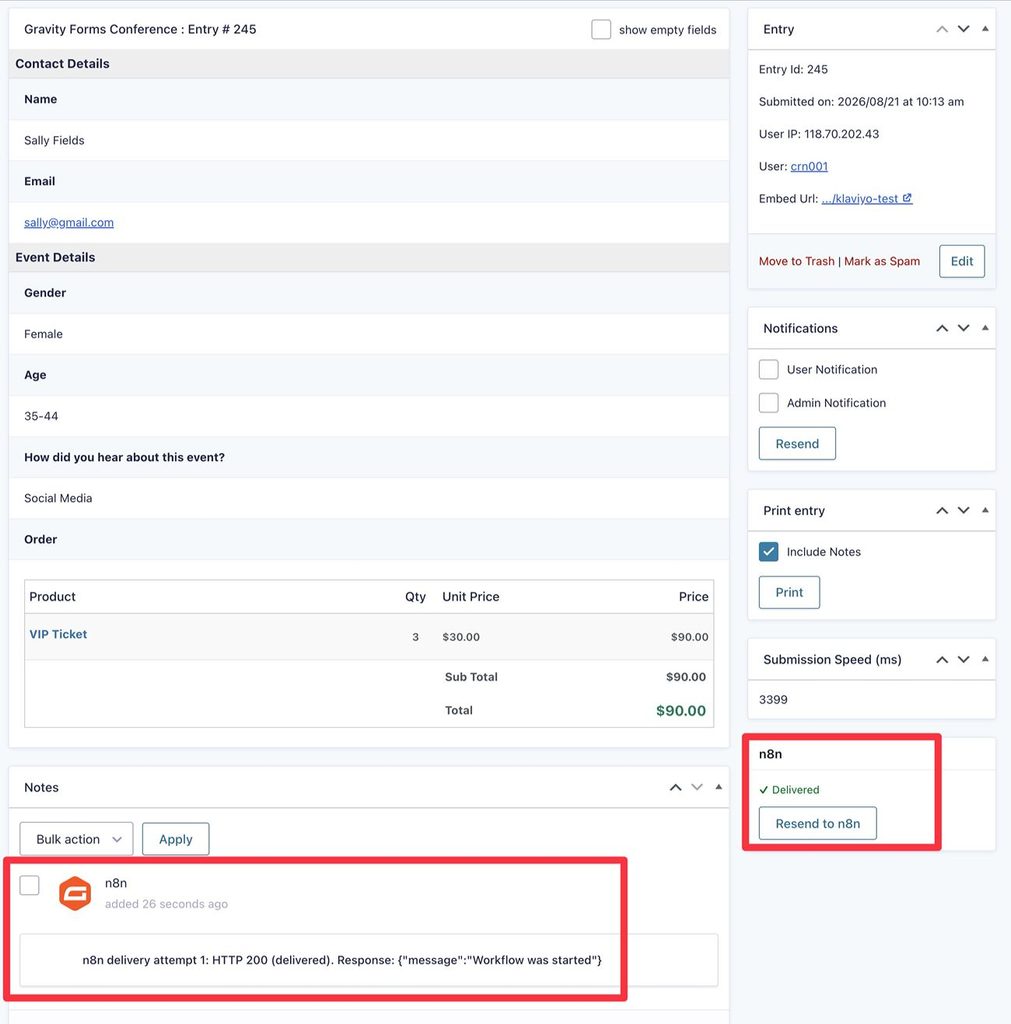
You can also track executions from the n8n dashboard.
Try the Gravity Forms n8n Add-On today
If you’re looking to set up your own n8n WordPress integration, try the n8n Add-On today.
The Gravity Forms n8n Add-On is available now in Gravity Labs. It’s free with any Gravity Forms license.
As a Labs add-on, it’s experimental and sits outside our standard support — and your feedback helps shape what we build next. If you give it a try, we’d love to hear how it works for you.

Newsletter
If you want to keep up-to-date with what’s happening on the blog sign up for the Gravity Forms newsletter!
"*" indicates required fields