Does your workflow rely on creating a Google Docs document based on a form submission on your site?
Whether you use Google Docs to save form submission data to Google Drive, collaborate with other members of your team, distribute information from a form entry, or anything else, the new Gravity Forms Google Docs Add-On can help you simplify your workflows.
With the add-on, you can automatically create a Google Docs document when someone submits a form on your site.
You’ll be able to…
- Dynamically insert form details in the document template (alongside static text)
- Control the title of the document
- Save the document to any folder in your Google Drive account
In this post, we’ll introduce you to the add-on’s key features in more detail. Then, we’ll show you step-by-step how to set it up on your site and connect WordPress and Gravity Forms to Google Docs.
Note: The Gravity Forms Google Docs Add-On is part of Gravity Labs — our home for experimental add-ons. It’s free with your Gravity Forms license, but it’s experimental and outside our official support. Labs is also how we learn what our community wants to see in the product, so if you try it, let us know what you think.
Why use the Gravity Forms Google Docs Add-On?
The Gravity Forms Google Docs Add-On is designed to simplify workflows for teams that rely on Google Docs to draft, collect, and distribute information.
It works with free Google accounts, as well as paid Google Workspace accounts (for either individual or organizational use).
You can use the add-on to automatically generate a new document whenever someone submits a form on your site.
You can set up your intake form however you want, including adding as many fields as needed.
Then, when you create your Google Docs feed, you’ll be able to control how to set up the document, including the following:
- Customize the document title – You can set up the title using a mix of static text and/or merge tags to dynamically include form information.
- Customize the document body – You can also fully control the body of the document. As with the title, you can use both static text and merge tags. The merge tags allow you to dynamically include data from the fields in your form.
- Save to a specific Google Drive folder – You can create the document in a specific Drive folder for your account/organization. Or, you can just save it in your root Drive folder.
As with other Gravity Forms add-ons, you can also add conditional logic rules to your Google Docs feed.
This opens up some interesting use cases. With conditional logic, you can implement some or all of the following:
- Only create a document in certain situations – You could choose to only create the document if a user fills out the form in a certain way.
- Use different title/body templates – You could adjust the content of the document body or title based on how someone fills out the form.
- Save the document to a different folder – You can save the document to different folders based on how someone fills out the form.
How to connect Gravity Forms to Google Docs
Now, let’s get into the full step-by-step guide on how to connect Gravity Forms to Google Docs.
To follow this guide, the only thing you’ll need is access to a Google account. You can use your existing free Google account. Or, you can also use a paid Google Workspace account.
Let’s go through the entire process…
1. Install the Gravity Forms Google Docs Add-On
To get started, you’ll need to install and activate the add-on on your website.
As we mentioned earlier, the Google Docs Add-On is part of Gravity Labs.
While it’s free to download with your Gravity Forms license, it sits outside the normal support that you receive for non-experimental add-ons.
Here’s how to download the add-on:
- Go to the Google Docs Add-On page at Gravity Labs.
- Log in to your existing Gravity Forms account on Gravity Labs, if you haven’t done so already.
- Click Download.
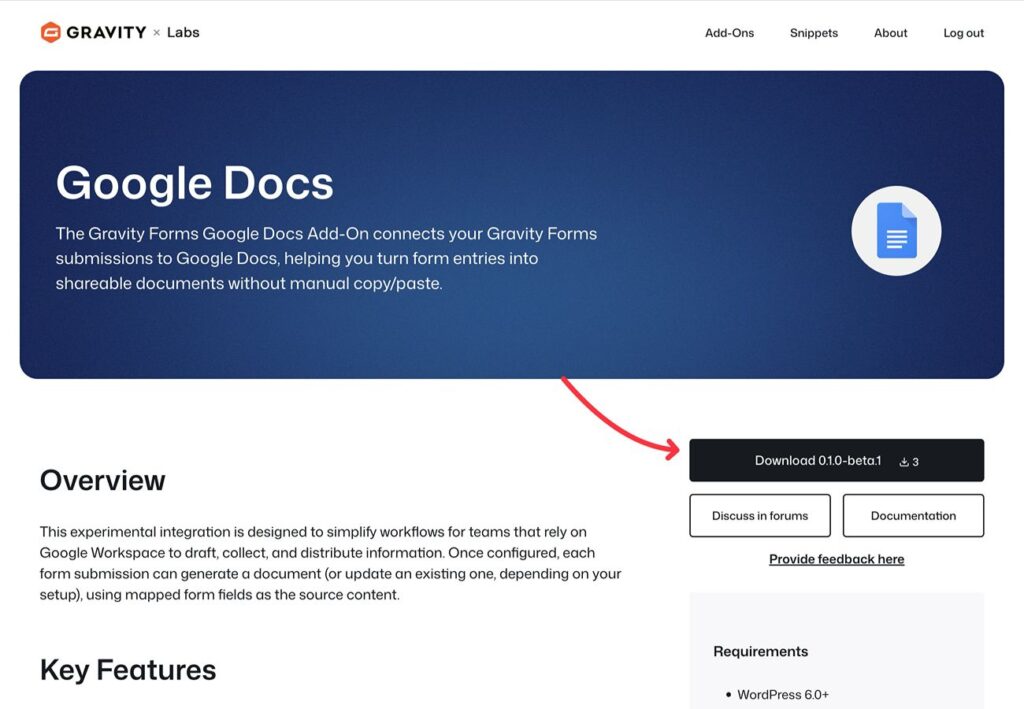
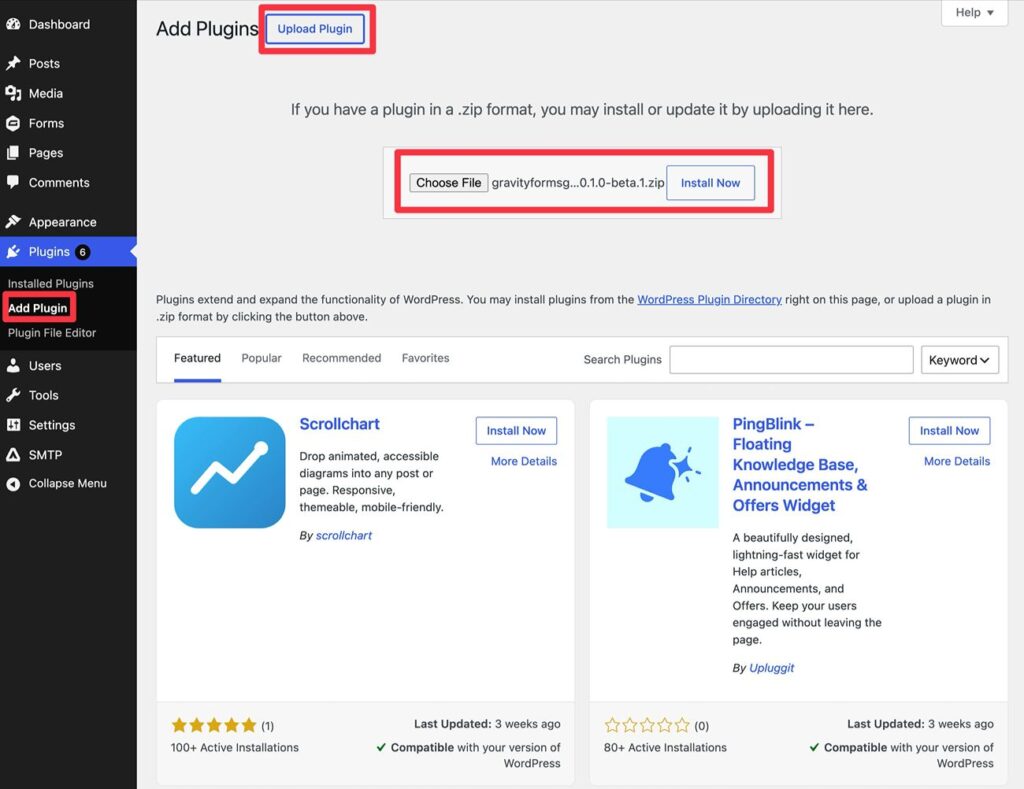
This will download the add-on’s ZIP file to your local computer. You can then upload and install it like any other WordPress plugin:
- Go to Plugins → Add Plugin in your WordPress dashboard.
- Click the Upload Plugin button.
- Select the ZIP file and click Install Now.
- On the next screen, make sure to activate the plugin.
2. Set up APIs and OAuth credentials in Google Cloud Console
Before you can connect your site to Google Docs, you’ll need to use Google Cloud Console to set up the Google Docs and Drive APIs and then create OAuth credentials.
All of this is free to do and you can use your existing Google account (or Google Workspace account, for businesses). It also doesn’t require any special technical knowledge, though you will need to click a bunch of buttons to set things up.
To get started, open Google Cloud Console, making sure that you’re logged in using your preferred Google account (whether that’s a free Google account or a paid Workspace account).
Then, let’s go through the steps…
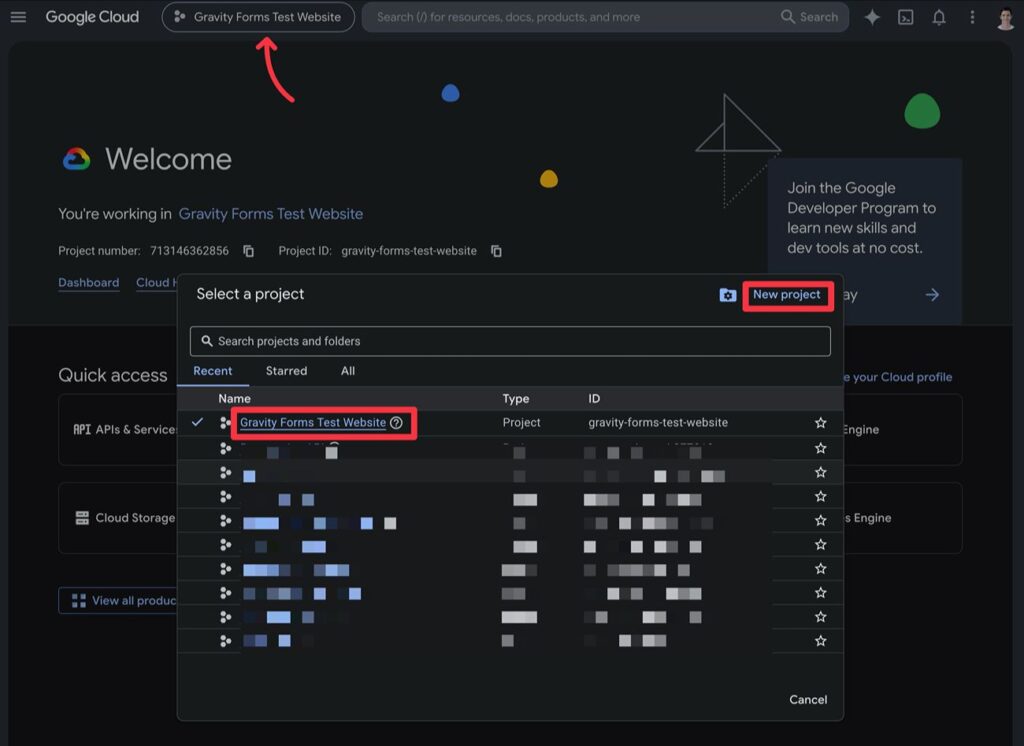
Create or choose a project in Google Cloud Console
First, you need to choose a project in which you’ll enable the APIs by clicking the project picker at the top-left of the interface.
You can use an existing project or click the New project link to create a new project.
Enable the Google Docs and Google Drive APIs
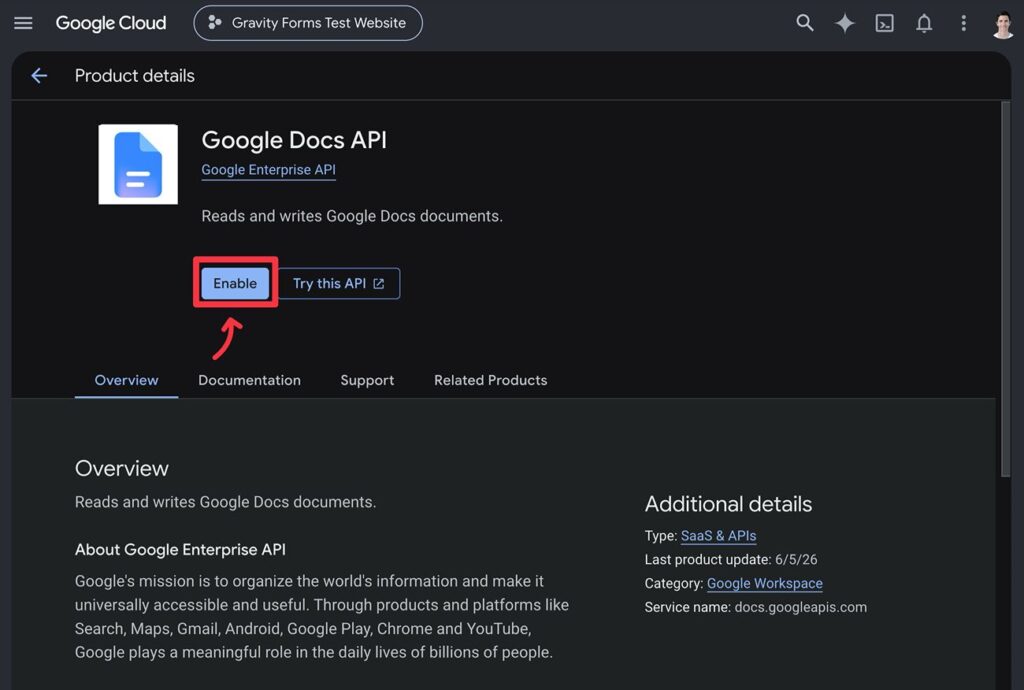
Now, you need to enable the APIs for Google Docs and Google Drive inside your project.
You can search for each API using the search box or use the links below:
You need to click the blue Enable button to enable each API.
Set up your OAuth consent screen and credentials
Once you’ve enabled the APIs for your project, you next need to set up your project’s OAuth consent screen, and then create OAuth credentials. This is what allows the add-on to connect to your Google Drive and Google Docs.
OAuth consent screen
To get started, go to the Credentials tab under APIs & Services within your Google Cloud project.
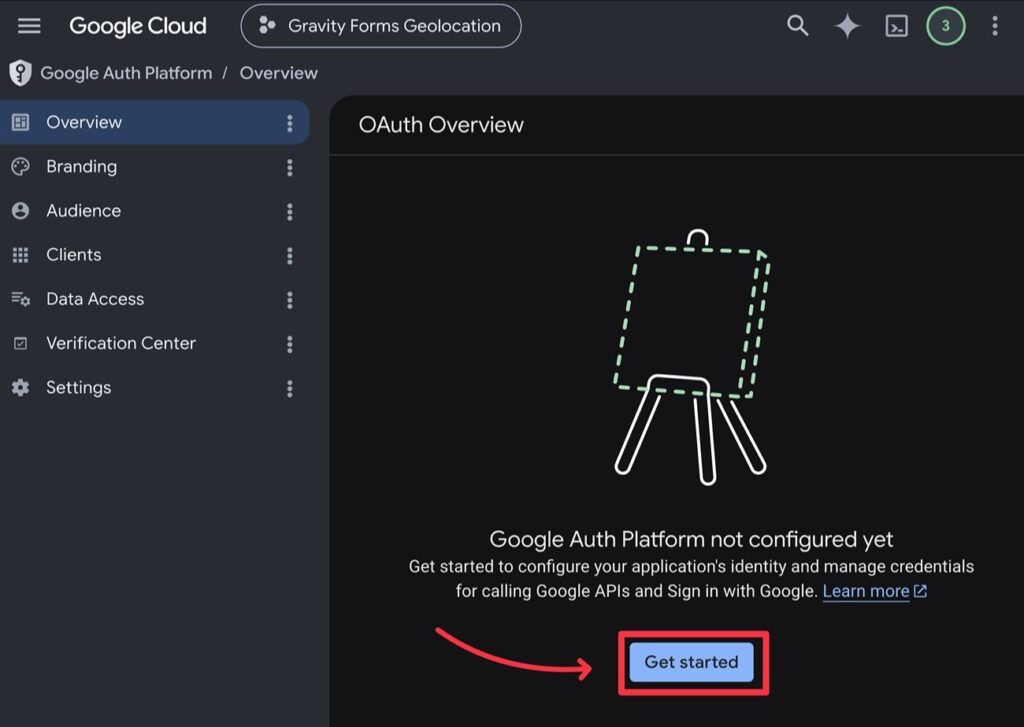
You should then see a prompt to Configure consent screen, if you haven’t already done so.
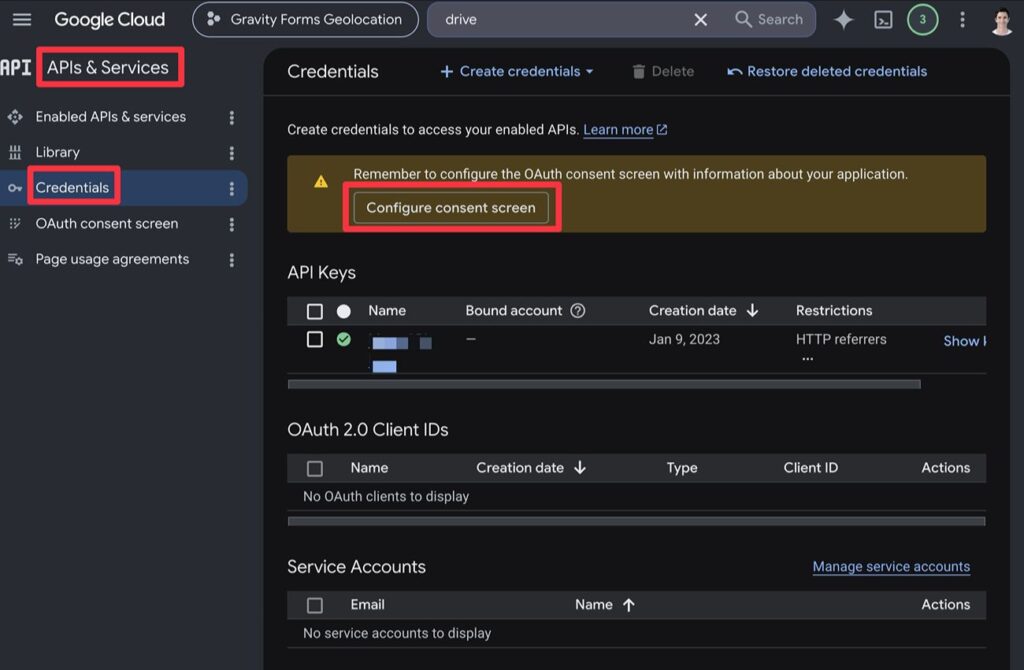
On the next screen, click Get started to set up the consent screen.
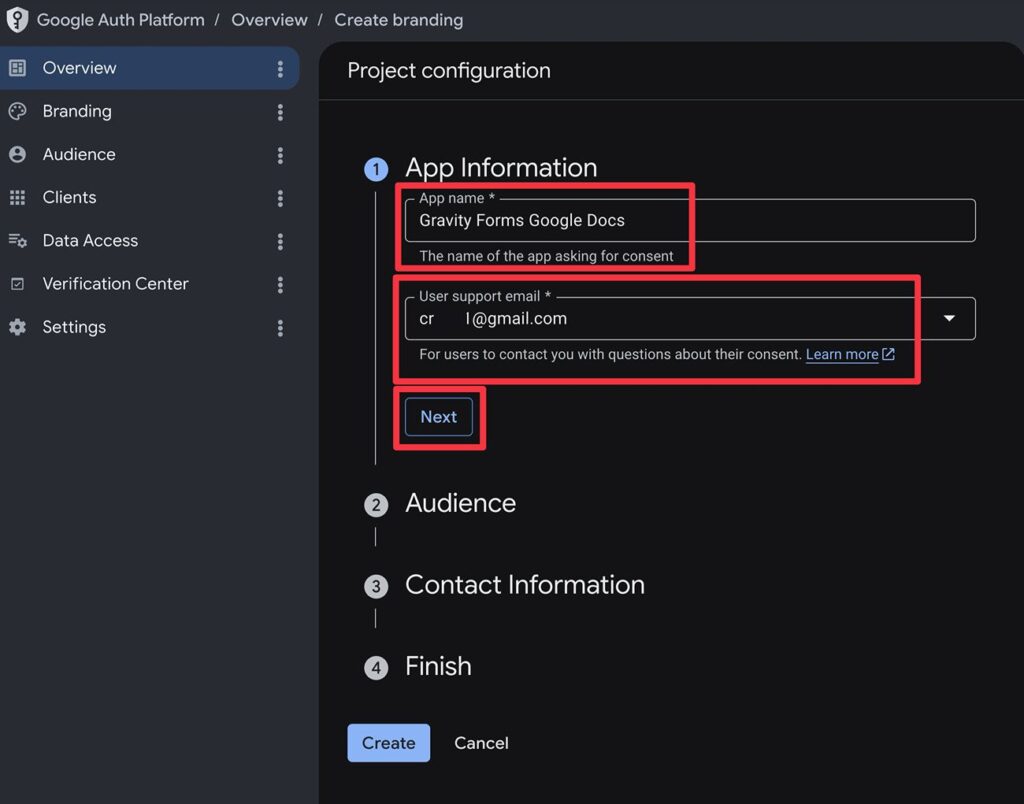
Under App Information, you can give your app a name. For example, “Gravity Forms Google Docs”. Then, choose your own email address in the User support email field.
Click Next.
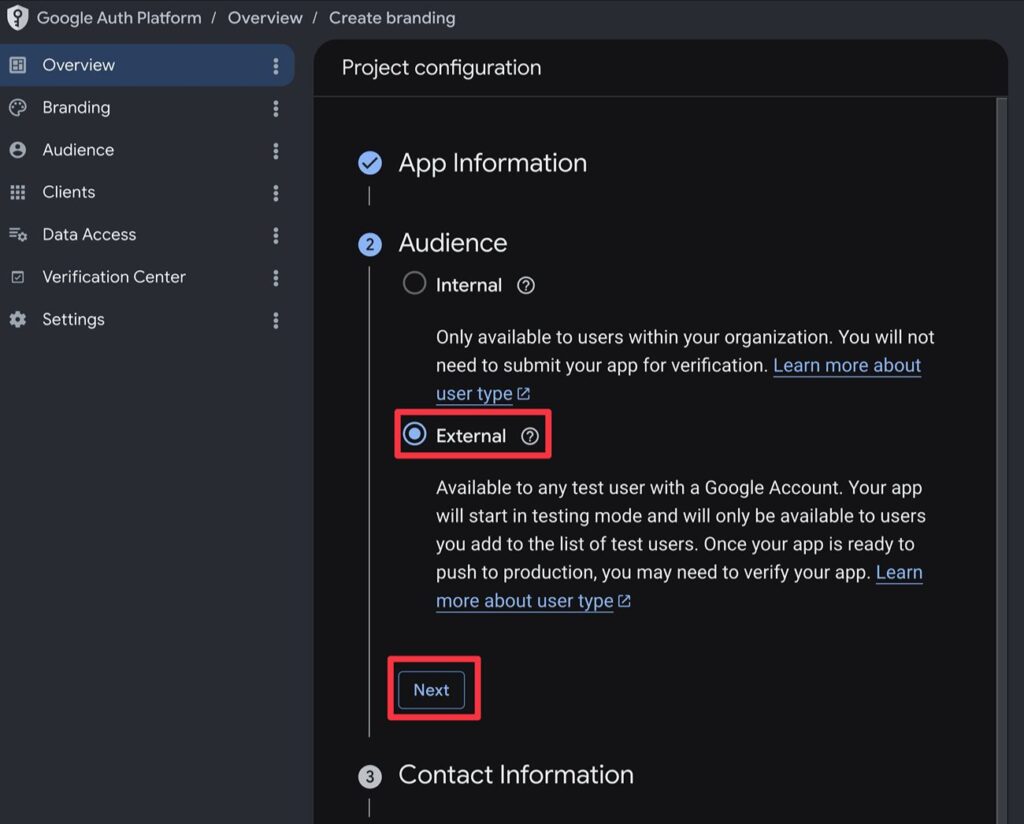
The next screen will prompt you to choose the Audience.
If you’re using a free Google account, you must choose External for the audience. Don’t worry, though – because you’ll be using the app in test mode, only authenticated users will be able to access it (and you won’t need to submit the app for verification).
If you’re using a paid Google Workspace account, you also have the option to choose Internal. This will make the app available to any users within your Google Workspace organization.
For this tutorial, we’re going to use External because it will work for both free Google accounts and paid accounts.
Click Next once you’ve made your choice.
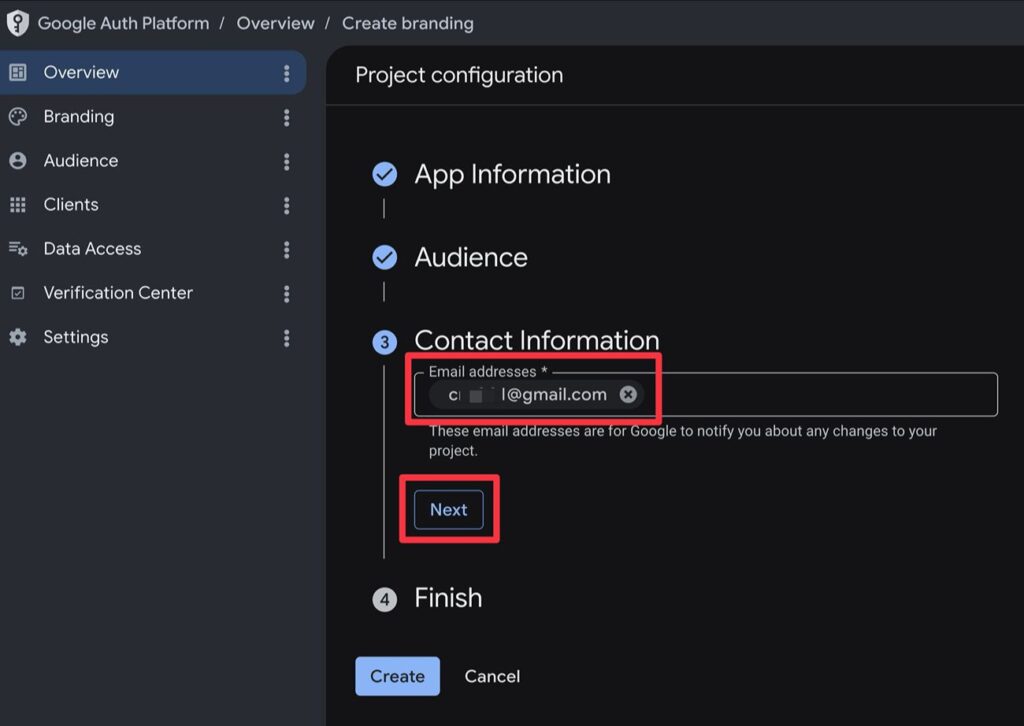
On the next screen, you’ll be prompted to enter your Contact Information.
Just enter your own email address again and then click Next.
On the final page, check the I agree… box and then click Continue. Then, click Create to finish setting up your OAuth consent screen.
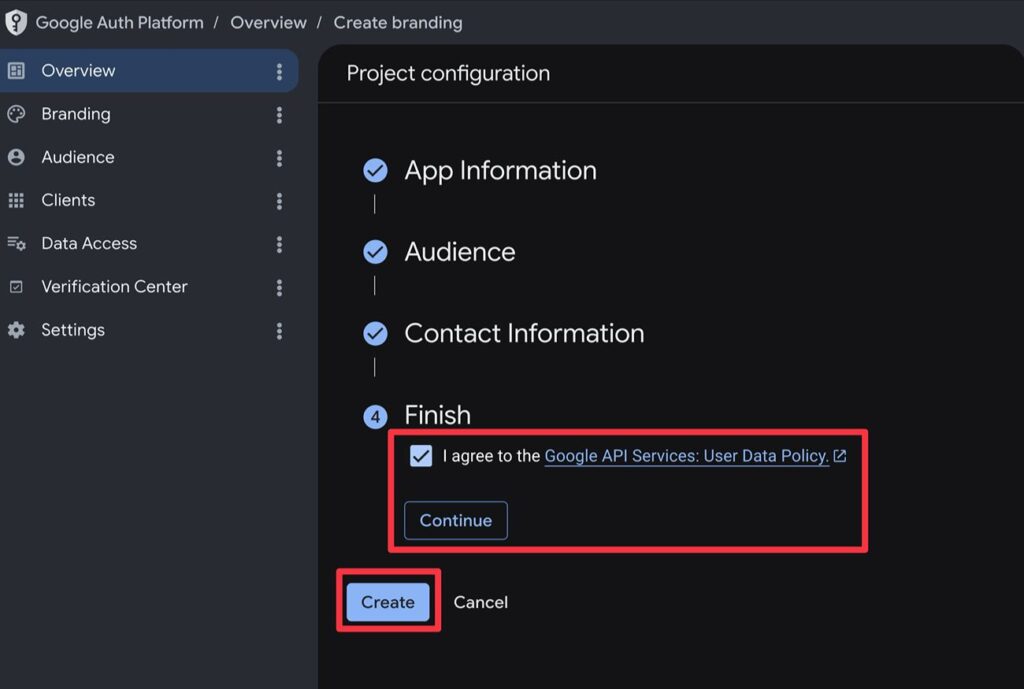
You should then be in the Google Auth Platform interface.
Add email address as test user (if using External audience)
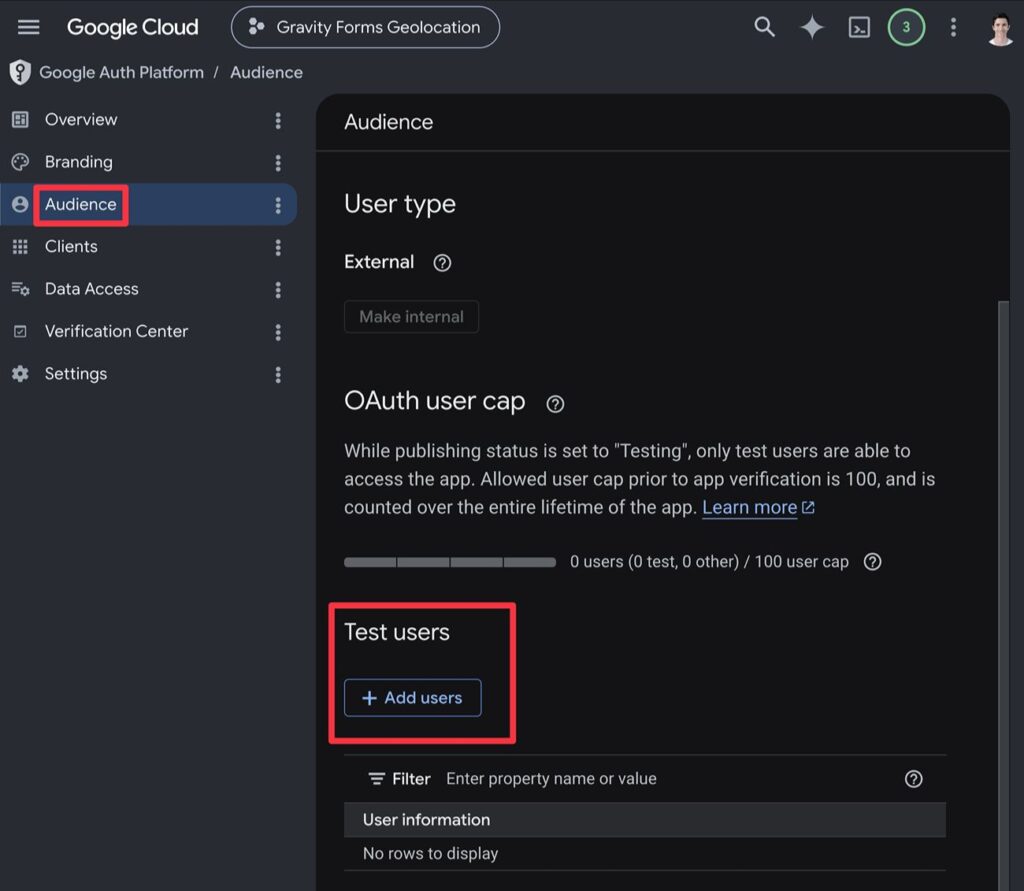
If you’re using an External audience, you’ll also need to add your Google account’s email address as a test user. Again, this will always be the case if you’re using a free Google account.
Inside the Google Auth Platform interface, go to the Audience tab.
Scroll down to the Test users section and click the + Add users button.
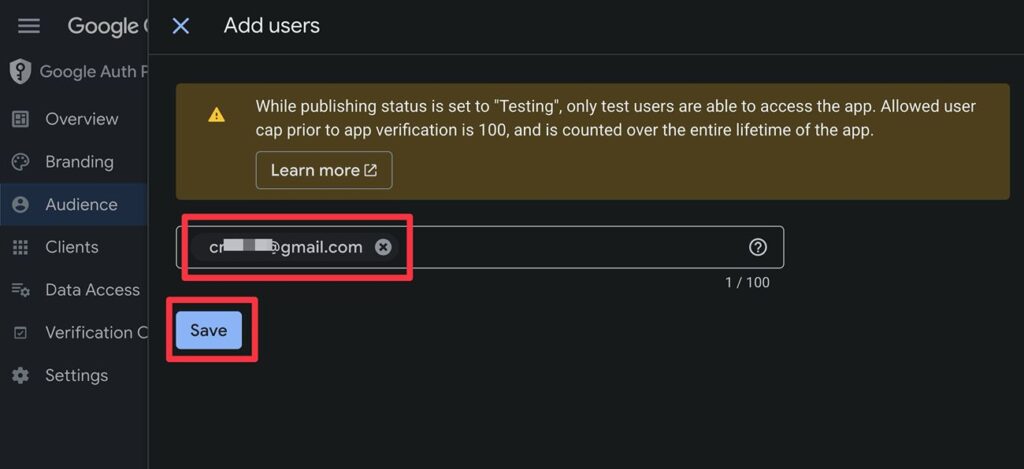
In the slide-out that appears, add the email address of your Google account. That is, the Google account that you’ll use for Google Docs. Usually, this will be the same as the email address that you’re using for Google Cloud Console.
Then, click Save.
Create OAuth client ID
To finish things out, you need to create the OAuth client ID, which is what Gravity Forms will use to connect to your Google account.
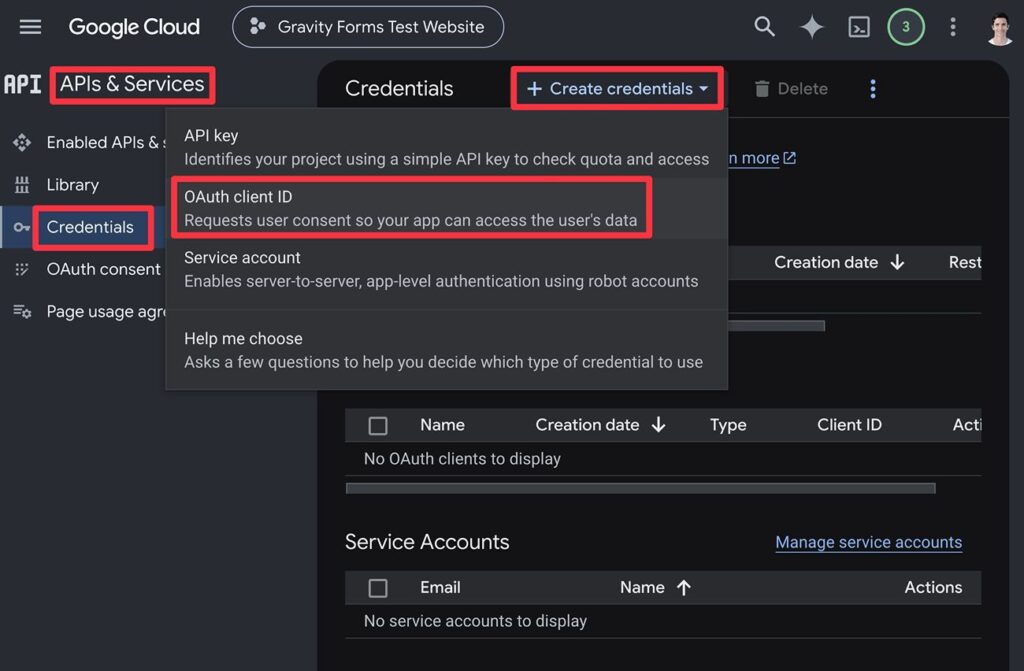
Go to APIs & Services → Credentials again.
Then, click the + Create credentials link and choose OAuth client ID from the drop-down.
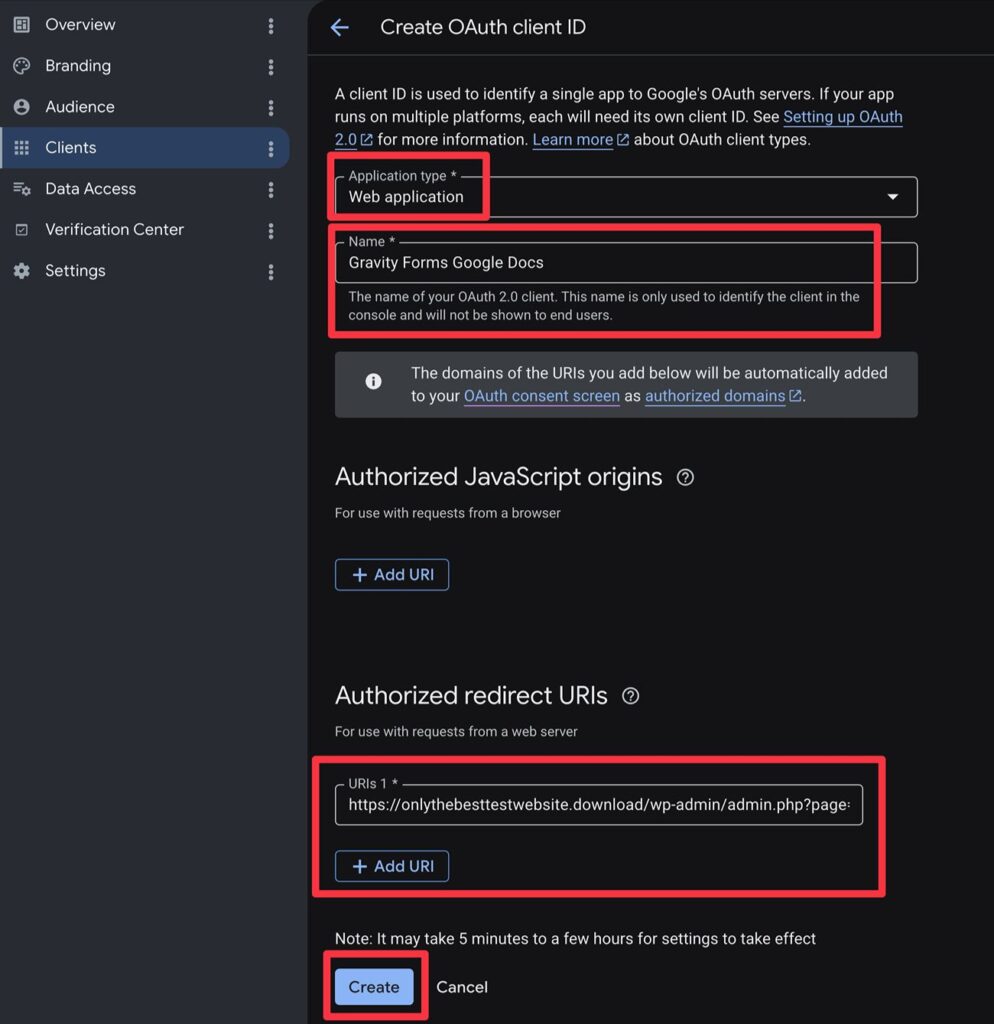
In the Create OAuth client ID interface, you’ll first need to choose Web application from the Application type drop-down.
Then, you can give it an internal name. For example, “Gravity Forms Google Docs”.
Then, click + Add URI under Authorized redirect URIs.
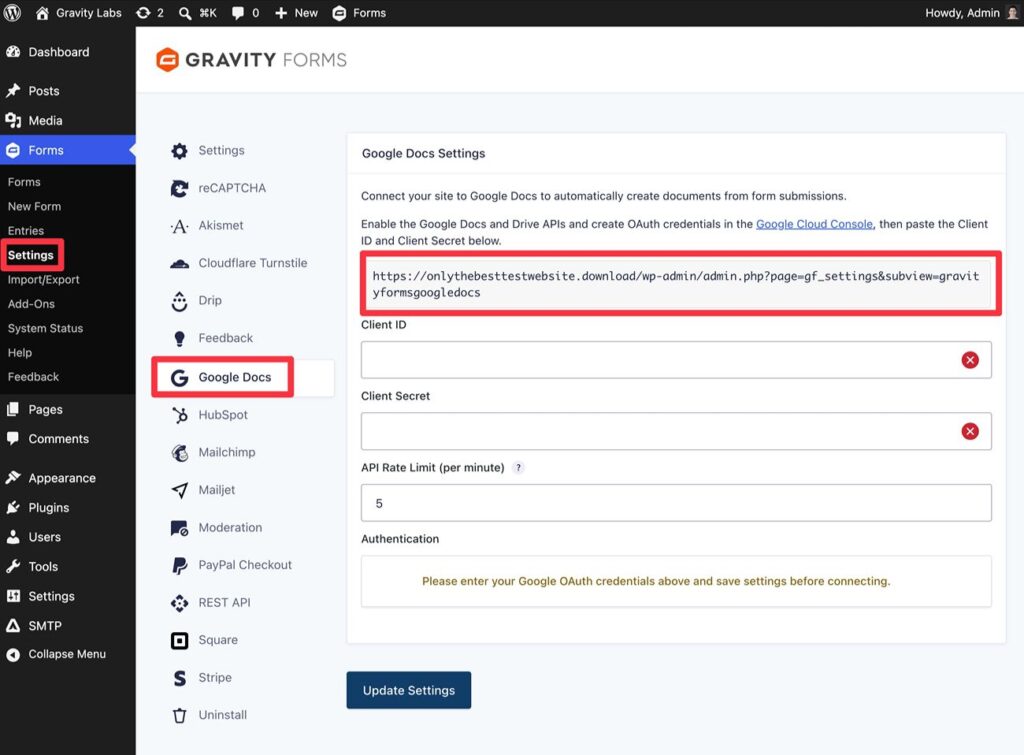
There, you need to add the redirect URL for the Gravity Forms Google Docs Add-On. You can find this in your WordPress dashboard by going to Forms → Settings → Google Docs and copying the URL that you find there.
If you’re having trouble finding this URL, we’ll show you this in more detail immediately below.
Once you’ve done that, click Create.
Google will then display a popup with two important pieces of information that you need to copy to a safe place:
- Client ID
- Client Secret
Copy both values to a safe place because Google will not display the client secret again.
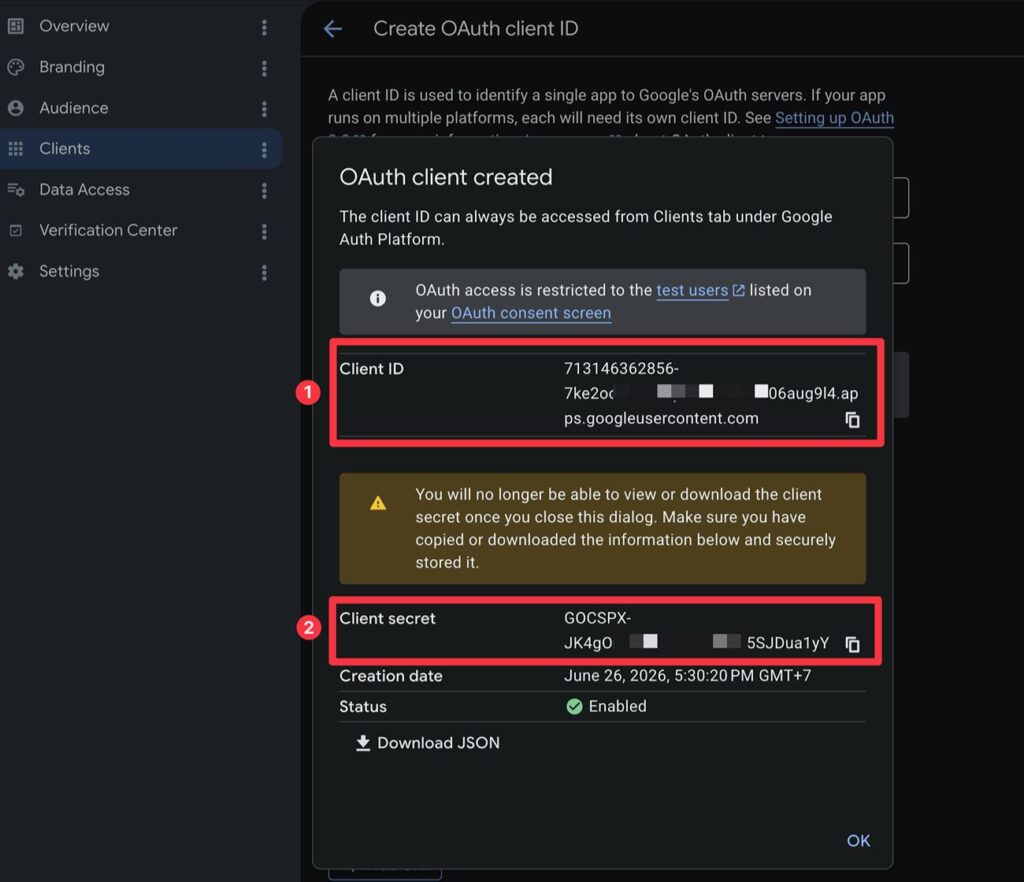
Once you have both values copied to a safe place, you’re finished inside of Google Cloud Console.
How to find the Google Docs Add-On redirect URL
If you’re having trouble finding the Gravity Forms Google Docs Add-On redirect URL that you need when setting up your OAuth client, here’s a more detailed guide and screenshot:
- Open your WordPress dashboard.
- Go to Forms → Settings.
- Select the Google Docs tab inside of the Gravity Forms settings area.
- Copy the URL in the screenshot below.
3. Connect Gravity Forms to Google Docs
Once you’ve set up the APIs and OAuth credentials, you need to connect Gravity Forms to Google Docs using those details.
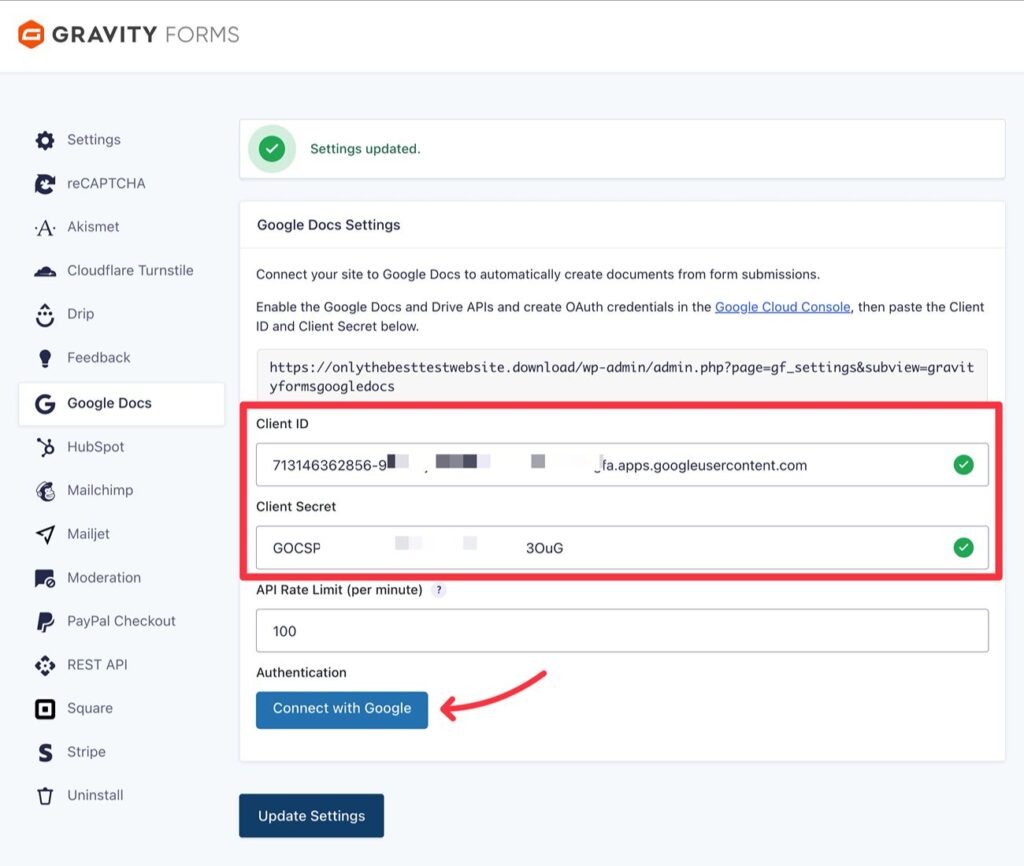
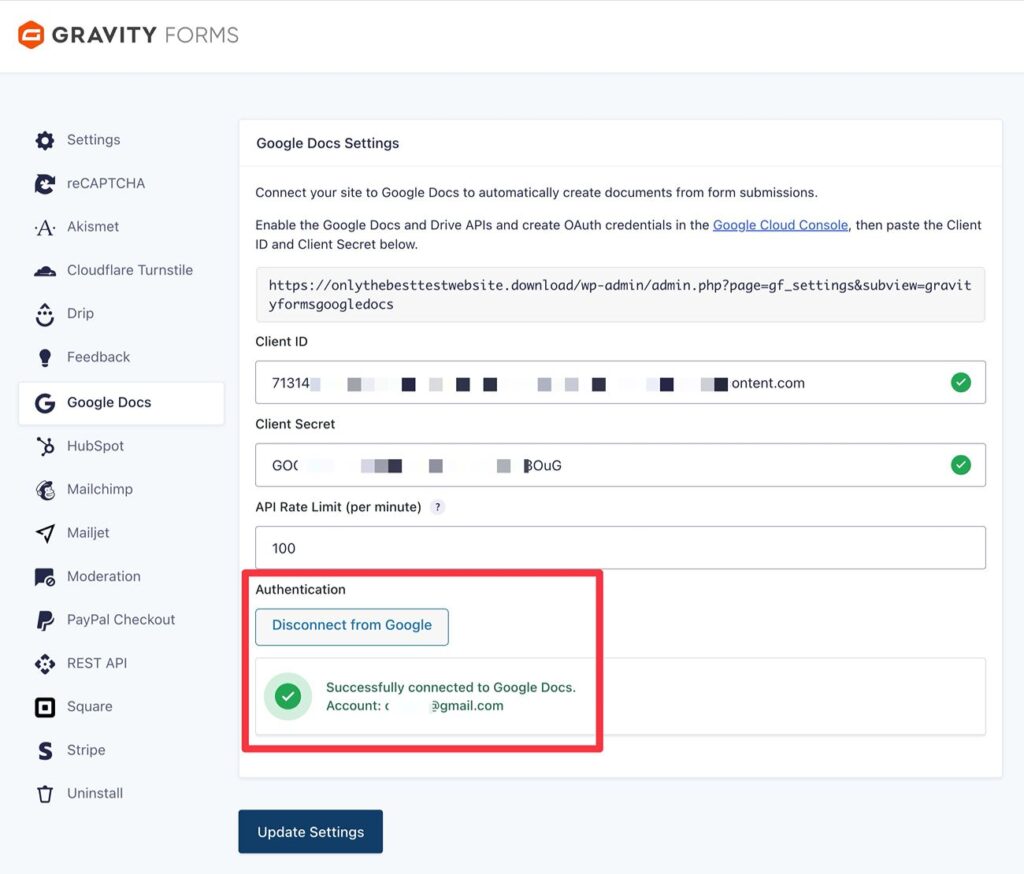
To get started, go to Forms → Settings → Google Docs in your WordPress dashboard.
Then, paste in the Client ID and Client secret values that you copied from Google Cloud Console in the previous section.
You can also set an API Rate Limit, which will limit how many documents your forms can create in a one-minute period. If you’re not sure about this, you can just leave it as the default.
Once you’ve done that, click the Update Settings button at the bottom.
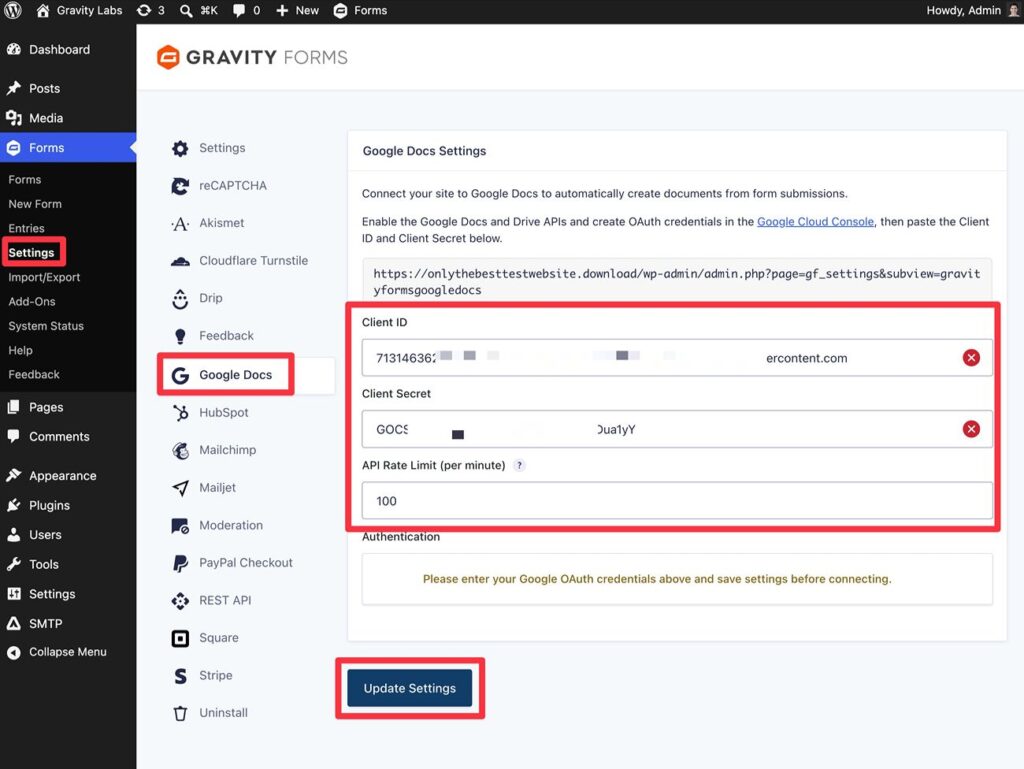
After clicking Update Settings, you should see a new button that prompts you to Connect with Google. If you don’t, make sure that you didn’t accidentally make a typo or paste a key into the wrong box.
Click that to launch the Google OAuth process.
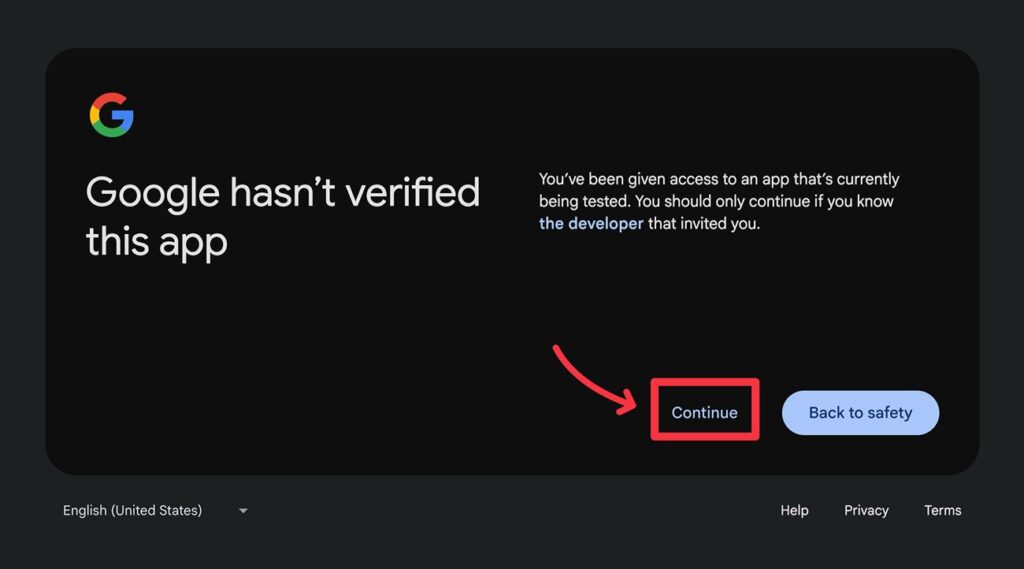
At the start of the authorization process, you’ll see a warning that Google hasn’t verified the app yet. Because you’re connecting to your own app as a test user, you’re safe to click Continue.
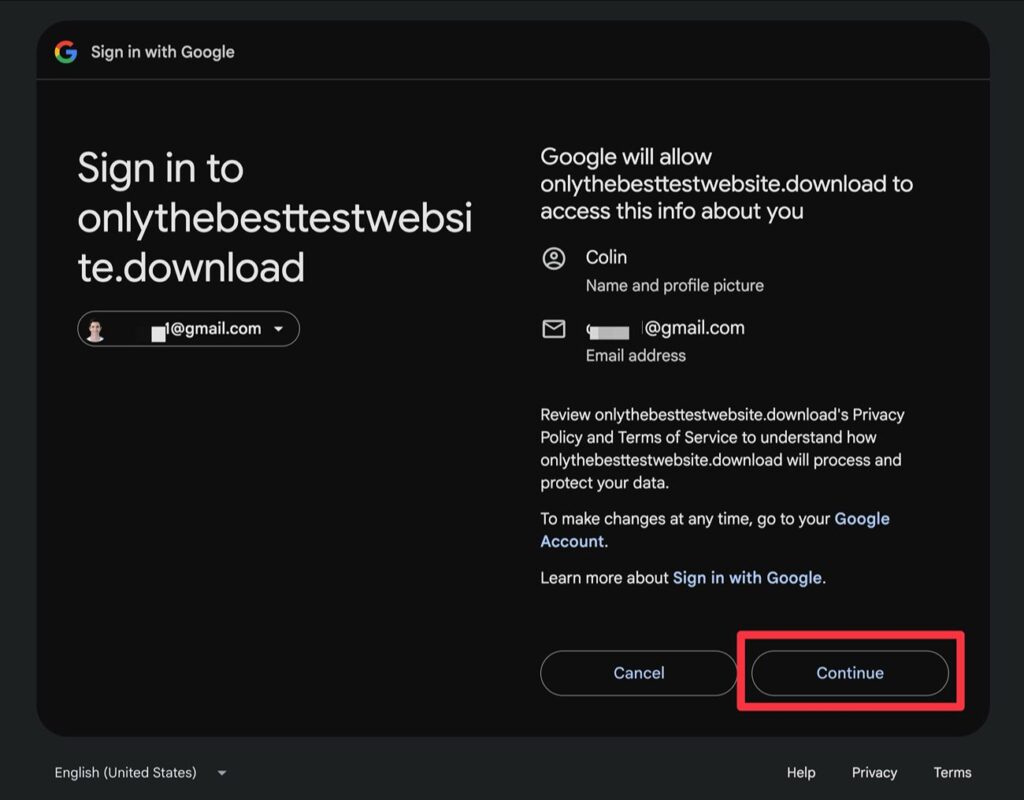
You then need to select the Google account that you want to connect to. Then, click Continue again.
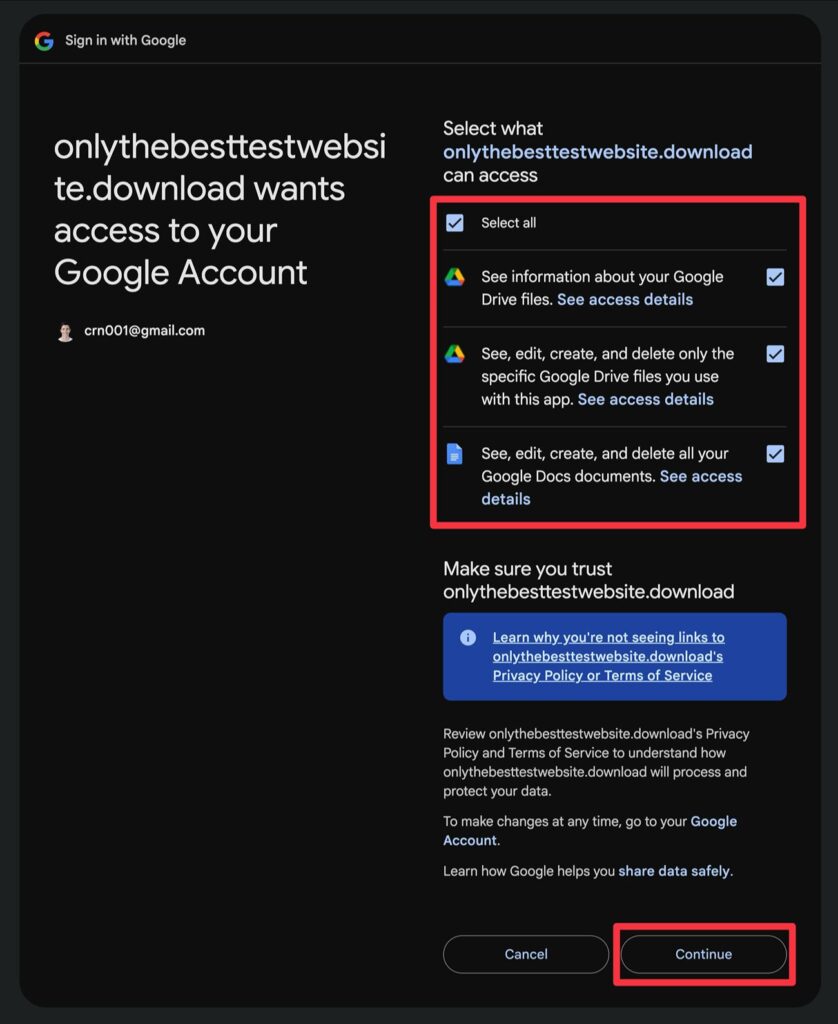
On the next screen, check the Select all box to give Gravity Forms the permissions that it needs to create Google Docs documents in your Drive folders.
Then, click Continue.
You should then be taken back to your WordPress dashboard, where you’ll see a message saying that you’ve Successfully connected to Google Docs with your chosen Google account.
4. Create or edit the form that you want to connect to Google Docs
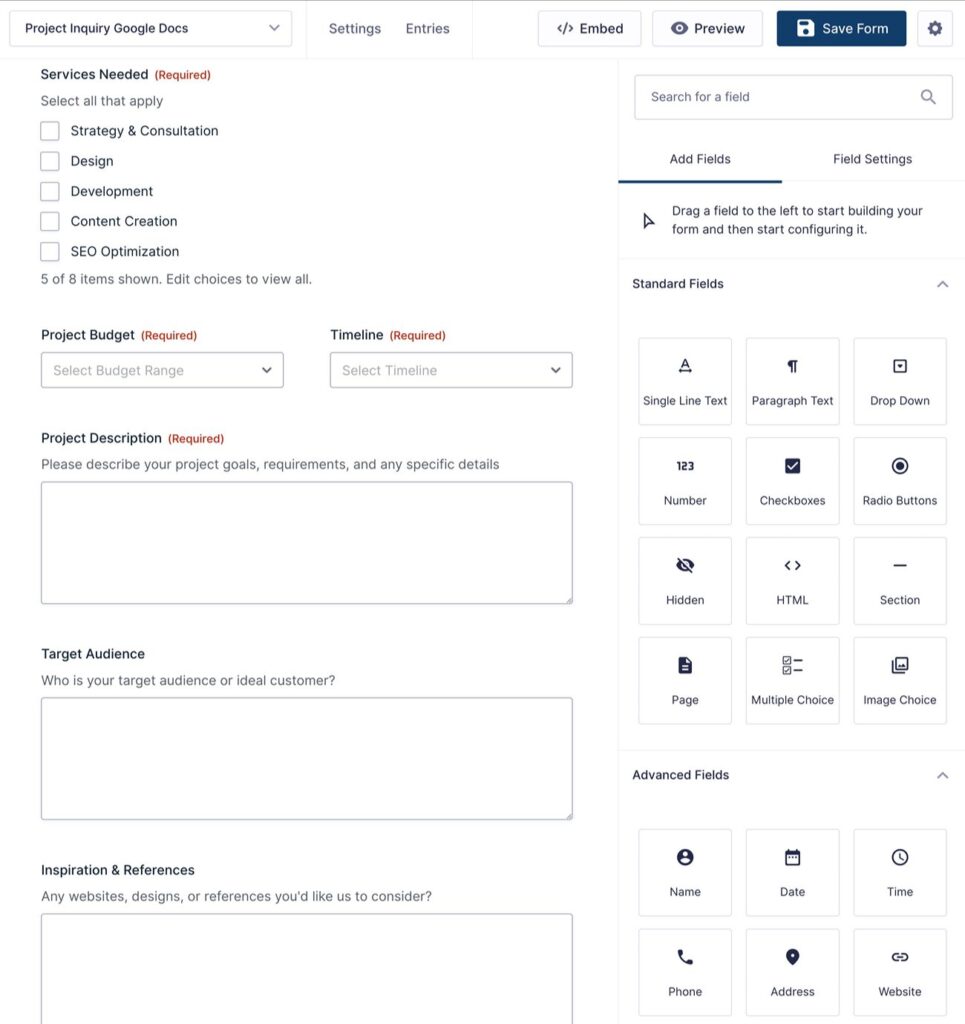
If you haven’t already set up the form that you want to connect to Google Docs, you’ll need to do that now.
You can use one of the many pre-made form templates or design your form from scratch.
Or, if you already have a form that you want to connect to Google Docs, you should open the editor for that form.
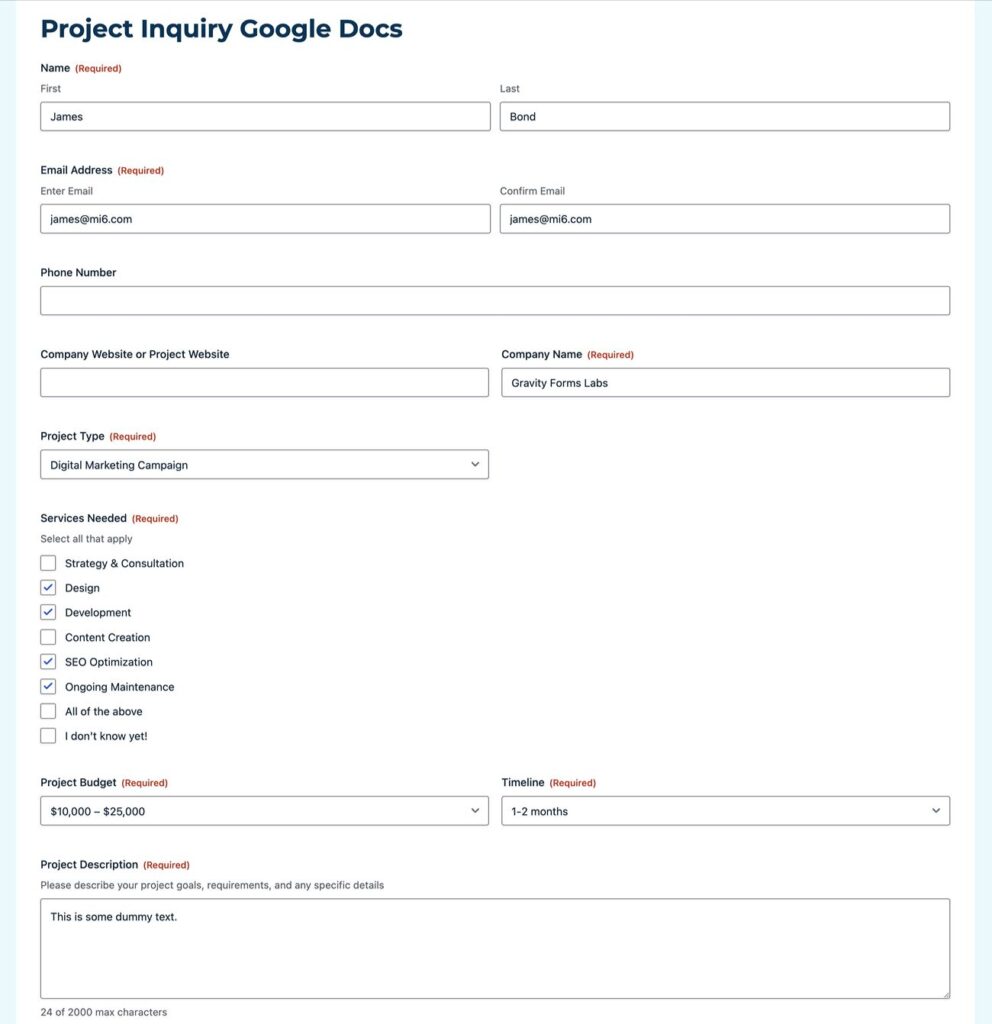
For this example, we’re using the pre-made Project Inquiry Form template. Putting the details from the project inquiry form template into Google Docs might make it easier for some teams to collaborate and provide a response to the project inquiry.
5. Set up a Google Docs feed for your form
Once you’re happy with your form itself, you need to create a Google Docs feed. This is what lets you control how to map data from your field to Google Docs.
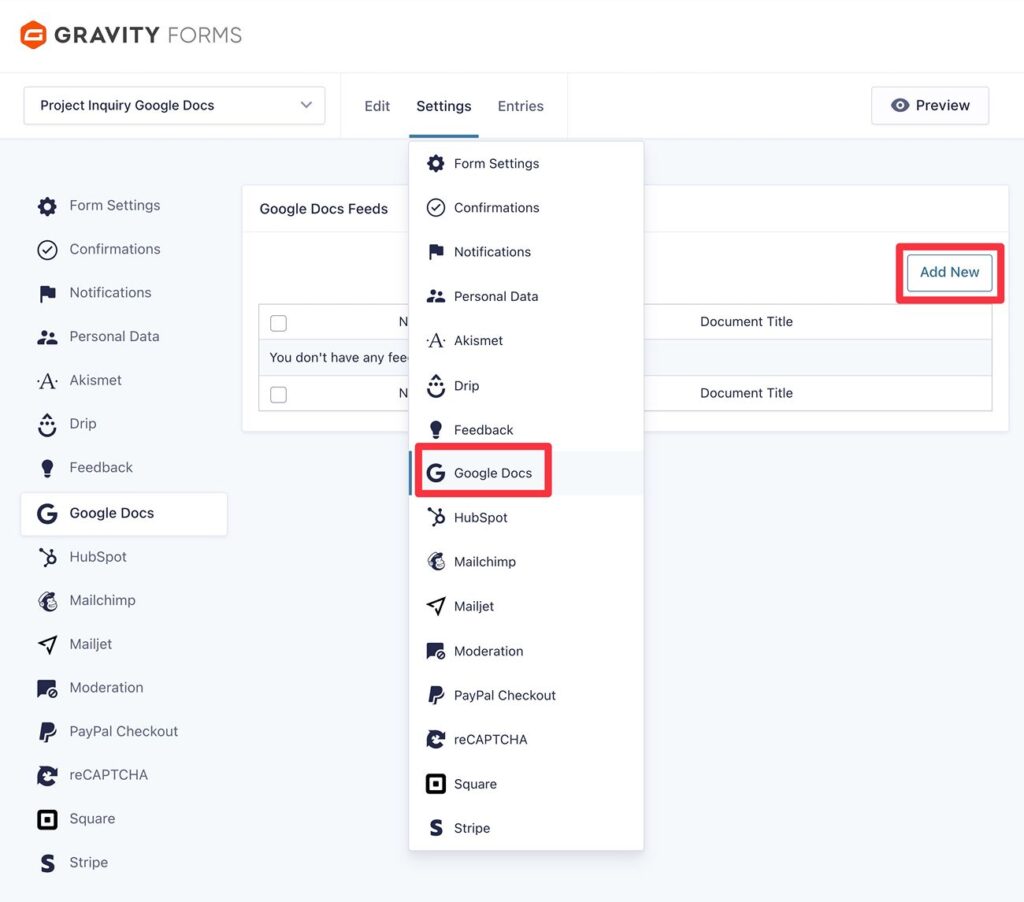
To create your first feed, go to Settings → Google Docs inside the form editor. Then, click Add New to create your first feed.
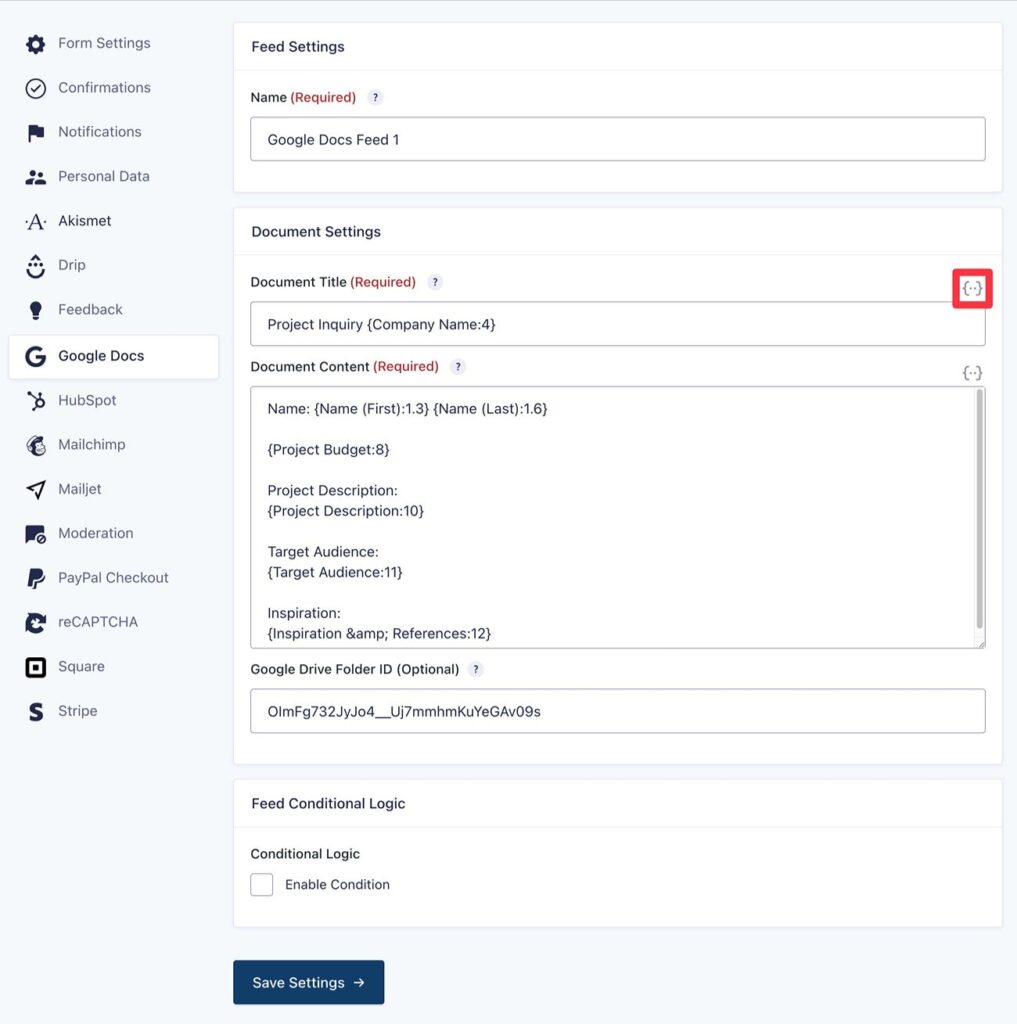
There are only a few settings inside the feed.
The two most important ones are:
- Document Title – controls the title of the document in Google Docs.
- Document Content – controls the body of the document.
For both fields, you can dynamically include data from your form using Gravity Forms merge tags. You can insert these by clicking the {..} icon in the top-right of each setting.
In addition to merge tags, you’re also free to mix in static text, which lets you add structure to the document if needed.
Below that, you also have an option to specify a Google Drive Folder ID. This allows you to save all docs into a specific folder, rather than just the main Google Drive folder.
To find the folder ID, open the Google Drive folder in a different tab. Then, look for the ID number at the end of the URL.
For example, if the URL is https://drive.google.com/drive/u/0/folders/1OImFg732JyJo4__Uj7mmhmKuYeGAv09s
The Google Drive folder ID is OImFg732JyJo4__Uj7mmhmKuYeGAv09s.
Finally, you also have the option to add conditional logic. This would let you create the document in a different way (or skip creating it entirely) based on how someone fills out the form.
When you’ve made your choices, make sure to click Save Settings at the bottom.
6. Test the Gravity Forms Google Docs connection with a submission
To finish things out, we recommend submitting a test entry to make sure everything is working as you want it to.
If you haven’t done so already, you’ll first need to embed the form somewhere on your site using the Gravity Forms block, shortcode, or PHP function.
Once you’ve done that, you can submit the form using some test information.
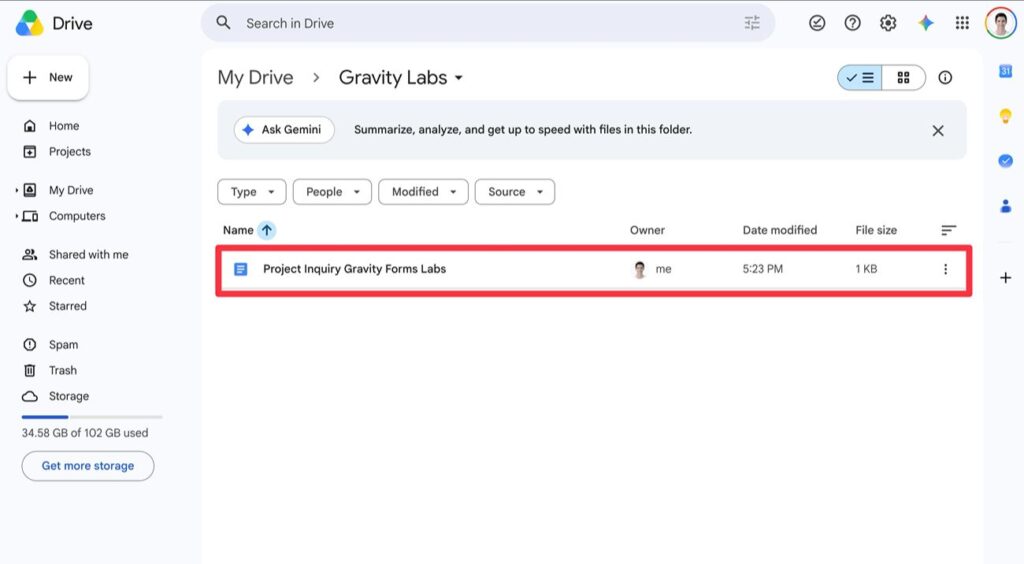
If everything works properly, you should see the Google Doc automatically appear, either in your main Google Drive folder or the folder ID that you specified.
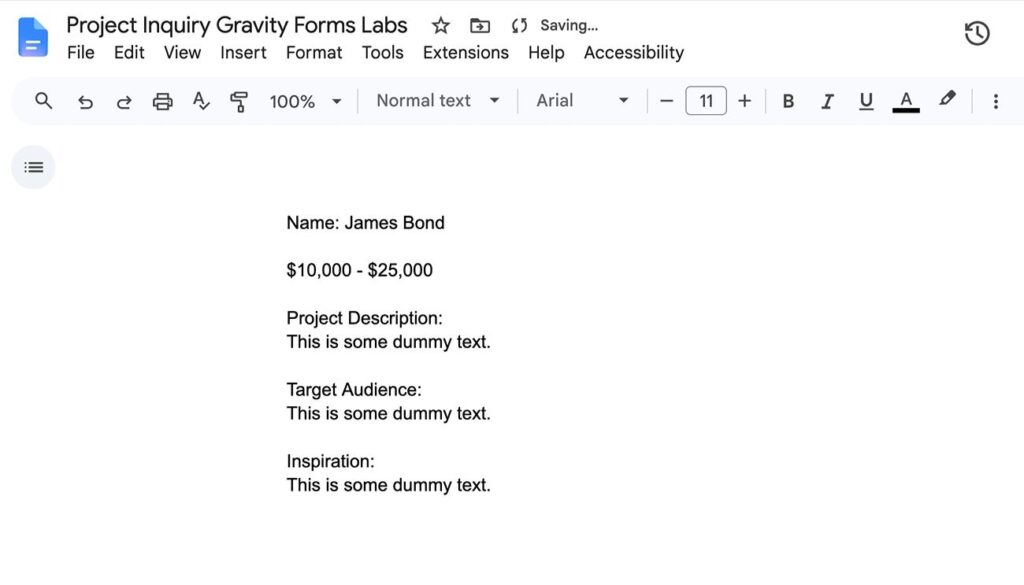
If you open the file, you should see all of the data appear according to the template that you created using static text and merge tags.
You’re then free to edit and collaborate in the document as needed.
Try the Gravity Forms Google Docs Add-On today
The Google Docs Add-On is available now in Gravity Labs. It’s free with any Gravity Forms license. As a Labs add-on, it’s experimental and sits outside our standard support — and your feedback helps shape what we build next. If you give it a try, we’d love to hear how it works for you.

Newsletter
If you want to keep up-to-date with what’s happening on the blog sign up for the Gravity Forms newsletter!
"*" indicates required fields