

Have you ever wanted to create a digital quiz on your own website? Maybe you want to use a quiz to train employees, make your content more engaging, or just give your visitors something to share.
With Gravity Forms, you can create an interactive quiz that grades user responses and collects their email address for future nurturing. In this article, we’ll walk you through the steps of creating your own quizzes with Gravity Forms.
How to Create Quizzes with Gravity Forms
Like most of our extensions, the Gravity Forms Quiz Add-On is easy to set up and use. Follow these steps to create your first quiz.
1. Install Gravity Forms
If you haven’t already, you’ll need to install Gravity Forms to your WordPress dashboard. Read our Getting Started Guide if this is your first time installing a plugin.
Step 2: Install the Quiz Add-On
In order to use the quiz features, you’ll need the Quiz Add-On. This add-on comes with with a Gravity Forms Elite License.
The great thing about the Elite License is that it grants you access to every Gravity Forms add-on. You’ll probably find uses for some of our other tools, like Survey, Coupons, User Registration, or Polls. You may even need our payment integrations – Stripe, Payments Pro, and 2Checkout.
To install an add-on, hover over Forms on the left hand menu in your WordPress dashboard. Click Add-Ons. Then find the Quiz Add-On in the list and click the Activate button.
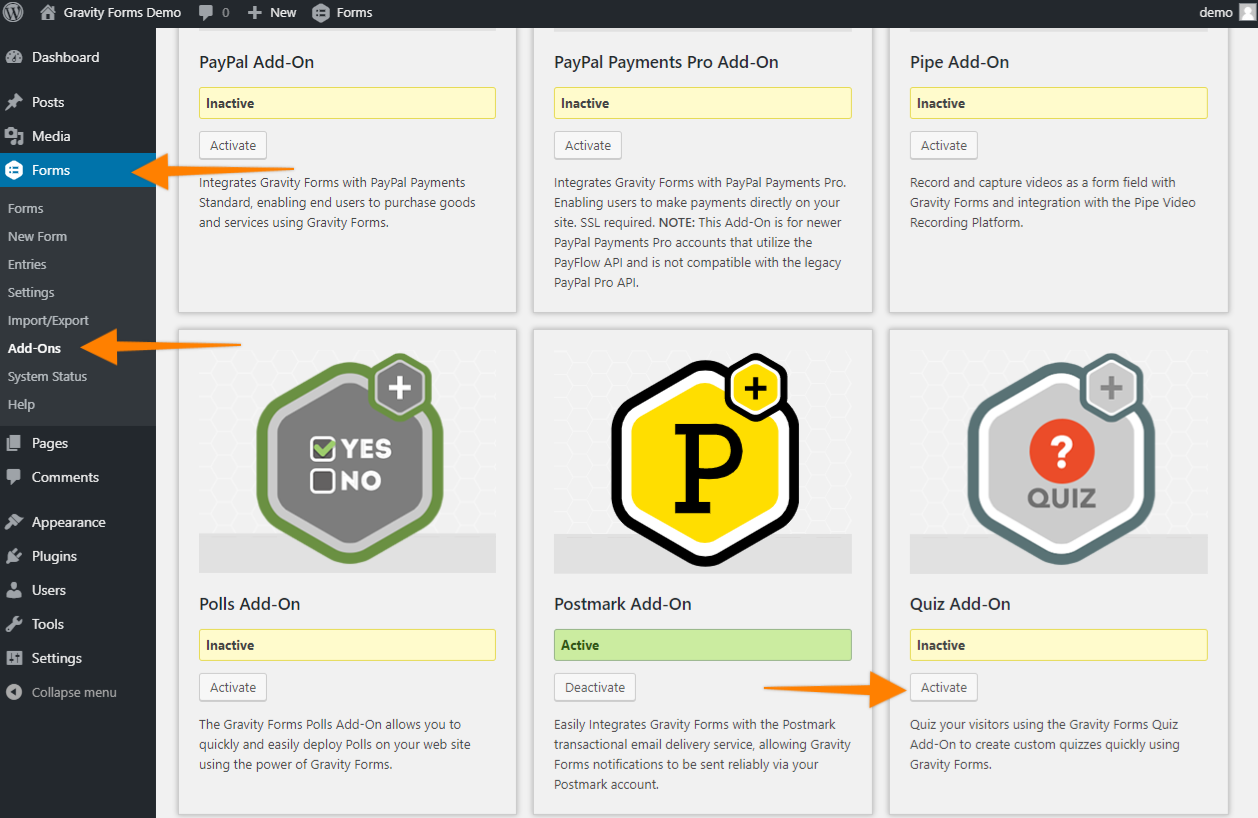
Next click on Plugins at the left side of your WordPress dashboard, find the Quiz Add-On on the list, and click the Activate link.
If you get stuck or would prefer to install the add-on manually, read our full guide on Installing a Gravity Forms Add-On.
3. Create Your Quiz Form
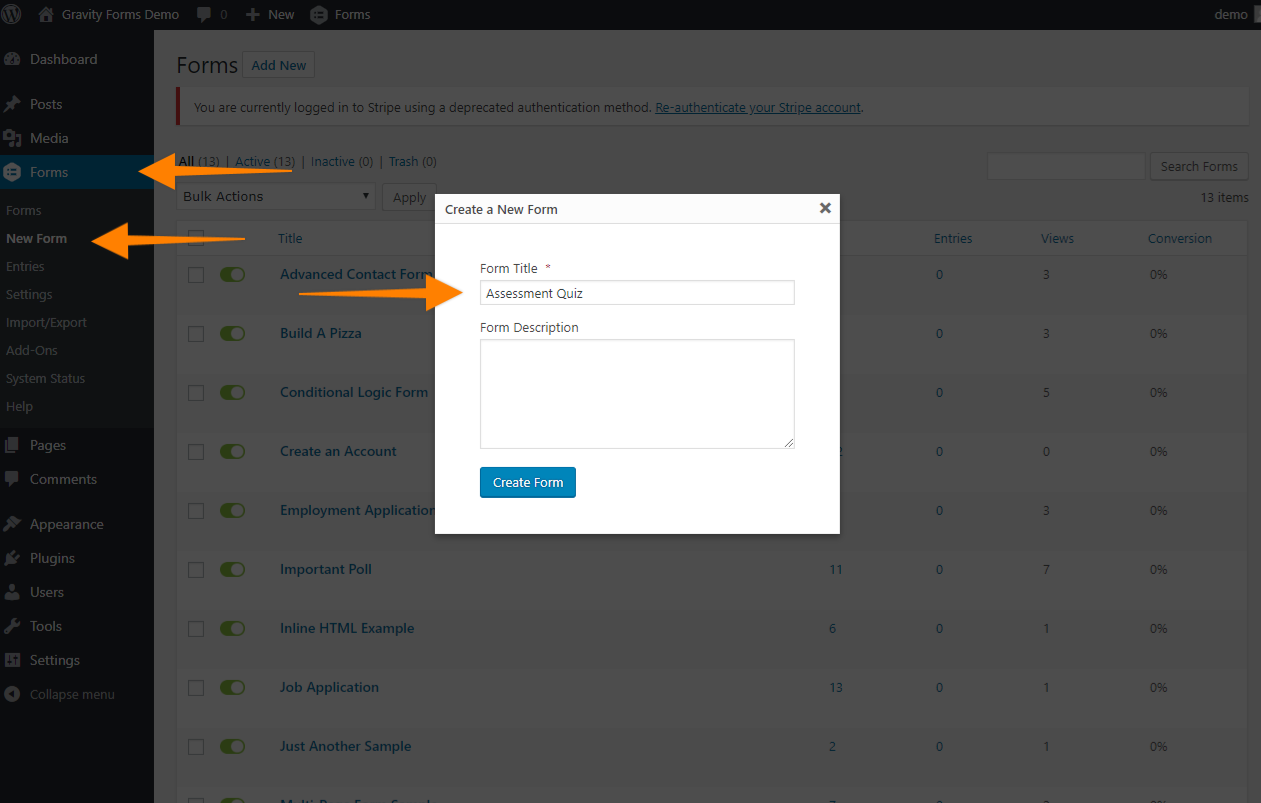
It’s time to make your first quiz! Hover over Forms on the left side of your dashboard and click New Form. Give your quiz a name that distinguishes it from other forms. You don’t have to give your form a description, but you may want to (this will appear with the form title on a page if you set it to).
If you aren’t familiar with WordPress, we recommend reading our step-by-step guide to creating forms: How to Create a Form in WordPress.
4. Build Your Quiz
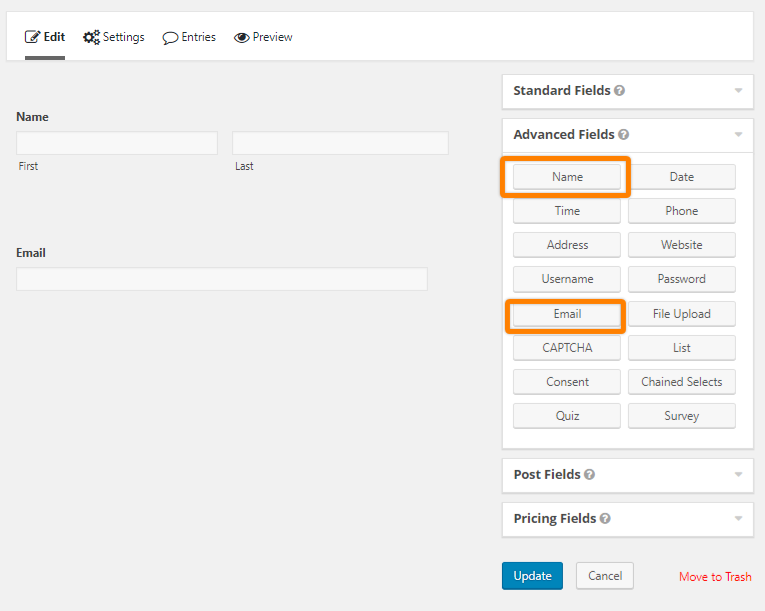
Now that you’ve got everything set up, it’s time to build your quiz. Start by adding a name and email field so you can send participants their results and contact them in the future.
For your quiz questions, you’ll need to use the Quiz field under Advanced Fields.
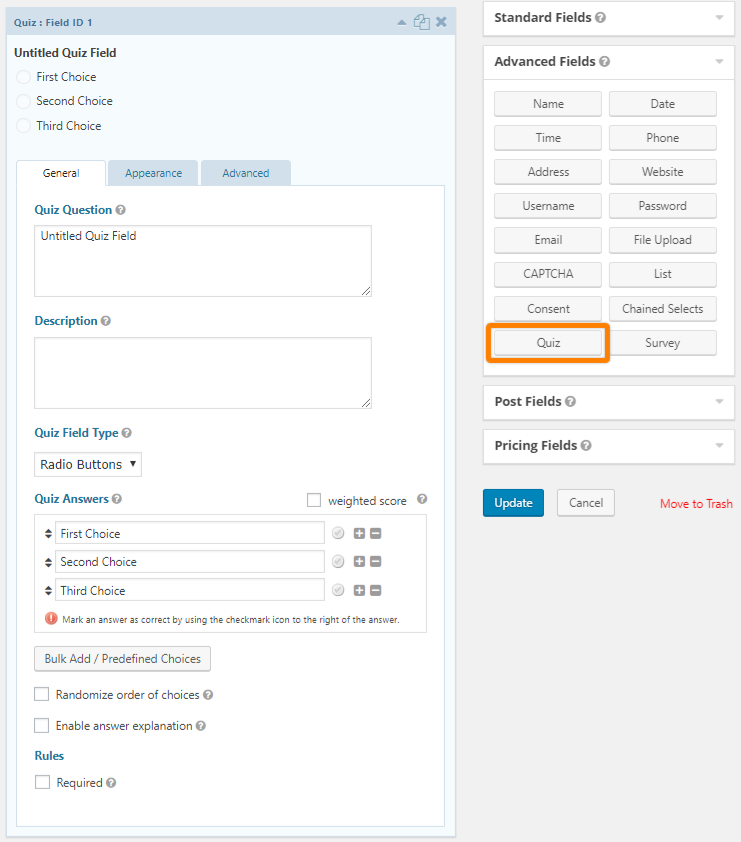
When you create a quiz field, you’ll first need to create the question. You may find it helpful to give each question a description as well. This is useful if you think your participants need a little more instruction to answer the question properly.
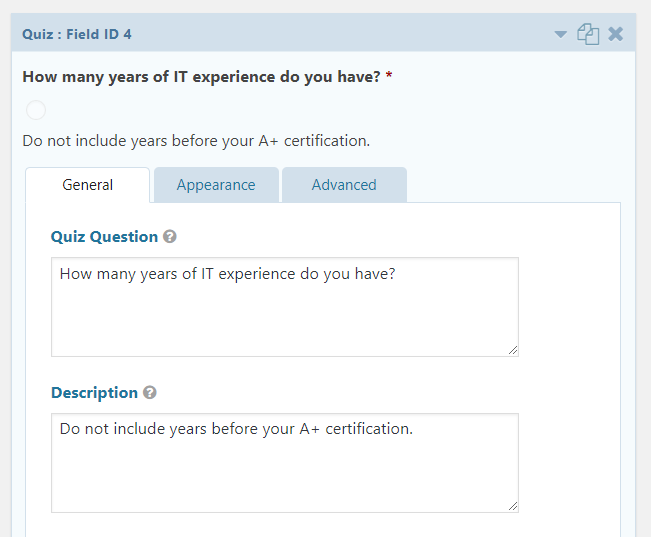
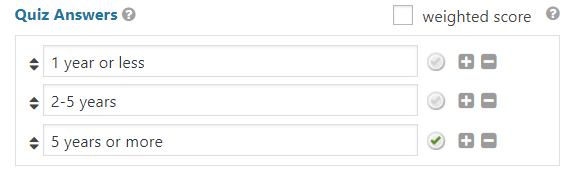
Next choose your quiz field type and enter your options. Your options are radio buttons, checkboxes, or a drop down.
If your question has a correct answer, click the check mark next to that option. This is how Gravity Forms knows how to score your quiz. In this case, for example, you might designate one option as the correct answer so you can reject participants who select something different.
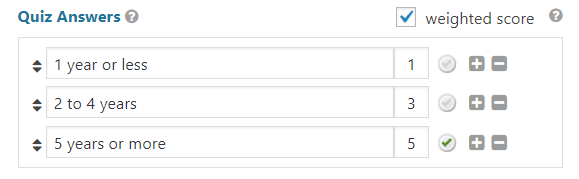
If your question doesn’t have a clear answer, you may want to give each option a weight for Gravity Forms to total at the end. In the case of our example, you might award people with more experience more weight.
Once you’re happy with your question, make sure to check the Required box at the bottom of the quiz field so users have to provide an answer before submitting. Then repeat this process with your other quiz questions and update your form to save it.
5. Configure Quiz Grading
Once you have all of your questions in place, your next step is to configure the grading system. When you added a quiz field to your form, a new section appeared under Form Settings called Quiz. This is where you’ll implement a grading system.
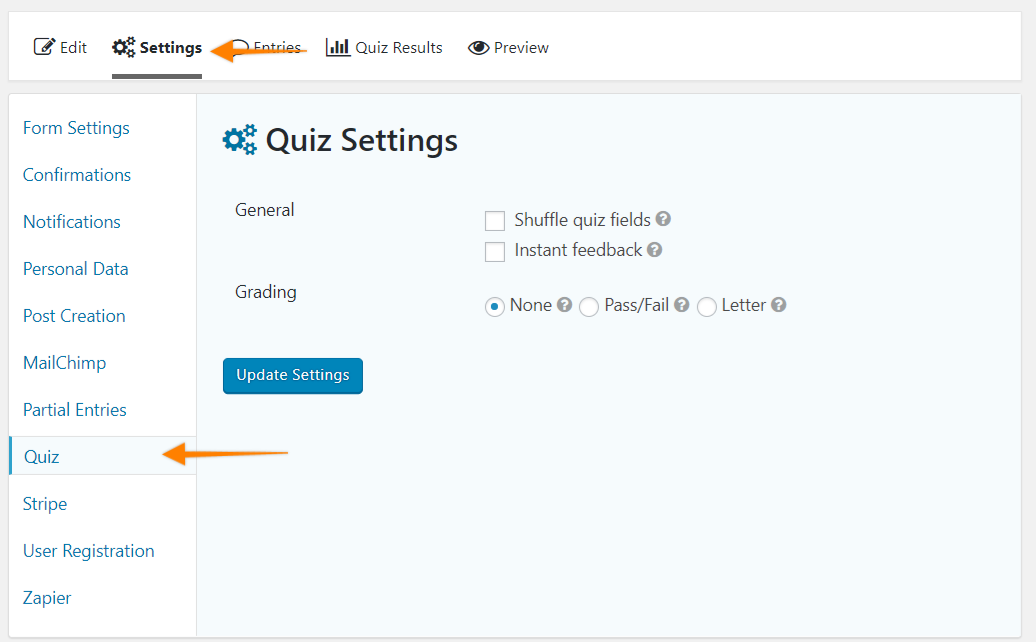
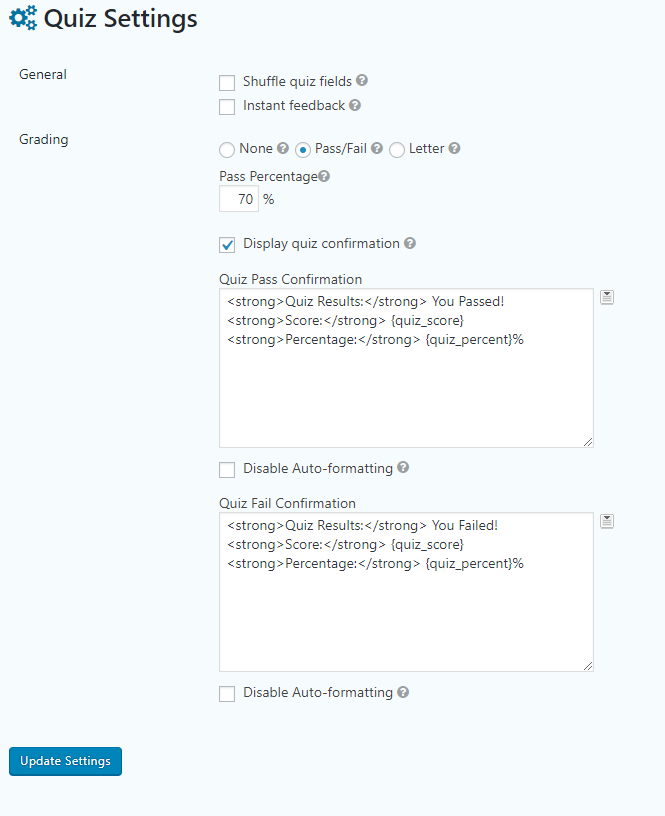
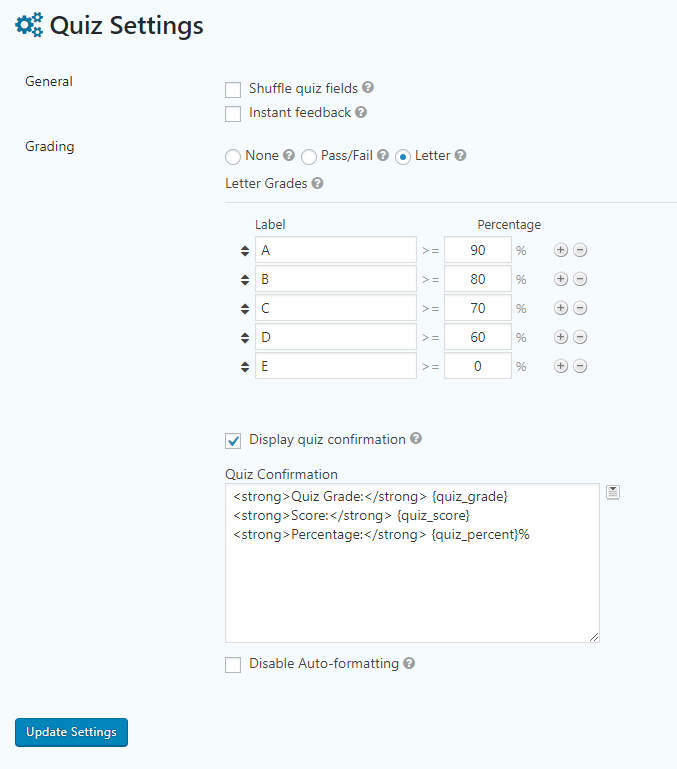
You have three options under Grading: Off, pass/fail, or letter.
Pass/fail grading lets you set a percentage threshold for passing the quiz. For instance, if you set the percentage at 70%, the user would have to get 70% of the questions correct to pass and see the Quiz Pass Confirmation. If they score under 70%, they would see the Quiz Fail Confirmation. You can customize these messages, including HTML.
Letter grading lets you assign a letter based on the pass percentage. For instance, you could award an A to anyone who scores 90% or above. You can use any letter you like and set any percentage. You can also set the confirmation message users see.
6. Configure Your Confirmations and Notifications
Confirmations are on-screen messages that give your users feedback about their submission. It reassures them that they did everything properly and can move on to something else. Gravity Forms’ default confirmation is “Thanks for contacting us! We will get in touch with you shortly.” You can change this under Form Settings > Confirmations.
Notifications are emails that Gravity Forms generates for each submission. You may want to send an email to the participant with their quiz results or an email to yourself notifying you of a new quiz submission. Change or create notifications under Form Settings > Notifications.
The Quiz Add-On comes with several new merge tags you might find useful. These can be used anywhere within Gravity Forms where merge tags are supported, but they’re primarily used to output results in confirmations and notifications.
- {all_quiz_results} – Displays all the results of the quiz fields in the form.
- {quiz_score} – Displays the number of correct quiz answers.
- {quiz_percent} – Displays the percentage of correct quiz answers.
- {quiz_grade} – Displays the grade the user achieved if the form uses letter grading.
- {quiz_passfail} – Displays either “passed” or “failed” if the form uses pass/fail grading.
Read our documentation on merge tags to learn more.
7. Add Your Quiz to a Page
Once you’re finished making your quiz, it’s time to embed it into one of your web pages so users can access it. This is a simple process that’s just like embedding any Gravity Form.
You have three options:
- Add your quiz using the classic editor. This consists of using the Add Form button at the top of your classic editor and selecting your quiz from the drop down. Gravity Forms will paste the quiz’s shortcode. Read our documentation to learn more.
- Add your quiz using the Gravity Forms block. If you use the Gutenberg editor, the Gravity Forms block is a quick way to embed your form. Read our documentation to learn more.
- Add your quiz to a theme file. This requires you to add a function call to your site’s theme. It’s a clean way to add a form, but it’s only for advanced users. Read our documentation to learn more.
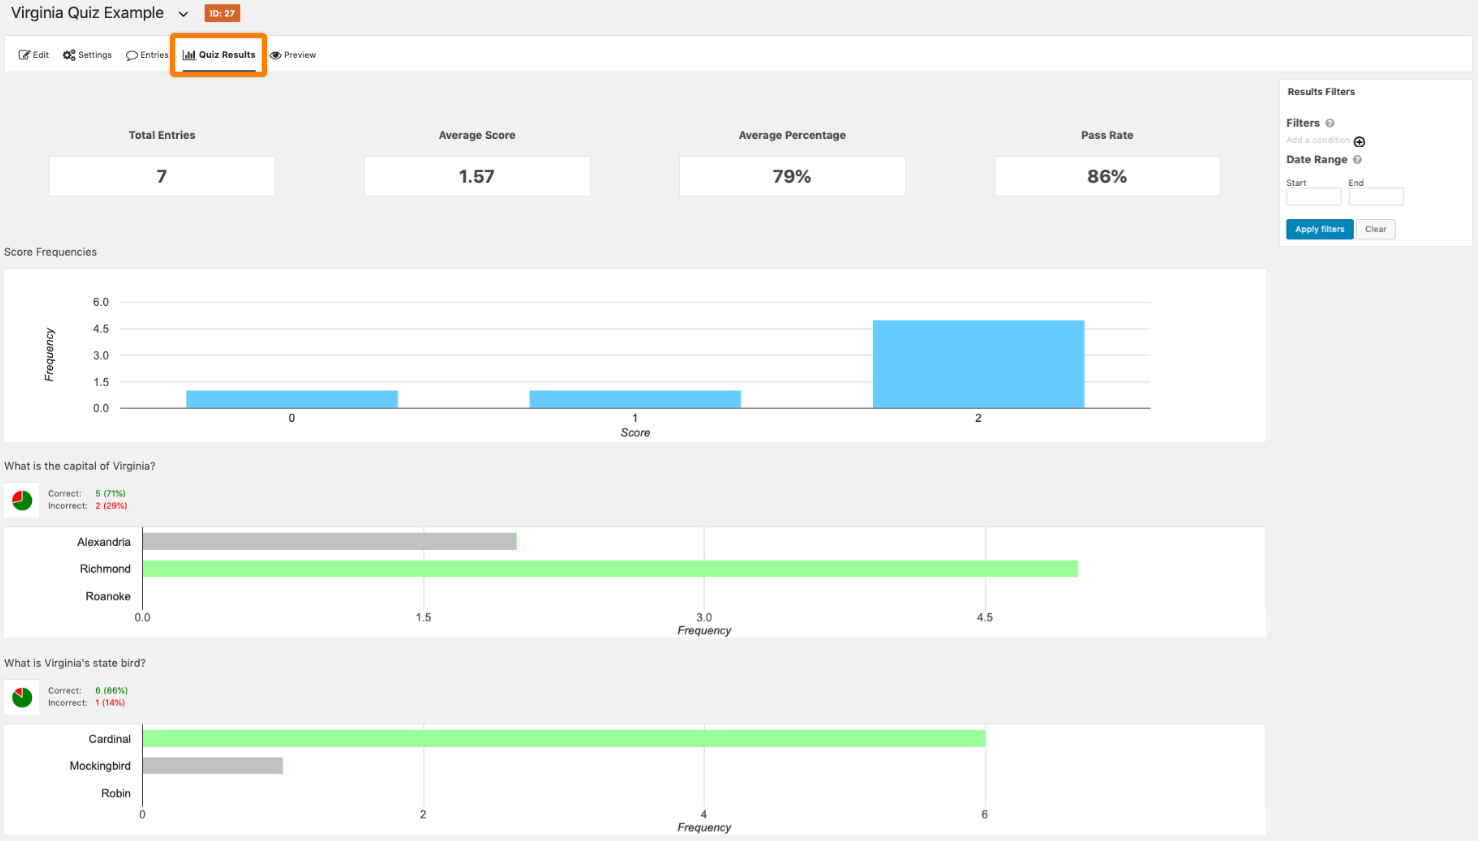
View Your Quiz Results
While it’s possible to view your quiz participants’ results under Entries (next to Form Settings), the Quiz Results tab is a better way to view all that data. This analytics page gives you a high level view of the form’s submissions in an easy-to-understand format. You can even filter this data based on date and field selection.
Happy Quizzing!
Quizzes are powerful ways to engage with your users and add value and entertainment to their lives. Follow the steps above to create a seamless, easy quiz on your website with Gravity Forms.
Have you ever made a quiz with Gravity Forms? Let us know in the comments below with a link. We’d love to check out your quiz!


