You got into photography to shoot, not to chase invoices. But if you’re running your entire photography business manually, that’s often what happens.
You send a deposit request. The client doesn’t reply. You follow up. You send the invoice. Then you wait. Then you follow up again. It’s exhausting, and it’s completely avoidable.
A properly built WordPress online booking and payment system handles all of that for you. This guide walks through how to build one using Gravity Forms and Gravity Flow. No coding required.
Key takeaways:
- Booking deposits are critical, but time-consuming to manage manually.
- Gravity Forms lets you collect booking details and securely process deposits.
- Gravity Flow automates booking approvals, deposit requests, notifications, and confirmations.
- Automation reduces errors and speeds up your booking process.
- You can build this entire system on WordPress without writing code.
Let’s get into it.
Why WordPress works for photography businesses
WordPress powers over 40% of the web. It’s free, flexible, and built to scale.
For photographers, it’s more than just a portfolio platform. It’s a full business hub. You can manage bookings, collect payments, send contracts, and automate follow-ups – all from one place.
Here’s why photographers choose WordPress for their websites:
- Full control over your content – You own your website and your client data. You’re not at the mercy of third-party platforms that change pricing or shut down features.
- Themes built for photographers – Hundreds of WordPress themes are designed around galleries, portfolios, and booking pages. Your site can look exactly how you want it to.
- Customization at your fingertips – Thousands of plugins let you extend your site. You can build a booking system that matches your exact workflow.
- SEO and growth potential – With tools like Yoast SEO, your site can rank in search engines. New clients can find you without relying on referrals or social media alone.
WordPress gives you the foundation. Gravity Forms and Gravity Flow is what turns that foundation into a working booking system.
What are Gravity Forms and Gravity Flow, and how do they help photographers?
Gravity Forms is a premium WordPress plugin for building advanced forms. It uses a drag-and-drop builder. No coding is required.
For photographers, it replaces your basic contact form with something far more powerful. You can collect session types, date preferences, package selections, and payment – all in a single submission.
Gravity Flow is an automation add-on that works with Gravity Forms. It turns form submissions into structured, automated workflows.
Each time a client submits a booking form, Gravity Flow takes over. It routes the submission to the right person, sends the right emails at the right time, and tracks every step so nothing falls through the cracks.
Here are some of the things Gravity Flow can do for photographers:
- Route new booking submissions to you or your studio manager for review.
- Send automatic notifications after a booking is approved or rejected.
- Schedule reminders and follow-ups based on booking dates, payment deadlines, or workflow activity.
- Automatically send a booking deposit form once you’ve confirmed availability.
- Track every booking from inquiry through deposit payment.
- Keep all booking activity attached to a single workflow.
Without Gravity Flow, you manage all of that manually. With it, the workflow runs itself.
Here’s how to set it up.
How to build a photography booking system on WordPress with Gravity Forms and Gravity Flow
To build a WordPress online booking and payment system, and in order to follow along with this tutorial, we’ll assume the following have already been set up:
- Gravity Forms and Gravity Flow installed and activated on your WordPress site. Alternatively, the Gravity Flow demo has everything you need to follow along.
- Gravity Forms Stripe integration installed and activated on your site.
- A booking inquiry form (built with Gravity Forms) – You can start with a pre-built form template and customize it to fit your business.
- A booking deposit checkout form (built with Gravity Forms) with a Stripe feed – This tutorial features Stripe, which is available with a Gravity Forms Pro, Elite, or Nonprofit license.

The workflow we’ll build in this tutorial supports a real-world photography business process that looks something like this:
- Client submits booking inquiry (built with Gravity Forms).
- Photographer reviews the request.
- Photographer contacts the client to discuss availability, pricing, package, location, timeline, etc.
- Photographer decides to move forward and approves the form entry (via Gravity Flow).
- Client submits the booking deposit form and pays the non-refundable deposit using Stripe.
Create the booking inquiry workflow
The booking inquiry form is where your booking workflow begins. Rather than immediately requesting payment, this form simply captures a booking request and allows you to confirm availability before asking the client to commit.
On this form, it’s a good idea to include a disclaimer that submitting the booking inquiry does not guarantee the date will be secured, and that once the terms and conditions are agreed, a booking deposit payment form will need to be completed to reserve the date.

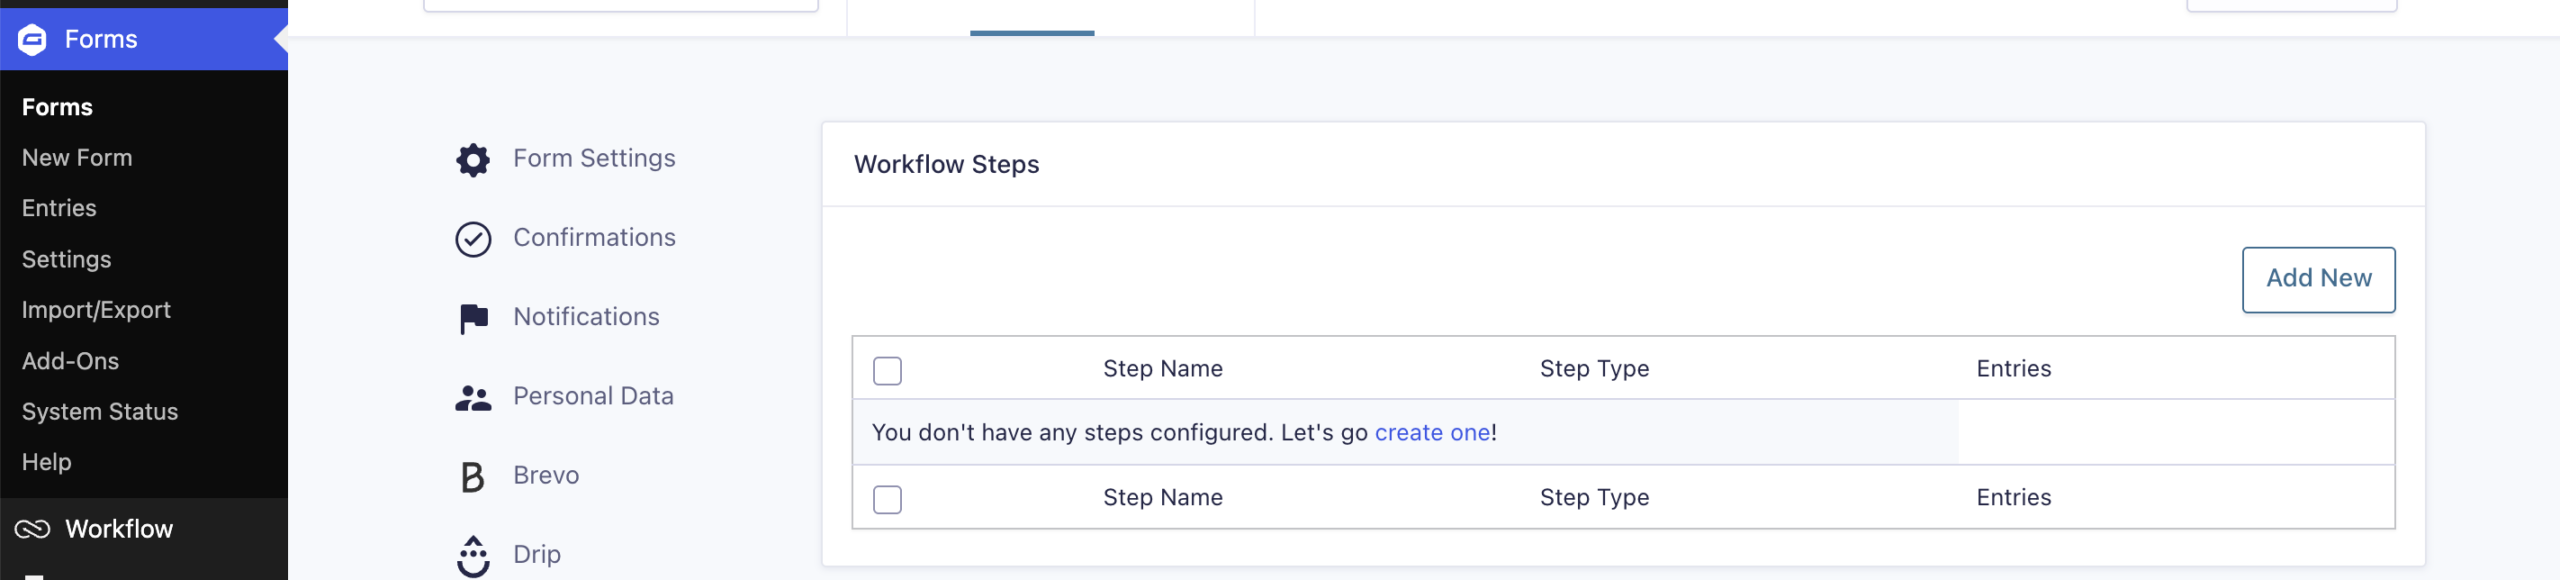
Open your booking inquiry form, then navigate to Settings → Workflow. Click Add New to create the first step in your first workflow.
Add an internal approval step
The first step in the workflow should be an Approval step assigned to you or the person responsible for managing bookings.
This gives you an opportunity to review each inquiry before committing to the booking. For example, you might confirm the requested date is available, review the session details, and contact the client to discuss pricing, packages, or any special requirements.
On the Step screen, click Approval and give the step a name.
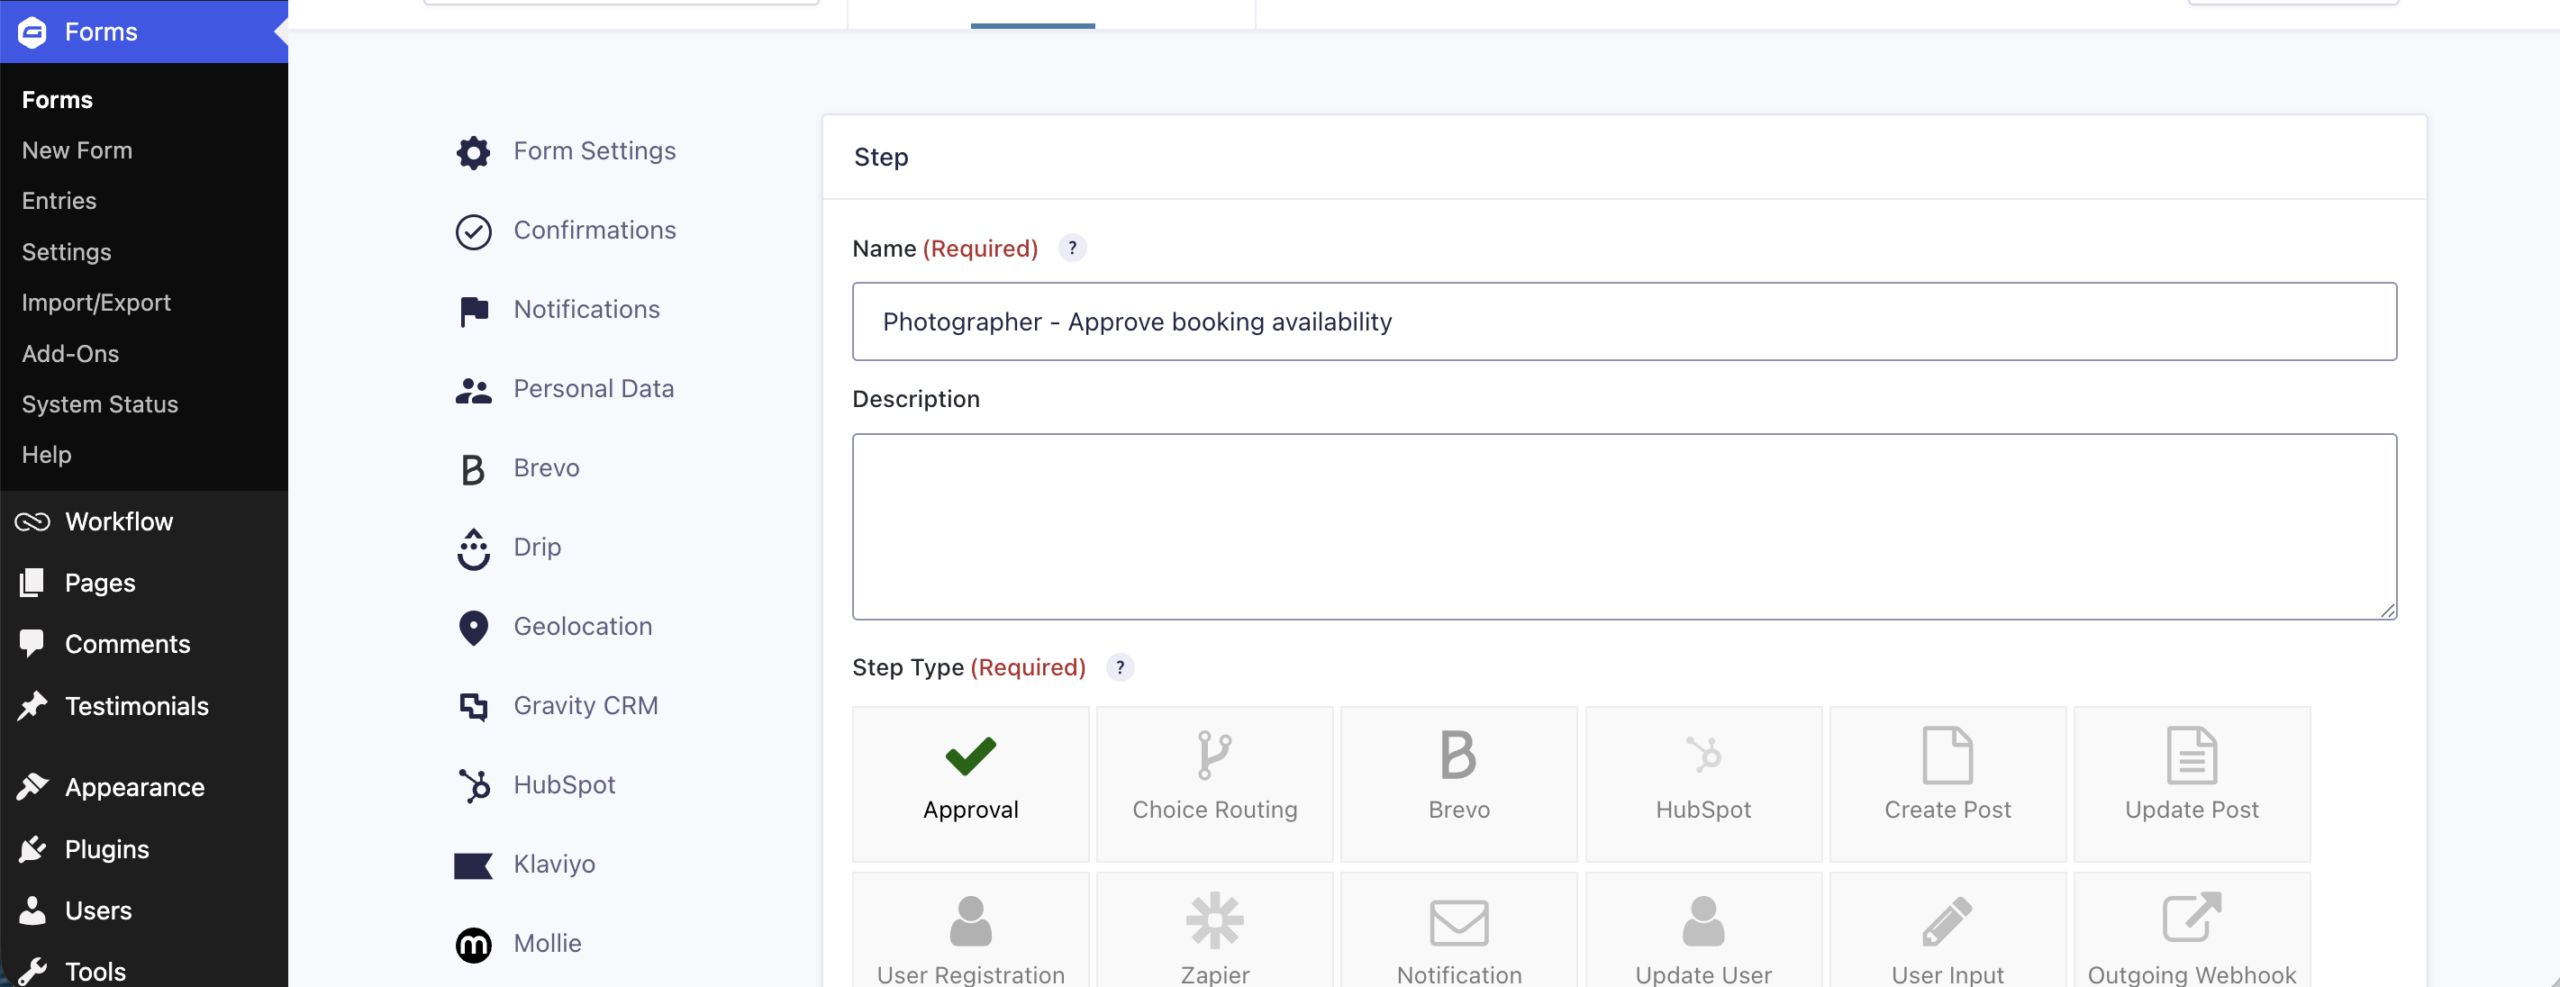
Configure the Approval step by assigning the appropriate user or role, then choose the fields you want to be editable or displayed while reviewing the request.
When you’re finished, click Update Step.
Tip: If you want to capture information that’s only relevant during the booking process, such as internal notes, consultation outcomes, or the agreed package, set those fields to Administrative in the form editor. They won’t appear on the public booking form, but they can be displayed and edited throughout your Gravity Flow workflow.
Visit the Gravity Flow documentation to learn more about the Approval step type and configuring the approval process.
In the real world, when you’re satisfied and ready to move forward with the booking, you’ll simply open the Workflow entries list for this form and approve them to continue the workflow. If the booking isn’t a good fit or the requested date isn’t available, simply reject the request instead.
Connect the booking inquiry form to the deposit form
Once you’ve agreed on the details with your client, the next step is collecting the non-refundable booking deposit that reserves their session date.
Click Add Step, give it a name, and select Form Submission.
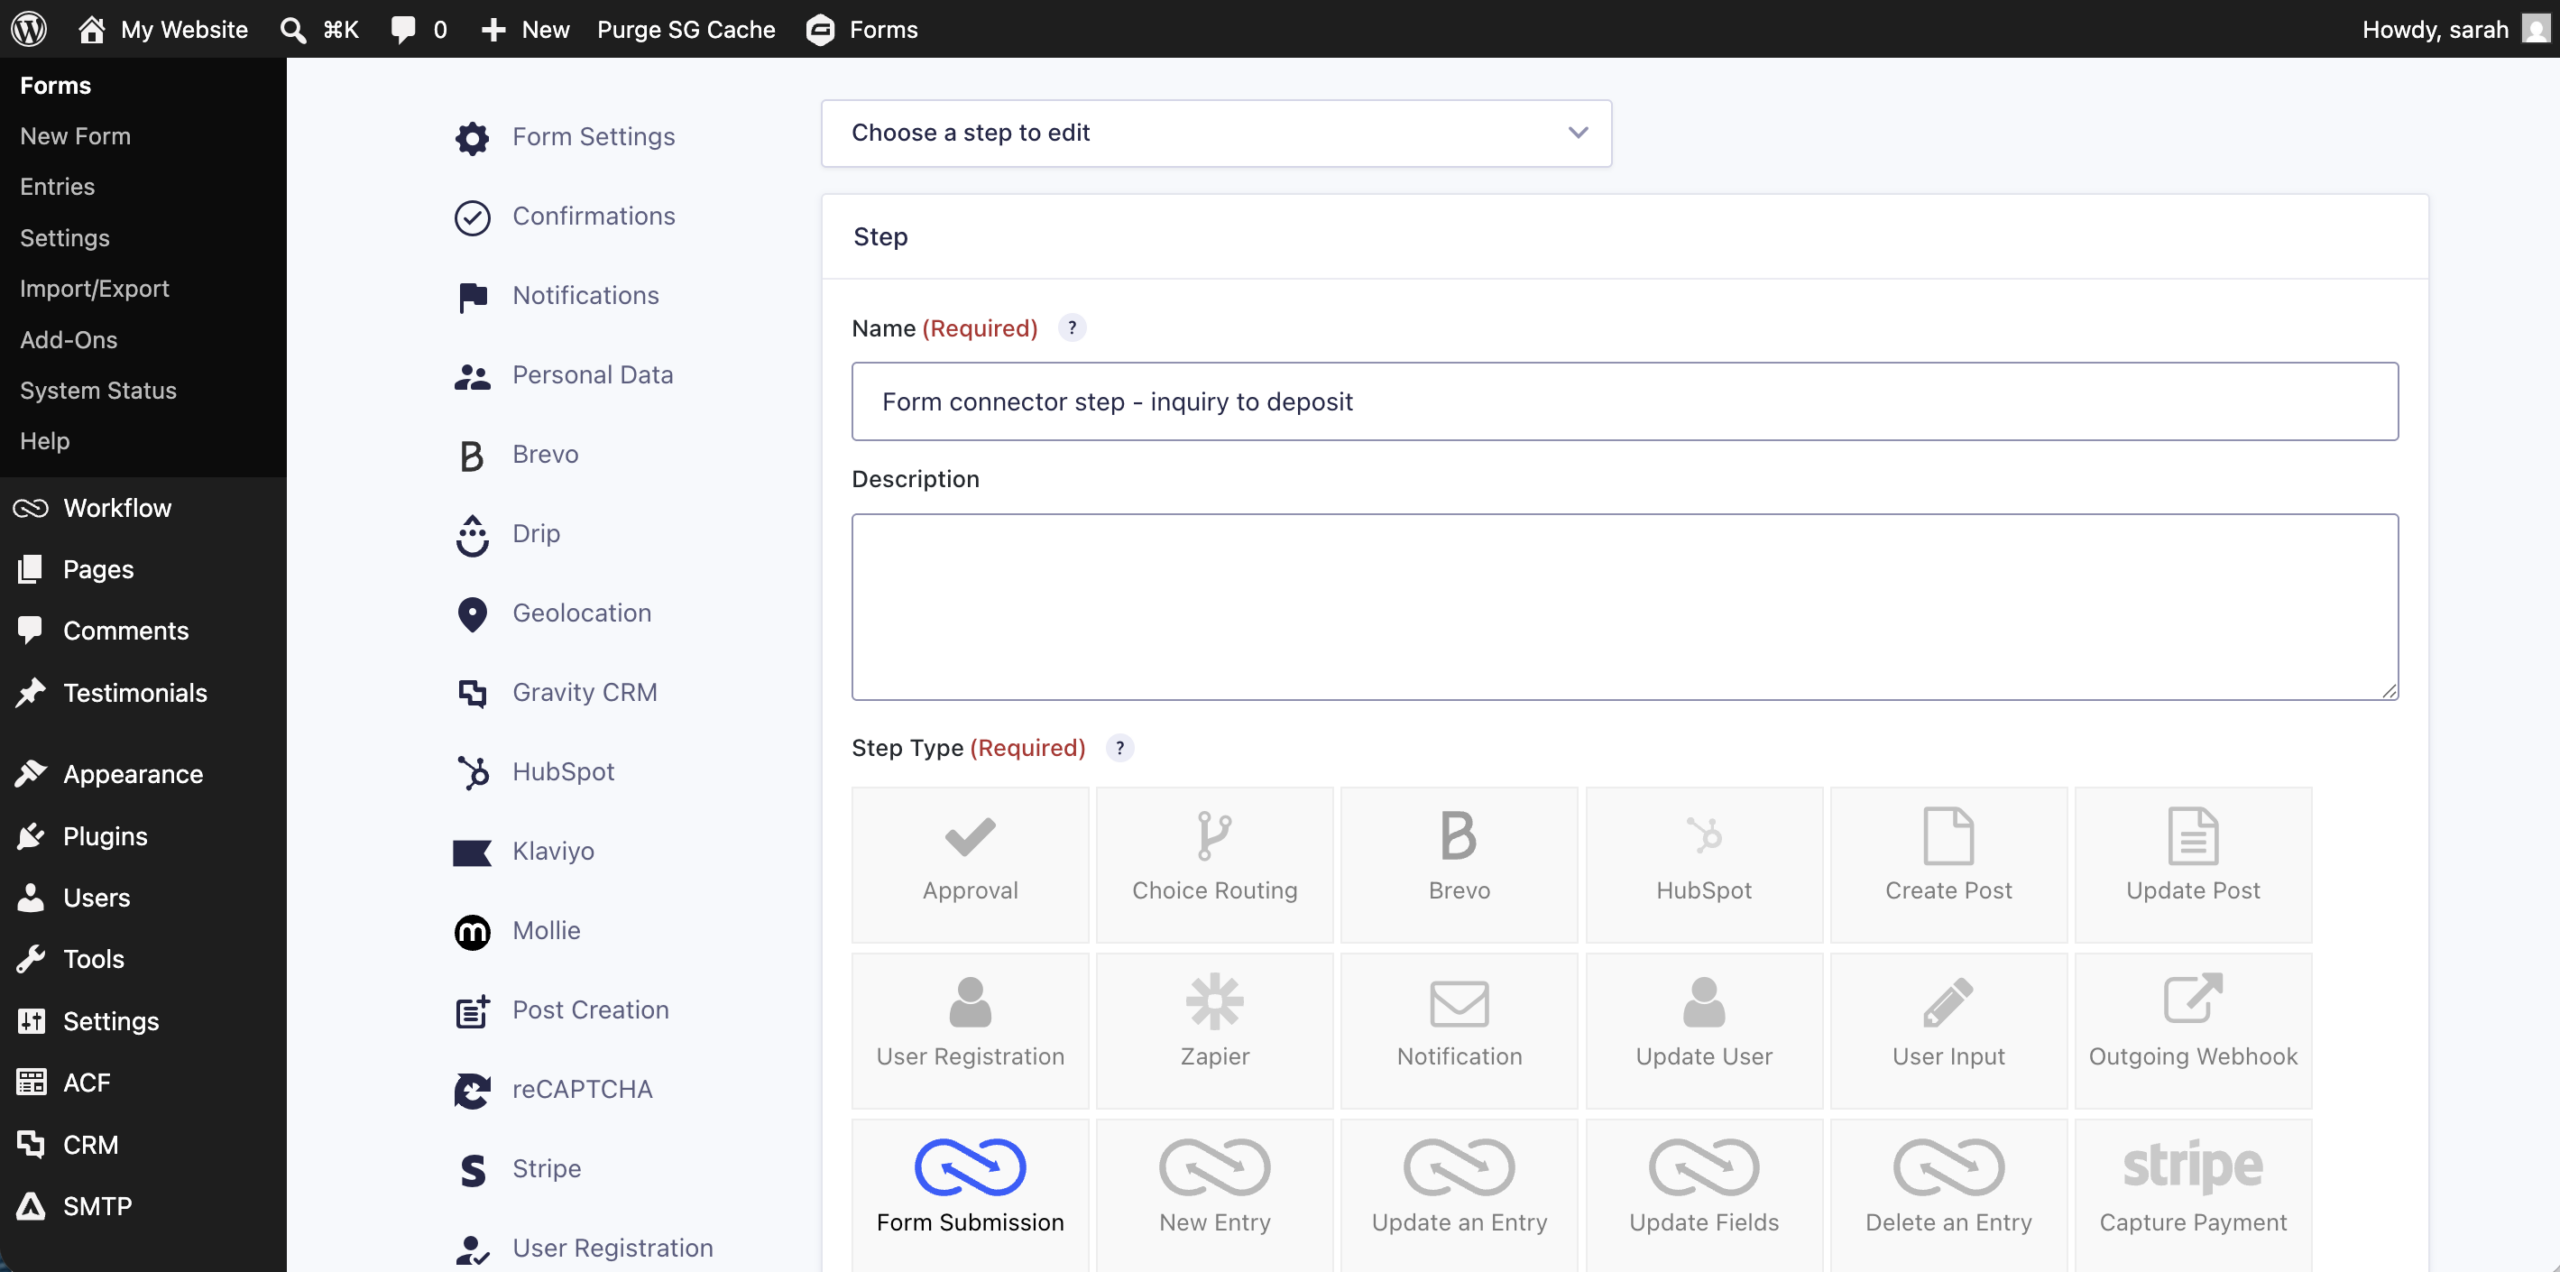
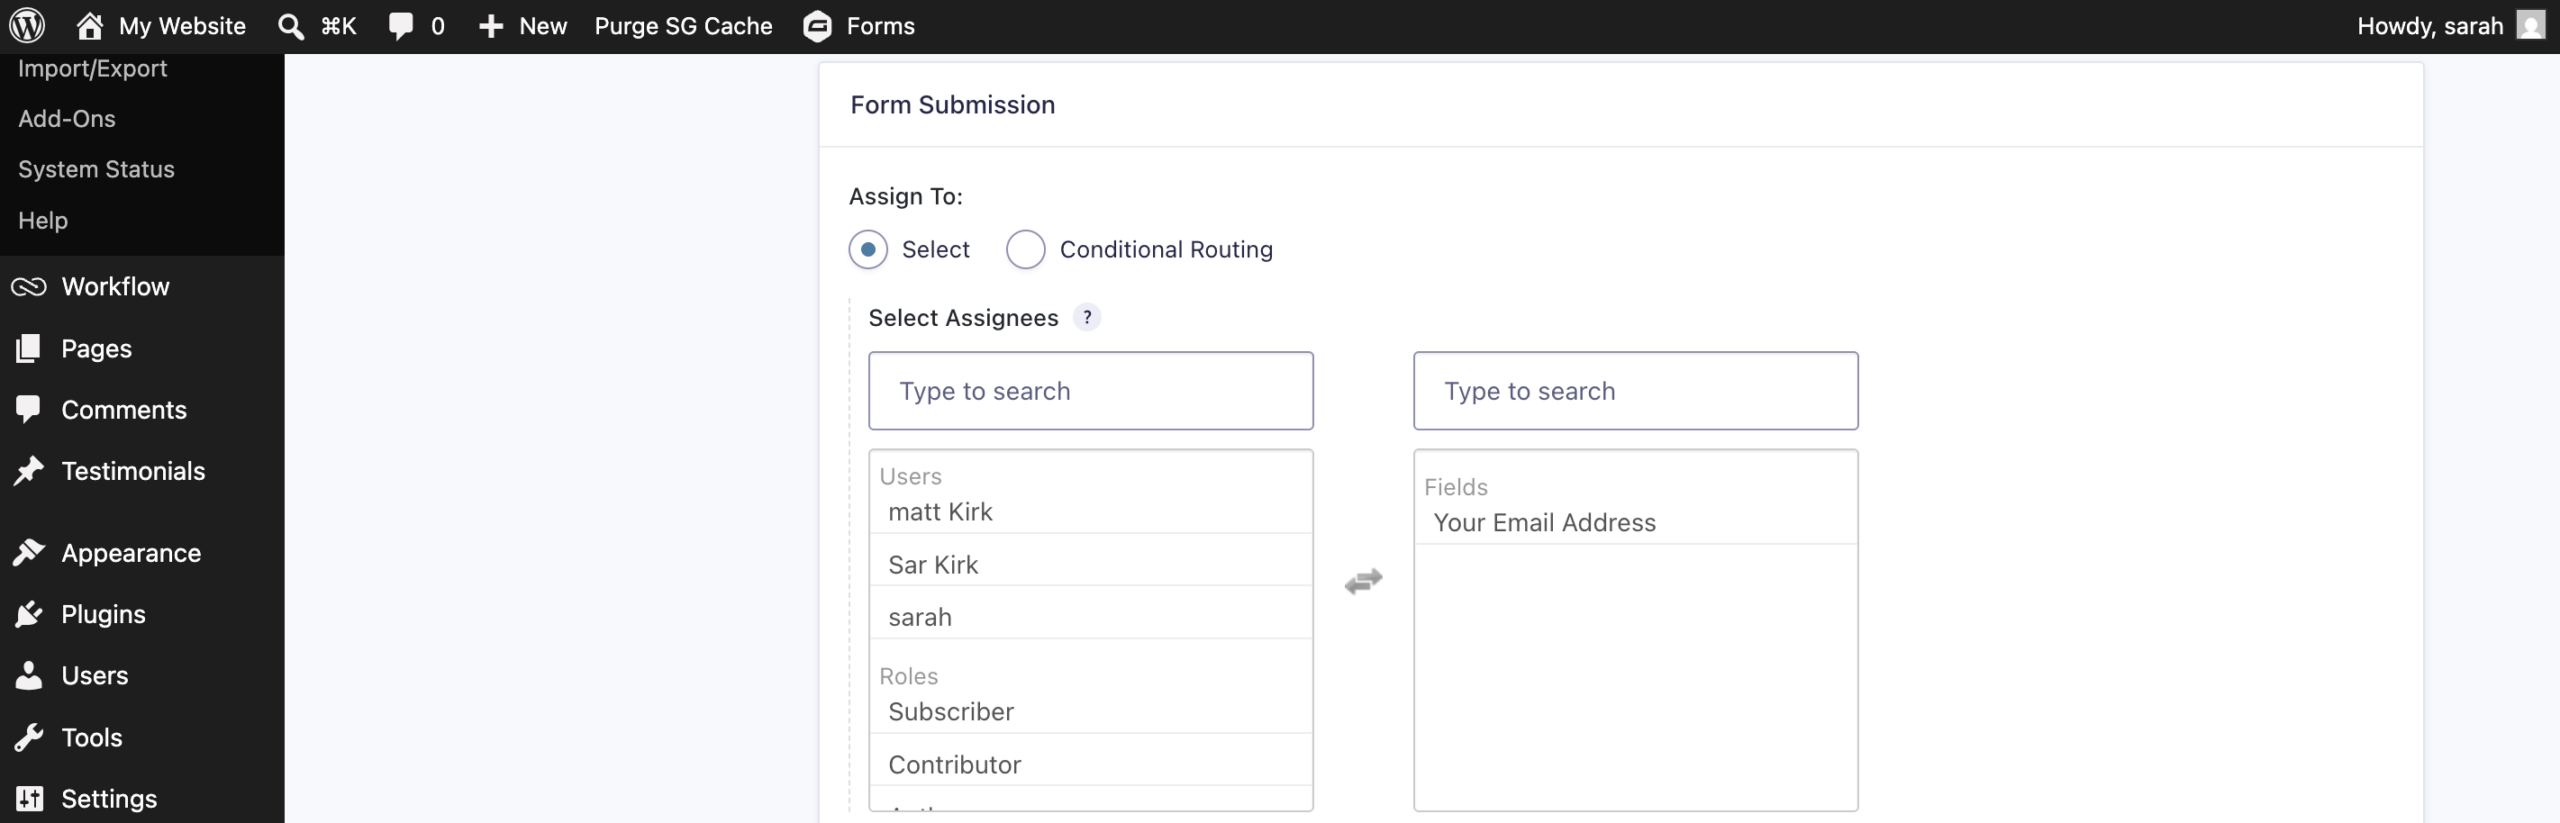
Under Assignee, select the field that contains your client’s email address. In this example, that’s Your email address. Learn more about assigning steps to an email field in our Gravity Flow documentation.
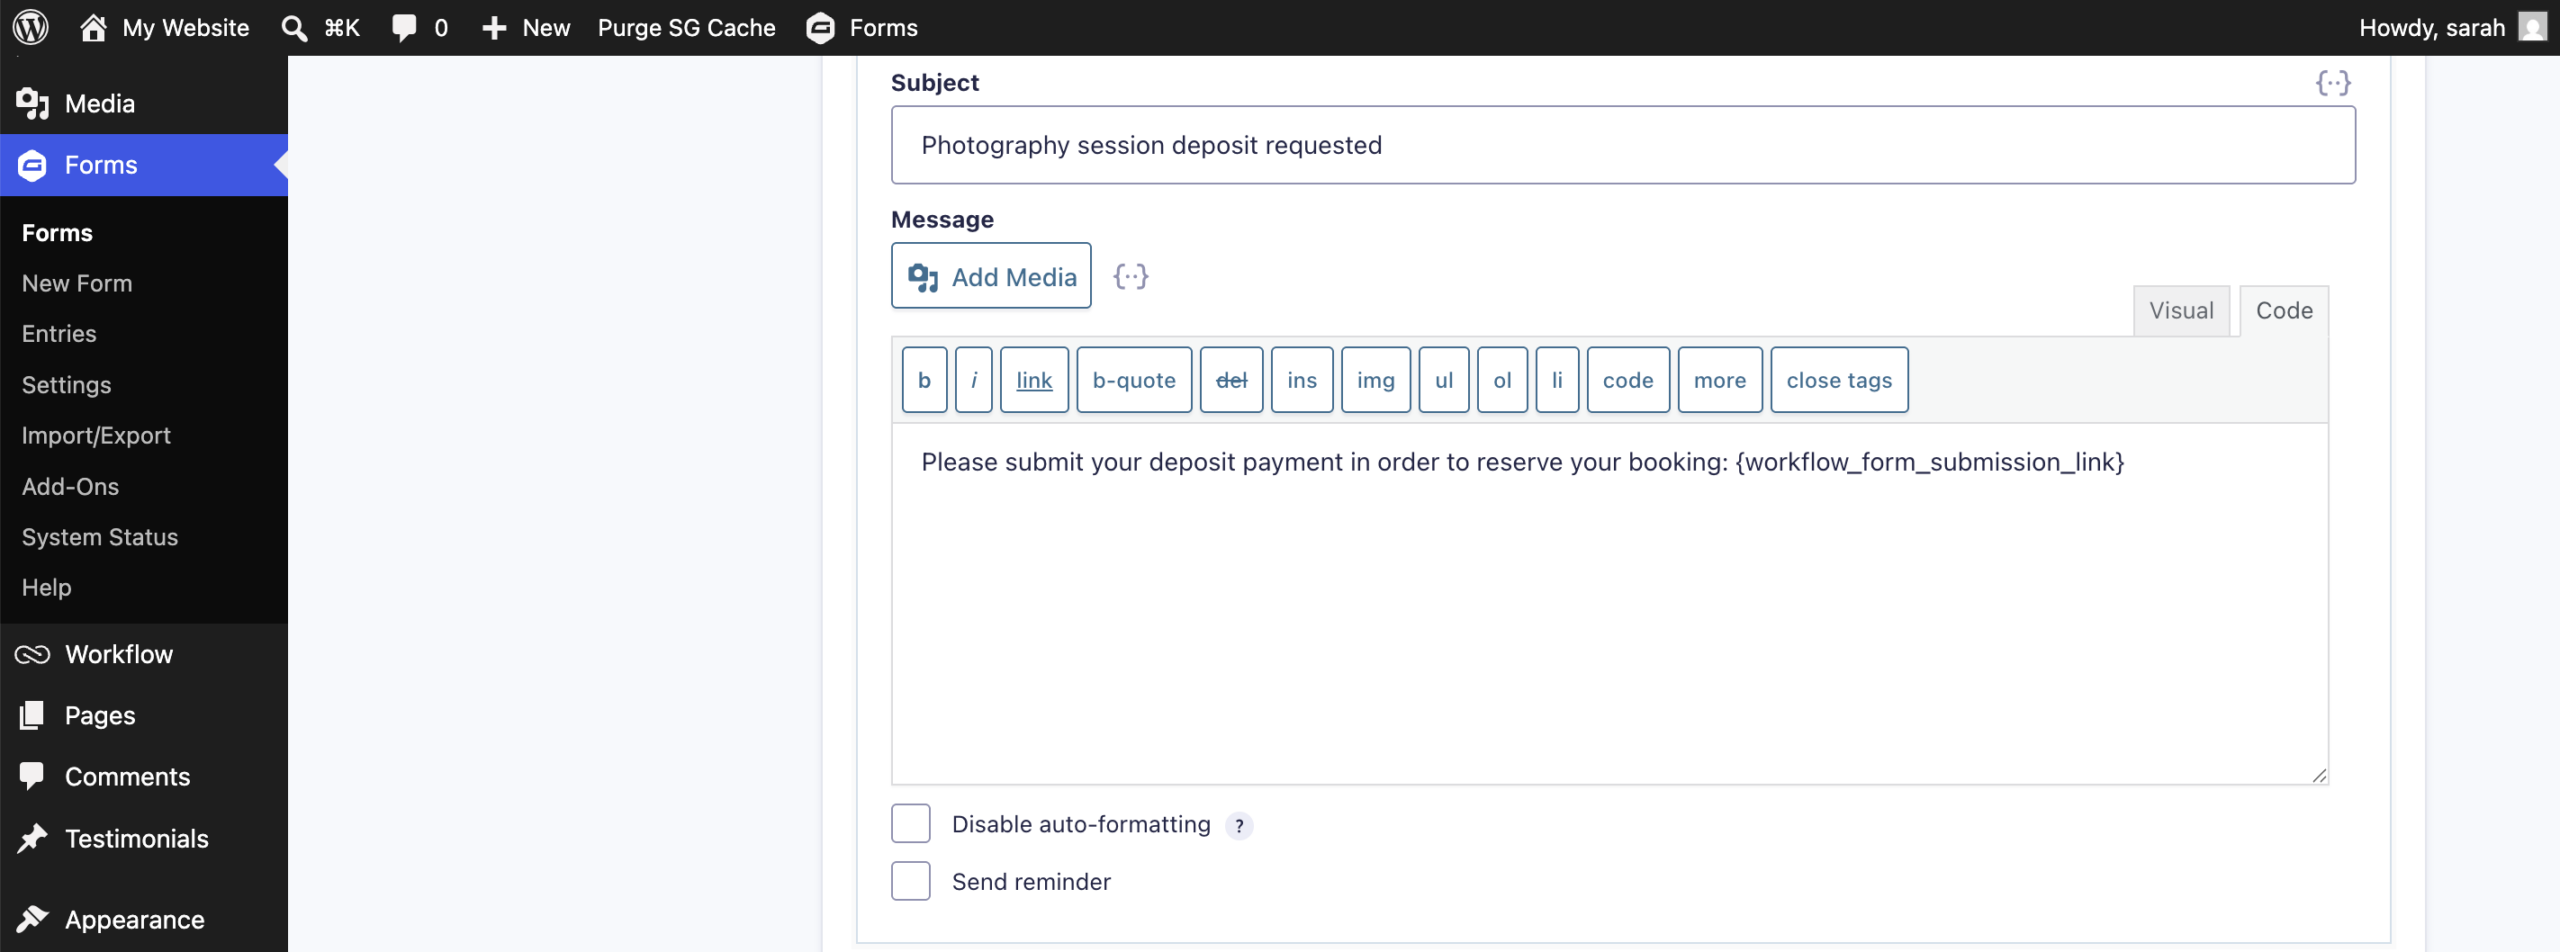
Next, feel free to customize the subject line and body of the email your client will receive. In this example, we’ve used a merge tag to link to the form submission. For more information on merge tags, visit the Gravity Flow documentation.
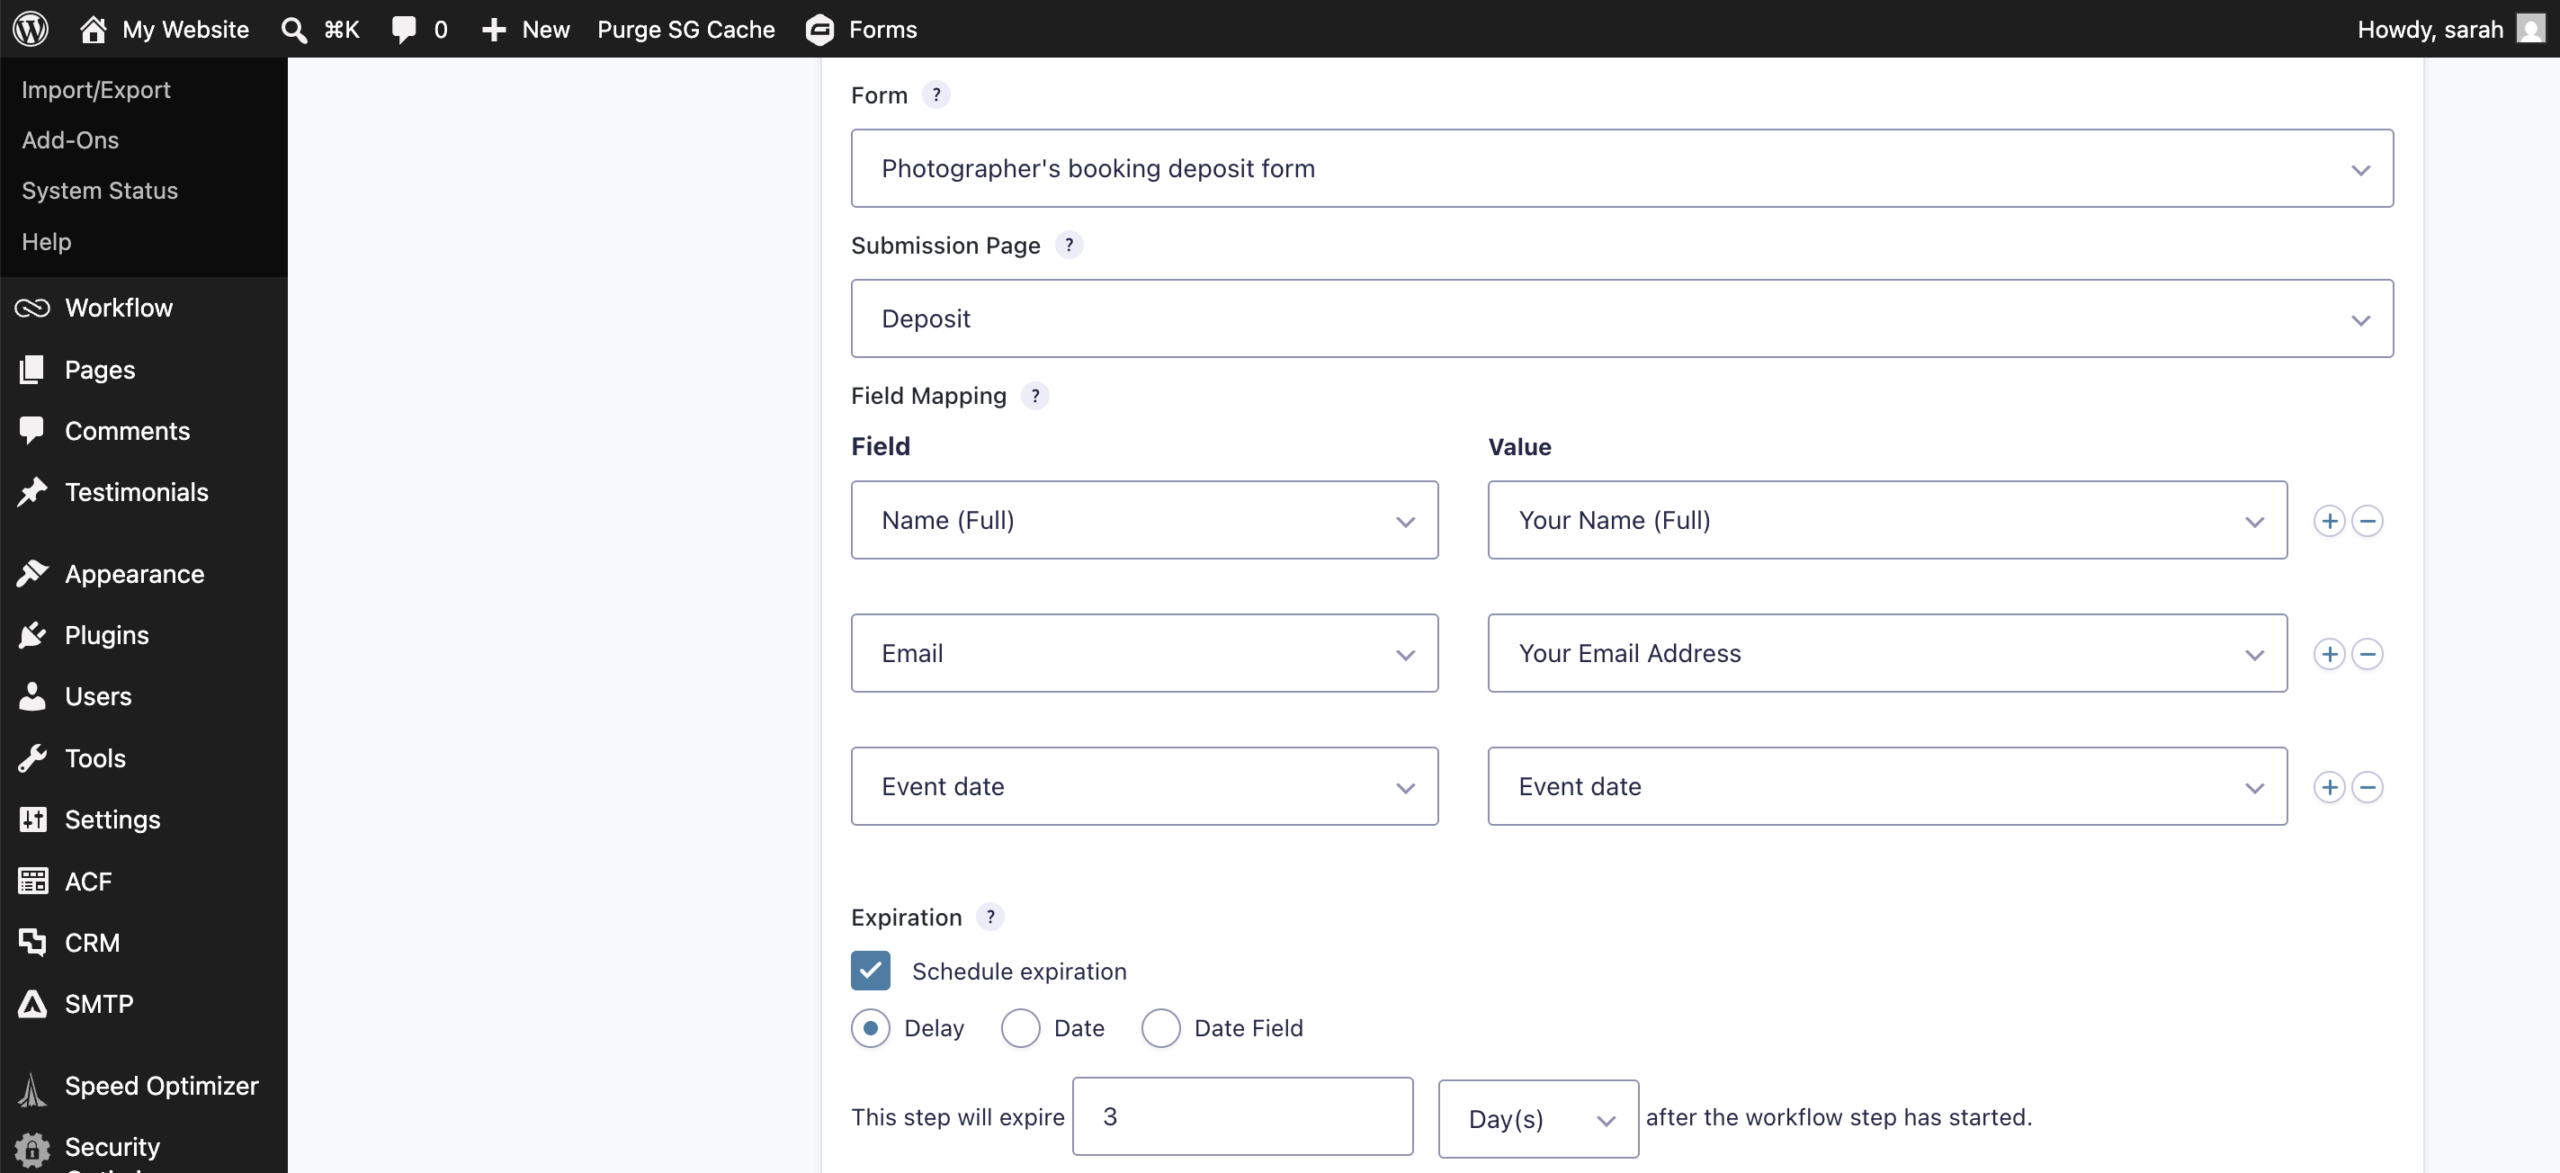
Under Form, choose the booking deposit payment form you created earlier. Then map the fields from your booking inquiry form to the corresponding fields in the booking deposit form.
This saves your client from entering the same information twice and helps ensure the payment is linked to the correct booking request.
You can also configure an expiration period for this step. If the client doesn’t submit their deposit within the allotted time, the request expires, allowing you to release the date for other bookings. Alternatively, you could configure an additional step that routes this entry back to an internal team member for further action.
When the workflow reaches this step, in the real world, the client receives an email containing a link to the pre-filled booking deposit form. They simply review the booking details and submit their non-refundable deposit through Stripe to reserve their session date.
Visit the Gravity Flow documentation to learn more about the Form Connector Extension and configuring the Form Submission step.
Test your workflow
Submit a test booking inquiry and walk through the entire process. Confirm that:
- The booking inquiry is routed to the correct approver.
- The approval step appears in your Workflow Inbox.
- The client receives the booking deposit email.
- The booking deposit form is pre-filled correctly.
- Stripe processes the payment successfully.
Testing everything once helps ensure your booking workflow runs smoothly when real clients begin submitting inquiries.
Build a WordPress booking system that works while you shoot
Your photography website should be doing more than displaying your portfolio.
With the right WordPress online booking and payment system, it becomes an active part of how your business runs. It collects bookings, processes deposits, sends contracts, and follows up on payments – all without you lifting a finger after the initial setup.
Gravity Forms and Gravity Flow make this possible on WordPress, built around your exact workflow and service types. You don’t need a third-party booking platform. You need the right tools, configured the right way.
Ready to see it in action? Try the Gravity Flow demo or purchase a license to start building your first photography booking workflow today.
Frequently asked questions
Do I need coding skills to set this up?
No. Both Gravity Forms and Gravity Flow use visual builders. You configure steps, conditions, and notifications through a point-and-click interface. No code required (although you can customize with code, if you want).
Can I require a deposit before reserving a booking?
Yes. In this workflow, the booking inquiry is reviewed first. Once you’ve confirmed availability and agreed on the details, the client receives a booking deposit form. Their session date isn’t reserved until the non-refundable deposit has been paid.
Can I build separate workflows for different session types?
Absolutely. Create a separate form and workflow for weddings, portraits, commercial shoots, or mini sessions. Each one can have its own pricing logic, approval steps, and email templates. Or, if the process is mostly the same, you can manage multiple session types in a single workflow using different fields, conditional steps, or connected workflows with the Form Connector extension.
What if I want to see the history of a booking?
Gravity Flow maintains a complete timeline for every entry, giving you a clear record of each booking as it moves through the approval process. You can quickly see who completed each step, when it was completed, and any workflow notes captured along the way. Instead of piecing together emails or trying to remember what happened, the entire booking history is available in one place.

Newsletter
If you want to keep up-to-date with what’s happening on the blog sign up for the Gravity Forms newsletter!
"*" indicates required fields