
Written by the editorial team at Jovvie…
If you use Gravity Forms for event registrations, donations, or bookings, you’ve probably run into this: someone wants to pay in person, so you ring them up on a separate card app, then match that payment to their form entry by hand later. With in-person payments for Gravity Forms, the form entry and the card payment happen together, in one record.
In-person payments for Gravity Forms – taking a card, phone, or digital wallet payment face to face for a Gravity Forms submission, with the payment result saved back to the form entry.
In this tutorial, you’ll set up the Jovvie In-Person Payments Gateway for Gravity Forms, connect your Stripe account, set up Tap to Pay on your phone or a card reader, and run a test checkout. Most setups take under 15 minutes.
Note: Jovvie is a third-party solution. Gravity Forms does not offer support for this platform, nor is this article intended to be a Gravity Forms endorsement of this platform, its developers, or quality of support. As always, we recommend you extensively evaluate all solutions to ensure their suitability for your purpose.
Why use Jovvie with Gravity Forms?
Gravity Forms already makes it easy to take payments on WordPress. The official Gravity Forms Stripe Add-On is built for online checkout, where customers enter their card details on your site. The Jovvie Payments Add-On covers the other side, when the customer is standing in front of you with a card or phone in hand.
- In-person payments without a second system – the Jovvie Payments Add-On is the way to take card reader and tap to pay payments from a Gravity Form, so in-person payments land on the same entries as the rest of your form data, with less to reconcile.
- Works with or without the Stripe Add-On – you don’t need the official Stripe Add-On for Jovvie to work, and you can run both on the same site to cover online and in-person payments.
- No plugin or subscription fees – the Jovvie Payments Add-On is a free plugin with no monthly subscription. Jovvie only charges a percentage of your transaction volume.
- Start with your phone – Tap to Pay turns your phone into a card reader with no extra hardware, and you can buy Stripe Terminal readers directly from your own Stripe account whenever you need them.
It fits anywhere you collect payments in person on a WordPress form:
- Events, classes, and registrations.
- Fundraisers and donations.
- Pop-up markets and gift certificate sales.
- Bookings and appointments.
- Memberships.
Jovvie is built by BizSwoop, in business since 2016 and a Stripe Partner since 2020. BizSwoop is trusted by more than 25,000 businesses.
Key features of the Jovvie Payments Add-On
- Flexible reader options – start with Tap to Pay on your iPhone or Android phone, or use internet-connected Stripe readers like the Stripe Reader S700 and WisePOS E and Bluetooth readers. All of these run on Stripe Terminal, the Stripe in-person payments platform. Customers can also pay with Apple Pay and Google Pay.
- Your pricing fields set the amount – the Product, Total, or Donation fields you already build in Gravity Forms are passed to Jovvie as the charge amount.
- Your account, your funds – payments go to your own Stripe account, so funds and reporting stay in the account you already manage.
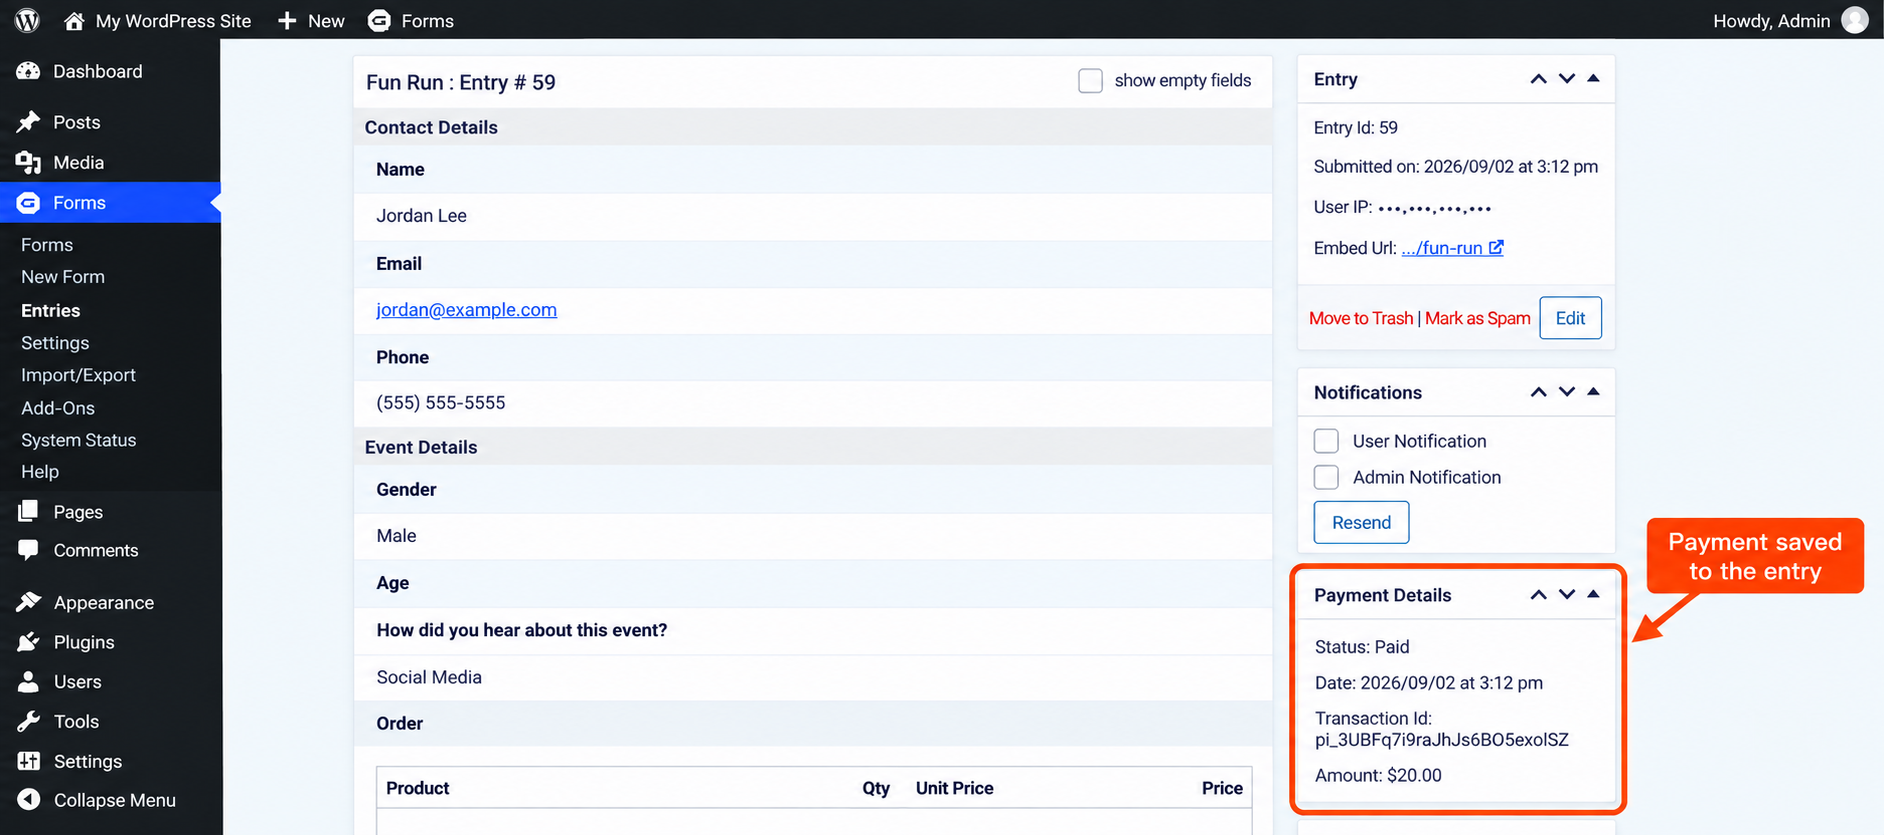
- Payment details on every entry – payment status and transaction IDs are saved to each entry and included in sales reporting.
- Secure hosted checkout – customers complete payment on a secure Jovvie hosted checkout page, where the reader charges the card and returns a confirmation.
How it works
- You or your customer fill out the form on a phone, tablet, laptop, or kiosk. Your pricing fields set the amount.
- After submitting, the form redirects to the secure Jovvie hosted checkout page, and your phone or card reader is ready to take payment.
- The customer pays with Tap to Pay on your phone, with no extra hardware needed, or taps, inserts, or swipes on a card reader. Apple Pay and Google Pay are supported too.
- The confirmation page appears, and the entry is marked Paid with its transaction ID.
What you’ll need before you start
- WordPress 6.0 or later with Gravity Forms 2.5 or later.
- A Stripe account. Use your existing account, or create a free one during setup.
- The Jovvie Payments Add-On.
- A phone or a card reader. With Tap to Pay, an NFC-enabled iPhone or Android phone works as your reader through the Jovvie mobile app, so you can start with no extra hardware. For a dedicated Gravity Forms card reader, the Stripe Reader S700 and WisePOS E register directly in WordPress, and Bluetooth readers connect through the Jovvie app.
- A public HTTPS site. Webhooks, which sync refunds and payment updates, can’t reach a localhost or maintenance-mode site.
This tutorial covers the essentials. For every setting, see the full Jovvie setup guide for Gravity Forms.
How to set up in-person payments for Gravity Forms
Install the Jovvie Payments Add-On
- Download the Jovvie Payments Add-On ZIP file. This link always has the latest version of the plugin.
- In your WordPress dashboard, navigate to Plugins > Add New Plugin.
- Click Upload Plugin, then choose the ZIP file you downloaded.
- Click Install Now, then click Activate.
- Navigate to Forms > Settings and confirm that Jovvie Payments appears in the settings menu.
Connect your Stripe account
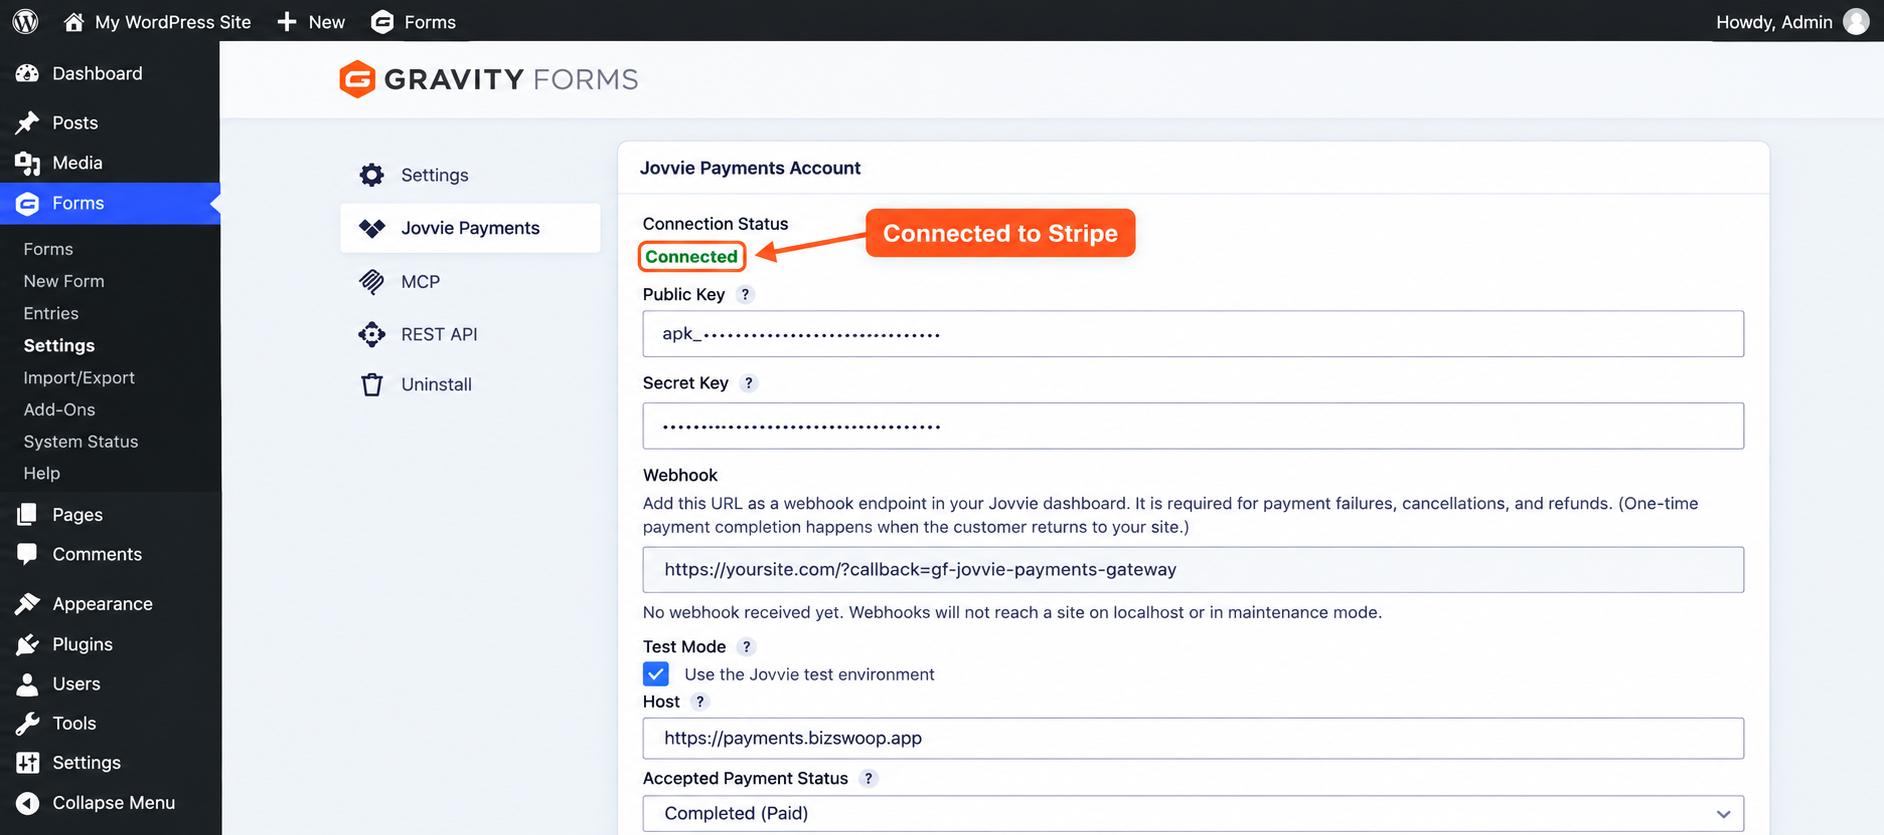
- Navigate to Forms > Settings > Jovvie Payments.
- Click Connect with Jovvie Payments.
- Create your Jovvie account, confirm your Stripe connection, and click Connect My Site.
- Your keys populate automatically, and the connection status changes to Connected.
- Copy the URL from the Webhook field on the same page, then add it as a webhook endpoint in your Jovvie dashboard.
Want to process with NMI payment gateway instead? Contact Jovvie Support to talk through your setup.
Choose your reader: your phone or a card reader
You can take payments with the phone you already have or with a dedicated card reader. Tap to Pay on an NFC-enabled iPhone or Android phone needs no extra hardware and is set up in the Jovvie app steps below. To register a Stripe Reader S700 or WisePOS E instead, stay on Forms > Settings > Jovvie Payments:
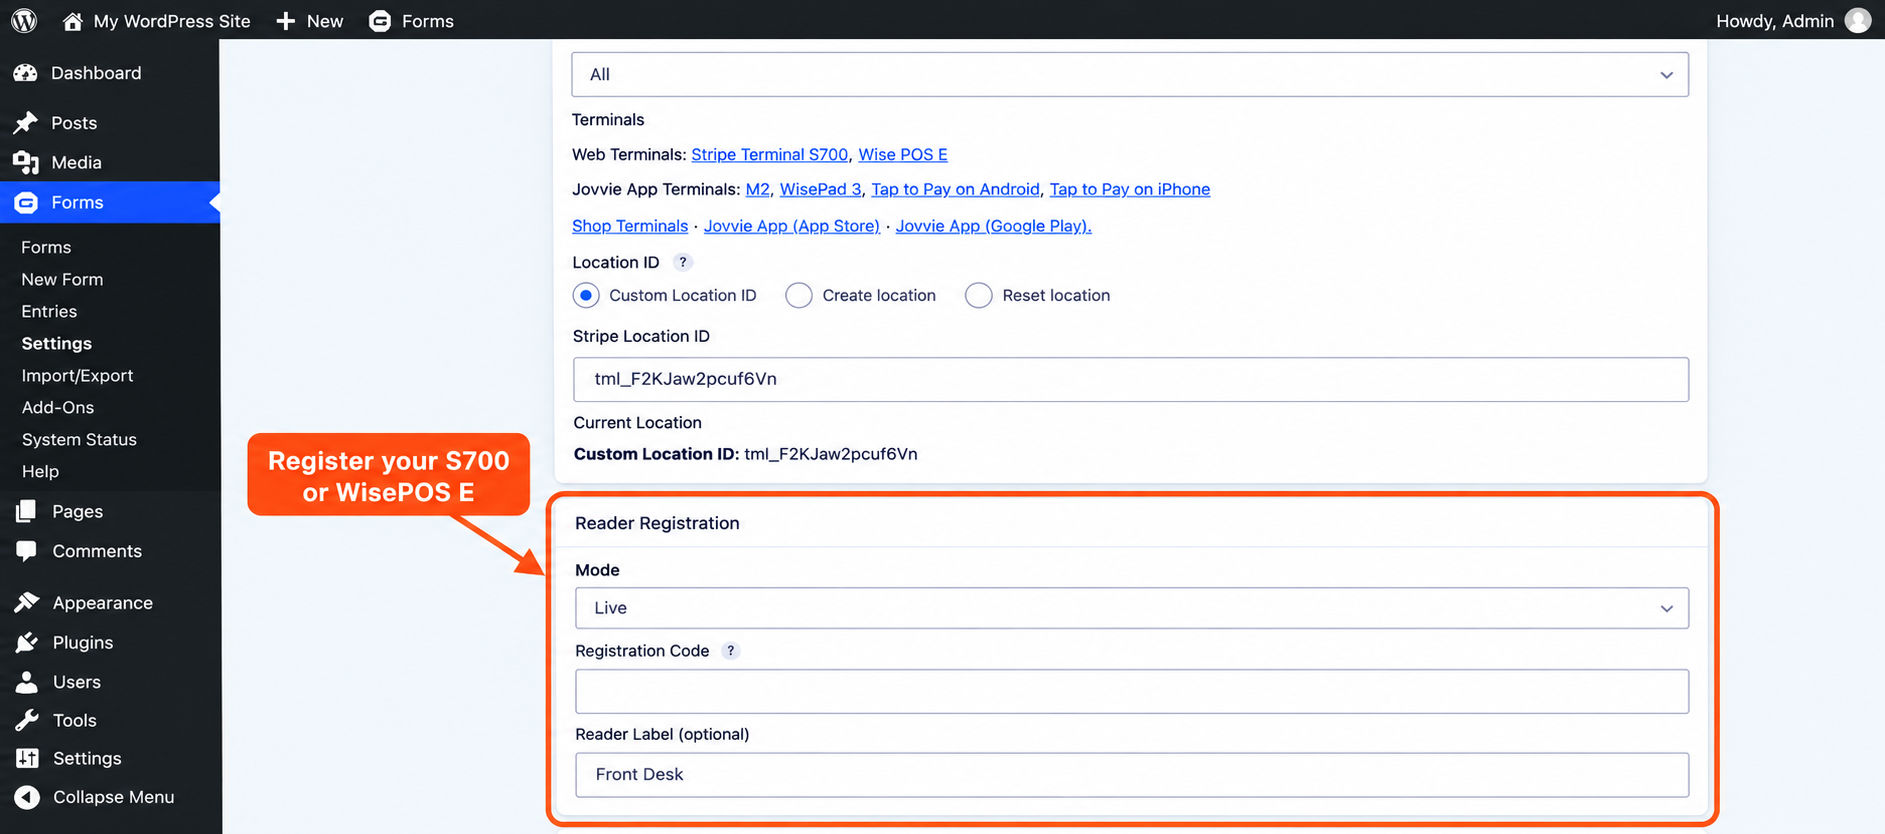
- Under Location & Terminals, create a location or enter an existing Stripe Location ID.
- Power on your Stripe Reader S700 or WisePOS E to display its registration code.
- Under Reader Registration, choose a mode, enter the code, and add a Reader Label, such as Front Desk.
- Click Update Settings. The reader shows as Online.
Bluetooth readers such as the M2 or WisePad 3 also connect in the Jovvie app. Every reader, including Tap to Pay, uses the location you set in item 1. The setup guide has details for every reader type.
Build your form and add a payment feed
Start with the form:
- Open your form in the form editor.
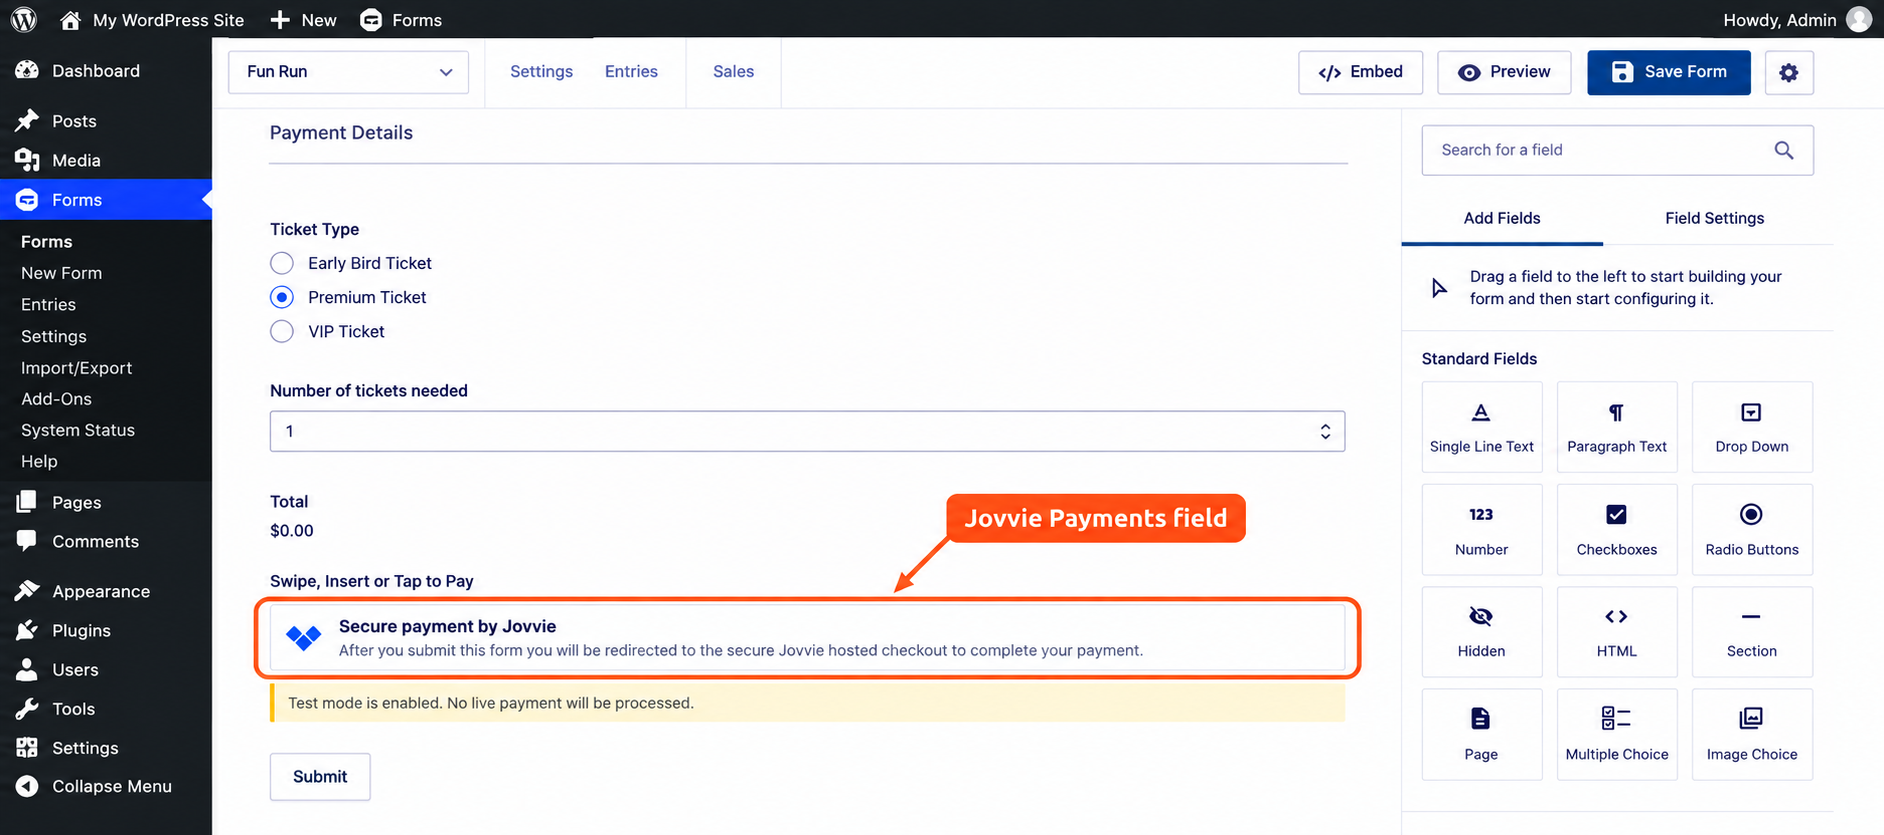
- Add a pricing field, such as a Product, Total, or Donation field, to set the amount.
- From the Pricing Fields group, add the Jovvie Payments field.
- Save the form.
Next, add a payment feed, which connects the form to Jovvie:
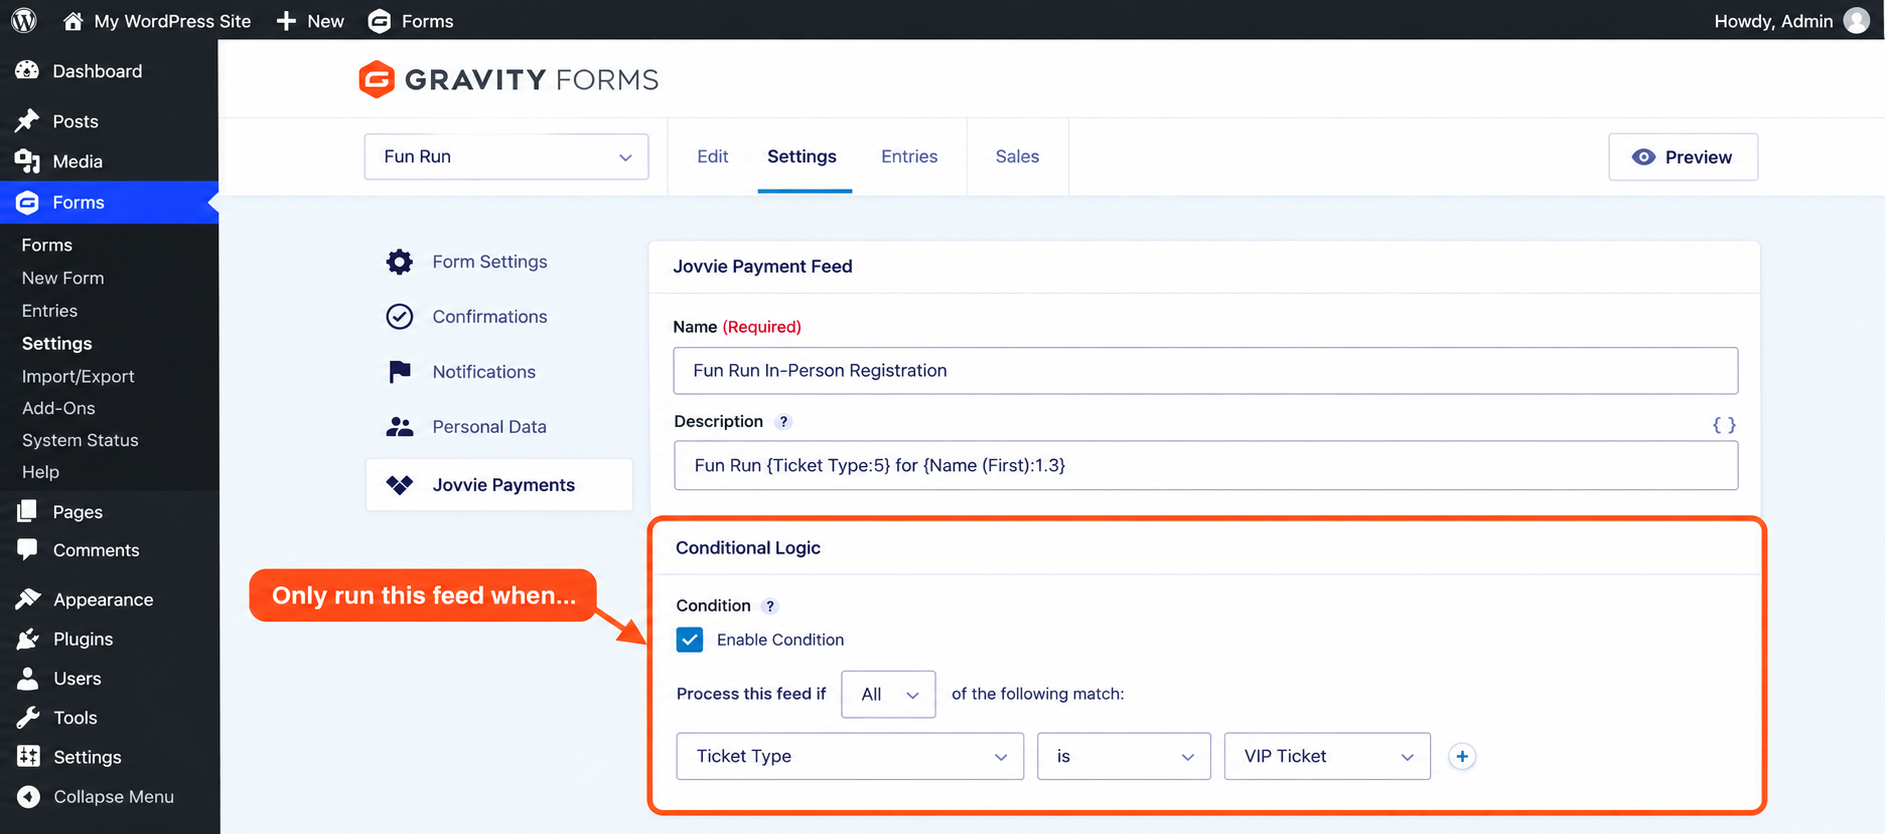
- Navigate to Settings > Jovvie Payments, then click Add New.
- Give the feed a name.
- Optionally, add a description for the checkout page. Merge tags are supported, so you can include values like a customer name or order number.
- Optionally, turn on conditional logic so the feed only runs when it should, such as when a customer chooses to pay in person.
- Click Save Settings.
Test the in-person checkout
- Navigate to Forms > Settings > Jovvie Payments and enable Test Mode.
- Submit your form from its public page.
- On the Jovvie hosted checkout page, your phone or reader is ready to take payment.
- Complete a test payment with Tap to Pay or your card reader.
When the payment succeeds, your confirmation page appears and the entry status changes to Paid. Navigate to Forms > Entries to see the status and transaction ID.
Go live
- Return to Forms > Settings > Jovvie Payments and uncheck Test Mode.
- Run a small live transaction to confirm everything works end to end.
Your form now accepts face-to-face payments in WordPress, with every payment recorded on its entry.
Set up Tap to Pay or a Bluetooth reader in the Jovvie app
The Jovvie app for iOS and Android is how you use Tap to Pay or a Bluetooth reader, turning a phone or tablet into a Gravity Forms point of sale (POS) with no extra hardware.
- Install the Jovvie app from the App Store or Google Play.
- Set the Home URL to the page that contains your form.
- Link your Jovvie payment account.
- Add a card reader and choose Bluetooth, Internet, or Tap to Pay.
- Load your form, submit it, and process the payment in the app.
Two options make shared and busy setups easier:
- Kiosk auto-reload – after each payment, the confirmation shows briefly and then the form reloads for the next customer.
- Counter-service access – enable Connect this browser so a shared, logged-out device can use your readers, which works well for front desks and check-in tables.
Frequently asked questions
How much does Jovvie cost?
The Jovvie Payments Add-On is a free plugin with no monthly subscription. Jovvie only charges a percentage of transaction volume. You can start immediately with Tap to Pay on your phone with no extra hardware, or buy card readers through your Stripe account.
Do I need a card reader?
No. With Tap to Pay, an NFC-enabled iPhone or Android phone running the Jovvie app accepts contactless cards, Apple Pay, and Google Pay, so you can start with no extra hardware. If you want a dedicated reader later, the Stripe Reader S700 and WisePOS E register in WordPress, and Bluetooth readers connect through the Jovvie app.
Where does the money go?
Payments go straight to your own Stripe account. Your funds and Stripe reporting stay in the account you already manage.
What happens if a payment is refunded or fails?
Process refunds in Jovvie or Stripe. Webhooks send refunds, cancellations, and failed payments back to Gravity Forms, so each entry shows the correct payment status.
Can I use conditional logic or multiple payment feeds?
Yes. Each payment feed supports conditional logic, and you can create multiple feeds on one form, using conditions to control which one runs.
Start taking in-person payments today
You’ve installed the Jovvie Payments Add-On, connected Stripe, set up your phone or reader, and run your first test checkout. Your forms can now handle orders, registrations, and donations online and in person, with every payment tracked on the entry.
Ready to set it up on your site? Get the Jovvie Payments Add-On for Gravity Forms and take your first in-person payment today.

Newsletter
If you want to keep up-to-date with what’s happening on the blog sign up for the Gravity Forms newsletter!
"*" indicates required fields