An expense claim is different from most requests a business handles, because it’s the employee’s own money. They paid for the flight, the mileage, or the client lunch out of their own pocket, and now they’re waiting to get it back.
In most businesses, getting that money back is a slow and awkward process. The claim goes in by email with a photo of a receipt. Finance asks for the receipt again, because the photo didn’t come through. The manager approves it verbally, finance never hears, and the reimbursement misses the payroll run. The employee asks about it twice, feels awkward both times, and quietly resolves to stop putting things on their own card.
In this post we’ll build the fix: An expense reimbursement form that captures the claim and the receipts properly, and a workflow that routes it to the right manager, adds a second sign-off automatically on larger amounts, and gets the approved claim to finance in time for the next payment run. The division of labor is simple: Gravity Forms captures the claim, and Gravity Flow handles everything after submit.
If you’re an agency or consultant, this one is for you first.
For agencies: Your client brings the problem, you bring Gravity Flow
This is a problem you spot by listening for frustration rather than process. When a client mentions expenses, listen for the grumble: staff joking about claims from March, a bookkeeper drowning in receipt photos, an office manager who has become the human router between employees and finance. Reimbursement is where a broken process stops being an operations problem and starts being a morale problem, and clients feel that even when they can’t name it.
If you built the purchase order workflow we covered on the blog, you already know how to deliver this one. It’s the same threshold pattern pointed at money going out to employees instead of money going out to vendors, and the two together make a tidy finance-operations package: one discovery conversation, two workflow builds, a client whose money now moves with an audit trail.
Handling your own team’s expenses rather than a client’s? Everything below works exactly the same. Let’s get into it…
The problem with expense claims
The claim itself is simple. The process around it leaks in three places:
- Receipts and claims travel separately – The claim is in an email, the receipts are in another email, and finance spends its time matching them up and chasing the ones that never arrived.
- Approvals don’t reach finance – A manager’s verbal or emailed “fine by me” doesn’t move money. Unless the approval lands in front of whoever runs the payment, the claim stalls in the gap between the two.
- Slow reimbursement costs goodwill – Every week a claim sits unpaid, an employee is involuntarily lending the company money. People remember that longer than they remember the amount.
The fix is the same shape as the purchase order workflow: a request goes in with everything attached, the right people approve it in order, and finance receives the approved claim ready to pay.
What this workflow does
Here’s the finished system we’re building:
- An employee submits an expense claim with the amount, category, and receipts attached.
- Gravity Flow routes the claim to their manager for approval.
- If the claim is $500 or more, a second approval step fires automatically and it goes to finance leadership too. Below $500, that step is skipped.
- On final approval, the claim is handed to your accounting system or payment process, and the employee is told it’s on the way.
- Every approval and handoff is logged in the entry’s timeline.
Step 1 is Gravity Forms. Steps 2 through 5 are all Gravity Flow. The form is quick, so most of our time goes on the workflow.
What you’ll need
- Gravity Forms (any license) to build the claim form
- Gravity Flow to run the approval workflow on top
Gravity Flow is a separate plugin that extends Gravity Forms. With both installed and activated, you’ll find a Workflow tab in each form’s settings, and that tab is where everything from Step 2 onwards happens.
Step 1: Build the expense claim form (Gravity Forms)
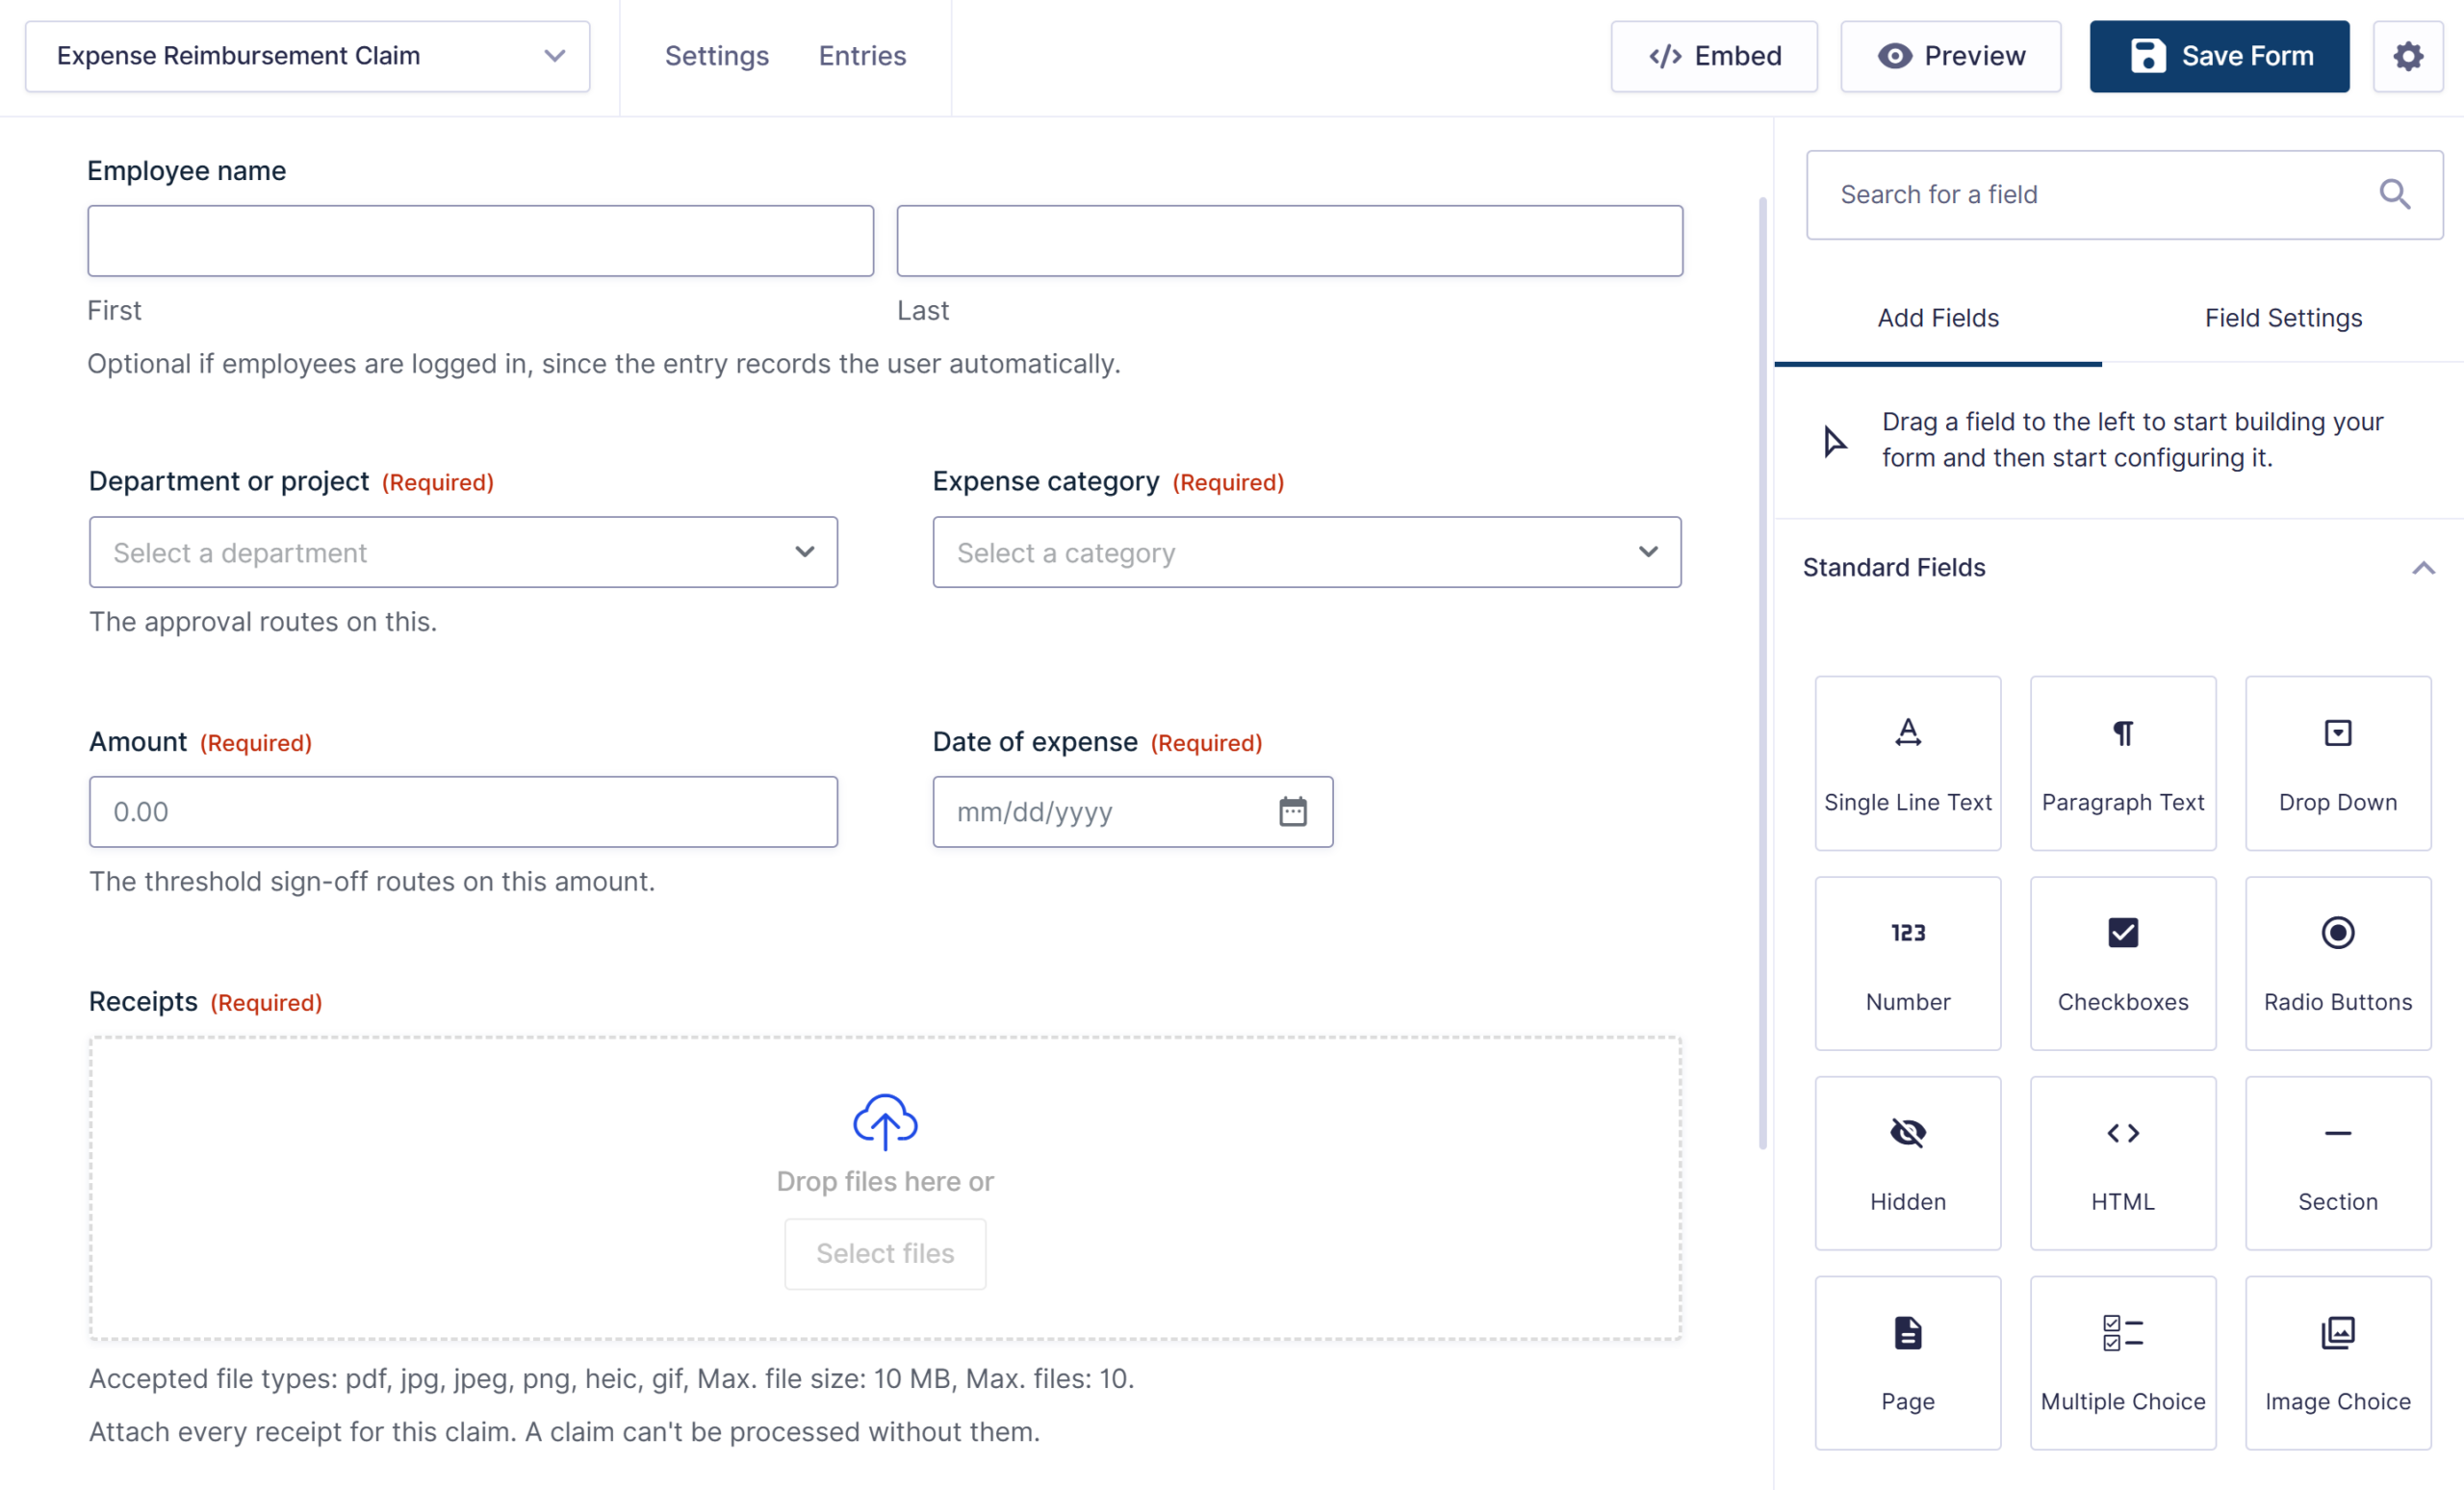
Create a new form with the fields a claim needs:
- Employee name (or require login and let the entry record the user automatically)
- Department or project (dropdown). The approval routes on this.
- Expense category (dropdown: travel, mileage, meals, supplies, and so on)
- Amount (Number field, formatted as currency). The threshold in Step 3 routes on this, so it has to be a proper Number field.
- Date of expense (Date field)
- Receipts (File Upload, set to allow multiple files, and required). Making this field required is the single change that ends receipt-chasing. A claim cannot exist without its receipts attached.
- Notes (paragraph field, optional)
Conditional logic keeps the form short: selecting Mileage can swap the receipt upload for start and end locations and a miles field, and a per diem category can show the relevant date range instead. Employees only ever see the fields their claim type needs.
Now for the workflow. From here on, everything we build lives in Gravity Flow.
Step 2: Route the claim to the right manager (Gravity Flow)
Add a new step in the form’s Workflow tab, set the type to Approval, and name it “Manager approval.”
In the assignee settings, choose Routing and build one rule per department, so each claim reaches the manager who actually knows whether the expense was legitimate:
- If Department is Sales, assign to the Sales Manager.
- If Department is Operations, assign to the Operations Manager.
- If the claim is against a project, a Project dropdown can route to the project lead instead.
The manager receives the claim with the receipts attached and approves or rejects it directly from the notification, without logging in to the WordPress admin. To keep claims from sitting, enable the step’s expiration with a window that suits your payroll cycle, and escalate anything unanswered so a forgotten claim becomes finance’s prompt instead of the employee’s problem.
One routing note worth keeping: When only the approver changes, route the assignee, as we’ve done here. When departments need entirely different processes, the Choice Routing step from Gravity Flow 3.1 sends each claim down its own branch instead.
Step 3: Add the threshold sign-off
Larger claims usually need a second pair of eyes, and this is the same threshold mechanic we built in detail in the purchase order post. The short version: add a second Approval step, assign it to your finance lead, and give the step one condition:
Only apply this step if Amount is greater than or equal to500.
A $40 parking claim gets manager approval and moves straight through. A $1,200 conference travel claim gets manager approval and then finance sign-off, automatically, with nobody checking a policy document. If your policy has more levels, stack more steps, each with its own condition. For the full walkthrough of how threshold conditions work, the purchase order post covers it step by step.
Step 4: Hand the approved claim to finance
An approved claim still has to become a payment, so close the gap with a step that delivers it:
- If your accounting platform accepts inbound webhooks, an Outgoing Webhook step sends the claim data (employee, amount, category, receipts link) the moment the final approval lands.
- If not, Gravity Flow’s Zapier step fires at this exact point in the workflow and carries the claim into QuickBooks, Xero, or your payroll system. As with the purchase order build, the timing matters: the Flow step runs after approval, where the Gravity Forms Zapier Add-On would fire at submission, before anything was approved.
- If your process is lighter, a notification step that emails the approved claim to your finance inbox does the job with no integration work at all.
Whichever you choose, finance receives claims that are complete, approved, and ready to pay, with the receipts one click away on the entry.
Step 5: Close the loop
Add notification steps so the people waiting actually hear the outcome:
- On final approval: Notify the employee that the claim is approved and headed for the next payment run. This one message ends the “any news on my expenses?” follow-ups.
- On rejection at either step: Notify the employee with the approver’s note, so they know what to fix before resubmitting.
And the entry’s timeline records the whole journey: who approved, at which step, when, and which steps were skipped for being under the threshold. When an accountant reconciles the quarter, every reimbursement has its receipts, its approvals, and its dates in one place.
The workflow at a glance
Here’s the complete build, end to end:
Expense claim submitted with receipts → Manager approval (routed by department or project) → Finance sign-off (fires only at $500 and above) → Claim to accounting (webhook or Zapier step) → Employee notified. Every step is logged in the entry’s timeline.
Two approval steps, one condition, one handoff, and a pair of notifications. Before rolling it out, run one claim under the threshold and one over it to watch the finance step skip and fire.
Reimbursements that pay on time
That’s the build. Receipts arrive attached. Approvals reach finance instead of evaporating in email. Employees stop lending the company money for weeks at a time, and nobody has to ask where their claim is, because the answer is on the entry.
Already using Gravity Forms? The claim form is the part you already know. Gravity Flow adds the routed approvals, the threshold sign-off, and the handoff to finance. Check out Gravity Flow pricing to get started, or sign up for a personalized demo and we’ll walk through an onboarding workflow live.
Find more workflow builds on the blog: time off requests, purchase orders, volunteer onboarding, and employee onboarding.

Newsletter
If you want to keep up-to-date with what’s happening on the blog sign up for the Gravity Forms newsletter!
"*" indicates required fields