Considering using Gravity Forms on your WordPress site?
In our Gravity Forms review, we’ll show you what it’s like to use this plugin as well as give you a good understanding of its features. We’ll discuss both the pros and cons of Gravity Forms to help you decide if it’s the right tool for you.
To make that happen, here’s everything we’re going to look at:
- What you can use Gravity Forms for
- What it’s like to build forms with Gravity Forms
- Some of the more advanced built-in features that Gravity Forms offers
- How the huge add-on libraries can help you extend Gravity Forms
- Documentation and support options
- Advanced support for developers
- Pricing details
That’s a lot of ground to cover! Watch the video or read on below…
What Can You Use Gravity Forms For?
To kick off our Gravity Forms review, let’s talk about what you can use Gravity Forms for.
First off, Gravity Forms is a lot more than a “contact form plugin”. While you certainly can use Gravity Forms for contact forms, the real power comes when you start creating more advanced types of forms and data capture setups.
Here are some examples of what you can build with Gravity Forms:
- Marketing and lead generation forms – including automatically syncing entries with your email marketing service or CRM.
- Payment forms – including calculating prices based on user decisions, offering coupons, and accepting payments via Stripe, PayPal, Square, and other payment gateways.
- Surveys and polls – including analyzing individual or aggregate responses from inside your WordPress dashboard.
- Conversational Forms – create a more interactive, personalized, and distraction free experience for your users. The friendly questioning style ensures forms appear less daunting to users, helping to increase engagement and remove barriers to completion.
- Content submission forms – you can add form data as WordPress post types (e.g. a guest post submission form) or display it straight on the frontend of your site (e.g. creating a directory based on form entry data).
- User registration – register users to your WordPress website, giving them their own accounts and enabling them to log in whenever needed.
- Quizzes – including grading users’ responses and viewing details from inside your dashboard.
- Contact forms – create contact forms that are as simple or advanced as you want them to be.
- …anything you need!
Where things get really fun is that you can also build workflows based on these forms.
For example, you could create a payment form for a service that you offer. When someone makes their payment via the form, you could then automatically create a task in your project management software and send yourself a ping on Slack.
Basically, you can build forms that match your workflows and automate tasks in useful ways.
Who uses Gravity Forms?
Well, any type of user can benefit, from WordPress newbies just looking for a user-friendly form tool to advanced developers who want something that they can really dig in to and customize.
With that being said, Gravity Forms is primarily used by businesses, agencies, and web professionals who need the ability to create more advanced, customizable data capture forms and applications.
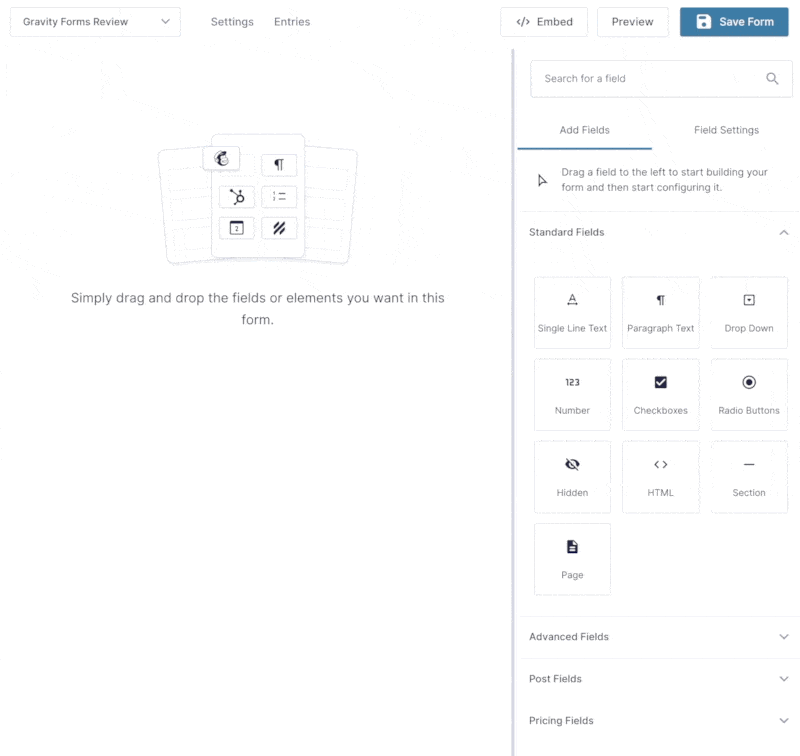
Ease of Use: How You’ll Build Forms
Next, let’s take a look at what it’s like to actually build some forms with Gravity Forms.
Here’s how it works:
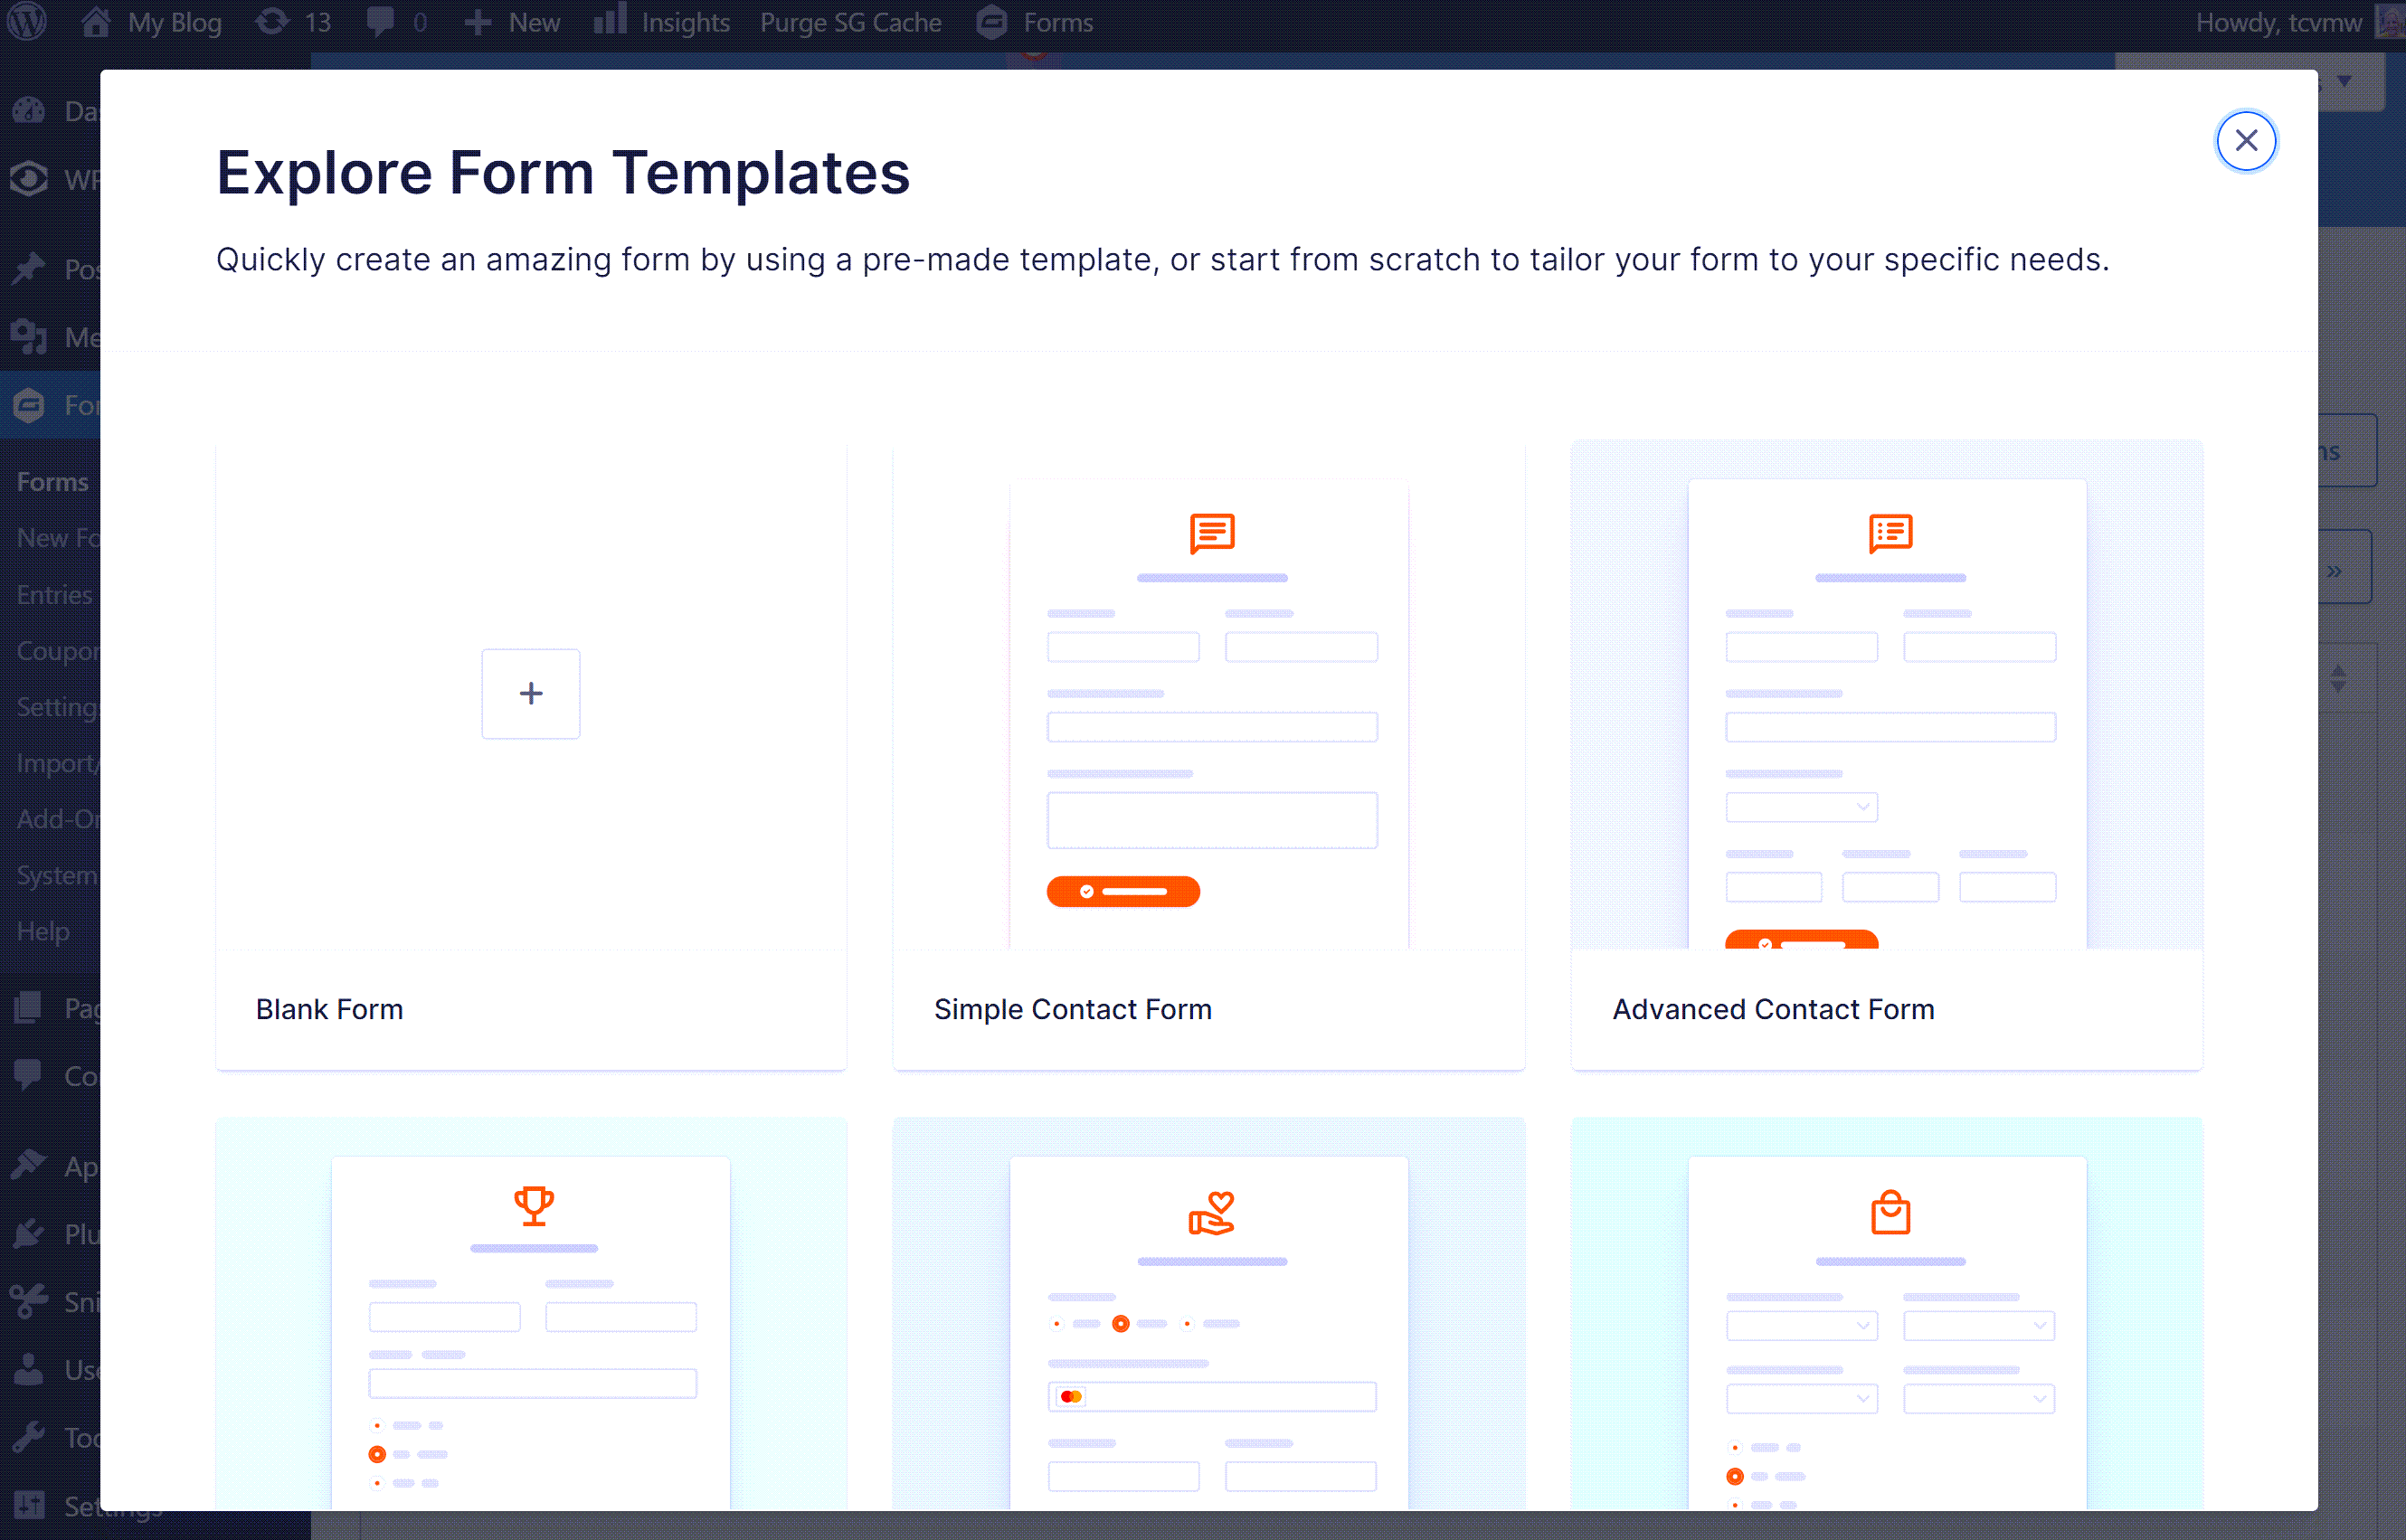
Select a Form Template
Gravity Forms provides a built-in template library that boasts some of our most popular types of forms. All tempaltes are fully customizable, providing a great jumping-off point for beginners and experienced users alike.
Within the form template library, you’ll be able to choose from a selection of quick-start templates to help you to get your forms up and running on your site fast. These include:
- Contact Forms
- Newsletter Signup Form
- Request a Quote Form
- Contest Entry Form
- Webinar Registration Form
Equally, you can opt for any of the more advanced templates that utilize our extensive collection of add-ons to cater to all your business needs. Examples include:
- Ecommerce Stripe Form
- Ecommerce PayPal Form
- Donation Form
- Survey
- User Registration
To get started with a new form template, within your WordPress dashboard select Forms > New Forms. You will then be presented with the new form template library.
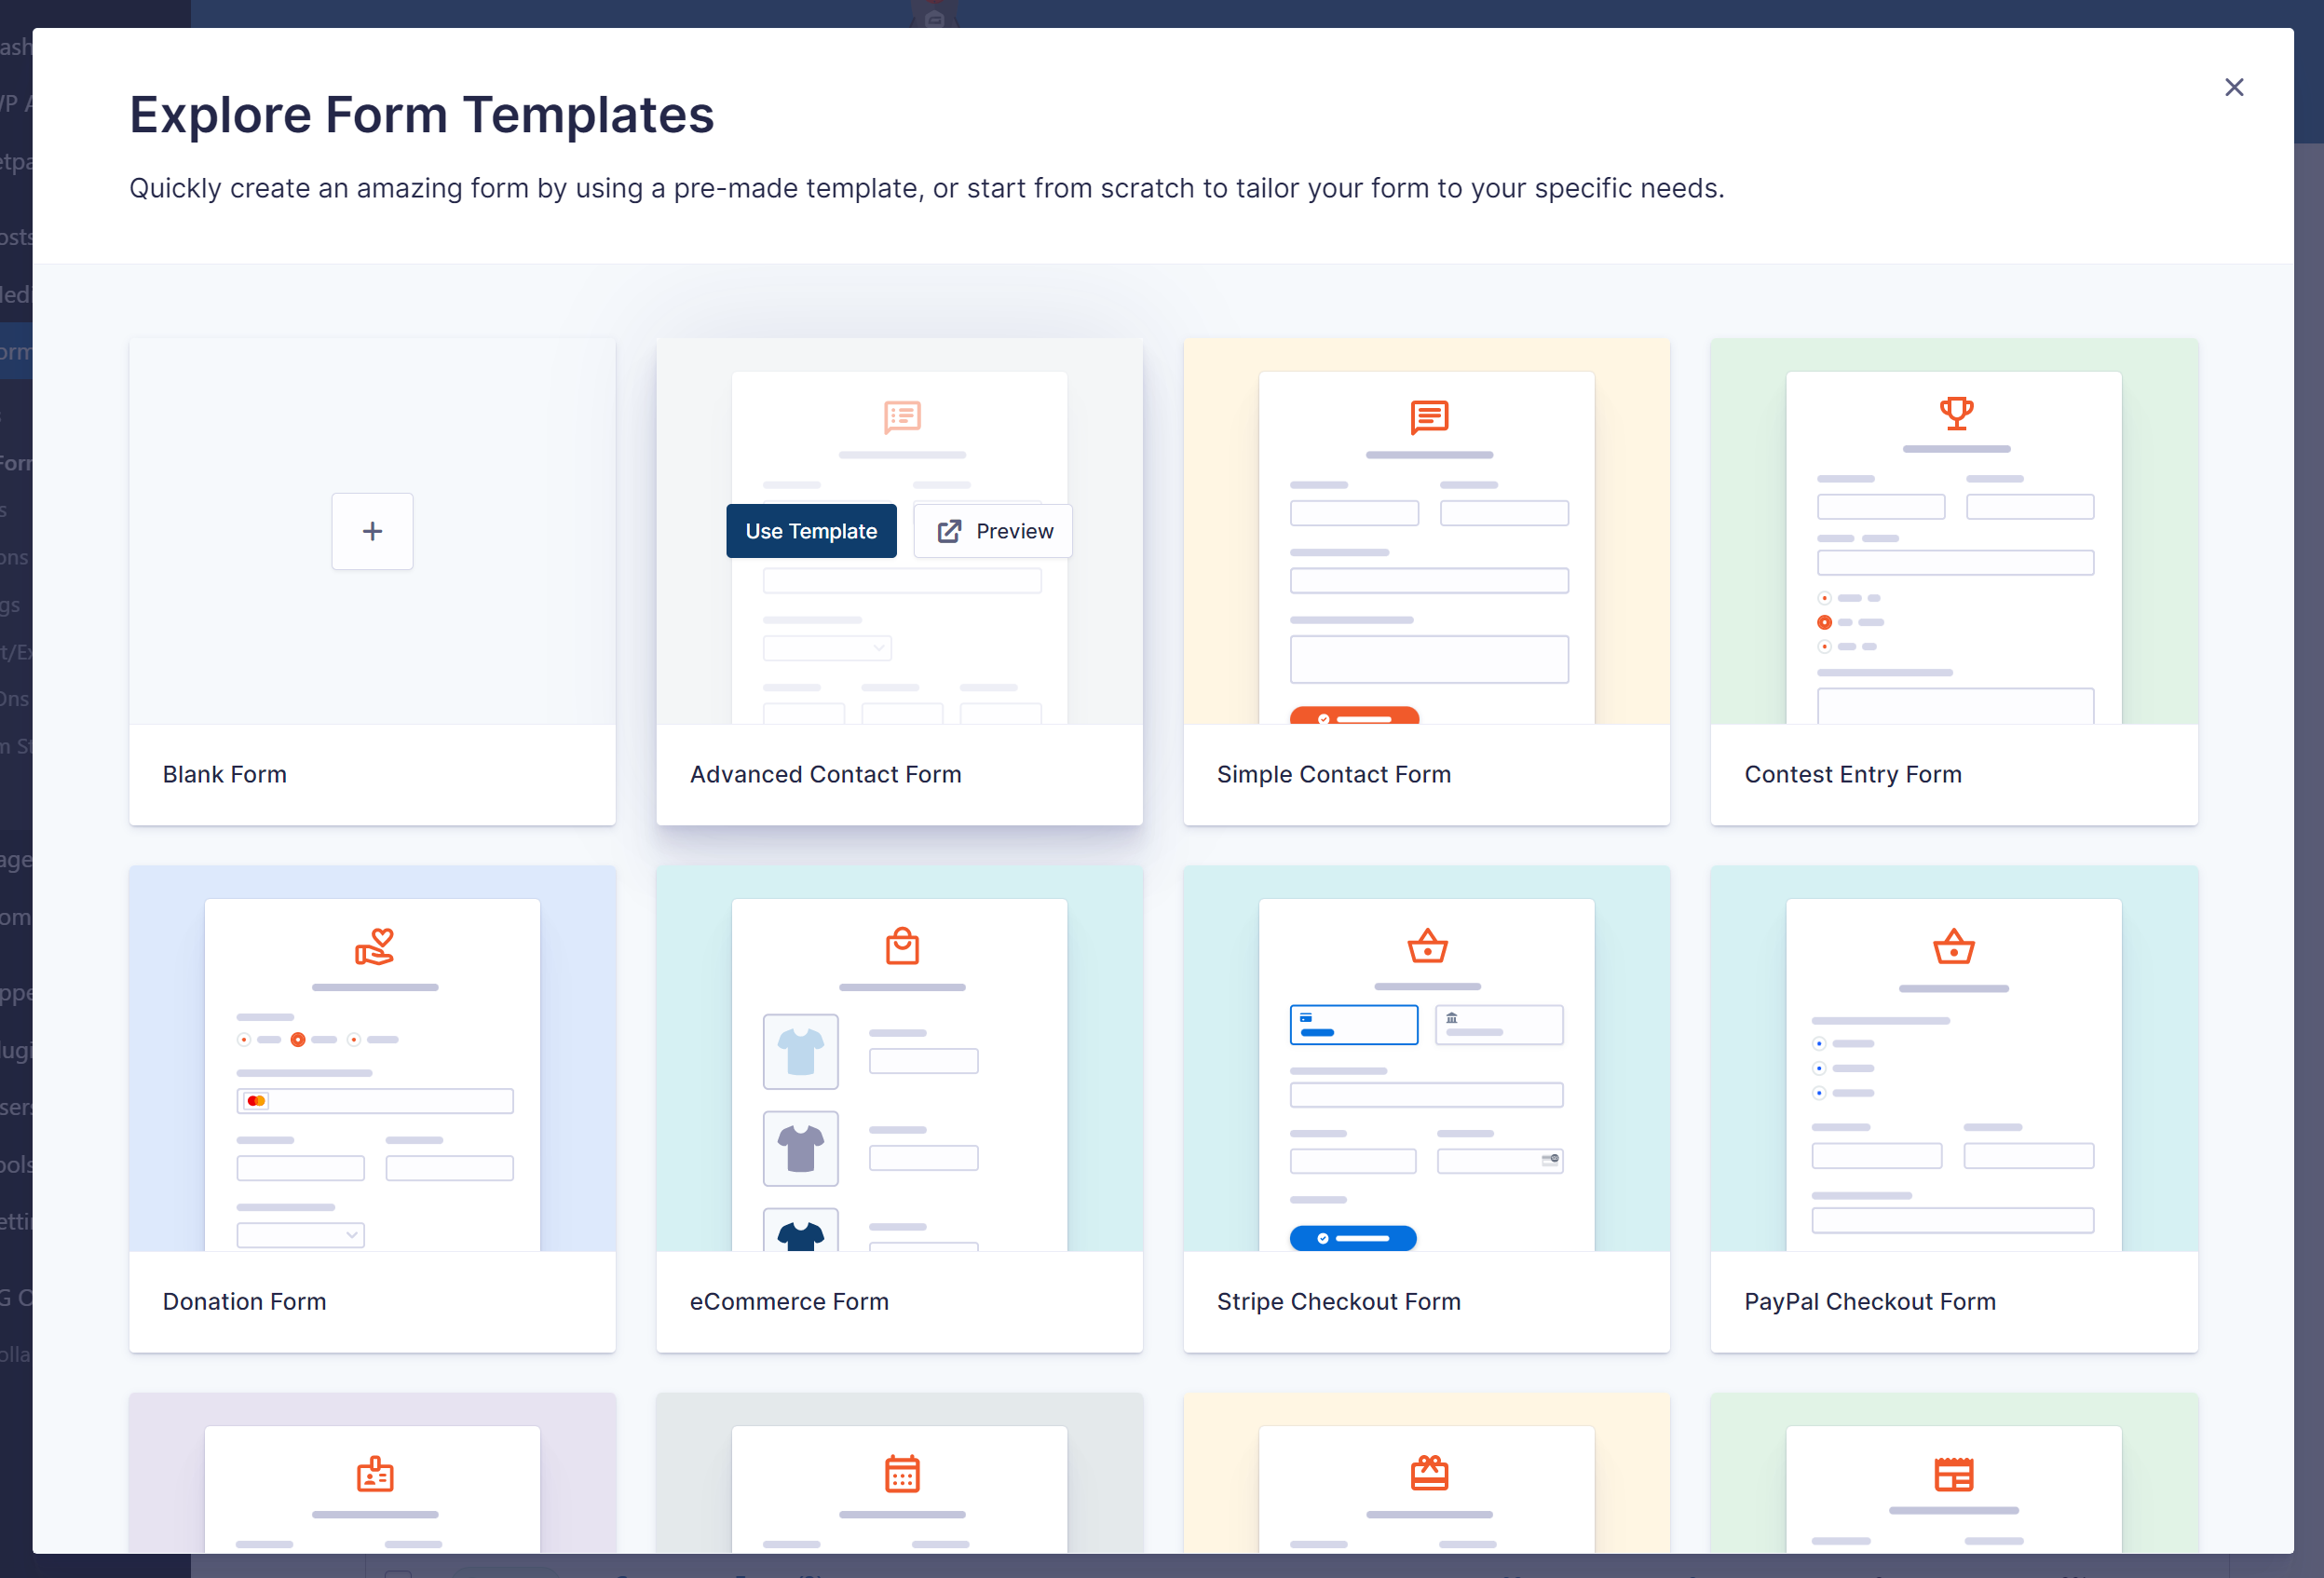
Here you can browse the library and preview each of the templates on the Gravity Forms website. Once you’ve made a decision on which template best matches your form needs, simply select Use Template.
You will be asked to give your form a name, and description if desired, and then the template will open within the form editor.
Depending your needs and the template you’ve chosen, you can now either publish the form as-is, or customize it within the form editor.
As mentioned, all the templates are totally customizable – within the form editor you can easily add, edit, or delete any of the form fields, by simply dragging and dropping them into and around the editor canvas. And you can also configure each of the fields’ settings, enabling you to customize the form to your specific requirements. More on this below!
Or Create a Form From Scratch
Alternatively, you can create a from from scratch. To get started, you’ll need to select Blank Form within the template library, and then give the form a name.
Once you click the Create Form button, it will launch you straight into the drag-and-drop form editor interface.
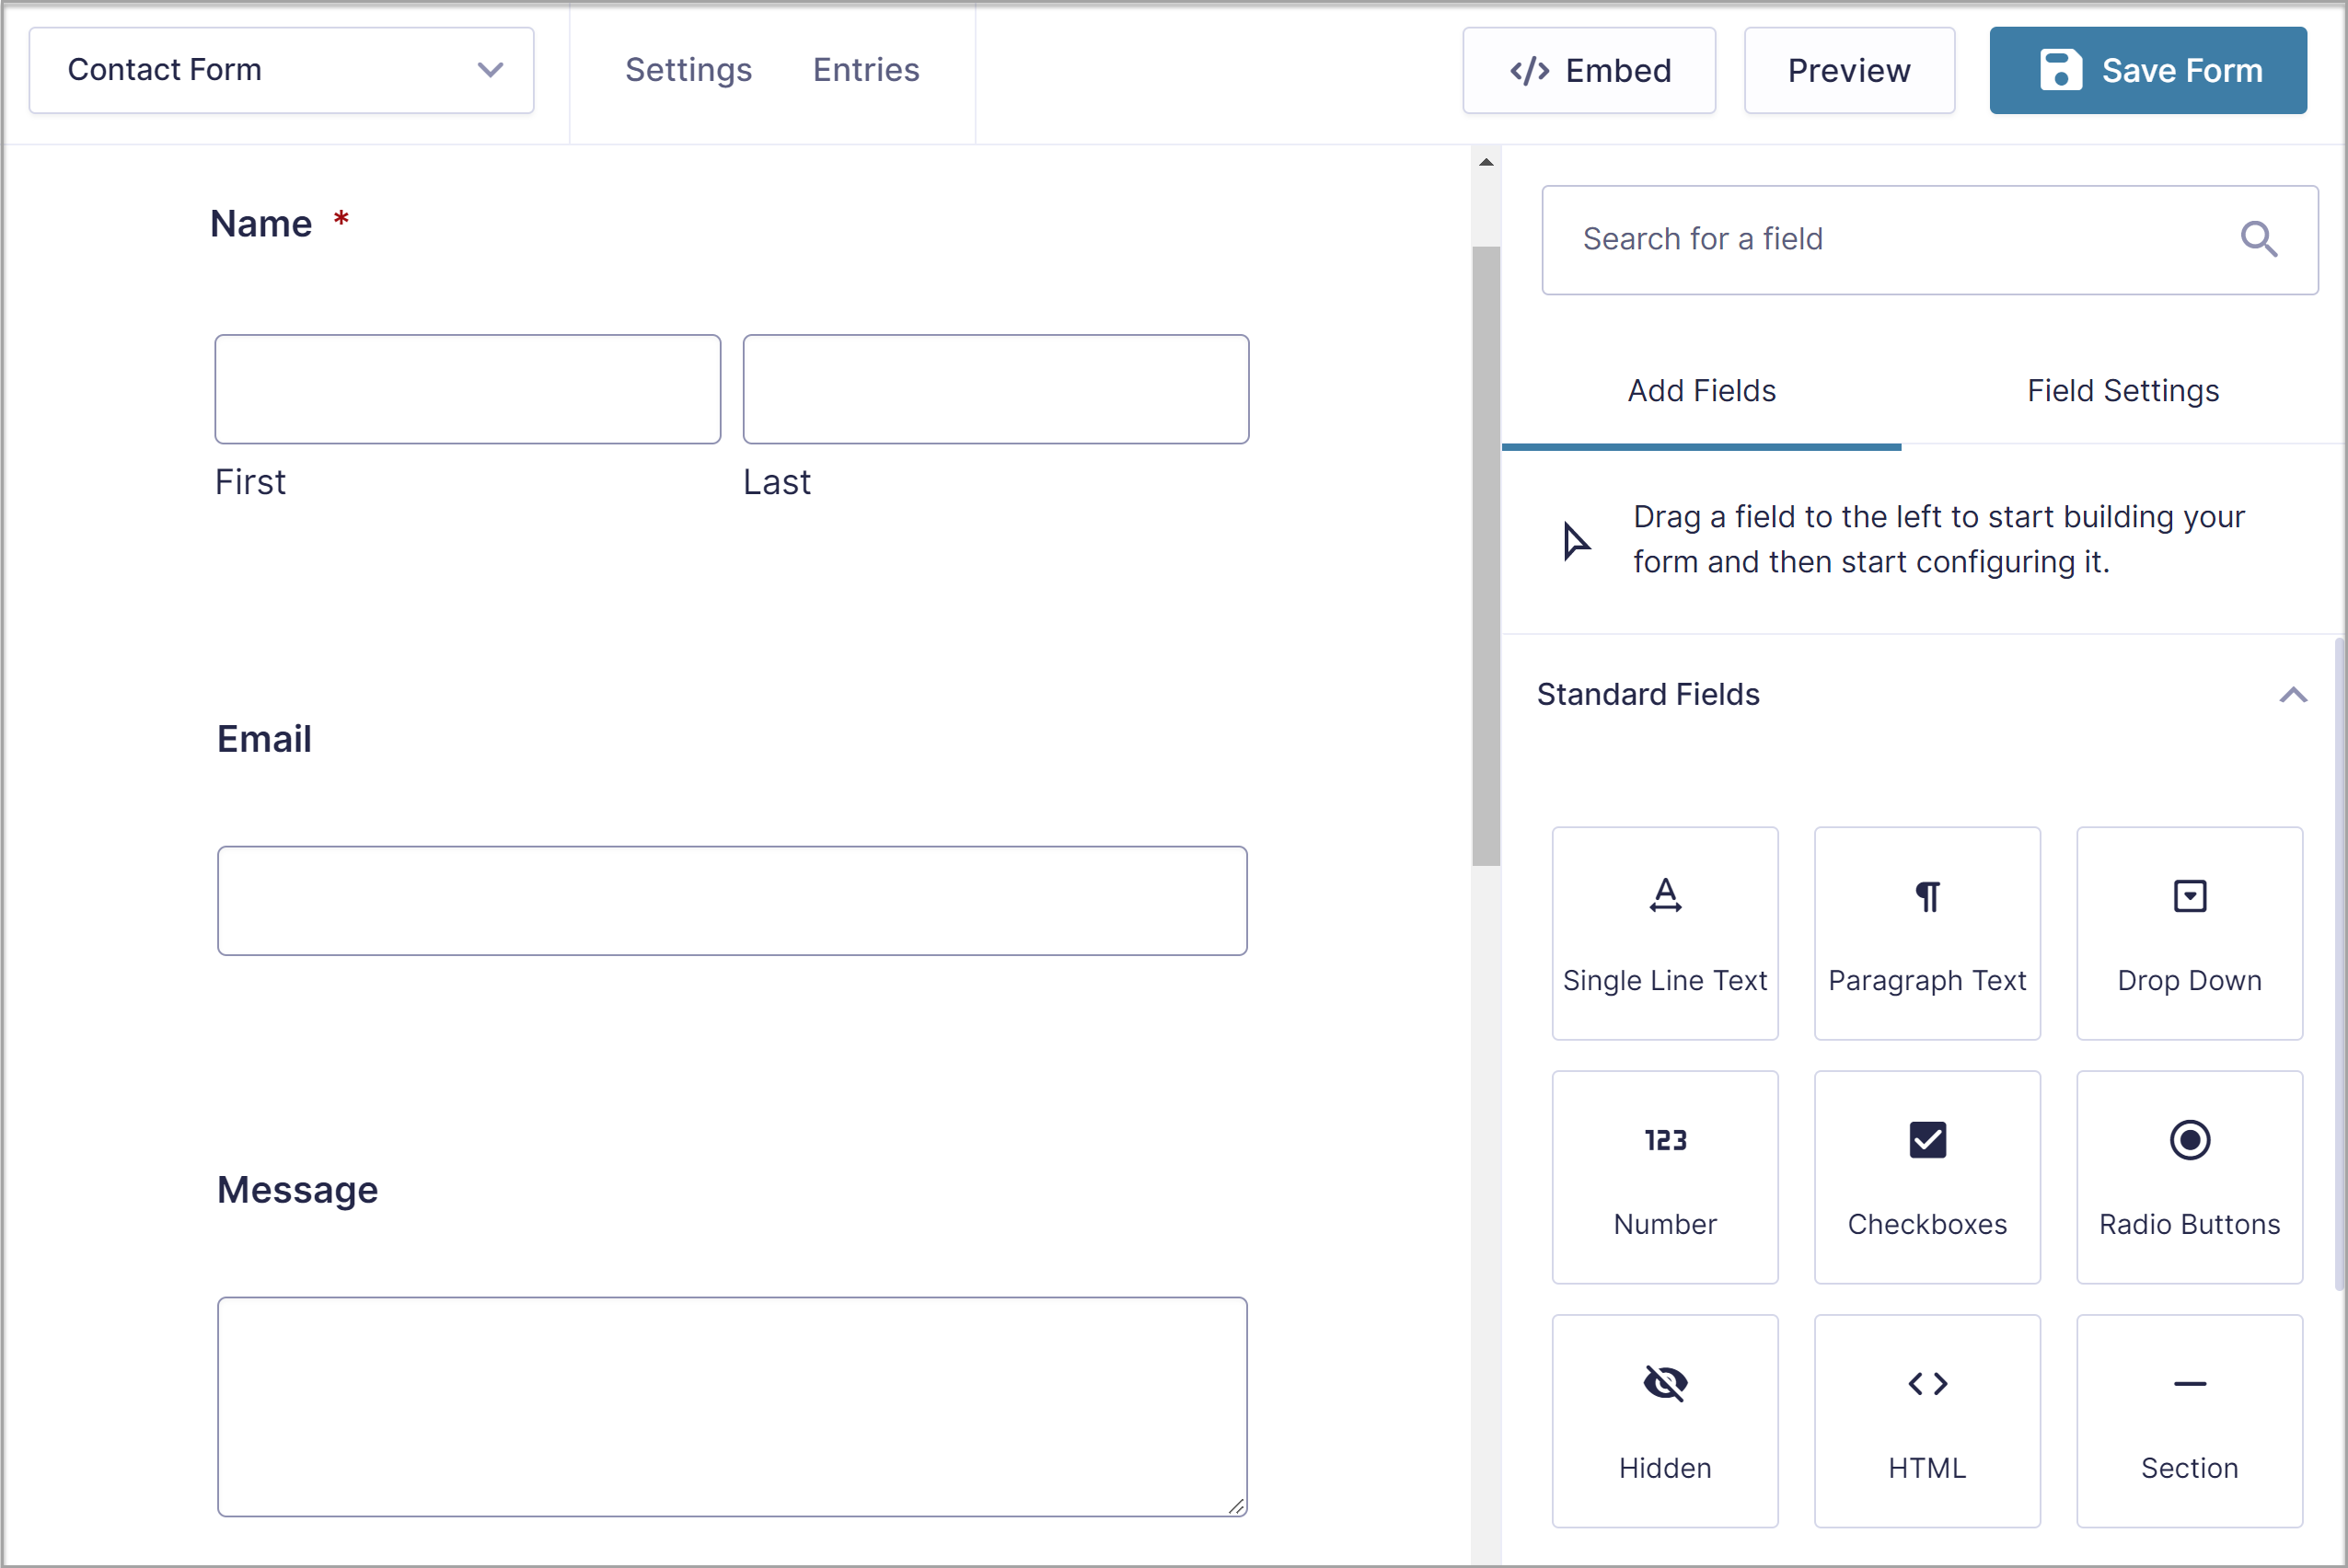
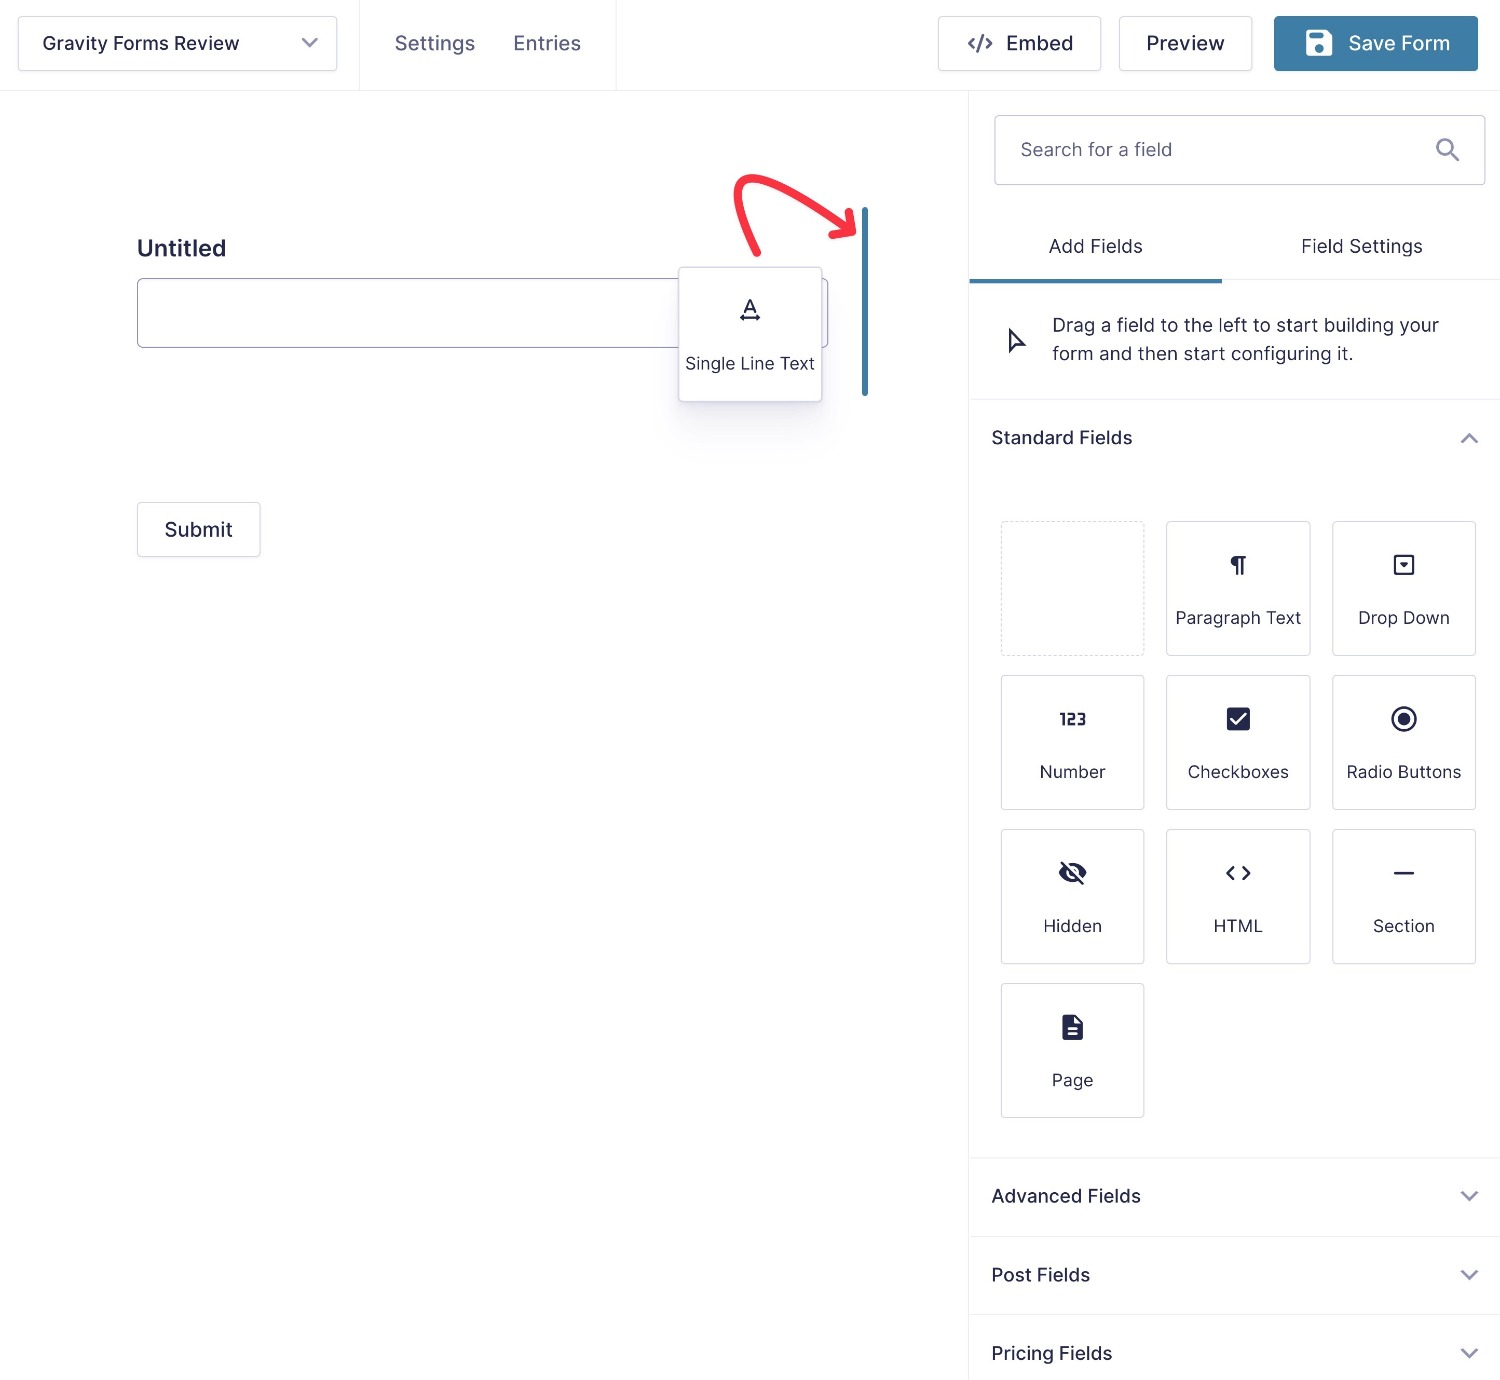
Add Form Fields
In the form editor, you’ll see a list of all the available form fields on the right side, divided into different categories.
To add form fields, all you need to do is drag them over from the side.
You can also use drag and drop to move around existing fields and you can create multi-column layouts just by dragging a field next to another one.
Whether you’re adding it above/below or beside a field, you’ll see a blue line appear where the field will go:
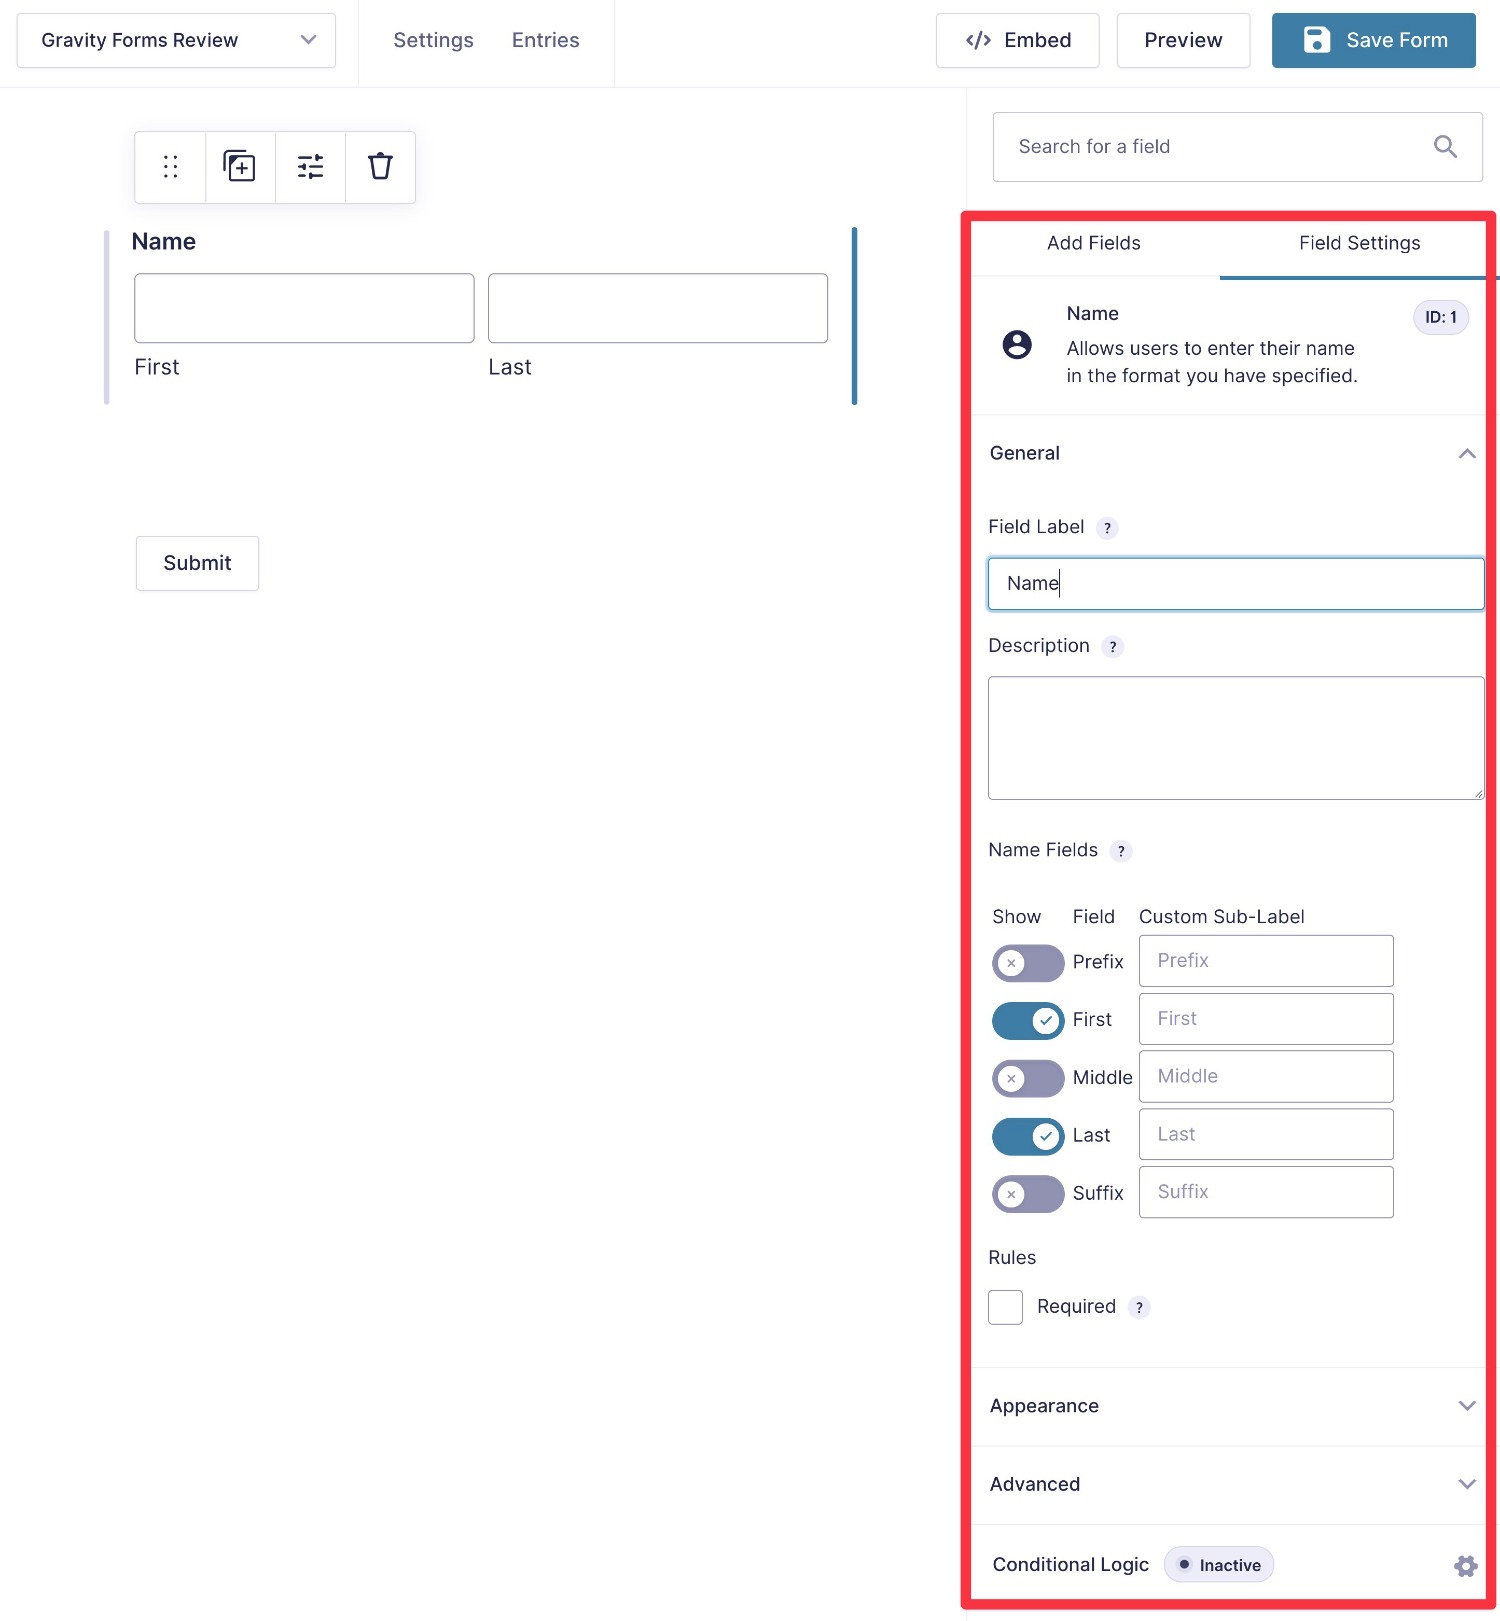
Configure Form Fields
To configure a field, you can click on it to open its settings in the sidebar.
There, you’ll be able to access generic settings such as the field title and whether or not the field is required, as well as advanced settings like conditional logic (more on that in a second).
You’ll also be able to access some settings that are specific to that field type. For example, if you add the Name field, you’ll be able to choose whether to collect the middle name, prefix, suffix, etc.
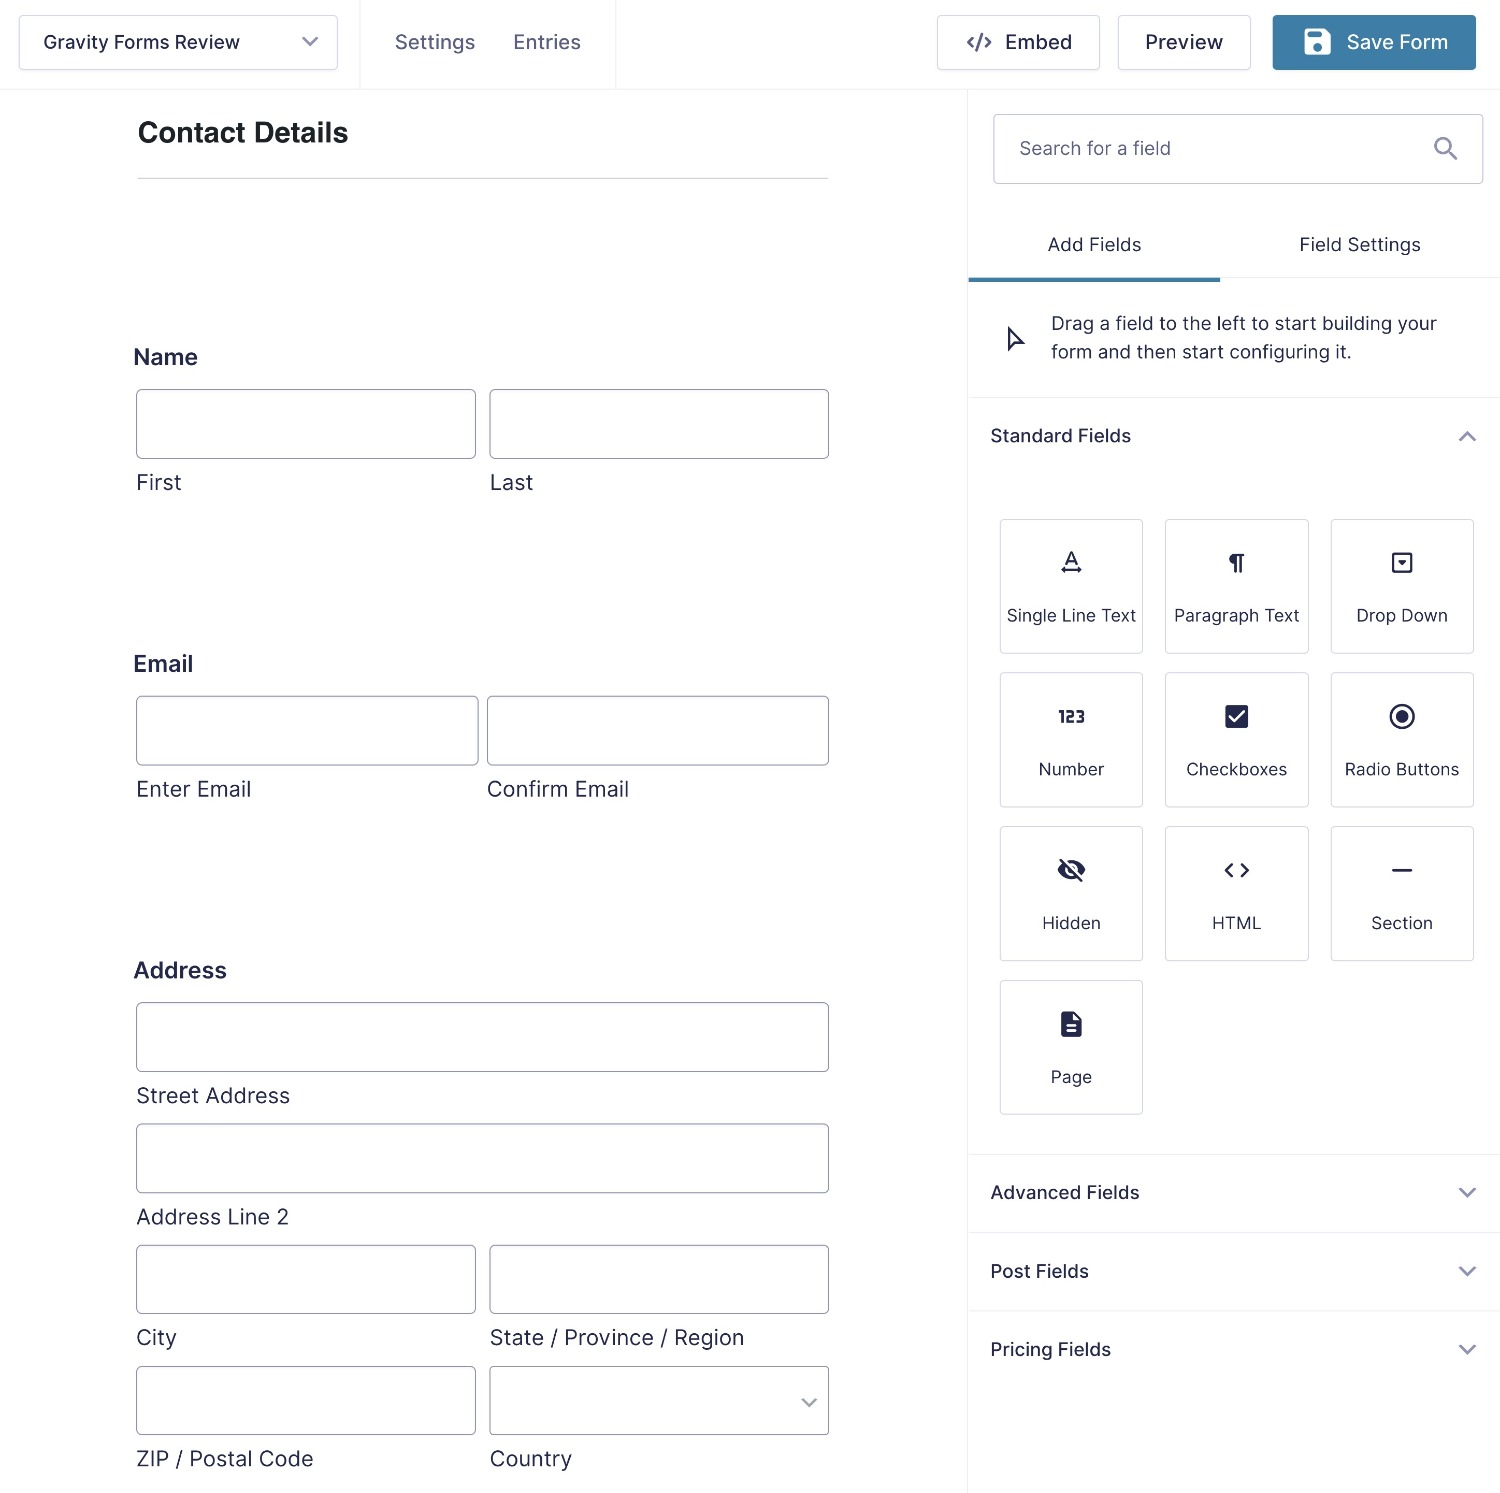
Here’s an example of what your form might look like after adding and configuring all of the fields:
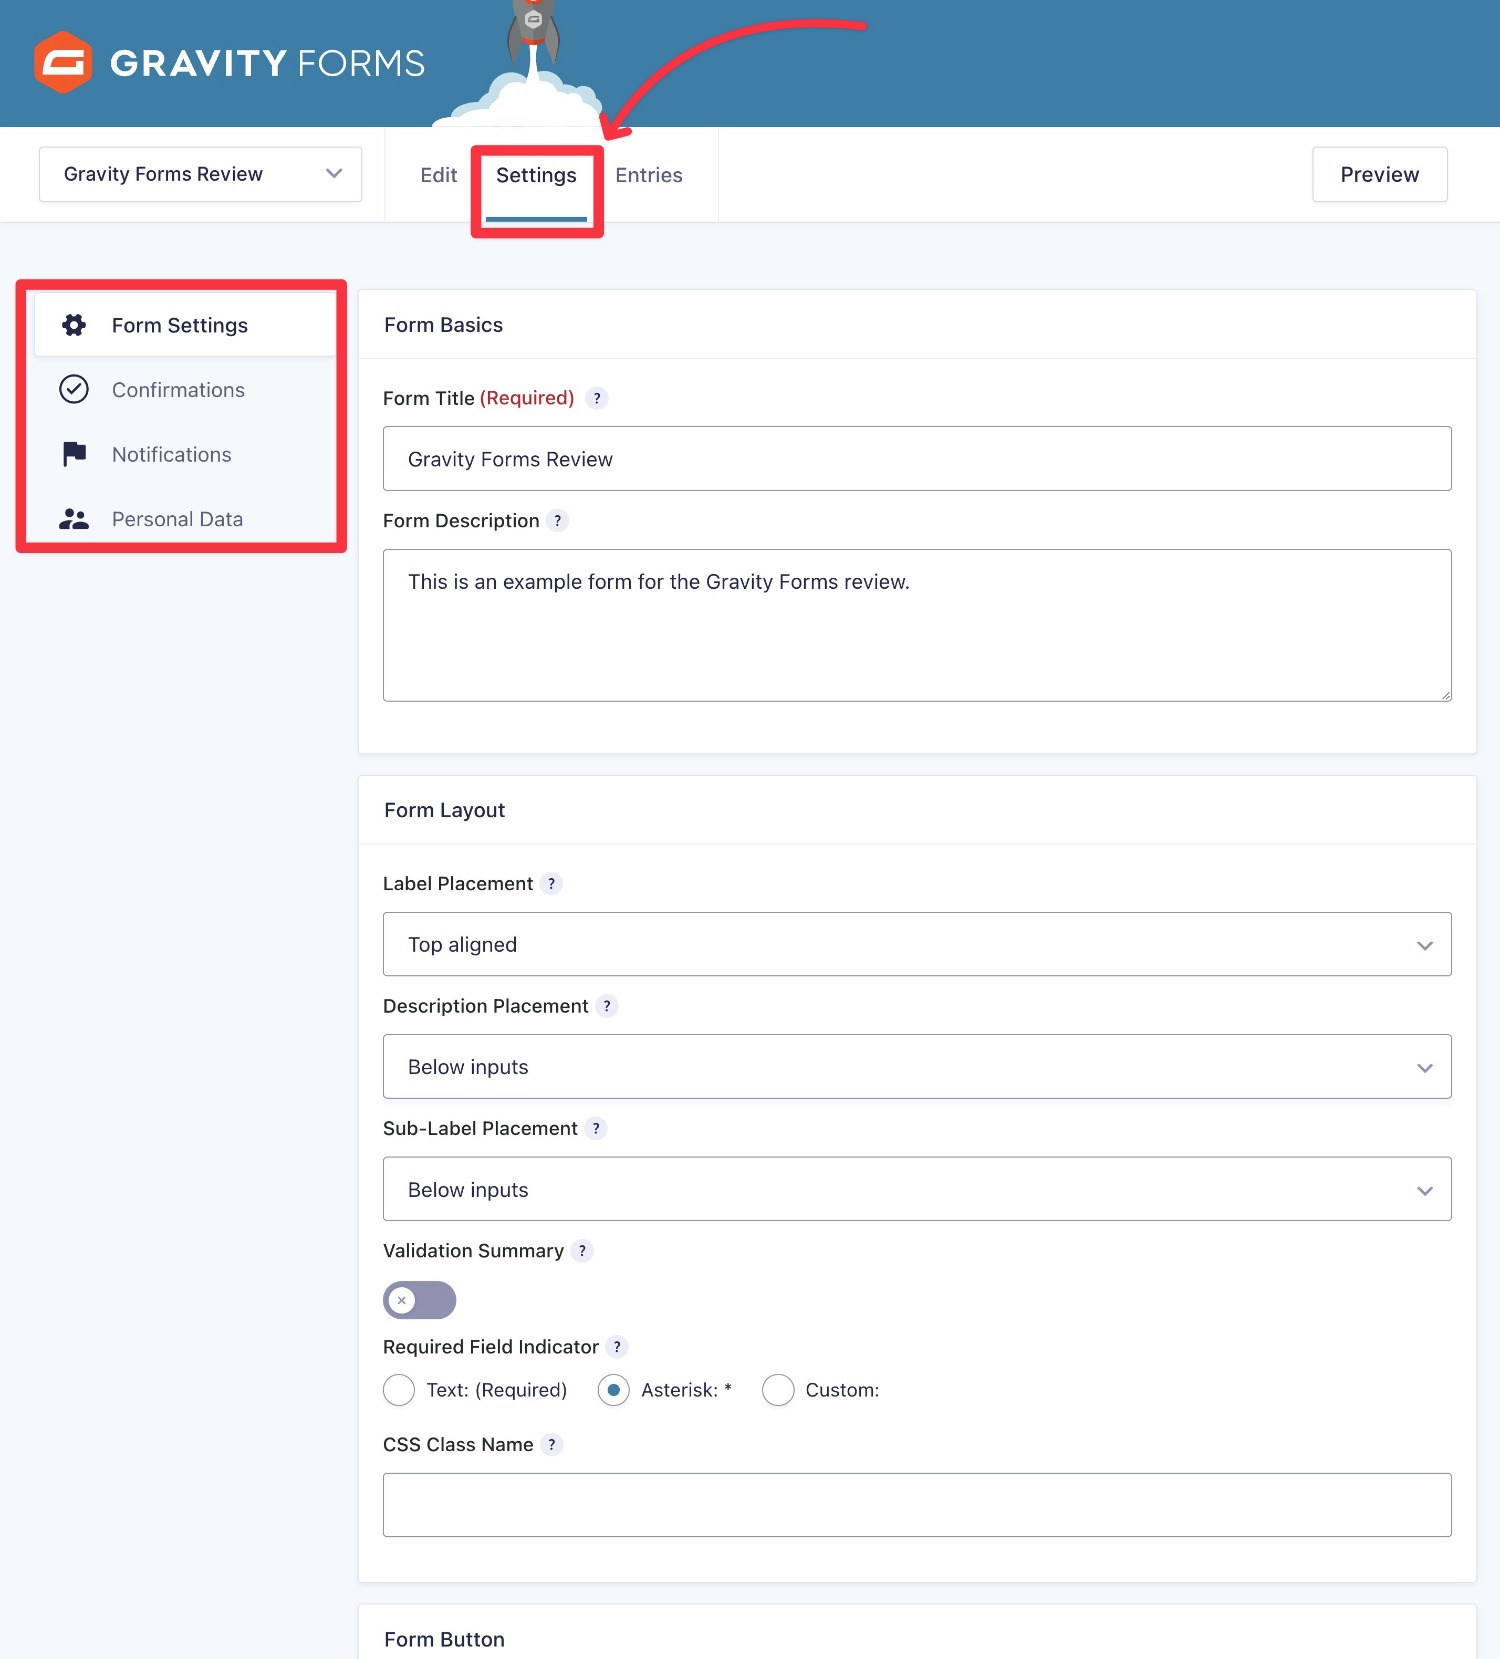
Set Up Form Settings
To finish configuring your form, you can set up your form’s settings by clicking the Settings option at the top of the interface.
Among many options, this is where you can control confirmation messages, email notifications to admins or form submitters, and Gravity Forms’ many integrations – more on those later!
Here are the settings that you get with just the core Gravity Forms plugin:
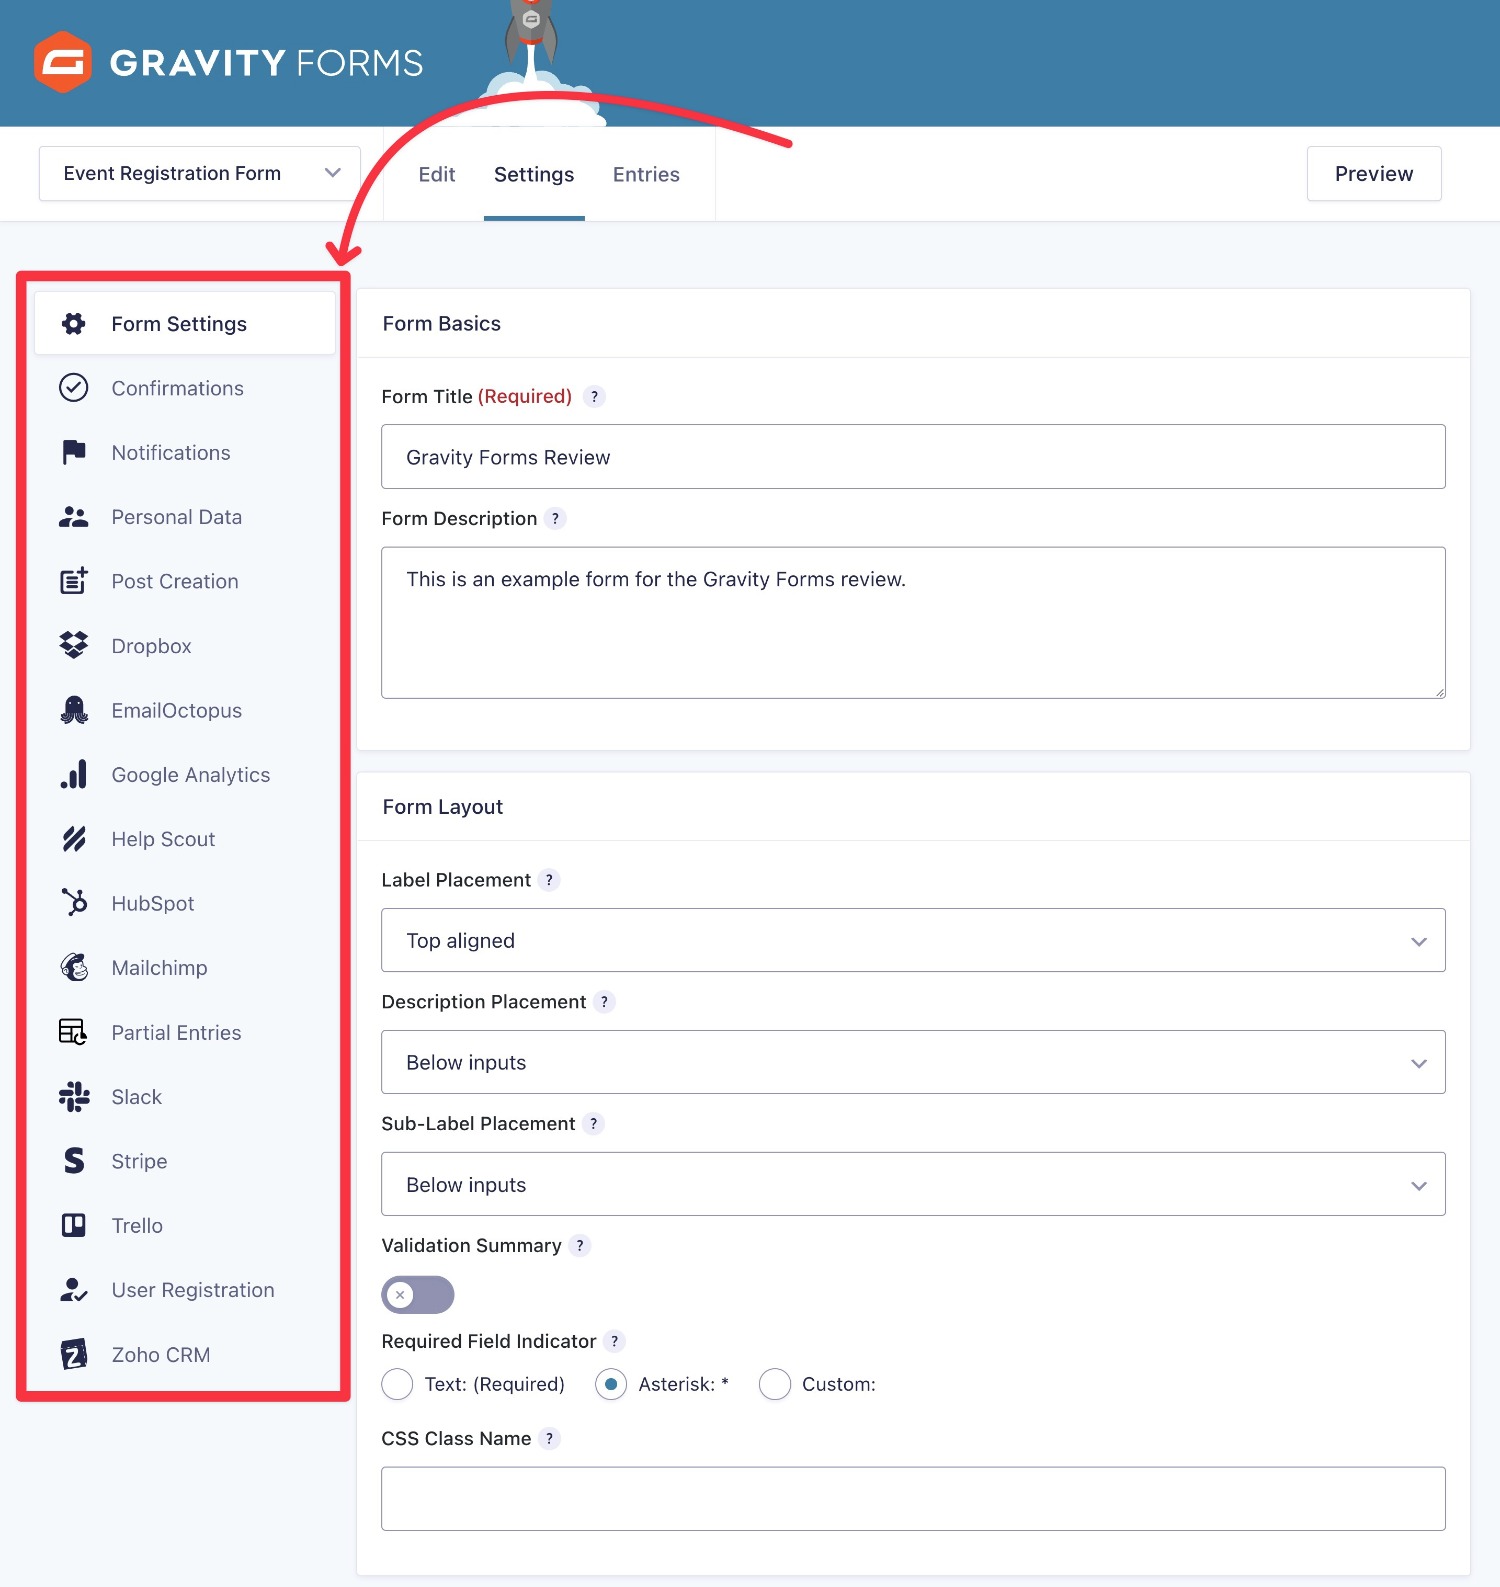
If you install some of Gravity Forms’ many add-ons, you’ll get additional settings.
For example, here’s what the settings list looks like with some of the add-ons installed:
Embed and Style Your Form
Once you’ve set up your form, you can easily embed it anywhere on your site using several different options:
- Block – use this in the WordPress block editor (AKA Gutenberg)
- Shortcode – add this to any text editor on your site.
- PHP function – add it directly to your theme’s template files or via hooks.
When you embed your form within the block editor, you can then use our Orbital form theme to easily style the look and feel of your form.
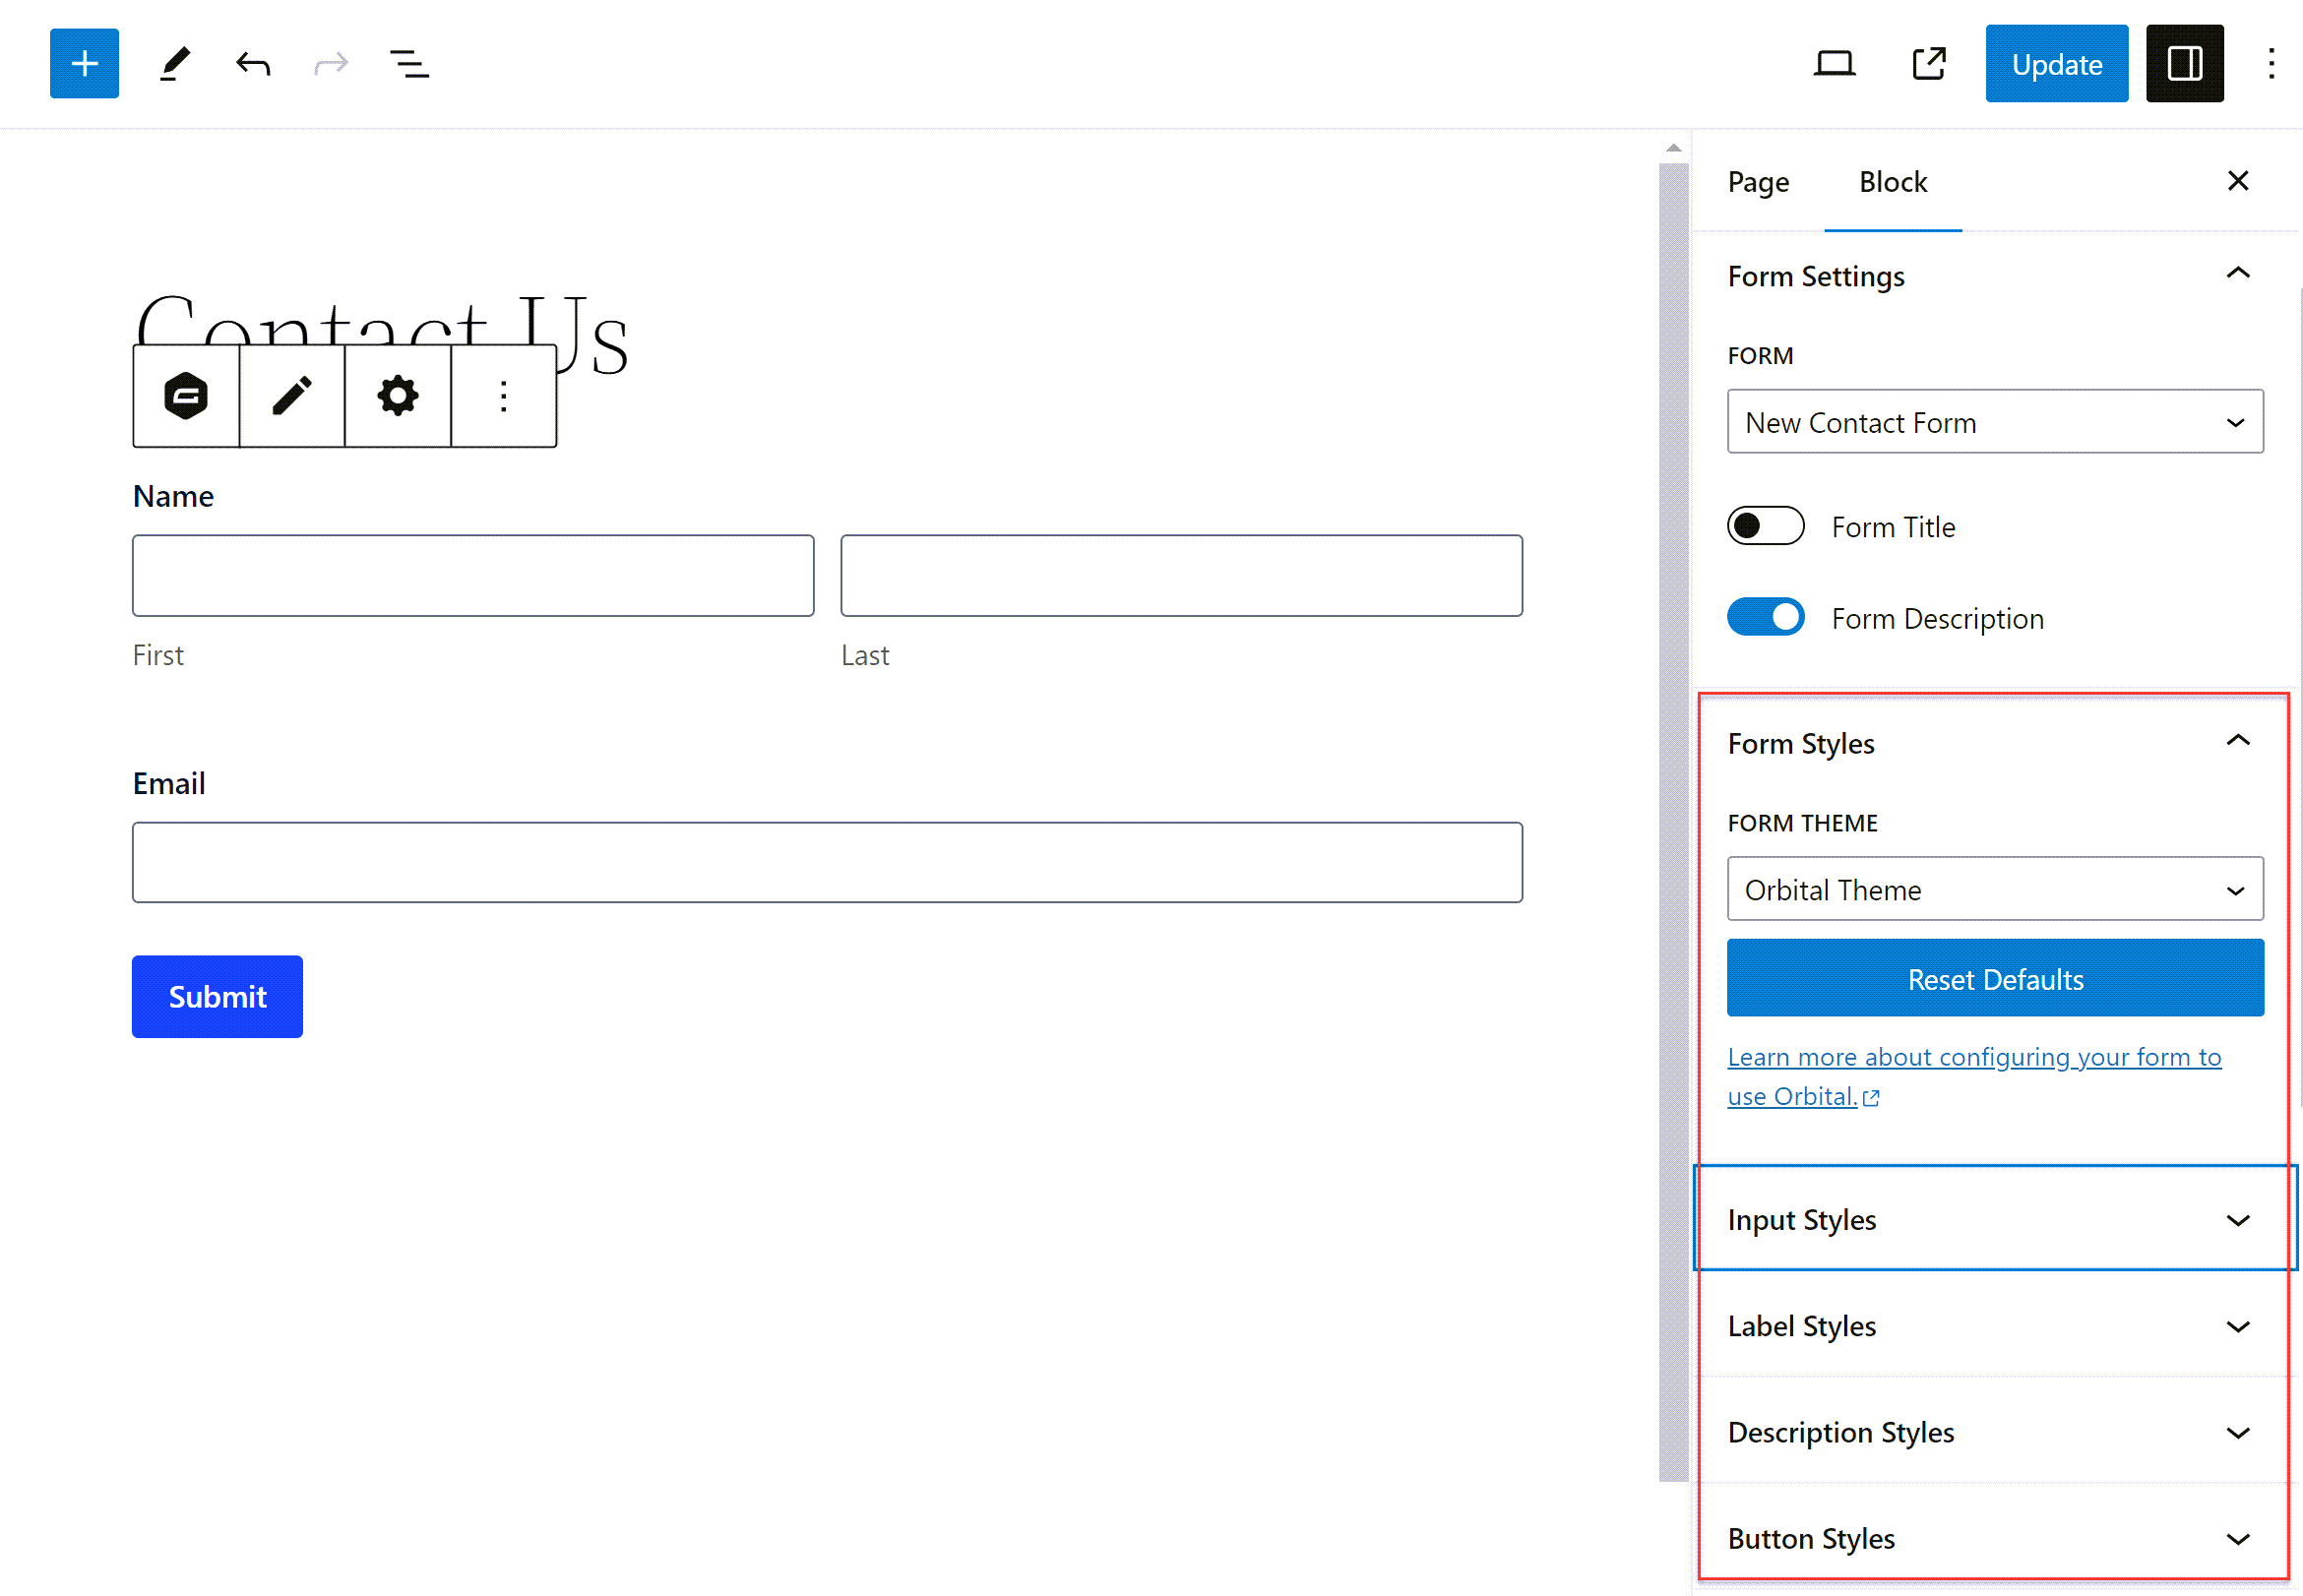
With Orbital, you’ll find built-in block styling options, allowing you to tweak the color scheme of your form, alter the size of inputs, modify button styles, and much more! For more information on how to style your forms, check out this guide – How to Style Forms in Gravity Forms: Ultimate Guide.
Once your form is embedded and styled it’s ready to publish. However, we’ve only touched the tip of the iceberg when it comes to Gravity Forms’ advanced features and add-ons. Keep reading to see what else this WordPress plugin has to offer…
Built-In Features for Advanced Forms
While the visual editor makes it easy to create your forms, the core Gravity Forms plugin still gives you access to plenty of advanced functionality.
Let’s go through some of the most notable features…
Conditional Logic to Adjust Forms Based on User Input
At times, you might want to adjust your form’s fields or behavior based on how users have filled out previous fields.
For example, you might only show a certain set of fields when a user checks a box.
To help with that, Gravity Forms offers built-in conditional logic for all parts of your forms.
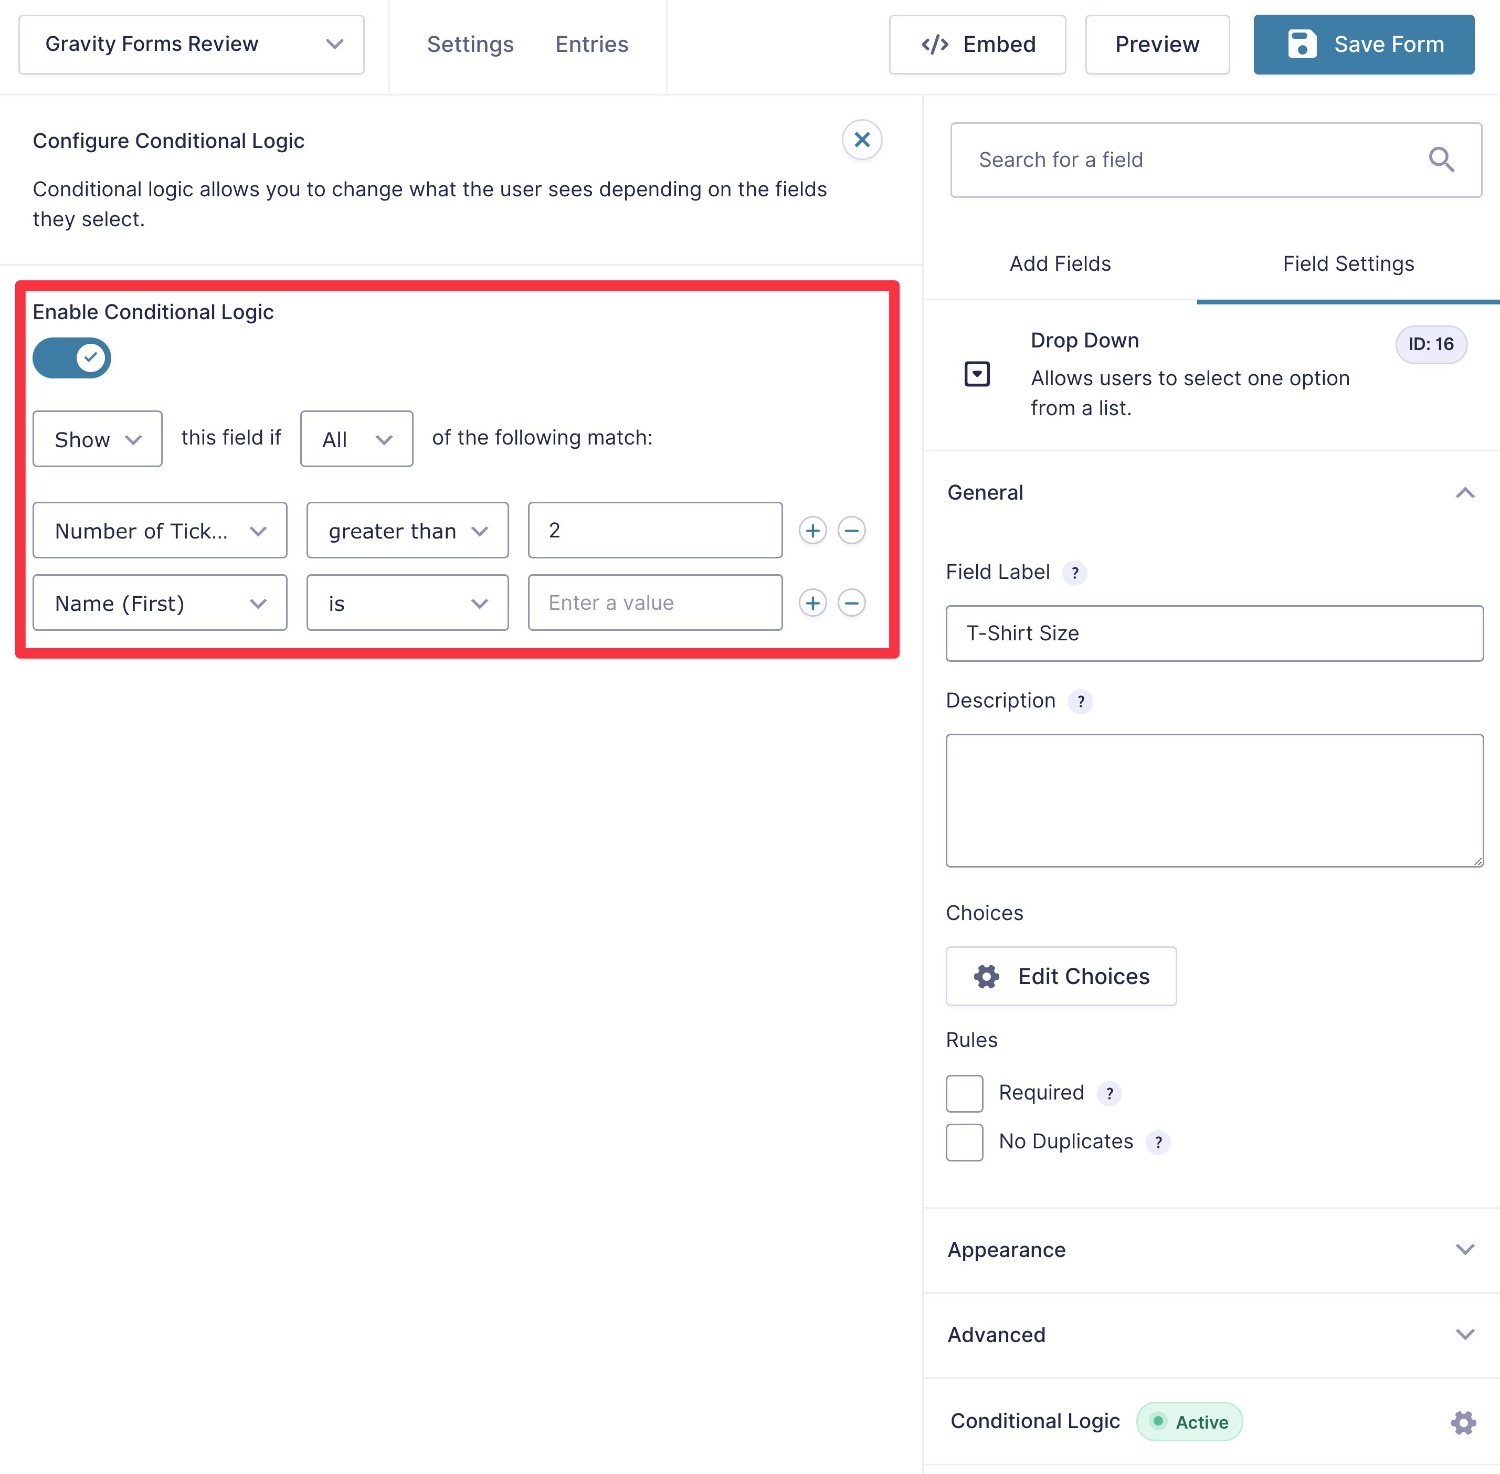
Not only can you use conditional logic to show/hide fields, but you can also use conditional logic to control confirmation messages, email notifications, connections to integrated services, and more.
For example, you could send email notifications to different members of your team depending on how a person filled out the form.
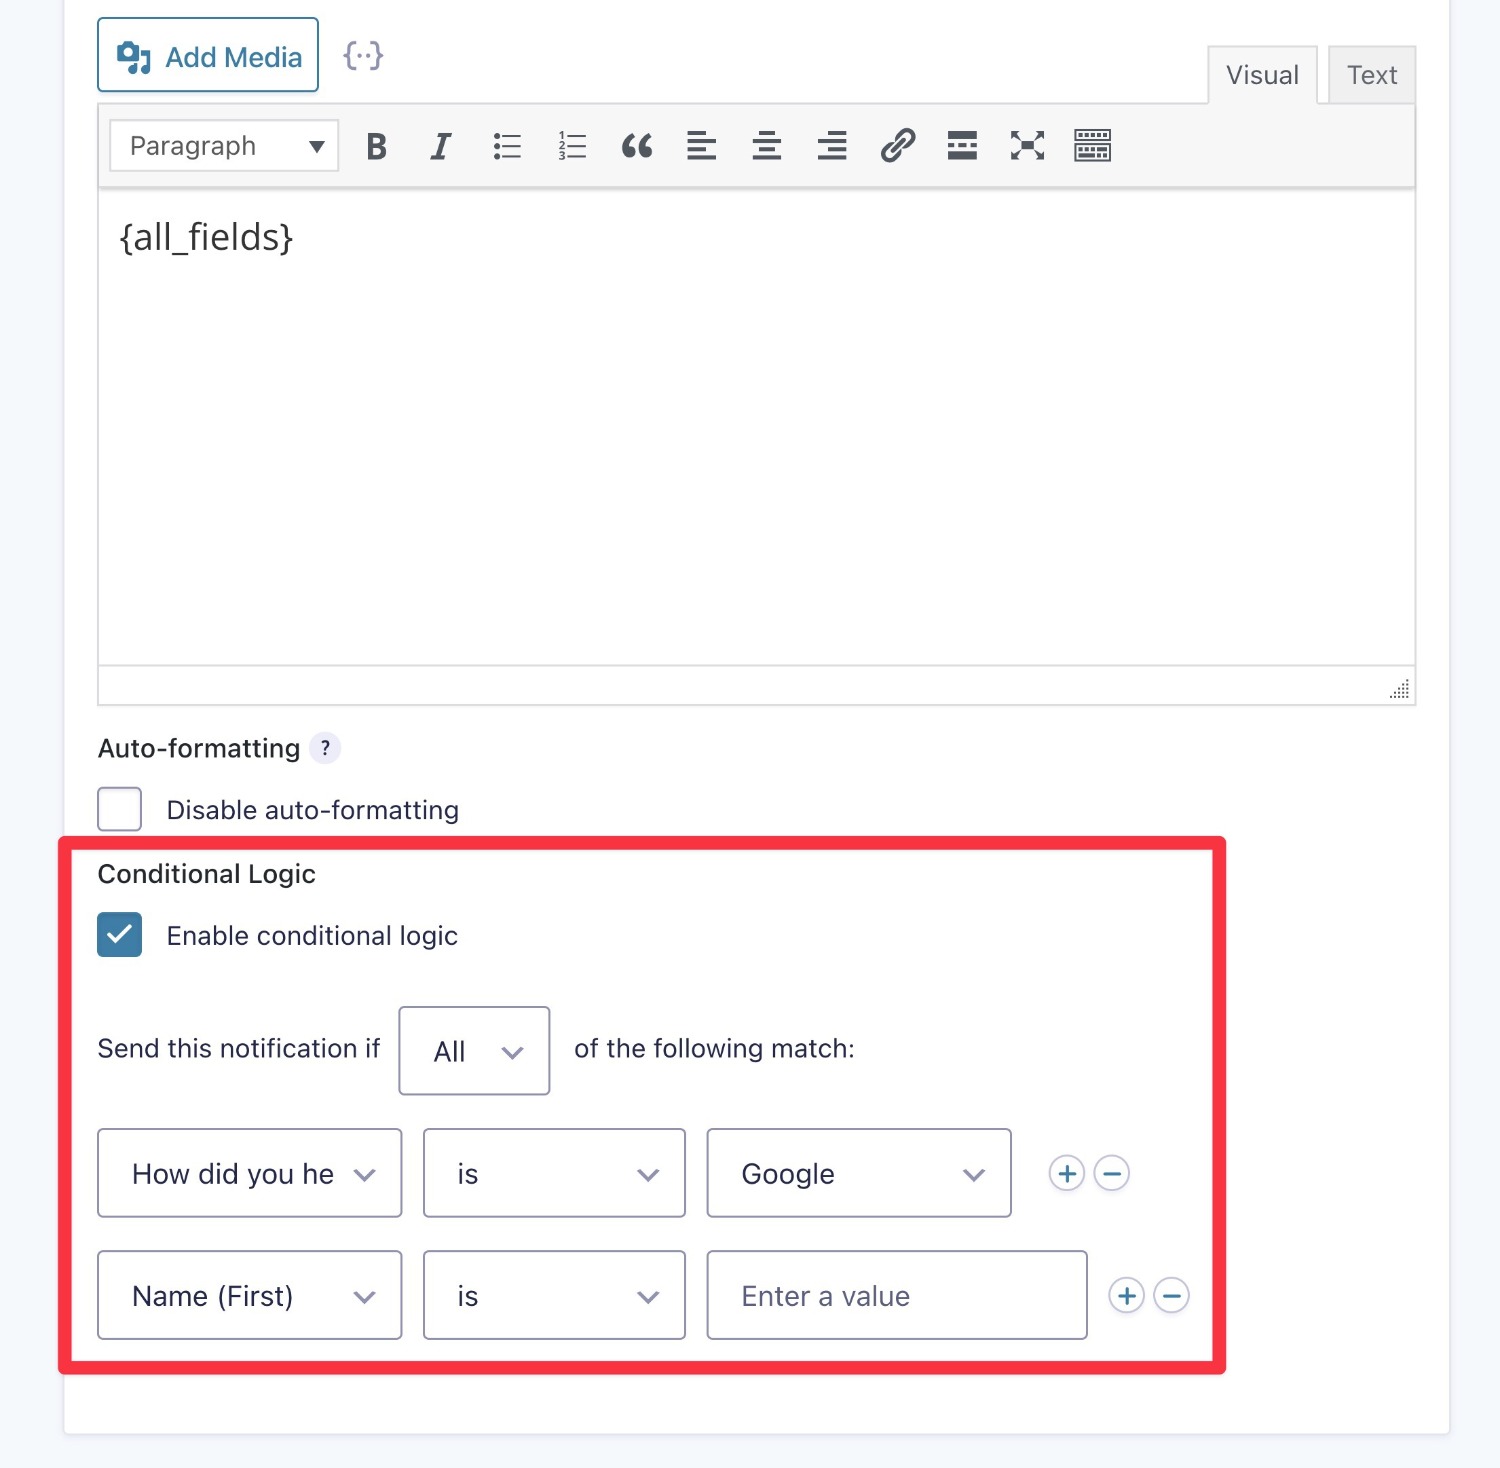
Speaking of notifications…
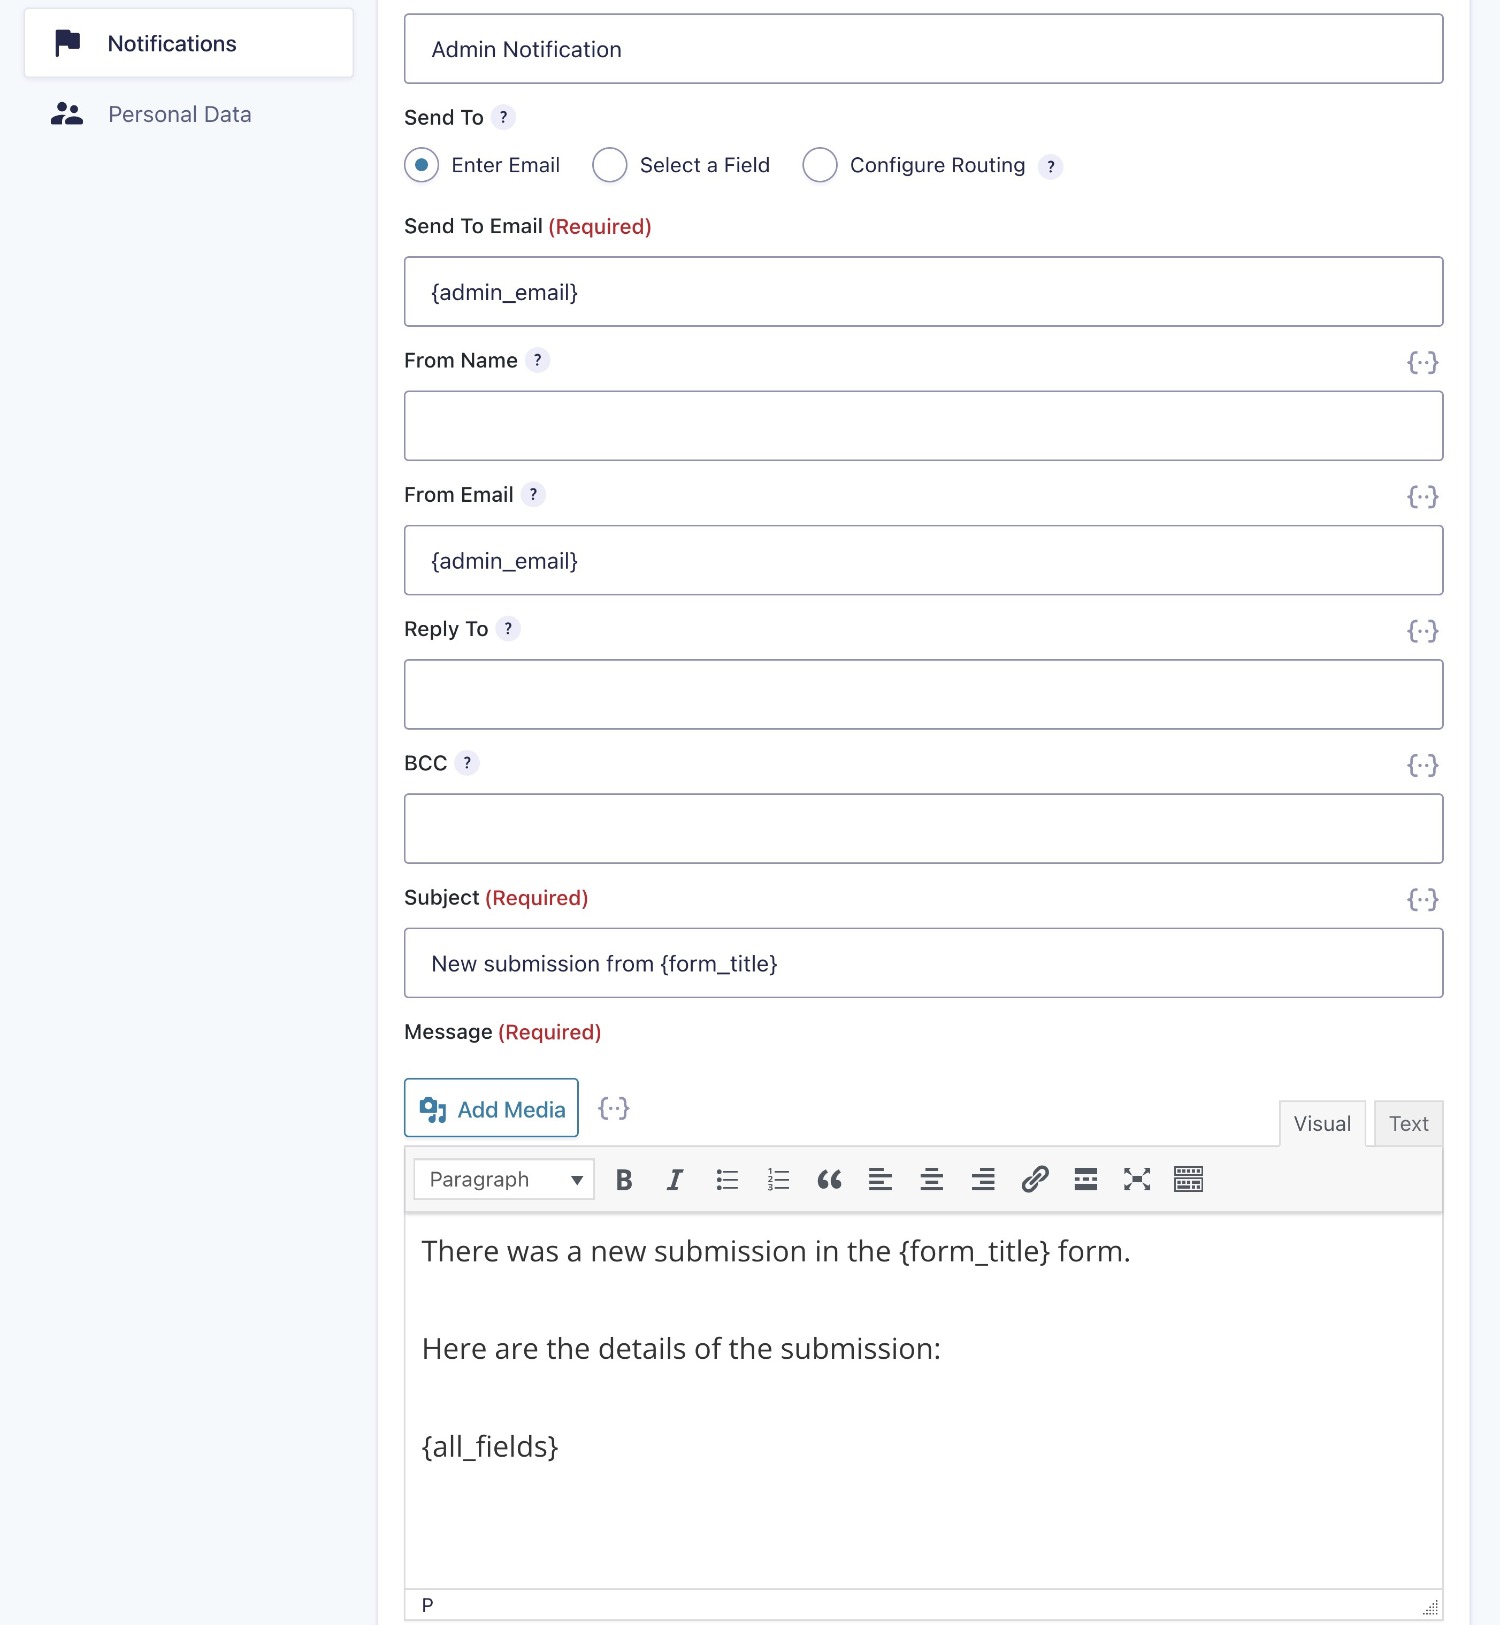
Notifications and Confirmation Messages
You can create unlimited email notifications when someone fills out a form, including emails to members of your team and the person who submitted the form.
You can also create unlimited confirmation messages and display different messages based on how someone filled out the form.
When you’re setting up these messages, you can use merge tags to dynamically insert data from the user’s submission.
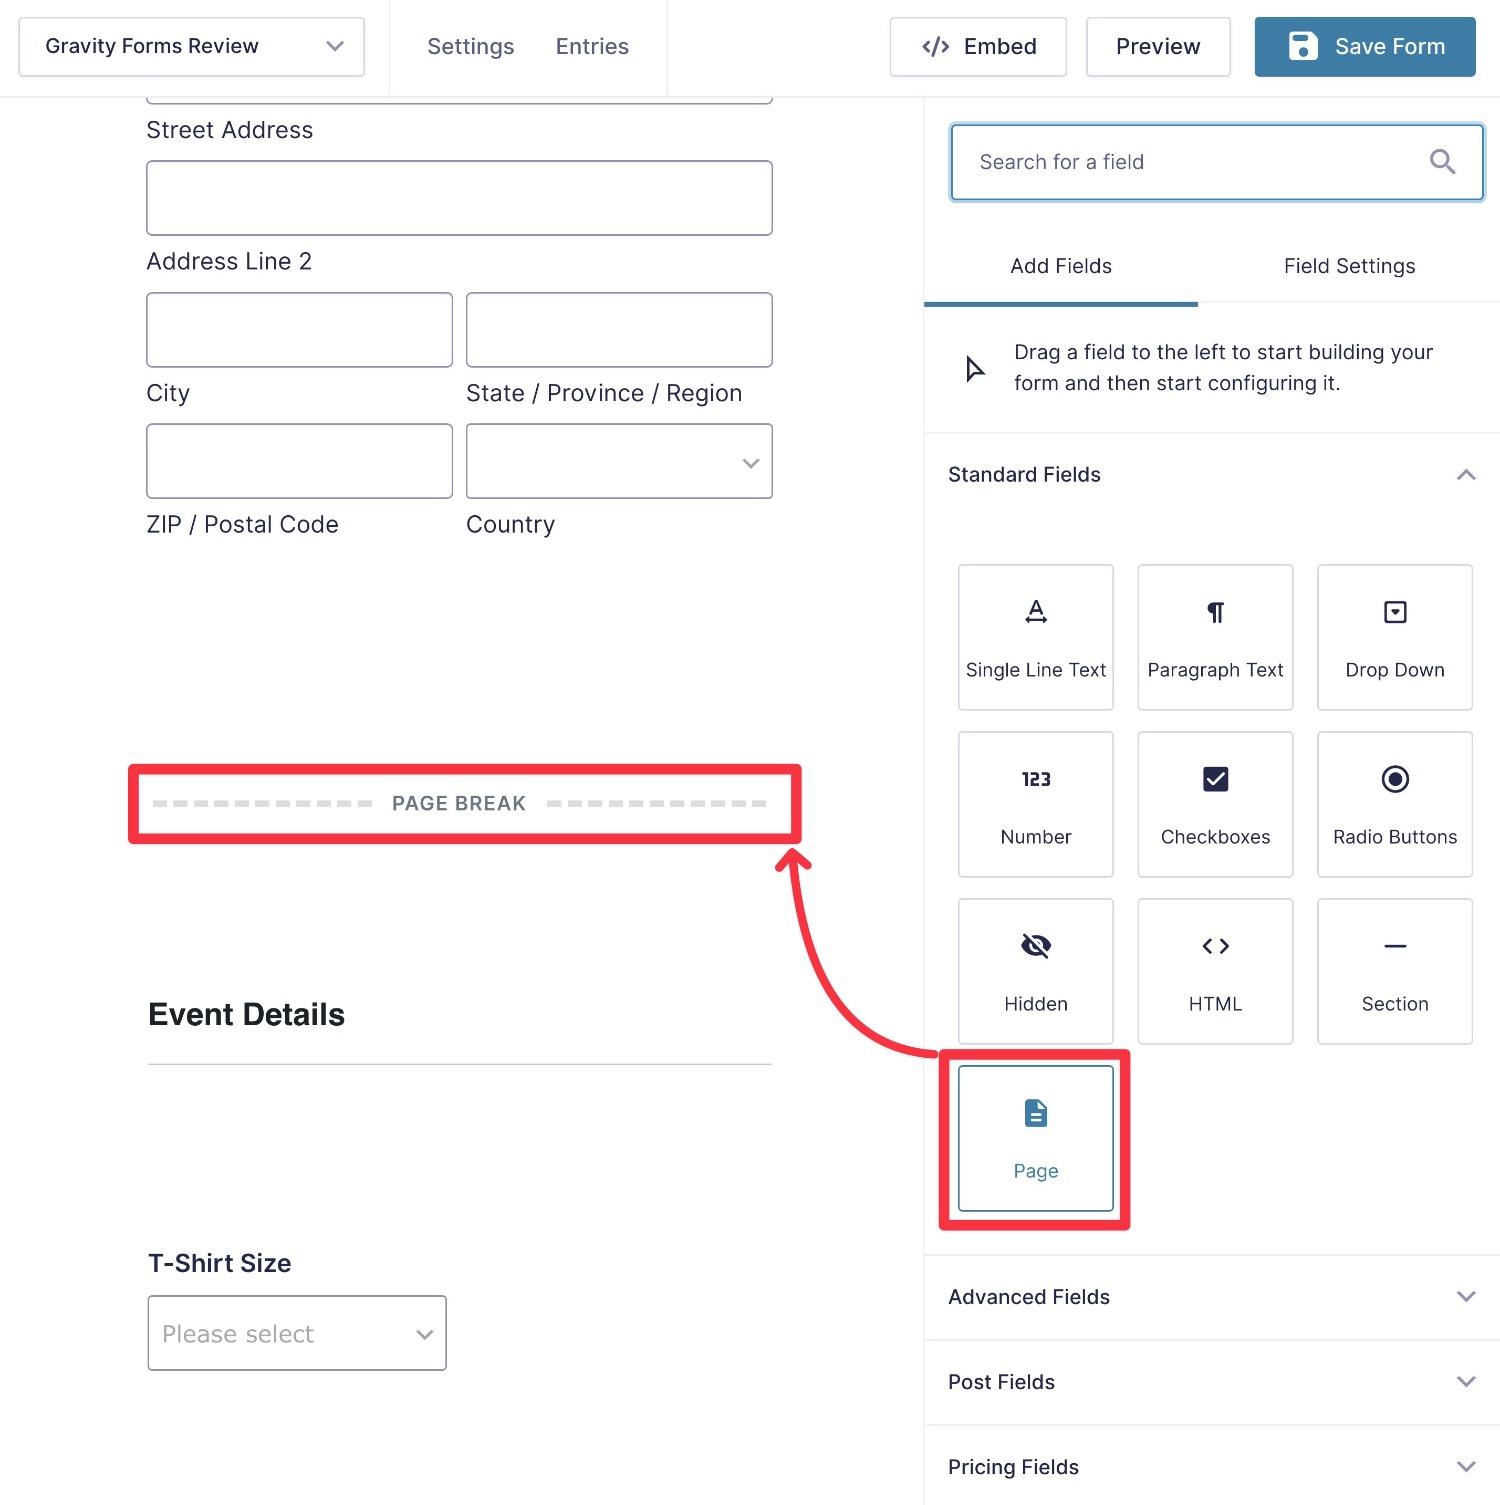
Multi-Page Forms
If you have longer forms, Gravity Forms lets you easily divide them into multiple pages. All you need to do is add a page divider when working in the form builder.
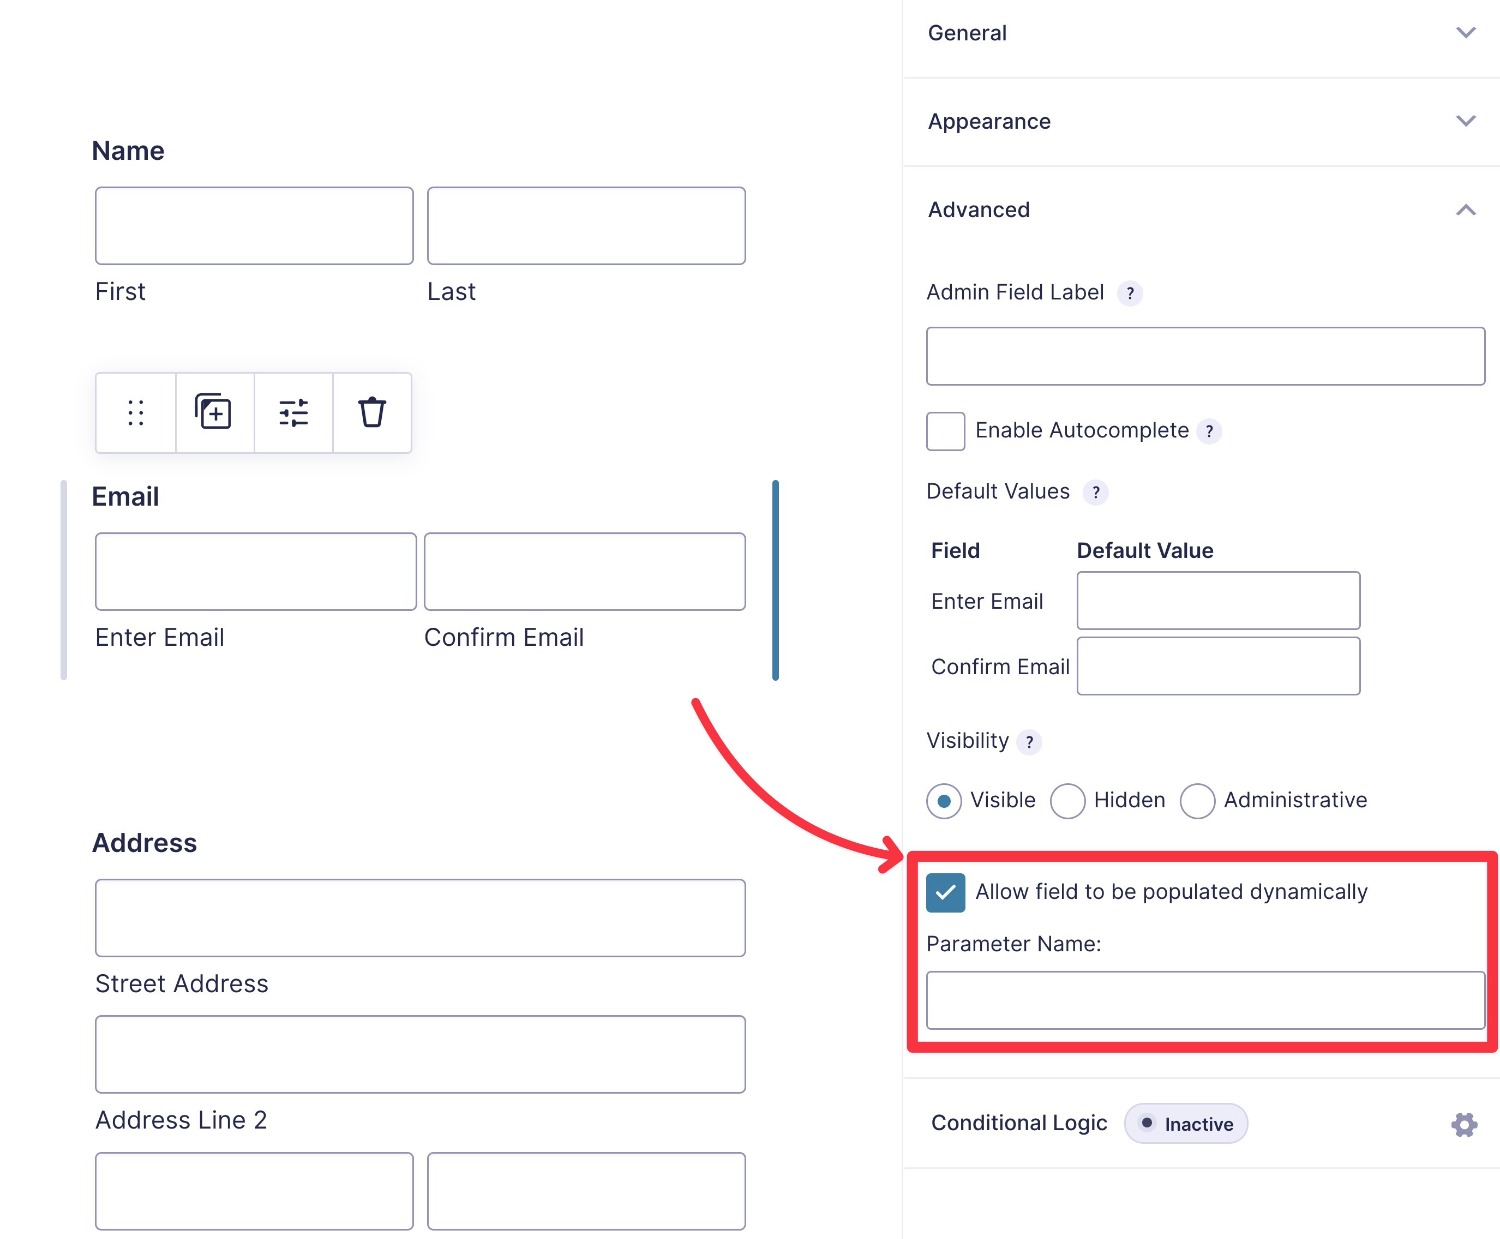
Dynamic Population
With dynamic population, you can pass data to your form to dynamically populate a field’s value. You can do this using query parameters, shortcodes, blocks, or hooks.
This comes in handy in a lot of different situations and can simplify both your life and your users’ lives. For example, let’s say you run multiple events and want to let people register for events using a form.
Rather than creating a separate form for each event, you could just create one unified registration form for all your events. Then, you could dynamically populate the form with the information for the specific event that the user clicked in from.
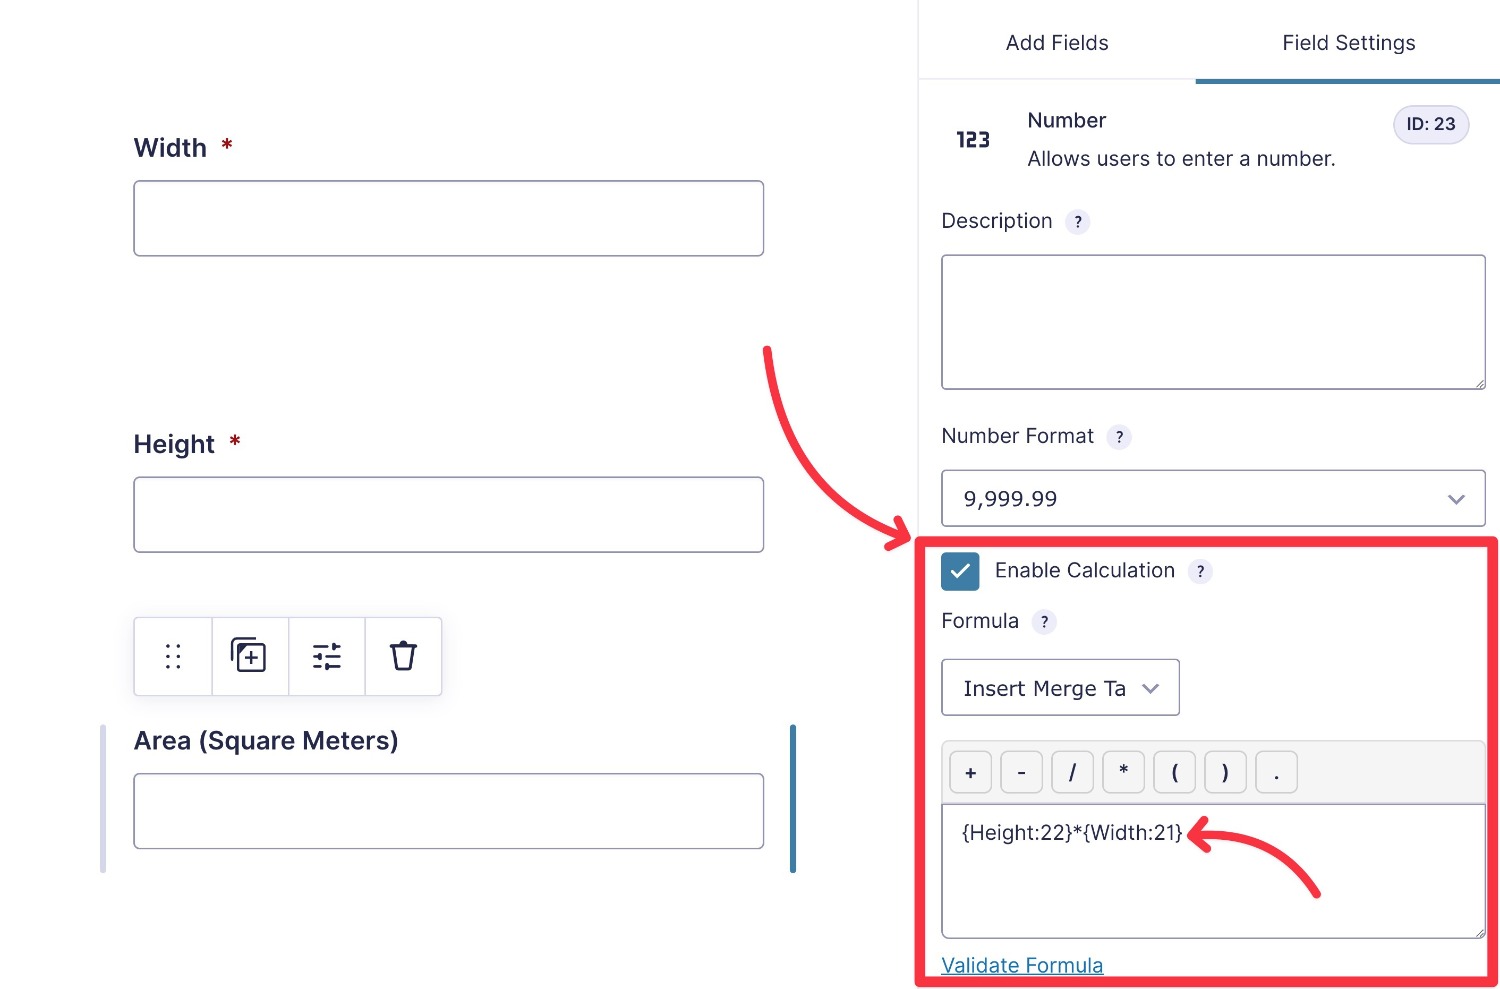
Calculations
With Gravity Forms’ calculation functionality, you can create your own mathematical calculations and formulas, using preset values and/or input from the form submitter.
One common example here would be a “Get a Quote” form. You could collect a user’s information using the form, run it through your quote formula, and then instantly provide the user with an accurate quote or estimate.
Similarly, you can create all kinds of useful calculators, such as a mortgage calculator that lets people figure out their monthly payments based on the loan amount, interest rates, and other factors.
In-Dashboard Entry Management
In addition to receiving email notifications when someone submits a form, Gravity Forms also gives you built-in entry management in your WordPress dashboard.
You can easily view information for individual submissions, along with seeing the overall view and conversion rate for your forms.
If you have a lot of submissions, you also get filter options to filter submissions by any information in your form, including individual fields. You can also customize the table columns that appear in the interface so that you can quickly see important information and use bulk actions to manipulate entries.

Feeds to Connect to Other Services and Set Up Automations
In Gravity Forms, feeds let you perform actions after someone submits your form, and they’re a big part of what makes Gravity Forms so flexible.
Here are some examples of what you can use feeds for:
- Pass data to your email marketing service or CRM.
- Send information to a payment gateway to process payments.
- Pass information to your ticketing system/helpdesk to create a new support request.
- Connect to a file storage service to upload attached files (e.g. Dropbox).
- Create a post on your site (or any custom post type).
- Register the user on your WordPress site.
- Send a notification to Slack.
- Add details to your project management system, e.g. creating a new Trello card.
- Etc.
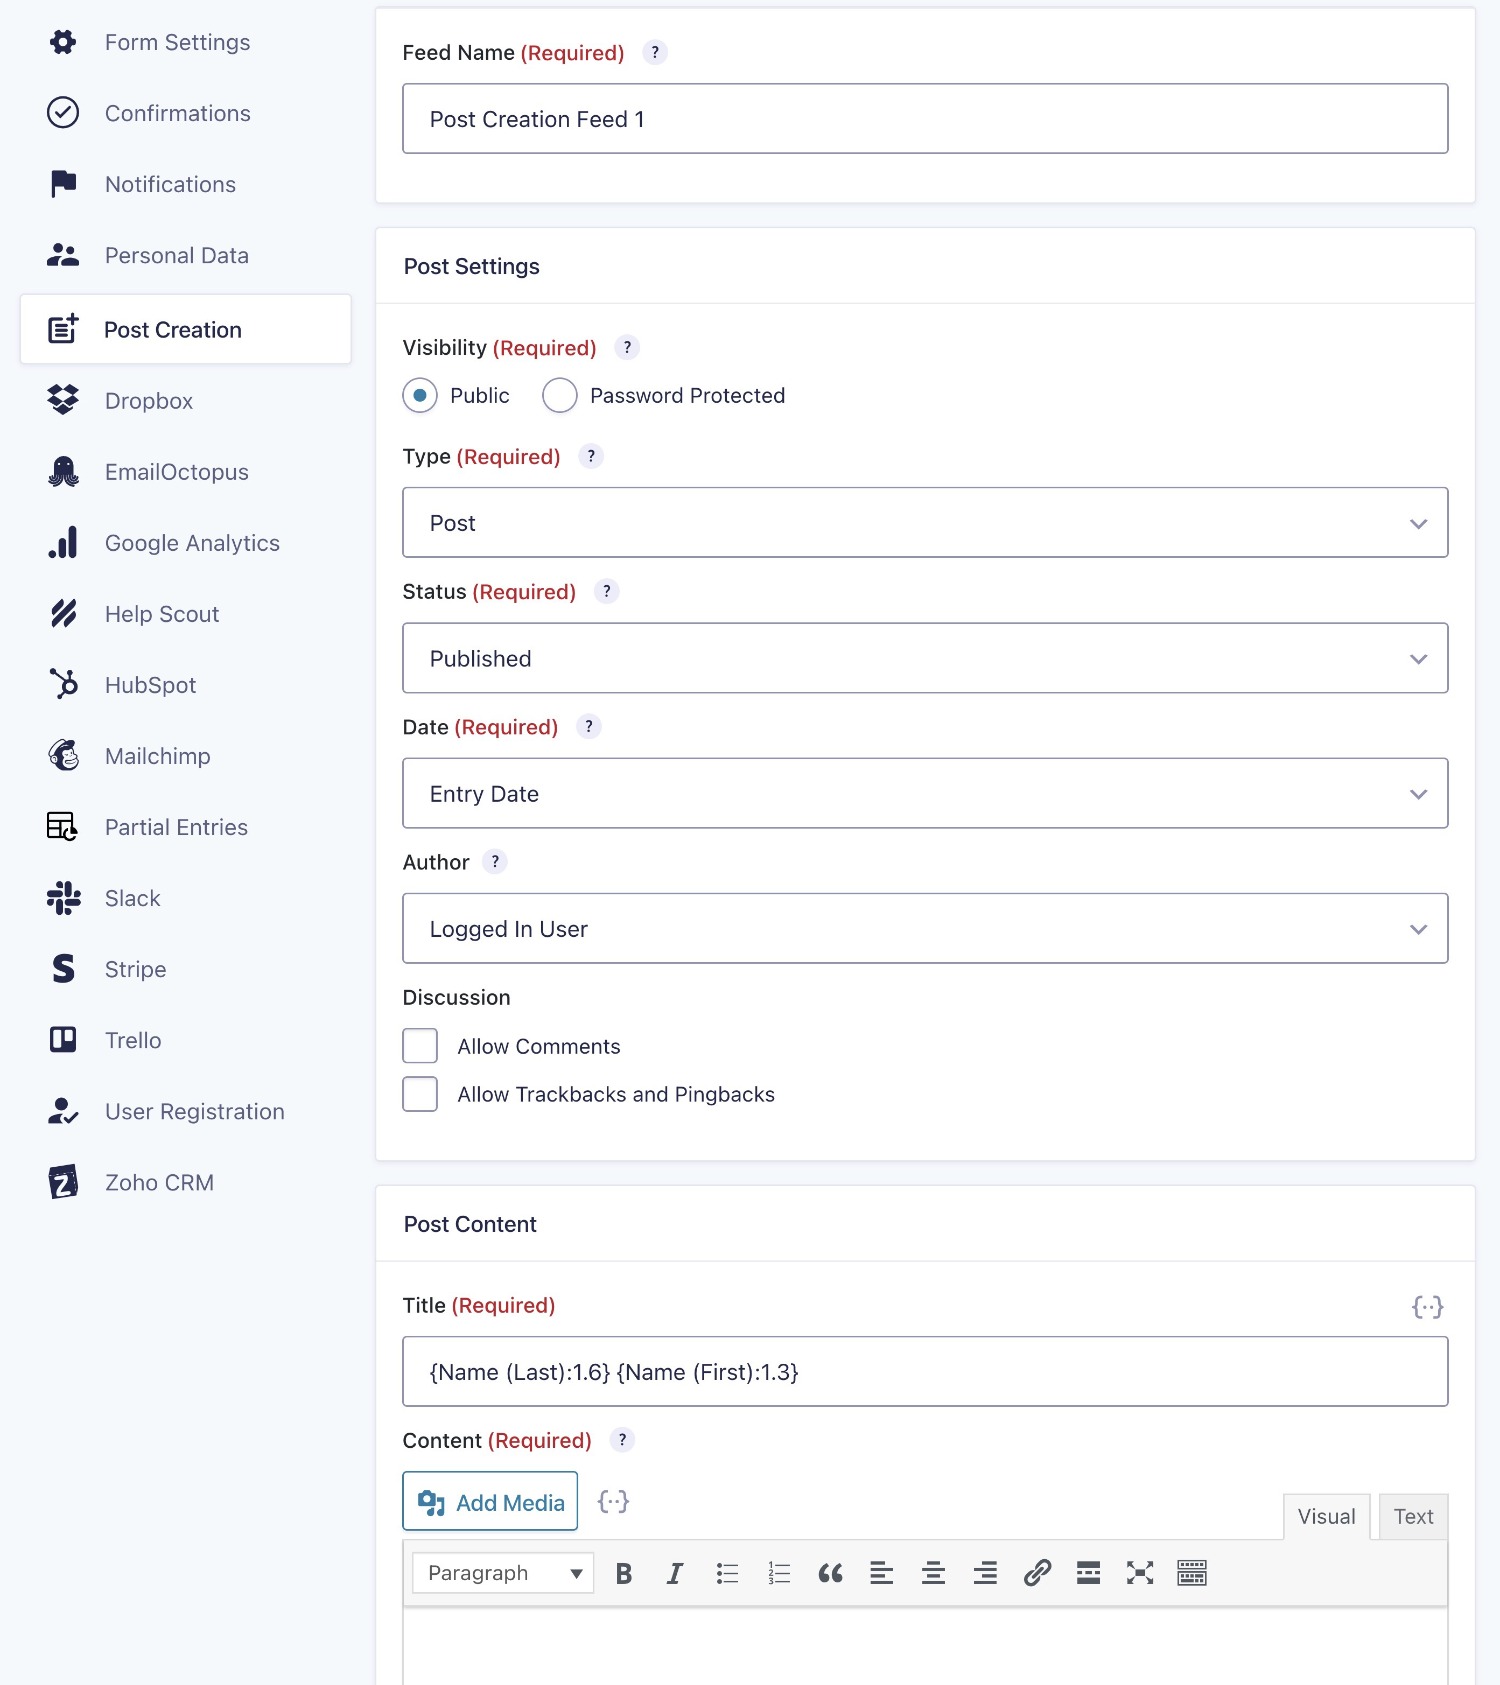
Here’s an example of creating a feed to create a new WordPress post when someone submits a form:
To access these feeds, you’ll install one of the official or third-party add-on plugins, so let’s talk about those next…
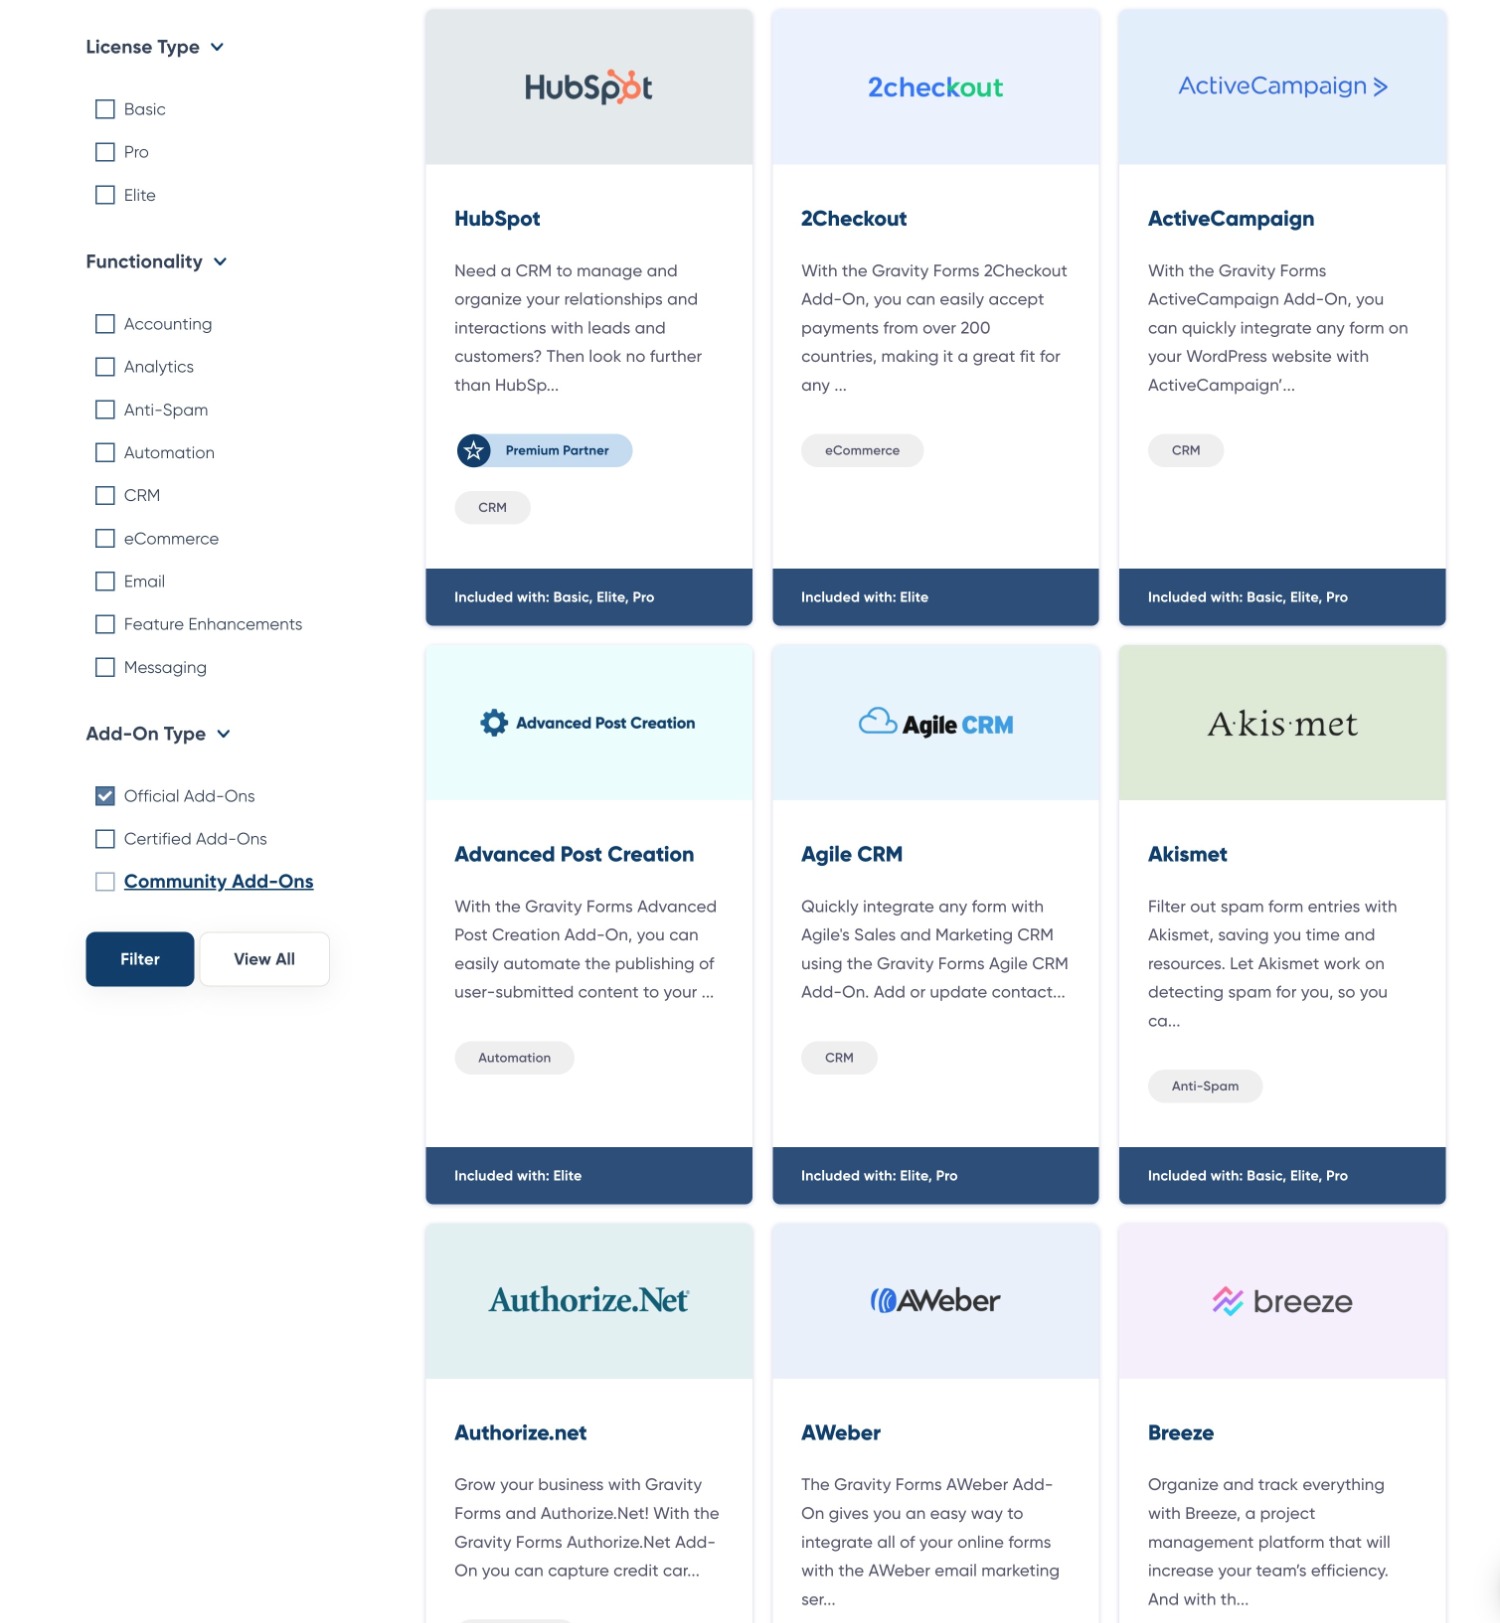
Large Ecosystem of Official and Third-Party Add-Ons
While the core Gravity Forms plugin is plenty powerful by itself, it’s also easy to extend thanks to a large library of official and third-party add-ons.
First off, Gravity Forms comes with anywhere from 17 official add-ons with the Basic license to 46+ official add-ons with the Elite license.
You can use these add-ons to help with all kinds of different needs including, in part, the following:
- Connecting forms to your favorite email marketing service or CRM.
- Adding payment functionality via Stripe, PayPal, Square, and others, including coupons.
- Using the Zapier integration to connect to any one of the thousands of apps on Zapier. There’s also a generic Webhooks Add-On.
- Protecting your forms from spam submissions using different strategies.
- Integrating with notification services such as Twilio (SMS) or Slack.
- Adding features such as partial entries and a signature collection field.
- Creating new types of forms including quizzes, surveys, polls, user registration, frontend content creation, and more.
You can browse all of the official add-ons here.
Here’s a quick summary of some of our most powerful and popular add-ons…
Stripe
With Gravity Forms, you can easily start using Stripe to accept one-time or recurring payments on your WordPress site. The Stripe Add-On boasts a multitude of features and customizable options, including:
- Diverse Payment Options – Support for various payment methods such as card transactions, wallet payments (Apple Pay, Google Pay, etc.), iDeal, and more.
- Flexible Payment Structures – Ideal for both one-time transactions like product purchases and recurring payments for subscription services. Offers support for open-ended subscriptions and plans with predefined payment cycles.
- Seamless WordPress Integration – Seamlessly access payment details, sales reports, subscription management, and refund processing within your WordPress dashboard.
- Stripe Link Support – Deploy Stripe’s accelerated checkout feature, Link, to facilitate faster checkouts by enabling autofill options for customer payment and shipping details.
- Support For the Gravity Forms Stripe App – Use the app to review entries received via Gravity Forms directly within your Stripe account dashboard, enabling a deeper understanding of customer behavior.
Mailchimp
If you’re looking to grow your email list then Gravity Forms and Mailchimp are a must! Gravity Forms is the best possible tool you can use for lead generation. And Mailchimp’s wide assortment of features – an extremely user-friendly dashboard, extensive support resources, and free and premium pricing structures – make it a great option for anyone looking to engage their audience through email marketing.
Our Mailchimp Add-On integrates Gravity Forms seamlessly with Mailchimp, allowing you to send data from submitted forms directly to your Mailchimp account.
Key features of this add-on include:
- Segment Your Mailing List – Automatically tag, segment, and group users from within your WordPress dashboard, enabling you to send personalized email campaigns based on form submission data.
- Custom Fields — Capture any field in your form and map it to a custom field in Mailchimp, allowing you to transfer the data that you need.
- Double Opt-In – Automatically send double opt-in messages to ensure only engaged and legitimate subscribers are added to your audience.
For more in-depth information on our Mailchimp Add-On, check out the Gravity Forms documentation.
Conversational Forms
With a conversational form layout, users answer one question at a time and advance through the form question-by-question (think Typeforms). While this is a more niche use case that won’t work for all types of forms, this approach can work well for certain types of information gathering.
The Conversational Forms Add-On provides an interactive and more personalized experience for those completing a form – generate leads, accept payments, and capture the data you need using fun and engaging conversational forms!
Head on over to the Conversational Forms Gallery to see what you can create with our Conversational Forms Add-On.
Survey
The Gravity Forms Survey Add-On gives you all the tools you need to create simple or advanced surveys and analyze the results right from your WordPress dashboard. You can create both client and customer-facing surveys as well as surveys targeted at your employees – whatever your survey requirements, Gravity Forms makes it possible!
Here are some of the top features that the Survey Add-On has to offer…
- Ease Of Use – The Survey Add-On is extremely user-friendly. Simply install the Survey Add-On, then within the form editor add the Survey field to your form and configure it to your liking.
- Survey Field Types – Within the Survey field, there are 8 Survey Field Types from which you can create your questions. Survey Field Types include Rating, Likert, Rank, Checkboxes, Dropdown, Paragraph Text, and many more. These options enable you to create custom surveys, appropriate to your survey goals and audience.
- Survey Results – With the Survey Add-On you can easily see the results of a survey right in your WordPress dashboard. What’s more, you can also filter the results by the start and end date as well as conditions that you set. For example, you can view only the good ratings or the bad ratings.
For more information on the Survey Add-On, check out the Gravity Forms documentation.
Zapier
While Gravity Forms has one of the lengthier official integration lists that you’ll find, there’s still a possibility that it doesn’t support the exact integration that you need, especially for more niche use cases.
Gravity Forms does support Zapier, so you can usually use Zapier to workaround any needed integrations. However, the Zapier approach isn’t always ideal because you might need to pay for one of Zapier’s premium plans, which adds some extra cost.
Even More Integrations!
Gravity Forms is always working on new integrations, so there’s a good chance any needed integration will be added if it’s popular enough.
In fact, you can see a list of features and integrations that are planned and under consideration on the Gravity Forms Roadmap. You can also vote or suggest other integrations – if there’s enough demand, your integration will make it onto the roadmap.
Certified Add-Ons
If 46+ official add-ons still aren’t enough for you, Gravity Forms also has a large library of quality extensions from third-party developers.
The easiest place to get started is to use Gravity Forms Certified Add-Ons. While these add-ons do still come from third-party developers, the Gravity Forms team has certified the quality of all of them – hence the name.
Here are some examples of what you can do with Certified Add-Ons:
- Create basic or advanced automation workflows using Gravity Flow (recently acquired by Gravity Forms).
- Generate filled PDFs based on form input using Fillable PDFs or Gravity PDF.
- Display Gravity Forms entries and entry data on the frontend of your site using GravityView.
- Perform even more advanced mathematical calculations using GravityMath.
This is just a small sampling of the many Certified Add-Ons that are available.
You can also find even more community add-ons that go beyond that. While the Gravity Forms team has not verified the quality of these extensions, you can still find some great quality options – just make sure to read the reviews and vet the developers.
Helpful Documentation and Support
To help you take advantage of all the functionality and add-ons, all Gravity Forms licenses provide access to support, along with detailed written documentation.
First off, all active license holders get access to support via tickets. The support hours are Monday – Friday from 9 AM to 5 PM Eastern time. Members of the Support team are true Gravity Forms experts and have extensive knowledge when it comes to solving even the most complex of issues.
For Basic and Pro license holders, Gravity Forms aims to respond within 48 hours, with prioritization given to requests for current plugin functionality and features.
If you’re on the Elite license, Gravity Forms aims to respond within 24 hours, with similar prioritization.
In addition to getting help straight from the Gravity Forms team, you can also access detailed self-help resources via the written documentation and video tutorials.
Advanced Support for Developers
Thanks to the easy-to-use interface, anyone can use and benefit from Gravity Forms, regardless of their knowledge level.
However, if you’re a developer (or hiring a developer to work on your site), Gravity Forms’ advanced developer support opens up a lot of additional options for customization.
First off, Gravity Forms offers hundreds of well-documented hooks that developers can use to add or modify functionality. You can browse all of these hooks in the documentation.
Beyond hooks, Gravity Forms also offers its own API that gives you even more flexibility for extending the default functionality.
You, or your developer, can use the REST API to fetch data (entries, forms, specific fields, etc.), send data to Gravity Forms, delete data, and more. To learn exactly how it works, you can check out the REST API documentation.
Finally, as we discussed above, Gravity Forms offers a robust add-on framework, so developers are free to use existing add-ons or create their own Gravity Forms add-ons as needed.
Is Gravity Forms the Right Plugin for You?
Gravity Forms is a premium plugin, with competitively priced licenses when compared to other premium form plugins.
If you’re looking for a free form builder plugin, Gravity Forms isn’t the plugin for you. However, our entry-level plan is very affordable.
There are three different pricing plans. Each gives you access to the full Gravity Forms core plugin. The only differences between the plans are as follows:
- Different plans give you access to different numbers of official add-ons, ranging from 17+ add-ons on the Basic license to 46+ add-ons on the Elite license.
- Support for different numbers of active sites, ranging from a single site on the Basic license to unlimited sites on the Elite license.
- The Elite license offers priority support and WordPress multisite support.
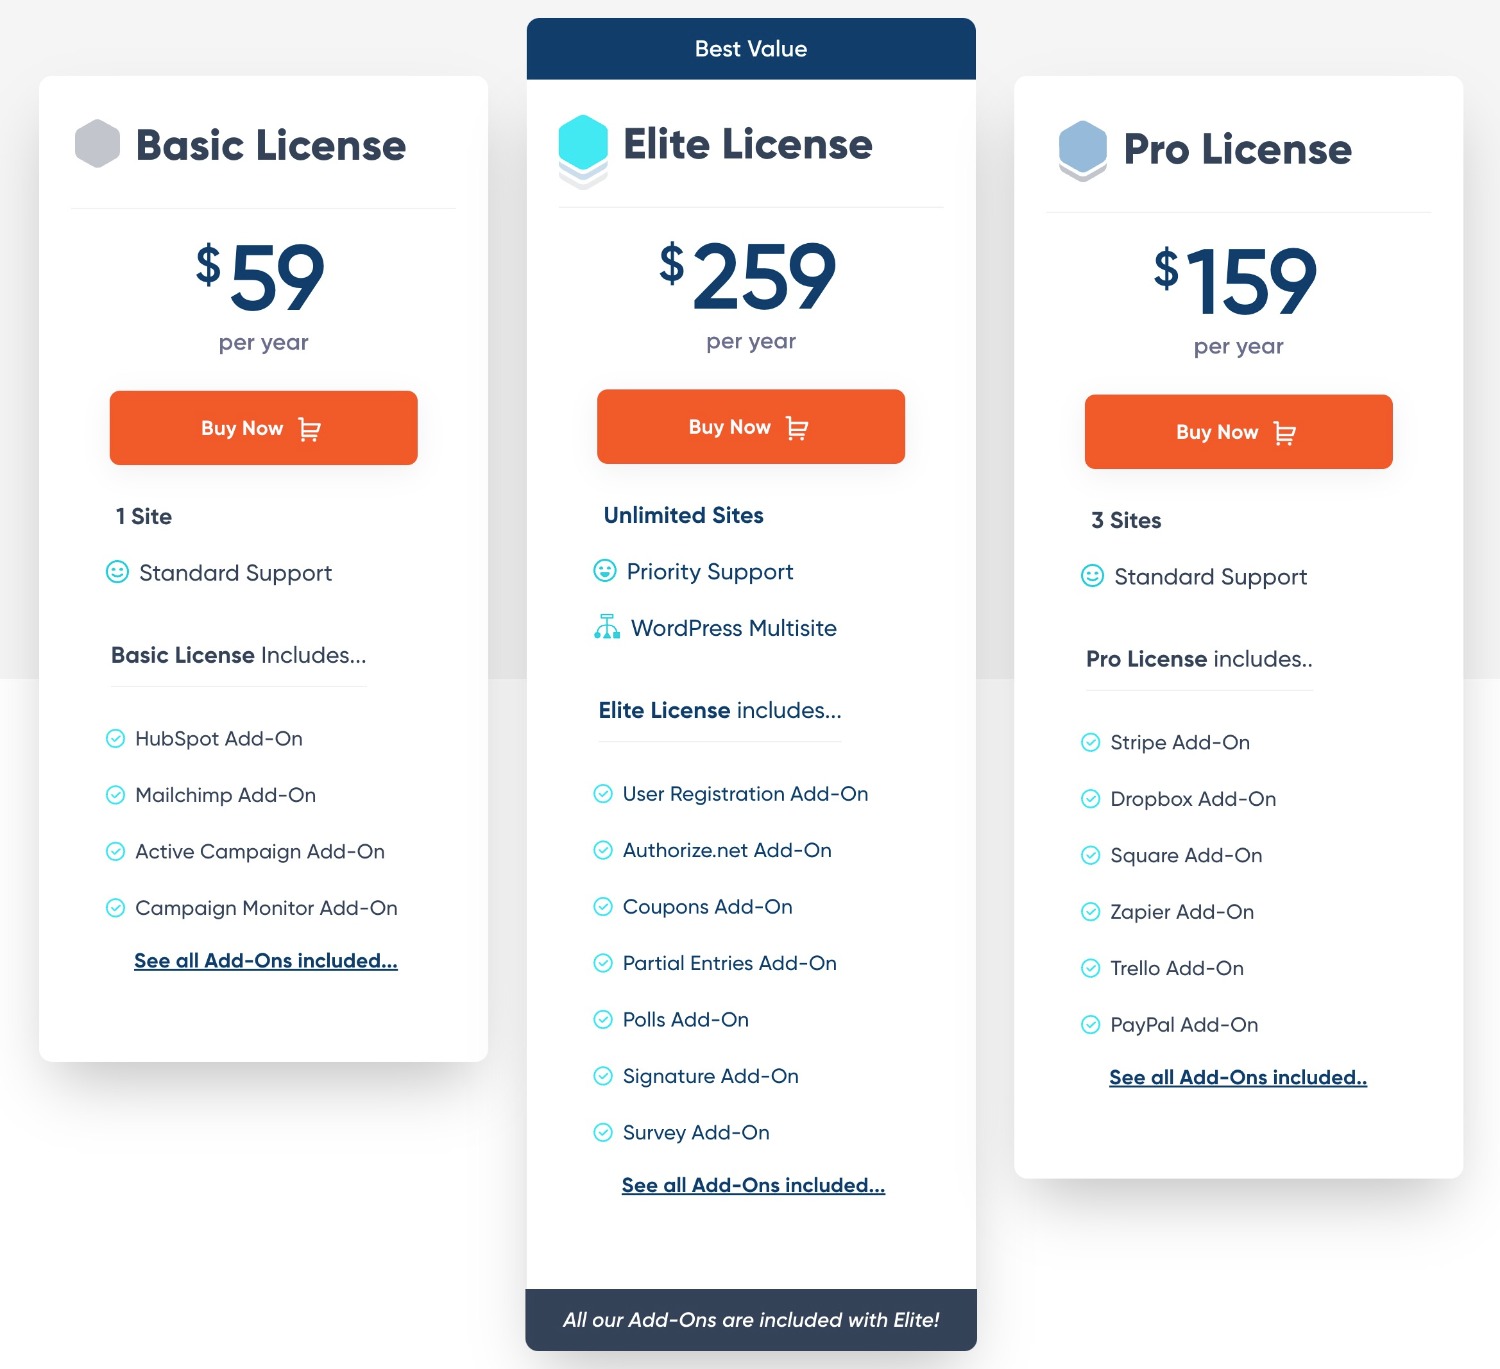
The pricing is also transparent, with no large price increase after the first year like you find with some other WordPress form plugins.
While there’s no free version to test Gravity Forms, you can spin up a free and fully functioning demo site that includes the core Gravity Forms plugin and all the official extensions.
If you’d like to test it out at no risk to your wallet, you can head to the Gravity Forms demo page.
Nonprofit License
We also offer a Nonprofit License for all registered nonprofit organizations.
The Nonprofit License is feature-packed, giving you access to all Gravity Forms’ built-in functionality, all of our current add-ons, licensing for three sites, standard support, and more.
So if you’re a nonprofit looking for the best form and data capture solution for WordPress, or you’re working with nonprofit clients, then you’re going to love our Nonprofit license offering. (Available to registered nonprofit organizations via an application process.)
Get Started With Gravity Forms Today
That wraps up our Gravity Forms review!
To recap, some of the main benefits of choosing Gravity Forms are as follows:
- An easy-to-use visual, drag-and-drop form builder interface.
- Powerful built-in features such as conditional logic, multi-page forms, calculations, dynamic field population, and more.
- A huge ecosystem of add-ons, including 46+ official add-ons as well as dozens of third-party Certified Add-Ons and community add-ons.
- Advanced support for developers who want to build their own custom solutions, including a flexible hook system, a REST API, and lots of documentation.
- Dedicated support, along with detailed documentation for self-help.
If you’re ready to try out Gravity Forms yourself, you have two ways to get started:
- Purchase your Gravity Forms license today to start building on your own sites right away.
- Spin up a 100% free, fully functional demo site to try all of the Gravity Forms features and add-ons on a working WordPress site. You don’t need to enter a credit card and you can access the working site in under a minute.

If you want to keep up-to-date with what’s happening on the blog sign up for the Gravity Forms newsletter!
"*" indicates required fields