

Do you want to start accepting user-submitted content on your website? Or do you already do so but need to streamline the process? Whether you’d like to display guest posts on your website, share testimonials, or add listings to your directory site, having a quick and easy way to accept and display this content is a must!
With the Gravity Forms Advanced Post Creation Add-On, you can easily automate the publishing of user-submitted content on the front-end of your WordPress website, creating a new post, page, or custom post type, for each form submitted.
In this article, we’ll explain in detail what the Advanced Post Creation Add-On does, who can benefit from using it, and share how you can get started with this powerful add-on. Let’s jump in…
Advanced Post Creation Add-On: An Intro
User-submitted content can be a bit of a double-edged sword. On the one hand, you don’t have to create all of the content for your website yourself. This not only saves you time but, depending on the type of website you have it also removes the pressure of having to constantly create content.
On the other hand, giving dashboard access to anyone publishing content on your website leaves your site vulnerable to various security risks. And if you choose to upload all the content yourself, this can quickly become an extremely time-consuming process.
Luckily, there is a better way — using the Advanced Post Creation Add-On for Gravity Forms!
As the name implies, the Advanced Post Creation Add-On makes it easy to create posts from form submissions. And to make things even better, the add-on is not limited to posts only. Once a visitor submits a form, you can set up the add-on to create a new page as well as a new custom post type by using any of the registered post types on your website.
There are many instances where you might want to allow your visitors or users to submit content to your WordPress website. Here are just a few examples…
Guest Post Submissions
If you run an online magazine or have any other type of news website, you may want to accept guest post submissions.
Accepting guest post submissions via Advanced Post Creation enables you to make full use of user-generated content with minimum input from yourself, leaving you free to focus on promoting and driving traffic to the website.
Directory Submissions
The Advanced Post Creation Add-On can save you a ton of time if you have a directory website. Instead of manually copying and pasting information from form submissions, let the add-on do the heavy lifting for you.
Marketplace Submissions
Similarly to directory submissions, you can let visitors submit products or services to your site. You can then sell those products/services through your marketplace and collect commission on each sale.
Community Events
If you have a community website with a lot of active community members, chances are you have multiple events happening throughout the month.
Instead of trying to keep track of every event yourself, simply let your community members submit those events using the Advanced Post Creation Add-On.
This works for neighborhood communities, college or high schools, and any other type of community website.
Job Board Postings
Make it easy for visitors to post job openings on your site. With the Advanced Post Creation Add-On, new job postings can automatically be created with all the important details thanks to merge tags and the ability to use any form field in the post content.
Ad Submissions
If you want to allow visitors to advertise on your site, this add-on will make it a breeze to submit a new advert. You can charge people to display ads, which enables you to easily monetize the site. For example, if you have a popular food blog, you can allow restaurants in your area to advertise on your site.
Public Resources Submissions
If you have a website where your visitors need to access certain documents or resources, you can use the Advanced Post Creation Add-On to facilitate the submission process.
Advanced Post Creation Add-On: The Features
 As mentioned earlier, you can use the add-on to create a new post, page, or a custom post type upon form submission. But that’s not the only feature of the Advanced Post Creation Add-On. Other useful features include…
- Add Uploaded Files To Media Library – Accept file uploads via your form with the File Upload field, then automatically upload those files to your Media Library and assign them to the post that is created.
- Map Custom Fields – Use form field values or merge tags to map custom fields with existing meta keys or by creating custom ones.
- Assign Posts to Taxonomies – Whenever a post is created using the Advanced Post Creation Add-On, you can assign tags, categories, and any other taxonomies.
- Conditional Logic – In addition to the above, you can enable Gravity Forms’ built-in conditional logic to ensure new posts are created only when certain conditions are met.
For more in-depth information on the Advanced Post Creation Add-On, check out the Gravity Forms documentation.
Get Started with the Advanced Post Creation Add-On
Let’s now take a look at how to get started with the Advanced Post Creation Add-On…
Step 1: Install Gravity Forms
The first step is to set up Gravity Forms on your site, if you don’t have the plugin installed already. Be sure to grab the correct license, keeping in mind that the Advanced Post Creation Add-On is available with the Elite license only.
Once you’ve obtained your license, go to your WordPress dashboard and navigate to Plugins > Add New. Upload the plugin zip file and once the plugin is installed and activated, follow the instructions to register the plugin with Gravity Forms.
For more information on how to get started with our plugin, check out this video tutorial – How to Install Gravity Forms on Your WordPress Website.
Step 2: Create Your Form
Next you’ll need to create the form that will accept submissions. You can build it out from scratch or use the Advanced Post Creation Add-On with any existing form.
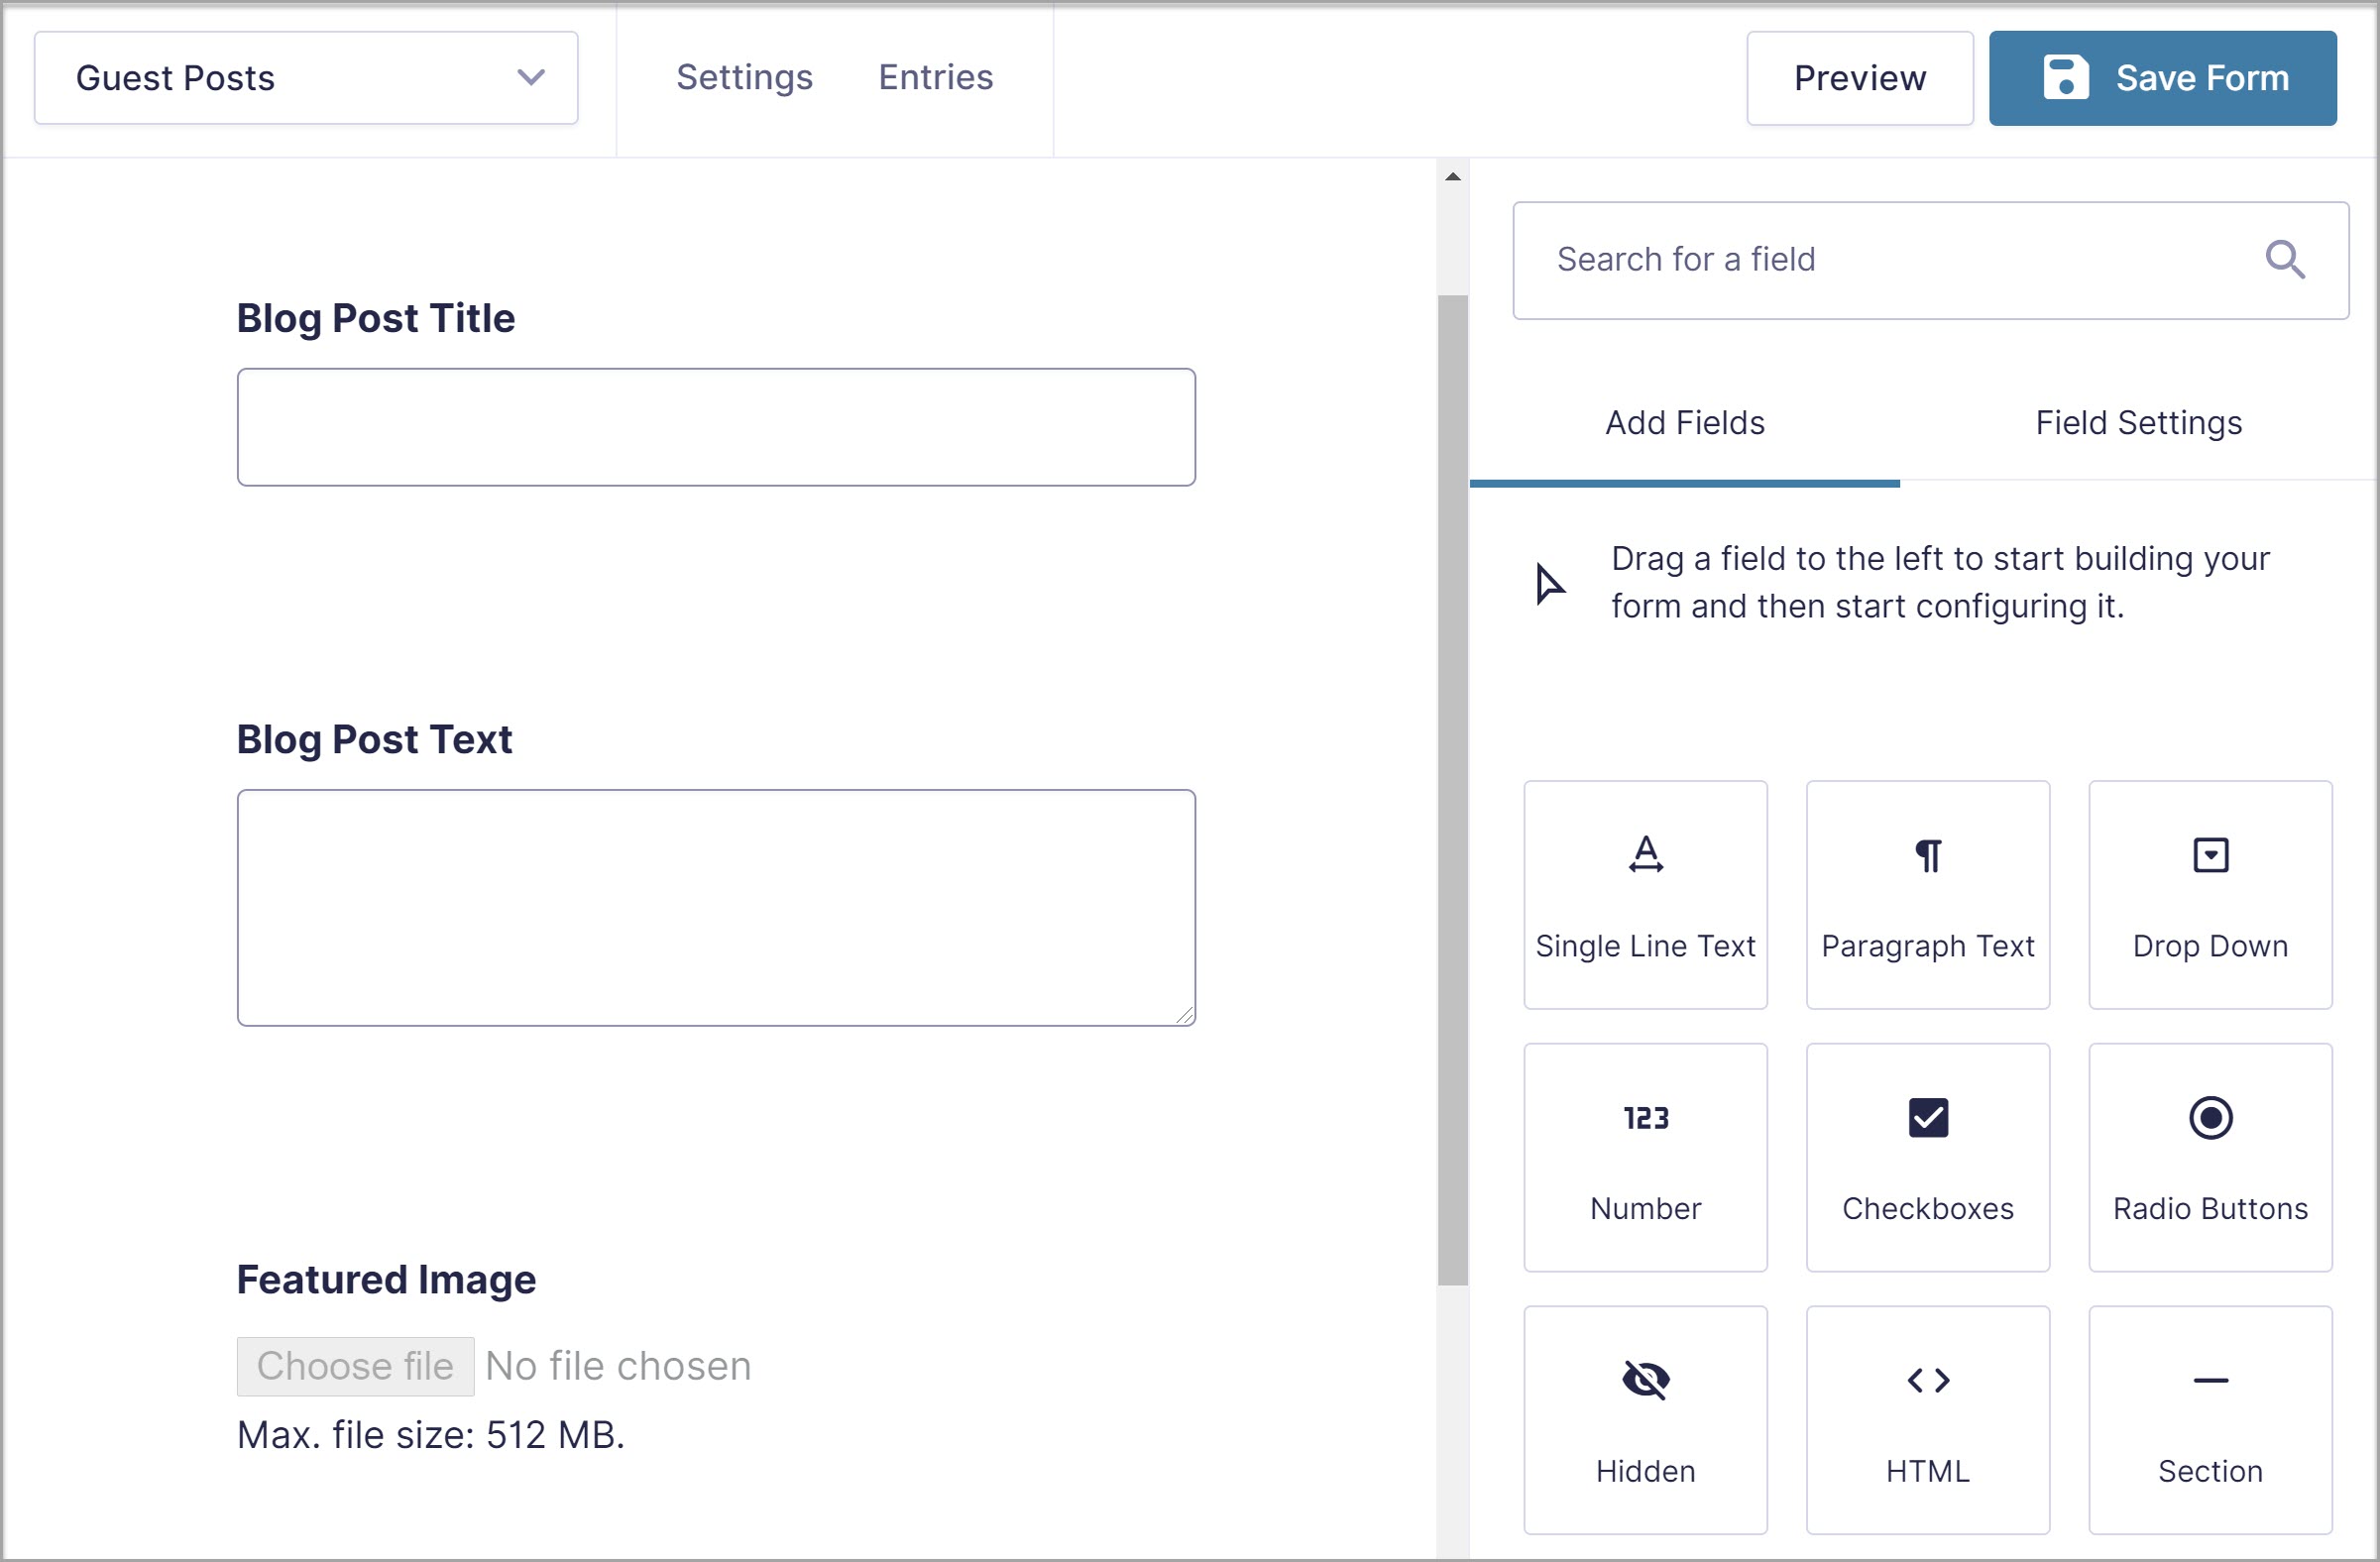
When creating your form, it is important to note that the Advanced Post Creation Add-On does not work with the built-in Post fields. Create your form using standard text and file upload fields instead. You will then be able to configure Advanced Post Creation in the form’s Settings (this process is covered further on in the article).
Here you can see we have created a guest post submission form, using a selection of fields including the Single Line Text Field (Blog Post Title), Paragraph Field (Blog Post Text), and the File Upload Field (Featured Image)…
 For a guest post submission form, you will probably want to use some, or all, of the following fields…
- Name
- Blog Post Title
- Blog Post Text
- Featured Image
- Post Excerpt
- Author Bio
Once you have created your form, select Save Form in the top right corner of the page.
Step 3: Install Advanced Post Creation Add-On
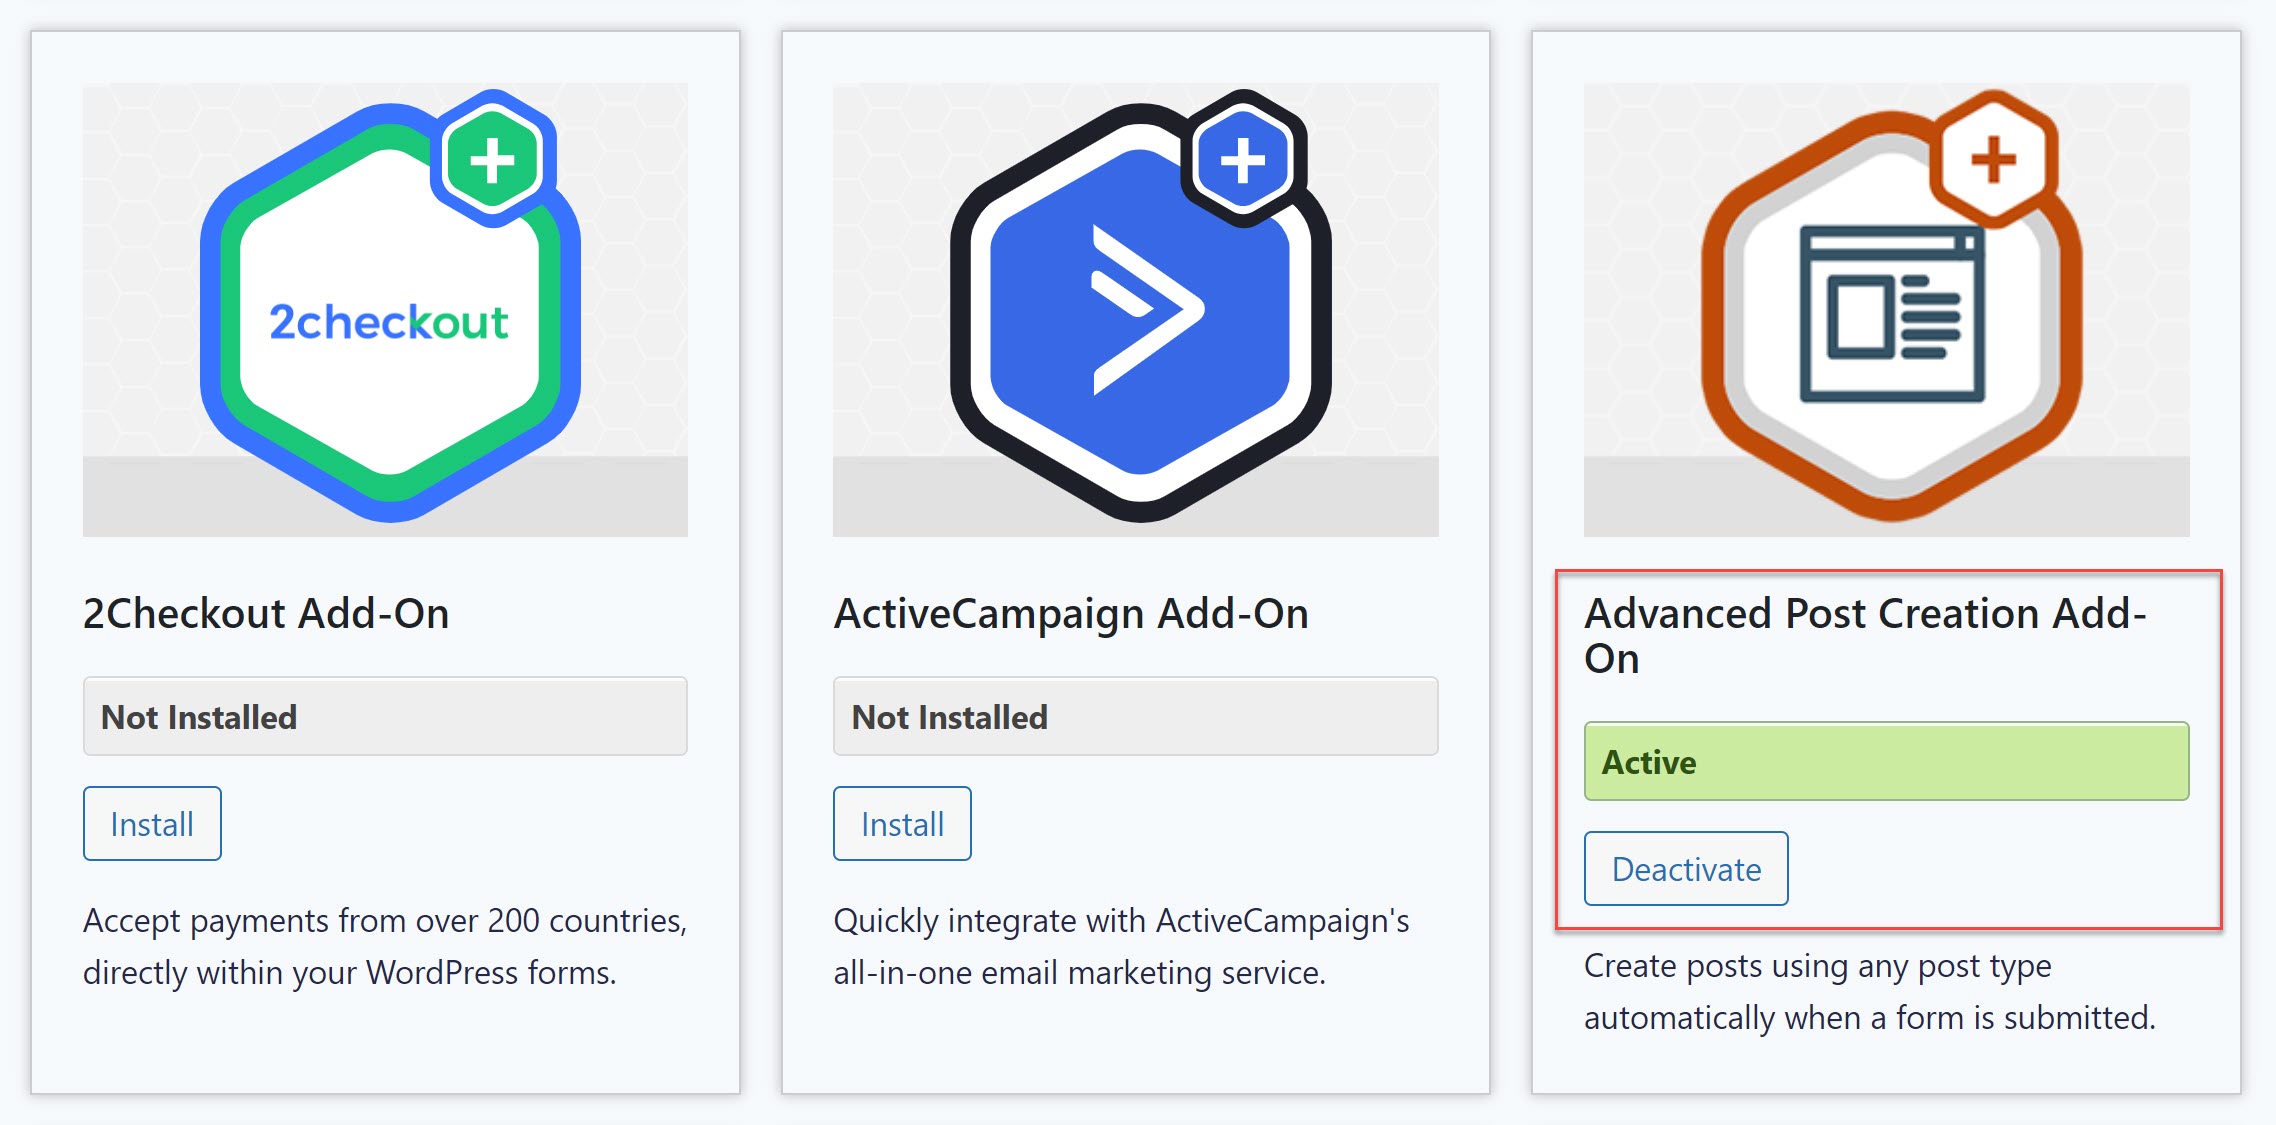
You will now need to install the Advanced Post Creation Add-On. Go to Forms > Add-Ons and scroll down until you find the add-on. Click on Install > Activate.
Step 4: Create a Post Creation Form Feed
You will now need to create a new Advanced Post Creation feed and configure the exact contents of the post that will be created upon every form submission. To do so, navigate back to your form and select Settings > Post Creation > Add New.
Give your Post Creation feed a name and configure the Post Settings. It is here, under Type, where you can select whether to create a new page, post, or a custom post type out of new form submissions. For the purposes of this article, we have selected Post.
(It is important to note that the Advanced Post Creation Add-on does not support creating or registering custom post types, custom fields, or taxonomies. If you need to publish to post types that are not already created or registered in your WordPress installation, you will need to take care of that using code or with any of the plugins that support creating and registering custom post types and custom fields).
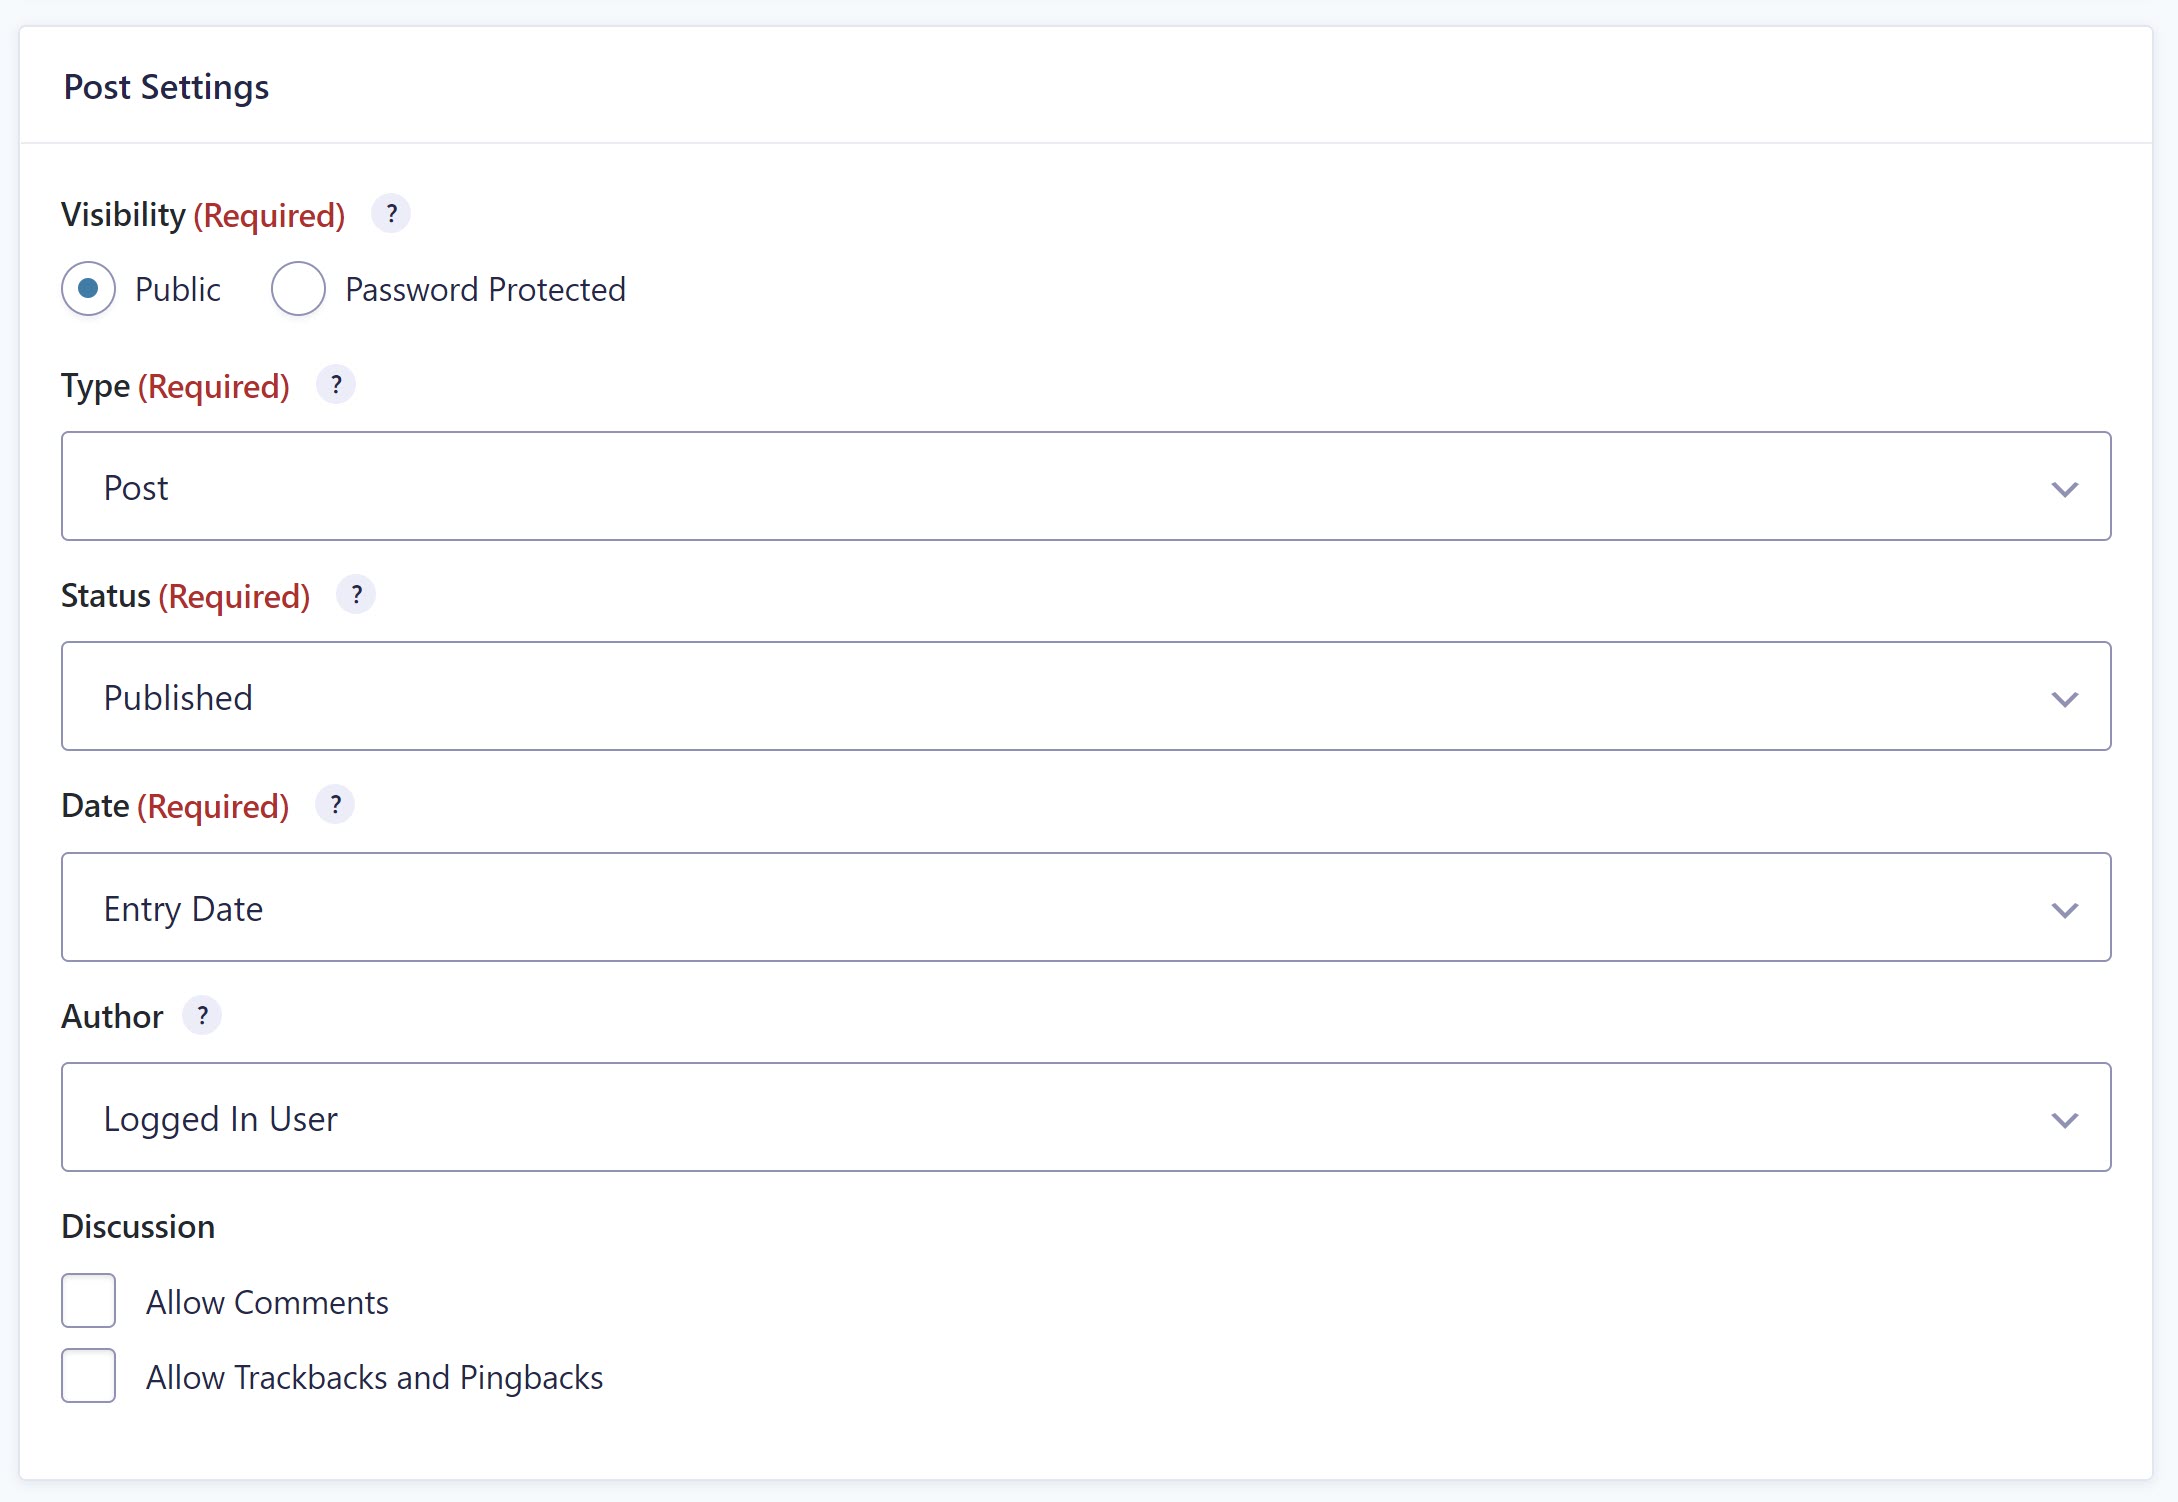 Under Post Settings, you can also set the Visibility of the post, making it public or keeping it password protected, as well as selecting the post’s Status, giving you the option of reviewing any submissions before making them public. Other configuration options include allowing comments on the post, as well as trackbacks and pingbacks.
Next, under Post Content, you will need to determine what content is going to be displayed in the new post or page that will be created.
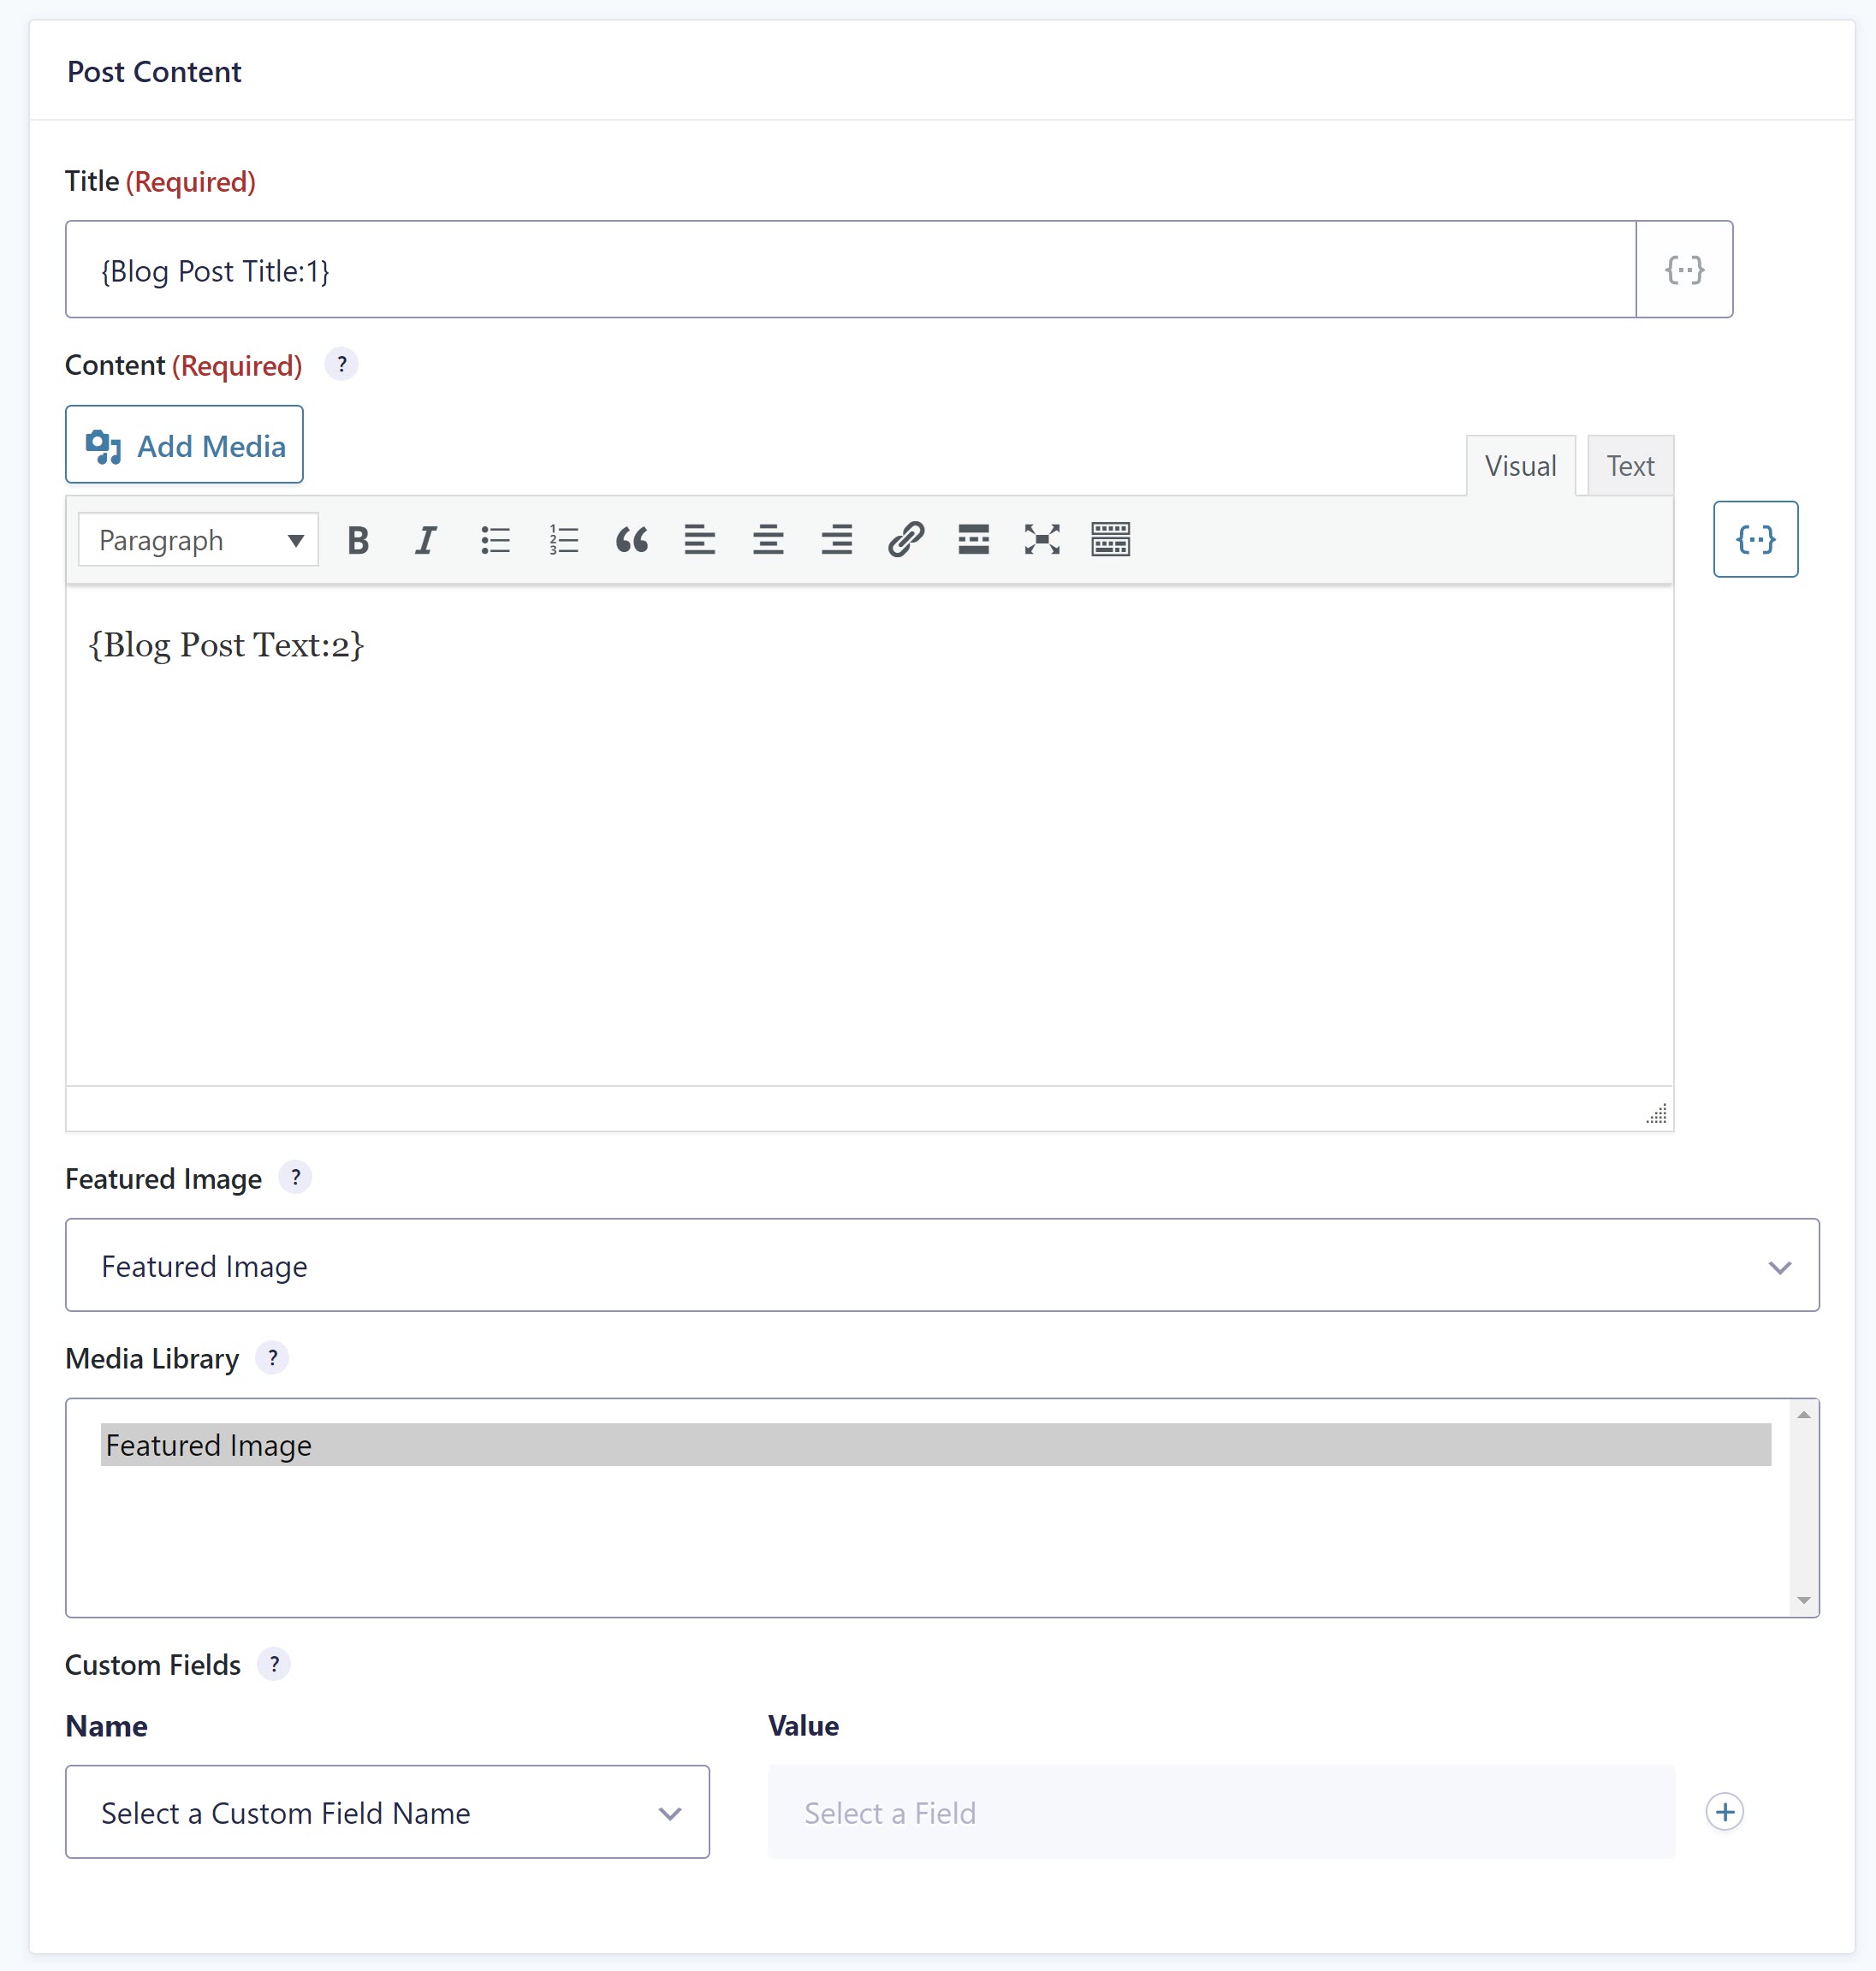 You can add static text or select merge tags to use any of the form fields for the new post title and content. You can also add uploaded files to your media library, select a file upload field to be the source for the article’s featured image, and importantly, add any custom fields.
In addition to all of that, you can assign categories and tags as well as enable conditional logic. When you’re done, click Save Settings. You’re now ready to add the form to your website and start accepting submissions.
For more in-depth information on creating an Advanced Post Creation feed, check out this article in the Gravity Forms documentation.
Support for WooCommerce and The Events Calendar
Another feature of the Advanced Post Creation Add-On is the ability to allow posts to be created upon form submission for third-party post types.
For example, you can use Advanced Post Creation in conjunction with both WooCommerce and The Events Calendar, enabling you to create new products for WooCommerce or add new events in The Events Calendar.
This is useful if you want to have a marketplace where visitors can submit their products or any type of website where visitors need to create events.
You can learn more about supporting third-party post types here – Advanced Post Creation Add-On: Using Third-Party Post Types.
Demo Gravity Forms Today!
As you can see, there are plenty of ways to make the Advanced Post Creation Add-On work for you. If you’d like to try out Gravity Forms and the Advanced Post Creation Add-On, sign up for a free Gravity Forms demo.
Build a form from scratch with the intuitive drag and drop form builder, browse through the add-ons to see how you can extend your forms even more, and explore premade form templates to see what’s possible with Gravity Forms.
Any questions on Gravity Forms or the Advanced Post Creation Add-On? Drop them in the comments below, we can’t wait to hear from you!


