

Trying to set up a donation form on your WordPress site?
If you’re fundraising for a non-profit organization or even just looking to raise a little money from your fans, the Gravity Forms plugin makes it easy to set up a customizable WordPress donation form.
You can get started from the importable donation form template and then adjust everything according to your needs.
You can accept preset amounts and/or let people enter a custom donation amount. You can also choose between accepting one-time donations or automatic recurring donations. Or, you can let donors make their own choice.
In this post, we’ll show you how to set up everything using your preferred payment processor. We’ll also show you how to make other enhancements, such as connecting your form to your email marketing service, customer relationship manager (CRM), and more.
Key features of the donation form template
Before we get into the full step-by-step tutorial, let’s quickly run over some of the key features that you can access with this guide and the donation form template:
- Drag-and-drop customization – You can use a drag-and-drop builder to customize every part of your donation form.
- One-time or recurring donations from the same form – You can let donors choose between making a one-time donation or setting up a recurring donation from the same form.
- Preset or custom donation amounts – In addition to offering as many preset donation amounts as you want, you can also offer a custom amount option that lets donors choose exactly how much they want to give. You could exclusively use the custom amount approach or mix preset donation amounts with a custom option.
- Choose your own payment processor – We’ll use Square for the tutorial, but you’re free to use a different processor such as Stripe, PayPal, or others.
- Support for tributes/dedications – You can easily add an option to let donors add their own tributes or dedication messages.
- Conditional logic – You can add conditional rules to show/hide certain form content, send different email notifications, and more.
- Integrations with other services – You can also integrate your donation form with your email marketing service, customer relationship manager (CRM), and any of the many other integrations that are available with Gravity Forms. You can also connect to Zapier for even more flexibility.
Which payment processor should your nonprofit use?
When setting up your donation form, Gravity Forms lets you choose the payment processor that works for your organization.
Currently, Gravity Forms offers dedicated integrations for the following services:
We have a post that compares the different payment add-ons to give you more information about each.
Your choice of payment processor can affect some key areas:
- Transaction fees – Services have different transaction fees, and some also offer special lower rates for registered nonprofits. Choosing a low-fee provider will help you keep more of the donation for your organization.
- Available payment methods – While all of these services work fine for card payments, some of them also offer unique options beyond that. For example, letting people donate via bank transfers, Apple Pay, Google Pay, or services like Venmo and Cash App. We have a guide to Venmo for nonprofits if you want to learn more.
- Currencies – If you want to accept donations that aren’t USD, you should make sure that the service supports processing payments directly in that currency (which helps donors avoid foreign transaction fees).
- Hardware for in-person payments – If your organization also wants to accept in-person donations in addition to your online donation form, you should look for a processor that offers user-friendly hardware so that you can use the same service for online and in-person payments.
For this tutorial, we’re going to use Square as the payment processor because it’s a solid all-around option and easy to get started with.
Square Promotion – Free Processing
Gravity Forms and Square have teamed up to offer an exclusive promotion for new Square customers — enjoy free processing fees for up to 180 days!
Here’s how it works:
- Free Payment Processing – Get $5,000 in credit card transactions processed for free within your first 180 days. After that, standard Square fees apply.
- $20 Off Square Hardware – Receive a $20 discount on Square hardware once you sign up.
To take advantage of this promotion, simply sign up for a Square account using this link and start processing payments with no extra fees.
How to set up a donation form on WordPress
Now, let’s get into the step-by-step guide on how to create a donation form on WordPress using Gravity Forms.
We’ll use the pre-made donation form template and then show you how you can set it up and customize it to meet your organization’s unique needs.
For this tutorial, we’re going to use Square as the payment processor for donations. However, all of the same steps apply to the other payment processors that Gravity Forms supports. So, whenever you see us referencing a task related to Square, you can just swap in a different payment processor if that’s better for your needs.
Install Gravity Forms and required add-ons
Before going any further, you’ll want to make sure that you’ve installed and activated the core Gravity Forms plugin, along with any essential add-ons.
In terms of required add-ons for a donation form, you only need to install one of the Gravity Forms payment add-ons.
We’re going to use Square and the Gravity Forms Square Add-On in this tutorial, but you could easily swap in one of the other payment processor add-ons that Gravity Forms offers.
Most of the payment add-ons are available on the Gravity Forms Pro license, including Square, Stripe, and PayPal.
If you’re not holding the Pro license yet (or Elite or Nonprofit licenses), you can purchase a new license here or upgrade your existing Basic license and only pay the prorated difference.
If you are part of a registered nonprofit, you can access every single Gravity Forms add-on on the discounted Nonprofit license.
While a payment add-on is the only requirement, you also might want to optionally install other add-ons to connect your donation form with other services that your organization uses, such as your email marketing newsletter, your customer relationship manager (CRM), etc.
We’ll cover some of these use cases later in the tutorial. For now, you can just install the payment add-on – you can always come back and install more add-ons later if needed.
Here’s how to do it:
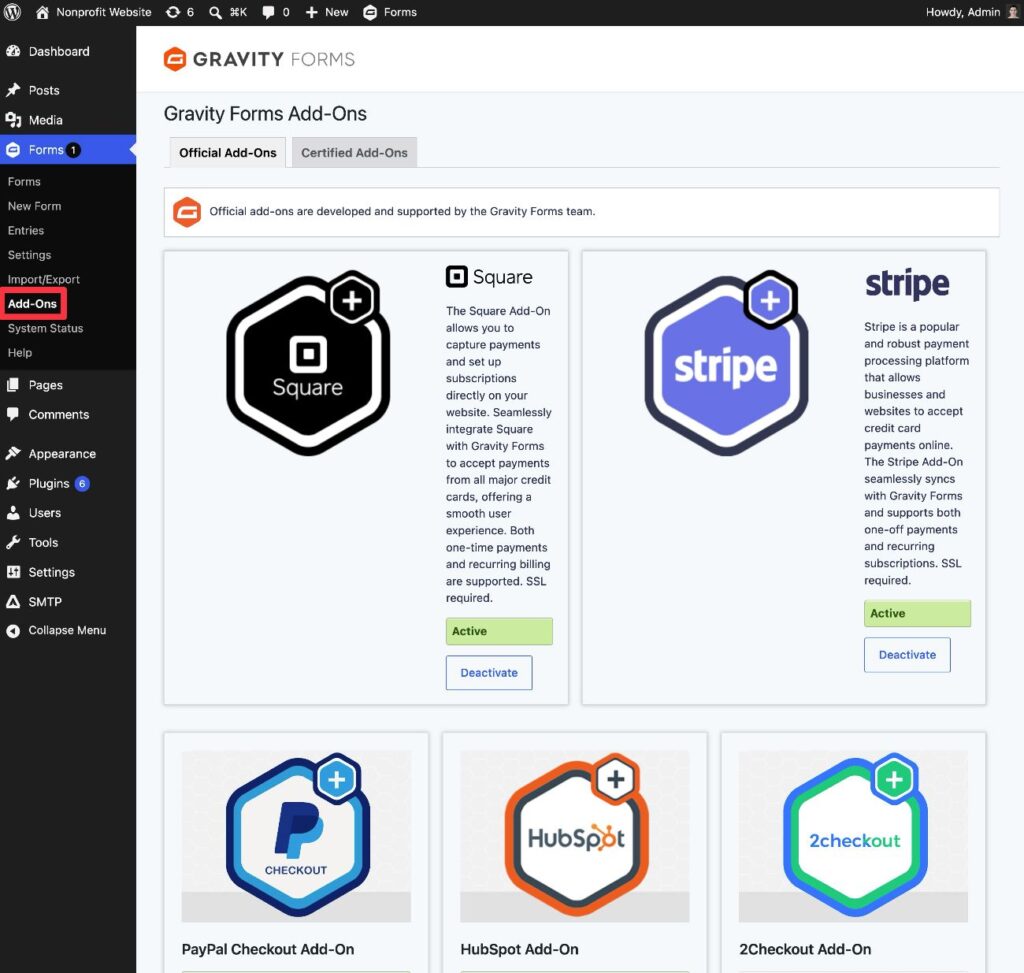
- Go to Forms → Add-Ons in your WordPress dashboard.
- Find the Square Add-On in the list of available add-ons.
- Click Install.
- Once the installation finishes, make sure to activate the add-on.
Connect to Square (or other payment processor)
Before you start setting up your actual donation form, you first need to connect Gravity Forms to Square (or to whichever payment processor you choose).
We’ll cover the quick version in this tutorial. However, if you want more detailed instructions for this part of the process, you can consult these links:
Here’s the quick version of how it works:
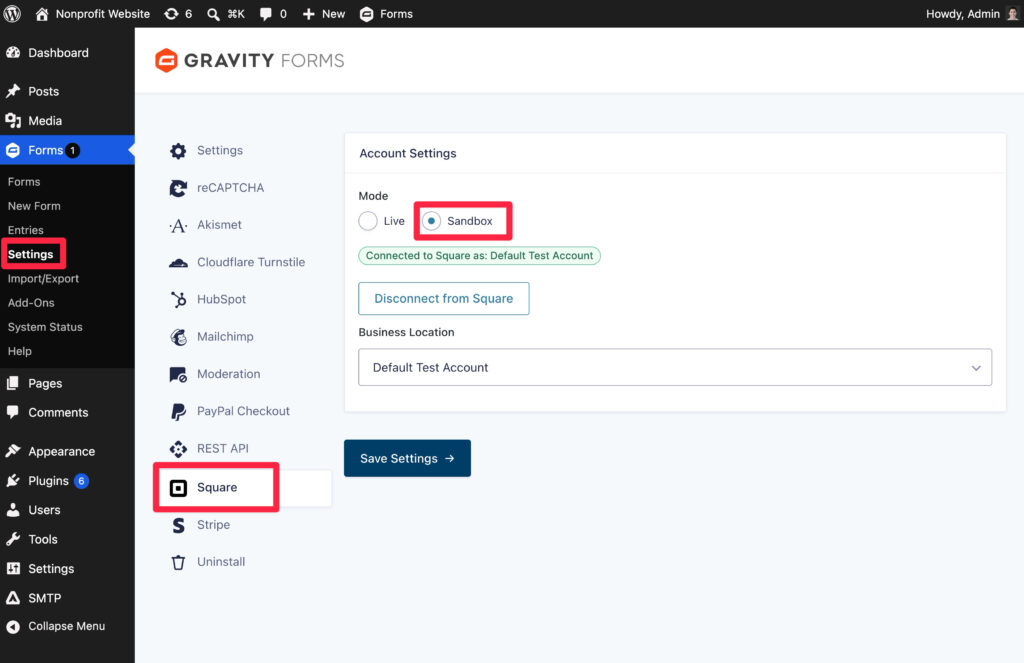
- Go to Forms → Settings in your WordPress dashboard.
- Select the Square tab in the Gravity Forms settings.
- Follow the prompts to connect your site to Square. We recommend connecting in Sandbox mode to start, as it will let you test your donation form with dummy payments. When you’re ready to accept real payments, you just need to come back here and set up Live mode.
Create a form using the donation form template
Once you’ve connected to your payment processor, you’re ready to set up your donation form.
To get started with the important essentials, you can use the donation form template that’s included with Gravity Forms:
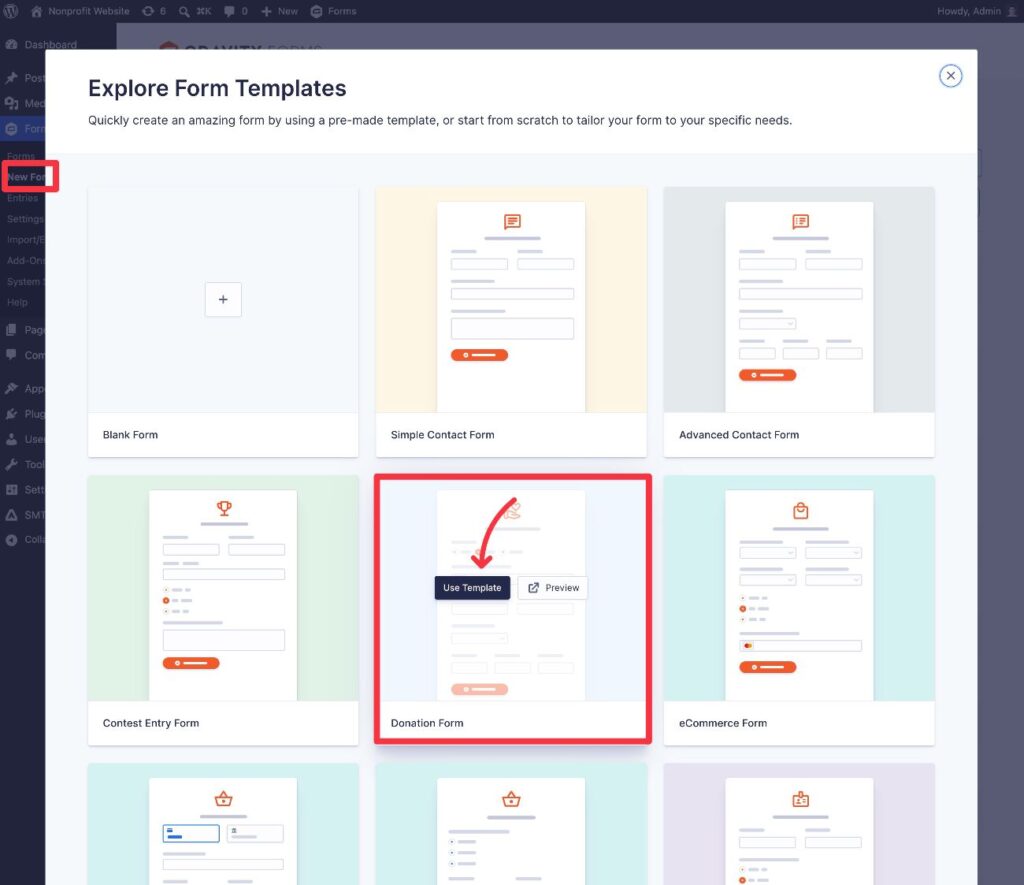
- Go to Forms → New Form in your WordPress dashboard.
- Find the Donation Form template in the list of available templates.
- Hover over the template and click the Use Template button.
- On the next screen, give your template a name and an optional description.
- Click Use Template again.
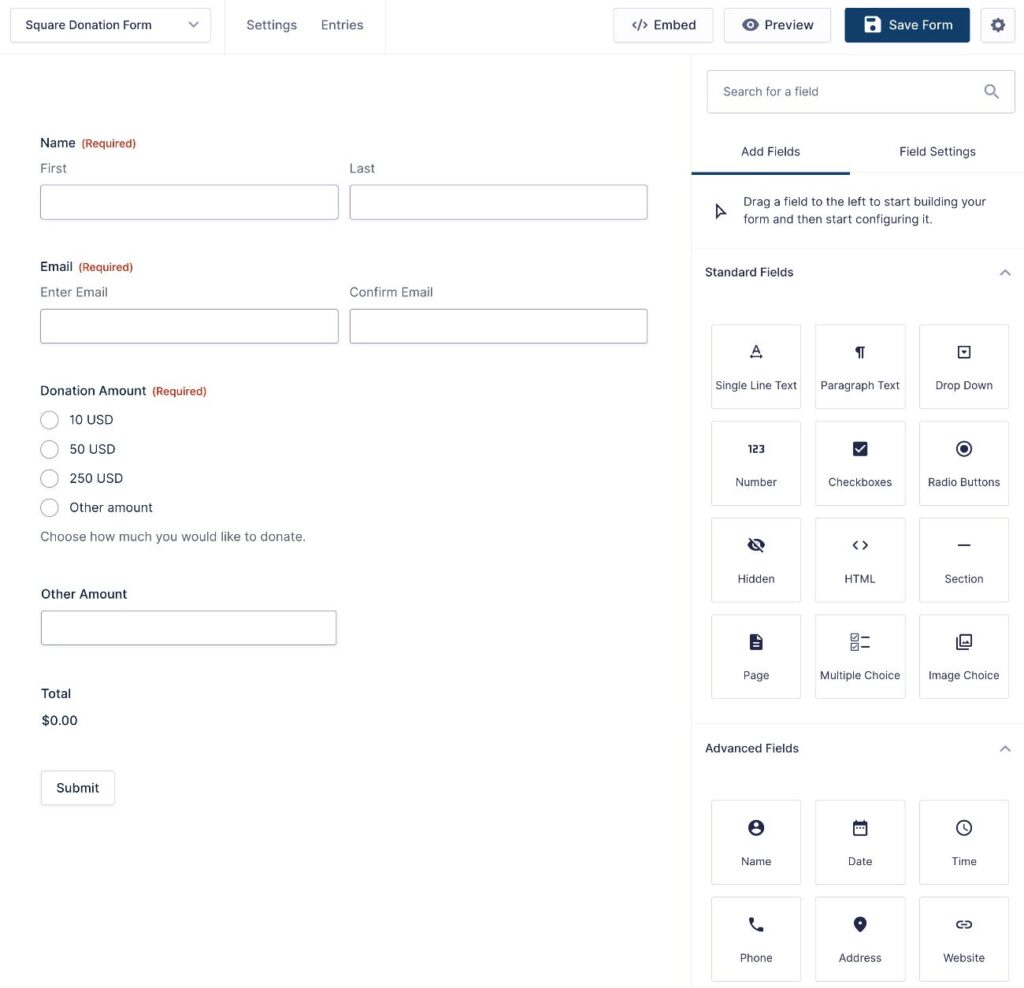
Gravity Forms will then take you to the drag-and-drop editor, where you’re free to fully customize the template to your organization’s needs. This includes:
- Editing all of the fields that are included in the template.
- Adding new fields to collect additional information from donors.
- Deleting any fields if needed (though you probably don’t want to delete any fields, as the template only includes the bare essentials).
To start, you might want/need to collect some additional information about your donors. For example, you might need their address and/or phone number, as it might be necessary for your recordkeeping.
You can find dedicated fields for these in the Advanced Fields section.
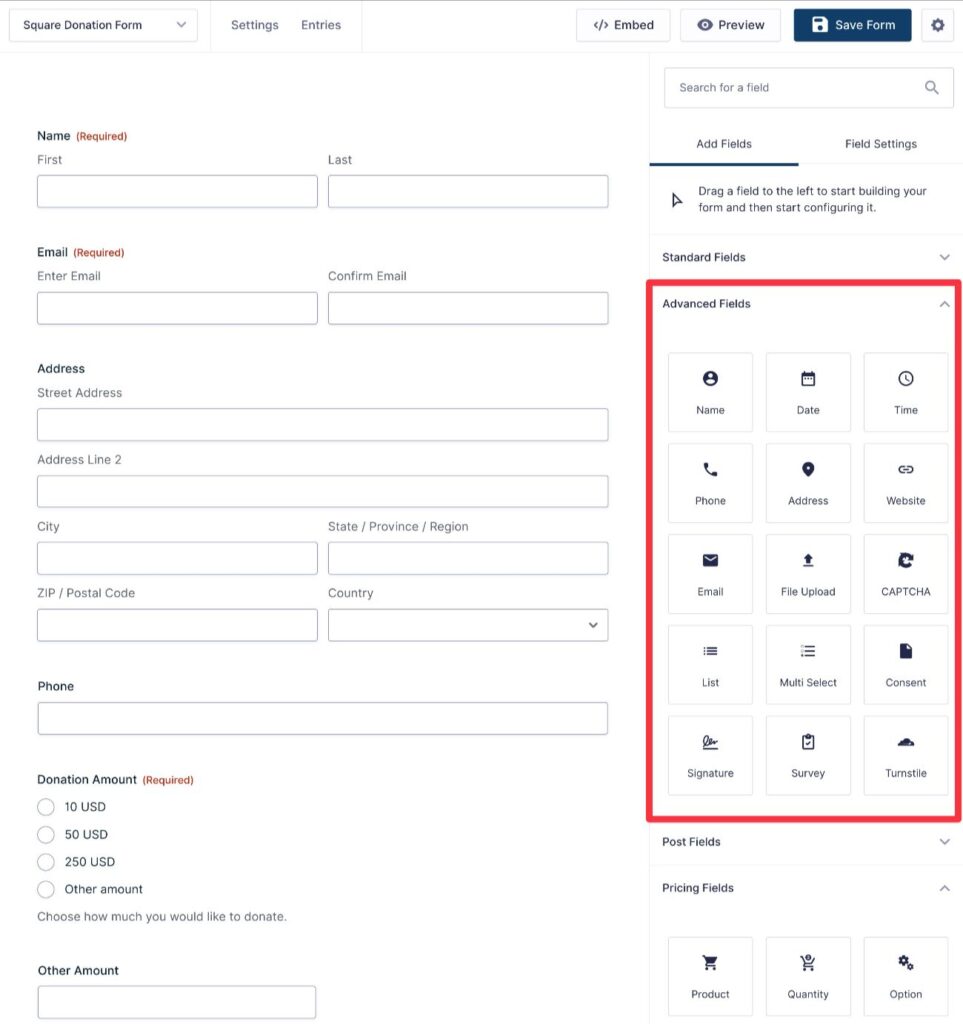
If you want to allow tributes/dedications, you could also add a field that lets donors enter their preferred tribute message.
You should also add a field for your chosen payment processor to the bottom of the form. For example, make sure you’ve added the Square field if you’re using Square for payments.
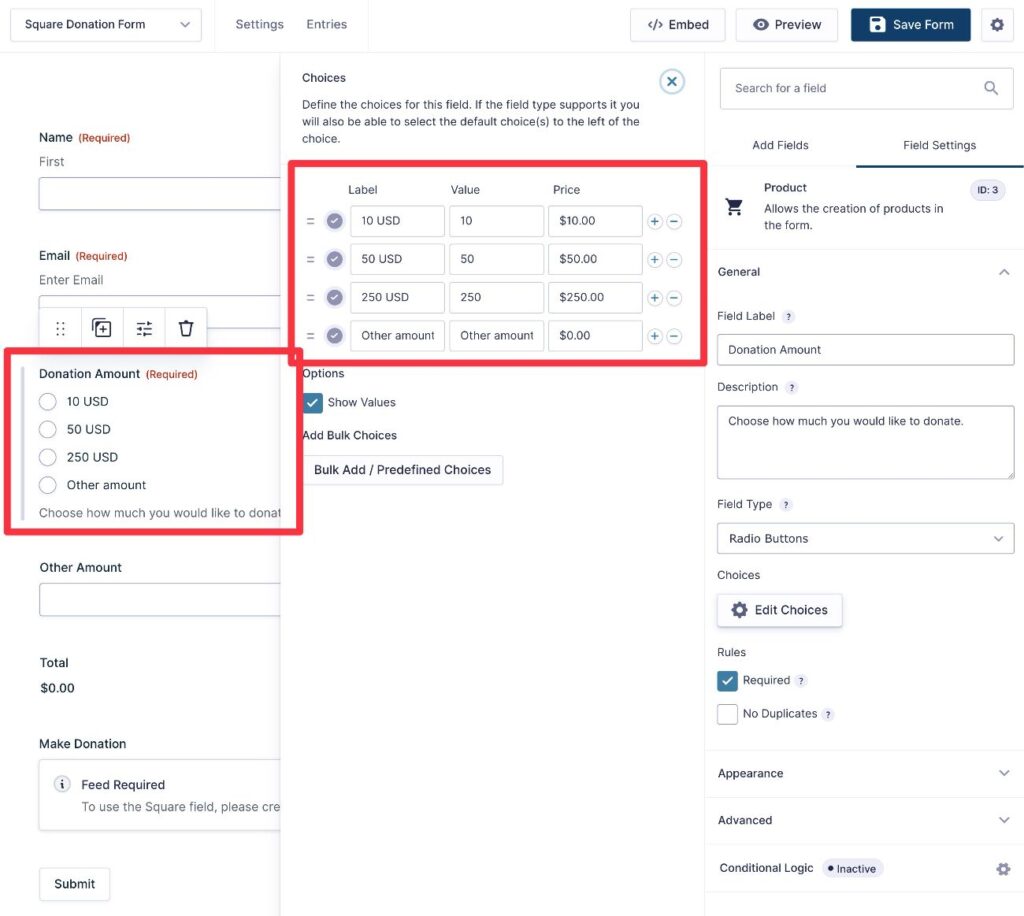
How to adjust preset donation amounts and custom option
By default, the template comes with three preset donation amounts, along with an “Other amount” option that lets donors enter a custom donation amount.
To adjust or remove these presets, you can edit the Product field.
How to give donors an option to make an automatic recurring donation
Depending on your use case, you might want to give donors the option to choose between making a one-time donation or setting up an automatic recurring donation.
We’ll cover how to do this in more detail in the next section.
Set up your payment feed(s)
Next, you need to create at least one Square feed. This lets you control how to process a donor’s payment. For example, whether to process it as a one-time donation or set up a recurring donation.
If you want to accept both one-time and recurring donations from the same form, you’ll need to create two different Square feeds and use conditional logic to control when to use each feed.
If you only need to accept one type of donation (e.g. only one-time donations), you will only need to create one feed.
We’ll first show you how to create one Square feed. Then, we’ll show you what it looks like to create multiple feeds with conditional logic.
How to create a Square feed
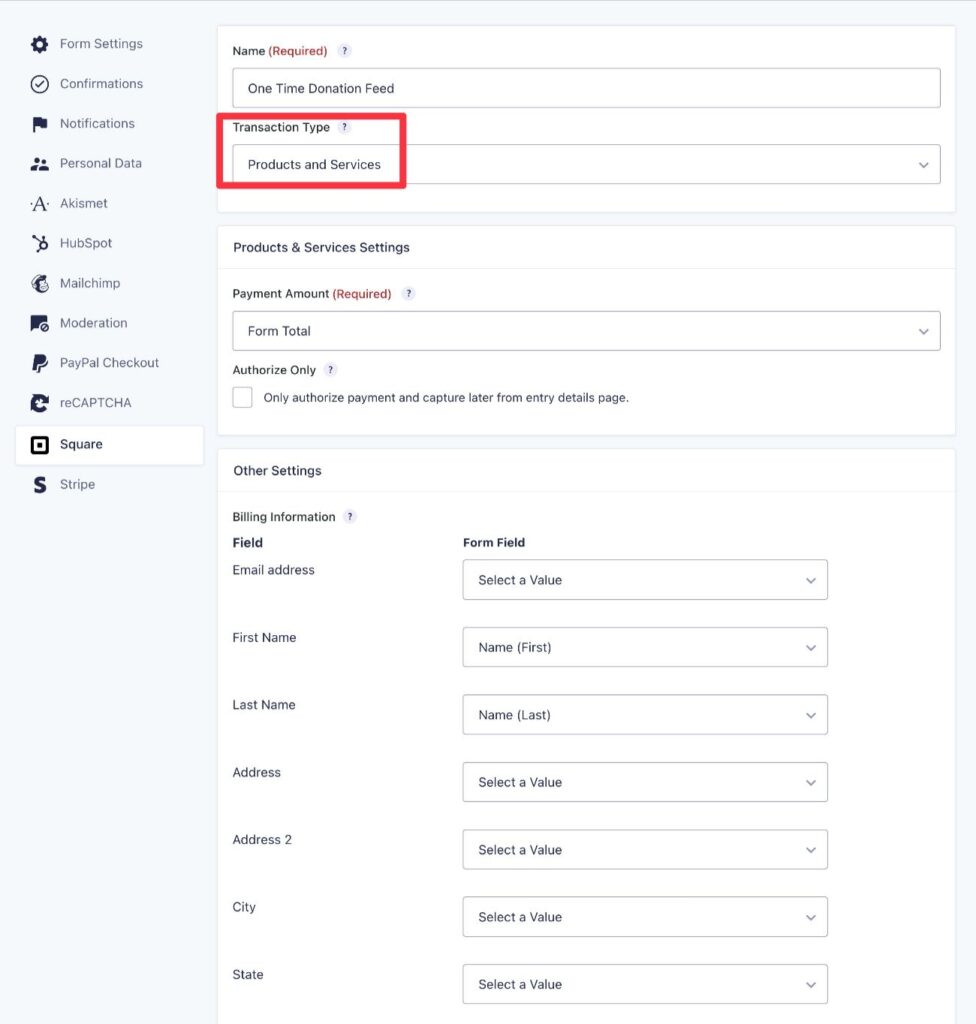
To create your first Square feed, go to Settings → Square → Add New inside the form editor.

You can then fill out the feed details – here is the full documentation if you need some help.
Under Transaction Type, choose between Products and Services for one-time donations and Subscription for automatic recurring donations.
You’ll then see some additional fields based on the Transaction Type that you choose.
How to set up multiple feeds for one-time and recurring donations
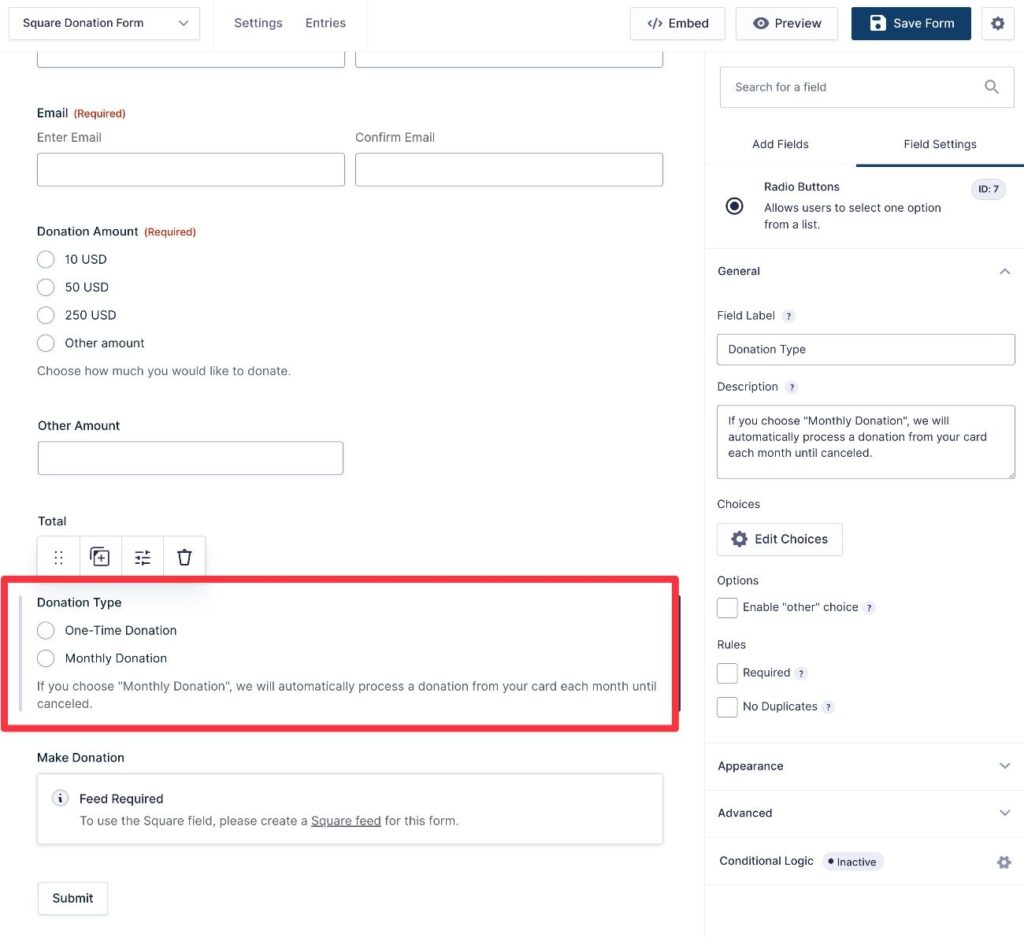
To accept one-time and recurring donations from the same form, you’ll first need to make sure that you’ve added a field to your form that lets donors choose between one-time or recurring donations.
For example, you could add a Radio Button field with two options:
- One-time donation
- Set up an automatic recurring donation
Once you’ve done that, you need to create two Square feeds:
- One-time donation feed – use the Products and Services payment type.
- Recurring donation feed – use the Subscription payment type and set up the billing schedule as needed. For example, “Every month” for monthly donations.
To make sure that only the right feed executes for each donation, you then need to add a conditional logic rule to each feed. You can find the conditional logic option at the bottom of the feed settings.
For the Products and Services feed, you would add a rule to only execute it if the donor chooses the “One-time donation” option in the Radio Button field:
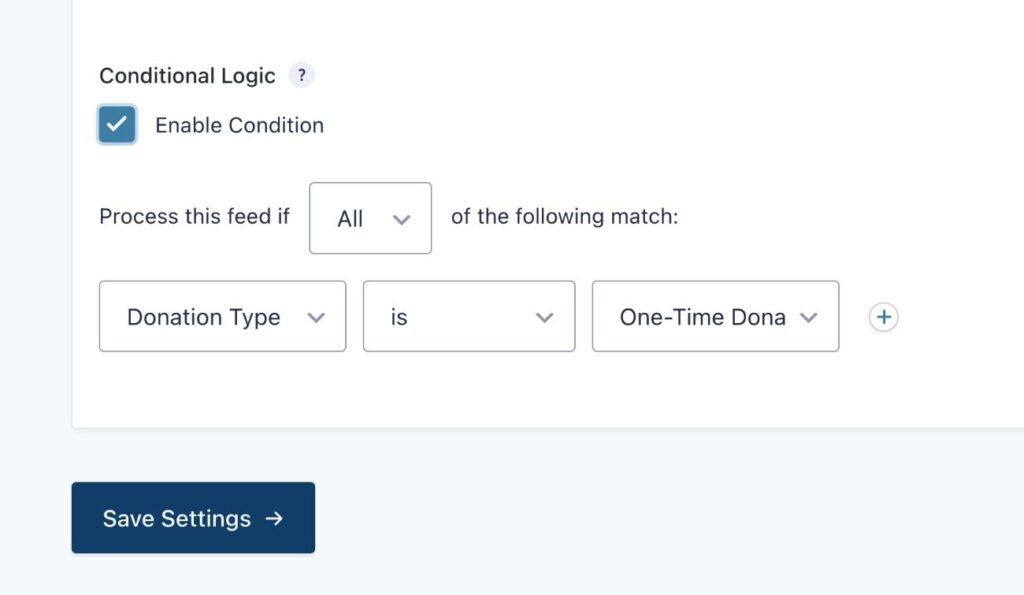
For the Subscription feed, you would add a rule to only execute it if the donor chooses the “Set up a recurring donation” option in the Radio Button field.
At the end, you’ll have two Square feeds like this:
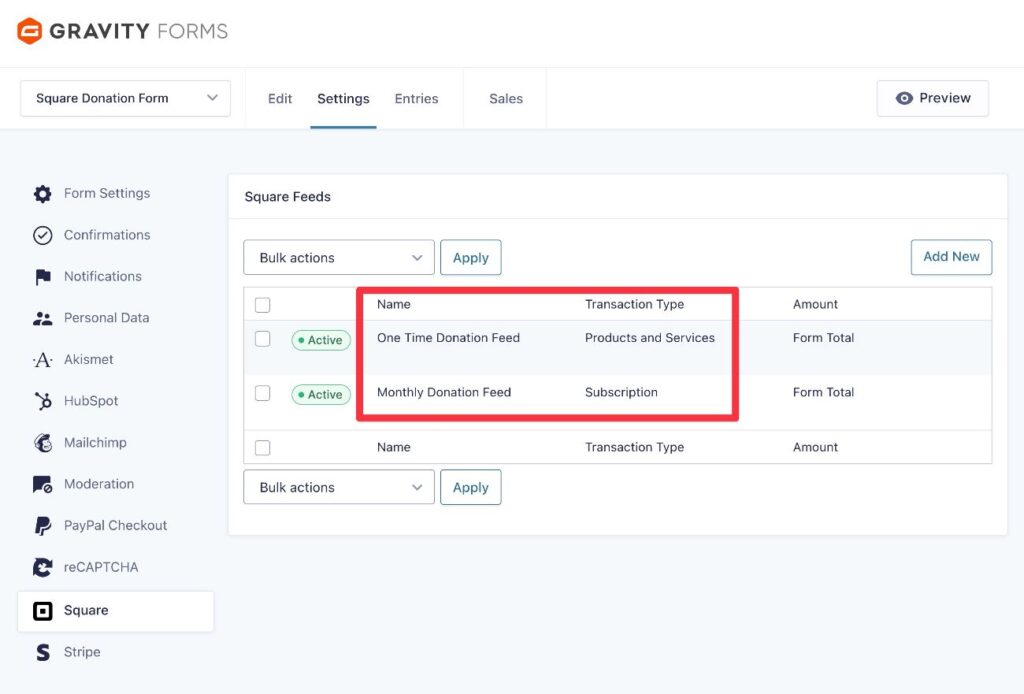
However, because of the conditional logic rules that you added, only one feed will execute for each donation, based on the choice that the donor made in the Radio Button field.
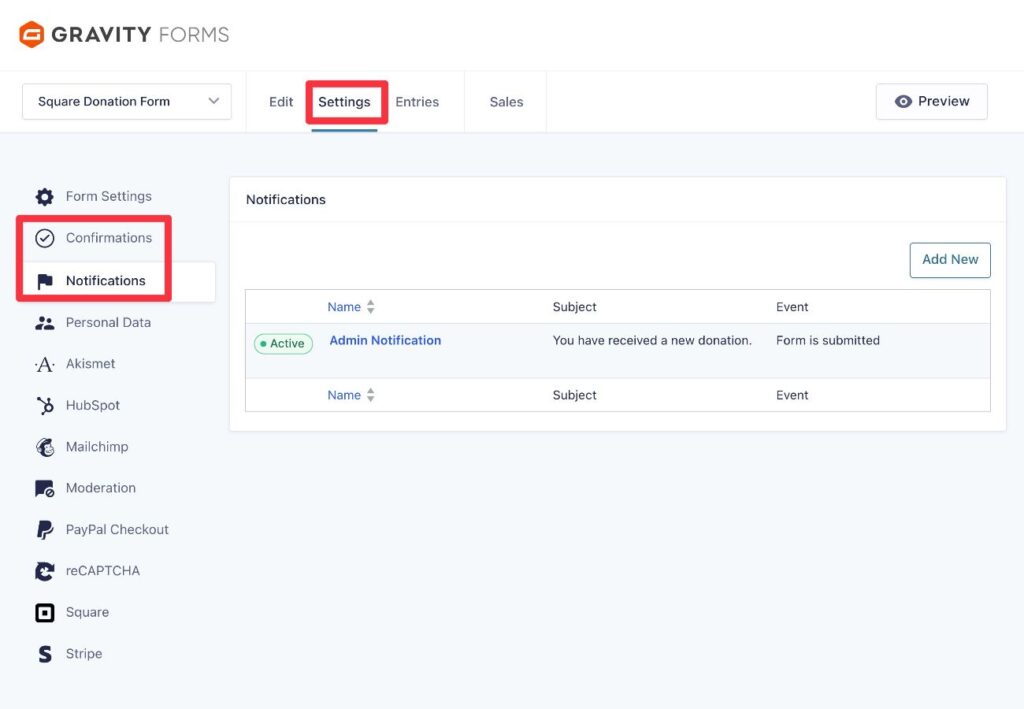
Configure notifications and confirmations
Next, you’ll want to set up some core backend features:
- Notifications – These let you send one or more emails to any email address. You can send emails to your donor, yourself, your team, etc.
- Confirmations – These let you display a message to donors or redirect them to another page (such as a thank you page).
You can also add conditional logic rules to both notifications and donations. For example, you could add a custom message for donors who set up a recurring donation that tells them how they can manage/cancel their donation.
To set up these features, you can go to Settings → Notifications and Settings → Confirmations in the form editor, respectively.
Connect to other services that your nonprofit uses (optional)
Another advantage of using Gravity Forms to create a donation form on WordPress is that you can also make use of all the other integrations and features that Gravity Forms offers.
Here are a few examples of the types of things that you can do:
- Add donors to your CRM – If you’re using a CRM to manage your donors, Gravity Forms can automatically sync a donor’s information to the CRM after they make a donation (or update the donor’s existing record).
- Subscribe donors to your email newsletter – You could add a field to your donation form that gives donors the ability to subscribe to your email newsletter. If donors choose that option, you can automatically subscribe them to your newsletter.
- Create automation workflows – If you have administrative tasks related to new donations, you can create structured automation workflows that automatically trigger when a person makes a donation. You can do this using the Gravity Flow plugin.
- Generate PDFs – You can automatically generate a PDF document with all of the donation information, which can be useful for your own recordkeeping and/or your donor’s recordkeeping.
Here’s an example of how it might work…
Give donors the option to subscribe to your email newsletter
To add email subscribe functionality to your donation form, you’ll first need to install the Gravity Forms add-on for the email marketing service that you’re using and then connect Gravity Forms to that service.
Gravity Forms offers dedicated integrations for 14+ popular email marketing services, but you can also use the Gravity Forms Zapier Add-On to connect your form to other email marketing services.
For this example, we’re using Mailchimp, which works like this:
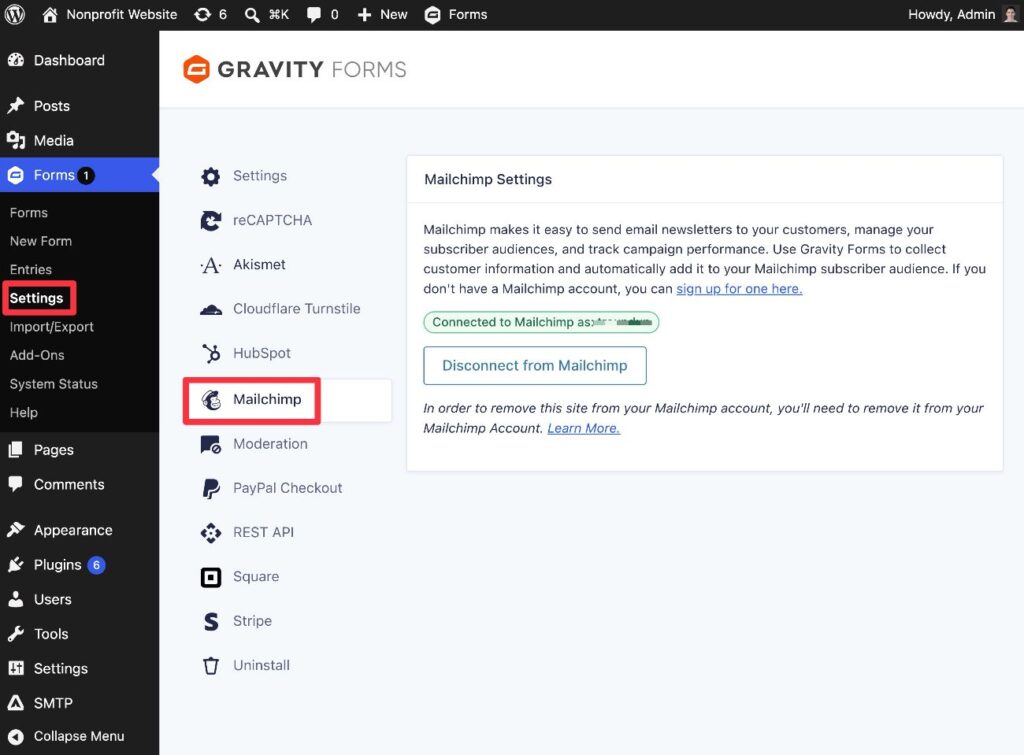
- Install the Gravity Forms Mailchimp Add-On.
- Go to Forms → Settings → Mailchimp in your WordPress dashboard. Follow the prompts to connect Gravity Forms to Mailchimp.
Next, you need to make sure that you’ve added an email subscribe option to the donation form.
This could be a simple checkbox field that gives donors the ability to opt in to the newsletter.
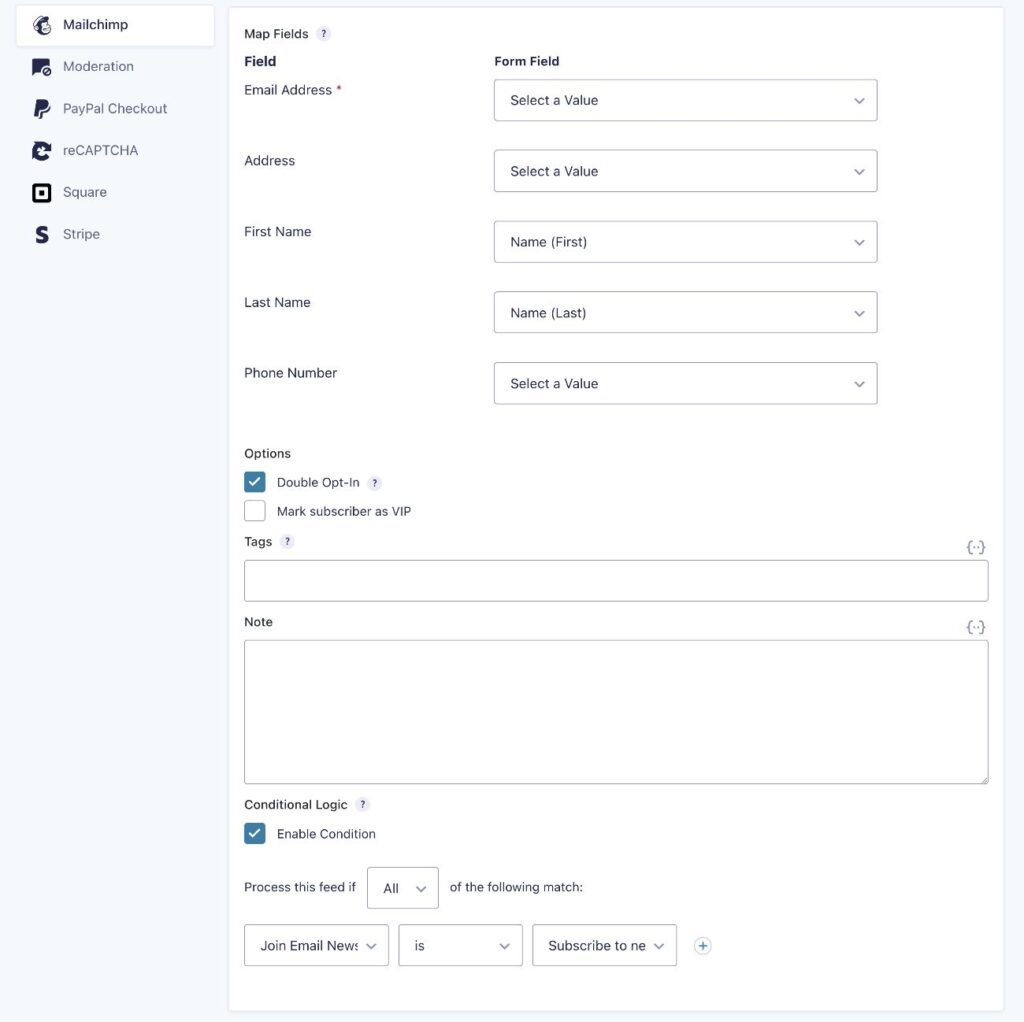
To finish things out, you need to create a feed for your email marketing service in your donation form.
For Mailchimp, you would go to Settings → Mailchimp → Add New inside the form editor.
To ensure that only donors who explicitly opt in are added to your email list, you can add a conditional logic rule to the Mailchimp feed so that the feed only executes if the donor checks the box to subscribe to your email newsletter.
Embed and test your WordPress donation form
Once you’ve finished setting up your donation form, you need to embed it somewhere on your organization’s website so that people can start making donations.
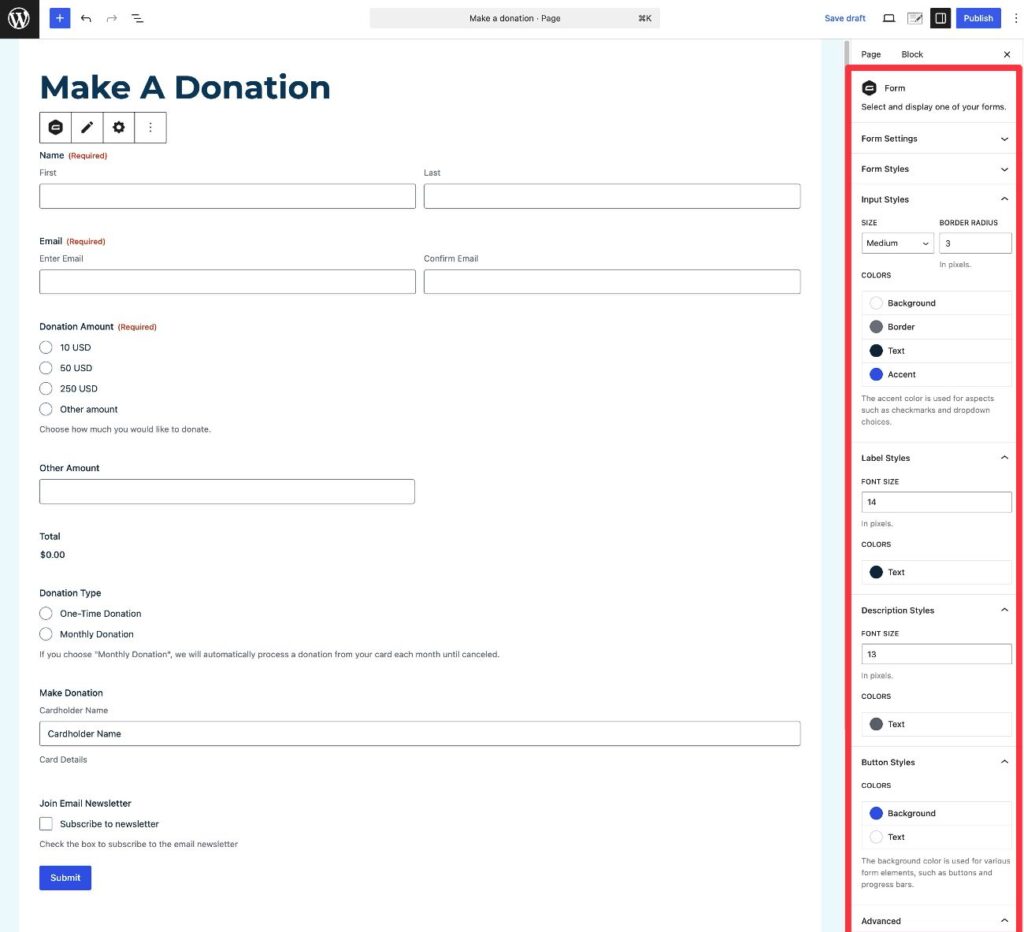
You can embed your form anywhere on your site using the Gravity Forms block, shortcode, or PHP function.
If you use the block, you’ll also be able to style your donation form directly from the WordPress editor.
If you connected Gravity Forms to Square in Test mode, you can now test your form by making a donation using one of Square’s credit card testing numbers.
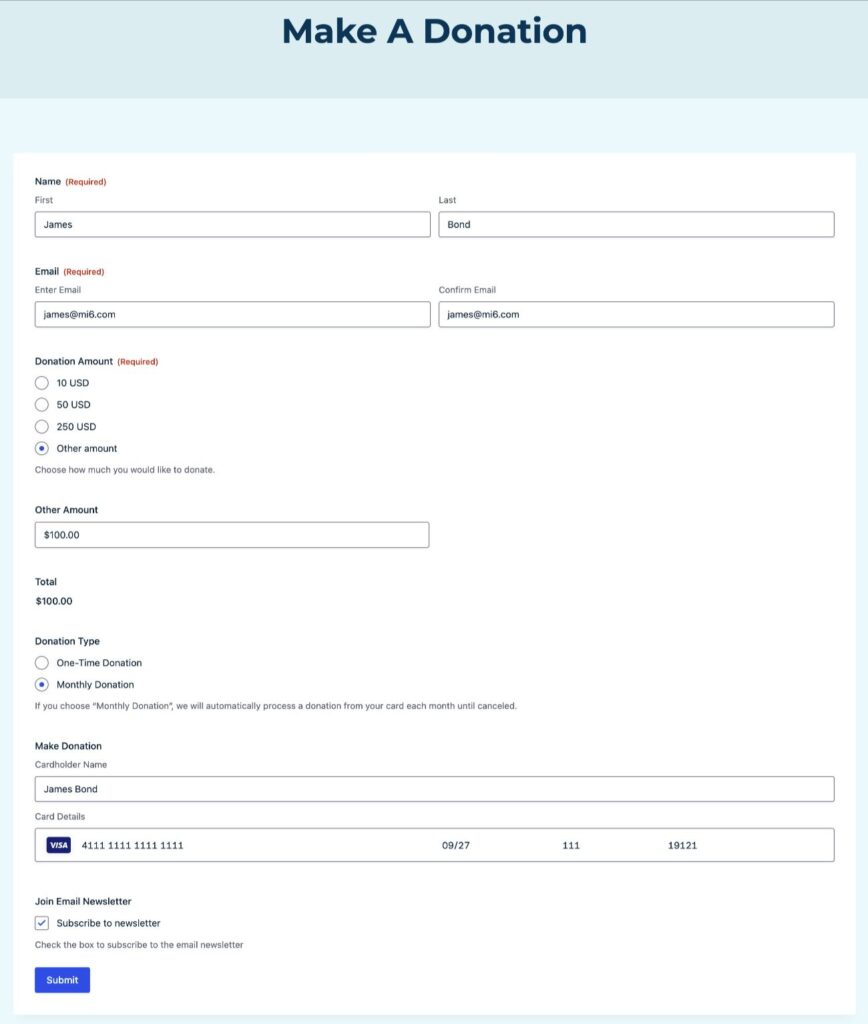
We’ll discuss how to view donation payments a little later in this post.
Enable live payments (if using Test mode)
If you tested your donation form and everything is working as you want it to, the last step in the process is to enable live payment processing. Once you enable Live mode, the form will start processing real payments from donors.
Here’s how to do this:
- Go to Forms → Settings in your WordPress dashboard.
- Select the Square tab in the settings area.
- Choose Live under Mode.
- Follow the same steps to connect your site to the live version of Square.

View and manage donations
Once your form is processing real donations, you’ll be able to view donations in two spots:
- WordPress dashboard – You can view a list of donations in Gravity Forms.
- Payment processor dashboard – You can also see all transactions in your chosen payment processor.
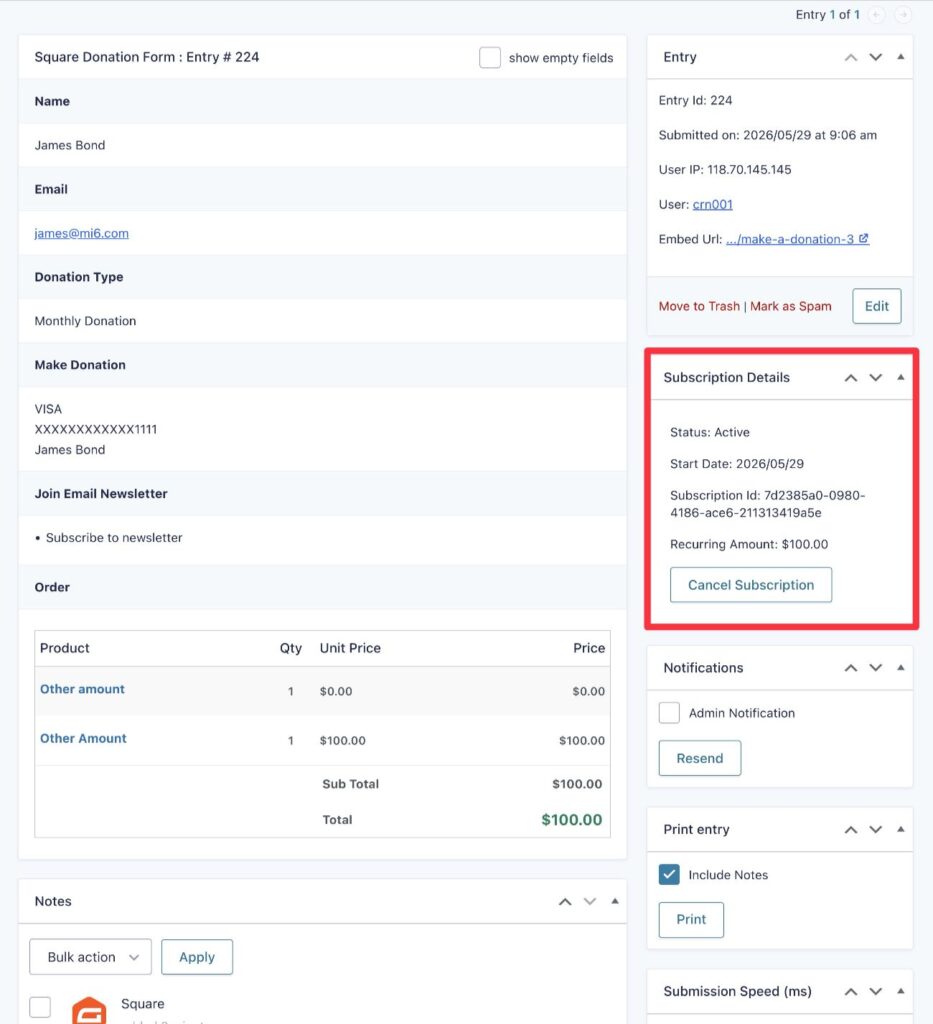
To view donations inside your WordPress dashboard, go to Forms → Entries and select your donation form from the list.
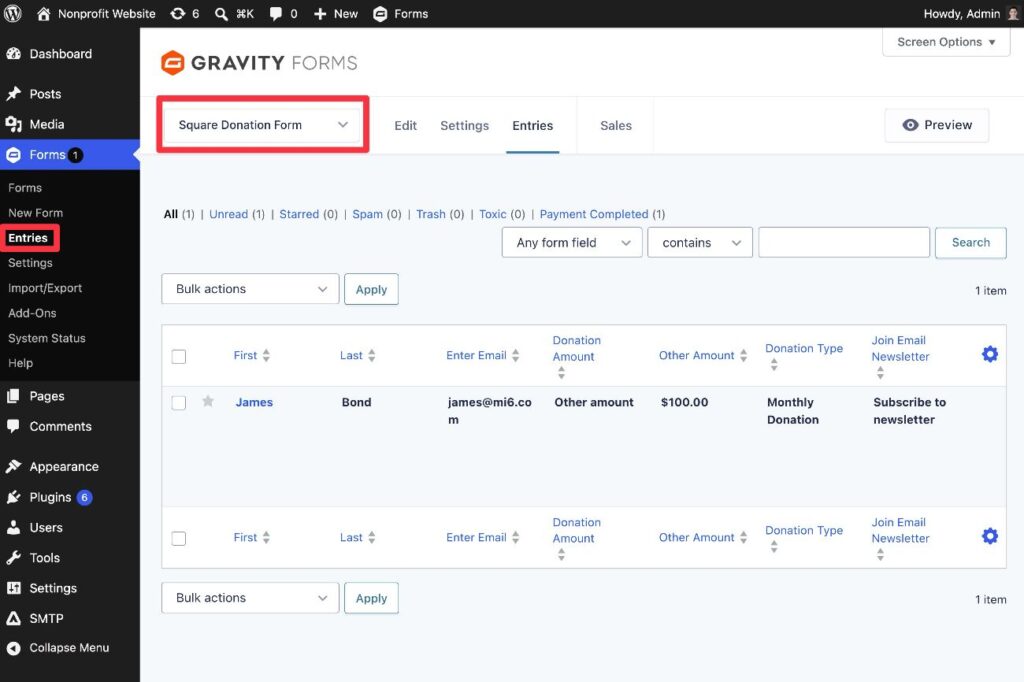
If you select a specific donation, you can view more details and also refund it if needed. Or, for automatic recurring donations, you can cancel a donor’s subscription.
Gravity Forms also offers a special Sales tab in the dashboard that lets you view aggregated payment/donation data for different time periods.
Create your WordPress donation form today
With Gravity Forms, you can easily create a customizable WordPress donation form that meets your unique needs.
You can offer preset amounts and custom donation options, let donors choose between one-time donations or recurring pledges, add tributes/dedications, integrate with other tools, and more.
If you’re not holding a Gravity Forms license, you can get started by purchasing the Gravity Forms Pro or Elite licenses. Or, if you’re part of a registered nonprofit, you can purchase the discounted Nonprofit license.
If you’d rather try all of this functionality before making your purchase, you can also create a free, fully functional demo site.

