Like most brands, you want more leads on your email list. Each lead is a potential customer, so more is always better.
Lead magnets are powerful tools to grow your email list. They turn casual website browsers into interested prospects. With the right lead magnet and an opt-in form, you can collect leads and deliver lead magnets automatically at any scale.
In this article, we’re going to explain how to set up a Gravity Form for your lead magnet.
What is a Lead Magnet?
A lead magnet is something valuable that you can exchange for a user’s contact information. In most cases, you are after their email address, but you can also give them a lead magnet for their phone number or physical address.
The purpose of a lead magnet is to increase conversions of your contact form, thus increasing your total number of leads. People are more likely to hand over their email address if they get something in return.
The most common type of lead magnet is a piece of downloadable content in PDF format, like a guide, blueprint, template, checklist, cheatsheet, etc. These are powerful because users can receive them right after submitting their information.
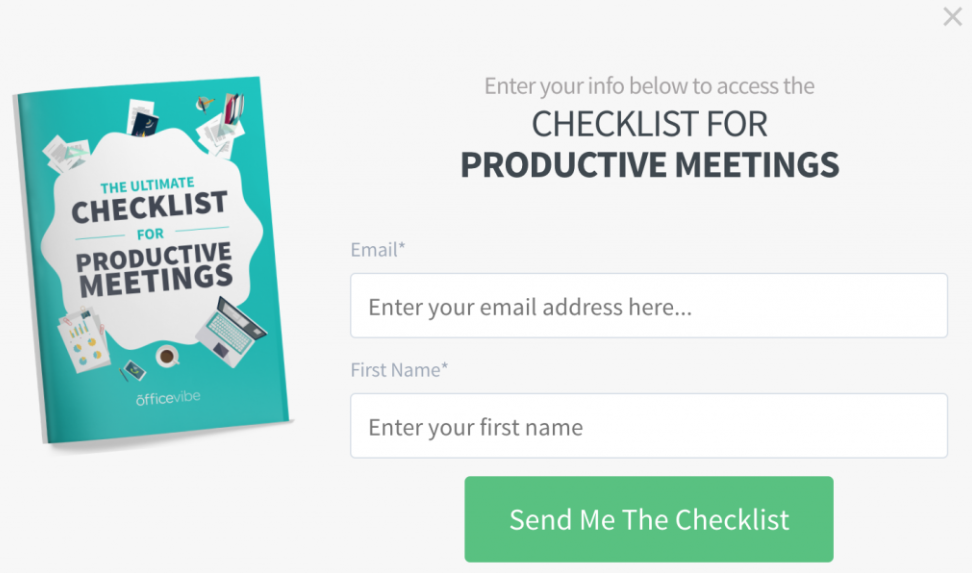
Here’s an example of a lead magnet from Digital Marketer.
It may seem like a lot of work to create a lead magnet, but it actually makes your life easier. People aren’t as likely to sign up for newsletters anymore. They probably won’t give you access to their inbox for free. Giving them something in return makes them more comfortable with the transaction.
A lead magnet is also a great way to begin an email-based conversation. The user already knows your content is valuable because they’ve seen it. They’ve also already taken the first step to interact with your brand via email.
How to Create a Lead Magnet Opt-In Form
A lead magnet opt-in form is similar to most other contact forms. It should be simple and fast for users to complete. The difference, however, is what comes after. Once the user submits the form, you’ll need to deliver the lead magnet to them.
Step 1: Create the Lead Magnet
Your first step, of course, is to create the lead magnet. This can be anything you like, but it should be something your users find valuable and actionable. They should be able to use your lead magnet to take steps right away to better their life or work.
You can build your lead magnet in any tool you like. Some people make fancy designs in Illustrator or Canva. Others use Word or Google Docs. It doesn’t matter what you use as long as you create something useful and valuable.
We encourage you to check out some lead magnet examples before you design your first lead magnet.
Once you’ve made your lead magnet, save it as a PDF and upload it to your WordPress Media Library. In your WordPress dashboard, select Add New under Media in the sidebar, then drag your PDF into the center box. Take note of the file’s URL. You’ll need this later.
Now let’s talk about the opt-in form!
Step 2: Create a Simple Opt-In Form
Install Gravity Forms if you haven’t. Read our Getting Started Guide documentation if you have any questions.
Create a new form by clicking New Form under Forms on the left sidebar of your WordPress dashboard. Name the form something unique so you can distinguish it from your other forms. If this form will only be used for one specific lead magnet, give it a name that relates to the lead magnet’s name.
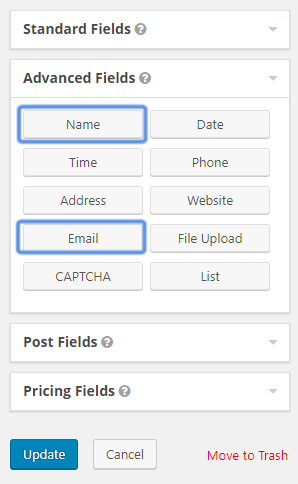
Step 3: Add Fields to Your Form
Once you create your form, your next step is to include the necessary fields.
Most lead magnet opt-in forms are starkly simple. They ask for a name and email address. Some don’t even bother asking for the name. We recommend keeping all your forms as simple and short as possible to improve conversions.
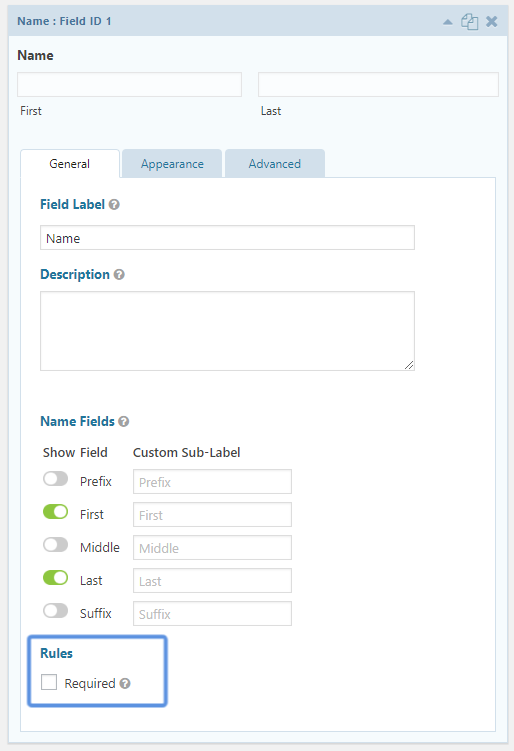
Drag the Name and Email fields from the menu on the right into your form editor.
Your form should look like this.
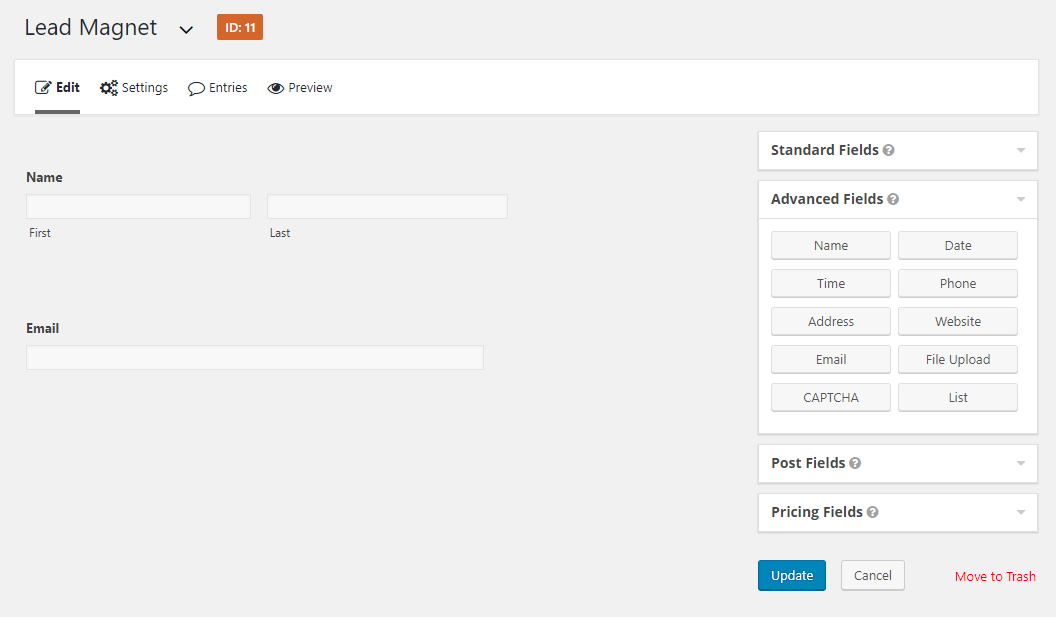
Next, open each field and click the Required checkbox.
If you do need more than two form fields, now’s the time to add them. You can ask anything you like, just keep in mind some people will balk at a long form.
Of course, it depends entirely on your lead and your needs. Your leads might not mind long forms. Or you might use a long form to eliminate people who aren’t as serious as you’d like them to be.
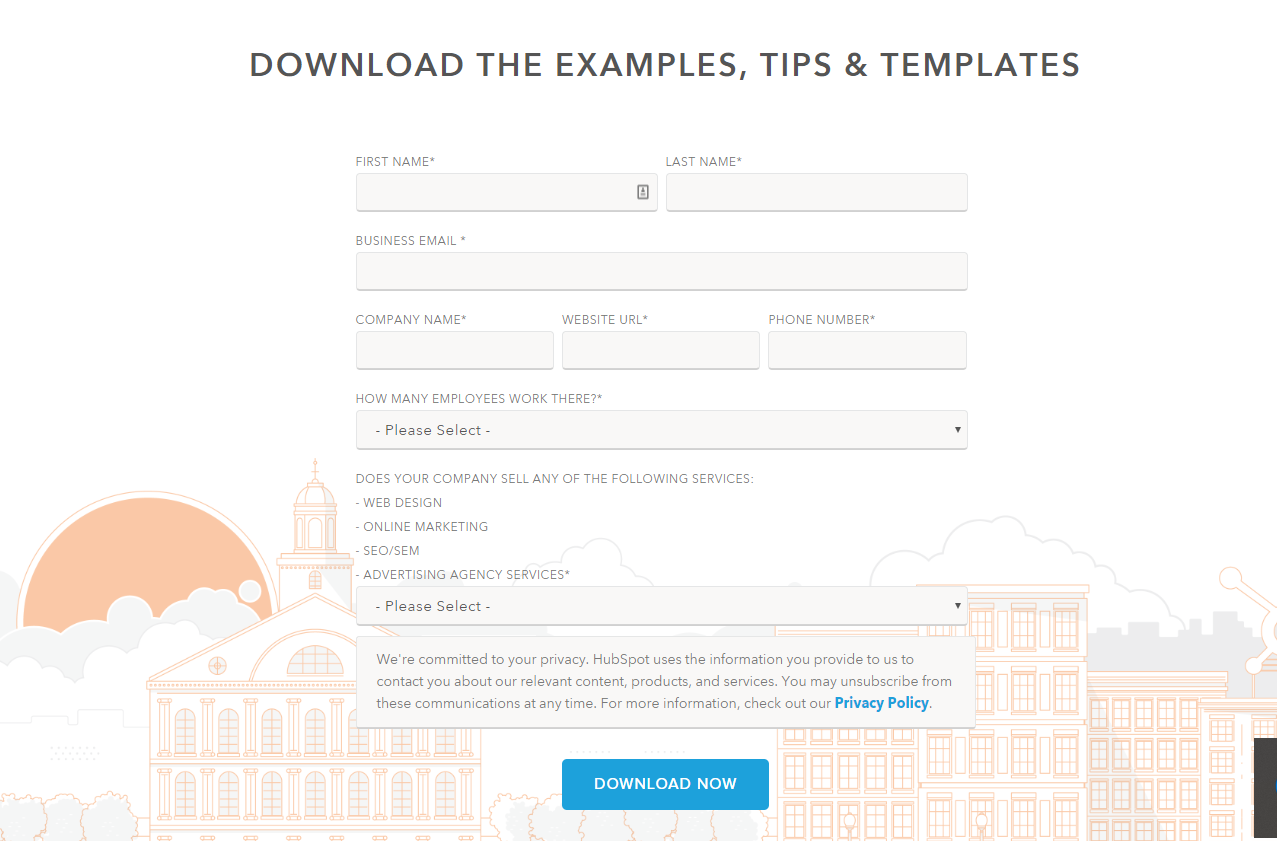
Check out this HubSpot form. They ask questions about your company and services. If you can’t or won’t answer these questions, then you aren’t really a lead for HubSpot. In this case, they don’t mind if some of their fields exclude people.
Step 4: Set Up the Lead Magnet Delivery
Your users will want their lead magnet as soon as they submit the form. You have two options here:
Method 1. Redirect the user to a new page.
An easy way to give your users the content is to redirect them to a new page where the content is published or available for download. The challenge here, however, is that it has to be a public page, so anyone with the URL can reach it. Your users could share the page with their friends who could access the content without going through your form.
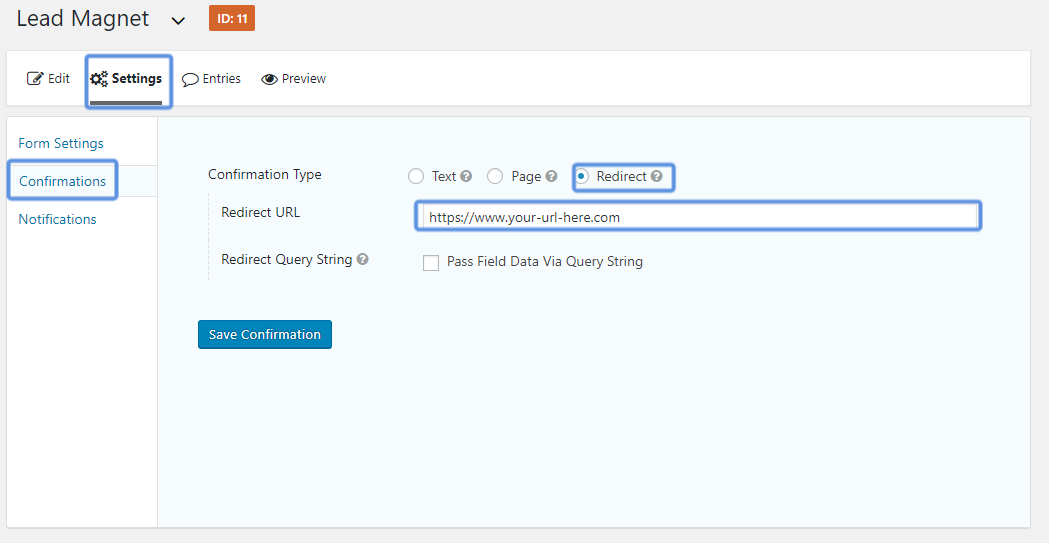
We don’t recommend this method, but if you prefer it, you’ll need to change the default confirmation to a redirect.
In the form editor, click Settings and Confirmations. Open the default confirmation and change the toggle to Redirect. Insert the URL of the page you want users to reach.
Method 2: Send a link to the downloadable content via email.
This is the preferred method of delivering lead magnets. There’s no way to circumvent the opt-in form. Sure, users can send the PDF to each other, but you can’t lock down your content completely.
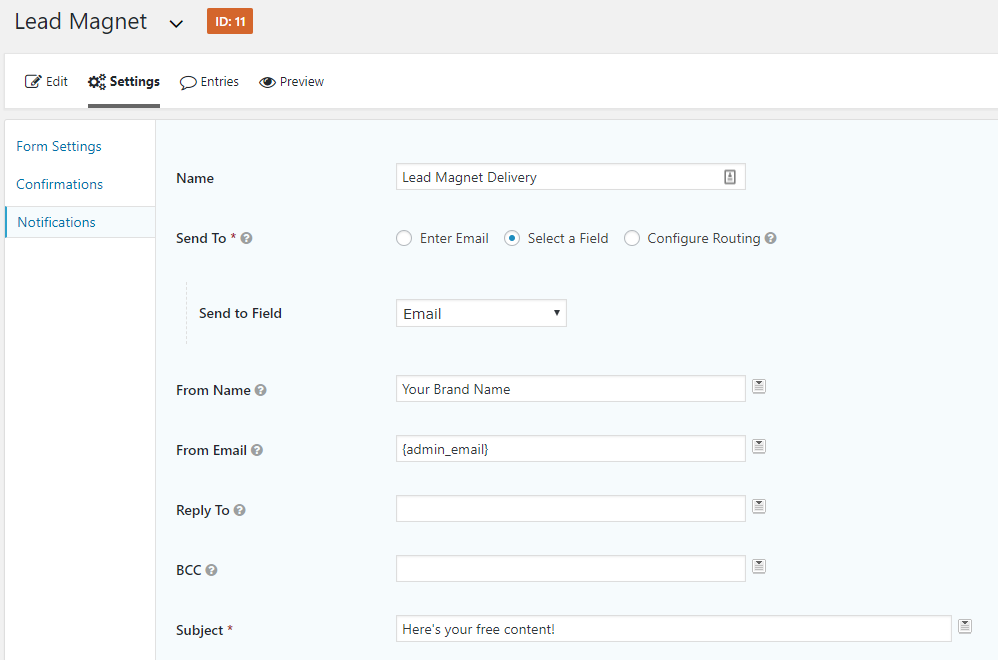
To create an automated email, you’ll need to build a new notification. In the form editor, click Settings, then Notifications, then Add New.
Give your notification a unique name. Next to Send To, click Select a Field. In the Send to Field drop down, choose Email. This will send the email to the email address they submitted. Include your name in the From Name field and give your email a subject in the Subject field.
Finally, you’ll have to write a message to your recipient. Keep it short and brief. They just want their free content. Include a link to wherever you hosted the PDF on your website.
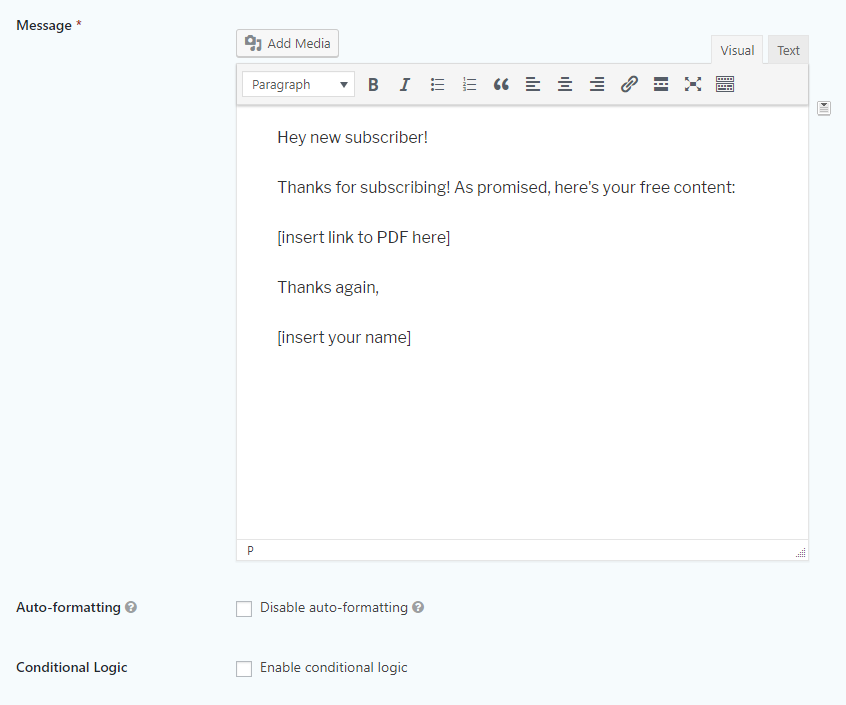
Of course, you can technically do anything you want with this email. You have access to WordPress’ HTML editor, so get as fancy as you like. You can also use Gravity Forms merge tags to include dynamic data points. Check out our full list of merge tags.
Don’t forget to click Save! Now whenever someone completes your lead magnet opt-in form, they’ll receive an automated email with a link to the free content.
Step 5: Integrate with Your Email Marketing Tool
Gravity Forms will collect emails in your WordPress backend, but you’ll need to move them to your email marketing tool so you can send them messages in the future.
While it’s possible to move each email address manually, there’s no need for that. Download and install one of Gravity Forms’ email marketing add-ons. We have integrations for ActiveCampaign, AWeber, Campaign Monitor, Constant Contact, GetResponse, MailChimp, and more.
Review of the documentation for whichever email marketing add-on you decide to use and follow its steps. Each add-on comes with unique instructions to sync with Gravity Forms. For instance, syncing with MailChimp requires you to generate an API key, generating a feed, etc.
Step 6: Embed the Form on a Page
Like all Gravity Forms, you’ll need to embed this form somewhere on your site for users to access. You can use the Gravity Forms Gutenberg Block, WordPress’ default Shortcode Block, or paste in the shortcode manually.
If you aren’t familiar with embedding a Gravity Form on a page, read our full documentation. (Don’t worry. It’s easy!)
Enjoy the Automation
Now that you know how to create a lead magnet opt-in form with Gravity Forms, you can sit back, enjoy the automation, and watch your email list grow. But don’t stop there! Create unique lead magnets for different pages, duplicate your lead magnet form, and watch your subscriber count explode!
Featured Image: Joe the Goat Farmer / Flickr