

Trying to create a WordPress course registration form?
With the Gravity Forms plugin and its new course registration form template, you can easily create a custom registration form for any type of course, including online and in-person courses.
You can process one-time payments or set up recurring subscriptions directly from the form, create WordPress accounts for students (if needed), integrate with the other tools that you’re using, fully customize every single field in your form, and more.
In this post, we’ll explain some of the key features and use cases of the course registration form template.
Then, we’ll show you step-by-step how to create and customize your own registration form for any type of course.
What does the course registration form template do?
The Gravity Forms course registration form template can handle all aspects of course registration, including support for both online and in-person courses.
At a high level, it helps you do some or all of the following:
- Collect information from students, including their contact details and any other information that you need to collect. You can fully customize all of the form fields and collect as much or as little information as needed.
- Charge students for access to the course, with support for both one-time payments and recurring subscriptions. By default, the template uses Square for payments, but you can choose any one of the payment processors that Gravity Forms supports.
- Offer multiple courses or sell a single course. You can let students choose from multiple courses as part of a single form or you could create a separate standalone form for each course that you offer.
- Create a WordPress user account for students if needed, which can be helpful for online courses. You can also integrate it with any LMS or membership plugin that uses the WordPress user role system (or you can skip this functionality if it doesn’t apply to your use case).
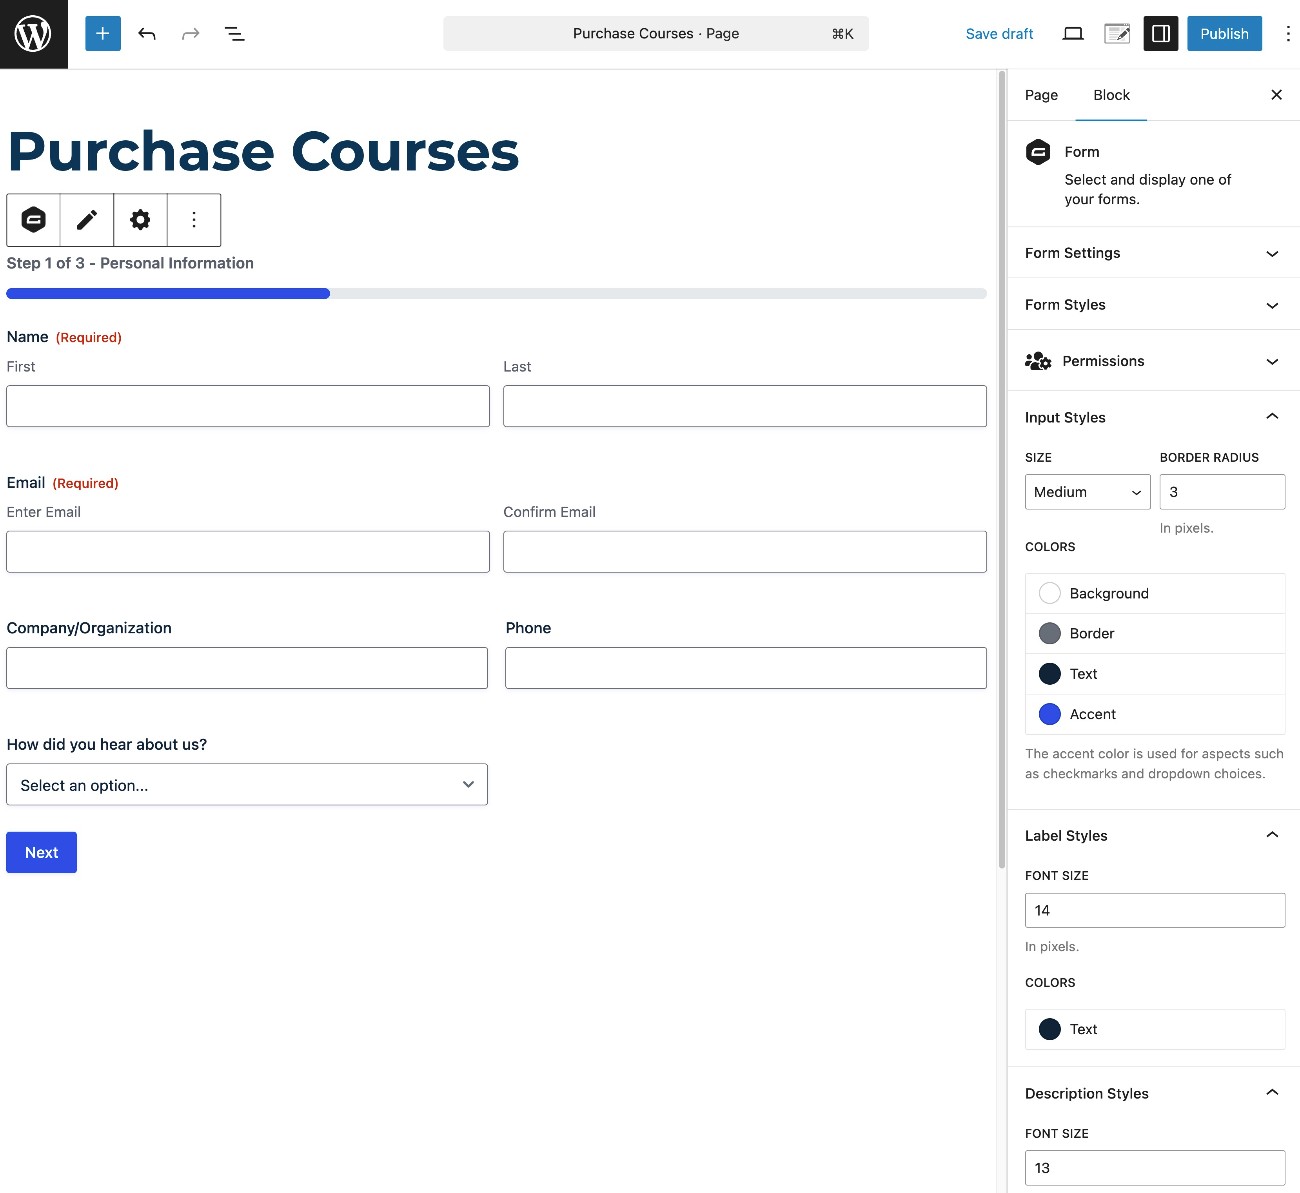
- Divide the form into multiple pages, which can make it more user-friendly and boost conversion rates (especially for longer registration forms).
- Add conditional logic rules to process things in different ways depending on the course that a student selected or other details in the form.
You can also easily integrate the form with other Gravity Forms add-ons, including integrating your CRM, email marketing service, and more. We’ll cover some examples of this in the tutorial below.
If you want to see the template in action, you can check out a live demo here.
Who can use the course registration form template?
The course registration form template works well for pretty much any course-related use case, including the following:
- In-person courses – You can sell access to courses or certification programs that you offer in person.
- Online courses – The template can integrate with any WordPress LMS or membership plugin that uses the native WordPress role system.
- One-on-one coaching – While it’s not the main focus of this post, this template can also work great for one-on-one coaching programs or certifications.
- Downloadable courses – If you offer your course content as downloadable content (videos, PDFs, etc), you can easily deliver those course materials to students after they register for the course.
How to create a WordPress course registration form
Now, let’s dig into the full step-by-step guide on how to set up the course registration form template on your WordPress website.
1. Install Gravity Forms and required add-ons
To get started, you’ll want to install the core Gravity Forms plugin and necessary add-ons, if you haven’t done so already.
At a minimum, you’ll need to install the Gravity Forms Square Add-On if you want to use the built-in payment functionality in the course registration form template. While the template is built with Square by default, you could also easily swap in one of the other payment processors that Gravity Forms supports.
To access the Square Add-On, you’ll need the Gravity Forms Pro, Elite, or Nonprofit license.
If you’re not holding one of those licenses yet, you can purchase a new license or upgrade your existing Basic license and only pay the prorated difference.
Once you’ve installed the core Gravity Forms plugin and activated it with your license key, here’s how to install the Square Add-On:
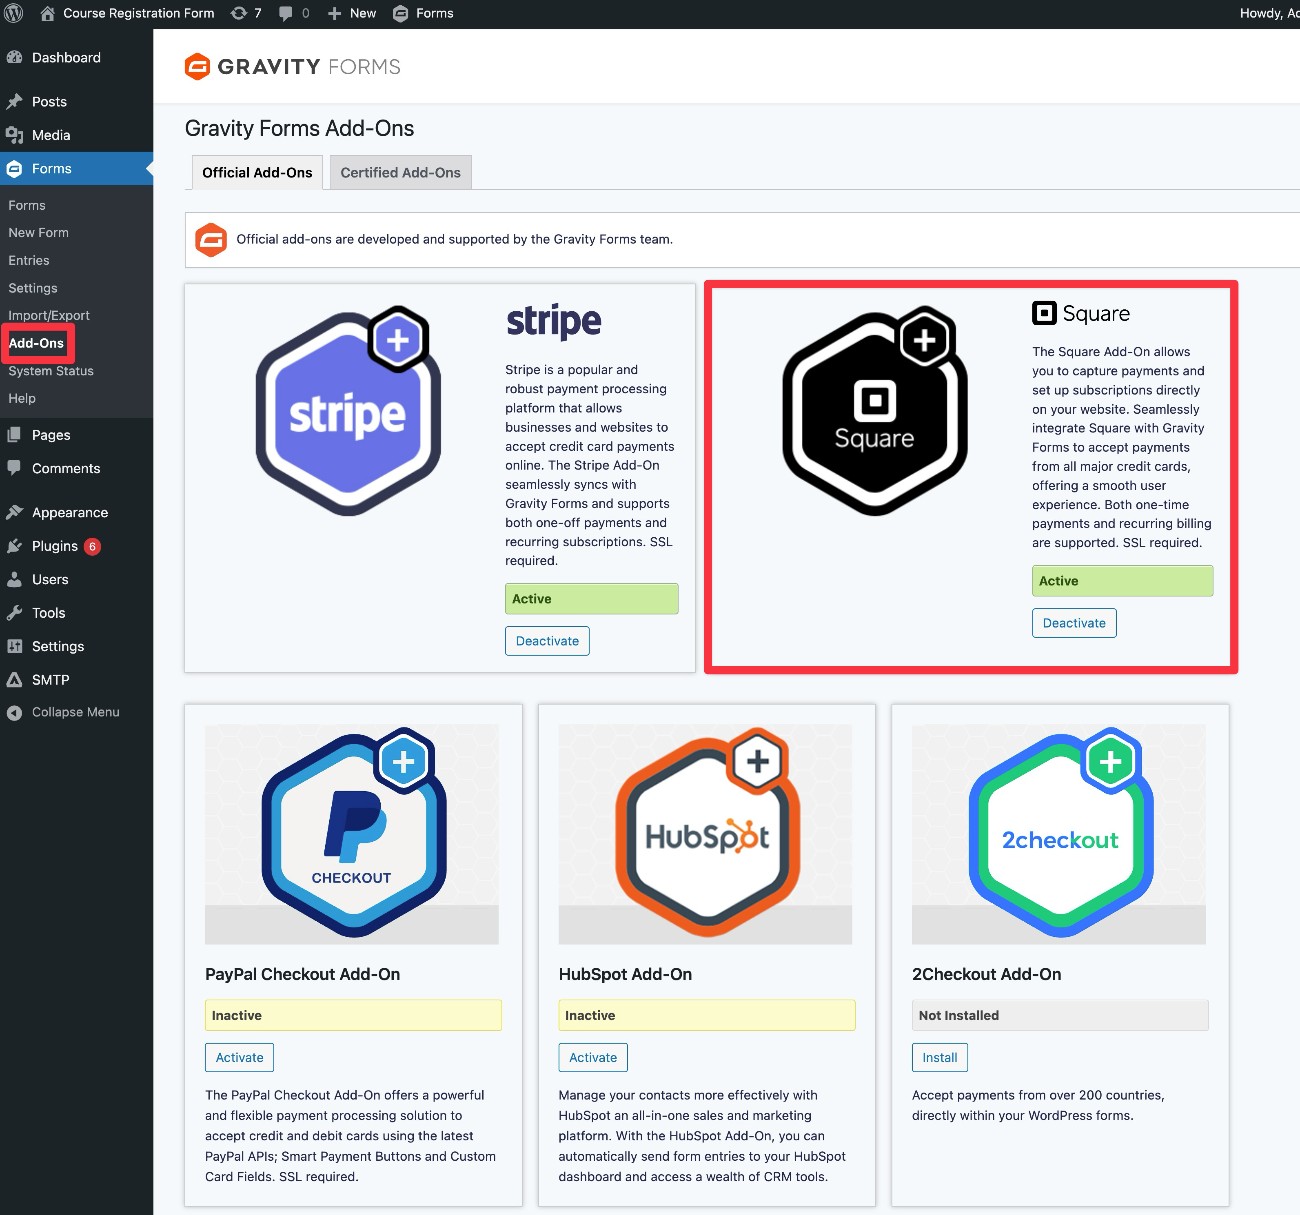
- Go to Forms → Add-Ons in the dashboard sidebar.
- Find the Square Add-On in the list of available add-ons.
- Click Install.
- Once the installation finishes, make sure to click Activate Plugin.
We’ll discuss some other optional add-ons that you might want to install later in this tutorial.
2. Connect Gravity Forms to Square (or any other payment processor)
Before you set up your form, you’ll need to connect Gravity Forms to Square for payment processing.
We will briefly cover how to set up the connection below. However, if you want more in-depth instructions for Square (or the other payment add-ons that Gravity Forms offers), you can consult these documentation articles:
We also have an entire guide on using Gravity Forms with Square.
Here’s the quick version of how to do it:
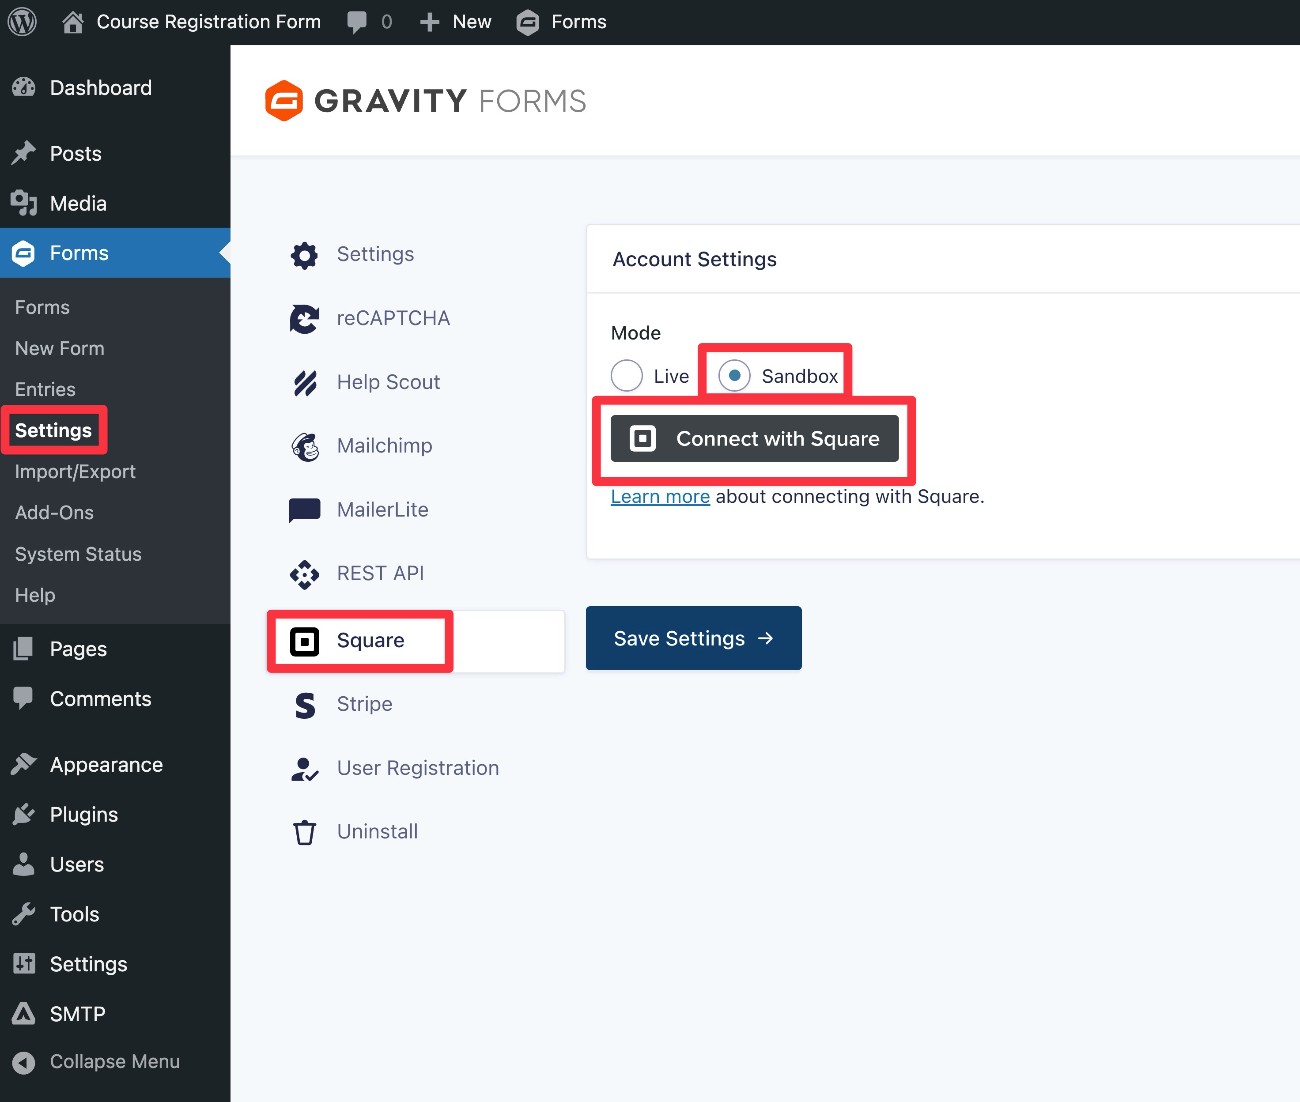
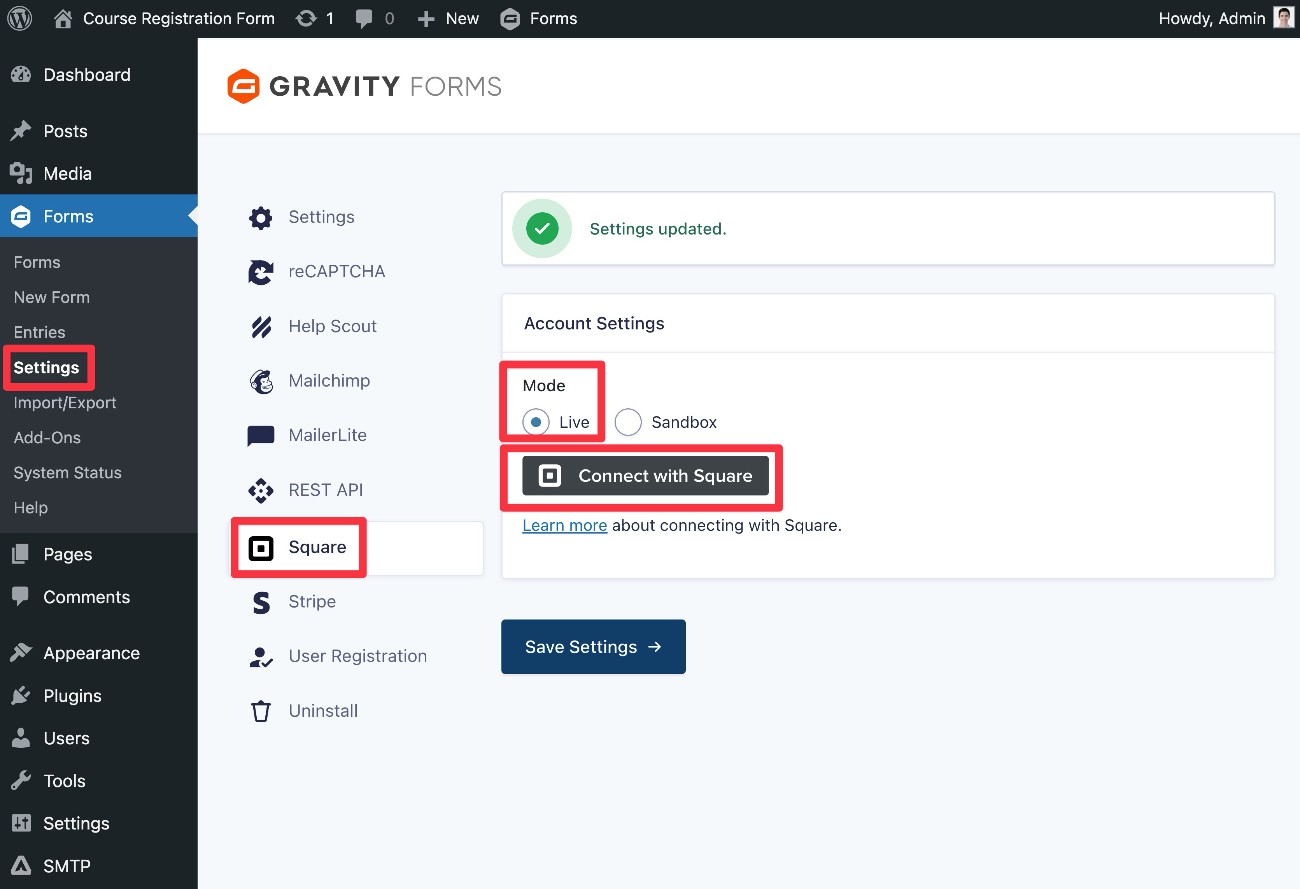
- Go to Forms → Settings in your WordPress dashboard.
- Select the Square tab.
- Choose Sandbox mode. This will let you test your form with dummy payments. When you’re ready to accept real payments, you can return to this interface and change to Live mode.
- Click Connect with Square.
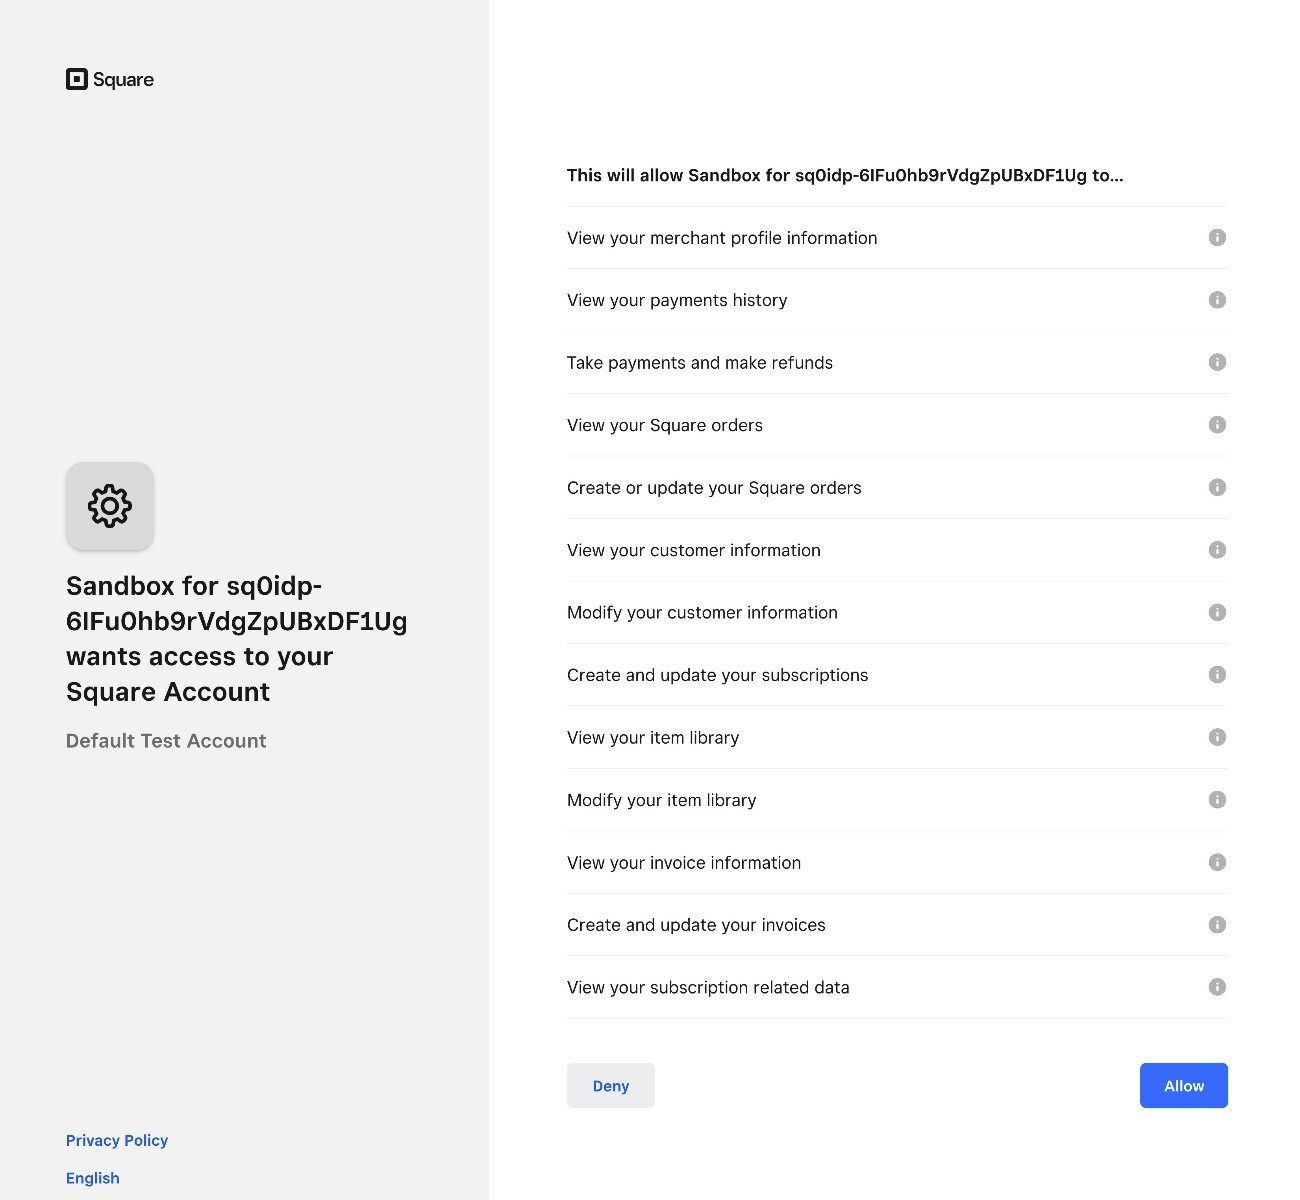
On the next screen, follow the Square authorization prompts to connect Gravity Forms to Square.
If you’re seeing a blank screen instead of the authorization flow, here’s how to fix it:
- Click this link to open the Square Developer dashboard in a new tab.
- Go to the Sandbox test accounts tab.
- In that tab, click the Square Dashboard link next to Default Test Account. This should take you to a URL that looks like this – https://app.squareupsandbox.com/dashboard/
- Leave this tab open in your browser.
- Go back to your WordPress site’s dashboard (in another tab) and click the Connect with Square button again.
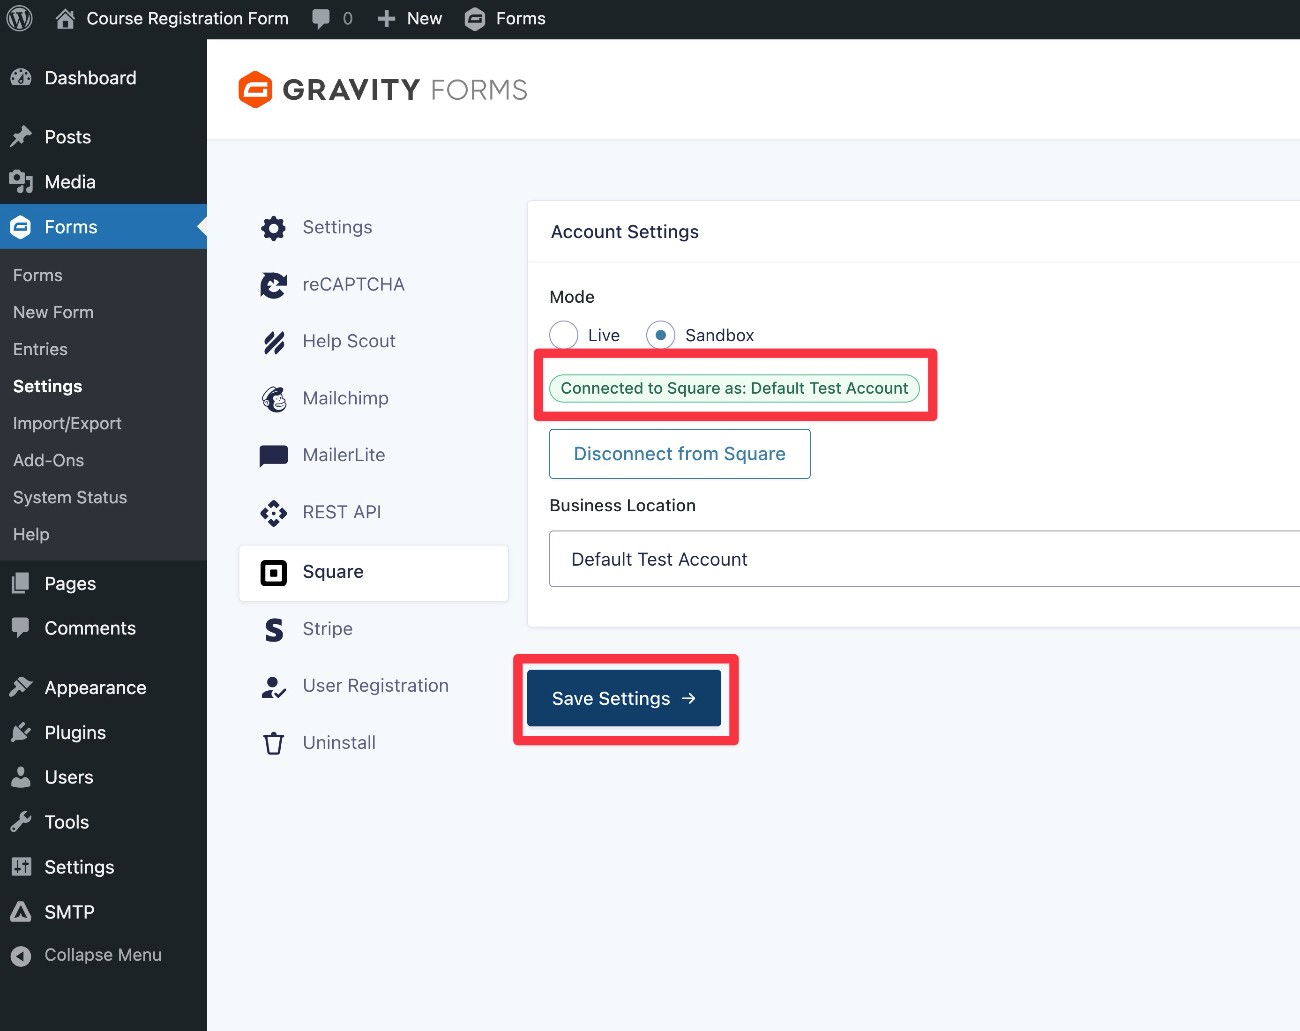
Once you’re back in your WordPress dashboard, you should see a message like “Connected to Square as: Default Test Account”.
Make sure to click the Save Settings button to save everything.
3. Set up your course registration form
Now, you’re ready to start setting up your course registration form:
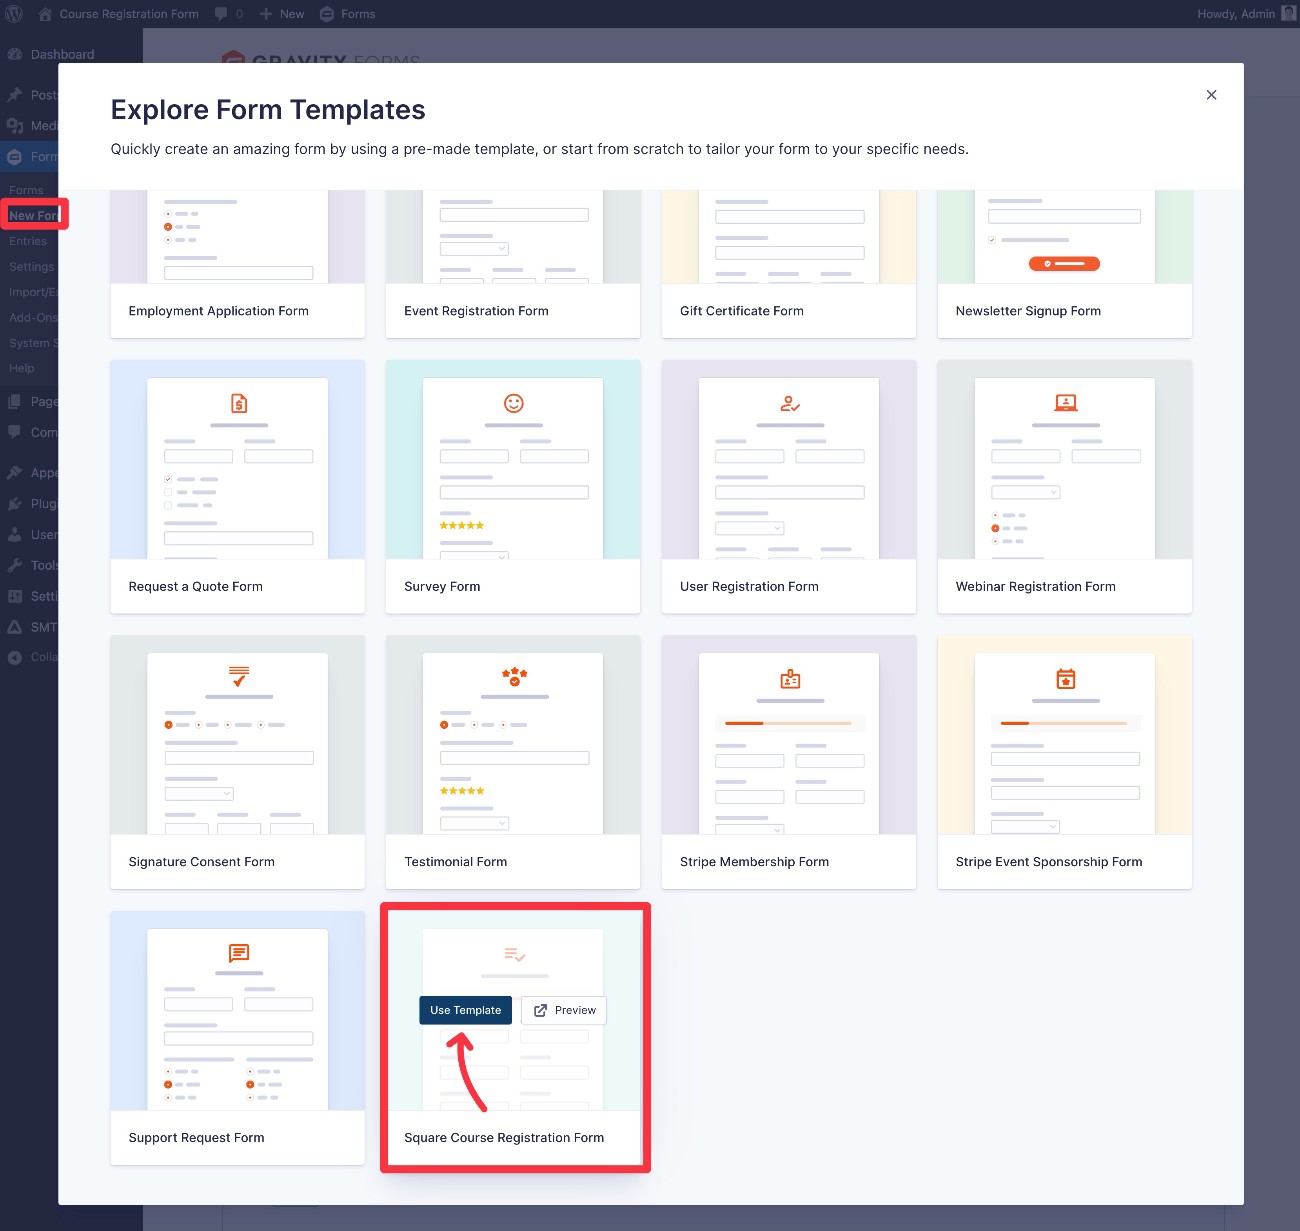
- Go to Forms → New Form in your WordPress dashboard.
- Find the Square Course Registration Form template in the list of templates and click Use Template.
- In the popup that appears, give your form a title and an optional description. Then, click Use Template again.
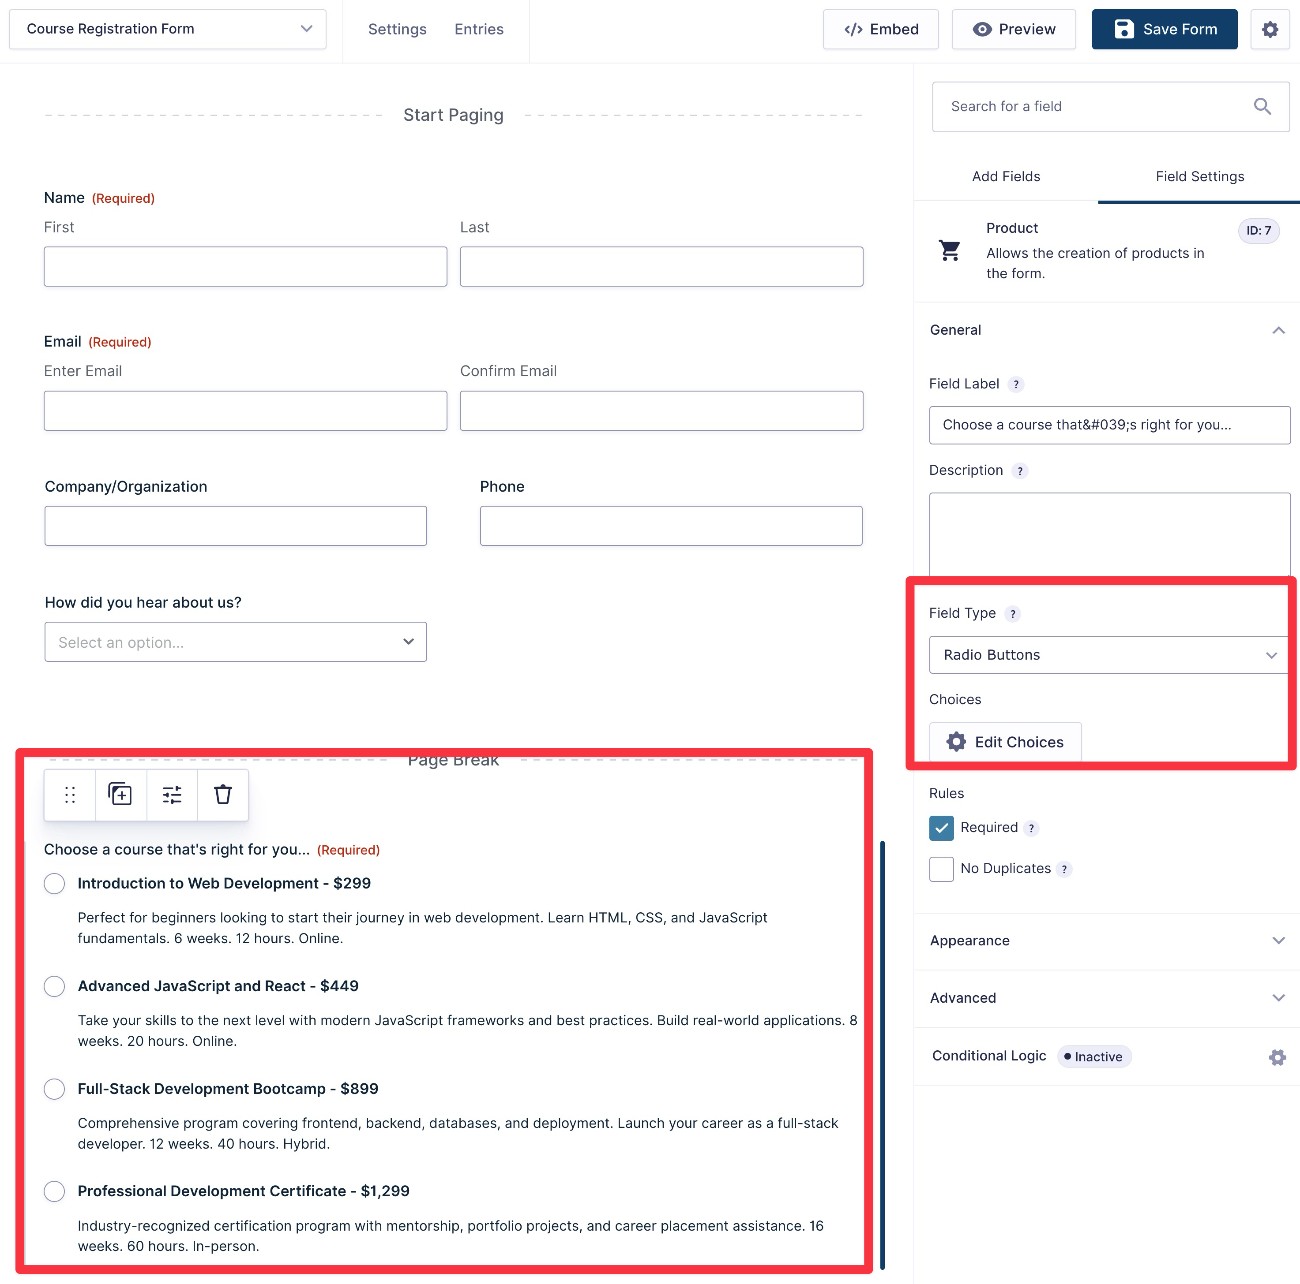
You should now be in the drag-and-drop form editor, which is where you can fully customize the course registration form template to your needs.
You’re totally free to…
- Add new fields to collect additional information from your students.
- Edit existing fields in the template to adjust them to your use case.
- Delete any unnecessary fields, if they don’t fit your needs.
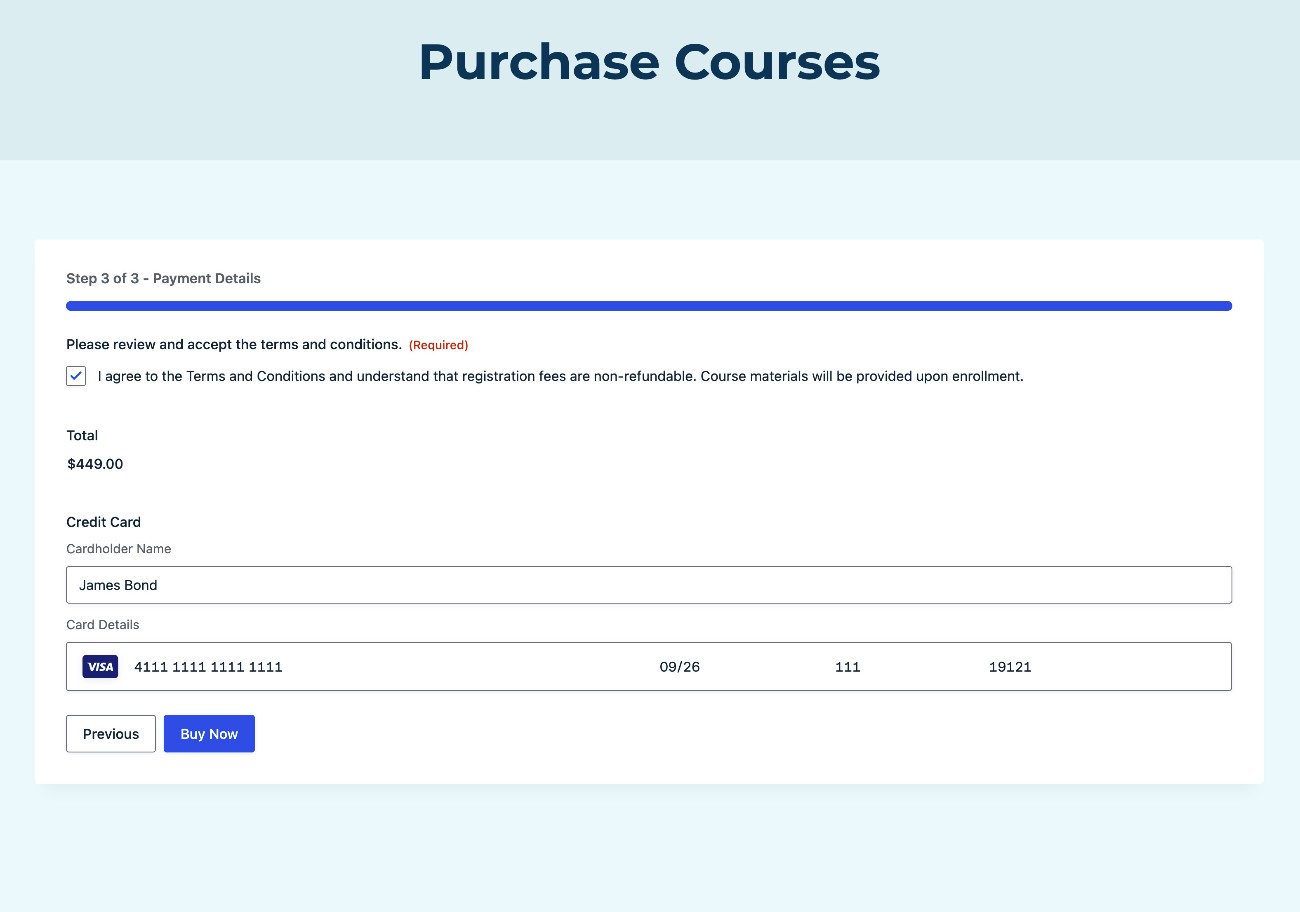
When editing the template, the most important field to customize is the Product field, which is what lets you define your course offerings, as well as the price of each course.
To adjust these details, you can select the Product field and choose Edit Choices.
Or, if you only sell a single course (or want to create separate course registration forms for each course), you can change the Product Field Type to Single Product instead of Radio Buttons.
We also recommend customizing the Consent field to include your actual agreement. Gravity Forms will store a record of this consent agreement for every course registration, which is helpful for your recordkeeping.
At the bottom of the form, the template includes a Square field, which is where students will enter their payment information. However, you will not see a live preview of this field until you create a Square feed, which we’ll cover in the next step.
If you chose to use a different payment processor (e.g. Stripe), you should replace the Square field with the field of your chosen processor.
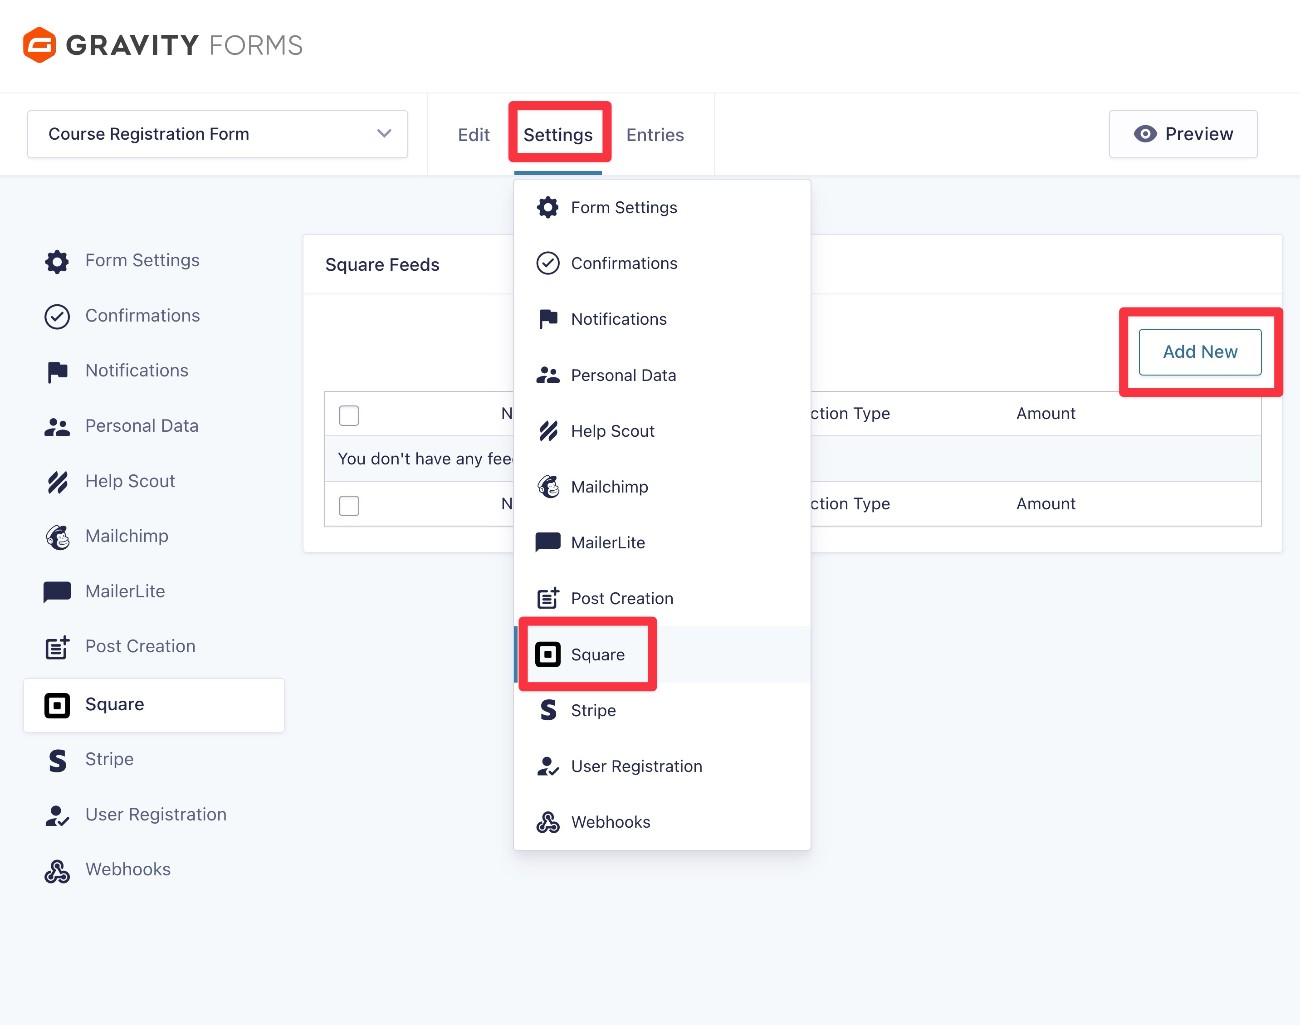
4. Create a payment feed (Square)
Once you’re happy with the fields in your course registration form, you can shift into configuring some of the backend settings, starting with payments.
To control how to process payments, you can create a feed for your chosen payment processor (Square, in our example). Your payment feed lets you control a number of important settings, such as whether to process it as a one-time payment or set up an automatic recurring subscription.
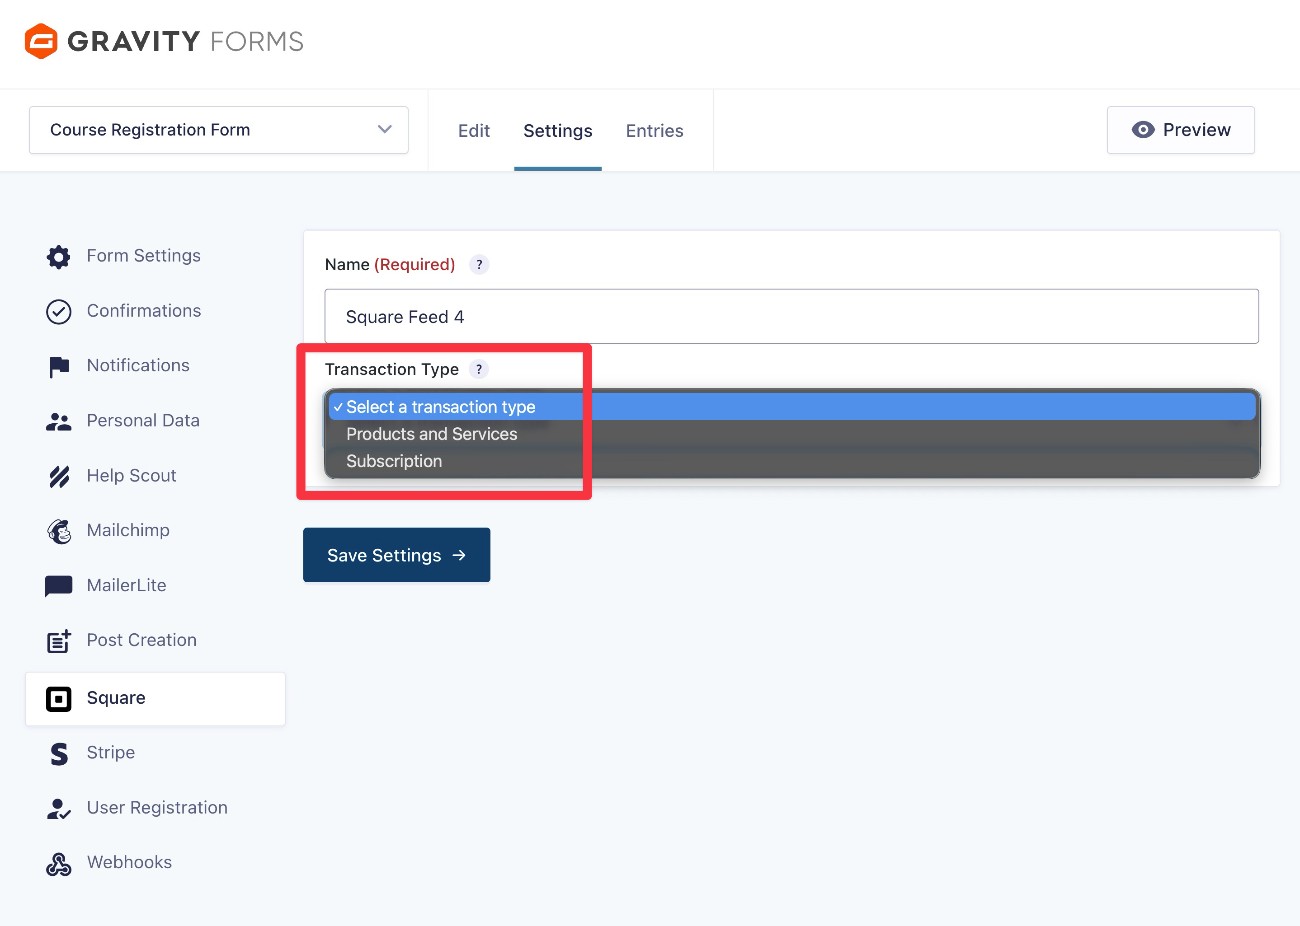
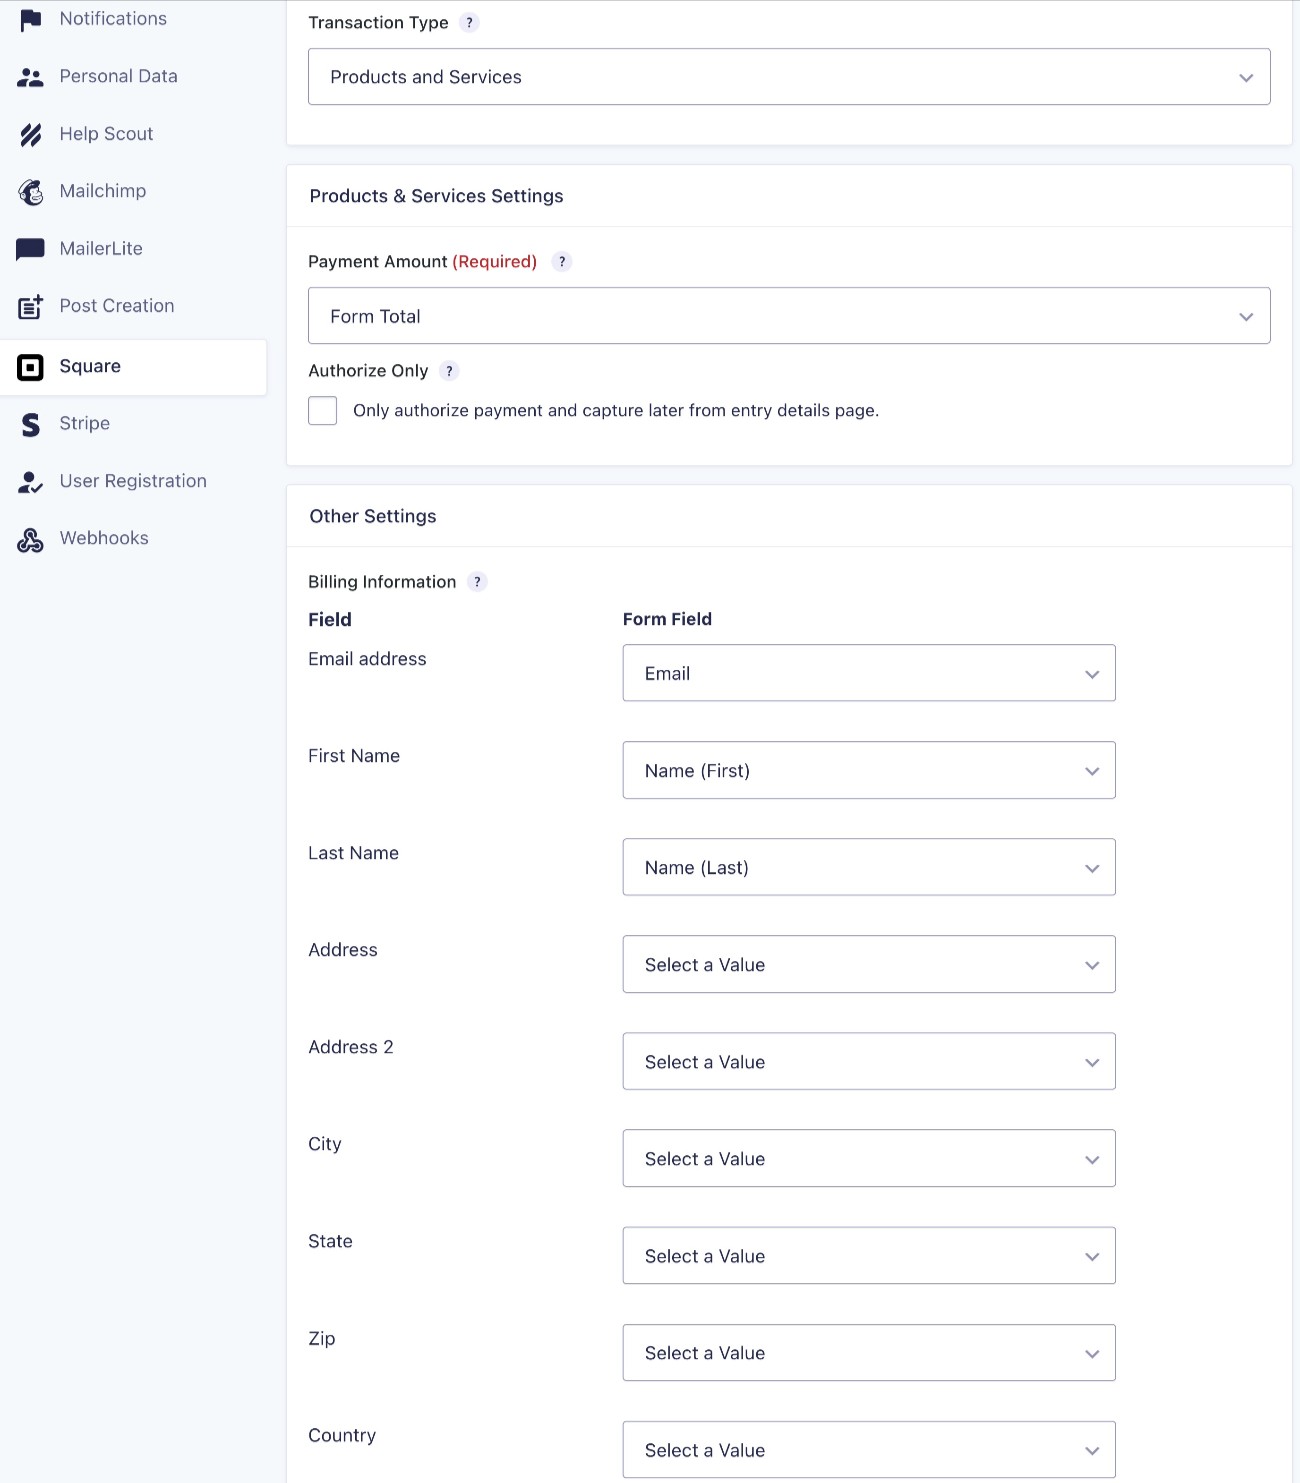
To create a Square feed, go to Settings → Square → Add New inside the form editor interface.
First, choose the Transaction Type:
- Products and Services – Use this to accept a one-time payment.
- Subscription – Use this to set up an automatic recurring subscription. You can also use this for payment plans (e.g. three payments of $199).
For this example, we’ll choose Products and Services for a one-time payment. However, the same basic steps apply to subscriptions – you just get a few additional options for controlling how the subscription works.
Once you choose the Transaction Type, you’ll see some additional options to control the payment amount, map form fields to fields in Square, and make a few other important choices.
You can also apply conditional logic rules to only execute the payment feed if certain conditions are met. This can be useful if you want to offer different payment options. For example, if you want to let students choose between making a one-time $549 payment or making three monthly payments of $199.
To implement this, you could do the following:
- Add an option to the form that lets users choose between a one-time payment and a payment plan.
- Create two Square feeds. One feed is a one-time payment and the other feed is a subscription that automatically ends after three billing cycles.
- Apply conditional logic rules to each Square feed to execute each feed based on which option the student selected in the form.
Once you’ve made all of your choices, make sure to click the Save Settings button at the bottom.
5. Create a User Registration feed (optional)
This step is 100% optional.
If you’re creating a course registration form for an online course website, you might want to create a WordPress user account for students as part of the registration process.
You can also use this to integrate your registration form with most popular WordPress LMS plugins and membership plugins, assuming the plugin that you’re using relies on the WordPress user role system.
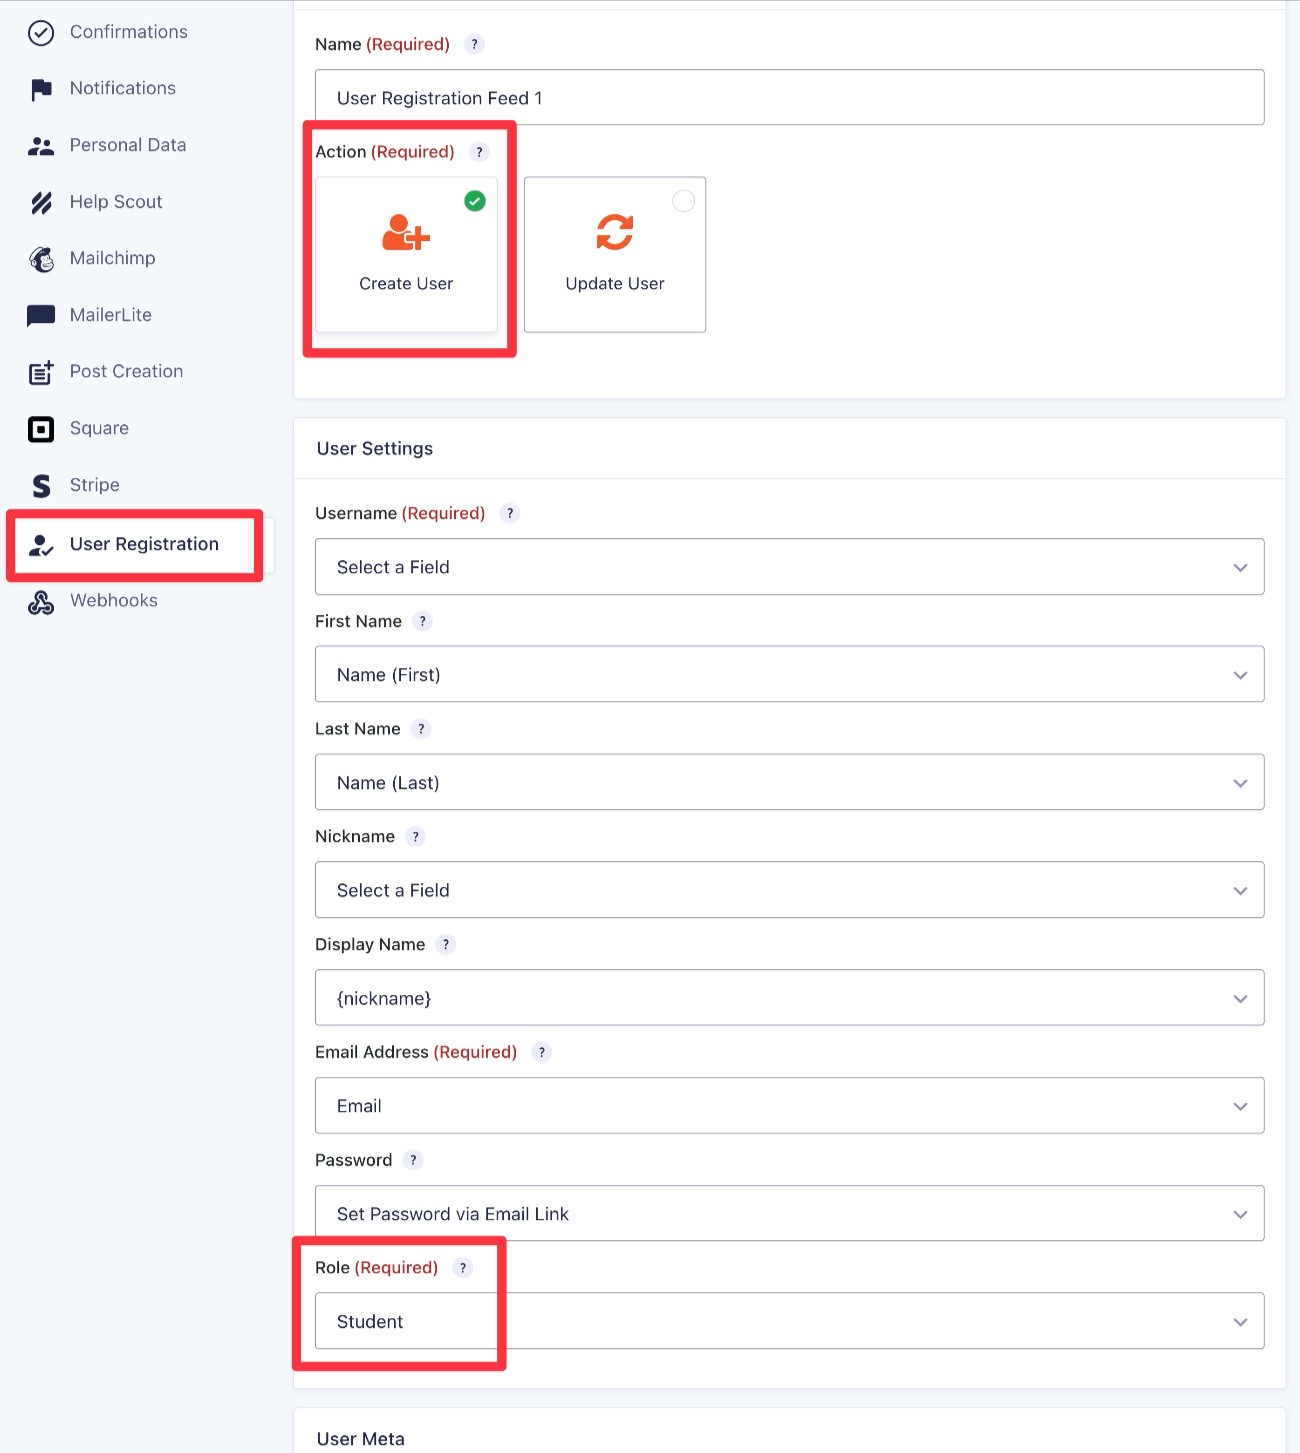
If you need to do this, you can add this to the form using the Gravity Forms User Registration Add-On, which is available on the Elite and Nonprofit licenses.
Once you’ve installed the add-on, you can create a User Registration feed for your form by going to Settings → User Registration → Add New in the form editor.
When configuring the User Registration feed, make sure to choose the correct user role based on the user role that your membership/LMS plugin uses.
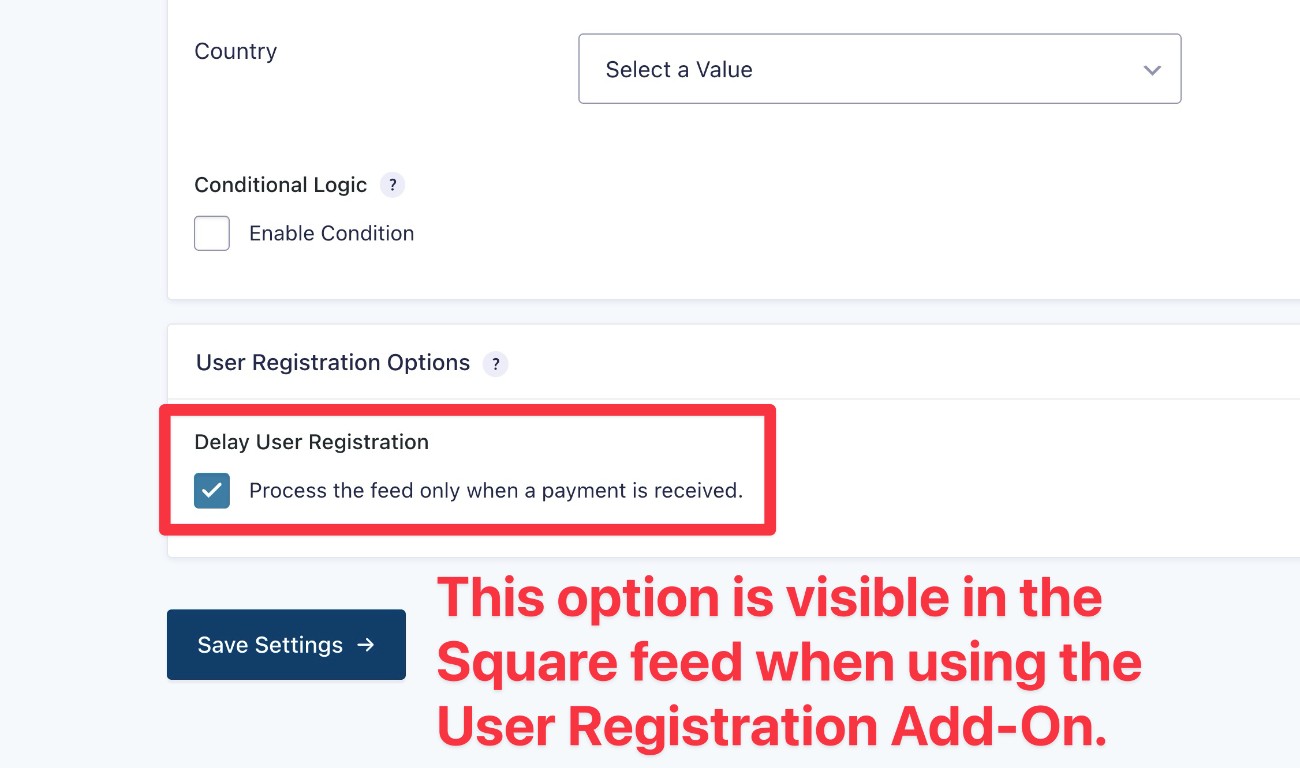
If you’re using the User Registration Add-On, you can go back and edit your Square payment feed so that it only creates a WordPress user account for students after the payment is received.
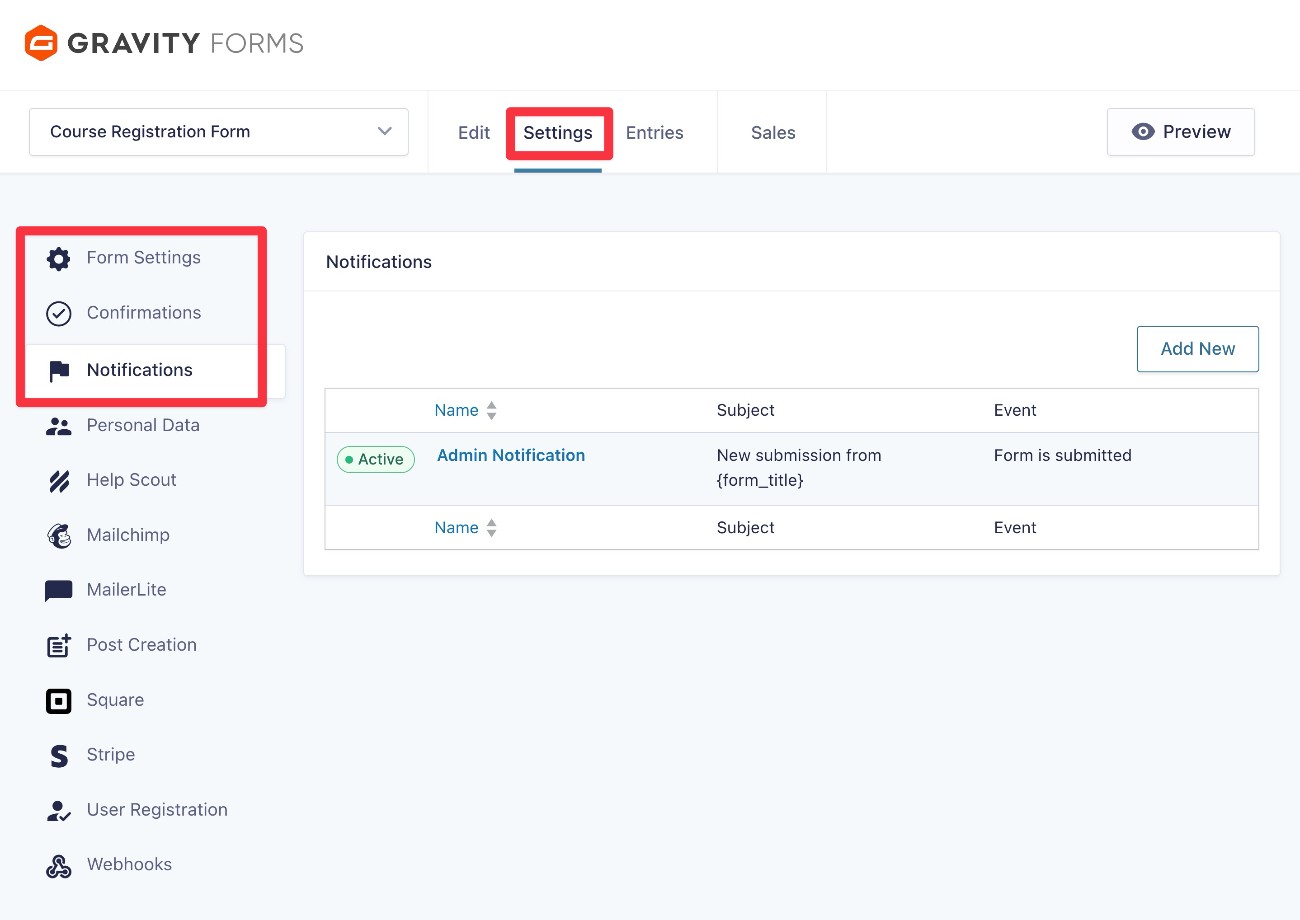
6. Configure general form settings (notifications, confirmations, etc.)
In addition to working with add-ons, there are also some general backend form settings that you should configure.
Beyond exploring the Form Settings area, we recommend setting up Confirmations and Notifications:
- Confirmations – Confirmations let you display a message after a student registers, or redirect them to a different page. For example, a page that provides more information about the course.
- Notifications – Notifications let you send one or more emails after someone registers. You can send emails to yourself, the student, your team, etc.
7. Extend your course registration form with other add-ons (optional)
As we mentioned earlier, one of the big advantages of using Gravity Forms for your course registration form is the ability to extend your form and integrate your online course website with the other tools that your business is using.
Even if you’re using a membership or LMS plugin that includes a built-in registration form feature, Gravity Forms will usually give you more flexibility than the built-in feature in whatever plugin you’re using.
In this section, we’ll go over a few examples of what you can do. However, this is by no means the full list of how you might want to extend your form.
To get even more ideas and see what’s possible, we recommend browsing all of the Gravity Forms add-ons.
Give students the option to subscribe to your email newsletter
If you want to grow your email newsletter/lists, you can give students an option to subscribe to your email list as part of registering for the course. When a student submits the registration form, Gravity Forms can automatically subscribe them to an email list.
Gravity Forms offers direct integration add-ons for most popular email marketing services, including Mailchimp, Active Campaign, Kit (ConvertKit), MailerLite, Campaign Monitor, and others.
Add students to your customer relationship manager (CRM)
If you’re using a CRM to improve sales, marketing, and/or customer service, Gravity Forms can help you integrate your course registration form directly with your CRM.
You can sync a student’s contact information to your CRM when they submit the registration form. In addition to syncing basic information, you can also pass form data to custom fields in your CRM and apply certain tags to students, such as tagging them with the course they signed up for.
Gravity Forms offers direct integration add-ons for most popular CRMs, including Salesforce, HubSpot, Zoho CRM, Capsule, and others.
If you’re using a CRM for which Gravity Forms doesn’t currently offer an add-on, you could also use Zapier as an intermediary. You can easily set up this connection using the Gravity Forms Zapier Add-On.
Create business process workflows and automations
Depending on your use case, you might have administrative tasks or workflows that you need to perform whenever a new student registers for a course. This is especially true if you offer a more one-to-one, coaching-like experience for students.
To automate these workflows, you can use the Gravity Flow plugin to create business process workflows that are triggered whenever a new student registers for your course.
Gravity Flow lets you build your automations using 40+ action steps, including applying conditional logic rules for even more flexible automations.
8. Embed and test your course registration form
Once you’ve finished setting up your form, you’re ready to embed it on your website and test it to make sure everything is working as you want it to.
You can embed the form anywhere on your site using the Gravity Forms block, shortcode, or PHP function.
If you use the block, you’ll also be able to style your course registration form directly from the editor.
Once you’ve embedded the form, we recommend submitting a test payment. Because we had you configure Square in Test mode for now, you can submit a dummy payment using any of Square’s card testing numbers.
How to view student registrations
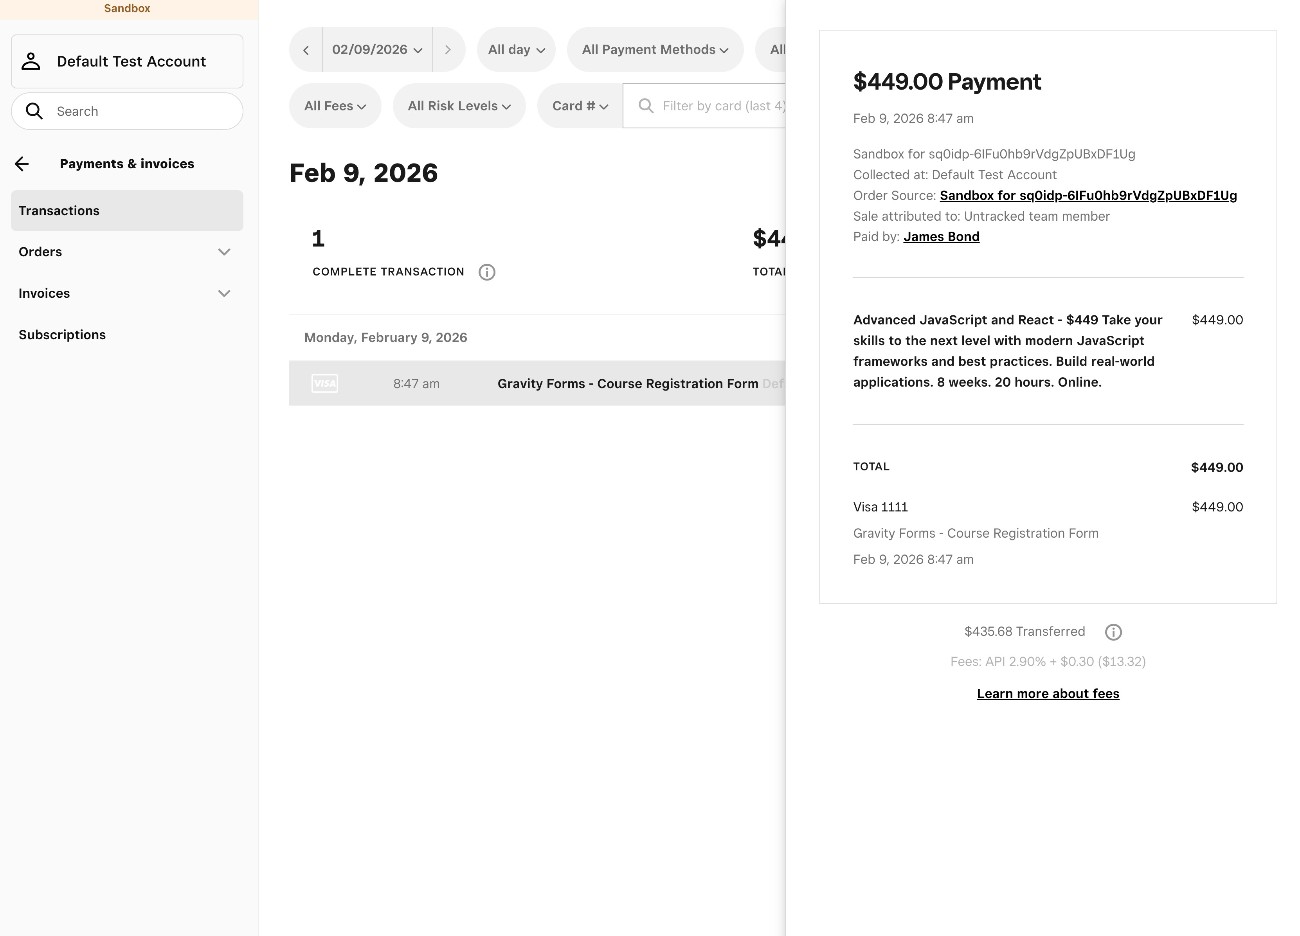
Once you submit the test registration (and also when you’re accepting live course registrations), you’ll be able to view student registrations in a few different spots.
First, you can go to Forms → Entries and select your course registration form to view a list of all registrations.
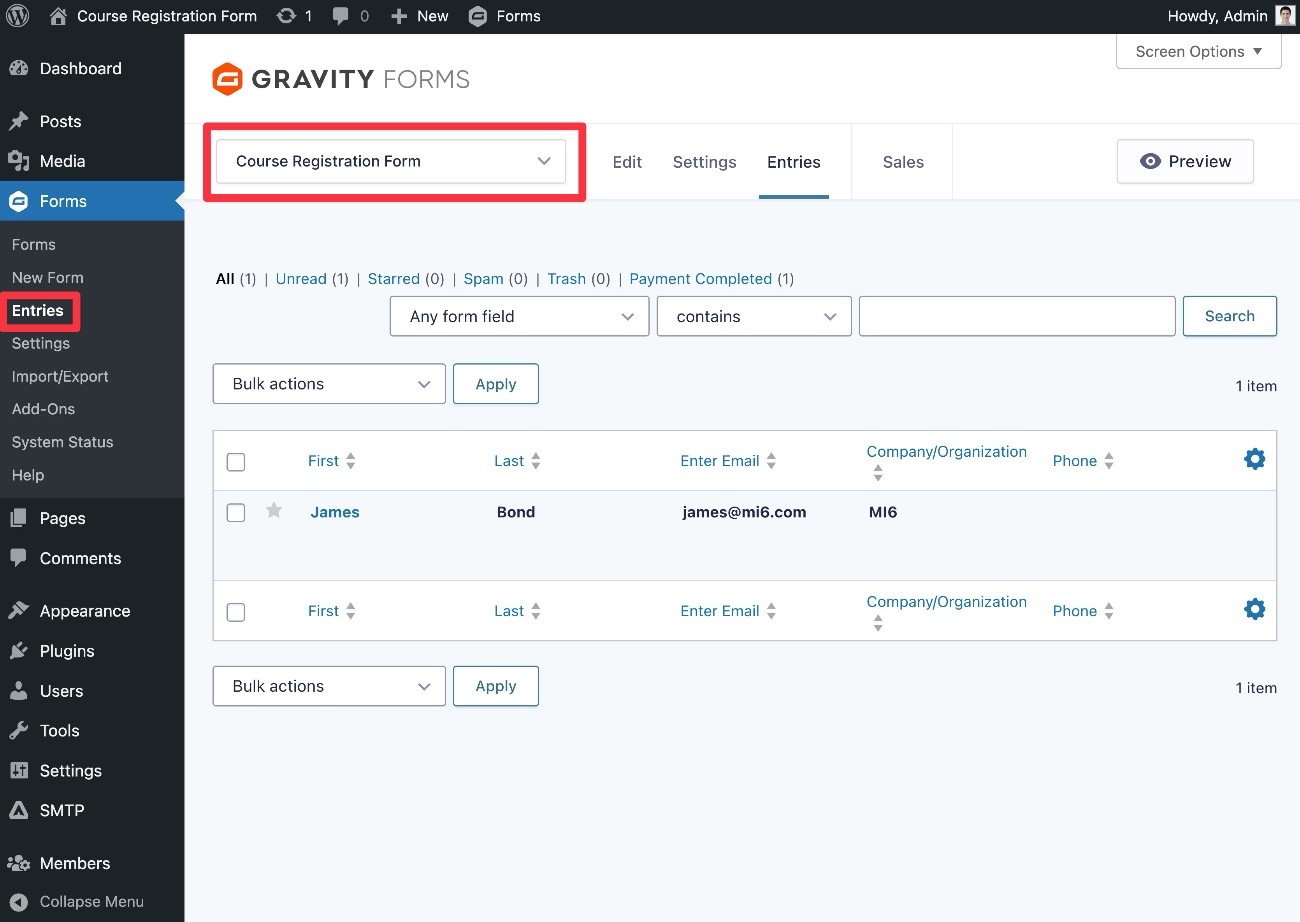
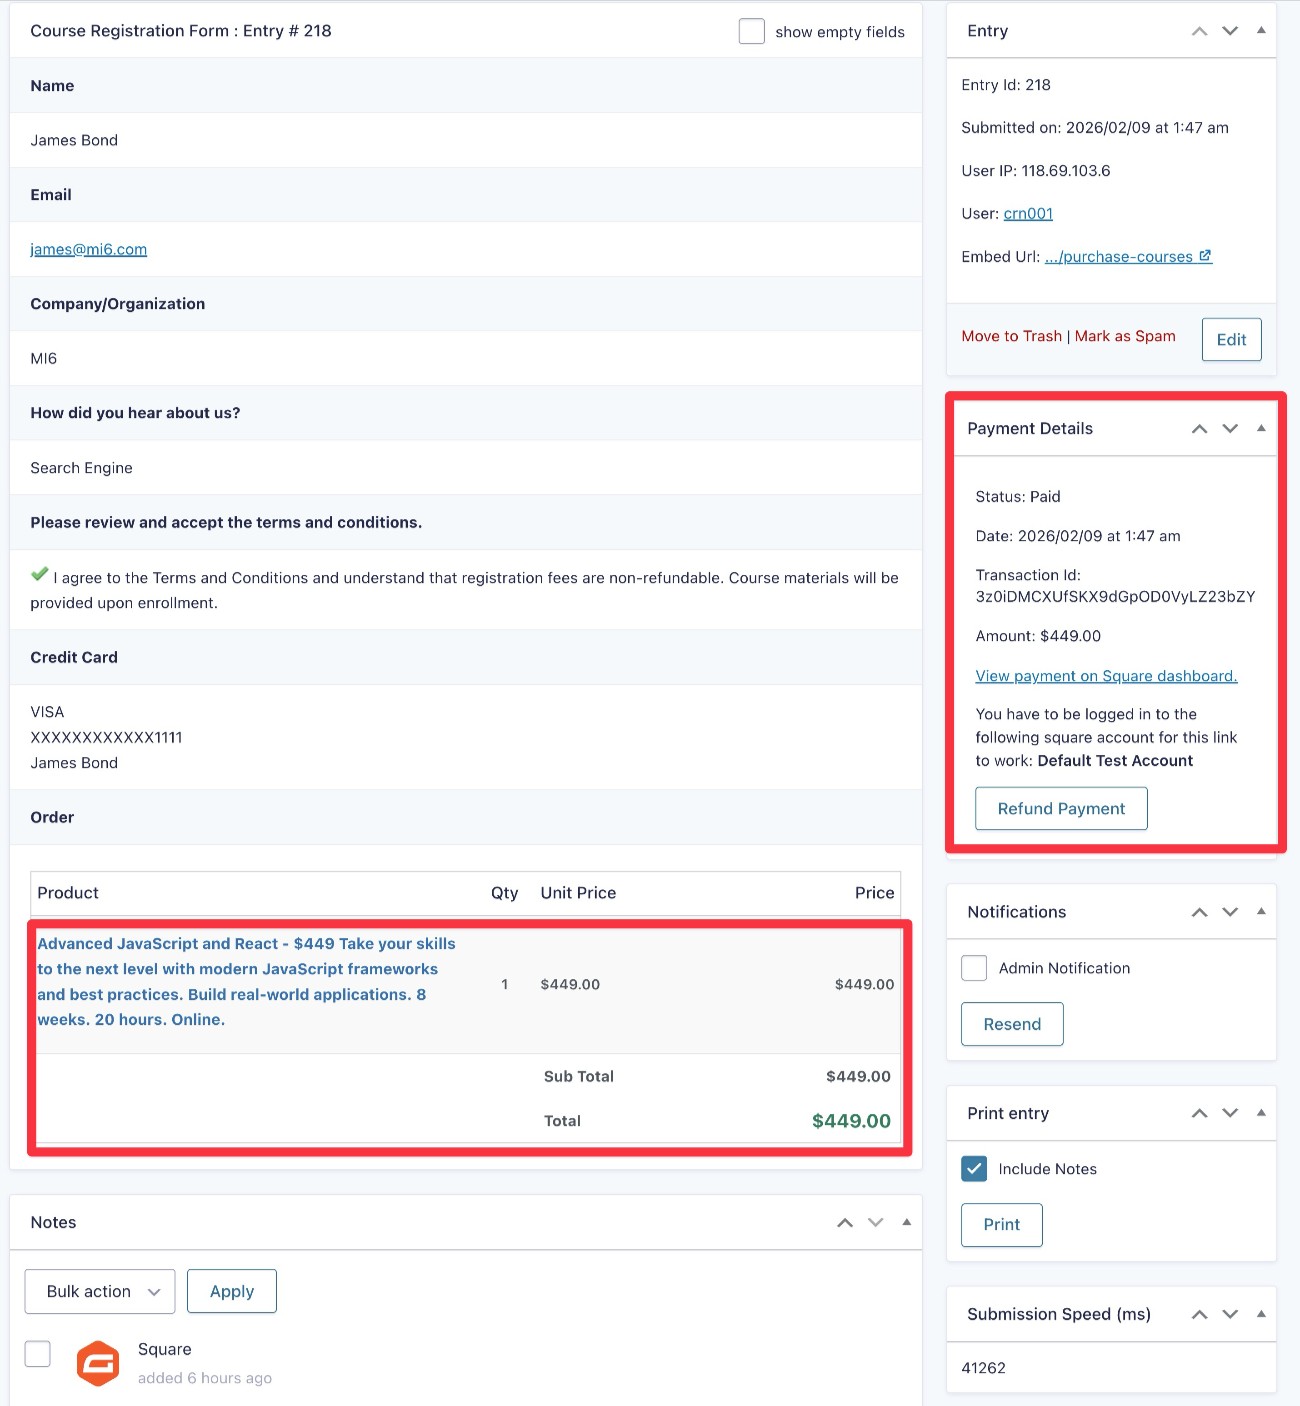
If you select a specific entry, you can see more details, including the course that the student selected. You can also manage their payment, such as refunding a student or canceling their subscription.
You’ll also see new registrations appear as transactions in your Square dashboard, though you don’t get quite as many details as you see in your WordPress dashboard.
For additional ways to stay on top of new course registrations, you also have plenty of other options:
- Set up email notifications for new course registrations using the core Notifications feature.
- Send yourself a Slack message when a student registers using the Gravity Forms Slack Add-On.
- Connect to any app using Zapier (which you can use to pass alerts or data) via the Gravity Forms Zapier Add-On.
- Send a webhook request to any service that supports webhooks using the Gravity Forms Webhooks Add-On.
- Receive a text message (SMS) using the Gravity Forms Twilio Add-On.
9. Enable live payments
To finish things out, you need to enable live payments so that you can start accepting real money when students register for your courses:
- Go to Forms → Settings in your WordPress dashboard.
- Select the Square tab.
- Change the Mode from Sandbox to Live.
- Click the Connect with Square button and repeat the same steps from before to connect Gravity Forms to your live Square payments account.
- Click Save Settings.
You can read this help article for more detailed instructions.
Create your course registration form today
With Gravity Forms, you can easily create a WordPress course registration form that works for in-person courses, digital course materials, online courses (powered by an LMS plugin), and more.
You can accept one-time or recurring payments directly from the form and also fully customize it to your needs, including the ability to also create a WordPress user account for students as part of the registration process.
The large ecosystem of add-ons that are available for Gravity Forms also unlocks even more flexibility, letting you add students to your CRM, subscribe them to your email newsletter, build workflow automations, and lots more.
To get started with the course registration form template and accept payments directly from your form, you’ll need a Gravity Forms Pro, Elite, or Nonprofit license to access the Square Add-On.
If you’re not holding a Pro, Elite, or Nonprofit license yet, you can purchase a new license here or upgrade your existing Basic license and only pay the prorated difference.
Or, if you’d like to try the course registration form template before purchasing your license, you can also create a free, fully functioning demo website here.

If you want to keep up-to-date with what’s happening on the blog sign up for the Gravity Forms newsletter!