If you want to make good decisions for your organization, you need information.
And if you want to get that information, you need to ask the people that your organization interacts with – whether those are paying customers, prospective customers, donors to your nonprofit, members of your website, readers of your blog, and so on.
Creating online surveys offers one of the best ways to get that information.
But if you want people to actually fill out your surveys (and not be annoyed while doing so), you need to make them as easy to use and as engaging as possible.
One way to do that is to use a conversational interface instead of the traditional web form layout. And in this post, we’ll show you how you can create conversational surveys on WordPress using Gravity Forms.
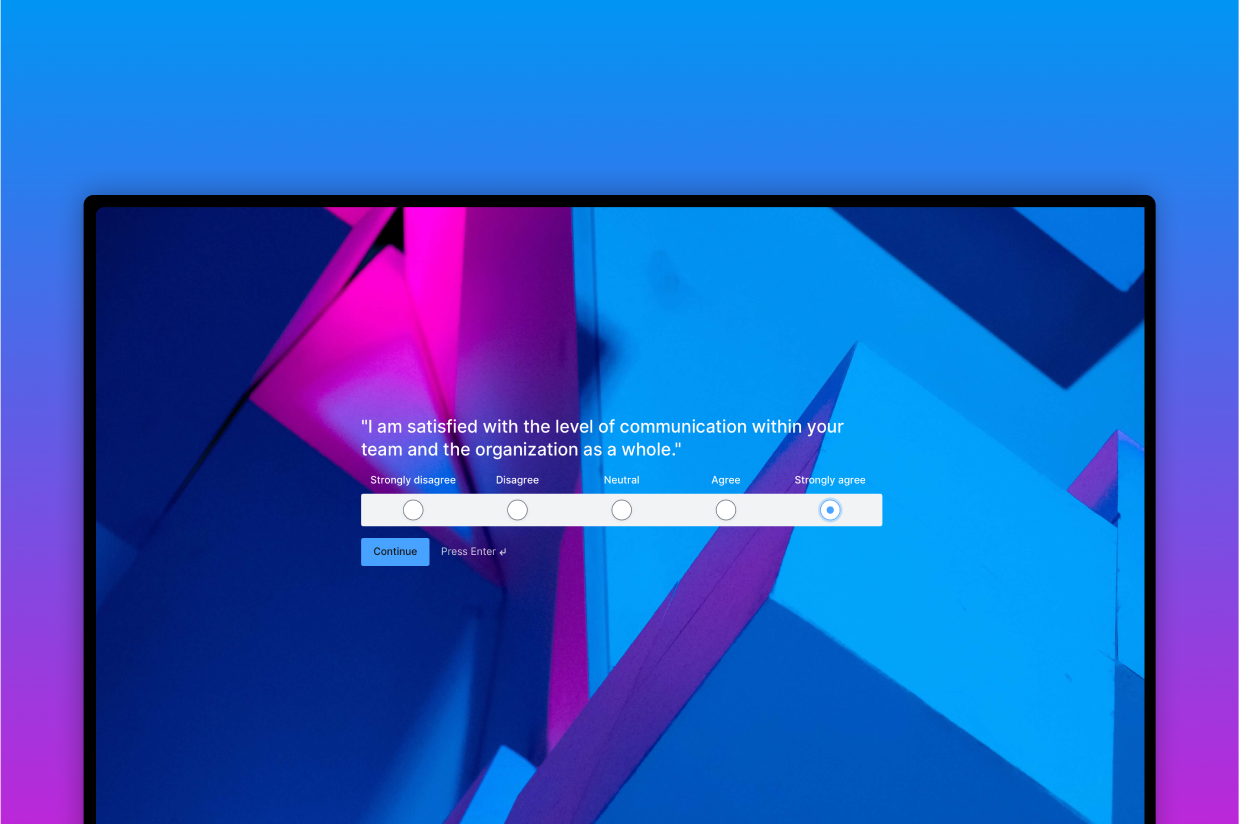
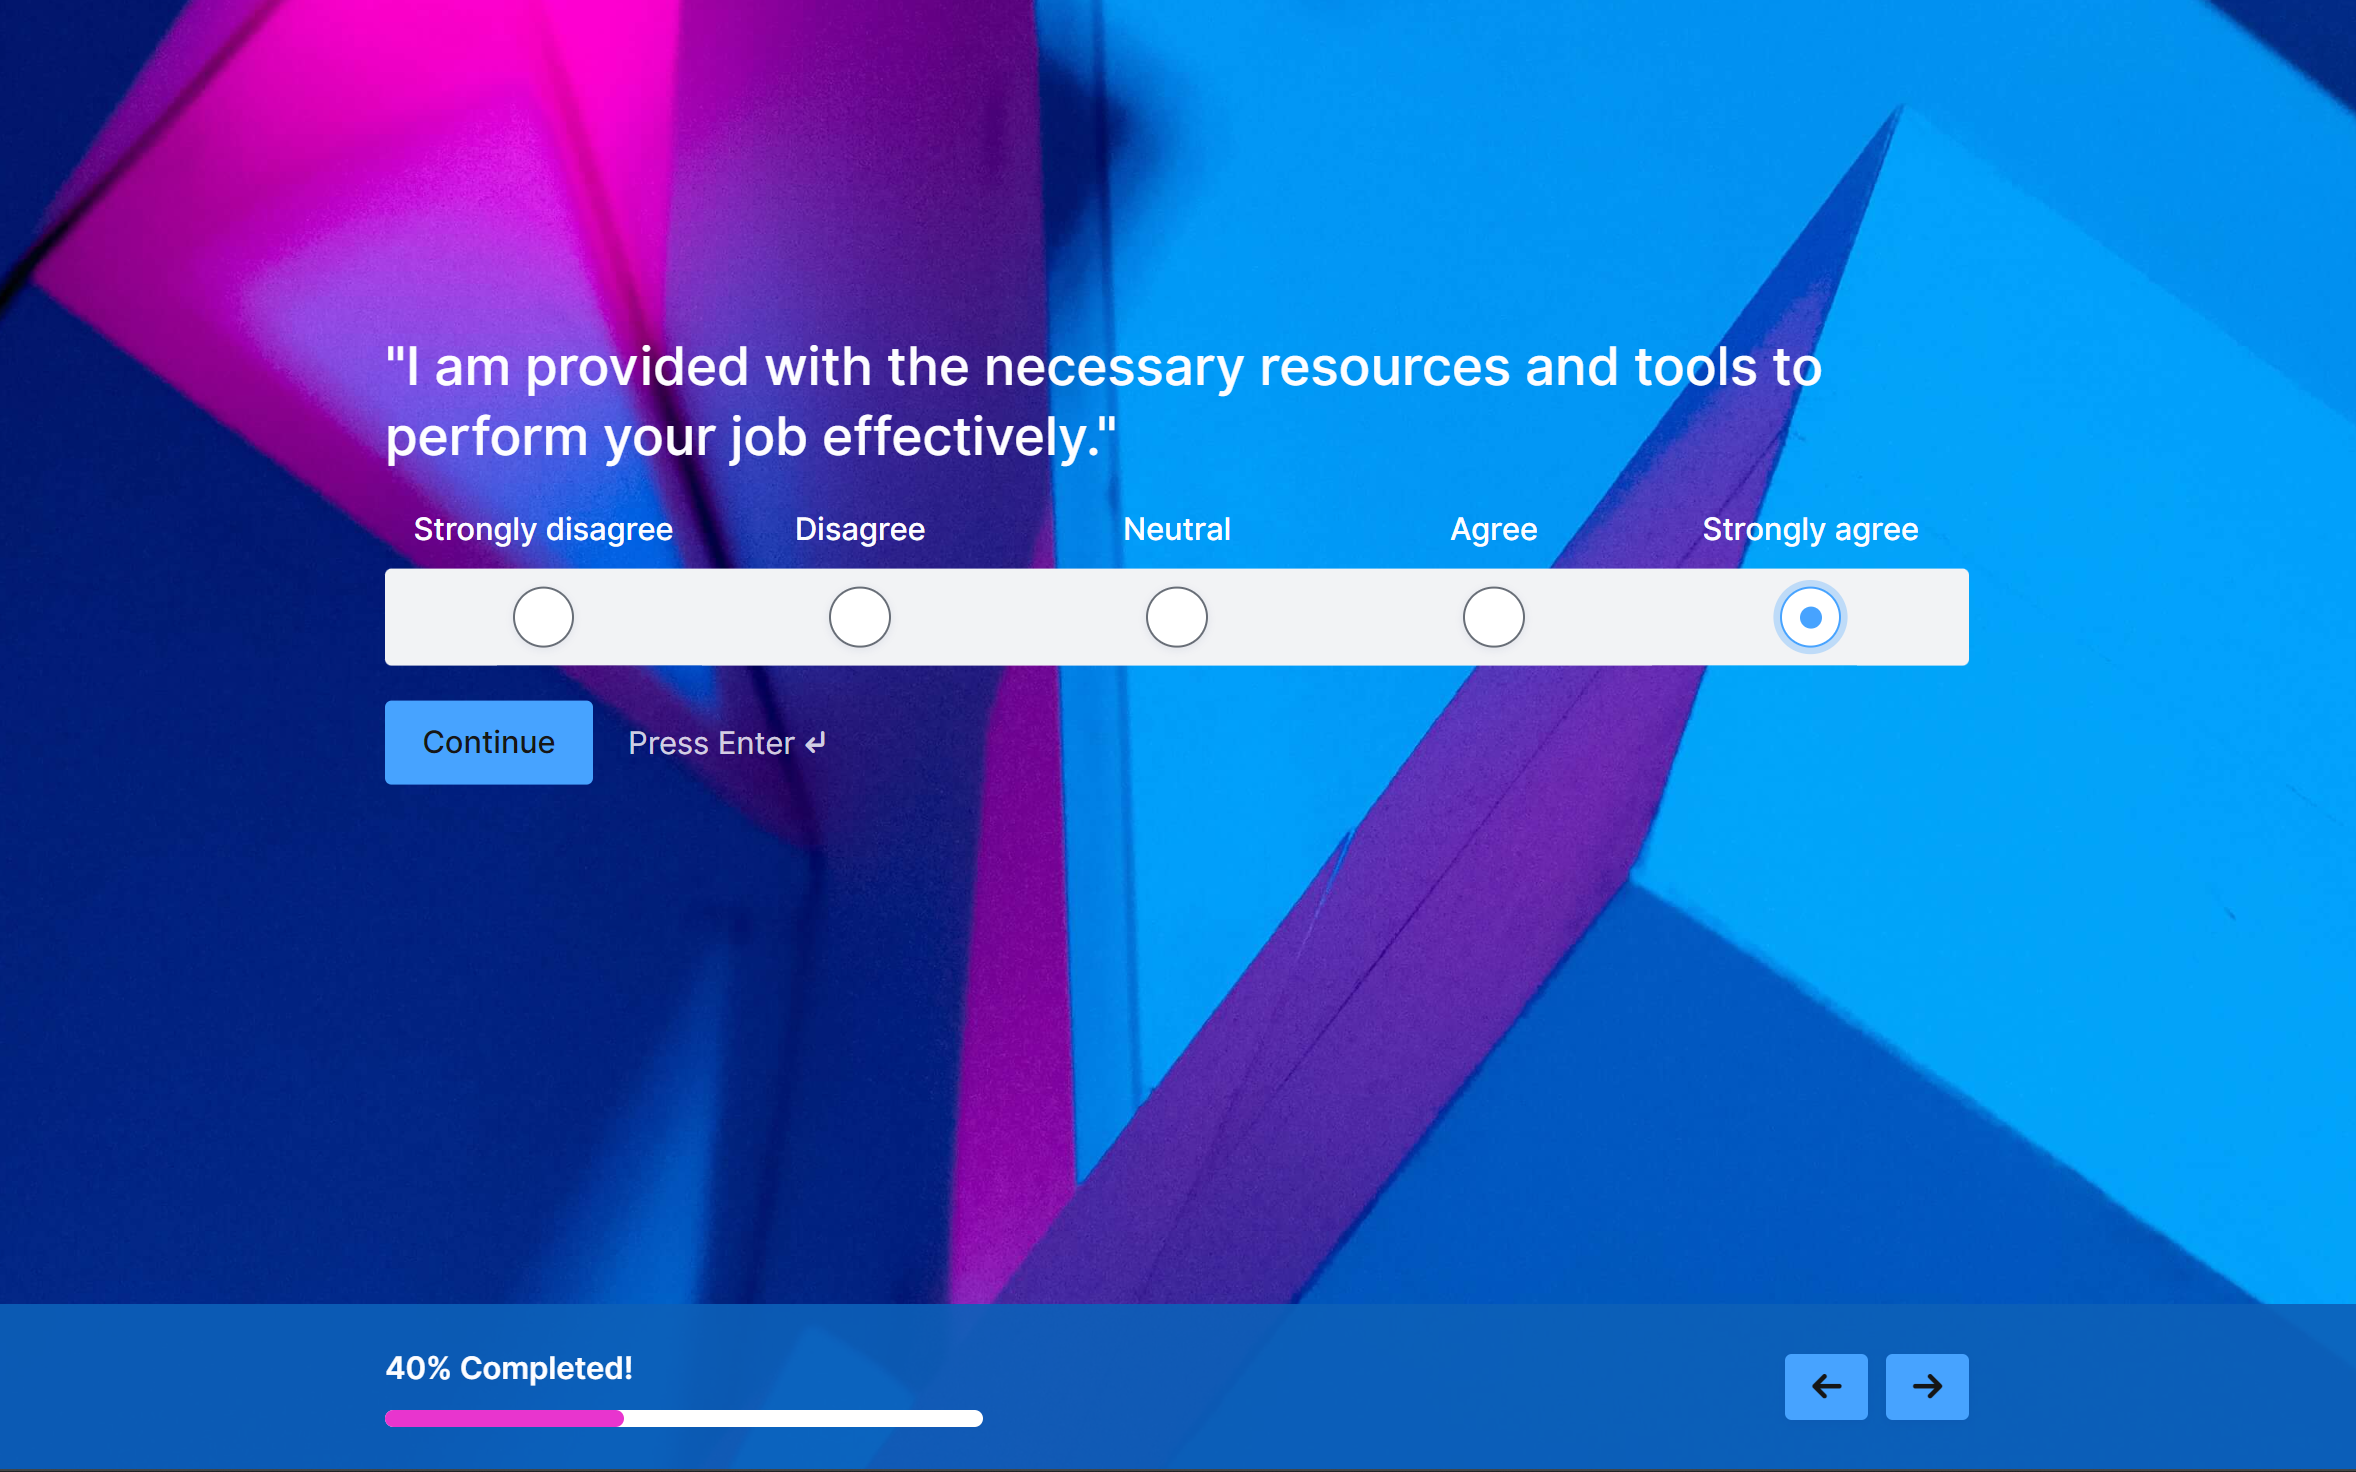
By following the steps in this post, you’ll be able to create engaging, question-by-question surveys that look something like this:
At the same time, you’re still free to use different survey question types (such as Likert scales) and personalize your survey using conditional logic.
Check out this great example of a conversational form using the Survey fields – Feedback Survey.
Ready to learn how it all works? Let’s dig in!
What Can You Use Gravity Forms Surveys For?
One of the great things about using Gravity Forms to build your surveys is that it lets you create pretty much any survey imaginable, and then display those survey questions in a traditional web form interface or a conversational interface (the latter of which is what we’re focusing on in this post).
Here’s a quick rundown of some of the survey types that you can create, though this is by no means a complete list:
- Customer satisfaction survey – understand how happy your customers are and where you could improve.
- Net Promoter Score (NPS) – one specific way of measuring customer satisfaction, especially over time.
- Market research – decide whether to enter a new market, add a new feature to your product, and so on.
- Employee engagement – discover how happy your employees are and find ways to prevent them from leaving.
- Customer or employee onboarding – learn about new customers/employees so that you can create a better experience for them.
- Donor preferences/engagement – learn more about your nonprofit’s donors so that you can fundraise more effectively.
While you can already use the core Gravity Forms plugin to create basic surveys, the dedicated Gravity Forms Survey Add-On adds a lot of useful functionality to help you more effectively create and analyze surveys.
First off, it gives you a dedicated Survey form field that you can use to add all different types of survey questions, from open-ended paragraphs to specific survey question formats, such as the Likert scale.
Beyond that, you also get a special survey analysis dashboard to analyze survey responses in bulk. For example, if it’s relevant to the survey question type, you’ll be able to use charts and graphs to see how your survey responses break out.
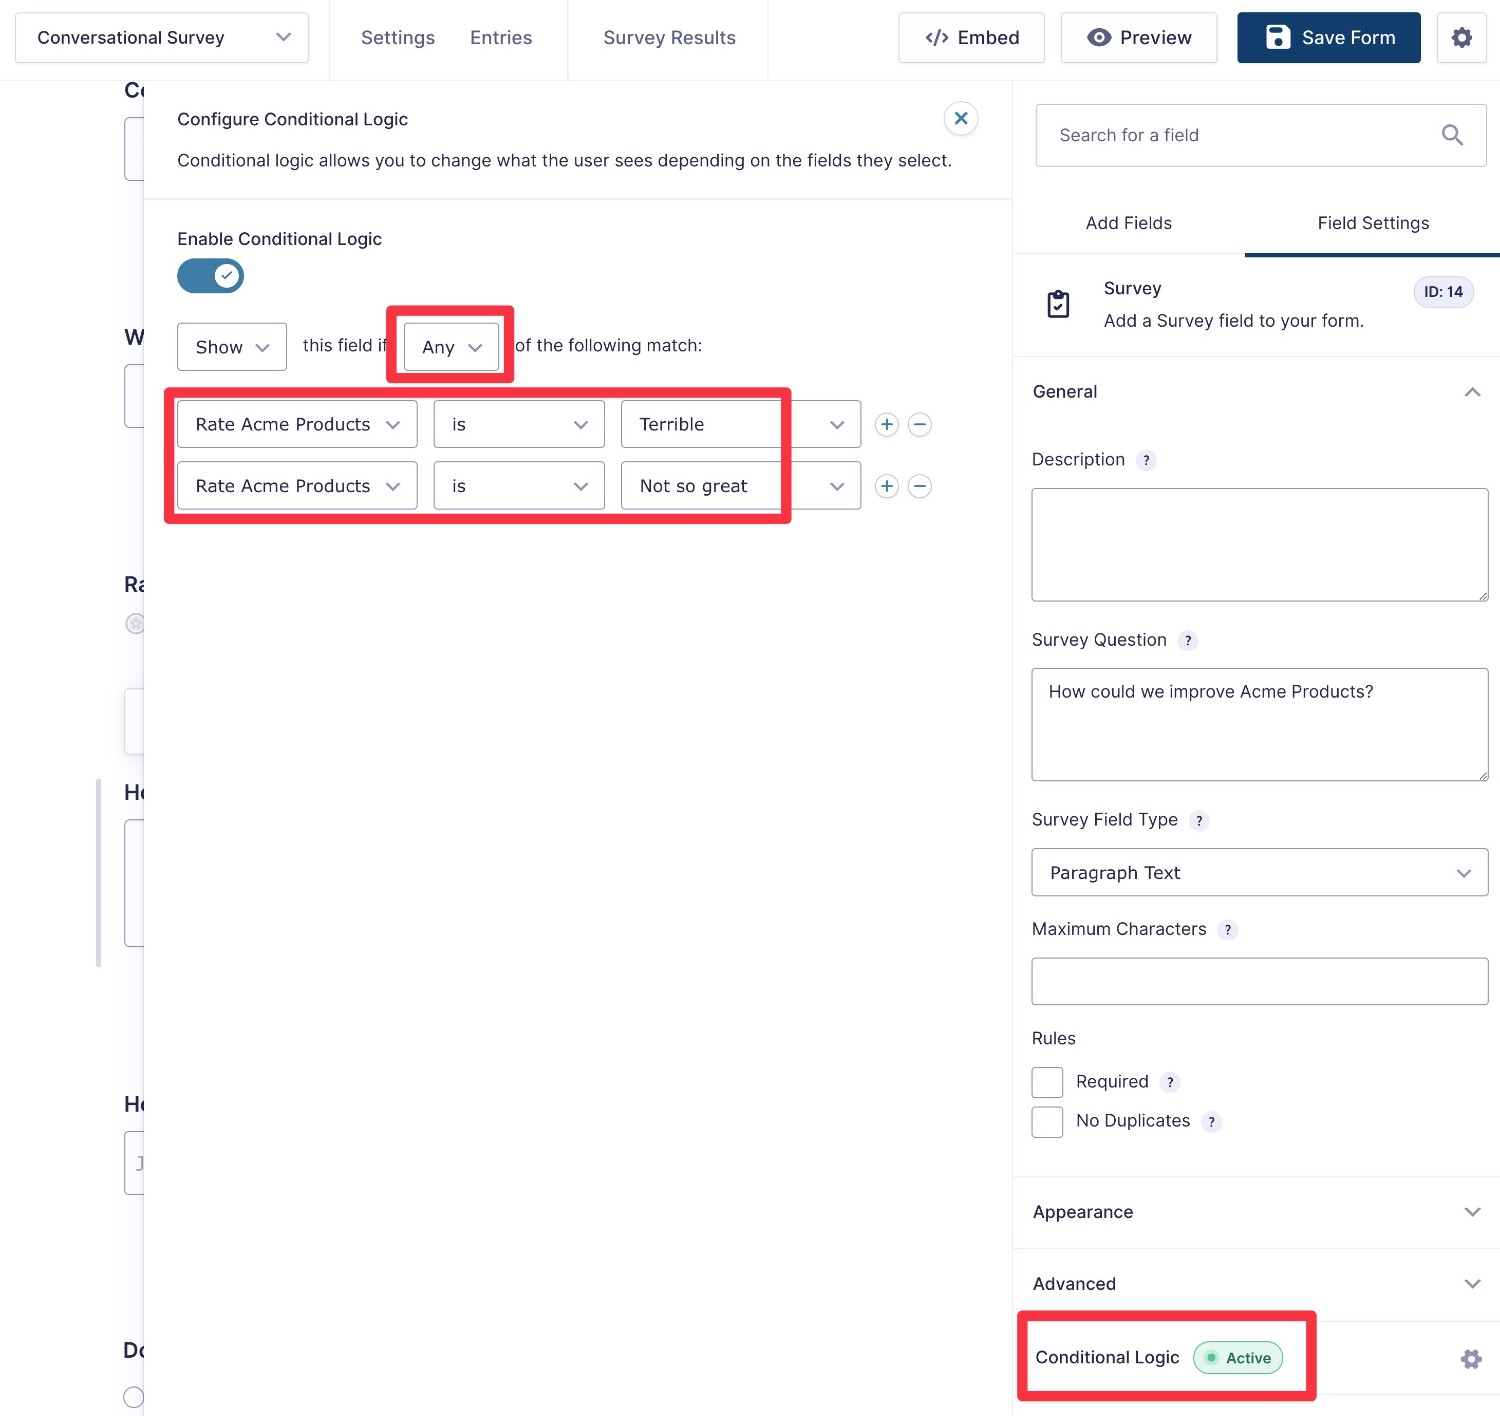
The Survey Add-On also fully supports the conditional logic functionality in Gravity Forms, which means that you can show/hide certain survey questions (or other parts of your form) based on how respondents have answered other questions in the survey.
Once you understand more about the respondent, you can hide questions that aren’t relevant and/or add new questions that dig deeper into areas that are relevant to that respondent.
This can be really useful for personalizing your surveys, creating a better experience for respondents, and helping you get more useful responses.
Why Use Conversational Forms for Surveys?
With the Gravity Forms Conversational Forms Add-On, you can add a conversational, Typeform-like interface to all of the forms that you create with Gravity Forms, including your survey forms.
Check out our Conversational Forms Gallery to see what can be achieved with the Conversational Forms Add-On.
The main advantage of experimenting with the conversational interface for your surveys is that it can help you make your surveys more engaging.
Surveys, especially lengthier ones, can feel intimidating for users to fill out.
Instead of displaying some/all of the questions at once in a traditional web form, the conversational interface lets you present questions one by one, which can feel a lot more manageable for respondents.
At the same time, you also have the option to add a progress bar, which lets you still give people an idea of how far they’ve progressed in the survey.
Here’s an example:
You can also still leverage the conditional logic features that we discussed above, so you’re not sacrificing any personalization opportunities by using the conversational interface.
Best of all, creating a conversational version of your Gravity Forms surveys requires very little extra work, and you’re always free to use both the regular web form interface and the conversational interface to see which one performs better.
How to Create Conversational Survey Forms With Gravity Forms
Now that you know a little bit more about why you might want to create conversational surveys, let’s get into how to actually set this up on your WordPress site.
Here’s a high-level look at the guide – keep reading for full instructions for each step:
- Install the required add-ons (Survey Add-on and Conversational Forms Add-On).
- Create your survey form.
- Configure other form functionality as needed (notifications, confirmations, etc.).
- Enable the conversational form interface for your survey form.
- Share your conversational form URL.
- Analyze your survey results.
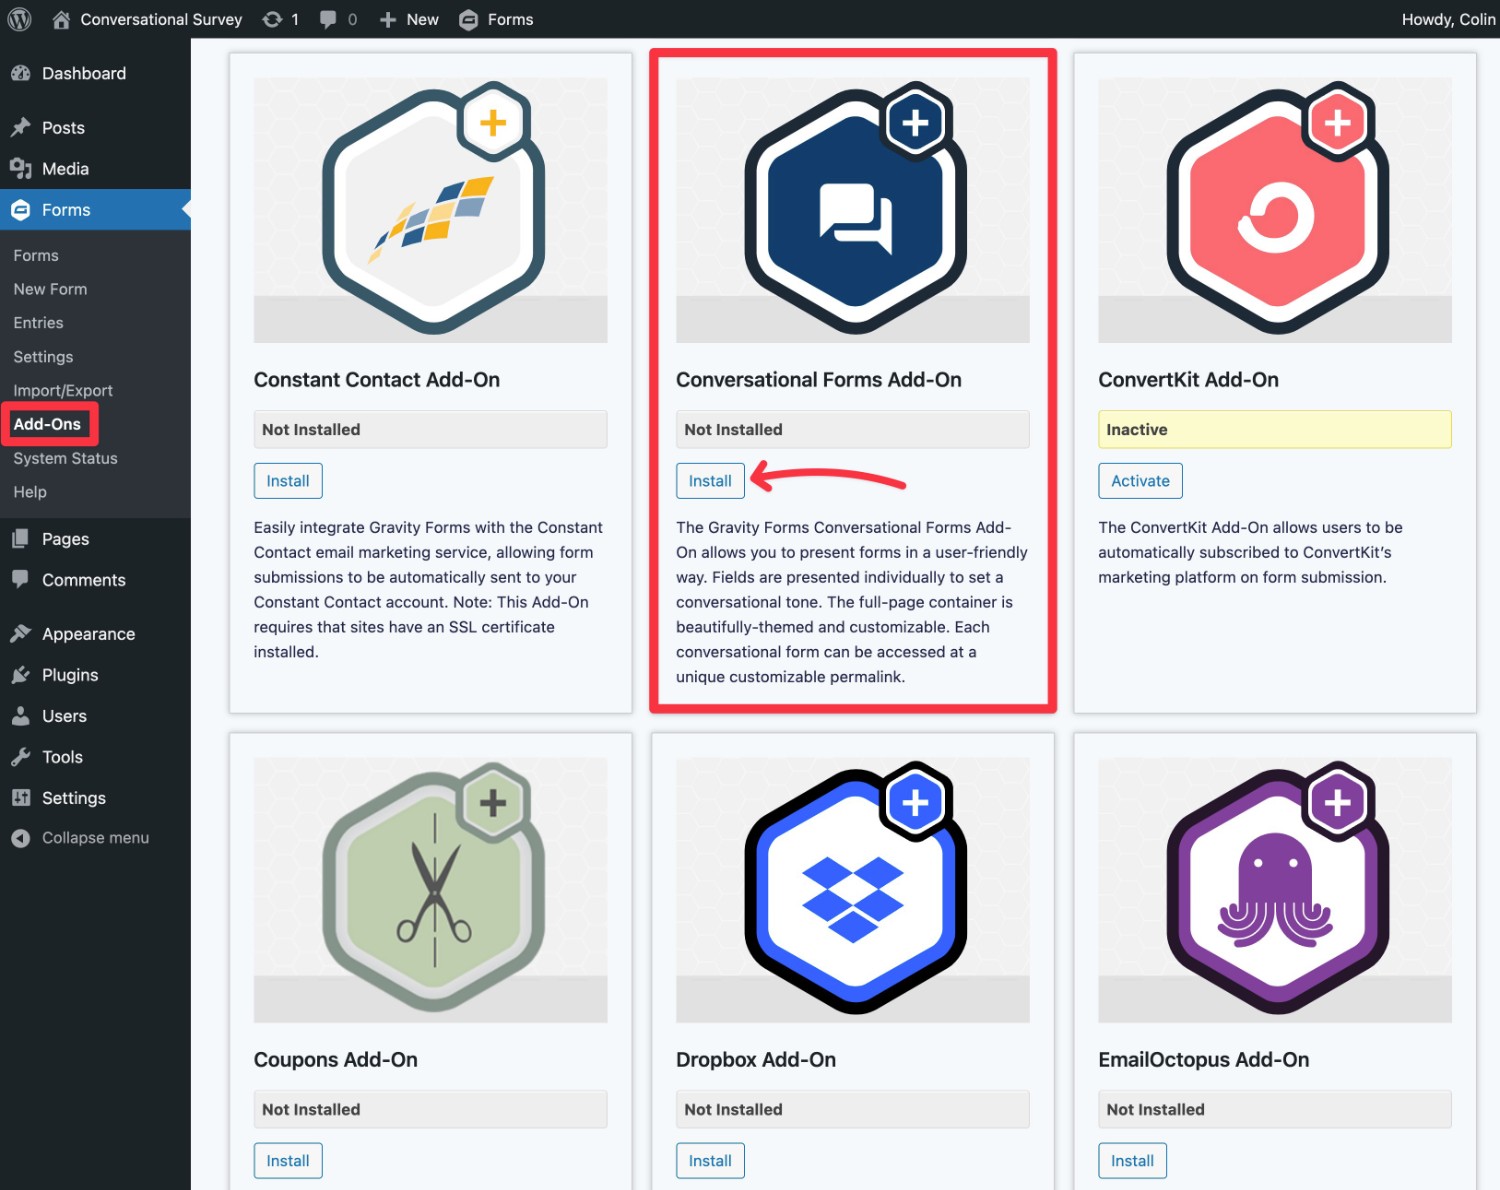
1. Install the Required Add-Ons
In addition to the core Gravity Forms plugin, you’ll also need two official add-ons to set up conversational survey forms:
Both add-ons are available on the Gravity Forms Elite license (or the Nonprofit license, for registered non-profit organizations).
If you’re not holding the Elite license yet, you can purchase a new Elite license here or upgrade your existing license and only pay the prorated difference.
To install the add-ons, go to Forms → Add-Ons in your WordPress dashboard. Make sure to activate each add-on after installing it.
2. Create Your Survey Form
Once you’ve installed the required add-ons, you’ll want to set up your survey form.
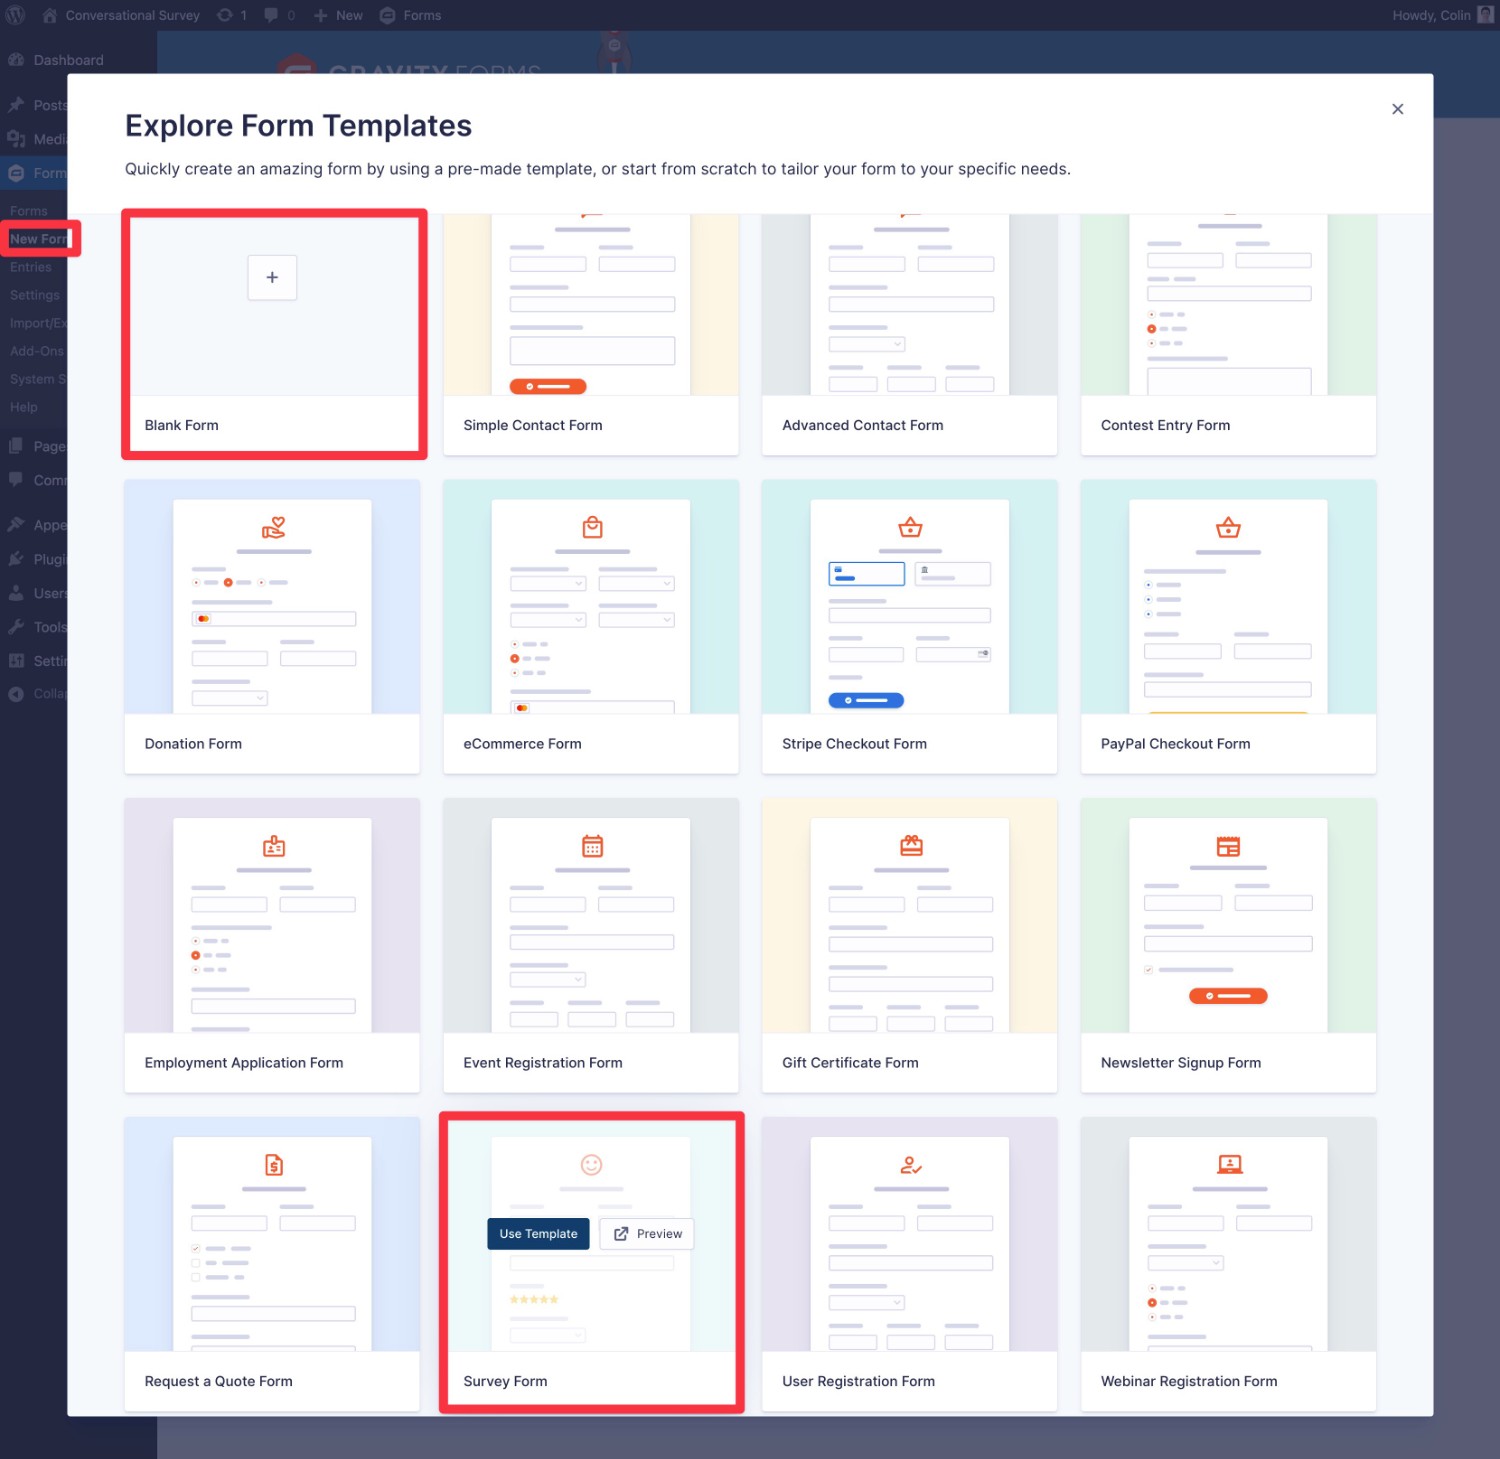
To get started, go to Forms → New Form.
You can then choose the premade Survey template or choose a blank canvas to build your survey from scratch.
For this example, we’ll use the Survey template.
After giving your form a name, you should be launched into the form builder interface.
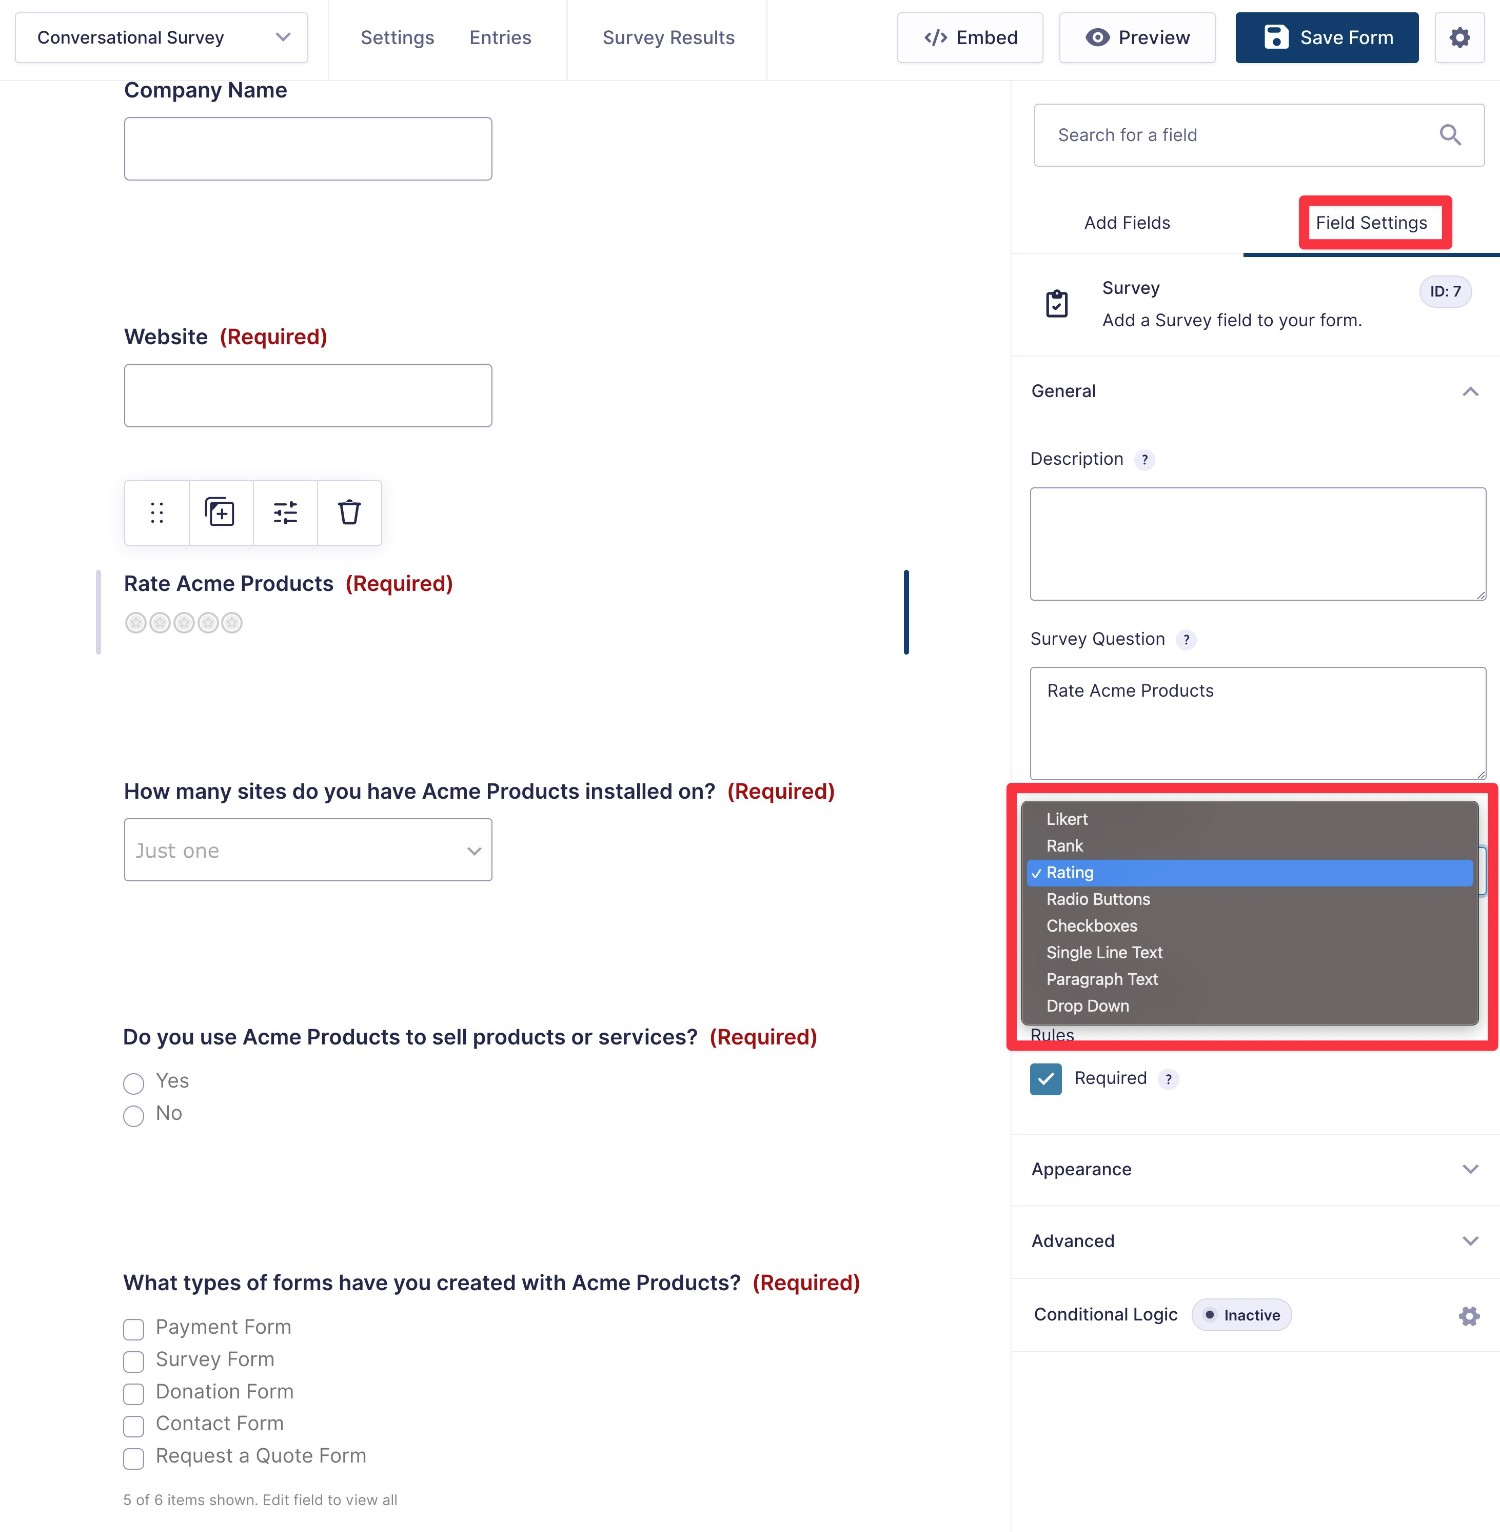
You can add new survey questions as needed by using the dedicated Survey field, which you’ll find in the Advanced Fields section.
In the Survey field’s settings area, you can choose between different survey question types. This includes generic formats like paragraph text or specific types of survey questions, such as Likert scales or star ratings.
You’re also free to add conditional logic to your Survey fields. For example, if someone selects a low rating in a rating question, you could use conditional logic to ask those users a follow-up question about how your organization could improve.
Depending on your goals, you also might want to add some non-survey fields to collect details about your respondents, such as their contact information.
However, for some survey formats, you might want to let users submit their responses anonymously – it really just depends on your specific use case.
3. Configure Other Form Functionality As Needed
Once you’ve set up the survey fields for your form, you’ll want to set up other backend form functionality as needed, including the following:
- Notifications – you can send an email to the respondent, yourself, and/or anyone else when you get a new survey response.
- Confirmations – you can display a message to respondents on your website after they submit the survey (or redirect them to a different page).
- Integrations – you can connect your survey forms to other tools that you’re using, such as saving respondents’ contact details to your CRM or adding them to your email list. Or, you can set up other types of integrations, such as automatically adding a user’s responses to Google Sheets (via Zapier) or Trello.
You can set all of these up from the form settings area. If you’d like a helping hand, here are some relevant documentation articles:
4. Enable the Conversational Interface
Now that you’ve mostly set up your survey form, the next step is to enable and configure the conversational interface:
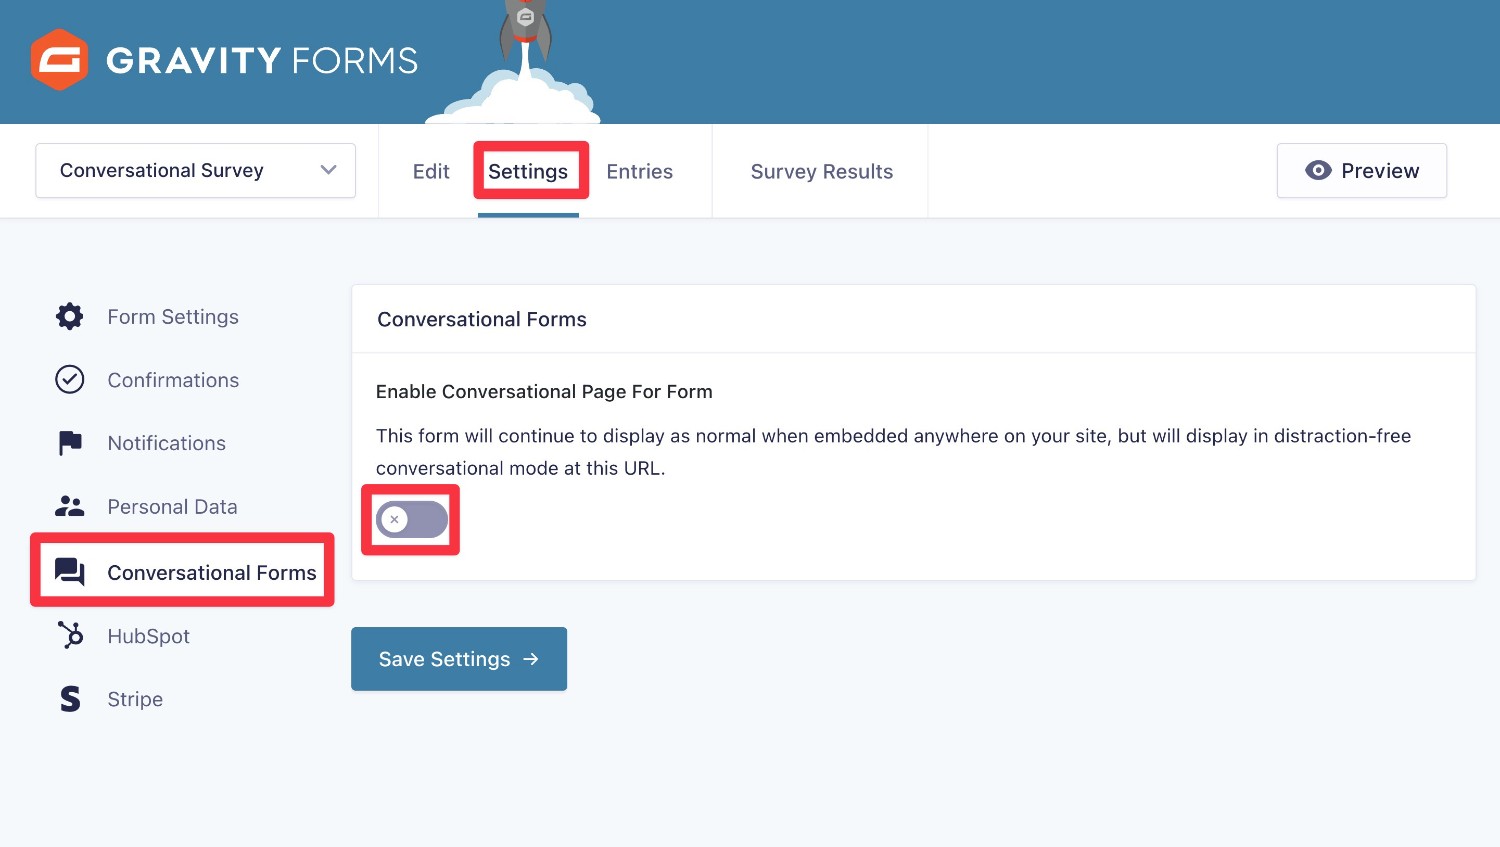
- Go to Settings → Conversational Forms in the form builder.
- Turn on the toggle for Enable Conversational Page For Form.
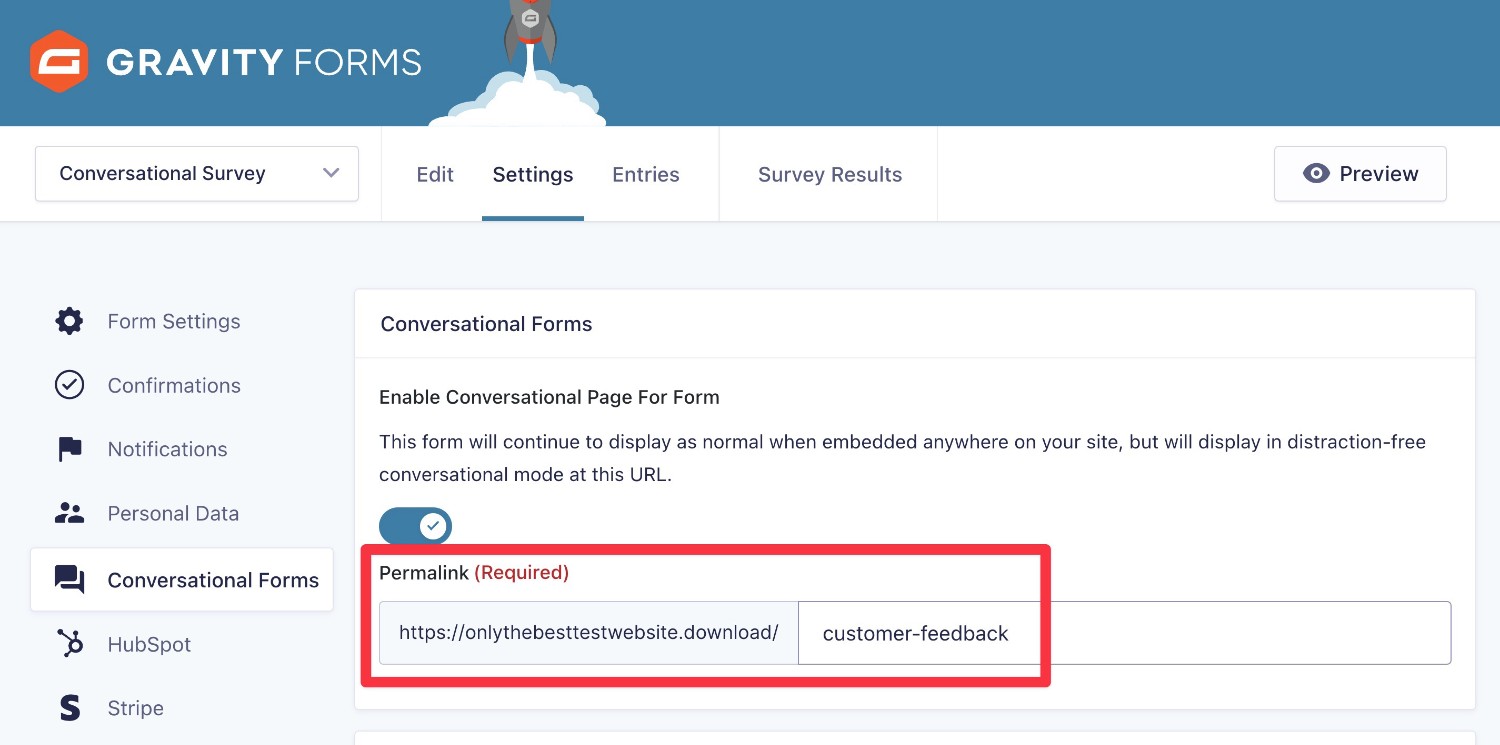
First, you’ll need to choose the URL (“Permalink”) for your conversational form. The conversational interface will only be visible when users fill out the survey at this URL.
If you were to embed the survey elsewhere using the Gravity Forms block or shortcode, those instances of the survey would still use the “normal” web form interface.
For example, you could do something like customer-feedback to make the conversational interface available at yoursite.com/customer-feedback.
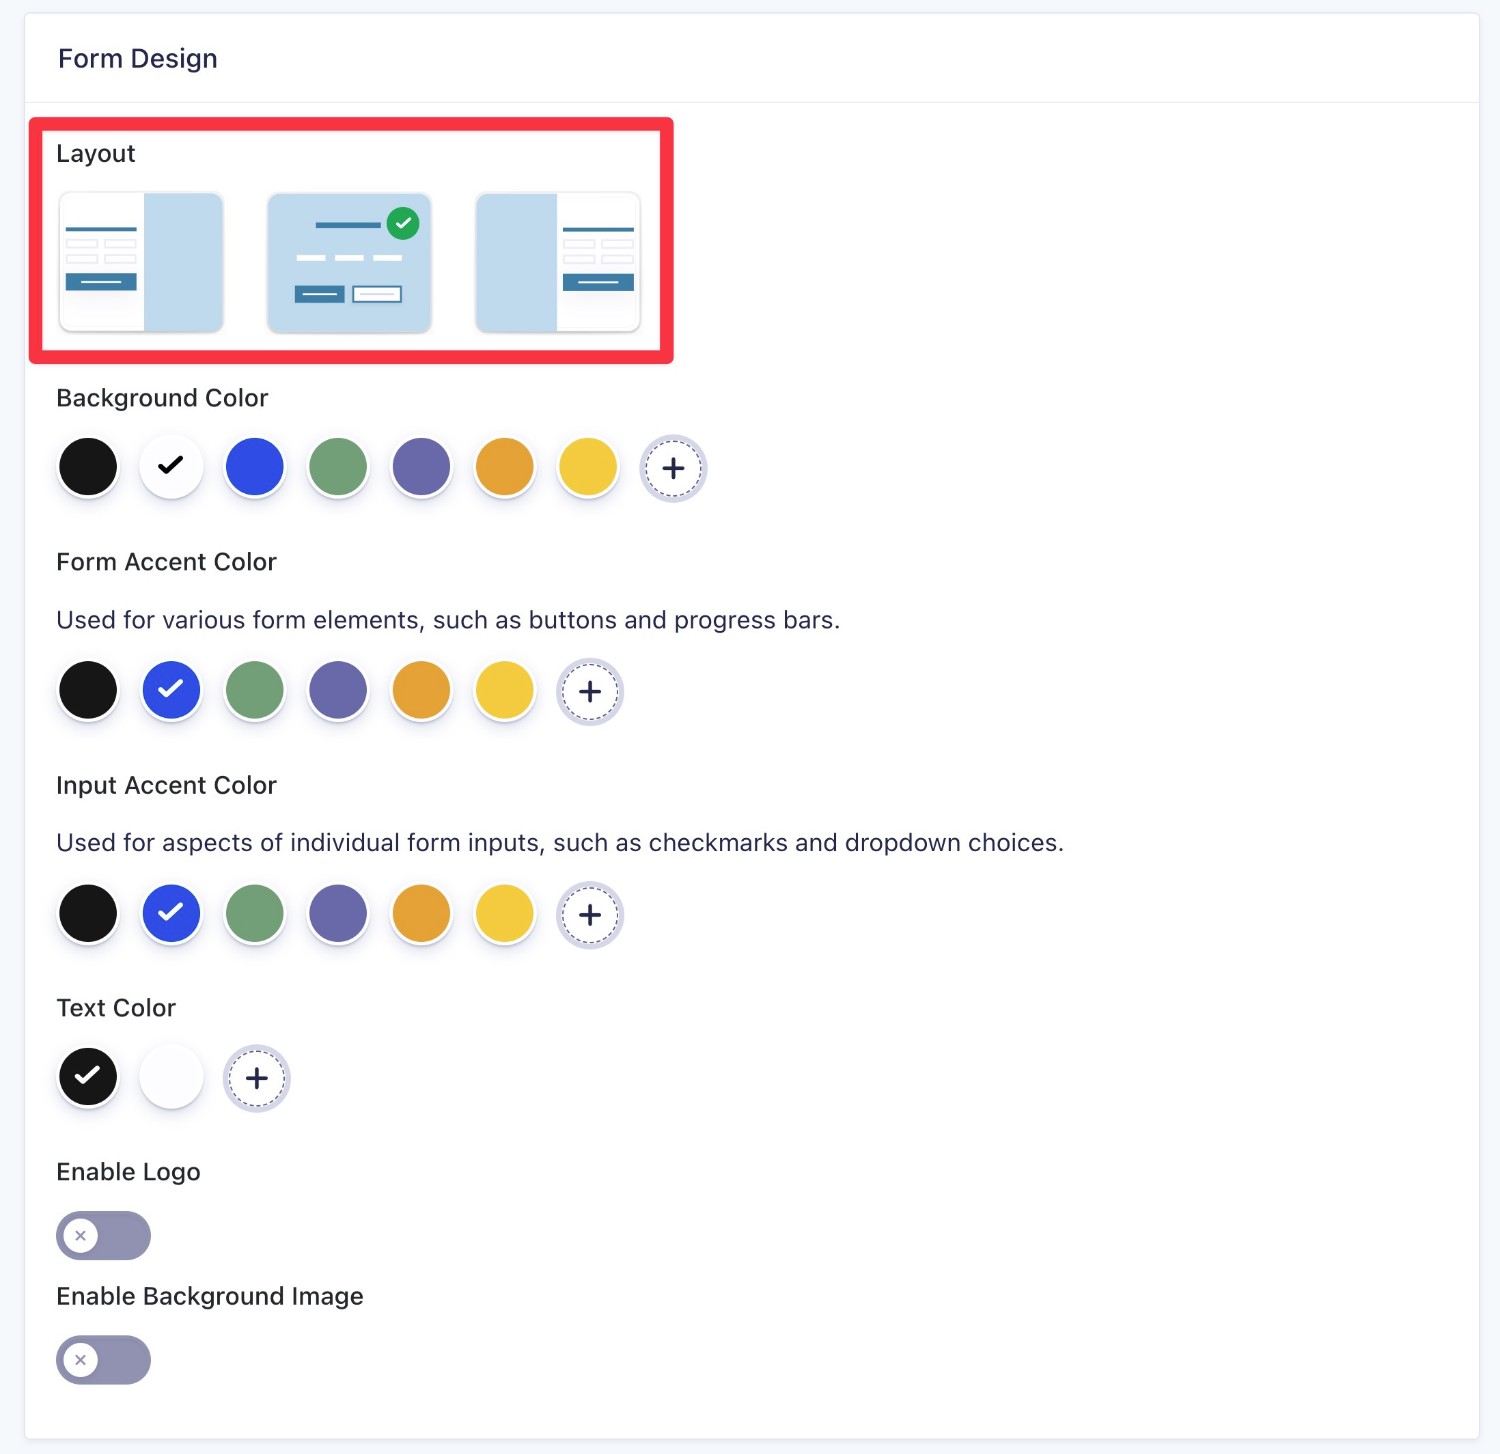
Below that, you can choose your conversational form layout from the three options. You can also customize the design by choosing which colors to use and, optionally, adding your logo and/or a custom background image.
Further down, you can customize some additional details:
- Welcome Screen – you have the option to add a customizable welcome screen that appears before the first question on your survey. You could use this to explain what the survey is about and how long it will take. In addition to adding text, you can also add your own custom image.
- Buttons – you can customize the text of the button that users will click to advance to the next question in your survey. By default, the button text is “Continue”.
- Footer – you can enable a progress bar, which gives respondents a feel for how much is left in the survey. This can be especially helpful for longer surveys, so that respondents don’t “give up” because they don’t know how many questions remain.
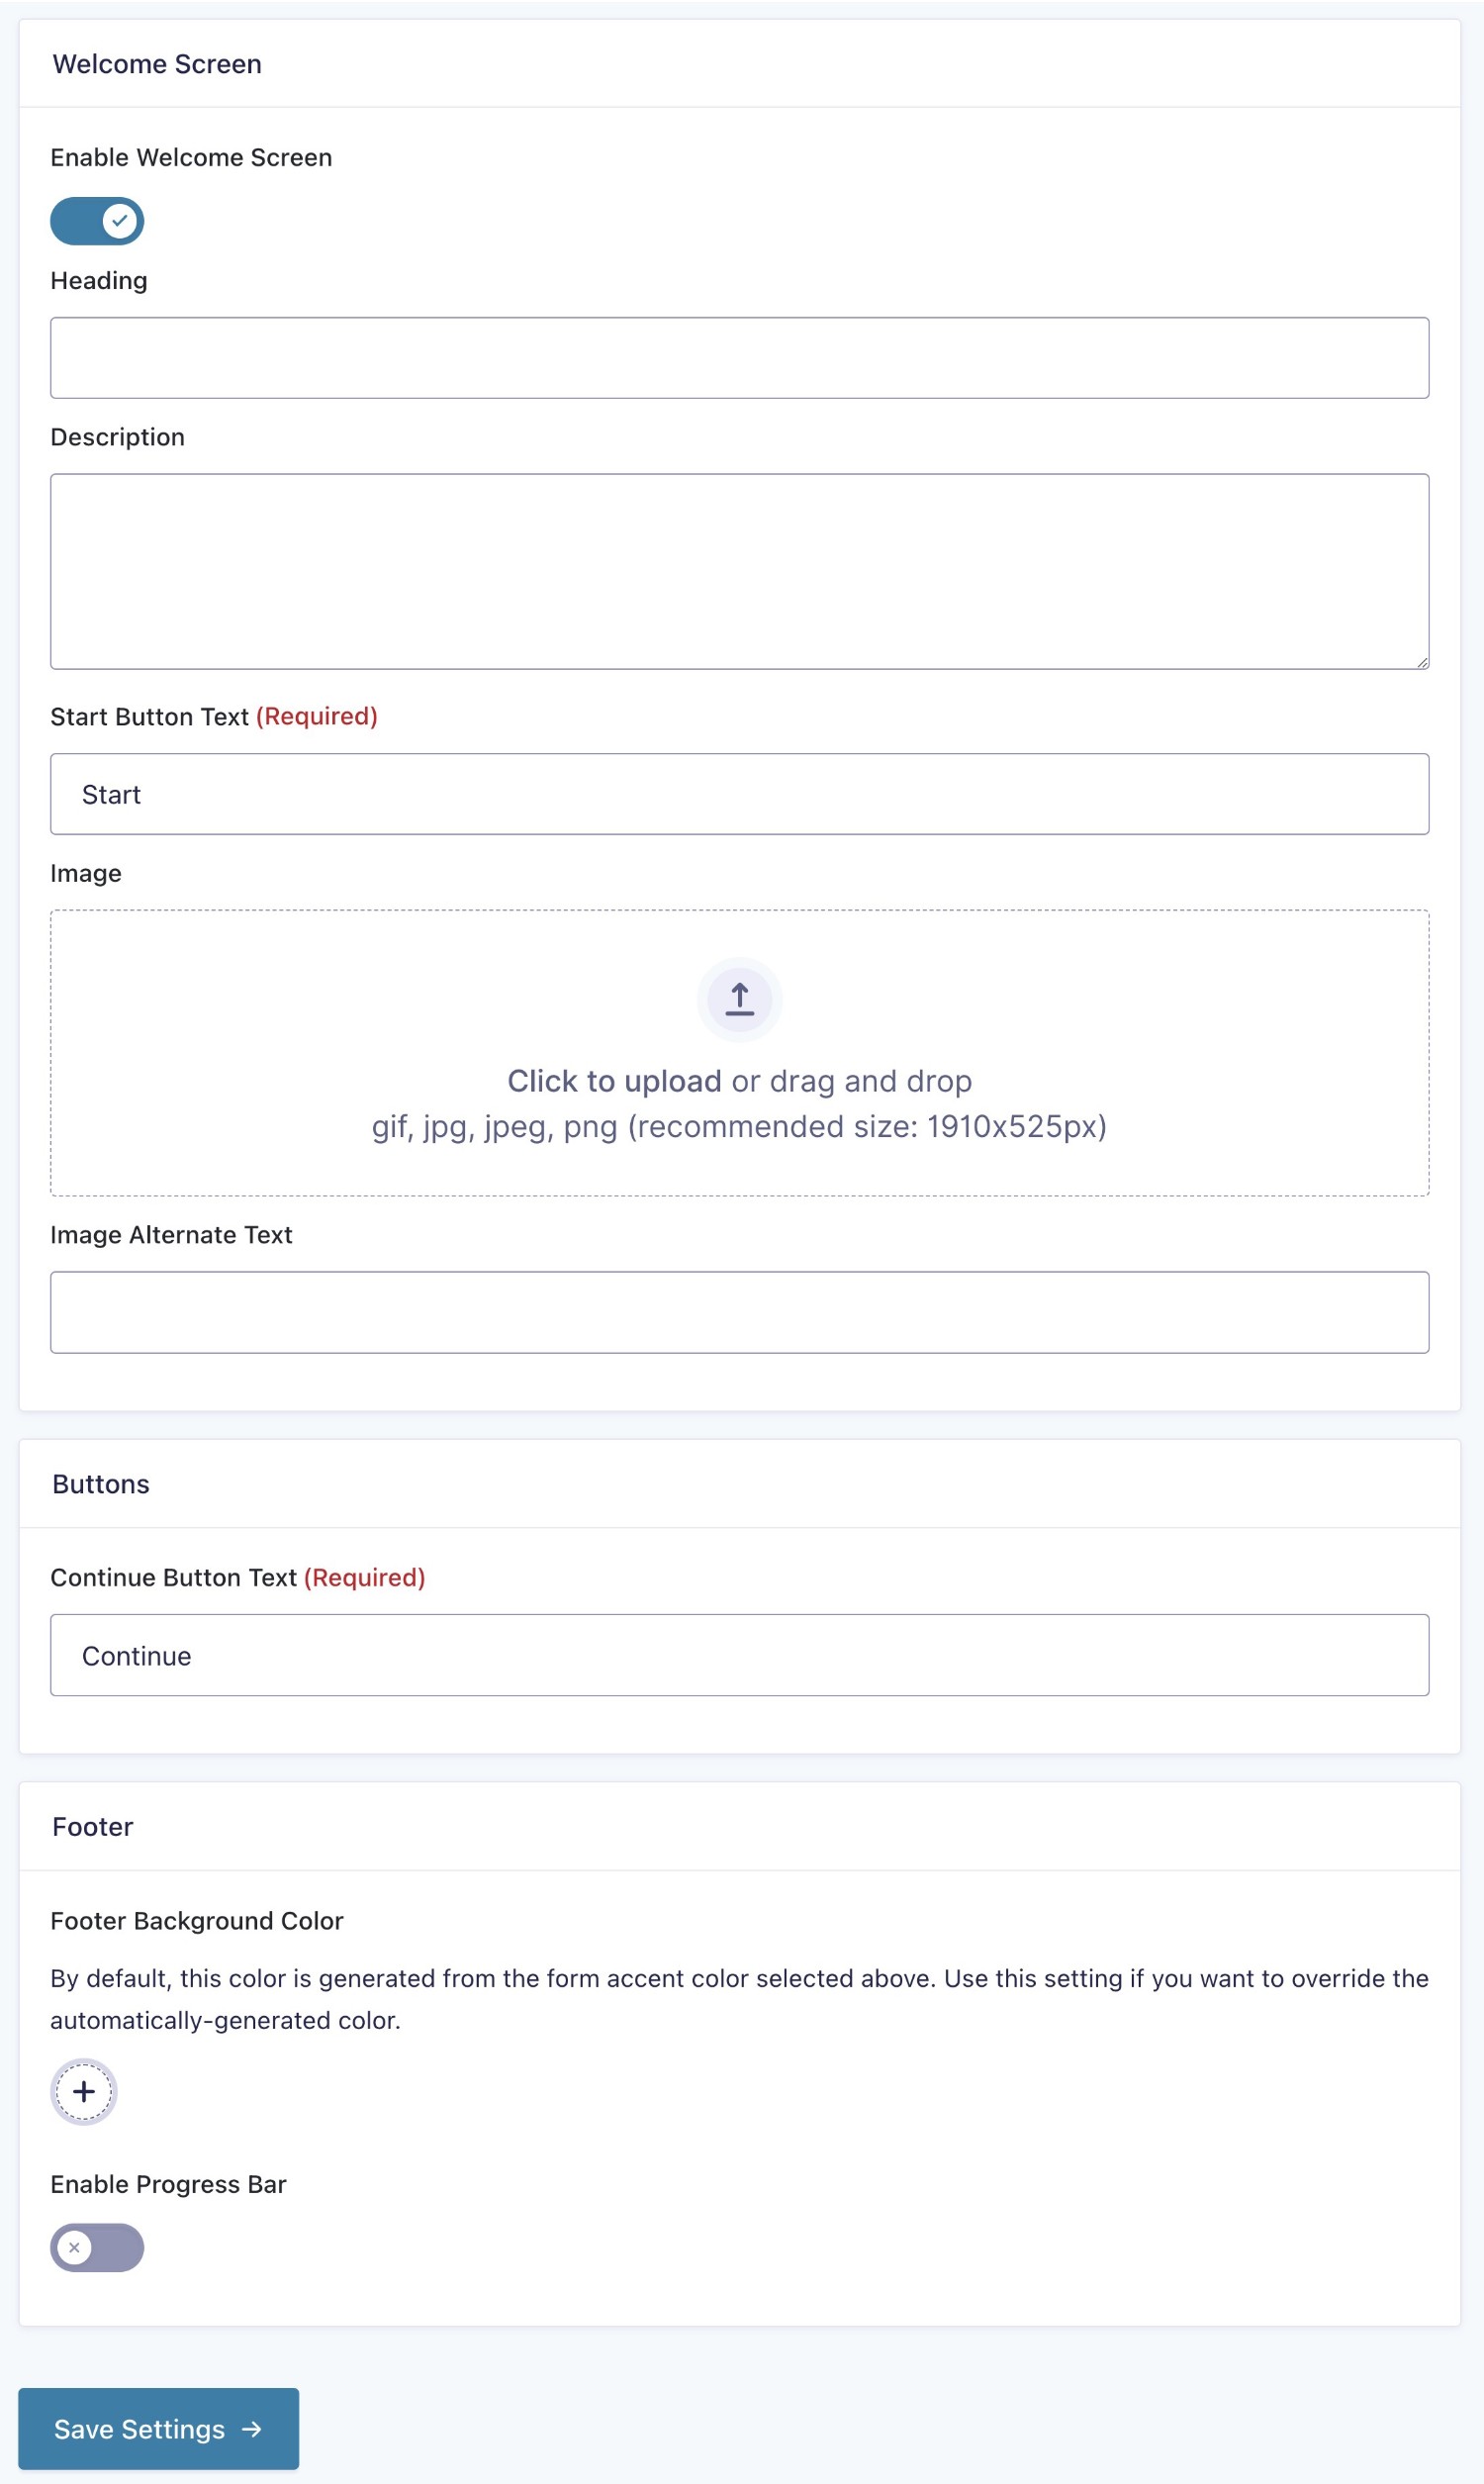
When you’re happy with how everything looks, make sure to click the Save Settings button.
You can then open your conversational form permalink to see what the live form looks like.
5. Share Your Conversational Form Page
Unlike non-conversational surveys that you create with Gravity Forms, there’s no need to manually embed your survey form using the Gravity Forms block or shortcode.
Again, your survey will already be available at the URL that you specified when enabling the conversational interface in the previous step.

If you were to embed the form using the Gravity Forms block or shortcode, that specific instance of the survey will use the traditional form interface (not the conversational interface).
This gives you the option to still use the regular form interface in addition to the conversational interface that’s available at the URL that you specified.
For example, you could test both versions to see which interface your respondents prefer.
6. Analyze Survey Results
Once you have some responses to your conversational survey, you can analyze the results from the special Survey Results interface.
You can use this interface to analyze all of the responses to this form, regardless of whether they came in via the conversational interface or a traditional form interface (if you embedded the form somewhere else).
Here’s how to access the survey results interface:
- Go to Forms → Entries in your WordPress dashboard.
- Select your survey form from the drop-down.
- Click on the Survey Results tab.
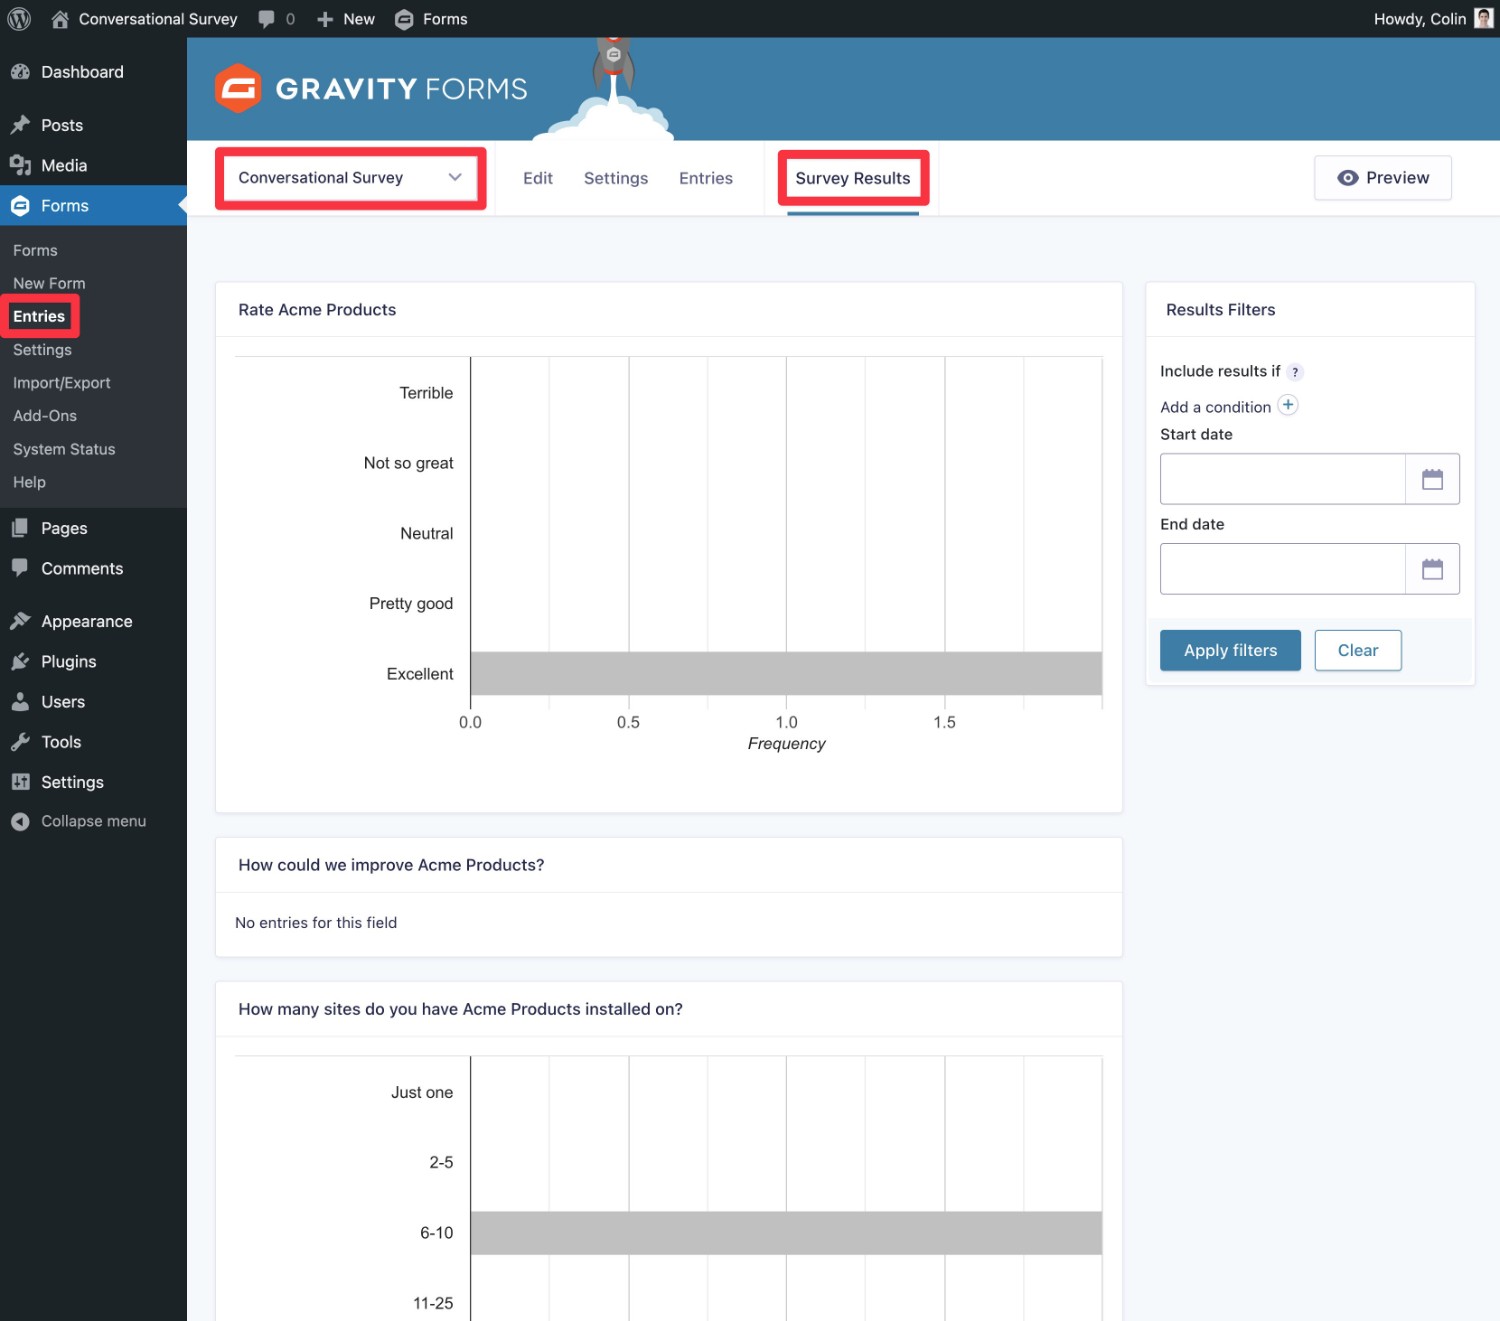
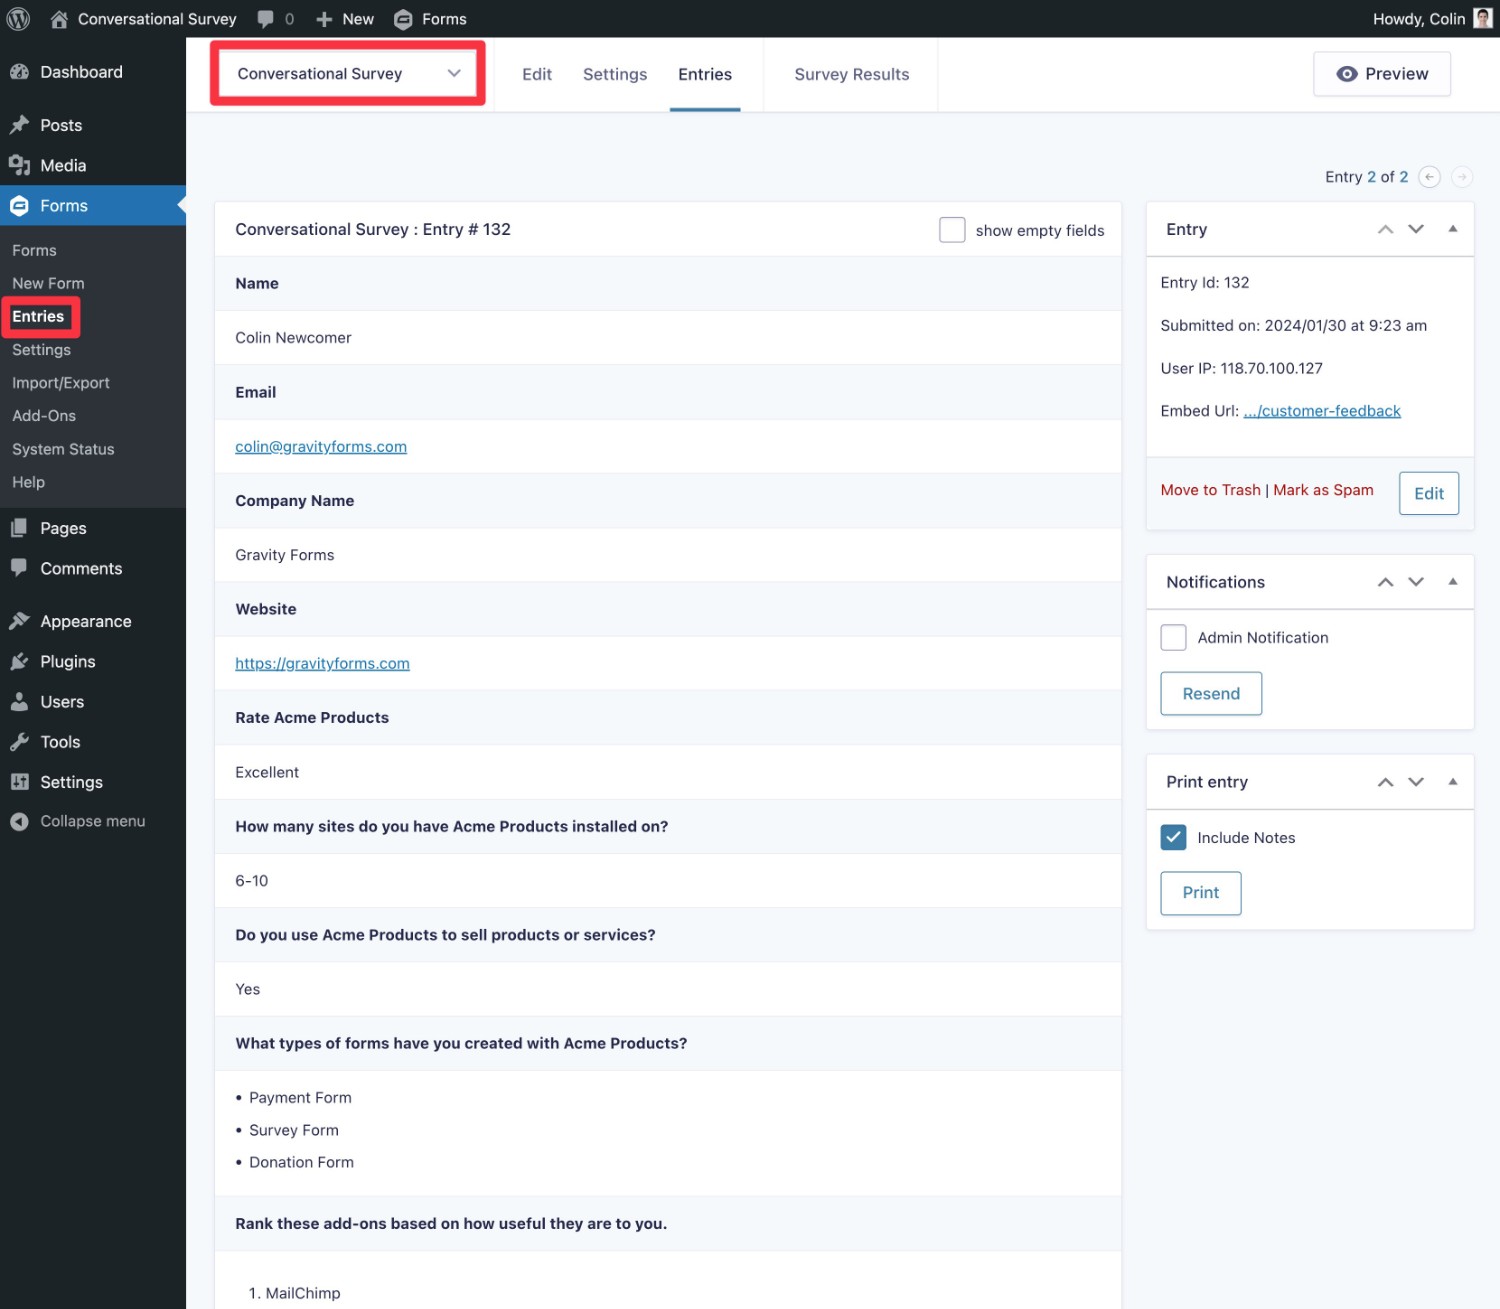
You’re also free to use the regular Entries interface to view the responses for individual survey submissions, just like you can for any form that you create with Gravity Forms.
Create Your Conversational Survey Form Today
If you want to create a more engaging survey experience for your users, experimenting with the conversational interface is something that you’ll definitely want to consider.
With the official Gravity Forms Survey Add-On and Conversational Forms Add-On, you can easily build conversational survey forms while still using important features like conditional logic.
Both the Survey Add-On and the Conversational Form Add-On are available on the Gravity Forms Elite license (or the Nonprofit license for registered non-profit organizations).
If you’re already holding the Elite license, you can follow this guide to create your first conversational survey form today.
If you’re not holding the Elite license yet, you can purchase a new Elite license here or upgrade your existing Basic or Pro license and only pay the prorated difference.
Or, you can create a free, fully functioning Gravity Forms demo site to try all of this functionality for yourself before making your purchase.

If you want to keep up-to-date with what’s happening on the blog sign up for the Gravity Forms newsletter!
"*" indicates required fields